1
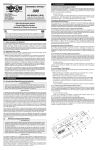
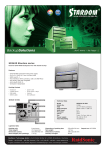
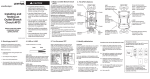
OPERATING AND INSTALLATION INSTRUCTIONS
FOR ELECTROLUX REFRIGERATORS.
INTRODUCTION
CONTENTS
We are pleased that you have chosen this refrigerator and
hope you will derive much satisfaction from using it, but first
a few well-meant words of advice:
OPERATING INSTRUCTIONS . . . . . . . . . . . . . . . . . . . . . 6
CONTROLS . . . . . . . . . . . . . . . . . . . . . . . . . . . . . . . . . . . . . 6
It is important to read through these instructions carefully
before beginning to use the refrigerator.
STARTING THE REFRIGERATOR . . . . . . . . . . . . . 6
To ensure good refrigeration and economical operation, the
refrigerator must be installed and used as described in
these instructions.
REGULATING THE TEMPERATURE. . . . . . . . . . . 6
FOOD STORAGE . . . . . . . . . . . . . . . . . . . . . . . . . . . . . . . 6
The refrigerator is designed for building-in to leisure vehicles such as caravans or motorhomes.
ICE-MAKING . . . . . . . . . . . . . . . . . . . . . . . . . . . . . . . . . . . . 6
The appliance is certified according to the EU-Gas-Directive
90/396/EEC.
DEFROSTING . . . . . . . . . . . . . . . . . . . . . . . . . . . . . . . . . . . 6
TRANSIT DAMAGE
CLEANING THE REFRIGERATOR . . . . . . . . . . . . . 7
Inspect the refrigerator for damage. Transit damage must
be reported without delay to whoever is responsible for
transport but not later than seven days after the refrigerator
was delivered.
TURNING OFF THE REFRIGERATOR . . . . . . . . . 7
MODELS
MAINTENANCE . . . . . . . . . . . . . . . . . . . . . . . . . . . . . . . . . 7
IF THE `FRIDGE FAILS TO WORK. . . . . . . . . . . . . 7
The three models are intended for different sources of
energy:
S105 G . . . . . . . . . . . . . . . . . . . . . . . . . LP Gas
S105 GE. . . . . . . . . . . . . . LP Gas and Electric
SOME USEFUL HINTS . . . . . . . . . . . . . . . . . . . . . . . . . 7
GUARANTEE . . . . . . . . . . . . . . . . . . . . . . . . . . . . . . . . . . . 7
DATA PLATE
SERVICE AND SPARE PARTS. . . . . . . . . . . . . . . . . 7
Check the data plate, inside the refrigerator, to ensure that
you have received the right model.
TECHNICAL DATA . . . . . . . . . . . . . . . . . . . . . . . . . . . . . 7
The right gas pressure is 30 mbar.
The right voltage is 230 volts.
INSTALLATION INSTRUCTIONS . . . . . . . . . . . . . . . . . . 7
The data plate contains e. g. the following details:
Model designation . . . . . . . . . . . . . . . . . . . . . . .
Product number . . . . . . . . . . . . . . . . . . . . . . . . .
Serial number . . . . . . . . . . . . . . . . . . . . . . . . . . .
REPOSITIONING THE HINGES . . . . . . . . . . . . . . . . 7
Since these details will be needed if you have to get in
touch with service personnel, it is a good idea to make a
note of them here.
INSTALLATION /BUILDING-IN . . . . . . . . . . . . . . . . . 8
DOOR PANEL. . . . . . . . . . . . . . . . . . . . . . . . . . . . . . . . . . . 8
LP GAS CONNECTION . . . . . . . . . . . . . . . . . . . . . . . . . 8
ELECTRICAL CONNECTION . . . . . . . . . . . . . . . . . . . 8
5
230 V Operation
OPERATING INSTRUCTIONS
● Turn off gas opertion (when applicable).
● Turn the knob (B) of the thermostat to its highest (coldest) position.
● Set switch (A) to position I. The switch will light up green
when the power supply is connected.
CONTROLS
The controls are located at the base of the refrigerator and
contain the following elements - as far as the refrigerator is
equipped for the corresponding type of energy, fig 1:
REGULATING THE TEMPERATURE
The position number refers to fig. 1.
Once the refrigerator has been started it will take a few
hours to become cold.
On 230 V operation the refrigerator is controlled by a thermostat and the thermostat knob (B) should be set at 3-5. If
a lower (colder) temperature is desired, set the thermostat
to a higher figure.
A rocker switch (A) is used to select the electric power
supply.
On LP gas operation the refrigerator temperature is regulated by the gas thermostat (E), which should be set at 3-4.
If a lower (colder) temperature is desired, set the thermostat
to a higher figure.
Refrigerator temperature is controlled by a thermostat (B)
when the unit runs on 230 V.
The piezoelectric igniter discharges sparks over the burner
when the button (C) is depressed.
The gas supply is turned on/off by means of the knob (D).
FOOD STORAGE
The refrigerator is fitted with a safety device which automatically shuts off the supply of gas if the flame goes out.
The safety device can be opened manually by depressing
knob (D).
Always keep food in closed containers. Never put hot food
in the refrigerator; allow it to cool first.
Never keep items in the refrigerator which might give
off flammable gases.
Refrigerator temperature is controlled by a thermostat (E)
when the refrigerator runs on LP gas. Please note that the
thermostat has no ``off'' position.
The 2-star (**) frozen food compartment is intended for the
storage of frozen food and for making ice. It is not suitable
for freezing items of food.
Also on the control panel is a flame indicator (F). Its pointer
(red) is in the green zone of the scale when the flame is
alight.
Never put bottles or cans of fizzy drinks in the frozen food
storage compartment as they may burst when freezing. Also
don't give children ice lollies straight from the compartment
as they could cause frost burns.
STARTING THE REFRIGERATOR
Most kinds of frozen food can be stored in the frozen food
compartment for about a month. This period of time may
vary, however, and it is important to follow the instructions
on the individual packings.
The position numbers refer to fig. 1.
Caution! Only use one source of energy at a time
ICE-MAKING
Fill the ice tray just below the brim with drinking water and
put it on the freezer shelf. It is possible to make ice faster
by turning the control knob temporarily to its highest value
but do not forget to turn it back to its regular setting afterwards as the refrigerator might otherwise become too cold.
LP Gas operation
After initial installation, after servicing, changing gas cylinders etc., the gas pipes may contain some air which should
be allowed to escape by briefly turning on the refrigerator or
other appliances. This will ensure that the flame lights
immediately.
DEFROSTING
To start gas operation:
Frost will gradually accumulate on the refrigerating surfaces. It must not be allowed to grow too thick as it acts as
an insulator and adversely affects refrigerator perfor-mance.
1. Open the shut-off valve of the gas bottle (check that there
is enough gas). Open any shut-off valve of the gas installation.
Check the formation of frost regularly every week and when
it gets about 3 mm thick, defrost the refrigerator.
2. Check that the switch for mains operation is off.
To defrost the `fridge, turn it off and remove the ice tray and
all food items. Warning: normally the temperature of items
of fozen foods would rise unduly during defrosting and so
they should be consumed within 24 h or discarded.
3. Turn on the gas supply by turning the (D) knob to position
4. Set the thermostat knob (E) to the highest setting.
5. Keeping the flame failure device buttom (D) pressed,
operate the igniter (C) until the flame lights.
Do not try to accelerate defrosting by using any kind of
heating appliance, as this might damage the plastic surfaces of the refrigerator. Neither should any sharp objects
be used to scrape off the ice.
6. Keep the (D) buttom pressed for a further 10 to 15 seconds then release it.
The defrost water runs from a collector channel down a
tube to a drip tray at the rear of the refrigerator where it
evaporates. When all the ice has melted, wipe the refrigera-
You can check that the flame is alight by watching the
indicator (F) (pointer moves to green area).
To terminate gas operation, turn knob (D) to ●.
6
tor dry and restart it.Place the food items back inside but
wait until the refrigerator is cold before making ice cubes.
If the refrigerator still does not work properly, call a service
technician.
CLEANING THE REFRIGERATOR
The sealed cooling system must not be opened, since it
is under high pressure.
Clean the inside of the refrigerator regularly to keep it fresh
and hygienic.
MAINTENANCE
Soak a cloth in a solution consisting of a teaspoon of bicarbonate of soda to half a litre of warm water. Wring out the
cloth and use it to clean the interior of the refrigerator and
its fittings.
Concerning gas- and electric installations, only authorized
experts are allowed to carry out maintenance and repair
works. Besides, it is recommendable to contact an authorized service if it comes to repair works.
Never use detergents, scouring powder, strongly scented
products or wax polish to clean the interior of the refrigerator as they may damage the surfaces and leave a strong
odour.
According to the valid regulations G607 of DVGW, the gas
installation as well as the connect flue oulets are to be
checked every two years by an expert (this has to be
arranged by the person responsible).
The exterior of the refrigerator should be wiped clean now
and again, using a damp cloth and a small quantity of detergent. But not the door gasket, which should only be cleaned
with soap and water and then thoroughly dried.
SOME USEFUL HINTS
Make sure that:
● Defrosting is carried out periodically.
● The refrigerator is clean and dry with the door left open
when it is not to be used for some time.
● Liquids or items with a strong odour are well packa-ged.
● The ventilation of the cooling unit is unobstructed
● Only one mode of operation at a time is used to run the
refrigerator.
The cooling unit behind the refrigerator should be cleaned
with a brush from time to time, but make sure that the
re-frigerator is switched off when doing this.
TURNING OFF THE REFRIGERATOR
If the refrigerator is not to be used for some time:
● Shut off any on-board valve in the gas line to the refrigerator.
● Set the electric switch (A) to 0.
● Set the gas valve (D) to ●.
● Empty the refrigerator. Defrost and clean it as described
earlier. Leave the doors of the refrigerator and the frozen
food compartment ajar. Use the travel catch to hold in
this position.
GUARANTEE
The refrigerator is guaranteed for one full year on condition
that it is used in a correct manner and in accordance with
these operating and installation in-structions.
TECHNICAL DATA S105 G, S105 GE
Overall dimensions, refrigerator
Height . . . . . . . . . . . . . . . . . . . . . . . . . 811 mm
Width
. . . . . . . . . . . . . . . . . . . . . . . . . 526 mm
Depth . . . . . . . . . . . . . . . . . . . . . . . . . 544 mm
IF THE `FRIDGE FAILS TO WORK
Check the following points before calling the service:
1. That the STARTING THE REFRIGERATOR instructions
have been followed.
Capacity
gross
. . . . . . . . . . . . . . . . . . . . . . . . . . . 103 lit
net
. . . . . . . . . . . . . . . . . . . . . . . . . . . . 91 lit
frozen food compt . . . . . . . . . . . . . . . . . . . 12 lit
Weight (whithout packaging) . . . . . . . . . . . . . . 33 kg
2. The refrigerator is level.
3. If it is possible to start the refrigerator on any of the
connected sources of energy.
4. If the refrigerator fails to work on gas, check:
Electrical data
Input 230 V . . . . . . . . . . . . . . . . . . . . . 125 watt
Energy consumption/24 hours . . . . .2,7 kWh
● That the gas bottle is not empty.
● That all LP-gas valves are open.
5. If the refrigerator fails to work on 230 V, check:
Lp gas data
Input
. . . . . . . . . . . . . . . . . . . . . . . . 232 watt
ditto, low flame . . . . . . . . . . . . . . . . . . 105 watt
Energy consumption/24 hours . . . . . .0,27 kg
Cooling medium . . . . . . . . . . . . . Ammonia or R 717
● That the 230 V supply is connected to the refrigerator.
● That the fuse is intact.
If the refrigerator is not cold enough it may be because:
1. The ventilation of the cooling unit is inadequate e.g. vent
grille in table top obstructed
2. The evaporator is frosted up.
INSTALLATION INSTRUCTIONS
3. The temperature control setting is incorrect.
REPOSITIONING THE HINGES
4. The gas pressure is incorrect - check the pressure regulator at the gas container.
The door hinges can be moved to the opposite side in the
following way:
● Screw out the lower hinge pin
● Remove the door from the upper hinge pin
● Remove the upper hinge pin and assemble it to the
opposing holder
● Fit the door on the pin and assembly the lower pin to the
new side
5. The ambient temperature is too high.
6. To much food is loaded at one time.
7. The door is not properly closed or the magnetic door seal
is defective.
8. More than one source of energy is used at one time.
7
● Check that the door gasket seals all around when the
door is closed and that the door moves freely
● Move cover plate from one handle mould to the otherone
ALL MAINS VOLTAGE WIRING IN THE CARAVAN MUST
BE INSTALLED IN ACCORDANCE WITH CURRENT
I.E.E. REGULATIONS INCLUDING THE USE OF AN
OUTLET AND COUPLER TO BS4343/- CEE17.
DOOR PANEL
For connection to a 230 V electricity supply, the refrigerator
has a 3-core mains lead which is intended for connection to
a properly earthed plug and socket outlet. The socket outlet
should be fitted in the caravan in a position readily accessible to the user, within reach of the mains lead. In the United
Kingdom, the plug and socket outlet should be of the nonreversible type.
The door panel can easily be mounted or changed. The
dimensions of the panel must be:
Height . . . . . . . . . . . . . . . . . . . . . . . . . 722 mm
Width
. . . . . . . . . . . . . . . . . . . . . . . . . 504 mm
Thickness. . . . . . . . . . . . . . . . . . . . max 3.8 mm
● Remove the door, see REPOSITIONING THE HINGES.
● Remove the lower trim moulding and then withdraw the
panel by sliding it downwards.
● Fit the new panel in place and slide it up as far as possible.
● Fit the trim moulding back in place.
IMPORTANT: The wires in the mains lead of this appliance
are coloured in accordance with the following code:
GREEN-AND-YELLOW = EARTH
BLUE = NEUTRAL
BROWN = LIVE
INSTALLATION
As the colours of the wires may not correspond with the
coloured markings identifying the terminals in your plug, in
the United Kingdom, proceed as follows:
The room should have a capacity (length x width x height)
of at least 20 m3 and have a window (which can be opened)
or a door to the outside.
The wire which is coloured GREEN-AND-YELLOW must be
connected to the terminal in the plug which is marked with
the letter E or by the earth symbol
, or coloured green
or green-yellow.
It is important that the refrigerator is not subject to radiation
of heat from a stove etc.
For best performance also at high ambient temperatures
there must be a free air circulation over the cooling unit at
the rear of the refrigerator.
The wire which is coloured BLUE must be connected to the
terminal which is marked with the letter N or coloured black.
The refrigerator is designed for a free-standing installation
and the clearance to side walls etc., should be at least 5 cm
(2'').
The wire which is coloured BROWN must be connected to
the terminal which is marked with the letter L or coloured
red.
LP GAS CONNECTION
WARNING - THIS APPLIANCE MUST BE EARTHED.
CAUTION! CHECK THAT THE GAS SUPPLIED TO THE
REFRIGERATOR IS AT THE CORRECT PRESSURE.
SEE THE REDUCING VALVE ON THE LP GAS CONTAINER.
In the United Kingdom, the plug or circuit to the refrige-rator
must be fitted with a fuse not greater than 5 amps. If a 13
amp.(B.S.1363) fused plug is used, it should be fitted with a
3 amp. fuse. In other countries, the fuse rating will depend
upon the voltage and local practice.
The refrigerator is designed for operation on LP gas, the
pressure of which must be 28 mbar for Butane and 37 mbar
for Propane. Check that this is stated on the data plate.
Plug the 230 V refrigerator power cord into an easily accessible wall socket.
The refrigerator is not designed for operation on town gas or
natural gas.
Electrical leads must be routed and secured so that
they cannot come into contact with hot or sharp parts
of the refrigerator.
The gas installation should only be carried out by an authorized gas fitter.
The gas supply pipe should be connected to the gas inlet
pipe on the right hand side of the gas control valve by
means of a suitable threaded coupling.
In making the connection to the refrigerator, a union gas
cock of an approved bottled-gas type must be incorporated
in the supply line in a position which is readily accessible to
the user. For eventual servicing purposes, the union should
be on the outlet side of the cock and the pipework should
be positioned so as not to prevent the refrigerator from
being readily withdrawn.
ELECTRICAL CONNECTION
The electrical installation must be carried out in a proper
and durable manner, taking into account all relevant regulations and codes of practice. For mains voltage operation,
it is important that the circuit to and in the caravan is effectively earthed.
The notations in the wiring diagramme (fig. 2) are:
G. Electric thermostat
H. Heating element, 230 V
I. Switch for 230 V operation
8