1
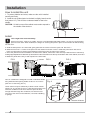
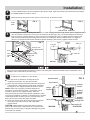
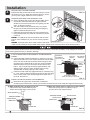
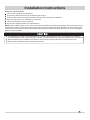
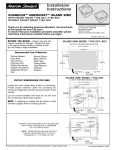
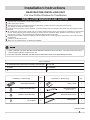
Installation Instructions
READ BEFORE INSTALLING UNIT
For Low Profile Window Air Conditioner
INSTALLATION WARNINGS AND CAUTION
Carefully read the installation manual before beginning.
Follow each step as shown.
Observe all local, state, and national electrical codes and by qualified, licensed, authorized personnel only.
Pay attention to danger and safety notices.
To avoid risk of personal injury, property damage, or product damage due to the weight of this device and sharp edges that may
be exposed:
Air conditioners covered in this manual pose an excessive weight hazard. Two or more people are needed to move and install
the unit. Wear protective gloves whenever lifting or carrying the unit. AVOID the sharp metal fins of front and rear coils. To
prevent injury or strain, use proper lifting and carrying techniques when moving unit.
Carefully inspect location where air conditioner will be installed. Be sure it will support the weight of the unit overan extended
period of time.
Handle air conditioner with care.
Make sure air conditioner does not fall during installation.
SAVE CARTON and these INSTALLATION INSTRUCTIONS for future reference. The carton is the best way to
store unit during winter, or when not in use.
DO NOT USE ANY SCREWS OTHER THAN THOSE SPECIFIED IN THESE INSTRUCTIONS.
Tools Required
SCREWDRIVER (Standard and Phillips and Flathead)
RULER
KNIFE
HAMMER
PENCIL
LEVEL
Hardware ( in plastic bag)
Qty.
Hardware ( in plastic bag)
Qty.
1
SUPPORT BRACKET
1
LONG LEVELING BOLT
1
SHORT LEVELING BOLT
1
WINDOW SASH SEAL
1
Ǝ6&5(:
8
FOAM STRIP
1
SASH LOCK
WEATHER SEALS
5
Ǝ;Ǝ;Ǝ
2020211A2565
1
How to Install
Installation
How to install the unit
1. To prevent vibration and noise, make sure the unit is installed
securely and firmly.
2. Install the unit a little slanted so the back is slightly lower than the
front (about 1/4"). This will force condensed water to flow to the
outside.
CAUTION: All side louvers of the cabinet must remain exposed to
the outside of the structure.
About 1/4"
Install
Left + Right Filler Panel Assembly
Place unit on floor, a bench or a table. There is a Left and Right side Filler Panels - be sure to use the proper
panel for each side. When installed, the flange for securing the panel in place to the window sill will be facing
into the room.
A. Hold the side panel in one hand and gently pull back the center to free the open end. See FIG. 1.
B. Slide the free end “I” section of the panel into the cabinet as shown in FIG. 2. Slide the panel down. Be sure to
leave enough space to slip the top and bottom of the frame into the rails on the cabinet.
C. Once the panel has been installed on the side of the cabinet, make sure it sits securely inside the frame channel by
making slight adjustments. Slide the top and bottom ends of the frame into the top and bottom rails of the cabinet, see FIG.3.
D. Slide the panel all the way in and repeat on the other side.
FIG.1
“I” section
FIG.2
FIG.3
Top Rail
Bottom Rail
Your air conditioner is designed to install in standard double
hung windows with opening widths of 26.5 to 41.5 inches
(673 mm to 1054 mm) (FIG. 4).
Lower sash must open sufficiently to allow a clear vertical
opening of 12.4 inches (315 mm ). Side louvers and the rear
of the air conditioner must have clear air space to allow
enough airflow through the condenser, for heat removal.
The rear of the unit must be outdoors, not inside a building
or garage.
Fig. 4
26.5 41.5
673 mm to 1054mm
INNER
WINDOW SILL
12.4 min
315 mm
INTERIOR
WALL
Wooden Windows
2
How to Install
Installation
2
Cut the FOAM STRIP to fit the underside of the window sash. Open the window, peel off the back and attach
the FOAM STRIP as shown in FIG.5
3
Mark center line with pencil on the center of the inner sill, as shown in FIG.6
FIG. 6
FIG. 5
FOAM
STRIP
INDOOR
CENTER LINE INNER SILL
4
Install support bracket on window sill. See FIG.7. Install leveling bolt up through bottom side of support bracket.
You can choose a short bolt or a long one according to window type. Also, you should select the position of
hole on bracket. Position bracket on sill of center line of window (See FIG.7). Fasten bracket loosely to sill
with screws provided. Adjust leveling bolt so that the air conditioner will be installed with a very slight tilt
DERXWƎGRZQZDUGWRZDUGWKHRXWVLGHIRUSURSHUGUDLQDJH6HH),*7LJKWHQEUDFNHWVFUHZV
FIG. 7
outer
window CLO P
OF SUPP
sill
(ITEM A)
SCREW
(ITEM D)
screw
screw
inner sill
support
bracket
close-up view
of support bracket
leveling bolt
outer sill
adjustment
slot
OLT
leveling bolt
inner
winnow
sill
ablut 1/4"
B
center line
of window
INDOOR
OUTDOOR
FIG. 8
Fail to securely install support bracket may result in unit falling from window if window sash is raised after unit is
installed. This could result in personal injury.
5
Install the air conditioner in the window
window sash
With the aid of an assistant, carefully lift the air
conditioner and slide it into the open window.
top channel
Make sure that support bracket is inserted in the pocket
under base fan, and that filler panels guide is stopped
by stopper on the support bracket as shown in FIG.9.
indoor
NOTE: When unit is properly centered and pushed
section
outward to correct bracket location, you will feel unit sit
securely in place on the support bracket. Hold unit
firmly during this procedure. After proper installation, make
sure the air conditioner is tilted 2-4° downward to the outside,
condensate should not drain from the overflow drain hole
during normal use,correct the slope otherwise.
inner sill
Lower top window sash all the way down so that sash
sits firmly in top channel of unit and expandable
curtain frames.
CAUTION: While performing the steps above, hold unit
INDOOR
firmly until window sash is lowered to top channel behind
filler panels. Personal injury or property damage may result
if unit falls from window.
FIG. 9
outdoor
section
support
bracket
pocket
stopper
support
bracket
leveling bolt
outer sill
OUTDOOR
3
How to Install
Installation
SECURE THE CURTAIN FRAMES:
Expand the filler panels and secure them using 4 screws
as shown in FIG.10. When filler panels opens or closes,
you may feel a slight resistance. This is normal.
6
FIG. 10
sash lock
WINDOW SASH SEAL AND WINDOW LOCK:
window sash seal
Cut the window sash seal to the window width. Stuff
the window sash seal between the glass and the
window to prevent air and insect from getting into the
room, as shown in FIG.10.
7ULPWKHZHDWKHUVHDOƎ;Ǝ;ƎWRDSURSHU
length, peel off the protective backing and plug any
gaps if needed as shown FIG.10.
Install the sash lock bracket to prevent window from
being raised which may result in unit falling.as shown
in FIG.10.
NOTE1: It is difficult to lock the windows with the sash
lock for some windows, so you can use lock by window
itself.
weather seal
NOTE2: If window sash has a metal surface. Use sheet
metal screws instead of the provided wood screws. Obtain sheet metal screws at local hardware store.
7
Sash lock and filler panels screws must be installed as instructed to avoid the possibility of unit falling from window
and causing personal injury or property damage.
8
IF AIR CONDITIONER IS BLOCKED BY STORM WINDOW
FRAME:
,IVWRUPZLQGRZSUHVHQWVLQWHUIHUHQFHIDVWHQDƎPP
wide wood strip to the inner window sill across the full width
of the sill. The wood strip should be thick enough to raise
the height of the window sill so that unit can be installed
without interference from the storm window frame, See
),*7RSRIZRRGVWULSVKRXOGEHDSSUR[LPDWHO\Ǝ
PPKLJKHUWKDQWKHVWRUPZLQGRZIUDPHWRKHOS
condensation to drain properly to the outside.
,QVWDOODVHFRQGZRRGVWULSDSSUR[LPDWHO\ƎPPORQJ
E\ƎPPZLGHDQGVDPHWKLFNQHVVDVWKHILUVWVWULS
in the center of the outer sill flush against the back of the
inner sill. See FIG.11.
wood strip
mounted on
top of inner sill
PLQ
PP
PP
clearance
frame
window
storm
inner sill
WOOD STRIP
FOR SUPPORT
outer sill
BRACKET
INDOOR
OUTDOOR
When storm window
frame is located on outer sill
FIG. 11
9
INSTALLATION FOR OTHER TYPE WINDOWS:
Dimensions and geometry of windows are different
DFFRUGLQJWRPDQXIDFWXUHU¶V&KHFN\RXUZLQGRZDQGUHIHUWR),*WRLQVWDOOWKHVXSSRUWEUDFNHWILUPO\
(a) When window frame is located on inner sill.
Ŗ Install a wood strip (window width long and
ZLQGRZIUDPHKHLJKWKLJKRQWKHLQQHUVLOO
E:KHQWKHZLQGRZIUDPHLVKLJKHUWKDQƎPP
Ŗ ,QVWDOODZRRGVWULSDERXWPPORQJRQ
the outer sill to raise support bracket.
SASH WINDOW
WINDOW FRAME
WINDOW FRAME
WOOD STRIP
PP
WOOD STRIP
INNER SILL
INNER SILL
OUTER SILL
OUTER SILL
FIG. 12
4
Installation Instructions
REMOVAL FROM WINDOW:
Turn off and unplug the air conditioner.
Unscrew the side screws that you installed in step 6 and 7.
Close the filler panels and remove window sash seal and sash lock from windows.
Keep a firm grip on the air conditoner as your sash.
Lift the air conditioner from the window.
Remove the support bracket from window frame.
NOTE: When cooling season is over, unit is removed from window for cleaning and storage. There may still be some
condensation water in the basepan. Remove the unit carefully to avoid water being spilled out on floor. Always store
unit flat on its base. Remove bracket and window sash seal from window and save. Window can not close if support
bracket remains installed.
Air conditioners covered in this manual pose an excessive weight hazard. Two or more people are needed to
move and install the unit. To prevent injury or strain, use proper lifting and carrying techniques when moving unit.
When handling the air conditioner, be careful to avoid cuts from sharp metal fins on front and rear coils.
Mark sure air conditioner does not fall during removal.
5