1
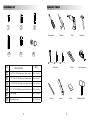
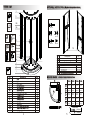
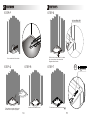
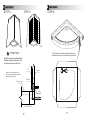
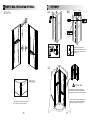
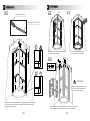
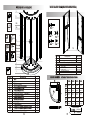
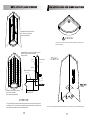
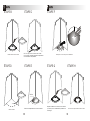
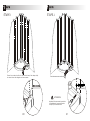
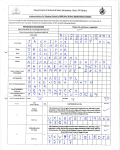
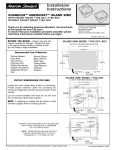
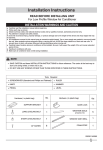
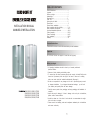
TABLE OF CONTENTS
INSTALLATION MANUAL
MANUEL D'INSTALLATION
General instructions....................................... .... 1
Important..........................................................1
Before you begin......................................... . . .... 1
Hardware list.....................................................2
Required Tools..................................................3
Parts List..................................................... ..... 4
Optional Acrylic Walls......................................5
Round Base .....................................................5
Shower Base Installation .................................6
Base Installation with Acrylic Walls ..................7-11
Base Installation on tiled wall.................. .. .. .. .. .. 12-17
Acrylic wall installation(Optional).......................18-21
Frame Assembly...............................................22-23
Frame Positioning ............................................24-27
Door Installation...............................................28-29
Warranty......................................................... ... 30
General instructions
Please take a few minutes to review this manual before you start installation.
Important
You will need at least two people to install this unit properly.
Before you begin:
·All
plumbing installations should be done by a licensed professional
plumber / installer .
·Observe all local plumbing
·To ensure that the shower
and building codes .
operates properly and securely , all studs(2"x4")must be
located at 1"(stud center) from the edge of the base . If there are no existing
studs , new
·We are not
studs should be installed behind drywall . (See page 6)
responsible for any damage to the unit or personal property caused
by improper installation . If you disregard instructional warnings , you will void
your warranty and possibly deal with water damage .
·Carefully
SW01,S22011,S22012,ST01B
SW02,S22021,S22022,ST02B
SW03,S22031,S22032,ST03B
SW04,S22041,S22042,ST04B
remove product from packaging and keep packaging until installation is
complete .
·Inspect
all parts for damage ; if there is damage to the unit prior to installation ,
please contact Customer Service.
·Install
the shower on a floor that is level and able to accommodate the weight
of the unit and an occupant .
·Please
consult local building codes and compliance standards prior to installation
and ensure conformity .
1
HARDWARE LIST
1
REQUIRED TOOLS
2
3
Silicone
Screwdriver
5
4
Hammer
6
8mm(5/16")
Ref.
Drill
1
3/8"(ST4*10) Philips round head screw
10(6+4 extra)
2
3/4"(ST4*20) Philips round head screw
12(8+4 extra)
3
1 1/8"(ST4* 30) Philips round head screw 10(6+4 extra)
4
1 ½" (ST4* 40) Philips round head screw
10(6+4 extra)
5
Wall plugs
10(6+4 extra)
6
Decorative cap
16(12+4 extra)
2
3.2mm(1/8")
Drill bits
Qty
Description
5mm(3/16")
Pencil
Trowel
Shim
Level
3
Tape measure
Rubber mallet
PARTS LIST
OPTIONAL ACRYLIC WALLS (SW01/SW02/SW03/SW04)
3
13
13
12B
12A
Ref:AA
12
Ref:BB
10
9
Ref:CC
11
10
Ref:EE
Ref:DD
9
6
8
4
2
14
8
7
6
5A
14
5B
AA*
BB*
CC*
DD*
EE*
3
2
1
Description
Ref.
1
2
3
5A
5B
7
8*
9
10
11*
12B
13*
Retaining clip
Door bottom wheel
Left sliding door
Right sliding door
PVC Magnetic door seal
Fixed glass panel
Fixed panel seal
Fixed panel track
Wall track
Door handle
Short vertical leak proof seal
Long vertical leak proof seal
Door top wheel
4
Qty
ROUND BASE
1
2
4
A
E
2
2
2
2
2
2
2
4
ST01B
ST02B
ST03B
ST04B
A
31 1/4"
794mm
34"
863mm
36"
914mm
38 1/5"
971mm
B
32 1/2"
825mm
35 1/5"
895mm
37 1/3"
948mm
39 3/5"
1006mm
C
3 3/4"
95mm
3 3/4"
95mm
3 3/4"
95mm
3 3/4"
95mm
D
7"
178mm
7"
178mm
12"
305mm
11 4/5"
300mm
E
36"
914mm
39 1/3"
999mm
411/2"
1054mm
44"
1118mm
D
4
1
1
2
13(9+4 extra)
13(9+4 extra)
26(18+8 extra)
10(6+4 extra)
13(9+4 extra)
ST01B/ST02B/ST03B/ST04B
C
12A
Base
Rail
B
6
2
Machine screw(M4X20)
Nut UNC
Flat washer
Screw(ST4*20)
Spring washer
*Items included in the Hardware Box
D
4*
Shower wall
Hardware kit
4
3
Qty
Description
Ref.
Variable sizes
5
A B D E
C
+
-1/8(3mm)
+
-1/4(6mm)
1
SHOWER BASE INSTALLATION
BASE INSTALLATION WITH ACRYLIC WALLS
Shower base installation with acrylic walls
(sold separately)
! ATTENTION!
Walls in your bathroom must be leveled for an optional installation .
Attention:in a new construction,
the shower base should be installed
before installing the tiles.
Tile
Drywall
STEP:A
Silicone
Shower base
Screw
About 20mm
Drywall
90°
Shower base installation with tiled walls
(sold separately)
SIDE SECTION VIEW
D
D
ATTENTION!
If you are proceeding with the shower base installation with our acrylic walls,
follow steps from A to J.If you are proceeding with the shower base installation
with any other wall finish, follow step K to V.
6
Walls must be perfectly perpendicular (90º) to the floor for an optional installation
7
1
1
CONTINUED
STEP:B
STEP:C
CONTINUED
STEP:F
Cut a round hole for the drain .
Trace the base outline on the floor with a
pencil. Mark drain location as well.
Put the base on the correct position .
STEP:D
STEP:E
STEP:G
STEP:H
Mortar
Cover the marked space with mortar.
Remove the base .
8
Make sure the base is level .
Place base back in its location,
over the mortar.
9
1
1
CONTINUED
STEP:I
CONTINUED
STEP:J
Drill six holes in the middle of base lip, on both
sides. Holes should be aligned with wall studs.
Fix the base to the wall with screws( 4 ) .
6X
(3.2mm)DRILL BIT
Ref: 4 (ST4*40)
!
ATTENTION!
Wait 24h before proceeding with the
installation of the shower walls & doors.
This will ensure that the mortar is dry.
10
11
2
BASE INSTALLATION ON TILED WALL
STEP:K
2
CONTINUED
STEP:M
STEP:N
90°
D
D
Walls in your bathroom must be vertical
for an optional installation.
STEP:L
Remove the base.
Trace the base outline on the floor with
a pencil. Mark drain location as well.
STEP:O
Mortar
Put the base on the correct position.
12
Cover the marked space with mortar.
13
2
2
CONTINUED
STEP:P
CONTINUED
STEP:S
(3.2mm)DRILL BIT
Drill six holes in the middle of the base
lip, on both sides. Holes should be
aligned with wall studs.
Cut a round hole for the drain.
STEP:Q
STEP:R
STEP:T
6X
Ref: 4 (ST4*40)
Make sure the base is level.
Place base on mortar, making sure
the drain hole is perfectly aligned.
14
Fix the base to the wall with screws( 4 ).
15
2
2
CONTINUED
STEP:U
!
STEP:V
CONTINUED
STEP:W
Cut the box in the same shape as the shower
base and place cutout over base for protection.
ATTENTION!
Wait 24h before proceeding with the
installation of the shower door.This
will ensure that the mortar is dry.
Tile
Drywall
Attention:in a new construction,
the shower base should be installed
before installing the tiles.
Silicone
Shower base
Screw
About 20mm
SIDE SECTION
16
17
3 ACRYLIC WALL INSTALLATION(OPTIONAL)
3
CONTINUED
AA
STEP:X
9X
Ref:CC
BB
Ref:EE
Ref:BB
Ref:AA
(5mm)DRILL
Attach both shower walls
together with machine screws
(AA,BB,CC,EE) as shown in the
illustration.
CC
Silicone
!
ATTENTION!
Acrylic walls must be leveled with the
shower base so that the space between
the base and the shower walls is constant.
Place the shower wall vertically on the
base, and use a pencil to trace a line
along the edge of the shower wall.
Add a bead of silicone along the wall
joint, as shown in the illustration.
18
19
3
CONTINUED
DD
CONTINUED
EE
Construction adhesive
FF
Nail
Furring strip,3/4"×3"(18×75mm)
3/8"
-(10
mm
)
X
!
Put construction adhesive on the
wood as shown in the illustration.
Nail wood pieces to the wall with a hammer,
to reinforce the installation.
1
(40
6"-
5m
m)
20"
-(50
8m
m)
3/8"-( 1 0mm)
3
6"-(
GG
155
mm
)
6X
Ref:DD(ST4*20)
OK
20"
(50
8m
m)
16"
-(40
!
5m
m)
Remove the shower wall,then attach 3" furring strips on the wall as shown
in the illustration.Install strips in the middle of the wall(as illustrated)to
strengthen the shower wall.
20
ATTENTION!
Make sure to apply even pressure
on the acrylic wall surface where
adhesive has been applied.
Put the shower wall back on the base,then attach the shower wall to
the wood pieces with screws(DD) on the top of the shower wall.
21
4
5
FRAME ASSEMBLY
HH
CONTINUED
JJ
4X
Ref.9
Ref.2
UP
Ref: 2 (ST4*20)
Ref.9
Loosen screws
of the retaining clips(3).
Then install the top rail with the
panel track with screws( 2 ).
4X
DOWN
Ref:8
Ref. 2
Ref: 2 (ST4*20)
Install both panel tracks with screws( 2 )to the
down rail as shown in the illustration .
II
Use the wood shim
to fit seal(8*)
KK
Ref:7
Tighten screws of the
retaining clips(3)
Ref.10
Insert wall tracks into the fixed panel
tracks as shown in the illustration.
Loosen screws of the retaining clips(3).
Insert the fixed glass panel into tracks as
shown in the illustration.
22
23
6
6
FRAME POSITIONING
LL
MM
CONTINUED
PP
Put shower door frame back on the base.
Put the shower door frame on the base,make
sure the wall tracks are leveled.
NN
Level the tracks and mark
the track holes positions.
OO
QQ
RR
6X
6X
Ref: 3 (ST4*30)
Ref:
1
6X
6X
Ref: 6
Remove the shower door frame,then insert
wall plugs into the holes using a hammer
(only for tiled walls).
Remove the shower door frame,drill
holes at each mounting hole position.
24
(ST4*10)
Ref: 6
Get through the screws holes on (10)
and (9),tighten with screws ( 1 ),then
install caps( 6 ) on the screws.
Install the frames to the wall using the
screws( 3 ),then install caps( 6 ) on the
screws.
25
7
7
CONTINUED
SS
CONTINUED
TT
Inside
Inside
Ref:12B
Outside
Outside
Ref: 5B
Ref: 5A
Inside
Glass
Ref: 12A
Outside
Install short vertical leak proof seals(12A).
Ref:6
Install long vertical leak proof seals(12B) and
PVC Magnetic door seals(6) on sliding door.
26
27
8
8
DOOR INSTALLATION
UU
CONTINUED
WW
4X
Ref:13*
24 Hours
Notes:
Allow 24 hours for
silicone to dry.
Install the top and bottom wheels and
the door handles on the sliding door.
2X
Ref:11*
4X
Ref:4*
VV
Adjust the screws on top wheel.
!
Insert the sliding door into the door frame as shown in the
illustration.Adjust the screws to ensure the sliding door
can move smoothly.
28
ATTENTION!
Silicone sealer must be only applied on the outside of the
shower to prevent leaks.
29
TABLE DES MATIÈRES
WARRANTY
Thank you for purchasing this Dolphin Plumbing Shower.
This product has been made to demanding, high-quality
standards and are guaranteed against manufacturing faults
for a period of 3 years from the date of purchase.
This warranty does not affect your statutory rights.
For service within the warranty period, please contact the
store where the product was purchased. Product model
number and proof of purchase are required for any service
request.
The product is guaranteed if used for normal trade purposes
and remains valid for the original purchaser only.
Any guarantee will be deemed invalid if the product has been
misused or neglected. Dolphin Plumbing cannot be held
responsible for any labour costs , injuries or damage incurred
during product installation, repair or replacement, including
any consequential or indirect damages.
Due to continuous product improvement, we reserve the right
to change the product specifications without prior notice.
Informations générales...................................................... 31
Important ......................................................................... 31
Avant de commencer ........................................................ 31
Pièces de quincaillerie....................................................... 32
Outils nécessaires ............................................................. 33
Pièces de la douche ........................................................... 34
Murs en acrylique................................................................ 35
Base ronde......................................................................... 35
Installation de la base de douche.......................................... 36
Installation de la base avec les murs en acrylique .................. 37-41
Installation de la base avec des tuiles................................... 42-47
Installation des murs en acrylique......................................... 48-51
Assemblage de la structure vitrée fixe................................... 52-53
Installation de I’armature de la porte de douche...................... 54-57
Installation de la porte de douche.......................................... 58-59
Garantie.............................................................................. 60
Informations générales
Veuillez prendre quelques minutes pour lire ce guide avant de procéder à l’installation.
Important
Vous devez être au moins deux personnes pour installer cette douche correctement.
Vant de commencer
·Tous les travaux de plomberie devraient être efectués par un plombier/installateur professionnel certifié. .
·Respectez les codes en batiment et de plomberie locaux.
·Afin que la douche fontionne correctement et de façon sécuritaire, tous les montants (2 po x 4 po)
doivent être situés à 1 po (centre du montant) de l’arête de la base. Si il n’y a pas de montants existants,
installez-en derrière la cloison sèche (voir p. 36).
·Nous ne sommes pas responsables des dommages pouvant être causés à la douche ou aux biens
personnels en cas d’installation incorrecte. Si vous ignorez les mises en garde de ce guide,
vous annulerez votre garantie et risquez d'avoir des dégâts d’eau.
·Retirez le produit de son emballage avec précaution et conservez celui-ci jusqu’à ce que l’installation
soit complétée.
·
Vérifiez toutes les pièces afin de vous assurer qu’aucune n’est endommagée. Si c’était le cas avant
l’installation, communiquez avec le Service à la clientèle.
·Installez la douche sur un plancher droit et capable d’accueillir le poids de la douche et de son utilisateur.
·euillez consulter le code en bâtiment local et les normes de conformité avant l’installation afin que
tout soit en règle.
30
31
OUTILS NÉCESSAIRES
PIÈCES DE QUINCAILLERIE
1
2
3
Tournevis
5
4
Perceuse
Marteau
6
8mm(5/16")
Pièce
Silicone
Description
Vis à tête ronde Philips de 3/8 po (ST4*10)
10(6+4 extra)
2
Vis à tête ronde Philips de 3/4 po (ST4*20)
12(8+4 extra)
3
Vis à tête ronde Philips de 1/8 po (ST4*30)
10(6+4 extra)
4
Vis à tête ronde Philips de 1/2 po (ST4*40)
10(6+4 extra)
5
Prises murales
10(6+4 extra)
6
Capuchons décoratifs
16(12+4 extra)
32
3.2mm(1/8")
Truelle
Mèches
Quantité
1
5mm(3/16")
Crayon
Niveau
Cale d’épaisseur
33
Ruban à mesurer
Maillet en caoutchouc
MURS EN ACRYLIQUE( SW01/SW02/SW03/SW04 )
PIÈCES DE LA DOUCHE
3
13
13
12B
12A
Pièce
Pièce:AA
12
Pièce
Pièce:BB
10
9
Pièce
Pièce:CC
11
10
Pièce
Pièce:EE
Pièce
Pièce:DD
9
6
8
4
2
14
8
7
6
5A
14
5B
1
1
2
3
5A
5B
Description
7
8*
9
10
11*
12B
13*
Agrafes de retenue
Roulettes pour le bas de la porte
Porte coulissante gauche
Quantité
1
2
Rails de panneaux fixes
Rails muraux
2
2
2
2
2
4
34
ST01B/ST02B/ST03B/ST04B
A
ST01B
ST02B
ST03B
ST04B
A
31 1/4po
794mm
34po
863mm
36po
914mm
38 1/5po
971mm
B
32 1/2po
825mm
35 1/5"
895mm
37 1/3po
948mm
39 3/5po
1006mm
C
3 3/4po
95mm
3 3/4"
95mm
3 3/4po
95mm
3 3/4po
95mm
D
7po
178mm
7"
178mm
12po
305mm
11 4/5po
300mm
E
36po
914mm
39 1/3"
999mm
411/2po
1054mm
44po
1118mm
D
4
1
Porte coulissante droite
Joints magnétiques en PVC pour portes
Panneaux de verre fixes
Joints de panneaux fixes
Poignées de porte
Courts joints verticaux à I’épreuve des fuites
Longs joints verticaux à I’épreuve des fuites
Roulettes pour le haut de la porte
BASE RONDE
1
2
4
E
2
2
C
12A
Base
Rails
B
6
13(9+4 extra)
13(9+4 extra)
26(18+8 extra)
10(6+4 extra)
13(9+4 extra)
*Pièces incluses dans la boîte de quincaillerie
D
4*
2
Vis de mécanique(M4X20)
Écrous UNC
Rondelles plates
Vis(ST4*20)
Rondelles élastiques
AA*
BB*
CC*
DD*
EE*
3
2
Pièces
Quantité
Murs de douche
Pièces de quincaillerie
4
3
Description
Pièces
Tailles variables
35
A B D E
C
+
-1/8(3mm)
+
-1/4(6mm)
1 INSTALLATION DE LA BASE AVEC LES MURS EN ACRYLIQUE
INSTALLATION DE LA BASE DE DOUCHE
Installation de la base de douche
avec les murs en acrylique
(vendus séparément).
! ATTENTION!
Les murs de votre salle de bain doivent être parfaitement à niveau pour une
installation optimale.
Attention:Dans le cas d’une nouvelle structure
la base de douche doit être installée
avant les tuiles.
Tuile
Cloison sèche
ÉTAPE A
Silicone
Base de douche
Vis
Environ 20mm
Cloison sèche
90°
Installation de la base de douche
avec les murs de tuiles
(tuiles vendues séparément).
VUE DE CÔTÉ
D
D
ATTENTION!
Si vous choisissez d’installer la base de douche avec nos murs en acrylique,suivez
les étapes A à J. Si vous choisissez d’installer la base de douche avec n’importe quel
autre type de finition de murs , suivez les étapes K à V.
36
Les murs doivent être parfaitement perpendiculaires(90°)au plancher pour une installation optimale.
37
1
1 SUITE
SUITE
ÉTAPE B
Placez la base au bon endroit.
ÉTAPE D
ÉTAPE C
ÉTAPE F
Avec un crayon , tracez le contour de la base
sur le plancher . Indiquez également I’emplacement
de la canalisation de plomberie .
ÉTAPE E
Découpez un trou rond pour la canalisation.
ÉTAPE G
ÉTAPE H
Mortier
Retirez la base.
Recouvrez I’emplacement de la base de mortier.
38
Replacez la base sur le mortier , en vous assurant
que le trou pour la canalisation de plomberie est
bien aligné .
Assurez-vous que la base est bien à niveau.
39
1
1
SUITE
SUITE
ÉTAPE J
ÉTAPE I
Percez 6 trous dans le milieu du rebord de la base (3 de chaque côté).
Les trous doivent être alignés avec les montants.
Fix ez la base au mur avec les vis ( 4 ) .
6X
Mèche de 3,2mm
Pièce: 4 (ST4*40)
!
ATTENTION!
Attendez 24 heures avant de procéder
à I’installation de la porte de douche,
le temps que le mortier sèche.
40
41
2
INSTALLATION DE LA DOUCHE AVEC DES MURS DE TUILES
ÉTAPE K
2
SUITE
ÉTAPE M
ÉTAPE N
90°
D
D
Les murs de votre salle de bain doivent être droits
et parfaitement perpendiculaires au plancher
pour une installation optimale.
ÉTAPE L
Avec un crayon,tracez le contour de la base
sur le plancher.Indiquez également
I’emplacement de la canalisation de plomberie.
Retirez la base.
ÉTAPE O
Mortier
Placez la base au bon endroit.
42
Recouvrez I’emplacement de la base de mortier.
43
2
2
SUITE
ÉTAPE P
SUITE
ÉTAPE S
Mèche de 3,2mm
Découpez un trou rond pour la canalisation.
Percez 6 trous dans le milieu du rebord
de la base(3 de chaque côté). Les trous
doivent être alignés avec les montants.
ÉTAPE Q
ÉTAPE R
ÉTAPE T
6X
Pièce: 4 (ST4*40)
Replacez la base par dessus le mortier,
en vous assurant d’aligner les trous
pour la canalisation.
Assurez-vous que la base est bien à niveau.
Fixez la base au mur avec les vis( 4 ).
44
45
2
2
SUITE
ÉTAPE U
!
ÉTAPE V
SUITE
ÉTAPE W
Découpez la boîte aux mêmes dimensions que la bse de
douche et déposez le carton sur la base de douche afin
de la protéger.
ATTENTION!
Attendez 24 heures avant de procéder
à l’installation de la prote de douche.
le temps que le mortier sèche.
Tuile
Cloison sèche
Attention:in a new construction,
the shower base should be installed
before installing the tiles.
Silicone
Base de douche
Vis
Environ 20mm
VUE DE CÔTÉ
46
47
3
INSTALLATION DES MURS D ’ ACRYLIQUE
3
SUITE
AA
ÉTAPE X
9X
BB
Pièce:CC Pièce:EE
Pièce:BB
Pièce:AA
(5mm)
PERCEUSE
Attachez les deux murs de
douche ensemble avec les
vis de mécanique (AA,BB,CC,EE) .
CC
Silicone
!
ATTENTION!
Les murs d ’ acrylique doivent être alignés
avec la base de douche de facon à ce que
l ’espace entre le s mur s e t la base demeure
constant .
Déposez les murs de douche verticalement
sur la base et avec un crayon, tracez le
contour des murs de douche.
Ajouter une goutte de silicone le long
du joint du mur, tel qu ’ illustré.
48
49
3
3
SUITE
DD
SUITE
EE
Adhésif de construction
FF
Clouez
Tasseau3/4×3po(18×75mm)
3/8"
-(10
mm
)
X
!
1
(40
6"-
5m
m)
20"
-(50
8m
m)
3/8"-( 1 0mm)
Clouez les pièces de bois au mur à l’aide
d’un marteau pour renforcer l’installation.
6"-(
GG
155
Appliquez de l’adhésif de construction
sur le bois tel qu’illustré.
mm
)
6X
Pièce:DD(ST4*20)
OK
20"
(50
8m
m)
16"
-(40
!
5m
m)
ATTENTION!
Assurez-vous d’exercer une
pression uniforme sur la surface
des murs d’acrylique,là où la colle
a été appliquée.
Retirez les murs de douche,puis fixez les tasseaux de 3 po sur les murs tel qu’illustré.
Installez les bandes dans le milieu des murs afin de solidifier les murs de douche(voir l’illustration).
Replacez les murs de douche sur la base,puis fixez les murs de douche
sur les pièces de bois avec des vis(DD) sur le dessus des murs.
50
51
4
ASSEMBLAGE DE LA STRUCTURE VITRÉE FIXE
HH
4
SUITE
JJ
Pièce 2 HAUT
4X
Pièce 9
Pièce : 2 (ST4*20)
Desserrez les vis
des agrafes de retenue(3).
Pièce 9
Puis fixez le rail arrondi du haut avec
les vis(2)aux rails des deux
panneaux de côté.
4X
BAS
Pièce 2
Pièce 8
Pièce : 2 (ST4*20)
Avec les vis( 2 ),fixez les rails des deux panneaux de côté
au rail arrondi du bas tel qu’illustré.
II
Utilisez la cale d’épaisseu
pour insérer le joint(8*)
KK
Pièce 7
Resserrez les vis des agrafes
de retenue(3).
Pièce 10
Insérez les rails muraux dans dans ceux
des panneaux fixes tel the qu’illustré.
Desserrez les vis des agrafes de retenue(3).
Insérez les panneaux de verre fixes
dans les rails tel qu’illustré.
52
53
5 INSTALLATION DE L’ARMATURE DE LA PORTE DE DOUCHE
MM
LL
5
SUITE
PP
Replacez l’armature de la porte de douche
sur la base.
Placez l’armature de la porte de douche sur la
base.Assurez-vous que les rails muraux sont
à niveau.
NN
Alignez les rails et indiquez
l’emplacement des trous des
rails.
OO
QQ
RR
6X
6X
Pièce: 3 (ST4*30)
Pièce: 1 (ST4*10)
6X
6X
Pièce: 6
Retirez l’armature de la porte de douche.
Percez tous les trous.
Pour les murs de tuiles,retirez l’armature de la
porte de douche,puis insérez les prises murales
dans les trous à l’aide d’un marteau.
54
Pièce: 6
Fixez la structure au mur en utilisant les vis( 3 ).
Puis ajoutez les capuchons décoratifs( 6 )
sur les vis.
Percez des trous au travers des rails
muraux (10) et des rails de panneaux vitrés
fixes(9).
Serrez avec les vis( 1 ).Puis installez les
capuchons décoratifs( 6 ) sur les vis.
55
5
5
SUITE
SS
SUITE
TT
Intérieur
Intérieur
Pièce12B
Extérieur
Extérieur
Pièce 5B
Pièce 5A
Intérieur
Pièce12A
Verre
Extérieur
Installez les courts joints verticaux
à l’épreuve des fuites(12A).
56
Pièce 6
Installez les longs joints verticaux à l’épreuve
des fuites(12B) et les joints magnétiques en PVC(6)
sur les portes coulissantes.
57
5
INSTALLATION DE LA PORTE DE DOUCHE
UU
4X
Pièce:13*
5
SUITE
WW
24 Hours
Notes:
Laissez sécher
la silicone 24 heures.
2X
Installez les roulettes du haut et du bas
et les poignées sur les portes coulissantes.
Pièce:11*
4X
Pièce:4*
VV
Ajustez les vis des roulettes du haut.
!
Insérez les portes coulissantes dans l’armature des portes
tel qu’illustré.Ajustez les vis de facon à ce que les portes
glissent facilement.
58
ATTENTION!
Le joint de silicone ne doit être appliqué qu’àl’extérieur
de la douche pour éviter les fuites.
59
Garantie
Nous vous remercions d'avoir acheté Douche Dolphin
Plumbing. Ce produit répond à des normes de haute qualité
et est garanti contre tout défaut de fabrication pour une
période de 3 ans à partir de la date d'achat.
Cette garantie n'affecte pas vos droits légaux.
Pour obtenir du service durant la période de garantie,
veuillez communiquer avec le détaillant où vous avez acheté
le produit. Le numéro de modèle du produit et une preuve
d'achat sont nécessaires pour toute demande de service.
Ce produit est garanti si vendu par le biais d'un commerce à
un consommateur pour son usage personnel et n'est valide
que pour l'acheteur original. La garantie sera jugée invalide
si le produit est mal entretenu ou mal utilisé. Dolphin
Plumbing ne peut être tenu responsable pour les frais de
main d'oeuvre, les blessures ou dommages pouvant être
occasionnés au moment de l'installation, de la réparation ou
du remplacement du produit, incluant les dommages
indirects et immatériels.
Compte tenu de l'amélioration continue des produits, nous
nous réservons le droit d'en modifier les spécifications sans
préavis.
60