1
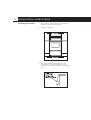
Freestander Ranges 6102 Series 1 CONTENTS Introduction Safety Instructions First Use Side Mounted Power Outlets Accessories 2 2 3 3 Clocks & Timers Ringer Timer Model Analogue Clock Model Automatic Cooking Using the Analogue Clock 4 4 5 Features and Functions Main Oven Features 6 Cooking Guide Cooking Guide 7 Roasting Guide Roasting Guide 8 Cooktops Radiant Cooktops 9 Cleaning Cleaning your Range Cleaning your Cooktop 10 10 Installation Instructions Installing Your Product 11 Warranty Manufacturer's Warranty Product Details & Customer Care Customer Care 12 13 14 INTRODUCTION 2 Congratulations Congratulations on the purchase of your new Freestander Range. We strongly recommend that you read these Use and Care Instructions carefully to take full advantage of the features offered by this product. This books covers operational instructions for the RA6102 Series Freestander Range - 'Thyme', 'Tamarind', 'Paprika' and 'Sage'. Safety Instructions 1. Household appliances are not intended to be played with by children. 2. Children or persons with a disability that may limit their ability to use the appliance, should have a competent person instruct them in its use. This person should be satisfied that they can then use the appliance without danger to themselves or their surroundings. 3. This appliance should be connected to a circuit which incorporates an isolating switch providing full disconnection from the power supply. 4. If your Range is placed on a base to align it with the bench, take measures to prevent the base of the Range from slipping. Warning During use this appliance becomes hot. Care should be taken to avoid touching heating elements inside the oven. Accessible parts may become hot when the grill is in use. Children should be kept away. We do not advise placing aluminium foil or dishes with reflective qualities on the oven bottom. This will cause a heat build up, which will result in irreversible damage to the enamel. First Use Remove accessories and condition the oven by running at bake, 200°C for one hour before using. There will be a distinctive smell, this is normal but make sure your kitchen is well ventilated during the conditioning period. 3 INTRODUCTION Side Mounted Power Outlets (New Zealand Only) The two side mounted power outlets are internally fused with one 10 amp fuse. Care should be taken not to overload them. If required the fuse can be repaired by following these steps: 1. Turn the power to the oven off. Extra care should be taken to make sure there is no power to the oven before repairing the fuse. 2. Pull the oven out from the wall os the back is accessible and locate the fuse cover on the right-hand side. 3. Using a Phillips style screwdriver, remove the screw holding the fuse cover in place and remove the fuse cover. 4. Remove the fuse carrier from its base and replace the blown fuse wire with a new 10 amp fuse wire. 10 amp is the maximum allowable fuse wire that can be used in this fuse. 5. Refit the fuse and the fuse cover. Accessories Your Range will be supplied with some of the features/accessories listed depending on the model you have purchased. 1 Roast Dish 1 or 2 Non Stick Bake Trays 2 Oven Racks 1 Grill Rack Warmer Drawer or Storage Drawer Best cooking results are achieved using the accessories provided with your Range. Shiny/ aluminium trays will affect performance, particularly browning and cooking time. CLOCKS & TIMERS 4 Ringer Timer Model This has a manual timer which can be set for up to 55 minutes. Setting the Ringer Timer The timer can be used at any time even if the oven is not in use. The timer can be set for up to 55 minutes. If the oven is in use, the timer does not turn the oven off. 1. To use the timer, turn the timer control knob clockwise to the 55 minute mark, then turn back to show the number of minutes you want. 2. The timer will count down and will ring when the set time is reached. Analogue Clock Model This clock has an analogue display and an automatic function. Setting The Analogue Clock To set the clock push the Cook Time knob in and turn anti clockwise until the clock shows the correct time. Make sure the shows. Press and turn the Start Time knob anti clockwise until the red triangle clicks into alignment with the hour hand. Setting the Minute Timer The Timer can be used at any time even if the oven is not in use, however if the oven is in use it will turn the oven off when the set time has elapsed. To set the Timer, turn the Cook Time knob anti clockwise until you have the number of minutes you want in the centre of the display window. When the time you have set is finished, the Timer will ring and the oven will turn off, if it is on. To turn the timer bell off, turn the left hand knob to . The Timer will continue to ring until turned off. Make sure the oven is returned to manual mode by turning the Cook Time knob until the shows. 5 CLOCKS & TIMERS Automatic Cooking Using the Analogue Clock Check that the clock shows the correct time. Choose the Function and Temperature that you want. The oven indicator light will glow and the elements will come on. Decide when you want the oven to come on. This is the time you want the oven to turn off, minus the cooking time you have set. Turn Cook Time knob anti clockwise until you have the number of minutes you want to cook for in the centre of the display window. Press and turn the Start Time knob anticlockwise until the red triangle is pointing to the time you want to start cooking. The indicator light will go out. The oven is now set for automatic cooking. To Turn the Oven Off, and/or Cancel Automatic Cooking Turn the cooktime knob until the symbol shows in the display window, turn the oven to manual mode. Press and turn the start time knob until the triangle clicks into alignment with the hour hand. turn temperature and function to off. Using Your Oven Turn the oven on by selecting the required temperature. The oven light will come on automatically. The oven indicator light will glow until it has reached the set temperature. For grilling turn the temperature to grill. When you have finished cooking, turn the oven off. Fan Grill Models Select required function using Function knob then select the temperature you want with the Temperature knob. The oven light will come on automatically when a function is selected. The Oven Indicator Light will glow until the oven has reached the set temperature. To use the grill, select Grill on the Function knob. Set to the required heat by using the Temperature knob. The hottest temperature is achieved at Hi. We recommend that this is used for grilling meats. When you have finished cooking, turn the oven off. FEATURES & FUNCTIONS Main Oven Features This Range has a concealed lower element and may require food to be cooked at a lower shelf position. Warmer Drawer Warmer drawers have a low powered element and are useful for keeping hot food warm or for warming plates and serving dishes. Rotate the knob to turn the warmer drawer on and off. Storage Drawer Storage drawers do not have an element so cannot keep food warm. Functions There are a variety of cooking functions depending on the model of Range you have purchased. These include Bake, Grill, Fan Grill and Fan Forced. Grill For best results when grilling, leave the oven door open at the first stop position. The grill function cooks a large area of food by using heat from an upper element and is suitable for tender cuts of meat, toasted snack foods and crisping toppings on many dishes. Bake Heat comes from the top and bottom of the oven. For baked products you will achieve a better result if the oven is pre-heated first. Cooking one tray of food at a time is preferable. Both elements are controlled by the thermostat and will cycle on and off to maintain the set temperature. This is the traditional method for cooking baked food. Fan Forced Multi level fan cooking circulates heat from an element around the fan, throughout the oven. This function is particularly good for multi tray cooking, reheating cooked foods and complete oven meals. Use Fan Forced for casseroles and baked vegetables and when cooking more than one tray of baking. Fan Grill The fan circulates heat from the grill element around the oven. This style of grilling takes the place of a rotisserie. Fan Grill is suitable for foods you would normally fry e.g. sausages, chops and meatballs. Fan grilling is carried out with the oven door closed and the oven does not need to be preheated. 6 7 COOKING GUIDE Fan Forced Function Bake Function Baked Products Time/Mins Temp °C Shelf Tim/Mins Temp°C Shelf Light Fruit Cake 75-85 145-150 4 80-85 150 4 Banana Cake 60-65 160-170 4 55-60 160-170 4 Biscuits 10-12 175-180 2& 3 10-12 175-180 2 Scones 10-15 225 2 10-15 225 2 Slices 20-25 160 3 20-25 175 3 Meringues 90-110 100 2& 3 90-110 100 3 Sponge 24-28 150 4 24-28 175 3 30-35 175 4 30-35 175 4 14-16 6-8 / 30-35 190-200 200/150 4 4 14-18 6-8/30-35 190-200 200/150 4 4 50-60 sec Hi 3 Chicken (Whole) Custard Tart Pastry Filling per 500g per 500g Grill Guide Toast Sausages Well Done* per side 10-15 Hi-250 2 30-35 4 * When grilling thicker items such as sausages, turn often to ensure even browning. Fan Grill Guide Chicken (Whole) 175 per 500g Shelf positions are numbered from the top down. You may need to alter the time to achieve your desired result. When multi cooking some products may need to be removed before others. Important These times and temperatures are a guide only and are based on the oven being pre-heated first. ROASTING GUIDE Meat Temp °C Minutes per 500g Internal Temp °C Beef Rare Medium Well Done 160-170 160-170 160-170 30-35 35-45 45-60 60-65 65-75 75-80 Mutton Well Done 160-170 45-60 80-85 Hogget / Lamb Medium Well Done 160-170 160-170 30-40 45-60 79-82 82-85 Pork Well Done 180-185 40-45 78 Chicken Well Done 160-180 25-30 Cervena * Rare 220 31/2 per cm thickness 65-70 * Brown prior to roasting in an oiled frypan on high heat. These temperatures and times are a guide only and you may need to increase or decrease these depending on your preferences. A large piece of meat requires fewer minutes per 500g than a smaller piece. Roasting times will be affected by the shape and size of the meat being roasted. Meat with a bone will cook quicker than a rolled roast. Do not add water to your roast as this has a steaming affect. Use a meat thermometer to ensure an accurate result. As the internal temperature of the meat will continue to rise during standing, please allow for this in your calculation. This is particularly important if you want a rare or medium rare roast. 8 9 COOKTOPS Radiant Cooktops The radiant coil cooktop has tubular heating elements. The elements are designed to lift and rotate allowing easy access to the element bowls for cleaning. Replacement bowl inserts are available from the dealer where you purchased your range. Control As the control knob is turned from Lo to Hi, the heat output is increased. Turn the control knob to Hi to begin cooking, adjusting as necessary. The elements are controlled by variable energy regulators giving infinite temperature control. At the low setting, delicate warming, melting chocolate or keeping milk warm at very low temperatures is able to be carried out. The high setting is ideal for boiling, simmering or frying. Once your pan is hot, reduce the temperature to maintain a steady heat to cook your food through. Cooking efficiency will vary due to the different types of cooking utensils used, like heavy based saucepans. Cooking results are influenced by pot quality and size. It is essential that pot size matches the diameter of the cooking zone. Low heat or slow cooking is often due to incorrect pot size usage. Utensils To get the best out of your cooktop follow these simple suggestions. Preheat the cookware on the cooktop before adding food. Cookware with a stainless steel sandwich base or enamelled cast iron will give you the best results. When food comes to the boil reduce the temperature setting. Never use plastic or aluminium dishes on the cooktop. It is important that the pans are the same size or slightly larger than the element. A pan with a flat base will make better contact with the element resulting in shorter cooking times. Aluminium and copper cookware can cause a metallic residue to remain on the cooktop. If left this becomes difficult to remove. Jagged edges on saucepans or heavy frypans may scratch the element. Round based woks should NOT be used on radiant elements, as they will damage the element bowls. CLEANING 10 Cleaning Your Cooktop The element bowls should be cleaned regularly to avoid food residue being burned on the enamel. Wipe out using warm water and detergent or liquid cleaner containing ammonia. The element bowls have an acid resistant finish but spillovers of acidic foods should be wiped up as soon as possible to avoid damaging the enamel. Cleaning your Range The aluminium liners supplied for the element bowl will deteriorate with use and are available as a spare part. Oven Door All surfaces can be wiped with a damp cloth and liquid detergent or non-abrasive cleaner. Wipe the outside surfaces frequently, using warm water and a household detergent or a spray on, wipe off cleaner. To remove the oven door for easier cleaning: 1. Open the door to the first stop position. 2. Lift the door to disengage the hinges by holding the handle only. Do not lift the door in the vicinity of the hinges, as they are spring loaded and will snap back. 3. To replace, place hinge arms in the slots, lift the door by the handle and push from the bottom of the door to engage the hinges. Warmer Drawer The warmer drawer can be removed for cleaning. Pull out until it stops, then lift it clear of the Range. We recommend that the warmer drawer is removed or paper towels are placed under the door when cleaning the oven to avoid accidental spills of oven cleaner onto the warmer drawer. Oven and Oven Racks Clean the inside of the oven while still warm, using household detergents or an ammonia based cleaner, e.g. Handy Andy. Off the shelf oven cleaners may be used providing the instructions supplied by the manufacturer are followed carefully. Failure to follow the manufacturers instructions could stain or damage the enamel. Oven Lamp Turn oven off at wall before touching the oven lamp. The glass cover can be removed for cleaning. Always replace the glass cover before using the oven. Ensure the appliance is switched off before replacing the oven lamp to avoid the possibility of electric shock. 11 INSTALLATION INSTRUCTIONS Installing Your Product 1. This product is designed for a 230/240V ac single or two phase connection. 2. Cabinet clearances. 3. Anti tip brackets are supplied with the accessories, so that the product can be secured to the wall to prevent it from tipping over. FISHER & PAYKEL MANUFACTURER'S WARRANTY 12 When you purchase any new Fisher & Paykel Whiteware Product you automatically receive a two year Manufacturer's Warranty covering parts and labour for servicing within New Zealand and Australia. Fisher & Paykel Undertakes to This warranty DOES NOT cover Service under this Manufacturer's Warranty must be provided by Fisher & Paykel. Repair or, at its option, replace without cost to the owner either for material or labour, any part of the Product, the serial number of which appears on the Product, which is found to be defective within TWO YEARS of the date of purchase. A. Service calls to which are not related to any defect in the Product. The cost of a service call will be charged if the problem is not found to be a Product fault. For example: 1. Correct the installation of the product. 2. Instruct you how to use the product. 3. Replace house fuses or correct house wiring or plumbing. 4. Correcting fault(s) caused by the user. B. Defects caused by factors other than: 1. Normal domestic use or 2. Use in accordance with the Product's User Guide. C. Defects to the Product caused by accident, neglect, misuse or Act of God. D. The cost of repairs carried out by nonauthorised repairers or the cost of correcting such unauthorised repairs. E. Normal recommended maintenance as set out in the Product's User Guide. Such service shall be provided during normal business hours. This Warranty Certificate should be shown when making any claim. This Warranty is an extra benefit and does not affect your legal rights. This Warranty applies only to product purchased in New Zealand and Australia. Please keep this Use & Care Manual in a safe place. Do not return to Fisher & Paykel. 13 PRODUCT DETAILS & CUSTOMER CARE PRODUCT DETAILS Fisher & Paykel Ltd Model/Serial No. Date of Purchase Purchaser Dealer Suburb Town Country Before You Call Check ... Before you call for service or assistance ... Check the things you can do yourself. Refer to your Use & Care Manual and check... 1. Your product is correctly installed 2. You are familiar with its normal operation If after checking these points you still need assistance, please refer to the following... NEW ZEALAND In New Zealand if you need assistance ...* Call your Fisher & Paykel retailer who is trained to provide information on your product, or if we can be of any further help, please contact our Customer Care Centre. Email: [email protected] Fax: (09) 273 0656 Postal Address: PO Box 14-917, Panmure, Auckland Toll Free: 0800 FP CARE 0800 37 2273 If you need service ...* Fisher & Paykel has a network of independent Fisher & Paykel AUTHORISED SERVICE CENTRES whose fully trained technicians can carry out any service necessary on your product. Your dealer or our Customer Care Centre can recommend an AUTHORISED SERVICE CENTRE in your area. CUSTOMER CARE 14 Before You Call Check ... Before you call for service or assistance ... Check the things you can do yourself. Refer to your Use & Care Manual and check... 1. Your product is correctly installed 2. You are familiar with its normal operation If after checking these points you still need assistance, please refer to the following... AUSTRALIA In Australia if you need assistance ...* Call the Fisher & Paykel CUSTOMER CARE CENTRE and talk to one of our Customer Care Consultants. Email: [email protected] Phone: (07)3826 9100 Fax: (07) 3826 9298 Postal Address: PO Box 798 Cleveland, QLD 4163 Toll Free: 1300 650 590 from anywhere within Australia If you need service ...* Fisher & Paykel Australia Pty Ltd has a network of independent Fisher & Paykel AUTHORISED SERVICE CENTRES whose fully trained technicians can carry out any service necessary on your product. Your State Office or our Customer Care Centre can recommend an AUTHORISED SERVICE CENTRE in your area. QUEENSLAND Australian State Offices Unit 1/400 Nudgee Rd, Hendra, Brisbane Qld 4011 Ph: (07) 3860 9170 Fax: (07) 3860 9179 VICTORIA 1507 Centre Rd, Clayton, Melbourne, Vic 3168 Ph: (03) 9542 4660 Fax: (03) 9542 4668 WESTERN AUSTRALIA Lot 12/137 Pilbara St., Welshpool, WA 6106 Ph: (08) 9356 4520 Fax: (08) 9356 4529 NORTHERN TERRITORY Unit 1, 46 McMinn St., Darwin, NT 0800 Ph: (08) 8981 0440 Fax: (08) 8981 0755 NEW SOUTH WALES SYDNEY 16 Parramatta Rd, Lidcombe, NSW 2141, Private Bag 7, Silverwater DC NSW 1811 Ph: (02) 8745 8220 Fax: (02) 8745 8288 NEW SOUTH WALES NEWCASTLE 27 Pendlebury Road, Cardiff, NSW 2285 Ph: (02) 4954 6011 Fax: (02) 4954 6145 SOUTH AUSTRALIA 10-12 Lafitte Road, Wingfield, SA 5013 Ph: (08) 8344 0450 Fax: (08) 8344 0459 * If you Call or Write, please provide ... Please provide, name and address, model number, serial number, date of purchase and a complete description of the problem. This information is needed to provide a better response to your request for assistance. Copyright Reserved © Fisher & Paykel 2001. The product specifications in this booklet apply to the specific products and models described at the date of issue. Under our policy of continuous product improvement, these specifications may change at any time. You should therefore check with your Dealer to ensure this booklet correctly describes the product currently available. New Zealand Customer Care Centre, toll free - 0800 37 2273 - 0800 FP Care, Australian Customer Care Centre, Priority - 1300 650 590 Date of Issue: March 2001 Part No. 573158I