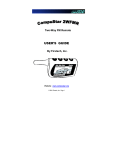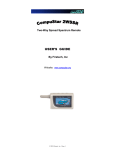
1
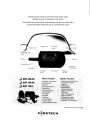
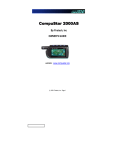
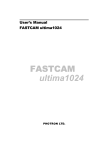
CompuStar SHF 2W-AS
USER’S GUIDE
Firstech, Inc. 230 E. Potter St. Suite #8, Anchorage, AK. 99518
1-907-563-8648
This device complies with Part 15 of the FCC Rules.
Operation is subject to the following two conditions:
(1) This device may not cause harmful interference,
and (2) this device must accept any interference
received, including interference that may cause
undesired operation.
CAUTION: Changes or modifications not expressly approved by the party
responsible for compliance could void the user’s authority to operate this device.
Page 1 of 9
INTRODUCTION
Thank you for choosing COMPUSTAR, a state-of-the-art TWO WAY
alarm/remote start systems for your vehicle. We, at FIRSTECH, INC., are
constantly researching and developing to make you and your vehicle safe and
more comfortable. SECURITY & COMFORT, that’s what FIRSTECH, INC. is all
about.
TABLE OF CONTENTS
1. Operation: Remote Functions For Automatic Transmission -------------Page 4
2. Operation: Remote Functions For Manual Transmission ---------------- Page 5
3. By- Pass Switch----------------------------------------------------------------------Page 6
4. Neutral Safety Switch---------------------------------------------------------------Page 7
5. Alarm Trigger--------------------------------------------------------------------------Page 7
6. Transmitter Learning Procedure--------------------------------------------------Page 7
7. Programming Options With Remote---------------------------------------------Page 7
8. Limited Lifetime Warranty----------------------------------------------------------Page 8
9. Registration Card---------------------------------------------------------------------Page 9
Page 2 of 9
1. OPERATION: REMOTE FUNCTIONS FOR AUTOMATIC TRANSMISSION
Page 3 of 9
1.
OPERATION: REMOTE FUNCTIONS FOR
AUTOMATIC TRANMISSON
and the system will also
Disarm/Unlock the doors as
well.
Button IV
Please take time to read the owners manual. If
you have any question, please contact your
authorized dealer.
Also, refer to the FUNCTION printed on the back
of your remote.
Button I.
Press ½ Sec.
Arm(Lock)/Disarm(Unlock)
If there is no response, you are
out of range.
All doors have to be closed: if
not, the door in the LCD will flash.
Factory setting: No ignition locks, Active
Arming. The status LED will begin to flash after
3 seconds upon locking the doors. The Starter
Kill (Optional feature, see your dealer) will take
into effect. The shock sensor will be in Impact
Watch Mode for 30 seconds upon arming.
Upon disarming, if siren chirps more than two
times, the system has been triggered while
armed: 3 chirping by Shock sensor, 4 chirping
by Door sensor. Note: The system also can be
programmed for Passive Arming. The system
will check the doors, and if the doors are all
closed, the system will arm itself in 30 seconds.
If the vehicle has a dome light delay circuit and
you have to wait until the dome lights go off
before you Arm(Lock) the car, consult your
authorized dealer about Passive Arming.
Warning: Do not press Button
I for more than ½ Sec. (See next)
Button I.
Press 2 Sec.
Panic
To turn off Panic, press Button
I for ½ second.
Panic is also a Car Finder.
Button II.
Start/Stop
Press
2 sec.
Remote
Running time: 15 or 25 minutes
(24/45 for diesel). Factory
setting is 25minutes(45 for
diesel). If there is no response,
you are out of range.
If the door in the LCD flashes, check to see if a
Door is open, the Hood is open, the by-pass
switch is On or the Brake pedal is being pressed.
The vehicle will remain running for until,
Programmed time elapsed, Button II pressed for
2 seconds, Break Pedal pressed, Hood opened,
or By-Pass Switch turned On.
Button III
Press 2 Sec.
Trunk
Release (optional see dealer)
When the Button III is pressed
for 2 Sec., the trunk will open
Press ½ Sec.
Query
The LCD will show the status
of your vehicle.
Note: Nothing will happen if
the Button IV is pressed more than ½ Sec.
The LCD in the remote displays 5 different
Modes.
Button I+II
Press ½ sec.
Mute
Mode (On/Off)
When the Mute Mode is Off
when SPK is indicated in the LCD.
Button I+III Press ½ Sec.
Valet
Mode (On/Off)
Valet Mode will shut down the
alarm and the remote starter
system. Only the Lock/Unlock
will work in valet mode. The
Valet Mode can also be
entered with the KEY. Turning
KEY to ON from ACC three
times within 3 seconds.
Note: The LCD will not display
the Zz. when the KEY is used
to enter the Valet Mode. Press
Button I+III to exit Valet Mode.
Button II+III Press ½ Sec.
Car Call/
Paging mode (On/Off)
Your remote will be paged
when your vehicle is being
tampered with. The LCD will
tell you whether it was
tampered by Impact Sensor
(hammer flashing) or Door
being opened (door flashing).
You will save the battery by
turning Off the Paging mode.
CAR CALL will indicate in the
LCD when this mode is on.
Note: The Pager will not
respond to the first stage of the
Shock Sensor.
Button II+IV Press ½ Sec.
24Hr.
Timer Mode (On/Off)
Your car will automatically start
every One, Two or Three
Hours. Factory Setting: 3 hrs.
If you want to change the
Factory Settings, see
programming section.
Page 4 of 9
Button III+IV Press ½ Sec.
Turbo
Mode (2nd car on/off)
Control Two vehicles with One
Remote. Why is it called
Turbo? This mode is used in
different ways in other
countries. Factory Setting: The
remote control has been
programmed to work either
Turbo On /Off indicated in the
LCD.
Note: If you want to program
more than one remote to a
vehicle, every time you
program a remote, you must
program the 2nd and 3rd remote
at the same time. Up to three
remotes to a vehicle.
2. OPERATION: REMOTE FUNCTIONS FOR
MANUAL TRANSMISSION
Please take time to read the owners manual. If
you have any question, please contact your
authorized dealer.
Also, refer the FUNCTION printed on the back
Button I.
Press ½ Sec.
Arm(Lock)/Disarm(Unlock)
If there is no response, you are
out of range.
All doors have to be closed: If
not, the door in the LCD will flash.
Factory setting: No ignition lock, Automatic
Arming(Lock) upon completion of reservation
and Active Arming. The status LED will begin to
flash after 3 seconds upon locking the doors.
The Starter Kill (Optional feature, see your
dealer) will take into effect. The shock sensor
will be in Impact Watch Mode for 30 seconds
upon Arming. Upon Disarming, if siren chirps
more than Two times, the system has been
triggered while armed. 3 chirping by Shock
sensor, 4 chirping by Door sensor. If the vehicle
has a dome light delay circuit and you have to
wait until the dome lights go off before you
Arm(Lock) the car, consult your authorized
dealer.
Note: Passive Arming. The system also can
be programmed for Passive Arming. The
system will check the doors. If the doors are all
closed, the system will arm itself in 30 seconds.
Warning: Do not press Button I
for more than ½ Sec. (See next)
Button I.
Press 2 Sec.
Panic
To turn off Panic, press Button
I for ½ second.
Panic is also a Car Finder.
Button II.
Start/Stop
Press
2 sec.
Remote
Running time: 15 or 25 minutes
(24/45 for diesel). Factory
setting is 25minutes(45 for
diesel). Also, the factory setting
is automatic Arming(Lock)
upon completion of reservation.
If there is no response, you are
out of range.
If the door in the LCD flashes without starting the
vehicle, when the Reservation Mode has not
been set. Also, check to see if a Door or the
Hood is open, the by-pass switch On or the
Parking Break released. The vehicle will remain
running for until; Programmed time has elapsed,
Button II pressed for 2 seconds, Parking Brake
released, Hood opened, or by-pass Switch turned
On.
IMPORTANT
1.
2.
3.
4.
The vehicle must be in the
NEUTRAL position.
The vehicle windows must be rolled
up.
Do not set the reservation mode
with any people in the vehicle.
Do not remote start with any people
in the vehicle.
Note: The system is not recommended for
vehicle with removable tops.
Reservation Mode must be set for Manual
Transmission vehicles to Remotely Start.
Steps1: After arriving at the destination, and
before turning the engine OFF, shift the
transmission to the Neutral position.
Step 2: Activate your parking brake.
Step 3. Remove the key from the ignition. The
engine will remain running.
Step 4. Exit the vehicle and close the door
within Two minutes from step 3. Then, the
engine will shut Off and Reservation Mode is
now complete.
Your vehicle is now ready for remote starting.
However, the reservation mode will be cancelled
if Door has been opened or CompuStar has been
put in Valet mode after Step 4, in which cases
you have to start the vehicle with the key and
repeat the above 4 steps if you want to restore
the Reservation Mode.
Page 5 of 9
Note: If you try to remote start the vehicle when
the Reservation Mode has not been set or
cancelled, the system will not start. The
parking light will flash Three times and the Door
in the LCD will start flashing to inform you that
the Reservation Mode has been cancelled or
not been set.
Canceling Reservation Mode
If you do not want to set the reservation mode,
shut off the engine before you exit the vehicle.
The engine will shut off if (a) you do not
activate your Parking brake when you turn your
key to Off position, (b) release your Parking
brake while engine is running, or if (c) you
press Button II between step 3 and 4.
Note: The Reservation Mode will cancel if the
Door opens or CompuStar has been put in
Valet mode after Step 4, in which cases you
have to start the vehicle with the key and repeat
the above 4 steps if you want to restore the
Reservation Mode.
Button III
Press 2 Sec.
Trunk
Release (optional see dealer)
When the Button III is pressed
for 2 Sec. The trunk will open
and the system will also
Disarm/Unlock the doors as
well.
Button IV
Press ½ Sec.
Query
The LCD will show the status
of your vehicle.
Note: Nothing will happen if
the Button IV is pressed for more than ½ Sec.
long.
Button II+III Press ½ Sec.
Car Call/
Paging mode (On/Off)
Your remote will be paged
when your vehicle is being
tampered with. The LCD will
tell you whether it was
tampered by Impact Sensor
(hammer flashing) or Door
being opened (door flashing).
You will save the battery by
turning off the Paging Mode.
CAR CALL will indicate in the
LCD when this Mode is On.
Note: The Pager will not
respond to the first stage of the
Shock Sensor.
Button II+IV Press ½ Sec.
24hr.
Timer Mode (On/Off)
Your car will automatically start
every One, Two or Three
Hours. Factory Setting: 3 Hrs.
If you want to change the
Factory Settings, see
programming section.
Button III+IV Press ½ Sec.
Turbo
Mode (2nd car On/Off)
Control Two vehicles with One
Remote. Why is it called
Turbo? This mode is used in
different ways in other
countries. Factory Setting: The
remote control has been
programmed to work either
Turbo On/Off indicated in the
LCD.
Warning: If you want to
program more than One
remote to a vehicle, each time
when you program a remote,
you must program the 2nd and
rd
3 remote at the some time.
Up to three remotes to a
vehicle.
The LCD in the remote shows 5 different Modes.
Button I+II
Press ½ Sec.
Mute
Mode (On/Off)
When the mode is Off when
SPK is indicated in the LCD.
Button I+III Press ½ Sec.
Valet
Mode (On/Off)
Valet Mode will shut down the
alarm and the remote starter
system. Only the Lock/Unlock
will work in Valet Mode. The
Valet Mode can also be
entered with the KEY. Turing
KEY to ON from ACC three
times within 3 seconds.
Note: The LCD will not display
the Zz. when the KEY is used
to enter the Valet Mode. Press
Button I+III to exit Valet Mode.
3.BY-PASS SWITCH
To shut Off the Remote Starter System, by
putting the by-pass switch to On position. ByPass switch on the Off position activates remote
starting function.
Page 6 of 9
4. NEUTRRAL SAFETY SWITCH
Your vehicle should starts only in Parked or in
Neutral position with the key. If the vehicle starts
in any other position, the Manual Transmission
Mode has to be activated. (Consult your
dealer).
5. ALARM TRIGGER
Your alarm will be triggered in the following ways:
A. Light Impacts will trigger the 1st stage of the
Shock Sensor, the siren will chirp 4 times and the
parking lights will flash for a few seconds. The
LCD will not show anything for 1st stage of the
Shock Sensor.
B. Heavy impacts will trigger the system with 30
Sec. of constant siren and flashing of the parking
lights. The Hammer in the LCD will show up and
flash 6 times if it is in the Paging Mode.
C. If a Door is opened, the siren will go off and
the parking lights will flash for 30 Sec. The door
in the LCD will flash 30 times if it is in the Paging
Mode.
D. Optional starter kill prevents the vehicle’s
starter from cranking.
6. TRANSMITTER LEARNING PROCEDURE
Steps 1: Put the system in Valet mode with key:
Ignition On and Off Three times with key within 3
Sec. The parking light will flash once, when it
enters the Valet Mode.
Step 2: Once in the Valet Mode, within 6 Sec.
choose one of the Lock options by pressing:
Button I for ½ Sec. for normal locks.
Button II for 2 Sec. for double pulse unlock
Button III for 2 Sec. for lock pulse after Ignition
turns Off for those vehicles that has factory
Ignition control Door Lock and Unlocks the Door
when the Ignition is turned Off.
Button IV for ½ Sec. for 4-second door lock
pulse.
The parking light will flash twice to confirm step 2.
Step 3: Program 2nd remote or 3rd remote by
pressing any button. The system will program up
to 3 remotes. The parking light will flash once to
confirm step 3.
Note: Step 3 will remove any of the previous
programming of the remotes. Each time when
you program a remote, you have to program the
nd
2 or 3rd remote also even if it was programmed
previously.
7. PROGRAMMING OPTIONS WITH REMOTE:
Step 1: Place the key in the Ignition, and turn to
the ON potion (vehicle not running.) (This means
that there should be 12v at IG1 and nothing at
the Tach sensing wire or Alternator sensing
wire.)
Step 2: Press the buttons I and IV for ½ Sec. The
siren will chirp once, now you are in the
Programming Mode.
Step 3: Option 1- Ignition Lock (locks all doors
after starting.)
Press button I for ½ Sec. to select Option 1.Press
button IV for ½ Sec. to not select Option 1.
(Two chirps, confirming step 3.)
Step 4: Option 2- locks all doors after
reservation (Manual Transmission only).
Please go over the procedure for Reservation
Mode for the Manual transmission. If you choose
Option 2, the doors will lock when you exit the
vehicle and close the door.
Option 2 is recommended.
Press button I for ½ Sec. to select Option 2.
Press button IV for ½ Sec. to not select Option2.
(Three chirps, confirming Step 3.)
Step 5: Option 3- A. (Passive Arming) After
the last door is closed the system will chirp every
10 seconds and Arm itself after 3 warning chrips.
Press Button I for ½ Sec.
Option 3- B. (Semi-passive arming) The
system will Arm itself after disarm like Option 3-A,
except if a door has been opened after disarm,
the system will not Passively arm. Press Button
II for 2 Sec.
Option 3- C. (Active arming) System wills
arm/disarm only by the remote. Press Button IV
for ½ Sec.
(Four chirps, confirming step 5.)
Step 6: Option 4-A. If you enter 24Hr mode, the
system will start the vehicle every hour. Press
Button I for ½ Sec.
Option 4- B. In 24Hr mode, every 2 hour. Press
button II for 2 Sec.
Option 4- C. In 24Hr mode, every 3 hour. Press
Button III for 2 Sec. Option 4-D. Not to program
24Hr Mode. Press button IV for ½ sec Five
chirps, confirming step 6.
NOTE: Go through the procedures Step by Step.
If the system dose not give the confirmation
chirps, go through the Programming Option
again.
Page 7 of 9
LIMIED LIFETIME WARRANTY
Firstech, Inc. Warrants to the original purchaser that this product shall be free of defects in material and
workmanship under normal use and circumstances for the period of time that the original owner of this
product owns the vehicle in which it is installed; except that the remote controller unit for the period of one
year from the date of installation to the original owner of this product. When the original purchaser returns
the product to the retail store where it was purchased or pre-paid postal to Firstech, Inc., 230 E. Potter Suite
8, Anchorage, Alaska 99518, USA within the warranty period, and if the product is defective Firstech, Inc,
will at its option repair or replace such.
“TO THE MAXIMUM EXTENT ALLOWED BY LAW, ANY AND ALL WARRANTIES ARE EXCLUDED BY
THE MANUFACTURER AND EACH ENTITY PARTICIPATING IN THE STREAM OF COMMERCE
THEREWITH. THIS EXCLUSION INCLUDES BUT IS NOT LIMITED TO, THE EXCLUSION OF ANY AND
ALL WARRANTY OF MERCHANTABILITY AND/OR ANY AND ALL WARRANTY OF FITNESS FOR A
PARTICULAR PURPOSE AND/OR AHY AND ALL WARRANTY OF NON-INFRINGEMENT OF PATENTS,
IN THE UNITED STATES OF ANERICA AND/OF ABROAD. NEITHER THE MANUFACTURER OR ANY
ENTITIES CONNECTED THEREWITH SHALL BE RESPONSIBLE OR LIABLE FOR ANY DAMAGES
WHATSOEVER, INCLUDING BUT NOT LIMITED TO, ANY CONSEQUENTIAL DAMAGES, INCIDENTAL
DAMAGES, DAMAGES FOR LOSS OF TIME, LOSS OF EARNINGS, COMMERCIAL LOSS, LOSS OF
ECOMONIC OPPORTUNITY AND THE LIKE. NOTHWITHSTANDING THE ABOVE, MANUFACTURER
DOES OFFER A LIMITED WARRANTY TO REPLACE OR REPAIR THE CONTROL MODULE AS
DESCRIBED ABOVE. Some states do not allow limitations on how long an implied warranty will last or the
exclusion or limitation of incidental or consequential damages. This warranty gives you specific legal rights,
and you may also have other rights, which vary State to State.
IMPORTANT NOTE:
A product’s warranty is automatically void if its date code or serial number is defaced, missing, or altered.
This warranty will not be valid unless you have completed the warranty card and mailed it to Firstech, Inc.,
within 10 days after purchase to the address listed on the card.
Page 8 of 9
Registration Card
Name__________________________________________________________
Address________________________________________________________
City__________________ State___________________ Zip____________
Phone Number: Home (
)_____________ Office (
)______________
Place of Purchase__________________________ Date of Purchase______
Purchase Model___________________
Purchase Price__________
Vehicle Make___________________ Model:_________________________
How did you hear about this product?_______________________________
Firstech Inc.
230 E. Potter Suite 8
Anchorage, AK 99518
Page 9 of 9