1
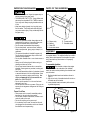
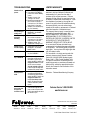
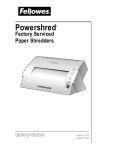
MODELS
CC4-2
PRODUCT USAGE GUIDE
CC4-2
Sheet capacity*:
Shred type:
Shred size:
Entry width:
Recommended use:
Maximum running time:
5
Confetti
5/32" x 2"
9-1/2"
10-20 shredding passes per day
5-7 min. on/15 minutes off
*Sheet capacity measured with 20 lb., 8-1/2" x 11" paper with the shredder operating at rated voltage.
Different paper weights, humidity, and electrical currents will affect capacity.
PLEASE READ AND SAVE THIS MANUAL WITH YOUR ORIGINAL RECEIPT
Customer Service: 1-800-955-0959
USE AND CARE MANUAL
PAPER SHREDDER
Personal Series
IMPORTANT SAFEGUARDS
¥ NEVER insert hands or fingers into paper entry as
serious personal injury may result.
¥ THIS MACHINE IS NOT A TOY. Keep children and
pets away from shredder AT ALL TIMES as serious
injury may result. Always unplug shredder when not
in use.
¥ Keep loose objects (jewelry, ties, long hair) away
from shredder. These items and others like them
may cause serious injury if they accidentally fall into
the paper entry.
¥ Confetti cut shredders contain sharp edges on the
underside of the machine. Use caution when positioning the shredder head onto the basket.
¥ Do not exceed recommended sheet capacity.
¥ Do not shred plastic, continuous forms, adhesive
labels, transparencies, glossy paper, newsprint, or
cardboard.
¥ This personal shredder is intended for paper only.
Do not attempt to shred paper clips or other hard
materials (except staples).
¥ Do not place shredder near or over a heat source or
water.
¥ Always turn off and unplug unit before moving or
cleaning and when not in use.
¥ Do not insert aerosol cleaners into or around the
shredder. Some agents may combust, causing serious injury.
¥ Never use flammable synthetic oil, petroleum- based
or aerosol lubricants to oil the cutting blades. Some
agents may combust, causing serious injury. Use
only a recommended oil in a non-aerosol container. See "MAINTENANCE."
¥ Do not use this product if it or the cord has been
damaged in any way.
¥ Do not open the cover for any reason. Doing so can
expose you to dangerous voltages and will void your
warranty.
PARTS OF THE SHREDDER
A
D
E
C
B
F
A.
B.
C.
D.
Paper entry
Basket
Red LED
Auto-start sensor
E. Power switch
F. Shredder head
ASSEMBLY
NOTE: This shredder will operate only when used with
the supplied basket. The supplied basket has a built-in
safety feature which prevents the shredder from operating if used with any other basket or if improperly
assembled.
To assemble shredder:
This shredder contains sharp edges
on the underside of the shredder
head. Use caution when positioning the shredder head
onto the basket.
1. Position shredder head over basket as shown in
Figure 1.
2. Align slot on back of shredder head with the tab on
the inside rear of the basket.
3. Lower shredder head onto basket (while maintaining tab/slot alignment).
®
Power Cord Care
¥ Place power cord in an easily accessible position,
because it is the main disconnect switch.
¥ Do not place machine where adults, children or animals may walk on the cord.
¥ Do not rest anything on the power cord.
¥ If an extension cord is used, be sure that all products plugged into the extension cord do not exceed
the extension cord ampere rating.
Figure 1
OPERATION
Cool-Down Cycle
This product features an auto-start
sensor. This sensor will turn on the cutting blades whenever anything is inserted into the
paper entry (while the power switch is in the AUTO
position). For the safety of pets and children, we recommend always moving the power switch to OFF and
unplugging whenever the shredder is unattended or
not in use.
This shredder is protected with a special safety feature
which prevents the motor from overheating with extensive use. When shredding is attempted beyond the
machine's maximum running time, the shredder
will automatically shut off its motor until it has
cooled to an acceptable operating level. This is normal and the shredder will return to operation after the
cool-down or "off" period. See "Product Usage Guide"
on front panel for maximum running time and related
cooling "off" time.
1. Assemble shredder (see "ASSEMBLY").
2. Remove any paper clips or other foreign objects
(except staples) from paper. If folding paper to fit
paper entry, adjust sheet capacity appropriately.
Do not attempt to shred paper clips or
other hard materials (except staples)
with this machine. Extensive use of paper clips or other
hard materials will result in damage to the cutting system and will void the manufacturer's warranty.
3. Be sure power switch is in OFF (O) position. Plug
shredder into proper power supply outlet.
4. Move power switch to AUTO (I) position. To clear
the cutting blades, the shredder will "run" for about
1 second immediately after switching to AUTO (I).
When the unit is turned on and in standby mode,
the shredder is ready to be fed paper through the
paper entry. (See "TROUBLESHOOTING" if red
LED is lit.)
NEVER insert hands or fingers into
paper entry as serious personal injury
may result.
Do not exceed recommended sheet
capacity (see "Product Usage Guide"
on front cover of this manual).
5. Slide paper straight into paper entry until the shredder automatically begins shredding.
The shredder automatically stops a few seconds
after shredding is complete.
Continue shredding as desired to a MAXIMUM
shredding time of 5-7 minutes. At this time, the
machine MUST be allowed to "cool down" for a
MINIMUM of 15 minutes. (See "Cool-Down
Cycle" for more information.)
If the shredder jams or shuts off before the maximum shredding time, see "Clearing a Jam" section
for further instructions.
6. Move power switch to OFF (O) position when
shredding is complete.
7. Unplug power cord from outlet whenever shredder
is unattended or not in use.
8. Check basket to see if it is full. If full, remove shredder head and empty basket contents. Replace
shredder head onto basket.
Clearing a Jam
If the shredder sheet capacity is exceeded or paper is
not put in straight, a jam may result. See "Product
Usage Guide" on front panel for maximum sheet
capacity for your shredder.
To clear a jam:
1. Move the power switch to the REVERSE (R) position. (NOTE: If waste basket is full, empty it before
clearing jam.) The shredder will reverse the paper
to clear the jam.
2. If the shredder jams in reverse, move the power
switch to AUTO (I) and allow to run for about five
seconds. If jam does not clear, move power switch
to REVERSE (R) again and allow to run for about
five seconds. Repeat this procedure until the jam is
cleared. If necessary, use care to grasp the paper
carefully and pull out to clear the jam.
3. Once the jam is cleared, move the power switch to
AUTO (I) for continued shredding or OFF (O) if
shredding is complete.
MAINTENANCE
Confetti cut shredders require regular (monthly) oiling of
the cutting blades to maintain proper operation. Failure to
oil the blades regularly could result in reduced sheet
capacity performance, excessive noise during operation,
paper jams and possibly shredder failure.
We recommend using only Powershred Lubricant
#35250 (available by contacting Fellowes) or a vegetable-based oil (such as corn or canola) in a nonaerosol container with an extension nozzle.
Never use flammable synthetic oil,
petroleum- based, or aerosol lubricants to oil the cutting blades. Some agents may combust, causing serious injury.
To oil the cutting blades:
1. From the top of the shredder, squeeze the recommended lubricant across the full width of the
blades.
2. Move the power switch to AUTO (I) position and
allow the blades to run at least 3 seconds.
3. Move the power switch to REVERSE (R) position
and allow it to run for at least 3 seconds.
4. Repeat steps 2-3 above at least 3 times.
TROUBLESHOOTING
LIMITED WARRANTY
Shredder will not
operate.
a. Shredder is not plugged in.
b. Power switch is in the OFF (O)
position. Move switch to AUTO (I)
position.
c. Shredder is jammed. See
"Clearing a Jam" section.
d. Shredder has exceeded the maximum run time and requires a
"cool-down" time. See "Product
Usage Guide" on front panel.
e. Shredder is not assembled properly. See "Assembly."
Shredder makes a
loud squeaking or
rubbing noise.
Shredder suddenly
stops while
shredding.
a. Cutting blades need to be oiled
REGULARLY. See "MAINTENANCE" section.
Shredder shreds
less than capacity.
a. Cutting blades need to be oiled
REGULARLY. See "MAINTENANCE" section.
a. Shredder is not assembled properly. See "ASSEMBLY."
Fellowes warrants all the cutting cylinders of the
machine to be free of defects in material and
workmanship for 3 years from the date of
purchase by the original consumer. Fellowes
warrants all other parts of the machine to be free
of defects in material and workmanship for 1 year
from the date of purchase by the original consumer. If any part is found to be defective during
the warrant period, your sole and exclusive
remedy will be repair or replacement, at FellowesÕ
option and expense, of the defective part.
This warranty does not apply in cases of abuse,
mishandling or unauthorized repair. ANY
IMPLIED WARRANTY, INCLUDING THAT OF
MERCHANTABILITY OR FITNESS FOR A
PARTICULAR PURPOSE, IS HEREBY LIMITED
IN DURATION TO THE APPROPRIATE
WARRANTY PERIOD SET FORTH ABOVE.
In no event shall Fellowes be liable for any
consequential or incidental damages attributable
to this product. This warranty gives you specific
legal rights. You may have other legal rights that
vary from state to state.
For more detail or to obtain service under this
warranty, please contact Fellowes Customer
Service at 1-800-955-0959, Monday through
Friday, 8 AM - 5 PM (Central Standard Time).
For specific instructions on obtaining service
under this warranty on machines purchased outside the USA, contact the appropriate location
listed in the Contact for Service section of this
instruction manual.
Red LED is lit.
a. Shredder has exceeded the maximum run time and requires a
"cool-down" time. See "Product
Usage Guide" on front panel.
b. Shredder is jammed. See
"OPERATION - Clearing a Jam."
Shredder operates
only in REVERSE.
a. A small piece of paper may be
blocking the auto-start sensor of
this shredder. Move the power
switch to the OFF (O) position and
unplug the shredder. Turn shredder over and use a toothpick
(from the underside of the unit)
to clear the paper blockage at the
auto-start sensor (center) location.
Shredder runs continuously when in
AUTO.
a. A small piece of paper may be
causing the auto-start feature to
run continuously. Move the power
switch to the OFF (O) position and
unplug the shredder. Use a
toothpick (from the top of the
unit) to clear the paper blockage
at the auto-start sensor (center)
location.
a. This is normal. The shredder runs
a few seconds longer than the
paper in order to keep the cutters
clear of paper particles and reduce
the chances of a jam.
Shredder runs for a
few seconds after
the paper has
cleared the cutters.
Warrantor: Fellowes Manufacturing Company.
Customer Service 1-800-955-0959
www.fellowes.com
1789 Norwood Avenue ¥ Itasca, Illinois 60143-1095
630-893-1600
®
Australia
Tullamarine, Vic
Benelux
Vianen, NL
Canada
Markham, Ont.
France
Rennes, I-V
Germany
Garbsen, Han.
Italy
Camerano, AN
Japan
Tokyo
Poland
Warsaw
United Kingdom
Doncaster, S. Yorks.
© 2001 Fellowes Printed in China. Form No. 30117