1
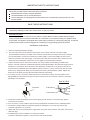
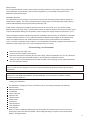
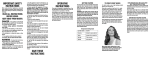
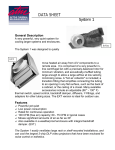
Owner's Manual
MODEL: CD400
Table of Contents
Top 14 Reasons to Buy Equator Compact Dishwasher
Page
1
Warranty
2
Unit Parts Identification
3
Important Safety Instructions
4
Installation
4
Water Pressure
5
Connection & Disconnection Instructions
5
Features
6
Operating Tips
8
Program Summary/Selection
8
Common Problems and Solutions
9
Introduction
Congratulations on your new Equator Dishwasher. In addition to its award winning design, this is a highly sophisticated
engineered product that will give you many years of satisfaction. Please spend a few moments to read the Owners Manual.
This will show you ways to best utilize your valuable purchase.
Here are 14 of the best reasons for buying your Dishwasher 1. Compact Size
The Dishwasher has a compact size of 18.8”x22.4”x19.6”. It can fit on a tabletop or any place that is convenient.
2. Water and Sewage Savings.
Your dishwasher uses only about 2.9 gallons of water in a Normal load (compared with 11-14 gallons in. regular
dishwashers). Less water results in a reduced sewage bill.
3. Energy Savings.
Since the Dishwasher uses a small amount of water to clean the dishes since there is less water to be heated. This results in
substantial energy savings.
4. Detergent Savings.
Since there is a reduced amount of water being used combined with the fact that the water is heated up to 160°, the amount
of detergent needed for a standard load is no more than a tablespoon.
5. Rack Capacity
The Dishwasher can accommodate either 4 place settings (large and small mixed) in its racks. This is very convenient for
use by small families, individuals, seniors, and offices.
6. Water Temperature Selection
A temperature selection switch allows the Dishwasher to be heated to either 130° or 160° for standard or heavy wash of
dishes.
7. Convenience
Your dishwasher can be installed as a freestanding unit with the faucet-adapter attachment included.
8. Built-in Installation
The convenient size of the dishwashers allows it to be built-into a cabinet.
9. Rinse-Aid
Your Dishwasher is equipped with an automatic rinse-aid dispenser.
10. Easy Clean Filter
The easy-to-clean filter allows any collected remnants of food to be removed from the Dishwasher.
11. Wash Options
This unit is a full-featured Dishwasher. It has three wash options rinse, normal wash, and fast wash.
12. Fast Wash
In these models, with the press of a button, the Dishwasher can do a fast wash a convenient feature for light washing of
dishes. A fast wash can be done within 25 minutes.
13. Spray Arms
Your one-spray arm dishwasher is ideal for regular dish cleaning and especially convenient for glasses.
14. Easy-to-Clean Exterior
The enameled metal cabinet and the high quality poly-molded door that make up the exterior of the Dishwasher make it easy
to clean with just a damp kitchen towel.
1
WARRANTY INFORMATION
Your Equator appliance is protected by this warranty under normal, personal,
family or household use (1 Year), and limited commercial use (90 days) in the
USA and Canada.
WARRANTY SERVICE
WARRANTY
This
warranty is given by:
Equator Corporation undertakes to the consumer-owner
Equator Corporation,
to repair or, at Equator Corporation’s option, to replace
Equator Plaza,
any part of this product which proves to be defective in
2801 W. Sam Houston Pkwy. N.,
workmanship or material under normal personal, family
Houston,
TX 77043-1611.
or household use, in the USA and Canada, for a period of
one year from the date of original purchase.
Service under this warranty must be obtained by the
For commercial use, the product is warranteed for a following steps, in order:
period of 90 days.
Call an Equator Corporation Authorized Service Agent
(obtain
number of nearest agent from your dealer or by
During this period, Equator Corporation will provide all
labor and parts necessary to correct such defect, free of c a l l i n g E q u a t o r S e r v i c e a t
charge, if the appliance has been installed and operated 1-800-776-3538). Under normal circumstances,
in accordance with Equator Corporation’s written Service will be provided during regular business hours
instructions with the appliance. Ready access to the (9:00 a.m. to 5:00 p.m. weekdays).
appliance, for service, is the responsibility of the
GENERAL
consumer-owner.
Since it is responsibility of the consumer-owner to
establish the warranty period by verifying the original
purchase
date, Equator Corporation recommends that
EXCLUSIONS
In no event shall Equator Corporation be liable for a receipt, delivery slip or some other appropriate
incidental or consequential damages or for damages payment record be kept for that purpose.
resulting from external causes such as abuse, misuse,
Remember to send in your Warranty Registration Card
incorrect voltage or acts God.
so that a proof of your purchase exists with Equator.
This
warranty gives you specific legal rights, and
This warranty does not cover service calls which do not
involve defective workmanship or materials covered by you may also have other rights which vary from State to
this warranty. Accordingly, diagnosis and repair costs State.
for a service call which does not involve defective
Corporate Office
workmanship or materials will be the responsibility of the
consumer-owner.
EQUATOR CORPORATION
Equator Plaza
2801 W. Sam Houston Pkwy. N.
Specifically, the following work is not covered under
Houston, TX 77043-1611
Tel: 713-464-3422 - Fax: 713-464-2151
warranty and does not constitute warranty work:
Tel: 800-776-3538
. Installation
-e.g. improper hook-up or leveling
. Maintenance - e.g. cleaning of air and/or water filter
. Damage
- e.g. Replacing broken door handle
Most work is covered. The defining factor is, has the
machine malfunctioned (Equator is responsible) or has
the customer omitted or done something to cause
machine to malfunction (customer is responsible).
Some States do not allow the exclusion or limitation of
incidental or consequential damages, so the above
limitation or exclusion may not apply to you.
2
FRONT VIEW
3
4
5
1
6
7
8
2
INSIDE VIEW
9
REAR VIEW
10
12
13
11
17
14
15
16
Illustration shows optional solid door assembly
1. WINDOW
2. FRONT PANEL
3. DOOR RELEASE BUTTON
4. PILOT LIGHT (POWER)
5. PILOT LIGHT (HIGH HEAT)
6. POWER ON/OFF BUTTON
7. HIGH-HEAT / NORMAL HEAT
8. PROGRAM / TIMER SELECTOR
9. SPRAY ARM
10 . FILTER
11. DETERGENT LOCATION
12. DOOR ASSEMBLY
13 . DOOR LATCH MECHANISM
14 . WATER INLET CONNECTION
15. DRAIN HOSE CONNECTION
16. POWER CORD
17. RINSE AID DISPENSER
3
IMPORTANT SAFETY INSTRUCTIONS
WARNING
When using your dishwasher, follow basic safety precautions
Read all instructions before using the dishwasher
Use the dishwasher only for its intended function
Use only detergents or wetting agents recommended for use in a dishwasher and keep them out of the
reach of children.
SAVE THESE INSTRUCTIONS
WARNING
Instructions pertaining to a risk of fire, electric shock, or injury to persons.
Electrical Instructions:
An electrical supply of 110-120 volts AC only, 60Hz is required. Make sure that a suitable electrical supply
socket is located close to where the dishwasher is to be placed. For your personal safety, the appliance must
be grounded. The appliance is equipped with a power supply cord having a 3-prong grounding plug. To minimize
possible shock hazards it must be plugged into a matching 3-prong grounding type electrical outlet.
Installation Instructions
1. Remove all packing materials carefully
2. The water inlet hose from the machine terminates in a 3/4” female connector. The water supply
should therefore terminate in a similar male connector and should have a stopcock close by in the pipe.
It is recommended to connect the machine to hot water supply. Connect the straight connector of the
inlet hose securely to the water supply . Connect the other end (bent connector) to the water inlet valve
at the back of the dishwasher cabinet. Do not over-tighten to avoid damage to threads.
3. Prepare the drain hose so that it has a hooked end. Use the plastic U-bend fitting provided for this
purpose. The end of the hose should be dropped into a drainage standpipe, the maximum height of which
should be no more than 6” above the base of the dishwasher. To allow for an air gap around the end of
the drain hoes, the diameter of the standpipe should be at least 1.2" (3cm). Connect the other end of the
drain hose (L shaped) to the drain port connection at the back of the dishwasher cabinet. Tighten the
drain hose to the drain port using the metal clip included in the package.
4. If you wish, you may connect the water inlet hose on to the kitchen sink tap. You must obtain correct
fittings/adaptors to match the inlet hose connectors to ensure secure connection. However, permanent
plumbing is recommended.
BACK VIEW
Drain
Connect
Inlet Valve
Connector
5. If leaks are located, immediately turn the water supply off and check the connections fully. Tighten
connections if necessary.
6. If for any reason you are unable to stop the leak yourself please seek advice from a qualified plumber.
7. The minimum height clearance required to install your dishwasher on a counter top surface with
overhead cupboards is 17.8” (45cm).
8. Make sure there is an electrical power supply within easy reach of the machine. The power cord is 6 feet
(182.8cm) long.
9. The dishwasher must be installed on a "solid" level surface.
To level the dishwasher, adjust the 4 level screws under the dishwasher.
4
Water Pressure
For best operating results, incoming water pressure should be between 0.5 and 10 bar. Incoming water supply
for the dishwasher is controlled by a 'pressure switch' application, so if household water pressure is low,
dishwasher fill time will be longer.
FOR BEST RESULTS:
Your dishwasher cleans by spraying a mixture of hot clean water and detergent (under pressure) against the
soiled surface of dishes. The water is pumped through a rotating spray arm, drained through a filter removing
food and soiled particles and pumped back through the spray arm.
Soiled water is pumped out and replaced with clean water at the end of each cycle. (the number of times
depends on the cycle being used) For best cleaning results, the water temperature must be at least 130o F (55oC).
To prevent dishwasher damage, the temperature of the incoming water supply should not exceed 160oF (71oC).
NOTE: Hard Water conditions will adversely affect the washability performance of your dishwasher. Hard Water
conditions will also contribute to "Lime" (white film substance) deposits and/or scaling? On the stainless steel
surface of the dishwasher tub and "Heater Element" located in the sump underneath the removable filter
screen. To assist in minimizing these conditions, it is recommended to periodically operate/rinse the inside of the
dishwasher (while empty) using 1 cup of white vinegar (at least once a week).
Disconnecting your Dishwasher
Disconnect the power supply cord.
Close the hot water supply at the stopcock.
Disconnect the inlet hose assembly from the water supply. When the dishwasher is not in use, place/store
the hose on the hanger hose bracket located on the rear wall of the dishwasher cabinet.
Appliances that are to be discarded must be made unusable. Pull off the plug, remove cable and make the
door lock and latch unusable
! IMPORTANT !
Once you open the water supply line, (even if it is closed immediately thereafter) the water inlet hose will be
pressurized.
! CAUTION !
DO NOT LET CHILDREN DISCONNECT THE DISHWASHER. Close supervision of children is always
important around appliances.
Loading your Dishwasher
The dishwasher is designed to receive a standard "4 piece" plate setting consisting of the following:
4 Dinner Plates
4 Bread & Butter Plates
4 Fruit Bowls
4 Cups & Saucers
4 Dinner Forks
4 Dinner Knives
4 Salad Forks
4 Teaspoons
2 Serving Spoons
1 Serving Spoons
1 Serving Fork
NOTE: For ease of loading/unloading large size dinner plates from the dish rack it may be necessary to
(temporarily) remove the silverware basket. When loading/unloading is complete, return the silverware
basket to its original position.
5
Preparing your Dishes for Washing
Scrape off all solid food particles from the dishes.
Remove excessive quantities of oil or grease.
Empty any liquids from glasses and cups.
All dishes should be thoroughly rinsed before being placed inside the dishwasher.
NOTE: Dishes with dried-on foods are more difficult to wash and may not come clean in a normal wash cycle.
Arrange all items with recessed or curved sections on a slant to drain water away.
Cups, pots, glasses, etc should be placed upside down.
When loading items to be washed:
Locate sharp items so that they are not likely to damage the door seal.
Load sharp knives with the handles up to reduce the risk of cut-type injuries
Do not load plastic items unless they are marked "dishwasher safe" or the equivalent. For plastic items not
marked, check the manufacturer's recommendations.
Do not load glasses over the dish rack pins. Glasses loaded over dish rack pins are not properly supported
and are likely to get damaged.
Items with wooden or bone handles and items joined together with glue are unsuitable as they cannot resist
hot water.
Do not touch the heating element during or immediately after use.
Do not operate your dishwasher unless all enclosure panels are properly in place.
Do not tamper with controls.
Do not abuse, sit on, or stand on the open door or dish-rack of the dishwasher. The machine may topple over.
Protect cables and hoses from high temperatures.
To reduce the risk of injury, do not allow children to operate or play with the dishwasher.
Using the Right Detergent
Use only detergent specifically made for use in dishwashers, as other types will cause over-sudding. If your
detergent is old and/or lumpy, throw it away. Old detergent loses its washing power. Lumpy detergent won't
dissolve.
How much Detergent Should You Use
That depends if your water is "hard" or "soft."
HARD WATER REQUIRES MORE DETERGENT TO GET DISHES CLEAN.
SOFT WATER REQUIRES LESS DETERGENT TO GET DISHES CLEAN.
The recessed detergent area located on the inside door panel will hold approximately 7 grams of detergent.
6
Using a Rinsing Agent
You can help prevent unsightly spots on dishes and glassware and reduce drying time by using a rinse agent.
A rinse agent is specially formulated to rinse away food and detergent residues that can be left behind on
your dishes. Used regularly, a rinse agent will automatically provide you with cleaner dishes every time you
wash.
To fill the rinse agent dispenser, unscrew the dispenser cap located on the inner door. Add the rinse agent
slowly into the container until it just reaches the bottom of the filling cap inside the dispenser opening.
Replace the cap. The dispenser will automatically release the rinse agent into the final rinse water
(approximately 90cc of rinse agent).
Rinse Feature
The "Rinse" is a convenience feature that allows dishes to be rinsed, if you don't have a full load ready
to be washed. (Preventing foods from becoming dried/caked on the dish surface) It is not necessary to add
detergent to the dishwasher during the Rinse cycle. However, due to the short duration of the pre-rinse,
(6 minutes only) make sure the incoming water supply is hot. Open the hot water faucet and run till hot,
before connecting the dishwater.
! IMPORTANT !
Your dishwasher is not a “waste disposal unit”, clean off large particles of food sediments before placing
dishes in the dishwasher.
Using the "High-Heat" Feature
The "High-Heat" feature gives you the option of washing/drying dishes at very high water temperatures.
When activated, the "High -Heat" feature energizes the heating element which will raise and maintain the
° F(66
° C)
internal water temperature of the dishwasher at 151
! CAUTION !
Water temperatures this high can cause severe burns/scalding. Always exercise extreme care when opening
and/or entering the dishwasher during the High -Heat cycle.
To activate this feature, push the "High" button on the control panel.
Pushed button in = the "High -Heat" feature is activated.
Using the "Normal - Heat" Feature
The "Normal - Heat" feature gives you the option of washing dishes at "normal" incoming water tank
temperature. (usually the incoming water temperature will be between 130o ~ 140oF / 54.4o ~ 60oC)
When activated, the "Normal -Heat" feature by-passes the heating element.
To activate the "Normal -Heat" feature push the "High/Normal" button on the control panel.
Push button out the "Normal -Heat" feature is activated.
! IMPORTANT !
When the "Normal - Heat" feature is activated, drying time for the dishes will be increased. The dishes dry
by a "convection" method only. To speed-up the drying time, we suggest you leave the dishwasher door partially
open after the program is complete. This will allow humidity from within to escape. Push the door open
button and the door pops opens to a pre-set convection dry position.
7
Operating Instructions
To operate the dishwasher:
1. Make sure the inlet and drain hoses are correctly and securely connected.
2. Push the door release button to open the door.
3. Place the dishes on the dish rack and cutlery inside the cutlery basket.
4. Check to make sure that the rotating spray arm can turn freely all the way round. If necessary remove any
obstacles.
5. Fill the detergent in the recessed area on inner door panel. (approx. 7 grams)
NOTE: If using the "Rinse" cycle only, it is not necessary to add detergent.
6. Close the door firmly
7. Open the hot water supply.
8. Turn the selector switch to the desired wash program. (Rinse, Normal, Short).
9. Press the power button.
-Button in = power on
-Button out = power off
The power light will illuminate indicating the machine is receiving power.
10. The dishwasher stops automatically at the end of the program. The power light will remain illuminated, until
the power button is switched off.
11. The dishwasher is designed to stop if the door is opened accidentally during operation.
12. After washing, dishes should be allowed to cool down for about 15 minutes so they are not too hot to handle.
Dishes will cool quicker if the door is opened slightly.
13. After unloading the dishwasher, remove the filter, clean off any bits of food, and put the filter back in its position.
NOTE: At the beginning of each cycle, the dishwasher always starts in the "drain" mode. This is
because the drain pump always retains a small amount of water (in the sump) from the previous
cycle. This is necessary to keep the pump primed.
Therefore, don't be alarmed if you see a small amount of water being pumped-out from the drain hose
prior to the start of the regular wash cycle. (THIS IS NORMAL)
Program Summary/Selection
RINSE:
Water Temperature: Incoming Water
Program Duration:6 Minutes
Water Consumption:2.8 liters/0.73US/gal.
NORMAL/HIGH HEAT:
Water Temperature:
143oF/62C
¡ã
8
COMMON DISHWASHING PROBLEMS AND SOLUTIONS
PROBLEM
POSSIBLE CAUSE
POSSIBLE SOLUTION
Dishwasher will not start
* Dishwasher not receiving
* Check electrical connection
electrical power.
Dishes not clean
fuse/circuit breaker.
* Door is unlatched.
* Close and latch door.
* Dishwasher not level..
* Level unit.
* Improper loading
* Arrange dishes so spray action
reaches all surfaces.
* Do not overload dishwasher.
* Spray arm not rotating freely
* Check spray arm to make sure
nothing (i.e. cutlery) is
obstructing spray arm rotation.
* Check if filter screen has become
dislodged and obstructing spray
arm rotation.
* Not enough detergent and/or
improper detergent being used.
* Use more dishwasher detergent
* Do not use detergent that is hard
or cracked.
* Use only a recommended
dishwasher detergent.
* Improperly prepared dishes.
* Excess food soil and liquids
should be removed from dishes
before loading.
* Water inlet hose kinked/bent
due to improper installation.
Chipping or breaking
* Improper loading of dishes.
glassware
* Eliminate kink or bend from
Inlet hose.
* Do not overload dish rack. Load
Glasses on the upper rack only,
Not over dish rack pins. Glasses
Loaded over dish rack pins are
Not properly supported and
Subject to damage.
Water remains in bottom
* A small amount of water
(in sump area) is normal.
* This is necessary to keep the
Pump primed and is drained
automatically at the beginning
of each cycle.
* Excessive amount of water;
Cycle not completed.
* Allow dishwasher to complete
Full cycle.
9