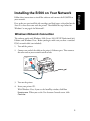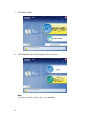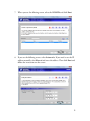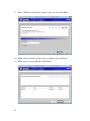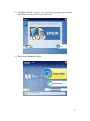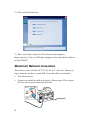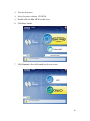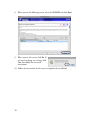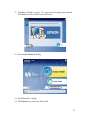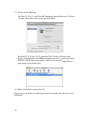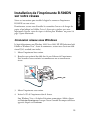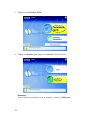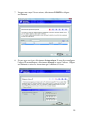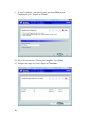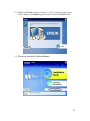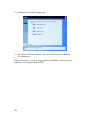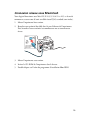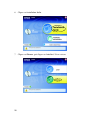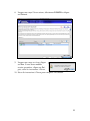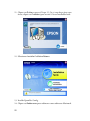
1
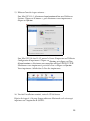
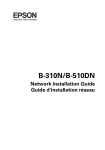
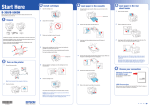
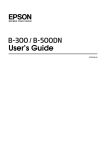
B-500DN
Network Installation Guide
Guide d'installation réseau
Installing the B-500 on Your Network
First, make sure you install the ink cartridges and load paper as described on the
Start Here sheet that came with the printer. Then follow the steps below for
Windows or on page 8 for Macintosh .
®
®
Windows Network Connection
The software works with Windows 2000, Server 2003, XP, XP Professional x64
Edition, and Windows Vista . Before you begin, make sure you have a standard
RJ-45 network cable (not included).
®
1. Turn off the printer.
2. Connect one end of the cable to the printer's Ethernet port. Then connect
the other end to your network switch or hub.
3. Turn on the printer.
4. Insert your printer CD.
With Windows Vista, if you see the AutoPlay window, click Run
Epsetup.exe. When you see the User Account Control screen, click
Continue.
3
English
Follow these instructions to install the software and connect the B-500DN to
your network.
5. Click Easy Install.
6. Click Network, then click Install on the next screen.
Note:
If you see a Windows Security Alert, click Unblock.
4
7. When you see the following screen, select the B-500DN and click Next.
8. If you see the following screen, select Automatic. If you need to set the IP
address manually, select Manual and enter the address. Then click Next and
follow the instructions on the screen.
5
9. Enter a different name for the printer if you want, then click Next.
10. Follow the instructions on the screen to complete the installation.
11. When you see a screen like this, click Finish.
6
12. Click Exit and skip to step 13. Or, if you need to manage your network,
click Back to return to the Easy Install screen.
13. Select Install Network Utility.
7
14. Select and install each item.
15. When you’re done, remove the CD and restart your computer.
Repeat steps 4 to 15 for every Windows computer on the network that will print
to the B-500DN.
Macintosh Network Connection
Your software works with Mac OS X 10.3.9, 10.4.11, and 10.5.x. Before you
begin, make sure you have a standard RJ-45 network cable (not included).
®
1. Turn off the printer.
2. Connect one end of the cable to the printer’s Ethernet port. Then connect
the other end to your network switch or hub.
8
3. Turn on the printer.
4. Insert the printer software CD-ROM.
5. Double-click the Mac OS X installer icon.
6. Click Easy Install.
7. Click Network, then click Install on the next screen.
9
8. When you see the following screen, select the B-500DN and click Next.
9. When you see this screen, click No. If
you need to change any settings, click
Yes, then follow the on-screen
instructions.
10. Follow the instructions on the screen to complete the installation.
10
11. Click Exit and skip to step 15. Or, if you need to manage your network,
click Back to return to the Easy Install screen.
12. Select Install Network Utility.
13. Install EpsonNet Config.
14. Click Restart to restart your Macintosh.
11
15. Do one of the following:
For Mac OS X 10.5, select Print & Fax from System Preferences. Click the
+ button, then select your printer and click Add.
For Mac OS X 10.4 or 10.3.9, open the Print Center or Printer Setup
Utility. Click Add, then click More Printers and select a connection such as
EPSON TCP/IP. Select your printer from the list and click Add. You see
your printer in the Printer List.
16. When you’re done, remove the CD.
Repeat steps 4 to 16 for every Macintosh on the network that will print to the
B-500DN.
12
Suivez ces instructions pour installer le logiciel et connectez l’imprimante
B-500DN sur votre réseau.
Premièrement, assurez-vous d’installer les cartouches d’encre et de charger du
papier tel qu’indiqué sur l’affiche Point de départ qui est incluse avec votre
imprimante. Ensuite, suivez les étapes ci-dessous pour Windows ou passez à la
page 19 pour Macintosh .
®
®
Connexion réseau sous Windows
Le logiciel fonctionne sous Windows 2000, Sever 2003, XP, XP Professional x64
Edition et Windows Vista . Avant de commencer, assurez-vous d’avoir un câble
réseau RJ-45 standard (non inclus).
®
1. Mettez l’imprimante hors tension.
2. Branchez une extrémité du câble dans le port Ethernet de l’imprimante.
Puis, branchez l’autre extrémité au commutateur ou au concentrateur
réseau.
3. Mettez l’imprimante sous tension.
4. Insérez le CD de l’imprimante dans le lecteur.
Sous Windows Vista, si la fenêtre Exécution automatique s’affiche, cliquez
sur Exécuter Epsetup.exe. Lorsque l’écran Contrôle du compte utilisateur
apparaît, cliquez sur Continuer.
13
Français
Installation de l’imprimante B-500DN
sur votre réseau
5. Cliquez sur Installation facile.
6. Cliquez sur Réseau, puis cliquez sur Installer à l’écran suivant.
Remarque :
Si vous voyez une alerte de sécurité de Windows, cliquez sur Débloquer.
14
7. Lorsque vous voyez l’écran suivant, sélectionnez B-500DN et cliquez
sur Suivant.
8. Si vous voyez cet écran, sélectionnez Automatique. Si vous devez configurer
l’adresse IP manuellement, sélectionnez Manuel et entrez l’adresse. Cliquez
sur Suivant et suivez les instructions qui s’affichent à l’écran.
15
9. Si vous le souhaitez, vous pouvez entrer un nom différent pour
l’imprimante, puis, cliquez sur Suivant.
10. Suivez les instructions à l’écran pour compléter l’installation.
11. Lorsque vous voyez cet écran, cliquez sur Terminer.
16
12. Cliquez sur Quitter et passez à l’étape 13. Ou, si vous devez gérer votre
réseau, cliquez sur Précédent pour revenir à l’écran Installation facile.
13. Sélectionnez Installer l’utilitaire Réseau.
17
14. Sélectionnez et installez chaque item.
15. Une fois l’installation terminée, retirez le CD du lecteur et redémarrez
votre ordinateur.
Répétez les étapes 4 à 15 pour chaque ordinateur Windows sur le réseau qui
imprimera sur l’imprimante B-500DN.
18
Connexion réseau sous Macintosh
Votre logiciel fonctionne sous Mac OS X 10.3.9, 10.4.11 et 10.5.x. Avant de
commencer, assurez-vous d’avoir un câble réseau RJ-45 standard (non inclus).
®
1. Mettez l’imprimante hors tension.
2. Branchez une extrémité du câble dans le port Ethernet de l’imprimante.
Puis, branchez l’autre extrémité au commutateur ou au concentrateur
réseau.
3. Mettez l’imprimante sous tension.
4. Insérez le CD-ROM de l’imprimante dans le lecteur.
5. Double-cliquez sur l’icône du programme d’installation Mac OS X.
19
6. Cliquez sur Installation facile.
7. Cliquez sur Réseau, puis cliquez sur Installer à l’écran suivant.
20
8. Lorsque vous voyez l’écran suivant, sélectionnez B-500DN et cliquez
sur Suivant.
9. Lorsque vous voyez cet écran, cliquez
sur Non. Si vous devez modifier
certains paramètres, cliquez sur Oui,
puis, suivez les instructions à l’écran.
10. Suivez les instructions à l’écran pour compléter l’installation.
21
11. Cliquez sur Quitter et passez à l’étape 15. Ou, si vous devez gérer votre
réseau, cliquez sur Précédent pour revenir à l’écran Installation facile.
12. Sélectionnez Installer l’utilitaire Réseau.
13. Installez EpsonNet Config.
14. Cliquez sur Redémarrer pour redémarrer votre ordinateur Macintosh.
22
15. Effectuez l’une des étapes suivantes :
Sous Mac OS X 10.5, sélectionnez Imprimantes et fax sous Préférences
Système. Cliquez sur le bouton +, puis sélectionnez votre imprimante et
cliquez sur Ajouter.
Sous Mac OS X 10.4 ou 10.3.9, ouvrez le Centre d’impression ou l’Utilitaire
Configuration d’imprimante. Cliquez sur Ajouter, puis cliquez sur Plus
d’imprimantes et sélectionnez une connexion telle que EPSON TCP/IP.
Sélectionnez votre imprimante à partir de la liste et cliquez sur Ajouter.
Votre imprimante s’affiche dans la Liste des imprimantes.
16. Une fois l’installation terminée, retirez le CD du lecteur.
Répétez les étapes 4 à 16 pour chaque ordinateur Macinotsh sur le réseau qui
imprimera sur l’imprimante B-500DN.
23
© 2008 Epson America, Inc.
CPD27321
Printed in XXXXX
Pays d’impression : XXXXX