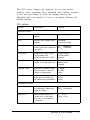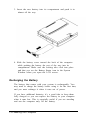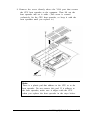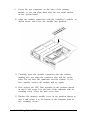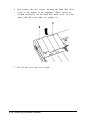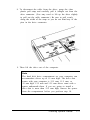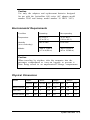
1
User’s Guide
Printed on recycled paper with at least 10% post-consumer content
IMPORTANT NOTICE
DISCLAIMER OF WARRANTY
Epson America makes no representations or warranties, either express or implied, by or
with respect to anything in this manual, and shall not be liable for any implied warranties
of merchantability and fitness for a particular purpose or for any indirect, special, or
consequential damages. Some states do not allow the exclusion of incidental or
consequential damages, so this exclusion may not apply to you.
COPYRIGHT NOTICE
All rights reserved. No part of this publication may be reproduced, stored in a retrieval
system, or transmitted, in any form or by any means, electronic, mechanical,
photocopying, recording, or otherwise, without the prior written permission of Epson
America, Inc. No patent liability is assumed with respect to the use of information
contained herein. Nor is any liability assumed for damages resulting from the use of the
information contained herein. Further, this publication and features described herein are
subject to change without notice.
TRADEMARKS
EPSON is a registered trademark of Seiko Epson Corporation
Action Note is a trademark, and EPSON Connection and EPSON Direct are service marks
of Epson America, Inc.
General notice: Other product names used herein are for identification purposes only and
may be trademarks of their respective owners. EPSON disclaims any and all rights in
those marks.
The Energy Star emblem does not represent EPA endorsement of any product or service.
Copyright © 1995 by Epson America, Inc.
Torrance, California, USA
ii
400387400-2
3/95
Important Safety Instructions
Read all of these instructions and save them for later reference. Follow
all warnings and instructions marked on the computer.
●
Turn off the computer before cleaning. Clean with a damp cloth only.
Do not spill liquid on the computer.
●
Use only the type of power source indicated on the computer’s label.
●
Connect all equipment to properly grounded power outlets. Avoid
using outlets on the same circuit as photocopiers or air control
systems that regularly switch on and off.
●
Do not let the computer’s power cord become damaged or frayed.
●
If you use an extension cord with the computer, make sure the total
ampere rating of the devices plugged into the extension cord does
not exceed the cord’s ampere rating. Also, make sure the total of all
devices plugged into the wall outlet does not exceed 15 amperes.
●
Except as specifically explained in this User's Guide, do not attempt
to service the computer yourself.
●
Unplug the computer and refer servicing to qualified service
personnel under the following conditions:
If the power cord or plug is damaged; if liquid has entered the
computer; if the computer has been dropped or the cabinet damaged;
if the computer does not operate normally or exhibits a distinct
change in performance. Adjust only those controls that are covered
by the operating instructions.
●
When traveling by airplane, be sure to take your computer into the
passenger compartment as carry-on luggage to prevent it from being
stored in an unpressurized storage area.
●
If you plan to use the computer in Germany, observe the following:
To provide adequate short-circuit protection and over-current
protection for this computer, the building installation must be
protected by a 16 Amp circuit breaker.
Beim Anschluß des Computers an die Netzversorgung muß
sichergestellt werden, daß die Gebäudeinstallation mit einem
16 A Überstromschutzschalter abgesichert ist.
iii
Importances Instructions de Sécurité
Lire attentivement les instructions suivantes et les conserver pour les
consulter en cas de besoin. Observer soigneusement tous les
avertissements et directives marques surl’ordinateur.
●
●
●
●
●
●
●
Débrancher l’ordinateur avant de le nettoyer. N'utiliser qu‘un chiffon
humide. Veiller à ne pas renverser de liquides sur l’appareil.
Utiliser seulement le type de source d‘alimentation électrique indiqué
sur l’étiquette.
Tout l’équipement doit être branché sur des prises de courant propre.
Ne jamais utiliser une prise sur le même circuit qu’un appareil à
photocopies ou un système de contrô1e de ventilation avec
commutation marche-arrêt automatique.
S’assurer que le cordon d’alimentation de l’ordinateur n’est pas
abîmé ni effiloché.
Dans le cas où on utilise un cordon de rallonge avec l’ordinateur,
s’assurer que l’intensité en ampères requise pour tous les appareils
branchés sur ce cordon ne soit pas supérieure à la capacité du cordon.
S’assurer aussi que cette intensité ne dépasse jamais la somme de 15
ampères pour l’ensemble des appareils.
Sauf dans les cas spécifiques expliqués dans ce manuel de l’usager,
ne pas essayer d’entretenir ou de réparer l’ordinateur soi-même.
Débrancher l’ordinateur et contacter un technician qualifié dans les
circonstances suivantes:
Si le cordon ou la prise sent abîmés; si un liquide a pénétré à
l’intérieur de l’appareil; si on a laissé tomber l’appareil ou si le boîtier
est endommagé; si l’ordinateur ne fonctionne pas normalement ou
fonctionne d‘une manière très difference de l’ordinaire. N‘ajuster que
les commandes décrites dans les directives.
●
●
Pour les voyages par avion, prendre l’ordinateur avec soi dans la
cabine comme bagage à main, pour éviter qu’il soit transporté dans
une soute non pressurisée.
Pour utiliser l’ordinateur en Allemagne, il est nécessaire que le
bâtiment soit muni d’un disjoncteur de 16 amperes pour protéger
l’ordinateur contre les courts-circuits et le survoltage.
iv
FCC COMPLIANCE STATEMENT
FOR AMERICAN USERS
This equipment has been tested and found to comply with the limits for a class B digital
device, pursuant to Part 15 of the FCC Rules. These limits are designed to provide
reasonable protection against harmful interference in a residential installation. This
equipment generates, uses, and can radiate radio frequency energy and, if not installed
and used in accordance with the instructions, may cause harmful interference to radio and
television reception. However, there is no guarantee that interference will not occur in a
particular installation. If this equipment does cause interference to radio and television
reception, which can be determined by turning the equipment off and on, the user is
encouraged to try to correct the interference by one or more of the following measures:
❑ Reorient or relocate the receiving antenna
❑ Increase the separation between the equipment and receiver
❑ Connect the equipment into an outlet on a circuit different from that to which the
receiver is connected
❑ Consult an experienced radio/ TV technician for help.
WARNING
The connection of a non-shielded equipment interface cable to this equipment will
invalidate the FCC Certification of this device and may cause interference levels that
exceed the limits established by the FCC for this equipment. It is the responsibility of the
user to obtain and use a shielded equipment interface cable with this device. If this
equipment has more than one interface connector, do not leave cables connected to
unused interfaces.
Changes or modifications not expressly approved by the manufacturer could void the
user’s authority to operate the equipment.
FOR CANADIAN USERS
This digital apparatus does not exceed the Class Blimits for radio noise emissions from
digital apparatus as set out in the radio interference regulations of the Canadian
Department of Communications.
Le présent appareil numérique n’émet pas de bruits radioé1ectriques dépassant les limites
applicable aux appareils numériques de Classe B prescrites dans le règlement sur le
brouillage radioélectrique édicté par le Ministère des Communications du Canada.
Contents
Introduction
Computer Features .. . . . .
.
Power-saving Features . . . . . . . . . . .
What This Manual Covers . . . . . . . . .
Conventions Used in This Manual.
Where to Get Help . . . . . . . . . .
CompuServe On-line Support. . ..
Chapter 1
.
.
.
.
.
.
. . .
. . . . .
. . . . .
. . . .
. . .
. . .
.
.
.
.
.
. . . 1
. . . . ...3
. . . . ...3
. . .
4
. .. . . 5
. . . 6
Setting Up the Computer
Opening the Screen . . . . . . . . . . . . . . . . . . . . . . . . ...1-1
Identifying the System Components. . . . . . . . . . . . . . 1-2
Connecting the AC Adapter. . . . . . . . . . . 1-3
Turning the Computer On and Off. . . . . . . . . . . . . . 1-5
Reading the System Window Icons. . . . . . . . . . . 1-7
Making Backup Copies of Your Files. . . . . . . . . . . . . 1-8
Running the System Configuration Utility. . . . . . . . . . . . . 1-8
When to Run the System Configuration Utility. . . . . . . . . 1-9
Starting the Utility . . . . . . . . . . . . . . . . . . . . . . ...1-9
Changing the Settings . . . . . . . . . . . . . . . . . . . . ...1-10
Setting, Deleting, and Changing a Password 1-13
Setting a password . . . . . . . . . . . . . . .. . . . . . . . . . . . 1-14
Deleting or changing a password. . . . . . . . . . . . . . . . . . . . 1-14
Setting the Power Management Options . . . . . . . . . . . 1-15
Exiting the System Configuration Utility . . . . . . . . . . . . . 1-18
Chapter 2
Using Your Computer
Caring for the Computer . . . . . .
Protecting the Hard Disk. . .
Using Energy Wisely . . . . . . . .
Using the Keyboard . . . . . . . . .
Using the Fn Key . . . . . . .
Using the Embedded Keypad.
. . . . . . . . . . . . . . . ...2-1
. . . . . . .
.. . . . . 2-2
. . . . . . . . . . . . . . . ...2-3
. . . . . . . . . . . . . . . ...2-3
. . . . . . . . . . . . . . . . ...2-4
. . . . . . . . . .
. 2-5
v
Using the Trackball . . . . . . . . . . . . . . . . . . . . . . . . ...2-6
Cleaning the Trackball . . . . . . . . . . . . . . . . . . . ...2-8
Resetting the Computer . . . . . .
.
.
... . 2-9
Changing the CPU Speed. . . . . . . . . . . . . . . . 2-9
Using Password Security . . . . . . . . . . . . . . . . . . . . . ...2-10
Entering a Boot Password. . . . . . . . . .
. . 2-11
Entering an SCU Password. . . . . . . . . . . . . 2-11
Using Diskettes . . . . . . . . . . . . . . . . . . . . . . . . . . ...2-12
Using Video Drivers and Utilities . . . . . . . . . . . . . . . . 2-13
Configuring PC Cards . . . . . . . . . . . . . . . . . . . . . . ...2-14
Installing Additional PC Card Drivers and Utilities . . . . . . . . . . . . . 2-15
Chapter 3
Powering the Computer
Using the AC Adapter . . . . . . . . . . . . . . . . . . . . . . ...3-1
Using the Battery . . . . . . . .. . . . . . . . . 3-2
Monitoring Battery Power. . . . . . . . . . . 3-4
Replacing the Battery . . . . . . . . . . . . . . . . . . . . ...3-7
Recharging the Battery . . . . . . . . . . . . . . . . . . . ...3-8
Using the Power Management Features. . . . .. . . . . . . . . . 3-10
Automatic Features . . . . . . . . . . . . . . . . . . . . . ...3-12
Manual Features . . . . . . . . . . . . . . . . . . . . . . . ...3-13
Resuming Activity From Suspend Mode . . . . . . . . . . . . . . 3-14
Using the APM Interface . . . . . . . . . . . . . . . 3-15
Using Suspend to Disk Mode. . . . . . . . . . . . .. 3-16
Creating the Suspend to Disk data file. . . . . . . . . . . 3-17
Recreating the Suspend to Disk data file. . . . . . . . .. 3-19
Chapter 4
Installing Optional Devices
Connecting an External Monitor . . . . . . . . . . . . . . . . . 4-1
Connecting a Parallel Device. . . . . . . . . . . . . . . . . . 4-3
Connecting a Serial Device . . . .. . . . . . . . . . . . . . . 4-4
Checking the Serial Port Settings. . . . . . . . . . . . . . . . 4-5
Connecting an External Keyboard or Mouse. . . . . . . . . . . . . . 4-5
Installing a PC Card .. . . . . . . . . . . . . . . . . . . . ...4-7
Installing a Memory Module. . .. . . . . . . . . . . . . . . . . . . . . 4-8
Removing and Replacing the Hard Disk Drive . . . . . . . . . . . . . . . . . 4-13
vi
Chapter 5
Troubleshooting
Identifying Your System . . . . . . . . . . . . . . . . . . . . . . . .
Error Messages . . . . . . . . . . . . . . . . . . . . . . . . . . . . . .
The Computer Won’t Start . . . . . . . . . . . . . . . . . . . . . . .
Battery Problems . . . . . . . . . . . . . . . . . . . . . . . . . . . . .
AC Adapter Problems . . . . . . . . . . . . . . . . . . . . . .
The LCD Screen Is Blank . . . . . . . . . . . . . . . . . . . . . . . .
The External Monitor Screen Is Blank. . . . . . . . . . . . . . . . . . . . . . . . .
The Computer Locks Up...... . . . . . . . . . . . . . . . . . .
Password Problems . . . . . . . . . . . . . . . . . . . . . . . . . . .
Embedded Keypad Problems . . . . . . . . . . . . . . . . . . . . .
Trackball Problems . . . . . . . . . . . . . . . . . . . . . . . . . . .
External Pointing Device Problems. . . . . . . . . . . .
Diskette Problems . . . . . . . . . . . . . . . . . . . . . . . . . . . .
Diskette Drive Problems . . . . . . . . . . . . . . . . . . . . . . . .
Hard Disk Problems . . . . . . . . . . . . . . . . . . . . . . . . . . .
Software Problems . . . . . . . . . . . . . . . . . . . . . . . . . . . .
Printer Problems . . . . . . . . . . . . . . . . . . . . . . . . . . . . .
Memory Module Problems . . . . . . . . . . . . . . . . . . . . . . .
PC Card Problems . . . . . . . . . . . . . . . . . . . . . . . . . . . .
5-1
5-3
5-3
5-4
5-5
5-6
5-7
5-8
5-9
5-9
5-9
5-10
5-11
5-12
5-12
5-13
5-14
5-14
5-15
Appendix A Specifications
CPU and Memory . . . . . . . . . . . . . . . . . . . . . . . .
Controllers . . . . . . . . . . . . . . . . . . . . . . . . . . . .
Interfaces . . . . . . . . . . . . . . . . . . . . . . . . . . . . .
Keyboard . . . . . . . . . . . . . . . . . . . . . . . . . . . . .
Trackball . . . . . . . . . . . . . . . . . . . . . . . . . . . . . .
Mass Storage . . . . . . . . . . . . . . . . . . . . . . . . . . .
LCD Screen . . . . . . . . . . . . . . . . . . . . . . . . . . . .
System Configuration Utility. . . . . . . . . . . .
Power sources . . . . . . . . . . . . . . . . . . . . . . . . . .
Environmental Requirements. . . . . . . .
. . . . .
Physical Dimensions . . . . . . . . . . . . . . . . . . . . . .
Optional Equipment . . . . . . . . . . . . . . . . . . . . . . .
. . ..
. . ..
. . ..
. . ..
. . ..
. . ..
. . ..
. .
. . ..
. .
. . ..
. . ..
A-l
A-2
A-3
A-3
A-3
A-3
A-4
A-4
A-4
A-5
A-5
A-6
Index
vii
Introduction
The EPSON ® ActionNote TM 600 Series notebook computers give
you exceptional speed, display quality, and expaddability—all
packaged in the latest in notebook computer technology.
The ActionNote computer has 4MB of standard memory on the
system board. Some systems have an additional 4MB memory
module installed (check your system startup screen). Your
ActionNote also comes with pre-installed MS-DOS, ®
Microsoft ® W i n d o w s ,T M and other software so you can run a
vast array of the latest programs, utilities, and games designed
for productivity and fun.
Your high-capacity hard disk drive will hold the hundreds of
program and data files you create as you use your computer.
And when you‘re ready to acquire more capability, your
computer’s two PCMCIA card slots allow you to quickly and
easily add flash RAM, fax/ modem, local area network (LAN),
and other PC card options.
You can even use your ActionNote like a desktop PC when
you‘re not on the road; just connect an external monitor,
keyboard, mouse, and printer.
Computer Features
Your computer comes with the following features:
486DX2 microprocessor with 8KB of internal cache
4MB of RAM on the system board (additional 4MB memory
module installed on some systems), expandable to 20MB
512KB of video RAM
Introduction 1
❑
LCD screen supporting VGA resolutions of 640 x 480 in
256 colors or 64 gray shades
❑
High-speed, 32-bit local bus video technology supports
resolutions up to 1024 x 768 in 16 colors or 800 x 600 in 256
colors on an external monitor
❑
High-capacity hard disk drive
❑
Built-in 16 mm trackball with two buttons
❑
Two stacked PCMCIA Type II slots, supporting two Type I
or Type II cards or one Type III card
❑
Long-lasting, rechargeable NiMH battery
❑
Compact AC adapter
❑
Pre-installed software on your hard disk drive, including
MS-DOS, Microsoft Windows, and in any other programs
❑
On-line computer user’s guide, Windows manual, and
other manuals providing instructions and inform ation
while you are on the road.
Your ActionNote has been configured for you and the hard
disk drive already contains most of the software you need.
Video drivers have already been installed and you can select
whether to load your PCMCIA drivers and utilities each time
you boot your computer.
See the card titled “For Software Support” that came with your
computer for a list of the manuals, diskettes, and brochures that
are included with your software.
Also see the “About EPSON” group window in Windows for
the latest information about your ActionNote and about
EPSON’s services.
2 Introduction
Power-saving Features
The ActionNote complies with the United States
Environmental Protection Agency’s Energy Star Program,
which prom otes the manufacture of energy-efficient printers,
computers, and monitors. Your computer’s power
management features place the system in low-power standby
and suspend modes when it has been inactive for specified
periods of time. The System Configuration utility lets you
customize the way your computer saves power so you can
ensure that the power management features fit the way you
work.
Note
If you use an Energy Star compliant external monitor with
your computer, it also enters a low-power standby mode
because it is not receiving video signals from your computer.
(Screens on non-compliant monitors become blank but do
not enter a low-power mode.)
What This Manual Covers
You do not need to read everything in this book to use your
computer; see the following chapter summaries:
Chapter 1 provides steps for setting up your computer.
Chapter 2 covers basic information about using the computer.
Chapter 3 explains how to power your computer with the
AC adapter or the battery and how to conserve battery power.
Chapter 4 describes how to connect optional devices, install
additional memory, and remove the hard disk drive.
Introduction 3
Chapter 5 provides troubleshooting tips.
Appendix A lists the computer’s specifications.
At the end of them anual, you’ll find an Index and a list of
EPSON U.S. and international marketing locations.
Conventions Used in This Manual
This manual uses the following type conventions in the text:
Example
Meaning
Enter
Keys you press on the keyboard
Fn F12
Keys you press at the same time; hold down the
key marked Fn and press the F12 key
C: \DOS
Text as it appears on the screen
DISKCOPY A: B:
Text that you type exactly as shown
4 Introduction
Where to Get Help
If you purchased your computer in the United States or
Canada, EPSON provides customer support and service
through a network of Authorized EPSON Customer Care
Centers. EPSON also provides support services through the
EPSON Connection. SM In the United States or Canada, dial
(800) 922-8911.
Call the EPSON Connection for the following:
❑
Technical assistance with the installation, configuration,
and operation of EPSON products
❑
Assistance in locating your nearest Authorized EPSON
Reseller or Customer Care Center
❑
Assistance with Extra Care Road Service
❑
Customer relations
❑
EPSON technical information library fax service
❑
Product literature on current and new products.
You can purchase accessories, manuals, or parts for EPSON
products from EPSON Accessories at (800) 873-7766 (U.S. sales
only). In Canada, call (800) 922-8911.
When you call for technical assistance, be ready to identify
your system and its configuration, and provide any error
messages to the support staff. See Chapter 5 for more
information.
If you purchased your computer in the United States or
Canada, EPSON also provides Extra Care Road Service. Your
ActionNote package should contain information on this
program; if not, call the EPSON Connection.
Introduction .5
If you purchased your computer outside the United States or
Canada, contact your EPSON dealer or the marketing location
nearest you for customer support and service. International
marketing locations are listed at the end of this manual.
If you need help with any software application program you
are using, see the documentation that came with that program
for technical support information.
CompuServe On-line Support
Your computer includes the CompuServe ® W i n C I M
information manager and a free CompuServe membership.
This membership entitles you to an introductory $15 usage
credit on CompuServe’s extended services and forums. The
brochure that came with your computer describes the
CompuServe services and how to access them, as well as
providing subscription information.
Note
To access CompuServe, you must install a modem PC card
in your computer.
The fastest way to access helpful tips, specifications, drivers,
application notes, tables for DIP switch or jumper settings, and
bulletins for EPSON products is through the Epson America
Forum on CompuServe.
To access the Epson America Forum, simply click on the green
traffic light icon and type EPSON at the menu prompt.
6 Introduction
Chapter 1
Setting Up the Computer
This chapter describes how to setup your computer. It covers:
❑
Opening the screen
❑
Identifying the system components
❑
Connecting the AC adapter
❑
Turning the computer on and off
❑
Reading the System Window icons
❑
Backing up files
❑
Running the System Configuration utility (SCU).
Opening the Screen
To open the LCD screen, slide the latch on the computer’s lid to
the right and lift the lid upward.
Setting Up the Computer 1-1
ldentifying the System Components
Use the illustrations below to help you identify your system
components.
1-2 Setting Up the Computer
Connecting the AC Adapter
The AC adapter included with your computer can be used in
most countries because it operates in the input ranges
100-250 VAC with frequencies of 47-63 Hz. If you are using the
adapter in a country other than the one where you purchased
your computer, make sure you have the correct power cord
before you connect the AC adapter to an electrical outlet.
Caution
Use only the adapter designed for the ActionNote 600 Series
computer (model number TSA3), or you could damage the
computer.
To connect the AC adapter, first connect the adapter’s power
cord to the connector, as shown below.
Setting Up the Computer 1-3
Position the connector on the AC adapter cable so the side with
the arrow faces up. Then connect the cable to the AC adapter
port on the right side of the computer.
Plug the adapter’s power cord into an electrical outlet. The
green power light on the adapter comes on and the AC Power
icon (the plug) appears in the computer’s System Window. (See
page 1-7 for a description of the System Window icons.)
For more information about powering the computer with the
AC adapter, see Chapter 3. For instructions on connecting
optional equipment to your computer, see Chapter 4.
1-4 Setting Up the Computer
Turning the Computer On and Off
The first time you use your computer, the battery may not be
charged (NiMH batteries lose up to 20% of their charge each
week they aren’t recharged), so make sure the AC adapter is
connected. Then press the power button on the back panel to
turn on the computer.
The computer beeps and then begins a series of power-on
diagnostics that check the circuit boards, memory, ports,
keyboard, and disk drives.
First you see this prompt:
Press SPACEBAR to skip memory test
Press the spacebar or let the power-on diagnostic tests
continue. Then you see this prompt on the bottom of the screen
for 1 second:
<CTRL-ALT-S> to enter System Configuration
Utility
(Ignore this prompt for now.)
You then see a prompt asking if you want to load PC card
drivers. If you do not respond to the prompt within 5 seconds,
the computer loads the drivers and continues to boot. Ignore
this prompt also. (See “Configuring PC Cards” in Chapter 2 for
more information about this prompt.)
Your computer comes with MS-DOS and Microsoft Windows
installed on the hard disk, so it starts Windows next.
Setting Up the Computer 1-5
Note
If you want to adjust the brightness, contrast, or other
aspects of the display, see “Using the Fn Key” in Chapter 2
for keyboard commands you can use.
If you plan to use another operating system, such as OS/ 2,®
U N I X® , or Windows NT, perform the necessary steps to install
the program now. See the documentation that came with it for
installation instructions.
Before you turn off the computer, save your data and exit the
program you are currently using. Make sure the computer is
not accessing data from the diskette drive, hard disk drive, or a
PC card by checking the icons in the System Window; see
page 1-7 for more information.
Press the power button for two seconds to turn off the
computer. This two second delay is a safety feature to prevent
you from accidentally turning off the computer.
Caution
Always make sure the computer is off before you connect or
disconnect equipment, such as an external keyboard. You
can, however, insert or remove a PC card, or connect a
printer while the computer is on.
1-6 Setting Up the Computer
Reading the System Window lcons
These icons appear in the System Window above the keyboard
to indicate the status of certain computer operations.
System Window icons
Icon
Name
Meaning
Caps Lock
Caps Lock is on
Num Lock
Num Lock is on; also helps control
embedded keypad; see Chapter 2
Scroll Lock
Scroll Lock is on
Embedded
Keypad
Locked
Embedded keypad is locked; see
Chapter 2
Hard Disk
Activity
Computer is accessing the hard disk drive
Diskette
Drive
Activity
Computer is accessing a diskette
PC Card
Activity
Computer is accessing a PC card
Suspend
System is in suspend mode; see Chapter 3
Battery
Gauges charging status and power left in
the battery; see Chapter 3
Status
Battery
Charging
AC adapter is charging the battery; see
Chapter 3
AC Power
AC adapter is connected to the
computer; see Chapter 3
For more information about the AC Power, Battery Charging,
Battery Status, and Suspend icons, see Chapter 3. For
information on the Num Lock and Embedded Keypad Locked
icons, see Chapter 2.
Setting Up the Computer 1-7
Making Backup Copies of Your Files
Before you start using your computer, it’s a good idea to make
a backup copy of your hard disk drive. Use the MWBACKUP
utility in the Windows Applications group or the MS-DOS
BACKUP command to back up the contents of the drive. Refer
to your on-line Windows manual or Windows Help utility for
instructions on using MWBACKUP; use the MS-DOS help
utility for instructions on using BACKUP.
You should make backup copies of any diskettes you have that
contain programs and store the copies away from your originals.
Also be sure to regularly backup your hard disk drive in case you
need to restore the files and programs you keep there.
Running the System Configuration Utility
The System Configuration utility (SCU) defines your system’s
configuration so the computer recognizes all of its devices. The
SCU is stored in the computer’s ROM (read only memory),
where you can access it whenever you turn on or reset the
computer, or when you press Ctrl Alt S at the MS-DOS prompt.
Caution
The SCU reboots your computer when you exit the utility
and any data left in your computer’s memory at that time is
lost. If you want to run the SCU while you are using an
MS-DOS application, save your data and exit the program
before you press Ctrl Alt S. To protect you from losing any
data, you cannot run the SCU from Windows.
The configuration you define through the SCU is stored in an
area of memory called CMOS RAM, which is backed up by a
battery and is not erased when you turn off or reset the
computer.
1-8 Setting Up the Computer
Note
If you remove the computer’s battery and leave your system
without a power source for more than 10 days, the internal
battery runs out of power and does not retain your
configuration information. If this happens, you must run the
SCU again and re-enter any changes you made to the default
settings.
When to Run the System Configuration Utility
Because your computer was set up and configured for you, the
configuration information may already be correct for your
needs. However, you may want to run the SCU to enter the
correct time and date, set a password, or customize the power
management features. (You can also access the power
management features by pressing Ctrl Alt P or Fn Esc.) In
addition, any time you change the computer’s configuration
(by installing or removing memory, for example), you need to
run the SCU to update the configuration.
Starting the Utility
You can start the SCU by pressing Ctrl Alt S at the MS-DOS
prompt or during power-on diagnostics. To start the SCU
during power-on diagnostics, make sure there is no diskette in
the diskette drive; then turn on your computer. You see the
following prompt at the bottom of your screen for 1 second:
<CTRL-ALT-S> to enter System Configuration
Utility
As soon as you see this message, press Ctrl Alt S.
Setting Up the Computer 1-9
If you do not press Ctrl Alt S within 1 second, the computer
loads Windows. If this happens, exit Windows and press
Ctrl Alt S at the MS-DOS prompt to start the SCU.
Changing the Settings
When the computer starts the SCU, you see the System
Configuration screen which lists the current configuration
option settings. To select the options you want to change, use
the pull-down menus that you open from the menu bar at the
top of the screen. Some of the menu bar options access other
screens, such as the Power Management option (PowerMgmt).
Use the
and
keys to highlight the menu bar option you
want to select; then press Enter. If you prefer, you can also
press the key for the highlighted letter in the menu option to
select it. (The Defaults and Exit options do not have
pull-down menus; see the table below for more information.)
Once you see a pull-down menu, use the or keys to
highlight the option you want to change and press Enter.
You ’ll notice two ways to change a particular option’s setting:
Select a setting or respond to a prompt displayed in a
dialog box on the screen
Press Enter to enable or disable the option; a check mark
indicates an enabled option.
To close a pull-down menu or dialog box, press E S C.
1-10 Setting Up the Computer
The SCU screen displays the detected size of your system
memory areas, including base, extended, and shadow memory.
It also lets you change or verify the settings listed in the
following table. An asterisk (*) next to an option indicates the
default setting.
SCU options
Option
Description
Settings
Date
Sets the date used by the
system
mm/old/yyyy
Time
Sets the time used by the
system
hh:mm:ss
Standard menu
Trackball
(24 hour format)
Enables or disables the
built-in trackball (assigned
as COM1 )
No
COM Port
Assigns the built-in serial
port address (the
PCMCIA slots are COM3)
COM2 (2F8h) *
COM4 (2E8h)
Disable
Parallel Mode (1)
Assigns the operation
mode of the parallel port
Normal *
Bidirectional
Disable
Diskette Drive
Specifies a diskette drive
type for drive A (drive B
option is inoperable)
1..44MB *
1.2 MB
None
Hard Disk (2)
Automatically detects the
drive type or allows you
to define the parameters
Custom
Auto *
None
Allows you to skip
non-essential diagnostic
tests at startup
No
= Enabled*
= Disabled
Preferences menu
Quick Boot
Num Lock
Sets whether Num Lock
mode is on or off when
you turn on or reset the
computer
No
= Enabled
= Disabled*
= On
= Off*
Setting Up the Computer
1-11
SCU options [continued)
Option
Description
Settings
Typematic Rate
Sets the speed at which
characters repeat when
you hold down a key; in
characters per second
(Cps)
2 CPS
6 CPS
10 CPS*
15 CPS
20 CPS
30 CPS
Typematic Delay
Sets the amount of time it
takes before a key
repeats input when you
hold it down; in
milliseconds (ins)
250 ms
500 ms *
750 ms
1000 ms
Boot Password
See "Setting, Deleting,
and Changing a
Password" below
No
= Enabled
= Disabled *
See "Setting, Deleting,
and Changing a
Password" below
No
= Enabled
= Disabled *
SCU Password
Boot Drive
Selects the drive the
computer should check
first as it boots the system
Drive A *
Drive C
Display Mode
Selects the display mode
the computer uses when
you boot the system
LCD *
CRT
BOTH (active matrix and
monochrome only)
LCD
(appears
only on
monochrome
models)
Sets the mode used to
display text and graphics
against the background
on your screen;
normal = white on a
black background,
reverse = black on a
white background
Normal *
Reverse
VGA menu
1-12 Setting Up the Computer
SCU options [continued)
Option
Description
Settings
Controls the processor’s
internal cache operation
No
Memory menu
Cache Enable
= Enabled*
= Disabled
PowerMgmt
menu
See "Setting the Power Management Options," below
Defaults
Sets all options to their default values
Exit
See “Exiting the SCU, ” below
* Default setting
(1) The parallel port is always LPT1. Some hardware diagnostic programs may
only be able to read the parallel port in Normal mode.
(2) Select Auto so the computer can try to automatically configure your hard
disk drive; select Custom to enter the specific parameters; select None if
you removed your hard disk drive.
Setting, Deleting, and Changing a Password
You can set two types of passwords on your system: a Boot
password and an SCU password. The Boot password prevents
an unauthorized user from accessing any programs or data on
your computer, including the System Configuration utility. The
SCU password prevents access only to the SCU and your
system configuration information.
If you set a Boot password, the computer prompts you to enter
it each time you turn on or reset your computer. If you set an
SCU password, the computer prompts you to enter it each time
you press Ctrl Alt S to run the SCU.
Follow the instructions in the next sections to set, delete, or
change your password. See the instructions in Chapter 2 for
entering your password when the system prompts you for it.
Setting Up the Computer
1-13
Setting a password
Follow these steps to set a password:
1.
Highlight the Boot Password or SCU Password
option.
2.
Press Enter. You see the password entry screen. (Press ESC to
exit this screen, if necessary.)
3.
Type a password from 4 to 8 characters long. As you type,
you see only asterisks (*) displayed on the screen.
4.
Press Enter. You see another password entry screen asking
you to verify the password by entering it again.
5.
Type the password again and press Enter. (If you enter an
incorrect password, you see an error message; start over
again at step 1.)
6.
You see a message verifying that a password is set. Press any
key to continue. The selected password option setting is
changed to
(Enabled).
Deleting or changing a password
If you want to delete or change a password, follow these steps:
1. Highlight the Boot Password
2. Press Enter; the
or SCU Password
option.
disappears and the password is disabled.
3. If you want to change the password, press Enter again. You
see the password entry screen.
4. Type a new password from 4 to 8 characters long. You see
only asterisks (*) displayed on the screen.
5. Press Enter. You see another password entry screen asking
you to verify the password by entering it again.
1-14 Setting Up the Computer
6. Type the password again and press Enter. (If you enter an
incorrect password, you see an error message; start over
again at step 1.)
7. You see a message verifying that a password is set. Press any
key to continue. The selected password option setting is
changed to
(Enabled).
Setting the Power Management Options
When you select the PowerMgmt option from the SCU menu
bar, the screen changes to the Power Management screen. Use
the menu bar and pull-down menu options the same way you
use them on the SCU screen.
Note
You can also access this screen outside of the SCU by
pressing Ctrl Alt P or Fn E SC at the MS-DOS prompt or by
pressing Fn E SC from Windows. Then when you exit the
Power Management screen, you return to the MS-DOS
prompt or to Windows, depending on where you were
when you brought up the screen.
Setting Up the Computer
1-15
The table below lists the power management options. For a
complete description of how these options work, see Chapter 3.
Caution
If you use your ActionNote on a network, you should
disable the computer’s power management features because
they can interfere with your network software and prevent
proper connection to the network.
Power management options
Description
Settings
Power Savings
Selects when the power
management features are
enabled; set Battery = enable
when using battery power only
Always *
Battery
Disable
Battery Low
Selects whether to warn you of
a low battery and enter
suspend mode or to warn you
and not enter suspend mode
4=
Alarm Resume
(1)
Sets a time in which the system
automatically resumes activity
after entering suspend mode; if
enabled, select a time
Option
Controls menu
Suspend *
No = Warn only
No
= Enable
= Disable *
System menu
CPU Standby
Sets an inactivity time period
after which the system slows
down the CPU (in seconds)
4 Sec *
8 Sec
16 Sec
Disable
Global Standby
Sets an inactivity time period
after which the system turns off
all devices and slows down the
CPU (in minutes)
1 Min
2 Min
4 Min
6 Min*
8 Min
12 Min
16 Min
Disable
1-16 Setting Up the Computer
Power management options
[continued]
Option
Description
Settings
Auto Suspend
(2)
Sets the inactivity time period
after which the system
automatically enters suspend
mode (in minutes) or you can
disable automatic suspend
mode; the type of suspend
mode entered depends on the
setting of the Disk Suspend
option, described below
1 Min
5 Min
10 Min*
20 Min
30 Min
40 Min
60 Min
Disable
Disk Suspend
Selects the type of suspend
mode the system uses when it
enters suspend mode: Suspend
to Memory (Disabled) or
Suspend to Disk (Enabled); see
“Using Suspend to Disk Mode"
in Chapter 3 before you
enable this option
Video Monitoring
(2) (3)
Determines whether video
activity prevents the system
from entering a standby or
suspend mode
No
= Enabled*
= Disabled
No
= Enabled*
= Disabled
Device menu
Video
Sets an inactivity time period
after which the computer turns
off the LCD screen or you can
specify that the LCD screen is
always on
1 Min
2 Min
4 Min
6 Min*
8 Min
12 Min
16 Min
Always On
Hard Disk
Sets an inactivity time period
after which the computer
places the hard disk drive in
power down mode (in minutes)
or you can specify that it never
enters this mode (always on)
1 Min
2 Min*
4 Min
6 Min
8 Min
12 Min
16 Min
Always On
Setting Up the Computer
1-17
Power management options [continued)
Settings
Option
Description
Defaults menu
Sets all the power management options to their
default values
Exit menu
Allows you to save your settings and exit the Power
Management Screen (if you changed settings) or exit
without saving your settings; returns to SCU, MS-DOS
prompt, or Windows, depending on how you brought
up the Power Management screen
* Default setting
(1) To enable an Alarm Resume time, press Enter and then press
or
until
you see Enabled. Then press Enter again and use the arrow keys to select
a resume time in hours and minutes. Press Enter again to return to the
pull-down menu.
(2) If you enabled Auto Suspend and Video Monitoring, you should not
use any Windows screen saver programs because the screen saver may
prevent your computer from entering suspend mode.
(3) If you enable Video Monitoring and your system’s video is active, the
system does not enter any standby or suspend modes. If you disable
Video Monitoring the system ignores video activity (such as a blinking
cursor) and enters these modes as necessary.
Existing the System Configuration Utility
When you are ready to exit the SCU, press ESC or select the
Exit menu bar option. If you have not changed any settings,
you see a message telling you to press ESC to exit the SCU.
If you have changed any settings, you see a screen offering two
exit options:
Esc
Returns you to the SCU screen; press ES C
again to exit the SCU without saving any
changes and reboot the computer
Enter
Saves your settings and reboots the
computer.
1-18 Setting Up the Computer
Chapter 2
Using Your Computer
This chapter describes basic computer operations, including:
Caring for the computer
Using energy wisely
Using the keyboard
Using the trackball
Resetting the computer
Changing the CPU speed
Using password security
Using diskettes
Using video drivers and utilities
Configuring PC cards.
Caring for the Computer
Follow these guidelines to keep your computer working well:
Keep the computer and AC adapter dry, and do not subject
them to extreme heat or cold.
To prevent damage to the LCD, do not place anything on
top of the computer, even if it is closed.
Using Your Computer 2-1
❑
When you are not using the serial, parallel, or VGA ports,
keep the port cover closed to prevent damage to the pins.
❑
Occasionally clean the computer’s exterior with a soft,
damp cloth.
❑
Occasionally clean the LCD screen using glass cleaner on a
soft cloth; do not spray the cleaner directly onto the screen.
❑
If your trackball is not working correctly, you may need to
clean it. Follow the instructions on page 2-8.
Protecting the Hard Disk
Observe these precautions to protect your hard disk and data:
❑ Never turn off or reset the computer when the Hard Disk
Activity icon appears in the System Window. This icon
indicates that the computer is copying data to or from the
hard disk.
❑ Never remove the hard disk drive when the computer is
on.
❑
After turning
the computer.
spinning and
place so you
❑
Although the hard disk is very reliable, be sure to backup
your files regularly. Make copies of all your system and
program diskettes before copying them to the hard disk.
the power off, wait 20 seconds before moving
This allows the disks in the drive to stop
the hard disk read/ write heads to lock in
do not damage the drive.
Caution
When traveling by airplane, be sure to take your computer
into the passenger compartment as carry-on luggage so it is
not stored in an unpressurized storage area.
2-2
Using Your Computer
Using Energy Wisely
By purchasing this Energy Star compliant computer, you join a
growing number of users concerned about conserving energy.
Here are a few additional energy-saving tips:
❑
If your printer and external monitor aren ‘t Energy Star
compliant, turn them off when you ‘re not using them.
❑
Use the print preview option in your software before you
print something. You’11 be able to catch formatting errors
before you commit them to paper.
❑
Remove PC cards when you are not using them. When
inserted, they use battery power. Fax/ Modem cards use the
most power—they can reduce battery life to under an hour.
The ActionNote computer allows you to “hot-swap” PC
cards, so that you can insert and remove a card as you need
it without having to restart or reconfigure your system.
❑
If you have an electronic m ail system available to you, send
E-mail rather than memos. Not only is this faster, but you’11
save paper and storage space too.
❑
Use recycled paper and recycle your used paper whenever
you can
Using the Keyboard
Although the keyboard on your computer has only 85 or 86
keys, it provides all the functions of a 101- or 102-key keyboard.
It has an embedded keypad that you can access using the
Num Lock and Fn keys. You can also control other features,
such as the LCD screen, using the Fn key. The embedded
keypad and the Fn key functions are described below.
Using Your Computer 2-3
Note
The keyboard on the ActionNote is available with different
layouts for different languages. Additionally, you can use
MS-DOS or Windows to reassign the layout of your
keyboard to duplicate that of another country. See your
on-line Windows manual or the MS-DOS help utility for
more information.
Using the Fn Key
When pressed with other keys, the Fn key lets you control
certain operations, as described in the following table. To use
these commands, hold down the Fn key and then press the
second key. If you are using an external keyboard (one without
an Fn key), use the alternative Ctrl Alt key sequence, as
described below.
Fn key functions
Key
command
Function
Fn F1 or
Decreases LCD brightness
Ctrl Alt F1
Fn F2 or
Increases LCD brightness
Ctrl Alt F2
Fn F3 or
Ctrl Alt F3
Fn F4 or
Ctrl Alt F4
Fn F9 or
Ctrl Alt F9
Fn F10 or
Ctrl Alt F10
2-4
Decreases contrast (active matrix LCD does not require this
feature—correct contrast adjusts automatically)
Increases contrast (active matrix LCD does not require this
feature—correct contrast adjusts automatically)
Toggles between disabling and enabling text enhancement
so the characters stand out clearly in text display mode
(monochrome LCD only)
Toggles the video between normal (white characters on
black background) and reverse (black characters on white
background); monochrome LCD only
Using Your Computer
Key
command
Fn F11 or
Ctrl Alt F11
Function
Increases or decreases the size of the vertical screen space
used by the images displayed (use with MS-DOS only)
Fn F12 or
Ctrl A1t F12
For the active matrix and monochrome LCDS, toggles the
display three ways—from the LCD to the external monitor,
then to both simultaneously, then back to the LCD. For the
dual scan LCD, toggles the display between the LCD and the
external monitor.
Fn Esc
Displays the Power Management screen when you are using
MS-DOS or Windows
Fn
Locks the embedded keypad, as described in the next
section
Num Lock
Using the Embedded Keypad
The embedded keypad (shown below) allows you to enter
numbers, symbols, and cursor control commands from a
keypad arrangement on the main keyboard. Use the Num Lock
and Fn keys to control the operation of the embedded keypad.
Using Your Computer 2-5
First lock the keypad by pressing Fn Num Lock. You see the
Embedded Keypad Locked icon in the System Window. (To
unlock it, press Fn Num Lock again; the icon disappears.)
Depending on whether the keypad is locked or not, the
embedded keypad works as described in the table below.
Keys pressed
Keypad locked
Keypad
unlocked
Any embedded keypad key
Cursor control
function
Alphanumeric
characters
Fn + embedded keypad key
Alphanumeric
characters
Cursor control
function
Num Lock key (you see the
Num Lock icon)
Numeric
characters
Alphanumeric
characters
Using the Trackball
The trackball on your ActionNote is a built-in pointing device
very similar to a mouse; you can use it to move the cursor,
select text or objects, cut and paste, or choose menu items. The
trackball is compatible with most software applications that
support pointing devices with PS/2 compatible drivers.
Note
PS/2 compatible trackball drivers for Windows and
MS-DOS applications are already loaded on your computer.
2-6
Using Your Computer
To use the trackball, roll it to move the cursor in the direction of
the ball: up, down, left, right, or diagonally.
Like the mouse, you can click or double-click the left button
(press it once or twice quickly) to make menu selections or
block text. Press the left button and hold it down while you
move the trackball to drag objects around the screen.
Note
The right button is sometimes used with programs written
for a two-button mouse, but you can use it as your primary
button. If you want to reassign the buttons and/ or adjust the
trackball sensitivity, use the Windows Mouse utility in the
Control Panel or the MS-DOS PANEL utility.
Using Your Computer 2-7
Cleaning the Trackball
If your trackball is not working properly, you may need to
clean it. Follow these steps:
1. Insert the trackball removal tool that came with your
computer into the two holes on the dial surrounding the
trackball. Then turn the dial counterclockwise until it stops.
2. Use the tool, if necessary, to lift out the dial and the trackball.
3. Blow any dust out of the trackball base. If the metal rollers
inside the base seem dirty, clean them gently with a cotton
swab.
4. Wash the trackball with warm water and a mild soap; then
dry it thoroughly with a lint-free cloth.
5. Place the trackball back in the base.
6. Place the dial over the trackball in the position it was in when
you removed it. Then use the trackball tool to turn it
clockwise until it locks into place.
2-8
Using Your Computer
Resetting the Computer
If necessary, you can reset the computer without turning it off
by pressing a combination of keys. This reloads the operating
system. To reset the computer, press Ctrl Alt Del. (If you are in
Windows, you first see a warning screen reminding you to save
your data and exit any open applications. Press Ctrl Alt Del
again to reset.) The screen goes blank for a moment and then
the computer resets itself.
Caution
Resetting the computer erases any data in memory that you
have not saved, so do not use the reset function unless it is
necessary. Also, some programs classify and store new data
only when you exit them properly; so do not reset the
computer before you exit a program, if possible.
If resetting the computer does not work, you probably need to
turn it off, wait five seconds, and turn it back on again.
Changing the CPU Speed
Your computer’s processor can operate at two speeds: high
speed and 12 MHz. At high speed, the computer performs
almost all its tasks faster. You may need to select the slower
speed to run copy-protected programs or a program with a
specific timing requirement. You may also want to select the
slower speed to save power when you are using programs that
do not require a high processor speed.
Using Your Computer 2-9
Your computer is setup to start at high speed. If you want to
change the speed (through MS-DOS only), use the following
key sequences:
Command
Function
Ctrl Alt
Sets CPU speed to low (12 MHz)
Ctrl Alt
Sets CPU speed to high
Using Password Security
Your ActionNote offers two types of passwords: a Boot
password and an SCU password. If you set a Boot password,
you must enter the password every time you turn on or reset
your computer. If you set an SCU password, the computer
prompts you to enter the password only when you press
Ctrl Alt S to run the System Configuration utility.
If you want to enter, change, or delete a password, run the
System Configuration utility as described in Chapter 1. When
you see a prompt to enter a password, see the next sections.
Caution
Once you set a Boot password, you cannot access your
system unless you enter it correctly, so make a note of it. If
you forget your password, call the EPSON Connection.
2-10
Using Your Computer
Entering a Boot Password
When the computer requires you to enter a Boot password, you
see a screen containing this prompt after you turn on or reset
the computer:
Enter your BOOT PASSWORD:
Type the correct password and press Enter. To protect your
password, the screen does not display the characters you type;
you only see a box indicating each character as you type it.
If you do not type the correct password, the computer repeats
the password prompt. Try typing the password again; the
computer allows you three tries to enter it correctly. After the
third incorrect attempt, the system beeps, reboots, and displays
another prompt. You have three more tries.
Entering an SCU Password
When you set an SCU password, the computer prompts you
for it only after you have pressed Ctrl Alt S to enter the System
Configuration utility. Before you see the SCU screen, you see
the following prompt on the password entry screen:
Enter your SCU PASSWORD:
Type your password and press Enter. To protect your
password, the screen does not display the characters you type;
you only see a box indicating each character as you type it.
If you do not type the correct password, the computer repeats
the password prompt. Try typing the password again; the
computer allows you three tries to enter it correctly. After the
third incorrect attempt, the system beeps and reboots; then you
must enter Ctrl Alt S again.
Using Your Computer
2-11
Using Diskettes
You can use either of the following types of diskettes in your
3.5-inch, 1.44MB diskette drive:
720KB, double-sided, double-density (usually labeled 2DD)
1.44MB, double-sided, high-density (usually labeled 2HD).
To insert a diskette, hold it with the label facing up and the
shutter leading into the drive. Slide it into the drive until it
clicks into place.
To remove the diskette, make sure the Diskette Drive Activity
icon does not appear in the System Window; then press the
release button. When the diskette pops out, remove it.
2-12
Using Your Computer
Caution
Never remove a diskette or reset or turn off the computer
while the diskette drive is being accessed; you could lose
data. Also, be sure to remove the diskette before you turn off
the computer.
Using Video Drivers and Utilities
Your system comes with high-resolution video display drivers
for Windows installed on your hard disk drive. You can select
the resolution (screen size), color, font size, cursor size, or
enable backlight and display timeout periods for these drivers
using the Windows ChipsCPL utility in the Control Panel. You
can also use the Chip sCPL utility to switch your display
between the LCD screen or an external monitor. When you use
the Chip sCPL utility to switch your computer’s display mode,
Windows saves it as the permanent display mode.
You can use the SCU utility or the Fn keys to change your
computer’s display mode, too. Using an Fn key only changes
the display mode for the current session, while using the SCU
utility changes the display mode permanently.
Note
Your ActionNote is configured to display in a 640x 480
VGA resolution of 256 colors on your LCD or an external
monitor. You can toggle between displaying on the LCD and
the CRT (or simultaneously to both for active matrix and
monochrome LCDS) by pressing Fn F12. You can also set
the default video mode the computer uses every time you
turn it on or reset it using the Display Mode option in the
SCU; see Chapter 1 for more information.
Using Your Computer
2-13
To check on the availability of drivers for non-Windows
applications, call the EPSON Connection or access the Epson
America Forum on CompuServe.
Configuring PC Cards
Whenever you turn on or reset your computer, you have a
number of options for configuring your PC card. The default
setting loads all PCMCIA drivers. You must load PCMCIA
drivers if you are going to use a PC card. If you are not going to
use a PC card, do not load any PCMCIA drivers because they
take up system memory that could be free for other uses. See
the EPSON Card and Socket Services User's Guide for more
information.
Once you have loaded the drivers and inserted a PC card, your
computer configures most cards automatically using card and
socket services software. Refer to the EPSON Card and Socket
Services User's Guide for more information on configuring your
PC card.
Caution
If you run the MS-DOS MEMMAKER utility, or load a
memory manager program (such as EMM386.EXE), you
must ensure that these programs do not interfere with the
memory addresses and other settings used by your PC card
drivers. See “PC Card Problems” in Chapter 5 for
instructions on using these programs.
2-14
Using Your Computer
Installing Additional PC Card Drivers and Utilities
While the ActionNote is fully compatible with PCMCIA
version 2.1 and JEIDA 4.1, some PC cards (such as LAN cards)
require that you install special drivers or software before they
can work correctly. For example, a LAN card may require that
you install a socket services enabler either as a device driver or
command that is executed when you load the network
operating system.
See the documentation that came with your PC card to see if
you need to install any additional drivers. You can obtain the
latest information on available PC card drivers by checking the
Epson America Forum on CompuServe. See “Where to Get
Help” in the Introduction to this manual for information about
connecting to the Epson America Forum.
Using Your Computer
2-15
2-16
Using Your Computer
Chapter 3
Powering the Computer
You can power your ActionNote with its compact AC adapter,
removable NiMH battery, or optional automobile cigarette
lighter adapter. This chapter describes how to use the AC
adapter and battery and how to conserve energy by using the
computer’s power management features.
I
Note
In addition to the AC adapter and battery that come with
your computer, you can purchase additional NiMH
batteries, an AC adapter that plugs into an automobile
cigarette lighter, and an external battery charger. Contact
your Authorized EPSON dealer or EPSON Accessories for
more information about these options.
Using the AC Adapter
The AC adapter allows you to connect the ActionNote to a
standard electrical outlet to power the computer and charge the
battery. You should use it whenever you have access to an
electrical outlet, especially when you are using a PC card, to
conserve battery power.
Note
Because LAN PC cards use a lot of power, you should power
your computer from the AC adapter and disable power
management when you are connecting to and using the
network.
Powering the Computer 3-1
The compact AC adapter included with your computer is
designed to operate in 100-250 VAC ranges with a frequency of
47-63 Hz. If you use the AC adapter in a foreign country, be
sure to use the correct plug adapter to fit the electrical outlet.
To connect the AC adapter, see the instructions in Chapter 1.
The adapter’s power light comes on and the computer’s AC
Power icon appears in the System Window. The Battery
Charging and Battery Status icons also appear to show you the
charging status of the battery. See page 3-5 for more
information on these icons.
Using the Battery
The removable NiMH battery powers the computer when the
AC adapter is not connected. The battery provides from 4 to
6 hours of power for monochrome LCD models and from 2.5 to
4 hours for color LCD models when you use the computer’s
power management features.
Caution
Use only the NiMH battery designed for use with this
computer (model number 10HR-4/3AU).
The length of time the battery provides power depends on how
you use the computer. It consumes more battery power if you
use a bright screen display, access the hard disk and diskette
drive often, or if you are using a PC card or the built-in serial
port.
To increase the amount of time you can use the computer
without the AC adapter, you can keep a supply of charged
batteries. This allows you to replace a spent battery and
continue your work.
3-2 Powering the Computer
Note
You can save power when you are not using the serial port
by setting the COM Port option to Disable in the SCU.
Just be sure to run the SCU to enable the port again before
you connect a device to it.
The ActionNote includes special power management features
that protect your data even when there is very little power left
in the battery. If the Battery Low option in the SCU is
enabled (default setting), the computer automatically enters
suspend mode when the battery power reaches a critically low
level.
If you selected Suspend to Memory as your suspend mode, the
contents of memory are protected for several hours. If you
selected Suspend to Disk (the default setting), the memory
contents are saved in a data file on your hard disk drive, so
they are always available. (See Chapter 1 for instructions on
selecting your suspend mode and see “Using the Power
Management Features” on page 3-10 for more information
about these modes.)
Note
Do not remove the computer’s battery and leave it without a
power source for more than 10 days. If this happens, the
real-time clock battery runs out of power and cannot retain
your system configuration information. You must run the
SCU and re-enter any changes you made to the default
settings.
The following sections describe how to monitor the battery life,
how to recharge the battery, and how to replace it.
Powering the Computer 3-3
Monitoring Battery Power
There are two ways to monitor the battery power in your
computer:
Select the Windows Power icon in the Control Panel
window
Watch the computer’s Battery Charging and Battery Status
icons.
If you are using Windows, you can select the Power icon in the
Control Panel window to see a status screen that gives
information about your battery.
Note
For a description of the power management modes available
from the Power dialog box, see “Using the APM Interface”
on page 3-15.
The computer’s Battery Charging and Battery Status icons
work together to let you know how the battery is charging (if
the AC adapter is attached) and how much power the battery
contains.
3-4 Powering the Computer
If you have the AC adapter connected, you see the AC Power
icon in the System Window. If the battery is currently charging,
you see the Battery Charging icon and the Battery Status icon
changes as follows to inform you of the charging status:
When the battery is fully charged, the Battery Charging icon
disappears and the AC Power and Battery Status icons appear
as follows:
Powering the Computer 3-5
If you are using only battery power to run your computer, you
do not see the AC Power or Battery Charging icons. The
Battery Status icon changes as follows as you use up battery
power:
Your battery is charged at approximately 76% to
100% of capacity
Your battery is charged at approximately 51% to
75% of capacity
Your battery is charged at approximately 26% to
50%of capacity
Your battery is charged between low battery
status and 25% of capacity
Your battery power is low; you have
approximately 20 minutes of power left.
Note
Times and percentages are approximates only, and may
differ depending on how you are using your computer.
When the Battery Status icon blinks, you have about
10 minutes of power left; insert a spare battery (as described in
the next section) or connect the AC adapter (as described in
Chapter 1).
3-6
Powering the Computer
Replacing the Battery
Follow these steps to replace the battery:
1. Complete your current activity and save your data
2. Slide the battery release grip on the battery cover toward the
front of the computer until the cover disengages from the
computer case. Then pull the battery straight out of its
compartment.
Note
Avoid touching the battery contacts with any metal
objects, such as keys or coins because they may short out
the battery’s circuits.
Powering the Computer 3-7
3. Insert the new battery into its compartment and push it in
almost all the way.
4. Slide the battery cover toward the back of the computer
while pushing the battery the rest of the way into its
compartment. Make sure the locking tabs click into place
and that you see the Battery Status icon in the System
Window when you open the LCD screen.
Recharging the Battery
The battery that comes with your system is rechargeable. You
may need to charge the battery before using it for the first time,
and you must recharge it when it runs out of power.
If you have additional batteries, it’s a good idea to keep them
fully charged so you can replace the battery in your computer
when it runs low. This is especially useful if you are traveling
and run the computer only off the battery.
3-8 Powering the Computer
To charge the battery, leave it in the computer and connect the
AC adapter. The computer automatically charges the battery
whenever the AC adapter is attached.
Note
You can purchase an optional external battery charger so
you can charge an extra battery while using another in your
computer.
To monitor the progress of battery charging, watch the Battery
Charging and Battery Status icons, as described on page 3-5.
It takes approximately 1.5 hours to charge a completely
discharged battery when the computer is off or when it is in
suspend mode. If you use the system while the battery is
recharging, it can take up to 3 hours.
Your computer has a safety timer that prevents it from
charging the battery too long. The timer stops charging after
2 hours if the computer is turned off and after 4 hours if it is
turned on.
If you find that, over time, the battery is losing its charge
sooner, the life of the battery may be reaching its end. As an
NiMH battery loses its charge, it can have a slight effect on
computer memory. Make sure you recondition the battery pack
about once a month by letting the battery discharge completely;
then recharge it. If this fails, replace it with a new battery.
Note
When you need to discard your battery, contact your local
government agency for recycling information.
Powering the Computer 3-9
Using the Power Management Features
Your ActionNote offers a variety of automatic and manual
power management features to help you conserve battery and
electrical power. These features slow down or stop the
operation of various system component—such as the CPU, the
hard disk, and the LCD screen—when you are not using your
computer but are leaving the power on.
There are four levels of power-savings that your computer can
enter: two standby modes and two suspend modes. Each of the
four modes provides progressively increased power
conservation and affects the functioning of progressively more
components in your computer.
The standby modes—CPU Standby and Global Standby—
reduce the speed and performance of the CPU, components
related to CPU operations, and peripheral components such as
the hard disk and LCD screen.
The suspend modes, Suspend to Memory and Suspend to Disk,
cut off power to the CPU and many other components to
provide the maximum power savings.
Caution
Read “Using Suspend to Disk Mode” on page 3-16 before
using Suspend to Disk mode so you can configure the
computer correctly for it.
3-10 Powering the Computer
The power-saving operations performed by the computer in
each of these modes are summarized in the table below.
Power-saving operations
Mode*
Function
CPU Standby
Reduces the CPU speed and the power used by
CPU-related components
Global Standby
Reduces the CPU speed and the power used by
CPU-related components; places peripheral
components such as the hard disk, LCD screen,
and screen backlight in their lowest active states
Suspend to Memory
Shuts off power to the CPU and DMA clocks; turns
off the video and all other controllable peripheral
devices
Suspend to Disk
Turns off all system logic, except for the system
wakeup circuitry and battery charger; the system
and video memory contents are saved to a file in
one contiguous space on the hard disk for later
restoration
* As Dower-saving increases, response time decreases. Power-saving
increases with each mode listed. CPU Standby saves the least amount of
power, while Suspend to Disk mode saves the most.
You can enable any or all of these power saving modes by
using a combination of automatic and manual power
management features, as described in the next sections.
Note
You can use all of the computer’s power management
features in conjunction with the Intel ® / Microsoft Advanced
Power Management (APM) interface, version 1.0 or higher.
This interface is provided with Windows and may be
provided with other software on your system. See “Using
the APM Interface” on page 3-15 for more information about
how APM works along with your computer’s power
management features.
Powering the Computer
3-11
Automatic Features
Using the Power Management screen, you can select individual
system inactivity time periods, at the end of which your
computer can automatically enter any or all of the
power-saving modes.
You can access the Power Management screen in two ways:
Run the SCU (from the DOS prompt only) and select the
PowerMgmt menu bar option. When you save and exit, the
computer restarts.
Press Ctrl Alt P (from the DOS prompt or Windows),
or Fn E SC (from Windows only).
The Power Management screen allows you to select
progressively longer timeout periods in which the system must
be inactive before the computer enters CPU Standby mode,
Global Standby mode, or either type of Suspend mode. You can
also do the following:
❑
Disable any or all of the power savings modes
❑
Select Suspend to Memory or Suspend to Disk as your
suspend mode
❑
Enable or disable the computer’s ability to enter suspend
mode automatically if your battery power is low
❑
Activate an alarm which sounds before the computer enters
suspend mode
❑
Select whether video activity is counted as system activity
❑
Select discrete timeout periods for the video and hard disk
components.
3-12 Powering the Computer
(See Chapter 1 for information on setting the Power
Management screen options.)
When your computer has been inactive for one of the timeout
periods you set, it performs the power savings operations listed
in the table on page 3-11, depending on which mode it is
entering.
When your system enters one of the standby modes, you
probably will not notice any difference. However, when you
resume activity from CPU Standby mode, the system responds
immediately. When you resume from Global Standby mode, it
can take up to 15 seconds for the hard disk drive to return to a
fully active state.
When the computer enters Suspend to Memory mode, the
Suspend icon appears in the System Window, and the screen
goes dark. If the computer is in Suspend to Disk mode, no icon
appears before the screen goes dark. The method you use to
resume activity depends on the type of suspend mode you
selected at the Power Management screen. See “Resuming
Activity From Suspend Mode,” below, for instructions on
resuming from suspend mode.
Manual Features
You can also enter the suspend mode you selected at the
Power Management screen by pressing the computer’s
Suspend/ Resume button, located just above the Num Lock key.
If you need to step away from your computer for a while, but
do not want to turn off the power, you can save energy by
pressing this button.
When you press the Suspend/ Resume button, the computer
beeps and then activates the suspend mode you selected on the
Power Management screen. After a moment, the Suspend icon
appears in the System Window and the screen becomes dark.
Powering the Computer
3-13
Note
If you selected Suspend to Disk mode, the computer may
not suspend immediately after you press the
Suspend/ Resume button. This is because your computer
may be performing a background task (which is not
apparent to you) that prevents it from entering Suspend to
Disk mode. If your computer does not suspend after a few
seconds, press the Suspend/ Resume button again.
You can reduce power consumption without affecting
performance by closing the ActionNote’s cover and turning off
the LCD backlight. Simply close the cover or press the
Suspend/ Resume button for more than two seconds. When
you release the button or open the cover, the LCD backlight
comes back on.
Resuming Activity From Suspend Mode
If you selected Suspend to Memory as your suspend mode, you
can press the Suspend/ Resume button above the Num Lock
key to resume activity. Then the Suspend icon disappears, the
hard disk spins up, and the video screen comes back on.
If you selected Suspend to Disk as your suspend mode, the
current system state is written to a file on your hard disk. This
file is hidden to prevent you from accidentally deleting it.
Because this mode essentially turns off your system, you must
press the power button on the computer’s back panel to resume
using your computer.
Note
See “Using Suspend to Disk Mode” on page 3-16 before
using Suspend to Disk mode.
3-14 Powering the Computer
When your computer comes back on, you see this message:
Previous System State is being Restored;
Please Wait . . .
After a few moments, the data is restored to your computer’s
memory and the screen returns to the state in which operations
were suspended.
Note
When you resume from Suspend to Disk mode, any
PCMCIA card and socket services that you loaded and
initialized before you suspended to disk are not reloaded or
reinitialized after you resume. Your computer may
recognize SRAM PC cards, but it will not recognize most
other PC cards. To reload and reinitialize these services, exit
any application programs you are using and exit Windows.
Then press Ctrl Alt Del to reboot your computer. Then select
the option to load your PCMCIA card drivers at the prompt.
Using the APM Interface
In addition to your computer’s power management features,
your system supports the Intel/ Microsoft Advanced Power
Management (APM) interface, version 1.0 or higher. This
interface enhances your system’s power-saving abilities by
providing increasing inactivity detection and lower CPU power
states without degrading performance.
APM is already enabled in the versions of MS-DOS and
Windows installed on your computer. MS-DOS provides APM
through the POWER. EXE utility. See your MS-DOS on-line
help utility for more inform ation about POWER.EXE.
Powering the Computer
3-15
Windows provides a Power icon in the Control Panel that
allows you to select Standard, Advanced, or no APM power
management mode and includes a battery status gauge. Use
the Windows on-line help utility and see the on-line Windows
manual for instructions on using these features.
When you have enabled your computer’s power management
features and APM, the following operations are performed by APM:
Monitors all system activity
Detects true inactive states and power demands of the
operating system and applications
Determines when to activate the necessary power
management features
Allows MS-DOS, the computer’s BIOS, and your
application programs to share power management features
in the most efficient manner.
Note
If you disable your computer’s power management features,
APM is also disabled, even if you have configured your
software to use it.
Using Suspend to Disk Mode
If you select Suspend to Disk as your suspend mode, you must
create a Suspend to Disk data file on the hard disk drive. The
computer writes the contents of system and video memory in
this file when it enters Suspend to Disk mode. The Suspend to
Disk data file must reside in a contiguous space on an
uncompressed hard disk partition. In addition, its size must be
at least the sum of your system memory plus your video
memory (512KB).
3-16 Powering the Computer
Note
If you select Suspend to Disk as your suspend mode but do
not create the Suspend to Disk data file, the computer uses
Suspend to Memory mode until you create the file.
The hard disk drive includes a Suspend to Disk data file
allocation utility called 0VMAKFIL.EXE that you can use to
create, remove, and recreate the Suspend to Disk data file.
Follow the instructions below to create the file on your hard
disk drive.
You may need to remove and recreate the file later if you use
any doubling software, such as the MS-DOS DRVSPACE
utility, or if you increase or decrease the size of your system
memory. See “Recreating the Suspend to Disk data file” on
page 3-19 for instructions.
Creating the Suspend to Disk data file
To create a Suspend to Disk data file, follow these steps:
1. If necessary, exit Windows to the MS-DOS prompt
2. Log onto the C:\ PM directory.
3. Type the following at the MS-DOS prompt and press Enter
to create the Suspend to Disk data file:
0VMAKFIL
4. You see a message listing the parameters of your hard disk
drive and the following prompt:
Okay to allocate Suspend To Disk Data
File? (y/n)
Press Y and Enter to continue
Powering the Computer
3-17
5. The 0VMAKFIL utility creates the Suspend to Disk data file.
After several minutes, the utility displays a confirmation
message and a prompt to reboot your system. Press
Ctrl Alt Del.
If the utility cannot create the file successfully, you may see
one of the following error messages:
No Suspend To Disk File Allocated
Failed to open taporary file
Disk too fragmented; targets contiguous
area: nnn sectors
If you see the last message, check the hard disk drive for any
files you don’t need, then delete them. Then run the
MS-DOS DEFRAG.EXE utility to defragment your hard
disk drive. See your on-line MS-DOS help utility for
instructions.
6. When your system reboots, you see the following message:
SystemSoft Suspend To Disk Enabled Suspend To Disk File Found
3-18 Powering the Computer
If you see an error message instead, one of the following
problems has occurred:
Suspend to Disk data file does not exist
Suspend to Disk data file is not a hidden file
Suspend to Disk data file is not large enough to contain
your system memory plus your video memory
Your computer cannot determine the location of the
first sector in the Suspend to Disk data file or the first
sector does not contain the correct signature.
Check that you followed the steps above correctly, specified
a large enough Suspend to Disk data file, and have enough
room on the hard disk drive for the file.
Note
If you see the following error message when your system
attempts to enter Suspend to Disk mode, you must run the
MS-DOS DEFRAG.EXE utility to defragment your hard disk
drive:
Suspend to Disk Disabled. Suspend to disk
file not contiguous
Then run 0VMAKFIL.EXE, as described above, to recreate
the Suspend to Disk data file.
Recreating the Suspend to Disk data file
Before you can recreate your Suspend to Disk data file, you
must remove the old data file and run the MS-DOS
DEFRAG.EXE utility to make enough room for the file on your
hard disk.
Powering the Computer
3-19
Caution
If you have used a disk doubling software program, such as
MS-DOS DRVSPACE, you must make sure the Suspend to
Disk data file resides in the boot partition of the drive and
not in the doubled partition.
If you use DRVSPACE later, be sure to remove the Suspend
to Disk data file from the hard disk, run DRVSPACE and
DEFRAG, then create the new file in the boot partition using
0VMAKFIL.EXE (as described below).
Follow these steps:
1. If necessary, exit Windows to the MS-DOS prompt.
2. Log onto the C:/ PM directory.
3. Type the following at the MS-DOS prompt and press Enter t o
remove the existing Suspend to Disk data file:
OVMAKFIL - R
You see the following message:
Deleted Existing Suspend To Disk Data
File
4. Type the following and press Enter to run the DEFRAG.EXE
utility:
DEFRAG C :
Follow the instructions on the screen to complete the
defragmentation process.
5. Follow the steps under “Creating the Suspend to Disk data
file,” above, to recreate the file.
3-20 Powering the Computer
Chapter 4
Installing Optional Devices
This chapter explains how to connect or install these devices:
External monitor
Parallel device
Serial device
External keyboard, keypad, mouse, or other PS/ 2 device
PC card
Expansion memory module
Hard disk drive.
Connecting an External Monitor
The VGA port on the back of your computer allows you to
connect an external color or monochrome VGA monitor.
Follow these steps:
1. Make sure both the computer and monitor are turned off
2. If necessary, connect the monitor cable to the monitor
3. If necessary, open the port cover on the back of the computer
Installing Optional Devices 4-1
4. Connect the monitor cable to the VGA port.
5. If the connector has retaining screws, tighten them.
6. Connect the monitor power cable to a grounded electrical outlet.
7. Turn on the monitor first, then the computer.
The display mode your computer uses depends on the setting
you selected for the Display Mode option in the System
Configuration utility. If you selected CRT , you see a display
only on the external monitor. If you selected L C D, you must
press Fn F12 to change the display to the external monitor. If
you selected BOTH (available with active matrix or monochrome
LCDS), you see a display on the external monitor and LCD
simultaneously, and may want to press Fn F12 to change the
display to the external monitor only. (If you are using an external
keyboard, press Ctrl Alt F12 to change the display mode.)
Be sure to run the SCU to change the setting of the Display Mode
option so your monitor displays the way you want it to whenever
you turn on or reset your computer. See Chapter 1 for instructions.
4-2 Installing Optional Devices
Your computer also includes a Windows utility that allows you
to enhance the display characteristics of your LCD and external
monitor and select your display mode. For details, see “Using
Video Drivers and Utilities” in Chapter 2.
Connecting a Parallel Device
You can use the parallel port to connect a parallel device, such
as a printer or scanner. Before you connect the device, check its
manual to see if you need to change any of its settings. You
may also need to change the Parallel Mode option in the
SCU to match the mode for your device. See Chapter 1 for more
information. Then follow these steps:
1. Make sure the computer and the parallel device are turned
off, then place the device near your computer.
2. If necessary, open the port cover on the back of the computer.
3. Connect the appropriate end of the device cable to the
parallel port.
Installing Optional Devices 4-3
4. If the connector has retaining screws, tighten them
5. Connect the other end of the cable to the parallel device. If
the device port has retaining clips, squeeze them gently
until they snap into place.
6. Connect the device’s power cable to a grounded electrical
outlet.
Connecting a Serial Device
You can use the RS-232C serial port to connect a serial device,
such as a serial printer, plotter, or mouse. Follow these steps:
1. Make sure both the computer and the serial device are turned
off.
2. If necessary, connect the serial cable to your serial device.
3. If necessary, open the port cover on the back of the computer.
4. Connect the serial cable to the computer’s serial port.
4-4 Installing Optional Devices
5. If the connector has retaining screws, tighten them.
6. If the serial device has a power cable, connect it to a
grounded electrical outlet.
See the next section and the documentation that came with
your serial device to see if any other steps are necessary.
Checking the Serial Port Settings
The serial port can send and receive data at a variety of speeds
and with many different protocols. This means you need to
configure the port to match the signals of the serial device you
connect.
As a general rule, choose the highest speed (baud rate) and the
protocol that provides the best error detection. Also, check the
documentation that came with your serial device to see if you
need to adjust any of the device settings.
Your computer’s default setting for the serial port is COM2 (the
trackball is COM1 and the PC card slots are COM3). If you
want to change the serial port setting to COM4, run the System
Configuration utility as described in Chapter 1. Make sure your
serial device is set up to use COM2 or COM4 and that the
settings shown in the Ports icon in the Windows Control Panel
match these settings.
Connecting an External Keyboard or Mouse
You can use the external key board/ mouse port to connect a
variety of PS/ 2 compatible devices, including an external
keyboard, keypad, or mouse.
Installing Optional Devices 4-5
To connect a device, turn off your computer. Then align the
device’s connector with the external keyboard/ mouse port on
the back of the computer and push in the connector.
If you connected an external keyboard, you can use it
immediately after connecting it. If you connected an external
pointing device, you must disable the computer’s built-in
trackball using the SCU before you can use the device. See
Chapter 1 for instructions.
Before you can use a pointing device with your applications,
you may need to install the special software driver that came
with it. See the documentation supplied with the device for
instructions.
4-6 Installing Optional Devices
Installing a PC Card
A PC card is a credit card-sized device that meets the PCMCIA
universal standard for adding memory, storage, and interface
cap abilities to portable systems. (See the EPSON Card and Socket
Services User's Guide for more in formation.) Your computer
supports up to two Type I and Type H PC cards, or one Type III
PC card. In addition, your computer uses the Intel ExCa T M
standard for hot insertion, which means the system recognizes
a PC card inserted into a card slot with the computer turned on.
The upper PC card slot is slot O and the lower slot is slot 1. If
you install a Type III PC card, you must install it in slot 1.
Follow these steps to install a PC card:
1. Open the door covering the PC card slots on the left side of
your computer.
2. Hold the PC card so the 68-pin connector on the edge of the
card faces the PC card slot and the card’s label (it usually
contains an arrow) faces up.
Installing Optional Devices 4-7
3. Align the card in the card guides of the appropriate slot.
Then push the card gently but firmly into the slot as far as
it will go. When you feel resistance, stop pushing; do not
force it into the slot.
When you have fully inserted the card, the release button on
the side of the slot pops out.
When you want to remove the PC card, check the PC Card
Activity icon in the System Window to verify that the computer
is not accessing the card; then press the release button to eject
it. Store the card properly in the case that came with it.
Caution
Do not change the setting of a memory PC card’s
write-protect switch while the card is installed in the
computer or you may damage the card. First eject the card,
then change the switch setting and reinsert it.
See Chapter 2 for instructions on configuring your PC card(s).
Installing a Memory Module
Your computer comes with at least 4MB of memory soldered
on the system board. If your computer’s startup screen shows
more than 4MB of memory installed, your computer already
has a memory module installed. You can increase the memory
by installing a 4MB, 8MB, or 16MB memory module, as
described in the table below.
Install this size memory module
For this amount of total memory
4MB
8MB
8MB
12MB
16MB
20MB
4-8 Installing Optional Devices
Caution
The memory module can be easily damaged and is
expensive to replace; so if you don’t feel confident about
installing it yourself, ask your Authorized EPSON Servicer
for assistance.
To install a memory module, you must first remove the
memory module cover and the CPU heat spreader. Follow
these steps:
1.
Turn off the computer and any peripheral devices.
2.
Disconnect any external device cables connected to the
computer.
3.
Close the LCD screen, if necessary.
4.
Turn the computer over so it is upside down.
Installing Optional Devices 4-9
5. Use a cross-head screwdriver to remove the two screws
securing the vented memory module cover on the bottom
of the computer, as shown below. (These screws are created
exclusively for the memory module cover, so keep them
with the cover until you replace it.)
6. Lift off the cover and set it aside.
7. Beneath the cover is a black metal CPU heat spreader with
holes in it. To remove it, first open the door covering the
ports on the back of your computer.
Caution
The CPU heat spreader may be hot if the computer has
been running recently. You may want to use a cloth to
protect your hands as you follow the next step.
4-10 Installing Optional Devices
8. Remove the screw directly above the VGA port that secures
the CPU heat spreader to the computer. Then lift out the
heat spreader and set it aside. (This screw is created
exclusively for the CPU heat spreader, so keep it with the
heat spreader until you replace it.)
Note
There is a plastic pad that adheres to the CPU or to the
heat spreader. Do not remove this pad. If it adheres to
the heat spreader, make sure it aligns with the CPU
when you replace the heat spreader in the steps below.
Installing Optional Devices
4-11
9.
Locate the two connectors on the base of the memory
module so you can align them with the two small sockets
on the system board.
10. Align the module connectors with the computer’s sockets, as
shown below, and lower the module into position.
11 Carefully press the module connectors into the sockets,
making sure you align the connector pins and the socket
holes. Do not force the connectors into the sockets; if you
have trouble, remove the module and try again.
12 Now replace the CPU heat spreader in the position shown
in step 8 and secure it to the back of the computer with its
retaining screw. Close the port cover door.
13 Replace the memory module cover in the position shown in
step 5 and secure it to the bottom of the computer with its
two retaining screws.
4-12 Installing Optional Devices
14. Turn the computer over and open the LCD screen.
15. Run the System Configuration utility, as described in
Chapter 1, to make sure your computer recognizes the new
memory configuration. (As soon as you turn on the
computer, it will prompt you to run the SCU because of the
memory size mismatch.) If you later remove or change the
memory module, be sure to run the SCU again.
16. If you are using Suspend to Disk as your suspend mode, you
should recreate the Suspend to Disk data file on your
computer’s hard disk drive so its size corresponds to your
new memory size. See “Using Suspend To Disk Mode” in
Chapter 3 for instructions.
Removing and Replacing the Hard Disk Drive
If you need to remove the hard disk drive, follow these steps:
1. Turn off the computer and any peripheral devices.
2. Disconnect any external device cables connected to the
computer.
3. Close the LCD screen, if necessary.
4. Turn the computer over so the bottom faces up.
5. Follow the steps on pages 4-10 through 4-11 to remove the
memory module cover and the CPU heat spreader.
Installing Optional Devices
4-13
6. Now remove the two screws securing the hard disk drive
cover to the bottom of the computer. (These screws are
created exclusively for the hard disk drive cover, so keep
them with the cover until you replace it.)
7. Lift off the cover and set it aside.
4-14 Installing Optional Devices
8. To disconnect the cable from the drive, grasp the clear
plastic pull strap and carefully pull it straight out from the
drive connector. (You may need to lift up the drive slightly
to pull out the cable connector.) Be sure to pull evenly
along the width of the strap so you do not bend any of the
pins in the drive connector.
9. Then lift the drive out of the computer.
Note
The hard disk drive compartment on your computer can
accommodate drives up to 19 mm high. The drive that
comes with your computer is 12.5 mm, 15.5 mm, or
19 mm high. 12.5 mm and 15.5 mm drives come with a
spacer underneath them. If you are going to install a
drive that is more than 15.5 mm high, remove the spacer
from the compartment before you perform step 10.
Installing Optional Devices
4-15
10. To reinstall the drive (or install a new one), position it
shown below; then place the rear of the drive beneath
lip of the computer’s side panel. Leave the side of the
containing the drive connector slightly above the
compartment so you can connect the cable in the next
as
the
drive
step.
11. Align the holes in the cable connector with the group of
44 pins on the right side of the drive connector. Make sure
the connector does not cover the group of four pins on the
left side of the connector.
12. When you are sure the holes and pins are properly aligned,
carefully push the cable connector straight onto the pins,
pressing firmly and evenly along the width of the
connector until it is fully seated.
4-16 Installing Optional Devices
13. Lower the drive into its compartment.
14. To replace the hard disk drive cover, hold it in the position
shown in step 6 on page 4-14 and insert the three tabs along
its edge into the three slots in the computer case. Then
secure it with its two retaining screws.
15. Replace the CPU heat spreader and memory module cover
by reversing steps 5 through 8 on pages 4-10 and 4-11.
16. Run the System Configuration utility as described in
Chapter 1 to automatically configure (or reconfigure) your
drive.
Installing Optional Devices
4-17
4-18 Installing Optional Devices
Chapter 5
Troubleshooting
You probably won‘t encounter any difficulties as you setup
and use your ActionNote. If anything out of the ordinary
happens, however, refer to this chapter for help.
If the suggestions here do not solve the problem, use the
guidelines below to identify your system and make a note of
any error messages your computer displays. Then contact your
Authorized EPSON Servicer or call the EPSON Connection at
(800) 922-8911.
Identifying Your System
When you request technical assistance, be ready to provide the
serial number of your computer, its system BIOS version
number, its configuration (including the types of disk drives
and options), and the names and version numbers of any
software programs you are using.
Use these guidelines to gather information about your system:
Serial number
Look on the underside of the
computer to find the serial number,
System BIOS
Restart your system. The computer
displays the system BIOS version
number as it performs power-on
diagnostics.
version
System
configuration
Press Ctrl Alt S and write down the
configuration settings shown on the
SCU screen and Power Management
screen.
Troubleshooting 5-1
Windows version
When your computer has loaded
Windows, select Help from the menu
bar. Then select About program
Manager to see the version number.
5-2
Software versions
In Windows applications, select
About from the Help menu, or read
the version number from the banner
screen displayed when the program
starts, or check your software manual.
MS-DOS version
In Windows, select the MS-DOS
Prompt icon. When the MS-DOS
prompt appears, type VER and press
Enter to display the MS-DOS version
number.
CONFIG.SYS
In Windows, use the Sysedit utility in
the Applications group to see a list of
the system configuration commands
in the file. At the MS-DOS prompt,
t y p e T Y P E c: \C O N F I G . S Y S a n d
press Enter.
AUTOEXEC.BAT
In Windows, use the Sysedit utility in
the Applications group to see a list of
the system startup commands in the
file. At the MS-DOS prompt, type
T Y P E c: \ A U T O E X E C . B A T a n d p r e s s
Enter.
SYSTEM.INI and
WIN.INI
Use the Sysedit utility in the
Applications group to see the
Windows initialization commands in
these files.
Troubleshooting
Error Messages
Your computer’s built-in memory (ROM) contains a series of
diagnostic programs, called power-on diagnostics, which your
computer runs automatically every time you turn it on. These
programs check internal devices such as ROM, RAM, the timer,
the keyboard controller, and the hard disk drive.
When the diagnostics test RAM, you can see the total amount
of memory currently installed in your system.
If the computer finds an error, it displays an error message on
the screen. Write down the message and give it to the person
who is helping you when you report the problem.
If the error is serious, the computer cancels further checking
and halts system initialization. The error message remains on
the screen and the computer locks up. If this happens, contact
your Authorized EPSON Servicer or the EPSON Connection to
report the problem.
The Computer Won't Start
If your computer does not start when you press the power
button, try the following:
1. Check the AC Power, Battery Charging, and Battery Status
icons. See Chapter 3 for a description of these icons.
2. Press the power button to turn off the computer. (You need
to press the power button for two second s.) If you are using
the battery, remove it and reinstall it. If you are using the
AC adapter, disconnect it and then reconnect it. Then turn
the power on again.
Troubleshooting 5-3
3. If the computer still does not start, the problem is probably
caused by the power source; see “Battery Problems” or
“AC Adapter Problems,” below.
Battery Problems
If you have trouble running the computer from a battery,
follow the steps in this section to find the problem. (Be sure to
read Chapter 3 for information on powering your system.)
1.
Check the Battery Status and Suspend icons in the System
Window. If the Battery Status icon indicates there is
sufficient battery power left and you see a Suspend icon,
the computer is in Suspend to Memory mode; press any
key or press the Suspend/ Resume button to continue. If
you are using Suspend to Disk as your Suspend mode,
press the computer’s power button to resume. See
Chapter 3 for more information.
2. If the Battery Status icon is empty and blinking, the battery
power is very low. If you have a second battery that is fully
charged, first turn off your computer, then use the second
battery to replace the one in the computer. If the computer
then works properly, you need to recharge the other
battery. See Chapter 3 for instructions.
3. If you replace the battery and the computer does not work
properly, the new battery may also not be fully charged.
Recharge this battery until it reaches its maximum capacity.
4. If you think the battery is not providing any power, it may
not be installed properly. Try removing and reinstalling it
according to the instructions in Chapter 3.
5. Connect the AC adapter to the computer and plug the
adapter into an electrical outlet. Turn on the computer and
see if it works using the AC adapter.
5-4
Troubleshooting
6. If the computer does not work with the AC adapter, see
“AC Adapter Problems.”
If the computer works using the AC adapter, the problem
may be that you have not used the battery in a long time
(three months or more), and you may need to recharge it.
If the Battery Charging icon appears, the battery is charging.
See Chapter 3 for more information about charging the
battery.
7. If you find that over time the battery is losing its charge in
less and less time, it may be reaching the end of its life. You
may need to replace it with a new battery.
Note
When you need to discard your battery, contact your local
government agency for recycling information.
AC Adapter Problems
If the computer does not work with the AC adapter, check the
adapter’s power light and AC Power icon in the computer’s
System Window. If they are not on, try the following:
1. Disconnect the AC adapter and then reconnect it.
2. Make sure the AC adapter is securely connected to the
computer and the electrical outlet.
3. If the connections are secure, check the electrical outlet to
make sure it is supplying power. (For example, plug a lamp
into the socket and turn it on.) If the outlet is working and
the connections are secure, there may be something wrong
with your AC adapter.
Troubleshooting 5-5
The LCD Screen is Blank
If the computer starts up (power icons appear in the status
panel) but no image appears on the LCD screen, follow these
steps to solve the problem:
1. The computer may be in suspend mode; press any key or
the Suspend/ Resume button to resume. If you are using
Suspend to Disk as your Suspend mode, press the
computer’s power button to resume.
2. You may have set a timeout period for the LCD screen on
the Power Management screen or with the Windows
ChipsCPL utility. This turns off the screen automatically
after a specified period of time has clap sed with no system
activity. Press any key to restore the display. (See
Chapters 1 and 3 for information about the power
management options, and Chapter 2 for information on the
ChipsCPL utility.)
3. Use the brightness and contrast key commands to adjust the
screen display. (The contrast adjustment has no effect on
active matrix screen s.) See Chapter 2 for instructions.
4. You may have switched your display to external monitor
mode. Press Fn F12 until you see the display on your LCD
screen. Make sure the default display selected in the SCU
Display Mode option and the setting in the Windows
ChipsCPL utility are correct for your system. See
Chapters 1 and 2 for more information.
5-6
Troubleshooting
The Internal Monitor Screen is Blank
If you are using an external monitor and no image appears on
its screen, follow these steps to solve the problem:
1. Make sure the monitor and then the computer are turned on.
2. Adjust the brightness and contrast of the monitor screen
using the controls on the monitor. (The contrast adjustment
has no effect on active matrix screens.)
3. Check that the monitor’s power cable is securely connected
to the monitor and to an electrical outlet. Be sure the
monitor cable is properly connected to both the monitor
and the computer. If you need to adjust the connection,
turn the computer off, adjust the cables, and then turn on
the computer again.
4. Check the monitor setting to make sure the correct one is
selected. Some computers can accept input from two
computers.
5. You may have switched your display to LCD mode. Press
Fn F12 until you see the display on your external monitor.
Make sure the default display selected in the SCU
Display Mode option and the setting in the Windows
ChipsCPL utility are correct for your system. See
Chapters 1 and 2 for more information.
6. If the monitor still does not work, turn off both the computer
and the monitor. Then check the electrical outlet for power.
Plug a lamp into the outlet and turn it on to see if the outlet
supplies power.
7. If the outlet works and an image still does not appear on
your monitor when you turn on the computer, contact your
monitor dealer, or call your Authorized EPSON Servicer or
the EPSON Connection.
Troubleshooting 5-7
The Computer Locks Up
If the computer locks up, try the following:
1.
Some operations take longer than others to perform. For
example, a spreadsheet program takes a long time to
recalculate a spreadsheet and many program calculations
can take several minutes to complete. Wait a few minutes
to see if the computer returns to normal operations.
2.
The computer may be in suspend mode. Press any key, or
press the Suspend/ Resume or power button (depending on
the type of suspend mode you are using) to resume
activity. See Chapter 3 for more information.
Note
If your battery power is low and your computer is in
Suspend to Disk mode, it may not have enough power
to boot your system when you press the power button to
resume. Connect the AC adapter or install a spare,
charged battery; then press the power button.
5-8
3.
You may be able to resume activity by canceling the current
operation. If you are executing an MS-DOS command, try
pressing Ctrl C or Ctrl Break. In Windows, press Ctrl Alt Del
to reset the system.
4.
Try pressing the Num Lock key. If the Num Lock icon does
not appear in the System Window, the computer is
probably locked up.
5.
If the computer remains locked up after you‘ve tried the
solutions listed above, reset it by pressing Ctrl Alt Del.
6.
If resetting does not work, the keyboard is probably locked.
Turn off the computer, wait five seconds, and turn it back
on.
Troubleshooting
Password Problems
If you set a password and you have trouble using it, try the
following:
1.
If you type the password and then see the password prompt
again, type the password again and press Enter. If you type
it incorrectly three times, the computer reboots and
prompts you again.
2.
If you know the current password but you want to change or
delete it, see Chapter 1 for instructions.
3.
If you have forgotten your password, call the EPSON
Connection for assistance.
Embedded Keypad Problems
If you have trouble using the embedded keypad or any of the
keys involved with the keypad, review the information in
Chapter 2.
If you have accidentally locked the keypad, the Embedded
Keypad Locked icon appears in the System Window. Press
Fn Num Lock to unlock it.
Trackball Problems
If your trackball is not working properly, check the following:
1. Make sure the trackball is enabled in the System
Configuration utility. See Chapter 1 for instructions.
2. Your trackball may be dirty. Follow the instructions in
Chapter 2 to clean it.
Troubleshooting 5-9
3. If you still have trouble with the trackball, contact your
Authorized EPSON Servicer or the EPSON Connection for
assistance.
External Pointing Device Problems
If your trackball, mouse, or other PS/ 2 compatible pointing
device does not work properly, try these solutions:
1. Did you install any necessary drivers and load them into
your computer’s memory? See the documentation that
came with your device for instructions. Your built-in
trackball is PS/ 2 compatible, so be sure to select these
drivers when necessary. (PS/ 2 compatible drivers for
Windows and MS-DOS applications are already installed
on your system.)
2. Did you disable the computer’s built-in trackball in the
System Configuration utility? If not, you must disable it in
order to use an external pointing device with your
computer. See Chapter 1 for instructions.
3. Is the external device connected properly? Make sure you
connected it to the external key boardl mouse port before
you turned on the computer, as described in Chapter 4.
4. If the device is connected to the computer’s serial port, make
sure the device and the COM port option in the SCU are
set to use the same COM port. See Chapter 1 for more
information.
5-10
Troubleshooting
5. If you still have trouble with an external device, check the
manual that came with it or contact the manufacturer.
Diskette Problems
If you have trouble accessing data on a diskette, follow these
steps to identify the problem:
1. Is the diskette properly inserted in the drive? Remove the
diskette and make sure it is inserted with the label facing
up.
2. Are you using the right type of diskette for your drive? The
3.5-inch drive in your computer can read either 720KB or
l.44MBdiskettes.
3. Is the diskette write-protected? If the write-protect switch is
set, first make sure the diskette does not contain files you
do not want to change or lose. Then move the switch to
remove the write protection. Ordinarily, it’s a good idea to
leave program diskettes write-protected, but some
programs don‘t work properly using write-protected
diskettes.
4. Is the diskette formatted? A new diskette must be formatted
before you can store data on it. See your MS-DOS on-line
help utility or your on-line Windows manual for
instructions.
5. Is the diskette damaged? If you have a backup copy of the
diskette, use it to repeat the operation that caused the
problem. If it works using the copy, the original diskette is
probably damaged. Discard the original and use the copy.
If you need to save the files on the original diskette, try
copying one file at a time.
Troubleshooting
5-11
6. Try formatting a blank diskette to determine if the diskette
drive is operating properly. If you cannot format a diskette,
see the next section.
Diskette Drive Problems
If you are having problems with the diskette drive, check the
following:
1. If the drive does not seem to be working, try performing a
similar operation with a diskette in another computer’s
drive, if you have access to one.
2. Make sure the diskette drive is set to the correct type in the
System Configuration utility. See Chapter 1 for instructions.
3. If the drive is making loud or unusual noises, stop the
current operation immediately and contact your
Authorized EPSON Servicer or the EPSON Connection.
Hard Disk Problems
If you have problems with your hard disk drive, check the
following:
1. If you have set an inactivity time period in the Hard D i s k
option on the Power Management screen and the drive
powered down, the hard disk may still be coming back up
to speed. Your drive needs about 15 seconds to resume
speed when you access it again.
2. Check the Hard Disk Activity icon. If you enter commands
that access the hard disk, the icon should appear in the
System Window. If the icon is blinking continually, there
may be a problem with the hard disk; contact your
Authorized EPSON Servicer or the EPSON Connection.
5-12
Troubleshooting
3. Make sure the Hard Disk option is set correctly in the SCU.
See Chapter 1 for instructions.
4. Make sure the hard disk drive cable is securely connected, as
described in the “Removing and Replacing the Hard Disk
Drive” section of Chapter 4.
Sotfware Problems
If you are having trouble with an application program, try the
following solutions:
1. If the application program does not start, check that you are
following the correct procedure for starting the program,
and that it is installed correctly.
2. If the program is running, see if it includes on-line help to
assist you in diagnosing the problem.
3. Your computer can run at either high speed or low speed.
While almost all programs work properly at high speed,
some must run at the slower speed. Check your software
manual to see if this is the case, and change the CPU speed
if necessary. See Chapter 2 for instructions.
4. If you have entered an MS-DOS command that you want to
stop, press Ctrl C or Ctrl Break. If you are using Windows,
press Ctrl Alt Del to reset the system.
5. An application program can occasionally lockup the
computer, making it unresponsive to the keyboard. If your
computer does not respond when you press the Num Lock
key, turn off your system, wait five seconds, and then turn
it back on and restart your application program.
6. If none of these solutions solve your software problem,
contact the software manufacturer for technical support.
Troubleshooting
5-13
Printer Problems
You can solve most printer problems by following the
instructions in your printer manual. If you have just connected
the printer, check that it has power and is properly connected
to the computer. See Chapter 4 for instructions on connecting a
printer. (The printer manual also gives instructions on cable
connections.)
If you have a serial printer or if the printer has problems
feeding paper, check the printer manual for the correct DIP
switch settings and for serial operation settings.
Memory Module Problems
If you have trouble with memory you have added to your
system, check the following:
1. Make sure the power-on diagnostics memory count and the
SCU are displaying the correct amount of memory. See
Chapter 1 for more information.
2. Did you insert the memory module correctly? See “Installing
a Memory Module” in Chapter 4.
3. Have you defined the memory properly in your CONFIG.SYS
file? See your MS-DOS on-line help utility for more
information.
5-14 Troubleshooting
PC Card Problems
If you are having trouble with a PC card inserted in your PC
card slot, check the following:
1. Did you insert the card properly? Press the release button to
remove the card; then try inserting it again. See Chapter 4
for installation instructions.
2. Did you load any PCMCIA drivers when you booted the
computer? Reboot your computer and select the
appropriate option at the PCMCIA driver prompt. Then try
your PC card operation again. See Chapter 2 for more
information about the PCMCIA drivers and utilities that
come with your computer.
3.
Did you resume from Suspend to Disk mode and then were
unable to use the card? When you resume from Suspend to
Disk mode, any PCMCIA card and socket services that you
loaded and initialized before you suspended to disk are not
reloaded or reinitialized after you resume. Your computer
may recognize SRAM PC cards, but it will not recognize
most other PC cards. To reload and reinitialize these
services, exit any application programs you are using and
exit Windows. Then press Ctrl Alt Del to reboot your
computer. Select the option to load your PCMCIA card
drivers at the prompt.
4. Have you loaded the correct PCMCIA drivers and utilities?
Your computer is setup to work with most PCMCIA cards,
but some cards require that you install special drivers or
software. For example, a LAN card may require you to
install a socket services enabler—either as a device driver
or command that is executed when you load the network.
See the documentation that came with the card for details.
Troubleshooting
5-15
5. If you inserted a RAM or hard disk card, did you format it?
Like a diskette, a new RAM or hard disk PC card may need
to be formatted (initialized) before you can use it. See the
documentation that came with the card for instructions.
6. Are you using a LAN PC card with the power management
features enabled or running only on battery power? You
should disable the power management features when you
are using the computer on a network because these features
can interfere with your network software. Also be sure to
connect the AC adapter when you use a LAN PC card
because these cards consume a lot of power.
7. Is your PC card compatible with the ActionNote? The PC
card slots in your computer support PCMCIA version 2.1
or earlier and accept up to two Type I or II cards, or one
Type III card. If you aren‘t sure your card is compatible, call
the EPSON Connection to ask about tested cards.
8. Did you run the MS-DOS MEMMAKER utility or load a
memory manager (such as MS-DOS EMM386.EXE)? If so,
you must ensure that these programs do not interfere with
the memory addresses and other settings used by your
PCMCIA drivers by editing your CONFIG.SYS file. See the
EPSON Card and Socket Services User's Guide for more
information.
5-16 Troubleshooting
Appendix A
Specifications
CPU and Memory
CPU
Cyrix SL-enhanced CX486DX2
microprocessor; includes built-in math
coprocessor, 8KB of internal cache, and
power management features; cache can be
enabled or disabled using the SCU
System speed
Maximum speed and low speed (12 MHz)
available; speed selection through
keyboard commands
Memory
4MB or 8MB RAM standard on the system
board; expandable to 8MB, 12MB, or 20MB
using a 4MB, 8MB, or 16MBmemory
module
ROM
128KB Flash ROM device containing the
system and VGA BIOS and System
Configuration utility code
Video RAM
512KB DRAM supports resolutions up to
640 x 480 in 256 colors on the color LCD
and up to 1024 x 768 in 16 or 800 x 600 in
256 colors on an external monitor
Shadow RAM
Supports shadowing of 128KB of system
and video BIOS ROM into RAM
Clock/
calendar
Real-time clock, calendar, and CMOS
RAM; backed up by internal battery
Specifications A-1
Controllers
Video
Chips and Technology ® 32-bit local bus
interface to the microprocessor; supports
enhanced video modes on an external
monitor; supports resolutions up to
640 x 480 in 256 colors on the color LCD
and up to 1024 x 768 in 16 or 800 x 600 in
256 colors on an external monitor; display
mode selectable using the SCU, the Fn F12
command, or Windows ChipsCPL utility
Diskette drive
Built-in super I/O controller for one
internal 3.5-inch diskette drive; supports
720KB and 1.44MB formats
Hard disk
Built-in super I/O controller for standard
IDE HDD; drive compartment
accommodates a standard 2.5-inch wide
hard disk drive up to 19 mm high
PCMCIA
Built-in controller for PCMCIA version 2.1,
Type I, II, or III cards; supports up to two
stacked Type I and Type II cards or one
Type III card; JEIDA 4.1 compatible;
supports standby and suspend modes;
supports hot insertion (including ExCA
standards)
A-2 Specifications
Interfaces
External VGA
15-pin, D-sub, female connector for analog
monitor
Parallel
Centronics ® compatible; 25-pin, D-sub,
fern ale connector; supports norm al (8-bit
AT compatible, unidirectional) and
bidirectional (16-bit PS/ 2 compatible)
modes
Serial
RS-232C, programm able, asynchronous,
9-pin, D-sub male connector
External
keyboard/
mouse
Auto-sensing, 6-pin, mini-DIN connector
for a PSI 2-type external keyboard,
keypad, mouse, or other pointing device
Keyboard
85/ 86 keys; 101/ 102-key keyboard
compatible; embedded keypad; support
for hot key commands
Trackball
Built-in 16 mm, serial trackball with two
buttons
Mass Storage
Hard disk drive
One internal 2.5 inch long, 12.5 mm to
19 mm high IDE hard disk drive; SCU
automatically detects standard IDE drive
types
Diskette drive
One internal, 3.5-inch, low power
consumption diskette drive; 720KB or
1.44MB format
Specifications A-3
LCD Screen
Active matrix color: 9.5-inch diagonal
640 x 480 x 256 colors,
Dual-scan twisted nematic (DSTN) color:
10.3-inch diagonal, 640 x 480 x 256 colors,
backlit
Monochrome: 9.4-inch diagonal, 64 gray
shades, 640 x 480, backlit
System
Configuration
Utility
Stored in ROM; accessible by pressing
Ctrl Alt S at system startup or at MS-DOS
prompt; includes power management
features
Power Sources
AC adapter
Size
5.3 inches (L) x 2.8 inches (W) x 1.5 inches (H)
(136 mm [L] x 72mm [W] x 37 mm [H])
Weight
13.5 ounces (380 grams)
AC cable length
6 ft (1.8 meters)
DC cable length
39 in (1 meter)
Input voltage
100 VAC to 250 VAC, autosensing
Input frequency
40 to 63 HZ
Output voltage
17 VDC with 2 Amp maximum and 20 VDC
with 1.05 Amp maximum
Battery
A-4 Specifications
Rechargeable, 12 Volt, 2.6Ah NiMH
battery; current regulation and automatic
charge stop by thermistor
Caution
Use only the adapters and replacement batteries designed
for use with the ActionNote 600 series (AC adapter model
number TSA3 and battery model number 10 HR-4/ 3AU).
Environmental Requirements
Condition
Operating
Non-operating
Temperature
42° to 95° F
(5° to 35° c)
–4° to 140° F
(-20° to 60° C)
Humidity
(non-condensing)
30% to 90%
5% to 95%
Altitude
-200 to 12,000 ft
-200 to 30,000 ft
(-67 to 4,000 m)
(47 to 10,000 m)
Caution
When traveling by airplane, take the computer into the
passenger compartment as carry-on luggage to prevent it
from being stored in an unpressurized storage compartment.
Physical Dimensions
Model
Depth
Width
Height
Weight
inches
mm
inches
mm
inches
mm
lb
kg
Monochrome
8.6
219
11
279
1.75
44.5
5.8
2.7
STN color
8.6
219
11
279
2.0
51
6.8
3.1
Active matrix
8.6
219
11
279
2.0
51
6.8
3.1
Specifications A-5
Optional Equipment
❑ 4MB, 8MB, and 16MB memory expansion modules
❑
External keyboard
❑
External numeric keypad
❑
Additional NiMH batteries
❑
External battery charger
❑ Automobile cigarette lighter adapter
❑
Additional AC adapter
❑
PCMCIA cards including Flash RAM, SRAM, Hard disk,
modem, fax/ modem, LAN cards, etc.
A-6 Specifications
Index
A
AC adapter
automobile, 3-1
connecting, 1-34
model number, 1-3, A-5
power icon, 1-4, 1-7, 3 -2, 3-5—6
power light, 1-4, 3-2
precautions, 2-1
problems, 5-5
specifications, 1-3, 3-2, A-4
using, 3-l–2
Airplane travel precautions, 2-2
Alarm Resume option, 1-16
Altitude, A-5
APM interface, 3-4 3-11, 3-1 5–16
Auto Suspend option, 1-17
AUTOEXEC.BAT, 5-2
B
Backup copies, 1-8
Battery
charging, 3-1, 3-4-6, 3-8–9
external charger, 3-1, 3-9
icons, 1-7, 3-2, 3-4-6, 3-8—9
internal, 1-9, A-1
life, 3-2
model number, 3-2, A-5
monitoring power, 3-4-6
precautions, 3-3 ,3-7
problems, 5-4—5
recycling, 3-9
replacing, 3-7—8
safety timer, 3-9
specifications, A-4
using, 3-2–9
Battery Low option, 1-16,3-3
Beeps, configuring BIOS, 5-1
Bidirectional parallel port, see
Parallel port
Boot drive, 1-12
Brightness, 2-4, 5-7
C
Cache, 1-13, A-1
Calendar, A-1
Caps Lock icon, 1-7
ChipsCPL utility, 2-13, 5-6-7
Clock, real-time, A-1
CMOS RAM, 1-8, A-1
CompuServe, Intro-6, 2-15
Computer
caring for, 2-l–2
dimensions, A-5
features, Intro-1
power button, 1-5-6, 5-3
powering, 3-1–20
problems, 5-34, 5-8
resetting, 2-9
serial number, 5-1
setting up, 1-1—18
turning on and off, 1-5-6
using, 2-1-16
CONFIG.SYS file, 5-2, 5-14 ,5-16
Configuration, 1-8, 5-1
Contrast, 2-4,5-7
Copy-protected programs, 2-9
CPU speed, 2-9,5-13, A-1
CPU Standby option, 1-16
D
Date, 1-11
Defaults
power management option, 1-18
SCU option, 1-9–10, 1-13
DEFRAG.EXE utility, 3-18–20
Depth, A-5
Disk Suspend option, 1-17
Index
1
Diskette drive
activity icon, 1-7, 2-12
configuring, 1-11
controller, A-2
problems, 5-12
specifications, A-3
Diskettes
backing up, 1-8
problems, 5-11—12
using, 2-12–13
Display Mode option, 1-12, 2-13, 4-2,
5-6—7
DRVSPACE utility, 3-17, 3-20
E
Embedded keypad, 1-7,2 -5-6,5-9
EMM386.EXE, 2-14, 5-16
Energy saving tips, 2-3
Energy Star, Intro-3, 2-3
Environmental requirements, A-5
EPSON
Accessories, Intro-5
America Forum, Intro-6, 2-14—15
Connection, Intro-5, 5-1
Extra Care Road Service, Intro-5
help, Intro-6, 5-7
marketing locations, Intro-4, Intro-6
Error messages, 5-3
External keyboard
configuring, 4-6
connecting, 4-5-6
port specifications, A-3
problems, 5-10—11
External monitor
connecting, 4-1—3
problems, 5-7
resolutions, A-2
specifications, A-3
switching display, 2-5,2-13, 4-2—3
2 Index
F
Fn key functions, 1-6, 2-3—5
G
Global Standby option, 1-16
H
Hard disk drive
activity icon, 1-7, 2-2
backup, 1-8
configuring, 1-11, 4-17
controller, A-2
power management option, 1-17
problems, 5-12—13
protecting, 2-2
replacing, 4-13—17
specifications, 4-15, A-3
Height, A-5
Help, see EPSON
Humidity, A-5
I
Icons, 1-7, 2-12, 3-2, 3-4—6, 3-8—9,
3-13, 4-8
Identifying system, 1-2, 5-l—2
Interfaces, A-3
K
Keyboard
configuring, 1-12
external, see External keyboard
Fn key functions, 1-6, 2-3-4
layouts, 2-4—6
specifications, A-3
using, 2-3-6
Keypad, embedded, 1-7, 2-5—6, 5-9,
L
N
LCD screen
adjusting display, 1-6, 2-34, 2-13,
4-2-3
cleaning, 2-2
closing, 3-14
configuration option, 1-12
opening, 1-1
precautions, 2-1
problems, 5-6
specifications, A-4
NiMH, see Battery
Num Lock
configuring default mode, 1-11
icon, 1-7
key functions, 2-3 ,2-5-6
M
Marketing locations, EPSON, Intro-6
Mass storage, A-3
Math coprocessor, A-1
MEMMAKER, 2-14, 5-16
Memory
cache, 1-13, A-1
CMOS RAM, 1-8, A-1
configuring, 1-11,4-13
manager program, 2-14
module, 4-8–13, 5-14, A-1
RAM, 5-3
ROM, 1-8,5-3, A-1
specifications, A-1
standard, 4-8, A-1
test prompt, 1-5
Microprocessor, A-1
Monitor, see External monitor
Mouse
configuring PSI 2, 4-6
connecting PS/2, 4-5—6
connecting serial, 4-4–5
driver, 2-6,5-10
port specifications, A-3
problems, 5-10—11
utilities, 2-7
O
On-line documentation, Intro-2
Options
available, A-6
installing, 4-1—18
0S/ 2, 1-6
P
Parallel port
configuring, 1-11,4-3
device connection, 4-34
specifications, A-3
Passwords
changing, 1-13–15
deleting, 1-13-15
entering, 2-10–11
problems, 5-9
setting, 1-12–15
PC card
activity icon, 1-7,4-8
additional drivers and utilities, 2-15
driver prompt, 1-5,2-14
installing, 1-6, 4-7—8
problems, 5-15–16
removing, 4-8
specifications, 4-7, A-2
storing, 4-8
using, 3-1-2
write-protect switch, 4-8
PCMCIA slots
address, 1-11
specifications, 4-7, A-2
using, 4-7-8
Index 3
Pointing device
connecting, 4-5—6
port specifications, A-3
problems, 5-10—11
Power
button, 1-5—6, 5-3
icon, 1-4, 1-7, 3-2, 3-4—6
problems, 5-3—4
sources, 3-1, 5-4, A-4–5
Power management
APM interface, 3-4,3-11, 3-15–16
automatic, 3-10, 3-12–13
defaults setting, 1-18
exiting, 1-18
features, Intro-3, 3-3,3-10-20
manual, 3-10, 3-13–14
options, 1-15—18, 3-12
resuming activity, 3-13–15
screen, 1-10, 1-13, 1-15, 2-5, 3-12–13
specifications, A-1
standby modes, see Standby
modes
suspend modes, see Suspend
modes
Power Savings option, 1-16
Power-on diagnostics, 1-5, 1-9,5-1,
5-3
POWER.EXE, 3-15
Printer problems, 5-14
Processor speed, 2-9,5-13, A-1
R
RAM, 5-3, A-1
Real-time clock, A-1
Resetting the computer, 2--9
ROM, 1-8,5-3, A-1
4 Index
S
Safety instructions, see iii-iv at front
of manual
Scanner, 4-34
Scroll Lock icon, 1-7
Serial number, 5-1
Serial port
address, 4-5
configuring, 1-11, 3-3,4-5
device connection, 4-4—5
specifications, A-3
Shadow RAM, A-1
Software
pre-installed, Intro-2
problems, 5-13
support, Intro-2
version numbers, 5-l–2
Specifications, A-l—6
Standby modes
configuring, 1-16, 3-12
power-saving operations, 3-10–11
Suspend modes
configuring, 1-16–17, 3-3, 3-12
icon, 1-7, 3-13
power-saving operations, 3-10–11
problems, 5-4,5 -6,5-8
resuming from, 3-14
to disk, 1-17, 3-10–11, 3-14–20, 4-13
to memory, 1-17, 3-10—11,3-14, 3-17
Suspend/ Resume button, 1-2,
3-13—14, 5-4, 5-8
System components, locating, 1-2
System Configuration utility
boot drive, 1-12
boot password, 1-12-15
cache, 1-13
changing settings, 1-10–13
COM port, 1-11,3-3
date, 1-11
defaults, l-9–l0, 1-13
dialog boxes, 1-10
diskette drive, 1-11
display mode, 1-12,2 -13,4-2,5-6-7
exiting, 1-10, 1-13, 1-18
hard disk, 1-11,4 -17, A-3
LCD, 1-12> 2-13
memory display, 1-11, 4-13, 5-14
menus, 1-10
num lock, 1-11
parallel mode, 1-11
power management, see Power
management
prompt, 1-5, 1-9
quick boot, 1-11
running, 1-8–l5
SCU password, 1-12–15
starting, 1-8-9, A-4
time, 1-11
trackball, 1-11
typematic delay, 1-12
typematic rate, 1-12
when to run, 1-9
System Window, 1-4, 1-7,3-2,3-8,
3-13, 4-8
System, identifying, 1-2, 5-l–2
SYSTEM.INI file, 5-2
Weight, A-5
Width, A-5
WIN .INI file, 5-2
Windows NT, 1-6
T
O
Temperature, A-5
Text conventions, Intro-4
Text mode enhancement, 2-4
Time, 1-11
0VMAKFIL.EXE utility, 3-17–20
Trackball
cleaning, 2-8
compatibility, 2-6
configuring, 1-11,2 -7,4-6
drivers, 2-6
problems, 2-2,2-8, 5-9–11
specifications, A-3
using, 2-6–8
Travel precautions, 2-2
Troubleshooting, 5-1–17
Turning computer on and off, 1-5-6
U
UNIX, 1-6
V
Vertical screen space, 2-5
VGA
drivers and utilities, 2-13–14, 4-3,
5-6—7
resolutions, A-1—2
VGA port
connecting to, 4-l–3
controller, A-2
specifications, A-3
Video Monitoring option, 1-17
Video option, 1-17
Video RAM, A-1
W
Index
5
Epson America (USA)
EPSON Connection
Tel: (800) 922-8911 (U. S. and Canada)
EPSON Accessories
Tel: (800) 873-7766
Fax: (310) 782-4401 (U. S. sales)
(800) 922-8911 (Canada)
EPSON DirectSM
P.O. BOX 2858
20770 Madrona Avenue
Torrance, CA 90509-1111
Computer system sales:
Tel: (800) 374-7300
(310) 782-5478
Fax: (310)782-4455
Epson America, Inc.
20770 Madrona Avenue
Torrance, CA, 90509-2842
Tel: (310) 782-0770
EPSON Ametica (International)
Epson Latin America
Miami, FL, USA
Tel: (305) 265-0092
Fax: (305) 265-0097
Epson Mexico, S.A. De C.V.
Mexico, D. F., Mexico
Tel: (525) 395-9944
Hotline: (91800) 50326
Fax: (525) 395-9499
Epson Argentina, S.A.
Buenos Aires, Argentina
Tel: (541) 322-6898
Fax: (541) 322-9725
Epson Do Brasil
Silo Paulo, SP Brazil
Tel: (5511) 813-3044
Fax: (5511) 210-9290
Epson Chile, S.A.
Santiago, Chile
Tel: (562) 232-8966
Fax: (562) 233-3197
Epson Venezuela, S.A.
Caracas, Venezuela
Tel: (582) 241-0433
Fax: (582) 241-4561
Epson Costa Rica, S.A
San Jose, Costa Rica
Tel: (506) 234-6666
Fax: (506) 225-5709
Epson Canada Limited
Willowdale, Ontario, Canada
800-GO-EPSON [(800) 463-7766]
Tel: (416) 498-9955
Fax: (416) 498-4574