1
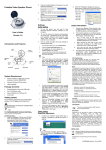
separately “ArcSoft WebCam Companion”
icon, and then follow the on-screen
instruction to install the application
software.
PC320
2.
When the “Properties” dialog box pops up,
please select “VGA SnapSize” and click
mouse button to choose the VGA snap
size you need. There are four selections
as below:
0: 640 * 480
1: 800 * 600
2: 1024 * 768
3: 1280 * 1024
3.
Under Windows® 98SE/ME/2000/XP
operating system, move the mouse
cursor to any empty space on the screen.
Right click the mouse button and select
“Properties” to pop up the “Display
Properties” dialog box. Please select
“Settings” and then adjust the screen
resolution to match the “VGA SnapSize”
you selected before.
4.
Under Windows Vista™ operating
system, move the mouse cursor to any
empty space on the screen. Right click
the
mouse
button
and
select
“Personalize” to pop up the “Display
Settings” dialog box. Please select
“Monitor” and then adjust the screen
resolution to match the “VGA SnapSize”
you selected before.
Web Cam
User’s Guide
Version 1.0
6.
The wizard will install ArcSoft suite: four
softwares at the same time.
7.
After first time installation, the system will
restart; there will be a new icon on the
desktop.
8.
Connect your WebCam to an available
USB port on your computer. Windows
should detect your new device.
Hardware Installation
1.
Plug the enclosed USB cable into camera
and USB port on the PC separately, and
then follow the on-screen instructions to
install the hardware. To avoid low voltage,
we recommend the user to plug the cable
connector to USB port on PC directly.
2.
Once pressing the snap shot button, the
LED indicator on camera will light up and
the “AMCAP” dialog box will pop up while
the installation is successful.
3.
Please select AMCAP and enable
“preview function” to view the video after
first-time installation. If there is no video
shown, please remove and connect again
to make sure the USB connection is
completed.
Notice:
For Notebook, LCD panel monitor
Please download the latest update of “Service
Pack” (from Start
Windows Update) to keep
the camera running smoothly.
Attention:
If you have more than one image device in
your system, please select the CamMaestro
as the PC Camera device. In this way, you can
use this camera to capture images.
Operating System Requirements
Windows 98SE, Windows Me, Windows 2000,
Windows XP, Windows Vista™
Driver Software Installation
Attention:
Make sure to install driver and software
BEFORE plugging the camera into USB port.
1.
Insert the software CD into the CD-ROM
drive of your computer.
2.
The installation program will run
automatically. If the installation does not
auto play, please run “autorun.exe” from
the CD-ROM’s root directory to install.
Power Source Adjustment
Choose the mode of “50Hz” or “60Hz” according
to your power source environment or video
output signal system to avoid the blurry image.
Amcap
Option
Video Capture Filter
OK
Snap Size Adjustment
1.
3.
Click the “Web Camera Driver” icon to
install device drivers.
4.
Click “DirectX-Update” to install DirectX
(9.0C) if you use old version or never
installed before.
5.
After
driver
installation,
please
click
Press the snap shot button on camera to
pop up the “AMCAP” dialog box. Please
select “Option” and then click “Video
Capture Filter” to continue.
3100553661 Version 1.0 Mar. 2007
Caméra Vidéo Digitale Mode d'emploi
d'installation rapide
Configuration Requise
Videocamera digitale Guida
all’installazione rapida
Guia do Utilizador da Câmara Web
Requisitos do Sistema
Requisiti del sistema
Windows 98SE, Windows Me, Windows
2000, Windows XP, Windows Vista™
Installer l’application et le Driver
Windows 98SE, Windows ME, Windows
2000, Windows XP, Windows Vista™
Windows 98SE, Windows Me, Windows
2000, Windows XP, Windows Vista™
Instalação do software
Installazione dell’ driver
Attention:
Assurez-vous d'installer le software avant de
brancher la caméra dans le USB.
Attenzione:
assicurarsi di installare il software PRIMA di
collegare la videocamera alla porta USB.
Atenção:
Certifique-se de que instala o software
ANTES de ligar a câmara à porta USB.
1.
Insérez le CD dans le CD-ROM de votre
ordinateur.
1.
Inserire il CD software nell’unità CD-ROM
del computer.
1.
Introduza o CD contendo o software na
unidade de CD-ROM do seu computador.
2.
Attendez quelques secondes et l'installation
se mettra en route automatiquement
2.
Attendere alcuni secondi ed il programma di
configurazione si avvierà automaticamente.
2.
Espere alguns segundos para que a
instalação
seja
executada
automaticamente.
Attenzione:
se
il
programma
di
configurazione ArcSoft non si avvia
automaticamente andare sulla barra delle
applicazioni, dalla Barra delle Applicazioni
fare clic su “Start”, e poi su “Esegui” trovare
il file “autorun.exe” nel CD con il software e
fare clic su “OK”.
Attention: Si l'installation du ArcSoft n'est
pas automatique, allez sur la Barre des
Tâches et cliquez sur “Démarrer”, puis sur
“Activer” et cherchez “autorun.exe” dans le
CD du logiciel et cliquez sur “OK”.
3.
4.
5.
Cliquez sur l’icône “Web Camera Driver”, et
l’installation s’effectuera automatiquement.
Veuillez cliquer séparément sur les icônes
“ArcSoft WebCam Companion”, puis suivez
les instructions sur écran pour installer le
logiciel d’application.
Une fois que toutes les procédures
d’installation sont terminées, le système
d’opération doit être relancé.
3.
Fare clic sull’icona “Web Camera Driver” per
poter completare automaticamente
l’installazione.
4.
Fare clic separatamente sulle icone “ArcSoft
WebCam Companion”, e seguire le
istruzioni che vengono visualizzate sullo
schermo per poter installare il software
applicativo.
5.
Una volta completate le procedure di
installazione è necessario riavviare il
computer
Italian
French
Digitale Videokamera Anleitung zur
schnellen Installation
Systemvoraussetzungen
2.
4.
Clique separadamente nos ícones “ArcSoft
WebCam Companion”, siga as instruções
mostradas no ecrã para instalar o software
de aplicação.
5.
Quando todos os procedimentos de
instalação estiverem concluídos, é
necessário reiniciar o sistema operativo.
Portuguese
電腦視訊攝影機—快速安裝指南
Windows 98SE, Windows Me, Windows
2000, Windows XP, Windows Vista™
Instalación de driver
Windows 98SE, Windows Me, Windows
2000, Windows XP, Windows Vista™
安裝程序
注意事項::
Atención:
asegúrese de instalar el software antes de
enchufar la cámara en la puerta USB.
必需先安裝完成驅動程式軟體,才能將視訊
攝影機插上電腦的 USB 槽。
Legen Sie die Software CD in das CD-ROM
Laufwerk Ihres Computers ein.
1.
1.
將軟體安裝光碟片放進電腦的光碟機中。
Warten Sie einige Sekunden, das Setup
beginnt automatisch.
Inserte el CD software en la unidad de
disco CD-ROM de su computadora.
2.
Espere unos segundos y el sistema
funcionará utomáticamente.
2.
電腦會自動執行軟體安裝畫面。
Achtung: Sollte das ArcSoft Setup nicht
automatisch beginnen, klicken Sie auf
“Start” auf der Taskleiste und dann auf
“Ausführen”. Suchen Sie die Datei
“autorun.exe“ auf der Software-CD und
klicken dann auf “OK”.
3.
Klicken Sie auf das “ Web Camera
Driver”-Symbol”. Die Installation wird
automatisch vervollständigt.
4.
Klicken Sie jeweils auf die Symbole
“ ArcSoft WebCam Companion” und
befolgen die Anweisungen auf dem
Bildschirm, um die Anwendungssoftware
zu installieren.
Atención: si el sistema no funciona
automáticamente, vaya a la Barra de
tareas y haga clic en “Inicio, y, a
continuación, en “Ejecutar” y busque
“autorun.exe” en el CD del software y
haga clic en “Aceptar”.
3.
Haga clic en el icono “ Web Camera
Driver” y la instalación.
4.
Haga clic en el icono “ArcSoft WebCam
Companion” y, a continuación, siga las
instrucciones que aparecen en pantalla
para instalar el software de aplicación.
5.
5.
Clique no ícone “Web Camera Driver” para
que
a
instalação
seja
concluída
automaticamente.
作業系統需求:
Requisito de Sistema
Attenzione:
assicurarsi di installare il software PRIMA di
collegare la videocamera alla porta USB.
1.
3.
Cámara de Vídeo Digital Guía de
instalación rápida
Windows 98SE, Windows Me, Windows
2000, Windows XP, Windows Vista™
Installieren der Anwendungs Software
Nota: Caso a instalação não seja
automaticamente iniciada, vá até à barra
de tarefas e clique em "Start"(Iniciar), de
seguida em “Run” (Executar) e procure o
ficheiro “autorun.exe“ no CD contendo o
software, de seguida clique em OK.
Das Betriebssystem muss neu gestartet
werden, nachdem alle Setupprozesse
vervollständigt wurden.
German
Una vez terminado el procedimiento de
configuración, es necesario reiniciar el
sistema operativo.
Spanish
若軟體安裝畫面無法自動執行,請從 CD 片
的 根 目 錄 中 點 選 “Driver” 檔 案 夾 , 執 行
“autorun.exe“ 程式安裝相機驅動程式。
3.
點選 “Web Camera Driver“ 圖示安裝驅動
程式。
4.
驅 動 程 式 安 裝 完 畢 後 , 請 點 選 “ArcSoft
WebCam Companion” 圖示,依照安裝精靈
之步驟安裝應用軟體。
5.
安裝完畢後,電腦系統將會重新開機,以執
行新的驅動程式。
Chinese