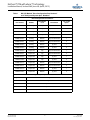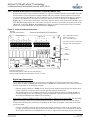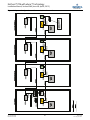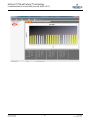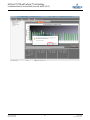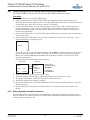
1
A Technical Manual from the experts
in Business-Critical Continuity™
NetSure™ ITM with eSure™ Technology
Installation Manual, Section 6040 (Issue AB, April 8, 2013)
Specification Number: 582145500
Model: NetSure™ ITM
NetSure™ ITM with eSure™ Technology
Installation Manual, Section 6040 (Issue AB, April 8, 2013)
This page is intentionally blank.
Spec. No: 582145500
Model: NetSure™ ITM
Section 6040
Issue AB, April 8, 2013
NetSure™ ITM with eSure™ Technology
Installation Manual, Section 6040 (Issue AB, April 8, 2013)
TABLE OF CONTENTS
IMPORTANT SAFETY INSTRUCTIONS . . . . . . . . . . . . . . . . . . . . . . . . . . . . . . . . . . . . . . . . . . . . . . . . 1
RELATED DOCUMENTATION . . . . . . . . . . . . . . . . . . . . . . . . . . . . . . . . . . . . . . . . . . . . . . . . . . . . . . 3
1.0
INSPECTING THE EQUIPMENT AND STORING FOR DELAYED INSTALLATIONS . . . . . . . . . . . . . 4
1.1
1.2
1.3
External Inspections . . . . . . . . . . . . . . . . . . . . . . . . . . . . . . . . . . . . . . . . . . . . . . . . . . . . . . . . . 4
Internal Inspections . . . . . . . . . . . . . . . . . . . . . . . . . . . . . . . . . . . . . . . . . . . . . . . . . . . . . . . . . . 4
Storing for Delayed Installation . . . . . . . . . . . . . . . . . . . . . . . . . . . . . . . . . . . . . . . . . . . . . . . . 4
2.0
INSTALLATION DRAWINGS AND RECOMMENDED TOOLS AND TEST EQUIPMENT . . . . . . . . . . . 6
2.1
2.2
2.3
Installation Drawings . . . . . . . . . . . . . . . . . . . . . . . . . . . . . . . . . . . . . . . . . . . . . . . . . . . . . . . . 6
Row-Based Installation Example . . . . . . . . . . . . . . . . . . . . . . . . . . . . . . . . . . . . . . . . . . . . . . 11
Recommended Tools and Test Equipment . . . . . . . . . . . . . . . . . . . . . . . . . . . . . . . . . . . . . . . 12
3.0
POSITIONING THE DC UPS SYSTEM . . . . . . . . . . . . . . . . . . . . . . . . . . . . . . . . . . . . . . . . .13
3.1
3.2
General Requirements . . . . . . . . . . . . . . . . . . . . . . . . . . . . . . . . . . . . . . . . . . . . . . . . . . . . . . . 13
General Guidelines for Positioning the DC UPS Modules . . . . . . . . . . . . . . . . . . . . . . . . . . . 13
3.2.1
3.2.2
3.2.3
3.3
3.4
Floor Installation . . . . . . . . . . . . . . . . . . . . . . . . . . . . . . . . . . . . . . . . . . . . . . . . . . . . . . . . . . . 14
Considerations in Moving the DC UPS Module . . . . . . . . . . . . . . . . . . . . . . . . . . . . . . . . . . . 15
3.4.1
3.4.2
3.4.3
3.5
3.6
Cable Entry . . . . . . . . . . . . . . . . . . . . . . . . . . . . . . . . . . . . . . . . . . . . . . . . . . . . . . . . . . . . . . . . . 13
Environmental Considerations . . . . . . . . . . . . . . . . . . . . . . . . . . . . . . . . . . . . . . . . . . . . . . . . . 13
Mechanical Considerations . . . . . . . . . . . . . . . . . . . . . . . . . . . . . . . . . . . . . . . . . . . . . . . . . . . . 14
Transporting . . . . . . . . . . . . . . . . . . . . . . . . . . . . . . . . . . . . . . . . . . . . . . . . . . . . . . . . . . . . . . . . 15
Moving a DC UPS Module . . . . . . . . . . . . . . . . . . . . . . . . . . . . . . . . . . . . . . . . . . . . . . . . . . . . . 15
Final Positioning. . . . . . . . . . . . . . . . . . . . . . . . . . . . . . . . . . . . . . . . . . . . . . . . . . . . . . . . . . . . . 15
Overhead Cable Tray Rails . . . . . . . . . . . . . . . . . . . . . . . . . . . . . . . . . . . . . . . . . . . . . . . . . . . 16
Front and Rear Bottom Panel Installation . . . . . . . . . . . . . . . . . . . . . . . . . . . . . . . . . . . . . . . 17
3.6.1
3.6.2
Bottom DC Distribution Feed (Bottom Cabled) Modules. . . . . . . . . . . . . . . . . . . . . . . . . . . . . 17
Top DC Distribution Feed (Top Cabled) Modules. . . . . . . . . . . . . . . . . . . . . . . . . . . . . . . . . . . 17
4.0
ELECTRICAL CONNECTIONS . . . . . . . . . . . . . . . . . . . . . . . . . . . . . . . . . . . . . . . . . . . . . . . 19
4.1
Wiring Information and Guidelines . . . . . . . . . . . . . . . . . . . . . . . . . . . . . . . . . . . . . . . . . . . . 19
4.1.1
4.1.2
4.1.3
4.2
4.3
4.4
Cable Lengths (Floor or Cabinet Top to Connection Point Inside DC UPS Module) . . . . . . . 19
Recommended Wire Sizes, Recommended Lugs, and Torque Requirements . . . . . . . . . . . . . 19
Wiring Guidelines. . . . . . . . . . . . . . . . . . . . . . . . . . . . . . . . . . . . . . . . . . . . . . . . . . . . . . . . . . . . 19
Protective Covers . . . . . . . . . . . . . . . . . . . . . . . . . . . . . . . . . . . . . . . . . . . . . . . . . . . . . . . . . . . 20
Wiring Connections Locations . . . . . . . . . . . . . . . . . . . . . . . . . . . . . . . . . . . . . . . . . . . . . . . . . 21
Making Electrical Connections . . . . . . . . . . . . . . . . . . . . . . . . . . . . . . . . . . . . . . . . . . . . . . . . 23
4.4.1
4.4.2
4.4.3
4.4.4
4.4.5
4.4.6
4.4.7
4.4.8
Spec. No: 582145500
Model: NetSure™ ITM
Cabinet Grounding Connection . . . . . . . . . . . . . . . . . . . . . . . . . . . . . . . . . . . . . . . . . . . . . . . . .
DC Distribution Ground/Return Busbar Grounding Connection . . . . . . . . . . . . . . . . . . . . . .
DC Output Distribution Connections . . . . . . . . . . . . . . . . . . . . . . . . . . . . . . . . . . . . . . . . . . . .
AC Input Power Connections . . . . . . . . . . . . . . . . . . . . . . . . . . . . . . . . . . . . . . . . . . . . . . . . . . .
Optional Alarm/Control Connections (to Primary Module only) . . . . . . . . . . . . . . . . . . . . . . .
ACU + Controller Ethernet Connection (to Primary Module only) . . . . . . . . . . . . . . . . . . . . .
Optional Emergency Power Off (EPO) Connection (to Primary Module only) . . . . . . . . . . . .
Battery Connections . . . . . . . . . . . . . . . . . . . . . . . . . . . . . . . . . . . . . . . . . . . . . . . . . . . . . . . . . .
i
23
23
24
25
27
30
31
32
Section 6040
Issue AB, April 8, 2013
NetSure™ ITM with eSure™ Technology
Installation Manual, Section 6040 (Issue AB, April 8, 2013)
4.5
Making Module-to-Module -48VDC and Ground/Return Interconnections
(if system consists of multiple DC UPS modules). . . . . . . . . . . . . . . . . . . . . . . . . . . . . . . . . . 32
4.5.1
4.6
-48Vdc and Ground/Return Busbar Interconnects . . . . . . . . . . . . . . . . . . . . . . . . . . . . . . . . . . 32
Making Alarm/Control Interconnections between Modules
(if system consists of multiple DC UPS modules). . . . . . . . . . . . . . . . . . . . . . . . . . . . . . . . . . 35
4.6.1
4.6.2
4.6.3
RS-485 Module-to-Module Interconnect . . . . . . . . . . . . . . . . . . . . . . . . . . . . . . . . . . . . . . . . . . 35
CAN-Bus Module-to-Module Interconnect . . . . . . . . . . . . . . . . . . . . . . . . . . . . . . . . . . . . . . . . 35
BLVD Module-to-Module Interconnect . . . . . . . . . . . . . . . . . . . . . . . . . . . . . . . . . . . . . . . . . . . 36
5.0
6.0
INSTALLING PCUS . . . . . . . . . . . . . . . . . . . . . . . . . . . . . . . . . . . . . . . . . . . . . . . . . . . . . . 42
START-UP INSTRUCTIONS . . . . . . . . . . . . . . . . . . . . . . . . . . . . . . . . . . . . . . . . . . . . . . . . . 43
6.1
6.2
General . . . . . . . . . . . . . . . . . . . . . . . . . . . . . . . . . . . . . . . . . . . . . . . . . . . . . . . . . . . . . . . . . . . 43
Final Battery Connections . . . . . . . . . . . . . . . . . . . . . . . . . . . . . . . . . . . . . . . . . . . . . . . . . . . . 43
6.2.1
6.2.2
6.2.3
6.3
Introduction . . . . . . . . . . . . . . . . . . . . . . . . . . . . . . . . . . . . . . . . . . . . . . . . . . . . . . . . . . . . . . . . 43
Safety. . . . . . . . . . . . . . . . . . . . . . . . . . . . . . . . . . . . . . . . . . . . . . . . . . . . . . . . . . . . . . . . . . . . . . 43
Connecting Batteries . . . . . . . . . . . . . . . . . . . . . . . . . . . . . . . . . . . . . . . . . . . . . . . . . . . . . . . . . 43
Initially Starting and Verifying DC UPS System Operation. . . . . . . . . . . . . . . . . . . . . . . . . 54
6.3.1
6.3.2
6.3.3
Initially Starting the DC UPS System and Verifying System Operation . . . . . . . . . . . . . . . . 55
Setting Common Controller Parameters. . . . . . . . . . . . . . . . . . . . . . . . . . . . . . . . . . . . . . . . . . 55
Changing the Numbering Scheme of the PCUs . . . . . . . . . . . . . . . . . . . . . . . . . . . . . . . . . . . . 56
7.0
SPECIFICATIONS AND TECHNICAL DATA. . . . . . . . . . . . . . . . . . . . . . . . . . . . . . . . . . . . . . . 57
7.1
7.2
7.3
7.4
7.5
Agency Approvals . . . . . . . . . . . . . . . . . . . . . . . . . . . . . . . . . . . . . . . . . . . . . . . . . . . . . . . . . . .
Environmental . . . . . . . . . . . . . . . . . . . . . . . . . . . . . . . . . . . . . . . . . . . . . . . . . . . . . . . . . . . . .
Mechanical Characteristics . . . . . . . . . . . . . . . . . . . . . . . . . . . . . . . . . . . . . . . . . . . . . . . . . . .
Monitoring Capability . . . . . . . . . . . . . . . . . . . . . . . . . . . . . . . . . . . . . . . . . . . . . . . . . . . . . . .
Electrical Characteristics. . . . . . . . . . . . . . . . . . . . . . . . . . . . . . . . . . . . . . . . . . . . . . . . . . . . .
57
57
57
58
59
7.5.1
7.5.2
7.5.3
7.5.4
7.5.5
7.5.6
7.5.7
7.5.8
7.5.9
7.5.10
7.5.11
59
61
61
62
63
65
65
66
66
66
67
Spec. No: 582145500
Model: NetSure™ ITM
Termination Type, Recommended Wire Size, Recommended Lugs. . . . . . . . . . . . . . . . . . . . .
Power Ratings . . . . . . . . . . . . . . . . . . . . . . . . . . . . . . . . . . . . . . . . . . . . . . . . . . . . . . . . . . . . . . .
AC Input Specifications . . . . . . . . . . . . . . . . . . . . . . . . . . . . . . . . . . . . . . . . . . . . . . . . . . . . . . .
DC Output Specifications. . . . . . . . . . . . . . . . . . . . . . . . . . . . . . . . . . . . . . . . . . . . . . . . . . . . . .
Battery Specifications . . . . . . . . . . . . . . . . . . . . . . . . . . . . . . . . . . . . . . . . . . . . . . . . . . . . . . . .
Advanced Control Unit Plus (ACU+) Controller. . . . . . . . . . . . . . . . . . . . . . . . . . . . . . . . . . . .
SM-DU+ . . . . . . . . . . . . . . . . . . . . . . . . . . . . . . . . . . . . . . . . . . . . . . . . . . . . . . . . . . . . . . . . . . .
SM-DU (used in Expansion Modules only in place of Controller) . . . . . . . . . . . . . . . . . . . . . .
SM-AC . . . . . . . . . . . . . . . . . . . . . . . . . . . . . . . . . . . . . . . . . . . . . . . . . . . . . . . . . . . . . . . . . . . . .
SM-BRC. . . . . . . . . . . . . . . . . . . . . . . . . . . . . . . . . . . . . . . . . . . . . . . . . . . . . . . . . . . . . . . . . . . .
Standard Features . . . . . . . . . . . . . . . . . . . . . . . . . . . . . . . . . . . . . . . . . . . . . . . . . . . . . . . . . . .
ii
Section 6040
Issue AB, April 8, 2013
NetSure™ ITM with eSure™ Technology
Installation Manual, Section 6040 (Issue AB, April 8, 2013)
FIGURES
Figure 1
Figure 2
Figure 3
Figure 4
Figure 5
Figure 6
Figure 7
Figure 8
Figure 9
Figure 10
Figure 11
Figure 12
Figure 13
Figure 14
Figure 15
Figure 16
Figure 17
Figure 18
Figure 19
Figure 20
Figure 21
Figure 22
Figure 23
Figure 24
Figure 25
Figure 26
Figure 27
Figure 28
Figure 29
Figure 30
Outline Drawing . . . . . . . . . . . . . . . . . . . . . . . . . . . . . . . . . . . . . . . . . . . . . . . . . . . . . . . . . . . . . . . . . 7
Bottom DC Distribution Feed Modules . . . . . . . . . . . . . . . . . . . . . . . . . . . . . . . . . . . . . . . . . . . . . . . 9
Top DC Distribution Feed Modules . . . . . . . . . . . . . . . . . . . . . . . . . . . . . . . . . . . . . . . . . . . . . . . . . 10
NetSure™ ITM Row-Based DC UPS System Installation Example . . . . . . . . . . . . . . . . . . . . . . . 11
Emerson Floor Stands . . . . . . . . . . . . . . . . . . . . . . . . . . . . . . . . . . . . . . . . . . . . . . . . . . . . . . . . . . . 14
Mounting Locations for Overhead Cable Tray Rails. . . . . . . . . . . . . . . . . . . . . . . . . . . . . . . . . . . . 16
Installing Front and Rear Bottom Panels . . . . . . . . . . . . . . . . . . . . . . . . . . . . . . . . . . . . . . . . . . . . 17
Installing Air Duct Assembly . . . . . . . . . . . . . . . . . . . . . . . . . . . . . . . . . . . . . . . . . . . . . . . . . . . . . . 18
Protective Covers . . . . . . . . . . . . . . . . . . . . . . . . . . . . . . . . . . . . . . . . . . . . . . . . . . . . . . . . . . . . . . . 20
Wiring Connections Locations (DC UPS Module with Bottom Feed DC Distribution) . . . . . . . . 21
Wiring Connections Locations (DC UPS Module with Top Feed DC Distribution) . . . . . . . . . . . 22
Cabinet Grounding Connection . . . . . . . . . . . . . . . . . . . . . . . . . . . . . . . . . . . . . . . . . . . . . . . . . . . . 23
DC Output Connections . . . . . . . . . . . . . . . . . . . . . . . . . . . . . . . . . . . . . . . . . . . . . . . . . . . . . . . . . . 24
AC Input Power Connection Routing Options. . . . . . . . . . . . . . . . . . . . . . . . . . . . . . . . . . . . . . . . . 26
Installing Conduit Fittings when AC is Fed from the Top . . . . . . . . . . . . . . . . . . . . . . . . . . . . . . . 26
AC Input Power Connections . . . . . . . . . . . . . . . . . . . . . . . . . . . . . . . . . . . . . . . . . . . . . . . . . . . . . . 26
Alarm and Control Connections . . . . . . . . . . . . . . . . . . . . . . . . . . . . . . . . . . . . . . . . . . . . . . . . . . . . 27
ACU+ Controller RJ-45 Ethernet Port . . . . . . . . . . . . . . . . . . . . . . . . . . . . . . . . . . . . . . . . . . . . . . 30
EPO Jumper Location. . . . . . . . . . . . . . . . . . . . . . . . . . . . . . . . . . . . . . . . . . . . . . . . . . . . . . . . . . . . 32
Module-Module Interconnect Busbars (DC UPS Module with Bottom Feed DC Distribution) . . 33
Module-Module Interconnect Busbars (DC UPS Module with Top Feed DC Distribution) . . . . . 34
SM-BRC RS-485 Jumper Locations . . . . . . . . . . . . . . . . . . . . . . . . . . . . . . . . . . . . . . . . . . . . . . . . . 35
Alarm/Control Cable Interconnects (cont’d on next page) . . . . . . . . . . . . . . . . . . . . . . . . . . . . . . . 37
System Configuration and Communications Connections . . . . . . . . . . . . . . . . . . . . . . . . . . . . . . . 39
Cabinet Interconnections . . . . . . . . . . . . . . . . . . . . . . . . . . . . . . . . . . . . . . . . . . . . . . . . . . . . . . . . . 40
Signal Cabling and Switch Settings. . . . . . . . . . . . . . . . . . . . . . . . . . . . . . . . . . . . . . . . . . . . . . . . . 41
PCU Handle and Safety Latch . . . . . . . . . . . . . . . . . . . . . . . . . . . . . . . . . . . . . . . . . . . . . . . . . . . . . 42
Making Final Battery Shelf Battery Interconnect Link Connections . . . . . . . . . . . . . . . . . . . . . . 44
Field Battery Monitoring Lead Connections to the SM-BRC Unit . . . . . . . . . . . . . . . . . . . . . . . . 54
System Efficiency Curve . . . . . . . . . . . . . . . . . . . . . . . . . . . . . . . . . . . . . . . . . . . . . . . . . . . . . . . . . . 62
Spec. No: 582145500
Model: NetSure™ ITM
iii
Section 6040
Issue AB, April 8, 2013
NetSure™ ITM with eSure™ Technology
Installation Manual, Section 6040 (Issue AB, April 8, 2013)
TABLES
Table 1
Table 2
Table 3
Table 4
Table 5
Table 6
Table 7
Table 8
Table 9
Table 10
Table 11
Table 12
Table 13
Table 14
Table 15
Table 16
Table 17
Table 18
DC UPS Module "Base Configuration Part Numbers"
and "Configured System Spec. Numbers" . . . . . . . . . . . . . . . . . . . . . . . . . . . . . . . . . . . . . . . . . . . . . 5
Distance to Connection Points inside the DC UPS Module . . . . . . . . . . . . . . . . . . . . . . . . . . . . . . 19
Programmable Digital Inputs . . . . . . . . . . . . . . . . . . . . . . . . . . . . . . . . . . . . . . . . . . . . . . . . . . . . . 28
Programmable Relay Outputs . . . . . . . . . . . . . . . . . . . . . . . . . . . . . . . . . . . . . . . . . . . . . . . . . . . . . 29
IB2 Board Communications Address Settings . . . . . . . . . . . . . . . . . . . . . . . . . . . . . . . . . . . . . . . . 30
ACU+ Controller RJ-45 Ethernet Port . . . . . . . . . . . . . . . . . . . . . . . . . . . . . . . . . . . . . . . . . . . . . . 30
DC UPS System Environmental Characteristics . . . . . . . . . . . . . . . . . . . . . . . . . . . . . . . . . . . . . . 57
DC UPS System Mechanical Characteristics (per module) . . . . . . . . . . . . . . . . . . . . . . . . . . . . . . 57
Shipping Dimensions and Weights . . . . . . . . . . . . . . . . . . . . . . . . . . . . . . . . . . . . . . . . . . . . . . . . . 58
AC Input and AC Input Grounding (per DC UPS module) . . . . . . . . . . . . . . . . . . . . . . . . . . . . . . 59
Cabinet Frame Grounding (per DC UPS module). . . . . . . . . . . . . . . . . . . . . . . . . . . . . . . . . . . . . . 59
DC Distribution (Distribution Circuit Breaker Option - per circuit breaker position) . . . . . . . . . 60
DC Distribution (Distribution Fuse Option - per fuse position). . . . . . . . . . . . . . . . . . . . . . . . . . . 60
Alarm/Control . . . . . . . . . . . . . . . . . . . . . . . . . . . . . . . . . . . . . . . . . . . . . . . . . . . . . . . . . . . . . . . . . . 61
Power Ratings . . . . . . . . . . . . . . . . . . . . . . . . . . . . . . . . . . . . . . . . . . . . . . . . . . . . . . . . . . . . . . . . . . 61
AC Input Specifications . . . . . . . . . . . . . . . . . . . . . . . . . . . . . . . . . . . . . . . . . . . . . . . . . . . . . . . . . . 61
DC Output Specifications . . . . . . . . . . . . . . . . . . . . . . . . . . . . . . . . . . . . . . . . . . . . . . . . . . . . . . . . . 62
Battery Specifications . . . . . . . . . . . . . . . . . . . . . . . . . . . . . . . . . . . . . . . . . . . . . . . . . . . . . . . . . . . . 63
Spec. No: 582145500
Model: NetSure™ ITM
iv
Section 6040
Issue AB, April 8, 2013
NetSure™ ITM with eSure™ Technology
Installation Manual, Section 6040 (Issue AB, April 8, 2013)
IMPORTANT SAFETY INSTRUCTIONS
SAVE THESE INSTRUCTIONS
This manual contains important instructions that should be followed during installation of your
NetSure™ ITM Row-Based DC UPS system.
Read this manual thoroughly before installing the DC UPS system. Retain this manual for use by
installing personnel.
!
WARNING
The DC UPS system should be installed by a qualified technician in accordance with the
information contained in this document.
!
WARNING
Special safety precautions are required for procedures involving handling and installation of
the DC UPS system. Observe all safety precautions in this manual before handling or
installing the DC UPS system.
!
WARNING
Exercise extreme care when handling DC UPS modules (cabinets) to avoid equipment damage
or injury to personnel. The DC UPS module weighs 3240 lb. (1470 kg), fully loaded.
Be aware of module weight and locate center of gravity symbols
before handling the DC UPS module. Test lift and balance the module
before transporting. Never tilt module more than 10 degrees from vertical.
!
WARNING
All power and control wiring should be installed by a qualified electrician. All power
and control wiring must comply with the National Electrical Code (NEC) and applicable local
codes.
Maximum load must not exceed that shown on the DC UPS module rating label.
Maximum output short circuit current is 7000 amperes.
!
WARNING
High Ground Leakage Current:
Ground connection is essential before connecting the input supply.
This equipment must be grounded in accordance with the NEC and applicable local codes.
!
CAUTION
Ground leakage current exceeds 3.5 mA and is less than 30 mA.
Transient and steady-state ground leakage currents, which may occur when starting the
equipment, should be taken into account when selecting instantaneous residual current
circuit breakers (RCCBs) or residual current devices (RCDs).
RCCBs must be selected sensitive to DC unidirectional pulses (Class A) and insensitive to
transient current pulses.
Note also that the ground leakage currents of the load will be carried by this RCCB or RCD.
Spec. No: 582145500
Model: NetSure™ ITM
1
Section 6040
Issue AB, April 8, 2013
NetSure™ ITM with eSure™ Technology
Installation Manual, Section 6040 (Issue AB, April 8, 2013)
!
CAUTION
This equipment is fitted with RFI suppression filters.
This unit complies with the limits for a Class A digital device, pursuant to Part 15 Subpart J
of the FCC rules. These limits provide reasonable protection against harmful interference in a
commercial environment. This unit generates, uses and radiates radio frequency energy and,
if not installed and used in accordance with this instruction manual, may cause harmful
interference to radio communications. This unit is not designed for use in a residential area.
Operation of this unit in a residential area may cause harmful interference that the User
must correct at his own expense.
!
WARNING
In case of fire involving electrical equipment, use only carbon dioxide fire extinguishers or
those approved for use in fighting electrical fires.
Battery Compartment Precautions
Batteries are factory installed in the DC UPS module. Final battery connections will be made by
Emerson after the DC UPS module is installed. DO NOT MAKE BATTERY CONNECTIONS. The
following precautions apply to the battery compartment that is part of the DC UPS module.
!
WARNING
Special safety precautions are required for procedures involving handling, installing, and
servicing batteries. Observe all battery safety precautions presented here and in the battery
instruction manual. These precautions should be followed implicitly at all times.
!
WARNING
A battery can present a risk of electrical shock and high short circuit current. Servicing of
batteries should be performed or supervised only by properly trained and qualified personnel
knowledgeable about batteries and the required precautions.
The following precautions should be observed when working on batteries:
•
•
•
•
•
•
Remove watches, rings and other metal objects.
Eye protection should be worn to prevent injury from accidental electrical arcs.
Use certified and well maintained insulated tools.
Do not lay tools or metal parts on top of batteries.
Disconnect charging source prior to connecting or disconnecting battery terminals.
Determine if battery is inadvertently grounded. If the battery is inadvertently grounded,
remove source from ground. Contact with any parts of a grounded battery can result in
electrical shock. The likelihood of such shock can be reduced if such grounds are removed
during installation and maintenance (applicable to equipment and remote battery supplies
not having a grounded supply circuit).
• Risk of explosion if battery is replaced with an incorrect type or if polarity is reversed.
When replacing batteries, replace with the same manufacturer and type, or equivalent. See
your local Emerson representative for a list of approved batteries.
• Dispose of used batteries according to the instructions provided with the batteries. Do not
dispose of batteries in a fire. They may explode.
In addition to the hazard of electric shock, gas produced by batteries can be explosive and
sulfuric acid can cause severe burns. Do not open or mutilate batteries. Released electrolyte is
harmful to the skin and eyes, and is toxic. If electrolyte comes into contact with skin, the
affected area should be washed immediately with large amounts of water.
Spec. No: 582145500
Model: NetSure™ ITM
2
Section 6040
Issue AB, April 8, 2013
NetSure™ ITM with eSure™ Technology
Installation Manual, Section 6040 (Issue AB, April 8, 2013)
!
WARNING
The DC UPS module’s internal batteries are connected and energized even if the DC UPS
module is turned OFF. Battery disconnect fuses are provided inside the DC UPS module. To
minimize the risk of injury, remove the battery disconnect fuses before any off-line servicing
is performed on the unit.
!
WARNING
DO NOT REMOVE BATTERY STRAPS. If a battery cell is replaced, ensure the battery strap
is replaced and appropriately tighten.
• Battery compartments contain non-spillable batteries.
• Keep units upright.
• Do not stack.
• Do not tilt.
Failure to heed this warning could result in smoke, fire, or electric hazard.
Call Emerson before moving DC UPS modules (after initial installation).
RELATED DOCUMENTATION
• System Operation Document (Section 6047).
• Site Planning Data and System Drawings Document (Section 6037).
• Emerson Excellence Range VRLA Battery (31020591)
Spec. No: 582145500
Model: NetSure™ ITM
3
Section 6040
Issue AB, April 8, 2013
NetSure™ ITM with eSure™ Technology
Installation Manual, Section 6040 (Issue AB, April 8, 2013)
1.0
INSPECTING THE EQUIPMENT AND STORING FOR DELAYED INSTALLATIONS
1.1
External Inspections
1. While the DC UPS system is still on the truck, inspect the equipment and shipping container(s)
for any signs of damage or mishandling. Do not attempt to install the system if damage is
apparent. If any damage is noted, file a damage claim with the shipping agency within 24 hours
and contact Emerson Network Power (number located on last pages of this document) to inform
them of the damage claim and the condition of the equipment.
2. Compare the contents of the shipment with the bill of lading. Report any missing items to the
carrier and your local Emerson representative immediately.
1.2
Internal Inspections
1. Remove any packaging material, then visually examine the DC UPS system for transit damage,
both internally and externally. Report any such damage to the shipper and to Emerson
immediately.
2. Check the nameplate inside the DC UPS module (located on the front top right side with front
door open) to verify that the "base configuration part number" and the "configured system spec.
number" correspond to the units ordered. Record the DC UPS module identification numbers and
serial number in the front of this manual. This information is necessary should service be
required. See Table 1.
NOTE
The "base configuration part number" determines how the DC UPS module is physically
configured and the "configured system spec. number" determines how the DC UPS module has
been set up.
3. Check for loose connections or unsecured components in the module.
4. Check for shipping damage to internal components.
1.3
Storing for Delayed Installation
If the equipment will not be installed immediately, it must be stored indoors where the humidity is no
higher than 95%. The storage area must protect the DC UPS system from excessive moisture.
For optimal battery life, store at a temperature between -4°F to +77°F (-20°C to +25°C) (see 7.2 Environmental).
!
CAUTION
If the batteries must remain disconnected from the DC UPS module for more than six (6)
months, the batteries must be recharged before use. To charge the batteries, the batteries
must be connected to the DC UPS module and the DC UPS module must be connected to
utility power and started up by qualified personnel.
Spec. No: 582145500
Model: NetSure™ ITM
4
Section 6040
Issue AB, April 8, 2013
NetSure™ ITM with eSure™ Technology
Installation Manual, Section 6040 (Issue AB, April 8, 2013)
Table 1
DC UPS Module "Base Configuration Part Numbers"
and "Configured System Spec. Numbers"
Base Configuration Part Numbers
Part Number
Module
Distribution
Feed
Distribution
No. of AC
Inputs
FAB8010542/2
Primary
Top
(22) Circuit Breaker
1
FAB8010542/1
Primary
Top
(22) Circuit Breaker
2
FAB8010542/4
Primary
Top
(6) Fuse
1
FAB8010542/3
Primary
Top
(6) Fuse
2
FAB8010540/2
Primary
Bottom
(22) Circuit Breaker
1
FAB8010540/1
Primary
Bottom
(22) Circuit Breaker
2
FAB8010540/4
Primary
Bottom
(6) Fuse
1
FAB8010540/3
Primary
Bottom
(6) Fuse
2
FAB8010543/2
Expansion
Top
(22) Circuit Breaker
1
FAB8010543/1
Expansion
Top
(22) Circuit Breaker
2
FAB8010543/4
Expansion
Top
(6) Fuse
1
FAB8010543/3
Expansion
Top
(6) Fuse
2
FAB8010541/2
Expansion
Bottom
(22) Circuit Breaker
1
FAB8010541/1
Expansion
Bottom
(22) Circuit Breaker
2
FAB8010541/4
Expansion
Bottom
(6) Fuse
1
FAB8010541/3
Expansion
Bottom
(6) Fuse
2
Configured System Spec. Numbers
Spec. Number
Description
582145500-M1
Primary Module
582145500-M2
1st Expansion Module
582145500-M3
2nd Expansion Module
582145500-M4
3rd Expansion Module
Spec. No: 582145500
Model: NetSure™ ITM
5
Section 6040
Issue AB, April 8, 2013
NetSure™ ITM with eSure™ Technology
Installation Manual, Section 6040 (Issue AB, April 8, 2013)
2.0
INSTALLATION DRAWINGS AND RECOMMENDED TOOLS AND TEST EQUIPMENT
2.1
Installation Drawings
The diagrams in this section illustrate the key mechanical and electrical characteristics of the
NetSure ITM DC UPS system.
General Notes Applicable to All Illustrations
1.
2.
3.
4.
5.
6.
7.
All dimensions are in inches (millimeters).
Minimum clearance above unit required for air exhaust is 8 in. (203mm).
Keep module within 10 degrees of vertical while handling.
Top and bottom cable entry options available.
Color - black.
Unit bottom is structurally adequate for forklift handling.
M12 mounting holes used for seismic anchoring or floor stand.
NOTE
If floor stand is used, the weight of the unit must be supported under all casters.
8. The Primary Module includes side panels. For installations consisting of Expansion Module(s),
one side panel on the Primary Module must be removed and be placed on the end Expansion
Module.
9. Leveling feet are not designed to carry the full weight of the module.
10. Finger-tighten leveler against the floor, then tighten with a wrench less than 2 turns for friction
fit against floor.
11. Control wiring, output cabling, and input cabling must be run separately.
12. Aluminum and copper-clad aluminum cables are not recommended.
13. All wiring is to be in accordance with the NEC and applicable local codes.
Spec. No: 582145500
Model: NetSure™ ITM
6
Section 6040
Issue AB, April 8, 2013
NetSure™ ITM with eSure™ Technology
Installation Manual, Section 6040 (Issue AB, April 8, 2013)
Figure 1
Outline Drawing
DC UPS MODULE WITH
TOP FEED DC DISTRIBUTION
DC UPS MODULE WITH
BOTTOM FEED DC DISTRIBUTION
Battery Compartment
Battery Compartment
CG
41.34
(1050)
26.38
(670)
CG
Conduits for
AC Inputs
41.34
(1050)
DC Power System
Compartment
26.38
(670)
DC Power System
Compartment
Conduits for
AC Inputs
11.81
(300)
11.81
(300)
23.62
(600)
Top View
23.62
(600)
Top View
CENTER OF GRAVITY
84.33
(2142)
top
cabled
Top Cabled Version
X = 11.81 (300)
Y = 26.38 (670)
Z = 36.61 (930)
84.72
(2152)
bottom
cabled
Bottom Cabled Version
X = 11.81 (300)
Y = 26.38 (670)
Z = 40.55 (1030)
(Bottom
cabled)
CG
Z
Y
CG
(top
cabled)
X
40.55
(1030)
36.61
(930)
See Detail A
for Bottom
Notes:
1. Dimensions are in inches (millimeters).
2. Weight (fully loaded): 3240 lbs / 1470 kg.
3. Heat Rejection: 18096 BTU/h at full load (per module).
4. May be installed on concrete slab or raised floor.
11.81
(300)
Front View
Spec. No: 582145500
Model: NetSure™ ITM
7
Section 6040
Issue AB, April 8, 2013
NetSure™ ITM with eSure™ Technology
Installation Manual, Section 6040 (Issue AB, April 8, 2013)
Figure 1, Detail A
ANCHORING
Anchoring bracket (4x)
used on concrete floor
(8X) Hilti HSV 1/2X4 1/2:
Item No.: 00384687
Anchoring bolts (4x)
used on raised floor
M12 x 1.75 x 70 Metric Socket Head Cap Screw.
(4X) Plain Finish with Allen Drive (hex drive) / Coarse
thread. Grade 12.9.
(4X)
M12 X 1.75 Metric Hex Nuts - Grade 10.9 /
Coarse Thread / Zinc Plated.
(8X) M12 Metric Flat Washer. Grade 10.9 /
Zinc. D=28mm or 11/8".
Corresponding ½” Imperial Fasteners Can Also be Used
Hole through foot (4x) for
anchoring on raised floor
39.65 (1007)
19.68 (500)
12.99 (330) - 13.39 (340)
31.22 (793)
R 0.28 (7)
35.43 (900)
0.59 (15)
35.43 (900)
Spec. No: 582145500
Model: NetSure™ ITM
8
Section 6040
Issue AB, April 8, 2013
NetSure™ ITM with eSure™ Technology
Installation Manual, Section 6040 (Issue AB, April 8, 2013)
Figure 2
Bottom DC Distribution Feed Modules
Battery
Compartment
Conduits for
AC Inputs
DC Power System
Compartment
Hot Aisle
Cold Aisle
Top
PCUs
PCUs
PCUs
PCUs
PCUs
PCUs
Air Flow
Battery
Compartment
BFU
Distr.
Distr.
Note 2
Raised Floor
Front
Side View
17.72 (450)
35.43
(900)
8.86
(225)
9.84
(250)
Support
Stand
8.86
(225)
9.84
(250)
½” (12mm) Floor
Anchoring Bolts
(4 places)
Spec. No: 582145500
Model: NetSure™ ITM
A
Optional Floor
Opening for
Battery Cooling
19.68
(500)
9
Notes:
1. Dimensions are in inches (millimeters).
2. Do not block air intake openings.
3. Minimum under floor space for underfloor
output cable runs: A = 1f (300mm).
4. Run cables not to block air openings for battery
cooling.
Section 6040
Issue AB, April 8, 2013
NetSure™ ITM with eSure™ Technology
Installation Manual, Section 6040 (Issue AB, April 8, 2013)
Figure 3
Top DC Distribution Feed Modules
Hot Aisle
Cold Aisle
Battery
Compartment
Distr.
DC Power
System
Compartment
AC Input
Conduit Openings
Openings for
Output Cables
Distr.
Air Flow
Top
Battery
Compartment
PCUs
PCUs
PCUs
PCUs
PCUs
PCUs
BFU
Concrete
Floor (slab)
Side View
Cable Tray
Note 2
Cable Tray Supports
if Mounted on Top of
Module
Front
Cable Run
35.43
(900)
Air Exchange
(keep clear)
Front View
½” (12mm) Floor
Anchoring Bolts
(4 places)
19.68
(500)
Battery
Compartment
23.62
(600)
Cable Tray
Notes:
1. Dimensions are in inches (millimeters).
2. Do not block air intake openings.
Top View
Spec. No: 582145500
Model: NetSure™ ITM
10
Openings for
Output Cables
Section 6040
Issue AB, April 8, 2013
NetSure™ ITM with eSure™ Technology
Installation Manual, Section 6040 (Issue AB, April 8, 2013)
2.2
Row-Based Installation Example
The NetSure ITM DC UPS system provides the flexibility to meet the needs of any data center.
The NetSure ITM DC UPS system is delivered fully configured for quick and easy field installation.
Multiple DC UPS modules can easily be connected on site in order to increase capacity. Each module
takes only 24" (w) x 41" (d) of floor space, including batteries and primary distribution. The NetSure
ITM DC UPS system is typically installed in the middle or at the end of a row of server racks. This
makes the system uniquely flexible and scalable. Deploy only the capacity that is initially needed;
modules can be added at any time to existing units on the data center floor.
Figure 4 depicts a top distribution feed installation powering IT racks. Depending on your site and
budget requirements, the NetSure ITM DC UPS solution can either be installed as a single
deployment, or incrementally by row. In either scenario, DC distribution cabling to each rack is
reduced by placing the NetSure ITM DC UPS in-the-row.
Whatever the physical layout of your data center, the NetSure ITM DC UPS allows for maximum
space for IT equipment. With DC UPS building block modules, you can mix and match configurations
and standard layouts to fit your available space.
Figure 4
NetSure™ ITM Row-Based DC UPS System Installation Example
Spec. No: 582145500
Model: NetSure™ ITM
11
Section 6040
Issue AB, April 8, 2013
NetSure™ ITM with eSure™ Technology
Installation Manual, Section 6040 (Issue AB, April 8, 2013)
2.3
Recommended Tools and Test Equipment
The following tools and test equipment are recommended to install the DC UPS modules.
•
•
•
•
•
•
•
•
•
•
•
•
•
•
•
•
•
•
Non-Contact Voltage Detector
Digital Multimeter (DMM), 0 to 60 V dc, 0 to 600 V ac
NO-OX-ID-A or Approved Equivalent
Lineman's Scissors
Lineman's Strippers
Lineman's Cutters
Electrician's Insulated Screwdrivers, Phillips, No. 1 and 2
Electrician's Insulated Screwdrivers, Flat-Blade, Small and Large
Adjustable Torque Wrench, 1/2" Drive, 0 in-lb to 800 in-lb
Ratchet, 1/2" Drive
Insulated Nut Driver Set
Crimping Tool with Dies from 350 kcmil to 2 AWG
Torx Screwdrivers or Bits: TX10 and TX20
17 mm Wrench or Socket for M10 Bolts and Nuts (for circuit breaker distribution)
19 mm Wrench or Socket for M12 Bolts and Nuts (for fuse distribution)
24 mm Wrench for Pallet.
Hexagonal mm Bit for the Air Duct.
Hexagonal Bit for the AC Input Breaker.
Contact Emerson for full turn key installation quote.
Spec. No: 582145500
Model: NetSure™ ITM
12
Section 6040
Issue AB, April 8, 2013
NetSure™ ITM with eSure™ Technology
Installation Manual, Section 6040 (Issue AB, April 8, 2013)
3.0
POSITIONING THE DC UPS SYSTEM
This section describes the environmental and mechanical considerations that must be taken into
account when planning the positioning and cabling of the DC UPS system. This section also provides
procedures for physical installation of the DC UPS cabinet.
Because every site is unique, some subsections present a guide to general procedures and practices
that should be observed by the installing engineer, rather than step-by-step installation instructions.
3.1
General Requirements
• The installer should be familiar with the installation requirements and techniques to be used in
securing the DC UPS module (cabinet) to the floor. It is up to the customer to determine the
requirements for anchoring the cabinet to the specific type of floor at the site, select proper
anchors, and to investigate the proper use of the anchor.
• This product is intended only for installation in a Restricted Access Location on or above a noncombustible surface.
• Front and rear access is required for installation and operation (see Clearances in this section).
3.2
General Guidelines for Positioning the DC UPS Modules
Choose a location for the DC UPS system that offers:
•
•
•
•
•
•
3.2.1
Easy connection to inputs, outputs, and alarms.
Air circulation sufficient to expel heat produced by the DC UPS system.
Protection against moisture and excessive humidity.
Protection against dust and other particulate matter.
Enough space to service the DC UPS system (see Clearances in this section).
Compliance with fire prevention regulations and practices.
Cable Entry
DC distribution and alarm cables enter the DC UPS module from the top or bottom, depending on
module configuration (top distribution feed or bottom distribution feed).
AC input cables can enter either at the top or bottom. Conduit openings are provided in both
locations.
3.2.2
Environmental Considerations
Before installing the DC UPS system, verify that the room satisfies the environmental conditions
stipulated in 7.2 - Environmental, paying particular attention to the ambient temperature and air
exchange system. Also refer to 7.2 - Environmental for details on heat dissipation.
The DC UPS system should be installed in a cool, dry, clean-air environment with adequate
ventilation to keep the ambient temperature within the specified operating range +23°F to +95°F
(-5°C to +35°C).
• Batteries are installed in the DC UPS module’s battery compartment. Temperature is a major
factor in determining battery life and capacity. Battery manufacturers recommend an operating
temperature of 77°F (25°C). Ambient temperatures higher than this reduce battery life;
temperatures lower than this reduce battery capacity. For optimal battery performance and
service life, inlet air temperature to the battery compartment (from the front of the system)
should be maintained between +68°F to +77°F (+20°C to +25°C).
The DC UPS module is cooled by internal fans. Cooling air enters the system through the front of the
unit and is exhausted out the top. To permit proper air flow and prevent overheating, do NOT block or
cover the ventilation openings or blow air down onto the unit. Ventilation clearance above the unit
must be a minimum of 8 in. (203mm).
Spec. No: 582145500
Model: NetSure™ ITM
13
Section 6040
Issue AB, April 8, 2013
NetSure™ ITM with eSure™ Technology
Installation Manual, Section 6040 (Issue AB, April 8, 2013)
3.2.3
Mechanical Considerations
The DC UPS system can be comprised of up to four (4) modules (cabinets), depending upon your
power requirements. All modules used are the same size and are designed to be positioned side-byside to form an aesthetically appealing equipment suite. The system always contains one (1) Primary
Module. For increased power demands, up to three (3) Expansion Modules may be added. Locate the
Primary Module at the far left or far right of the row. Remove the side panel from the Primary Module
from the side that will face adjacent Expansion Modules. Place the first Expansion Module next to the
Primary Module. Place additional Expansion Modules (if required) next to each other. Install the side
panel removed from the Primary Module to the open side of the last Expansion Module in the row.
NOTE
When the DC UPS system consists of multiple modules, the switches inside the modules are
pre-set at the factory to identify the module as the Primary Module, 1st Expansion Module, 2nd
Expansion Module, or 3rd Expansion Module. When placing modules, refer to the nameplate
identification number (see Table 1) to ensure the Primary Module is placed on the end, and
Expansion Modules are place in sequential order.
Clearances
There are no ventilation grilles on the sides of the DC UPS module. The DC UPS modules may be
placed with the sides touching or against a wall.
To enable routine tightening of power terminations within the DC UPS module, make sure there is
sufficient clearance in front and rear of the DC UPS module to permit free passage of personnel and
that the front door can be fully opened.
Leave a minimum of 8 in. (203mm) between the top of the DC UPS module and the ceiling to permit
adequate air circulation above the unit. Emerson recommends against using air conditioning or other
systems that blow air onto the top of the unit.
Leave a minimum of 36 in. (914 mm) between the back of the DC UPS module and a wall to permit
adequate air circulation for the battery compartment fans and facilitate maintenance access.
3.3
Floor Installation
Refer also to 3.1 - General Requirements.
The diagrams in 2.0 - Installation Drawings and Recommended Tools and Test Equipment
show the location of holes in the base plate for bolting the DC UPS module to the floor.
If the module is to be placed on a raised floor, it should be mounted on a floor stand that will support
the equipment point loading. Refer to the cabinet-bottom views in 2.0 - Installation Drawings and
Recommended Tools and Test Equipment to design this pedestal. Contact your Emerson Sales
Representative for a floor stand designed for this system (see Figure 5).
Figure 5
Emerson Floor Stands
P/N 547822
24” Tall Floor Stand
Spec. No: 582145500
Model: NetSure™ ITM
P/N 547823
36” Tall Floor Stand
14
Section 6040
Issue AB, April 8, 2013
NetSure™ ITM with eSure™ Technology
Installation Manual, Section 6040 (Issue AB, April 8, 2013)
3.4
Considerations in Moving the DC UPS Module
3.4.1
Transporting
Ensure that the DC UPS module weight is within the designated surface weight loading (lb./ft2 or kg/
cm2) of any handling equipment. The DC UPS module weighs 3240 lb. (1470 kg), fully loaded.
WARNING
!
Ensure that any equipment that will be used to move the DC UPS module has sufficient
lifting capacity. Ensure adequate personnel and lifting equipment are available when taking
the module off its shipping pallet. The module presents a tipping hazard. Do not tilt the
module further than 10 degrees from vertical.
The DC UPS module is fitted with casters. Take care to prevent movement when unbolting
the module from its shipping pallet. The casters are strong enough for movement across even
surfaces only. Casters may fail if they are subjected to shock loading, such as being dropped or
rolled over holes in the floor or obstructions. Such failure may cause the unit to tip over,
injuring personnel and damaging the equipment.
WARNING
!
Batteries are factory installed in the DC UPS module’s battery compartment. Care must be
taken when maneuvering modules with batteries. Keep such moves to a minimum. See
Battery Compartment Precautions on page 2.
3.4.2
Moving a DC UPS Module
Cabinet Preparation
1. Inspect the cabinet as described in 1.1 - External Inspections and 1.2 - Internal Inspections.
2. Remove the front and rear bottom panels to gain access to the bolts securing the cabinet to the
pallet.
Moving DC UPS Module from Shipping Pallet
Use lifting equipment, such as a forklift or similar equipment, appropriately rated for the weight of
the load to move the DC UPS cabinet from its shipping pallet.
When moving a DC UPS cabinet with a forklift or similar equipment, make sure that the fork is of
sufficient length for the pallet size and capable of lifting the cabinet. Also use a forklift with
adjustable forks or a narrow type.
1.
2.
3.
4.
5.
Close the front door.
Slide the forklift into place.
Unbolt the cabinet from the pallet.
Lift the cabinet. The pallet should drop off from its own weight.
Carefully move the DC UPS module to its installation location or set the DC UPS module down on
its casters if it is to be rolled into position.
Moving DC UPS Module to Installation Location
The DC UPS module may be rolled on its casters when moving the unit a short distance. For longer
distances, move the DC UPS module with a forklift or similar equipment to ease the relocation and to
reduce vibration.
3.4.3
Final Positioning
Note that the DC UPS modules sit on four casters. When the DC UPS module has been finally
positioned, ensure that the adjustable stops are set so that the DC UPS module will remain
stationary and stable.
Spec. No: 582145500
Model: NetSure™ ITM
15
Section 6040
Issue AB, April 8, 2013
NetSure™ ITM with eSure™ Technology
Installation Manual, Section 6040 (Issue AB, April 8, 2013)
3.5
Overhead Cable Tray Rails
Refer to Figure 6 for mounting locations for overhead cable tray rails.
Figure 6
Mounting Locations for Overhead Cable Tray Rails
Brackets can be used to secure
rails for overhead cable trays, drill
as required.
Holes for 1/4” thread-forming
screws to secure rails for
overhead cable trays.
Customer supplied
conduit fittings
Spec. No: 582145500
Model: NetSure™ ITM
16
Section 6040
Issue AB, April 8, 2013
NetSure™ ITM with eSure™ Technology
Installation Manual, Section 6040 (Issue AB, April 8, 2013)
3.6
Front and Rear Bottom Panel Installation
3.6.1
Bottom DC Distribution Feed (Bottom Cabled) Modules
Refer to Figure 7 and install the front and rear bottom panels.
Figure 7
Installing Front and Rear Bottom Panels
Power Compartment Half
3.6.2
Secure with
Supplied Screws
Battery Compartment Half
Top DC Distribution Feed (Top Cabled) Modules
Installing the Supplied Air Duct Assembly: The Air Duct Assembly must be installed in DC UPS
modules configured for top DC distribution feed (top cabled). The Air Duct Assembly allows air to be
drawn from the bottom front of the DC UPS module and up into the battery compartment for cooling.
Refer to Figure 8 and install the supplied Air Duct Assembly.
Spec. No: 582145500
Model: NetSure™ ITM
17
Section 6040
Issue AB, April 8, 2013
NetSure™ ITM with eSure™ Technology
Installation Manual, Section 6040 (Issue AB, April 8, 2013)
Figure 8
Installing Air Duct Assembly
Note: If AC power cables are fed from the bottom, install AC power cables before installing air duct.
Note: The rubber parts of the air duct assembly may be lubricated with water before sliding the air duct halves into place.
Procedure:
1) Partially slide the half of the air duct assembly with vents into the
front bottom compartment of the DC UPS module (power compartment bottom).
2) Install and secure the supplied bracket with the supplied screws.
3) Slide the half of the air duct assembly with vents completely into the DC UPS module,
and secure with the supplied screws.
Install supplied bracket after
partially sliding assembly in.
Secure with supplied screws.
Power Compartment Half
4) Slide the remaining half of the air duct assembly into the
rear bottom compartment of the DC UPS module (battery compartment bottom).
5) Secure the air duct half just installed with the supplied screws.
Secure with supplied screws.
Battery Compartment Half
Air Duct Assembly
Battery Compartment Half
Power Compartment Half
Installed View
Spec. No: 582145500
Model: NetSure™ ITM
18
Section 6040
Issue AB, April 8, 2013
NetSure™ ITM with eSure™ Technology
Installation Manual, Section 6040 (Issue AB, April 8, 2013)
4.0
ELECTRICAL CONNECTIONS
The DC UPS system requires grounding, DC output distribution, AC input power, alarm/control, and
battery wiring once it has been mechanically installed.
If the system consists of multiple DC UPS modules, battery and ground/return busbars must be
interconnected and alarm/control interconnect wiring between modules must be made.
4.1
Wiring Information and Guidelines
4.1.1
Cable Lengths (Floor or Cabinet Top to Connection Point Inside DC UPS Module)
To help calculate the total cable length required, refer to Table 2 for the distance from the floor or
cabinet top to selected connection points inside the DC UPS module. Determine the cable length
required to reach the DC UPS module, then add the appropriate length from the table and adequate
slack for repair and maintenance.
Table 2
Distance to Connection Points inside the DC UPS Module
Connection Point
inside DC UPS
Module
4.1.2
Distance - Bottom
DC Distribution Feed Module
Distance - Top
DC Distribution Feed Module
From Floor
in. (mm)
From Top of Module
in. (mm)
From Floor
in. (mm)
From Top of Module
in. (mm)
AC Input
79 (2000)
138 (3500)
157 (4000)
59 (1500)
DC Output
28 (700)
N/A
N/A
28 (700)
Grounding
79 (2000)
138 (3500)
157 (4000)
59 (1500)
Alarm/Control
59 (1500)
N/A
N/A
47 (1200)
Recommended Wire Sizes, Recommended Lugs, and Torque Requirements
The main factors affecting the choice and size of wires are voltage, current (also taking into account
overcurrent), room temperature, and installation conditions.
The power cables of the system must be sized with respect to the following:
• AC Input Cables - The AC input cables must be sized for the module’s maximum input current.
• DC Output Distribution Cables - The DC output distribution cables must be sized for the
module’s output breakers or fuses.
• Battery Cables - The DC UPS module contains a battery compartment. Battery cables are
factory supplied and sized accordingly.
Refer to Termination Type, Recommended Wire Size, Recommended Lugs on page 59 for
recommended wire sizes and recommended lugs. Refer to the illustrations in this section for torque
requirements.
NOTE
The above referenced section gives nominal currents for determining the size of DC UPS
module power cables. Other important factors to consider include cable route length and
coordination with protective devices.
4.1.3
Wiring Guidelines
The following are guidelines only and are superseded by the NEC and applicable local codes where
applicable.
• The grounding cable connecting the DC UPS module to the main ground system must follow the
most direct route possible.
• Consider using paralleled smaller cables for heavy currents—this can ease installation.
Spec. No: 582145500
Model: NetSure™ ITM
19
Section 6040
Issue AB, April 8, 2013
NetSure™ ITM with eSure™ Technology
Installation Manual, Section 6040 (Issue AB, April 8, 2013)
• When laying power cables, do not form coils; this will help avoid increasing formation of
electromagnetic interference. Positive and negative cables should be run together.
• Alarm/control wiring and power wiring must be run separately.
Output and input cables must be run separately.
4.2
Protective Covers
Wiring connection access requires removing protective covers from the DC UPS module. When
making electrical connections, remove the appropriate protective cover, as shown in Figure 9.
Replace all protective covers after all electrical connections have been made and checked.
Figure 9
Protective Covers
Protective Cover
Protective Cover
Protective Cover
Protective Cover
Protective Cover
Protective Cover
Protective Cover
Protective Cover
Protective Cover
Protective Cover
SU IT ABLE F OR M OU N T IN G ON C ON C R ET E
OR OT H E R N O N -C O M BU ST IBLE SU R F AC E ON LY.
SUITABLE FOR MOUNTING ON CONCRETE
OR OTHER NON-COMBUSTIBLE SURFACE ONLY.
Front View
(Bottom Cabled Configuration)
AC Input
Protective Cover
Front View
(Top Cabled Configuration)
Rear View
Dual AC Input
Circuit Breaker Option
Protective Cover View
(Top cabled configuration shown,
bottom cabled configuration similar.)
AC Input Protective
Cover Removed
Spec. No: 582145500
Model: NetSure™ ITM
20
Section 6040
Issue AB, April 8, 2013
NetSure™ ITM with eSure™ Technology
Installation Manual, Section 6040 (Issue AB, April 8, 2013)
4.3
Wiring Connections Locations
The DC UPS module input and output cable connections are easily accessible from the front of the
unit for installation. Refer to Figure 10, Figure 11, Figure 12, Figure 13, Figure 14, Figure 16,
Figure 17, Figure 18, and Figure 19 for connection locations. The DC UPS module contains a
battery compartment. Battery cables are factory supplied and connected to the DC UPS module. Final
connections to the batteries are made in the procedure in 6.2 - Final Battery Connections. Battery
connections are done from the rear of the DC UPS module.
Figure 10 Wiring Connections Locations (DC UPS Module with Bottom Feed DC Distribution)
Module Cabinet
Grounding
AC Input
Conduit Openings
(AC input cables
may also enter at
bottom of cabinet.)
AC Input
(to circuit breakers)
Alarm/Control
Cabling Channel
DC Output
Circuit Breaker (Fuse)
Busbars (-48VDC)
Ground/Return
Busbars
ISO View
(panels removed)
ISO View
(panels removed)
PCU AC Input
Circuit Breakers
AC Input Conduit Opening
2"
Recommended Coupling:
Raco Type 2628 (Grainger 3LV08)
or Thomas Betts Type TK126US
Alarm/Control Connections
(to ACU+ IB2 Interface Board)
(Primary Module only)
AC Input
Circuit Breaker(s)
ACU+ Controller
(Primary Module only)
AC Input Circuit
Breaker Cover
Battery Fuses (3)
(Battery leads factory
connected and routed to
Battery Compartment.)
AC Input Channel
Load Distribution Devices
DCCB01 - DCCB11 (Top Row)
DCCB12 - DCCB22 (Bottom Row)
(DC distribution breakers shown,
large fuses available.)
Note: Three extra positions are provided
on the ground/return busbar for customer
connection to site ground.
Battery Compartment and Base
Removed in Illustrations for Clarity
Front View
(door removed)
Spec. No: 582145500
Model: NetSure™ ITM
21
Battery Return and Load Return
(Battery return leads factory
connected and routed to
Battery Compartment.)
Section 6040
Issue AB, April 8, 2013
NetSure™ ITM with eSure™ Technology
Installation Manual, Section 6040 (Issue AB, April 8, 2013)
Figure 11 Wiring Connections Locations (DC UPS Module with Top Feed DC Distribution)
AC Input Conduit
Openings (AC input
cables may also enter
at bottom of cabinet,
conduit supplied
routed to bottom
of cabinet.)
DC Output
Cable Openings
Module Cabinet
Grounding
Ground/Return
Busbars
Alarm/Control
Cabling Channel
DC Output
Circuit Breaker (Fuse)
Busbars (-48VDC)
AC Input
(to circuit breakers)
ISO View
(panels removed)
ISO View
(panels removed)
Note: Three extra positions are provided
on the ground/return busbar for customer
connection to site ground.
Battery Return and Load Return
(Battery return leads factory
connected and routed to
Battery Compartment.)
Load Distribution Devices
DCCB01 - DCCB11 (Top Row)
DCCB12 - DCCB22 (Bottom Row)
(DC distribution breakers shown,
large fuses available.)
AC Input Channel
AC Input Circuit
Breaker Cover
Alarm/Control Connections
(to ACU+ IB2 Interface Board)
(Primary Module only)
AC Input
Circuit Breaker(s)
ACU+ Controller
(Primary Module only)
AC Input Conduit Opening
PCU AC Input
Circuit Breakers
2"
Recommended Coupling:
Raco Type 2628 (Grainger 3LV08)
or Thomas Betts Type TK126US
Battery Compartment and Base
Removed in Illustrations for Clarity
SUIT ABLE F O R MO UNT ING O N CO NCRET E
Battery Fuses (3)
(Battery leads factory
connected and routed to
Battery Compartment.)
O R O THER NO N-COMBUST IBLE SURF ACE O NLY.
Front View
(door removed)
Spec. No: 582145500
Model: NetSure™ ITM
22
Section 6040
Issue AB, April 8, 2013
NetSure™ ITM with eSure™ Technology
Installation Manual, Section 6040 (Issue AB, April 8, 2013)
4.4
Making Electrical Connections
CAUTION
!
The electrical connections described in this section must be performed by authorized
electricians or qualified technical personnel. Follow the NEC and applicable local codes. If you
have any difficulties, contact your local Emerson representative or Emerson Services.
Before making electrical connections, do the following for each DC UPS module (see Figure 10 and
Figure 11 for circuit breaker and fuse locations).
• Open the front door. For bottom cable installations, remove the lower front panel. For all
installations, remove protective panels as required (see 4.2 - Protective Covers).
• Ensure the main AC input circuit breaker(s) is in the OFF position.
• Ensure all PCU AC input circuit breakers are in the OFF position.
• Ensure the three (3) battery disconnect fuses are removed.
• Ensure all distribution circuit breakers are in the OFF position or distribution fuses are removed.
4.4.1
Cabinet Grounding Connection
The cabinet grounding connection is made to a stud located on the top of the DC UPS module, as
shown in Figure 12. A cabinet grounding cable must be connected to this stud, per site requirements.
Tighten the connection to the torque indicated in Figure 12.
Each module also contains a separate stud located on each side to connect the supplied grounding
strap between DC UPS modules, if desired.
All modules and cable conduit should be grounded in accordance with the NEC and all applicable
local codes.
WARNING
!
Failure to follow proper grounding procedures can result in electric shock hazard to personnel
or the risk of fire, should a ground fault occur.
NOTE
Proper grounding significantly reduces electromagnetic interference problems in systems.
Figure 12 Cabinet Grounding Connection
Module Cabinet
Grounding Stud
Studs for Connecting
Grounding Strap
between Modules
3/8” (M10) Stud.
Recommended Torque is
407-434 in-lbs (46-49 Nm).
5/16” (M8) Studs.
Recommended Torque is
204-221 in-lbs (23-25 Nm).
Customer supplied
conduit fittings
Module Top View
4.4.2
DC Distribution Ground/Return Busbar Grounding Connection
The DC distribution ground/return busbar must be connected via a solidly grounded lead to the main
building ground. Three extra positions are provided on the ground/return busbar for customer
connection to site ground. Refer to Figure 10 and Figure 11 for location of the DC distribution
ground/return busbar. Refer to Table 250-122 in the American National Standards Institute (ANSI)
approved National Fire Protection Association's (NFPA) National Electrical Code (NEC) for
grounding conductor size. Typically use equivalent or minimum of 1/0 AWG.
Spec. No: 582145500
Model: NetSure™ ITM
23
Section 6040
Issue AB, April 8, 2013
NetSure™ ITM with eSure™ Technology
Installation Manual, Section 6040 (Issue AB, April 8, 2013)
4.4.3
DC Output Distribution Connections
Connect the DC output distribution cables between the DC UPS module and the loads as required.
These connections are made to the output circuit breaker or fuse busbars and the ground/return
busbar, as shown in Figure 10 or Figure 11. Refer to Figure 13 for a view of the busbar
terminations. Tighten the connections to the torque indicated in Figure 13.
WARNING
!
If the load equipment will not be ready to accept power on the arrival of the commissioning
engineer, then ensure that the system output cables are safely isolated.
Figure 13 DC Output Connections
DISTRIBUTION CIRCUIT BREAKERS
DC UPS MODULE WITH
TOP FEED DC DISTRIBUTION
DC UPS MODULE WITH
BOTTOM FEED DC DISTRIBUTION
1”
(25.4mm)
1”
(25.4mm)
DC Output (-48Vdc)
(per distribution position)
to distribution device busbar
Terminals are 3/8” (M10) studs.
Recommended Torque is 407-434 in-lbs (46-49 Nm).
DC Output Return
(per distribution position)
to ground/return busbars
1”
(25.4mm)
1”
(25.4mm)
Note: Three extra positions are provided
on the ground/return busbar for customer
connection to site ground.
DC UPS MODULE WITH
TOP FEED DC DISTRIBUTION
DISTRIBUTION FUSES
(optional)
DC UPS MODULE WITH
BOTTOM FEED DC DISTRIBUTION
1.5”
(38.1mm)
1
1
1.75”
(44.45mm)
Spec. No: 582145500
Model: NetSure™ ITM
1.75”
(44.45mm)
1.75”
(44.45mm)
Terminals are 1/2” (M12) studs.
Recommended Torque is 690-743 in-lbs (78-84 Nm).
DC Output Return
(per distribution position)
to ground/return busbars
Note: Three extra positions are provided
on the ground/return busbar for customer
connection to site ground.
24
1.75”
(44.45mm)
1.5”
(38.1mm)
1.75”
(44.45mm)
1.75”
(44.45mm)
DC Output (-48Vdc)
(per distribution position)
to distribution device busbar
Section 6040
Issue AB, April 8, 2013
NetSure™ ITM with eSure™ Technology
Installation Manual, Section 6040 (Issue AB, April 8, 2013)
4.4.4
AC Input Power Connections
!
WARNING
AC input power connections must be performed by a qualified electrician.
Before connecting AC input cables to the DC UPS module, ensure that you are aware of the
location and operation of the overcurrent protection devices that connect these cables to the
power distribution panel. Before connecting AC input cables, de-energize and lockout or
tagout these overcurrent protection devices.
Do not apply AC input power to the DC UPS module before the arrival of the commissioning
engineer.
AC Input Overcurrent Protective Device
!
CAUTION
To reduce the risk of fire, connect AC input only to a circuit provided with correct amperes
maximum branch circuit overcurrent protection in accordance with the NEC, ANSI/NFPA 70.
External overcurrent protection for the AC input circuit is to be provided by the customer. Refer to
AC Input Specifications on page 61 for maximum input current ratings. Each DC UPS module is
provided with one or two internal 150A AC input circuit breaker.
AC Input Connections
AC input leads can enter the DC UPS module from the top or from the bottom. Refer to Figure 14 for
an AC input routing diagram. Figure 15 provides a diagram for installing conduit fittings when AC
is fed from the top.
One or two AC input breakers are provided (depending on module configuration). Refer to Figure 16
for an AC input connections diagram. Tighten the connections to the torque indicated in Figure 16.
Note that a cover needs to be removed to access the circuit breakers as shown in Figure 9.
• Connect Feed A AC input supply cables between the power distribution panel and the DC UPS
module’s internal Feed A input circuit breaker (Feed A: L1, L2, L3 terminals).
• If the DC UPS module is configured for two AC input feeds, connect the optional Feed B AC input
supply cables between the power distribution panel and the DC UPS module’s internal Feed B
input circuit breaker (Feed B: L1, L2, L3 terminals).
Spec. No: 582145500
Model: NetSure™ ITM
25
Section 6040
Issue AB, April 8, 2013
NetSure™ ITM with eSure™ Technology
Installation Manual, Section 6040 (Issue AB, April 8, 2013)
Figure 14 AC Input Power Connection Routing Options
DC UPS MODULE WITH
TOP FEED DC DISTRIBUTION
DC UPS MODULE WITH
BOTTOM FEED DC DISTRIBUTION
AC enters at top.
Battery Compartment
Battery Compartment
AC enters at top.
65kAic
Circuit
Breaker
Run AC Cables
from Top OR Bottom
AC enters at bottom.
65kAic
Circuit
Breaker
Run AC Cables
from Top OR Bottom
AC enters at bottom.
Figure 15 Installing Conduit Fittings when AC is Fed from the Top
1) Remove cover plate.
2) Install one or two customer provided
conduit fittings to supplied conduit plate.
Note: Cut cover plate in half if
only one conduit being installed.
Customer provided
conduit fittings.
3) Secure conduit plate with conduit
fittings installed to top of cabinet.
Note: If only one conduit being installed,
re-install plate that was cut in half.
Figure 16 AC Input Power Connections
DC UPS MODULE WITH
BOTTOM FEED DC DISTRIBUTION
DC UPS MODULE WITH
TOP FEED DC DISTRIBUTION
factory wiring
AC INPUT
380/480VAC, 3 Phase, 50/60Hz
A
Feed
B (optional)
Feed
AC IN A AC IN B
L1 L2 L3 L1 L2 L3
GND
Stud
L1 L2 L3 L1 L2 L3
AC IN A AC IN B
A
Feed
GND
Stud
GND
Stud
B (optional)
Feed
AC INPUT
380/480VAC, 3 Phase, 50/60Hz
GND
Stud
factory wiring
One or two AC input circuit breakers are provided (depending on module configuration).
Two ground studs (5/16” [M8]) are provided attached to the sides of the enclosure surrounding the AC input circuit breaker(s).
Recommended torque is 124 in-lbs (14 Nm) for AC input circuit breaker connection.
Recommended torque is 204-221 in-lbs (23-25 Nm) to grounding studs.
Spec. No: 582145500
Model: NetSure™ ITM
26
Section 6040
Issue AB, April 8, 2013
NetSure™ ITM with eSure™ Technology
Installation Manual, Section 6040 (Issue AB, April 8, 2013)
4.4.5
Optional Alarm/Control Connections (to Primary Module only)
Alarm/control connections are made to the ACU+ Controller Customer Interface Board (IB2). The IB2
board provides connection points for digital inputs and relay outputs. System required connections
are factory wired to the IB2 board. The customer may wire to un-used digital input and relay outputs,
if desired. The IB2 board is located in an enclosure above the ACU+ Controller (see Figure 10 or
Figure 11). To access these connections, loosen the captive fastener on the front of the enclosure and
slide the IB2 board partially out of the shelf. Note that a wireway is provided to route the wires to the
IB2 board, as shown in Figure 10 or Figure 11. Connect external alarm/control wiring to terminal
blocks J3-J9 of the IB2 board, as required. Refer to Figure 17.
Figure 17 Alarm and Control Connections
Top View
ACU+ IB2 Interface Board
R elay O utputs
5
3
J8
J7
7
J9
Customer Input/Output (I/O) Connections
NO C NC NO C NC NO C NC NO C NC
5
3 1 5
3 1 5
3 1 5
3 1
N C = N orm ally C losed
C O M = C om m o n
N O = N orm ally O pen
D igital Inputs
1
J6
8 7 6 5 4 3 2 1
J5
J4
J3
5
3
1
5
3
1
5
3
A ll re lay contacts are sh ow n
w ith the re lay deenergized.
1
+
6
4 2 6
4 2 6
4 2 6
4 2
NO C NC NO C NC NO C NC NO C NC
8
6
4
6
4
2
6
4
2
6
2
4
2
J12
Tem p.
P robe #2
J11
Tem p.
P robe #1
to ACU+
ON
SW1
Terminals are M2 screws.
Recommended Torque is 1.92-2.16 in-lbs (0.22-0.25 Nm).
Wire size range is 26 AWG to 16 AWG (0.14 mm^2 to 1.0 mm^2).
Digital Input Connections
Up to eight (8) digital inputs may be connected to the IB2 board. Digital inputs that have factory
connections are listed in Table 3. A blank column in Table 3 is also provided if you want to document
custom connections to un-used digital inputs.
• Observe proper polarity per Table 3. Note that you must supply both paths for the digital input
(either a positive or negative signal and the opposite polarity return path).
• The digital inputs can be configured to provide an alarm when the signal is applied (HIGH) or
removed (LOW) (Local menu "Settings / System Dashboard / General"). Refer to Appendix A in
the NetSure ITM Operation Manual (Section 6047).
Connecting a NetSure RDB Rack PDU (Power Distribution Unit) to the NetSure ITM: The following
applies to all PDUs listed in the NetSure RDB Installation and Operation Manual (Section 6041).
Perform the following after installing and making the DC input and output connections to the PDU
per Section 6041.
• Connect a 22 AWG lead from the circuit breaker alarm connector located on the last PDU to the
(-) input of one of the unused digital inputs on the IB2 board. Connect a second 22 AWG lead from
the NetSure ITM System Ground/Return (+) to the (+) input of the same digital input on the IB2
Spec. No: 582145500
Model: NetSure™ ITM
27
Section 6040
Issue AB, April 8, 2013
NetSure™ ITM with eSure™ Technology
Installation Manual, Section 6040 (Issue AB, April 8, 2013)
board. Assign a unique signal name to this digital input (Web interface "Signal Information
Modification Submenu"). Refer to Appendix A in the NetSure ITM Operation Manual (Section
6047).
Table 3
Programmable Digital Inputs
Programmable
Digital Input
Pin No.
J3-1
–
J3-2
+
J3-3
–
J3-4
+
J3-5
–
J3-6
+
J4-1
–
J4-2
+
J4-3
–
J4-4
+
J4-5
–
J4-6
+
J5-1
–
J5-2
+
J5-3
–
J5-4
+
1
2
3
4
5
6
7
8
Dedicated to...
Customer
Custom Digital Input
Available for Customer
Custom Digital Input
Available for Customer
Custom Digital Input
Available for Customer
Custom Digital Input
PCU EPO
factory wired
Fan Supply Alarm
factory wired
Fan Alarm
factory wired
Available for Customer
Custom Digital Input
Available for Customer
Custom Digital Input
J5-5
--
internal connections
J5-6
Relay Output Connections
The IB2 board provides eight (8) programmable alarm relays with Form-C contacts. Default relay
assignments are documented in Table 4. A blank column in Table 4 is also provided if you want to
document a custom configuration. Alarm relay contacts are rated for 2A @ 30VDC and 0.5A @
125VAC (60W maximum power consumption).
• Each relay can be individually configured to activate for any system alarm condition.
• Refer to the NetSure ITM Operation Manual (Section 6047) for programming instructions.
Spec. No: 582145500
Model: NetSure™ ITM
28
Section 6040
Issue AB, April 8, 2013
NetSure™ ITM with eSure™ Technology
Installation Manual, Section 6040 (Issue AB, April 8, 2013)
Table 4
Programmable Relay Outputs
Programmable
Relay Output
1
2
3
4
5
6
7
8
Pin No.
J6-5
NO
J6-3
COM
J6-1
NC
J6-6
NO
J6-4
COM
J6-2
NC
J7-5
NO
J7-3
COM
J7-1
NC
J7-6
NO
J7-4
COM
J7-2
NC
J8-5
NO
J8-3
COM
J8-1
NC
J8-6
NO
J8-4
COM
J8-2
NC
J9-5
NO
J9-3
COM
J9-1
NC
J9-6
NO
J9-4
COM
J9-2
NC
Alarms Assigned
to this Relay (Default)
Alarms Assigned
to this Relay (Custom)
All alarms programmed
with alarm severity of
"critical alarm".
Relay de-energizes
during an alarm condition.
(See Note 1.)
All alarms programmed
with alarm severity of
"warning alarm".
Relay energizes
during an alarm condition.
(See Note 1.)
All alarms programmed
with alarm severity of
"information alarm".
Relay energizes
during an alarm condition.
(See Note 1.)
Available for Customer
Custom Setting
Available for Customer
Custom Setting
Available for Customer
Custom Setting
Available for Customer
Custom Setting
Available for Customer
Custom Setting
Note 1: Relay 1 through Relay 3 are defined at the factory by logic
equations factory programmed into the PLC Logic Function.
Spec. No: 582145500
Model: NetSure™ ITM
29
Section 6040
Issue AB, April 8, 2013
NetSure™ ITM with eSure™ Technology
Installation Manual, Section 6040 (Issue AB, April 8, 2013)
IB2 Board DIP Switch Settings (for reference only)
Dip Switch SW1 on the IB2 board is used to set the communications address for this board (Table 5).
In this system, both switches of SW1 are to be set in the OFF position. Refer to Figure 17 for SW1
location.
Table 5
IB2 Board Communications Address Settings
DIP Switch SW1
Board Number
1
2
OFF
OFF
1
ON
OFF
2
OFF
ON
3
ON
ON
na
IB2 Board LED Indicators (for reference only)
The IB2 board has a green LED indicator which is lit in normal operation and flashes when the IB2
board is communicating with the Controller.
4.4.6
ACU + Controller Ethernet Connection (to Primary Module only)
The ACU+ Controller provides a Web Interface via an Ethernet connection to a TCP/IP network. An
RJ-45 10BaseT jack is provided on the front of the ACU+ Controller for connection into a customer's
network running TCP/IP. This jack has a standard Ethernet pin configuration scheme, twisted pair.
Refer to Figure 10 or Figure 11 for location of the ACU+. Refer to Figure 18 for location and
Table 6 for pinouts of the Ethernet port. Use shielded Ethernet cable (grounded at both ends). Note
that the ACU+ Controller’s RJ-45 jack is connected to chassis ground.
You can access the Web pages of the power system locally by using a "crossover" or "straight" cable
connected directly between your PC and the ACU+.
Figure 18 ACU+ Controller RJ-45 Ethernet Port
Ethernet Port (RJ-45)
ESC
Table 6
Spec. No: 582145500
Model: NetSure™ ITM
ENT
ACU+ Controller RJ-45 Ethernet Port
Port Pin
Number
Name
Definition
1
Tx+
Write Signal +
2
Tx-
Write Signal -
3
Rx+
Read Signal +
4
--
no connection
5
--
no connection
6
Rx-
Read Signal -
7
--
no connection
8
--
no connection
30
Section 6040
Issue AB, April 8, 2013
NetSure™ ITM with eSure™ Technology
Installation Manual, Section 6040 (Issue AB, April 8, 2013)
4.4.7
Optional Emergency Power Off (EPO) Connection (to Primary Module only)
The DC UPS module has an Emergency Power Off (EPO) function operated by a remote contact
provided by the User.
!
WARNING
The EPO circuit operates with -48Vdc. There is -48Vdc present on the terminals the EPO
jumper connects to. There is -48Vdc present on these same terminals that an external EPO
switch will be connected to.
NOTE
The external EPO switch wiring must be double-insulated. The wire must be 600V, 18-16 AWG
stranded for maximum runs between 82 and 197 feet (25-60m), respectively.
If the EPO function is desired, locate the EPO jumper in the Primary Module (see Figure 19).
Remove the EPO jumper (the jumper connects from the bottom terminal of the EPO terminal block
and the bottom of EPO Fuse F11). Connect a customer provided external normally closed switch
between the bottom terminal of the EPO terminal block and the bottom of the EPO Fuse.
The following occurs when the EPO switch is opened.
• The battery LVD contactor in each DC UPS module opens, disconnecting the battery from each
module.
• If the ACU+ "EPO Enabled" option is set to YES, the PCUs in each DC UPS module shut down
after 5 seconds. If the ACU+ "EPO Enabled" option is set to NO, PCUs remain running.
NOTE
The Emergency Stop action within the DC UPS module opens the battery LVD contactor and
(if programmed in the ACU+) shuts down the PCUs.
It does not internally disconnect the input power supply. To disconnect ALL power to the DC
UPS module, open the upstream feeder breaker(s) when the remote EPO is activated.
It does not disconnect the SM-BRC. The SM-BRC will still be powered by the batteries.
Spec. No: 582145500
Model: NetSure™ ITM
31
Section 6040
Issue AB, April 8, 2013
NetSure™ ITM with eSure™ Technology
Installation Manual, Section 6040 (Issue AB, April 8, 2013)
Figure 19 EPO Jumper Location
1
11
12
22
DETAIL A
Components Behind Cover
SEE DETAIL A
EPO Fuse
EPO
Terminal
Block
EPO
Jumper
Top DC Distribution Feed Shown,
Bottom DC Distribution Feed Similar
SUIT ABLE F O R MO UNT ING O N CO NCRET E
O R O THER NO N-COMBUST IBLE SURF ACE O NLY.
Front View
(door removed)
4.4.8
Battery Connections
Batteries are factory installed and connected. Final connections to the batteries are made in the
procedure presented in 6.2 - Final Battery Connections.
4.5
Making Module-to-Module -48VDC and Ground/Return Interconnections
(if system consists of multiple DC UPS modules)
Note that all hardware is provided.
4.5.1
-48Vdc and Ground/Return Busbar Interconnects
1. Install the provided -48Vdc Interconnect Busbar(s) between the -48Vdc busbars located in each
adjacent DC UPS module. Refer to Figure 20 (DC UPS module with bottom feed DC distribution)
and Figure 21 (DC UPS module with top feed DC distribution). Torque to the values listed in the
illustrations.
2. Install the provided Ground/Return Interconnect Busbar(s) between the ground/return busbars
located in each adjacent DC UPS module. Refer to Figure 20 (DC UPS module with bottom feed
DC distribution) and Figure 21 (DC UPS module with top feed DC distribution). Torque to the
values listed in the illustrations.
Spec. No: 582145500
Model: NetSure™ ITM
32
Section 6040
Issue AB, April 8, 2013
NetSure™ ITM with eSure™ Technology
Installation Manual, Section 6040 (Issue AB, April 8, 2013)
Figure 20 Module-Module Interconnect Busbars (DC UPS Module with Bottom Feed DC Distribution)
-48Vdc Busbar
Hardware Build-Up
M10 Nut
(electro zinc treatment with bright chromate)
M10 Belleville Lock Washer
DIN 6796-10.5 STEEL
(electro zinc treatment with bright chromate)
Torque to 418 in-lbs (47.3 Nm)
-48Vdc
Busbar
Ground/Return Busbar
Hardware Build-Up
M10 x 30mm Bolt
(electro zinc treatment with bright chromate)
M10 Belleville Lock Washer
DIN 6796-10.5 STEEL
(electro zinc treatment with bright chromate)
Torque to 418 in-lbs (47.3 Nm)
Ground/Return
Busbar
Battery Compartment and Base
Removed in Illustrations for Clarity
-48Vdc Interconnect Busbar
(can be installed on left and/or
right side of module)
Ground/Return Interconnect Busbar
(can be installed on left and/or
right side of module)
Spec. No: 582145500
Model: NetSure™ ITM
33
Section 6040
Issue AB, April 8, 2013
NetSure™ ITM with eSure™ Technology
Installation Manual, Section 6040 (Issue AB, April 8, 2013)
Figure 21 Module-Module Interconnect Busbars (DC UPS Module with Top Feed DC Distribution)
-48Vdc Busbar
Ground/Return
Busbar
Hardware Build-Up
M10 Nut
(electro zinc treatment with bright chromate)
M10 Belleville Lock Washer
DIN 6796-10.5 STEEL
(electro zinc treatment with bright chromate)
Torque to 418 in-lbs (47.3 Nm)
Ground/Return Busbar
Hardware Build-Up
M10 x 30mm Bolt
(electro zinc treatment with bright chromate)
M10 Belleville Lock Washer
DIN 6796-10.5 STEEL
(electro zinc treatment with bright chromate)
-48Vdc
Busbar
-48Vdc
Busbar
Torque to 418 in-lbs (47.3 Nm)
SUIT ABLE F O R MO UNT ING O N CO NCRET E
O R O THER NO N-COMBUST IBLE SURF ACE O NLY.
Battery Compartment and Base
Removed in Illustrations for Clarity
Ground/Return Interconnect Busbar
(can be installed on left and/or
right side of module)
-48Vdc Interconnect Busbar
(can be installed on left and/or
right side of module)
Spec. No: 582145500
Model: NetSure™ ITM
34
Section 6040
Issue AB, April 8, 2013
NetSure™ ITM with eSure™ Technology
Installation Manual, Section 6040 (Issue AB, April 8, 2013)
4.6
Making Alarm/Control Interconnections between Modules
(if system consists of multiple DC UPS modules)
Make the following module-to-module alarm/control interconnections as required. Refer to Figure 23
for an interconnect diagram. See also the Cabinet Interconnections illustration in Figure 24,
Figure 25, and Figure 26.
4.6.1
RS-485 Module-to-Module Interconnect
Primary Module to 1st Expansion Module (Skip if No 1st Expansion Module)
1. Locate the long RS-485 interconnect cable (RPM 628 415/2) (yellow/white wire twisted pair) coiled
up on the right side of the Primary Module.
2. Route this cable through the openings in the sides of the cabinets to the 1st Expansion Module.
3. Connect this cable to the mating RS-485 interconnect cable connected to the SM-AC located in the
1st Expansion Module (yellow/white wire twisted pair).
1st Expansion Module to 2nd Expansion Module (Skip if No Additional Expansion Module)
1. Locate the long RS-485 interconnect cable (RPM 628 415/2) (yellow/white wire twisted pair) coiled
up on the right side of the 1st Expansion Module.
2. Route this cable through the openings in the sides of the cabinets to the 2nd Expansion Module.
3. Connect this cable to the mating RS-485 interconnect cable connected to the SM-AC located in the
2nd Expansion Module (yellow/white wire twisted pair).
Additional Expansion Modules (Skip if No Additional Expansion Module)
1. Make similar connections between each adjacent Expansion Module.
SM-BRC RS-485 Termination Resistor Setting in Last DC UPS Module
1. A jumper on the SM-BRC circuit board is used for selecting a termination resistor for the RS-485
connection. RS-485 termination is disabled when the jumper is across pins 1 and 2 (default). It is
enabled when the jumper is across pins 2 and 3. See Figure 22 for the location of the jumper.
In most cases, RS-485 termination is not necessary because maximum baud rate is 19200 bps
(default is 9600). RS-485 termination is recommended when intermittent communications occur.
If there are intermittent communications errors, it is recommended to set the termination resistor
on the SM-BRC in the last module to the enabled position (jumper between pins 2 and 3) instead
of the factory disabled position (jumper between pins 1 and 2).
Figure 22 SM-BRC RS-485 Jumper Locations
4.6.2
CAN-Bus Module-to-Module Interconnect
CAN-Bus End Resistor (move only if more than one DC UPS module)
1. Locate the short CAN-Bus interconnect cable jumper connected to the SM-DU+ in the Primary
Module (black/white wire twisted pair located behind the SM-DU+ sheetmetal enclosure and
Spec. No: 582145500
Model: NetSure™ ITM
35
Section 6040
Issue AB, April 8, 2013
NetSure™ ITM with eSure™ Technology
Installation Manual, Section 6040 (Issue AB, April 8, 2013)
exiting the top of the SM-DU+). Remove the CAN-Bus End Resistor plugged into this cable only if
there are Expansion Modules.
2. Locate the short CAN-Bus interconnect cable jumper connected to the SM-DU in the last (end)
Expansion Module (black/white wire twisted pair located behind the SM-DU sheetmetal
enclosure). Plug the CAN-Bus End Resistor into this cable.
1st Expansion Module to Primary Module
1. Locate the long CAN-Bus interconnect cable (RPM 628 351/1) coiled up on the right side of the 1st
Expansion Module (black/white wire twisted pair).
2. Route this cable through the openings in the sides of the cabinets to the Primary Module.
3. Route this cable through the top lip of the Primary Module’s SM-DU+ sheetmetal enclosure.
4. Connect this cable to the mating CAN-Bus interconnect cable connected to the SM-DU+ in the
Primary Module (black/white wire twisted pair located behind the SM-DU+ sheetmetal enclosure
and exiting the top of the SM-DU+).
2nd Expansion Module to 1st Expansion Module
1. Locate the long CAN-Bus interconnect cable (RPM 628 351/1) coiled up on the right side of the
2nd Expansion Module (black/white wire twisted pair).
2. Route this cable through the openings in the sides of the cabinets to the 1st Expansion Module.
3. Connect this cable to the mating CAN-Bus interconnect cable connected to the SM-DU in the 1st
Expansion Module (black/white wire twisted pair located behind the SM-DU sheetmetal
enclosure).
Additional Expansion Modules
1. Make similar connections between each remaining Expansion Module.
4.6.3
BLVD Module-to-Module Interconnect
1st Expansion Module to Primary Module
1. Locate the BLVD control interconnect cable (RPM 628 466/3) coiled up on the right side of the 1st
Expansion Module (the Expansion Module’s BLVD cable is factory connected to the bottom
connector on the LVD Relay Board, and exits at the back of the LVD Relay Board’s sheetmetal
enclosure).
2. Route this cable through the openings in the sides of the cabinets to the Primary Module.
3. Route the cable through the back of the Primary Module’s LVD Relay Board sheetmetal
enclosure.
4. Connect this cable to the mating BLVD control interconnect cable (RPM 628 465/3) in the
Primary Module (the Primary Module’s BLVD cable is factory connected to the bottom connector
located on the LVD Relay Board).
2nd Expansion Module to 1st Expansion Module
1. Locate the BLVD control interconnect cable (RPM 628 466/3) coiled up on the right side of the 2nd
Expansion Module (the Expansion Module’s BLVD cable is factory connected to the bottom
connector on the LVD Relay Board, and exits at the back of the LVD Relay Board’s sheetmetal
enclosure).
2. Route this cable through the openings in the sides of the cabinets to the 1st Expansion Module.
3. Route the cable through the back of the 1st Expansion Module’s LVD Relay Board sheetmetal
enclosure.
4. Connect this cable to the mating BLVD control interconnect cable (RPM 628 465/3) in the 1st
Expansion Module (the 1st Expansion Module’s BLVD cable is factory connected to the bottom
connector located on the LVD Relay Board).
Additional Expansion Modules
1. Make similar connections between each remaining Expansion Module.
Spec. No: 582145500
Model: NetSure™ ITM
36
Section 6040
Issue AB, April 8, 2013
NetSure™ ITM with eSure™ Technology
Installation Manual, Section 6040 (Issue AB, April 8, 2013)
Figure 23 Alarm/Control Cable Interconnects (cont’d on next page)
CAN-Bus
1
11
12
22
Black/White Wire Twisted Pair
(RPM 628 351/1)
located coiled up on right side of
Expansion Module cabinet (mating
connector located behind Detail A cover)
1
11
12
22
Cable Runs this Direction
RS-485
SEE DETAIL A
SEE DETAIL A
Yellow/White Wire Twisted Pair
(RPM 628 415/2)
located coiled up on right side of
Primary Module cabinet (mating
connector located on SM-AC)
Cable Runs this Direction
SM-AC
BLVD
LVD
Relay
Board
LVD
Relay
Board
Cable Runs this Direction
BLVD Control Cable
(RPM 628 465/3)
SUIT ABLE F O R MO UNT ING O N CO NCRET E
O R O THER NO N-COMBUST IBLE SURF ACE O NLY.
Front View
Primary Module
(door removed)
BLVD Control Cable
(RPM 628 466/3)
located coiled up
on right side of
Expansion Module
cabinets
SUIT ABLE F O R MO UNT ING O N CO NCRET E
O R O THER NO N-COMBUST IBLE SURF ACE O NLY.
Note: Cabinets must be installed next to each other, shown
apart here for clarity of control cabling interconnections.
DETAIL A
Components Behind Cover
Front View
Expansion Module
(door removed)
DETAIL A
Components Behind Cover
Can-Bus End Resistor
(if no Expansion Module)
LVD Relay Board
LVD Relay Board
CAN-Bus
Black/White Wire
Twisted Pair
(Primary Module)
SM-DU+
SM-DU+
BLVD Control Cable
(RPM 628 466/3)
(Expansion Modules Only)
BLVD Control Cable
(RPM 628 465/3)
Spec. No: 582145500
Model: NetSure™ ITM
37
BLVD Control Cable
(RPM 628 465/3)
Section 6040
Issue AB, April 8, 2013
NetSure™ ITM with eSure™ Technology
Installation Manual, Section 6040 (Issue AB, April 8, 2013)
Figure 23 Alarm/Control Cable Interconnects (cont’d from previous page)
Note: Cabinets must be installed next
to each other, shown apart here
for clarity of control cabling
interconnections.
CAN-Bus
1
Black/White Wire Twisted Pair
(RPM 628 351/1)
located coiled up on right side of
2nd Expansion Module cabinet (mating
connector located on SM-DU)
11
1
11
12
22
Cable Runs this Direction
12
22
RS-485
SEE DETAIL A
SEE DETAIL A
Yellow/White Wire Twisted Pair
(RPM 628 415/2)
located coiled up on right side of
1st Expansion Module cabinet (mating
connector located on SM-AC)
Cable Runs this Direction
SM-DU
(Expansion Modules only)
SM-AC
BLVD
LVD
Relay
Board
LVD
Relay
Board
Cable Runs this Direction
BLVD Control Cable
(RPM 628 465/3)
BLVD Control Cable
(RPM 628 466/3)
located coiled up
on right side of
Expansion Module
cabinets
Connectors
Located on
SM-DU (top view)
SUIT ABLE F O R MO UNT ING O N CO NCRET E
O R O THER NO N-COMBUST IBLE SURF ACE O NLY.
Front View
1st Expansion Module
(door removed)
SUIT ABLE F O R MO UNT ING O N CO NCRET E
O R O THER NO N-COMBUST IBLE SURF ACE O NLY.
Front View
2nd Expansion Module
(door removed)
CAN-Bus Black/White
Wire Twisted Pair
(Expansion Module)
DETAIL A
Components Behind Cover
Can-Bus End Resistor
(moved from Primary Module
to last Expansion Module)
LVD Relay Board
DETAIL A
Components Behind Cover
LVD Relay Board
CAN-Bus
Black/White Wire
Twisted Pair
(Primary Module)
SM-DU+
SM-DU+
BLVD Control Cable
(RPM 628 466/3)
(Expansion Modules Only)
BLVD Control Cable
(RPM 628 465/3)
Spec. No: 582145500
Model: NetSure™ ITM
38
BLVD Control Cable
(RPM 628 465/3)
Section 6040
Issue AB, April 8, 2013
NetSure™ ITM with eSure™ Technology
Installation Manual, Section 6040 (Issue AB, April 8, 2013)
Figure 24 System Configuration and Communications Connections
Spec. No: 582145500
Model: NetSure™ ITM
39
Section 6040
Issue AB, April 8, 2013
NetSure™ ITM with eSure™ Technology
Installation Manual, Section 6040 (Issue AB, April 8, 2013)
Relative position for the cabinets
Figure 25 Cabinet Interconnections
Spec. No: 582145500
Model: NetSure™ ITM
40
Section 6040
Issue AB, April 8, 2013
NetSure™ ITM with eSure™ Technology
Installation Manual, Section 6040 (Issue AB, April 8, 2013)
Figure 26 Signal Cabling and Switch Settings
Spec. No: 582145500
Model: NetSure™ ITM
41
Section 6040
Issue AB, April 8, 2013
NetSure™ ITM with eSure™ Technology
Installation Manual, Section 6040 (Issue AB, April 8, 2013)
5.0
INSTALLING PCUS
!
WARNING
In order to prevent damage to the latching mechanism, do not use excessive force on the PCU
handle when pushing the PCU into the cabinet.
PCUs are hot swappable. They can be installed with the system operating.
Procedure
1. Place the PCU into an unoccupied mounting position without sliding it in completely.
2. Push the “Safety Latch Release” located on the front of the PCU "UP". Refer to Figure 27 for an
illustration.
3. Gently push the PCU into the mounting location until it stops.
4. Note that the PCU will NOT be completely seated in the mounting location until the next step is
performed.
5. Push the “Safety Latch Release” located on the front of the PCU "DOWN". Gently push the PCU
into the mounting location until it is completely seated.
6. Push the PCU’s handle in and secure the PCU to the cabinet by tightening the captive fastener
located on the handle.
7. Repeat the above steps for each PCU being installed in the DC UPS module.
8. After the PCUs are physically installed, they are ready for operation immediately after power is
supplied to them.
Figure 27 PCU Handle and Safety Latch
Handle
Captive
Fastener
Spec. No: 582145500
Model: NetSure™ ITM
Safety
Latch
Release
Handle
Safety
Latch
Pin
42
Section 6040
Issue AB, April 8, 2013
NetSure™ ITM with eSure™ Technology
Installation Manual, Section 6040 (Issue AB, April 8, 2013)
6.0
START-UP INSTRUCTIONS
6.1
General
The NetSure ITM DC UPS system must be fully installed and commissioned before startup. The
start-up procedure consists of making final battery connections, initially starting the system, and
verifying system operation. Emerson Network Power will perform ALL start-up procedures, including
making final battery connections.
THE FOLLOWING ARE GENERAL GUIDELINES FOR EMERSON TECHNICIANS.
6.2
Final Battery Connections
6.2.1
Introduction
Each DC UPS module contains a battery compartment. The battery compartment consists of six
battery shelves that house (4) 6V batteries, each. Batteries are factory installed and wired for (3)
-48VDC battery strings. Also provided is a 800A battery disconnect fuse for each string.
6.2.2
Safety
Special care should be taken when working with the batteries associated with the DC UPS module.
See the precautions in the battery instruction manual and in Battery Compartment Precautions
at the beginning of these instructions.
6.2.3
Connecting Batteries
Battery Leads
The batteries are factory installed and most battery interconnections are factory made. The following
interconnections need to made during installation to complete the battery electrical path to the DC
UPS module. Refer to Figure 28 for the battery connections torque value for the Emerson EB4 6V200
battery.
1. Refer to Figure 28 and connect the supplied Battery Interconnect Links between the indicated
Battery Shelves. For each connection:
a. Install the faston lugs on top of the battery links as shown in Figure 28. Note that battery
monitoring leads are factory connected to the faston lugs and each faston lug is insulated for
shipping. Observe proper polarity when attaching the faston lugs with factory wiring to the
battery posts.
b. Tighten the connections to the torque indicated in Figure 28.
c. Place the plastic cover over the battery terminals and interconnect link.
2. On all remaining battery terminals (factory connections); remove the plastic covers, check the
torque, then reinstall the plastic covers. Torque to value indicated in Figure 28.
DO NOT INSTALL THE BATTERY FUSES BEFORE THE EQUIPMENT HAS BEEN
COMMISSIONED AND THE PROCEDURE IN "6.3.1 - Initially Starting the DC UPS System
and Verifying System Operation" IS PERFORMED.
Spec. No: 582145500
Model: NetSure™ ITM
43
Section 6040
Issue AB, April 8, 2013
NetSure™ ITM with eSure™ Technology
Installation Manual, Section 6040 (Issue AB, April 8, 2013)
Figure 28 Making Final Battery Shelf Battery Interconnect Link Connections
DC UPS Module Rear View (B attery Compartment)
Red
Monitoring
Lead
Typical Monitoring
Lead Connections
Temperature
Sensor Lead
(white and
white/black
leads)
Black
Monitoring
Lead
Battery
Interconnect
Link
Faston
Lug
Lead Labeled
1.5+ (Battery One Link)
2.5+ (Battery Two Link)
3.5+ (Battery Three Link)
Faston
Lug
Bolt
Lock Washer
Flat Washer
Battery
Interconnect
Link
Faston
Lug
Battery Terminal
Typical Hardware Build-Up
Final Battery Shelf Interconnections
1) Connect supplied Battery Interconnect
Links between these points.
2) Place faston lugs with factory wired
battery monitoring leads on top of
interconnect link as shown in illustration.
DO NOT PLACE BETWEEN LINK AND
BATTERY TERMINALS.
3) Torque to 97 in-lbs (11 Nm).
4) Place plastic cover over battery terminals
and interconnect links.
6) On all remaining battery terminals (factory
connections); remove the plastic covers,
check the torque, then reinstall the
plastic covers.
Spec. No: 582145500
Model: NetSure™ ITM
44
Section 6040
Issue AB, April 8, 2013
NetSure™ ITM with eSure™ Technology
Installation Manual, Section 6040 (Issue AB, April 8, 2013)
Perform InterCell Resistance Calibration
Use the Alber software to run an Intercell Resistance test.
1. After making final battery connections and before installing battery fuses, perform the following:
a. Disconnect the RS-485 cable from the back of the SM-BRC.
b. Connect the USB cable from the SM-BRC to your computer.
c. Start the ALBER Configurator.
2. Click on the "Connect to Monitor" button at the top of the screen.
Spec. No: 582145500
Model: NetSure™ ITM
45
Section 6040
Issue AB, April 8, 2013
NetSure™ ITM with eSure™ Technology
Installation Manual, Section 6040 (Issue AB, April 8, 2013)
3. Select "USB" as the Connection Type and click on "Connect to Monitor" at lower right.
Spec. No: 582145500
Model: NetSure™ ITM
46
Section 6040
Issue AB, April 8, 2013
NetSure™ ITM with eSure™ Technology
Installation Manual, Section 6040 (Issue AB, April 8, 2013)
4. Click "Setup" on the menu tree found at the left of the window.
Spec. No: 582145500
Model: NetSure™ ITM
47
Section 6040
Issue AB, April 8, 2013
NetSure™ ITM with eSure™ Technology
Installation Manual, Section 6040 (Issue AB, April 8, 2013)
5. Select the "General Tab" and fill in the following:
a. System Configuration (String x Cells x Voltages): 3x8x6V.
(note that this is a pull down selection)
b. RS-485/Module Address (1-254).
For ITM Module 1, set to 120.
For ITM Module 2, set to 121.
For ITM Module 3, set to 122.
For ITM Module 4, set to 123.
c. RS-485 Baud Rate: 19200 bps.
(note that this is a pull down selection)
6. Press "Apply".
Spec. No: 582145500
Model: NetSure™ ITM
48
Section 6040
Issue AB, April 8, 2013
NetSure™ ITM with eSure™ Technology
Installation Manual, Section 6040 (Issue AB, April 8, 2013)
7. Click"OK" in the pop-up window.
Spec. No: 582145500
Model: NetSure™ ITM
49
Section 6040
Issue AB, April 8, 2013
NetSure™ ITM with eSure™ Technology
Installation Manual, Section 6040 (Issue AB, April 8, 2013)
8. Select "Real-Time Data" in the menu tree at the left.
9. Click on the "Internal R" tab at top of screen.
10. Check the box "Set baseline" and click on the "Start" button.
Spec. No: 582145500
Model: NetSure™ ITM
50
Section 6040
Issue AB, April 8, 2013
NetSure™ ITM with eSure™ Technology
Installation Manual, Section 6040 (Issue AB, April 8, 2013)
11. Click on "Yes" in the pop-up window.
Spec. No: 582145500
Model: NetSure™ ITM
51
Section 6040
Issue AB, April 8, 2013
NetSure™ ITM with eSure™ Technology
Installation Manual, Section 6040 (Issue AB, April 8, 2013)
12. The unit will start calibration. One at a time each green bar will appear for each battery block.
Spec. No: 582145500
Model: NetSure™ ITM
52
Section 6040
Issue AB, April 8, 2013
NetSure™ ITM with eSure™ Technology
Installation Manual, Section 6040 (Issue AB, April 8, 2013)
13. When the last green bar appears, a pop-up will appear indicating that the test is done. Click "OK".
14. Select "Disconnect from Monitor" at the top of the screen.
15. Remove the USB cable from your computer and re-install the RS-485 cable into the SM-BRC.
Spec. No: 582145500
Model: NetSure™ ITM
53
Section 6040
Issue AB, April 8, 2013
NetSure™ ITM with eSure™ Technology
Installation Manual, Section 6040 (Issue AB, April 8, 2013)
Field Battery Monitoring Lead Connections to the SM-BRC Unit
Battery monitoring leads are factory connected to the mating halves of the SM-BRC unit’s Load
Inputs terminal blocks labeled 1, 3, 5, 7 and 2, 4, 6, 8. The DC UPS module is factory shipped with the
mating halves of the SM-BRC’s Load Inputs terminal blocks labeled 1, 3, 5, 7 and 2, 4, 6, 8
disconnected. This is to prevent the batteries from discharging when the system is not powered.
When the DC UPS module is to be placed into service, open the battery compartment’s top rear access
panel. Locate the disconnected connectors labeled "Load Inputs 1, 3, 5, 7" and "Load Inputs 2, 4, 6, 8".
Plug these connectors into the back of the SM-BRC, as shown in Figure 29. Repeat this procedure for
each DC UPS module in the system.
NOTE
If the system is powered down for an extended period of time, remove the Battery Fuses and
disconnect the SM-BRC’s "Load Inputs Terminal Block 1, 3, 5, 7" and "Load Inputs Terminal
Block 2, 4, 6, 8" so that the batteries do not discharge.
Figure 29 Field Battery Monitoring Lead Connections to the SM-BRC Unit
Connector labeled 2, 4, 6, 8.
Connector labeled 1, 3, 5, 7.
Rear View SM-BRC
Field Battery Monitoring Lead Connections
The DC UPS module is factory shipped with the mating halves
of the SM-BRC’s Load Inputs terminal blocks 1, 3, 5, 7 and 2, 4, 6, 8
disconnected. When ready to place the module into service, locate
and plug the mating halves of the SM-BRC’s Load Inputs terminal blocks
1, 3, 5, 7 and 2, 4, 6, 8 here.
6.3
Initially Starting and Verifying DC UPS System Operation
!
WARNING
During this procedure the output terminals will become live.
If any load equipment is connected to the DC UPS module output terminals, please check
with the load user and ascertain whether it is safe to apply power to the load. If the load is not
ready to receive power, then ensure that it is safely isolated from the DC UPS module output
terminals.
Spec. No: 582145500
Model: NetSure™ ITM
54
Section 6040
Issue AB, April 8, 2013
NetSure™ ITM with eSure™ Technology
Installation Manual, Section 6040 (Issue AB, April 8, 2013)
6.3.1
Initially Starting the DC UPS System and Verifying System Operation
The NetSure ITM DC UPS must be fully installed and commissioned before startup.
Procedure
1. Open the front door on each DC UPS module.
2. Apply AC input power to each DC UPS module by closing the external AC disconnect(s) or
protective device(s) that supplies power to each DC UPS module. If the dual AC input feed option
is furnished, there will be two (2) devices per DC UPS module.
3. On each DC UPS module, close the main AC input circuit breaker. If the dual AC input feed
option is furnished, a safety latch is provided on the circuit breakers to prevent both circuit
breakers from being placed in the ON position. Slide the latch over to allow the desired circuit
breaker to be turned ON.
4. On each DC UPS module, close all PCU AC input circuit breakers. Note that each circuit breaker
feeds two (2) PCUs.
5. In the Primary DC UPS module, once the ACU+ Controller is powered on, a starting... screen
appears followed by a language screen.
English
Press “” or “” to select the desired language. Press ENT to confirm the selection. If no key is
pressed within 30 seconds, the ACU+ Controller automatically selects the displayed language.
Refer to the NetSure ITM Operation Manual (Section 6047) for ACU+ Controller local menu
operating instructions.
Once initialized, the ACU+ Main Screen displays.
Main Screen
0 9:2 0 :2 0
F lo a t
5 3 .4 V
40 4 A
Auto
N o Alarm
Main Menu
E N T M A IN M E N U
S ta tus
Settings
ESC
Energy Saving
Manual
CustomizeMenu
Press
or
to browse through
MAIN MENU.
Press ENT to
enter Sub-Menu.
6.
7.
8.
9.
10.
With an external meter, measure battery voltage.
Adjust the system’s float voltage to within approximately 0.5V of battery voltage.
In each DC UPS module, install the three battery disconnect fuses.
Adjust the system’s float voltage to 54.5Vdc.
In each DC UPS module, place each distribution circuit breaker to the ON position or install all
distribution fuses.
11. In the Primary DC UPS module, verify that there are no alarms present on the ACU+ local
display.
6.3.2
Setting Common Controller Parameters
Navigate through the controller menus and submenus to set common controller parameters (time,
date, IP address, etc.). Refer to Section 3.5 of the NetSure ITM Operation Manual (Section 6047) for
common tasks performed locally.
Spec. No: 582145500
Model: NetSure™ ITM
55
Section 6040
Issue AB, April 8, 2013
NetSure™ ITM with eSure™ Technology
Installation Manual, Section 6040 (Issue AB, April 8, 2013)
6.3.3
Changing the Numbering Scheme of the PCUs
Follow these procedures to change how the ACU+ identifies (numbers) the PCUs installed in the
system. These procedures are performed from the ACU+ Controller’s local display and keypad.
Initial Installation (numbering the PCUs per their Physical Location in the System)
1.
2.
3.
4.
5.
6.
7.
8.
9.
10.
11.
12.
13.
14.
15.
Go to Main Menu / Settings / PCU.
Press Enter.
Navigate down to PCU 1 (001).
Press Enter.
Look for the PCU installed in the system with a flashing LED.
Press Enter.
Press the Up or Down Arrow until the number displayed is the same as the physical position of
the PCU with the flashing LED.
Press Enter.
Press ESC.
Navigate down to the next PCU and repeat steps 4 thru 10.
After all PCUs are renumbered, go to Main Menu / Control / PCU / All PCU Ctrl.
Press Enter.
Navigate down to Confirm Posi/PH.
Select Yes, then press Enter.
Verify that the ACU+ now numbers the PCUs via their physical position in the system by going to
Main Menu / Status / PCU and scrolling down to each PCU listed in the display. Compare the
PCU number highlighted in the display with the physical position of the PCU with the flashing
LED.
Swapping PCUs Physical Positions without Adding or Removing the Number of PCUs
1. If you swap PCUs, the ACU+ numbering stays with the PCUs. For example, if PCU in physical
position 1 is swapped with PCU in physical position 2, the ACU+ numbers the PCU now installed
in physical position 1 as 2 and the PCU now installed in physical position 2 as 1. To correct this,
repeat the steps shown in the "Initial Installation" procedure for ONLY the two PCUs that were
swapped.
Removing a PCU without Replacing It
1.
2.
3.
4.
5.
6.
Remove the PCU.
Go to Main Menu / Control / PCU / All PCU Ctrl.
Press Enter.
Navigate down to Confirm Posi/PH.
Select Yes, then press Enter.
Now, when you view the voltage and current for the removed PCU, the fields will be highlighted
in BLACK to indicate this PCU is not present. Also, the WEB interface shows that PCU
information GREYED out.
7. If you now re-install that same PCU in it's previous physical position, it will retain its previous
slot number.
Replacing a Previously Installed PCU with a New PCU
1.
2.
3.
4.
Remove a previously installed PCU.
Clear the PCU Lost Alarm.
Install the new PCU.
The new PCU is automatically assigned the same numbering as the original PCU it replaced.
Spec. No: 582145500
Model: NetSure™ ITM
56
Section 6040
Issue AB, April 8, 2013
NetSure™ ITM with eSure™ Technology
Installation Manual, Section 6040 (Issue AB, April 8, 2013)
7.0
SPECIFICATIONS AND TECHNICAL DATA
7.1
Agency Approvals
The NetSure ITM DC UPS system has the following agency approval ratings:
• EN 60 950-1:2006
• UL 60 950-1
• UL 1801 (This unit is UL Listed ["c UL"] as a DC Power Distribution Center. This unit meets the
requirements of CSA 22.2, No. 225 and is tested and Certified by UL ["c UL"] as a Custom Built
Power Distribution Center.)
7.2
Environmental
The NetSure ITM DC UPS system is designed to operate under the following environmental
conditions without damage or degradation in electrical operating characteristics:
Table 7
7.3
DC UPS System Environmental Characteristics
System Operating Temperature
+23°F to +95°F (-5°C to +35°C)
Recommended Operation with Battery (Air Inlet):
+68°F to +77°F (+20°C to +25°C)
System Storage Temperature (optimal)
-4°F to +77°F (-20°C to +25°C)
Relative Humidity
0 to 95%, non-condensing
Operating Elevation
6562 ft (2000m) at full power
Audible Noise
< 60dB
Heat Rejection at Full Load
18,096 BTU/hr. (5.3kW) per module
EMI
FCC Class A
Mechanical Characteristics
Table 8
DC UPS System Mechanical Characteristics (per module)
Form Factor
Rack
Unit Dimensions
Inches: 83H x 24W x 41D
(Millimeters: 2100H x 600W x 1040D)
Unit Weight
3240 lb (1470 kg)
Airflow
560 CFM (950 m3/h)
Cable Entry
Bottom or Top
Color
Black (Z-0350)
Protection Grade
(with open/closed front doors)
IP 20
Spec. No: 582145500
Model: NetSure™ ITM
57
Section 6040
Issue AB, April 8, 2013
NetSure™ ITM with eSure™ Technology
Installation Manual, Section 6040 (Issue AB, April 8, 2013)
Table 9
System
Size
Module
w/
Batteries
PCUs
7.4
Shipping Dimensions and Weights
70KW
140KW
210KW
280KW
Inches:
92H x 29W x 47D
Millimeters:
2337H x 737W x 1194D
Weight:
3307lb (1500kg)
(2) Modules,
per module:
Inches:
92H x 29W x 47D
Millimeters:
2337H x 737W x 1194D
Weight:
3307lb (1500kg)
(3) Modules,
per module:
Inches:
92H x 29W x 47D
Millimeters:
2337H x 737W x 1194D
Weight:
3307lb (1500kg)
(4) Modules,
per module:
Inches:
92H x 29W x 47D
Millimeters:
2337H x 737W x 1194D
Weight:
3307lb (1500kg)
12 PCUs:
Pallet (12 PCUs):
Inches:
22H x 44W x 48D
Millimeters:
559H x 1118W x 1219D
Weight:
258lb (117kg)
24 PCUs:
Pallet (24 PCUs):
Inches:
38H x 44W x 48D
Millimeters:
965H x 1118W x 1219D
Weight:
486lb (220kg)
36 PCUs:
1st Pallet (30 PCUs):
Inches:
46H x 44W x 48D
Millimeters:
1168H x 1118W x 1219D
Weight:
600lb (272kg)
48 PCUs:
1st Pallet (30 PCUs):
Inches:
46H x 44W x 48D
Millimeters:
1168H x 1118W x 1219D
Weight:
600lb (272kg)
2nd Pallet (6 PCUs):
Inches:
14H x 44W x 48D
Millimeters:
356H x 1118W x 1219D
Weight:
144lb (65kg)
2nd Pallet (18 PCUs):
Inches:
30H x 44W x 48D
Millimeters:
762H x 1118W x 1219D
Weight:
372lb (169kg)
(1) Module:
Monitoring Capability
Standard: Web-based monitoring, alarm reporting via SNMP, and integration with Liebert SiteScan
via SiteLink-E module.
Optional: Energy Master Remote Supervision available from Emerson.
Spec. No: 582145500
Model: NetSure™ ITM
58
Section 6040
Issue AB, April 8, 2013
NetSure™ ITM with eSure™ Technology
Installation Manual, Section 6040 (Issue AB, April 8, 2013)
7.5
Electrical Characteristics
7.5.1
Termination Type, Recommended Wire Size, Recommended Lugs
AC Input
Table 10
AC Input and AC Input Grounding (per DC UPS module)
AC Input
Input
Voltage
Maximum
Input
Current
480Vac
92A
400Vac
110A
380Vac
116A
Terminal
Type
Recm.
Wire
Size1
Conduit Size
Screw
Clamp
2/0 AWG
2"
AC Input Grounding
Input
Voltage
Bolt
Size
Recm.
Wire
Size1
Conduit
Size
5/16" (M8)
1/0 AWG
2"
Recommended Lug
(Thomas & Betts P/N)
Compression
1-Hole; 3/8" Bolt
480Vac
400Vac
1
54109
Wire sizes based on recommendations of the American National
Standards Institute (ANSI) approved National Fire Protection
Association's (NFPA) National Electrical Code (NEC). Table 310-16
for copper wire at 90°C conductor temperature operating in ambient
of 35°C was used. For other operating ambient temperatures, refer
to the NEC. For operation in countries where the NEC is not
recognized, follow applicable codes.
Equipment grounding conductors must be provided with the AC
input conductors supplied to the module. Frame ground terminals
must be connected to earth ground, not power system neutral.
Equipment grounding conductor size based on recommendations of
the NEC Table 250-122 for copper wire. When aluminum or copper
clad aluminum grounding conductor is used, refer to Table 250 122
for increased conductor size. For operation in countries where the
NEC is not recognized, follow applicable codes.
Cabinet Frame Grounding
Table 11
Cabinet Frame Grounding (per DC UPS module)
Bolt
Size
Recm.
Wire
Size
3/8" (M10)
6 AWG
Spec. No: 582145500
Model: NetSure™ ITM
Recommended Lug
(Thomas & Betts P/N)
Compression
1-Hole; 3/8" Bolt
54136
59
Section 6040
Issue AB, April 8, 2013
NetSure™ ITM with eSure™ Technology
Installation Manual, Section 6040 (Issue AB, April 8, 2013)
DC Distribution
Table 12
DC Distribution (Distribution Circuit Breaker Option - per circuit breaker position)
OCP
Device
Rating
Maximum
Output
Current
@ 54V
100A
80A
Terminal
Bolt
Size
Recm.
Wire Size1
Load
1/0 AWG
Lug Requirement
Recommended Lug
(Thomas & Betts P/N)
2-Hole, 1" Centers
54209
1-Hole
54109
2-Hole, 1" Centers
54209
1-Hole
54109
2-Hole, 1" Centers
54210
1-Hole
54110
2-Hole, 1" Centers
54211
1-Hole
54111
Return
Load
150A
120A
1/0 AWG
Return
3/8" (M10)
Load
175A
140A
2/0 AWG
Return
Load
200A
160A
3/0 AWG
Return
1
Wire sizes based on recommendations of the American National Standards Institute (ANSI)
approved National Fire Protection Association's (NFPA) National Electrical Code (NEC). Table
310-16 for copper wire at 75°C conductor temperature operating in ambient of 35°C was used. For
other operating ambient temperatures, refer to the NEC. For operation in countries where the NEC
is not recognized, follow applicable codes. Sizes assume one layer of cables in open cable tray.
Alternate sizing may be required for other installation configurations. Refer to the NEC or contact
Emerson Services (contact information provided at the end of this document).
Table 13
DC Distribution (Distribution Fuse Option - per fuse position)
OCP
Device
Rating
Maximum
Output
Current
@ 54V
200
160
Terminal
Bolt
Size
Recm.
Wire Size1
Lug Requirement
Recommended Lug
(Thomas & Betts P/N)
Load
3/0 AWG
54265
Return
1/2" (M12)
2-Hole, 1.75" Centers
Load
500
400
(2) 250 kcmil
Return
1
(2) 54275
Wire sizes based on recommendations of the American National Standards Institute (ANSI)
approved National Fire Protection Association's (NFPA) National Electrical Code (NEC). Table
310-16 for copper wire at 75°C conductor temperature operating in ambient of 35°C was used. For
other operating ambient temperatures, refer to the NEC. For operation in countries where the NEC
is not recognized, follow applicable codes. Sizes assume one layer of cables in open cable tray.
Alternate sizing may be required for other installation configurations. Refer to the NEC or contact
Emerson Services (contact information provided at the end of this document).
Battery
The battery cables are factory provided and sized accordingly.
Spec. No: 582145500
Model: NetSure™ ITM
60
Section 6040
Issue AB, April 8, 2013
NetSure™ ITM with eSure™ Technology
Installation Manual, Section 6040 (Issue AB, April 8, 2013)
Alarm/Control
Table 14
7.5.2
Screw Size
Recm. Wire Size
M2
24-16 AWG
Power Ratings
Table 15
7.5.3
Alarm/Control
Power Ratings
Power
Rating
Primary
Module 1
Expansion
Module 2
Expansion
Module 3
Expansion
Module 4
Full
70 kW
70 kW
70 kW
70 kW
N+1
64 kW
70 kW
70 kW
70 kW
AC Input Specifications
Table 16
AC Input Specifications
Phase
Power Factor
3
0.99 at full load, 0.98 at 50% load
Frequency
Input Voltage – Nominal
Input Voltage – Range
45-65 Hz
400 / 480V, 3 wire + ground
304-530 VAC; shall withstand up to
600 VAC input without damage.
Internal AC Input Breaker Size
150A
Internal AC Input Breaker
AIC Rating
65,000A
Max Input Current / Module
Nominal 480V: 115A @ 384V; 92A @ 480V
Nominal 400V: 138A @ 320V; 110A @ 400V
Nominal 380V: 145A @ 304V; 116A @ 380V
Inrush Current
Inrush current does not exceed 150% of the
rated input steady state peak value.
Total Harmonic Distortion
Spec. No: 582145500
Model: NetSure™ ITM
<5% from 50-100% of load
61
Section 6040
Issue AB, April 8, 2013
NetSure™ ITM with eSure™ Technology
Installation Manual, Section 6040 (Issue AB, April 8, 2013)
7.5.4
DC Output Specifications
Table 17
DC Output Specifications
Voltage
System Efficiency
Energy Optimization Mode;
Intelligent Power Matching
Distribution Types
Normal Operation: -54.5 VDC (battery float)
Nominal: -48VDC
Range: -42 to -58 VDC
96% peak
(system level including
branch distribution losses).
See Figure 30.
Allows operation at near-peak efficiency
down to 5% overall load.
22 Circuit Breakers, 100-200A each;
Optional: 6 Fuses, 100-500A each
Figure 30 System Efficiency Curve
Regulation (PCU)
a.
b.
c.
d.
e.
Voltage Regulation: ±1%.
Load Regulation: ±0.5%.
Line Regulation: ±0.1%.
Overshoot at Startup: ±1%.
Dynamic Response (at rated input and output voltage values):
•Response time is 200 µs, and the overshoot is 5% for load changes at 50%-25%-50% and 50%75%-50%.
•Overshoot or undershoot is 5% and within ±1% of the regulation band, 4 ms at 50 µs for load
changes at 10%-90% and 90%-10%.
Filtering
Typical readings were taken at nominal input voltage, nominal output voltage, 50% load, and 25
degrees C ambient.
a. Wide Band Noise: Complies with Telcordia GR-947-CORE.
1. Typically 55 millivolts peak-to-peak. Does not exceed 200 millivolts peak-to-peak
2. Typically 15.9 millivolts rms. Does not exceed 100 millivolts rms.
Hold Up Time
10 ms (The DC voltage is allowed to decrease to 42V from 54V during the test.)
Spec. No: 582145500
Model: NetSure™ ITM
62
Section 6040
Issue AB, April 8, 2013
NetSure™ ITM with eSure™ Technology
Installation Manual, Section 6040 (Issue AB, April 8, 2013)
7.5.5
Battery Specifications
Table 18
Battery Specifications
Type
VRLA, Emerson Excellence EB4, 200 Ah
Arrangement
3 strings; eight 6V blocks per string
Per 6V Block
Per 70 kW Module
(24 blocks)
200
4800
Acid Weight - lb. (kg)
14.9 (6.7)
357.6 (160.8)
Total Acid Volume - gal. (L)
0.97 (3.67)
23.2 (87.8)
Free Acid Volume - gal. (L)
0.1 (0.37)
0.23 (0.88)
Lead Weight - lb. (kg)
54.7 (24.8)
1312.8 (595.2)
Total Weight - lb. (kg)
77.2 (35.0)
1852.8 (840)
Capacity - Ah
Backup Time
See backup time table at various loads.
Case Material
UL94-HB or UL94-V0
Design Life
15 years @ 68°F (20°C); 10 years @ 77°F (25°C)
Recharge Time (to 97% of
nominal capacity)
Less than 3 hours for > 35% load;
Less than 4 hours > 15% load.
MECHANICAL
Dimensions
Depth:
Width:
Height:
377 mm, including connectors and covers
135 mm, including ventilation spacing
250 mm
CAPACITY
Constant Power Discharge @ 20°C (w/cell):
End Voltage
Operating Time To End Voltage (minutes)
Per Cell
600
480
360
300
240
180
120
60
180
120
60
Constant Current Discharge @ 20°C (A):
End Voltage
Operating Time To End Voltage (minutes)
Per Cell
600
480
360
300
240
OTHER TECHNICAL FEATURES
• Valve-regulated lead-acid battery with AGM technology.
• Validation in accordance with IEC 896-2.
Spec. No: 582145500
Model: NetSure™ ITM
63
Section 6040
Issue AB, April 8, 2013
NetSure™ ITM with eSure™ Technology
Installation Manual, Section 6040 (Issue AB, April 8, 2013)
Battery Back-up Time (minutes)
Load
10kW
20kW
30kW
40kW
50kW
64kW
70kW
80kW
90kW
100kW
110kW
120kW
134kW
140kW
150kW
160kW
170kW
180kW
190kW
204kW
210kW
220kW
230kW
240kW
250kW
260kW
274kW
280kW
Spec. No: 582145500
Model: NetSure™ ITM
Single module
70kW
130
55
28
17
12
7
3
Two modules
140kW
300
130
90
55
41
24
21
17
14
12
10
8
6
3
64
Three modules
210kW
480
210
130
90
70
50
43
34
27
22
19
17
16
14
12
10
9
8
7
4
2
Four modules
280kW
630
300
180
130
100
75
69
55
47
40
34
28
25
22
19
17
15
14
13
11
10
9
9
8
7
6
3
1
Section 6040
Issue AB, April 8, 2013
NetSure™ ITM with eSure™ Technology
Installation Manual, Section 6040 (Issue AB, April 8, 2013)
7.5.6
Advanced Control Unit Plus (ACU+) Controller
Display
LCD with 4 × 16 Characters
Communication
RS232, RS485, Ethernet, USB
Protocol
HTTP, SNMP, EEM, SocTpe, RSoc
Local Indicators
Green LED: Illuminates when CPU is working
correctly.
Red LED: Illuminates when there is a critical or
warning alarm.
Yellow LED: Illuminates when there is an
information alarm.
Inputs
5 Analog Inputs
System Output Voltage
Battery Voltage
Battery Temperature
Ambient Temperature
Battery Shunt (for Battery Current)
14 Digital Inputs
3 Battery Fuses
2 DC Distribution Fuses
8 Generic Digital Inputs (where D15 reserved for
"Fan CB Tripped" and D16 for "Fan Alarm")
1 Contactor Status
Outputs
1 Output
Contactor Control
DC Power Plant Alarms
AC Mains Failure, PCU Failure, High Voltage
Shutdown, Fan Failure, Thermal Derating (of PCU
output due to high temperature)
Monitoring Capability
SNMP/Web Based Monitoring Included;
Compatibility with SiteScan Available
EnergyMaster Remote Monitoring (contact your
Emerson Representative)
7.5.7
SM-DU+
Communication
RS485, CAN, RS232
Local Indicators
Green LED: Illuminates when CPU is working
correctly. Flashes (1/3Hz) to indicate
communication fault with controller. Flashes (1Hz)
to indicate communicating with controller.
Red LED: Illuminates when there is a critical or
warning alarm.
Yellow LED: Illuminates when there is an
information alarm.
Inputs
22 Current Measurements
22 DC Fuse/Breaker Status Detection
Spec. No: 582145500
Model: NetSure™ ITM
65
Section 6040
Issue AB, April 8, 2013
NetSure™ ITM with eSure™ Technology
Installation Manual, Section 6040 (Issue AB, April 8, 2013)
7.5.8
7.5.9
SM-DU (used in Expansion Modules only in place of Controller)
Communication
RS485, CAN, RS232
Local Indicators
Green LED: Illuminates when CPU is working
correctly. Flashes (1/3Hz) to indicate
communication fault with controller. Flashes (1Hz)
to indicate communicating with controller.
Red LED: Illuminates when there is a critical or
warning alarm.
Yellow LED: Illuminates when there is an
information alarm.
Inputs
Output Voltage
Output Current
3 Battery Fuse Alarms
1 Fan Alarm
2 DU Fuse Alarms
Outputs
Contactor Control
SM-AC
Communication
RS232 / RS485
Local Indicators
Green LED: Illuminates when CPU is working correctly.
Red LED: Illuminates when there is an alarm.
Digital Inputs
12 Digital Inputs
Alarms/Events
Analog Inputs
3 Mains/Phase Voltage
3 Phase Current
1 Battery Voltage
1 Temperature
1 Network Frequency
3 Apparent Powers
3 Active Powers
3 Reactive Powers
3 Current Distortions
Energy
0-600 VAC, 0-346 VAC
0-5 A External Current Transformer
0-36 VDC
-25°C to +80°C / -13°F to +176°F
45-65 Hz
kVA (calculated in software)
kW (calculated in software)
kVA (calculated in software)
0-100% (calculated in software), THD (Total Harmonic Distortion)
kWh (calculated in software)
Digital Outputs
4 Relay Outputs
24VDC / 250VAC, 5A
7.5.10 SM-BRC
Battery Cells Monitored
Inputs
24 Battery Cells
Spec. No: 582145500
Model: NetSure™ ITM
Reports...
• Total battery voltage.
• Battery current.
• 24 cell/block voltages.
• Ambient temperature (battery compartment)
66
Section 6040
Issue AB, April 8, 2013
NetSure™ ITM with eSure™ Technology
Installation Manual, Section 6040 (Issue AB, April 8, 2013)
7.5.11 Standard Features
Type of Power Conversion Circuit: High frequency.
Float Charging Output Mode: In this mode of operation, system output voltage is constant and
output current does not exceed the current limit setting. During normal operation, the battery is not
required to furnish load current and remains in a fully charged condition.
Float voltage is set via the Controller, default @ 54.5V for furnished batteries.
NOTE
If the current demanded by the load exceeds the current limit setting of the system, the battery is
required to furnish the difference in load current and begins discharging.
Input Protection:
a. Input Over/Under Voltage Protection: The PCU shuts down and its protection indicator
(yellow) illuminates when the input voltage is lower than 260VAC or higher than 530VAC.
This condition is reported to the power system Controller and the power system Controller
processes the alarms accordingly.
b. Input Fusing: Input fuse is provided in each PCU. This fuse is not customer replaceable.
Output Protection:
a. Current Limiting: The maximum current delivered by the system is programmed via the
Controller. The Controller automatically adjusts the current limit circuit on each PCU so that
this value is not exceeded. If a PCU fails, the Controller automatically resets each remaining
PCU's current limit point to maintain this value. The Controller also insures that the current
limit circuit on any PCU is not set above 110% of its capacity. The default current limit
setting is the sum of each installed PCU's output rating. If an additional PCU is added to the
system, the system current limit is automatically increased by the rating of the new PCU and
the new current limit value is displayed.
The current limiting point is set via the Controller.
b. Output Fusing: Output fuse is provided in each PCU. If a fuse opens, local and remote PCU
Fail Alarms activate. This fuse is not customer replaceable.
c. High Voltage Shutdown:
1. Internal: If PCU output voltage exceeds an adjustable preset value, the PCU shuts down.
•After approximately 5 seconds, the PCU automatically restarts. If PCU output voltage
again exceeds the high voltage shutdown value within 5 minutes, the PCU shuts down
and locks out. Manual restart is then required. If the PCU does not experience a high
voltage condition within the 5 minute time period, the restart circuit is reset.
•Only the PCU causing the high voltage condition shuts down.
•The high voltage shutdown point is set via the Controller.
2. Backup: If PCU output voltage exceeds a second (non-adjustable) value, the PCU shuts
down and locks out regardless of load. Manual restart is then required. The fixed
hardware HVSD is 59.5V (within the range of 58.5 to 60V).
High Temperature Protection:
a. When the PFC board temperature is higher than 85°C, the PCU turns off. When the PFC
board temperature is lower than 75°C, the PCU resumes normal operation, and the hysteresis
is at least 10°C.
b. When the difference between “ambient temperature" and "PFC board temperature” is greater
than 5°C, the PCU turns off. When the difference between “ambient temperature" and "PFC
board temperature” is less than 2°C, the PCU resumes normal operation, and the hysteresis is
at least 3°C.
c. When the DC board temperature is higher than 105°C, the PCU turns off. When the DC board
temperature is lower than 95°C, the PCU resumes to normal operation, and the hysteresis is
at least 10°C.
Spec. No: 582145500
Model: NetSure™ ITM
67
Section 6040
Issue AB, April 8, 2013
NetSure™ ITM with eSure™ Technology
Installation Manual, Section 6040 (Issue AB, April 8, 2013)
Fan Fault Protection: An alarm will be generated upon a fan fault. In such cases, the fault
indicator (red) on the PCU front panel will flash and the PCU will also inhibit its output. Autorecovery is enabled upon the clearing of the corresponding fault.
PFC Over/Under Voltage: The PCU will shut down when its bus voltage is higher than the over
voltage set point or is lower than the under voltage set point. During such conditions, the PCU does
not output any power and its protection indicator (yellow) will light up.
Active Load Sharing (PCU): The PCU uses advanced digital active load sharing technology that
maintains balancing to within ±3A. The difference in the average current between PCUs is <±3A for
loads in the 10 to 100% range. The Controller also has a PCU Load Sharing function.
Startup Time: The PCU has two startup modes:
a. Normal Soft Start Time: The duration from the time when the PCU is powered on to the
time when the PCU provides output voltage is <8s.
b. Current Walk-In: The rise time of the PCU output voltage is >8s at 90% of the rated load,
and the maximum time is 90s at 100% of the rated load.
Hot Swappable: The PCU is designed to be plug-and-play. The PCU can be inserted or removed
from a live DC power system with no damage. When the PCU is plugged into the system, the system
output voltage will not be affected.
Cooling: Each PCU contains a fan for forced convection cooling.
Fan Control: When the PFC bus voltage is within a normal range, the built-in processor adjusts the
fan’s speed according to the PCU’s internal temperature and output current. For example, a higher
temperature or output current will increase the fan speed. Above 45°C at full load, the fan operates at
full speed. When the PFC bus voltage is abnormal, such as very low bus voltage, the fan turns off.
Communication Failure: The PCU’s protection indicator (yellow) will flash should it experience a
communication failure. The failure information will be reported to the Controller and the Controller
will process the failure accordingly. During a communication failure, in order to protect the battery,
the PCU output voltage will automatically adjust to 53.5 V (this is a default value which can be
modified using the Controller). The PCU will revert to normal operation once normal communication
is restored.
Unbalance of PCU Output Current: When the output current of the PCUs in a DC power system
is unbalanced, the PCU having the unbalanced output current will be identified automatically and its
protection indicator (yellow) will turn on.
The failure information will be reported to the Controller and the Controller will process the failure
accordingly.
Local Status and Alarm Indicators:
a.
b.
c.
d.
Spec. No: 582145500
Model: NetSure™ ITM
Power (Green)
Protection (Yellow)
Alarm (Red)
A 10-segment Green LED is located on the front panel to represent output current, each
segment represents 10A.
68
Section 6040
Issue AB, April 8, 2013
NetSure™ ITM with eSure™ Technology
Installation Manual, Section 6040 (Issue AB, April 8, 2013)
NetPerform™ Optimization Services
At Emerson Network Power, we understand the importance of reliable equipment – it’s critical to both your
business and your bottom line. That is why we offer a wide array of services to meet all of your network
infrastructure needs.
Technical Support
Email
Phone
[email protected]
[email protected]
1.800.800.5260
Answers technical product and system
questions; determines status of warranties and
contractual agreements for repair.
Services - Design, Deployment & Optimization
Email
[email protected]
Phone
1.800.800.1280, option 7
FreedomCare Secure.EmersonNetworkPower.com
Provides quotes and bid responses, order
placement and scheduling for design, and
deployment and optimization services.
Download service & maintenance reports
online.
Spare Parts
Email
Phone
[email protected]
[email protected]
1.800.800.1280, option 5
Pricing and PO processing of spare parts,
including but not limited to breakers, cables,
fuses, rectifier fans, misc. breaker and fuse
panels, enclosure fans, doors & switches, etc.
DC Power Depot Repair
Email
[email protected]
Phone
1.800.800.1280, option 6
Creates and processes RMAs, determines lead
times and pricing, provides repair shipping
information and status.
DC Power Product Training
Email
Phone
[email protected] Requests for quotes, order placement and
scheduling.
1.800.800.1280, option 8
For More Information
To learn more about service offerings from Emerson Network Power, please contact your sales representative,
call 1-800-800-1280 option 7, email [email protected] or visit
www.EmersonNetworkPower.com/EnergySystems.
Spec. No: 582145500
Model: NetSure™ ITM
69
Section 6040
Issue AB, April 8, 2013
NetSure™ ITM with eSure™ Technology
Installation Manual, Section 6040 (Issue AB, April 8, 2013)
The information contained in this document is subject to change without notice and may
not be suitable for all applications. While every precaution has been taken to ensure the
accuracy and completeness of this document, Emerson Network Power, Energy Systems,
North America, Inc. assumes no responsibility and disclaims all liability for damages resulting from use of this information or for any errors or omissions. Refer to other local
practices or building codes as applicable for the correct methods, tools, and materials to
be used in performing procedures not specifically described in this document.
The products covered by this instruction manual are manufactured and/or sold by Emerson
Network Power, Energy Systems, North America, Inc. This document is the property of
Emerson Network Power, Energy Systems, North America, Inc. and contains confidential and
proprietary information owned by Emerson Network Power, Energy Systems, North
America, Inc. Any copying, use or disclosure of it without the written permission of Emerson
Network Power, Energy Systems, North America, Inc. is strictly prohibited.
Names of companies and products are trademarks or registered trademarks of the
respective companies. Any questions regarding usage of trademark names should be
directed to the original manufacturer.
Learn more about the NetSure™ ITM DC UPS from Emerson at: EmersonNetworkPower.com/NetSureITM.
EmersonNetworkPower.com/EnergySystems (North America)
EmersonNetworkPower.eu/EnergySystems (EMEA)
© Emerson Network Power, Energy Systems, North America, Inc. 2013.
Business-Critical Continuity™, Emerson Network Power™, the Emerson Network Power logo, Emerson™ and Consider it Solved are service marks and trademarks of Emerson Electric Co.
EnergyMaster™, eSure™, NetPerform™, NetReach™, NetSpan™, NetSure™ and NetXtend™ are trademarks of Emerson Network Power, Energy Systems, North America, Inc.
Spec. No: 582145500
Model: NetSure™ ITM
Section 6040
Issue AB, April 8, 2013