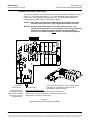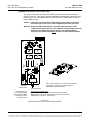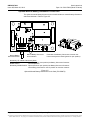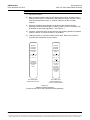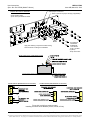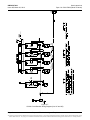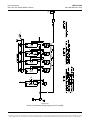
1
NetSure™ +24V DC Power System
User Instructions
UM581127000 (Issue AB, March 22, 2012)
SPEC. NO.
MODEL
581127000
710NPBA
Business-Critical Continuity™, Emerson Network Power, and the Emerson Network
Power logo are trademarks and service marks of Emerson Electric Co.
NetSure™, NetSpan™, NetReach™, NetXtend™, and NetPerform™
are trademarks of Emerson Network Power, Energy Systems, North America, Inc.
All other trademarks are the property of their respective owners.
The products covered by this instruction manual are manufactured and/or
sold by Emerson Network Power, Energy Systems, North America, Inc.
The information contained in this document is subject to change without notice and may not be
suitable for all applications. While every precaution has been taken to ensure the accuracy and
completeness of this document, Emerson Network Power, Energy Systems, North America, Inc.
assumes no responsibility and disclaims all liability for damages resulting from use of this information
or for any errors or omissions. Refer to other local practices or building codes as applicable for the correct
methods, tools, and materials to be used in performing procedures not specifically described in this document.
This document is the property of Emerson Network Power, Energy Systems, North America, Inc.
and contains confidential and proprietary information owned by Emerson Network Power, Energy
Systems, North America, Inc. Any copying, use or disclosure of it without the written permission
of Emerson Network Power, Energy Systems, North America, Inc. is strictly prohibited.
Copyright
©
2012, Emerson Network Power, Energy Systems, North America, Inc.
All rights reserved throughout the world.
User Instructions
Spec. No. 581127000 (Model 710NPBA)
UM581127000
Issue AB, March 22, 2012
TABLE OF CONTENTS
CONTENTS
PAGE
IMPORTANT SAFETY INSTRUCTIONS ...................................................................................ii
General Safety ..................................................................................................................................................... ii
Voltages ............................................................................................................................................................... ii
Battery .................................................................................................................................................................. ii
Circuit Card Handling .......................................................................................................................................... iii
STATIC WARNING ................................................................................................................... iv
CHAPTER 1. SYSTEM OVERVIEW ..........................................................................................1
Customer Documentation Package ..................................................................................................................... 1
System Description .............................................................................................................................................. 1
CHAPTER 2. OPERATING PROCEDURES ..............................................................................3
Controller, Rectifiers, and Optional Converters ................................................................................................... 3
ESTOP Function .................................................................................................................................................. 3
Local Controls and Indicators............................................................................................................................... 3
Circuit Card Locations ................................................................................................................................... 3
System Interface Circuit Card ........................................................................................................................ 5
Optional LVD Driver Circuit Card ................................................................................................................... 6
Optional LVD Driver Lite Circuit Card ............................................................................................................ 7
Optional Manual Battery Disconnect Circuit Card ......................................................................................... 8
CHAPTER 3. MAINTENANCE ...................................................................................................9
System Maintenance Procedures ........................................................................................................................ 9
Adding a Rectifier or DC-DC Converter Module to an Existing Module Mounting Assembly .............................. 9
Installing a Field Expansion Module Mounting Assembly .................................................................................. 11
Changing the ACU+ LVD Control Level for a Contactor .................................................................................... 14
CHAPTER 4. TROUBLESHOOTING AND REPAIR ................................................................ 15
Contact Information ............................................................................................................................................ 15
Controller, Rectifiers, and Optional Converters ................................................................................................. 15
ACU+ Controller Configuration .......................................................................................................................... 15
System Troubleshooting Information ................................................................................................................. 15
Replacement Information ................................................................................................................................... 18
Replacement Procedures................................................................................................................................... 18
Replacing a Rectifier or Converter Module ................................................................................................. 18
Replacing the ACU+ Controller ................................................................................................................... 18
Replacing a Distribution Device................................................................................................................... 19
Circuit Card Replacement Procedures ........................................................................................................ 30
Replacing a Distribution Panel .................................................................................................................... 44
Replacing a Battery or Load Disconnect Contactor .................................................................................... 47
REVISION RECORD ................................................................................................................ 52
Table of Contents
Page i
This document is property of Emerson Network Power, Energy Systems, North America, Inc. and contains confidential and proprietary information owned by Emerson Network Power, Energy
Systems, North America, Inc. Any copying, use, or disclosure of it without the written permission of Emerson Network Power, Energy Systems, North America, Inc. is strictly prohibited.
UM581127000
Issue AB, March 22, 2012
User Instructions
Spec. No. 581127000 (Model 710NPBA)
IMPORTANT SAFETY INSTRUCTIONS
GENERAL SAFETY
Danger: YOU MUST FOLLOW APPROVED SAFETY PROCEDURES.
Performing the following procedures may expose you to hazards. These
procedures should be performed by qualified technicians familiar with the
hazards associated with this type of equipment. These hazards may
include shock, energy, and/or burns. To avoid these hazards:
a) The tasks should be performed in the order indicated.
b) Remove watches, rings, and other metal objects.
c) Prior to contacting any uninsulated surface or termination, use a
voltmeter to verify that no voltage or the expected voltage is present.
d) Wear eye protection, and use recommended tools.
e) Use double insulated tools appropriately rated for the work to be
performed.
Caution: Performing maintenance and/or troubleshooting procedures may
interrupt power to the loads, if battery reserve is not sufficient.
VOLTAGES
AC Input Voltages
Danger: This system operates from AC voltage capable of producing fatal
electrical shock. AC input power must be completely disconnected from
the branch circuits wiring used to provide power to the system before any
AC electrical connections are made. DO NOT apply AC power to the
system until all electrical connections have been completed and checked.
DC Input/Output Voltages
Danger: This system produces DC Power and may require battery to be connected
to it. Although the DC voltage is not hazardously high, the rectifiers
and/or battery can deliver large amounts of current. Exercise extreme
caution not to inadvertently contact or have any tool inadvertently contact
a battery terminal or exposed wire connected to a battery terminal.
NEVER allow a metal object, such as a tool, to contact more than one
termination or battery terminal at a time, or to simultaneously contact a
termination or battery terminal and a grounded object. Even a momentary
short circuit can cause sparking, explosion, and injury.
BATTERY
Danger: Correct polarity must be observed when connecting battery leads.
Danger: Special safety precautions are required for procedures involving
handling, installing, and servicing batteries. Observe all battery safety
precautions in this manual and in the battery instruction manual. These
precautions should be followed implicitly at all times. Remove watches,
rings, and other metal objects before connecting battery leads.
Page ii
Important Safety Instructions
This document is property of Emerson Network Power, Energy Systems, North America, Inc. and contains confidential and proprietary information owned by Emerson Network Power, Energy
Systems, North America, Inc. Any copying, use, or disclosure of it without the written permission of Emerson Network Power, Energy Systems, North America, Inc. is strictly prohibited.
User Instructions
Spec. No. 581127000 (Model 710NPBA)
UM581127000
Issue AB, March 22, 2012
CIRCUIT CARD HANDLING
Warning: Installation or removal of the circuit cards requires careful handling.
Before handling any circuit card, read and follow the instructions
contained on the Static Warning Page.
Important Safety Instructions
Page iii
This document is property of Emerson Network Power, Energy Systems, North America, Inc. and contains confidential and proprietary information owned by Emerson Network Power, Energy
Systems, North America, Inc. Any copying, use, or disclosure of it without the written permission of Emerson Network Power, Energy Systems, North America, Inc. is strictly prohibited.
UM581127000
Issue AB, March 22, 2012
User Instructions
Spec. No. 581127000 (Model 710NPBA)
STATIC WARNING
The printed circuit cards used in this equipment contain static sensitive components. The warnings listed below
must be observed to prevent damage to these components. Disregarding any of these warnings may result in
personal injury or damage to the equipment.
1. Strictly adhere to the procedures provided in this document.
2. Before touching any static sensitive component or printed circuit card containing such a component,
discharge all static electricity from yourself by wearing a wrist strap grounded through a one megohm
resistor. Some wrist straps, such as Emerson Network Power Part Number 631810600, have a built-in
one megohm resistor; no external resistor is necessary. Read and follow wrist strap manufacturer’s
instructions outlining use of a specific wrist strap.
3. Do not touch the traces or components on a printed circuit card containing static sensitive components.
Handle the printed circuit card only by the edges that do not have connector pads.
4. After removing a printed circuit card containing a static sensitive component, place the printed circuit card
only on conductive or anti-static material such as conductive foam, conductive plastic, or aluminum foil.
Do not use ordinary Styrofoam or ordinary plastic.
5. Store and ship static sensitive devices or printed circuit cards containing such components only in static
shielding containers.
6. If necessary to repair a printed circuit card containing a static sensitive component, wear an appropriately
grounded wrist strap, work on a conductive surface, use a grounded soldering iron, and use grounded
test equipment.
Page iv
Static Warning
This document is property of Emerson Network Power, Energy Systems, North America, Inc. and contains confidential and proprietary information owned by Emerson Network Power, Energy
Systems, North America, Inc. Any copying, use, or disclosure of it without the written permission of Emerson Network Power, Energy Systems, North America, Inc. is strictly prohibited.
User Instructions
Spec. No. 581127000 (Model 710NPBA)
UM581127000
Issue AB, March 22, 2012
CHAPTER 1.
SYSTEM OVERVIEW
CUSTOMER DOCUMENTATION PACKAGE
This document (UM581127000) provides User Instructions for NetSure™ Power System
Model 710NPBA, Spec. No. 581127000.
The complete Customer Documentation Package consists of…
Bound System Installation Manual
Power System Installation Instructions:
IM581127000
Power System Quick Start Guide:
QS581127000
Bound ACU+ Controller User Manual
ACU+ Controller User Instructions:
UM1M820BNA
(includes instructions
for 1M820DNA Controller)
USB Drive with All Customer Documentation
Power System Installation Instructions:
IM581127000
Power System Quick Start Guide:
QS581127000
Power System User Instructions:
UM581127000
Power System “System Application Guide”:
SAG581127000
Power Data Sheet:
PD588705200
(PD588705201, PD588705202,
PD588705203, PD588705204)
Rectifier Instructions:
UM1R243000
Converter Instructions:
UM1C24481500
Engineering Drawings
Also provided on the USB drive is an ACU+ configuration drawing and the ACU+
configuration files loaded into the ACU+ as shipped.
SYSTEM DESCRIPTION
+24V DC @ up to 2000 amperes power system.
The NetSure™ 710NPBA DC Power System is a complete integrated power system
containing rectifiers, optional converters, intelligent control, metering, monitoring, and
distribution.
This power system is designed to power a load while charging a negative grounded
battery. This power system is capable of operating in a batteryless installation or off
battery for maintenance purposes. The power system is designed for operation with the
negative output grounded.
Chapter 1. System Overview
Page 1
This document is property of Emerson Network Power, Energy Systems, North America, Inc. and contains confidential and proprietary information owned by Emerson Network Power, Energy
Systems, North America, Inc. Any copying, use, or disclosure of it without the written permission of Emerson Network Power, Energy Systems, North America, Inc. is strictly prohibited.
UM581127000
Issue AB, March 22, 2012
User Instructions
Spec. No. 581127000 (Model 710NPBA)
This system consists of the following components.
Distribution Cabinet
The system always includes a minimum of one distribution cabinet, which provides
DC distribution through fuses and/or circuit breakers. The distribution cabinet is
factory mounted in the relay rack specified when ordered.
Four different sizes of distribution cabinets are available to accept from one (1) to
four (4) distribution panels. A variety of distribution panels are available that provide
load distribution, battery distribution, and dual voltage load distribution for use with
-48V converters. These distribution panels are configured to accept either bullet
nose type circuit breakers and TPS/TLS fuseholders, TPH fuses, TPL-B fuses, or
GJ/218 circuit breakers.
The distribution cabinet may be equipped with low voltage load disconnect (LVLD),
low voltage battery disconnect (LVBD), and manual battery disconnect.
ACU+ (Advanced Control Unit Plus) Controller
The system contains one controller. The controller provides power system control
(including optional low voltage battery disconnect (LVBD) and low voltage load
disconnect (LVLD) control), rectifier control (including a charge control function),
converter control, metering functions, monitoring functions, and local/remote alarm
functions. The controller also supports rectifier temperature compensation if the
system is equipped with a temperature probe(s). Temperature probe(s) may also be
designated to monitor ambient air temperature and/or battery temperature. The
controller also provides data acquisition, system alarm management, and advanced
battery and energy management. The controller contains an LCD display and
keypad for local access. The controller provides Ethernet connection and supports
software upgrade via its USB port. It also comes with a comprehensive web page
and SNMP capability for remote system management. Refer to the ACU+ Controller
User Instructions (UM1M820BNA) for more information.
Module Mounting Assembly
The system contains one module mounting assembly which houses rectifier modules
and optional DC-DC converter modules. A module mounting assembly consists of
one (1) to four (4) 8-position module mounting shelves. Refer to Power Data Sheet
PD588705200 (PD588705201, PD588705202, PD588705203, PD588705204) for
more information.
Rectifier Modules
The system contains rectifier modules, which provide load power, battery float
current, and battery recharge current during normal operating conditions. Refer to
the Rectifier User Instructions (UM1R243000) for more information.
Optional DC-DC Converter Modules
Where –48VDC load power is also required, DC-DC converter modules are available.
Refer to the Converter User Instructions (UM1C24481500) for more information.
Page 2
Chapter 1. System Overview
This document is property of Emerson Network Power, Energy Systems, North America, Inc. and contains confidential and proprietary information owned by Emerson Network Power, Energy
Systems, North America, Inc. Any copying, use, or disclosure of it without the written permission of Emerson Network Power, Energy Systems, North America, Inc. is strictly prohibited.
User Instructions
Spec. No. 581127000 (Model 710NPBA)
UM581127000
Issue AB, March 22, 2012
CHAPTER 2.
OPERATING PROCEDURES
CONTROLLER, RECTIFIERS, AND OPTIONAL CONVERTERS
For operation instructions on these units, refer to the following documents.
ACU+ Controller User Instructions (UM1M820BNA)
Rectifier User Instructions (UM1R243000)
Converter User Instructions (UM1C24481500)
ESTOP FUNCTION
If an ESTOP switch is wired to the ACU+ IB2 Interface Board, customer-furnished system
ground applied to terminal DI8- activates the ESTOP function. The ESTOP function
shuts down and locks out the rectifiers, opens the LVD’s, and shuts down the converters.
When the ESTOP signal is removed, LVD’s close (if battery present) and converters
restart. To restart the rectifiers; turn AC power to the rectifiers OFF, wait 30 seconds or
more, then turn AC power to the rectifiers ON. Rectifiers can also be restarted via the
Local and Web-interface ACU+ menus using the “rectifier reset” command.
LOCAL CONTROLS AND INDICATORS
Refer to the Controller, Rectifier, and Converter User Instructions for descriptions of the
local controls and indicators located on these units.
Refer to this section for descriptions of the local controls and indicators located on the
circuit cards installed inside the distribution cabinet.
Circuit Card Locations
Refer to Figure 2-1.
Chapter 2. Operating Procedures
Page 3
This document is property of Emerson Network Power, Energy Systems, North America, Inc. and contains confidential and proprietary information owned by Emerson Network Power, Energy
Systems, North America, Inc. Any copying, use, or disclosure of it without the written permission of Emerson Network Power, Energy Systems, North America, Inc. is strictly prohibited.
UM581127000
Issue AB, March 22, 2012
User Instructions
Spec. No. 581127000 (Model 710NPBA)
4-Row Cabinet Shown,
Others Similar
(Front Door Removed in
Illustration for Clarity)
Optional EIB
(ACU+ Extended Interface Board)
(located on inside side panel)
IB2
(ACU+ Interface Board)
(located on inside side panel)
Optional SM-DU+ and
Shunt Interface Board
ACU+ Controller
Mounting Position
Optional LVD
Driver Circuit Card
OR
Optional Manual Battery
Disconnect Circuit Card
System Interface
Circuit Card
Optional LVD Driver
Lite Circuit Card
Optional Manual Battery
Disconnect Circuit Card
Figure 2-1
Circuit Card Locations
Page 4
Chapter 2. Operating Procedures
This document is property of Emerson Network Power, Energy Systems, North America, Inc. and contains confidential and proprietary information owned by Emerson Network Power, Energy
Systems, North America, Inc. Any copying, use, or disclosure of it without the written permission of Emerson Network Power, Energy Systems, North America, Inc. is strictly prohibited.
User Instructions
Spec. No. 581127000 (Model 710NPBA)
UM581127000
Issue AB, March 22, 2012
System Interface Circuit Card
The system interface circuit card contains test points to externally monitor system voltage
and system load. Refer to Figure 2-2.
J7
540974
System Load Shunt Scale
List 21, 1-Row Cabinet
800A / 25mV
32A per mV
List 22, 2-Row Cabinet
2000A / 25mV
80A per mV
List 23, 3-Row Cabinet
2500A / 25mV
100A per mV
List 24, 4-Row Cabinet
2500A / 25mV
100A per mV
1
J1
J2
1
1
J3
TB2
J4
J8
1
J10
J5
TB1
TP1 TP2 TP3 TP4
TP1 (+) and TP2 (-)
System Voltage
Monitoring
TP3 (+) and TP4 (-)
System Load
Shunt Monitoring
Figure 2-2
System Interface Circuit Card
Chapter 2. Operating Procedures
Page 5
This document is property of Emerson Network Power, Energy Systems, North America, Inc. and contains confidential and proprietary information owned by Emerson Network Power, Energy
Systems, North America, Inc. Any copying, use, or disclosure of it without the written permission of Emerson Network Power, Energy Systems, North America, Inc. is strictly prohibited.
UM581127000
Issue AB, March 22, 2012
User Instructions
Spec. No. 581127000 (Model 710NPBA)
Optional LVD Driver Circuit Card
The optional LVD driver circuit card contains an LVD inhibit switch and indicator. Refer to
Figure 2-3. This card is required for 2-, 3-, or 4-row distribution cabinets that contain
three or more LVD contactors (LVBD and/or LVLD); or if the distribution cabinet is
equipped with an LVBD contactor rated 1200A or higher.
Caution: If the switch is returned to the ON (normal) position when low voltage
disconnect alarms are active, a low voltage disconnection will occur.
Warning: While the LVD inhibit switch is in the OFF (inhibit) position, a low
voltage disconnection will not occur if battery or load voltage decreases
below the low voltage disconnect setpoint. For maximum battery
protection, this switch should NOT be left in the OFF (inhibit) position.
J6
J5
J4
J9
J3
J2
J1
J7
S1
LVD Inhibit
Active Indicator
Illuminates when the
low voltage disconnect
circuit has been disabled
through the use of the
LVD Inhibit switch.
LVD Inhibit Switch
Note: The UP position will not close the LVBD contactor
if the battery is manually disconnected using the
Manual Battery Disconnect Switch.
Momentary UP / Middle / Down
Momentary UP Position: Closes all LVD Contactors (inhibit mode).
Middle Position: OFF (ACU+ DOES NOT control LVD’s) (inhibit mode).
DOWN Position: ON (ACU+ controls LVD’s).
Figure 2-3
Optional LVD Driver Circuit Card (P/N 540972)
Page 6
Chapter 2. Operating Procedures
This document is property of Emerson Network Power, Energy Systems, North America, Inc. and contains confidential and proprietary information owned by Emerson Network Power, Energy
Systems, North America, Inc. Any copying, use, or disclosure of it without the written permission of Emerson Network Power, Energy Systems, North America, Inc. is strictly prohibited.
User Instructions
Spec. No. 581127000 (Model 710NPBA)
UM581127000
Issue AB, March 22, 2012
Optional LVD Driver Lite Circuit Card
The optional LVD driver lite circuit card contains an LVD inhibit switch and indicator.
Refer to Figure 2-4. This card is required for distribution cabinets that contain two LVLD
contactors or one LVLD contactor and one LVBD contactor. LVBD contactor must be
rated at 600A or lower.
Caution: If the switch is returned to the ON (normal) position when low voltage
disconnect alarms are active, a low voltage disconnection will occur.
Warning: While the LVD inhibit switch is in the OFF (inhibit) position, a low
voltage disconnection will not occur if battery or load voltage decreases
below the low voltage disconnect setpoint. For maximum battery
protection, this switch should NOT be left in the OFF (inhibit) position.
J3
J1
J2
S1
LVD Inhibit
Active Indicator
Illuminates when the
low voltage disconnect
circuit has been disabled
through the use of the
LVD Inhibit switch.
Note: The UP position will not close the LVBD contactor
if the battery is manually disconnected using the
Manual Battery Disconnect Switch.
LVD Inhibit Switch
Momentary UP / Middle / Down
Momentary UP Position: Closes all LVD Contactors (inhibit mode).
Middle Position: OFF (ACU+ DOES NOT control LVD’s) (inhibit mode).
DOWN Position: ON (ACU+ controls LVD’s).
Figure 2-4
Optional LVD Driver Lite Circuit Card (P/N 547873)
Chapter 2. Operating Procedures
Page 7
This document is property of Emerson Network Power, Energy Systems, North America, Inc. and contains confidential and proprietary information owned by Emerson Network Power, Energy
Systems, North America, Inc. Any copying, use, or disclosure of it without the written permission of Emerson Network Power, Energy Systems, North America, Inc. is strictly prohibited.
UM581127000
Issue AB, March 22, 2012
User Instructions
Spec. No. 581127000 (Model 710NPBA)
Optional Manual Battery Disconnect Circuit Card
The optional manual battery disconnect circuit card contains a manual battery disconnect
switch and indicator. Refer to Figure 2-5.
J2
J1
S1
Manual Battery
Disconnect Switch
Manual Battery Disconnect
Active Indicator
Illuminates if the Battery Disconnect Contactor has
been manually disconnected (placed in open position).
Momentary UP / Middle / Momentary Down
Momentary UP Position:
Closes (latches in close position) the Battery Disconnect Contactor.
Middle Position:
Normal Operation.
Momentary DOWN Position: Opens (latches in open position) the Battery Disconnect Contactor.
Momentarily place switch in the UP position to close the contactor.
Figure 2-5
Optional Manual Battery Disconnect Circuit Card (P/N 540973)
Page 8
Chapter 2. Operating Procedures
This document is property of Emerson Network Power, Energy Systems, North America, Inc. and contains confidential and proprietary information owned by Emerson Network Power, Energy
Systems, North America, Inc. Any copying, use, or disclosure of it without the written permission of Emerson Network Power, Energy Systems, North America, Inc. is strictly prohibited.
User Instructions
Spec. No. 581127000 (Model 710NPBA)
UM581127000
Issue AB, March 22, 2012
CHAPTER 3.
MAINTENANCE
SYSTEM MAINTENANCE PROCEDURES
It is recommended to perform the maintenance procedures listed in Table 3-1 every
6-months to ensure continual system operation.
PROCEDURE
REFERENCED IN
Check ventilation openings for
obstructions such as dust,
papers, manuals, etc.
--
Inspect and tighten all
installer's connections.
COMPLETED (√)
IM581127000,
Chapter 4.
Making Electrical
Connections.
Note: This table may be reproduced as necessary to record and document
system performance.
Table 3-1
Maintenance Procedures to be Performed at 6-Month Intervals
ADDING A RECTIFIER OR DC-DC CONVERTER MODULE
TO AN EXISTING MODULE MOUNTING ASSEMBLY
To increase system current capacity, a rectifier module can easily be added to an existing
module mounting assembly that contains an empty rectifier module mounting position.
Likewise, in systems that accept DC-DC converter modules, to increase subsystem
capacity a DC-DC converter module can be added to a module mounting assembly that
contains an empty converter module mounting position.
The module location diagram on the front of each module mounting assembly shows
which type of module can be operated in that shelf. (See Figure 3-1.) Rectifier modules
will operate in any mounting position in any shelf. If a shelf accepts DC-DC converter
modules, they must be installed in any or all of the four middle mounting positions (B, C,
F, G) of each 8-position module mounting shelf.
It is recommended that the current limit point be checked whenever a rectifier is added to
or removed from the power system. Refer to “Checking the ACU+ Current Limit Point
after Adding or Removing a Rectifier” in “CHAPTER 4. TROUBLESHOOTING AND
REPAIR”.
The rectifier or converter module being added is assigned by the ACU+ the lowest
available identification number. If desired, you can change the identification number, see
“Configuring the ACU+ Identification of Rectifier Modules” or “Configuring the ACU+
Identification of Converter Modules” in Chapter 5 of the separate Power System
Installation Manual (IM581127000).
Chapter 3. Maintenance
Page 9
This document is property of Emerson Network Power, Energy Systems, North America, Inc. and contains confidential and proprietary information owned by Emerson Network Power, Energy
Systems, North America, Inc. Any copying, use, or disclosure of it without the written permission of Emerson Network Power, Energy Systems, North America, Inc. is strictly prohibited.
UM581127000
Issue AB, March 22, 2012
User Instructions
Spec. No. 581127000 (Model 710NPBA)
Procedure
1) Unpack the module.
2) Note the model number located on the handle of the module. Model numbers
starting with the letter “R” (R24-2500 or R24-3000) are rectifier modules. Model
numbers starting with the letter “C” (C24/48-1500) are DC-DC converter
modules.
3) Check the module location diagram on the front of the module mounting
assembly to determine which type of module (rectifier or DC-DC converter) can
be installed in each mounting position. See Figure 3-1.
4) If present, remove the blank cover panel from the mounting position into which a
rectifier or DC-DC converter module is to be installed.
5) Install the rectifier or converter module into the shelf. Refer to the rectifier or
converter User Instructions for a procedure.
MODULE
LOCATION
DIAGRAM
MODULE
LOCATION
DIAGRAM
RECTIFIERS
(PCUs)
RECTIFIERS
(PCUs)
A B C D
A B C D
E F G H
E F G H
THIS SHELF
ACCEPTS
RECTIFIERS
(PCUs)
ONLY
CONVERTERS
This Shelf Accepts
Rectifier Modules Only
This Shelf Accepts
Rectifier Modules and
DC-DC Converter Modules
THIS SHELF
ACCEPTS
RECTIFIERS
(PCUs) IN ALL
8 SLOTS AND
CONVERTERS
IN 4 MIDDLE
SLOTS
Figure 3-1
Module Location Diagrams
(located on the front of each module mounting assembly)
Page 10
Chapter 3. Maintenance
This document is property of Emerson Network Power, Energy Systems, North America, Inc. and contains confidential and proprietary information owned by Emerson Network Power, Energy
Systems, North America, Inc. Any copying, use, or disclosure of it without the written permission of Emerson Network Power, Energy Systems, North America, Inc. is strictly prohibited.
User Instructions
Spec. No. 581127000 (Model 710NPBA)
UM581127000
Issue AB, March 22, 2012
INSTALLING A FIELD EXPANSION
MODULE MOUNTING ASSEMBLY
A field expansion module mounting assembly can be added to a system that has 24 or
fewer module mounting positions.
Procedure
Danger: Adhere to the “Important Safety Instructions” presented at the front of
this document.
Note: Refer to Figure 3-2 as this procedure is performed.
1) Slide the expansion module mounting assembly into position directly beneath the
bottom-most shelf of the module mounting assembly installed in the system (no
space between shelves). Secure the expansion module mounting assembly to
the relay rack with the provided 12-24 x 1/2" mounting screws and grounding
washers.
Note: Install the ground washers so the teeth make contact with the metal on
the mounting angles. Torque all screws to 65 in-lbs.
2) Remove the rear cover from the bottom-most shelf of the module mounting
assembly installed in the system and the expansion module mounting assembly.
Note: Apply electrical anti-oxidizing compound to busbar mating surfaces before
performing the next step.
3) Secure the existing shelf’s busbars to the expansion shelf’s mating busbars with
the supplied interconnect busbars and hardware. Hardware build-up is: shelf’s
busbar, interconnect busbar, 1/4" hardened flat washer, 1/4" Belleville lock
washer, 1/4-20 nut. Install the Belleville lock washer so the concave side is
towards the busbar. Torque all connections to 60 in-lbs.
4) Install the supplied side brackets (both sides) to tie the existing shelf to the
expansion module mounting assembly.
5) If the Expansion Shelf Accepts DC-DC Converters: Refer to the Power
System Installation Instructions (IM581127000) and install the converter output
jumpers.
6) Remove the termination cable from the bottom controller bus interconnection
connector on the bottom-most existing shelf and plug it into the bottom controller
bus interconnection connector on the expansion shelf. See Figure 3-3.
7) Plug the controller bus connector on the cable exiting the top of the expansion
shelf into the mating connector exiting the bottom of the shelf above it. See
Figure 3-3.
8) Replace the rear covers removed in step 2) above.
9) Refer to the Power System Installation Instructions (IM581127000) and connect
AC input power to the expansion shelf.
10) Refer to the rectifier and converter User Instructions and install modules into the
expansion shelf as required.
Chapter 3. Maintenance
Page 11
This document is property of Emerson Network Power, Energy Systems, North America, Inc. and contains confidential and proprietary information owned by Emerson Network Power, Energy
Systems, North America, Inc. Any copying, use, or disclosure of it without the written permission of Emerson Network Power, Energy Systems, North America, Inc. is strictly prohibited.
UM581127000
Issue AB, March 22, 2012
User Instructions
Spec. No. 581127000 (Model 710NPBA)
588705203
(Existing 24-Position Shelf Assembly)
(588705201 and 588705202 similar)
12-24 x 1/2"
Thread Forming
Hex Head Screw
(2 per side)
No. 10/12
Ground Washer
(2 per side)
(Torque to 65 in-lbs)
588705200
(8-Position Expansion Shelf)
Bracket to secure
shelves together.
Rear View
Interconnect
Busbars
Apply electrical anti-oxidizing compound to
busbar mating surfaces before installing
Expansion Module Mounting Shelf.
1. Slide the Expansion Module Mounting Shelf
into the relay rack.
2. Secure the Expansion Module Mounting Shelf
to the relay rack.
3. Remove rear cover from existing shelf and
the Expansion Module Mounting Shelf.
4. Secure the existing shelf’s busbars to the
expansion shelf’s busbars with the supplied
interconnect busbars.
1/4" Hardened Flat Washer
1/4" Belleville Lock Washer
1/4-20 Nut
(16 places)
Torque to 60 in-lbs.
5. Tie the existing shelf to the Expansion
Module Mounting Shelf with the supplied
brackets (both sides).
5. Remove the connector from the bottom
controller communications connector in the
existing shelf and plug it into the bottom
controller communications connector in the
expansion shelf. Plug the loose end of the
bottom controller communications connector
in the existing shelf into the loose end of the
top controller communications connector in
the expansion shelf.
6. Reinstall rear covers.
Figure 3-2
Installing a Field Expansion Module Mounting Assembly
Page 12
Chapter 3. Maintenance
This document is property of Emerson Network Power, Energy Systems, North America, Inc. and contains confidential and proprietary information owned by Emerson Network Power, Energy
Systems, North America, Inc. Any copying, use, or disclosure of it without the written permission of Emerson Network Power, Energy Systems, North America, Inc. is strictly prohibited.
User Instructions
Spec. No. 581127000 (Model 710NPBA)
UM581127000
Issue AB, March 22, 2012
Distribution
Cabinet
Slate and
Slate/White
Wires
Brown and
Brown/White
Wires
Module
Mounting
Shelf
Existing Communications Cable Connections
Distribution
Cabinet
Slate and
Slate/White
Wires
Brown and
Brown/White
Wires
Module
Mounting
Shelf
Expansion
Module
Mounting
Shelf
New Communications Cable Connections
Figure 3-3
Communications Cables
Chapter 3. Maintenance
Page 13
This document is property of Emerson Network Power, Energy Systems, North America, Inc. and contains confidential and proprietary information owned by Emerson Network Power, Energy
Systems, North America, Inc. Any copying, use, or disclosure of it without the written permission of Emerson Network Power, Energy Systems, North America, Inc. is strictly prohibited.
UM581127000
Issue AB, March 22, 2012
User Instructions
Spec. No. 581127000 (Model 710NPBA)
CHANGING THE ACU+ LVD CONTROL
LEVEL FOR A CONTACTOR
The ACU+ Controller has two available LVD control levels (LVD1 and LVD2). The level
used to control a contactor is determined by which connector on the LVD circuit card its
control leads are plugged into. To change the LVD control level for a contactor, simply
switch which LVD connector it is plugged into (if an open connector is available) on the
LVD circuit card. Refer to Figure 4-13 and Figure 4-14 for connector location and
function.
Note: DO NOT change a Low Voltage Load Disconnect contactor to LVD Control Level
2 (LVD2) if the system is furnished with a Low Voltage Battery Disconnect
contactor.
Page 14
Chapter 3. Maintenance
This document is property of Emerson Network Power, Energy Systems, North America, Inc. and contains confidential and proprietary information owned by Emerson Network Power, Energy
Systems, North America, Inc. Any copying, use, or disclosure of it without the written permission of Emerson Network Power, Energy Systems, North America, Inc. is strictly prohibited.
User Instructions
Spec. No. 581127000 (Model 710NPBA)
UM581127000
Issue AB, March 22, 2012
CHAPTER 4.
TROUBLESHOOTING AND REPAIR
CONTACT INFORMATION
Support contact information is provided on the inside of the back cover of this document.
CONTROLLER, RECTIFIERS, AND OPTIONAL CONVERTERS
For troubleshooting and repair instructions on these units, refer to the following
documents.
ACU+ Controller User Instructions (UM1M820BNA)
Rectifier User Instructions (UM1R243000)
Converter User Instructions (UM1C24481500)
ACU+ CONTROLLER CONFIGURATION
If any ACU+ Controller configuration settings were changed, refer to the ACU+ User
Instructions (UM1M820BNA) and save a copy of the configuration file. This file can be
used to restore the ACU+ Controller settings, if required, at a later date.
Note that provided on a USB drive furnished with the system is an ACU+
configuration drawing (C-drawing) and the ACU+ configuration files loaded into the
ACU+ as shipped.
SYSTEM TROUBLESHOOTING INFORMATION
This system is designed for ease in troubleshooting and repair. The various indicators as
described in CHAPTER 2. OPERATING PROCEDURES and in the Controller, Rectifier,
and Converter User Instructions are designed to isolate failure to a specific element.
Once the faulty element has been identified, refer to “Replacement Information” and
"Replacement Procedures" in this chapter.
Troubleshooting Alarm Conditions on the ACU+ Controller
The ACU+ Controller displays alarm conditions as listed in the Available Alarms section
of the ACU+ User Instructions (UM1M820BNA). Programmable external alarm relays are
also available. Refer to the System Installation Instructions (IM581127000) and the
configuration drawing (C-drawing) supplied with your power system documentation for
your alarm relay configurations.
The ACU+’s Active Alarm and Alarm History submenus allow the user to view alarm
details. Refer to the ACU+ User Instructions (UM1M820BNA) to access these menus.
Checking the ACU+ Current Limit Point after Adding or Removing a Rectifier
If a rectifier is added to the power system, the system current limit point will automatically
increase by the percentage each existing rectifier was set to provide prior to the addition.
If a rectifier is removed from the system (and the Rect Comm Fail alarm is reset), the
current limit point will remain unchanged unless the capacity of the remaining rectifiers is
not sufficient to maintain the present current limit point. If that happens, the current limit
point will automatically increase to the maximum (121% of the remaining rectifiers).
It is recommended that the current limit point be checked whenever a rectifier is added to
or removed from the power system.
Chapter 4. Troubleshooting and Repair
Page 15
This document is property of Emerson Network Power, Energy Systems, North America, Inc. and contains confidential and proprietary information owned by Emerson Network Power, Energy
Systems, North America, Inc. Any copying, use, or disclosure of it without the written permission of Emerson Network Power, Energy Systems, North America, Inc. is strictly prohibited.
UM581127000
Issue AB, March 22, 2012
User Instructions
Spec. No. 581127000 (Model 710NPBA)
Procedure
1) With the Main screen displayed, press ENT to go to the Main Menu. Navigate to
and select “Settings” (ENT).
2) If a password screen opens, a password must be entered to allow the User to
make adjustments. If a password was previously entered and has not yet timed
out, skip this step and proceed to step 3). Otherwise, to enter a password, with
the cursor at the User Name field (default is “Admin”), press the down arrow key
to move cursor down to the password line. Press ENT. “0” is highlighted. Press
the up arrow key once to change the “0” to”1” (default password is “1”), then
press ENT twice. (Note: If you have been assigned a unique User Name and
password, follow this procedure to enter these.)
3) With the Settings menu screen displayed, navigate to and select “Rectifier”
(ENT) / “All Rect Set” (ENT).
4) Navigate to “Current Limit Pt”. The current limit in amperes is displayed. If no
change is required, go to step 6). To make a change, proceed with step 5).
5) With the cursor at “Current Limit Pt”, press ENT to change the current limit point.
Use the up or down arrow keys to set as desired, then press ENT.
6) Return to the Main screen by repeatedly pressing ESC (escape).
Clearing a Rectifier Communications Fail Alarm after Removing a Rectifier
If a rectifier module is removed from the system, a rectifier communications failure alarm
is generated. If the rectifier module will not be replaced, the alarm should be cleared as
described in the following procedure.
Procedure
1) With the Main screen displayed, press ENT to go to the Main Menu. Navigate to
and select “Manual” (ENT).
2) If a password screen opens, a password must be entered to allow the User to
make adjustments. If a password was previously entered and has not yet timed
out, skip this step and proceed to step 3). Otherwise, to enter a password, with
the cursor at the User Name field (default is “Admin”), press the down arrow key
to move cursor down to the password line. Press ENT. “0” is highlighted. Press
the up arrow key once to change the “0” to”1” (default password is “1”), then
press ENT twice. (Note: If you have been assigned a unique User Name and
password, follow this procedure to enter these.)
3) With the Manual menu screen displayed, navigate to and select “Rectifier” (ENT)
/ “All Rect Ctrl” (ENT).
4) Navigate to “Clear Comm Fail”. Press ENT. “Yes” highlights.
5) Press ENT to select the operation. Press ENT again to confirm.
6) Return to the Main screen by repeatedly pressing ESC (escape).
Clearing a Converter Communications Fail Alarm after Removing a Converter
If a converter module is removed from the system, a converter communications failure
alarm is generated. If the converter module will not be replaced, the alarm should be
cleared as described in the following procedure.
Procedure
1) With the Main screen displayed, press ENT to go to the Main Menu. Navigate to
and select “Manual” (ENT).
Page 16
Chapter 4. Troubleshooting and Repair
This document is property of Emerson Network Power, Energy Systems, North America, Inc. and contains confidential and proprietary information owned by Emerson Network Power, Energy
Systems, North America, Inc. Any copying, use, or disclosure of it without the written permission of Emerson Network Power, Energy Systems, North America, Inc. is strictly prohibited.
User Instructions
Spec. No. 581127000 (Model 710NPBA)
UM581127000
Issue AB, March 22, 2012
2) If a password screen opens, a password must be entered to allow the User to
make adjustments. If a password was previously entered and has not yet timed
out, skip this step and proceed to step 3). Otherwise, to enter a password, with
the cursor at the User Name field (default is “Admin”), press the down arrow key
to move cursor down to the password line. Press ENT. “0” is highlighted. Press
the up arrow key once to change the “0” to”1” (default password is “1”), then
press ENT twice. (Note: If you have been assigned a unique User Name and
password, follow this procedure to enter these.)
3) With the Manual menu screen displayed, navigate to and select “Converter”
(ENT) / “All Conv Ctrl” (ENT).
4) Navigate to “Clear Comm Fail”. Press ENT. “Yes” highlights.
5) Press ENT to select the operation. Press ENT again to confirm.
6) Return to the Main screen by repeatedly pressing ESC (escape).
Clearing a Rectifier Lost Alarm
If the ACU+ Controller resets while a rectifier communications fail alarm is active, the
rectifier communications fail alarm is replace with a rectifier lost alarm. To clear the
alarm, perform the following procedure.
Procedure
1) With the Main screen displayed, press ENT to go to the Main Menu. Navigate to
and select “Manual” (ENT).
2) If a password screen opens, a password must be entered to allow the User to
make adjustments. If a password was previously entered and has not yet timed
out, skip this step and proceed to step 3). Otherwise, to enter a password, with
the cursor at the User Name field (default is “Admin”), press the down arrow key
to move cursor down to the password line. Press ENT. “0” is highlighted. Press
the up arrow key once to change the “0” to”1” (default password is “1”), then
press ENT twice. (Note: If you have been assigned a unique User Name and
password, follow this procedure to enter these.)
3) With the Manual menu screen displayed, navigate to and select “Rectifier” (ENT)
/ “All Rect Ctrl” (ENT).
4) Navigate to “Clear Rect Lost”. Press ENT. “Clear” highlights.
5) Press ENT to select the operation. Press ENT again to confirm.
6) Return to the Main screen by repeatedly pressing ESC (escape).
Clearing a Converter Lost Alarm
If the ACU+ Controller resets while a converter communications fail alarm is active, the
converter communications fail alarm is replace with a converter lost alarm. To clear the
alarm, perform the following procedure.
Procedure
1) With the Main screen displayed, press ENT to go to the Main Menu. Navigate to
and select “Manual” (ENT).
2) If a password screen opens, a password must be entered to allow the User to
make adjustments. If a password was previously entered and has not yet timed
out, skip this step and proceed to step 3). Otherwise, to enter a password, with
the cursor at the User Name field (default is “Admin”), press the down arrow key
to move cursor down to the password line. Press ENT. “0” is highlighted. Press
the up arrow key once to change the “0” to”1” (default password is “1”), then
Chapter 4. Troubleshooting and Repair
Page 17
This document is property of Emerson Network Power, Energy Systems, North America, Inc. and contains confidential and proprietary information owned by Emerson Network Power, Energy
Systems, North America, Inc. Any copying, use, or disclosure of it without the written permission of Emerson Network Power, Energy Systems, North America, Inc. is strictly prohibited.
UM581127000
Issue AB, March 22, 2012
User Instructions
Spec. No. 581127000 (Model 710NPBA)
press ENT twice. (Note: If you have been assigned a unique User Name and
password, follow this procedure to enter these.)
3) With the Manual menu screen displayed, navigate to and select “Converter”
(ENT) / “All Conv Ctrl” (ENT).
4) Navigate to “Clear Conv Lost”. Press ENT. “Clear” highlights.
5) Press ENT to select the operation. Press ENT again to confirm.
6) Return to the Main screen by repeatedly pressing ESC (escape).
REPLACEMENT INFORMATION
When a trouble symptom is localized to a faulty rectifier module, converter module,
controller, or system circuit card; that particular device or circuit card should be replaced
in its entirety. Other than a rectifier module or converter module fan replacement, no
attempt should be made to troubleshoot or repair individual components on any rectifier
module, converter module, controller, or circuit card.
Refer to SAG581127000 (System Application Guide) for replacement part numbers.
REPLACEMENT PROCEDURES
Danger: Adhere to the “Important Safety Instructions” presented at the front of this
document.
Replacing a Rectifier or Converter Module
Refer to the Rectifier User Instructions (UM1R243000) or Converter User Instructions
(UM1C24481500) for a rectifier and converter module replacement procedure. Refer
also to System Troubleshooting Information in this chapter.
The rectifier or converter module being replaced is assigned by the ACU+ the lowest
available identification number. If desired, you can change the identification number, see
“Configuring the ACU+ Identification of Rectifier Modules” or “Configuring the ACU+
Identification of Converter Modules” in Chapter 5 of the separate Power System
Installation Manual (IM581127000).
Replacing the ACU+ Controller
Refer to the ACU+ User Instructions (UM1M820BNA) for a controller replacement
procedure.
Page 18
Chapter 4. Troubleshooting and Repair
This document is property of Emerson Network Power, Energy Systems, North America, Inc. and contains confidential and proprietary information owned by Emerson Network Power, Energy
Systems, North America, Inc. Any copying, use, or disclosure of it without the written permission of Emerson Network Power, Energy Systems, North America, Inc. is strictly prohibited.
User Instructions
Spec. No. 581127000 (Model 710NPBA)
UM581127000
Issue AB, March 22, 2012
Replacing a Distribution Device
General
Replace distribution devices with the same type and rating. Refer to System Application
Guide SAG581127000 for part numbers.
Distribution Fuse “Alarm Fuse” Replacement
If a distribution fuse opens, the associated alarm fuse opens. Replace the distribution
fuse before replacing the alarm fuse.
Procedure
1) An alarm fuse is removed by pulling it straight out of the fuseholder. If the alarm
fuse is located in a modular fuse carrier, hold the fuse carrier in place with your
thumb while pulling on the alarm fuse to prevent the entire carrier from
inadvertently being pulled out.
2) Safety fuse covers are provided for all Bussmann GMT type fuses installed in the
system. These covers snap onto the fuses and provide protection from exposed
electrical terminations when a fuse opens. Insure that the safety fuse cover is
installed after replacing a fuse. Refer to Figure 4-1 for installation details.
Safety Cover
P/N 248898700
(GMT-X)
Safety Cover
P/N 102774
(GMT-Y)
Figure 4-1
Installation of Safety Fuse Covers
Chapter 4. Troubleshooting and Repair
Page 19
This document is property of Emerson Network Power, Energy Systems, North America, Inc. and contains confidential and proprietary information owned by Emerson Network Power, Energy
Systems, North America, Inc. Any copying, use, or disclosure of it without the written permission of Emerson Network Power, Energy Systems, North America, Inc. is strictly prohibited.
UM581127000
Issue AB, March 22, 2012
User Instructions
Spec. No. 581127000 (Model 710NPBA)
Replacing a TPS/TLS Fuse
Procedure
Note: Refer to Figure 4-2 as this procedure is performed.
1) Open the distribution cabinet’s front door by turning the latch in the
counterclockwise position.
2) Remove the fuse carrier from the mounted fuseholder body by pulling it straight
out.
3) Remove the open fuse from the fuse carrier and replace it with the same type
and rating.
4) Replace the alarm fuse located in the front of the fuse carrier with the same type
and rating. Ensure that a plastic safety cover is installed on the alarm fuse.
5) Push the fuse carrier securely back into the mounted fuseholder body. Note that
a polarizing key on the bottom of the carrier prevents the carrier from being
inserted upside down.
6) Verify no Fuse Alarms are active.
7) Close the distribution cabinet’s front door. Turn the latch clockwise to secure the
door.
Shorter Side
to the Top
Insert these terminals
into corresponding sockets
on distribution panel.
Fuseholder Assembly
Fuseholder Body
TPS/TLS Fuse
GMT-X
Safety Fuse Cover
(Replacement
P/N 248898700)
Longer Side
to the Bottom
Fuse Carrier
GMT-18/100A
Alarm Fuse
(Replacement
P/N 248610301)
Fuseholder Assembly
Exploded View
Polarizing Keyway
Matches Key on
Bottom of Fuse Carrier
Fuseholder Assembly (P/N 117201) includes
body & carrier, alarm fuse, and alarm fuse safety cover.
Figure 4-2
Replacing a TPS/TLS Fuseholder and/or Fuse
Page 20
Chapter 4. Troubleshooting and Repair
This document is property of Emerson Network Power, Energy Systems, North America, Inc. and contains confidential and proprietary information owned by Emerson Network Power, Energy
Systems, North America, Inc. Any copying, use, or disclosure of it without the written permission of Emerson Network Power, Energy Systems, North America, Inc. is strictly prohibited.
User Instructions
Spec. No. 581127000 (Model 710NPBA)
UM581127000
Issue AB, March 22, 2012
Replacing a Bullet Nose Fuseholder
Procedure
Note: Refer to Figure 4-2 as this procedure is performed.
1) Open the distribution cabinet’s front door by turning the latch in the
counterclockwise position.
2) Remove the fuse carrier from the mounted fuseholder body by pulling it straight
out.
3) Gently rock the defective fuseholder up and down while pulling firmly outward
until the fuseholder is free from the distribution panel.
4) Orient the fuseholder as shown in Figure 4-2. Insert the terminals on the rear of
the fuseholder into their corresponding sockets on the distribution panel. Ensure
the alarm contact on the back of the fuseholder makes contact with the alarm
terminal on the mounting circuit card. Push fuseholder in firmly until fully seated
in the distribution panel.
5) Push the fuse carrier securely back into the mounted fuseholder body. Note that
a polarizing key on the bottom of the carrier prevents the carrier from being
inserted upside down.
6) Verify no Fuse Alarms are active.
7) Close the distribution cabinet’s front door. Turn the latch clockwise to secure the
door.
Chapter 4. Troubleshooting and Repair
Page 21
This document is property of Emerson Network Power, Energy Systems, North America, Inc. and contains confidential and proprietary information owned by Emerson Network Power, Energy
Systems, North America, Inc. Any copying, use, or disclosure of it without the written permission of Emerson Network Power, Energy Systems, North America, Inc. is strictly prohibited.
UM581127000
Issue AB, March 22, 2012
User Instructions
Spec. No. 581127000 (Model 710NPBA)
Replacing a Bullet Nose Circuit Breaker
Procedure
Note: Refer to Figure 4-3 as this procedure is performed.
1) Open the distribution cabinet’s front door by turning the latch in the
counterclockwise position.
2) Operate the defective circuit breaker to the OFF position.
3) Gently rock the defective circuit breaker up and down while pulling firmly outward
until the breaker is free from the distribution panel.
4) Ensure that the circuit breaker is in the OFF position, and is of the correct rating.
5) Orient the circuit breaker as shown in Figure 4-3. Insert the terminals on the rear
of the circuit breaker into their corresponding sockets on the distribution panel.
Ensure the alarm contact on the back of the circuit breaker makes contact with
the alarm terminal on the mounting circuit card. Push distribution device in firmly
until fully seated in the distribution panel.
6) Operate the replacement circuit breaker to the ON position.
7) Verify no Circuit Breaker Alarms are active.
8) Close the distribution cabinet’s front door. Turn the latch clockwise to secure the
door.
Shorter Side
to the Top
Lettering on
handle must be
right side up.
Insert these terminals
into corresponding sockets
on distribution panel.
Turn off
before installing.
Longer Side
to the Bottom
Figure 4-3
Replacing a Bullet Nose Circuit Breaker
Page 22
Chapter 4. Troubleshooting and Repair
This document is property of Emerson Network Power, Energy Systems, North America, Inc. and contains confidential and proprietary information owned by Emerson Network Power, Energy
Systems, North America, Inc. Any copying, use, or disclosure of it without the written permission of Emerson Network Power, Energy Systems, North America, Inc. is strictly prohibited.
User Instructions
Spec. No. 581127000 (Model 710NPBA)
UM581127000
Issue AB, March 22, 2012
Replacing a TPH Fuse
Procedure
Note: Refer to Figure 4-4 as this procedure is performed.
1) Open the distribution cabinet’s front door by turning the latch in the
counterclockwise position.
2) Remove the fuse carrier from the mounted fuseholder body by grasping its
handle and pulling straight out.
3) Remove the open fuse from the fuse carrier and replace it with the same type
and rating.
4) Push the fuse carrier securely back into the mounted fuseholder body.
5) On the distribution panel, locate the open alarm fuse associated with the TPH
fuse being replaced. Replace the alarm fuse with the same type and rating.
Ensure that a plastic safety cover is installed on the alarm fuse.
6) Close the distribution cabinet’s front door. Turn the latch clockwise to secure the
door.
Fuse
Fuseholder Body
Fuse Carrier
Figure 4-4
Replacing a TPH Fuse
Chapter 4. Troubleshooting and Repair
Page 23
This document is property of Emerson Network Power, Energy Systems, North America, Inc. and contains confidential and proprietary information owned by Emerson Network Power, Energy
Systems, North America, Inc. Any copying, use, or disclosure of it without the written permission of Emerson Network Power, Energy Systems, North America, Inc. is strictly prohibited.
UM581127000
Issue AB, March 22, 2012
User Instructions
Spec. No. 581127000 (Model 710NPBA)
Replacing a TPL-B Fuse
Procedure
Note: Refer to Figure 4-4 as this procedure is performed.
1) Open the distribution cabinet’s front door by turning the latch in the
counterclockwise position.
2) Remove the fuse case from the mounted fuse block by grasping its handle and
pulling it straight out.
3) Open the fuse case.
4) Remove the open fuse from the fuse case and replace it with the same type and
rating.
5) Close the fuse case.
6) Push the fuse case securely back into the mounted fuse block.
7) Replace the alarm fuse located in the front of the TPL-B fuse block. Replace
only with a fuse of the same type and rating. Ensure that a plastic safety cover is
installed on the alarm fuse.
8) Close the distribution cabinet’s front door. Turn the latch clockwise to secure the
door.
GMT-18/100A Alarm Fuse
(P/N 248610301) and
GMT-X Safety Fuse Cover
(P/N 248898700)
(Both are provided
w/ fuseblock)
Fuse Installed in
Open Fuse Case
(rear view)
Fuseblock
(P/N 516241)
TPL Fuse
Fuse Case
Fuse Installed in
Closed Fuse Case
(rear view)
Open Fuse Case View
Figure 4-5
Replacing a TPL-B Fuse
Page 24
Chapter 4. Troubleshooting and Repair
This document is property of Emerson Network Power, Energy Systems, North America, Inc. and contains confidential and proprietary information owned by Emerson Network Power, Energy
Systems, North America, Inc. Any copying, use, or disclosure of it without the written permission of Emerson Network Power, Energy Systems, North America, Inc. is strictly prohibited.
User Instructions
Spec. No. 581127000 (Model 710NPBA)
UM581127000
Issue AB, March 22, 2012
Replacing a GJ/218 Circuit Breaker
Procedure
Note: Refer to Figure 4-6 as this procedure is performed.
1) Open the distribution cabinet’s front door by turning the latch in the
counterclockwise position.
2) Operate the defective circuit breaker to the OFF position.
Danger: The bolts being removed in the following step may be at system
potential. Use insulated tools.
3) Remove the hardware securing the circuit breaker to the distribution panel and
partially remove the circuit breaker.
4) Record each alarm wire located on the back of the circuit breaker (color and
location on circuit breaker). Wiring diagrams are provided in Figure 4-6, Figure
4-7, and Figure 4-8. Carefully disconnect the alarm wiring from the back of the
circuit breaker, ensuring the exposed end does not contact any energized circuit.
5) Shunted Breakers Only: Record each shunt wire located on the back of the
circuit breaker (color and location on circuit breaker). Wiring diagrams are
provided in Figure 4-6, Figure 4-7, and Figure 4-8. Carefully disconnect the
shunt wiring from the back of the circuit breaker, ensuring the exposed end does
not contact any energized circuit.
6) Ensure that the replacement circuit breaker is in the OFF position, and is of the
correct rating and type (electrical trip/mechanical trip or electrical trip only).
Orient the circuit breaker over its mounting location. Re-attach the alarm wiring
and shunt wiring (if applicable) to the back of the circuit breaker as recorded
above. Wiring diagrams are provided in Figure 4-6, Figure 4-7, and Figure 4-8.
Danger: The bolts being installed in the following step may be at system
potential. Use insulated tools.
7) Install the replacement circuit breaker into its mounting position and secure with
the hardware previously removed. Torque to 60 in-lbs.
8) Transfer the circuit breaker guard from the old circuit breaker to the new circuit
breaker.
9) Operate the replacement circuit breaker to the ON position.
10) Verify no Circuit Breaker Alarms are active.
11) Close the distribution cabinet’s front door. Turn the latch clockwise to secure the
door.
Chapter 4. Troubleshooting and Repair
Page 25
This document is property of Emerson Network Power, Energy Systems, North America, Inc. and contains confidential and proprietary information owned by Emerson Network Power, Energy
Systems, North America, Inc. Any copying, use, or disclosure of it without the written permission of Emerson Network Power, Energy Systems, North America, Inc. is strictly prohibited.
UM581127000
Issue AB, March 22, 2012
User Instructions
Spec. No. 581127000 (Model 710NPBA)
INSTALLING CIRCUIT BREAKER
Alarm jumper connector.
Holes to route shunt jumper through (if applicable).
ON
OFF
Apply anti-oxidizing compound to busbar mating
surfaces before mounting circuit breakers.
1/4" Hardened
Flat Washer
1/4" Belleville
Lock Washer
1/4-20 x 3/4” Bolt
(2 places)
Torque to 60 in-lbs.
INSTALLING CIRCUIT BREAKER GUARD
ALARM WIRING (BREAKERS W/OUT SHUNTS)
ALARM WIRING (BREAKERS WITH SHUNTS)
Figure 4-6 (cont’d on next page)
Replacing a GJ/218 Circuit Breaker (1-Pole)
Page 26
Chapter 4. Troubleshooting and Repair
This document is property of Emerson Network Power, Energy Systems, North America, Inc. and contains confidential and proprietary information owned by Emerson Network Power, Energy
Systems, North America, Inc. Any copying, use, or disclosure of it without the written permission of Emerson Network Power, Energy Systems, North America, Inc. is strictly prohibited.
User Instructions
Spec. No. 581127000 (Model 710NPBA)
UM581127000
Issue AB, March 22, 2012
Alarm jumper connectors.
INSTALLING CIRCUIT BREAKER
Holes to route shunt jumper through (if applicable).
2-pole breaker shown.
3-pole and 4-pole breakers similar.
ON
OFF
Busbar
Apply anti-oxidizing compound to busbar mating
surfaces before mounting circuit breakers.
1/4" Hardened
Flat Washer
1/4" Belleville
Lock Washer
1/4-20 x 3/4” Bolt
(4 places)
Torque to 60 in-lbs.
INSTALLING CIRCUIT BREAKER GUARD
ALARM WIRING (BREAKERS W/OUT SHUNTS)
ALARM WIRING (BREAKERS WITH SHUNTS)
Figure 4-6 (cont’d from previous page)
Installing a GJ/218 Circuit Breaker (2-Pole, 3-Pole, 4-Pole)
Chapter 4. Troubleshooting and Repair
Page 27
This document is property of Emerson Network Power, Energy Systems, North America, Inc. and contains confidential and proprietary information owned by Emerson Network Power, Energy
Systems, North America, Inc. Any copying, use, or disclosure of it without the written permission of Emerson Network Power, Energy Systems, North America, Inc. is strictly prohibited.
User Instructions
Spec. No. 581127000 (Model 710NPBA)
List AC Only
UM581127000
Issue AB, March 22, 2012
Figure 4-7
GJ/218 Circuit Breaker Wiring Diagram (List AC and AD)
Page 28
Chapter 4. Troubleshooting and Repair
This document is property of Emerson Network Power, Energy Systems, North America, Inc. and contains confidential and proprietary information owned by Emerson Network Power, Energy
Systems, North America, Inc. Any copying, use, or disclosure of it without the written permission of Emerson Network Power, Energy Systems, North America, Inc. is strictly prohibited.
UM581127000
Issue AB, March 22, 2012
List BC Only
User Instructions
Spec. No. 581127000 (Model 710NPBA)
Figure 4-8
GJ/218 Circuit Breaker Wiring Diagram (List BC and BD)
Chapter 4. Troubleshooting and Repair
Page 29
This document is property of Emerson Network Power, Energy Systems, North America, Inc. and contains confidential and proprietary information owned by Emerson Network Power, Energy
Systems, North America, Inc. Any copying, use, or disclosure of it without the written permission of Emerson Network Power, Energy Systems, North America, Inc. is strictly prohibited.
UM581127000
Issue AB, March 22, 2012
User Instructions
Spec. No. 581127000 (Model 710NPBA)
Circuit Card Replacement Procedures
Warning: Circuit cards used in this power system contain static-sensitive devices.
Read the Static Warning at the front of this document before performing
any of the following procedures.
General
The following circuit card replacement procedures can be performed with the system
operating.
Refer to Figure 2-1 for circuit card locations.
Caution: When performing any step in these procedures that requires removal or
installation of hardware, use caution to ensure no hardware is dropped
and left inside the cabinet; otherwise service interruption or equipment
damage may occur.
Note: When performing any step in these procedures that requires removal of existing
hardware, retain all hardware for use in subsequent steps.
System Interface Circuit Card Replacement
Procedure
1) Performing this procedure may activate external alarms. Do one of the following.
If possible, disable these alarms. If these alarms cannot be easily disabled,
notify the appropriate personnel to disregard any future alarms associated with
this system while the procedure is being performed.
Danger: Performing the next steps exposes service personnel to battery
potential. Exercise extreme caution not to inadvertently contact or
have any tool inadvertently contact any energized electrical
termination.
2) Open the distribution cabinet’s front door by turning the latch in the
counterclockwise position.
Warning: Damage to the circuit card may result if the next step is not followed.
3) Connect an approved grounding strap to your wrist. Attach the other end to a
suitable ground.
4) Remove the top and front panels to access the circuit cards at the bottom of the
distribution cabinet.
5) Carefully label any wires connected to the customer connection terminal block on
the circuit card. These wires must be connected to the same terminals on the
replacement circuit card. Refer to Figure 4-9.
6) Carefully label the connectors plugged into the circuit card. These connectors
must be plugged into the same connectors on the replacement circuit card.
Refer to Figure 4-9.
Danger: In the next step, external wiring may be energized from an external
source. DO NOT allow bare wire ends to contact any grounded or
energized object.
7) Remove the external wiring from the customer connection terminal block. DO
NOT allow the bare wire end to contact any grounded or energized object.
Isolate the wire end with electrical tape. Repeat for each wire to be removed.
8) Unplug all connectors plugged into the circuit card.
Page 30
Chapter 4. Troubleshooting and Repair
This document is property of Emerson Network Power, Energy Systems, North America, Inc. and contains confidential and proprietary information owned by Emerson Network Power, Energy
Systems, North America, Inc. Any copying, use, or disclosure of it without the written permission of Emerson Network Power, Energy Systems, North America, Inc. is strictly prohibited.
User Instructions
Spec. No. 581127000 (Model 710NPBA)
UM581127000
Issue AB, March 22, 2012
9) Remove the screws securing the circuit card and remove the circuit card from the
distribution cabinet.
10) In this step, ensure you do not intermix the old and replacement circuit cards.
Set the shorting jumpers on the replacement circuit card to match the locations
on the old circuit card. Jumper settings are documented in CHAPTER 3.
SETTING JUMPERS AND SWITCH OPTIONS of the Power System Installation
Instructions (IM581127000).
11) Slide the replacement circuit card into the mounting position inside the
distribution cabinet, and secure with the screws removed from the old circuit
card.
12) Plug all connectors removed from the old circuit card into the same position on
the replacement circuit card.
Danger: In the next step, external alarm wiring may be energized from an
external source. DO NOT allow bare wire ends to contact any
grounded or energized object.
13) Reconnect the external wiring to the correct terminals on the customer
connection terminal block. First remove the electrical tape that was applied to
the bare wire end in a previous step. DO NOT allow the bare wire end to contact
any grounded or energized object. After securing the wire, gently tug on the wire
to ensure that it cannot be pulled out of the terminal block. Repeat for each wire
to be reconnected.
14) Remove the grounding wrist strap.
15) Reinstall the top and front panels that cover the circuit cards at the bottom of the
distribution cabinet.
16) Close the distribution cabinet’s front door. Turn the latch clockwise to secure the
door.
17) Enable the external alarms, or notify appropriate personnel that this procedure is
finished.
18) Ensure that there are no local or remote alarms active on the system.
Chapter 4. Troubleshooting and Repair
Page 31
This document is property of Emerson Network Power, Energy Systems, North America, Inc. and contains confidential and proprietary information owned by Emerson Network Power, Energy
Systems, North America, Inc. Any copying, use, or disclosure of it without the written permission of Emerson Network Power, Energy Systems, North America, Inc. is strictly prohibited.
UM581127000
Issue AB, March 22, 2012
User Instructions
Spec. No. 581127000 (Model 710NPBA)
J1, J2, J3, J4
Distribution Panels FA Inputs
J8
Selects to power Controller
from “Battery Power” or not.
J1
J2
RS485 Connection
TB2 1A: RS485+
TB2 2A: RS485-
No
Battery Battery
Pwr Pwr
Shorting Jumper
J3
1B 2B 3B
J8
TB2
RS232 Connection
TB2 1B: CGND
TB2 2B: TXD232
TB2 3B:RXD232
3 2 1
J4
1A 2A 3A
J10
Battery Monitoring External / Internal
(see TB1-4 and TB1-5 for
external monitoring points)
J10
J8
External Internal
1
TB1
1
2
3
J5
5
TP1
TP2
TP3
7
8
9
TP4
Shorting Jumper
J10
J5
CAN
TB1-1: Battery Tray FA
TB1-2: External Battery FA
TB1-3: External System FA
TB1-4: External Battery Monitoring (-)
TB1-5: External Battery Monitoring (+)
TP1 (+) and TP2 (-)
System Voltage
Monitoring
TP3 (+) and TP4 (-)
System Load
Shunt Monitoring
TB1
Wire Size Capacity: 22-12 AWG.
Recommended Torque: 3.0 in-lbs.
FA Signals: Battery applied to the terminal
turns in an alarm.
Figure 4-9
System Interface Circuit Card Connector Locations
Page 32
Chapter 4. Troubleshooting and Repair
This document is property of Emerson Network Power, Energy Systems, North America, Inc. and contains confidential and proprietary information owned by Emerson Network Power, Energy
Systems, North America, Inc. Any copying, use, or disclosure of it without the written permission of Emerson Network Power, Energy Systems, North America, Inc. is strictly prohibited.
User Instructions
Spec. No. 581127000 (Model 710NPBA)
UM581127000
Issue AB, March 22, 2012
IB2 (ACU+ Interface Board) and Optional
EIB (ACU+ Extended Interface Board) Replacement
Procedure
1) Performing this procedure may activate external alarms. Do one of the following.
If possible, disable these alarms. If these alarms cannot be easily disabled,
notify the appropriate personnel to disregard any future alarms associated with
this system while the procedure is being performed.
Danger: Performing the next steps exposes service personnel to battery
potential. Exercise extreme caution not to inadvertently contact or
have any tool inadvertently contact any energized electrical
termination.
2) Open the distribution cabinet’s front door by turning the latch in the
counterclockwise position.
Warning: Damage to the circuit card may result if the next step is not followed.
3) Connect an approved grounding strap to your wrist. Attach the other end to a
suitable ground.
4) Carefully label the wires connected to the customer connection terminal blocks
on the circuit card. These wires must be connected to the same terminals on the
replacement circuit card. Refer to Figure 4-10 or Figure 4-11.
5) Carefully label the connectors plugged into the circuit card. These connectors
must be plugged into the same connectors on the replacement circuit card.
Refer to Figure 4-10 or Figure 4-11.
Danger: In the next step, external wiring may be energized from an external
source. DO NOT allow bare wire ends to contact any grounded or
energized object.
6) Remove the external wiring from the customer connection terminal blocks. DO
NOT allow the bare wire end to contact any grounded or energized object.
Isolate the wire end with electrical tape. Repeat for each wire to be removed.
7) Unplug all connectors plugged into the circuit card.
8) Remove the circuit card by removing the bracket the circuit card is mounted to.
Remove the circuit card from the bracket.
9) In this step, ensure you do not intermix the old and replacement circuit cards.
Set the switch on the replacement circuit card to the same setting as the old
circuit card. Switch settings are documented in CHAPTER 3. SETTING
JUMPERS AND SWITCH OPTIONS of the Power System Installation
Instructions (IM581127000).
10) Secure the replacement circuit card to the bracket, and re-install the circuit card
and bracket into the distribution cabinet.
11) Plug all connectors removed from the old circuit card into the same position on
the replacement circuit card.
Danger: In the next step, external alarm wiring may be energized from an
external source. DO NOT allow bare wire ends to contact any
grounded or energized object.
12) Reconnect the external wiring to the correct terminals on the customer
connection terminal block. First remove the electrical tape that was applied to
the bare wire end in a previous step. DO NOT allow the bare wire end to contact
any grounded or energized object. After securing the wire, gently tug on the wire
Chapter 4. Troubleshooting and Repair
Page 33
This document is property of Emerson Network Power, Energy Systems, North America, Inc. and contains confidential and proprietary information owned by Emerson Network Power, Energy
Systems, North America, Inc. Any copying, use, or disclosure of it without the written permission of Emerson Network Power, Energy Systems, North America, Inc. is strictly prohibited.
UM581127000
Issue AB, March 22, 2012
User Instructions
Spec. No. 581127000 (Model 710NPBA)
to ensure that it cannot be pulled out of the terminal block. Repeat for each wire
to be reconnected.
13) Remove the grounding wrist strap.
14) Close the distribution cabinet’s front door. Turn the latch clockwise to secure the
door.
15) Enable the external alarms, or notify appropriate personnel that this procedure is
finished.
IB2 Board (Top View)
Connector
to ACU+
2
8 7 6 5 4 3 2 1
2
J1
SW1
RELAY
4
2
6
2
4
4
6
2
4
6
6
2
4
8
6
1
3
5
1
3
5
1
3
5
1
NO C NC NO C NC NO C NC NO C NC
3
5
*
NO C NC NO C NC NO C NC NO C NC
5
6
3
4
1
2
5
6
3
4
1
2
5
6
3
4
1
Digital Input Terminal Blocks
J5
J4
J3
1
3
5
7
Relay Output Terminal Blocks
J9
J8
J7
J6
J10
-
+
J11
J12
IB2 Board Assembly
J2
EX TEMP
PROBE 2
EX TEMP
PROBRE 1
16) Ensure that there are no local or remote alarms active on the system.
J3-J9:
Wire Size Capacity: 16-26 AWG.
Recommended Torque: 2.2 in-lbs.
Figure 4-10
IB2 (ACU+ Interface Board) Connector Locations
Page 34
Chapter 4. Troubleshooting and Repair
This document is property of Emerson Network Power, Energy Systems, North America, Inc. and contains confidential and proprietary information owned by Emerson Network Power, Energy
Systems, North America, Inc. Any copying, use, or disclosure of it without the written permission of Emerson Network Power, Energy Systems, North America, Inc. is strictly prohibited.
User Instructions
Spec. No. 581127000 (Model 710NPBA)
UM581127000
Issue AB, March 22, 2012
Optional EIB Interface Board Assembly
J8
J9
Optional EIB Interface Board
(Top View)
J5
J6
J7
SW1
J2
J3
J4
J5-J9
Wire Size Capacity: 16-26 AWG.
Recommended Torque: 2.2 in-lbs.
Figure 4-11
EIB (ACU+ Extended Interface Board) Connector Locations
Chapter 4. Troubleshooting and Repair
Page 35
This document is property of Emerson Network Power, Energy Systems, North America, Inc. and contains confidential and proprietary information owned by Emerson Network Power, Energy
Systems, North America, Inc. Any copying, use, or disclosure of it without the written permission of Emerson Network Power, Energy Systems, North America, Inc. is strictly prohibited.
UM581127000
Issue AB, March 22, 2012
User Instructions
Spec. No. 581127000 (Model 710NPBA)
SM-DU+ and Shunt Interface Assembly Replacement
Procedure
1) Performing this procedure may activate external alarms. Do one of the following.
If possible, disable these alarms. If these alarms cannot be easily disabled,
notify the appropriate personnel to disregard any future alarms associated with
this system while the procedure is being performed.
Danger: Performing the next steps exposes service personnel to battery
potential. Exercise extreme caution not to inadvertently contact or
have any tool inadvertently contact any energized electrical
termination.
2) Open the distribution cabinet’s front door by turning the latch in the
counterclockwise position.
Warning: Damage to the circuit card may result if the next step is not followed.
3) Connect an approved grounding strap to your wrist. Attach the other end to a
suitable ground.
4) Carefully label the wires connected to the shunt input terminal blocks on circuit
card. These wires must be connected to the same terminals on the replacement
circuit card. Refer to Figure 4-12.
5) Carefully label the connectors plugged into the circuit card. These connectors
must be plugged into the same connectors on the replacement circuit card.
Refer to Figure 4-12.
Danger: In the next step, external wiring may be energized from an external
source. DO NOT allow bare wire ends to contact any grounded or
energized object.
6) Remove the external wiring from the shunt input terminal blocks. DO NOT allow
the bare wire end to contact any grounded or energized object. Isolate the wire
end with electrical tape. Repeat for each wire to be removed.
7) Unplug all connectors plugged into the circuit card.
8) Remove the screw securing the SM-DU+ and Shunt Interface Assembly to the
bottom of the distribution cabinet, and remove the assembly.
9) SM-DU+: In this step, ensure you do not intermix the old and replacement circuit
cards. Set the switches on the replacement circuit card to the same settings as
the old circuit card. Switch settings are documented in CHAPTER 3. SETTING
JUMPERS AND SWITCH OPTIONS of the Power System Installation
Instructions (IM581127000).
10) Slide the replacement SM-DU+ and Shunt Interface Assembly into the mounting
position inside the distribution cabinet, and secure with the screw removed from
the old assembly.
11) Plug all connectors removed from the old circuit card into the same position on
the replacement circuit card.
Danger: In the next step, external alarm wiring may be energized from an
external source. DO NOT allow bare wire ends to contact any
grounded or energized object.
12) Reconnect the external wiring to the correct terminals on the shunt input terminal
blocks. First remove the electrical tape that was applied to the bare wire end in a
previous step. DO NOT allow the bare wire end to contact any grounded or
energized object. After securing the wire, gently tug on the wire to ensure that it
Page 36
Chapter 4. Troubleshooting and Repair
This document is property of Emerson Network Power, Energy Systems, North America, Inc. and contains confidential and proprietary information owned by Emerson Network Power, Energy
Systems, North America, Inc. Any copying, use, or disclosure of it without the written permission of Emerson Network Power, Energy Systems, North America, Inc. is strictly prohibited.
User Instructions
Spec. No. 581127000 (Model 710NPBA)
UM581127000
Issue AB, March 22, 2012
cannot be pulled out of the terminal block. Repeat for each wire to be
reconnected.
13) Remove the grounding wrist strap.
14) Close the distribution cabinet’s front door. Turn the latch clockwise to secure the
door.
15) Enable the external alarms, or notify appropriate personnel that this procedure is
finished.
16) Ensure that there are no local or remote alarms active on the system.
Chapter 4. Troubleshooting and Repair
Page 37
This document is property of Emerson Network Power, Energy Systems, North America, Inc. and contains confidential and proprietary information owned by Emerson Network Power, Energy
Systems, North America, Inc. Any copying, use, or disclosure of it without the written permission of Emerson Network Power, Energy Systems, North America, Inc. is strictly prohibited.
UM581127000
Issue AB, March 22, 2012
User Instructions
Spec. No. 581127000 (Model 710NPBA)
SM-DU+ and
Shunt Interface Board
TB1 - TB2
Wire Size Capacity: 16-26 AWG.
Recommended Torque: 2.2 in-lbs.
RS 232
RS485
RS485
J5
J3
can
TB2
J4
J4A
Red Indicator
Yellow Indicator
Green Indicator
SW2
SW1
1B
1A
pow er
J1
J7
SHUNT
J1
J8
SHUNT
TB1
J6
FUSE
J2
ON
Shunt Interface Board
OFF
12345678 12345678
SM-DU+
Figure 4-12
SM-DU+ and Shunt Interface Assembly Connector Locations
Page 38
Chapter 4. Troubleshooting and Repair
This document is property of Emerson Network Power, Energy Systems, North America, Inc. and contains confidential and proprietary information owned by Emerson Network Power, Energy
Systems, North America, Inc. Any copying, use, or disclosure of it without the written permission of Emerson Network Power, Energy Systems, North America, Inc. is strictly prohibited.
User Instructions
Spec. No. 581127000 (Model 710NPBA)
UM581127000
Issue AB, March 22, 2012
Optional LVD Driver and LVD Driver Lite Circuit Card Replacement
Procedure
1) Performing this procedure may activate external alarms. Do one of the following.
If possible, disable these alarms. If these alarms cannot be easily disabled,
notify the appropriate personnel to disregard any future alarms associated with
this system while the procedure is being performed.
Danger: Performing the next steps exposes service personnel to battery
potential. Exercise extreme caution not to inadvertently contact or
have any tool inadvertently contact any energized electrical
termination.
2) Open the distribution cabinet’s front door by turning the latch in the
counterclockwise position.
Warning: Damage to the circuit card may result if the next step is not followed.
3) Connect an approved grounding strap to your wrist. Attach the other end to a
suitable ground.
4) If any of the low voltage disconnect contactors is open and it is desired to be
closed, push the LVD Inhibit Switch to the UP position momentarily and then
leave the switch in the middle (OFF) position.
5) Remove the top and front panels to access the circuit cards at the bottom of the
distribution cabinet.
6) Carefully label the connectors plugged into the circuit card. These connectors
must be plugged into the same connectors on the replacement circuit card.
Refer to Figure 4-13 or Figure 4-14.
7) Unplug all connectors plugged into the circuit card.
8) Remove the screws securing the circuit card and remove the circuit card from the
distribution cabinet.
9) Slide the replacement circuit card into the mounting position inside the
distribution cabinet, and secure with the screws removed from the old circuit
card.
10) Ensure that the LVD Inhibit Switch is in the middle (OFF) position.
11) Plug all connectors removed from the old circuit card into the same position on
the replacement circuit card.
12) Push the LVD Inhibit Switch to the down (ON) position.
13) Remove the grounding wrist strap.
14) Reinstall the top and front panels that cover the circuit cards at the bottom of the
distribution cabinet.
15) Close the distribution cabinet’s front door. Turn the latch clockwise to secure the
door.
16) Enable the external alarms, or notify appropriate personnel that this procedure is
finished.
17) Ensure that there are no local or remote alarms active on the system.
Chapter 4. Troubleshooting and Repair
Page 39
This document is property of Emerson Network Power, Energy Systems, North America, Inc. and contains confidential and proprietary information owned by Emerson Network Power, Energy
Systems, North America, Inc. Any copying, use, or disclosure of it without the written permission of Emerson Network Power, Energy Systems, North America, Inc. is strictly prohibited.
UM581127000
Issue AB, March 22, 2012
J5
J6
J3
User Instructions
Spec. No. 581127000 (Model 710NPBA)
J4
J2
J1
J1, J2, J3
To LVLD contactor, uses ACU+
LVD1 control setting (Level 1).
J7
J4, J5, J6
To LVLD contactor, uses ACU+
LVD2 control setting (Level 2).
S1
DO NOT change a Low Voltage
Load Disconnect contactor to
LVD Control Level 2 (LVD2) if
the system is furnished with a
Low Voltage Battery Disconnect
contactor.
J7
To LVBD contactor, uses ACU+
LVD2 control setting (Level 2).
Notes:
1. Connects up to (4) LVLD
and (1) LVBD contactors.
Figure 4-13
Optional LVD Driver Circuit Card Connector Locations
Page 40
Chapter 4. Troubleshooting and Repair
This document is property of Emerson Network Power, Energy Systems, North America, Inc. and contains confidential and proprietary information owned by Emerson Network Power, Energy
Systems, North America, Inc. Any copying, use, or disclosure of it without the written permission of Emerson Network Power, Energy Systems, North America, Inc. is strictly prohibited.
User Instructions
Spec. No. 581127000 (Model 710NPBA)
UM581127000
Issue AB, March 22, 2012
DO NOT change a Low Voltage
Load Disconnect contactor to
LVD Control Level 2 (LVD2) if
the system is furnished with a
Low Voltage Battery Disconnect
contactor.
J1
To LVLD contactor, uses ACU+
LVD1 control setting (Level 1).
J3
To LVLD contactor, uses ACU+
LVD2 control setting (Level 2).
J3
J1
J2
To LVBD contactor, uses ACU+
LVD2 control setting (Level 2).
Can only be used if it is contained
in a List 21 (1-row) cabinet.
Notes:
1. Connects up to (2) LVD
contactors rated at 600A or less.
2. Only one (1) contactor per level
can be accommodated. J2 and J3
are on Level 2, only one (1) of these
connectors can be used at a time.
J2
S1
Figure 4-14
Optional LVD Driver Lite Circuit Card Connector Locations
Chapter 4. Troubleshooting and Repair
Page 41
This document is property of Emerson Network Power, Energy Systems, North America, Inc. and contains confidential and proprietary information owned by Emerson Network Power, Energy
Systems, North America, Inc. Any copying, use, or disclosure of it without the written permission of Emerson Network Power, Energy Systems, North America, Inc. is strictly prohibited.
UM581127000
Issue AB, March 22, 2012
User Instructions
Spec. No. 581127000 (Model 710NPBA)
Optional Manual Battery Disconnect Circuit Card Replacement
Procedure
1) Performing this procedure may activate external alarms. Do one of the following.
If possible, disable these alarms. If these alarms cannot be easily disabled,
notify the appropriate personnel to disregard any future alarms associated with
this system while the procedure is being performed.
Danger: Performing the next steps exposes service personnel to battery
potential. Exercise extreme caution not to inadvertently contact or
have any tool inadvertently contact any energized electrical
termination.
2) Open the distribution cabinet’s front door by turning the latch in the
counterclockwise position.
Warning: Damage to the circuit card may result if the next step is not followed.
3) Connect an approved grounding strap to your wrist. Attach the other end to a
suitable ground.
4) Remove the top and front panels to access the circuit cards at the bottom of the
distribution cabinet.
5) Carefully label the connectors plugged into the circuit card. These connectors
must be plugged into the same connectors on the replacement circuit card.
Refer to Figure 4-15.
6) Unplug all connectors plugged into the circuit card.
7) Remove the screws securing the circuit card and remove the circuit card from the
distribution cabinet.
8) Place the replacement circuit card into the mounting position inside the
distribution cabinet, and secure with the screws removed from the old circuit
card.
9) Plug all connectors removed from the old circuit card into the same position on
the replacement circuit card.
10) Remove the grounding wrist strap.
11) Reinstall the top and front panels that cover the circuit cards at the bottom of the
distribution cabinet.
12) Close the distribution cabinet’s front door. Turn the latch clockwise to secure the
door.
13) Enable the external alarms, or notify appropriate personnel that this procedure is
finished.
14) Ensure that there are no local or remote alarms active on the system.
Page 42
Chapter 4. Troubleshooting and Repair
This document is property of Emerson Network Power, Energy Systems, North America, Inc. and contains confidential and proprietary information owned by Emerson Network Power, Energy
Systems, North America, Inc. Any copying, use, or disclosure of it without the written permission of Emerson Network Power, Energy Systems, North America, Inc. is strictly prohibited.
User Instructions
Spec. No. 581127000 (Model 710NPBA)
UM581127000
Issue AB, March 22, 2012
J2
J1
Figure 4-15
Optional Manual Battery Disconnect Circuit Card Connector Locations
Chapter 4. Troubleshooting and Repair
Page 43
This document is property of Emerson Network Power, Energy Systems, North America, Inc. and contains confidential and proprietary information owned by Emerson Network Power, Energy
Systems, North America, Inc. Any copying, use, or disclosure of it without the written permission of Emerson Network Power, Energy Systems, North America, Inc. is strictly prohibited.
UM581127000
Issue AB, March 22, 2012
User Instructions
Spec. No. 581127000 (Model 710NPBA)
Replacing a Distribution Panel
Refer to the Admonishments at the beginning of this document before performing this
procedure.
Danger: Performing this procedure exposes service personnel to battery potential.
Exercise extreme caution not to inadvertently contact or have any tool
inadvertently contact any energized electrical termination.
Procedure
Note: Refer to Figure 4-16 as this procedure is performed.
Removing the Distribution Panel
1) Open the distribution cabinet’s front door by turning the latch in the
counterclockwise position.
2) Remove the plastic shield covering the circuit breakers or fuseholders on the
panel to be removed by loosening the screws holding the shield and sliding the
shield upwards.
3) Disconnect all load or battery wiring from the circuit breaker or fuse positions.
4) On panels equipped with a ground busbar, remove all load return or battery
return wiring from the ground busbar.
5) On panels equipped with shunts, label the shunt leads then remove them from
the panel.
6) Locate the in-line FA/CBA connector located near the back of the panel, and
separate the connector halves.
7) Refer to Figure 4-16 and remove the hardware securing the panel’s Ground
Busbar (if equipped) to the distribution cabinet’s busbar.
8) For load distribution panels, refer to Figure 4-16 and remove the hardware
securing the panel’s System Load Distribution busbar to the distribution cabinet’s
busbar.
9) For battery distribution panels, refer to Figure 4-16 and remove the hardware
securing the panel’s Battery Busbar to the distribution cabinet’s busbar.
10) For dual voltage load distribution panels, refer to Figure 4-16 and remove the
hardware securing the -48V jumper leads.
11) Refer to Figure 4-16 and remove the hardware securing the distribution panel to
the distribution cabinet. Remove the panel from the distribution cabinet.
Page 44
Chapter 4. Troubleshooting and Repair
This document is property of Emerson Network Power, Energy Systems, North America, Inc. and contains confidential and proprietary information owned by Emerson Network Power, Energy
Systems, North America, Inc. Any copying, use, or disclosure of it without the written permission of Emerson Network Power, Energy Systems, North America, Inc. is strictly prohibited.
User Instructions
Spec. No. 581127000 (Model 710NPBA)
UM581127000
Issue AB, March 22, 2012
Installing the Distribution Panel
Note: In the following procedure, before making busbar-to-busbar connections, apply a
thin coating of electrical anti-oxidizing compound to the mating surfaces of the
busbars.
1) Orient the replacement distribution panel into distribution cabinet, checking to
ensure no wires are pinched. Replace the hardware securing the distribution
panel to the distribution cabinet (10-32 x 5/8” bolt, #10 flat washer, 4-places).
2) For dual voltage load distribution panels, replace the hardware securing the
-48V jumper leads (1/4-20 bolt or nut, 1/4” lock washer, 1/4” flat washer. Torque
to 84 in-lbs).
3) For battery distribution panels, replace the hardware securing the panel’s
Battery Busbar to the distribution cabinet’s busbar (3/8-16 x 1-1/4” bolt, 3/8”
Belleville lock washer, 3/8” hardened flat washer, 2-places. Torque to 180
in-lbs.)
4) For load distribution panels, replace the hardware securing the panel’s System
Load Distribution busbar to the distribution cabinet’s busbar (1/4-20 x 1” bolt, 1/4”
Belleville lock washer, 1/4” Belleville lock washer (concave side of Belleville lock
washers face each other), 1/4” hardened flat washer, 2-places. Torque to 60
in-lbs).
5) Replace the hardware securing the panel’s Ground Busbar (if equipped) to the
distribution cabinet’s busbar (1/4-20 x 1” bolt, 1/4” Belleville lock washer, 1/4”
Belleville lock washer (concave side of Belleville lock washers face each other),
1/4” hardened flat washer, 2-places. Torque to 60 in-lbs).
6) Locate the in-line FA/CBA connector located near the back of the panel, and plug
it into the mating connector half in the distribution cabinet.
7) On panels equipped with shunts, reconnect the shunt leads.
Warning: In the next step, observe correct polarity; otherwise equipment
damage will result.
8) On panels equipped with a ground busbar, reconnect the load return or battery
return wiring to the ground busbar.
9) Reconnect the load or battery wiring to the circuit breaker or fuse positions.
10) Transfer the plug-in circuit breakers or fuses from the old panel to the
replacement panel.
11) Replace the plastic shield covering the circuit breakers or fuseholders on the
replacement panel.
12) Verify no Circuit Breaker/Fuse Alarms are active.
13) Close the distribution cabinet’s front door. Turn the latch clockwise to secure the
door.
Chapter 4. Troubleshooting and Repair
Page 45
This document is property of Emerson Network Power, Energy Systems, North America, Inc. and contains confidential and proprietary information owned by Emerson Network Power, Energy
Systems, North America, Inc. Any copying, use, or disclosure of it without the written permission of Emerson Network Power, Energy Systems, North America, Inc. is strictly prohibited.
UM581127000
Issue AB, March 22, 2012
User Instructions
Spec. No. 581127000 (Model 710NPBA)
Battery Busbar
Hardware
Ground Busbar
Hardware
Battery
Distribution
Panel
Distribution Panel
Hardware
Distribution Panel
Hardware
Load
Distribution
Panel
Ground Busbar
Hardware
System Load
Distribution Busbar
Hardware
Front
Front
Components removed in illustration for clarity only.
List DA Dual Voltage
Distribution Panel
(Lists DB, DC, and DD similar.)
Shorting Block if 4th shelf
has Converter Option.
If more than three shelves with the
Converter Option, /–48/ jumpers.
Assembly order is: lug, 1/4" flat washer, 1/4" lock washer,
1/4-20 nut. Torque to 84 in-lbs. Note that a shorting block
will be factory installed in this distribution device position.
/–48/ jumpers.
Assembly order is: lug, 1/4" flat washer,
1/4" lock washer, 1/4-20 bolt.
Torque to 84 in-lbs.
Figure 4-16
Replacing a Distribution Panel
Page 46
Chapter 4. Troubleshooting and Repair
This document is property of Emerson Network Power, Energy Systems, North America, Inc. and contains confidential and proprietary information owned by Emerson Network Power, Energy
Systems, North America, Inc. Any copying, use, or disclosure of it without the written permission of Emerson Network Power, Energy Systems, North America, Inc. is strictly prohibited.
User Instructions
Spec. No. 581127000 (Model 710NPBA)
UM581127000
Issue AB, March 22, 2012
Replacing a Battery or Load Disconnect Contactor
Danger: All sources of AC and DC power must be completely disconnected from
this power system before performing this procedure. Use a voltmeter to
verify no DC voltage is present on the system busbars before proceeding.
Note: In the following procedure, before making busbar-to-busbar connections, apply a
thin coating of electrical anti-oxidizing compound to the mating surfaces of the
busbars.
Procedure
Note: Refer to Figure 4-17, Figure 4-18, Figure 4-19, or Figure 4-20 as this
procedure is performed.
Removing the Contactor
1) Verify all AC and DC power sources are disconnected from the power system.
2) For the 1-row distribution cabinet, the contactor can be accessed from the top
of the distribution cabinet. For the 2, 3, or 4-row distribution cabinet, the
contactor can be accessed from the rear (and top) of the distribution cabinet.
3) For the 2, 3, or 4-row distribution cabinet, remove the distribution cabinet’s
rear access panel(s).
4) Disconnect the wiring to the contactor by unplugging the quick disconnects.
5) Note the orientation of the contactor to ensure the replacement is installed the
same way. Unbolt the contactor (4-places) and remove. Save all hardware.
Installing the Replacement Contactor
1) Position the replacement contactor oriented the same way as the old.
2) Secure the contactor with the hardware removed above. Refer to Figure 4-17,
Figure 4-18, Figure 4-19, or Figure 4-20 for hardware build-up and recommended
torque.
3) Replace the wiring to the contactor by plugging-in the quick disconnects. Refer
to Figure 4-17, Figure 4-18, Figure 4-19, or Figure 4-20.
4) For the 2, 3, or 4-row distribution cabinet, replace the distribution cabinet’s rear
access panel(s).
Restarting the Power System
1) Reconnect the AC and DC power sources to the power system.
2) Start the power system. Refer to the separate Installation Instructions
(IM581127000) for a startup procedure.
3) Verify no alarms are active.
Chapter 4. Troubleshooting and Repair
Page 47
This document is property of Emerson Network Power, Energy Systems, North America, Inc. and contains confidential and proprietary information owned by Emerson Network Power, Energy
Systems, North America, Inc. Any copying, use, or disclosure of it without the written permission of Emerson Network Power, Energy Systems, North America, Inc. is strictly prohibited.
UM581127000
Issue AB, March 22, 2012
User Instructions
Spec. No. 581127000 (Model 710NPBA)
Battery
Disconnect
Contactor
5/16-18 x 1” Bolt
5/16" Belleville Lock Washer
5/16" Belleville Lock Washer
(concave side of Belleville
Lock Washers face each other)
5/16" Hardened Flat Washer
(4 places)
Torque to 100 in-lbs.
Apply electrical anti-oxidizing
compound to busbar mating surfaces.
Components removed in
illustration for clarity only.
Front
Contactor styles vary
between manufacturer’s.
Brown Wire
Brown/White Wire
Red/White Wire
White/Black Wire
Brown Wire
Brown/White Wire
White/Black Wire
Red/White Wire
Figure 4-17
Replacing a Battery Disconnect Contactor
in a 1-Row Distribution Cabinet
Page 48
Chapter 4. Troubleshooting and Repair
This document is property of Emerson Network Power, Energy Systems, North America, Inc. and contains confidential and proprietary information owned by Emerson Network Power, Energy
Systems, North America, Inc. Any copying, use, or disclosure of it without the written permission of Emerson Network Power, Energy Systems, North America, Inc. is strictly prohibited.
User Instructions
Spec. No. 581127000 (Model 710NPBA)
UM581127000
Issue AB, March 22, 2012
1/2-13 x 1-1/4” Bolt
1/2" Belleville Lock Washer
1/2" Belleville Lock Washer
(concave side of Belleville
Lock Washers face each other)
1/2" Hardened Flat Washer
(4 places)
Torque to 500 in-lbs.
Apply electrical anti-oxidizing
compound to busbar mating surfaces.
Battery
Disconnect
Contactor
Front
Shown being removed from front
for clarity only. Removal is from rear.
Components removed in
illustration for clarity only.
Brown/White Wire
Brown Wire
2-row Distribution Cabinet
shown, 3 or 4-row cabinet similar.
Red/White
Wire
White/Black
Wire
Figure 4-18
Replacing a Battery Disconnect Contactor
in a 2, 3, or 4-Row Distribution Cabinet
Chapter 4. Troubleshooting and Repair
Page 49
This document is property of Emerson Network Power, Energy Systems, North America, Inc. and contains confidential and proprietary information owned by Emerson Network Power, Energy
Systems, North America, Inc. Any copying, use, or disclosure of it without the written permission of Emerson Network Power, Energy Systems, North America, Inc. is strictly prohibited.
UM581127000
Issue AB, March 22, 2012
User Instructions
Spec. No. 581127000 (Model 710NPBA)
5/16-18 x 1” Bolt
5/16" Belleville Lock Washer
5/16" Belleville Lock Washer
(concave side of Belleville
Lock Washers face each other)
5/16" Hardened Flat Washer
(4 places)
Torque to 100 in-lbs.
Load
Disconnect
Contactor
Apply electrical anti-oxidizing
compound to busbar
mating surfaces.
Components removed in
illustration for clarity only.
Front
Contactor styles vary
between manufacturer’s.
Violet/White Wire
Violet Wire
Red Wire
Black Wire
Violet/White Wire
Violet Wire
Black Wire
Red Wire
Figure 4-19
Replacing a Load Disconnect Contactor
in a 1-Row Distribution Cabinet
Page 50
Chapter 4. Troubleshooting and Repair
This document is property of Emerson Network Power, Energy Systems, North America, Inc. and contains confidential and proprietary information owned by Emerson Network Power, Energy
Systems, North America, Inc. Any copying, use, or disclosure of it without the written permission of Emerson Network Power, Energy Systems, North America, Inc. is strictly prohibited.
User Instructions
Spec. No. 581127000 (Model 710NPBA)
UM581127000
Issue AB, March 22, 2012
Components removed in
illustration for clarity only.
Load Disconnect
Contactor
5/16-18 Nut
5/16" Belleville Lock Washer
5/16" Belleville Lock Washer
(concave side of Belleville
Lock Washers face each other)
5/16" Hardened Flat Washer
(4 places)
Torque to 100 in-lbs.
Apply electrical anti-oxidizing
compound to busbar
mating surfaces.
Front
2-row Distribution Cabinet
shown, 3 or 4-row cabinet similar.
Contactor styles vary
between manufacturer’s.
Violet/White Wire
Violet Wire
Red Wire
Black Wire
Violet/White Wire
Violet Wire
Black Wire
Red Wire
Figure 4-20
Replacing a Load Disconnect Contactor
in a 2, 3, or 4-Row Distribution Cabinet
Chapter 4. Troubleshooting and Repair
Page 51
This document is property of Emerson Network Power, Energy Systems, North America, Inc. and contains confidential and proprietary information owned by Emerson Network Power, Energy
Systems, North America, Inc. Any copying, use, or disclosure of it without the written permission of Emerson Network Power, Energy Systems, North America, Inc. is strictly prohibited.
UM581127000
Issue AB, March 22, 2012
User Instructions
Spec. No. 581127000 (Model 710NPBA)
REVISION RECORD
Issue
Change
Number
(ECO)
AA
LLP215523
New
AB
LLP216783
Misc. updates.
Page 52
Description of Change
Revision Record
This document is property of Emerson Network Power, Energy Systems, North America, Inc. and contains confidential and proprietary information owned by Emerson Network Power, Energy
Systems, North America, Inc. Any copying, use, or disclosure of it without the written permission of Emerson Network Power, Energy Systems, North America, Inc. is strictly prohibited.
NetPerform™ Optimization Services
At Emerson Network Power, we understand the importance of reliable equipment – it’s critical to both
your business and your bottom line. That is why we offer a wide array of services to meet all of your
network infrastructure needs.
Technical Support
Email
[email protected]
[email protected]
Phone
1.800.800.5260
Answers technical product and system
questions; determines status of warranties and
contractual agreements for repair.
Services - Design, Deployment & Optimization
Email
[email protected]
Phone
1.800.800.1280, option 7
FreedomCare Secure.EmersonNetworkPower.com
Provides quotes and bid responses, order
placement and scheduling for design, and
deployment and optimization services.
Download service & maintenance reports
online.
Spare Parts
Email
[email protected]
[email protected]
Phone
1.800.800.1280, option 5
Pricing and PO processing of spare parts,
including but not limited to breakers, cables,
fuses, rectifier fans, misc. breaker and fuse
panels, enclosure fans, doors & switches, etc.
DC Power Depot Repair
Email
[email protected]
Phone
1.800.800.1280, option 6
Creates and processes RMAs, determines
lead times and pricing, provides repair
shipping information and status.
DC Power Product Training
Email
Phone
[email protected] Requests for quotes, order placement and
scheduling.
1.800.800.1280, option 8
For More Information
To learn more about service offerings from Emerson Network Power, please contact your sales
representative, call 1-800-800-1280 option 7, email [email protected] or visit
www.EmersonNetworkPower.com/EnergySystems.