1
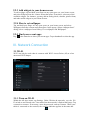
Genesis Prime XL – EGS102
User Manual
1
Since the tablet software updates regularly, the user manual may not cover all
aspects of new features.
Important Notices
• The new battery will be in its best condition after being fully charged and
discharged 2-3 times.
• While using earphones, if the volume is excessively high it may cause hearing
damage. Please adjust the volume of the player to a safe level and moderate
duration of use.
• Do not disconnect the tablet suddenly when formatting or uploading and downloading,
which can lead to program errors.
• Do not dismantle the tablet by yourself, and do not use alcohol, thinner or benzene to
clean its surface.
• Do not use the tablet while driving or walking.
• The tablet is not moisture and water resistant. Please do not use it in a damp
environment.
• Do not drop or hit the tablet against a hard surface, or the screen may be damaged or
cracked.
• Do not upgrade the firmware by yourself. The tablet should be upgraded with the
right firmware and right method offered by us. If upgrade is needed, please
contact us.
2
I. Getting Started
1.1 Turn on/off
1.1.1 Turn on
To start your tablet, press and hold the power key for 2 seconds. The Ematic logo
indicates that the tablet is loading.
Once the lock screen loads, drag the padlock icon to the right to unlock.
1.1.2 Turn off
When the tablet is on, to shut off your tablet, press and hold the power key until the
System options dialog appears and tap Power Off, then your tablet will shut down
dialog appears. Tap OK.
1.2 Lock/unlock the screen (sleep mode)
To save battery, you should put your tablet in sleep mode by turning off the LCD
display. To do this, press the power key and immediately release it. Do it again to
bring up the lock screen.
1.3 Connect to a computer
1.3.1 Connect to PC via USB cable
1. Connect the tablet to your computer by USB.
2. The device driver will install.
You can now copy files onto the tablet just as you would with a USB flash drive.
3. Remove the USB cable when you finish transferring files.
1.3.2 Connect to Mac® via USB cable
1. Connect the tablet to your computer by USB.
2. Go to android.com/filetransfer on your Mac and install the Android File Transfer
application.
3. The Android File Transfer application will launch automatically when you connect
the tablet to your computer by USB. Drag and drop files to transfer.
4. Remove the USB cable when you finish transferring files.
3
II. Your Home Screen
2.1 Icons on Home Screen
You can fill the home screen with any combination of shortcuts, widgets, and
folders you like.
When you power up your tablet for the first time, you‟ll see the main home-screen
panel. This panel is typically centered; you can access additional panels on either side
of the main one by swiping your finger left or right.
At the bottom of the Home Screen is your Status Bar.
Back – Go back to the previous screen.
Home – Go back to the home screen. Hold and slide up to access Google Now™.
Recent Apps – Opens a list of recent apps. Tap an app to open or swipe left/right to remove the thumbnail.
Decrease Volume
Increase Volume
Menu – Tap for more option or settings.
All Apps – View all your apps.
Google Search – Tap the microphone icon to search by voice.
2.2 Operations on Home Screen
2.2.1 Add app icon to home screen
Within the All Apps menu, touch and hold any icon for about 2 seconds, the icon will
become movable and appear on the home screen.
2.2.2 Remove app icon from home screen
On the main screen, touch and hold the undesired icon. Drag the item to the X and
release it when it turns red.
4
2.2.3 Add widgets to your home screen
To add a widget, tap and hold your finger on any open space on your home screen,
and select Widgets from the context menu that opens. From there, select any of the
available widgets. For instance, you may add an analog clock, calendar, picture frame,
and other useful widgets to your Home Screen.
2.2.4 How to set wallpaper
Tap and hold your finger on any open space on your home screen, and select
Wallpapers from the context menu that opens. In the popup “Select wallpaper from”
dialog, select a wallpaper from Gallery, Live wallpapers and Wallpapers.
2.2.5 Find your recent apps
Tap
in the status bar to show your recent apps. Tap a thumbnail to select the app.
III. Network Connection
3.1 Wi-Fi
Wi-Fi can only be used when it connects with Wi-Fi Access Point (AP) or a free
unsecured Wi-Fi hotpot.
3.1.1 Turn on Wi-Fi
Within the All Apps menu, tap Settings. Under Wireless & networks, t ap t h e WiFi switch to turn on and scan. Your tablet lists the networks it finds within range. Tap
a network to connect. If necessary, enter the password, and tap Connect. When your
tablet is connected to the network, the wireless indicator appears in the status bar.
5
The blue lines indicate connection strength.
3.1.2 Turn off Wi-Fi
To turn off Wi-Fi, tap the Wi-Fi ON switch under Wireless & networks. Turn off
Wi-Fi when you‟re not using it, to extend the life of your battery between charges.
6
3.1.3 Add a Wi-Fi network
Users may also add a Wi-Fi network under Wi-Fi settings. Tap + in the top right
corner. Enter the SSID (name) of the network. If necessary, enter security or other
network configuration details. Touch Save.
3.1.4 Forget a Wi-Fi network
In the Wi-Fi settings screen, tap the name of the network. Tap “Forget” in the
dialog that opens.
3.3 Portable Hotspot
3.3.1 Portable Wi-Fi hotspot
Tap to share your tablet‟s mobile network data connection as a portable Wi-Fi
hotspot.
3.4 VPN settings
3.4.1 Add VPN profile
Opens a screen that prompts you to select the type of VPN to add. You are then
prompted for VPN configuration details.
IV. Internet Browsing
4.1 Internet Browsing
Before using your browser, make sure Wi-Fi is connected.
On the home screen, tap the Google text field or the Chrome icon to open your
browser.
In the address bar, tap the text field to make the Android keyboard appear for entry of
keywords or a URL.
Tap and hold the text field to edit text or change input method.
V. Install and Manage Apps
5.1 Install and Manage Apps
This tablet is preloaded with the Google Play Store; you can search and install apps here
after logging in with your Google account.
7
VI. Multi-Media Functions
6.1 Music
After loading your music onto your tablet, tap the Play Music icon
(found by
default on your home screen or by opening the All Apps menu). You‟ll be given the
option of selecting by Artist, Song, Album, or custom Playlist. Tap to select. Your
selection will begin to play through the tablet‟s built in speakers or through external
headphones if attached via the headphone port. The media player allows you to shuffle,
skip, or pause your current selection and even displays the album artwork when
available.
6.2 Video
6.2.1 Video Playback
You can play videos stored on your tablet or SD card. To play, tap the Video
Select the video you‟d like to play.
icon.
Pause or advance your video via the toolbar along the bottom of the screen.
6.2.1 Video Playback by HDMI
You can connect the tablet to your HDTV using an HDMI cable. When the tablet is
connected the screen will go black. You must choose and begin playing a video before
connecting the HDMI cable.
6.3 Gallery
You can view, show off, and even edit your digital pictures on the tablet‟s display. After
loading your media, tap the Video app within the All Apps menu. Tap the desired picture
to display. To scroll through your collection, swipe left or right. Tap the image to reveal
the menu. By tapping the menu icons you may delete an image or share it via Picasa,
Bluetooth or Gmail. You can even set images as your wallpaper or edit and add effects.
6.4 Camera
Tap the camera icon in the App Panel to open the camera.
6.4.1 Take photos
Tap the blue shutter button to take a photo.
You can view the photos you have taken by tapping the preview on the upper
right hand corner, or you can go back to Gallery.
6.4.2 Record videos
Tap the video camera icon to record videos.
8
Tap the red record button to start recording and tap it again to stop recording.
Videos can be viewed in the Video app.
6.5 eBook reader
Tap the Play Books icon within the All Apps menu to open your library or buy more
books.
Tap an eBook to read.
In reading, tap the top of the screen to reveal the sub menu where you can adjust the text
size, screen brightness, jump chapters, and more.
6.5.1 Download Books
With Wi-Fi on you can download available eBooks.
VII. Settings
Within the All Apps menu, tap the Settings icon (or found by default on your home
screen).
Settings include: Wi-Fi, Sound, Display, Storage, Battery, Apps, Location services,
Security, Language & input, Backup & rest, Accounts, Date & time, Accessibility, and
Developer options.
7.1 Display Settings
Under DEVICE, tap 'Display' to set brightness, sleep, font size, or change wallpaper.
The display has a screen timeout by default set to 1 min. If the unit is left inactive for
that period of time, the screen will go dark as if turned off. However, it is simply in
standby mode. Press and release the power button and a screen will appear with a
padlock icon. This is your lock screen. Slide the padlock to unlock the screen.
7.2 Applications Settings
Under DEVICE, tap Apps. Tap an app listed to view storage information, force stop,
uninstall, or clear data.
7.3 Set language & Input
Under PERSONAL, tap Language & input. You may set your language or keyboard
here.
7.4 Storage Settings
To view your storage status, tap Storage under Device.
Note: As software takes up your tablet memory, the total memory is usually less than
the actual flash memory.
7.5 Set location & security
9
Set up screen lock, and add or remove tablet administrators. With this setting, you are
able to lock the screen with a pattern, PIN or password to avoid your tablet being used
without permission.
VII. Battery
Very Low Battery
Full Battery
Charging Battery
Indicates that the battery is full. When the battery level becomes too low, a
prompt comes up to charge your tablet.
The tablet can be charged with the USB wall charger when it is on or off.
Note: Please charge it by the Adaptor we supplied.
The tablet may take 4-5 hours to charge to full.
Tips on extending battery life
1. Streaming audio or video apps will use a lot of battery life
2. Disable Location services. You can turn it off from Settings → location
services.
3. Switch off Wi-Fi if you‟re not close to a strong Wi-Fi signal for extended periods
of time.
4. Use a Quick Screen Timeout. You can alter this option from Settings → Display
→ Sleep.
5. Reduce brightness to a comfortable level using a widget or at Settings
→ Display → Brightness.
6. Use Web Widgets wisely. Widgets that access the Web consume more power
than widgets that do not.
Note:
1. Only use the supplied wall charger to charge the tablet as other chargers may
damage the device.
2. The tablet cannot be charged via USB cable when connected to your PC.
Troubleshooting
1. Cannot turn on the tablet.
Check the tablet‟s power level. Please charge it before starting it. If your tablet still
cannot be turned on, you may reset it before you turn it on.
2. No sound from earphone.
10
Check if volume is set to „0‟. Or earphone may be broken, please try another one.
3. Loud static noise.
Check if there is dust in the earphone or speaker. Check if the file is broken.
4. Frozen to any operation.
Please use a pin to reset and then restart your tablet.
5. Screen goes dark when connected to TV via HDMI cable.
The tablet supports only one-end output, so it is normal that the screen goes dark
when connected to TV via HDMI cable. When a video playback is finished,
disconnect the cable and the screen recovers.
6. Application not working.
Possible reasons may be that this app is not compatible with your OS or the
downloaded .apk file is broken so you may need to download a full version.
7. How do I delete a Google account?
If an account is added, the account is shown in Accounts of Settings, where you may
also add another account. To delete an undesired account, tap the account, then tap the
menu icon in the upper right hand corner and choose Remove account.
Limitations of Liability Statement
Links to Third Party Sites
The Ematic User Manual may contain or reference links to third-party sites, however, please be aware that
Ematic is not responsible for and cannot control these other sites. Ematic makes no representations or
warranties whatsoever about any other website which you may access as a result of reading this user
manual, or otherwise. When you access a website that is not owned or operated by Ematic (a “non-Ematic
website”), even one that may contain an Ematic logo, please understand that it is independent from Ematic,
and that Ematic has no direct control over the content on such website(s). In addition, a link to any such
non-Ematic website does not mean Ematic endorses or accepts any responsibility for the content, or of any
functionalities or services, of such website(s). Furthermore, Ematic makes no promise, representation or
warranty that any non-Ematic website you navigate to will be free of viruses, worms, Trojan horses and
other items of a destructive nature. The Ematic User Manual is for your exclusive benefit and you assume
all risks, losses and/or damages of whatever nature that may result arising out of your use of the Ematic
User Manual.
Limitation of Liability and Indemnity
To the maximum extent permitted by applicable law, Ematic shall not be liable for any damages suffered
as a result of using, modifying, contributing, copying, distributing, or downloading the materials, use of
the Ematic User Manual or use of any Ematic product and/or software. In no event shall Ematic be liable
for any indirect, extraordinary, exemplary, punitive, special, incidental, or consequential damages
(including, without limitation, loss of data, revenue, profits, use or other economic advantage) however
arising, whether for breach of contract or in tort, even if Ematic has been previously advised of the
11
possibility of such damage. You agree that you have sole responsibility for adequate protection and
backup of data and/or equipment used in connection with the product and software and will not make a
claim of any nature against Ematic for lost data, inaccurate output, work delays or lost profits resulting
from the use of the materials. You agree to indemnify, hold harmless and defend Ematic, together with its
affiliates, parent and subsidiary entities, successors, assigns, partners, managers, members, employees,
officers, directors and shareholders, from and against any and all damages, liens, liabilities, losses,
demands, actions, causes of action, claims, costs and expenses (including, without limitation, reasonable
attorneys‟ fees, charges and disbursements, as well as the cost of in-house counsel and appeals) arising
from or related to Ematic, the use of The Ematic User Manual or any Ematic product and/or software.
Some jurisdictions do not allow the exclusion or limitation of incidental or consequential damages, so the
above limitation or exclusion may not apply to you.
Windows™ is a registered trademark of Microsoft Corp. in the United States and other countries; Mac
OS® is a registered trademark of Apple Inc.; Linux™ is a registered trademark of Linus Torvalds.
Android is a trademark of Google Inc. The Android robot is reproduced or modified from work created
and shared by Google and used according to terms described in the Creative Commons 3.0 Attribution
License. ©2012 Google In. All rights reserved. Android, Google, Google Play, YouTube and other marks
are trademarks of Google Inc. Ematic is not affiliated with Google Inc. Wi-Fi®, the Wi-Fi CERTIFIED
logo, and the Wi-Fi logo are registered trademarks of the the Wi-Fi Alliance.
Ematic is not affiliated with Microsoft, Apple, Inc., Linux, or Google, Inc., (including Android).
This device complies with Part 15 of the FCC Rules. Operation is subject to the following two conditions:
(1) this device may not cause harmful interference, and (2) this device must accept any interference
received, including interference that may cause undesired operation.
The Ematic brand and products are owned by Shaghal, Ltd.
12