1
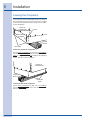
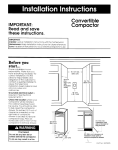
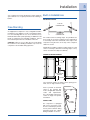
Installation
Your compactor has been designed to require minimum
space without loss of capacity whether free-standing or
built-in.
Built-in Installations
mounting straps
top of
compactor
Free Standing
As shipped, the Compactor is only configured for built in
installations. This appliance can be converted from builtin to free-standing with the use of Toe Kick Accessory
Kit Model ETC15TKH (sold separately). If additional cord
length is required for free-standing installation, remove
the cord clamp and wire tie on the back of the unit.
CAUTION: Failure to use Toe Kick Accessory Kit Model
ETC15TKH in a free-standing installation may cause the
compactor to be unstable during operation.
front of
compactor
Two under-counter mounting straps are provided. Use
these straps to secure the compactor to the underside of
a countertop. Fasten the slotted end of the straps to the
compactor using the holes in the top of the compactor
cabinet as shown.
NOTE: When installing compactor under granite or solidsurface countertops, bend the mounting straps so they
can be secured to the adjacent cabinetry.
under-counter opening
15” w
24” d
345/8”
h
electrical
Opening
outlet
15" Wide
34-1/2"
12”High
min.
22" Deep
The compactor requires an under-counter opening 15-in.
wide, 345/8-in. high, and 24-in. deep.
Plan to provide an electrical
outlet in the opening that
meets all applicable electrical
codes and requirements.
See “Grounding Instructions”
section on Page 3 for specific
information.
cord clamp
The compactor is equipped
with a 6-ft. long power cord.
Use the cord clamp to prevent
excess power cord from being
pinched beneath the cabinet
during installation or service.
cord
clamp
Installation
Leveling the Compactor
Your compactor has four adjustable levelers; (2) rollers in
the rear and (2) legs in the front. They allow you to adjust
for uneven floors and also trim the unit up to fit an undercounter installation.
back of
compactor
slots
adjusting
screws
wood
block
rollers
To level the back of the compactor:
Tip the back of compactor up and onto a wood block.
Loosen the adjusting screws only far enough to move the
rollers to a higher or lower slot. Retighten the adjusting
screws and remove the wood block.
front of
compactor
wood
block
leveling
legs
To level the front of the compactor:
Tip the front of compactor up and onto a wood block.
Turn the leveling legs in or out to the desired position.
Remove the wood block.