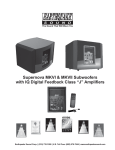
1
EARTHQUAKE SOUND
12" POWERED & LOADED
BANDPASS ENCLOSURE
Owners Manual
MODEL:
BP112
The Sound That Will Move You.
Earthquake Sound reserves the right to amend details of the specifications without notice.
Copyright © Earthquake Sound Corporation
Earthquake Sound Corporation • 2727 McCone Avenue Hayward CA, 94545 • Phone: 510732-1000 Fax: 510-732-1095
Sound That Will Move You.
TABLE OF CONTENTS
WARRANTY
Cautions and Advisories
Warranty
Specifications
Page • 2
Page • 3-4
Page • 5
Installation
Page • 6
Five (5) year limited warranty:
Earthquake warrants the original purchaser that all Factory Sealed New Audio
Products be free from defects in material and workmanship under normal and proper use
for a period of five (5) years from the date of purchase (as shown on the original bill of sale
with serial number affixed/written on it). The five (5) year warranty period is valid only if an
authorized Earthquake dealer properly installs the product and the warranty registration
card is properly filled out and sent to Earthquake Sound Corporation. If a non-authorized
party installs the product a ninety (90) day warranty period will be applied.
(A) Five (5) years limited warranty plan coverage guidelines:
THANK YOU
Thank you for choosing Earthquake Sound’s BP112 powered and loaded bandpass
enclosure, for superior enhancement of your mobile audio system. With proper
installation and responsible listening, your subwoofer(s) will give you years of near
perfect sound reproduction.
We strongly recommend you to have your new subwoofer(s) installed by an authorized
Earthquake Sound dealer: Installation professionals employed by your dealer have the
correct tools and knowledge to install your equipment neatly and successfully. Also, when
your new products are installed by an authorized dealer, your product will include a FIVE
YEAR LIMITED WARRANTY. If you choose to perform your own installation, your
warranty will be subject to limitations. Dealer policies on handling warranty requests may
vary from one dealer to the next. Please read the warranty information in its entirety and
use good judgment when making these vital decisions.
CAUTION: Earthquake Subwofoers are capable of generating high sound pressure
levels. You should exercise caution when operating these
subwoofer/amplifier systems. Long term exposures to high levels of
sound pressure will cause permanent damage to your hearing. Sound pressure levels
exceeding 85dB can be dangerous with constant exposure. Set your audio system to a
comfortable loudness level. Earthquake Sound Corporation does not assume liability
for damages resulting from the direct use of Earthquake amplifiers or other
Earthquake products , and urges users to play their music at moderate listening levels.
2
SOUND LEVEL DBA
DURATION IN HOURS
90
92
95
97
100
102
105
110
115
8
6
4
3
2
1 - 1 1/2
1
1/2
1/4 or less
www.earthquakesound.com
THE CHART (ON THE SIDE) SHOWS THE
U.S. GOVERNMENTS OCCUPATIONAL
S A F E T Y
A N D
H E A L T H
ADMINISTRATION
(OSHA)
REGULATIONS
WHICH
WERE
IN
E F F E C T AT T H E T I M E O F T H I S
P U B L I C AT I O N F O R P E R M I S S I B L E
NOISE EXPOSURE, PER 29CFR1910.95,
TABLE G-16.
• First year: Earthquake pays for labor, parts, and return ground freight (only in US
mainland, not including Alaska and Hawaii).
• Second year: Earthquake pays for labor and parts only, customer must pay freight
both ways.
• Third, fourth & fifth year: Earthquake pays for labor only. Customer must pay for
parts and freight both ways.
(B) Warning:
Products (sent for repair) that are tested by Earthquake technicians and deemed
to have no problem(s) will not be covered by the five (5) year limited warranty. Customer
will be charged a minimum of one (1) hour of labor (ongoing rates)
plus shipping
charges back to customer.
(C) Earthquake will repair or replace - at our option - all defective products/parts
subject to the following provisions:
• Defective products/parts have not been altered or repaired by other than an
Earthquake factory approved technician.
• Products/parts are not subjected to negligence, misuse, improper use, or accident,
damaged by improper line voltage, used with incompatible products, or have its serial
number or any part of it altered, defaced or removed, or have been used in any way
that is contrary to Earthquake's written instructions.
(D) Warranty Limitations:
Warranty does not cover products that have been modified or abused.
Including but not limited to the following:
• Damages to speaker cabinet and cabinet finish due to misuse, abuse, or use of
improper use of cleaning materials/methods.
• Bent speaker frame, broken speaker connectors, holes in speaker cone, surround &
dust cap, burnt speaker voice coil.
• Fading, deterioration of speaker components & finish due to improper exposure to
elements.
• Bent amplifier casing, damaged finish on the casing due to abuse, misuse, or
improper use of cleaning material.
• Burnt traces on PCB.
• Product/part damaged due to poor packaging or abusive shipping conditions.
• Subsequent damage to other products.
WARRANTY CONTINUED ON NEXT PAGE
3
WARRANTY
A
SPECIFICATIONS
warranty claim will not be valid if the warranty registration card is not properly filled
out & returned to Earthquake with a copy of the sales invoice.
(E) Service Request:
To receive product/s service, contact Earthquake's service department at
(510) 732-1000 and request an RMA number (Return Material Authorization); items
shipped without a valid RMA number will be refused. Make sure you provide us with your
complete/correct shipping address, a valid phone number, and a brief description of the
problem you are experiencing with the product. In most cases, our technicians might be
able to resolve the problem over the phone, thus eliminating the need to ship the product.
(F) Shipping Instructions:
Product/s must be packaged in its original protective box(s) to minimize
transport damage. Shipping claims regarding items damaged in transit must be
presented to carrier. Earthquake Sound Corporation reserves the right to refuse any
products improperly packed. Original bill of sale must accompany product returned for
service. We encourage you to include with the package a written description of the
problem. Ship product to: Earthquake Sound Corp. 2727 Mc Cone Avenue, Hayward, CA
94545. Ph (510) 732-1000. You are responsible for the cost of shipping the product to
Earthquake Sound Corporation.
(G) Disputes Resolution:
All disputes - between clients and Earthquake Sound Corporation resulting from the five (5) years limited warranty policy must be resolved according to the
laws & regulations of the county of Alameda -California.
Please keep this warranty information in your
files for future reference if necessary. It is
recommended that you stick your serial number
here for future reference.
4
www.earthquakesound.com
Max Power: 2000-Watts
Speaker impedance: 4ohm
Peak power: 565W (4ohm)
RMS power: 400W (4ohm)
Frequency Response: 5Hz (+0.5dB)---350Hz (-3dB)
Phase shift: 0-180
THD: Less than 0.8% (100Hz, 4ohm)
Adjust range of input signal voltage: 0.2-6.0V (RCA input) 1.0-12V (Hi-input)
Dimensions (H x W x D): 15 1/4" x 21 3/4" x 17 1/2"
387.35mm x 552.45mm x 445.5mm
LPF: 50-300Hz. 12Db/oct
Bass Boost: 0-10dB (40Hz)
Remote control: 19.685 feet, 6 meters
Control current: remote input current 2mA
Protection function: Over current protection, short current protection, over
voltage and shortcoming voltage protection, Thermal protection, output DC
protection
Features:
• Built in digital amplifier
• High power 12” subwoofer with die cast basket
• Band-pass enclosure with kick ass design
• Fits in many vehicles
• Saves space, time and money
SERIAL NUMBER
Specifications Are Subject To Change Without Notice
5
POWER SUPPLY CONNECTIONS
HI INPUT
LOW
INPUT
L+
R+
L-
R-
R
Bass
Boost
Level
Min
L
Max Min
LPF
Max 50Hz
Remote
Subsonic
ON
OFF
ON
OFF
300Hz
Phase Shift
0
180
Power Thermal OC DC
Protection
BASS
EXT
REM GND +12V
Fuses
Power-Supply Connections
Positive: Connect a wire (at least 12-gauge)
between the vehicles +(positive) battery
terminal and the "+12V" connection on BP112
amplifier. You must install a fuse holder with a
50-75A fuse, within 18" of the battery. Route
the power wire through a grommet in the
vehicle's firewall. If there is not factory
grommet available, you must install one.
Negative: Connect a wire (at least 12-gauge)
between the -(ground) connection on BP112
amplifier and a bare metal surface near the
mounting location. You may need to scrape
away some paint from the metal surface to
insure a good connection. Use a screw and a
lock (star) washer.
Remote: Connect a wire (usually blue)
between the remote terminal on BP112 and
the remote output wire on the back of your
15A 15A
POWER
head unit (deck). This wire should provide
between +5VDC and +12VDC when the unit
is on and no voltage when the unit is off.
Note: If your head unit provides preamp outputs it will have remote wire. If your
radio provides only high-level outputs, it may not have a remote wire. If you will
be using the high level outputs from your head unit, you do not need to connect
the remote output. The speaker level inputs will sense voltage on the speaker
wires and BP112 will turn itself on. If you are using only lin-level (RCA) inputs,
you must connect the remote wire to the BP112.
Input Connections:
TUNING BP112
BP112 provides several controls that simplify sonic integration with virtually any
vehicle’s unique acoustic properties. Please read the following section carefully
to familiarize yourself with the function of each control.
Controls
Level: The Level control is a rotary knob on the panel with the electrical
connections. This switch will line match the voltage of your head unit, which will
deliver high sound quality and performance.
Bass Boost: BP112’s interaction with the acoustics of your vehicle may produce
a peak or dip in BP112’s response. For the vast majority of vehicles, these peaks
or dips occur at about 40Hz — around the frequency of a low bass guitar note.
Use this control to correct that peak or dip. Adjustment between –6dB and +3dB
is possible. Although response without any sharp peaks or dips is technically
correct, you may choose the position that best suits your taste.
LPF: The low-pass filter, blocks unwanted high frequencies to allow cleaner lowfrequencies.
Gain Control / Remote Gain: This control will adjust the input sensitivity of
BP112. Use this control to adjust the relative volume (loudness) of BP112 with
respect to the other speakers in the vehicle. To use the remote gain control you
must set the main gain to it's max level, then adjust the remote gain to your
preference. Note: If the main gain is not set to max then it will limit the usability of
the remote gain. Also be sure to make sure that your system is turned OFF while
executing this process, so that you do not damage your amplifier or subwoofer.
Subsonic: BP112’s interaction with the acoustics of your vehicle may produce a
peak or dip in BP112’s response. For the vast majority of vehicles, these peaks or
dips occur at about 40Hz — around the frequency of a low bass guitar note. Use
this control to correct that peak or dip. Adjustment between –6dB and +3dB is
possible. Although response without any sharp peaks or dips is technically
correct, you may choose the position that best suits your taste.
Note: BP112 is equipped with two line level (RCA) inputs and four high level
inputs. Any combination of high-level and speaker-level inputs may be used to
provide nonfading bass when connected to a head unit with four outputs.
Head units with dedicated subwoofer outputs (line level): Connect the
subwoofer output form the head unit to line-level inputs.
Head units with four line-level (RCA) outputs:
Connect the four high-level outputs to the four high-level inputs on the BP112.
6
www.earthquakesound.com
Specifications Are Subject To Change Without Notice
7
TUNING BP112
Phase Control: The phase control is a switch located on the panel with the
electrical connections. This switch will reverse the phase of BP112's output with
respect to its input. When installing BP112 with an existing factory or aftermarket
system, depending on BP112’s location in the vehicle and the distance between
it and the other speakers in the car, reversing the phase (by moving the phase
switch) may produce a discernable increase or decrease in the amount of upper
bass reproduced. Although the position that yields the most upper bass is
technically correct, you may choose the position that better suits your taste.
Crossover: The crossover control adjusts the amount of high-frequency
information present in BP112’s output.
Power LED: The power LED will glow red to indicate that BP112 is operational.
Thermal Protection LEDs: The Thermal/Protection LEDs will glow green when
the protection circuit has determined that the woofer has reached maximum
excursion and power. BP112’s woofer has been modified to provide maximum
performance, monitor the Thermal LED while you are tuning BP112. When
BP112 is properly tuned the servo LED should light momentarily during highlevel bass transients. Avoid adjustments that cause the LED to remain lit for
extended periods.
6
www.earthquakesound.com
Specifications Are Subject To Change Without Notice
7
1. Start with gain control set to minimum and the crossover control and bass
control rotated midway, to 12 o’clock.
2. Choose program material with substantial bass content and turn the
volume control on your head unit to three-quarters of its total output
(approximately 3 o’clock on rotary controls).
3. Adjust the gain control clockwise until the Protection LED flashes with each
bass note but doesn’t stay lit continuously.
4. Listen to your system, making a mental note of the amount of upper bass
present in your system.
5. Switch the phase control to 180 degrees and recheck for upper bass
content. There may be more upper bass, less upper bass, or there may be no
change. The position that provides the most upper bass is correct, but you
may choose either setting according to your taste.
6. Adjust the crossover control clockwise or counterclockwise until the
perceived output from BP112, as heard at the listening position, contains only
low-frequency information; i.e., you should NOT hear any vocals coming from
BP112 when you are seated in the normal listening position.
7. Adjust the bass-boost control clockwise or counterclockwise to suit your
taste.
8. Recheck the Protection LED to make sure it’s blinking with the bass but is
not lit continuously. If it is lit continuously, adjust the gain control
counterclockwise until it blinks.
Note: Although this adjustment sequence will in most cases provide
satisfactory tuning, the actual process may include several readjustments of
each of the controls since their settings will interact with each other. If
necessary, consult your authorized Earthquake car-audio dealer for help in
tuning your system.
TROUBLESHOOTING
1. Power LED not lit: fuse blown, head unit not functioning properly (no
remote voltage), faulty power, ground or remote connection.
2. Power LED lit but no sound output: inputs not connected, head unit not
functioning properly (no output), head-unit fader control set incorrectly (2channel connection only).
3. Output from BP112 sounds muddy or distorted: input gain set too high
(Thermal Protection LED lit constantly), bass boost set too high (Thermal
Protection LED lit constantly), head-unit output is distorted or blown.