1
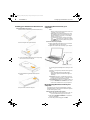
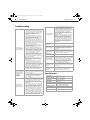
DX-HD302513_12-0295_MAN_ENG_V1.fm Page 1 Monday, June 18, 2012 12:46 PM
USB 3.0 - 2.5" SATA HDD Enclosure
DX-HD302513
USER GUIDE
DX-HD302513_12-0295_MAN_ENG_V1.fm Page 2 Monday, June 18, 2012 12:46 PM
2
DX-HD302513
USB 3.0 2.5” SATA HDD Enclosure
Contents
Safety information. . . . . . . . . . . . . . . . . . . . . . . . . . . . . . . . . . . . . . . . . . . . . 3
Important safety instructions . . . . . . . . . . . . . . . . . . . . . . . . . . . . . . . . . . . .3
System requirements . . . . . . . . . . . . . . . . . . . . . . . . . . . . . . . . . . . . . . . . . . 3
Features . . . . . . . . . . . . . . . . . . . . . . . . . . . . . . . . . . . . . . . . . . . . . . . . . . . . . . 3
Package contents. . . . . . . . . . . . . . . . . . . . . . . . . . . . . . . . . . . . . . . . . . . . . . . .3
Front . . . . . . . . . . . . . . . . . . . . . . . . . . . . . . . . . . . . . . . . . . . . . . . . . . . . . . . . . . . .3
Setting up your hard drive enclosure . . . . . . . . . . . . . . . . . . . . . . . . . . . 3
Installing your hard drive in the enclosure . . . . . . . . . . . . . . . . . . . . . . . .4
Connecting the enclosure to your computer. . . . . . . . . . . . . . . . . . . . . .4
Disconnecting the enclosure from your computer . . . . . . . . . . . . . . . .4
Partitioning and formatting a new hard drive. . . . . . . . . . . . . . . . . . . . .5
Troubleshooting . . . . . . . . . . . . . . . . . . . . . . . . . . . . . . . . . . . . . . . . . . . . . . 6
Specifications . . . . . . . . . . . . . . . . . . . . . . . . . . . . . . . . . . . . . . . . . . . . . . . . . 6
Legal notices . . . . . . . . . . . . . . . . . . . . . . . . . . . . . . . . . . . . . . . . . . . . . . . . . . 7
One-year limited warranty . . . . . . . . . . . . . . . . . . . . . . . . . . . . . . . . . . . . . 9
DX-HD302513_12-0295_MAN_ENG_V1.fm Page 3 Monday, June 18, 2012 12:46 PM
Introduction
DX-HD302513
Introduction
Congratulations on the purchase of your new Dynex DX-HD302513
external hard drive enclosure kit. You can install a 2.5" SATA hard drive
(HDD) by installing it into the enclosure and enjoy the benefits of a
portable external hard disk drive.
3
For best performance and reliability, install the latest updates and
service packs (SP) for Windows (go to the Start menu and select
Windows Update).
Features
• Provides a USB 3.0 interface compatible with prior USB 2.0 and
1.1 standards.
• Supports 2.5" SATA interface hard drive (max height 0.374 in
[9.5 mm]).
• A power/data active indicator.
• Rapid heat dissipation.
• Supports Plug-and-Play and is hot-swappable.
• Patented strong aluminum design.
• Simple to set up and easy to use.
Safety information
Warning: To reduce the risk of fire or electric shock, do not expose this
device to rain or moisture.
CAUTION
RISK OF ELECTRIC
SHOCK
DO NOT OPEN
Package contents
This symbol indicates that dangerous
voltage constituting a risk of electric
shock is present within your hard drive
enclosure.
This symbol indicates that there are
important operating and maintenance
instructions in the literature
accompanying your hard drive
enclosure.
•
•
•
•
USB 3.0 2.5” SATA hard drive enclosure
Hi-speed USB 3.0 A to Micro B cable
Quick Setup Guide
Screwdriver
Front
Important safety instructions
• This hard drive enclosure is to be used in temperatures of
41~95°F (5~35°C). Temperatures exceeding these limits may
damage your hard drive or the enclosure. Avoid heat sources or
direct sunlight.
• This hard drive enclosure can be stored in a humidity range of
between 10% and 90%, and can be operated in a humidity range
of between 5% and 80%.
• Do not connect the hard drive enclosure to your computer
without taking precautions to avoid electrostatic discharge or
short circuits, which could damage the hard drive enclosure or
your computer.
• Do not place this hard drive enclosure close to a source of strong
magnetic fields (such as a computer screen, TV, radio, or speaker).
Strong magnetic fields can affect the reliability of data transfer to
and from the hard drive enclosure.
• Do not place anything heavy on top of the hard drive enclosure.
• Use only the accessories provided in the accessory package.
• Before you install or use the hard drive enclosure, read the user
manual and assemble the enclosure carefully.
• To prevent short circuits, do not leave any metal objects inside
the enclosure when installing the hard drive.
• To prevent short circuits, do not use the hard drive enclosure close
to water, rain, or high humidity.
System requirements
• One 2.5" SATA hard drive.
• PC or Macintosh computer with an available USB 3.0 port. (You
can connect to a USB 2.0 port, but it will only run at USB 2.0
speeds).
• Supports Microsoft Windows XP, Windows Vista, and Windows 7
operating systems.
• Supports Mac OS X version 10.4 or higher operating system (USB
2.0 only).
#
Item
Description
indicator Turns on when the hard drive is on.
1 Status
(blue)
Blinks when the hard drive is active.
2 USB 2.0 port
Connect a USB cable to this port and to your
computer.
Setting up your hard drive
enclosure
Read the safety precautions before you install your hard drive in the
enclosure:
• Use only the accessories provided.
• Make sure that you first touch an unpainted, grounded metal object
to discharge any static electricity stored on your clothing or body
before touching any electronic components.
• Handle the printed circuit board (PCB) by the edges only. Avoid
touching the electronic components.
DX-HD302513_12-0295_MAN_ENG_V1.fm Page 4 Monday, June 18, 2012 12:46 PM
4
DX-HD302513
Installing your hard drive in the enclosure
To install your hard drive in the enclosure:
1 Remove the two screws from the panel with the USB connector.
Setting up your hard drive enclosure
Connecting the enclosure to your
computer
Notes:
• Make sure you have installed the hard drive into the enclosure before
connecting the enclosure to your computer.
• A new hard drive must be initialized and partitioned before it will
appear in Windows Explorer or on your Mac desktop. Refer to your
hard drive manufacturer’s documentation, or see “Formatting the
hard drive on your PC” on page 5.
• For optimal performance, make sure your laptop or PC has USB 3.0
ports (
). If your computer does not have USB 3.0 capability,
you can plug the USB 3.0 cable into any available USB 2.0 port, but it
will only run at USB 2.0 speeds.
To connect the enclosure to your computer:
2 Remove the plastic end cap and circuit board.
1 Plug the smaller USB 3.0 (Micro-B type) connector on the USB
cable (provided) into the port on the enclosure.
2 Plug the other end of the cable into USB port on your computer.
USB 3.0 A type male connector
3 Connect your hard drive’s SATA connector to the corresponding
connector on the enclosure circuit board.
2.5” SATA hard drive
USB 3.0 Micro B type male connector
4 Gently slide the drive tray, with drive attached, into the
enclosure.
The operating system automatically detects and sets up the new
drive.
If the drive is correctly detected, a new drive letter is assigned to
the enclosure.
• For PCs, the new drive letter appears in My Computer.
• For Macintosh computers, the new drive letter appears on
the desktop.
Note for PC users: If you do not see an additional drive in your system,
you might need to format the new drive. See the following section for
more information on detecting and formatting your drive.
Notes for Macintosh users: If you do not see an additional drive in your
system, select Disk Utilities from the Utilities folder, then select the
external enclosure and format the drive to meet your requirements.
Disconnecting the enclosure from your
computer
5 Replace the two screws on the side panel.
You can disconnect the enclosure at any time while the computer is
turned off. If, however, you want to disconnect it while the computer is
on, make sure that you do it correctly.
To disconnect the enclosure while your PC is running:
Note: If a drive window is open or the hard drive enclosure is active, close
any associated windows before trying to remove the enclosure.
1 Right-click the Safely Remove Hardware icon (located near
the clock on the taskbar).
2 Click the drive you want to unplug, then click STOP.
DX-HD302513_12-0295_MAN_ENG_V1.fm Page 5 Monday, June 18, 2012 12:46 PM
Setting up your hard drive enclosure
3 When Windows notifies you that it is safe to do so, unplug the
enclosure from your computer.
To disconnect the enclosure while Mac OS X is running:
1 Drag the USB icon into the TRASH.
2 Unplug the enclosure.
Partitioning and formatting a new hard
drive
Creating a new partition on your PC
Caution: Doing the following will erase any existing data on the drive. If
the drive is damaged and you wish to recover the data, continuing
may overwrite the existing information!
Note: For new hard drives, you need to initialize and partition your hard
drive before it will appear in Windows Explorer.
The best way to partition a new hard drive is to use the manufacturer’s
program. Most hard drives should come with a CD that includes the
installation program. If not, visit the manufacturer's website to see if a
download is available. If the manufacturer’s program is not available,
try the following instead:
DX-HD302513
5
2 Locate the Utilities folder on the Mac OS CD and double-click it
to open the folder.
3 Double-click Drive Setup to open the program.
4 From the list of drives, select the drive you want to initialize, then
click Initialize.
To format your hard drive with Mac OS Extended format:
This method of formatting hard drives provides for a more efficient use
of hard drive storage space.
1 Click Custom Setup.
2 Select the Type menu in the Volume info area, then click Mac
OS Extended Format.
3 Resize the volumes if desired.
4 When ready, click OK, then click Initialize.
If initialization fails, do the following:
1 Click Initialization Options from the Functions menu.
2 Select Low level format, then click OK. Choosing this option
adds significant time to the initialization process.
Formatting the hard drive on a Mac
Caution: Formatting is only required for a new hard drive. Do not format
a drive that contains valuable data that you want to save.
To create a new partition on your PC:
1 Right-click on My Computer, or Computer, depending on
which version of Windows you have, then click Manage.
2 Select Disk Management under Storage on the left pane. Your
PC should give you the option to initialize the disk. If not, locate
the new drive, right-click on it (where it reads “New Simple
Volume”), then click Initialize. (This step may not be required
for some hard drives).
3 Follow the prompts in the wizard.
4 When the process is complete, locate your hard drive in the
bottom right pane. Right-click on the area with a status bar (to
the right of the “New Simple Volume” area), then click New
Partition.
5 Continue following the wizard’s directions. The recommended
partition type is “primary” and the recommended file system is
“NTFS.” Note that Windows XP limits FAT32 partitions to only
32GB.
You should now be able to see the drive in Windows Explorer.
Formatting the hard drive on your PC
Caution: Formatting is only required for a new hard drive. Do not format
a drive that contains valuable data that you want to save.
To format the hard drive on your PC:
1 Click Start, then click Control Panel.
2 Click Performance and Maintenance (in Windows 7, click
System and Security), then click Administrative Tools.
3 Click Computer Management, then click Disk Management
from the menu on the left side of the screen.
4 Click on the new drive (identifiable by the model number or drive
capacity), then click on the Action tab at the top of the screen.
5 Go to All Tasks, then click Format from the menu.
6 Select the file system and other choices you want, then click OK.
Formatting the hard drive in Mac OS x
Creating a new partition in Mac OS X 10.4 or higher
If you are using a new hard drive, you may need to initialize it first.
Initialize your new hard drive using Drive Setup from the Mac OS CD
that came with your computer.
To initialize a Hard Drive:
1 Start up your computer from the Mac OS CD.
To format the hard drive:
1
2
3
4
Click Disk Utility (under Applications).
Select the new hard drive you are trying to install.
Click the Erase tab.
Choose a volume format and assign a name to the new drive,
then click Erase.
DX-HD302513_12-0295_MAN_ENG_V1.fm Page 6 Monday, June 18, 2012 12:46 PM
6
DX-HD302513
Troubleshooting
• Make sure the drive is functioning. A drive that
does not work in a laptop will more than likely
not work with this enclosure either. When you
connect the enclosure to the PC, you should hear
the drive spin up (it may be very faint). Contact
your hard drive manufacturer or PC
manufacturer for information on testing your
hard drive.
• The enclosure may not be receiving enough
power to spin up the hard drive. USB ports are
supposed to have a power rating of
5.25V/500mA. If the system provides less than
500mA per USB port, the enclosure may not
have enough power to spin up the hard drive
completely (although the enclosure will light up
and you will hear the drive attempting to spin
up).
• Make sure that the USB cable is connected firmly
to your enclosure and computer.
• Make sure that the USB cable is not broken or
damaged in some way.
• Open the enclosure and make sure that all of the
connections are securely fastened.
• If you have a desktop computer, try using the
I do not see the
USB ports on the back of the computer instead
enclosure/additional
of the front USB ports. The cables connecting
drive in my system
front USB ports are not always properly shielded
and may not properly handle USB 3.0 speeds.
• Your PC may not be able to recognize the
partition on the hard drive because it is
damaged or not a valid format. You can initialize,
partition, and format unrecognized drives by
using the software that comes with the hard
drive or by using the Disk Manager (PC users) or
Disk Utilities (Mac Users).
Caution: Doing this will erase any existing data on
the drive. If the drive is damaged and you wish to
recover the data, continuing WILL overwrite the
existing information.
• If using a new hard drive, have you formatted
and partitioned the hard drive? If not, see
"Partitioning and formatting a new hard drive"
on page xx. If the hard drive is not formatted and
partitioned, your PC will not assign a drive letter.
• There are some computers that have difficulty
starting with a USB hard drive connected.
Unplug the hard drive, then restart your
computer. Once started, connect the hard drive.
• Do not use non-powered USB hubs because they
often are unable to provide enough power.
There is a USB icon in
the system tray, but I
can't find the hard
disk in MY
COMPUTER
The data transfer
between computer
and device is slow
• Make sure the hard drive has been initialized and
partitioned if using a new hard drive. If you need
to do this, see "Partitioning and formatting a new
hard drive" on page 5.
• If you have Windows 7, you may not have rights
to the files and folders and may need to take
Ownership of these files and folders. Go to
http://support.microsoft.com/kb/2623670 for
more information.
• Your system may be operating at USB 2.0 speeds
due to an incorrect driver installation of the USB
3.0 adapter card. Or you may have a system that
does not support USB 3.0. If your system
includes a PCIe slot, you can achieve SuperSpeed
USB transfer rates by installing a USB 3.0 PCIe
adapter card.
• Make sure the enclosure is connected to a USB
3.0 or 2.0 port. Transfer speeds are optimal/best
with your hard drive enclosure if you are using
USB 3.0 ports. Data throughput is greatly
affected by the type and location of data on the
disk. A few very large files will copy much faster
than many small files since the larger files are
more likely to be arranged sequentially on the
disk.
• Magnetic Hard Disk Drives operate at speeds
slower than the USB 3.0's maximum data transfer
rate. If using an HDD, your transfer speeds will be
faster on USB 3.0 than on USB 2.0, but will still be
limited by the phyiscal disk's throughput.
Troubleshooting
• Connecting your hard drive to the enclosure is
just like connecting a hard drive to the inside of
your computer. The enclosure itself will not
corrupt your data. If data has become corrupt, it
is likely caused by removing the enclosure while
data was still being written to the hard drive,
from subjecting the drive to some kind of
physical trauma (even very subtle trauma), or
due to a design or quality issue with the original
The data on my hard
drive manufacturer.
Caution: Never remove the enclosure while data is
drive is corrupt!
being written to the hard drive! Doing so may cause
the hard drive to become corrupt. Make sure all
applications being run off the disk and all files in use
are no longer in use before removing the unit. For
PCs, use the Safely Remove Hardware icon to eject
the drive before disconnecting. For Mac, drag the
hard drive to the trash before disconnecting. Never
operate the disk and enclosure in a partially
assembled state.
Can I boot from the
enclosure?
• This enclosure does not support using the
enclosed disk drive as a boot device.
Why can't I partition
or format my drive?
• Verify that you are logged into the computer
with an account that has Administrator Rights. If
that does not resolve the issue, contact your
hard drive manufacturer or PC manufacturer for
assistance.
My hard drive is 2TB,
are there any unique
issues?
• Make sure you have the latest Service Pack
installed on Windows XP. With the latest Service
Pack, Windows XP, Windows Vista, and Windows
7 should recognize up to a 2TB drive.
Is RAID or JBOD
supported?
• No
Why do I keep seeing
8 GB of hard drive
space (no partition)?
• This is most likely because this space was either
not partitioned or initialized when the hard drive
was formatted. Another reason is that when the
hard drive has been removed improperly, a
ghost drive can be created on the computer
which confuses the computer into thinking there
is still usable space. It is best to turn off the
enclosure and reboot your system.
Can I use the hard
drive enclosure with
a Mac and a PC at the
same time?
• No, the hard drive must be initialized and
partitioned for one or the other. When formatted
for Mac, a PC will not be able to see the partition,
and vice versa.
The enclosure will
not assemble
correctly
• Check the physical size of the hard drive. Does it
fit correctly into the enclosure? Make sure your
drive does not have any additional rails or
mounting hardware connected to it.
Specifications
Device interface
SATA
Dimensions (WxLxH)
5.4 x 3.1 x 0.6 inches
(137.2 x 78.7 x 15.2 mm)
Host interface
USB 3.0 Micro B type
Power supply
USB power
Hard drives supported
1 TB 2.5" SATA interface hard drive
(max height 0.374 in [9.5 mm])
Operating temperature
Operating: 32~104°F (0~40°C)
Operating humidity
20% to 80% non-condensing
Certification
FCC Class B, ICES-003
DX-HD302513_12-0295_MAN_ENG_V1.fm Page 7 Monday, June 18, 2012 12:46 PM
Legal notices
Legal notices
FCC Part 15
This device complies with Part 15 of the FCC Rules. Operation of this
product is subject to the following two conditions: (1) this device may
not cause harmful interference, and (2) this device must accept any
interference received, including interference that may cause undesired
operation.
This equipment has been tested and found to comply within the limits
for a class B digital device, pursuant to Part 15 of the FCC Rules. These
limits are designed to provide reasonable protection against harmful
interference in a residential installation. This equipment generates,
uses, and can radiate radio frequency energy and, if not installed and
used in accordance with the instructions, may cause harmful
interference to radio communications. However, there is no guarantee
that interference will not occur in a particular installation. If this
equipment does cause harmful interference to radio or television
reception, which can be determined by turning the equipment off and
on, the user is encouraged to try to correct the interference by one or
more of the following measures:
• Reorient or relocate the receiving antenna.
• Increase the separation between the equipment and receiver.
• Connect the equipment into an outlet on a circuit different from
that to which the receiver is connected.
• Consult the dealer or an experienced technician for help.
FCC warning
Changes or modifications not expressly approved by the party
responsible for compliance with the FCC Rules could void the user’s
authority to operate this equipment.
Canada ICES-003 statement
This Class B digital apparatus complies with Canadian ICES-003.
This equipment complies with the applicable technical standards of
ICES 003:1997 in accordance with the measurement procedures
specified in CISPR22-96.
DX-HD302513
7
DX-HD302513_12-0295_MAN_ENG_V1.fm Page 8 Monday, June 18, 2012 12:46 PM
8
DX-HD302513
Legal notices
DX-HD302513_12-0295_MAN_ENG_V1.fm Page 9 Monday, June 18, 2012 12:46 PM
Legal notices
One-year limited warranty
Dynex Products (“Dynex”) warrants to you, the original purchaser of this new
DX-HD302513 (“Product”), that the Product shall be free of defects in the original
manufacture of the material or workmanship for a period of one (1) year from the date
of your purchase of the Product (“Warranty Period”). This Product must be purchased
from an authorized dealer of Dynex brand Products and packaged with this warranty
statement. This warranty does not cover refurbished product. If you notify Dynex during
the Warranty Period of a defect covered by this warranty that requires service, terms of
this warranty apply.
How long does the coverage last?
The Warranty Period lasts for one year (365 days) from the date you purchased the
Product. The purchase date is printed on the receipt you received with the Product.
What does this warranty cover?
During the Warranty Period, if the original manufacture of the material or workmanship
of the Product is determined to be defective by an authorized Dynex repair center or
store personnel, Dynex will (at its sole option): (1) repair the Product with new or
rebuilt parts; or (2) replace the Product at no charge with new or rebuilt comparable
products or parts. Products and parts replaced under this warranty become the property
of Dynex and are not returned to you. If service of products and parts are required after
the Warranty Period expires, you must pay all labor and parts charges. This warranty
lasts as long as you own your Dynex Product during the Warranty Period. Warranty
coverage terminates if you sell or otherwise transfer the Product.
How to obtain warranty service?
If you purchased the Product at a retail store location, take your original receipt and the
Product to the store you purchased it from. Make sure that you place the Product in its
original packaging or packaging that provides the same amount of protection as the
original packaging. If you purchased the Product from an online web site, mail your
original receipt and the Product to the address listed on the web site. Make sure that
you put the Product in its original packaging or packaging that provides the same
amount of protection as the original packaging.
To obtain in-home warranty service for a television with a screen 25 inches or larger, call
1-888-BESTBUY. Call agents will diagnose and correct the issue over the phone or will
have an Dynex-approved repair person dispatched to your home.
Where is the warranty valid?
This warranty is valid only to the original purchaser of the Product in the United States,
Canada, and Mexico.
What does the warranty not cover?
This warranty does not cover:
• Customer instruction
• Installation
• Set up adjustments
• Cosmetic damage
• Damage due to acts of God, such as lightning strikes
• Accident
• Misuse
• Abuse
• Negligence
• Commercial use
• Modification of any part of the Product
• Plasma display panel damaged by static (non-moving) images applied for
lengthy periods (burn-in).
This warranty also does not cover:
• Damage due to incorrect operation or maintenance
• Connection to an incorrect voltage supply
• Attempted repair by anyone other than a facility authorized by Dynex to service
the Product
• Products sold as is or with all faults
• Consumables, such as fuses or batteries
• Products where the factory applied serial number has been altered or removed
DX-HD302513
9
REPAIR REPLACEMENT AS PROVIDED UNDER THIS WARRANTY IS YOUR EXCLUSIVE
REMEDY. DYNEX SHALL NOT BE LIABLE FOR ANY INCIDENTAL OR CONSEQUENTIAL
DAMAGES FOR THE BREACH OF ANY EXPRESS OR IMPLIED WARRANTY ON THIS PRODUCT,
INCLUDING, BUT NOT LIMITED TO, LOST DATA, LOSS OF USE OF YOUR PRODUCT, LOST
BUSINESS OR LOST PROFITS. DYNEX PRODUCTS MAKES NO OTHER EXPRESS WARRANTIES
WITH RESPECT TO THE PRODUCT, ALL EXPRESS AND IMPLIED WARRANTIES FOR THE
PRODUCT, INCLUDING, BUT NOT LIMITED TO, ANY IMPLIED WARRANTIES OF AND
CONDITIONS OF MERCHANTABILITY AND FITNESS FOR A PARTICULAR PURPOSE, ARE
LIMITED IN DURATION TO THE WARRANTY PERIOD SET FORTH ABOVE AND NO
WARRANTIES, WHETHER EXPRESS OR IMPLIED, WILL APPLY AFTER THE WARRANTY
PERIOD. SOME STATES, PROVINCES AND JURISDICTIONS DO NOT ALLOW LIMITATIONS ON
HOW LONG AN IMPLIED WARRANTY LASTS, SO THE ABOVE LIMITATION MAY NOT APPLY
TO YOU. THIS WARRANTY GIVES YOU SPECIFIC LEGAL RIGHTS, AND YOU MAY ALSO HAVE
OTHER RIGHTS, WHICH VARY FROM STATE TO STATE OR PROVINCE TO PROVINCE.
Contact Dynex:
For customer service please call 1-800-305-2204
www.dynexproducts.com
Distributed by Best Buy Purchasing, LLC
7601 Penn Avenue South, Richfield, Minnesota, U.S.A. 55423-3645
© 2012 BBY Solutions, Inc.
All rights reserved. DYNEX is a trademark of BBY Solutions, Inc. Registered in some
countries. All other products and brand names are trademarks of their respective
owners.
DX-HD302513_12-0295_MAN_ENG_V1.fm Page 12 Monday, June 18, 2012 12:46 PM
www.dynexproducts.com (800) 305-2204
Distributed by Best Buy Purchasing, LLC
7601 Penn Ave. South, Richfield, MN 55423 U.S.A.
© 2012 BBY Solutions, Inc. All rights reserved.
DYNEX is a trademark of BBY Solutions, Inc. Registered in some countries. All other products and
brand names are trademarks of their respective owners.
12-0295
ENGLISH