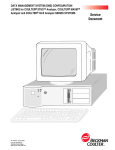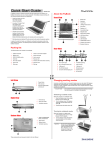
1
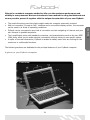
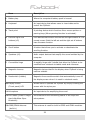
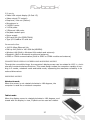
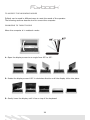
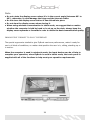
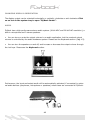
User’s Manual
Thanks
We would like to thank you for choosing
FlyBook® as your mobile computer.
This choice can completely change your life.
We hope you will be happy with your FlyBook®.
03
Announcement
Dialogue Technology Corporation is a registered trademark.
FlyBook is a trademark of the Dialogue Technology Corporation.
All trade names referred to in this document are the servicemark, trademark or registered
trademark of respective manufacturers or companies.
Disclaimer
Specifications and information in this document are subject to change without notice.
Please visit our web site or contact us for the latest information.
With regards to the accuracy of this document, no warranty is made or implied.
Copyright
No part of this document may be copied or reproduced in any form or by any means
without the express written permission of ©1991-2005 Dialogue Technology Corporation.
04
About this user’s guide
This user’s guide includes the essential information for the users who need to use or manage
the FlyBook computer on their own.
The content covers all FlyBook’s models. Please check your own model and disregard the other
models.
Windows®XP home edition is the default operation system of the FlyBook computer.
All of the descriptions in this guide are under Windows®XP home edition.
If this user’s guide is not able to help you with the problems, please read the on-line guide
in your computer, consult your dealer or visit our web site (http://www.dialogue.com.tw)
for more information.
05
Table of contents
06
CHAPTER 1
PACKING LIST
13
What the warranty covers
15
How to obtain the warranty service
15
STATEMENT OF LIMITED WARRANTY
What the warranty does not cover
14
15
Limitation of liability
16
How to get help
17
Taking care of your computer
17
Best care for your Flybook
17
Taking care of the adapter and power cord
Taking care of ther battery
17
18
CHAPTER 2
INTRODUCTION
21
Frontview
21
Left view
24
A glance at your Flybook computer
21
Rear view
23
Right view
24
Bottom view
25
FEATURES
26
Processor
26
Memory
26
Storage
26
Memory
26
Power
26
Display
26
Input devices
26
Audio
26
I/O ports
27
Communication
CONVERTIBLE DISPLAY SCREEN AND WORKING MODES
27
27
WORKING MODES
27
Tablet mode
27
27
Notebook mode
07
TO MODIFY THE WORKING MODES
28
To tablet mode
28
MULTIMEDIA
30
Outputting display to a video display device
30
INNOVATIVE “PROMPT TO PLAY” INTERFACE
Outputting display to a VGA display device
Outputting sound or voice to an earphone or speakers
Inputting sound or voice from an external microphone
29
30
30
30
CONNECTIVITY
30
USB link
31
FAST DATA LINK
31
IEEE 1394 link
31
Ethernet link
31
Wireless network connection
31
Bluetooth communication
31
GPRS/CDMA communication
31
PC card connection
31
Dial-up link
31
CHAPTER 3
STARTING THE FLYBOOK
35
Getting your FlyBook ready
35
Installing battery pack
35
TURNING ON THE POWER
35
INSTALLING OPERATION SYSTEM
36
CHAPTER 4
USING THE FLYBOOK
39
Indicators
39
Windows keys
40
Keyboard
40
LOCK KEYS
42
HOT KEYS
TRACK POINTS, MOUSE BUTTONS, AND SCROLL BUTTON
Touch panel screen
Calibrating your touch panel
08
42
43
44
45
DISPLAY
46
Adjusting display brightness
Switching display output to an external display device
47
47
Setting display color and resolution
47
AUDIO
48
Adapter
49
Changing display orientation
48
POWER SYSTEM
49
Battery
49
Recharging the battery
49
Power management
50
Selecting a suitable running mode
50
Power Schemes option
50
Setting time for the automatic execution event of built-in power-saving schemes
51
Alarms option
52
Advanced option
53
Power Meter option
52
“Always show icon on the taskbar”
“Prompt for password when computer resumes from standby”
54
54
“Hibernate” option
55
PROTECTING your computer against unauthorized access
55
PROTECTING YOUR FLYBOOK
55
BIOS password
55
Operating system passwords
55
Hard disk password
55
PROTECTING YOUR FLYBOOK AGAINST DAMAGE
Reserving backups of your personal data frequently
55
55
Using a strap to prevent falling over
56
From a hidden partition of built-in hard disk
56
RESETTING THE FLYBOOK
57
RECOVERING YOUR SYSTEM
FROM THE RECOVERY CD
56
57
CHAPTER 5
CONNECTION THROUGH OPTIONS
60
IEEE 1394 link
60
60
USB link
09
Ethernet link
60
MAKING CONNECTION TO AN ETHERNET
62
CONFIGURING YOUR CONNECTION
WIRELESS COMMUNICATIONS THROUGH THE BUILT-IN MODULES
61
63
Wireless Network Connection
63
Making connection to a Wireless Network
65
Configuring your connections
Bluetooth communication (Optional)
Configuring your connections
63
66
66
Making connections to Bluetooth-equipped devices
66
Configuring your connection
68
CDMA communication (Optional)
70
GPRS COMMUNICATION
Making connection to a GPRS network
68
69
DIAL-UP LINK THROUGH THE BUILT-IN MODEM
Configuring your connection
Making a dial-up link
70
70
70
PC CARD CONNECTION
70
PC card insertion
71
BIOS SETUP UTILITY
71
PC card ejection
71
Default - Main menu
72
Default - Internal HDD sub-menu
72
Default Security menu
74
Default menu of the Boot
74
APPENDIX B TESTED DEVICES
75
Exit Menu
74
DDR RAM Modules
75
USB
75
PCMCIA/CF/CardBus
75
IEEE 1394
75
10
CHAPTER 1
CHAPTER 1
BEFORE YOU START
11
12
•
•
Do not connect the adapter to the Flybook before it is has been prepared for use.
If the computer is being used for the first time, the battery pack must be fully
charged.
PACKING LIST
What you will find in the Flybook package:
Item
Note
1. FlyBook computer
Take care when removing the computer from the
2. Battery before use.
Special FlyBook battery. Take off the protection cover
3. Adapter
package.
Made specifically for the FlyBook computer. Handle with
care and read carefully through the instructions before use.
4. Power cord
5. Stylus pen panel.
6. Read me first
7. User’s guide
8. Recovery CD
Connects the adapter to the power source.
An input periheral of the display (touch
panel).
A guide designed to help the user to understand everything
for an efficient use of Flybook. Please read through the
manual before beginning any operation with Flybook.
The present manual.
A CD for the configuration of your FlyBook computer. It
includes pre-installed Windows XP, drivers and utilities that
are crucial for using the computer. Warning! All data
preserved in the computer will be cancelled when the
9. Windows XP home
®
edition authority
10.Warranty card
11.Slip bag
CD is installed.
The Microsoft certificate which indicates that the Windows®
XP home edition installed in your FlyBook computer is
legally licensed.
Where the Serial number is written, and where you will
find service and warranty information concerning your
FlyBook computer.
A custom pocket bag, for the transport of your Flybook.
13
CHAPTER 1
Note
Statement of limited warranty
Dialogue Technology Corporation provides a one-year limited warranty for all complete unit
FlyBook models with an additional one-year extension provided by Dialogue Europe
Corporation.
The warranties provided by Dialogue Technology Corporation in this statement do not apply to
computers purchased from resellers.
All the services provided and connected to the warranty are inseparable from the performance
of Flybook unless otherwise stated.
Nothing in this statement affects the statutory rights of customers that can in no
way be waived or limited by contract.
These warranties provide specific legal rights and you may have other rights which
vary from different jurisdictions.
14
What the warranty does not cover
• Any software programs purchased from third parties are not warranted, whether they are
shipped or pre-loaded with the computer, installed subsequently or otherwise.
• Damage caused by misuse, viruses, accidents, modifications, unsuitable physical or
operating environments, or improper maintenance is not warranted.
• Any integrated or peripheral devices not provided by Dialogue Technology Corporation
are excluded from warranty.
• The warranty is void by removal or alteration of identification labels on the computer
or its parts.
• Dialogue Technology Corporation does not warrant error-free operation of the hardware
and software for the uninterrupted use of Flybook for lengthy intervals.
Warranty service
If the computer does
assistance centers or
In general, you must
service center before
not function as warranted during the warranty period, please contact the
authorized resellers to obtain the warranty services.
provide the information or evidence stated on the Warranty Card to the
requesting assistance.
Furthermore, it is necessary to inform the assistance center:
• What kind of problem you are having with your FlyBook
• How you have attempted to resolve this problem.
• Remember to make a copy of your personal data before delivering the computer to the
service center. The service center does not guarantee for your personal data on the hard
disk during the service and maintenance period nor does it guarantee for its privacy.
• In order to fulfill their obligations, the service center or reseller must have the rights to
access your Flybook without any limits.
15
CHAPTER 1
What the warranty covers
• The computer is warranted and provided free from defects in materials and workmanship.
• The computer is warranted conforming to the official published specifications.
• The warranty period starts from the effective date of sale, which coincides with the date of
invoice or sales receipt unless Dialogue Technology Corporation or regional resellers inform
you otherwise.
• A part replacement will assume the warranty service status of the removed part only.
• Unless Dialogue Technology Corporation and/or international extensions specify otherwise,
these warranties apply only to the country or region in which you purchase the computers.
Note
•
All servicing and servicing procedures vary from country to country or region to
region. Please read your warranty card to obtain further information.
•
We remind you once again to create a copy of your personal data before
delivering the computer to the service center.
Liability Limitations
•
The total liability of Dialogue Technology Corporation arising out of this statement may be
limited by the amount actually paid for the purchase of the product.
•
In no event shall Dialogue Technology Corporation be liable for costs of substitute
products or services.
•
In no event shall Dialogue Technology Corporation be liable to any entity for any special,
consequential, incidental or other damages, however caused and on any theory of liability,
and whether or not breach of contract, negligence or otherwise, and whether or not
Dialogue Technology Corporation has been advised of the possibility of such damage.
•
These limitations will apply notwithstanding any failure or non of essential purpose of any
•
The limitation of liability of Dialogue Technology Corporation is cumulative, with all
expenditures of Dialogue Technology Corporation being aggregated to determine
satisfaction of the limit.
•
The existence of claims or suits shall not increase or extend the limit under this statement.
•
In no event shall any resellers or suppliers of Dialogue Technology Corporation be liable
for any direct, indirect, consequential or other damages arising out of this statement.
limited remedy provided herein.
16
When you have any problems using your Flybook, in addition to referring to this manual or
on-line-helps in your computer, you can:
•
•
Call service centers to help you solve the problems.
Access the service web site to receive related information.
All information on service web sites can be found in your warranty card.
Best care for your FlyBook
Knowing how to take care of your FlyBook computer can avoid the computer from coming to
harm or being damaged. Please comply with the following instructions:
Taking care of the computer
•
•
•
•
Handle with extreme care.
Do not expose the computer to temperatures above 50° C or below 0° C.
Keep the computer away from direct sunlight or heat sources.
Do not expose the computer to rain or moisture.
•
•
•
Do not expose the computer to dusty or dirty environments.
Do not place objects on top of the computer.
Do not place the computer on uneven surfaces.
•
•
•
•
•
•
•
•
•
Do not spill water or any other liquid on the computer.
Do not place the computer near magnetic fields.
Avoid heavy shocks or vibrations to the computer.
Make sure that the convertible hinge is in the correct position before closing the display screen.
Do not slam the display screen when closing it.
Do not operate the touch-panel using any thing besides the stylus pen of the computer.
Do not cover the enclosure openings. It will block the air convection of the cooling system.
Only use the adapter specifically provided with your computer.
Make sure the computer is turned off and the adapter is unplugged before changing any
system modules (Battery pack, DRAM module, hard disk… ).
17
CHAPTER 1
How to get help
Taking care of the adapter and power cord
•
•
•
•
•
•
Carefully read the specifications and safety precautions written on the adapter.
Make sure the power source is within safety range and is safe to use before connecting
the adapter to the source.
Do not connect the adapter to any other devices.
Do not place heavy objects on top of the adapter or power cord; do not step on them.
Do not pull on the power cord; disconnect the computer at the plug when unplugging it.
Disconnect the adapter from the power source when the computer is not being used.
Taking care of your battery pack
•
•
•
•
•
•
•
•
•
•
Read the safety precautions indicated on the battery.
When the battery is not being used, preserve it in the protection cover.
Keep the battery away from direct sunlight or heat. When Flybook is turned off, the best
temperature for preserving the battery is between 0° and 30° C.
Do not expose the battery to rain or moisture.
Do not spill water or any other liquid on the battery.
Avoid heavy shocks to the battery.
Do not put any heavy objects on top of the battery.
Keep the battery away from children.
Periodically recharge the battery (for further information, please refer to the section on
BIOS setup utility)
Make sure that the battery always operates in a correct and regular manner.
18
CHAPTER 2
CHAPTER 2
INTRODUCTION
19
20
Flybook is a notebook computer studied to offer you the maximum performance and
mobility in every moment. We have introduced a new method for using the Notebook and
we are proud to present it together with the unique characteristics of your new FlyBook.
•
•
•
•
The following sections are dedicated to the principal features of your FlyBook computer.
A glance at your FlyBook computer
Front view
21
CHAPTER 2
•
The small dimensions and ultra-light weight make the computer extremely practical.
With an innovative “Prompt to Play” interface and a convertible display screen, the computer
can be used in all kinds of operating conditions.
FlyBook can be connected to any kind of connection so that navigating in Internet and your
own Intranet is possible anywhere.
The Input/Output ports with standard connectors, and characteristics such as the two IEEE
1394 ports, allow you to make external connections without having to use specific cables.
In spite of its small dimensions, FlyBook is studied to satisfy users who are looking for the
maximum in multimedia functions.
Item
Description
1. Battery bay
Where the computer’s battery pack is housed.
2. Keyboard
An input device that allows users to insert data and to
control the FlyBook.
3. Track point
A pointing device which functions like a mouse pointer or
panning keys (When panning function is activated).
4. Left and right click
buttons (x2)
Click devices that function like the left and right buttons of the
normal mouse. Both the left set and the right set of buttons
have the same function.
5. Scroll button
A button that allows you to activate or deactivate the
scrolling function.
6. Speakers (x2)
Audio output devices that amplify the sound emitted by the
computer.
7. Convertible hinge
A metallic hinge with 2 shafts that allow the FlyBook to be
modified from notebook to tablet mode and viceversa.
8. Magnetic closures
Magnetic devices that fix the display when FlyBook is being
used as a tablet.
9. Reed switch (hidden)
Magnetic-force-sensitive switch that automatically turns off
the display screen when it is used in notebook mode.
10. Display screen
(Touch panel) LCD
Allows users to operate the FlyBook by simply touching the
screen with the stylus pen.
11. Microphone
An input device for amplifying the sound.
12. LED status (Power-ChargeHard disk-Wlan-GprsBluetooth)
LEDs that show the functioning status of the keys and
sub-systems.
13. GPRS/CDMA Antenna
(built-in)
This antenna is used for built-in GPRS and CDMA modules.
22
Item
Description
Used for the built-in Wireless LAN module
15. Bluetooth antenna
(built-in)
Used for the built-in Bluetooth module.
CHAPTER 2
14. Wireless LAN antenna
(built-in)
Rear view
Item
Description
1. Power connection
A connection that connects the computer to an AC -DC
adapter to supply the computer with power.
2. Fax/Modem port
An RJ-11 connector that allows connection of the computer
to a telephone line.
3. USB port (x2)
Two standard USB connections that allow connection of
FlyBook to any USB (2.0) devices.
4. Ethernet LAN port
An RJ-45 connection that allows an Ethernet link.
5. External display port
A D-sub 15 connection that allows the computer to connect
to an external VGA display device.
6. Ventilation openings
Openings where the hot air flows out.
7. TV Video output
connection
A connection that allows the computer to connect to a
television.
23
Item
Description
8. IEEE 1394 ports (x2)
Firewire
4-pin 1394 connections that allow the computer to connect
to an IEEE 1394 device.
9. Earphone connection
earphone or speakers.
A connection that allows the computer to connect to an
10. Microphone connection
external microphone.
A connection that allows the computer to connect to an
11. PC card slot
Accepts any type-I or type-II CardBus PC cards.
12. Strap opening
An opening where a strap can be fixed to prevent the
computer from falling over.
Left view
Item
Description
1. On/Off button
Button for switched FlyBook i.
2. SIM card slot
Slot for inserting a GPRS or CDMA SIM card.
Right view
24
Item
Description
A comparrtment that houses the hard disk
2. Stylus pen holder
Where the stylus pen is lodged.
3. Ventilation openings
Openings where cool air enters the computer.
BOTTOM VIEW
Item
Description
1. CMOS battery
module compartment and
A comparrtment that houses the CMOS battery and the
of DRAM memory.
2. Reset switch
A switch for resetting the computer.
3. Battery latches (x2)
Latches that impede the battery pack from moving
4. Ventilation openings
Openings where cool air enters the computer.
module of DRAM memory.
out of place.
25
CHAPTER 2
1. Hard disk bay
FEATURES
Processor
• Transmeta Crusoe TM5800 processor
Memory
• System Memory: one SO-DIMM DDR-SDRAM, 512MB max.
• Video RAM: 16MB in ATI VGA chipset.
• BIOS ROM: 512KB flash ROM
Storage memory
• Hard disk: 20/30/40/60/80/100 2.5” ATA/IDE hard disk.
• Memory card: can be installed in the PC card slot (PCMCIA)
• CD ROM and other storage devices: external via USB / IEEE 1394 link.
Power
• High-performance power management system with ACPI (Advanced Configuration Power
Interface)
• Direct power supply (through an adapter)
• Long life battery.
• Battery charging: direct power charging (through AC-DC adapter).
Display
• Screen: 8.9” LTPS (Low Temperature Poly-Silicon) wide-XVGA TFT (Thin Film Transistor) LCD
(Liquid Crystal Display) that displays 32-bit color (true color) at 1024 x 600 resolutions.
• 3D display
• Displaying on an external VGA display device (LCD/CRT monitor, projector).
• Displaying on a video display device (TV).
Audio
• Integrated ALI (M1535+) AC-Link audio, compliant with AC97.
• Built-in speakers and microphone.
• Earphone connection.
• Microphone connection.
Input devices
• Mini-size 80-key enhanced Windows keyboard with hot keys support.
• 2 track points with 2 sets of mouse buttons (left and right button).
• Display panning support.
• Touch panel with palm-rejection.
26
CHAPTER 2
I/O ports
• Video VGA output display (D-Sub 15).
• Video output (TV output).
• Earphone / line-out (Stereo).
• Microphone in.
• 2 USB2.0 ports.
• 2 1394 ports.
• 2 Ethernet LAN ports.
• Fax/data modem port.
• Power supply.
• SIM card slot (for GPRS/CDMA).
• Type I/II CardBus PC card slot.
Communication
• 10/100 Mbps Ethernet link.
• Dial-up link (Built-in V.90 56K fax/MODEM).
• Wireless LAN (Built-in Wireless LAN module and antenna).
• Bluetooth (Built-in Bluetooth module and antenna)
• GPRS or CDMA communication (Built-in GPRS or CDMA module and antenna)
CONVERTIBLE DISPLAY SCREEN AND WORKING MODES
Through the convertible hinge, the computer’s display screen can be rotated to 180° in clockwise and counterclockwise directions. This smart design makes the computer capable of working in 2 modes, notebook mode and tablet mode, expressing the maximum versatility in its
reduced dimensions.
WORKING MODES
Notebook mode
When the screen is not rotated clockwise to 180 degrees, the
computer is used like a notebook computer.
Tablet mode
When the display screen is rotated clockwise to 180 degrees, and
closed with the display in view, FlyBook can be used as a tablet.
27
TO MODIFY THE WORKING MODES
FlyBook can be used in different ways to meet the needs of the operator.
The following sections describe how to convert the computer.
CHANGING TO TABLET MODE
When the computer is in notebook mode:
1. Open the display screen to an angle from 85° to 95°.
2. Rotate the display screen 180° in clockwise direction until the display clicks into place.
3. Gently lower the display until it lies on top of the keyboard.
28
Note
INNOVATIVE “PROMPT TO PLAY” INTERFACE
The special ergonomics studied to give FlyBook maximum performance, make it ready for
use in all kinds of conditions, no matter what position the user is in, sitting, standing up or
in motion.
When the computer is used in notebook mode, the input devices can be of help to
complete your operation; when FlyBook is used in tablet mode, the touch panel is
supplied with all of the functions to help meet your operative requirements.
29
CHAPTER 2
• Do not rotate the display screen unless it is in the correct angle (between 85° to
95°), otherwise, it could damage the hinge and the internal cables.
• Do not close the display screen before it has clicked into place.
• Do not slam the display screen when closing it.
• When using wireless communication in tablet mode, we suggest that no matter
whether the computer is held by hand or is set up on the desk, always keep the
display screen upwards or forwards in order to obtain the best communication quality.
MULTIMEDIA
With high-performance audio and display system, the computer possesses an extensive
multimedia capacity. Through the built-in high-quality display, stereo speakers and microphone,
the computer offers an excellent audio and video performance. Besides, the completeness of
the multimedia subsystem allows the connection with external input and output devices
through the external display port, video out put (TV), earphone and microphone connections.
Connection with an external VGA display device
The video output is of the standard D-sub 15 kind. Through the video out port, you can connect
the computer’s display to an external VGA display device, or to a digital projector. This is very
useful for connecting the display to larger display devices, as in meetings or presentations.
Connection to a video display device
Through the port, you can connect the computer’s display to a video such as a TV monitor.
The port can support either NTSC standards such as VGA multimedia, or PAL standard.
The standard that the port will support depends on the country where the computer was
purchased. However, it can be modified through the computer’s BIOS system. Please refer
to the configuration of your FlyBook computer.
Connection with the earphone or speakers
Inserting the earphone connector in the audio output the sound of the computer is deviated.
Inputting sound or voice from an external microphone
Connecting a microphone to the audio input, the built-in microphone is excluded and FlyBook
uses the external one.
CONNECTIVITY
Your FlyBook computer offers you the maximum possibilities of connectivity. All connections
can be made quickly and easily through the various options offered.
30
FAST DATA LINK
USB link
The USB ports allow you to connect or daisy-chain the computer with USB peripheral such
as keyboards, mouse, external disks, CD-ROM drives, digital cameras and so on. Two
high-speed standard USB ports (USB 2.0) are available in your computer.
Ethernet link
Through the Ethernet port (RJ45 connection), the computer can be connected to an Ethernet
(10 Mbps) or fast Ethernet (10/100 Mbps) to access network resources and other services.
Wireless network connection
The wireless network connection feature is built-in for all models. Your computer can
communicate with other wireless-equipped devices via 802.11 Protocol.
Bluetooth communication
The Bluetooth communication feature allows your computer to interconnect with varied types
of Bluetooth-equipped devices via Bluetooth protocol.
GPRS/CDMA communication
The GPRS/CDMA module of communication can access Internet resources via a
built-in GPRS/CDMA module (according to the model of computer). Both modules are capable
of operating in data mode as well as voice mode.
Dial-up link
The computer comes with a built-in V.90 56K fax/data MODEM module. You can connect a
phone line from the MODEM port (RJ11) to a telephone connection to make a dial-up link.
PC card connection
The PC card slot can accept any CardBus type I and type II data card and device card,
including memory card, CF disk, MODEM card, wireless LAN card, and so on.
31
CHAPTER 2
IEEE 1394 link
IEEE 1394 is another kind of high-speed I/O standard. Through 1394 ports, you can connect
or chain the computer with external 1394 devices. Two 4-pin 1394 ports are available in your
computer.
32
STARTING THE FLYBOOK
33
CHAPTER 3
CHAPTER 3
34
Preparing your computer
After getting to know your FlyBook computer, the first thing you need to do is to prepare
it for use. The following sections show you how to complete this operation.
Installing the battery pack.
Insert the battery inside the battery bay until it is in
the right place.
2.
Secure the battery with the blocking devices
TURNING ON YOUR FLYBOOK
Turning on your FlyBook computer is very simple. Just follows the steps below:
1.
Connect one end of the adapter to the power outlet and the other end to the power jack
on the computer.
Note
If it is the first time you start the computer, please connect the computer to a power
source.
35
CHAPTER 3
1.
2.
Open the screen display by hand until reaching a suitable viewing angle
3.
Press the on/off button for two seconds (on the left side of the computer) to turn
on the power.
OPERATING SYSTEM
Windows XP® home edition is already installed in your computer. After turning on your FlyBook
and waiting for approximately one minute, a guided procedure will appear for the activation and
personalization of Microsoft Windows.
36
CHAPTER 4
USING YOUR FLYBOOK
CHAPTER 4
37
38
In this chapter, you will learn how to use your FlyBook computer and customize the computer
to you own needs.
Indicators
The computer has several LEDs that show the status of key parts or sub-systems
(power-charge-hard disk-Wlan-GPRS-Bluetooth).
Item
Description
1
Power Item
Indicates that FlyBook is turned on.
2
Battery
Fixed light: indicates that FlyBook is fed by a power source.
Flashing light: indicates that FlyBook is fed by battery.
3
Hard Disk:
Indicates that the hard disk is functional.
4
Bluetooth
Indicates that the Bluetooth module is turned on.
5
GPRS/CDMA
Indicates that the GPRS/CDMA module is turned on.
6
Wireless Network
Indicates that the WiFi module is turned on.
7
Caps lock
Indicates that the letters are blocked in upper cage.
8
Num lock
Indicates that the numbers are blocked.
39
CHAPTER 4
N°
Keyboard
The computer keyboard is an 80-key mini-size keyboard, but it covers all functions of Windows
enhanced keyboard. As well as this, several keys are available for system control and they are
specifically designed for use with your FlyBook computer.
All the function keys can be classified into three categories and are listed as follows.
Windows keys
The Windows keys perform specific Windows functions.
40
Key
Description
Launches Windows "Start" menu.
Windows command that permits to pass from one window to another.
+E
Launches Windows "My Computer" task.
+F
Launches Windows "Find" program.
+M
Minimizes all tasks into taskbars.
+
+R
+ M Undoes minimize all tasks into taskbars.
Launches Windows "Run" program.
Opens a context menu, like the right button of a mouse.
41
CHAPTER 4
Shift
+ Tab
SPECIAL LOCK KEYS
There are 3 lock keys on the keyboard. You can press the keys to activate or deactivate a specific function.
Key
Description
Caps lock
When Caps lock is on, all alphabetic characters typed are uppercase.
Fn + NumLK
When Numl lock is on, the numeric keypad is functional
Fn + ScrLK
When Scroll lock is on, the screen will scroll one line up and down while
pressing arrow keys up and down respectively. It does not function on all
applications.
Numeric keypad
Hot keys
The hot keys are specific keys for system control. You can press the keys to toggle function.
42
DESCRIPTION
Fn + Esc
Turns on and off the light of mouse and panning keys.
Fn +
Turns on and off the power of the GPRS or CDMA modules.
Fn + F1
Decreases screen brightness.
Fn + F2
Increases screen brightness.
Fn + F3
Activates stand-by mode.
Fn + F4
De-activates stand-by mode.
Fn + F5
Mutes the speaker volume.
Fn + F6
Increases speaker volume.
Fn + F7
Turns on and off the power of the speakers.
Fn + F8
Turns on and off the power of the Wireless LAN mode.
Fn + F9
Turns on and off the power of Bluetooth mode.
Fn + F10
Switches the display output to the LCD display screen, to an external display
device or both.
TRACK POINTS, MOUSE BUTTONS, AND PAN BUTTON
Two “track points“ along with two sets of mouse buttons are available on your computer.
43
CHAPTER 4
KEY
By lightly pressing on the track point you can move the cursor; the direction and speed of the
cursor depends on the direction and pressure applied to the track point. By lightly tapping the
track point, there is a special device which allows to obtain the same result as clicking the left
button of the mouse.
The pan button switches the panning function on or off. When you direct the track point up or
down it begins to scroll the page.
The pan button only works when documents and/or web sites occupy more than one vertical
page, and it substitutes the use of the vertical bar.
Touch Panel
FlyBook is equipped with a touch panel device with pressure sensitive, palm-rejection technology. You can use the stylus pen along with your computer as a point device to operate the
computer. The stylus pen can act as a mouse or you can use it to write, to draw, to select, and
to navigate any tasks displayed on the screen. The following is a brief introduction of touch
panel operation:
• Touching on the display screen will move the cursor to the point touched.
• Touching on any icons or items of the menu bar, will select the touched item.
• Double touching on a task icon or item, will invoke the relative tasks of the icon or item.
• By touching an icon or an item selected on the display screen and pressing on the stylus pen,
you can drag the item to another position.
44
•The stylus pen can be used just like a mouse when the mouse right button mode is on
(Touching on the Pen Mount icon on the lower right side of the display). You can select the
"right button" option which opens a command window at the top right hand side of the display
(this is very useful when using the tablet version of FlyBook) - touching the "right button" window will invert the preset button from right to left.
Notes
To clean the touch panel, please use only special LCD products (without ammonia).
Spray some cleaner on a cloth or towel and then wipe it softly over the panel surface.
Calibrating your touch panel
Calibrating the touch panel means to register the cursor position on the screen relative to the
pen tip position. Calibration is necessary in the following circumstances:
45
CHAPTER 4
• When the touch panel is being used for the first time.
• When the cursor position does not correctly match the pen tip position which could cause
mistakes or unpredictable errors while using the computer.
• When the system image is restored.
To calibrate the touch panel the indications below must be followed:
1. Double click on "FlyBook Control Center " icon on the tool bar at the lower right of the display. The FlyBook Control Center window appears.
2. Click on "PenMount" to start the program of calibration software.
3. Click on the "Calibrate" option. The PenMount Control Center window appears.
4. Click on [Standard Calibration] or select 4,9,15 or 25 dots calibration in [Advanced Mode].
(Usually standard calibration will be enough). Follow the program instructions.
Display
The computer is connected to an 8.9" LTPS TFT LCD screen display. The colors visualized on the
screen are 32-bit, wide-XVGA display (1024 x 600 resolution).
• The display system offers you OSD (On Screen Display) to guide you in the use of several
hot keys when these are pressed. For example, when you press Fn + F1 (Increases screen
brightness), the display visualizes:
•
The display output can be switched to an external display device.
•
The display color, resolution and orientation can be changed.
46
Adjusting display brightness
You can use hot keys to increase and decrease the display brightness. Please see the
Keyboard section.
Connecting display output to an external display device
You can also use hot keys to connect the display output to an external VGA display device or
video display device. Please see Keyboard section.
Setting display color and resolution
The display color and resolution can be changed through the Display setting utility of Windows.
1. Right click on desktop and then click on [Properties] to evoke the Display setting window.
2. Click on Settings option and then select resolution and the depth of color you prefer.
3. The display color and resolution will change after clicking on Ok to close the window.
CHAPTER 4
Please refer to Windows XP® user’s manual for details.
47
CHANGING DISPLAY ORIENTATION
The display output can be oriented horizontally or vertically, clockwise or anti-clockwise. Click
on an icon in the system tray to open "FlyBook Center".
AUDIO
FlyBook has a high-performance stereo audio system (18-bit ADC and 20-bit DAC resolution), a
built-in microphone and 2 stereo speakers.
• You can tune or mute the output volume in an audio application, but the maximal output
volume is controlled by the audio hardware system. Please see the Keyboard section. (Pag. 43)
• You can turn the speakers on and off, and increase or decrease the output volume through
the hot keys. Please see the Keyboard section.
Furthermore, the input and output audio will be automatically activated, if connected, to exter-
nal audio devices (earphones, microphone or speakers) when these are connected to FlyBook.
48
POWER
The power system of FlyBook includes an adapter and battery. Through the adapter, a power
source directly supplies the computer with power and charges the battery at the same time.
The battery supplies the computer with power only when the adapter is disconnected from the
power supply and it is not connected to FlyBook.
The computer controls power activities through an ACPI power management unit. The unit
minimizes power consumption and at the same time optimizes system performance. Windows
interacts and takes charge of all power-saving affairs for the computer.
Adapter
The adapter can be connected to most power sources, however it is a good idea to verify the
following before connecting the adapter to a power source:
•
•
The voltage and frequency of the power source must always conform to the specifications of
the adapter.
The power plug must connect perfectly to the power outlet.
Otherwise, do not link up the computer.
If the adapter connects properly with the power source, the green LED indicator will light up.
Battery system
Note
If the computer is being used for the first time, the battery pack must be fully charged.
Recharging the battery
Periodically recharging the battery pack allows to prolong the battery life. It is a good idea to
do this every 2 or 3 months. The BIOS SETUP UTILITY provides a recovery utility. Please see
the BIOS setup utility section.
49
CHAPTER 4
With 3 2200mAH high-capacity Li-ion battery cells, if fully charged, the battery pack should
keep the computer working for various hours, depending on the applications and modes used.
Power management
The power management unit continually monitors the power status and employs a set of power
management schemes to maximize power conservation. It also allows you to customize the
schemes according to your own needs.
The computer offers you a system utility, Power Options, to change the adjustable parameters of power management schemes and to check the power status.
To start Power Options
1. Click on [Start menu][Settings][Control panel] to visualize Control panel.
2. Double click on [Power Options] in the Control panel window.
3. When the Power Options window appears, check status or change settings, choosing from
the various options.
Power Schemes Option
Selecting a running mode
Select a running mode for your FlyBook from the Power Schemes selection window. The running mode is one of the major schemes of the power management unit that automatically optimizes the computer’s performance and minimizes the computer’s power consumption. Six
different modes are available for you. You can choose the one that suits you for your computer.
• Home/Office Desk: The CPU runs at full-speed when the adapter is connected to the computer.
50
• Portable/Laptop: The CPU’s running speed depends on the computer’s loading.
• Presentation: The display screen will always remain turned on and the CPU will run in
power-saving mode.
• Always On: The computer’s CPU will always run in full-speed mode.
• Minimal Power Management: The CPU’s speed also depends on the computer’s loading.
• Max Battery: The CPU will run in power-saving mode when the battery pack supplies the
computer with power.
Setting time for the automatic execution of predefined power-saving schemes
4 predefined power-saving schemes, Turn off monitor, Turn off hard disks, System standby and
System hibernates, allow you to set time for their automatic execution.
CHAPTER 4
It is necessary to set the time for two kinds of power-supplying modes.
51
Alarms option
This option allows you to activate the low and critical battery alarm and defines when and how
the computer will indicate this.
Power Meter option
This option permits you to visualize the power-supplying mode and power status of the battery
pack.
52
Advanced option
“Always show icon on the taskbar”
A Power Options icon will appear on the taskbar and you can double click directly on the icon
to invoke a Power Options Properties window.
CHAPTER 4
“Prompt for password when computer resumes from standby”
This option allows to resume working in Windows after a period of standby mode only after your
login password has been inserted.
53
“Hibernate”
This option permits you to assign space on the hard disk that Windows will use for the hibernation scheme. The hibernation scheme cannot be activated if there is not enough free space.
If “Enable hibernate” is not selected, the hibernation scheme cannot be activated.
54
PROTECTING YOUR FLYBOOK
To protect your computer against unauthorized access and damage is very important. The
following is an explanation of how to perform this.
Protecting your computer against unauthorized access
Your computer is supplied with 3 password types, different levels of protection to secure your
computer system and data against unauthorized access.
BIOS password
The BIOS password can effectively protect your computer from unauthorized access to the
system and unauthorized access to the BIOS setup utility.
Once the password is set, you must digit the password at the beginning of boot procedure.
Please refer to the BIOS setup utility section.
Note
If you forget the BIOS password, please contact service centers or authorized resellers to resolve the problem.
Hard disk password
The hard disk password can prevent unauthorized access to your hard disk. Once the password
is set, you must enter the password after BIOS test in the boot procedure. Please refer to BIOS
setup utility section to see how to set your hard disk password.
Note
Operating system passwords
Using an Operating system password to prevent unauthorized access is very effective. Windows
XP® allows you to create several sets of user names and passwords for different users. Please
refer to Windows XP® user’s manual to see how to create the user’s account and login.
Protecting personal data contained in your FlyBook
Reserving frequent backups of your personal data
To protect your personal data, the first thing you need to do is frequently reserve backups of
this data. There are different ways to achieve this:
•
•
•
•
•
Backup your data to a secondary logical disk driver (D driver)
Backup your data to a CF card or USB CF disk.
Backup your data to a recordable compact disk through an external USB or 1394 CD-RAM driver.
Backup your data to an external USB or 1394 hard disk driver.
Backup your data to servers or computers that you have right to access in your network.
55
CHAPTER 4
If you forget the hard disk password, as for the BIOS password, please contact service centers or authorized resellers to resolve the problem.
Using a strap to prevent the computer from falling
The safety strap needs to be fixed, passing it through the opening on the right side of your
FlyBook. This device serves to prevent the computer from falling, especially when the computer
is used in tablet mode or in hand position.
HANDY Modality: here the Flybook can be used by holding it in both hands and wearing the
safety strap. You will be able to navigate in Internet, visualize files, e-mail, etc. even while
standing up. In this case you will find it extremely comfortable to use the set of buttons on the
left hand side.
RECOVERING YOUR SYSTEM (FOR EXPERIENCED USERS)
Only to be used by experienced users, and only after copying your personal data in an external
unit, because the recovering process eliminates all files on the hard disk. The recovery can be
performed through:
• A hidden partition of the hard disk where a pre-installed image of your Operating system has
been stored.
• The recovery CD containing a pre-installed image of your operating system (provided with
FlyBook).
Recovery from a hidden partition of the internal hard disk
Please follow the steps below to recover your system:
1. Turn on the power of your computer.
2. When the BIOS test message “HIT F9” is shown on the screen in boot procedure, press F9.
3. The main menu of recovery utility will show on the screen (in this application the mouse
and touch screen are not activated).
4. Move through the various options using the Tab key.
56
5. When the frame of “Recover System Partition” is highlighted press the spacing bar.
6. After a few seconds a system request will appear. If you are sure, proceed in this operation.
FROM THE RECOVERY CD
Please follow the steps below:
1. Connect a USB CD-ROM to your computer.
2. Insert your recovery CD to the CD-ROM.
3. Turn on the power of your computer.
4. When the main menu of recovery CD is shown on the screen, select “recover system partition”.
5. Follow the procedure to finish the job as in point 5 of the preceding section “Recovery from a
hidden partition of the internal hard disk”
RESETTING THE COMPUTER
If your FlyBook is turned off incorrectly, the computer must be reset. Use a needle or something
RESET
57
CHAPTER 4
pointed to press the reset switch in order to restart the computer.
58
Chapter 5
CONNECTION THROUGH OPTIONS
CHAPTER 5
59
CONNECTION THROUGH OPTIONS
Ports and built-in wireless modules allow you to make connections through various options.
USB LINK
You can connect or daisy-chain your USB peripheral devices to either USB port.
Windows provides a “plug-and-play” interface for the USB links.
•
•
For
the
For
the
devices where the driver is already installed in the computer, just connect the device to
computer. The connected device will be automatically linked.
devices that do not have a driver installed, please refer to the instructions provided by
device manufacturer.
NOTE
When a USB storage device that is connected to your computer needs to be removed,
remember to deactivate the connection before removing it. To deactivate a device:
• Double click on the icon Safely Remove Hardware shown on the taskbar.
• When the “Safely Remove Hardware” window appears, select the device to be
disconnected and click on “Stop”
IEEE 1394 LINK
You can connect or chain your 1394 supported devices to either 1394 port. Windows offers a
“plug-and-play” service for the 1394 links. If the device driver of the connected device is
already installed in your computer, the connection occurs automatically. Otherwise you can
make reference to the instructions that come with the device.
Ethernet link (Ethernet connection)
Connect a 10 Base-T Ethernet cable from the Ethernet port to a network jack or hub in your
network.
60
CONFIGURING YOUR CONNECTION
If it is the first time you connect the computer to an Ethernet, please follow the steps below to
configure your connection:
1. Click on [Start menu][Settings][Control panel] to visualize Control Panel.
2. Double click on [Network Connections] icon in the Control panel window. A window appears.
3. Double click on [Local Area Connection]. A Local Area Connection Properties window will open.
CHAPTER 5
4. Click on the [General] option and follow the guidelines in Windows XP® user’s manual to
complete the TCP/IP configuration.
61
MAKING CONNECTION TO AN ETHERNET
If the connection setting configured fits in with the network you wish to link, the link will be
automatic and the services provided to the network users will be activated once the cable is
connected.
To verify the settings of the connection, double click on the [Local Area Connection] icon in the
Network Connections window. A Local Area Connection Status window will appear this
time. In Local Area Connection Status window, you can:
• Check connection status.
• Disable and enable the connection
• Click on [Properties] to invoke Local Area Connection Properties window to change the
connection setting.
NOTE
You can select the option “Shows icon in notification area when connected” situated
in the Local Area Connection Properties window. A Local Area Connection Status icon
will show on the taskbar, and you can directly click on the icon to invoke the Local Area
Connection Status window.
62
WIRELESS COMMUNICATIONS THROUGH THE BUILT-IN MODULES
To start wireless communications you must activate the modules.
You can use hot keys (see page 42) or the FlyBook Control Center to enable and disable the
modules.
To use hot keys, please see the Keyboard section (page 42).
The following steps guide you how to activate and deactivate the modules through the FlyBook
Control Center:
1. Double click on [FlyBook Control Center] icon in system tray. To open the FlyBook Control
Center window.
2. Click on the relative button or icon to enable or disable the module.
Wireless Network Connection
It is possible to create a peer-to-peer connection or a connection to a WIFI network through
“Access Point”.
1. Click on the [Setting] icon in FlyBook Control Center window or double click on [Wireless
Network Connection] icon in Network Connections window. A Wireless Network
Connection Properties window appears.
63
CHAPTER 5
Configuring your connections
2. Click on the [Wireless Networks] option. Here you can seek networks, perform and
configure the settings of Preferred Networks.
3. Click on [General] option and refer to Windows X® user’s manual to complete the TCP/IP
configuration of this option.
64
Making connection to a Wireless Network
With the Wireless Network module, the computer will automatically seek the preferred networks
listed in Preferred Networks and connect to the privileged one. The services provided to the
network users will be provided by FlyBook.
You can double click once again on [Wireless Network Connection] icon in Network
Connections window. This time a Wireless Network Connection Status window will be invoked.
In Wireless Network Connection Status window, you can:
•
Check connection status.
•
Disable and enable the connection.
•
Click on [Properties] to invoke Wireless Network Connection Properties window once
again in order to change the connection settings.
Connection to another FlyBook: Please refer to the Windows®XP Guide
In Wireless Network Connection Properties window, you can select “Shows icon in
notification area when connected”. A Wireless Network status icon will show on the
taskbar, and you can directly click on the icon to invoke the Wireless Network
Connection Status window.
65
CHAPTER 5
Note
Bluetooth communication (Optional)
When the Bluetooth module is activated, you will find a Bluetooth icon in the system tray,
which is blue in color with a white Bluetooth logo insert. When the module is deactivated the
logo insert is always red.
Note
• If the Bluetooth module has been activated, but the icon is blue with a red
Bluetooth logo insert, the communication is not ready.
• To interrupt the communication, deactivate the module (Through FlyBook Control
Center)
Configuring your connections
The computer connects to different types of Bluetooth-equipped devices via different types of
Bluetooth service protocol. All of the connection settings are configured in the Bluetooth
Configuration window. You can right-click on the Bluetooth icon in system tray and then select
[Advanced Configuration] to invoke Bluetooth Configuration window.
Please see Bluetooth Application Note in the CD provided to learn how to configure your
connections.
Making connections to Bluetooth-equipped devices
You can right-click on the Bluetooth icon in system tray and then select [Explore My Bluetooth
Places] to explore My Bluetooth Places.
66
Make connections to your Bluetooth-equipped devices in My Bluetooth Places window.
Or you can right-click on the Bluetooth icon in the system tray and then select [Quick
Connect][Service name] to select a specific connection service, for making connections to the
specific type of devices.
Please see the Bluetooth Application Note in the CD provided to learn how to make connections to your Bluetooth-equipped devices.
CHAPTER 5
67
GPRS COMMUNICATION
To use the GPRS module, it is necessary to have a SIM card. This will
permit you to connect with Internet and to check your e-mail. Insert the
SIM card into the SIM card slot before activating the module.
Configuring your connection
1. Once the module is activated with the SIM card, the system will ask
the PIN code (if present), digit the code and then press Enter.
2. Click on the [Advanced] option and then input an initialization command in the Extra
initialization commands window.
3. Click on [Ok] to close the window.
NOTE
The Extra initialization command is different from network to network. Request the
command from your network service provider.
• In Network Connections window, run Create a Connections window to create a dial-up connection for GPRS. If completed, an access option to the Network Connections will appear.
68
Making connection to a GPRS network
Please follow the steps below to make a GPRS link (If a dial-up connection, named GPRS is
created):
1. Click on [GPRS] in
Network Connections
window.
A dialogue box appears
Connect GPRS.
2. Input phone number in the Dial-up window, and then input the user name and password of
your account.
3. Click on [Dial] to start the link.
When connected, click on [GPRS] once more in the Network Connections window. A connec-
Note
The phone number dialed also depends on the GPRS network. Request the phone
number from your network service provider (usually the software installs it in
automatic).
69
CHAPTER 5
tion status window appears this time. In the status window, you can:
• Check connection status.
• Stop the connection.
CDMA communication (Optional)
The CDMA module in your computer is CDMA2000 compliant. The procedure of configuring and
making a connection is the same used for GPRS communication. Please refer to the GPRS
section.
DIAL-UP LINK THROUGH THE BUILT-IN MODEM
Configuring your connection
In Networks window, select Create a new connection to create a dial-up connection. If
completed, a dial-up entry will show in Networks window.
Making a dial-up link
Please follow the steps below to make a dial-up link (If a dial-up connection, named Dial-up, is
created.):
1.
2.
3.
4.
Connect the modem to a phone line (from the MODEM port to a telephone jack).
Click on [Dial-up] in Networks window to invoke Dial-up Link dialogue box.
Input dial-up phone number, user name and password of your account.
Click on [Dial] to start the connection.
If connected, click on [Dial-up] once again in Networks window. A connection status window
appears this time. In the status window, you can:
• Check connection status.
• Stop the connection.
PC CARD CONNECTION
Windows integrates the function “plug-and-play” for the PC card connection. If a card is
inserted in the PC card slot and Windows cannot find the driver, Windows will guide you to the
installation of the driver. For some device cards, specific application programs are required. See
the manufacturer’s instructions.
70
PC card insertion
Insert a card to the PC card slot until it clicks into place.
PC card ejection
The ejection rod of the slot is of the push-push type. Push on the nob of the rod and then push
the rod to eject the card.
BIOS SETUP UTILITY (ONLY FOR EXPERIENCED USERS)
The BIOS setup utility is a hardware configuration utility of your computer. To enter the setup
screen, press F2 during the POST (Power On Self Test) when starting up the computer. You
need to run the utility if the hardware of your computer is installed for the first time or the
hardware configuration has been changed.
71
CHAPTER 5
The utility also provides a function that will load a default configuration into the nonvolatile memory if the memory configuration has been modified.
MAIN MENU DI DEFAULT
Item
Note
System Time
[12:00:00]
Press <Tab>, <Shift-Tab>, or
<Enter>, to select Field.
System Date
[07/01/1998]
Press <Tab>, <Shift-Tab>, or
<Enter>, to select Field.
Language
[English (US)]
[Chinese (CH)]
Select the display language for the BIOS.
Internal HDD
2161MB
Boot Display
Device
Both (LCD+CTR)
Show the display device.
System Memory
640 KB
(BIOS auto detect, display for information only)
Extended Memory
15360KB
(BIOS auto detect, display for information only)
CPU Type
CPU Speed
Crusoe TM5800
1000 MHz
(BIOS auto detect, display for information only)
(BIOS auto detect, display for information only)
BIOS Version
0.2A-0106-6202
/083A0000
(BIOS-VGA-uP version/Bios Version OfDmiType0,
display for information only)
DEFAULT - INTERNAL HDD SUB-MENU
72
Item
Note
Type:
Auto
Cylinders:
4188
Heads:
16
Sectors:
63
Maximum
Capacity:
2161MB
Multi-Sector
Transfers
[16 Sectors] / [Disabled]
[2 Sectors] / [4 Sectors]
[8 Sectors]
Determines the number of sectors per block for
multiple sector transfers.
LBA Mode
[Enabled] [Disabled]
Enabling LBA causes Logical Block
32 Bit I/O:
[Disabled] [Enabled]
This setting enables or disables 32
bit IDE data transfers.
Transfer
Mode:
[Standard]/[Fast PIO 1] /
[Fast PIO 2] / [Fast PIO 3]
[Fast PIO 4] / [FPIO 3 /
[DMA 1] / [FPIO 4 / DMA 2]
Selects the method for moving data to/from the
drive. Introduce the drive to select the optimum
transfer mode.
SMART
Monitoring:
Disabled
(BIOS auto detect, display for information only).
Ultra DMA
Mode:
[Disabled] / [Mode 0] /
[Mode 1] / [Mode 2]
Selects the Ultra DMA mode.
Control:
Shows the internal Hard Disk drive.
Addressing to be used in place of Cylinders,
Heads & Sectors.
CHAPTER 5
73
Default - Security menu
The password includes two levels; one is the Supervisor Password of highest priority; the
other is of lower priority for the User Password. All of the passwords must be formed of 8
standard characters.
Default menu of the Boot
Exit Menu
74
APPENDIX B TESTED DEVICES
DDR RAM Modules
•
•
•
A-DATA 512MB (A-DATA)
Kingmax 512MB (Kingmax)
Transcend 512MB (Samsung)
PCMCIA/CF/CardBus
•
•
•
•
•
•
IBM MicroDrive
Lucent Orinoco WLAN
Socket LP-E 10/100 LAN
Pretec 56K compact Modem
Buffalo AirStation WLI-CF-S11G
Asus wireless WL-100 PCMCIA 802.11b card
USB
•
•
•
•
•
•
•
•
•
•
•
Wintek WK-360 USB keyboard
External enclosure
Juster SP-16050 USB speaker (Philips DSS 330 speaker)
Mitsumi D35GUE USB floppy
Beckin USB mouse
Intopic USB mouse
Billionton Bluetooth
WLAN PRISM3 IEEE 802.11b
Sony MicroVault USB drive 64MB
IEEE 1394
• Prolific PL3507 Combo device
For further lists of compatibility, please see the website:
75
CHAPTER 5
•
•
•
•
•
•
SanDisk cruzer 128M
Logitech QuickCAM Express
Billionton USB 2.0 card reader
Cypress USB 2.0
Logitech Wheel mouse
Aten VH-107 7 ports USB hub
Fujitsu card reader
Zippy WK-712 USB keyboard + USB hub
www.flybook.biz.
NOTES
76
NOTES
77
NOTES
78
NOTES
79
NOTES
80
NOTES
81
NOTES
82
HDEM01-000-05-EN