1
Microsoft® Windows®
Storage Server 2003 R2
x64 Edition
Getting Started Guide
使用入门指南
入門指南
Guide de mise en route
Erste Schritte
はじめに
시작 설명서
Guía de introducción
w w w. d e l l . c o m | s u p p o r t . d e l l . c o m
Microsoft® Windows®
Storage Server 2003 R2
x64 Edition
Getting Started Guide
w w w. d e l l . c o m | s u p p o r t . d e l l . c o m
Notes, Notices
NOTE: A NOTE indicates important information that helps you
make better use of your computer.
NOTICE: A NOTICE indicates either potential damage to
hardware or loss of data and tells you how to avoid the problem.
____________________
Information in this document is subject to change without notice.
© 2006 Dell Inc. All rights reserved.
Reproduction in any manner whatsoever without the written permission of
Dell Inc. is strictly forbidden.
Trademarks used in this text: Dell and the DELL logo, PowerEdge, and Dell
OpenManage are trademarks of Dell Inc.; Windows Server is a trademark, and
Microsoft and Windows are registered trademarks of Microsoft Corporation.
Other trademarks and trade names may be used in this document to refer to either
the entities claiming the marks and names or their products. Dell Inc. disclaims
any proprietary interest in trademarks and trade names other than its own.
February 2006
P/N YH406
Rev. A01
Contents
Introduction .
. . . . . . . . . . . . . . . . . . . . . . . . . . . . .
5
Entering the Default Administrator User Name
and Password
. . . . . . . . . . . . . . . . . . . . . . . . . . . .
6
Configuring the Network IP Address
for the NAS System.
. . . . . . . . . . . . . . . . . . . . . . . .
6
. . . . .
7
. . . . . . . . . . . . . . . . . . . . . . .
8
Configuring Your System For Network Access
Configuring Your System Using a Keyboard,
Monitor, and Mouse .
Changing the Administrator Password .
. . . . . . . . . .
9
Localizing Your System Using the Multilanguage
User Interface
. . . . . . . . . . . . . . . . . . . . . . . . . . . .
9
Starting the Windows Storage Server
Management Console.
. . . . . . . . . . . . . . . . . . . . .
Contents
10
3
Accessing the Microsoft Management Console .
. . .
10
. . . . . .
. . . . . .
10
11
. . . . . . . . . . . . . . . . . . . . . . . . . . . .
12
Access the MMC Locally on the Host . . . . . . . . .
Access the System Using Remote Desktop Connection
Installing Dell OpenManage Server
Administrator
Accessing Server Administrator . . . . . . .
Adding Trusted Sites to Your Browser . . . .
Updating Your System . . . . . . . . . . . . .
Updating Your Microsoft Windows Software .
Other Documents You May Need.
4
Contents
. . . . . . . . . . .
13
14
14
15
. . . . . . . . . . . . . .
15
. . . . . . . . . . .
. . . . . . . . . . .
. . . . . . . . . . .
This document provides an overview of the Microsoft® Windows®
Storage Server 2003 R2 x64 operating system and information about
configuring, localizing, and installing your Dell™ PowerEdge™ Network
Attached Storage (NAS) system on a corporate network.
This document provides information about the following topics:
•
Operating system overview
•
Entering your user name and password
•
Configuring the network IP address
•
Configuring your system for network access
•
Configuring your system using a keyboard, monitor, and mouse
•
Changing the administrator password
•
Localizing your system using the Multilanguage User Interface (MUI)
•
Starting the Windows Storage Server Management Console
•
Accessing the MUI
•
Installing Dell OpenManage™ Server Administrator
Introduction
The Windows Storage Server 2003 R2 x64 Edition operating system adds
new search capabilities, simplified setup and storage management,
extensibility, and is specially tuned to provide optimal NAS performance.
Windows Storage Server 2003 R2 x64 Edition is the latest release in this
operating system series and provides significant enhancements in storage
management scenarios, as well as ease of installation.
Your PowerEdge NAS system is pre-configured with the Windows Storage
Server 2003 R2 x64 Edition operating system. Most of the setup
procedures are completed for you and do not require user intervention.
When your system boots for the first time, the Microsoft Mini Setup
process begins. When completed, your system automatically reboots.
After the Mini Setup procedure has completed, you can access the server
locally or remotely.
The following sections provide information about completing the
operating system installation procedures.
Getting Started Guide
5
NOTE: If your system is pre-configured with software RAID 5, the system
performs a RAID synchronization to optimize the array. The process runs in the
background and may affect your overall system performance until it completes.
If the system is powered off before the process completes, RAID
synchronization will begin again when the system is powered up and continue
until it completes.
For More Information
For more information about the Windows Storage Server 2003 R2 x64
Edition operating system, see the Microsoft Windows Storage Server 2003
R2 x64 Administrator’s Guide located on the Dell Support website at
support.dell.com
For information about minimum supported BIOS, firmware, and RAID
controller versions, see the Microsoft Windows Storage Server 2003 R2 x64
Important Information document located on the Dell Support website at
www.dell.com/ostechsheets.
Entering the Default Administrator User Name
and Password
When logging into the NAS system for the first time, you must enter an
administrator user name and password. The default administrator user
name for your NAS system is administrator and the default password
is storageserver.
Configuring the Network IP Address
for the NAS System
If you have a DHCP server on your network, you are not required to
configure your NAS system’s IP address because DHCP automatically
assigns an address to the NAS system. If your network is not configured
with a DHCP server, configure the NAS system’s IP address through
the Network Configuration window.
To access the Network Configuration window, click Start and select
Settings→ Control Panel→ Network Configuration.
6
Getting Started Guide
NOTE: If you do not have a DHCP server on your network, a local keyboard,
monitor, and a mouse is required to complete your NAS configuration. See
"Configuring Your System Using a Keyboard, Monitor, and Mouse" for more
information.
NOTE: The Windows Firewall is enabled by default. When you access the
remote system, you may experience issues with connectivity.
Configuring Your System For Network Access
1 If your NAS system is powered on, turn it off.
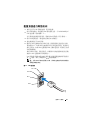
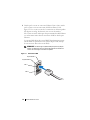
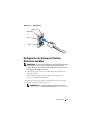
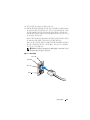
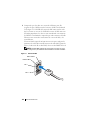
2 Connect one end of an Ethernet cable into one of the 10/100/1000
RJ-45 NIC connectors (see Figure 1-1) on the back of your NAS
system.
For more information on the location of system connectors, see your
NAS system’s User’s Guide.
3 Connect the other end of the Ethernet cable to a functioning Ethernet
jack.
4 Push the power button to turn on the NAS system.
5 Verify that the server is connected to the Ethernet by ensuring that the
LED associated with the NIC connector is illuminated. See Figure 1-1.
If the NIC connector’s LED is a steady green color, then the
connection is good. If the NIC connector’s LED is a flashing amber
color, then data is successfully being transferred.
If the LED is not illuminated, check to make sure that each end of the
Ethernet cable is seated properly in the NIC connector and the
Ethernet jack.
The NAS system retrieves the required information to set up network
parameters (the IP address, gateway subnet mask, and DNS server
address) from a DHCP server on the network.
NOTE: It may take several minutes for the NAS system to boot, depending
on your configuration and the amount of storage attached to the system.
Getting Started Guide
7
Figure 1-1. NIC Connector
NIC 1 LED
NIC 2 LED
NIC 1
NIC 2
Configuring Your System Using a Keyboard,
Monitor, and Mouse
NOTE: Depending on your method of configuration, local KVM connections
may be required to complete the installation and configuration procedures.
If your remote system can complete the configuration procedures, local KVM
connections are not required for operation.
1 Connect a keyboard, monitor, and mouse to the NAS system.
For information about system connectors, see your system’s User’s
Guide.
2 Push the power button to turn on the NAS system.
3 Log in to the NAS system.
NOTE: The default administrator user name is administrator
and the default password is storageserver.
8
Getting Started Guide
Changing the Administrator Password
1 Click Start and select Administrative Tools→ Computer
Management.
2 In the Computer Management window in the Computer
Management (Local) tree, expand Local Users and Groups and select
Users.
3 In the right window pane, right click Administrator and select Set
Password.
4 In the Set Password for Administrator window, click Proceed.
5 Enter and confirm your password in the appropriate fields and
click OK.
6 Close the Computer Management window.
Localizing Your System Using the
Multilanguage User Interface
The NAS system allows you to change the native language for the
operating system's user interface. Many languages are installed on your
system by default. The Multilanguage User Interface (MUI) allows the
NAS system to display operating systems menus, dialogs, and help files
in multiple languages.
If your system was pre-configured with the Windows Storage Server 2003
R2 x64 Edition operating system, the MUI is pre-configured with your
localized language in both the regional settings and in the browser
settings. No user intervention is required.
To change the default browser language:
1 Open an Internet Explorer browser.
2 In the Tools menu, select Internet Options.
3 In the General tab, click Languages.
4 In the Language Preference window, click Add.
5 In the Language box, select a language.
6 Click OK.
Getting Started Guide
9
Starting the Windows Storage Server
Management Console
The Windows Storage Server Management Console appears in the
Microsoft Management Console (MMC), providing an easy and
convenient method for system administration. The Management Console
opens automatically when you are logged into the Windows Storage
Server 2003 R2 x64 operating system.
To open the Windows Storage Server Management Console, click Start
and select All Programs→ Windows Storage Server Management.
In the Management Console window, the left window pane shows the
File Server Management (Local) node as the default node. The center
window pane provides selectable scenarios that assist you with operating
system administration.
Accessing the Microsoft Management Console
The MMC is configured by default as part of the Microsoft Start menu.
The MMC can be used for disk management, configuring NFS, and as a
general NAS management station. See the Microsoft MMC document
included with your system for more information.
Using MMC, you can configure your storage using one of the following
methods:
•
Access the MMC locally on the host
•
Access the MMC remotely using a Remote Desktop Connection
Access the MMC Locally on the Host
The MMC appears on the host as a selectable item in the Start menu.
If the MMC does not appear in the Start menu after startup, perform
the following steps:
1 Click Start and select Run.
2 In the Open field, type the following and click OK:
nas.msc
NOTE: The nas.msc file is located at c:\windows\system32.
10
Getting Started Guide
Access the System Using Remote Desktop Connection
Use Remote Desktop Connection for remote server administration to
reduce the overhead associated with remote administration. Enabled by
Terminal Services technology, Remote Desktop for Administration is
specifically designed for server management.
Remote Desktop for Administration does not require a special license for
client systems that access the server. Additionally, you are not required to
install Terminal Server Licensing when using Remote Desktop for
Administration.
Administrators can also fully administer computers running Windows
Storage Server 2003 R2 x64 Edition from systems running earlier versions
of Windows by installing Remote Desktop Connection.
NOTE: To connect to Remote Desktop for Administration from a remote system,
use Remote Desktop Connection.
Create and Save a Remote Desktop Connection To Your Desktop
To create and save a Remote Desktop connection to Windows Storage
Server 2003 R2 x64 Edition, perform the following steps:
1 Click Start and select Run.
2 In the Open field, type the following and then click OK.
mstsc
The Remote Desktop Connection window appears.
3 In the Computer field, type the computer name or IP address of the
storage server and then click Options.
4 In the Remote Desktop Connection window in the Connection
settings box, click Save As.
5 In the Save As window in the File name field, type a name for the
connection and include the default .rdp extension.
6 In the Save in drop-down menu, select Desktop and then click Save.
Your connection is saved to your desktop.
For more information about configuring your remote desktop connection,
click Help in the Remote Desktop Connection window.
Getting Started Guide
11
Installing Dell OpenManage Server
Administrator
Dell OpenManage Server Administrator provides a comprehensive,
one-to-one system management solution using an integrated, Web
browser-based interface (the Server Administrator home page) or a
command line interface (CLI) through the operating system.
Server Administrator allows you to manage NAS systems on a network
locally and remotely and to focus on managing the entire network with
comprehensive, one-to-one system management.
NOTE: For the purpose of using Server Administrator, a "system" can be a
stand-alone system, a server with Network Attached Storage units in separate
chassis, or a modular system consisting of one or more server modules in a
chassis.
See your Server Administrator documentation for more information.
Installing Server Administrator
The Dell Installation and Server Management CD provides a setup
program to install, upgrade, and uninstall Server Administrator and other
managed system software components on your managed system.
Additionally, you can install Server Administrator on multiple systems
through an unattended installation across a network.
Using the setup program on the Dell Installation and Server Management
CD, you can install and upgrade Server Administrator on systems running
all supported Windows Storage Server 2003 R2 x64 Editions operating
systems.
To install Server Administrator, perform the following steps:
1 Insert the Dell Installation and Server Management CD into your
system’s CD drive.
The CD autoloads and the Server Administrator Installer window
appears.
2 Click Install, Modify, Repair or Remove Server Administrator.
3 In the License Agreement window, read and understand the agreement
and click Next.
12
Getting Started Guide
4 In the Setup Type window, select the appropriate setup type for your
configuration and click Next.
5 In the Ready to Install window, click Install.
6 In the Install Wizard Completed window, click Finish.
Accessing Server Administrator
You can access Server Administrator locally through the host by doubleclicking the Server Administrator icon on the desktop.
To access Server Administrator directly from a client system on the same
network, open Internet Explorer 6.0 or later and connect to the secure
port, 1311, of your NAS system.
For example, type:
https://DELL1234567:1311
where DELL1234567 is the name of your NAS system.
If port 1311 is disabled by the firewall, use the following procedure to set
an exception to enable port 1311 for OpenManage use.
1 Click Start and select Settings→ Control Panel→ Windows
Firewall.
2 Click the Exceptions tab.
3 Click on Add port.
4 Type Dell OpenManage Server Administrator
in the Name field.
5 Type 1311 in the Port number field.
6 Click OK.
7 If prompted, restart the firewall service.
Getting Started Guide
13
Adding Trusted Sites to Your Browser
Due to enhanced Microsoft security standards, you may be prompted to
add an internet or intranet site to the trusted sites zone when you initially
access the site.
To add trusted sites to Internet Explorer, perform the following steps:
1 In the Tools menu, click Internet Options.
The Internet Options window appears.
2 Click the Security Tab.
The Security tab menu appears.
3 Click Trusted Sites.
The Trusted sites option appears.
4 Click Sites.
The Trusted sites window appears.
5 In the Add this Web site to the zone: field, type the address of the site,
using the https: secure protocol, and click Add.
The site appears in the Web sites: box.
6 Repeat step 5 to add any additional sites and click OK.
The Internet Options window appears.
7 Click OK.
Updating Your System
The Server Update Utility CD contains an application for identifying and
applying updates to your server. The Server Update Utility (SUU) also can
be downloaded from the Dell Support website at support.dell.com. See
the Server Update Utility User’s Guide for more information.
To update individual Server Administrator components, use componentspecific Dell Update Packages, which may be found on the Dell PowerEdge
Updates CD. The SUU compares the versions of components currently
installed on your Dell PowerEdge NAS system with update components
that are packaged on the Dell PowerEdge Updates CD. Use the SUU to
view a comparison report of the versions and to update an entire system.
14
Getting Started Guide
Updating Your Microsoft Windows Software
To update your Windows Storage Server 2003 R2 x64 Edition operating
system, see the Microsoft Support website at support.microsoft.com. All
updates to Windows Server™ 2003 R2 x64 Editions apply to Windows
Storage Server 2003 R2 x64.
Other Documents You May Need
NOTICE: The Product Information Guide provides important safety and
regulatory information. Warranty information may be included within this
document or as a separate document.
•
The Rack Installation Guide or Rack Installation Instructions included
with your rack solution describes how to install your system into a rack.
•
The Administrator’s Guide provides information about completing the
configuration procedures on your system and a general overview of
Windows Storage Server 2003 R2 x64 Edition features.
•
The Important Information document provides the minimum hardware
and software requirements and all known issues.
•
The system’s User's Guide provides information about system features
and technical specifications.
•
Systems management software documentation describes the features,
requirements, installation, and basic operation of the software.
•
Operating system documentation describes how to install
(if necessary), configure, and use the operating system software.
Getting Started Guide
15
•
Documentation for any components you purchased separately provides
information to configure and install these options.
•
Updates are sometimes included with the system to describe changes
to the system, software, and/or documentation.
NOTE: Always read the updates first because they often supersede
information in other documents.
•
Release notes or readme files may be included to provide last-minute
updates to the system, documentation, or advanced technical reference
material intended for experienced users or technicians.
•
The Server Update Utility User's Guide describes how you can use the
Server Update Utility to view the software versions on your system and
update your system’s software. It can be downloaded from the Dell
Support website at support.dell.com.
16
Getting Started Guide
Microsoft® Windows®
Storage Server 2003 R2
x64 Edition
使用入门指南
w w w. d e l l . c o m | s u p p o r t . d e l l . c o m
注和注意
注:注表示可以帮助您更好地使用计算机的重要信息。
注意:注意表示可能会损坏硬件或导致数据丢失,
并告诉您如何避免此类问题。
____________________
本说明文件中的信息如有更改,恕不另行通知。
© 2006 Dell Inc. 版权所有,翻印必究。
未经 Dell Inc. 书面许可,严禁以任何形式进行复制。
本文中使用的商标:Dell、DELL 徽标、PowerEdge 和 Dell OpenManage
是 Dell Inc. 的商标; Windows Server 是 Microsoft Corporation 的商标,
Microsoft 和 Windows 是 Microsoft Corporation 的注册商标。
本文件中述及的其它商标和产品名称是指拥有相应商标和名称的公司或
其制造的产品。Dell Inc. 对本公司的商标和产品名称之外的其它商标和产
品名称不拥有任何专有权。
2006 年 2 月
P/N YH406
修订版 A01
目录
简介 .
. . . . . . . . . . . . . . . . . . . . . . . . . . . . . . . . .
输入默认管理员名称和密码 .
. . . . . . . . . . . . . . .
为 NAS 系统配置网络 IP 地址 .
配置系统进行网络访问
22
. . . . . . . . . . . . . .
22
. . . . . . . . . . . . . . . . . . .
23
使用键盘、显示器和鼠标配置系统
更改管理员密码 .
21
. . . . . . . . . .
24
. . . . . . . . . . . . . . . . . . . . . . . .
24
使用多语种用户界面本地化系统
. . . . . . . . . . . .
启动 Windows Storage Server 管理控制台 .
访问 Microsoft 管理控制台 .
在主机上本地访问 MMC . . .
使用远程桌面连接访问系统.
. . . . .
25
. . . . . . . . . . . . . . . .
26
. . . . . . . . . . . . . . . . . . .
. . . . . . . . . . . . . . . . . . .
安装 Dell OpenManage Server Administrator
访问 Server Administrator. . . .
将可信站点添加到您的浏览器
更新系统 . . . . . . . . . . . .
更新 Microsoft Windows 软件 .
25
. . . .
. . . . . . . . . . . . . . . . . .
. . . . . . . . . . . . . . . . . .
. . . . . . . . . . . . . . . . . .
. . . . . . . . . . . . . . . . . .
您可能需要的其它说明文件 .
. . . . . . . . . . . . . . .
目录
26
26
27
29
29
30
30
30
19
20
目录
本说明文件概要介绍 Microsoft® Windows® Storage Server 2003 R2 × 64 操
作系统,并提供有关在公司网络上配置、本地化和安装 Dell™ PowerEdge™
网络连接存储器 (NAS) 系统的信息。
本说明文件提供有关以下主题的信息:
•
操作系统概览
•
输入用户名和密码
•
配置网络 IP 地址
•
配置系统进行网络访问
•
使用键盘、显示器和鼠标配置系统
•
更改管理员密码
•
使用多语种用户界面 (MUI) 本地化系统
•
启动 Windows Storage Server 管理控制台
•
访问 MUI
•
安装 Dell OpenManage™ Server Administrator
简介
Windows Storage Server 2003 R2 × 64 Edition 操作系统增加了新的搜索功
能,简化了设置和存储管理过程,提高了可扩展性,并经过专门优化以提
供最佳的 NAS 性能。Windows Storage Server 2003 R2 × 64 Edition 是本操
作系统系列的最新版本,它在存储管理方面提供了重要的增强功能,
并且易于安装。
PowerEdge NAS 系统已预配置了 Windows Storage Server 2003 R2 × 64 Edition
操作系统。大多数设置过程已经完成,无需用户干预。
第一次引导系统时,将开始 Microsoft Mini Setup(Microsoft 袖珍安装)
过程。此过程完成后,系统将自动重新引导。完成 Mini Setup(袖珍安
装)过程后,用户可以本地或远程访问服务器。
以下各节介绍有关完成操作系统安装过程的信息。
注:如果系统已预配置了软件 RAID 5,系统将执行 RAID 同步以优化阵列。
此过程在后台运行,在完成之前可能会影响系统的整体性能。如果在此过
程完成之前关闭系统电源,则在系统通电时将再次开始 RAID 同步,
直至此过程完成。
使用入门指南
21
有关详情
有关 Windows Storage Server 2003 R2 × 64 Edition 操作系统的详情,
请参阅 Dell 支持 Web 站点 support.dell.com 上的 Microsoft Windows
Storage Server 2003 R2 × 64 Administrator’s Guide(《Microsoft Windows
Storage Server 2003 R2 × 64 管理员指南》)
有关支持的最低 BIOS、固件和 RAID 控制器版本的信息,请参阅 Dell
支持 Web 站点 www.dell.com/ostechsheets 上的 Microsoft Windows Storage
Server 2003 R2 × 64 Important Iormation(Microsoft Windows Storage
Server 2003 R2 × 64 重要信息)说明文件。
输入默认管理员名称和密码
首次登录 NAS 系统时,必须输入管理员用户名和密码。NAS 系统的默认
管理员用户名为 administrator,默认密码为 storageserver。
为 NAS 系统配置网络 IP 地址
如果网络上已配备 DHCP 服务器,则无需配置 NAS 系统的 IP 地址,
因为 DHCP 会自动为 NAS 系统分配地址。如果网络中未配置 DHCP 服
务器,则通过 Network Configuration(网络配置)窗口配置 NAS 系统的
IP 地址。
要访问 Network Configuration(网络配置)窗口,请单击 Start(开始),
然后选择 Settings(设置)→ Control Panel(控制面板)→ Network
Configuration(网络配置)。
注:如果网络上未配备 DHCP 服务器,则需要使用本地键盘、显示器和
鼠标来完成 NAS 配置。有关详情,请参阅“使用键盘、显示器和鼠标配
置系统”。
注:默认情况下,已启用 Windows 防火墙。在访问远程系统时,
可能会遇到与连接有关的问题。
22
使用入门指南
配置系统进行网络访问
1
如果已打开 NAS 系统的电源,请关闭电源。
2
将以太网电缆的一端连接到 NAS 系统背面上的一个 10/100/1000 RJ-45
NIC 连接器(请参阅图 1-1)。
有关系统连接器位置的详情,请参阅 NAS 系统的《用户指南》。
3
将以太网电缆的另一端连接到有效的以太网插孔。
4
按电源按钮打开 NAS 系统。
5
确保与 NIC 连接器相关的 LED 亮起,验证服务器已连接至以太网。
请参阅图 1-1。如果 NIC 连接器的 LED 呈绿色持续亮起,则表明连
接是正常的。如果 NIC 连接器的 LED 呈琥珀色闪烁,则表明正在成
功地传输数据。
如果 LED 未亮起,请进行检查,以确保以太网电缆的两端分别正确
地插入 NIC 连接器和以太网插孔中。
NAS 系统将从网络中的 DHCP 服务器上检索设置网络参数所需的信
息(IP 地址、网关子网掩码和 DNS 服务器地址)。
注:引导 NAS 系统可能需要几分钟,具体视连接至系统的存储设备
的配置和数量而定。
图 1-1. NIC 连接器
NIC 1 LED
NIC 2 LED
NIC 1
NIC 2
使用入门指南
23
使用键盘、显示器和鼠标配置系统
注:根据配置方法,您可能需要进行本地 KVM 连接,才能完成安装和配
置过程。如果远程系统可以完成配置过程,则无需进行本地 KVM 连接,
系统即可正常运行。
1
将键盘、显示器和鼠标连接至 NAS 系统。
有关系统连接器的信息,请参阅《用户指南》。
2
按电源按钮打开 NAS 系统。
3
登录到 NAS 系统。
注:默认的管理员用户名为 administrator,默认密码为
storageserver。
更改管理员密码
1
单击 Start(开始),选择 Administrative Tools(管理工具)→
Computer Management(计算机管理)。
2
在 Computer Management(计算机管理)窗口的 Computer
Management (Local)(计算机管理 [ 本地 ])树中,展开 Local Users
and Groups(本地用户和组),然后选择 Users(用户)。
3
在右侧窗格中,右键单击 Administrator(管理员),然后选择 Set
Password(设置密码)。
4
在 Set Password for Administrator(为管理员设置密码)窗口中,
单击 Proceed(继续)。
5
在相应字段中输入并确认密码,然后单击 OK(确定)。
6
关闭 Computer Management(计算机管理)窗口。
24
使用入门指南
使用多语种用户界面本地化系统
NAS 系统允许您更改操作系统用户界面的母语。默认情况下,系统中安
装了多种语言。多语种用户界面 (MUI) 允许 NAS 系统用多种语言显示操
作系统菜单、对话框和帮助文件。
如果系统预配置了 Windows Storage Server 2003 R2 × 64 Edition 操作系统,
则 MUI 在区域设置和浏览器设置中都已预配置了本地化语言。无需用户
干预。
要更改默认的浏览器语言:
1
打开 Internet Explorer 浏览器。
2
在 Tools(工具)菜单中,选择 Internet Options(Internet 选项)。
3
在 General(常规)选项卡中,单击 Languages(语言)。
4
在 Language Preference(语言首选项)窗口中,单击 Add(添加)。
5
在 Language(语言)框中,选择语言。
6
单击 OK(确定)。
启动 Windows Storage Server 管理控制台
Windows Storage Server 管理控制台显示在 Microsoft 管理控制台 (MMC)
中,可提供简单便捷的系统管理方法。当您登录到 Windows Storage Server
2003 R2 × 64 操作系统时,系统将自动打开该管理控制台。
要打开 Windows Storage Server 管理控制台,请单击 Start(开始),
然后选择 All Programs(所有程序)→ Windows Storage Server
Management(Windows Storage Server 管理)。
在 Management Console(管理控制台)窗口中,左窗格中将显示 File Server
Management (Local)(文件服务器管理 [ 本地 ])节点作为默认节点。
中间窗格提供多种可供选择的方案,帮助您进行操作系统管理。
使用入门指南
25
访问 Microsoft 管理控制台
默认情况下,MMC 配置为 Microsoft 开始菜单的一部分。MMC 可用于进
行磁盘管理和配置 NFS,还可用作常规的 NAS 管理站。有关详情,
请参阅系统随附的 Microsoft MMC 说明文件。
通过 MMC,可以使用以下方法之一配置存储设备:
•
在主机上本地访问 MMC
•
使用远程桌面连接远程访问 MMC
在主机上本地访问 MMC
在主机上,MMC 显示为 Start(开始)菜单中的一个可选项。如果启动
后,在 Start(开始)菜单中未显示 MMC,则执行以下步骤:
1
单击 Start(开始),然后选择 Run(运行)。
2
在 Open(打开)字段中,键入以下命令,然后单击 OK(确定):
nas.msc
注:nas.msc 文件位于 c:\windows\system32 下。
使用远程桌面连接访问系统
使用远程桌面连接来进行远程服务器管理,可以减少与远程管理相关的额
外开销。用于管理的远程桌面通过终端服务技术实现,它是专门为管理服
务器而设计的。
对于访问服务器的客户机系统,用于管理的远程桌面不需要特殊许可。
此外,在使用用于管理的远程桌面时,无需安装终端服务器许可。
通过安装远程桌面连接,管理员也可以从运行 Windows 较早版本的系统
上全面管理运行 Windows Storage Server 2003 R2 × 64 Edition 的计算机。
注:要从远程系统连接到用于管理的远程桌面,请使用远程桌面连接。
26
使用入门指南
创建远程桌面连接并保存到您的桌面上
要创建和保存指向 Windows Storage Server 2003 R2 × 64 Edition 的远程桌
面连接,请执行以下步骤:
1
单击 Start(开始),然后选择 Run(运行)。
2
在 Open(打开)字段中,键入以下命令,然后单击 OK(确定)。
mstsc
屏幕将显示 Remote Desktop Connection(远程桌面连接)窗口。
3
在 Computer(计算机)字段中,键入计算机名称或存储服务器的 IP
地址,然后单击 Options(选项)。
4
在 Remote Desktop Connection(远程桌面连接)窗口的 Connection
settings(连接设置)框中,单击 Save As(另存为)。
5
在 Save As(另存为)窗口的 File name(文件名称)字段中,
键入连接的名称,并包含默认的 .rdp 扩展名。
6
在 Save in(保存于)下拉式菜单中,选择 Desktop(桌面),
然后单击 Save(保存)。
此连接已保存到您的桌面上。
有关配置远程桌面连接的详情,请单击 Remote Desktop Connection
(远程桌面连接)窗口中的 Help(帮助)。
安装 Dell OpenManage Server Administrator
Dell OpenManage Server Administrator 通过一个集成的、基于 Web 浏览
器的界面(Server Administrator 主页)提供了一个全面、一对一的系统管
理解决方案,同时通过操作系统提供了一个命令行界面 (CLI)。
借助于 Server Administrator,用户可以本地和远程管理网络上的 NAS 系
统;同时,通过全面、一对一的系统管理功能,可以将精力集中在整个网
络的管理上。
注:使用 Server Administrator 的“系统”既可以是独立式系统,也可以是
在单独的机箱中装有多个网络连接存储器装置的服务器,还可以是在机箱
中安装了一个或多个服务器模块的模块化系统。
有关详情,请参阅 Server Administrator 说明文件。
使用入门指南
27
安装 Server Administrator
Dell Installation and Server Management CD 提供了一个设置程序,用于在
所管理的系统上安装、升级和卸载 Server Administrator 和其它所管理的系
统软件组件。此外,还可以采用无人参与安装方式,通过网络在多个系统
上安装 Server Administrator。
使用 Dell Installation and Server Management CD 上的设置程序,可以在运
行所有支持的 Windows Storage Server 2003 R2 × 64 Edition 操作系统的系
统上安装和升级 Server Administrator。
要安装 Server Administrator,请按以下步骤进行:
1
将 Dell Installation and Server Management CD 插入系统的光盘驱
动器。
CD 自动载入程序,并显示 Server Administrator Installer
(Server Administrator 程序)窗口。
2
单击 Install, Modify, Repair or Remove Server Administrator
(安装、修改、修复或删除 Server Administrator)。
3
在 License Agreement(许可协议)窗口中,阅读并理解此协议,
然后单击 Next(下一步)。
4
在 Setup Type(安装类型)窗口中,选择与配置相应的安装类型,
然后单击“Next”(下一步)。
5
在 Ready to Install(准备安装)窗口中,单击 Install(安装)。
6
在 Install Wizard Completed(安装向导完成)窗口中,单击 Finish
(完成)。
28
使用入门指南
访问 Server Administrator
在主机上,双击桌面上的 Server Administrator 图标可以本地访问 Server
Administrator。
要从位于同一网络中的客户机系统直接访问 Server Administrator,请打开
Internet Explorer 6.0 或更新版本,并连接 NAS 系统的安全端口 1311。
例如,键入:
https://DELL1234567:1311
其中,DELL1234567 是 NAS 系统的名称。
如果防火墙禁用了端口 1311,请使用以下过程设置例外,以使端口 1311
可用于 OpenManage。
1
单击 Start(开始),然后选择 Settings(设置)→ Control Panel
(控制面板)→ Windows Firewall(Windows 防火墙)。
2
单击 Exceptions(例外)选项卡。
3
单击 Add port(添加端口)。
4
在 Name(名称)字段中,键入 Dell OpenManage Server
Administrator。
5
在 Port number(端口号)字段中,键入 1311。
6
单击 OK(确定)。
7
如果出现提示,请重新启动防火墙服务。
将可信站点添加到您的浏览器
由于提高了 Microsoft 安全标准,因此当您初次访问互联网或内部网时,
系统可能会提示您将这些站点添加到可信站点区域。
要将可信站点添加到 Internet Explorer,请执行以下步骤:
1
在 Tools(工具)菜单中,单击 Internet Options(Internet 选项)。
屏幕将显示 Internet Options(Internet 选项)窗口。
2
单击 Security(安全)选项卡。
屏幕将显示 Security(安全)选项卡菜单。
3
单击 Trusted Sites(受信任的站点)。
屏幕将显示 Trusted sites(受信任的站点)选项。
4
单击 Sites(站点)。
屏幕将显示 Trusted sites(可信站点)窗口。
使用入门指南
29
5
在 Add this Web site to the zone:(将该网站添加到区域中:)字段
中,使用 https: 安全协议键入站点的地址,然后单击 Add(添加)。
该站点将出现在 Web sites:(网站:)框中。
6
重复步骤 5 添加任何其它的站点,然后单击 OK(确定)。
屏幕将显示 Internet Options(Internet 选项)窗口。
7
单击 OK(确定)。
更新系统
Server Update Utility CD 包含一个用于识别服务器和对服务器应用更新的
应用程序。也可以从 Dell 支持 Web 站点 support.dell.com 下载 Server
Update Utility(服务器更新公用程序,SUU)。有关详情,请参阅 Server
Update Utility User ’s Guide(《服务器更新公用程序用户指南》)。
要更新 Server Administrator 的单独组件,请使用组件特定的 Dell 更新软
件包,您可以在 Dell PowerEdge Updates CD 上找到该软件包。SUU 将当
前安装在 Dell PowerEdge NAS 系统上的组件版本与 Dell PowerEdge Updates
CD 中的更新组件进行比较。使用 SUU 查看版本比较报告,然后更新整
个系统。
更新 Microsoft Windows 软件
要更新 Windows Storage Server 2003 R2 × 64 Edition 操作系统,请参阅
Microsoft 支持网站 support.microsoft.com。Windows Server 2003 R2 × 64
Edition 的所有更新均适用于 Windows Storage Server 2003 R2 × 64。
您可能需要的其它说明文件
注意:《产品信息指南》,提供了重要的安全信息和管制信息。保修信
息可能包括在该说明文件中,也可能作为单独的说明文件提供。
•
随机架解决方案附带的《机架安装指南》或《机架安装说明》,
介绍了如何在机架中安装系统。
•
《管理员指南》,提供了有关完成系统配置过程的信息,并简要概
述了 Windows Storage Server 2003 R2 × 64 Edition 的功能。
•
重要信息说明文件,提供了最低硬件和软件要求及所有的已知问题。
•
系统的《用户指南》,提供了有关系统功能和技术规格的信息。
30
使用入门指南
•
系统管理软件说明文件,介绍了软件的功能、要求、安装和基本
操作。
•
操作系统说明文件,介绍了如何安装(如果有必要)、配置和使用
操作系统软件。
•
单独购买的任何组件所附带的说明文件,提供了有关配置和安装这
些选件的信息。
•
系统有时附带更新,用于说明对系统、软件和/或说明文件所做的
更改。
注:请始终先阅读这些更新,因为更新通常用于替代其它说明文件中的
信息。
•
系统可能附带版本注释或自述文件,以提供系统、说明文件的最新
更新,或者为有经验的用户或技术人员提供高级技术参考资料。
•
Server Update Utility User’s Guide(《服务器更新公用程序用户指
南》),说明了如何使用服务器更新公用程序来查看系统上的软件
版本和更新系统的软件。可以从 Dell 支持 Web 站点 support.dell.com
下载该指南。
使用入门指南
31
32
使用入门指南
Microsoft® Windows®
Storage Server 2003 R2
x64 Edition
入門指南
w w w. d e l l . c o m | s u p p o r t . d e l l . c o m
備註和注意
備註:「備註」指出可協助您善加利用電腦的重要資訊。
注意:「注意」表示可能會損壞硬體或導致資料遺失,
並告訴您如何避免此類問題的發生。
____________________
本文件中的資訊如有變更,恕不另行通知。
© 2006 Dell Inc. 版權所有。
未經 Dell Inc. 的書面許可,不准以任何形式進行複製。
本文件中使用的商標:Dell、DELL 標誌、PowerEdge 和 Dell OpenManage
為 Dell Inc. 的商標;Windows Server 為商標,而 Microsoft 和 Windows
為 Microsoft Corporation 的註冊商標。
本文件中述及的其他商標和商業名稱可能指擁有相應商標和名稱的公司
實體或其產品。Dell Inc. 對本公司之外的商標和產品名稱不擁有任何專
有權。
2006 年 2 月
P/N YH406
修訂版 A01
內容
簡介 .
. . . . . . . . . . . . . . . . . . . . . . . . . . . . . . . . .
輸入預設管理員使用者名稱和密碼
. . . . . . . . . .
38
. . . . . . . . . . . . . .
38
. . . . . . . . . . . . . . . . . . .
39
組態 NAS 系統的網路 IP 位址 .
設定系統進行網路存取
使用鍵盤、顯示器和滑鼠設定系統
變更管理員密碼 .
37
. . . . . . . . . .
40
. . . . . . . . . . . . . . . . . . . . . . . .
40
使用多語言使用者介面本土化系統
. . . . . . . . . .
啟動 Windows Storage Server 管理主控台 .
存取 Microsoft 管理主控台 .
在主機上從本機存取 MMC .
使用遠端桌面連線存取系統.
. . . . .
41
. . . . . . . . . . . . . . . .
41
. . . . . . . . . . . . . . . . . . .
. . . . . . . . . . . . . . . . . . .
安裝 Dell OpenManage Server Administrator
存取 Server Administrator. . . . . .
將「信任的網站」新增至瀏覽器 .
更新系統 . . . . . . . . . . . . . .
更新 Microsoft Windows 軟體 . . .
其他您可能需要的文件
41
. . . .
. . . . . . . . . . . . . . . .
. . . . . . . . . . . . . . . .
. . . . . . . . . . . . . . . .
. . . . . . . . . . . . . . . .
. . . . . . . . . . . . . . . . . . .
內容
42
42
43
44
45
45
46
46
35
36
內容
本文件概述 Microsoft® Windows® Storage Server 2003 R2 × 64 作業系統
以及關於在公司網路中設定、本土化和安裝 Dell™ PowerEdge™ Network
Attached Storage (NAS) 系統的資訊。
本文件提供關於下列主題的資訊:
•
作業系統概觀
•
輸入您的使用者名稱和密碼
•
設定網路 IP 位址
•
設定系統進行網路存取
•
使用鍵盤、顯示器和滑鼠設定系統
•
變更管理員密碼
•
使用多語言使用者介面 (MUI) 本土化系統
•
啟動 Windows Storage Server 管理主控台
•
存取 MUI
•
安裝 Dell OpenManage™ Server Administrator
簡介
Windows Storage Server 2003 R2 × 64 Edition 作業系統新增了搜尋功能、
簡化的設定和儲存管理、擴充性,並已專門調整為提供最佳的 NAS 效能。
Windows Storage Server 2003 R2 × 64 Edition 是本作業系統系列中的最新
版本,大大增強了儲存管理功能,並且簡化了安裝。
您的 PowerEdge NAS 系統已使用 Windows Storage Server 2003 R2 × 64
Edition 作業系統預先組態。大多數設定程序均已完成,無需使用者介入。
在系統第一次啟動時,Microsoft 迷你安裝程式即會開始安裝。安裝完成
時,系統自動重新啟動。迷你安裝程式完成安裝程序後,您可以從本機
或遠端存取伺服器。
下列各節詳述如何完成作業系統安裝程序。
備註:如果您的系統已使用軟體 RAID 5 預先組態,系統將執行 RAID 同
步以最佳化陣列。同步程序在背景中執行,執行期間可能會影響您的整
體系統效能。如果在該程序完成之前關閉了系統電源,則在系統加電時,
RAID 同步將重新開始,直到完成為止。
入門指南
37
更多資訊
如需 Windows Storage Server 2003 R2 × 64 Edition 作業系統的詳細資訊,
請參閱 Dell 支援網站 support.dell.com 上的 Microsoft Windows Storage
Server 2003 R2 × 64 Administrator’s Guide (Microsoft Windows Storage Server
2003 R2 × 64 管理員指南 )。
如需有關最小支援的 BIOS、韌體和 RAID 控制器版本,請參閱 Dell 支援
網站 www.dell.com/ostechsheets 上的 Microsoft Windows Storage Server 2003
R2 × 64 Important Information (Windows Storage Server 2003 R2 × 64 重要
資訊 ) 文件。
輸入預設管理員使用者名稱和密碼
在第一次登入 NAS 系統時,必須輸入管理員使用者名稱和密碼。
NAS 系統的預設管理員使用者名稱為 administrator,預設密碼為
storageserver。
組態 NAS 系統的網路 IP 位址
如果您的網路上有 DHCP 伺服器,則無需組態 NAS 系統的 IP 位址,
因為 DHCP 會自動指定位址給 NAS 系統。如果您的網路未使用 DHCP
伺服器組態,請透過 Network Configuration ( 網路組態 ) 視窗組態 NAS
系統的 IP 位址。
要存取 Network Configuration ( 網路組態 ) 視窗,請按一下 Start ( 開始 )
並選擇 Settings ( 設定 ) → Control Panel ( 控制台 ) → Network
Configuration ( 網路組態 )。
備註:如果您的網路上沒有 DHCP 伺服器,則需要本機鍵盤、顯示器和
滑鼠來完成 NAS 組態。請參閱「使用鍵盤、顯示器和滑鼠設定系統」
以獲得更多資訊。
備註:Windows 防火牆預設為啟用。在存取遠端系統時,您可能會遇到
連接性問題。
38
入門指南
設定系統進行網路存取
1 如果 NAS 系統電源已開啟,請關閉。
2 將 Ethernet 電纜的一端連接至 NAS 系統背面的一個 10/100/1000 RJ-45
NIC 連接器 (請參見圖 1-1)。
如需系統連接器位置的詳細資訊,請參閱 NAS 系統的使用者指南。
3 將 Ethernet 電纜的另一端連接至運作中的 Ethernet 插座。
4 按電源按鈕以開啟 NAS 系統。
5 可透過觀察與 NIC 關聯的 LED 是否亮起來確認伺服器是否連接至
Ethernet。請參見圖 1-1。如果 NIC 連接器的 LED 呈綠色持續亮起,
則表明連接狀況良好。如果 NIC 連接器的 LED 呈琥珀色閃爍,
則表明資料正在順利傳送。
如果 LED 未亮起,請檢查 Ethernet 電纜的各端是否正確穩定地連
接至 NIC 連接器和 Ethernet 插座。
NAS 系統將從網路上的 DHCP 伺服器擷取所需的資訊來設定網路參
數 (IP 位址、閘道子網路遮罩和 DNS 伺服器位址 )。
備註: NAS 系統啟動可能需要幾分鐘,視您的組態和系統安裝的儲
存容量而定。
圖 1-1. NIC 連接器
NIC 1 LED
NIC 2 LED
NIC 1
NIC 2
入門指南
39
使用鍵盤、顯示器和滑鼠設定系統
備註:視您的組態方法而定,可能需要進行本機 KVM 連接才能完成安裝
和組態程序。如果遠端系統可以完成組態程序,則無需本機 KVM 連接即
可進行操作。
1 將鍵盤、顯示器和滑鼠連接至 NAS 系統。
如需系統連接器的資訊,請參閱系統的使用者指南。
2 按電源按鈕以開啟 NAS 系統。
3 登入 NAS 系統。
備註: 預設管理員使用者名稱為 administrator,預設密碼為
storageserver。
變更管理員密碼
1 按一下 Start (開始) 並選擇 Administrative Tools (管理工具)→ Computer
Management (電腦管理)。
2 在 Computer Management (電腦管理) 視窗的 Computer Management
(Local) (電腦管理(本機)) 樹中,展開 Local Users and Groups (本機
使用者和群組) 並選擇 Users (使用者)。
3 在右窗格中,用滑鼠右鍵按一下 Administrator (管理員) 並選擇
Set Password (設定密碼)。
4 在 Set Password for Administrator (設定管理員密碼) 視窗中,按一下
Proceed (繼續)。
5 在對應的欄位中輸入並確認您的密碼,然後按一下 OK (確定)。
6 關閉 Computer Management (電腦管理) 視窗。
40
入門指南
使用多語言使用者介面本土化系統
NAS 系統允許您變更作業系統使用者介面的原始語言。系統預設安裝有
許多語言。多語言使用者介面 (MUI) 允許 NAS 系統以多種語言顯示作業
系統功能表、對話方塊和說明檔案。
如果您的系統已經使用 Windows Storage Server 2003 R2 × 64 Edition 作業
系統預先組態,則 MUI 的區域設定和瀏覽器設定將會用本土化的語言預
先組態。而無需使用者介入。
若要變更預設的瀏覽器語言,請:
1 開啟 Internet Explorer 瀏覽器。
2 在工具功能表中,選擇網際網路選項。
3 在一般標籤中,按一下語言。
4 在語言喜好設定視窗中,按一下新增。
5 在語言方塊中,選擇一種語言。
6 按一下確定。
啟動 Windows Storage Server 管理主控台
Windows Storage Server 管理主控台將出現在 Microsoft 管理主控台 (MMC)
中,提供簡便的系統管理方法。該管理主控台在您登入 Windows Storage
Server 2003 R2 × 64 作業系統時自動開啟。
若要開啟 Windows Storage Server 管理主控台,請按一下開始並選擇所有
程式 → Windows Storage Server 管理。
在 Management Console ( 管理主控台 ) 視窗中,左窗格顯示 File Server
Management (Local) ( 檔案伺服器管理 ( 本機 )) 節點作為預設節點。
中央窗格提供協助您管理作業系統的可選情景。
存取 Microsoft 管理主控台
MMC 預設組態為 Microsoft 開始功能表的一部份。MMC 可用於磁碟管
理、組態 NFS 以及用作一般的 NAS 管理站。請參閱系統隨附的 Microsoft
MMC 文件以獲得更多資訊。
利用 MMC,可藉下列任一方法組態您的儲存系統:
•
在主機上從本機存取 MMC
•
使用遠端桌面連線從遠端存取 MMC
入門指南
41
在主機上從本機存取 MMC
MMC 在主機上顯示為開始功能表中的一個可選項目。如果 MMC 在啟動
後沒有顯示在開始功能表中,請執行下列步驟:
1 按一下開始,然後選擇執行。
2 在開啟欄位中,鍵入下列內容,然後按一下確定:
nas.msc
備註:nas.msc 檔案位於 c:\windows\system32。
使用遠端桌面連線存取系統
使用遠端桌面連線進行遠端伺服器管理可以降低與遠端管理相關的費用。
「用於管理的遠端桌面」由終端機服務技術支援,專門設計用於伺服器
管理。
「用於管理的遠端桌面」不需要特殊的用戶端系統授權即可存取伺服器。
此外,在使用「用於管理的遠端桌面」時,也無需安裝終端機伺服器授權。
安裝遠端桌面連線之後,管理員亦可從早期版本的 Windows 系統完全管
理執行 Windows Storage Server 2003 R2 × 64 Edition 的電腦。
備註:若要從遠端系統連接至「用於管理的遠端桌面」,請使用遠端桌
面連線。
建立並儲存遠端桌面連線至桌面
若要建立並儲存遠端桌面連線至 Windows Storage Server 2003
R2 × 64 Edition,請執行下列步驟:
1 按一下開始,然後選擇執行。
2 在開啟欄位中,鍵入下列內容,然後按一下確定:
mstsc
螢幕上將會出現 Remote Desktop Connection ( 遠端桌面連線 ) 視窗。
3 在 Computer (電腦) 欄位中,鍵入儲存伺服器的電腦名稱或 IP 位址,
然後按一下 Options (選項)。
4 在 Remote Desktop Connection (遠端桌面連線) 視窗的 Connection
settings (連線設定) 方塊中,中,按一下 Save As (另存新檔)。
5 在 Save As (另存新檔) 視窗的 File name (檔案名稱) 欄位中,
鍵入連線的名稱,要包括預設的 .rdp 副檔名。
42
入門指南
6 在 Save in (儲存位置) 下拉功能表中,選擇 Desktop (桌面),
然後按一下 Save (儲存檔案)。
您的連線即會儲存至桌面。
如需有關設定遠端桌面連線的詳細資訊,請在 Remote Desktop Connection
( 遠端桌面連線 ) 視窗中按一下 Help ( 說明 )。
安裝 Dell OpenManage Server Administrator
Dell OpenManage Server Administrator 透過作業系統使用整合式、基於 Web
瀏覽器的介面 (Server Administrator 首頁 ) 或指令行介面 (CLI) 提供全面
的一對一管理解決方案。
Server Administrator 可讓您從本機和遠端管理網路上的 NAS 系統,
以及透過全面的一對一管理來集中管理整個網路。
備註:為了使用 Server Administrator,「系統」可以是獨立的系統、將
Network Attached Storage 單元安裝於獨立機殼的伺服器、或在機殼中包
括一或多個伺服器模組的模組化系統。
請參閱您的 Server Administrator 文件以獲得更多資訊。
安裝 Server Administrator
Dell 安裝與伺服器管理 CD 提供安裝程式,用以安裝、升級和解除安裝
Server Administrator 以及受管理系統上的其他受管理系統軟體元件。
您也可以透過自動網路安裝在多個系統上安裝 Server Administrator。
使用 Dell 安裝與伺服器管理 CD 上的安裝程式,您可以在所有支援的
Windows Storage Server 2003 R2 × 64 Editions 作業系統上安裝和升級 Server
Administrator。
若要安裝 Server Administrator,請執行下列步驟:
1 將 Dell 安裝與伺服器管理 CD 插入系統的光碟機。
該 CD 將自動載入,並且螢幕上出現 Server Administrator Installer
( 伺服器管理員安裝程式 ) 視窗。
2 按一下 Install, Modify, Repair or Remove Server Administrator
(安裝、修改、修復或移除伺服器管理員)。
3 在 License Agreement (授權合約) 視窗中,閱讀並理解合約,
然後按一下 Next (下一步)。
入門指南
43
4 在 Setup Type (安裝類型) 視窗中,選擇適合您的組態的安裝類型,
然後按一下 Next (下一步)。
5 在 Ready to Install (準備安裝) 視窗中,按一下 Install (安裝)。
6 在 Install Wizard Completed (安裝精靈完成) 視窗中,按一下 Finish
(完成)。
存取 Server Administrator
您可以連按兩下桌面的 Server Administrator ( 伺服器管理員 ) 圖示,
透過主機從本機存取 Server Administrator。
若要直接從同一網路的用戶端系統存取 Server Administrator,請開啟 Internet
Explorer 6.0 或更新版本,然後連接至 NAS 系統的安全連接埠 1311。
例如,鍵入:
https://DELL1234567:1311
其中 DELL1234567 為 NAS 系統的名稱。
如果連接埠 1311 已被防火牆停用,請使用下列程序設定例外以啟用連接
埠 1311 供 OpenManage 使用。
1 按一下開始,選擇設定→ 控制台→ Windows 防火牆。
2 按一下 Exceptions (例外) 標籤。
3 按一下 Add port (新增連接埠)。
4 在 Name (名稱) 欄位中鍵入 Dell OpenManage Server
Administrator。
5 在 Port number (連接埠號碼) 欄位中鍵入 1311。
6 按一下 OK (確定)。
7 如果出現提示,請重新啟動防火牆服務。
44
入門指南
將「信任的網站」新增至瀏覽器
由於 Microsoft 安全保護標準的提高,在您開始存取網站時,系統可能會
提示您將網際網路或公司內部網站新增至信任的網站區域。
若要將信任的網站新增至 Internet Explorer,請執行下列步驟:
1 在工具功能表中,按一下網際網路選項。
螢幕上將會出現網際網路選項視窗。
2 按一下安全性標籤。
螢幕上將會出現安全性標籤功能表。
3 按一下信任的網站。
螢幕上將會出現信任的網站選項。
4 按一下網站。
螢幕上將會出現信任的網站視窗。
5 在將此網站加到該區域:欄位中,鍵入網址,使用 https: 安全通訊
協定,然後按一下新增。
該網站將出現在網站:方塊中。
6 重複步驟 5 以新增任何其他網站,然後按一下確定。
螢幕上將會出現網際網路選項視窗。
7 按一下確定。
更新系統
Server Update Utility ( 伺服器更新公用程式 ) CD 包含用於辨識和套用更
新至伺服器的應用程式。Server Update Utility (SUU) 亦可從 Dell 支援網
站 support.dell.com 下載。請參閱 Server Update Utility User’s Guide
( 伺服器更新公用程式使用者指南 ) 以獲得更多資訊。
若要更新個別 Server Administrator 元件,請使用元件特定的 Dell 更新套
件,這些套件可在 Dell PowerEdge Updates (Dell PowerEdge 更新 ) CD 中找
到。SUU 會將您 Dell PowerEdge NAS 系統上目前安裝的元件版本與 Dell
PowerEdge Updates CD 上封裝的更新元件進行比較。請使用 SUU 檢視比
較報告和更新整個系統。
入門指南
45
更新 Microsoft Windows 軟體
若要更新 Windows Storage Server 2003 R2 × 64 Edition 作業系統,請參閱
Microsoft 支援網站 support.microsoft.com。所有 Windows Server 2003
R2 × 64 Editions 更新均適用於 Windows Storage Server 2003 R2 × 64。
其他您可能需要的文件
注意:產品資訊指南提供重要的安全與管制資訊。保固資訊包含於此文
件或以單獨文件附加。
•
機架安裝指南或機架安裝說明隨附於機架解決方案,說明如何將系
統安裝於機架中。
•
管理員指南提供在系統上完成組態程序的資訊,並概述 Windows
Storage Server 2003 R2 × 64 Edition 的功能。
•
重要資訊文件提供最低的硬體及軟體要求,並列出所有已知的問題。
•
系統的使用者指南提供有關系統功能和技術規格的資訊。
•
系統管理軟體說明文件說明軟體的功能、要求、安裝和基本操作。
•
作業系統說明文件說明如何安裝 ( 如有必要 )、組態和使用作業系統
軟體。
•
您單獨採購的任何元件之說明文件提供這些選件的組態和安裝資訊。
•
有時候更新會包含在系統中以描述系統、軟體和/或說明文件的變更。
備註:請務必先閱讀更新內容,因為它們經常在其他文件中更新資訊。
•
可能會隨附附註說明或讀我檔案以提供最新的系統更新、說明文件
或進階的技術參考資料以供有經驗的使用者或技術人員使用。
•
伺服器更新公用程式使用者指南說明如何使用伺服器更新公用程式
檢視系統上的軟體版本和更新系統軟體。該公用程式可從 Dell 支援
網站 support.dell.com 下載。
46
入門指南
Microsoft® Windows®
Storage Server 2003 R2
x64 Edition
Guide de mise en route
w w w. d e l l . c o m | s u p p o r t . d e l l . c o m
Remarques et avis
REMARQUE : une REMARQUE indique des informations
importantes qui peuvent vous aider à mieux utiliser votre
ordinateur.
AVIS : un AVIS vous avertit d'un risque de dommage matériel
ou de perte de données et vous indique comment éviter le
problème.
____________________
Les informations contenues dans ce document peuvent être modifiées
sans préavis.
© 2006 Dell Inc. Tous droits réservés.
La reproduction de ce document de quelque manière que ce soit sans
l'autorisation écrite de Dell Inc. est strictement interdite.
Marques utilisées dans ce document : Dell, le logo DELL, PowerEdge et Dell
OpenManage sont des marques de Dell Inc. ; Windows Server est une marque
de Microsoft Corporation ; Microsoft et Windows sont des marques déposées de
Microsoft Corporation.
Tous les autres noms de marques et marques commerciales utilisés dans ce
document se rapportent aux sociétés propriétaires des marques et des noms de
ces produits. Dell Inc. décline tout intérêt dans l'utilisation des marques déposées
et des noms de marques ne lui appartenant pas.
Février 2006
P/N YH406
Rev. A01
Sommaire
Présentation
. . . . . . . . . . . . . . . . . . . . . . . . . . . .
51
Saisie du nom d'utilisateur et du mot de passe
par défaut de l'administrateur .
. . . . . . . . . . . . . . .
52
Configuration de l'adresse IP réseau
pour le système NAS
. . . . . . . . . . . . . . . . . . . . . .
53
Configuration du système pour l'accès
au réseau
. . . . . . . . . . . . . . . . . . . . . . . . . . . . . .
53
Configuration du système à l'aide d'un clavier,
d'un moniteur et d'une souris
. . . . . . . . . . . . . . . .
55
. . . .
55
. . . . . . . . . . . . . . . . . . . . . . . .
56
Modification du mot de passe administrateur .
Changement de langue à l'aide de l'interface
multilingue (MUI) .
Démarrage de la console Windows Storage
Server Management .
. . . . . . . . . . . . . . . . . . . . . .
Accès à la console MMC
. . . . . . . . . . . . . . . . . . .
Accès à la console MMC en local sur l'hôte . . . . . . . .
Accès au système via une connexion au bureau à distance
. . . .
. . . .
Sommaire
56
57
57
57
49
Installation de Dell OpenManage
Server Administrator .
. . . . . . . . . . . . . . . . . . . . . .
Accès à Server Administrator . . . . . .
Ajout de sites de confiance au navigateur
Mise à jour du système . . . . . . . . . .
Mise à jour de Microsoft Windows . . . .
Autres documents utiles
50
Sommaire
59
. . . . . . . . . . . . .
60
61
62
62
. . . . . . . . . . . . . . . . . . . .
62
. . . . . . . . . . . . .
. . . . . . . . . . . . .
. . . . . . . . . . . . .
Ce document présente le système d'exploitation Microsoft® Windows®
Storage Server 2003 R2 x64. Il indique comment configurer et installer
un système Dell™ PowerEdge™ Network Attached Storage (NAS) sur
un réseau d'entreprise, et contient les instructions requises pour changer
la langue de l'interface utilisateur.
Les sujets traités sont les suivants :
•
Présentation du système d'exploitation
•
Saisie du nom d'utilisateur et du mot de passe
•
Configuration de l'adresse IP réseau
•
Configuration du système pour l'accès au réseau
•
Configuration du système à l'aide d'un clavier, d'un moniteur
et d'une souris
•
Modification du mot de passe administrateur
•
Changement de langue à l'aide de l'interface multilingue (MUI)
•
Démarrage de la console Windows Storage Server Management
•
Accès à l'interface MUI
•
Installation de Dell OpenManage™ Server Administrator
Présentation
Le système d'exploitation Windows Storage Server 2003 R2 x64 Edition
inclut de nouvelles fonctions de recherche et simplifie la gestion du
stockage et de la configuration. Évolutif, il a été conçu spécialement
pour optimiser les performances des systèmes de stockage réseau (NAS).
Dernier-né de cette famille de systèmes d'exploitation, Windows Storage
Server 2003 R2 x64 Edition apporte des améliorations notables en termes
de gestion du stockage et de facilité d'installation.
Windows Storage Server 2003 R2 x64 Edition a été pré-installé sur votre
système NAS PowerEdge. La plupart des procédures de configuration ont
déjà été effectuées et ne requièrent aucune intervention de l'utilisateur.
La mini-installation Microsoft est lancée au premier démarrage du
système. Lorsqu'elle est terminée, le système redémarre automatiquement. Vous pouvez alors accéder au serveur en local ou à distance.
Guide de mise en route
51
Les sections suivantes fournissent des informations sur les procédures
d'installation du système d'exploitation.
REMARQUE : si le système a été pré-configuré en RAID logiciel de niveau 5,
il lance une synchronisation RAID pour optimiser la matrice. Ce processus
s'exécute en arrière-plan et peut affecter les performances générales du
système tant qu'il n'est pas terminé. Si le système est mis hors tension
prématurément, la synchronisation RAID recommence à la prochaine mise
sous tension, jusqu'à ce qu'elle puisse se terminer.
Informations supplémentaires
Pour plus d'informations sur Windows Storage Server 2003 R2 x64
Edition, consultez le document Microsoft Windows Storage Server 2003
R2 x64 Administrator's Guide (Guide de l'administrateur Microsoft
Windows Storage Server 2003 R2 x64), qui se trouve sur le site de support
technique support.dell.com.
Consultez le document Microsoft Windows Storage Server 2003 R2 x64
Important Information (Informations importantes concernant Microsoft
Windows Storage Server 2003 R2 x64) pour plus d'informations sur les
versions minimales prises en charge pour le BIOS, le micrologiciel et
les contrôleurs RAID. Ce document est disponible sur le site
www.dell.com/ostechsheets.
Saisie du nom d'utilisateur et du mot de passe
par défaut de l'administrateur
Lorsque vous vous connectez au système NAS pour la première fois, vous
devez entrer un nom d'utilisateur pour l'administrateur, ainsi qu'un mot
de passe. Par défaut, le nom d'administrateur est administrator et
le mot de passe storageserver.
52
Guide de mise en route
Configuration de l'adresse IP réseau
pour le système NAS
Si votre réseau contient un serveur DHCP, il est inutile de configurer
l'adresse IP du système NAS (le protocole DHCP attribue cette adresse
automatiquement). Dans le cas contraire, configurez l'adresse IP du
système NAS via la fenêtre Configuration du réseau.
Pour accéder à cette dernière, cliquez sur Démarrer et sélectionnez
Paramètres→ Panneau de configuration→ Configuration du réseau.
REMARQUE : si le réseau n'est équipé d'aucun serveur DHCP, vous devez
disposer d'un clavier, d'un moniteur et d'une souris sur le système local pour
procéder à la configuration du système NAS. Voir “Configuration du système à
l'aide d'un clavier, d'un moniteur et d'une souris” pour obtenir des informations
supplémentaires.
REMARQUE : le pare-feu Windows est activé par défaut. Il est donc possible
que vous soyez confronté à des problèmes de connectivité lors de l'accès
au système distant.
Configuration du système pour l'accès
au réseau
1 Si le système NAS est sous tension, éteignez-le.
2 Connectez l'extrémité d'un câble Ethernet à l'un des connecteurs de
NIC 10/100/1000 RJ-45 (voir la figure 1-1) situés à l'arrière du système
NAS.
Pour plus d'informations sur l'emplacement de ces connecteurs,
reportez-vous au Guide d'utilisation du système NAS.
3 Connectez l'autre extrémité du câble Ethernet à une prise Ethernet.
4 Appuyez sur le bouton d'alimentation pour mettre le système NAS
sous tension.
Guide de mise en route
53
5 Vérifiez que le serveur est connecté à Ethernet. Pour ce faire, vérifiez
que le voyant associé au connecteur du NIC est allumé. Voir la
figure 1-1. Si ce voyant est vert fixe, la connexion est de bonne qualité.
S'il clignote en orange, des données sont en cours de transfert.
Si le voyant est éteint, vérifiez que chaque extrémité du câble Ethernet
est correctement insérée dans le connecteur de NIC et dans la prise
Ethernet.
Le système NAS obtient du serveur DHCP les informations permettant de définir les paramètres réseau (adresse IP, passerelle, masque
de sous-réseau et adresse du serveur DNS).
REMARQUE : le démarrage du système NAS peut prendre quelques
minutes. Ce délai varie selon la configuration utilisée et le nombre de
ressources de stockage connectées au système.
Figure 1-1.
Connecteur de NIC
Voyant du NIC 1
Voyant du NIC 2
NIC 1
NIC 2
54
Guide de mise en route
Configuration du système à l'aide d'un clavier,
d'un moniteur et d'une souris
REMARQUE : selon la méthode de configuration utilisée, vous devrez
peut-être utiliser des connexions KVM locales pour effectuer les procédures
d'installation et de configuration. Ces connexions ne sont pas nécessaires
si la configuration peut être effectuée à partir du système distant.
1 Connectez un clavier, un moniteur et une souris au système NAS.
Pour plus d'informations sur les connecteurs du système, consultez
le Guide d'utilisation.
2 Appuyez sur le bouton d'alimentation pour mettre le système NAS
sous tension.
3 Connectez-vous au système NAS.
REMARQUE : le nom d'utilisateur par défaut de l'administrateur est
administrator. Le mot de passe par défaut est storageserver.
Modification du mot de passe administrateur
1 Cliquez sur Démarrer et sélectionnez Outils d'administration →
Gestion de l'ordinateur.
2 Dans l'arborescence Gestion de l'ordinateur (Local) de la fenêtre
Gestion de l'ordinateur, développez Utilisateurs et groupes locaux
puis sélectionnez Utilisateurs.
3 Dans le volet de droite, cliquez avec le bouton droit sur Administrateur
et sélectionnez Définir le mot de passe.
4 Dans la fenêtre Définir le mot de passe Administrateur, cliquez sur
Continuer.
5 Saisissez puis confirmez le mot de passe dans les champs appropriés,
puis cliquez sur OK.
6 Fermez la fenêtre Gestion de l'ordinateur.
Guide de mise en route
55
Changement de langue à l'aide de l'interface
multilingue (MUI)
Le système NAS permet de changer la langue de l'interface utilisateur
du système d'exploitation. Par défaut, plusieurs langues sont installées.
L'interface MUI permet d'afficher les menus, boîtes de dialogue et fichiers
d'aide du système d'exploitation dans plusieurs langues.
Si le système a été pré-configuré avec Windows Storage Server 2003
R2 x64 Edition, l'interface MUI est configurée pour prendre en compte
votre langue dans les paramètres régionaux et dans le navigateur.
Aucune intervention de l'utilisateur n'est requise.
Pour changer la langue par défaut du navigateur, procédez comme suit :
1 Ouvrez Internet Explorer.
2 Dans le menu Outils, sélectionnez Options Internet.
3 Dans l'onglet Général, cliquez sur Langues.
4 Dans la fenêtre Langues, cliquez sur Ajouter.
5 Dans la zone Langue, sélectionnez une langue.
6 Cliquez sur OK.
Démarrage de la console Windows Storage
Server Management
La console Windows Storage Server Management s'affiche dans la console
MMC (Microsoft Management Console) et simplifie l'administration du
système. Elle s'ouvre automatiquement lorsque vous vous connectez à
Windows Storage Server 2003 R2 x64.
Pour ouvrir la console Windows Storage Server Management, cliquez
sur Démarrer et sélectionnez Tous les programmes→ Windows Storage
Server Management.
Le noeud par défaut affiché dans la fenêtre Management Console est
Gestion de serveur de fichiers (Local). Le volet central affiche plusieurs
scénarios que vous pouvez sélectionner pour bénéficier d'une assistance
lors des opérations liées à l'administration du système d'exploitation.
56
Guide de mise en route
Accès à la console MMC
Par défaut, la console MMC figure parmi les options du menu Démarrer.
Elle peut être utilisée pour configurer le système de fichiers réseau (NFS)
et gérer les disques ou le système NAS. Pour plus d'informations,
consultez la documentation concernant la console MMC fournie
avec le système.
La console MMC permet de configurer le stockage via l'une des méthodes
suivantes :
•
Accès à la console MMC en local sur l'hôte
•
Accès à la console MMC via une connexion au bureau à distance
Accès à la console MMC en local sur l'hôte
La console MMC doit normalement figurer parmi les options du menu
Démarrer. Si tel n'est pas le cas, procédez comme suit :
1 Cliquez sur Démarrer et sélectionnez Exécuter.
2 Dans le champ Ouvrir, tapez la commande suivante et cliquez sur OK :
nas.msc
REMARQUE : le fichier nas.msc se trouve dans le répertoire
c:\windows\system32.
Accès au système via une connexion au bureau à distance
La gestion du serveur via la fonction Connexion au bureau à distance
permet d'alléger la charge liée à l'administration à distance. La fonction
Bureau à distance pour administration est activée par la technologie
Terminal Services et spécialement conçue pour la gestion des serveurs.
Aucune licence spéciale n'est requise pour les clients qui accèdent au
serveur, et il n'est pas nécessaire d'installer la gestion de licences
Terminal Server.
La connexion au bureau à distance permet également aux administrateurs
de gérer intégralement les systèmes Windows Storage Server 2003 R2 x64
Edition à partir d'ordinateurs équipés de versions antérieures de Windows.
REMARQUE : pour vous connecter à la fonction Bureau à distance pour
administration à partir d'un système distant, utilisez la connexion au bureau
à distance.
Guide de mise en route
57
Création d'une connexion au bureau à distance et ajout d'une icône
sur le bureau
Pour créer et enregistrer une connexion au bureau à distance vers
un système Windows Storage Server 2003 R2 x64 Edition, procédez
comme suit :
1 Cliquez sur Démarrer et sélectionnez Exécuter.
2 Dans le champ Ouvrir, tapez la commande suivante et cliquez sur OK.
mstsc
La fenêtre Connexion Bureau à distance s'affiche.
3 Dans le champ Ordinateur, entrez le nom ou l'adresse IP du serveur
de stockage, puis cliquez sur Options.
4 Dans la zone Paramètres de connexion de la fenêtre Connexion
Bureau à distance, cliquez sur Enregistrer sous.
5 Dans le champ Nom de fichier de la fenêtre Enregistrer sous, saisissez
un nom pour la connexion en conservant l'extension par défaut .rdp.
6 Dans le menu déroulant Enregistrer dans, sélectionnez Bureau
puis cliquez sur OK.
La connexion est enregistrée sur le bureau.
Pour plus d'informations sur la configuration de la connexion au bureau
à distance, cliquez sur Aide dans la fenêtre Connexion Bureau à distance.
58
Guide de mise en route
Installation de Dell OpenManage Server
Administrator
Dell OpenManage Server Administrator fournit une solution de gestion
de systèmes individuels complète, qui peut être utilisée via une interface
intégrée de type navigateur Web (page d'accueil de Server Administrator)
ou au moyen de l'interface CLI du système d'exploitation.
Ses fonctions d'administration permettent de gérer des systèmes NAS
individuellement sur un réseau, en local ou à distance, et de se concentrer
sur la gestion du réseau dans son ensemble.
REMARQUE : dans le cadre de l'utilisation de Server Administrator, le terme
“système” peut désigner un système autonome, un serveur connecté à des
unités NAS dans un châssis distinct, ou bien un système modulaire constitué
d'un châssis contenant un ou plusieurs modules serveurs.
Pour plus de détails, reportez-vous à la documentation de Server
Administrator.
Installation de Server Administrator
Le CD Dell Installation and Server Management contient un programme
de configuration qui permet d'installer, de mettre à niveau et de désinstaller Server Administrator, ainsi que d'autres composants logiciels du
système géré. Vous pouvez également installer Server Administrator
automatiquement sur plusieurs systèmes du réseau.
Le programme de configuration fourni sur le CD Dell Installation and
Server Management permet d'installer Server Administrator et de le mettre
à niveau sur tout système équipé d'une version prise en charge de
Windows Storage Server 2003 R2 x64 Edition.
Pour installer Server Administrator, procédez comme suit :
1 Insérez le CD Dell Installation and Server Management dans le lecteur.
Le CD démarre automatiquement et la fenêtre Server Administrator
Installer (Programme d'installation de Server Administrator) s'affiche.
2 Cliquez sur Install, Modify, Repair or Remove Server Administrator
(Installer, modifier, réparer ou supprimer Server Administrator).
3 Dans la fenêtre License Agreement (Contrat de licence),
prenez connaissance du contrat et cliquez sur Next (Suivant).
Guide de mise en route
59
4 Dans la fenêtre Setup Type (Type de configuration), sélectionnez
le type de configuration souhaité puis cliquez sur Next.
5 Dans la fenêtre Ready to Install (Prêt pour l'installation), cliquez
sur Install (Installer).
6 Dans la fenêtre Install Wizard Completed (Assistant d'installation
terminé), cliquez sur Finish (Terminer).
Accès à Server Administrator
Vous pouvez accéder à Server Administrator en local sur le système hôte.
Pour ce faire, cliquez deux fois sur l'icône Server Administrator du bureau.
Pour accéder directement à Server Administrator à partir d'un système
client connecté au même réseau, ouvrez Internet Explorer 6.0 (ou version
suivante) puis connectez-vous au port sécurisé (1311) du système NAS.
Par exemple, tapez :
https://DELL1234567:1311
où DELL1234567 est le nom du système NAS.
Si le port 1311 est désactivé par le pare-feu, utilisez la procédure suivante
pour définir une exception afin d'activer ce port pour l'utilisation
d'OpenManage.
1 Cliquez sur Démarrer et sélectionnez Paramètres→ Panneau
de configuration→ Pare-feu Windows.
2 Cliquez sur l'onglet Exceptions.
3 Cliquez sur Ajouter un port.
4 Tapez Dell OpenManage Server Administrator
dans le champ Nom.
5 Tapez 1311 dans le champ Numéro du port.
6 Cliquez sur OK.
7 Si un message vous y invite, redémarrez le service de pare-feu.
60
Guide de mise en route
Ajout de sites de confiance au navigateur
Microsoft ayant renforcé ses normes de sécurité, vous serez probablement
invité à ajouter un site Internet ou intranet auquel vous accédez pour la
première fois à la zone des sites de confiance.
Pour ajouter des sites de confiance à Internet Explorer, procédez
comme suit :
1 Dans le menu Outils, cliquez sur Options Internet.
La fenêtre Options Internet s'affiche.
2 Cliquez sur l'onglet Sécurité.
Le menu correspondant s'affiche.
3 Cliquez sur Sites de confiance.
L'option Sites de confiance s'affiche.
4 Cliquez sur Sites.
La fenêtre Sites de confiance s'affiche.
5 Dans le champ Ajouter ce site Web à cette zone, tapez l'adresse du site
en utilisant le protocole de sécurité https:, puis cliquez sur Ajouter.
Le site s'affiche dans la zone Sites Web.
6 Recommencez l'étape 5 pour ajouter des sites supplémentaires,
puis cliquez sur OK.
La fenêtre Options Internet s'affiche.
7 Cliquez sur OK.
Guide de mise en route
61
Mise à jour du système
Le CD Server Update Utility contient une application permettant
d'identifier les mises à jour et de les appliquer au serveur. Cet utilitaire
(Server Update Utility, ou SUU) peut également être téléchargé à partir
du site support.dell.com. Pour plus d'informations, consultez le document
Server Update Utility User's Guide (Guide d'utilisation de Server Update
Utility).
Pour mettre à jour uniquement certains composants de Server
Administrator, utilisez les progiciels de mise à jour Dell appropriés
disponibles sur le CD Dell PowerEdge Updates. SUU compare les versions
des composants installés sur le système Dell PowerEdge NAS avec celles
du CD Dell PowerEdge Updates. Il permet d'afficher un rapport
comparatif de ces versions et de mettre à jour la totalité du système.
Mise à jour de Microsoft Windows
Pour mettre à jour le système d'exploitation Windows Storage Server 2003
R2 x64 Edition, consultez le site Web de support technique de Microsoft,
support.microsoft.com. Toutes les mises à jour des éditions de Windows
Server™ 2003 R2 x64 s'appliquent à Windows Storage Server 2003 R2 x64.
Autres documents utiles
AVIS : le Guide d'informations sur le produit contient d'importantes informations se rapportant à la sécurité et aux réglementations. Les informations sur
la garantie se trouvent soit dans ce document, soit à part.
•
Le document Instructions d'installation du rack ou le Guide
d'installation du rack fournis avec la solution rack décrivent
l'installation du système.
•
Le document Guide de l'administrateur (Guide de l'administrateur)
contient des informations relatives aux procédures de configuration
du système, ainsi qu'une présentation générale des fonctions de
Windows Storage Server 2003 R2 x64 Edition.
•
Le document Informations importantes présente la configuration
minimale requise sur le plan matériel et logiciel, et répertorie
tous les incidents recensés.
62
Guide de mise en route
•
Le Guide d'utilisation fournit des informations sur les fonctions et
spécifications techniques du système.
•
La documentation du logiciel de gestion de systèmes comprend des
renseignements sur les fonctionnalités, les spécifications, l'installation
et le fonctionnement de base du logiciel.
•
La documentation du système d'exploitation décrit comment installer
(au besoin), configurer et utiliser le système d'exploitation.
•
La documentation fournie avec les composants achetés séparément
contient des informations permettant de configurer et d'installer ces
options.
•
Des mises à jour sont parfois fournies avec le système. Elles décrivent
les modifications apportées au système, aux logiciels ou à la
documentation.
REMARQUE : lisez toujours les mises à jour en premier car elles remplacent
souvent les informations contenues dans les autres documents.
•
Des notes de version ou des fichiers lisez-moi (readme) sont parfois
fournis ; ils contiennent des mises à jour de dernière minute apportées
au système ou à la documentation, ou des documents de référence
technique avancés destinés aux utilisateurs expérimentés ou aux
techniciens.
•
Le document Server Update Utility User's Guide (Guide d'utilisation
de Server Update Utility) explique comment utiliser SUU pour
afficher les versions de logiciels installées sur le système et les mettre
à jour. Il peut être téléchargé à partir du site support.dell.com.
Guide de mise en route
63
64
Guide de mise en route
Microsoft Windows
Storage Server 2003 R2
x64 Edition
Erste Schritte
w w w. d e l l . c o m | s u p p o r t . d e l l . c o m
Anmerkungen und Hinweise
ANMERKUNG: Eine ANMERKUNG macht auf wichtige
Informationen aufmerksam, die die Arbeit mit dem Computer
erleichtern.
HINWEIS: Ein HINWEIS warnt vor möglichen Beschädigungen
der Hardware oder vor Datenverlust und zeigt auf, wie derartige
Probleme vermieden werden können.
____________________
Irrtümer und technische Änderungen vorbehalten.
© 2006 Dell Inc. Alle Rechte vorbehalten.
Jegliche Reproduktion dieses Dokuments ohne vorherige schriftliche
Genehmigung von Dell Inc. ist streng untersagt.
Marken in diesem Text: Dell und das DELL Logo, PowerEdge und Dell
OpenManage sind Marken von Dell Inc.; Windows Server ist eine Marke und
Microsoft und Windows sind eingetragene Marken von Microsoft Corporation.
Alle anderen in dieser Dokumentation genannten Marken und Handelsnamen
sind Eigentum der jeweiligen Hersteller und Firmen. Dell Inc. erhebt keinen
Anspruch auf Marken und Handelsnamen mit Ausnahme der eigenen.
Februar 2006
P/N YH406
Rev. A01
Inhalt
Einführung .
. . . . . . . . . . . . . . . . . . . . . . . . . . . . .
69
Eingabe des vorgegebenen Administratorbenutzernamens und -kennworts
. . . . . . . . . . . . .
71
Konfiguration der Netzwerk-IP-Adresse
für das NAS-System .
. . . . . . . . . . . . . . . . . . . . . .
71
Konfiguration des Systems
für den Netzwerkzugriff
. . . . . . . . . . . . . . . . . . . .
72
Konfiguration des Systems mit Tastatur,
Bildschirm und Maus .
. . . . . . . . . . . . . . . . . . . . .
73
. . . . . . . . . .
74
. . . . . . . . . .
74
. . . . . . . . . . . . . . . . . . . . .
75
Ändern des Administratorkennworts .
Lokalisieren des Systems mit der
Mehrsprachen-Benutzerschnittstelle
Aufrufen der Windows Storage Server
Management Console.
Aufrufen der Microsoft Management Console
Lokaler MMC-Zugriff auf dem Host . . . . . . . . .
Systemzugriff über eine Remotedesktopverbindung
. . . .
. . . . . . . .
. . . . . . . .
Inhalt
75
75
76
67
Installation von Dell OpenManage
Server Administrator .
. . . . . . . . . . . . . . . . . . . . . .
Aufrufen von Server Administrator . . . . . . . . . . .
Hinzufügen von vertrauenswürdigen Sites im Browser
Aktualisieren des Systems . . . . . . . . . . . . . . .
Aktualisieren der Microsoft Windows-Software . . . .
Weitere nützliche Dokumente
68
Inhalt
77
. . . . . .
78
79
80
80
. . . . . . . . . . . . . . . .
81
. . . . . .
. . . . . .
. . . . . .
Dieses Dokument enthält einen Überblick über das Betriebssystem
Microsoft Windows Storage Server 2003 R2 x64 und Informationen
über die Konfiguration, Lokalisierung und Installation des Dell
PowerEdge NAS-Systems (Network Attached Storage) in einem
Unternehmensnetzwerk.
In diesem Dokument finden Sie Informationen zu den folgenden
Themen:
•
Überblick über das Betriebssystem
•
Eingabe von Benutzername und Kennwort
•
Konfiguration der Netzwerk-IP-Adresse
•
Konfiguration des Systems für den Netzwerkzugriff
•
Konfiguration des Systems mit Tastatur, Bildschirm und Maus
•
Ändern des Administratorkennworts
•
Lokalisieren des Systems mit der Mehrsprachen-Benutzerschnittstelle
(MUI)
•
Aufrufen der Windows Storage Server Management Console
•
Ausführen der MUI-Schnittstelle
•
Installation von Dell OpenManage Server Administrator
Einführung
Das Betriebssystem Windows Storage Server 2003 R2 x64 Edition bietet
neue Suchfunktionen, vereinfachte Einrichtung und Speicherverwaltung
sowie Erweiterbarkeit; insbesondere wird eine optimale NAS-Leistung
erreicht. Windows Storage Server 2003 R2 x64 Edition ist die neueste
Version dieser Betriebssystemreihe, die erhebliche Verbesserungen für
Speicherverwaltungsszenarien aufweist und sich einfach installieren lässt.
Ihr PowerEdge NAS-System ist vorkonfiguriert mit dem Betriebssystem
Windows Storage Server 2003 R2 x64 Edition. Die meisten Einrichtungsvorgänge wurden bereits durchgeführt und erfordern keinen Benutzereingriff.
Erste Schritte
69
Wenn Sie das System zum ersten Mal starten, beginnt das Microsoft
Mini-Setup. Nach Abschluss des Setups wird das System automatisch neu
gestartet. Danach können Sie auf den Server lokal oder über das Netzwerk
zugreifen.
In den folgenden Abschnitt ist beschrieben, wie die Installationsmaßnahmen für das Betriebssystem durchgeführt werden.
ANMERKUNG: Wenn das System mit softwareseitigem RAID 5 vorkonfiguriert
ist, wird eine RAID-Synchronisation zum Optimieren des Arrays durchgeführt.
Der Vorgang findet im Hintergrund statt und kann bis zu seinem Abschluss die
allgemeine Systemleistung beeinträchtigen. Wenn das System vor Abschluss
des Vorgangs ausgeschaltet wird, beginnt die RAID-Synchronisation beim
nächsten Einschalten erneut, bis der Vorgang abgeschlossen ist.
Weitere Informationen
Weitere Informationen über das Betriebsystem Windows Storage Server
2003 R2 x64 Edition erhalten Sie im Dokument Microsoft Windows
Storage Server 2003 R2 x64 Administrator’s Guide (Microsoft Windows
Storage Server 2003 R2 x64 Administratorhandbuch) auf der Dell
Support-Website support.dell.com
Informationen über die zur Unterstützung mindestens erforderlichen
Versionsnummern von BIOS, Firmware und RAID-Controller erhalten Sie
im Dokument Microsoft Windows Storage Server 2003 R2 x64 Important
Information (Microsoft Windows Storage Server 2003 R2 x64 Wichtige
Informationen) auf der Dell Support-Website unter
www.dell.com/ostechsheets.
70
Erste Schritte
Eingabe des vorgegebenen Administratorbenutzernamens und -kennworts
Wenn Sie sich am NAS-System zum ersten Mal anmelden, müssen Sie
einen Administratorbenutzernamen mit dem dazugehörigen Kennwort
eingeben. Der vorgegebene Administratorbenutzername für das NASSystem lautet administrator, und das entsprechende Kennwort
ist storageserver.
Konfiguration der Netzwerk-IP-Adresse
für das NAS-System
Wenn das Netzwerk über einen DHCP-Server verfügt, brauchen Sie die
IP-Adresse des NAS-Systems nicht zu konfigurieren, da DHCP dem NASSystem automatisch eine Adresse zuweist. Wenn das Netzwerk nicht mit
einem DHCP-Server ausgestattet ist, konfigurieren Sie die IP-Adresse
des NAS-Systems im Fenster Network Configuration (Netzwerkkonfiguration).
Um das Fenster Network Configuration (Netzwerkkonfiguration)
zu öffnen, klicken Sie auf Start und wählen Sie Einstellungen→
Systemsteuerung→ Netzwerkkonfiguration.
ANMERKUNG: Wenn im Netzwerk kein DHCP-Server vorhanden ist,
benötigen Sie zum Durchführen der NAS-Konfiguration eine lokalen Gerätesatz
aus Tastatur, Bildschirm und Maus. Weitere Informationen finden Sie unter
„Konfiguration des Systems mit Tastatur, Bildschirm und Maus“.
ANMERKUNG: Die Windows Firewall ist standardmäßig aktiviert. Wenn Sie
über das Netzwerk auf das System zugreifen, kann es zu Verbindungsproblemen kommen.
Erste Schritte
71
Konfiguration des Systems für den Netzwerkzugriff
1 Falls das NAS-System eingeschaltet ist, schalten Sie es aus.
2 Verbinden Sie ein Ende eines Ethernet-Kabels mit einem der
10/100/1000 RJ-45 NIC-Anschlüsse (siehe Abbildung 1-1) auf
der Rückseite des NAS-Systems.
Nähere Informationen über die Position der Systemanschlüsse erhalten
Sie im User’s Guide (Benutzerhandbuch) zum NAS-System.
3 Verbinden Sie das andere Ende des Ethernet-Kabels mit einer
funktionierenden Ethernet-Anschlussbuchse.
4 Betätigen Sie den Netzschalter, um das NAS-System einzuschalten.
5 Überprüfen Sie die Ethernet-Verbindung des Servers, indem Sie
kontrollieren, ob die LED für den entsprechenden Anschluss leuchtet.
Siehe Abbildung 1-1. Wenn die LED des NIC-Anschlusses stetig grün
leuchtet, ist die Verbindung ordnungsgemäß hergestellt. Wenn die
LED des NIC-Anschlusses gelb blinkt, zeigt dies die Übertragung
von Daten an.
Wenn die LED nicht leuchtet, überprüfen Sie den korrekten Sitz
des Ethernet-Kabels am NIC-Anschluss und an der EthernetAnschlussbuchse.
Das NAS-System bezieht die für das Einrichten der Netzwerkparameter (IP-Adresse, Gateway-Subnetzmaske und DNSServeradresse) erforderlichen Informationen von einem DHCP-Server
im Netzwerk.
ANMERKUNG: Der Startvorgang des NAS-Systems kann mehrere
Minuten dauern, je nach Konfiguration und der am System
angeschlossenen Speicherkapazität.
72
Erste Schritte
Abbildung 1-1.
NIC-Anschluss
LED für NIC 1
LED für NIC 2
NIC 1
NIC 2
Konfiguration des Systems mit Tastatur,
Bildschirm und Maus
ANMERKUNG: Je nach Konfigurationsverfahren sind eventuell lokale KVMVerbindungen erforderlich, um die Installation und Konfiguration durchzuführen. Wenn Sie die Konfiguration über das Netzwerk vornehmen können,
benötigen Sie keine KVM-Verbindungen.
1 Verbinden Sie eine Tastatur, einen Bildschirm und eine Maus mit
dem NAS-System.
Nähere Informationen zu den Systemanschlüssen finden Sie
im User’s Guide (Benutzerhandbuch).
2 Betätigen Sie den Netzschalter, um das NAS-System einzuschalten.
3 Melden Sie sich beim NAS-System an.
ANMERKUNG: Der vorgegebene Administratorbenutzername lautet
administrator, und das zugehörige Kennwort ist storageserver.
Erste Schritte
73
Ändern des Administratorkennworts
1 Klicken Sie auf Start und wählen Sie Verwaltung→ Computerverwaltung.
2 Erweitern Sie im Fenster Computerverwaltung im Zweig Computerverwaltung (lokal) den Eintrag Lokale Benutzer und Gruppen,
und wählen Sie Benutzer.
3 Klicken Sie im rechten Bereich auf Administrator, und wählen Sie
Kennwort festlegen.
4 Klicken Sie im Fenster Set Password for Administrator
(Kennwort für Administrator festlegen) auf Fortsetzen.
5 Geben Sie das Kennwort in den entsprechenden Feldern ein,
und klicken Sie auf OK.
6 Schließen Sie das Fenster Computerverwaltung.
Lokalisieren des Systems mit der
Mehrsprachen-Benutzerschnittstelle
Sie können für das NAS-System die Sprache der Betriebssystem-Benutzerschnittstelle ändern. Viele Sprachen sind standardmäßig auf dem System
installiert. Die Mehrsprachen-Benutzerschnittstelle (MUI) ermöglicht für
das NAS-System die Anzeige von Menüs, Dialogfenstern und Hilfedateien
in verschiedenen Sprachen.
Wenn das System mit dem Betriebssystem Windows Storage Server 2003
R2 x64 Edition vorkonfiguriert war, ist die Mehrsprachen-Schnittstelle
bereits für Ihre Sprache eingestellt, und zwar sowohl bei den Länderals auch den Browsereinstellungen. Es ist kein Eingriff vom Benutzer
erforderlich.
So ändern Sie die Standardsprache des Browsers:
1 Öffnen Sie ein Fenster des Internet-Explorer-Browsers.
2 Wählen Sie im Menü Extras den Eintrag Internetoptionen.
3 Klicken Sie auf der Registerkarte Allgemein auf Sprachen.
4 Klicken Sie im Fenster Spracheinstellung auf Hinzufügen.
5 Wählen Sie eine Sprache im Feld Sprache.
6 Klicken Sie auf OK.
74
Erste Schritte
Aufrufen der Windows Storage Server
Management Console
Die Windows Storage Server Management Console wird in der Microsoft
Management Console (MMC) angezeigt und ermöglicht eine einfache
und komfortable Verwaltung des Systems. Die Management Console wird
automatisch geöffnet, wenn Sie sich bei Windows Storage Server 2003
R2 x64 angemelden.
Um die Windows Storage Server Management Console zu öffnen, klicken
Sie auf Start und wählen Sie Alle Programme→ Windows Storage Server
Management (Windows Storage Server Verwaltung).
Im linken Bereich des Fensters Management Console wird der Knoten
File Server Management (Local) (Dateiserververwaltung [lokal]) als
Standardknoten angezeigt. Der mittlere Fensterbereich enthält Szenarien,
die Sie zur vereinfachten Betriebssystemverwaltung auswählen können.
Aufrufen der Microsoft Management Console
Die MMC ist standardmäßig im Microsoft Startmenü konfiguriert. Die
MMC lässt sich einsetzen für Datenträgerverwaltung, NFS-Konfiguration
sowie als allgemeine NAS-Verwaltungsstation. Weitere Informationen
erhalten Sie im mitgelieferten Dokument über Microsoft MMC.
MMC ermöglicht die Speicherkonfiguration mit einem der folgenden
Verfahren:
•
Lokaler MMC-Zugriff auf dem Host
•
Netzwerkzugriff auf die MMC über eine Remotedesktopverbindung
Lokaler MMC-Zugriff auf dem Host
Die MMC erscheint auf dem Host als auswählbare Option im Menü
Start. Wenn die MMC nach dem Start nicht im Menü Start angezeigt
wird, gehen Sie wie folgt vor:
1 Klicken Sie auf Start und wählen Sie Ausführen.
2 Geben Sie im Feld Öffnen den nachstehenden Befehl ein, und klicken
Sie auf OK:
nas.msc
ANMERKUNG: Die Datei nas.msc befindet sich im Verzeichnis
c:\windows\system32.
Erste Schritte
75
Systemzugriff über eine Remotedesktopverbindung
Verwenden Sie die Remotedesktopverbindung zur Serververwaltung über
das Netzwerk und reduzieren Sie so den Aufwand für die Fernverwaltung.
Remotedesktop für Verwaltung ist mit Terminal-Services-Technologie
ausgestattet und eignet sich speziell für die Serverwaltung.
Remotedesktop für Verwaltung benötigt keine spezielle Lizenz für ClientSysteme, die auf den Server zugreifen. Außerdem ist es nicht erforderlich,
bei der Benutzung von Remotedesktop für Verwaltung die TerminalServer-Lizenzierung zu installieren.
Computer mit Windows Storage Server 2003 R2 x64 Edition lassen
sich auch von einem System mit einer Vorgängerversion von Windows
vollständig verwalten, wenn die Remotedesktopverbindung auf jenem
System installiert wird.
ANMERKUNG: Um von einer Netzwerkstation auf Remotedesktop für
Verwaltung zuzugreifen, verwenden Sie die Remotedesktopverbindung.
Erstellen und Speichern einer Remotedesktopverbindung auf dem Desktop
Um eine Remotedesktopverbindung zu Windows Storage Server 2003
R2 x64 Edition zu erstellen und zu speichern, gehen Sie wie folgt vor:
1 Klicken Sie auf Start und wählen Sie Ausführen.
2 Geben Sie im Feld Öffnen den nachstehenden Befehl ein, und klicken
Sie auf OK:
mstsc
Das Fenster Remotedesktopverbindung wird angezeigt.
3 Geben Sie im Feld Computer den Computernamen oder die IPAdresse des Speicherservers ein, und klicken Sie dann auf Optionen.
4 Klicken Sie im Fenster Remotedesktopverbindung im Feld
Connection settings (Verbindungseinstellungen) auf Speichern unter.
76
Erste Schritte
5 Geben Sie im Fenster Speichern unter im Feld Dateiname einen
Namen für die Verbindung ein, und ergänzen Sie die standardmäßige
Erweiterung .rdp.
6 Wählen Sie im Dropdownmenü Speichern in den Eintrag Desktop,
und klicken Sie dann auf Speichern.
Die Verbindung wird auf dem Desktop gespeichert.
Weitere Informationen über das Konfigurieren der Remotedesktopverbindung erhalten Sie, wenn Sie im Remotedesktopverbindung
auf Hilfe klicken.
Installation von Dell OpenManage
Server Administrator
Dell OpenManage Server Administrator ist eine umfassende, Eine-zuEins-Systemverwaltungslösung, die sich mit einer integrierten browserbasierten Schnittstelle (der Server-Administrator-Homepage) oder einer
Befehlszeilenschnittstelle (CLI) über das Betriebssystem bedienen lässt.
Mit Server Administrator können Sie NAS-Systeme im Netzwerk lokal
und aus der Ferne verwalten. Die Verwaltung des gesamten Netzwerks
erfolgt über eine umfassende Eins-zu-Eins-Systemverwaltung.
ANMERKUNG: Ein „System“ im Sinne von Server Administrator kann
ein eigenständiges System sein, ein Server mit NAS-Einheiten in separaten
Gehäusen oder ein modulares System mit einem oder mehreren Servermodulen
in einem Gehäuse.
Nähere Informationen finden Sie in der Dokumentation zu Server
Administrator.
Erste Schritte
77
Installation von Server Administrator
Auf der Dell Installation and Server Management-CD befindet sich
ein Setup-Programm, mit dem sich Server Administrator und andere
Softwarekomponenten auf dem verwalteten System installieren, upgraden
und deinstallieren lassen. Außerdem können Sie Server Administrator auf
mehreren Systemen mit einer unbeaufsichtigten Installation über das
Netzwerk installieren.
Mit dem Setup-Programm auf der Dell Installation and Server
Management-CD können Sie Server Administrator auf Systemen mit
Windows Storage Server 2003 R2 x64 Edition installieren oder upgraden.
Um Server Administrator zu installieren, gehen Sie wie folgt vor:
1 Legen Sie die Dell Installation and Server Management-CD
im CD-Laufwerk des Systems sein.
Die CD wird automatisch gestartet, und das Fenster Server
Administrator Installer wird angezeigt.
2 Klicken Sie auf Install, Modify, Repair or Remove Server
Administrator (Server Administrator installieren, ändern, reparieren
oder entfernen).
3 Lesen Sie aufmerksam die Bedingungen im Fenster Lizenzvertrag,
und klicken Sie dann auf Weiter.
4 Wählen Sie im Fenster Setup Type (Setup-Typ) den betreffenden Typ
für die Installation aus, und klicken Sie auf Weiter.
5 Klicken Sie im Fenster Ready to Install (Bereit zur Installation)
auf Installieren.
6 Klicken Sie im Fenster Install Wizard Completed (Fertigstellen
des Assistenten) auf Fertig stellen.
Aufrufen von Server Administrator
Sie können Server Administrator lokal über den Host aufrufen, indem
Sie auf das Symbol Server Administrator auf dem Desktop doppelklicken.
Um Server Administrator direkt von einem Client-System auf dem
gleichen Netzwerk aufzurufen, öffnen Sie Internet Explorer 6.0 oder
höher, und stellen Sie eine Verbindung mit dem sicheren Port 1311
des NAS-Systems her.
78
Erste Schritte
Geben Sie beispielsweise ein:
https://DELL1234567:1311
wobei DELL1234567 der Name des NAS-Systems ist.
Wenn Port 1311 von der Firewall deaktiviert wurde, legen Sie mit den
folgenden Schritten eine Ausnahme fest, um Port 1311 zur Verwendung
durch OpenManage freizugeben.
1 Klicken Sie auf Start und wählen Sie Einstellungen→
Systemsteuerung→ Windows-Firewall.
2 Klicken Sie auf die Registerkarte Ausnahmen.
3 Klicken Sie auf Port.
4 Geben Sie Dell OpenManage Server Administrator
im Feld Name ein.
5 Geben Sie 1311 im Feld Portnummer ein.
6 Klicken Sie auf OK.
7 Wenn Sie dazu aufgefordert werden, starten Sie den Firewall-Dienst
neu.
Hinzufügen von vertrauenswürdigen Sites im Browser
Aufgrund von verbesserten Microsoft-Sicherheitsstandards werden Sie
beim ersten Zugriff auf eine Internet- oder Intranet-Site möglicherweise
dazu aufgefordert, diese Site der Zone mit den vertrauenswürdigen Sites
hinzuzufügen.
So fügen Sie im Internet Explorer vertrauenswürdige Sites hinzu:
1 Klicken Sie im Menü Extras auf den Eintrag Internetoptionen.
Das Fenster Internet Options (Internetoptionen) wird angezeigt.
2 Klicken Sie auf die Registerkarte Sicherheit.
Das Menü Security (Sicherheit) wird angezeigt.
3 Klicken Sie auf Trusted Sites (Vertrauenswürdige Sites).
Die Option Trusted sites (Vertrauenswürdige Sites) wird angezeigt.
4 Klicken Sie auf Sites.
Das Fenster Trusted sites (Vertrauenswürdige Sites) wird angezeigt.
Erste Schritte
79
5 Geben Sie im Feld Diese Website zur Zone hinzufügen: die Adresse
der Website ein, unter Verwendung des sicheren https-Protokolls,
und klicken Sie auf Hinzufügen.
Die Website wird im Feld Websites: angezeigt.
6 Wiederholen Sie Schritt 5 gegebenenfalls für weitere Websites,
und klicken Sie dann auf OK.
Das Fenster Internet Options (Internetoptionen) wird angezeigt.
7 Klicken Sie auf OK.
Aktualisieren des Systems
Die Server Update Utility-CD enthält eine Anwendung zum Identifzieren
und Anwenden von Updates für den Server. Das SUU-Dienstprogramm zum
Server-Update kann auch von der Dell Support-Website support.dell.com
heruntergeladen werden. Weitere Informationen hierzu finden Sie im Server
Update Utility User’s Guide (Server-Update-Dienstprogramm Benutzerhandbuch) zum System.
Um einzelne Komponenten von Server Administrator zu aktualisieren,
verwenden Sie komponentenspezifische Dell Update-Pakete, die sich
auf der Dell PowerEdge Updates-CD befinden. Das SUU-Dienstprogramm
vergleicht die derzeit auf dem Dell PowerEdge NAS-System installierten
Komponentenversionen mit den Update-Komponenten auf der Dell
PowerEdge Updates-CD. Verwenden Sie das SUU-Dienstprogramm, um die
Versionsvergleiche anzuzeigen und das gesamte System zu aktualisieren.
Aktualisieren der Microsoft Windows-Software
Um das Betriebssystem Windows Storage Server 2003 R2 x64 Edition
zu aktualisieren, rufen Sie die Microsoft Support-Website
support.microsoft.com auf. Alle Updates für die Windows Server 2003 R2
x64 Editions gelten für Windows Storage Server 2003 R2 x64.
80
Erste Schritte
Weitere nützliche Dokumente
HINWEIS: Das Product Information Guide (Produktinformationshandbuch)
enthält wichtige Informationen zu Sicherheits- und Betriebsbestimmungen.
Garantiebestimmungen können als separates Dokument beigelegt sein.
•
Im zusammen mit der Rack-Lösung gelieferten Rack Installation Guide
(Rack-Installationshandbuch) bzw. in der Rack Installation Instructions
(Rack-Installationsanleitung) ist beschrieben, wie das System in einem
Rack installiert wird.
•
Das Administrator’s Guide (Administratorhandbuch) enthält
Informationen über die Konfigurationsmaßnahmen für das System
und einen allgemeinen Überblick über die Funktionen von Windows
Storage Server 2003 R2 x64 Edition.
•
Das Dokument Important Information (Wichtige Informationen)
enthält die Mindestanforderungen für Hardware und Software und
informiert über bekannte Probleme.
•
Das User's Guide (Benutzerhandbuch) enthält Informationen
über Systemfunktionen und technische Daten.
•
In der Dokumentation zur Systemverwaltungssoftware sind die
Merkmale, die Anforderungen, die Installation und der grundlegende
Einsatz der Software beschrieben.
•
In der Dokumentation zum Betriebssystem ist beschrieben, wie das
Betriebssystem installiert (sofern erforderlich), konfiguriert und
verwendet wird.
Erste Schritte
81
•
Dokumentationen für alle separat erworbenen Komponenten
enthalten Informationen über die Konfiguration und Installation
dieser Zusatzgeräte.
•
Möglicherweise sind auch aktualisierte Dokumente beigelegt, in denen
Änderungen am System, an der Software oder an der Dokumentation
beschrieben sind.
ANMERKUNG: Lesen Sie diese aktualisierten Dokumente immer zuerst,
da sie frühere Informationen gegebenenfalls außer Kraft setzen.
•
Möglicherweise sind Versionshinweise oder Readme-Dateien
vorhanden – diese enthalten letzte Aktualisierungen der Systemdokumentation oder fortgeschrittenes technisches Referenzmaterial
für erfahrene Benutzer oder Techniker.
•
Im Dokument Server Update Utility User's Guide (Server-UpdateDienstprogramm Benutzerhandbuch) ist beschrieben, wie Sie mit
dem Server-Update-Dienstprogramm die Softwareversionen auf
dem System anzeigen und die Systemsoftware aktualisieren. Das
Dienstprogramm kann von der Dell Support-Website support.dell.com
heruntergeladen werden.
82
Erste Schritte
Microsoft® Windows®
Storage Server 2003 R2
x64 Edition
はじめに
w w w. d e l l . c o m | s u p p o r t . d e l l . c o m
メモ、注意
メモ: コンピュータを使いやすくするための重要な情報
を説明しています。
注意: ハードウェアの損傷やデータの損失の可能性を
示し、その危険を回避するための方法を説明しています。
____________________
本書の内容は予告なく変更されることがあります。
© 2006 すべての著作権は Dell Inc. にあります。
Dell Inc. の書面による許可のない複製は、いかなる形態においても厳
重に禁じられています。
本書で使用されている商標について:Dell および DELL ロゴ、PowerEdge、
および Dell OpenManage は Dell Inc. の商標です。Windows Server
は Microsoft Corporation の商標です。Microsoft および Windows
は Microsoft Corporation の登録商標です。
本書では、必要に応じて上記以外の商標や会社名が使用されている場
合がありますが、これらの商標や会社名は、一切 Dell Inc. に帰属する
ものではありません。
2006 年 2 月
P/N YH406
Rev. A01
目次
はじめに
. . . . . . . . . . . . . . . . . . . . . . . . . . . . . .
87
デフォルトの管理者ユーザー名とパスワー
ドの入力
. . . . . . . . . . . . . . . . . . . . . . . . . . . . . .
88
NAS システムのネットワーク IP アドレ
スの設定
. . . . . . . . . . . . . . . . . . . . . . . . . . . . . .
89
ネットワークにアクセスするためのシ
ステム設定.
. . . . . . . . . . . . . . . . . . . . . . . . . . . .
89
キーボード、モニター、およびマウスを
使用したシステムの設定 .
. . . . . . . . . . . . . . . . .
91
管理者パスワードの変更 .
. . . . . . . . . . . . . . . . .
91
多言語ユーザーインタフェースを使用し
てシステムをローカライズする方法.
. . . . . . . .
92
. . . . . . . . . . . . . . . . . . . . . . . . . . . . . .
92
Windows Storage Server 管理コンソー
ルの起動
Microsoft 管理コンソールへのアクセス
ホストでローカルから MMC にアクセス . . . . .
リモートデスクトップ接続を使用してシステム
にアクセス . . . . . . . . . . . . . . . . . . . . . .
. . . . . .
93
. . . . . . .
93
. . . . . . .
93
目次
85
Dell OpenManage Server Administrator
のインストール .
. . . . . . . . . . . . . . . . . . . . . . . . .
Server Administrator へのアクセス . . . . . . . . . .
信頼済みサイトのブラウザへの追加 . . . . . . . .
システムのアップデート . . . . . . . . . . . . . . .
Microsoft Windows ソフトウェアのアップデート .
その他のマニュアル .
86
目次
. . . . . .
94
. . . . . .
96
97
98
98
. . . . . . . . . . . . . . . . . . . . .
98
. . . . . .
. . . . . .
本書では、Microsoft® Windows® Storage Server 2003 R2 x64 オペレー
ティングシステムの概要、および Dell™ PowerEdge™ Network Attached
Storage(NAS)システムを企業ネットワークに設置し、設定、
ローカライズする手順について説明します。
本書は次のトピックに関する情報を提供しています。
•
オペレーティングシステムの概要
•
ユーザー名とパスワードの入力
•
ネットワーク IP アドレスの設定
•
ネットワークにアクセスするためのシステム設定
•
キーボード、モニター、およびマウスを使用したシステムの設定
•
管理者パスワードの変更
•
多言語ユーザーインタフェース(MUI)を使用してシステムをロー
カライズする方法
•
Windows Storage Server 管理コンソールの起動
•
•
MUI へのアクセス
Dell OpenManage™ Server Administrator
はじめに
Windows Storage Server 2003 R2 x64 Edition オペレーティングシス
テムは、新しい検索機能、ストレージ管理、拡張性が加わり、セット
アップが簡易化されているほか、NAS の最適なパフォーマンスが得ら
れるように特別に調整されています。Windows Storage Server 2003
R2 x64 Edition は、このオペレーティングシステムシリーズで最新の
リリースであり、インストールが容易に行えるだけでなく、ストレー
ジ管理のさまざまな面が大幅に改善されています。
お使いの PowerEdge NAS システムには、工場出荷時に Windows
Storage Server 2003 R2 x64 Edition オペレーティングシステムがイン
ストールされ、設定済みです。セットアップ手順のほとんどが完了し
ており、ユーザーの操作は不要です。
システムを初めて起動したときに、Microsoft Mini Setup の処理が開
始します。完了すると、システムが自動的に再起動します。Mini Setup
の処理が完了すると、ローカルでもリモートからでもサーバーにアク
セスできます。
はじめに
87
以下の項では、オペレーティングシステムのインストール手順を完了
する方法について説明します。
メモ:お使いのシステムがソフトウェア RAID 5 で設定済みの場合、シ
ステムは RAID の同期化を実行してアレイを最適化します。この処理は
バックグラウンドで実行され、完了するまでシステム全体のパフォー
マンスが影響を受けることがあります。処理が完了する前にシステム
の電源が切られた場合は、システムに再度電源を入れた時点で RAID の
同期化が再開し、完了するまで続行されます。
詳細情報
Windows Storage Server 2003 R2 x64 Edition オペレーティングシス
テムの詳細については、デルサポートサイト support.dell.com で
『Microsoft Windows Storage Server 2003 R2 x64 Administrator's
Guide』(Microsoft Windows Storage Server 2003 R2 x64 管理者ガ
イド)を参照してください。
BIOS、ファームウェア、RAID コントローラのサポートされている最も
低いバージョンについては、デルサポートサイト
www.dell.com/ostechsheets で『Microsoft Windows Storage
Server 2003 R2 x64 Important Information』(Microsoft Windows
Storage Server 2003 R2 x64 重要情報)を参照してください。
デフォルトの管理者ユーザー名とパスワー
ドの入力
はじめて NAS システムにログインする際には、管理者ユーザー名とパ
スワードを入力する必要があります。お使いの NAS システムのデフォ
ルトの管理者ユーザー名は administrator で、デフォルトのパスワー
ドは storageserver です。
88
はじめに
NAS システムのネットワーク IP アドレスの
設定
ネットワーク上に DHCP サーバーがある場合、DHCP が IP アドレスを
自動的に NAS システムに割り当てるので、NAS システムの IP アドレ
スを設定する必要はありません。お使いのネットワークが DHCP サー
バーで設定されていない場合は、ネットワークの設定 ウィンドウで NAS
システムの IP アドレスを設定します。
ネットワークの設定 ウィンドウにアクセスするには、スタート をクリッ
クし、設定 → コントロールパネル → ネットワークの設定 の順にクリッ
クします。
メモ:ネットワーク上に DHCP サーバーがない場合は、NAS の設定を
完了するためにローカルのキーボード、モニター、およびマウスが必
要です。詳細については、「キーボード、モニター、およびマウ
スを使用したシステムの設定」を参照してください。
メモ:Windows ファイアウォールはデフォルトで有効です。リモート
システムにアクセスする際に、接続に関する問題が発生する場合があ
ります。
ネットワークにアクセスするためのシステ
ム設定
1 NAS システムに電源が入っている場合は、オフにします。
2 Ethernet ケーブルの一方の端を NAS システム背面の 10/100/1000
RJ-45 NIC コネクタ(図 1-1 を参照)の 1 つに接続します。
システムコネクタの位置の詳細については、NAS システムの
『ユーザーズガイド』を参照してください。
3 Ethernet ケーブルのもう一方の端を機能している Ethernet
ジャックに接続します。
4 電源ボタンを押して、NAS システムの電源を入れます。
はじめに
89
5 NIC コネクタと関連する LED の点灯を確かめることで、サーバー
が Ethernet に接続されていることを確認します。図 1-1 を参照し
てください。NIC コネクタの LED が緑色に点灯していれば、接続
は正常です。NIC コネクタの LED が黄色に点滅している場合は、
データの転送が正常に行われています。
LED が点灯していない場合は、Ethernet ケーブルの両端が NIC コ
ネクタと Ethernet ジャックに正しく接続されていることを確認し
ます。
NAS システムは、ネットワーク上の DHCP サーバからネットワー
クパラメータのセットアップに必要な情報(IP アドレス、ゲート
ウェイサブネットマスク、および DNS サーバーアドレス)を検索
します。
メモ: 設定やシステムに接続されているストレージの容量によっ
ては、NAS システムが起動するのに数分かかることがあります。
図 1-1 NIC コネクタ
NIC 1 LED
NIC 2 LED
NIC 1
NIC 2
90
はじめに
キーボード、モニター、およびマウスを使
用したシステムの設定
メモ:設定方法によっては、インストールと設定の手順を完了するの
にローカル KVM 接続が必要な場合があります。リモートシステムで設
定手順を完了できる場合は、操作のためにローカル KVM 接続は必要あ
りません。
1 キーボード、モニター、およびマウスを NAS システムに接続し
ます。
システムコネクタの詳細については、お使いのシステムの
『ユーザーズガイド』を参照してください。
2 電源ボタンを押して、NAS システムの電源を入れます。
3 NAS システムにログインします。
メモ: デフォルトの管理者ユーザー名は administrator
で、デフォルトのパスワードは storageserver です。
管理者パスワードの変更
1 スタート をクリックし、管理ツール → コンピュータの管理 の順
に選択します。
2 コンピュータの管理 ウィンドウの コンピュータの管理(ローカル)
ツリーで ローカルユーザーとグループ を展開し、ユーザー を選
択します。
3 右ウィンドウペインで Administrator を右クリックし、
パスワードの設定 を選択します。
4 Administrator のパスワードの設定 ウィンドウで、続行 をクリッ
クします。
5 パスワードの入力と確認入力を各フィールドで行い、 OK をクリッ
クします。
6 コンピュータの管理 ウィンドウを閉じます。
はじめに
91
多言語ユーザーインタフェースを使用して
システムをローカライズする方法
NAS システムでは、オペレーティングシステムのユーザーインタフェー
スに使用される言語を変更できます。システムには、デフォルトで多数
の言語がインストールされています。多言語ユーザーインタフェース
(MUI)により、NAS システムはオペレーティングシステムメニュー、
ダイアログ、およびヘルプファイルを複数の言語で表示することがで
きます。
お使いのシステムが Windows Storage Server 2003 R2 x64 Edition オ
ペレーティングシステムで設定済みの場合、MUI は地域の設定とブラ
ウザの設定のどちらにおいても、お使いの言語にあらかじめ設定され
ています。ユーザーは何も行う必要がありません。
デフォルトのブラウザ言語を変更するには、次の手順を実行します。
1 Internet Explorer ブラウザを開きます。
2 ツール メニューで インターネットオプション を選択します。
3 全般 タブで、言語 をクリックします。
4 言語の優先順位 ウィンドウで 追加 をクリックします。
5 言語 ボックスで言語を選択します。
6 OK をクリックします。
Windows Storage Server 管理コンソールの起動
Windows Storage Server 管理コンソールは Microsoft 管理コンソール
(MMC)内に表示され、これを使用すれば、システムの管理が容易に
なります。Windows Storage Server 2003 R2 x64 オペレーティングシ
ステムにログインすると、管理コンソールは自動的に開きます。
Windows Storage Server 管理コンソールを開くには、スタート をク
リックし、すべてのプログラム→ Windows Storage Server の管理
の順に選択します。
管理コンソール ウィンドウには、左ウィンドウペインに File Server
Management(Local)(ファイルサーバー管理(ローカル))ノー
ドがデフォルトノードとして表示されます。中央ウィンドウペインに
は、オペレーティングシステムの管理に役立つ選択可能な例が用意さ
れています。
92
はじめに
Microsoft 管理コンソールへのアクセス
MMC はデフォルトで Microsoft Start メニューの一部として設定され
ています。MMC は、ディスク管理と NFS の設定に、また、一般的な
NAS 管理ステーションとして使用できます。詳細については、システ
ムに同梱の Microsoft MMC のマニュアルを参照してください。
MMC を使用すると、次のいずれかの方法でストレージを設定できます。
•
ホストでローカルから MMC にアクセス
•
リモートデスクトップ接続を使用してリモートから MMC にアク
セス
ホストでローカルから MMC にアクセス
MMC はホストで、スタート メニュー内に選択可能な項目として表示さ
れます。起動後に MMC が スタート メニューに表示されない場合は、
次の手順を実行します。
1 スタート をクリックし、ファイル名を指定して実行 を選択します。
2 名前 フィールドに次のテキストを入力し、OK をクリックします。
nas.msc
メモ:nas.msc ファイルは c:\windows\system32 にあります。
リモートデスクトップ接続を使用してシステムにアクセス
リモートサーバーの管理にリモートデスクトップ接続を使用して、リモー
ト管理によるオーバーヘッドを低減します。ターミナルサービステクノ
ロジによって有効にされる管理用リモートデスクトップ(Remote Desktop
for Administration)は、サーバー管理専用に設計されています。
管理用リモートデスクトップは、サーバーにアクセスするクライアン
トシステム用に特別なライセンスを必要としません。また、管理用リ
モートデスクトップ使用時には、Terminal Server Licensing のインス
トールは不要です。
管理者はまた、リモートデスクトップ接続をインストールすることで、
Windows Storage Server 2003 R2 x64 Edition を実行しているコンピュー
タを Windows の旧バージョンを実行しているシステムから十分に管理
することができます。
メモ:リモートシステムから管理用リモートデスクトップに接続する
には、リモートデスクトップ接続を使用します。
はじめに
93
リモートデスクトップ接続を作成し、デスクトップに保存する方法
リモートデスクトップ接続を作成し、Windows Storage Server 2003
R2 x64 Edition に保存するには、次の手順を実行します。
1 スタート をクリックし、ファイル名を指定して実行 を選択します。
2 名前 フィールドに次のテキストを入力し、OK をクリックします。
mstsc
リモートデスクトップ接続 ウィンドウが表示されます。
3 コンピュータ フィールドにストレージサーバーのコンピュータ名
または IP アドレスを入力し、オプション をクリックします。
4 リモートデスクトップ接続 ウィンドウの Connection settings
(接続の設定)ボックスで 名前を付けて保存 をクリックします。
5 名前を付けて保存 ウィンドウの ファイル名 フィールドに、デフォ
ルトの .rdp 拡張子を含めて接続用の名前を入力します。
6 保存先 ドロップダウンメニューで デスクトップ を選択し、
保存 をクリックします。
接続がデスクトップに保存されます。
リモートデスクトップ接続の設定の詳細については、リモートデスク
トップ接続 ウィンドウの ヘルプ をクリックしてください。
Dell OpenManage Server Administrator
のインストール
Dell OpenManage Server Administrator には、統合されたウェブブラ
ウザベースのインタフェース(Server Administrator のホームページ)
またはオペレーティングシステムを通じてコマンドラインインタフェー
ス(CLI)を使用する総合的な 1 対 1 のシステム管理ソリューションが
備わっています。
Server Administrator を使用することで、総合的な 1 対 1 のシステム
管理により、ネットワーク上の NAS システムをローカルまたはリモー
トで管理し、ネットワーク全体の管理に集中することができます。
メモ:Server Administrator を使用するには、「システム」はスタンドア
ロン、別のシャーシ内に NAS ユニットを備えたサーバー、1 つのシャー
シ内に 1 つまたは複数のサーバーモジュールを組み込んだモジュラーシ
ステムのいずれでもかまいません。
詳細については、お使いの Server Administrator のマニュアルを参照
してください。
94
はじめに
Server Administrator のインストール
『Dell Installation and Server Management CD』には、Server
Administrator およびその他のシステム管理ソフトウェアのコンポー
ネントをお使いのシステムにインストール、アップグレードし、アン
インストールするためのセットアッププログラムが用意されています。
また、Server Administrator をネットワークを介して複数のシステム
に無人インストールすることも可能です。
『Dell Installation and Server Management CD』のセットアッププ
ログラムを使用して、サポートされているすべての Windows Storage
Server 2003 R2 x64 Edition オペレーティングシステムを実行している
システムに Server Administrator をインストールし、アップグレード
することができます。
Server Administrator をインストールするには、次の手順を実行します。
1 システムの CD ドライブに『Dell Installation and Server Management
CD』をセットします。
CD がオートロードし、Server Administrator インストーラ
ウィンドウが表示されます。
2 Install, Modify, Repair or Remove Server Administrator
(Server Administrator のインストール、変更、修復、または削
除)をクリックします。
3 ライセンス契約 ウィンドウの契約内容を読んで理解したら、
次へ をクリックします。
4 セットアップの種類 ウィンドウで、使用する構成にふさわしいセッ
トアップの種類を選択し、次へ をクリックします。
5 Ready to Install(インストールの準備が整いました)ウィンド
ウで、インストール をクリックします。
6 Install Wizard Completed(インストールウィザードが完了し
ました)ウィンドウで、終了 をクリックします。
はじめに
95
Server Administrator へのアクセス
デスクトップの Server Administrator アイコンをダブルクリックす
ることで、ホストを通じてローカルで Server Administrator にアクセ
スできます。
同じネットワーク上にあるクライアントシステムから Server Administrator
に直接アクセスするには、バージョン 6.0 またはそれ以降の Internet
Explorer を開き、お使いの NAS システムのセキュアポート(1311)
に接続します。
たとえば、次のように入力します。
https://DELL1234567:1311
DELL1234567 は NAS システムの名前です。
ポート 1311 がファイアウォールによって無効にされている場合は、次
の手順で例外を設定し、ポート 1311 を OpenManage で使用できるよ
うに有効にします。
1 スタート をクリックし、設定 → コントロールパネル → Windows
ファイアウォール の順に選択します。
2 例外 タブをクリックします。
3 ポートの追加 をクリックします。
4 名前 フィールドに Dell OpenManage Server Administrator
と入力します。
5 ポート番号 フィールドに 1311 と入力します。
6 OK をクリックします。
7 ファイアウォールサービスの再起動を指示するメッセージが表示
されたら、ファイアウォールサービスを再起動します。
96
はじめに
信頼済みサイトのブラウザへの追加
Microsoft の高度なセキュリティ基準により、インターネットまたはイ
ントラネットのサイトにはじめてアクセスする場合、サイトを信頼済
みサイトゾーンに追加するように求めるメッセージが表示される場合
があります。
信頼済みサイトを Internet Explorer に追加するには、次の手順を実行
します。
1 ツール メニューで インターネットオプション をクリックします。
インターネットオプション ウィンドウが表示されます。
2 セキュリティ タブをクリックします。
セキュリティ タブのメニューが表示されます。
3 信頼済みサイト をクリックします。
信頼済みサイト オプションが表示されます。
4 サイト をクリックします。
信頼済みサイト ウィンドウが表示されます。
5 次の Web サイトをゾーンに追加する フィールドに https: secure
protocol を使用してサイトのアドレスを入力し、追加 をクリック
します。
Web サイト ボックスにサイトが表示されます。
6 手順 5 を繰り返して他のサイトを追加し、OK をクリックします。
インターネットオプション ウィンドウが表示されます。
7 OK をクリックします。
はじめに
97
システムのアップデート
『Server Update Utility CD』には、アップデートを識別してお使いの
サーバーに適用するためのアプリケーションが入っています。Server
Update Utility(SUU)は、デルサポートサイト support.dell.com か
らダウンロードすることも可能です。詳細については、Server Update
Utility の『ユーザーズガイド』を参照してください。
Server Administrator の個々のコンポーネントをアップデートするに
は、コンポーネントに固有の Dell アップデートパッケージを使用して
ください。Dell アップデートパッケージは『Dell PowerEdge Updates
CD』に入っています。SUU は、お使いの Dell PowerEdge NAS システ
ムに現在インストールされているコンポーネントのバージョンを
『Dell PowerEdge Updates CD』に入っているアップデートコンポー
ネントと比較します。SUU を使用してバージョンの比較レポートを参
照し、システム全体をアップデートしてください。
Microsoft Windows ソフトウェアのアップデート
Windows Storage Server 2003 R2 x64 Edition オペレーティングシス
テムをアップデートする場合は、Microsoft のサポートサイト
support.microsoft.com を参照してください。Windows Server™
2003 R2 x64 Edition に対するアップデートはすべて Windows Storage
Server 2003 R2 x64 に適用されます。
その他のマニュアル
注意 : 『製品情報ガイド』には、安全および認可機関に関する情報が
記載されています。保証に関する情報については、『サービス&サポー
トのご案内』を参照してください。
•
システムをラックに取り付ける方法については、ラックに付属の
『ラック取り付けガイド』に説明があります。
•
『管理者ガイド』には、お使いのシステムの設定手順を完了する
ための情報、および Windows Storage Server 2003 R2 x64 Edition
の機能に関する概要が記載されています。
•
『重要情報』には、ハードウェアとソフトウェアの最小要件とす
べての既知の問題が記載されています。
•
システムの『ユーザーズガイド』では、システム機能および仕様
について説明しています。
98
はじめに
•
システム管理ソフトウェアのマニュアルでは、システム管理ソフ
トウェアの機能、動作要件、インストール、および基本操作につ
いて説明しています。
•
オペレーティングシステムのマニュアルでは、オペレーティング
システムソフトウェアのインストール手順(必要な場合)や設定
方法、および使い方について説明しています。
•
システムとは別に購入した各種コンポーネントのマニュアル。こ
れらのオプションを取り付けて設定する方法を説明しています。
•
システム、ソフトウェア、またはマニュアルの変更に関して記載さ
れたアップデート情報がシステムに付属していることがあります。
メモ:このアップデート情報には他の文書の内容を差し替える情報が
含まれていることがあるので、必ず最初にお読みください。
•
リリースノートまたは readme ファイルには、システムまたはマ
ニュアルの最新のアップデート情報や、専門知識をお持ちのユー
ザーや技術者のための高度な技術情報が含まれていることがあり
ます。
•
Server Update Utility の『ユーザーズガイド』では、Server Update
Utility を使用してお使いのシステムのソフトウェアバージョンを
表示し、ソフトウェアをアップデートする方法を説明しています。
『ユーザーズガイド』は、デルサポートサイト support.dell.com
からダウンロードできます。
はじめに
99
100
はじめに
Microsoft® Windows®
Storage Server 2003 R2
x64 Edition
시작 설명서
w w w. d e l l . c o m | s u p p o r t . d e l l . c o m
참고 , 알림
참고: 참고는 컴퓨터를 보다 효율적으로 사용하는데 도움이
되는 중요 정보를 제공합니다.
주의사항: 알림은 하드웨어의 손상 또는 데이터 유실 위험
을 설명하며, 이러한 문제를 방지할 수 있는 방법을 알려줍
니다.
____________________
본 설명서에 수록된 정보는 사전 통보 없이 변경될 수 있습니다.
© 2006 Dell Inc. All rights reserved.
Dell Inc.의 사전 승인 없이 어떠한 경우에도 무단 복제하는 것을 엄격히 금
합니다.
본 설명서에 사용된 상표인 Dell, DELL 로고, PowerEdge 및 Dell OpenManage
는 Dell Inc.의 상표입니다. Windows Server는 상표이며 Microsoft 및 Window
는 Microsoft Corporation의 등록 상표입니다.
본 설명서에서 특정 회사의 표시나 제품 이름을 지칭하기 위해 기타 상표
나 상호를 사용할 수도 있습니다. Dell Inc.는 자사가 소유하고 있는 것 이
외에 기타 모든 등록 상표 및 상표 이름에 대한 어떠한 소유권도 보유하지
않습니다.
2006 년 2 월
P/N YH406
Rev. A01
차례
소개 .
. . . . . . . . . . . . . . . . . . . . . . . . . . . . . . . . .
기본 관리자 사용자 이름 및 암호 입력 .
. . . . . . .
106
. . . . . . . .
106
. . . . . . . . . . . .
106
NAS 시스템용 네트워크 IP 주소 구성 .
네트워크 액세스용 시스템 구성 .
105
키보드 , 모니터 및 마우스를 사용한 시
스템 구성 .
. . . . . . . . . . . . . . . . . . . . . . . . . . . . .
관리자 암호 변경
. . . . . . . . . . . . . . . . . . . . . . . .
108
108
MUI (Multilanguage User Interface)
를 사용한 시스템 한글화
. . . . . . . . . . . . . . . . . .
Windows 스토리지 서버 관리 콘솔 .
. . . . . . . . . .
MMC (Microsoft Management Console) 액세스 .
호스트에서 MMC 로컬 액세스 . . . . . . . . .
원격 데스크탑 연결을 사용한 시스템 액세스 .
109
. .
110
. . . . . . . .
110
110
. . . . . . . .
Dell OpenManage Server Administrator 설치
. . . .
111
. . . . . . . . . . .
. . . . . . . . . . .
112
113
114
114
. . . . . . . . . . . . . . . . . . . . . .
114
Server Administrator 액세스 . . . . . . . .
브라우저에 신뢰할 수 있는 사이트 추가 .
시스템 업데이트 . . . . . . . . . . . . . .
Microsoft Windows 소프트웨어 업데이트
기타 필요한 설명서
109
. . . . . . . . . . .
. . . . . . . . . . .
차례
103
104
차례
본 설명서는 Microsoft® Windows® Storage Server 2003 R2 × 64 운영 체제
의 개요 및 Dell™ PowerEdge™ Network Attached Storage (NAS) 시스템을
기업 네트워크에서 구성, 한글화 및 설치하는 방법에 대한 내용에 대해 설
명합니다.
본 설명서는 다음 항목에 대한 정보를 설명합니다.
•
운영 체제 개요
•
사용자 이름 및 암호 입력
•
네트워크 IP 주소 구성
•
네트워크 액세스용 시스템 구성
•
키보드, 모니터 및 마우스를 사용한 시스템 구성
•
관리자 암호 변경
•
MUI(Multilanguage User Interface)를 사용한 시스템 한글화
•
Windows 스토리지 서버 관리 콘솔
•
MUI 액세스
•
Dell OpenManage™ Server Administrator 설치
소개
Windows Storage Server 2003 R2 × 64 Edition 운영 체제에는 새로운 검색
기능, 간단해진 설치 및 스토리지 관리, 확장성이 추가되었으며 최적의 NAS
성능을 제공합니다. Windows Storage Server 2003 R2 × 64 Edition은 이 운
영 체제 계열의 최신 버전이며 쉬운 설치뿐만 아니라 스토리지 관리 시나
리오에 대한 향상된 기능도 제공합니다.
PowerEdge NAS 시스템은 Windows Storage Server 2003 R2 × 64 Edition 운
영 체제로 이미 구성되어 있습니다. 대부분의 설치 과정이 완료되므로 사
용자가 개입할 필요가 없습니다.
시스템이 처음으로 부팅되면 Microsoft 최소 설치 과정이 시작됩니다. 설
치가 완료되면 시스템이 자동으로 재부팅됩니다. 최소 설치 과정이 완료
된 후 서버를 로컬 또는 원격으로 액세스할 수 있습니다.
다음 절에서는 운영 체제 설치 과정 완료에 대한 내용을 설명합니다.
참고 : 시스템이 소프트웨어 RAID 5 로 이미 구성되어 있으면 시스템이 RAID
동기화 작업을 수행하여 배열을 최적화합니다 . 이 과정은 백그라운드에
서 실행되며 완료될 때까지 시스템의 전체 성능에 영향을 줄 수 있습니다 .
과정이 완료되기 전에 시스템의 전원이 꺼지는 경우 전원이 다시 켜지면
RAID 동기화가 시작되어 완료될 때까지 계속 실행됩니다 .
시작 설명서
105
추가 정보
Windows Storage Server 2003 R2 × 64 Edition 운영 체제에 대한 자세한 내
용은 Dell 지원 웹 사이트(support.dell.com )의 Microsoft Windows Storage
Server 2003 R2 × 64 관리 설명서를 참조하십시오.
최소 지원되는 BIOS, 펌웨어 및 RAID 컨트롤러 버전에 대한 자세한 내용
은 Dell 지원 웹 사이트(www.dell.com/ostechsheets)의 Microsoft Windows
Storage Server 2003 R2 × 64 중요 정보 문서를 참조하십시오.
기본 관리자 사용자 이름 및 암호 입력
처음으로 NAS 시스템에 로그인하면 관리자 사용자 이름 및 암호를 입력해
야 합니다. NAS 시스템의 기본 관리자 사용자 이름은 administrator
이고 기본 암호는 storageserver.입니다.
NAS 시스템용 네트워크 IP 주소 구성
네트워크에 DHCP 서버가 있는 경우 DHCP는 자동으로 NAS 시스템에 주
소를 할당해주므로 NAS 시스템의 IP 주소를 구성하지 않아도 됩니다. 네
트워크가 DHCP 서버로 구성되어 있지 않은 경우 네트워크 구성 창에서
NAS 시스템의 IP 주소를 구성하십시오.
네트워크 구성 창을 액세스하려면 시작을 클릭하고 설정→ 제어판→ 네
트워크 구성을 선택하십시오.
참고 : 네트워크에 DHCP 서버가 없는 경우 NAS 구성을 완료하려면 로컬
키보드 , 모니터 및 마우스가 필요합니다 . 자세한 내용은 " 키보드 , 모니터
및 마우스를 사용한 시 스템 구성 " 을 참조하십시오 .
참고 : Windows 방화벽은 기본값으로 활성화되어 있습니다 . 원격 시스템
을 액세스하면 연결 문제가 발생할 수 있습니다 .
네트워크 액세스용 시스템 구성
1 NAS 시스템의 전원이 켜져 있으면 끄십시오 .
2 Ethernet 케이블의 한쪽 끝을 NAS 시스템 뒤쪽에 있는 10/100/1000
RJ-45 NIC 커넥터 ( 그림 1-1 참조 ) 의 끝에 연결하십시오 .
시스템 커넥터 위치에 대한 자세한 내용은 NAS 시스템의 사용 설명
서를 참조하십시오 .
3 Ethernet 케이블의 다른 쪽 끝을 Ethernet 기능 잭에 연결하십시오 .
106
시작 설명서
4 전원 단추를 눌러 NAS 시스템을 켜십시오 .
5 NIC 커넥터와 연관된 LED 가 켜져 있는지 확인하여 서버가 Ethernet
에 연결되어 있는지 점검하십시오 . 그림 1-1 를 참조하십시오 . NIC
커넥터의 LED 가 계속 녹색이면 연결 상태가 좋다는 의미입니다 .
NIC 커넥터의 LED 가 황색으로 깜박거리면 데이터가 성공적으로 전
송 중이라는 의미입니다 .
LED 가 깜박거리지 않으면 Ethernet 케이블의 양쪽 끝이 NIC 커넥터
및 Ethernet 잭에 제대로 장착되어 있는지 확인하십시오 .
NAS 시스템은 필요한 정보를 검색하여 네트워크의 DHCP 서버에서
네트워크 매개 변수 (IP 주소 , 게이트웨이 , 서브넷 마스크 및 DNS
서버 주소 ) 를 설치합니다 .
참고: NAS 시스템이 부팅하려면 시스템에 장착된 스토리지의 구성 및
양에 따라 몇 분이 걸릴 수 있습니다.
그림 1-1.
NIC 커넥터
NIC 1 LED
NIC 2 LED
NIC 1
NIC 2
시작 설명서
107
키보드 , 모니터 및 마우스를 사용한 시
스템 구성
참고 : 구성 방법에 따라 설치 및 구성 과정을 완료하기 위해 로컬 KVM 연
결이 필요할 수 있습니다 . 원격 시스템이 구성 과정을 완료할 수 있으면 로
컬 KVM 연결은 필요하지 않습니다 .
1 NAS 시스템에 키보드 , 모니터 , 마우스를 연결하십시오 .
시스템 커넥터에 대한 자세한 내용은 시스템의 사용 설명서를
참조하십시오 .
2 전원 단추를 눌러 NAS 시스템을 켜십시오 .
3 NAS 시스템에 로그인합니다 .
참고: 기본 관리자 이름은 administrator 이고 기본 암호는
storageserver입니다.
관리자 암호 변경
1 시작을 클릭하고 관리자 도구 → 컴퓨터 관리를 선택하십시오 .
2 컴퓨터 관리 ( 로컬 ) 트리의 컴퓨터 관리 창에서 로컬 사용자 및
그룹을 확장하고 사용자를 선택하십시오 .
3 오른쪽 창에서 관리자를 마우스 오른쪽 단추로 클릭한 다음
암호 설정을 선택하십시오 .
4 관리자용 암호 설정 창에서 계속을 클릭하십시오 .
5 해당 필드에 암호를 입력하고 확인을 클릭합니다 .
6 컴퓨터 관리 창을 닫으십시오 .
108
시작 설명서
MUI (Multilanguage User Interface)
를 사용한 시스템 한글화
NAS 시스템을 사용하면 운영 체제의 사용자 인터페이스 기본 언어를 변
경할 수 있습니다. 기본값으로 많은 언어가 시스템에 설치됩니다. MUI
(Multilanguage User Interface)를 사용하면 NAS 시스템이 운영 체제 메뉴,
대화 상자 및 도움말 파일을 여러 언어로 표시할 수 있습니다.
시스템이 Windows Storage Server 2003 R2 × 64 Edition 운영 체제로 이미
구성되어 있는 경우 MUI가 지역 설정과 브라우저 설정 양쪽에 해당 지역
언어로 미리 구성됩니다. 사용자가 개입하지 않아도 됩니다.
기본 브라우저 언어를 변경하려면 다음과 같이 수행하십시오.
1 Internet Explorer 브라우저를 엽니다 .
2 도구 메뉴에서 인터넷 옵션을 선택합니다 .
3 일반 탭에서 언어를 클릭합니다 .
4 언어 기본 설정 창에서 추가를 클릭합니다 .
5 언어 상자에서 언어를 선택합니다 .
6 확인을 클릭합니다 .
Windows 스토리지 서버 관리 콘솔
Windows 스토리지 서버 관리 콘솔은 MMC(Microsoft Management Console)
에 나타나며 시스템 관리를 쉽고 편리하게 해줍니다. Windows Storage Server
2003 R2 × 64 운영 체제에 로그인하면 관리 콘솔이 자동으로 열립니다.
Windows 스토리지 서버 관리 콘솔을 열려면 시작을 클릭하고 모든 프로
그램→ Windows 스토리지 서버 관리를 선택합니다.
관리 콘솔 창에서 왼쪽 창은 파일 서버 관리 (로컬) 노드를 기본 노드로 보여
줍니다. 중간 창은 운영 체제 관리를 도와줄 시나리오 목록을 보여줍니다.
시작 설명서
109
MMC (Microsoft Management Console) 액세스
MMC는 Microsoft 시작 메뉴의 일부로 기본값으로 구성됩니다. MMC는
디스크 관리, NFS 구성 및 일반 NAS 관리 스테이션으로 사용할 수 있습니
다. 자세한 내용은 시스템에 포함된 Microsoft MMC 문서를 참조하십시오.
MMC를 사용하여 다음 방법 중 하나를 통해 스토리지를 구성할 수 있습
니다.
•
호스트에서 MMC 로컬 액세스
•
원격 데스크탑 연결을 사용한 MMC 원격 액세스
호스트에서 MMC 로컬 액세스
MMC는 호스트에 시작 메뉴에서 선택 가능한 항목으로 나타납니다. 시작
후 MMC가 시작 메뉴에 나타나지 않으면 다음 단계를 수행하십시오.
1 시작을 클릭하고 실행을 선택합니다 .
2 열기 필드에서 다음을 입력하고 확인을 클릭합니다 .
nas.msc
참고 : nas.msc 파일은 c:\windows\system32 에 있습니다 .
원격 데스크탑 연결을 사용한 시스템 액세스
원격 서버 관리에 원격 데스크탑 연결을 사용하여 원격 관리와 연관된 오
버헤드를 줄이십시오. 터미널 서비스 기술로 활성화된 관리용 원격 데스
크탑은 서버 관리를 위해 특별히 설계되었습니다.
관리용 원격 데스크탑에는 서버에 액세스하는 클라이언트 시스템용 특별
라이센스가 필요하지 않습니다. 또한 관리용 원격 데스크탑을 사용할 때
Terminal Server Licensing을 설치하지 않아도 됩니다.
관리자는 또한 원격 데스크탑 연결을 설치하여 하위 Windows 버전이 탑재
된 시스템에서 Windows Storage Server 2003 R2 × 64 Edition이 탑재된 컴
퓨터까지 전체 관리할 수 있습니다.
참고 : 원격 시스템에서 관리용 원격 데스크탑에 연결하려면 원격 데스크
탑 연결을 사용하십시오 .
110
시작 설명서
원격 데스크탑 연결 생성 및 데스크탑에 저장
원격 데스크탑 연결을 생성하고 Windows Storage Server 2003 R2 × 64 Edition
에 저장하려면 다음 단계를 수행하십시오.
1 시작을 클릭하고 실행을 선택합니다 .
2 열기 필드에서 다음을 입력하고 확인을 클릭합니다 .
mstsc
원격 데스크탑 연결 창이 나타납니다 .
3 컴퓨터 필드에서 컴퓨터 이름 또는 스토리지 서버의 IP 주소를 입력
한 다음 옵션을 클릭합니다 .
4 연결 설정 상자의 원격 데스크탑 연결 창에서 다른 이름으로 저장을
클릭합니다 .
5 파일 이름 필드의 다른 이름으로 저장 창에서 연결 이름을 입력하고
기본 .rdp 확장자를 포함시킵니다 .
6 저장 위치 드롭 다운 메뉴에서 바탕 화면을 선택한 다음 저장을 선택
합니다 .
그러면 연결이 바탕 화면에 저장됩니다 .
원격 데스크탑 연결 구성에 대한 자세한 내용은 원격 데스크탑 연결 창에
서 도움말을 클릭합니다.
Dell OpenManage Server Administrator 설치
Dell OpenManage Server Administrator는 통합된 웹 브라우저 기반의 인터페
이스(Server Administrator 홈 페이지) 또는 운영 체제의 CLI(Command Line
Interface)를 사용하는 종합 일- 대일 시스템 관리 솔루션을 제공합니다.
Server Administrator를 사용하면 네트워크의 NAS 시스템을 로컬 및 원격
으로 관리할 수 있으며 종합 일대일 시스템 관리로 네트워크 전체를 관리
할 수 있습니다.
참고 : Server Administrator 의 용도로써 " 시스템 " 은 별도의 섀시에 네트워
크 스토리지 장치 또는 섀시에 하나 이상의 서버 모듈로 구성된 모듈 시스
템이 장착된 서버와 같은 독립형 시스템이 될 수 있습니다 .
자세한 내용은 Server Administrator 설명서를 참조하십시오.
시작 설명서
111
Server Administrator 설치
Dell Installation and Server Management CD에는 Server Administrator 설치,
업그레이드 및 제거를 위한 설치 프로그램과 시스템에서 관리되는 기타
소프트웨어 구성 요소가 들어 있습니다. 또한 네트워크 상의 무인 설치를
통해 여러 시스템에 Server Administrator를 설치할 수 있습니다.
Dell Installation and Server Management CD의 설치 프로그램을 사용하여
지원되는 모든 Windows Storage Server 2003 R2 × 64 Editions 운영 체제가
탑재된 시스템에서 Server Administrator를 설치 및 업그레이드할 수 있습
니다.
Server Administrator를 설치하려면 다음 단계를 수행하십시오.
1 Installation and Server Management CD 를 시스템의 CD 드라이브에
넣습니다 .
CD 가 자동으로 실행되고 Server Administrator Installer 창이 나타
납니다 .
2 Install, Modify, Repair or Remove Server Administrator
(Server Administrator 설치 , 수정 또는 제거 ) 를 클릭합니다 .
3 License Agreement ( 사용 계약 ) 창에서 계약 내용을 숙지하고 Next
( 다음 ) 을 클릭합니다 .
4 Setup Type ( 설치 유형 ) 창에서 구성에 적합한 설치 유형을 선택하
고 Next( 다음 ) 를 클릭합니다 .
5 Ready to Install ( 설치 대기 ) 창에서 Install ( 설치 ) 을 클릭합니다 .
6 Install Wizard Completed ( 설치 마법사 완료 ) 창에서 Finish
( 마침 ) 를 클릭합니다 .
Server Administrator 액세스
바탕 화면에서 Server Administrator 아이콘을 두 번 클릭하여 호스트에서
Server Administrator를 로컬 액세스할 수 있습니다.
동일한 네트워크의 클라이언트 시스템에서 직접 Server Administrator를
액세스하려면 Internet Explorer 6.0 이상의 버전을 열고 NAS 시스템의 1311
포트에 연결하십시오.
예를 들면, 다음을 입력하십시오.
https://DELL1234567:1311
여기서 DELL1234567은 NAS 시스템의 이름입니다.
112
시작 설명서
1311 포트가 방화벽에 막혀 있으면 다음 절차를 통해 예외 규칙을 적용하
여 OpenManage 용으로 1311 포트를 활성화하십시오.
1 시작을 클릭하고 설정 → 제어판 → Windows 방화벽을 선택합니다 .
2 예외 탭을 클릭하십시오 .
3 포트 추가를 클릭합니다 .
4 이름 필드에 Dell OpenManage Server Administrator
를 입력합니다 .
5 포트 번호 필드에 1311 을 입력합니다 .
6 확인을 클릭합니다 .
7 메시지가 표시되면 방화벽 서비스를 재시작하십시오 .
브라우저에 신뢰할 수 있는 사이트 추가
Microsoft 보안 규정의 강화로 인해 처음 사이트에 액세스할 때 인터넷 또
는 인트라넷 사이트를 신뢰할 수 있는 사이트 영역에 추가할지 묻는 메시
지가 표시될 수 있습니다.
신뢰할 수 있는 사이트를 Internet Explorer에 추가하려면 다음 단계를 수
행하십시오.
1 도구 메뉴에서 인터넷 옵션을 클릭합니다 .
인터넷 옵션 창이 나타납니다 .
2 보안 탭을 클릭합니다 .
보안 탭 메뉴가 나타납니다 .
3 신뢰할 수 있는 사이트를 클릭합니다 .
신뢰할 수 있는 사이트 옵션이 나타납니다 .
4 사이트를 클릭합니다 .
신뢰할 수 있는 사이트 창이 나타납니다 .
5 영역에 웹 사이트 추가 : 필드에서 https: 보안 프로토콜을 사용하여
사이트의 주소를 입력하고 추가를 클릭합니다 .
해당 사이트가 웹 사이트 : 상자에 나타납니다 .
6 다른 사이트를 추가하려면 단계 5 를 반복한 다음 확인을 클릭합니다 .
인터넷 옵션 창이 나타납니다 .
7 확인을 클릭합니다 .
시작 설명서
113
시스템 업데이트
Server Update Utility CD에는 서버 업데이트 확인 및 적용 응용프로그램이
들어 있습니다. SUU(Server Update Utility)는 Dell 지원 웹 사이트
(support.dell.com)에서도 다운로드할 수 있습니다. 자세한 내용은
Server Update Utility 사용 설명서를 참조하십시오.
Server Administrator 구성 요소를 개별 업데이트하려면 Dell PowerEdge
Updates CD에 있는 구성 요소별 Dell 업데이트 패키지를 사용하십시오.
SUU는 Dell PowerEdge NAS 시스템에 현재 설치되어 있는 구성 요소의 버
전과 Dell PowerEdge Updates CD에 들어 있는 업데이트 구성 요소를 비교
합니다. SUU를 사용하여 버전 비교 보고서를 검토하고 시스템 전체를 업
데이트합니다.
Microsoft Windows 소프트웨어 업데이트
Windows Storage Server 2003 R2 × 64 Edition 운영 체제를 업데이트하려면
Microsoft 지원 웹 사이트(support.microsoft.com)를 참조하십시오. Windows
Server™ 2003 R2 × 64 Edition에 대한 모든 업데이트는 Windows Storage
Server 2003 R2 × 64에 적용됩니다.
기타 필요한 설명서
주의사항 : 제품 정보 안내는 중요한 안전 지침 및 규제 관련 정보를 제공
합니다 . 보증 정보는 본 설명서에 포함되어 있거나 별도의 문서로 제공됩
니다 .
•
랙 솔루션과 함께 제공되는 랙 설치 설명서 또는 랙 설치 안내 지침
에는 시스템을 랙에 설치하는 방법이 기술되어 있습니다.
•
관리 설명서는 시스템에서 구성 절차를 완료하는 방법 및 Windows
Storage Server 2003 R2 × 64 Edition 기능 개요에 대해 설명합니다.
•
중요 정보 문서는 최소 하드웨어 및 소프트웨어 요구 사항 및 알려진
모든 문제에 대해 설명합니다.
•
시스템의 사용 설명서는 시스템 기능 및 기술 사양에 대해 설명합니다.
114
시작 설명서
•
시스템 관리 소프트웨어 설명서는 소프트웨어 기능, 요구사항, 설치
및 기본 작동을 설명합니다.
•
운영 체제 설명서에는 운영 체제 소프트웨어 설치(필요한 경우), 구
성 및 사용 방법이 기술되어 있습니다.
•
별도로 구입한 구성요소의 설명서에는 옵션을 구성하고 설치하는
내용이 기술되어 있습니다.
•
시스템, 소프트웨어 또는 설명서의 변경 사항이 포함된 갱신본이 시
스템과 함께 제공되기도 합니다.
참고 : 업데이트본에는 최신 정보가 수록되어 있으므로 다른 설명서를 읽
기 전에 반드시 먼저 참조하시기 바랍니다 .
•
릴리즈 노트나 readme 파일에는 시스템에 대한 최신 업데이트 사항
이나 전문가 또는 기술자를 위한 고급 기술 참조 자료가 포함되어 있
기도 합니다.
•
SUU (Server Update Utility) 사용 설명서는 SUU(Server Update Utility)
를 사용하여 시스템의 소프트웨어 버전을 검토하고 시스템 소프트
웨어를 업데이트하는 방법에 대해 설명합니다. Dell 지원 웹 사이트
(support.dell.com)에서 다운로드할 수 s있습니다.
시작 설명서
115
116
시작 설명서
Microsoft® Windows®
Storage Server 2003 R2
x64 Edition
Guía de introducción
w w w. d e l l . c o m | s u p p o r t . d e l l . c o m
Notas y avisos
NOTA: una NOTA proporciona información importante que le
ayudará a utilizar mejor el ordenador.
AVISO: un AVISO indica la posibilidad de daños en el hardware
o la pérdida de datos, e informa de cómo evitar el problema.
____________________
La información contenida en este documento puede modificarse
sin previo aviso.
© 2006 Dell Inc. Reservados todos los derechos.
Queda estrictamente prohibida la reproducción de este documento en cualquier
forma sin la autorización por escrito de Dell Inc.
Marcas comerciales utilizadas en este texto: Dell, el logotipo de DELL,
PowerEdge y Dell OpenManage son marcas comerciales de Dell Inc.; Windows
Server es una marca comercial y Microsoft y Windows son marcas comerciales
registradas de Microsoft Corporation.
Otras marcas y otros nombres comerciales pueden utilizarse en este documento
para hacer referencia a las entidades que los poseen o a sus productos. Dell Inc.
renuncia a cualquier interés sobre la propiedad de marcas y nombres comerciales
que no sean los suyos.
Febrero de 2006
P/N YH406
Rev. A01
Contenido
Introducción
. . . . . . . . . . . . . . . . . . . . . . . . . . . .
121
Introducción del nombre de usuario y la contraseña
predeterminados del administrador .
. . . . . . . . . . .
122
Configuración de la dirección IP de red
para el sistema NAS .
. . . . . . . . . . . . . . . . . . . . . .
123
Configuración del sistema para acceder
a la red
. . . . . . . . . . . . . . . . . . . . . . . . . . . . . . . .
123
Configuración del sistema mediante
un teclado, un monitor y un ratón
. . . . . . . . . . . . .
Cambio de la contraseña del administrador .
. . . . .
125
125
Localización del sistema mediante la interfaz
de usuario multilingüe
. . . . . . . . . . . . . . . . . . . . .
126
Inicio de la consola de administración
. . . .
126
. . . . . . . . . . . . . . . . . . . . . . . . . . . .
127
del servidor de almacenamiento de Windows
Acceso a la consola de administración
de Microsoft
Acceso a la consola MMC de forma local en el host . . . . . .
Acceso al sistema mediante una conexión a escritorio remoto
.
.
Contenido
127
128
119
Instalación de Dell OpenManage
Server Administrator .
. . . . . . . . . . . . . . . . . . . . .
Acceso a Server Administrator . . . . . . . . . . .
Adición de sitios de confianza al explorador . . . .
Actualización del sistema . . . . . . . . . . . . . .
Actualización del software de Microsoft Windows
Otros documentos necesarios
120
Contenido
129
. . . . . . .
130
131
132
132
. . . . . . . . . . . . . . .
133
. . . . . . .
. . . . . . .
. . . . . . .
En este documento se proporciona información general sobre el sistema
operativo Microsoft® Windows® Storage Server 2003 R2 x64, así como
información sobre la configuración, localización e instalación del sistema
de almacenamiento conectado a red (NAS, Network Attached Storage)
de Dell™ PowerEdge™ en una red corporativa.
En este documento se proporciona información sobre los temas
siguientes:
•
Información general sobre el sistema operativo
•
Introducción del nombre de usuario y de la contraseña
•
Configuración de la dirección IP de red
•
Configuración del sistema para acceder a la red
•
Configuración del sistema mediante el teclado, el monitor y el ratón
•
Cambio de la contraseña del administrador
•
Localización del sistema mediante la interfaz de usuario multilingüe
(MUI)
•
Inicio de la consola de administración del servidor de almacenamiento
de Windows
•
Acceso a la MUI
•
Instalación de Dell OpenManage™ Server Administrator
Introducción
El sistema operativo Windows Storage Server 2003 R2 x64 Edition
incorpora nuevas funciones de búsqueda, simplificación en la
configuración y administración de almacenamiento y capacidad de
ampliación, y está especialmente ajustado para proporcionar un
rendimiento óptimo de NAS. Windows Storage Server 2003 R2 x64
Edition es la versión más reciente de esta serie del sistema operativo y
ofrece mejoras significativas para la administración de almacenamiento;
asimismo, el proceso de instalación es sencillo.
El sistema NAS de PowerEdge está preconfigurado con el sistema
operativo Windows Storage Server 2003 R2 x64 Edition. La mayoría
de los procedimientos de configuración son automáticos y no requieren
la intervención del usuario.
Guía de introducción
121
Cuando el sistema se inicia por primera vez, empieza el proceso de
instalación mínima de Microsoft. Al finalizar, el sistema se reiniciará
automáticamente. Una vez que haya finalizado el procedimiento de
instalación mínima, podrá acceder al servidor de forma local o remota.
En las secciones siguientes se proporciona información sobre los procedimientos de instalación del sistema operativo.
NOTA: si el sistema está preconfigurado con RAID por software 5, el sistema
efectuará una sincronización de RAID para optimizar la matriz. El proceso se
ejecuta en segundo plano y puede afectar al rendimiento general del sistema
hasta que finalice. Si el sistema se apaga antes de que finalice el proceso,
la sincronización de RAID se reiniciará al encender el sistema y continuará
hasta que finalice.
Información adicional
Para obtener más información sobre el sistema operativo Windows
Storage Server 2003 R2 x64 Edition, consulte Microsoft Windows Storage
Server 2003 R2 x64 Administrator’s Guide (Guía del administrador de
Microsoft Windows Storage Server 2003 R2 x64), que se encuentra en
la página web de asistencia de Dell (support.dell.com).
Para obtener información sobre las versiones mínimas admitidas del BIOS,
del firmware y de la controladora RAID, consulte el documento Microsoft
Windows Storage Server 2003 R2 x64 Important Information (Información
importante sobre Microsoft Windows Storage Server 2003 R2 x64), que
se encuentra en la página web de asistencia de Dell
(www.dell.com/ostechsheets).
Introducción del nombre de usuario y la
contraseña predeterminados del administrador
Cuando inicie sesión en el sistema NAS por primera vez, deberá introducir
el nombre de usuario y la contraseña del administrador. El nombre de
usuario predeterminado del administrador para su sistema NAS es
administrator y la contraseña predeterminada es storageserver.
122
Guía de introducción
Configuración de la dirección IP de red
para el sistema NAS
Si tiene un servidor DHCP en la red, no es necesario que configure la
dirección IP del sistema NAS, ya que el DHCP asigna automáticamente
una dirección al sistema NAS. Si la red no está configurada con un
servidor DHCP, configure la dirección de IP del sistema NAS mediante
la ventana Network Configuration (Configuración de red).
Para acceder a la ventana Network Configuration (Configuración de red),
haga clic en Inicio y seleccione Configuración→ Panel de control→
Network Configuration (Configuración de red).
NOTA: si no tiene un servidor DHCP en la red, se requiere un teclado local,
un monitor y un ratón para finalizar la configuración de NAS. Para obtener
más información, consulte “Configuración del sistema mediante un teclado,
un monitor y un ratón”.
NOTA: el servidor de seguridad de Windows está activado de forma
predeterminada. Al acceder al sistema remoto, pueden producirse problemas
de conectividad.
Configuración del sistema para acceder
a la red
1 Si el sistema NAS está encendido, apáguelo.
2 Conecte un extremo de un cable Ethernet a uno de los conectores
de NIC RJ-45 10/100/1000 (vea la figura 1-1) en la parte posterior
de sistema NAS.
Para obtener más información sobre la ubicación de los conectores
del sistema, consulte la Guía del usuario del sistema NAS.
3 Conecte el otro extremo del cable Ethernet a una toma Ethernet
que funcione.
4 Pulse el botón de encendido para encender el sistema NAS.
Guía de introducción
123
5 Compruebe que el servidor esté conectado a Ethernet; para ello,
asegúrese de que el LED asociado al conector de NIC esté iluminado.
Vea la figura 1-1. Si el LED del conector de NIC emite una luz verde
fija, la conexión es correcta. Si el LED del conector de NIC emite una
luz ámbar parpadeante, los datos se están transfiriendo correctamente.
Si el LED no está iluminado, compruebe que ambos extremos del cable
Ethernet estén conectados correctamente al conector de NIC y a la
toma Ethernet.
El sistema NAS recupera la información necesaria para configurar los
parámetros de red (la dirección IP, la máscara de subred de la puerta de
enlace y la dirección del servidor DNS) de un servidor DHCP de la red.
NOTA: el sistema NAS puede tardar varios minutos en iniciarse, según
la configuración y la cantidad de almacenamiento conectado al sistema.
Figura 1-1.
Conector de NIC
LED de la NIC 1
LED de la NIC 2
NIC 1
NIC 2
124
Guía de introducción
Configuración del sistema mediante
un teclado, un monitor y un ratón
NOTA: según el método de configuración, es posible que se requieran
conexiones KVM locales para completar los procedimientos de instalación
y configuración. Si el sistema remoto puede completar los procedimientos
de configuración, no se requieren conexiones KVM locales.
1 Conecte un teclado, un monitor y un ratón al sistema NAS.
Para obtener información sobre los conectores del sistema,
consulte la Guía del usuario del sistema.
2 Pulse el botón de encendido para encender el sistema NAS.
3 Inicie sesión en el sistema NAS.
NOTA: el nombre de usuario predeterminado del administrador
es administrator y la contraseña predeterminada es
storageserver.
Cambio de la contraseña del administrador
1 Haga clic en Inicio y seleccione Herramientas administrativas→
Administración de equipos.
2 En la ventana Administración de equipos del árbol Administración
del equipo (local), expanda Usuarios y grupos locales y seleccione
Usuarios.
3 En el panel derecho de la ventana, haga clic con el botón derecho
del ratón en Administrador y seleccione Establecer contraseña.
4 En la ventana Establecer contraseña para Administrador, haga clic
en Continuar.
5 Escriba y confirme la contraseña en los campos pertinentes y haga clic
en Aceptar.
6 Cierre la ventana Administración de equipos.
Guía de introducción
125
Localización del sistema mediante la interfaz
de usuario multilingüe
El sistema NAS permite cambiar el idioma original de la interfaz de
usuario del sistema operativo. Hay muchos idiomas instalados en el
sistema de manera predeterminada. La interfaz de usuario multilingüe
(MUI) permite que el sistema NAS muestre los menús, los cuadros de
diálogo y los archivos de ayuda del sistema operativo en varios idiomas.
Si el sistema fue preconfigurado con el sistema operativo Windows
Storage Server 2003 R2 x64 Edition, la MUI estará preconfigurada con
el idioma localizado tanto en la configuración regional como en la
configuración del explorador. No es necesaria la intervención del usuario.
Para cambiar el idioma predeterminado del explorador, realice lo siguiente:
1 Abra un explorador Internet Explorer.
2 En el menú Herramientas, seleccione Opciones de Internet.
3 En la ficha General, haga clic en Idiomas.
4 En la ventana Preferencias de idioma, haga clic en Agregar.
5 En la casilla Idioma, seleccione un idioma.
6 Haga clic en Aceptar.
Inicio de la consola de administración del
servidor de almacenamiento de Windows
La consola de administración del servidor de almacenamiento de
Windows aparece en la consola de administración de Microsoft (MMC,
Microsoft Management Console), con lo que se proporciona un método
sencillo y práctico para la administración del sistema. La consola de
administración se abre automáticamente cuando inicia sesión en el
sistema operativo Windows Storage Server 2003 R2 x64.
Para abrir la consola de administración del servidor de almacenamiento
de Windows, haga clic en Inicio y seleccione Todos los programas→
Windows Storage Server Management.
126
Guía de introducción
En el panel izquierdo de la ventana Management Console (Consola de
administración), se muestra el nodo File Server Management (Local)
(Administración de servidores de archivos [local) como nodo predeterminado. En el panel central de la ventana se proporcionan situaciones
seleccionables que le ayudarán en la administración del sistema operativo.
Acceso a la consola de administración
de Microsoft
La consola MMC está configurada como parte del menú de inicio de
Microsoft de manera predeterminada. Puede utilizarse para la administración de discos, la configuración de NFS y como una estación de
administración general de NAS. Para obtener más información, consulte
el documento sobre la consola MMC de Microsoft suministrado con
el sistema.
Mediante la consola MMC, puede configurar el almacenamiento
con uno de los métodos siguientes:
•
Acceso a la consola MMC de forma local en el host
•
Acceso a la consola MMC de forma remota mediante una conexión
a escritorio remoto
Acceso a la consola MMC de forma local en el host
La consola MMC aparece en el host como un elemento seleccionable
del menú Inicio. Si no aparece en el menú Inicio después del inicio,
realice los pasos siguientes:
1 Haga clic en Inicio y seleccione Ejecutar.
2 En el campo Abrir, escriba lo siguiente y haga clic en Aceptar:
nas.msc
NOTA: el archivo nas.msc está ubicado en c:\windows\system32.
Guía de introducción
127
Acceso al sistema mediante una conexión a escritorio remoto
Utilice Conexión a Escritorio remoto para que la administración del
servidor remoto reduzca la sobrecarga asociada a la administración remota.
La opción Escritorio remoto para Administración, activada por la tecnología de Servicios de Terminal Server, está específicamente diseñada para
la administración del servidor.
La opción Escritorio remoto para Administración no requiere una licencia
especial para los sistemas cliente que acceden al servidor. Además,
no es necesario instalar las licencias de Terminal Server cuando se utiliza
Escritorio remoto para Administración.
Asimismo, los administradores pueden administrar completamente los
ordenadores que ejecutan Windows Storage Server 2003 R2 x64 Edition
desde sistemas que ejecutan versiones anteriores de Windows mediante
la instalación de Conexión a Escritorio remoto.
NOTA: para conectarse al Escritorio remoto para Administración desde
un sistema remoto, utilice Conexión a Escritorio remoto.
Creación y almacenamiento de una conexión a escritorio remoto en el
escritorio
Para crear y guardar una conexión a escritorio remoto en Windows Storage
Server 2003 R2 x64 Edition, realice los pasos siguientes:
1 Haga clic en Inicio y seleccione Ejecutar.
2 En el campo Abrir, escriba lo siguiente y, a continuación, haga clic
en Aceptar.
mstsc
Se abre la ventana Conexión a Escritorio remoto.
3 En el campo Equipo, escriba el nombre del equipo o la dirección IP del
servidor de almacenamiento y, a continuación, haga clic en Opciones.
4 En la casilla Configuración de la conexión de la ventana Conexión
a Escritorio remoto, haga clic en Guardar como.
128
Guía de introducción
5 En el campo Nombre de archivo de la ventana Guardar como, escriba
un nombre para la conexión e incluya la extensión predeterminada .rdp.
6 En el menú desplegable Guardar en, seleccione Escritorio
y, a continuación, haga clic en Guardar.
La conexión se guardará en el escritorio.
Para obtener más información sobre la configuración de la conexión a
escritorio remoto, haga clic en Ayuda en la ventana Conexión a Escritorio
remoto.
Instalación de Dell OpenManage Server
Administrator
Dell OpenManage Server Administrator proporciona una solución de
administración de sistemas completa e-individualizada mediante una
interfaz integrada basada en el explorador web (la página de inicio de
Server Administrator) o una interfaz de línea de comandos (CLI)
mediante el sistema operativo.
Server Administrator permite administrar sistemas NAS de una red de
forma local y remota y centrarse en la administración de toda la red gracias
a una administración del sistema completa e individualizada.
NOTA: para este uso de Server Administrator, un “sistema” puede ser
un sistema independiente, un servidor con unidades de almacenamiento
conectado a red en chasis independientes o un sistema modular formado
por uno o más módulos de servidor en un chasis.
Para obtener más información, consulte la documentación de Server
Administrator.
Instalación de Server Administrator
El CD Dell Installation and Server Management (Instalación y administración de servidores Dell) incluye un programa de instalación para
instalar, actualizar y desinstalar Server Administrator, así como otros
componentes de software del sistema de administración del sistema
administrado. Además, Server Administrator puede instalarse en varios
sistemas de una red mediante una instalación que no necesita
supervisarse.
Guía de introducción
129
Mediante este programa que incluye el CDDell Installation and Server
Management, podrá instalar y actualizar Server Administrator en sistemas
que ejecuten todos los sistemas operativos Windows Storage Server 2003
R2 x64 Editions admitidos.
Para instalar Server Administrator, realice los pasos siguientes:
1 Inserte el CD Dell Installation and Server Management en la unidad
de CD del sistema.
El CD se carga automáticamente y aparece la ventana Server
Administrator Installer (Programa de instalación de Server
Administrator).
2 Haga clic en Install, Modify, Repair or Remove Server Administrator
(Instalar, modificar, reparar o quitar Server Administrator).
3 En la ventana License Agreement (Contrato de licencia), lea
el contrato y, si está de acuerdo, haga clic en Next (Siguiente).
4 En la ventana Setup Type (Tipo de instalación), seleccione el tipo
de instalación adecuada para su configuración y haga clic en Next
(Siguiente).
5 En la ventana Ready to Install (Preparado para instalar), haga clic
en Install (Instalar).
6 En la ventana Install Wizard Completed (Asistente de instalación
completado), haga clic en Finish (Finalizar).
Acceso a Server Administrator
Para acceder a Server Administrator de forma local a través del host,
haga doble clic en el icono de Server Administrator del escritorio.
Para acceder a Server Administrator directamente desde un sistema
cliente de la misma red, abra Internet Explorer 6.0 o posterior y conéctese
al puerto seguro, 1311, del sistema NAS.
Por ejemplo, escriba:
https://DELL1234567:1311
donde DELL1234567 es el nombre del sistema NAS.
130
Guía de introducción
Si el servidor de seguridad desactiva el puerto 1311, utilice el
procedimiento siguiente para definir una excepción que permita activar
el puerto 1311 para utilizar OpenManage.
1 Haga clic en Inicio y seleccione Configuración→ Panel de control→
Firewall de Windows.
2 Haga clic en la pestaña Excepciones.
3 Haga clic en Agregar puerto.
4 Escriba Dell OpenManage Server Administrator
en el campo Nombre.
5 Escriba 1311 en el campo Número de puerto.
6 Haga clic en Aceptar.
7 Si se le solicita, reinicie el servicio de servidor de seguridad.
Adición de sitios de confianza al explorador
Debido a los estándares de seguridad mejorados de Microsoft, es posible
que se le pida que añada un sitio de Internet o de intranet a la zona de
sitios de confianza cuando acceda al sitio por primera vez.
Para añadir sitios de confianza en Internet Explorer, realice los pasos
siguientes:
1 En el menú Herramientas, haga clic en Opciones de Internet.
Se abre la ventana Opciones de Internet.
2 Haga clic en la ficha Seguridad.
Aparece el menú de la ficha Seguridad.
3 Haga clic en Sitios de confianza.
Se muestra la opción Sitios de confianza.
4 Haga clic en Sitios.
Se abre la ventana Sitios de confianza.
5 En el campo Agregar este sitio Web a la zona:, escriba la dirección
del sitio con el protocolo seguro https: y haga clic en Agregar.
El sitio aparece en la casilla Sitios Web: .
Guía de introducción
131
6 Repita el paso 5 para añadir sitios adicionales y haga clic en Aceptar.
Se abre la ventana Opciones de Internet.
7 Haga clic en Aceptar.
Actualización del sistema
El CD Server Update Utility (Utilidad Server Update) contiene una
aplicación para identificar y aplicar actualizaciones al servidor. La utilidad
Server Update (SUU) también puede descargarse de la página web de
asistencia de Dell (support.dell.com). Para obtener más información,
consulte Server Update Utility User’s Guide (Guía del usuario de la
utilidad Server Update).
Para actualizar componentes individuales de Server Administrator, utilice
los paquetes de actualización de Dell específicos de componentes, que
pueden encontrarse en el CD Dell PowerEdge Updates (Actualizaciones
de Dell PowerEdge). SUU compara las versiones de los componentes que
están instalados en ese momento en el sistema NAS de Dell PowerEdge
con los componentes de actualización suministrados en el CD Dell
PowerEdge Updates. Utilice SUU para ver un informe comparativo de
las versiones y para actualizar un sistema completo.
Actualización del software de Microsoft Windows
Para actualizar el sistema operativo Windows Storage Server 2003 R2 x64
Edition, visite la página web de asistencia de Microsoft
(support.microsoft.com). Todas las actualizaciones a Windows Server™
2003 R2 x64 Editions se aplican a Windows Storage Server 2003 R2 x64.
132
Guía de introducción
Otros documentos necesarios
AVISO: en la Guía de información del producto se proporciona información
importante sobre seguridad y normativas. La información de la garantía puede
estar incluida en este documento o constar en un documento aparte.
•
En los documentos Guía de instalación del rack o Instrucciones de
instalación del rack, incluidos con el rack, se describe cómo instalar
el sistema en un rack.
•
En la Guía del administrador se proporciona información sobre
cómo completar los procedimientos de configuración en el sistema
e información general sobre las funciones de Windows Storage
Server 2003 R2 x64 Edition.
•
En el documento Información importante se enumeran los requisitos
mínimos de hardware y software y todos los problemas conocidos.
•
En la Guía del usuario del sistema se ofrece información sobre
las características y las especificaciones técnicas del sistema.
•
En la documentación del software de administración de sistemas
se describen las características, los requisitos, la instalación y el
funcionamiento básico del software.
•
En la documentación del sistema operativo se describe cómo instalar
(si es necesario), configurar y utilizar el software del sistema operativo.
Guía de introducción
133
•
En la documentación de los componentes adquiridos por separado
se incluye información para configurar e instalar las opciones
correspondientes.
•
Algunas veces, con el sistema se incluyen actualizaciones en que se
describen los cambios realizados en la documentación, en el software
o en el sistema.
NOTA: lea siempre las actualizaciones primero, ya que a menudo éstas
sustituyen la información de otros documentos.
•
Es posible que se incluyan notas de la versión o archivos Léame para
proporcionar actualizaciones de última hora relativas al sistema o a la
documentación, o material de consulta técnica avanzada destinada a
usuarios o técnicos experimentados.
•
En el documento Server Update Utility User's Guide (Guía del usuario
de la utilidad Server Update) se describe cómo se puede utilizar la
utilidad Server Update para ver las versiones de software del sistema y
actualizar el software del sistema. Puede descargarse de la página web
de asistencia de Dell (support.dell.com).
134
Guía de introducción