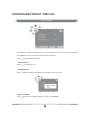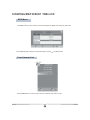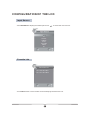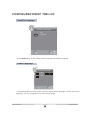
1
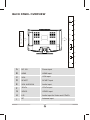
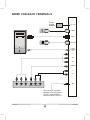
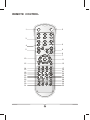
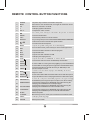
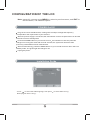
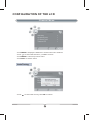
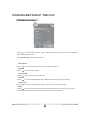
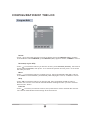
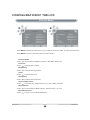
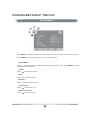
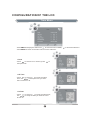
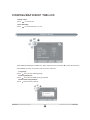
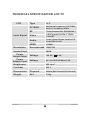
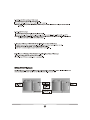
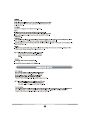
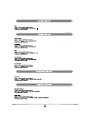
LCDVD152UK
USER’S GUIDE
LCD TV Safety Warnings
Damage
Never use your TV if it is damaged in any way. Always place your TV on a flat level
surface avoiding anywhere which may be subject to strong vibration.
Weather
It is advisable to unplug the aerial during an electrical storm.
Temperature
Avoid extremes of temperature, either hot or cold, place your TV well away from
heat sources such as radiators or gas/electric fires.
Naked Flames
Naked flames such as candles and night lights should not be placed on or near your TV.
Ornaments
Vases and other water containers or lamps should not be put on top of your TV set.
Moisture
Do not allow your TV to be exposed to rain, moisture, dust. If any liquid is spilt into
your TV it can cause serious damage. If you spill any liquid into your TV unplug the
power cord immediately. Contact your store.
Ventilation
The TV must be well ventilated. Do not cover your TV or place it inside a small
confined space. Make sure that there is a gap of at least 10cm on both sides and
20 cms at the top.
Interference
Do not place your TV on or near appliances which may cause electromagnetic
interference (TV or Hi-Fi speakers). If you do, it may adversely affect the working
of the unit, and cause a distorted picture or sound.
Batteries
Batteries are easily swallowed by young children. Do not allow young children to
play with the remote control unit.
Covers
Do not remove any fixed covers as this may expose dangerous voltages.
Standby
The power button on the remote control doesn't switch off the TV completely and
the TV will continue to draw electricity from the mains supply. There fore in the
interests of safety and to avoid unnecessary energy consumption, never leave
your TV in standby while unattended for long periods of time, eg. while on holiday.
We recommend that you unplug at the mains power supply.
Power Cord
Make sure your TV or TV stand is not resting on top of the power cord, as the weight
of the TV may damage the cord and create a safety hazard.
Packaging
If you can store the packaging it will prove useful should you need to transport the
TV to protect it while it is in transit. Try to reuse packaging wherever you can. If you
cannot store it, contact your local authority for details of your nearest recycling
facilities.
Installation
We strongly recommend that this product is installed by qualified personnel with
enough skill and competence. The seller cannot assume liabilities for damage
caused by mistake in installation, mounting, misuse or modification.
This symbol on the product or in the instructions means that
your electrical and electronic equipment should be disposed
at the end of its life separately from your household waste.
There are separate collection systems for recycling in the EU.
For more information, please contact the local authority or
your retailer where you purchased the product.
The apparatus shall not be exposed to dripping or splashing
and that no objects filled with liquids, such as vases, shall be
placed on the apparatus.
The apparatus shall be connected to a MAINS socket outlet
with a protective earthing connection.
The MAINS plug or an appliance coupler is used as the
disconnect device, the disconnect device shall remain readily
operable.
CONTENT
ACCESSORIES ----------------------------------------------------------------- 1
FRONT PANEL BUTTONS--------------------------------------------------- 2
BACK PANEL OVERVIEW--------------------------------------------------- 3
BRIEF FOR BACK TERMINALS----------------------------------- 4
REMOTE CONTROL----------------------------------------------------------- 5
REMOTE CONTROL BUTTON FUNCTIONS ------------------ 6
CONFIGURATION OF THE LCD-------------------------------------------- 7
POWER ON/OFF------------------------------------------------------- 7
INSTALLATION GUIDE----------------------------------------------- 7
CHANNEL MENU------------------------------------------------------- 8
AUTO TUNING---------------------------------------------------- 8
DTV MANUAL TUNING---------------------------------------- 9
ATV MANUAL TUNING----------------------------------------- 10
PROGRAM EDIT------------------------------------------------- 11
PICTURE MENU-------------------------------------------------------- 12
SOUND MENU---------------------------------------------------------- 13
TIME MENU-------------------------------------------------------------- 14
OPTION MENU--------------------------------------------------------- 15
LOCK MENU------------------------------------------------------------- 16
EPG MENU-------------------------------------------------------- 17
FAST CHANNEL LIST------------------------------------------ 17
INPUT SOURCE------------------------------------------------- 18
FAVORITE LIST-------------------------------------------------- 18
SUBTITLE LANGUAGE---------------------------------------- 19
TECHNICAL SPECIFICATION LCD TV----------------------------------- 20
DVD OPERATION---------------------------------------------------------------- 21
SAFETY PRECAUTIONS------------------------------------------------------ 28
CARE AND MAINTENANCE -------------------------------------------------- 29
ACCESSORIES
ACCESSORIES
Thank you for purchasing this LCD-TV.
This LCD-TV package comes with:
User’s Guide book
Remote control
Battery AAA x 2
Adapter
Power Cord/External Power Supply
Warranty Card x 1
OPTIONAL ACCESSORIES
You can purchase these optional accessories for your LCD TV:
HDMI Cable
AV Cable
SCART Cable
VGA Cable
Audio Cable
Please save your packaging as you will need this in the event of
warranty/service repair or support. We are unable to carry out
warranty/service if you are unable to package it correctly. The safest
way to package your item in the event of warranty/service repair is in
its original box/packaging.
FRONT PANEL BUTTONS
10
1
POWER
2
SOURCE
3
MENU
4
CH+
5
CH-
6
VOL+
8
7
VOL-
9
1
Power ON/OFF
2
Select the input source:DTV/TV/SCART/YPBPR/DVD/PC-RGB/HDMI/AV
3
OSD (ON Screen Display) Menu
4
Channel Up/Scroll up
5
Channel Down/Scroll down
6
Volume Up/Right orientation
7
Volume Down/Left orientation
8
Remote Sensor
9
Indicator Light
10
DVD Button
BACK PANEL OVERVIEW
Top/Label Side Of Disc
DC 12V
A
HDMI
B
VGA
C
SCART
D
VGA
AUDIO
IN
E
Y
PB
F
PR
VIDEO
G
L
H
R
RF
A
DC 12V
Power input
B
HDMI
HDMI input
C
VGA
VGA input
D
SCART
SCART input
E
VGA AUDIO IN
Audio input
F
YPBPR
YPBPR input
G
VIDEO
VIDEO input
H
L/R
Audio input for Video and Y/PB/PR
I
RF
Antenna input
I
BRIEF FOR BACK TERMINALS
Power
Supply
Adapter
DC 12V
HDMI
HDMI
VGA
SCART
SCART
VGA
AUDIO
IN
Y
PB
PR
VIDEO
L
R
L
Y
PB
PR
R
RF
VIDEO Audio Out
Don’t remove the cable
between Indoor antenna
(TV RF ) and Outdoor
antenna (DVB R F-OUT)
REMOTE CONTROL
1
2
3
4
5
i
6
NICAM
SOURCE
VOL
CH
8
9
7
10
OK
11
EXIT
MENU
13
12
14
15
18
19
22
23
26
27
30
31
FAV
EPG
SUBT
LIST
TEXT
HOLD
PGDN
PGUP
DVD
INDEX
SIZE
REPEAT ANGLE
REVEAL SUBPAGE
L/R
SLEEP TV-RADIO AUDIO
SET UP
P-MODE
17
16
21
20
25
24
29
28
33
32
REMOTE CONTROL BUTTON FUNCTIONS
1
POWER
The power key to switch On and Off of the power
2
MUTE
Press once to turn off the sound, once again to restore the sound
3
0-9
Select TV channels in TV mode
4
i
To display system information
5
VOL+/-
To adjust the sound volume
6
7
In TV mode, press this key to come back to the previous TV channel
NICAM
To select sound modes
8
CH+/-
To select the previous or next TV channel
9
SOURCE
To cycle through the input source:DTV/TV/SCART/YPBPR/DVD/PC-RGB/HDMI/AV
10
To move the cursor and select the option needed
11
OK
To confirm the selected option
12
MENU
To open the system setting menu of the LCD Display
13
EXIT
In the TV menu mode, press this key to return to the upper menu
14
FAV
To select and store channels of favorite program
15
EPG
To open EPG menu
16
SUBT
To open and close subtitles on DVB
17
LIST
To display the TV program list
18
TEXT/
To open the function of TELETEXT or remove the disc
19
HOLD/
To select the lock-on function of TEXT/Stop the DVD disc
20
PGDN/
To select TEXT for viewing the next page/play or pause the DVD disc
21
PGUP/DVD
To select TEXT for viewing the previous page/return to the DVD main menu
22
INDEX/
To select and return to the main directory of TEXT/skip to the
previous chapter or track
23
SIZE/
To zoom in and out for the display of the TEXT/skip to the next
chapter or track
24
REVEAL/
To select the hidden TEXT function/backward scene with faster speed
25
SUBPAGE/
To open the TEXT function of sub-page/foward scene with faster speed
26
RED/REPEAT
To select the corresponsive TELETEXT page after entering the homepage
of TELETEXT/cycle through the options: Chapter, Title, All and nothing
27
GREEN/ANGLE
To select the corresponsive TELETEXT page after entering the
homepage of TELETEXT/select multiple angles
28
YELLOW/AUDIO
To select the corresponsive TELETEXT page after entering the
homepage of TELETEXT/select desired audio track
29
CYAN/SETUP
To select the corresponsive TELETEXT page after entering the
homepage of TELETEXT/open and close the DVD OSD menu
30
SLEEP
Select sleep time
31
TV-RADIO
When watching a channel, allows you to switch between TV and Radio modes.
32
AUDIO
To display audio language.
33
P-MODE
Select picture mode
CONFIGURATION OF THE LCD
Note: generally, you can press MENU to return to previous menu, and EXIT to
exit the menu, it is a default option.
POWER On/Off
Plug the TV into a standard outlet, making sure the output voltage and frequency
corresponds to the requirement of your machine.
When the power supply is connected, the red indicator on the front panel will be on and the
machine turns into standby state.
Push the POWER button on your remote control the indicator on the front panel will
change from red to green. And after several seconds, the system will enter the state
previously selected when it was used last time.
When finish watching, push the POWER button on your remote control to return the TV to
standby mode, The green light will change to red.
Unplug the power.
Installation Guide
- Press
to select the OSD language, then press
Refer page 8 “Auto Tuning”.
to select Auto Tuning.
CONFIGURATION OF THE LCD
Channel Menu
- Press MENU to display the OSD menu to select the menu Channel.
- Press
to select the selection,
or OK to confirm.
- Press MENU to return to previous menu.
- Press EXIT to exit the menu.
Auto Tuning
- Press
to select the country, then OK to confirm.
CONFIGURATION OF THE LCD
- Press
to select start highlight. Press OK key to start Auto Tuning.
- Press <Menu> to skip the current tuning (ATV or DTV).
- Press <Exit> to return to the previous menu.
DTV Manual Tuning
- Press
to select the channel, then OK to search.
CONFIGURATION OF THE LCD
ATV Manual Tuning
- Press
to select the selection,
the following suboptions.
to adjust the option as requirement. See details in
- Press SAVE (RED) to save the channel.
Storage To
- Press
to select the channel number you want to save to.
System
- Press
to select the system.
Current CH
- Press
to select the current channel.
Search
- Press
to search backward/forward, MENU or EXIT to stop the searching.
Fine-Tune
- Press
to fine tuning when the signal of the current channel is weak.
Skip
- Press
to turn on/off the switch of skip. When the switch is turned on, the current
channel will be skipped when you scan channels with P+/P- button.
CONFIGURATION OF THE LCD
Program Edit
TV
1
S-02
TV
2
C-42
TV
3
S-03
TV
4
S-04
RENAME
MOVE
DELETE
SKIP
FAV
Delete
- Press
to select the channel you want to delete, then press DELETE (RED), and the
channel will be marked DELETE, press DELETE (RED) again to delete, or MENU to cancel.
Rename(only for ATV)
- Press
to select the channel you want to rename, press RENAME (GREEN), the channel
will be marked RENAME, then press
to select the position of word, press
to select
the letter you want.
Move
- Press
to select the channel you want to move, then press MOVE (YELLOW), and the
channel will be marked MOVE, press MOVE (YELLOW) again to move, or MENU to cancel.
Skip
- Press
to select the channel you want to skip, then press SKIP (CYAN) to mark or
dismark the channel. The channel marked SKIP will be skipped when you scan channels
with CH+/CH- button.
Favorite
- Press
to select your favorite channel, then press FAV to mark or dismark the channel.
The channel marked FAV will be storage to the favorite list.
CONFIGURATION OF THE LCD
Picture Menu
- Press MENU to display the OSD menu
to select the menu PICTURE,
- Press MENU to return to the main menu from the submenu.
Picture Mode
- Press
to select Picture Mode. Dynamic, Standard, Mild, User.
Contrast
- Press
to adjust the contrast.
Brightness
- Press
to adjust the brightness.
Color
- Press
to adjust the color.
Sharpness
- Press
to adjust the sharpness.
Color Temperature
- Press
to select Color Temperature. Cool, User, Warm, Medium.
Aspect Ratio
- Press
to select Aspect Ratio. Zoom1, Zoom2, Auto, 4:3, 16:9.
Noise Reduction
- Press
to open or close Noise Reduction.
to enter the submenu.
CONFIGURATION OF THE LCD
Sound Menu
- Press MENU to display the OSD menu
to select the menu SOUND,
to enter the submenu.
- Press MENU to return to the main menu from the submenu.
Sound Mode
- Press
to select sound mode. Standard, Music, Movie, Sports, User. Press MENU to confirm
and return to preview menu.
Treble
- Press
to adjust the treble.
Bass
- Press
to adjust the bass.
Balance
- Press
to adjust the balance.
Auto Volume
- Press
to select off or on.
Surround Sound
- Press
to select off or on.
CONFIGURATION OF THE LCD
Time Menu
- Press MENU to display the OSD menu,
to select the menu TIMER,
- Press MENU to return to the main menu from the submenu.
Clock
- Press
to select hour or minute, press
setup the time.
to
Off Time
- Press
to select on,
to enter the setup
item, use
to setup the time you want
the TV to be turn off.
OnTime
- Press
to select on,
to enter the setup item,
use
to setup the time you want the TV to
be turn on.
to enter the submenu.
CONFIGURATION OF THE LCD
Sleep Timer
- Press
to select timer.
Auto Standby
- Press
to select standby on or off.
Option Menu
- Press MENU to display the OSD menu,
to select the menu OPTION,
- Press MENU to return to the main menu from the submenu.
Language
- Press
to select the OSD language.
Hearing Impaired
- Press
to On/Off the OSD Hearing Impaired.
Restore Factory Default
- Press
restore factory default.
to enter the submenu.
CONFIGURATION OF THE LCD
Lock Menu
- Press MENU to display the OSD menu,
to select the menu Lock,
- Press MENU to return to the main menu from the submenu.
- Press
enter Password is “0000”.
Lock Channel
- Press
to select off or on.
Set password
- Press
display please enter password new password and confirm.
Block Program
- Press
display to enter Block Program, press Lock (GREEN).
to enter the submenu.
CONFIGURATION OF THE LCD
EPG Menu
- Use EPG button on the remote control to display the EPG menu directly as below:
-Press DATE (YELLOW) to enter Date Option, press
to select Date.
Fast Channel List
- Press LIST button on the remote control to display the channel List.
CONFIGURATION OF THE LCD
Input Source
- Press SOURCE to display the OSD input source,
to select the menu source.
TV
SCART
YPBPR
DVD
PC-RGB
HDMI
AV
Favorite List
Favorite List
DTV 800 SZTVM01
DTV 801 SZTVM02
- Press FAV button on the remote control to display the Favorite List.
CONFIGURATION OF THE LCD
Subtitle Language
Subtitle Language
TTX
Off
English
- Press SUBT button on the remote control to display the Subtitle Language.
Audio Language
Audio Language
MPEG
English
DOLBY
UND
CE
L
R
- Press NICAM button on the remote control to display Audio Language. If there are several
language, you can use
button to select the language.
TECHNICAL SPECIFICATION LCD TV
LCD
Input Signal
Resolution
Speaker Output
Power
Adapter Output
Power
Adapter Input
Type
15.6’’
PC-RGB
Horizontal frequency:20-70KHz
Vertical frequency:60Hz
RF
75 ohm Antenna/PAL-SECAM/DVB-T
Video
1 AV/Composite RCA,1 YPB P R
1 SCART
Audio
1 pair 3.5mm Phone Jack for PC
1 pair RCA for AV
HDMI
1 HDMI
Recommended 1366X768
2X2W
Voltage
12V DC
Voltage
AC 100-240V 50/60Hz 1.0A
Brightness
250 cd/m2
Contrast
500:1
4.0A
Dimensions
Physical
400mm(W)X142mm(D)X315mm(H)
Weight
Net
3.3Kg
SAFETY PRECAUTIONS
This LCD TV is manufactured and tested to ensure the user s safety. Improper
use or installation may result in danger to the LCD TV as well as to the user.
Carefully adhere to the following warnings and keep this user guide to hand for
future reference.
WARNINGS
This LCD TV should be operated only at the correct power sources indicated in
the label . If you’ re unsure of the power supply in your residence, consult your
local dealer or service center.
Do not try to repair the LCD TV yourself as it contains no user-serviceable parts.
The LCD TV should only be repaired by a qualified technician.
Do not remove the LCD TV cabinet. There are high-voltage parts inside that may
cause electric shock. Even when the power cord is disconnected.
Stop using the LCD TV if the cabinet is damaged. Have it checked by a service
technician.
Put your LCD TV only in a clean, dry environment. Unplug the LCD TV immediately
if gets wet and consult your service technician.
Always unplug the LCD TV before cleaning it. Clean the cabinet with a clean, dry
cloth. Apply non-ammonia based cleaner onto the cloth, not directly onto the glass
screen.
Keep the LCD TV away from magnetic objects, motors, TV sets, and transformer.
Do not place heavy objects on the cable or power cord.
For PLUG CABLE EQUIPMENT, the Socket-outlet shall be installed near the
equipment and shall be easily accessible.
CARE AND MAINTENANCE
Care
Avoid exposing your LCD TV directly to sunlight other heat source.
Place your LCD TV away from the sun to reduce glare.
Put your LCD TV in a well ventilated area. Do not place anything heavy on top
of your LCD TV.
Make certain your LCD TV is installed in a clean and moisture-free area.
Keep your LCD TV away from magnets, motors, transformers, speakers, and other
TV sets.
Safety Tips
In the event of smoke, abnormal noise or order coming from your LCD TV, remove
the power cord immediately and consult your service center.
CAUTION-Never remove the rear cover of your LCD TV cabinet.
Never try to repair your LCD TV yourself. Always call your service center or a
qualified technician to carry out repairs.
TROUBLESHOOTING
No power
Make sure A/C power cord is securely connected.
Plug another electrical device into the power outlet to verify that the outlet is
supplying proper voltage.
Power on but no screen image
Make sure the video cable supplied with the TV is tightly secured to the video
output port on back of video source (DVD,VCR) If not, tightly secure it.
Adjust brightness.
Make sure all signal cables are installed.
Wrong or abnormal colors
If any colors (red,green,blue) are missing, check the video cable to make
sure it is securely connected. Loose or broken pins in the cable connector
could cause an improper connection.
Connect the TV unit to another video source or use another Tvs to make
sure the video source was not causing the problem.
Pixel Guarantee
The pixel guarantee applicable for this device is ISO 134062 Class 2 Standard.
Accessories Guarantee
Accessories are not guaranteed.
202750323