1
Important Safety Instructions
Please study this manual carefully and always keep it available. There are, however, some
installation and operation precautions which you should be aware of.
(1). Read these instructions - All the safety and operating instructions should be read before the
product is operated.
(2). Keep these instructions - The safety and operating instructions should be retained for future
reference.
SPLASH
RESISTANT
(3). Heed all warnings - All warnings on the product and in the operating instructions should be
adhered to.
(4). Follow all instructions - All operating and use instructions should be followed.
(5). Do not block any ventilation openings. Install in accordance with the manufacturer's
instruction-To ensure reliable operation of the product and protect it from overheating, put
the product in a position and location that will not interfere with its proper ventilation. For
example, do not place the product on a bed, sofa, or similar surface that may block the
ventilation openings. Do not put it in a built-in system, such as a bookcase or a cabinet that
may keep air from flowing through its ventilation openings.
(6). Do not install near any heat sources such as radiators, heat registers, stoves, or other
apparatus (including amplifiers) that product heat.
(7). Protect the power cord from being walked on or pinched particularly at plugs, convenience
receptacles, and the point where they exit from the apparatus.
(8). Only use attachments or accessories specified by the manufacturer. Do not use attachments
not recommended by the product manufacturer as they may cause hazards.
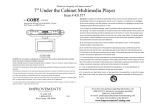
CD SHOWER RADIO WITH ALARM CLOCK
CD-SH 287
C OM PA C T
(9). Unplug this apparatus during lightning storms or when unused for long periods of time.
Unplug it from the wall outlet and disconnect the antenna or cable system. This will prevent
damage to the product due to lightning and power line surges.
(10). Refer all servicing to qualified service personnel. Servicing is required when the apparatus
has been damaged in any way, such as power-supply cord or plug is damaged, liquid has
been spilled or objects have fallen into the apparatus, does not operate normally, or has been
dropped. Do not attempt to service this product yourself. Opening or removing covers may
expose you to dangerous voltages or other hazards.
DIGITAL AUDIO
Please read this manual before connection and use.
INSTRUCTION MANUAL
(11). Power sources-this product should be operated only from the type of power source indicated
on the marking label. If you are not sure of the type of power supply to your home, consult
your product dealer or local power company. For products intended to operate from battery
power, or other sources, refer to the operating instructions.
(12). Overloading-do not overload wall outlets, extension cords, or integral convenience
receptacles as this can result in a risk of fire or electric shock.
Safety Instructions
Table of Contents
CAUTION
IMPORTANT SAFETY INSTRUCTIONS
SAFETY INFORMATION
TABLE OF CONTENTS
RISK OF ELECTRIC SHOCK
DO NOT OPEN
WARNING: SHOCK HAZARD-DO NOT OPEN
AVIS: RISOUE DE CHOC ELECTRIQUE-NE PAS OUVRIR
Page
INTRODUCTION(Index to the Part and Controls)......................................................................1-2
. The lightning flash with arrowhead symbol within an equilateral triangle
is intended to alert the user to the presence of uninsulated "dangerous
voltage" within the product's enclosure
that may be of sufficient magnitude to constitute risk of electric shock to
persons.
INTRODUCTION(CD Control buttons).........................................................................................2
Alarm Clock/Radio
Control Buttons
. The exclamation point within an equilateral triangle is intended to alert the
user to the presence of important operating and maintenance (servicing)
instructions in the literature accompanying the product.
INTRODUCTION(The LCD Display Content...............................................................................4
Connecting to a Headphone
INTRODUCTION(Stand and Wall-Mounting Mechanism)...........................................................3
POWER OPERATIONS(Adapter Operations................................................................................5
Battery Installations
TO PLAY A CD DISC(Basic operations)....................................................................................6-7
FCC NOTICE: This equipment has been tested and found to comply with the
limits for a Class B digital device. Pursuant with the FCC Rules,
Part15. These limits are designed to provide reasonable protection
against harmful interference in a residential installation.
This equipment generates, uses and can radiate radio frequency
energy. And if not installed and used in accordance with the
instruction may cause harmful interference to radio communication.
IMPORTANT
The CD mechanism and the sensitive circuitry may cause interference to a radio
tuner nearby. Do not operate this unit while operating other radio devices.
DANGER This product utilizes invisible laser radiation.
Avoid direct exposure to the beam.
CAUSION Use of controls, adjustments or procedures not listed in this manual
may result in hazardous radiation exposure.
CONCERNING COMPACT DISCS
Only compact discs identified with this mark can be used with this player.
C OM PA C T
DIGITAL AUDIO
RADIO/ALARM CLOCK OPERATIONS..................................................................................8-9
SPECIFICATION..........................................................................................................................9
CARES OF DISC..........................................................................................................................10
TROUBLE SHOOTING................................................................................................................11
WARRANTY..................................................................................................................................12
Introduction
Introduction
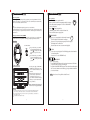
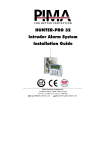
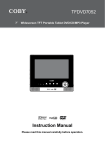
Index to the Parts and Controls
SNOOZE
ON
CD DOOR
OPEN
Power LED
STOP
PLAY/PAUSE
PROGRAM
VOLUME Control
PREV&NEXT
MODE
AUTO/AL.CD.RADDIO
OFF
TIME
TUNING
HOUR&MIN
AM/FM/AL
ALARM.SET&ON/OFF
LCD Display
SPEAKERS
Headphone Jack
DC 6V IN
Stand
.1.
ON: Press to turn on the unit.
OFF: Press to turn off the unit.
Power LED Indicator: It is red when power is ON.
DC 6V IN: Connect to the supplied AC/DC adapter for power supply.
Volume Control: Adjust to the desired volume level.
Headphone Jack: Connect to a headphone.
Speakers: Two speakers produce stereo sound.
AUTO/AL. CD. RADIO: Turn the knob to select the desired function from AUTO/
AL,CD and radio.
CD Control Buttons
OPEN: Press to unlock the CD door and open it by hand. To close the CD door, just
push on the door till the button is well clicked.
PLAY/PAUSE: Press to shift between playing and pausing a CD disc.
STOP: press to stop the playback.
PREV: Press to skip to the previous track. Press and hold to fast backward through
the disc.
NEXT: Press to skip to the next track. Press and hold to fast forward through the
disc.
MODE:Press repeatedly to select the desired playing mode (repeat 1, repeat all,
INTRO, normal)
PROG: Allows the player to play the contents in a programmed sequence.
Alarm Clock /Radio Control Buttons
TIME, HOUR and MIN: Allows the clock setting function (Hour and Minute).
ALARM SET, HOUR and MIN: Allows the alarm clock setting function (hour and
Minute).
ALARM ON/OFF: Press to turn ON/OFF the alarm function.
AM/FM/AL: Turn the knob to select the radio between AM and FM, or the alarm
source among AM, FM and AL (buzzer).
Tuning: Adjust to the desired radio station.
.2.
Introduction
Introduction
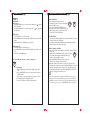
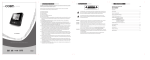
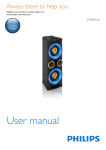
Stand and Wall-Mounting Mechanism
This unit can be operated with standing on a desk or mounting on wall. Please
follow the descriptions as below for operating the mechanisms.
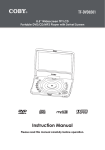
The LCD Display Content
NOTE: Please make sure to get the mechanism unlocked before turning the stand.
a. Stand Mechanism
:UNLOCK
:LOCK
1 ALL
PROG RAND
Track
a. For standing on a desk,
please slide the switch to
BATT Indicate
INTRO
Timer
KHz
MHz
AM
FM
PM
the LOCK position to
STEREO AL
tighten the mechanism.
b. Slide the switch to the
UNLOCK position to
release the mechanism.
Frequency and Clock Display
Connecting to a Headphone
Be sure that your unit is at low volume level before connecting the headphone.
Increase the volume gradually for your comfortable listening.
b. Wall Mounting Mechanism
CAUTION:
To Headphone jack
Hearing experts advise against
the constant use of personal
a. For wall mounting, please
stereos played at high volume.
slide to the LOCK position
Constant high volume use can
to tighten the mechanism.
lead to hearing loss. If you
b. Slide the switch to the
UNLOCK position to
release the mechanism.
.3.
experience ringing in the ears or
Headphone
hearing loss, dis-continue use
and seek medical advise.
.4.
Power Operations
To play a CD disc
Adapter Operations
Power is supplied through the provided appropriative power adapter (INPUT: 110/220V
OUTPUT: 6V 600mA), one end of which is connected to the DC IN jack on the main unit,
another to the wall outlet with AC110-220V.
Note:
a. If you have difficulty inserting the plug, turn it over and reinsert it.
b. If the unit will not be in use for long periods of time, disconnect the plug from the outlet.
c. In order to prolong the operation life, the intervals of continuous power on should be not
less than 30s.
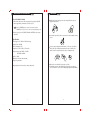
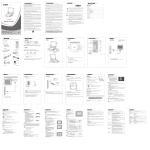
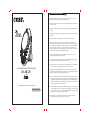
Battery Operations (NOT INCLUDED)
This unit also operates on four (4) "C" size batteries. Open the battery cover and insert the
batteries in the battery compartment following the polarity diagram indicated inside.
Back View
Lock Mechanism:
To open the battery cover, turn the
LOCK
lock mechanism till the direction
mark"
" pointing at the OPEN
position, then open the cover by
hand.
To lock the battery cover, turn the
lock mechanism till the direction
mark"
" pointing at the LOCK
position.
LOCK
Battery Installations
a. For the power supply of CD/RADIO/
ALARM CLOCK operations, insert
4"C" size batteries in the battery compartment.
b. The 2"AAA" size batteries are to be
put in the battery comparment for
clock back-up purpose in case of
power failure or breakdowns. Replace
the battery every six months for the
best performance.
UM-2X4 (R14,SIZE C) 6V
Basic operations
1. Press the ON button to turn the unit ON.
2. Insert a CD disc into the CD compartment with label facing up.
3. Select CD function by turning the "AUTO/AL. CD. RADIO"
knob to CD position.
4. Press
to start playing the disc.
5. Adjust the volume control to the desired volume level.
6. Press the STOP button to stop playback.
PLAY/PAUSE
Press once to start playing the disc from the first track. 01 01:30
The LCD displays the current track # and timer.
Press twice to stop the playing temporarily. The LCD displays
the flashing time of current track.
Press the button once more to resume normal playback.
STOP
Press once to stop the playback. The LCD displays the total track number
and total lasting time.
Press twice to access to STANDBY mode.
PREV/NEXT
To play a specified track
Press the PREV/NEXT button to skip to the previous/next track. Each time
you press the button, one track will be skipped.
Press and hold the PREV/NEXT button to fast backward/forward through the
disc. The track # and timer on the LCD keeps going backward/forward until
you release the button.
NOTE: Sound is muted during Fast Backward/Forward.
Remove the batteries if the player will
not be in use for a long period of time.
AAA 1.5V
AAA 1.5V
WARNING:
The battery used in this device may present a fire or chemical burn hazard if mistreated.
Do not recharge, disassemble, incinerate, or heat the batteries about 100 C (212 F).
Use of another battery may present a risk of fire or explosion. Dispose of used batteries.
Do not dispose of fire.
Keep batteries out of children's reach.
.5.
.6.
To play a CD disc
RADIO/ALARM CLOCK OPERATIONS
MODE
Repeat playing
Press the MODE button once, to repeat playing the current track. " 1" appears
on the LCD window.
Press the MODE button twice, to repeat playing the disc. "
ALL " appears on
the LCD window.
INTRO playing
To listen to the first 10 seconds of each track.
Press the MODE button three times, the flashing "INTRO" appears on the LCD
window.
Press the PLAY button to start INTRO play from track #1.
RANDOM playing
To listen the CD tracks in a random sequence.
Press the MODE button four times, the flashing" RAND" appears on the LCD
screen.
Press PLAY to start RANDOM play.
Press the MODE button five times to resume normal playback.
Program playing
a. Press the PROG button. And the flashing "PROG" appears on the
LCD.
b. Press the PREV/NEXT button to select the desired track, and press
PROG to confirm.
c. Repeat step (b) to set the program playing sequence up to 20 tracks.
d. Press the Play button to start program playing.
e. Press the STOP button to cancel the program memories.
.7.
RADIO OPERATION
1. Press the ON button to turn the unit ON.
2. To turn radio on, turn the "AUTO/AL. CD. RADIO"
knob to "RADIO" position.
3. Select AM or FM from the AM/FM/AL knob.
4. Adjust the volume control to the desired volume level.
5. Turn the tuning control to the desired radio station.
6. To turn radio off, Press the OFF button.
CLOCK SETTING
1. To set hour, while holding the TIME button, press HOUR until the desired hour
is displayed. Then, release both buttons.
2. To set minute, while holding the TIME button, press MIN until the desired
minute is displayed. Then, release both buttons.
WAKE TO RADIO or BUZZER
1. Select the desired radio station (AM/FM) or buzzer (AL), and adjust to desired
volume level.
2. Turn the "AUTO/AL.CD.RADIO" knob to "AUTO/AL" position.
3. To set alarm, while holding the ALARM SET button, press
HOUR to set hour and MIN to set minute.
4. Press the ALARM ON/OFF button for the 1st time to set
alarm ON."AL" will appear on the LCD window.
And the radio or buzzer will be turned on to wake you up at the preset time.
5. To turn the radio or buzzer off, press the ALARM ON/OFF button for the second
time. And after 24 hours, the radio or buzzer will be ON again automatically.
6. To cancel the ALARM function, press the ALARM ON/OFF for the 3rd time,
and "AL" will disappear from the LCD screen.
NOTE:
1. Once the auto alarm function is activated, the OFF button does not function.
2. During the auto alarm (AM or FM) functioning period, if the "AUTO/AL, CD,
RADIO" knob is turned for CD function, frequency information may appear on
the LCD window, please press the " ALARM ON/OFF" button to set alarm off.
.8.
RADIO/ALARM CLOCK OPERATIONS
SNOOZE TO REPEAT ALARM
1. When alarm is turned on, it will be temporarily off by pressing the SNOOZE
button. Approximately 6 minutes later, it will be on again.
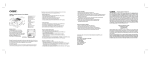
Cares of Disc
Handle discs by their outer edges and /or the center spindle holes to prevent
fingerprints and scratches.
NOTE: Once the SNOOZE function is activated, it means this unit is in
SNOOZE period. Please do not set other new alarms during this period.
2. Refer to the step 5 and 6 in "WAKE TO RADIO or BUZZER" section to turn
alarm OFF.
Specification:
Power Supply: 110V~60Hz/220V~50Hz dual voltage
Applicable disc: CD/CD-R
Power Consumption: 2.5W
Output Power: 0.35W x2 (CD), 0.5W x2 (radio)
Frequency Range: AM: 530KHz - 1700KHz
FM: 88MHz - 108MHz
Speaker: 8 OHM
Dimensions: 174x50x250 mm (main unit)
Weight: 640g (main unit)
Design and specifications are subject to change without notice.
.9.
Do not bend or press the disc. Do not expose the disc to direct sunlight or heating
sources.
To remove stains or fingerprints from the surface of a disc, use a soft, lint-free,
and dry cloth. Wipe in straight movements from the center of the disc to the
outside. Do not use any chemical products, as they can damage the disc.
Do not write on or attach labels to the surface of the disc.
To minimize exposure to dust and dirt. Replace discs in their cases after use.
Store each disc in its case, out of direct sunlight, high temperature and humidity.
.10.
Trouble shooting
Trouble shooting
Should your player develop a problem, please check below before requesting service.
Symptom
Check and Action
* Check if the power cord has been properly connected to
the power outlet.
*Replace with new batteries.
System does not * Be sure to select a sound source. (CD, AM/FM etc.)
function at all
* Unplug the main unit, and then reconnect it. This allows
the unit to reset itself after a power surge or power
interruption.
No sound
CD does
not play
Radio does
not work
* Increase the volume.
* Disconnect any headphones.
* No disc. Load a disc.
* Disc has been loaded upside down. Place the disc with
the label side up.
* Disc is damaged or dirty. Clean the disc or try another
one.
* Moisture may be condensed inside the player. Remove
the disc and leave the unit power on for one or two hours.
* Disc is incorrect type for the player.
90 DAYS LIMITED WARRANTY
COBY ELECTRONICS CORP. ("COBY") warrants this product to the original purchaser to be free
from defects in material or workmanship under normal use for 90 DAYS from the date of original
purchase. COBY agrees under this warranty, to repair or replace it with a new or reconditioned product
at no additional charge. Our warranty does not cover any product which has been subject to neglect,
unreasonable use, accident, violation of operating instruction or any product that has been repaired or
modified by an unauthorized service agent. To obtain factory service, return this unit freight-prepaid to
the address shown below within the duration of this warranty. Enclose $6.00 for each item in the form
of money order made payable to COBY ELECTRONICS CORP. to cover the cost of shipping and
handing. Also, include a copy of the sales receipt to show proof of purchase and a detailed description
of the problem. The unit(s) must be packaged in such a way as to reasonably protect it from possible
shipping damage. For further information write to
COBY ELECTRONICS CORP.
Customer Service Dept.
56-65 Rust Street
Maspeth, N.Y.11378
COBY's liability under any legal theory for any loss damage in any way related to this product shall
not exceed the sales price of this product. In no event shall COBY be liable for any incidental or
consequential damages resulting from the use of this product, or inability to use this product. Repair
or replacement as provided under this warranty is the exclusive right of the consumer.
Except to the extent prohibited by law, no express or implied warranty of merchant ability or fitness
for a particular purpose on this product shall be extended beyond the period of this warranty. Some
states prohibit the exclusion or limitation of incidental or consequential damages, so that the above
limitation or exclusion may not apply to you. This warranty gives you specific rights, and you may also
have other rights which may vary from state to state.
* You may be in an area of weak signal coverage.
.11.
.12 .