Transcript
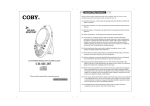
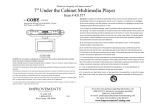
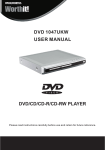
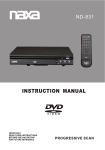
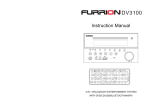
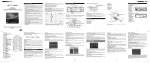
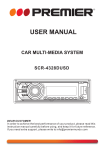
Important Safety Instruction
Important Safety Instruction
R
CAUTION: Use of controls or adjustments or performance of procedures other than those specified
herein may result in hazardous radiation exposure.
(13) Unplug this apparatus during lightning storms or when unused for long periods of time. Unplug it from
Please carefully study this manual and always keep it available. There are, however, some installation and
lightning and power-line surges.
operation precautions which you should be aware of .
(14) Refer all servicing to qualified service personnel. Servicing is required when the apparatus has been
(1) Read these instructions-All the safety and operating instructions should be read before the product is
damaged in any way, such as power-supply cord or plug is damaged, liquid has been spilled or objects
have fallen into the apparatus, the apparatus has been exposed to rain or moisture, does not operate
(2) Keep these instructions-The safety and operating instructions should be retained for future reference.
normally, or has been dropped.
(3) Heed all warnings-All warnings on the product and in the operating instructions should be adhered to.
(15) Power Sources- This product should be operated only from the type of power source indicated on the
(4) Follow all instructions-All operating and use instructions should be followed.
marking label. If you are not sure of the type of power supply to your home, consult your product dealer or
(5) Do not use this apparatus near water-The apparatus shall not be exposed to dripping or splashing and
local power company. For products intended to operate from battery power, or other sources, refer to the
that no objects filled with liquids, such as vases, shall be placed on the apparatus.
operating instructions.
(6) Clean only with dry cloth-Unplug this product from the wall outlet before cleaning. Do not use liquid or
(16) Protective Attachment Plug-The product is equipped with an attachment plug having overload
aerosol cleaners. Clean only with dry cloth.
protection. This is a safety feature. See instruction manual for replacement or resetting of protective device.
the possibility of the loss of an authorization code for a CATV converter, is not intended to be unplugged
by the manufacturer that has the same overload protection as the original plug.
that may be of sufficient magnitude to constitute risk of electric shock to persons.
presence of important operating and maintenance (servicing) instructions in the literature
(17) Outdoor Antenna Grounding- If an outside antenna or cable system is connected to the product, be
PLAYING A DISC.....................................................................................................................................................11
FUNCTION BUTTONS......................................................................................................................................12-15
CAUTION:
To prevent electric shock, match wide blade plug to wide slot, and fully insert.
CAUTION:
This Digital Video Disc Player employs a laser System. To prevent direct exposure to the
visible laser radiation is present.
regard to proper grounding conductors, location or antenna- discharge unit, connection to grounding
to protect it from overheating, and these openings must not be blocked or covered. The openings should
Use of controls or adjustments or performance of procedures other than those specified
electrodes, and requirements for the grounding electrode.
herein may result in hazardous radiation exposure. DO NOT STARE INTO BEAM.
(including amplifiers) that produce heat.
blades with one wider than the other. A grounding type plug has two blades and a third grounding prong.
The wide blade or the third prong is provided for your safety. If the provided plug does not fit into your outlet,
consult an electrician for replacement of the obsolete outlet.
(10) Protect the power cord from being walked on or pinched particularly at plugs, convenience receptacles,
in a residential installation.
circuits as contact with them might be fatal.
This equipment generates, uses and can radiate radio frequency energy and if not installed and used in
for home and other limited viewing uses only unless otherwise authorized by Macrovision.
may touch dangerous voltage points or short-out parts that could result in a fire or electric shock. Never
Reverse engineering or disassembly is prohibited.
spill liquid of any kind on the product.
(21) Servicing -Do no attempt to service this product yourself as opening or removing covers may expose
you to dangerous voltage or other hazards. Refer all servicing to qualified service personnel.
at plugs, convenience receptacles, and the point where they exit from the product.
(22) Replacement Parts-When replacement parts are required, be sure the service technician has used
replacement parts specified by the manufacturer or have the same characteristics as the original part.
Unauthorized substitutions may result in fire, electric, or other hazards.
(12) Use only the cart, stand, tripod, bracket, or table specified by the manufacturer, or sold with the appa-
(23) Safety Check- Upon completion of any service or repairs to this product, ask the service technician
ratus. When a cart is used, use caution when moving the cart/apparatus combination to avoid injury from
to perform safety checks to determine that the product is in proper operating condition.
tip-over.
NOTE: 1. Mains plug is used as the disconnect device. It shall remain readily operable and should not
be obstructed during intended use.
2. The rating label is located on the bottom enclosure of the apparatus.
Monday- Friday 8:00AM ~ 11:00PM (EST) 1-800-681-2629 or 718-416-3197
Monday- Friday 6:30PM ~ 11:00PM (EST) 1-800-727-3592
Saturday- Sunday 9:00AM ~ 11:00PM (EST) 1-800-727-3592
Or Send E-Mail to: [email protected] / [email protected]
Unpacking
Identification of Controls
Identification of Controls
Note on Disc
Please make sure the following items are included with your DVD player. If any items are
missing, contact your dealer.
This product incorporates copyright protection technology that is protected by U.S. patents and other intellectual
property rights. Use of this copyright protection technology must be authorized by Macrovision, and is intended
likely to be walked on or pinched by items placed upon or against them, paying particular attention to cords
recommended by the product manufacturer as they may cause hazards.
TROUBLE SHOOTING...........................................................................................................................................18
SPECIFICATIONS..................................................................................................................................................19
accordance with the instruction may cause harmful interference to radio communication.
NOTICE:
(20) Object and Liquid Entry- Never push objects of any kind into this product through openings as they
and the point where they exit from the apparatus. Power-supply cords should be routed so that they are not
(11) Only use attachments/'accessories specified by the manufacturer. Do not use attachments not
CUSTOM SETUP....................................................................................................................................................17
the FCC Rules,Part 15. These limits are designed to provide reasonable protection against harmful interference
an outside antenna system, extreme care should be taken to keep from touching such power lines or
this can result in a risk of fire or electric shock.
SETUP MENU........................................................................................................................................................16
FCC NOTICE: This equipment has been tested and found to comply with the limits for a Class B digital device. Pursuant with
or other electric light or power circuits, or where it can fall into such power lines or circuits. When installing
(19) Overloading- Do not overload wall outlets, extension cords, or integral convenience receptacles as
CONNECTIONS(Connecting to an amplifier ...........................................................................................................7
equipped with a Dolby Pro
Logic Surround)
Dangerous high voltage is present inside the enclosure. Do not open the cabinet.
built-up static charges. Article 810 of the National Electrical Code, ANS/NFPA 70, provides information with
(18) Power lines- An outside antenna system should not be located in the vicinity of overhead power lines
IDENTIFICATION OF CONTROLS.......................................................................................................................3-5
To reduce the risk of fire or electric shock, do not expose this appliance to rain or moisture.
and openings in the cabinet are provided for ventilation and to ensure reliable operation of the product and
(9) Do not defeat the safety purpose of the polarized or grounding-type plug. A polarized plug has two
NOTE ON DISC........................................................................................................................................................2
PREPARATIONS BEFORE OPERATION...........................................................................................................8-10
WARNING:
7) Do not block any ventilation openings. Install in accordance with the manufacturer's instruction-Slots
(8) Do not install near any heat sources such as radiators, heat registers, stoves, or other apparatus
Identification of Controls
Main Unit
Main Unit
Disc Requirement
Disc size
DVD video
discs
Audio+Video
(moving picture)
12cm
Audio CDs
Audio
Maximum playback time
133 min (SS-SL)
242 min (SS-DL)
266 min (DS-SL)
484 min (DS-DL)
12cm
In addition, this unit can play back a CD-R, or CD-RW that contains audio titles or MP3 files.You cannot playback discs
Zoom
(TV or monitor with audio/video input)
PREV/NEXT Skip
MENU
Speaker
other than those listed above.(CD-ROM, CD-Extra, CD-G, and CD-l discs can not be played on this DVD player.)
Stop
Mute
SETUP
LCD
MODE
Step
DIRECTION&
ENTER
DISPLAY
Care of Disc
TITLE
DVD Player
Remote Control
LCD Mode
Setup
Play/Pause
Menu
Enter
Direction buttons
Mute
TFT LCD
74min
If the TV has a video input, connect the DVD
player with a video cable. Do not connect more
than one video connection at a time to avoid
picture interference.
Connecting to a TV set
Display
Power
Contents
Mute
Clear
Connections
Title
The DVD player can playback the following discs.
Disc mark
Page
CONNECTIONS(Connecting to a TV)......................................................................................................................6
. The exclamation point within an equilateral triangle is intended to alert the user to the
laser beam, do not try to open the enclosure. When open and the interlocks are defeated,
the manufacturer's instructions have been adhered to .
IMPORTANT SAFETY INSTRUCTIONS
SAFETY INFORMATION
TABLE OF CONTENTS
UNPACKING.............................................................................................................................................................1
. The lightning flash with arrowhead symbol within an equilateral triangle is intended to alert
sure the antenna or cable system is grounded so as to provide some protection against voltage surges and
not be placed in a built-in installation such as a bookcase or rack unless proper ventilation is provided or
Customer Service Hours
WARNING: SHOCK HAZARD-DO NOT OPEN
AVIS: RISOUE DE CHOC ELECTRIQUE-NE PAS OUVRIR
accompanying the product.
If replacement of the plug is required, be sure the service technician has used a replacement plug specified
never be blocked by placing the product on a bed, sofa, rug, or other similar surface. This product should
Please read this manual before connection and use.
CAUTION
RISK OF ELECTRIC SHOCK
DO NOT OPEN
the user to the presence of uninsulated "dangerous voltage" within the product's enclosure
Exception: A product that is meant for uninterrupted service and that for some specific reason, such as
cleaning description otherwise required in 131.8(5)
Table of Contents
the wall outlet and disconnect the antenna or cable system. This will prevent damage to the product due to
operated.
by the user for cleaning or any other purpose, may exclude the reference to unplugging the product in the
TF-DVD7107
Safety Precautions
Continued
DC 9V IN
Battery Charge indicator
AV Switch
VIDEO
OPTICAL/AUDIO
HEADPHONE Jack
VOLUME Control
Video disc contains high-density compressed data that needs proper handling.
1. Hold the disc's outer edge and/or the center spindle hole. Do not touch the disc surface.
2. Do not bend or press the disc. Do not expose the disc to direct sunlight or heating sources.
Numeric buttons
STOP
SLOW
RETURN
Step
Clear
NEXT
PLAY/PAUSE
Remote Sensor
POWER ON Indicator
DISC lid
FF/FR Search
To VIDEO OUT
Step
Slow
PBC
Program
Repeat A-B
Repeat
Audio
To AUDIO OUT
SubTitle
OPEN PREV
To AUDIO/VIDEO
input
Angle
Remote Control
Battery
CD Car Cord
Audio/Video cable(Supplied)
3. Store discs in cabinet vertically , and in dry condition. Prevent exposure to :
Direct sunlight
Heat or exhaust from a heating device.
Extreme humidity.
NOTE:
Place a disc with label facing up, and push gently on the center of the disc so it goes into position.
NOTE:
To start playing, press the ENTER button.
AC/DC Adapter
Power Cord
4. Clean the disc surface with a soft, dry cleaning cloth. Wipe the disc surface gently and radically from center
toward the outer edge.Do not apply thinner , alcohol , chemical solvent, or sprays when cleaning.
Such cleaning fluids will permanently damage the disc surface.
1. Refer to the owner's manual of your TV as well.
2. Before connecting the DVD player to a TV set, be sure to turn the power off
and unplug both units from the wall outlet.
To stop playing, press the STOP button.
To Skip Forward/Skip Backward, press the PREV/NEXT
/
.
To Fast Forward/Fast Backward, press and hold the PREV/NEXT button for about two seconds.
POWER Switch
HEADPHONE Jack
RCA Cable
Power ON LED status:
a). It is green under normal playback.
b). It is red under STANDBY mode.
Headphones
.1.
.2.
Connections
.3.
Power Connections
Insert the battery
Connecting to an amplifier equipped with a Dolby Pro Logic Surround with optical input
Power Connections
AC Adapter
For new or exhausted rechargeable battery pack, we recommend it be charged for 4 hours.
Amplifier equipped with a Dolby Pro Logic Surround
1. Place the battery into its cradle recessed on the bottom of the player and insert the battery hooks
into the its slots.
2. Slide OPEN button to arrow direction to lock it.
3. To release the battery, slide OPEN button to the opposite direction and then take off the battery.
To DC in jack
Function Buttons
Basic Playback
Battery Pack
Remote Control
AC adapter:
This AC adapter operates on
100-240V~~50/60Hz 2A Min
DC OUT: 9V
DC current: 2.0A Min
.6.
Playing a Disc
Preparations before Operation
Preparations before Operation
Preparations before Operation
.5.
.4.
LCD Mode
To adjust the Brightness, Contrast, and Color of the TFT panel.
Press the LCD Mode button, the screen shows:
Prepare the power supply.
1. Slide the POWER switch to ON position to turn the unit on.
LCD
Mode
2. Load a disc
Press OPEN button to open the disc lid and insert a disc with the label up.
Close the disc lid by hand.
If the single sided disc is placed in upside down,
"NO DISC" or "BAD DISC" will appear on the TV screen.
3. Start playback
Press PLAY button to start playing. (Some discs may play automatically).
POWER Switch
OPEN Button
If a DVD disc menu appears on screen
battery hooks
battery cradle
To wall outlet
Press the DIRECTION buttons to select the desired feature in the menu.
Press ENTER button to confirm a selection in the menu.
Optical cable
OPEN button
4. Adjust the volume
Turn the volume control on main unit to the desired volume level.
Note:
1. Refer to the diagram. Open the battery compartment of the remote control. Insert batteries, then close the
compartment.
2. To use the remote control, point it at the remote sensor of the unit and operate in the range of 5 meters and
at angle of 60.
3. Generally, the batteries last for about one year. Replace the batteries if the remote control does not work.
4. Remove the batteries if remote control will not be in use for a long period of time.
To AUDIO OUT jack
With a receiver equipped with Dolby Digital
Li-ion Rechargeable Battery pack
7.4V 3000mA/h
Caution:
Do not connect the power plug to a power outlet other than that indicated on the label, as this
may result in a risk of fire or electric shock.
Do not connect or disconnect the power plug with wet hands. Doing so may cause electric shock.
Do not use an AC adapter other than that specified, as it may cause a fire or damage to the player.
Charging the battery pack
The battery pack can be recharged for about 300 times without obvious performance dropped.
For initial use, we recommend it be charged for at least 4 hours.
To charge the battery, just attach it to the main unit and then power on the unit by AC adaptor.
Battery charging indicator lights red while battery is under charging and it will turn to
green after the battery is fully charged.
Warning: The battery used in this device may present a fire or chemical burn hazard if mistreated.
Do not recharge, disassemble, incinerate, or heat about 100 C(212 F)
Use of another battery may present a risk of fire or explosion. Dispose of used batteries.
Keep batteries away from children. Do not disassemble or dispose of fire.
NOTE: When battery voltage reaches low, the unit will access to STANDBY mode automatically.
.
Connect the equipment. Refer to receiver's owner'
Problem disc messages
The following message will be displayed on screen when there is a format problem with loaded disc:
SCREEN 16 : 9 4 : 3
1. Press up/down direction button to highlight the desired
item and press left/right button to make adjustment.
2. To set screen size, press up/down direction button to
select SCREEN and then press left/right button to
set screen dimension as 16:9 or 4:3 .
3. To reset all items, select RESET by up/down direction
button and then press left/right direction button to confirm.
RESET
Display
Press Display button to show the time and status information.
Pres Display button the third time to quit the display mode.
Under AV IN mode (Slide the AV switch to IN position), press the Display button to shift the TV SYSTEM
between NTSC and PAL.
Play/Pause/Stop
Press Play button for the first time to play the disc.
Press the button for the second time to pause playing. (Still picture).
Press again to resume playback.
Press the STOP button once, to stop playback.Press the PLAY button to resume. Disc will begin playing
from where it was stopped.
Press the STOP button twice, to stop playback. Press the PLAY button to resume.Disc will begin playing
from the beginning.
Skip Forward/Backward
Press the button to skip advance DVD chapter or CD track
"WRONG REGIONAL DISC"
Region code of the disc is not matching to the player's (region 1 to region 6)
"WRONG PASSWORD"
The rating level of the disc is higher than the rating level setting of the player.
The player will not play the disc.
"WRONG DISC"
The player is equipped with automatic disc quality detection software. When the player detects a problem or damaged
disc, the unit may play the disc at a lower quality or stop completely, depending on the damaged level of the disc.
Production qualities of DVD discs vary. Some discs may deviate from the industry
standard. Some incorrectly formatted discs may be played. However, the playback and
operational quality may be substandard.
POWER management
If the player will not be in use for a long period of time, please push power switch to OFF position.
Press the button to skip backward DVD chapter or CD track
NOTE: Player will not skip forward or backward during "WARNING" section of a DVD disc.
Single chapter DVD or single track CD cannot be skipped.
Fast Forward/Backward
Press the button to fast forward through the disc. Repeatedly pressing the button will increase the search
speed.
Normal
x2
x4
x8
x16
x32
Press the button to fast backward through the disc. Repeatedly pressing the button will increase the search
speed.
Press PLAY to resume normal playback.
NOTE: The player is muted in fast forward or fast backward mode.
The player will not fast forward or fast backward during WARNING section of a DVD disc.
Slow
Press SLOW button to play at slow motion. Repeatedly pressing the button will decrease the slow speed.
Slow
Normal
x1/2
x1/4
x1/8
x1/16
x1/32
NOTE: The player is muted at SLOW mode.
.7.
.8.
Function Buttons
Function Buttons
Disc MENU/TITLE
Menu
Title
While playing a DVD, press the MENU button to return to the DVD disc start menu.
While playing a DVD, press the TITLE button to return to the beginning of the Title menu.
NOTE: Some DVD discs do not allow the TITLE function.
Select an item in the menu
In the DVD disc start menu or in the Set Up menu
Press DIRECTION buttons to highlight function icons.
Press ENTER button to confirm a selection.
Clear
Press CLEAR button to cancel an entry.
Playing CD /Search by Time
a). Press the SEARCH button once to show search entry.
b). Input Second, Minute and Hour information.
c). To cancel the incorrect input, press the Clear button.
To execute the search, press ENTER button.
d). To exit , press SEARCH again.
Numeric Key Pad
(Random Program access)
1). To directly access a DVD Chapter or a CD track, input the desired DVD Chapter or CD Track
number using the numeric key pad.
2.) Input data for the DVD disc start menu or the player's setup menu.
NOTE: Some DVD discs do not allow direct access function.
Audio
While playing a DVD disc, press AUDIO button to select the language of the audio sound track.
A DVD disc may contain up to 8 selectable audio sound tracks.
SETUP
Second
Minute
Hour
0 03 30
Program
Hour
Press the SETUP button to enter the player's setup menu.
The SETUP menu allows the viewer to adjust the setting details of the DVD player.
Please read the "SETUP menu" of the manual for further directions on how to use the SETUP menu.
PROGRAM
To program play a disc in a desired sequence.
NOTE:
The Program function is available just as the player is in Navigate Off mode.
Press the PBC button to set Navigate Off.
Second
Title Chapter
Repeat Section A-B
To repeat playback a specific section of a disc.
Press the A-B button at the starting point of the desired section. "Repeat A" appears on screen.
Press the A-B button again at the end of the desired section. "Repeat A-B" appears on screen.
A-B
The player will start repeating playback the selected section from A to B until the function is cancelled.
To cancel the function, press the A-B button for the third time to return to normal playback.
Repeat
PLAYING DVD
Press the ZOOM button repeatedly and the TV screen will display:
ZOOMx2
ZOOMx4
ZOOMx1
PLAYING JPEG
Press the ZOOM button repeatedly and the TV screen will display:
25%
50% 100% 150%
200%
While at 100%, press the direction button to rotate the picture.
While at 150% or 200%, press the direction button to move the picture position.
NOTE: The picture quality decreases as the picture size increases.
Folder
Disc
Off
Title
Disc
Off
Chapter
Disc
Default setting
English
English
English
English
Default setting
Off
TV System
To select the TV system from: NTSC; PAL; AUTO
Brightness
To select the brightness from: Normal; Bright; Soft
Contrast
To select the contrast level from:-4; -3; -2; -1; 0; 1; 2; 3; 4
Press the direction keys to highlight the desired Custom item. (Parental Ctrl, Password, Angle Mark, Default)
Symptom
No power
Does not play
B). Password
Move the cursor to the PASSWORD prompt and press ENTER. Input the password 8888 if it is the first use.
After confirmation, you will be required to input a new 4-digit code, and verify again.
WARNING:
Please keep a copy of the new password in a safe place. Otherwise, you will not be able to change the Parental
Control.
Please remember your password, as the DEFAULT setting will revert everything BUT the PASSWORD to the
factory defaults.
C). Angle Mark
Choose between ON and OFF.
When the Angle Mark function is ON, an icon will be displayed on screen if the disc has multiple angle shots
available for viewing.
Press ANGLE on the remote control to enjoy these scenes.
D). Default
This function allows you to change the player back to the factory default settings. All settings will be changed
back to the original settings except the Password.
No Picture
Picture noisy/
distorted
No sound or sound
output not complete
16:9
OFF
NTSC
NORMAL
0
Certain DVD discs are formatted in wide screen (16:9) or letter box (4:3) only. Adjusting the setting of the
disc player will not change the screen size for these "Format-only" discs.
The TV system for North America is NTSC. Auto should only be used if you have a Multi-System TV.
Audio Setup
Press the Direction keys to highlight the desired Audio item.
STEP
Press STEP when playing, it can step frame by frame.
Press PLAY button to quit the STEP mode.
Item
Angle
While playing a DVD disc, press ANGLE button to view different camera angles on the disc.
A DVD disc may contain up to 9 selectable camera angles.
SubTitle
While playing a DVD disc, press Sub-Title button to select the language of the viewable subtitle.
A DVD disc may contain up to 32 selectable subtitles.
.14.
Digital Out
Instruction
To select the digital output from:
SPDIF/PCM; SPDIF/RAW; OFF
Specification
Should your DVD player develop a problem, please check below before requesting service:
Check and Action
1. Make sure the unit has been powered on manually.
2. Check if the power cord has been properly connected to the power outlet.
3. Make sure the battery pack is fully charged.
1. No disc, load a disc.
2. Disc has been loaded upside down. Place the disc with the label side up.
3. Disc's rating level is higher than the player's setting.
4. Disc is incorrect type for the player.
5. Disc is damaged or dirty. Clean the disc or try another one.
6. Moisture may be condensed inside the player. Remove the disc and leave the unit
power on for one or two hours.
Power supply
DC 9.0V 2A (AC adapter TERMINAL)
Power consumption
< 9.8W
Signal system
NTSC / PAL
Video output
1+0.2V (p-p), 75ohm,
negative sync.,
3.5 mm mini jack x1
Audio output
1.5 Vrms (1 KHz, 0dB), 3.5 mm mini jack x1
Earphone terminal
3.5mm stereo mini jack x2
Signal /Noise ratio(audio)
90dB typical
Dynamic range(audio)
90dB typical
1. Check if the TV set has been powered on. Use TV remote to select AV signal for
DVD rather than broadcast.
2. Check if the system connection is proper and secure.
3. Check if the connection cables are damaged.
4. Clean the disc.
Panel size
7 inch (16:9)
Resolution
480 X 234 pixels
1. Disc is damaged or dirty. Clean the disc or try another one.
2. Reset the color system of the TV set.
3. Make sure the DVD player is not connected through a VCR, cable or satellite dish.
Laser
Wavelength 650 nm
Operating conditions
Temperature: 0 c to 35 c. Operation status : Horizontal
Dimensions
197 x168x40 mm (main unit)
Weight
970g (main unit)
1. Check if the TV and amplifier have been switched on and correctly set.
2. Check if the TV and amplifier system connections are secured.
3. Press AUDIO button to select other audio tracks of the disc.
4. Check if the MUTE function of the TV or amplifier has been activated.
5. There will be no sound output during REVERSE PLAY/PAUSE/SLOW and
SEARCH.
Remote control
does not work
1. Make sure the POWER button on the unit has been turned on manually.
2. Remove the obstacles between the remote control and the player.
3. Point the remote control towards the remote sensor on the player.
4. Check if the batteries of the remote control have been loaded with correct
polarities.
5. Replace the batteries of the remote control.
Malfunction
Should the player develop a malfunction, unplug the player for 30 minutes. After
that, power on the player and the restore function should reset the player.
NOTE:
Multi-Angle/Subtitle/Audio
.13.
Instruction
To select the TV screen size from:
4:3 PS (Pan Scan); 4:3 LB (Letter Box); 16:9 (Wide Screen)
Screen Saver To set Screen Saver function ON or OFF.
NOTE: Some DVD discs do not allow REPEAT function.
Step
Instruction
To select the language of the OSD.
To select the language of the Menu.
To select the language of the audio sound track
To select the language of the subtitle.
When OFF is selected, the subtitle will not be displayed.
TV Type
Zoom
Track
Item
OSD
Menu
Audio
Subtitle
Item
Press REPEAT button repeatedly to select the repeat mode.
Track
ZOOM
NOTE:
: Move :Move : Select
: Quit
:SelectSETUP
SETUP:Out
Screen Setup
Press the Direction keys to highlight the desired SCREEN item.
REPEAT
Press MUTE button to select mute on or mute off.
1. Press SETUP button to show "setup" menu.
2. Press the direction button to select a desired item.
3. Press ENTER button to confirm.
4. Press SETUP button again to quit. Or select "EXIT"
and press ENTER.
.12.
Trouble Shooting
A). Parental Ctrl
There are eight levels of Parental Control. Level one opens discs to people of all ages. Level eight is suitable
only for adults.
To change the parental control setting, a 4-digit code is required to be input first. (The default code is 8888.)
When the input code is confirmed, the level setting menu will appear. Select the appropriate level by the
UP/DOWN button, and press ENTER to confirm.
Language Setup
Press the Direction keys to highlight the desired LANGUAGE item.
Press Program button to enter the program menu.
NOTE: Some DVD discs do not allow the A-B function playback. This function does not apply to MP3 discs.
MUTE
(SETUP MENU)
Various features of the DVD player can be adjusted
in the SETUP menu.
Make sure the player is in STOP mode before setting the
SETUP menu.
0 03 30
Minute
Custom Setup
Setup Menu
NOTE: Some DVD discs do not have multiple ANGLES, SUBTITLES or AUDIO features.
Setup
.11.
.10.
Function Buttons
SEARCH
Go to a desired section. (A desired Title, Chapter, Time)
Search Playing DVD
Search by Title/Chapter
a). Press SEARCH button once,below picture appears:
b). Press LEFT/RIGHT direction button to highlight the entry.
c). Input the desired title/chapter by numeric keys.
d). Press ENTER button to execute search.
e). To exit, press SEARCH again.
Search by Time (For limited DVD discs only)
a). Press the SEARCH button twice to show search entry.
b). Input Second, Minute and Hour by the numeric keys
c). Press the ENTER button to execute the search.
d). To cancel the incorrect information you have input,
press the Clear button.
e). To exit , press SEARCH again.
Press the RETURN button on main unit to return to the upper level menu.
Mute
.9.
Default setting
SPDIF/RAW
NOTE:
When Digital Out is NOT in use, it is recommended to turn OFF the digital output setting, for the purpose
of minimizing the circuit interference.
.15.
.16.
.17.
.18.
.19.