Transcript
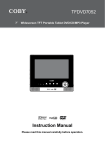
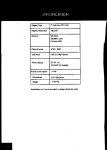
COBY Electronics Corp.
SPECIFICATION
56-65 Rust Street
Maspeth, NY 11378
www.cobyusa.com
www.ecoby.com
WARNING:
7″ Widescreen Digital Photo Frame
To prevent fire or shock hazard, do not expose this device to rain or moisture. Dangerous high
voltage is present inside the enclosure. Do not open the cabinet.
PRECAUTIONS..............................................................................................................................................................2
CAUTION: To prevent electric shock, match wide blade of plug to wide slot of outlet and fully
insert.
TABLE OF CONTENTS..................................................................................................................................................8
..
Protect your hearing: Hearing experts advise against the constant use of personal stereos
played at high volume. Constant exposure to high volumes can lead to hearing loss. If you should
experience ringing in the ears or hearing loss, discontinue use and seek medical advice.
FEATURES...................................................................................................................................................................10
IMPORTANT SAFETY INSTRUCTION......................................................................................................................... 4
PACKAGE CONTENTS..................................................................................................................................................9
GETTING STARTED.....................................................................................................................................................12
Installing a Memory Card.........................................................................................................................................12
Powering your Digital Picture Frame........................................................................................................................12
Turning Your Photo Frame ON/OFF..................................................................................................................... ..13
Connecting to a computer........................................................................................................................................13
Photo...........................................................................................................................................................................14
Change View............................................................................................................................................................14
Zoom........................................................................................................................................................................14
Note:
This equipment has been tested and found to comply with the limits for Class B digital
devices, pursuant to Part 15 of the FCC rules. These limits are designed to provide
reasonable protection against harmful interference in a residential installation. This
equipment generates, uses and can radiate radio frequency energy and, if not installed
and used in accordance with the instructions, may cause harmful interference to radio
communications. However, there is no guarantee that interference will not occur in a particular installation. If this equipment does cause harmful interference to radio or television reception, which can be determined by turning the equipment off and on, the user is
encouraged to try to correct the interference by one or more of the following measures:
Display Resolution
800×480
Memory
MS Card
SD/MMC/XD Card
Full-size USB
Photo Format
JPEG JPG
USB Host
USB 2.0 High-Speed
Power Supply
DC 5V, 1A,
100-240V AC Adapter
CALENDAR...................................................................................................................................................................15
SETUP ..........................................................................................................................................................................16
Photo Setup.................................................................................................................................................................................................................................16
Calendar Setup...........................................................................................................................................................................................................................16
System Setup...............................................................................................................................................................................................................................17
P/N: 907-DP74-0S01-00R
Specifications and manual are subject to change without prior notice.
KICKSTAND..................................................................................................................................................................18
Using the Kickstand................................................................................................................................................18
- Reorient or relocate the receiving antenna.
- Increase the separation between the equipment and receiver.
- Connect the equipment into an outlet on a circuit different from that to which the
receiver is connected.
- Consult the dealer or an experienced radio/TV technician for help
DP740
7″ Full-Color TFT LCD
UNIT VIEW....................................................................................................................................................................11
Function Buttons.....................................................................................................................................................11
FCC Statement:
this device complies with Part 15 of the FCC Rules. Operation is subject to the following
two conditions:
(1) This device may not cause harmful interference, and
(2) This device must accept any interference received, including interference that may
cause undesired operation.
DP740
Display Type
TROUBLE SHOOTING...................................................................................................................................................19
SPECIFICATION..........................................................................................................................................................20
Use of shielded cable is required to comply with Class B limits in Subpart B of Part 15 of
the FCC rules.
Do not make any changes or modifications to the equipment unless otherwise specified
in the manual. If such changes or modifications should be made, you could be required
to stop operation of the equipment.
INSTRUCTION MANUAL
Please read this manual carefully before operation
GETTING STARTED
UNIT VIEW
Please make sure that the items shown below are included in the package. Should
an item be missing, please contact the local retailer from which you purchased this
product.
2
1
3
•
7" widescreen TFT LCD color display
•
Displays JPEG, JPG photo files
1
2
Installing a Memory Card
5
4
Turning Your Photo Frame On/Off
Your picture frame supports the following types of memory cards:
4
•
Photo slideshow mode
•
•
Calendar and clock with alarm timer
•
XD-Picture (XD)
•
SD, MMC, MS, XD card slot
•
Secure Digital (SD)
•
Full-size USB port for use with flash memory drives
•
Wall-mountable design with detachable stand
6
GETTING STARTED
7
8
Memory Stick (MS)
•
Multi Media Card (MMC)
•
USB Flash Storage Drive
•
To turn your photo frame on, set the Power Switch to the “On” position.
•
To turn your photo frame off, set the Power Switch to the “Off” position.
Connecting to a Computer
Connect the photo frame to your computer with a USB cable. Upon connection:
• Your computer will automatically recognize the memory cards installed in
your photo frame. Icons representing your installed memory cards will appear
as “Removable Disk ” when you open “My Computer”.
9
10
3
USB Port
(computer)
Getting photos and files onto your picture frame for viewing couldn’t be easier!
4
USB Port (mini)
11
Make sure that there’s no USB flash drive connecting to the DP frame
before connecting the DP frame to a computer.
Powering your Digital Picture Frame
Your Picture Frame should be connected to
an AC 100-240V wall outlet.
Function Buttons
1.
DP Frame x 1
3. Kickstand and Screw x 1
2.
AC Adapter x 1
4.
Manual x 1
1. -/+ Button
Press to move the cursor left/right in
menu setting and also can be used to
turn pages in the full screen display.
2. Enter/Slidshow
Press for enter during menu selection.
In photo (full-screen) display mode,
press and hold this button to start / stop
photo slideshow.
3. Change View
Press this button to shift between the
view modes Crop to Fill, Full Screen
and Fit to Screen in photo (full-screen)
display mode.
In Calendar Mode: press this button
to change the calendar mode.
12
TROUBLESHOOTING
If you have a problem with this device, please read the troubleshooting guide
below and check our website at www.cobyusa.com for Frequently Asked
Questions (FAQs) and firmware updates. If these resources do not resolve the
problem, please contact Technical Support.
ADDRESS
COBY Electronics Technical Support
150 Knowlton Way
Savannah, GA 31407
EMAIL
[email protected]
WEB
www.cobyusa.com
PHONE
800-727-3592: Weekdays 8:30AM–9:00PM EST
Saturdays 9:00AM–5:30PM EST
718-416-3197: Weekdays 8:00AM–5:30PM EST
The player does not turn on.
•
Make sure the unit has been powered on manually (i.e., the Power Switch has
been physically set to the ON position).
•
Ensure that the power cord has been properly connected to the power outlet.
I cannot select a memory card.
•
Ensure that a memory card has been installed.
•
Ensure that the memory card is properly installed.
•
Ensure that the memory card is not defective.
The alarm does not work.
•
Make sure the Alarm Setting is set properly in Calendar Setup in Setup Menu.
20
4. Menu
Press for exit.
On the Main Menu Screen, press this button to
move the cursor to the memory device list.
5. Down/Up button
Press to move the cursor down/up during
menu selection.
On the Main Menu Screen, select the desired
memory device, and then press Enter button to
confirm.
6. Card slot
Connect the SD/MMC/MS/XD card.
7. Power switch
To turn the photo frame on/off.
8. Full-size USB port
To connect with USB flash drives..
9. Mini-size USB port
To connect with computer.
10. Power Jack
Connect with the power source.
11. TFT Display.
•
Calendar
Inserted: A card icon that is in-color indicates that a memory card has been
inserted(installed) in the corresponding slot.
No card: A card icon that is grayed-out indicates that a memory card has not been
installed in the corresponding slot and is not available for use.
Selected: A higlighted frame indicates that the card slot is selected. Only card slots with
an installed memory card may be selected.
To view time and data, select Calendar on the main menu screen and press Enter button to
confirm. Then the calendar will shown as below.
Main Menu Screen
DC OUT: 5V 1A
Upon turning on the power, your photo frame will display the “Main menu” screen shown below:
Using the supplied power adapter,
plug one end of the adapter into
your photo frame’s Power In jack
and plug the other end into an AC
100-240V wall outlet.
Press the MENU button and then press the UP/DOWN button to select an available card.
Display Mode
The demo slideshow will automatically start in approximately 8 seconds if you don’t press
any button.
Slideshow Duration
Transition Effect
Slideshow Repeat
Select the Photo icon on the main menu screen and press Enter button to enter the Photo mode.
To zoom in the pictures, press “+” button.
Each successive press of “+” button will change the level of magnification as shown below:
ZOOM OFF
250%
125%
150%
175%
200%
225%
Display Mode
Set Date
1. You can adjust the time and data in Calendar setup menu, please refer to Calendar setup in
the Setup menu.
2. There are three display mods available, you can press Change View button to select the
desired mode.
3. Press “-/+” button to view the previous/next month.
4. If there are available pictures, it will be displayed on the right of the window in slideshow mode,
press Up/Down button to turn the pictures.
5. Press Menu button to exit.
The Photo List will display supported Photo files, only.
Your photo frame can display baseline JPEG / JPG files.
14
15
Sets the photo slideshow effect.
Random
Sets the photo slideshow repeat On
function on/off
Auto boot time
16
Auto-power
frequency
Reset
Calendar+
Time+Slideshow
To set Date: Press the UP / DOWN button to select
the number of the date and year, and press the
LEFT/RIGHT button to adjust.
Sets the Calendar display mode
Set Time
To set the Clock Time: Press the UP / DOWN
button to select the the time, and press the
LEFT/RIGHT button to select the desired time.
Alarm Set
Alarm Time
On
Sets the Alarm
To set an Alarm Time: Press the UP / DOWN
button to select the Off/On and time and press the
LEFT/RIGHT button to select the desired time and
On.
To delay the alarm timer, when the alarm timer
sounds, press the ENTER button to turn it off
completely, press any other buttons to delay it. The
alarm timer will sound again 9 minutes, 18 mintues
and 27 minutes later. The alarm will then turn off
automatically.
Mon to Fri.
Sets the Alarm Frequency
Repeat
Sets Snooze Mode
Alarm Frequency
Snooze
Use only AC adapters of the type specified here. Failure to do so
may cause a fire or damage the player.
13
Fit to Screen
Sets the photo display ratio.
Sets the time interval of slideshow 5Sec.
photos.
Sets the Clock Mode
To the amplified picture(only), press Up/Down button to move it up/down;
press and hold “-/+” button to move it left/right.
Do not handle the power plug with wet hands. Doing so may cause
electric shock.
language
Brightness
Conrast
Saturation
Hue
Power On
Power Off
Slideshow
Clock Mode
Note: You can only press the “-” button to zoom out the amplified pictures, but can’t zoom out the
original pictures.
Do not connect the power plug to a power outlet other than that
which is indicated here or on the label as this may result in the risk
of fire or electric shock.
Sets the photo display mode for
entering the Photo Mode from the
Main Menu.
Auto Shut time
Changing View
Zoom
System Setup
Using the Kickstand
Sets the menu language of the photo frame.
Sets the brightness of the screen.
Sets the Contrast of the screen.
Sets the Saturation of the screen.
Sets the Hue of the screen.
Sets the power on
English
7
7
7
1
50
Off
Off
Sets the power off
Sets the auto boot/shut time for the photo frame.
1. Make sure the Power switch on the DP frame is set to ON.
2. Press the UP/DOWN button to select On / Off and time.
3. Press the LEFT/RIGHT button to select the desired time..
Calendar Setup
If your photo frame is set to slideshow in photo setup, it will display the photo in slideshow
mode.You can press Menu button to enter thumbnail mode, and press Menu button again to exit.
If your photo frame is set to thumbnail in photo setup, it will display in thumbnail mode. In this
mode, to display a photo(full screen), use the direction button to select a thumbnail and press
enter button to confirm.
Press the CHANGE VIEW button to change between the screen ratio modes Full Screen, Fit to Screen and Crop
to Fill.
To view the previous/next photo, press Down/Up button.
KICKSTAND
SETUP
Photo Setup
Display Ratio
Photo
Simply insert the memory card of your choice into its corresponding card slot located on the left panel of the photo frame. Take care to orient the card in the proper
direction.
SETUP
CALENDAR
GETTING STARTED
Sets the Auto-Power On / Off Frequency.
Attach the kickstand to the DP frame.
Mon. to Fri.
Resets all settings to their factory default state.
2
24-Hour
Turn the screw to the right to tighten the kickstand.
17
18
0
19