1
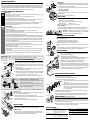
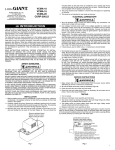
High Power Lighting System
for Bicycles
English
TWIN/SOLO
Model HL-NC250/260
Design Pat. Pending Copyright© 1997 CAT EYE Co., Ltd.
Printed in Japan NCM25W-011120 0688488 4
MOUNTING EXAMPLE
TWIN: HL-NC250
Mounted under the bars with the optional extension spacer.
SOLO: HL-NC260
NAMES
Please make sure that all the following parts are in the package.
3
7
5
1
4
8
10
6
9
2
11
13
12
TWIN
HL-NC250
2
Lamp Body/Lamp bracket (H-27)
ENGLISH
FRENCH
Phare
Bracket(H-27) Support de phare (H-27)
Switch
Interrupteur
Switch Bracket Collier d’interrupteur
Plug
Prise
Jack
Fiche
Cord
Câble
Battery Cap
Coiffe de batterie
Bottle Battery Batterie
Battery Charger Chargeur de batterie
Rubber Pad
Garniture en caoutchouc
Battery Belts
Sangles de batterie
Cord Holder Attache-câble
1 Lamp Body
2
3
4
5
6
7
8
9
10
11
12
13
DEUTSCH
Lampengehäuse
Lampenhalterung (H-27)
Schalter
Halterung Schalter
Stecker
Buchse
Kabel
Batteriedeckel
Batteriebehälter
Batterieladegerät
Gummipolster
Batterieriemen
Kabelhalter
SOLO
HL-NC260
1
SPANISH
Cuerpo de Lámpara
Soporte de Lámpara (H-27)
Interruptor
ITALIANO
NEDERLANDS
Lampade
lampomhulsel
Soporte del interruptor
Enchufe macho
Enchufe hembra
Cable
Tapa de la batería
Cuerpo de la batería
Cargador de la batería
Almohadilla de goma
Correas de la batería
Sujetacable
Supporto dell’interruttore Schakelaarhouder
1
Supporto faro (H-27) Lamphouder (H-27) 2
3
Schakelaar
Interruttore
Presa di connessione
Spinotto della batteria
Cavo
Copribatteria
Portabatteria
Centralina caricabatteria
Spessore in gomma
Fasce per la batteria
Supporto cavo
4
5
Plug
6
Contactje
Snoer
7
8
Batterijdeksel
9
Batterijhuls
Batterijlader
10
Rubberen vulstukjes 11
12
Batterij bandjes
Snoerhouder
13
LIMITED WARRANTY
2-Year Warranty:
Only Lamp Unit and Battery Charger
(Excluding bulb and battery)
If trouble or damage occurs during normal use, the product will be repaired or replaced free of charge. Type your name, address, date of
purchase and the situation of trouble clearly on the warranty certificate, and send it back to the appropriate service center together with the
product. Insurance, handling and transportation charges shall be borne by the customer. After being repaired or replaced, the product will be
shipped back to the customer.
Address for service:
CO.,LTD.
2-8-25 Kuwazu, Higashi Sumiyoshi-ku Osaka 546-0041 JAPAN
Attention: CAT EYE Customer Service Section
Phone: 81-6-6719-7781 Fax: 81-6-6719-2362
Service & Research Address for United States Consumers:
CAT EYE Service & Research Center
1705 14th St. #115 Boulder, CO 80302
Phone: 303-443-4595 Toll Free: 800-5CATEYE(800-522-8393)
Fax: 303-473-0006 e-mail: [email protected]
Lamp Unit
INSTRUCTION MANUAL
Lamp Body
Warning!!! Never touch the lamp body until thoroughly cooled. You may get burnt.
1. To install, slide the lamp body forward onto the lamp bracket until it clicks into
position. Do the same thing with the switch.
2. To remove the lamp body, slide it backward while pushing the lever. Be sure to
remove the switch together.
READ ALL INSTRUCTIONS BEFORE FIRST USE
Thank you for purchasing the CAT EYE TWIN / SOLO Model HL-NC250/260. Designed for high performance night
cycling, this rechargeable lighting system adopts powerful halogen bulb technology. This is a unique high power 12 volt
system. Before operating, thoroughly familiarize yourself with this manual so that you understand the light's safe and
correct operation. Please keep this manual, along with the warranty card, for future reference.
Bracket
Slide
Connecting the Jack
FOR SAFE OPERATIONS (IMPORTANT)
Warning!!!
• The lamp body becomes extremely hot when turned on. Never touch the lamp body or lens until
thoroughly cooled. Injury may result.
• Stop using the light at once if the lamp unit, cord or bottle battery is broken.
• Use only the included battery charger for charging.
• Never short-circuit the terminal of the bottle battery and the plug of the battery charger. It may
cause the battery to over heat, resulting in fire or damage of the components.
• When the battery comes to the end of its useful life, turn the bottom of the bottle battery counterclockwise and take out the inside battery. Safely and properly dispose of the old battery.
• Never place it within children’s reach.
Lever
Push
After connecting the jack to the plug, wind the cord round the frame so that it will
not hinder riding.
Note: Securely connect the jack to the plug.
HOW TO USE
How to Switch on/off
• To switch on/off, press the swicth button.
• With the HL-NC250 TWIN, the two buttons operate as follows:
Yellow Button: 20W
Grey Button: 12W
Note: In case the light does not turn on, charge the battery.
Important Note
Angle of Beam
• When using this light on public roads, be sure to adjust the angle of the beam downward so as not
to blind oncoming traffic.
• Never disassemble the lamp body or bottle battery for the purpose of modification.
• Never use the bottle battery with other equipment.
• Although the lamp body and the battery are water-resistant (normal weather conditions of rain,
etc.), never intentionally submerge them under water.
• Never touch the halogen bulb with bare-fingers; natural skin oils can cause the bulb to over heat and break.
• Never touch or wipe the inside of the reflective mirror. This may degrade the quality of the light output.
• Ni-Cad batteries have unique characteristics. The light output will remain high until just the batteries run out, and then drop suddenly. Take precautions against such a situation by preparing a
spare light or spare bottle battery.
• Use only the included battery charger for charging. Never charge the battery for more than 24
hours. After charging, be sure to unplug the charger from the outlet.
• A long period of non-use will lower the voltage of the battery due to natural self discharge. Always
charge the battery before using.
• The operation time and charging time may vary with the environment.
• Overdischarge (leaving the light on after the power is completely gone) shortens the performance
life of the battery.
• If the lamp body or parts become dirty with mud, etc., gently wipe it away with a dish towel which is
moistened with mild soap. Never apply paint thinner, benzine or alcohol; damage will result.
Switch on the light at night in flat place, and adjust the angle vertically. (It is also
adjusted 10° horizontally.) To adjust, loosen the screw of the bracket a little.
Warning!!! In addition to its high brightness, the beam is widely
diffused. When using this light on public roads, be sure to adjust the
angle downward so as not to blind oncoming traffic.
REPLACING BOTTLE BATTERY
1
2
Battery cap
Jack
HOW TO CHARGE
Rubber
ring
BEFORE FIRST USE: The factory-loaded battery is not fully charged; the charge is useful only for a short period
of time. Before first use, charge the battery fully following the instructions on [HOW TO CHARGE].
Bottle battery
HOW TO ATTACH THE BRACKET
on top of the bars
Lamp Bracket (Use both of the two brackets for NC250)
There are two ways of mounting the lamp unit to bicycle; on top of the bars
or under the bars. Make sure no cables touch the lamp body. (If brake wire
hinders the installation of the "mounting under the bars", use the optional
extension spacer.)
1. Attach the bracket (H-27) to the handlebar using the appropriate rubber
pads provided. Hand-tighten the bolt.
Bolt
2. Before tightening the bolt, adjust the angle of the beam and the position
of the lamp body. (Before using, readjust the angle according to the instruction of "Angle of Beam" in "HOW TO USE" section.)
Bracket (H-27)
3. Tighten the bolt securely. (For a more secure fit, use a screwdriver.)
Bracket (H-27)
Rubber Pad
under the bars
Rubber Pad
Spacer
Turn
Slide
Slide
Using the Extension spacer H-27 LS (Option)
1. Loosen the screw of the spacer and turn the spacer 180°.
Tighten the screw securely again.
2. Insert the extension spacer to the lamp body from the rear.
3. When removing the lamp body from the bracket, remove it
together with the extension spacer.
Extension spacer (option)
Switch
Switch Bracket
Switch Bracket:
Attach the switch bracket (with the switch on it) on the handlebar. Be careful not
to hinder the braking or shifting operation.
1. Use the appropriate rubber pad provided. Tighten the bolt.
SLIDE
2. To remove the switch from the switch bracket, slide it sideway while pushing
the lever (as shown in the figure).
* When removing the switch, remove the lamb body together.
Screw
Lever
Plug
Jack
Bottle battery
HOW TO REPLACE THE BULB UNIT
When replacing the bulb unit, disconnect the jack from the plug. Be sure the lamp body
and the bulb have cooled before replacing.
1. Turn the socket holder counterclockwise and remove it.
2. Turn the lock ring counterclockwise and remove it.
3. Pull out the bulb unit from the lamp body and remove it from the
unit holder.
4. Insert a new bulb unit into the unit holder and fix it with two screws.
Bulb
Rubber ring A
Note: Never touch the halogen bulb with bare-fingers; natural skin
Socket holder
oils can cause the bulb to over heat and break. Never touch or
Lamp body
wipe the inside of the reflective mirror. This may degrade the qualUnit holder
ity of the light output.
Bulb unit
5. Make sure if the rubber ring A/B is properly aligned. Install the lock ring, and tighten it.
Rubber ring B
6. Install the socket holder and tighten it.
Lock ring
Note: For the best performance of waterproofing, securely tighten all the parts. If water
Unit holder
leaks into the inside of the bulb unit, it might result in damage of the components.
Bulb unit
Bottle cage
SAFETY SYSTEM (AUTO-RESET FUSE)
screw
HOW TO MOUNT
Mount the bottle battery into your bottle cage, the lamp body to the lamp bracket
and the switch to the switch bracket. Connect the jack to the plug.
Bottle Battery
Belts
Insert the battery into your bottle cage and fix it tightly with the battery belts.
Note: While riding, the bottle battery may jump out of the bottle cage by a
strong impact. Be sure to fasten it securely with the belts.
Use only the included battery charger in an AC outlet for charging.
1. Insert the plug of the battery charger into the jack of the bottle battery (or
the jack inside of the battery cap).
2. Plug the battery charger into an AC outlet.
* The standard charging time is 8 hours if no charge is left in the battery. Never
charge the battery for more than 24 hours; battery damage will result.
3. After charging, unplug the battery charger and pull out the plug.
Note: Be sure to unplug the battery charger after charging.
Note: To make full use of the bottle battery's capacity, recharge after the
battery's whole capacity has been consumed. If the battery does not serve
the proper run time even after it has a full charge it may be at the end of
it's useful life. Replace it with a new one. Recharge / Discharge Number
of Times: at least 500 (until rated capacity drops to 50%)
Battery charger
Cord
Bottle battery
By preparing a spare bottle battery, you can continue to use the light and the time for
night riding will be extended.
1. Turn the battery cap counterclockwise and open it.
2. Disconnect the inside jack and replace the bottle battery.
Note: After replacing, securely connect the jack again.
Note: When closing the battery cap, be careful not to catch dust around the rubber
ring.
* The bottle battery can be charged without the battery cap. In this case, connect
the plug of the charger directly to the jack inside of the bottle battery.
When an electrical surge/malfunction occurs in the circuit or the temperature of the battery rises, the fuse blows because of its safety system and the circuit will be closed. In this
case, switch the lamp off, find the cause of the malfunction and remove it. After leaving it
for a while, the fuse will automatically recover.
Note: If the fuse blows even after the malfunction is removed, or if the fuse does not
recover, call the appropriate service center for assistance.
SPECIFICATIONS
Bulb:
12W/20W Halogen Bulb
(Only 12W Halogen Bulb with HL-NC260)
Battery:
Bottle battery /12V-2400mAH Ni-Cad Battery
With thermal fuse for overcharge prevention
Charger:
CAT EYE Battery Charger (12V J6.5 type)
Operation Time: (when the temperature is 20°C)
12W:
approx. 140 minutes of continuous use
20W:
approx. 80 minutes of continuous use
12W+20W: approx. 50 minutes of continuous use
Charging Time:
approx. 8 hours(when the temperature is 20°C)
Operating Temperature Charging: 0°C - 40°C (32°F - 104°F)
Range:
Operating: -10°C - 40°C (14°F - 104°F)
Recharge/Discharge
at least 500 (until rated capacity drops to 50%)
Number of Times:
* The specifications and design are subject to change without notice.