Transcript
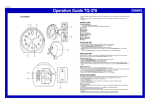
MA0612-EA
Operation Guide W-CLO.H
<Type 1>
• A sticker is affixed to the glass of this clock when you purchase it. Be sure to remove the sticker before
using the clock.
• Depending on its model number, the appearance of your clock may differ somewhat from that shown in
the illustration.
TO START THE CLOCK
1) with polarity as indicated.
Insert a battery into the battery compartment (1
TO SET THE TIME
2) in either direction.
Turn the hour/minute adjuster (2
TO CALIBRATE THE SECONDS
<Type 1>
Remove the battery to stop the second hand at 12 o’clock position. Replace the battery at a time signal to
restart the second hand on the correct second.
<Type 2>
3) to the STOP setting to stop the second hand. Slide (3
3) to START on a time signal to
Slide switch (3
restart the second hand.
• The start of the second hand may be delayed depending on the restart timing.
<Type 2>
REPLACING THE BATTERY
Low battery power is indicated when timekeeping slows or stops completely. Should either of these
symptoms occur, replace the battery immediately. A battery left in the clock after it becomes low or goes
dead can leak battery fluid.
1. Remove the old battery.
2. Load a new battery, making sure that its positive (+) and negative (–) ends are facing correctly. Loading
a battery incorrectly can cause it to burst and damage the clock.
Battery precautions
• Keep batteries out of the reach of small children. If a battery is swallowed accidentally, contact your
physician immediately.
• Be sure to load the battery with its positive (+) and negative (–) ends facing correctly.
• Never charge the battery that comes with the clock.
• Should a battery ever leak while in the clock, wipe out the fluid with a cloth, taking care not to let any get
onto your skin.
• Replace the battery at least once a year, even if the current battery is working normally.
• The battery that comes with the clock loses some power during transport and storage.
1