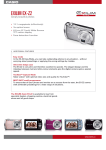
1
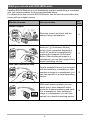
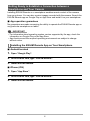
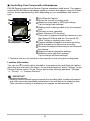
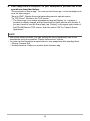
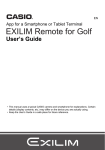
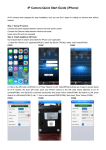
EN
App for a Smartphone or Tablet Terminal
EXILIM Remote 3.0
User’s Guide
• This manual uses a typical CASIO camera and smartphone for explanations. Certain
details (display contents, etc.) may differ on the device you are actually using.
• Keep the User’s Guide in a safe place for future reference.
Read this first!
• The contents of this manual are subject to change without notice.
• The contents of this manual have been checked at each step of the production
process. Feel free to contact us if you notice anything that is questionable,
erroneous, etc.
• Any copying of the contents of this User’s Guide, either in part or its entirety, is
forbidden. Except for your own personal use, any other use of the contents of this
manual without the permission of CASIO COMPUTER CO., LTD. is forbidden
under copyright laws.
• CASIO COMPUTER CO., LTD. shall not be held liable for any damages or lost
profits suffered by you or any third party due to the use of this application software.
• CASIO COMPUTER CO., LTD. shall not be held liable for any damages or lost
profits caused by loss of memory contents due to malfunction, repair, or any other
reason.
• Note that the example screens and product illustrations shown in this User’s Guide
may differ somewhat from the screens and configuration of the actual camera.
2
Contents
Read this first! . . . . . . . . . . . . . . . . . . . . . . . . . . . . . . . . . . . . . . . . . . . . . . . . . . 2
What you can do with EXILIM Remote . . . . . . . . . . . . . . . . . . . . . . . . . . . . . . . 4
Getting Ready to Establish a Connection between a Smartphone and Your
Camera . . . . . . . . . . . . . . . . . . . . . . . . . . . . . . . . . . . . . . . . . . . . . . . . . . . . . . . 6
]
]
Installing the EXILIM Remote App on Your Smartphone . . . . . . . . . . . . . . . . . . . 6
Establishing a Wireless Connection for the First Time . . . . . . . . . . . . . . . . . . . . . 7
Using a Smartphone as a Camera Remote Controller . (Remote Capture) . . . 8
Sending the Image Displayed on the Camera Monitor Screen
to a Smartphone . . . . . . . . . . . . . . . . . . . . . . . . . . . . . . . . . . (Quick Send) . . 11
]
]
To assign the Quick Send function to the front shutter button
or Õ (Continuous Shutter) button . . . . . . . . . . . . . . . . . . . . . . . . . . . . . . . . . . . 11
To send the image on the camera monitor screen to a smartphone. . . . . . . . . . 12
Sending a Just-recorded Snapshot
to a Smartphone . . . . . . . . . . . . . . . . . . . . . (Send Last Shot/Quick Send) . .
Sending a Snapshot or Movie File from Camera Memory
to a Smartphone . . . . . . . . . . . . . . . . . . . . . . . . . . (Send Selected Image) . .
Sending All Images Shot on the Current Day
to a Smartphone . . . . . . . . . . . . . . . . . . . . . . . . . . . . .(Send New Images) . .
Trouble shooting . . . . . . . . . . . . . . . . . . . . . . . . . . . . . . . . . . . . . . . . . . . . . . .
Copyrights . . . . . . . . . . . . . . . . . . . . . . . . . . . . . . . . . . . . . . . . . . . . . . . . . . . .
3
13
14
17
18
19
What you can do with EXILIM Remote
Installing EXILIM Remote on your smartphone and then establishing a connection
with your camera enables the functions described below.
For details about how to install EXILIM Remote, see the user documentation that
comes with your digital camera.
With this function:
You can do this:
See
page:
Remote Capture
Quick Send
Remotely control and shoot with the
camera using a smartphone.
8
On a camera that has a front shutter
button or Õ (Continuous Shutter)
button, send a snapshot displayed in
the PLAY mode to a smartphone by
pressing the camera's front shutter
button. After sending an image to a
smartphone, you can then upload it to a
social networking service.
11
Send a snapshot that was just recorded
with the camera to a smartphone. After
sending an image to a smartphone, you
can then upload it to a social networking
service.
13
With some camera models, you can
select one or more snapshot and/or
movie file in camera memory and send
it to a smartphone. After sending an
image to a smartphone, you can then
upload it to a social networking service.
14
Send Last Shot/Quick Send
Send to phone
4
IMPORTANT!
• Never use wireless LAN functions inside an aircraft or anywhere else where such
operation is restricted.
• Some smartphone models may not be able to play back movie files from your
camera.
• Depending on your smartphone model, its operating system version, and/or its
remaining storage capacity can cause failure of a movie or snapshot save
operation. Receiving a camera file, perform the required operation on your phone
to check if the file was stored properly.
• Viewing a movie received on an Android terminal:
Note that movies are not displayed by Gallery. Movies are stored in a folder named
“EXILIM Remote”. A separate movie player is required to playback movies (whose
files have the file name extension MOV). Depending on your movie player, you
may not be able to playback movies and/or audio.
• Images recorded with another company's camera cannot be received by a phone
using this app.
• Attempting to use a memory card that includes a wireless function with your
camera can cause abnormal operation.
NOTE
• Note that using wireless LAN functions requires more battery power usage than
normal. Make sure that the camera battery is sufficiently charged before starting a
wireless LAN operation.
• The operating range depends on the local communication environment and on the
type of smartphone you are connected to.
5
Getting Ready to Establish a Connection between a
Smartphone and Your Camera
Installing EXILIM Remote on a smartphone enables remote control of the camera
from your phone. You can also receive images recorded with the camera. Search the
EXILIM Remote app on Google Play or App Store and install it on your smartphone.
. App operation guarantees
No guarantees are made concerning the ability to operate the EXILIM Remote app on
any particular smartphone or tablet.
IMPORTANT!
• For information about operating system version supported by the app, check the
information on Google Play or the App Store.
• App functions and the required operating environment are subject to change
without notice.
Installing the EXILIM Remote App on Your Smartphone
. Android terminal
1.
Open “Google Play”.
2.
In the search field, type “EXILIM Remote”.
3.
Install EXILIM Remote.
. iPhone (iOS)
1.
Open “App Store”.
2.
In the search field, type “EXILIM Remote”.
3.
Install EXILIM Remote.
6
Establishing a Wireless Connection for the First Time
The first time you establish a wireless LAN connection between a smartphone and
your camera, you will need to configure your phone’s wireless LAN settings, and input
the camera’s SSID and password. For information about how to do this, refer to your
camera’s user documentation. Once you configure wireless LAN settings, you will not
need to configure them again.
• What you need to do to establish a wireless LAN connection depends on the type
of smartphone you are using. For details about how to establish a wireless LAN
connection see the user documentation that comes with your smartphone.
. What to do if you are unable to establish a wireless LAN connection
between the camera and a smartphone.
This problem may be caused when the smartphone is already wirelessly connected to
one of the networks or devices below. Go to your smartphone’s Wi-Fi settings and
select your camera’s SSID.
• Household wireless LAN
• Public wireless LAN
• Portable wireless LAN device
7
Using a Smartphone as a Camera Remote Controller
(Remote Capture)
This function lets you remotely shoot a snapshot or movie with the camera using a
smartphone. You also can perform remote zoom, self-timer, and other operations as
well.
. On a camera that has a [MENU] button
You can use any one of the recording modes below to shoot with Remote Capture.
Depending on the camera model being used there may be some recording mode that
cannot be used or recording modes that are not equipped.
• Program Auto
• Premium Auto Pro
• A (Aperture AE) mode
• S (Shutter Speed AE) mode
• M (Manual Exposure) mode
1.
Turn on your camera, and then select one of the above as the
recording mode.
2.
On the camera, press [MENU].
3.
On the camera’s “REC MENU”, select “Remote Capture”.
4.
On the camera, select “Remote Start”.
5.
On your smartphone, start up the EXILIM Remote app.
This will establish a connection between the smartphone and your camera.
• About 60 seconds after your camera establishes a connection with the
smartphone, the camera’s monitor screen will go blank and its back lamp will
light green.
• If the message “Connect your phone to the access point below.” remains on
the camera’s monitor screen, change the smartphone’s Wi-Fi settings so your
camera is selected for connection (page 7).
6.
Compose the image on your smartphone’s screen as you shoot.
• After you are finished with Remote Capture, exit the app. Or you can press the
camera's [MENU] button. For full details, see the user documentation that
comes with your camera.
. Model without a menu button
1.
With the camera in the REC mode, display the “
icon.
” (Remote Capture)
The method you should use to display the “ ” (Remote Capture) icon depends
on your camera model. For full details about these methods, see the user
documentation that comes with your camera.
8
2.
On your camera, touch the “
3.
On your smartphone, start up the EXILIM Remote app.
” (Remote Capture) icon.
This will establish a connection between the smartphone and your camera.
• About 60 seconds after your camera establishes a connection with the
smartphone, the camera’s monitor screen will go blank and its back lamp will
light green.
• If the message “Connect your phone to the access point below.” remains on
the camera’s monitor screen, change the smartphone’s Wi-Fi settings so your
camera is selected for connection (page 7).
4.
Compose the image on your smartphone’s screen as you shoot.
• After you are finished using Remote Capture, touch “Exit” on the camera or exit
the app on your smartphone. For details, see the user documentation that
comes with your digital camera.
. Camera Limitations
Depending on the model of the camera being used there may be limitations on
shooting. Equipped functions depend on the camera model.
• The Movie Quality is always STD (640x480) when shooting with Remote Capture.
• “O Tracking” cannot be selected for the AF area setting while shooting with
Remote Capture. If “O Tracking” is selected in another mode, selecting Remote
Capture will cause the AF area setting to change to “U Spot”.
• The Motion Shutter (Handsfree) cannot be used while shooting with this function.
• High Speed CS and Prerecord CS can be used in any recording mode other than
Premium Auto Pro. Configure CS Speed, Maximum CS Shots, and Pre-record CS
Shots settings on the camera before establishing a wireless LAN connection.
• In the case of Prerecord CS, tapping the “PAST” button at the bottom of the
smartphones screen will start continual pre-recording of images to a temporary
buffer. After that, tapping the shutter button 8 (see below) will record the number
of images specified by “Maximum CS Shots” (pre-recorded images plus real-time
recorded images).
• When the focus mode setting is “AF” (Auto Focus) or “Macro”, continuous AF is
enabled during Remote Capture and focus is performed in the center of image.
• If the camera you are using has a pop-up flash unit and you want to use it, be sure
to pop up the flash unit before shooting.
9
. Controlling Your Camera with a Smartphone
EXILIM Remote supports the Remote Capture operations listed below. This manual
explains EXILIM Remote operations based on screens that appear using the iPhone
version. Some operations may differ depending on your smartphone and camera
type.
1
bl
2
3
4
5
6
7
bk
9
8
1 Exits Remote Capture.
2 Shows the current recording mode.
3 Displays current flash or LED light settings.
Tap to change flash settings*.
4 Displays what is being picked up by the camera’s
lens.
5 Performs a zoom operation.
6 Starts Prerecord CS shooting*.
This button is displayed when the camera is in the
High Speed CS Mode and the “Pre-record CS
Shots” setting is anything other than 0.
7 Toggles between snapshot and movie shooting.
8 Shoot a snapshot or start movie recording.
9 Receives the snapshot that was just recorded with
the camera.
bkDisplays location information settings.
blDisplays current self-timer settings.
Tap to change self-timer settings*.
* Functions that are not included on the camera you are using are not displayed.
Location Information
You can use 9 to add location information to snapshots shot with Remote Capture
when they are received by the phone. On an Android terminal, select “Options” on the
Remote Capture screen. On an iPhone, perform the following operation: “Settings”
* “Privacy” * “Location Services”.
IMPORTANT!
• Enabling location-based services causes the recording date, location information,
and other personally identifiable information to be included in the snapshot data.
Take care when sharing or publishing such images on web services, etc.
10
Sending the Image Displayed on the Camera Monitor Screen
to a Smartphone (Quick Send)
With some camera models, you can use the procedure below to send an image
displayed in the PLAY mode (including movies) to a smartphone by pressing the
camera's front shutter button or Õ (Continuous Shutter) button. After sending an
image to a smartphone, you can then upload it to a social networking service.
To assign the Quick Send function to the front shutter button
or Õ (Continuous Shutter) button
1.
Turn on the camera and enter the PLAY mode.
2.
On the camera, press [MENU].
3.
On the camera, select one of the items below from the “PLAY MENU”
and then press [SET].
Front Shutter
Quick Send
4.
On the camera, select one of the items below and then press [SET].
Quick Send
Send by HS Key
• Pressing the front shutter button or Õ (Continuous Shutter) button sends the
displayed image to a smartphone via wireless LAN.
11
To send the image on the camera monitor screen to a
smartphone
1.
On the camera, display the images you want to send to the phone.
• To send one image from a CS, press [SET] to start playback of the group
images. When the image you want to send is displayed, press [SET] again to
pause playback.
2.
On the camera, press one of the buttons below.
Front shutter button
Õ (Continuous Shutter) button
3.
On your smartphone, start up the EXILIM Remote app.
This will establish a connection between your camera and the smartphone, and
send the files to the smartphone.
• If the message “Connect your phone to the access point below.” remains on
the camera’s monitor screen, change the smartphone’s Wi-Fi settings so your
camera is selected for connection (page 7).
4.
After image send is complete, on your smartphone, perform either of
the operations described below.
“Preview photo in Scene app”: You can use the Scene app* on the smartphone to
view the sent images.
“Send to SNS”: Display the social networking service upload screen.
“To TOP Panel”: Return to the TOP screen.
* The Scene app is an image management app by Ripplex Inc. It makes it
possible to display images at high speed and to share albums with friends. If
you don’t want to use the Scene app, tap “Setting” in the upper right corner of
the EXILIM Remote TOP screen, and then select “Off” for “Launch Scene
Application”.
NOTE
• “Û” is displayed on the camera screen while there is a wireless LAN connection
between the camera and a smartphone.
• With some camera models, you can specify the size of snapshots sent to the
smartphone using the camera’s “Resize before send” feature.
• You can use the smartphone apps below to view snapshots after sending them.
– iPhone: Camera Roll
– Android terminal: Gallery or another photo browser app
12
Sending a Just-recorded Snapshot to a Smartphone
(Send Last Shot/Quick Send)
With some camera models, you can send a snapshot you just recorded with the
camera to a smartphone. After sending an image to a smartphone, you can then
upload it to a social networking service.
• Note that you will not be able to use Send Last Shot to send a snapshot to a
smartphone if you performed any one of the operations below after recording the
snapshot.
– Exiting the REC mode to the PLAY mode or turning off the camera
– Resetting the camera or formatting camera memory
– Selecting Remote Capture
– Performing a movie recording operation
1.
On the camera, enter the REC mode and shoot the snapshot.
2.
On the camera, touch the “
3.
On the camera, touch “Send”.
4.
On your smartphone, start up the EXILIM Remote app.
” (Send Last Shot) or (Quick Send) icon.
This will establish a connection between your camera and the smartphone, and
send the snapshot you just recorded to the smartphone.
• If the message “Connect your phone to the access point below.” remains on
the camera’s monitor screen, change the smartphone’s Wi-Fi settings so your
camera is selected for connection (page 7).
5.
After image send is complete, on your smartphone, perform one of the
operations described below.
“Preview photo in Scene app”: You can use the Scene app* on the smartphone to
view the sent images.
“Send to SNS”: Display the social networking service upload screen.
“To TOP Panel”: Return to the TOP screen.
* The Scene app is an image management app by Ripplex Inc. It makes it
possible to display images at high speed and to share albums with friends. If
you don’t want to use the Scene app, tap “Setting” in the upper right corner of
the EXILIM Remote TOP screen, and then select “Off” for “Launch Scene
Application”.
NOTE
• With some camera models, you can specify the size of snapshots sent to the
smartphone using the camera’s “Resize before send” feature.
• You can use the smartphone apps below to view snapshots after sending them.
– iPhone: Camera Roll
– Android terminal: Gallery or another photo browser app
13
Sending a Snapshot or Movie File from Camera Memory to a
Smartphone (Send Selected Image)
You can select one more snapshot and/or movie file in camera memory and send it to
a smartphone. You can select up to 100 files, totaling no more than 500MB for a
single send. After sending an image to a smartphone, you can then upload it to a
social networking service.
. On a camera that has a [MENU] button
1.
Turn on the camera and enter the PLAY mode.
2.
On the camera, press [MENU].
3.
On the camera’s “PLAY MENU”, select “Send to phone”.
4.
On the camera, select “Send Selected Image”.
5.
On the camera, move the blue selection boundary to the image you
want to send to the phone, and then press [SET].
Selecting the image of a file causes its check box to become selected.
6.
After selecting the images of all of the files you want to send to the
smartphone, on the camera, press [MENU].
7.
On your smartphone, start up the EXILIM Remote app.
This will establish a connection between your camera and the smartphone, and
send the files to the smartphone.
• If the message “Connect your phone to the access point below.” remains on
the camera’s monitor screen, change the smartphone’s Wi-Fi settings so your
camera is selected for connection (page 7).
14
8.
After image send is complete, on your smartphone, perform either of
the operations described below.
“Preview photo in Scene app”: You can use the Scene app* on the smartphone to
view the sent images.
“Send to SNS”: Display the social networking service upload screen.
“To TOP Panel”: Return to the TOP screen.
* The Scene app is an image management app by Ripplex Inc. It makes it
possible to display images at high speed and to share albums with friends. If
you don’t want to use the Scene app, tap “Setting” in the upper right corner of
the EXILIM Remote TOP screen, and then select “Off” for “Launch Scene
Application”.
NOTE
• “Û” is displayed on the camera screen while there is a wireless LAN connection
between the camera and a smartphone.
• With some camera models, you can specify the size of snapshots sent to the
smartphone using the camera’s “Resize before send” feature.
• You can use the smartphone apps below to view snapshots after sending them.
– iPhone: Camera Roll
– Android terminal: Gallery or another photo browser app
. Model without a menu button
1.
Turn on the camera, and then enter the PLAY mode.
2.
On the camera, display the “
” (Image Send) icon.
The method you should use to display the “
your camera model.
” (Image Send) icon depends on
3.
Touch the “
4.
On the camera, touch “
5.
On the camera, touch the images of the files you want to send to the
smartphone.
” (Image Send) icon.
” (Send to phone).
Touching the image of a file causes its check box to become selected.
6.
After selecting the images of all of the files you want to send to the
smartphone, touch “OK”.
7.
On your smartphone, start up the EXILIM Remote app.
This will establish a connection between your camera and the smartphone, and
send the files to the smartphone.
• If the message “Connect your phone to the access point below.” remains on
the camera’s monitor screen, change the smartphone’s Wi-Fi settings so your
camera is selected for connection (page 7).
15
8.
After image send is complete, on your smartphone, perform one of the
operations described below.
“Preview photo in Scene app”: You can use the Scene app* on the smartphone to
view the sent images.
“Send to SNS”: Display the social networking service upload screen.
“To TOP Panel”: Return to the TOP screen.
* The Scene app is an image management app by Ripplex Inc. It makes it
possible to display images at high speed and to share albums with friends. If
you don’t want to use the Scene app, tap “Setting” in the upper right corner of
the EXILIM Remote TOP screen, and then select “Off” for “Launch Scene
Application”.
NOTE
• With some camera models, you can specify the size of snapshots sent to the
smartphone using the camera’s “Resize before send” feature.
• You can use the smartphone apps below to view snapshots after sending them.
– iPhone: Camera Roll
– Android terminal: Gallery or another photo browser app
16
Sending All Images Shot on the Current Day to a Smartphone
(Send New Images)
Some cameras can be configured to send all images shot during the current day to a
smartphone. However, images sent with this function (Send New Images) are not resent.
1.
Turn on the camera and enter the PLAY mode.
2.
On the camera, press [MENU].
3.
On the camera’s “PLAY MENU”, select “Send to phone”.
4.
On the camera, select “Send New Images”.
5.
On your smartphone, start up the EXILIM Remote app.
This will establish a connection between your camera and the smartphone, and
send the files to the smartphone. The connection between your camera and the
smartphone will be terminated automatically after the send operation is complete.
• If the message “Connect your phone to the access point below.” remains on
the camera’s monitor screen, change the smartphone’s Wi-Fi settings so your
camera is selected for connection (page 7).
NOTE
• If you have a very large number of images to send, the send operation will stop
automatically after every 100 images are sent. You will need to repeat the above
operation as many times as necessary to send all of the images.
• You can specify the size of the snapshots sent to the smartphone using “Resize
before send”.
• The option for sending the images to a social networking service is disabled when
sending images using this function.
• You can use the smartphone apps below to view snapshots after sending them.
– iPhone: Camera Roll
– Android terminal: Gallery or another photo browser app
• This procedure cannot be used to send movies.
• Sending grouped images using this procedure causes them to become ungrouped.
17
Trouble shooting
The camera won’t send movies.
* EXILIM Remote has a maximum file size limitation when sending files. Movie
files that are 500MB or greater in size cannot be sent.
The camera cannot connect with a smartphone.
* If the smartphone or other device has a Wi-Fi connection auto switching function
(auto network switching), the function may be affecting the connection with the
camera. Disable Wi-Fi connection auto switching (network auto switching) by
clearing the setting’s check box, etc.
* Delete the camera SSID from the smartphone Wi-Fi settings, and then re-input it
along with the required password.
A movie sent to a smartphone cannot be viewed. I don't know where the
movie file is stored.
* An Android terminal does not display movies in the Gallery, but movies are
stored in the EXILIM Remote folder. To play back a movie, you need to install a
separate movie player app (that supports playback of MOV files) on your
terminal. Depending on your movie player, you may not be able to play back a
movie or its audio.
18
Copyrights
Except for your own personal enjoyment, unauthorized use of snapshots or movies of
images whose rights belong to others, without the permission of the right holder, is
forbidden by copyright laws. In some cases, shooting of public performances, shows,
exhibitions, etc. may be restricted entirely, even if it is for your own personal
enjoyment. Regardless of whether such files are purchased by you or obtained for
free, posting them on a website, a file sharing site, or any other Internet site, or
otherwise distributing them to third parties without the permission of the copyright
holder is strictly prohibited by copyright laws and international treaties. For example,
uploading or distributing on the Internet images of TV programs, live concerts, music
videos, etc. that were photographed or recorded by you may infringe upon the rights
of others. Note that CASIO COMPUTER CO., LTD. shall not be held liable for use of
a camera in any way that infringes on the copyrights of others or that violates
copyright laws.
The following terms, which are used in this manual, are registered trademarks or
trademarks of their respective owners.
Note that trademark ™ and registered trademark ® are not used within the text of this
manual.
• iPhone is a trademark of Apple Inc.
• Android and Google Play are trademarks or registered trademarks of Google Inc.
• App Store is a service mark of Apple Inc.
• iOS is a trademark or registered trademark of Cisco Systems, Inc. of the United
States.
• Wi-Fi is a registered trademark of the Wi-Fi Alliance.
• EXILIM and EXILIM Remote are registered trademarks or trademarks of CASIO
COMPUTER CO., LTD.
• All other company or product names mentioned herein are registered trademarks
or trademarks of their respective companies.
Any and all unauthorized copying, distribution, and transfer for commercial purposes
of the software provided by CASIO are prohibited.
19
CASIO COMPUTER CO., LTD.
6-2, Hon-machi 1-chome
Shibuya-ku, Tokyo 151-8543, Japan
M29
MA1501-A
2015