1
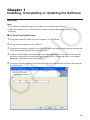
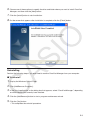
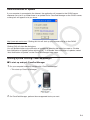
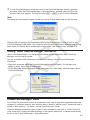
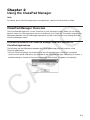
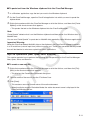
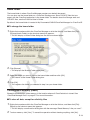
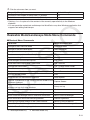
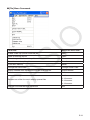
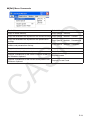
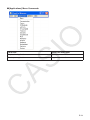
For ClassPad II Series
ClassPad
Manager
(for Windows®)
User’s Guide
CASIO Education website URL
http://edu.casio.com
Access the URL below and register as a user.
http://edu.casio.com/dl/
E
Getting Started
• You can use ClassPad Manager to develop programs and eActivities using the same commands
as those available on the ClassPad. You can store your programs and eActivities on your
computer.
• ClassPad Manager provides the following capabilities.
· ClassPad emulation, which lets you perform ClassPad operations on your computer
· ClassPad emulation screen capture (to the clipboard) and screen printing
· Copy and paste of data (text, values, expressions, etc.) between ClassPad Manager and
other Windows applications
Note
• See your ClassPad User’s Guide for details about operating the on-screen ClassPad unit
emulator.
• Calculation results produced by ClassPad Manager may be different from those produced by
the ClassPad. This is due to the way that computers perform floating-point calculations. Note,
however, that the calculation range of ClassPad Manager is the same as ClassPad (±1×10−999 to
±9.999999999×10999 and 0).
• Display examples shown in this User’s Guide are intended for illustrative purposes only.
The actual text and values that appear on display may differ from the examples shown in this User’s
Guide.
E-1
User Registration
Access the URL below to register as an official user.
http://edu.casio.com/dl/
System Requirements
Operating Systems: Windows XP Home Edition (SP3 or later), Windows XP Professional (32-bit)
(SP3 or later), Windows Vista® (32-bit), Windows 7 (32-bit/64-bit), Windows 8
(32-bit/64-bit) (Desktop UI)
Your hardware configuration needs higher than functionalities that operating
system recommends.
Computer:
Computer with one of the Windows operating systems pre-installed (Excluding
computers with an upgraded operating system and self-built computers.)
Disk Space:
100MB for installation and uninstall
Note:
Actual requirements and product functionality may vary based on your system
configuration and operating system.
Other:
USB port for direct connection. Do not connect via a USB hub.
Video adapter and display must support resolution of XGA (1024×768) or
higher (up to FHD (1920×1080)), 16 bit or higher system color.
CD-ROM drive
Adobe® Reader® 6.0 or later.
Note
• Windows and Windows Vista are registered trademarks or trademarks of Microsoft Corporation in
the United States and/or other countries.
• Adobe and Reader are either registered trademarks or trademarks of Adobe Systems
Incorporated in the United States and/or other countries.
• Company and product names used herein are trademarks of their respective owners.
• Note that trademark ™ and registered trademark ® are not used within the text of this user’s
guide.
E-2
Contents
Chapter 1 Installing, Uninstalling or Updating the Software ................... E-4
ClassPad Manager Data .................................................................................. E-7
Chapter 2 Using the ClassPad Manager.................................................... E-8
ClassPad Manager Overview ........................................................................... E-8
ClassPad Manager Operations ...................................................................... E-10
Using ClassPad Manager in the Resizable Mode/Landscape Mode .............. E-14
Resizable Mode/Landscape Mode Menu Commands .................................... E-21
Using ClassPad Manager in the Fixed-size Mode .......................................... E-27
Fixed-size Mode Menu Commands ................................................................ E-28
Appendix ..................................................................................................... E-29
ClassPad Manager Shortcut Keys .................................................................. E-29
E-3
Chapter 1
Installing, Uninstalling or Updating the Software
Installing
Note
• Do not install ClassPad Manager into a folder that is used by other software.
• Follow this procedure if you have an earlier version of ClassPad Manager already on your
computer.
k To install ClassPad Manager
1. Place the bundled CD-ROM into your computer’s CD-ROM drive.
2. On the menu that appears, click “INSTALL”.
3. Choose the language you want for the ClassPad and ClassPad Manager manuals installed with
ClassPad Manager and then click the [OK] button.
4. Carefully read the terms and conditions of the license agreement. If you agree to be bound by
the terms and conditions of the license agreement, choose “I accept the terms in the license
agreement” and then click the [Next] button.
5. Enter the install key printed on the install key label that comes with the software, and then click
the [Next] button.
E-4
6. Choose one of these options to specify the drive and folder where you want to install ClassPad
Manager, and then click the [Next] button.
7. Click the [Install] button to start installation.
8. On the screen that appears after installation is complete, click the [Finish] button.
Uninstalling
Perform the following steps if you ever need to remove ClassPad Manager from your computer.
k To uninstall
1. Display the Windows Control Panel.
2. Click [Add/Remove Programs].
3. In the list of applications on the dialog box that appears, select “ClassPad Manager”, depending
on which version you currently have installed.
4. Click the [Add/Remove] button to start a program maintenance wizard.
5. Click the [Yes] button.
• This completes the uninstall procedure.
E-5
Auto Notification of Update
If your computer is connected to the Internet, the application will connect to the CASIO server
whenever you start it up. When there is an update file for ClassPad Manager on the CASIO server,
a dialog box will appear to let you know.
http://www.edu.casio.com/: Clicking this link will start up your browser and go to the CASIO
website.
Clicking [OK] will close the dialog box.
You can disable further auto-notification of updates by selecting the check box next to “Disable
Auto Notification of Update” before clicking [OK]. To re-enable auto-notification of updates, select
“Auto Notification of Update” on the ClassPad Manager Help menu.
Starting Up and Quitting ClassPad Manager
k To start up and quit ClassPad Manager
1. On your computer’s desktop, double-click “ClassPad Manager”.
• This starts up ClassPad Manager.
2. On ClassPad Manager, perform the management tasks you want.
E-6
3. To quit ClassPad Manager, move the cursor to the ClassPad Manager window, right-click
anywhere within the ClassPad Manager or click the title bar, and then select [Exit] on the
shortcut menu that appears. You can also click f - c to quit ClassPad Manager.
Note
The dialog box shown below appears when you start up ClassPad Manager for the first time.
Clicking [OK] will configure My Documents\CASIO\ClassPad Manager for ClassPad II as the
ClassPad Manager home folder. You could also click [Browse] and select a different folder as the
home folder. For details about configuring the home folder, see “Home Folder” on page E-13.
Viewing “About ClassPad Manager” Information
“About ClassPad Manager” is a dialog box that shows version information about ClassPad
Manager, and your serial number.
You can use either of the following two procedures to display “About ClassPad Manager”
information.
• Right-click anywhere within the ClassPad Manager or click the title bar. On the menu that
appears, select “About ClassPad Manager”.
• On the Resizable Mode/Landscape Mode (see page E-14), click [Help], and then select “About
ClassPad Manager”.
ClassPad Manager Data
Your ClassPad stores eActivity data in one memory area, and all other data (application data and
variables) in a different memory area. eActivity data is stored in “eActivity area”, while other data is
stored in “Main memory”. For details, see the ClassPad User’s Guide.
ClassPad Manager stores both types of data on your computer’s hard drive in “virtual ClassPad”
(.vcp) format files. Under initial default settings, a file named “default.vcp” is created automatically
for use as the ClassPad Manager’s “Active Document”.
E-7
Chapter 2
Using the ClassPad Manager
Note
For details about ClassPad applications and operations, see the ClassPad User’s Guide.
ClassPad Manager Overview
The ClassPad Manager puts a virtual ClassPad on your computer screen, which you can use to
perform almost all of the operations that are available on your ClassPad. This section explains the
differences between ClassPad Manager operations and the ClassPad unit, and among the three
ClassPad Manager modes.
Differences between the ClassPad Manager and the Functions of
ClassPad Applications
The following are the differences between the ClassPad Manager and the functions of the
ClassPad applications.
• Certain ClassPad settings and functions that are not required when running on a computer
(such as touch panel calibration) are disabled on the ClassPad Manager. Attempting to access a
disabled setting or function will cause the message “Unavailable” to appear on the display.
E-8
ClassPad Manager Display Mode
The ClassPad Manager has three display modes: a Resizable Mode, a Landscape Mode and a
Fixed-size Mode.
• Use the Main application to enter the Landscape Mode.
• The Resizable Mode/Landscape Mode provides functionality that is virtually identical to that as
the ClassPad, but in a typical Windows operating environment. The Resizable Mode/Landscape
Mode also provides a number of special extended functions that are not available on the Fixedsize Mode. For details, see “Using ClassPad Manager in the Resizable Mode/Landscape Mode”
on page E-14.
• The Fixed-size Mode displays a virtual ClassPad that looks almost the same as your ClassPad
unit.
Resizable Mode
Landscape Mode
Fixed-size Mode
Q To select the display mode
Right-click anywhere within the ClassPad Manager or click the title bar, and then click [Resizable
Mode], [Landscape Mode] or [Fixed-size Mode] on the shortcut menu that appears.
E-9
ClassPad Manager Operations
This section explains the operations you can perform on the Resizable Mode, Landscape Mode
and Fixed-size Mode screens of the ClassPad Manager.
Computer Keyboard Operations
The following are the operations you can perform on your computer keyboard to control the
ClassPad application that is currently running in the ClassPad Manager.
• Alphanumeric input
• Cursor key operations (The cursor keys of your computer correspond to the ClassPad cursor
keys.)
• Input of special characters (like π) and commands using shortcut key operations
Note
For information about shortcut keys, see “ClassPad Manager Shortcut Keys” in the Appendix on
page E-29.
Copy and Paste
Q To copy a screen image to the Windows clipboard
1. Display the image you want to copy.
2. Right-click anywhere within the ClassPad Manager or click the title bar, and then click [Capture
Screen] on the shortcut menu that appears.
• The above procedure copies an image of the screen you displayed in step 1 to the Windows
clipboard.
• After that, you can then paste the image into another Windows application.
Tip
• If Resizable Mode/Landscape Mode is selected as the display mode, select [Capture Screen] on
the [Edit] menu in step 2 instead of using the shortcut menu.
• If you have two application windows on the display in the Resizable Mode/Landscape Mode,
the above [Capture Screen] command will copy both windows as they appear on your computer
screen. If you want to copy a specific application window, click the window to make it active and
then click [Capture Current Panel] on the [Edit] menu in step 2 of the above procedure.
Q To copy alphanumeric text from the screen to the Windows clipboard
1. On the ClassPad Manager, drag your mouse pointer across the range of text you want to
select, so it becomes highlighted.
2. On your computer keyboard, press [Ctrl] + [C] to copy the selected text.
• This copies the text you selected in step 1 to the Windows clipboard (as Unicode text).
• After that, you can paste the text you copied into another Windows application (as Unicode
text).
E-10
Q To paste text from the Windows clipboard into the ClassPad Manager
1. In a Windows application, copy the text you want to the Windows clipboard.
2. On the ClassPad Manager, open the ClassPad application into which you want to paste the
clipboard text.
3. Right-click anywhere within the ClassPad Manager or click the title bar, and then click [Paste
Special] on the shortcut menu that appears.
• This pastes the text on the Windows clipboard into the ClassPad Manager.
Note
“Paste Special” detects what is on the Windows clipboard and then pastes it as Windows text, or
MathML data.
You can use “Paste Special” to paste text or MathML data created by other Windows applications.
Important Warning
When the ClassPad detects MathML data on the clipboard, the ClassPad will attempt to paste it
in a 2D math form (natural input form) without warning you. There is no guarantee that the pasted
form will be identical to what was copied from other applications.
vcp File Operations (New, Open, Save, Save As)
This section explains how to perform the following vcp file operations on the ClassPad Manager:
New, Open, Save, and Save As.
Q To create a new vcp file
1. Right-click anywhere within the ClassPad Manager or click the title bar, and then click [File] [New] on the shortcut menu that appears.
• This displays the Create New Document dialog box.
2. Type the name of the new file into the “File Name” box.
3. Click [Save].
• This creates a new vcp file and makes it the active document.
• When the display mode is Resizable Mode, the active document name is displayed in the
ClassPad Manager title bar.
E-11
Q To open an existing vcp file using drag and drop
Drop the vcp file into the ClassPad Manager.
Q To open an existing vcp file using the menu command
1. Right-click anywhere within the ClassPad Manager or click the title bar, and then click [File] [Open] on the shortcut menu that appears.
• This displays the Open dialog box.
2. On the dialog box, select the file you want to open and then click [Open].
• This opens the file you selected and makes it the active document.
Note
You can also use the above procedures to open an mcs or fls file created using a previous
ClassPad Manager version. Doing so, however, will convert the file to vcp format automatically.
Q To save the currently open vcp file
Right-click anywhere within the ClassPad Manager or click the title bar, and then click [File] - [Save]
on the shortcut menu that appears.
Note
The current active document is saved automatically whenever you quit ClassPad Manager. When
you start up ClassPad Manager the next time, the active document that was open during your last
session opens automatically.
Q To save the currently open vcp file under a different name
1. Right-click anywhere within the ClassPad Manager or click the title bar, and then click [File] [Save As] on the shortcut menu that appears.
• This displays the Save As dialog box.
2. Type the new name into the “File Name” box.
3. Click [Save].
• This saves the currently open vcp file under the new name and makes the new file the active
document.
E-12
Home Folder
The home folder is where ClassPad Manager creates your default document.
You can also use the home folder as a ClassPad Storage area. Store C2P/XCP files that you
export with the ClassPad application in the home folder. For details about the Storage area and
C2P/XCP files, see the ClassPad User’s Guide.
By default, the home folder is located in My Documents\CASIO\ClassPad Manager for ClassPad II.
Q To change the home folder
1. Right-click anywhere within the ClassPad Manager or click the title bar, and then click [File] [Change Home Folder] on the shortcut menu that appears.
• This will display a Home Folder dialog box like the one shown below.
2. Click [Browse].
• This displays the Browse Folder dialog box.
3. Select the folder you want to use as the home folder and then click [OK].
• This returns to the Home Folder dialog box.
4. Click [OK].
• This registers the folder you selected in step 3 as your home folder.
Clearing Main Memory (Reset)
Except for eActivity files, Main memory is the location where all ClassPad data is stored. See
“ClassPad Manager Data” on page E-7 for more information.
Q To clear all data, except for eActivity files
1. Right-click anywhere within the ClassPad Manager or click the title bar, and then click [File] [Reset] on the shortcut menu that appears.
• This will display a confirmation dialog box with the message “Reset Memory? Are you sure?”.
2. To clear memory, click [Yes]. To cancel the operation without clearing anything, click [No].
E-13
Using ClassPad Manager in the Resizable Mode/
Landscape Mode
Resizable Mode/Landscape Mode Screen Structure
The following shows the structure of the ClassPad Manager in the Resizable Mode/Landscape
Mode.
Floating
Menu Bar
Function
Bar
Landscape
Window
ClassPad
OS screen
Resizable
Window
Status
Bar
Resizable Mode
Landscape Mode
Resizable Window/Landscape Window
Note
The Resizable Window size can be changed by clicking border and then dragging it to the size you
want. Adjust the Resizable Window so the ClassPad OS screen is at least 320×528.
Floating Menu Bar
The menu bar has five menus: File, Edit, Applications, Window, and
Help. The menu bar “floats”, which mean that you can move it around
independent of the Resizable Window/Landscape Window.
Function Bar
The function bar includes four buttons that correspond to the ClassPad’s
icon panel (Menu, Resize, Swap), along with a “Keyboard” button that
corresponds to the ClassPad’s k key.
E-14
Status Bar
The status bar shows the following information.
1
2
3
1 ClassPad Manager status and other messages
2 Current zoom setting (Normal or Large)
For more information, see “Changing the ClassPad OS Screen
Zoom Setting (Zoom)” on page E-16.
3 Size of ClassPad OS screen displayed on the current window
Q Function Bar Button Operations
The table below explains what you can do with the function bar buttons.
When you want to do this:
Click this
function bar
button:
Or select this menu
item:
Display the application menu*1
Menu
[Applications] - [Menu]
Resize the currently active window (when there are
two windows displayed) so it fills the entire display, or Resize
return to the dual window display again
[Window] - [Resize]
Swap the upper and lower windows, or swap full size
Swap
windows when one is open behind another
[Window] - [Swap]
Click to toggle display of the ClassPad’s soft
keyboard on and off
[Window] - [Keyboard]
Keyboard
*1 Resizable Mode only
Using the Floating Menu Bar to Start Up a ClassPad Application
You can start up an application by clicking the [Applications] menu and then the name of the
application on the menu.
E-15
Changing the ClassPad OS Screen Zoom Setting (Zoom)
To change the ClassPad OS screen zoom setting, right-click anywhere within the window or click
the title bar, and then click [Zoom] - [Normal] or [Zoom] - [Large].
[Zoom] - [Normal]
[Zoom] - [Large]
Note
You can also change the zoom setting by clicking [Zoom] - [Normal] or [Zoom] - [Large] on the
floating menu bar’s [Window] menu.
E-16
Displaying Key Palettes
Clicking [Window] - [Palette] on the floating menu bar will display a sub-menu of key palettes.
Click a key palette name to display it. Each key palette can be opened, closed and repositioned
independently.
[General Math]
[Math]
[2D Math]
[Symbols]
[2D Math ADV]
[Variables]
[International Characters]
Note
You can also display a soft keyboard by clicking the [Keyboard] button on the function bar, just like
on your ClassPad.
E-17
Generating MathML Data
ClassPad Manager can output algebraic expressions and text you input with the Main application,
eActivity application, or other application as a MathML file (.mml). You can also copy algebraic
expressions and text as MathML data (content, presentation, or combined format) to the Windows
clipboard.
Q To export a selected algebraic expression to a MathML file
Example: To output an algebraic expression input with the Main application to a MathML file
1. Click [Applications] - [Main] to start up the Main application.
2. Input the algebraic expression you want to output to the MathML file.
3. Drag your mouse pointer across the expression to select (highlight) it.
4. Click [File] - [Export MathML].
• This displays the Save As dialog box.
5. Type in the file name, and then click [Save].
• This saves the expression you selected in step 3 as an mml file.
Q To copy a selected algebraic expression as MathML data to the Windows
clipboard
1. Select (highlight) the expression you want to copy by dragging your mouse pointer across it.
2. Click [Edit] - [Copy Special] - [MathML].
• This displays the sub-menu shown below.
E-18
3. Click the sub-menu item you want.
To copy data using this type of MathML markup:
Select this option:
Content
• Content markup captures the mathematical structure.
Content
Presentation
• Presentation markup captures notational structure.
Presentation
Combined
• Combined uses content markup whenever possible. Otherwise, it uses
presentation markup.
Combined
• Please consult the Internet or other publications for full details about MathML content markup
and presentation markup.
Copying algebraic Expressions and Text as Unicode Text
You can use the procedure below to copy text or an algebraic expression you selected on the
ClassPad application to the Windows clipboard as Unicode text.
Q To copy algebraic expressions or text as Unicode text
1. Select (highlight) the expression or text you want to copy by dragging your mouse pointer
across it.
2. Click [Edit] - [Copy Special] - [Unicode].
• This copies the selected expression or text to the Windows clipboard as Unicode text.
• You can paste the copied text into any Windows application that supports text editing.
E-19
Copying an Entire eActivity
You can copy the entire content of an eActivity that is currently opened with the eActivity
application to the Windows clipboard. The format of the copied data depends on whether it comes
from a text row, calculation row, or strip.
text row
Copied as Unicode text. Since a natural display expression that was input with
the 2D Keyboard into a text row is copied as Unicode text, the natural display
format is lost. Text rows can be edited within other applications.
calculation row
Both the calculation expression and its result are copied as bitmaps. Because
of this, a natural display expression that was input with the 2D Keyboard into
a calculation row is copied as an image, just as it appears on the Resizable
Window/Landscape Window. Calculation rows cannot be edited within other
applications.
strip
The string “<Container>” is inserted in place of the strip. If the strip has a title,
the title is appended to the right of “<Container>”.
Original eActivity
Data Pasted in WordPad
Q To copy an entire eActivity
1. Open the eActivity whose content you want to copy.
2. Click [Edit] - [Copy Special] - [eActivity].
• This displays the sub-menu shown below.
E-20
3. Click the sub-menu item you want.
To specify this option:
Select this option:
Calculation rows copied as actual size (×1) bitmaps
×1
Calculation rows copied as double size (×2) bitmaps
×2
• Clicking ×1 or ×2 copies all of the content of the currently open eActivity to the Windows
clipboard.
• You can paste the copied text and bitmaps into WordPad or any other Windows application that
supports text editing and bitmaps.
Resizable Mode/Landscape Mode Menu Commands
Q Shortcut Menu Commands
To do this:
Select this menu item:
Change to the Fixed-size Mode
Fixed-size Mode
Change to the Resizable Mode*1
Resizable Mode
Change to the Landscape Mode*2
Landscape Mode
Create a new vcp (virtual ClassPad) file
File - New
Open an existing file
File - Open
Save changes to the current vcp file
File - Save
Save the current vcp file with a new name
File - Save As
Change the home folder
File - Change Home Folder
Clear Main memory
File - Reset
Reopen one of the four most recently opened files
Recent Documents
Print the current screen
Print
Paste the text on the Windows clipboard
Paste Special
Capture a screenshot of the virtual ClassPad screen to the
Capture Screen
Windows clipboard
Keep the ClassPad Manager window and all of its subwindows on top of all other windows
Always on top
Minimize the ClassPad Manager window
Minimize
Change the ClassPad OS screen zoom setting
Zoom
Show ClassPad Manager version and other information
About ClassPad Manager
Show information about the license agreement
License Agreement
Start up your browser and go to the CASIO website
Search ClassPad Manual
Open the ClassPad Manager manual
Search ClassPad Manager Manual
Quit the ClassPad Manager application
Exit
*1 Landscape Mode only
*2 Resizable Mode only
E-21
Q [File] Menu Commands
To do this:
Select this menu item:
Create a new vcp (virtual ClassPad) file
New
Open an existing vcp file
Open
Save changes to the current vcp file
Save
Save the current vcp file with a new name
Save As
Clear Main memory
Reset
Change the home folder
Change Home Folder
Export selected math expressions and text to an mml file
Export MathML
Print the current screen
Print
1 <file name>
Reopen one of the four most recently opened files
2 <file name>
3 <file name>
4 <file name>
Quit the ClassPad Manager application
Exit
E-22
Q [Edit] Menu Commands
To do this:
Select this menu item:
Copy an entire eActivity
Copy Special - eActivity
Copy the selected math expression with content markup Copy Special - MathML - Content
Copy the selected math expression with presentation
markup
Copy Special - MathML - Presentation
Copy the selected math expression with combined
content and presentation markup
Copy Special - MathML - Combined
Copy the selected text as Unicode
Copy Special - Unicode
Paste text from the Windows clipboard
Paste Special
Capture a screenshot of the virtual ClassPad screen to
the Windows clipboard
Capture Screen
Capture a screenshot of the current active panel to the
Windows clipboard
Capture Current Panel
E-23
Q [Applications] Menu Commands
To do this:
Select this menu item:
Display the Application menu
Menu
Start up an application
Applicable menu item
E-24
Q [Window] Menu Commands
To do this:
Select this menu item:
Change to the Fixed-size Mode
Fixed-size Mode
Change to the Resizable Mode*1
Resizable Mode
Change to the Landscape Mode*2
Landscape Mode
Keep the ClassPad Manager Window and all of its sub-windows on
top of all other windows
Always on top
Minimize the ClassPad Manager Window
Minimize
Change the ClassPad OS screen zoom setting to normal size
Zoom - Normal
Change the ClassPad OS screen zoom setting to large size
Zoom - Large
Open the ClassPad keyboard
Keyboard
Open the General Math key palette
Palettes - General Math
Open the 2D Math key palette
Palettes - 2D Math
Open the 2D Math ADV key palette
Palettes - 2D Math ADV
Open the Variables key palette
Palettes - Variables
Open the Math key palette
Palettes - Math
Open the Symbols key palette
Palettes - Symbols
Open the International Characters key palette
Palettes - International
Characters
Resize the currently active window (when there are two windows
displayed) so it fills the entire display, or return to the dual window
display again
Resize
Swap the upper and lower windows, or swap full size windows
when one is open behind another
Swap
*1 Landscape Mode only
*2 Resizable Mode only
E-25
Q [Help] Menu Commands
To do this:
Select this menu item:
Start up your browser and go to the CASIO website
Search ClassPad Manual
Open the ClassPad Manager manual
Search ClassPad Manager Manual
Toggle Auto Notification of Update between enabled and
disabled. Auto Notification of Update is enabled when this
menu item has a check box next to it.
Auto Notification of Update
Show information about the license agreement
License Agreement
Show ClassPad Manager version and other information
About ClassPad Manager
E-26
Using ClassPad Manager in the Fixed-size Mode
LCD Window
In the Fixed-size Mode, you can display only the screen portion (including the Icon Panel) of the
ClassPad in a separate window, called the “LCD Window”.
LCD Window
Q To open the LCD Window
Right-click anywhere within the ClassPad Manager or click the title bar, and then click [LCD
Window] on the shortcut menu that appears.
Q To close the LCD Window
Click the
button in the upper right corner of the LCD Window.
Note
The LCD Window and ClassPad Manager are displayed at the same time. The ClassPad Manager
cannot be closed.
Controlling the Window Zoom Settings
The Fixed-size Mode has three zoom settings: Small, Normal, Large. The LCD Window has three
zoom settings: Normal, Large, Xlarge.
E-27
Q Changing the Fixed-size Mode Zoom Setting
Right-click anywhere within the Fixed-size Mode or click the title bar, and then click [Zoom] [Small], [Zoom] - [Normal], or [Zoom] - [Large].
Q Changing the LCD Window Zoom Setting
Right-click anywhere within the LCD Window or click the title bar, and then click [Zoom] - [Normal],
[Zoom] - [Large], or [Zoom] - [Xlarge].
Fixed-size Mode Menu Commands
Q Shortcut Menu Commands
To do this:
Select this menu item:
Change to the Resizable Mode
Resizable Mode
Change to the Landscape Mode
Landscape Mode
Display a separate LCD Window
LCD Window
Create a new vcp (virtual ClassPad) file
File - New
Open an existing vcp file
File - Open
Save changes to the current vcp file
File - Save
Save the current vcp file with a new name
File - Save As
Change the home folder
File - Change Home Folder
Clear Main memory
File - Reset
Reopen one of the four most recently opened files
Recent Documents
Print the current screen
Print
Paste text from the Windows clipboard
Paste Special
Capture a screenshot and store it on the Windows clipboard
Capture Screen
Keep the ClassPad Manager window and all its sub-windows on
top of other windows
Always on top
Minimize the ClassPad Manager window
Minimize
Change the window size
Zoom
Show ClassPad Manager version and other information
About ClassPad Manager
Show information about the license agreement
License Agreement
Start up your browser and go to the CASIO website
Search ClassPad Manual
Open the ClassPad Manager Manual
Search ClassPad Manager
Manual
Quit ClassPad Manager
Exit
E-28
Appendix
ClassPad Manager Shortcut Keys
Shortcut Key
Function
Ctrl+b
Bold
Ctrl+c
Copy
Ctrl+x
Cut
Ctrl+v
Paste
Ctrl+i
Inputs imaginary unit
Ctrl+p
Inputs π
Ctrl+e
Inputs e
Ctrl+a
Select all
Ctrl+t
Inputs Ctrl+z
Undo
Ctrl+r
Identical to the Resize button (see page E-15)
Ctrl+k
Displays the keyboard
Ctrl+n
Creates a new document
Ctrl+o
Opens an existing document
Alt+x
Inputs single-character variable x
Alt+y
Inputs single-character variable y
Alt+z
Inputs single-character variable z
Alt+Shift+e
Inputs E for exponential value
Alt+i
Inputs infinity
Alt+s
Inputs the square root function (in natural input format)
Alt+F4
Closes the ClassPad Manager
E-29
CASIO COMPUTER CO., LTD.
6-2, Hon-machi 1-chome
Shibuya-ku, Tokyo 151-8543, Japan
SA1303-A
© 2013 CASIO COMPUTER CO., LTD.