1
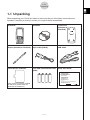
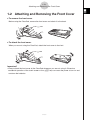
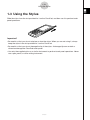
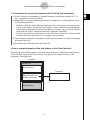
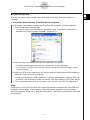
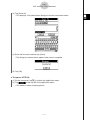
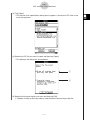
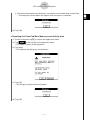
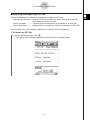
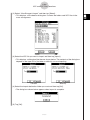
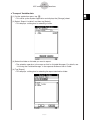
E
ClassPad 330 PLUS
Hardware
User’s Guide
CASIO Education website URL
http://edu.casio.com
ClassPad website URL
http://edu.casio.com/products/classpad/
Access the URL below and register as a user.
http://edu.casio.com/dl/
GUIDELINES LAID DOWN BY FCC RULES FOR USE OF THE UNIT IN THE U.S.A. (not
applicable to other areas).
NOTICE
This equipment has been tested and found to comply with the limits for a Class B digital
device, pursuant to Part 15 of the FCC Rules. These limits are designed to provide reasonable
protection against harmful interference in a residential installation. This equipment generates,
uses and can radiate radio frequency energy and, if not installed and used in accordance with
the instructions, may cause harmful interference to radio communications. However, there is
no guarantee that interference will not occur in a particular installation. If this equipment does
cause harmful interference to radio or television reception, which can be determined by turning
the equipment off and on, the user is encouraged to try to correct the interference by one or
more of the following measures:
• Reorient or relocate the receiving antenna.
• Increase the separation between the equipment and receiver.
• Connect the equipment into an outlet on a circuit different from that to which the receiver is
connected.
• Consult the dealer or an experienced radio/TV technician for help.
FCC WARNING
Changes or modifications not expressly approved by the party responsible for compliance
could void the user’s authority to operate the equipment.
Proper connectors must be used for connection to host computer and/or peripherals in order to
meet FCC emission limits.
Connector SB-62
USB connector for the ClassPad
ClassPad to ClassPad
ClassPad to Windows® compatible PC/Macintosh computer
Declaration of Conformity
Model Number:
Trade Name:
Responsible party:
Address:
Telephone number:
ClassPad 330 PLUS
CASIO COMPUTER CO., LTD.
CASIO AMERICA, INC.
570 MT. PLEASANT AVENUE, DOVER, NEW JERSEY 07801
973-361-5400
This device complies with Part 15 of the FCC Rules. Operation is subject to the
following two conditions: (1) This device may not cause harmful interference, and
(2) this device must accept any interference received, including interference that
may cause undesired operation.
Windows and Windows Vista are registered trademarks or trademarks of Microsoft Corporation
in the United States and/or other countries.
Mac, Macintosh, and Mac OS are registered trademarks or trademarks of Apple Inc. in the
United States and/or other countries.
Fugue © 1999 – 2002 Kyoto Software Research, Inc. All rights reserved.
Company and product names used in this user’s guide may be registered trademarks or
trademarks of their respective owners.
Note that trademark ™ and registered trademark ® are not used within the text of this user’s guide.
1
Contents
Contents
Chapter 1 Getting Ready
1-1
1-2
1-3
1-4
1-5
1-6
1-7
Unpacking ............................................................................................. 1-1-1
Attaching and Removing the Front Cover ......................................... 1-2-1
Using the Stylus ................................................................................... 1-3-1
Replacing Batteries and Setting Up the ClassPad ............................ 1-4-1
Handling Precautions .......................................................................... 1-5-1
Adjusting Display Contrast ................................................................. 1-6-1
Configuring Power Properties ............................................................ 1-7-1
Auto Power Off ..................................................................................................1-7-1
Configuring Power Properties.............................................................................1-7-1
1-8
1-9
1-10
1-11
Optimizing “Flash ROM” ..................................................................... 1-8-1
Specifying the Ending Screen Image ................................................. 1-9-1
Adjusting Touch Panel Alignment ................................................... 1-10-1
Battery Settings ...................................................................................1-11-1
Chapter 2 Performing Data Communication
2-1 Data Communication Overview .......................................................... 2-1-1
Connectable Devices and Transferable Data .....................................................2-1-1
Select Connection Mode Dialog Box ..................................................................2-1-3
Using the ClassPad Communication Application ...............................................2-1-4
2-2 Connecting the ClassPad to Another Device .................................... 2-2-1
Connecting to Another ClassPad Unit ................................................................2-2-1
Connecting to an EA-200 Data Analyzer ............................................................2-2-2
Connecting to a Computer (USB) .......................................................................2-2-3
Connecting to a Projector (USB) ........................................................................2-2-4
2-3 Configuring Communication Parameters ........................................... 2-3-1
Wakeup ..............................................................................................................2-3-2
2-4 Transferring Data to Another ClassPad Unit ..................................... 2-4-1
Selecting Data for Transfer.................................................................................2-4-3
Sending a Screenshot of the Current Display Contents .....................................2-4-5
Communication Standby ....................................................................................2-4-6
Interrupting an Ongoing Data Communication Operation ..................................2-4-6
2-5 Transferring Data between ClassPad and a Computer .................... 2-5-1
2-6 VCP and XCP File Operations ............................................................. 2-6-1
2-7 Projecting ClassPad Screen Contents from a Projector .................. 2-7-1
Appendix
1
2
3
4
5
Resetting and Initializing the ClassPad .............................................. α-1-1
Deleting an Application ........................................................................ α-2-1
Power Supply ........................................................................................ α-3-1
Number of Digits and Precision........................................................... α-4-1
Specifications ........................................................................................ α-5-1
20110901
Chapter
Getting Ready
This section contains important information you need to know before
using the ClassPad for the first time.
1-1
1-2
1-3
1-4
1-5
1-6
1-7
1-8
1-9
1-10
1-11
Unpacking
Attaching and Removing the Front Cover
Using the Stylus
Replacing Batteries and Setting Up the ClassPad
Handling Precautions
Adjusting Display Contrast
Configuring Power Properties
Optimizing “Flash ROM”
Specifying the Ending Screen Image
Adjusting Touch Panel Alignment
Battery Settings
20110901
1
1-1-1
Unpacking
1-1 Unpacking
When unpacking your ClassPad, check to make sure that all of the items shown here are
included. If anything is missing, contact your original retailer immediately.
ClassPad
CD-ROM
Front Cover
(Attached to
ClassPad.)
Stylus (Inserted in ClassPad.)
3-pin Cable (SB-62)
USB Cable
Touch Screen Protector
Four AAA-size Batteries LR03
(AM4)
Quick Start Guide
Keyboard
ON/OFF
Clear
=
(
)
,
(–)
x
7
4
1
0
y
z
8
5
2
.
^
9
÷
쎹
6
3
−
+
EXP
EXE
E
ClassPad 330 PLUS
Quick Start Guide
CASIO Education website URL
http://edu.casio.com
ClassPad website URL
http://edu.casio.com/products/classpad/
Access the URL below and register as a user.
(The protector is already installed
on the touch screen when you
purchase the ClassPad.)
http://edu.casio.com/dl/
20120301
1-2-1
Attaching and Removing the Front Cover
1-2 Attaching and Removing the Front Cover
u To remove the front cover
Before using the ClassPad, remove the front cover and attach it to the back.
u To attach the front cover
When you are not using the ClassPad, attach the front cover to the front.
Important!
• Always attach the front cover to the ClassPad whenever you are not using it. Otherwise,
accidental operation of the touch screen or the o key can cause the power to turn on and
run down the batteries.
20110901
1-3-1
Using the Stylus
1-3 Using the Stylus
Slide the stylus from the slot provided for it on the ClassPad, and then use it to perform touch
panel operations.
Important!
• Be careful so that you do not misplace or lose the stylus. When you are not using it, always
keep the stylus in the slot provided for it on the ClassPad.
• Be careful so that you do not damage the tip of the stylus. A damaged tip can scratch or
otherwise damage the ClassPad touch panel.
• Use only the supplied stylus or a similar instrument to perform touch panel operations. Never
use a pen, pencil, or other writing instrument.
20110901
1-4-1
Replacing Batteries and Setting Up the ClassPad
1-4 Replacing Batteries and Setting Up the
ClassPad
Precautions:
Incorrectly using batteries can cause them to burst or leak, possibly damaging the interior of the
ClassPad. Note the following precautions:
• Use only the batteries that are specifically listed in “Recommended Batteries” (shown below).
Never use any other type of batteries.
• Be sure that the positive (+) and negative (–) poles of each battery are facing in the proper
directions.
• Never mix batteries of different brands or
models.
• When using nickel-metal hydride batteries,
make sure to fully charge the batteries before
use.
• For details about how to charge nickel-metal
hydride batteries, see the user documentation
that comes with the batteries.
• Note that the amount of operation between charges provided by nickel-metal hydride batteries
may be shorter than the life of alkaline batteries.
• Never mix batteries of different types.
• Never mix old batteries and new ones.
• Never leave dead batteries in the battery compartment.
• Remove the batteries if you do not plan to use the ClassPad for long periods.
• Never try to recharge the batteries supplied with the ClassPad.
• Do not expose batteries to direct heat, let them become shorted, or try to take them apart.
• For details about how to use batteries, see the user documentation that comes with the
batteries.
(Should a battery leak, clean out the battery compartment of the ClassPad immediately, taking
care to avoid letting the battery fluid come into direct contact with your skin.)
Keep batteries out of the reach of small children. If swallowed, consult with a physician
immediately.
u Recommended Batteries
AAA-size alkaline batteries:
LR03 (AM4)
AAA-size nickel-metal hydride batteries:
Duracell rechargeable
Energizer rechargeable
SANYO eneloop
20110901
1-4-2
Replacing Batteries and Setting Up the ClassPad
u ClassPad Operation
(1) Making sure that you do not accidentally press the o key, attach the front cover to the
ClassPad and then turn the ClassPad over. Remove the battery cover from the ClassPad by
pulling with your finger at the point marked 1.
1
(2) Load the four batteries that come with ClassPad.
• Make sure that the positive (+) and negative (–) ends of
the batteries are facing correctly.
(3) Replace the battery cover, making sure that its tabs enter
the holes marked 2 and turn the ClassPad front side up.
(4) Remove the front cover from the ClassPad.
(5) Align the touch panel.
a. Your ClassPad should turn on automatically and display
the Touch Panel Alignment screen.
20110901
1-4-3
Replacing Batteries and Setting Up the ClassPad
b. Tap the center of each of the four cross marks as they appear on the display.
• If the Touch Panel Alignment screen does not appear,
use the stylus to press the RESTART button on the
back of the ClassPad.
RESTART
Button
Important!
• It may take a little time for your ClassPad to start up after
you press the RESTART button.
(6) Adjust the display contrast.
a. Tap the button to make contrast darker, or the
button to make it lighter.
b. After the contrast setting is the way you want, tap [Set].
• Tapping [Initial] on the Contrast dialog box returns contrast to its initial factory default
setting.
(7) Specify the display language.
a. On the list that appears, tap the language you want to
use.
• You can select German, English, Spanish, French, or
Portuguese.
b. When the language you want is selected, tap [Set].
• Tapping [Cancel] selects English and advances to the next dialog box.
20110901
1-4-4
Replacing Batteries and Setting Up the ClassPad
(8) Specify the soft keyboard key arrangement.
a. On the list that appears, tap the key arrangement you
want to use.
b. When the key arrangement you want is selected, tap [Set].
• Tapping [Cancel] selects QWERTY arrangement and advances to the next dialog box.
(9) Specify the battery type.
a. On the list that appears, tap the battery type that
matches the batteries loaded in the ClassPad.
• If you are using the batteries that came with the
ClassPad, select “Alkaline batteries”.
b. Tap [Set].
• This displays the confirmation dialog box.
c. Tap [OK].
• Tapping [Cancel] returns to Battery Settings dialog box.
20110901
1-5-1
Handling Precautions
1-5 Handling Precautions
• Your ClassPad is made of precision components. Never try to take it apart.
• Avoid dropping your ClassPad and subjecting it to strong impact.
• Do not store the ClassPad or leave it in areas exposed to high temperatures or humidity, or
large amounts of dust. When exposed to low temperatures, the ClassPad may require more
time to display results and may even fail to operate. Correct operation will resume once the
ClassPad is brought back to normal temperature.
• Your ClassPad supports use of both alkaline batteries and rechargeable nickel-metal hydride
batteries. Note that the amount of operation between charges provided by nickel-metal hydride
batteries is shorter than the life of alkaline batteries. Use only batteries that are specifically
recommended for this ClassPad.
• Replace the batteries once every one year regardless of how much the ClassPad is used during
that period. Never leave dead batteries in the battery compartment. They can leak and damage
the ClassPad. Immediately remove nickel-metal hydride batteries from the ClassPad after their
charge is used up. Leaving uncharged nickel-metal hydride batteries in the ClassPad can cause
them to deteriorate.
• Keep batteries out of the reach of small children. If swallowed, consult a physician immediately.
• Avoid using volatile liquids such as thinners or benzine to clean the ClassPad. Wipe it with a
soft, dry cloth, or with a cloth that has been moistened with a solution of water and a neutral
detergent and wrung out.
• Always be gentle when wiping dust off the display to avoid scratching it.
• In no event will the manufacturer and its suppliers be liable to you or any other person for any
damages, expenses, lost profits, lost savings or any other damages caused by loss of data
and/or formulas arising out of malfunction, repairs, or battery replacement. It is up to you to
prepare physical records of data to protect against such data loss.
• Never dispose of batteries, the liquid crystal panel, or other components by burning them.
• When the “Batteries are extremely low!” message appears on the display, replace the batteries
as soon as possible.
• Be sure to turn off the ClassPad before replacing the batteries.
• If the ClassPad is exposed to a strong electrostatic charge, its memory contents may be
damaged or the keys may stop working. In such a case, perform the reset operation to clear the
memory and restore normal key operation.
• If the ClassPad stops operating correctly for some reason, use the stylus to press the
RESTART button on the back of the ClassPad. Note, however, that this clears all the data in
ClassPad memory.
• Note that strong vibration or impact during program execution can cause execution to stop or
can damage the ClassPad’s memory contents.
• Using the ClassPad near a television or radio can cause interference with TV or radio reception.
• Before assuming malfunction of the ClassPad, be sure to carefully reread this user’s guide to
ensure that the problem is not due to insufficient battery power, programming, or operational
errors.
20110901
1-5-2
Handling Precautions
• Make sure nothing gets between the front cover and the touch screen. Besides creating the
risk of scratching the touch screen, an object coming into contact with the screen can cause the
power to turn on and run down the batteries.
• Always attach the front cover to the ClassPad whenever you are not using it. Otherwise,
accidental operation of the touch screen or the o key can cause the power to turn on and
run down the batteries.
Be sure to keep physical records of all important data!
Low battery power or incorrect replacement of the batteries that power the ClassPad can cause
the data stored in memory to be corrupted or even lost entirely. Stored data can also be affected
by strong electrostatic charge or strong impact. It is up to you to keep back up copies of data to
protect against its loss.
Backing Up Data
ClassPad data can be converted to a VCP file or XCP file and transferred to a computer for
storage. For details, see “2-5 Transferring Data between ClassPad and a Computer” and “2-6 VCP
and XCP File Operations”.
In no event shall CASIO Computer Co., Ltd. be liable to anyone for special, collateral, incidental,
or consequential damages in connection with or arising out of the purchase or use of these
materials. Moreover, CASIO Computer Co., Ltd. shall not be liable for any claim of any kind
whatsoever against the use of these materials by any other party.
• Be sure to keep all user documentation handy for future reference.
• The contents of this user’s guide are subject to change without notice.
• No part of this user’s guide may be reproduced in any form without the express written
consent of the manufacturer.
• The options described in Chapter 2 of this user’s guide may not be available in certain
geographic areas. For full details on availability in your area, contact your nearest CASIO
dealer or distributor.
20110901
1-6-1
Adjusting Display Contrast
1-6 Adjusting Display Contrast
Use the following procedure to display the Contrast dialog box and adjust display contrast.
u ClassPad Operation
(1) On the application menu, tap Y.
• This starts up the System application.
(2) Tap Z to display the Contrast dialog box.
(3) Adjust display contrast.
To do this:
Tap this button:
Make the display lighter
Make the display darker
Return contrast to its initial factory default setting
• Tapping and holding
release the button.
or
Initial
continually performs the applicable operation until you
(4) To close the Contrast dialog box, tap [Set].
20110901
1-7-1
Configuring Power Properties
1-7 Configuring Power Properties
Use the Power Properties dialog box to configure the auto power off (APO) setting.
Auto Power Off
The Auto Power Off (APO) feature helps conserve battery power by turning off the ClassPad
unit automatically whenever you do not perform any operation for specified amount of time.
You can specify 10 or 60 minutes for the Auto Power Off trigger time. The initial default APO
setting is 10 minutes.
Configuring Power Properties
u ClassPad Operation
(1) On the application menu, tap Y.
• This starts up the System application.
(2) Tap X to display the Power Properties dialog box.
(3) Configure the Auto Power Off setting.
(4) After the Auto Power Off setting is the way you want, tap [Set] to apply it and close the
Power Properties dialog box, or tap [Cancel] to close without changing the setting.
20110901
1-8-1
Optimizing “Flash ROM”
1-8 Optimizing “Flash ROM”
Use the following procedure to perform a “garbage collection” operation that optimizes
eActivity area and mass storage area (USB Flash Drive). Optimizing Flash ROM increases
the amount of memory available for storage.
u ClassPad Operation
(1) On the application menu, tap Y.
• This starts up the System application.
(2) Tap <.
• This displays a confirmation asking if you really want
to optimize eActivity area and mass storage area.
(3) Tap [Yes] to optimize eActivity area and mass storage area, or [No] to cancel.
• After you tap [Yes], the message “Now Optimizing...” remains displayed while
optimization is in progress. The message “Complete!” appears when optimization is
complete.
(4) Tap [OK] to close the “Complete!” message dialog box.
Tip
• You can interrupt the “garbage collection” operation by tapping
on the icon panel.
Important!
• Never press the RESTART button on the back of the ClassPad while a “garbage collection”
operation is in progress. Doing so can damage memory, resulting in loss of all memory
contents and malfunction of your ClassPad. If this happens, you will need to request repair
from your CASIO Maintenance Service Provider. Note that repair of your ClassPad will not
recover any lost memory contents.
20110901
1-9-1
Specifying the Ending Screen Image
1-9 Specifying the Ending Screen Image
Whenever you press the o key to turn off the ClassPad unit, it copies any data currently
in RAM to Flash ROM, and then turns off power. The ending screen is what appears on the
display while the RAM data save operation is being performed, until power is actually turned
off. You can specify the image data you want to appear as the ending screen.
u ClassPad Operation
(1) On the application menu, tap Y.
• This starts up the System application.
(2) Tap N to display the Ending Screen dialog box.
• To see this icon, you must first tap the right arrow
button on the toolbar to scroll.
(3) Tap the down arrow button. On the list that appears, tap the ending screen image you
want to use.
• To see the list, open the drop down list near the top of the dialog box. The list shows
the images in the file you created with the Presentation application.
• Tapping the [View] button displays a preview of the currently selected screen image.
Tap [OK] to close the preview image and others (see Tip below).
(4) After the image you want is selected, tap [Set] to apply it and close the Ending Screen
dialog box, or tap [Cancel] to close the dialog box without changing the setting.
Tip
• A bitmap you create and save with the Picture application can be used as an ending screen
image. The allowable bitmap size for an ending screen image is 160 × 240 pixels.
• A bitmap of a Graph window can also be created in the Graph & Table and 3D Graph
applications. Draw a graph and then select [Store Picture] from the a menu.
20110901
1-10-1
Adjusting Touch Panel Alignment
1-10 Adjusting Touch Panel Alignment
You should adjust touch panel alignment whenever you find that the wrong operation or no
operation is performed when you tap the ClassPad screen.
u ClassPad Operation
(1) On the application menu, tap Y.
• This starts up the System application.
(2) Tap M to display the touch panel alignment screen.
• To see this icon, you must first tap the right arrow
button on the toolbar to scroll.
(3) Use the stylus to tap the center of each of the four crosses as they appear on the
screen.
• When aligning your ClassPad try to tap the exact center of each cross.
20110901
1-11-1
Battery Settings
1-11 Battery Settings
Use these settings to specify the battery type you will use.
u ClassPad Operation
(1) On the application menu, tap Y.
• This starts up the System application.
(2) Tap
to display the Battery Settings dialog box.
• To see this icon, you must first tap the right arrow
button on the toolbar to scroll.
(3) Tap the type of battery you loaded and then tap [Set].
• This displays the confirmation dialog box.
(4) Tap [OK].
• This registers the selected battery type and closes the confirmation dialog box.
• If you tap [Cancel] instead of [OK], the confirmation dialog box will close without
registering the selected battery type.
20110901
Chapter
Performing Data
Communication
You can use the SB-62 data communication cable to connect
your ClassPad to another ClassPad unit or to a CASIO Data
Analyzer, and transfer data between them.
To transfer data between a ClassPad and a personal computer,
you need to use the special USB cable that comes with
ClassPad.
You can also use the USB cable to connect a ClassPad to a
CASIO projector and project its screen contents.
This chapter explains how to perform data communication
operations and exchange data.
2-1
2-2
2-3
2-4
2-5
2-6
2-7
Data Communication Overview
Connecting the ClassPad to Another Device
Configuring Communication Parameters
Transferring Data to Another ClassPad Unit
Transferring Data between ClassPad and a Computer
VCP and XCP File Operations
Projecting ClassPad Screen Contents from a Projector
20110901
2
2-1-1
Data Communication Overview
2-1 Data Communication Overview
This section provides an overview of the types of connections that are possible, and the data
that can be transferred over each connection. It also tells you how to use the
Communication application to transfer data.
Important!
• Never press the RESTART button on the back of the ClassPad while a data communication
operation is in progress. Doing so can damage memory, resulting in loss of all memory
contents and malfunction of your ClassPad. If this happens, you will need to request repair
from your CASIO Maintenance Service Provider. Note that repair of your ClassPad will not
recover any lost memory contents.
Connectable Devices and Transferable Data
The following four types of connections are possible.
• Two ClassPad units
• A ClassPad and a computer
• A ClassPad and a CASIO EA-200 Data Analyzer
• A ClassPad and a CASIO Projector
The following provides details about each of these connections, and describes the type of
data that can be transferred over each.
k Connecting Two ClassPad Units
You can transfer variable data, eActivity data, and display image data between two ClassPad
units.
• For information about variables, see “1-7 Variables and Folders” in the separate Software
User’s Guide.
• For information about eActivity data, see “Chapter 10 – Using the eActivity Application” in
the separate Software User’s Guide.
• For information about display image data, see “Sending a Screenshot of the Current
Display Contents” on page 2-4-5.
• Use of ClassPad OS Version 3.06 or greater is recommended for data communication.
u Connection
Use the special SB-62 3-pin data communication cable to connect two ClassPad units. For
details, see “Connecting to Another ClassPad Unit” on page 2-2-1.
u How to Transfer Data
You can use either of the two following methods to transfer data between two ClassPad
units.
• Use the Communication application. See “2-4 Transferring Data to Another ClassPad
Unit” for details.
• Use the “SendVar38k” and “GetVar38k” program commands. See “Chapter 12 – Using
the Program Application” in the separate Software User’s Guide for details.
20110901
2-1-2
Data Communication Overview
k Connecting a ClassPad to a Computer
You can perform the following operations when connected to a computer.
• Transfer variable data and eActivity data between the ClassPad and a computer
• Install add-in applications, language data, and operating system upgrades onto your
ClassPad from the computer
• Transfer ClassPad display image data to the computer
• For information about variables, see “1-7 Variables and Folders” in the separate Software
User’s Guide.
• For information about eActivity data, see “Chapter 10 – Using the eActivity Application” in
the separate Software User’s Guide.
• For information about connecting ClassPad and Screen Receiver, see the Screen Receiver
User’s Guide.
• Your ClassPad may operate abnormally after you update its operating system if the
operating system you install is not compatible with your ClassPad hardware version. If you
accidentally install an operation system version that is not compatible with your ClassPad
hardware version, visit the following Website information about what you need to do to get
your ClassPad working normally again.
http://edu.casio.com/products/classpad/
• When installing an add-in, make sure it is for ClassPad 330 PLUS. ClassPad 330 PLUS
does not support use of ClassPad 330 add-in applications.
u Connection
Use the special USB cable to connect the ClassPad’s 4-pin mini USB port to your computer’s
USB port. For details, see “Connecting to a Computer (USB)” on page 2-2-3.
u How to Transfer Data
For details, see “2-5 Transferring Data between ClassPad and a Computer”.
k Connecting a ClassPad to a CASIO EA-200 Data Analyzer
You can perform the following operations when connected to a Data Analyzer.
• Transfer Data Analyzer setup information and sampled data to the ClassPad
• Transfer variable data, eActivity data, and Data Analyzer setting information from the
ClassPad to the Data Analyzer
• For information about variables, see “1-7 Variables and Folders” in the separate Software
User’s Guide.
• For information about eActivity data, see “Chapter 10 – Using the eActivity Application” in
the separate Software User’s Guide.
• For information about Data Analyzer setup information and sample data, see the user
documentation that comes with the Data Analyzer.
u Connection
Use the special SB-62 3-pin data communication cable to connect two units. For details, see
“Connecting to an EA-200 Data Analyzer” on page 2-2-2.
20110901
2-1-3
Data Communication Overview
u How to Transfer Data
Use the “Send38k” and “Receive38k” program commands to transfer data. For details, see
“Chapter 12 – Using the Program Application” in the separate Software User’s Guide, and
the user documentation that comes with the Data Analyzer.
k Connecting a ClassPad to a CASIO Projector
You can connect the ClassPad to a CASIO projector and project ClassPad screen contents
onto a screen.
u Connection
Use the special USB cable to connect the ClassPad’s 4-pin mini USB port to your projector’s
USB port. For details, see “Connecting a Projector (USB)” on page 2-2-4.
u How to Project ClassPad Screen Contents
For details, see “2-7 Projecting ClassPad Screen Contents from a Projector”.
Select Connection Mode Dialog Box
Connecting ClassPad to a computer or projector with the USB cable will cause the Select
Connection Mode dialog box shown below to appear. Tap the button that corresponds to
device that ClassPad is connected to.
• [USB Flash] .................... Mode for connecting ClassPad to a computer for data transfer.
See “To establish a connection between ClassPad and a
computer” (page 2-5-1).
• [Screen Receiver] ........... Mode for using the Screen Receiver software a computer
running Windows Vista® or Windows® 7 to display ClassPad
screen contents on the computer screen. See the Screen
Receiver User’s Guide for details. Do not perform any operation
on ClassPad until the ClassPad screen contents are displayed
by Screen Receiver.
• [Screen Receiver(XP)] .... Mode for using the Screen Receiver software a computer
running Windows®XP to display ClassPad screen contents on
the computer screen.
20110901
2-1-4
Data Communication Overview
• [Projector] ....................... Mode for connecting ClassPad to a projector and projecting
ClassPad screen contents. See “2-7 Projecting ClassPad Screen
Contents from a Projector” for details.
• [Cancel] .......................... Closes the Select Connection Mode dialog box without changing
the setting.
Tip
• Instead of tapping on-screen buttons, you can also use the keypad keys 1 through 5 to
select a connection mode.
Important!
The Select Connection Mode dialog box will not appear right away if you connect the USB
cable while a progress bar is displayed or while a calculation is in progress. Disconnect the
USB cable and wait until the progress bar disappears or the calculation is complete, and then
reconnect.
Using the ClassPad Communication Application
To perform a data transfer operation, tap B on the application menu to start up the
Communication application.
20110901
2-1-5
Data Communication Overview
k Communication Application Menus and Buttons
The following explains the operations you can perform using the menus and buttons of the
Communication application.
To do this:
Select data to send
Enter receive standby
Enter standby for operating system
upgrading
Enter standby to receive a display image
from another ClassPad unit
Configure communication parameters
Tap this
button:
E
R
–
j
–
Or select this menu item:
Link - Transmit
Link - Receive
Link - OS Update
Link - Screen Receive (3pin)
Setup - Open Setup Menu
• For details about configuring communication parameters, see “2-3 Configuring
Communication Parameters”.
20110901
2-2-1
Connecting the ClassPad to Another Device
2-2 Connecting the ClassPad to Another Device
This section provides detailed explanations about how to connect the ClassPad to another
ClassPad unit, to a computer, to a CASIO Data Analyzer, and to a CASIO Projector.
Connecting to Another ClassPad Unit
Use the procedure below to connect two ClassPad units.
k Required Hardware
ClassPad: 2 units
Special SB-62 Cable: 1
u ClassPad Operation
(1) Turn both units off.
(2) Connect the data communication cable as shown in the illustration below.
• Insert both of the plugs securely, as far as they will go.
Cable
• For information about what you should do to transfer data, see “2-4 Transferring
Data to Another ClassPad Unit”.
20110901
2-2-2
Connecting the ClassPad to Another Device
Connecting to an EA-200 Data Analyzer
You can use the CASIO Data Analyzer to sample and collect data on various everyday
natural phenomena. You can also connect the Data Analyzer to your ClassPad, and control
Data Analyzer operation from your ClassPad. You can transfer setup information from the
ClassPad to the Data Analyzer, trigger sampling from the ClassPad, and graph sample
results on your ClassPad.
k Required Hardware
ClassPad: 1 unit
EA-200 Data Analyzer: 1
Special SB-62 Cable: 1
u ClassPad Operation
(1) Turn off the ClassPad and Data Analyzer.
(2) Remove the connector cover from the 3-pin communication port of the Data Analyzer,
and connect one end of the data communication cable to the port.
(3) Connect the other end of the data communication cable to the 3-pin communication
port of the ClassPad.
Ready
Sampling
SET UP
Error
Batt
Power
START/STOP
Cable
• For information about what you should do to transfer data, see the user
documentation that comes with the Data Analyzer.
20110901
2-2-3
Connecting the ClassPad to Another Device
Connecting to a Computer (USB)
Use the procedure below to connect ClassPad to a computer.
k Required Hardware
ClassPad: 1 unit
Computer: 1
Special USB Cable: 1
Running one of the following operating systems.
Windows® XP Home Edition (SP1 or later)
Windows® XP Professional (32-bit, SP1 or later)
Windows Vista® (32-bit, SP1 or later)
Windows® 7 (32-bit, 64-bit)
Mac OS 10.4, Mac OS 10.5, Mac OS 10.6, Mac OS 10.7
u ClassPad Operation
(1) Turn off the ClassPad.
(2) Connect one end of the special cable that comes with the ClassPad to the USB port of
your computer.
(3) Connect the other end of the special cable as shown below.
• For information about what you should do to actually transfer data, see “2-5
Transferring Data between ClassPad and a Computer”.
20110901
2-2-4
Connecting the ClassPad to Another Device
Connecting to a Projector (USB)
Use the procedure below to connect ClassPad to a CASIO projector.
k Required Hardware
ClassPad: 1 unit
Projector: 1
Special USB Cable: 1
k Connectable Projectors (As of October 2011)
XJ-A135, XJ-A145, XJ-A155, XJ-A235, XJ-A245
XJ-A135V, XJ-A145V, XJ-A155V, XJ-A235V, XJ-A245V, XJ-A255V
XJ-M145, XJ-M245, XJ-M155, XJ-M255
XJ-H1650
XJ-ST145, XJ-ST155
Some of the projector models listed above may require updating to the latest firmware
version to support connection with your ClassPad. Visit the site below for information about
which projector models require firmware updating, how to check the firmware version of a
projector, how to update a projector’s firmware, and the latest CASIO projector models that
are available.
http://edu.casio.com/support/projector/
u ClassPad Operation
(1) Turn off the ClassPad.
(2) Connect one end of the special cable that comes with the ClassPad to the USB port of
your projector.
(3) Connect the other end of the special cable as shown below.
• For information about what you should do to project ClassPad screen contents, see
“2-7 Projecting ClassPad Screen Contents from a Projector”.
20120301
2-3-1
Configuring Communication Parameters
2-3 Configuring Communication Parameters
Before trying to transfer data with the ClassPad, you should perform the procedures
described in this section to configure its data communication parameters.
u ClassPad Operation
(1) On the application menu, tap B.
• This starts the Communication application and displays a window that shows its
current communication parameter settings.
(2) Tap [Setup] and then [Open Setup Menu].
• This displays a dialog box for changing communication parameters, like the one
shown below.
(3) Configure the communication parameter settings as described below.
• Items marked with an asterisk ( ) are initial defaults.
u Screen Copy To
*
Specify “Outer Device”.
u Cable Type
When connecting to this type of device:
Another ClassPad unit or a Data Analyzer
A computer’s USB port
20110901
Select this setting:
3pin cable
USB cable*
2-3-2
Configuring Communication Parameters
u Speed (3Pin)
To specify this data rate for 3-pin communication:
9600 bps
38400 bps
115200 bps
Select this setting:
9600 bps
38400 bps
115200 bps*
The above setting specifies the data rate when connected to another ClassPad, or a
Data Analyzer. Note that you must set the data rate (baud rate) for both the ClassPad
and the connected device so they are identical.
u Wakeup Enable
To do this:
Turn on the wakeup function (see below)
Turn off the wakeup function
Select this setting:
On*
Off
(4) When all the settings are the way you want, tap [Set] to save them.
• The Communication application window appears at this time, with the new
parameters you just configured. Check to make sure the settings are the way you want.
Wakeup
Wakeup is a function that automatically puts the ClassPad into data communication standby
whenever the ClassPad detects data coming in from a connected external device. You can
turn wakeup on or off with the [Wakeup Enable] setting on the Communication dialog box.
What happens when wakeup is turned on depends on the type of device connected to the
ClassPad.
k When connected to another ClassPad unit
When the sending device performs a data send operation, the receiver device’s wakeup
function activates and data receive is performed automatically. The receiver device operates
normally as long as no data is being received.
In this configuration, wakeup does not operate on the receiver device when any one of the
following three conditions exists.
• When any setting other than “3pin cable” is selected for [Cable Type] on the
Communication dialog box.
• When any ongoing calculation or graphing operation is being performed. Wakeup
activates when the ongoing operation is complete.
20110901
2-4-1
Transferring Data to Another ClassPad Unit
2-4 Transferring Data to Another ClassPad Unit
This section details the steps you should perform in order to transfer data from one ClassPad
unit to another.
u ClassPad Operation
(1) Use the procedure under “Connecting to Another ClassPad Unit” on page 2-2-1 to
connect the two units.
(2) Use the procedure under “2-3 Configuring Communication Parameters” to configure the
parameters of the two units as shown below.
Cable Type: 3pin cable
Speed (3Pin): 115200 bps
Wakeup Enable: On
• If the speed settings of the two ClassPad units are different from each other, the
slower setting is used.
The remaining steps of this procedure are marked Sender to indicate steps and
information that apply to the sending device, or Receiver to indicate receiving device
steps and information.
Sender
(3) In the Communication application, tap [Link], and then [Transmit], or tap E.
• This displays the Select Data dialog box.
Sender
(4) Select the data you want to send.
• For more information, see “Selecting Data for Transfer” on page 2-4-3.
Sender
(5) Tap [OK].
20110901
2-4-2
Transferring Data to Another ClassPad Unit
Sender
(6) In response to the confirmation message that appears, tap [OK] to send the data or
[Cancel] to cancel the send operation.
• Sender
Tapping [OK] sends the data you selected in step (4).
• Receiver
If the receiving device has wakeup enabled, it automatically starts receiving the data.
Sender
(7) The message “Complete!” appears to let you know when the send operation is finished.
Tap [OK].
• This returns to the Select Data dialog box.
Sender
(8) On the Select Data dialog box, tap [Cancel].
• This returns to the Communication application window.
Receiver
(9) The message “Complete!” appears to let you know when the receive operation is
finished. Tap [OK].
Important!
• When wakeup is turned off on the receiving device, you need to perform the following
operation on the receiving device before performing step (3):
Start up the Communication application, tap [Link] and then [Receive], or tap R.
This puts the receiving unit into receive standby, which is indicated by the Standby dialog
box on the display.
Tip
• When you send a variable or data item, it is normally stored in the current folder of the receiving
device. A variable or data item sent from the library folder of the sending device, however, is
stored in the “library” folder of the receiving device.
• When you send a folder (by selecting the check box next to a folder name), the variables and
data items inside each folder are sent and stored in folders with the same name on the receiving
device.
• If a data item with the same name as the data item being received already exists on the receiving
device, the communication operation is paused and a dialog box asking whether the existing item
should be replaced appears on the display of the receiving device. Tap [Yes] to replace, or [No]
to cancel receipt of the data item. To terminate data communication, tap [Cancel]. If you want to
replace all data items without being asked, tap [Yes to all].
• If the receiving device runs out of memory, a message dialog box appears to warn you. When
this happens, terminate the data communication operation by tapping [OK] on the dialog box of
the receiving device, delete data you no longer need from the memory of the receiving device,
and then try again.
20110901
2-4-3
Transferring Data to Another ClassPad Unit
Selecting Data for Transfer
Perform the following steps on the sending device to select the data you want to send in step
(3) of the procedure on page 2-4-1.
u ClassPad Operation
(1) In the Communication application, tap [Link] and then [Transmit], or tap E to display
the Select Data dialog box.
• A list that shows user folders and the “main” folder appears first.
Title of currently displayed list
(folder name when a folder is open)
(2) Tap the [View] menu and then select the data type from the list that appears.
To list this on the Select Data dialog box:
User folders and the “main” folder
Library variables
System variable groups
eActivity folders
Select this [View] menu command:
Data Folder List
Library
Application Status
eActivity Folder List
(3) Select the data you want to send.
• On the Select Data dialog box, select the check box next to the data you want to
send.
• You can also tap the [All] menu and select one of the following commands to select or
deselect data.
To do this:
Select all currently displayed items
Deselect all currently displayed items
Select all items in all lists
Deselect all items in all lists
Select this [All] menu command:
Select List
Deselect List
Select All Lists
Deselect All Lists
• Opening a folder in [Data Folder List] or [eActivity Folder List] displays the variables
and data contained inside it, which can be individually selected for transfer. To select
a variable or data contained in a particular folder, tap its folder name to open it.
20110901
2-4-4
Transferring Data to Another ClassPad Unit
Data Folder List
Tap “Presystm” to
highlight it, and then
tap it again.
This lists the variables contained in
the “Presystm” folder.
eActivity Folder List
Tap “e-Act2”.
This lists the data contained
in the “e-Act2” folder.
• To return to the folder list from a list of folder contents, tap I in the lower left corner
of the window.
• You can transfer all of the variables or data in a folder by selecting the check box next
to the folder name on the data folder list or eActivity folder list.
(4) Tap [OK] to send the data or [Cancel] to cancel the send operation.
• After tapping [OK], continue from step (5) of the procedure on page 2-4-1.
20110901
2-4-5
Transferring Data to Another ClassPad Unit
Sending a Screenshot of the Current Display Contents
Use the following procedure to send the current display contents of your ClassPad to another
ClassPad unit.
Important!
Screenshot transfer is disabled when either of the following conditions exists.
• While a calculation or graphing operation is in progress
• If a data communication operation is already in progress
u ClassPad Operation
(1) Use the procedure under “Connecting to Another ClassPad Unit” on page 2-2-1 to
connect the two units.
(2) Use the procedure under “2-3 Configuring Communication Parameters” to configure
the parameters of the two units as shown below.
Cable Type: 3pin cable
Speed (3Pin): 115200 bps
Wakeup Enable: On
Screen Copy To: Outer Device (Sending device only)
The remaining steps of this procedure are marked Sender to indicate steps and
information that apply to the sending device, or Receiver to indicate receiving device
steps and information.
Sender
(3) Display the screen you want to send.
(4) Tap h.
• Sender
This sends the currently displayed screen.
• Receiver
If the receiving device has wakeup enabled, it automatically starts receiving the data.
The received screen appears on the display after the receive operation is complete.
Sender
(5) If you want to send another screenshot, repeat steps (3) and (4).
Receiver
(6) To cancel a receive standby state, press the c key.
Important!
• When wakeup is turned off on the receiving device, you need to perform the following
operation on the receiving device before performing step (4):
Start up the Communication application, tap [Link], and then [Screen Receive], or tap j.
This puts the receiving unit into receive standby, which is indicated by the Standby dialog
box on the display.
Tip
• Note that received screenshots can be displayed, but not saved.
20110901
2-4-6
Transferring Data to Another ClassPad Unit
Communication Standby
The ClassPad enters “communication standby” when you perform a send or receive
operation. While in communication standby, the ClassPad waits for the other unit to send
data, or for it to get ready to receive data.
The following describes how communication standby affects certain ClassPad operations.
• Auto Power Off (Getting Ready — 1-7 Configuring Power Properties) becomes disabled.
• ClassPad power cannot be turned off.
• If data communication does not start within three minutes after the ClassPad enters data
communication standby, the message “Timeout” appears. When this happens, tap [Retry]
to try again or [Cancel] to cancel the data communication operation.
Interrupting an Ongoing Data Communication Operation
Pressing the c key on either the sending device or receiving device during a data
communication operation terminates it.
20110901
2-5-1
Transferring Data between ClassPad and a Computer
2-5 Transferring Data between ClassPad and a
Computer
Establishing a USB connection between ClassPad and a computer will cause the computer
to recognize the ClassPad’s mass storage area as a USB Flash Drive. After a connection
is established, data can be transferred between ClassPad and computer using computer
operations only.
k Connecting and Disconnecting with a Computer in the USB Flash Mode
Important!
• Never touch the USB cable plugs and screen while a data communication operation
is in progress. Static electricity from your fingers can cause data communication to be
terminated.
u To establish a connection between ClassPad and a computer
(1) Start up your computer.
(2) After starting up your computer, use the USB cable to connect it to the ClassPad.
• The ClassPad will turn on automatically and the “Select Connection Mode” screen will
appear.
(3) Tap [USB Flash].
• Establishing a connection between the ClassPad
and a computer will cause the screen shown nearby
to appear.
(4) On your computer, open the ClassPad drive.
• The ClassPad drive will appear inside My Computer under Windows® XP, and inside
Computer under Windows Vista® or Windows® 7. Use Windows Explorer to open the
ClassPad drive.
• Under Mac OS X, the ClassPad drive icon appears on the Mac desktop. Double-click
the icon to open it.
• The ClassPad drive represents ClassPad’s mass storage area.
(5) Perform the required operation on your computer to transfer the data.
• For details about data transfer operations, see “Transferring Data” (page 2-5-3).
20110901
2-5-2
Transferring Data between ClassPad and a Computer
u To terminate the connection between the ClassPad and a computer
(1) If the ClassPad is connected to a Windows computer, note the drive letter (E, F, G,
etc.) assigned to the ClassPad drive.
(2) Depending on the type of operating system your computer is running, perform one of
the following operations.
• Windows: Click the “Safely Remove Hardware” icon in the toolbar in the lower right
corner of the display. On the menu that appears, select “USB mass storage device”
whose letter matches the ClassPad drive letter you noted in step (1) above. Check to
make sure the “Safe To Remove Hardware” message is displayed.
• Mac OS: Drag the ClassPad drive icon to the Eject icon (Trash icon). Check to make
sure that the ClassPad drive icon is no longer on your desktop.
(3) The message “Complete!” will appear on the ClassPad screen. To close the message
dialog box, tap [OK].
(4) Disconnect the USB cable from the ClassPad.
u How a computer displays files and folders in the ClassPad drive
Establishing a connection between ClassPad and a computer in USB Flash mode displays
folder and files stored in the ClassPad mass storage area as folders and files in the
computer’s ClassPad drive.
ClassPad
Flash ROM
eActivity Area
Computer
ClassPad Drive
Mass Storage Area
(USB Flash Drive)
Main Memory
20110901
2-5-3
Transferring Data between ClassPad and a Computer
k Transferring Data
This section explains data transfer operations while the ClassPad drive is open on a
computer.
u To transfer data between ClassPad and a computer
(1) Establish a connection between the ClassPad and computer, and then open the
ClassPad drive on the computer.
• For details about how to establish a connection, see “To establish a connection
between the ClassPad and a computer” (page 2-5-1).
(2) Perform copy, edit, delete, and other file operations as required.
• Use the same file operations that you normally do on your computer.
• If you have a VCP file or XCP file you want to transfer to ClassPad, copy it to the
ClassPad drive.
(3) After you finish all the operations you want to perform, terminate the USB connection
between ClassPad and the computer.
• When you terminate a USB connection, ClassPad automatically imports a VCP file
currently in the AutoImport folder. For details, see “Auto Import of VCP Files” below.
• For information about manual file import, see “2-6 VCP and XCP File Operations”.
Note
Copying files to the ClassPad drive can cause the connection between the ClassPad and
computer to be dropped. If this happens, enter the System application and execute an
Optimize operation (page 1-8-1), and then re-establish a connection between the ClassPad
and computer.
20110901
2-5-4
Transferring Data between ClassPad and a Computer
k Auto Import of VCP Files
When you terminate a USB connection, ClassPad automatically imports a VCP file currently
in the AutoImport folder.
• VCP File Import .... Only one VCP file inside the top level of the AutoImport folder is
imported to main memory and the eActivity area. Existing data is
overwritten and new data is added. If there are multiple VCP files
in the AutoImport folder, you need to select the one to be imported
manually.
All folders and files in the AutoImport folder are moved to the SAVE-F
folder.
(1) Copy the VCP file to the top level of the AutoImport folder of the ClassPad drive.
(2) The VCP file in the AutoImport folder will be imported to ClassPad automatically when the
USB connection between ClassPad and the computer is terminated.
• Movement of files to the SAVE-F folder starts after import is complete. The dialog box
shown below appears when the save process is complete.
(3) Tap [OK].
• This displays the Communication application screen.
Tip
• The error message “Insufficient Memory” will appear if main memory or eActivity area memory runs low
during the import operation. If this happens, delete data you no longer need from the main memory or
eActivity area and try importing again. For details, see “2-6 VCP and XCP File Operations”.
k Importing XCP Files
For information about importing XCP files, see “To import an XCP file” (page 2-6-5).
20110901
2-5-5
Transferring Data between ClassPad and a Computer
k Installing Add-In Files
Add-in files can be installed on ClassPad to give it additional functions. The following are the
types of add-in files that are available.
• Add-in applications (.c1a): Installing this type of add-in displays the application in the
application menu.
• Add-in language (.lng): Installing this type of add-in adds the applicable language to the
Language dialog box for selection.
Note
Add-ins intended for the ClassPad 300, ClassPad 300 PLUS, and ClassPad 330 (.cpa files)
are not supported by the ClassPad 330 PLUS.
u To install an add-in file
In step (2) of the procedure under “To transfer data between ClassPad and a computer”
(page 2-5-3), copy the add-in file (.c1a or .lng) you want to install to the ClassPad drive root
directory. This all you need to do to complete installation.
k USB Connection Precautions
• Depending on the operating system your computer is running, perform one of the following
operations on the computer to terminate a connection with the ClassPad.
- Windows: Click the “Safely Remove Hardware” icon in the toolbar in the lower right corner
of the display. On the menu that appears, select “USB mass storage device”. Check to
make sure the “Safe To Remove Hardware” message is displayed.
- Mac OS: Drag the ClassPad drive to Trash. Check to make sure that the ClassPad drive
is no longer on your desktop.
• Never use a computer operation to format the ClassPad drive.
Doing so will cause a “File System ERROR” message to appear on the ClassPad screen
after you terminate the USB connection between the ClassPad and computer. When this
happens, you will not be able to start up the ClassPad unless you perform an Initialize All
operation, which deletes all data currently in ClassPad memory.
• When copying a file from your computer’s local disk to the ClassPad drive, it may take
several minutes before copying starts. This is because copying automatically performs
optimization of the ClassPad’s storage memory. It does not indicate malfunction. For
information about storage memory optimization, see “1-8 Optimizing “Flash ROM””.
• A USB connection between the ClassPad and a computer may be terminated automatically
if the computer enters a power save mode, sleep mode, or any other standby state.
k Rules for ClassPad Files and Folders
• Up to 200 files per folder can be displayed on the storage memory information screen.
If a folder has more than 200 files and you need to display them all, divide them among
multiple folders so the total number of files in a single folder is not greater than 200.
• Though you can create folders on your computer nested to more than three levels in
storage memory, this calculator will display only up to the third level.
• The following are characters that can be used in file names and folder names.
A-Z, a-z, 0-9, !, #, $, %, ’, ,(comma), (, ), +, –, ., ;, =, @, [, ], ^, _, `, ~, space
20110901
2-5-6
Transferring Data between ClassPad and a Computer
k Error Messages
Error Message
Description
Insufficient Storage Memory
Insufficient available capacity in the mass storage area.
Insufficient Memory
Insufficient capacity in main memory or the eActivity area
during import.
Invalid Data Type
You are attempting to import an invalid file type.
File System ERROR
A file system error occurred.
20110901
2-6-1
VCP and XCP File Operations
2-6 VCP and XCP File Operations
When saving ClassPad eActivity data or program data for storage on a computer or in the
ClassPad mass storage area, you need to convert it to a VCP file or XCP file. VCP files and
XCP files can be imported later to ClassPad from a computer or the ClassPad mass storage
area when required.
• Use VCP (***.vcp) file format when you want to batch store and later import all of the
ClassPad’s files and data.
• Use XCP (***.xcp) file format when you want to store and later import individual variables or
eActivity files for each type of ClassPad data (eActivity, Geometry, Spreadsheet, etc.) Note
that XCP format can be used to store variables and eActivity files only. For information
about variable data types, see page 1-7-3 of the separate Software User’s Guide.
A save operation saves the following variables and eActivity files.
(1) System variables: Ans, a0, list1, xmin, xmin3d and other data
(2) General variables: Files saved with Geometry, Spreadsheet, Program, etc.
List files, Mat files, etc.
Image files saved as hard copies
(3) eActivity files
• Saving to a VCP file (***.vcp) saves all of the above files and data currently in ClassPad
memory.
• Saving to an XCP file (***.xcp) saves only the variables or eActivity files for a specific
data type (eActivity, Geometry, Spreadsheet, etc.).
VCP and XCP files can be transferred between ClassPad and a computer when there is a
USB Flash mode connection between them. For details about connection modes, see “2-5
Transferring Data between ClassPad and a Computer”.
k VCP File Save As/Open/New
The following explains the three file operations available for VCP files.
Save As ... Main memory contents and eActivity data are converted to a VCP file.
Open ........ Imports a VCP file stored in the mass storage area into the main memory and
eActivity area.
New .......... Resets the main memory and eActivity area.
On ClassPad, use the application menu to perform VCP file operations.
u To save a VCP file
(1) On the icon panel, tap m to display the application menu.
(2) Tap
at the top left of the application menu.
• This opens a menu of setting options.
20110901
2-6-2
VCP and XCP File Operations
(3) Tap [Save As].
• This displays a file specification dialog box like the one shown below.
(4) Enter the file name and then tap [Save].
• The dialog box shown below appears after save is complete.
(5) Tap [OK].
u To open a VCP file
(1) On the icon panel, tap m to display the application menu.
(2) Tap
at the top left of the application menu.
• This opens a menu of setting options.
20110901
2-6-3
VCP and XCP File Operations
(3) Tap [Open].
• This causes a file specification dialog box to appear. It shows the VCP files in the
mass storage area.
(4) Select the VCP file you want to open and then tap [Open].
• This displays the dialog box shown below.
1
2
(5) Select the file import option you want and then tap [OK].
1 Deletes all data in the main memory and eActivity area and import the file.
20110901
2-6-4
VCP and XCP File Operations
2 Overwrites existing data as necessary and imports non-existent data as new data.
• The dialog box shown below will appear when file import is complete.
(6) Tap [OK].
u Resetting the ClassPad Main Memory and eActivity Area
(1) On the icon panel, tap m to display the application menu.
(2) Tap
at the top left of the application menu.
• This opens a menu of setting options.
(3) Tap [New].
• This displays the dialog box shown below.
(4) Tap [OK].
• The dialog box shown below will appear.
(5) Tap [OK].
20110901
2-6-5
VCP and XCP File Operations
k Importing and Exporting XCP Files
The following explains the three file operations available for XCP files.
View Storage & Import ... Imports a XCP file stored in the mass storage area into the
main memory or eActivity area.
Export Variables ............ Variable data in main memory is converted to an XCP file.
Export eActivities ........... eActivity data in the eActivity area is converted to an XCP file.
On ClassPad, start up the System application to perform XCP file operations.
u To import an XCP file
(1) On the application menu, tap Y.
• This starts up the System application and displays the [Storage] sheet.
20110901
2-6-6
VCP and XCP File Operations
(2) Select “View Storage & Import” and then tap [Select].
• This displays a file selection dialog box. It shows the folders and XCP files in the
mass storage area.
(3) Select the XCP file you want to import and then tap [Import].
• This displays a dialog box like the one shown below. The contents of the dialog box
depend on the type of file (Variable or eActivity) you are importing.
Variable
eActivity
(4) Select the import destination folder you want and then tap [OK].
• The dialog box shown below appears when import is complete.
(5) Tap [OK].
20110901
2-6-7
VCP and XCP File Operations
u To export Variable data
(1) On the application menu, tap Y.
• This starts up the System application and displays the [Storage] sheet.
(2) Select “Export Variables” and then tap [Select].
• This displays a dialog box for selecting a folder.
(3) Select the folder or Variable you want to export.
• The selection operation is the same as that for Variable Manager. For details, see
“1-8 Using the Variable Manager” in the separate Software User’s Guide.
(4) Tap [Export].
• This displays a dialog box for selecting the export destination folder.
20110901
2-6-8
VCP and XCP File Operations
(5) Select the export destination folder you want and then tap [OK].
• The dialog box shown below will appear when export is complete.
(6) Tap [OK].
u To export eActivity data
(1) On the application menu, tap Y.
• This starts up the System application and displays the [Storage] sheet.
(2) Select “Export eActivities” and then tap [Select].
• This displays the eActivity data selection dialog box.
(3) Select the folder or eActivity you want to export.
• The selection operation is the same as that for the eActivity application Files dialog
box. For details, see “Managing eActivity Files” (page 10-2-3) in the separate
Software User’s Guide.
(4) Tap [Export].
• The rest of this procedure is the same as that for exporting Variable data.
20110901
2-6-9
VCP and XCP File Operations
k Error Messages
VCP File Save As/Open/New
Error Message
Insufficient Storage Memory
Insufficient Memory
Too Many eActivity Files
Exceeds Maximum Number of
Folders
Invalid Data Type
Description
Insufficient mass storage area memory during file
creation.
Insufficient main memory or eActivity area memory
during the Open process.
Number of eActivity files exceeded the allowable
maximum during the Open process.
Number of user folders exceeded the allowable
maximum during the Open process. User folders are
any folders used for main memory Variables.
Invalid data format VCP file specified during the Open
process.
Importing and Exporting XCP Files
Error Message
Invalid Data Type.
Invalid file or folder name.
Invalid Name
Insufficient Memory.
Insufficient Storage Memory.
Import failed.
Export failed.
Description
Attempt to import an improper file type.
Folder, file, or path name is too long, so the folder or
file cannot be created in the mass storage area.
A folder with the same name as the folder being
exported already exits.
Insufficient main memory or eActivity area memory.
Folder/file cannot be created because of insufficient
mass storage area capacity.
Error generated during import causing abnormal import
end.
Error generated during export causing abnormal export
end.
20110901
2-7-1
Projecting ClassPad Screen Contents from a Projector
2-7 Projecting ClassPad Screen Contents from
a Projector
You can connect ClassPad to a CASIO projector and project its screen contents.
k To project ClassPad screen contents from a projector
(1) Use the procedure under “Connecting to a Projector (USB)” (page 2-2-4) to connect
ClassPad to a projector.
• ClassPad will turn on automatically and the Select Connection Mode screen will
appear.
(2) Tap [Projector].
• This displays the dialog box shown below.
(3) Tap [OK].
20110901
2-7-2
Projecting ClassPad Screen Contents from a Projector
k Precautions when Connecting
• An hourglass figure may remain projected on the screen after you connect the ClassPad
to a projector. Also, changing to another screen while a graph is being drawn or while a
Program application program is running could possibly result in the projected screen being
different from the ClassPad screen. If this happens, performing some operation on the
ClassPad will restore normal display.
• If the ClassPad stops operating normally, disconnect the USB cable and then reconnect it.
If this does not correct the problem, disconnect the USB cable, turn the projector off and
then back on, and then reconnect the USB cable.
20110901
α
Appendix
1 Resetting and Initializing the ClassPad
2 Deleting an Application
3 Power Supply
4 Number of Digits and Precision
5 Specifications
20110901
α -1-1
Resetting and Initializing the ClassPad
1 Resetting and Initializing the ClassPad
The memory of your ClassPad is divided into four parts: main memory, a mass storage
area for storing data, an eActivity area, and a RAM area for executing various calculations
and operations. Reset and initialize restore normal ClassPad operation after some problem
occurs.
RAM Reset
Perform RAM reset when the ClassPad freezes up or otherwise fails to perform as expected
for some reason. A RAM reset does not affect data stored in main memory, the mass storage
area, or the eActivity area, but it clears any data stored in the RAM area.
Memory Reset
There are four different types of memory reset operations.
1 - Deleting all variable data in main memory
2 - Deleting all eActivity data
3 - Deleting all data in the mass storage area
4 - All three of the above
Memory Initialize
Initializing memory deletes all data and returns ClassPad memory to its initial factory default
state. When initializing memory, you will be able to specify whether or not you also want to
delete add-in applications.
This section explains how to perform the RAM reset operations only. The memory reset and
memory initialize operations are performed using the System application. For details, see “16-3
Using the Reset Dialog Box” and “16-4 Initializing Your ClassPad” in the separate Software
User’s Guide.
20110901
α -1-2
Resetting and Initializing the ClassPad
k Performing the RAM Reset Operation
You should perform the RAM reset operation whenever your ClassPad freezes up or when
it begins to operate abnormally for some reason. The RAM reset operation should restore
normal ClassPad operation.
Important!
• The RAM reset operation deletes all data that is temporarily stored in ClassPad RAM.
Performing the RAM reset operation while a calculation is in progress will cause any data
stored in RAM by the calculation to be lost.
• Perform the RAM reset operation only when your ClassPad ceases to operate normally for
some reason.
u ClassPad Operation
(1) Use the stylus to press the RESTART button on the back of the ClassPad.
• Following the RAM reset operation,
the ClassPad restarts automatically.
RESTART
Button
(2) After the ClassPad restarts, perform the ClassPad setup operation (touch panel
alignment, display contrast adjustment, display message language selection, keyboard
settings). See Chapter 16 in the separate Software User’s Guide for more information
about the ClassPad setup operation.
• The application menu appears after you finish the setup operation.
20110901
α -2-1
Deleting an Application
2 Deleting an Application
You can delete an add-in application by deleting it from the application menu or by using the
[Add-In App.] Memory Usage sheet of the System application as described in Chapter 16 in the
separate Software User’s Guide.
The following procedure shows how to delete an add-in application from the application
menu only. For information about using the System application’s [Add-In App.] tab, see
Chapter 16 in the separate Software User’s Guide.
u To use the application menu to delete an add-in application
(1) Tap m to display the application menu.
(2) Tap the down arrow button in the menu bar, and then select [Additional] from the list
that appears.
• This displays a list of all the applications you have installed on your ClassPad.
(3) Tap s, and then tap [Delete Application] on the menu that appears.
• This causes all of the icons to be surrounded by a broken line, indicating that your
ClassPad is ready to delete applications.
on the icon panel.
• To exit the delete operation at this time, tap
(4) Tap the icon of the application you want to delete.
(5) In response to the dialog box that appears, tap [OK] to delete the application, or [Cancel]
to cancel without deleting anything.
Tip
• Note that you can delete only add-in applications. You cannot delete any of the ClassPad’s
built-in applications.
• If you prefer to view remaining memory capacity as you delete add-in applications, use the
[Add-In App.] Memory Usage sheet of the System application as described in Chapter 16 in the
separate Software User’s Guide.
20110901
α -3-1
Power Supply
3 Power Supply
Your ClassPad is powered by four AAA-size batteries LR03 (AM4), or four nickel-metal
hydride batteries.
The battery level indicator is displayed in the status bar.
........................ full
........................ medium
........................ low
Important!
• Be sure to replace batteries as soon as possible whenever the battery level indicator shows
(medium).
(low). At this
• Replace batteries immediately whenever the battery level indicator shows
level, you will not be able to perform data communication or perform other functions.
• The following message indicates that batteries are about to go dead. Replace batteries
immediately whenever this message appears.
Batteries are extremely low!
Replace batteries immediately!
If you try to continue using the calculator, it will automatically turn off. You will not be able to
turn power back on until you replace batteries.
Be sure to replace batteries at least once every one year, no matter how much you use the
ClassPad during that time.
The batteries that come with this ClassPad discharge slightly during shipment and storage.
Because of this, they may require replacement sooner than the normal expected battery life.
Backing Up Data
ClassPad data can be converted to a VCP file or XCP file and transferred to a computer for
storage. For details, see “2-5 Transferring Data between ClassPad and a Computer” and “2-6
VCP and XCP File Operations”.
Important!
• When battery power is very low, your ClassPad may not turn back on when you press its
o key. If this happens, immediately replace its batteries.
20110901
α -4-1
Number of Digits and Precision
4 Number of Digits and Precision
k Number of Digits
Standard Mode
The following applies when the check box next to the “Decimal Calculation” item on the Basic
Format dialog box is not selected.
• Up to 611 digits are stored in memory for integer values.
• Decimal values up to 15 digits are converted to fraction format and saved in memory. When
a mathematical expression cannot be converted to fraction format, the result is displayed in
decimal format.
• Values stored in memory are displayed as-is, regardless of how [Number Format] settings
(Normal 1, Normal 2, Fix 0 – 9, Sci 0 – 9) are configured (except when a decimal value is
displayed).
Decimal Mode
The following applies when the check box next to the “Decimal Calculation” item on the Basic
Format dialog box is selected.
• Values stored in Ans memory and values assigned to variables have the same number of
digits as defined for Standard mode values.
• Values are displayed in accordance with how [Number Format] settings (Normal 1, Normal 2,
Fix 0 – 9, Sci 0 – 9) are configured.
• Displayed values are rounded to the appropriate number of decimal places.
• Some applications store values using a mantissa up to 15 digits long and a 3-digit
exponent.
k Precision
• Internal calculations are performed using 15 digits.
• The error for a single mathematical expression (Decimal mode calculation error) is ±1 at the
10th digit. In the case of exponential display, calculation error is ±1 at the least significant
digit. Note that performing consecutive calculations causes error to be cumulative. Error is
y
, x!, nPr, nCr,
also cumulative for internal consecutive calculations performed for: ^(x ), x
etc.
• Error is cumulative and tends to be larger in the vicinity of a function’s singular point(s) and
inflection point(s), and the vicinity of zero. With sinh(x) and tanh(x), for example, the
inflection point occurs when x = 0. In this vicinity, error is cumulative and precision is poor.
20110901
α -5-1
Specifications
5 Specifications
Calculation range:
±1 × 10–999 to ±9.999999999 × 10999 and 0. Internal operations use 15-digit mantissa.
Exponential display range: Normal 1: 10–2 > |x|, |x| > 1010
Normal 2: 10–9 > |x|, |x| > 1010
Program capacity: 515000 bytes (max.)
Power supply:
Four AAA-size batteries LR03 (AM4), or four nickel-metal hydride batteries
Power consumption: 0.5 W
Approximate battery life:
New alkaline batteries or fully-charged new nickel-metal hydride batteries used in an ambient
temperature of 25°C.
AAA-size alkaline batteries LR03 (AM4)
230 hours (continuous display of application menu)
140 hours continuous operation (5 minutes calculation, 55 minutes display)
1 year (unused with power off)
Nickel-metal hydride batteries (recommended type only)
170 hours (continuous display of application menu / Reference)
100 hours continuous operation (5 minutes calculation, 55 minutes display / Reference)
* Battery life can be reduced dramatically by the conditions described below.
- Continuous program calculation execution
- Manufacturer and type of battery used, differences between individual batteries
- Operating conditions (applications used)
- Calculator settings (display brightness, etc.)
Auto power off:
Power is automatically turned off if no operation is performed for a specified period
(user-settable as 10 minutes or 60 minutes). The initial default setting is 10 minutes.
Ambient temperature range: 0°C to 40°C (32°F to 104°F)
Dimensions: 21 mm (H) × 84 mm (W) × 189.5 mm (D)
/16" (H) × 3 5/16" (W) × 7 7/16" (D)
13
Weight: Approx. 260 g (9.2 oz) (including batteries)
20110901
α -5-2
Specifications
Data Communication
Port: 3-pin data communication port
4-pin mini USB port
Method: Start-stop (asynchronous), full-duplex
Transmission speed (BPS): 115200/38400/9600 bits/second (normal)
38400 bits/second (Send38k/Receive38k)
Parity: None
Bit length: 8 bits
Stop bit:
Send38k: 2 bits
Receive38k: 1 bit
Flow control: X ON
20110901
Canadian Regulatory Information
Information concernant la Réglementation Canadienne
This Class B digital apparatus complies with Canadian ICES-003.
Cet appareil numérique de la classe B est conforme à la norme NMB-003 du Canada.
Manufacturer:
CASIO COMPUTER CO., LTD.
6-2, Hon-machi 1-chome, Shibuya-ku, Tokyo 151-8543, Japan
Responsible within the European Union:
CASIO EUROPE GmbH
Casio-Platz 1, 22848 Norderstedt, Germany
This mark applies in EU countries only.
CASIO COMPUTER CO., LTD.
6-2, Hon-machi 1-chome
Shibuya-ku, Tokyo 151-8543, Japan
One or more of the following patents may be used in the product.
U.S.Pats. 5,539,867
SA1203-D