1
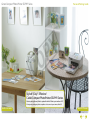
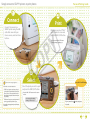
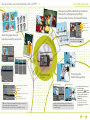
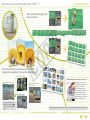
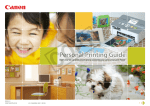
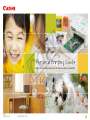
C
Y
P
O
Here’s how you can print pictures just by connecting your camera to a Canon Printer
PPG 1
CDP-E073-010
© CANON INC. 2009
1
Canon Compact Photo Printer SELPHY Series
Personal Printing Guide
C
Y
P
O
Stylish ! Easy ! Effective !
Canon Compact PhotoPrinter SELPHY Series.
Want to print right away? Want to print with the kids? Want to print without a PC?
Now you can print great photos anywhere. Just connect your camera, that’s it!
SELPHY ES Series
SELPHY CP Series
2
Simply connect to SELPHY printers to print photos
Personal Printing Guide
1
3
Connect
Print
Connect the camera to a
SELPHY printer using the USB
cable that came with your
Canon camera, and turn them
both on.
Make sure you select “Print”
on the camera's screen and
press the FUNC./SET button.
Y
P
O
*If you press the FUNC./SET button
during printing, printing stops.
2
!
Select
If an error message appears…
Follow the on-screen instructions
. If “File Error” appears, you have selected
a photo that is not printable. Photos from
other cameras or images that have been
altered using computer software may not
be printable.
If “Print error” appears, turn the printer off
and on again and repeat the set-up.
.
For trouble shooting details, see the Printer
User Guide.
C
Easy One-Touch Printing
Select the photo you wish to print
and press the FUNC./SET button.
*Press the FUNC./SET button twice for certain
models.
See next page for multiple
printing or other set-ups.
If your camera has a
it to print.
button, just press
3
You have many ways to print photos with a SELPHY – 1
Personal Printing Guide
Manage your photos with dates and numbers.
Better prints with special print effects.
Select number of prints to share with friends.
B,D
E
G Date and photo
number
G
H Special print effects
H
I Number of prints
Select the paper size and
layout you want for your prints.
B
1 Select [Paper Settings]
2 Select paper size
3 Press the FUNC./SET button
4 Select layout
A Print using the set-up on the printer
C
Y
P
O
*When [Default] is selected,
printing uses the set-up on
the printer.
1 Select [Trimming]
*When photos were taken with dates
embedded, select [Off] for
Trim images for
better looking photos.
2 Set printing area
B With borders
C Borderless
E Print ID photos
F [Fixed Size] Select print size
camera's L (Large) recording pixel setting.
*[Fixed Size] can be selected in L, Postcard, and Wide size only.
•To change size of frame: use Zoom
lever or Zoom button
•To move frame: use
buttons
•To rotate frame: press [DISP.] or [SET]
button, or use the Control Dial*
•Set trimming area: press [SET] or
[MENU] button*
D Print multiple photos on one sheet
*[ID Photo] can only be selected when the images were shot in the
.
*Operation differs depending
*Images smaller than 640X480 cannot be trimmed.
*Trimming photos with embedded dates may not show
the dates properly.
on camera models. Follow the
instructions shown on the bottom
part of the screen.
4
You have many ways to print photos with a SELPHY – 2
Personal Printing Guide
Select your favorite images from
movies and print.
C
Print all the photos you select on one sheet (DPOF).
Image data management is easy with indexed prints!
Select photos to print
1 Select photos on camera
2 Connect the camera to
the printer
Change print settings
Y
P
O
Printing directly from a memory card is easy too.
By inserting a memory card in
a SELPHY, you can enjoy layout
printing, color adjustment
(My Color), automatic image
adjustment, and other functions.
With the SELPHY ES series, you
can add frames around photos,
insert stamp patterns and speech
balloons, or make calendars.
*Select photos by pressing the
MENU button and use the tab.
See the Camera User Guide for
details.
*What you can do depends on the printer model. See the Canon website or product brochures for details.
5
Canon Inkjet Printers (PIXMA Series)
Personal Printing Guide
You can print with many types of paper from business cards
to A4 with Canon Inkjet Printers (PIXMA Series).
You can print on many types of paper with various size and layout options.
You can also copy and scan with very versatile all-in-one printers.
*What you can do depends on the printer model.
See the Canon website or product brochures.
Full range of image correction and
printing effects!
Default
On
Off
Face
Vivid
NR
Vivid+NR
Red-Eye1
Red-Eye2
C
: Print with printer set-up
: Automatically corrects to best set-up
: No printing correction
: Lightens up faces when back-lit
: Greener leaves on trees and bluer seas and skies
: Noise reduction
: Both [Vivid] and [NR] On
: Correct red-eyes
: All [NR], [Face] and [Red-Eye 1] On
Y
P
O
You can use many types of
paper to print.
!
If an error message appears…
Follow the instructions as they appear on screen
*If [File Error] appears, you have selected a photo that is not printable. Photos from other
cameras or images that have been altered using computer software may not be printable.
*If [Print Error] appears, check the paper size set-up.
If this message appear when the set-up is correct, turn the printer off and on again.
*If [Printer error] appears, turn off the printer, reconnect the cables and turn it on again. If this
does not solve the problem, contact Canon Customer Service.
*If [Ink absorber full] appears, contact Canon Customer Service for replacement of the ink
absorber.
If the Error light on the printer is blinking or an error message appears, be sure to check the
Printer User Guide.
6