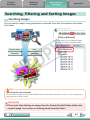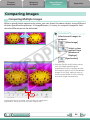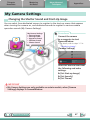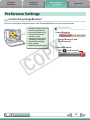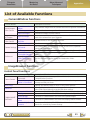
1
Software Guide
for Macintosh
•ImageBrowser
•CameraWindow
•Movie Uploader for YouTube
•PhotoStitch
Y
P
O
C
Special Features
Transfer Images and Movies
Insert Text
Save Still Images
From Movies
ABC
Print Images
Edit Movies
A
Attach Images to Email
Plus many other useful features
Table of Contents
How to Use This Manual
1
Things to
Remember
Mastering
the Basics
More Advanced
Techniques
Appendices
About this Manual
Notation Conventions
The contents of this manual are classified according to the following symbols.
IMPORTANT
•The “Important” sections contain operating precautions or important topics.
Ensure that you read them.
HINT
• The “Hint” sections contain procedural suggestions and tips for your convenience. Read them as
necessary.
Y
P
O
C
Operating Environment
•This manual uses Mac OS X v10.5 screen shots and procedures in the explanations.
The screen shots and procedures may appear slightly different if you are using
another version of Mac OS.
• The displayed screens and procedures may also differ slightly from the examples
depending upon the camera or printer model in use.
•The explanations in this guide are based on the premise that a Canon compact
digital camera will be used with the software.
•Some functions may not be available depending on the camera model.
Word Searches
This document is provided as an Adobe Reader document. Use Adobe Reader’s Search
functions to find specific words or phrases that you recall but cannot find. To access
this function, in Adobe Reader click the [Edit] menu and select the [Search] option.
If you are using Adobe Reader 8 or later, you can also perform searches with the [Find]
function right on the toolbar.
Input search text here
Table of Contents
2
Things to
Remember
Mastering
the Basics
More Advanced
Techniques
Appendices
Precautions for Connecting the Camera to the Computer
•When connecting the camera to the computer with an interface cable, make sure to connect
the cable directly to the computer’s USB port. The connection may not operate correctly if
you attach the camera to the computer via a USB hub.
•The connection may not operate correctly if you are using other USB devices, excluding
USB mice or keyboards, at the same time as the camera. If this occurs, disconnect the other
devices from the computer and try reconnecting the camera.
•Do not connect two or more cameras at the same time to the same computer. The
connections may not operate correctly.
•Do not allow the computer to go into sleep (standby) mode while a camera is connected
via the USB interface cable. If this does happen, do not disconnect the interface cable. Try
to awaken the computer with the camera in the connected state. Some computers will not
awaken properly if you disconnect the camera while they are in sleep (standby) mode. Please
refer to your computer manual for instructions regarding the sleep (standby) mode.
•Do not disconnect the camera from the computer if CameraWindow is displayed on the
screen.
Y
P
O
C
IMPORTANT
•You are recommended to use an AC adapter (sold separately) when connecting
to a computer. Ensure that you use fully charged batteries if you cannot use an
AC adapter.
• See the Camera User Guide for procedures on connecting the camera to the
computer.
Table of Contents
3
Things to
Remember
Mastering
the Basics
More Advanced
Techniques
Appendices
Table of Contents
About this Manual.................................................................................................................... 2
Precautions for Connecting the Camera to the Computer..................................................... 3
Things to Remember............................................................................................. 6
CameraWindow and ImageBrowser........................................................................................ 6
CameraWindow and ImageBrowser............................................................................................... 6
ImageBrowser’s Browser Window........................................................................................... 7
How to Display Browser Window................................................................................................... 7
Names of the Browser Window Parts............................................................................................. 7
How to Perform Tasks............................................................................................................... 8
Selecting and Using Functions........................................................................................................ 8
Mastering the Basics............................................................................................. 9
Y
P
O
C
Transferring Images.................................................................................................................. 9
Transferring Images by Connecting the Camera to a Computer.................................................. 9
Printing..................................................................................................................................... 12
Printing a Single Image on a Single Page.................................................................................... 12
Index Print...................................................................................................................................... 14
How to Use CameraWindow.................................................................................................. 16
First Menu Screen to Open............................................................................................................ 16
Image Transfer Screen................................................................................................................... 17
Organize Images Screen................................................................................................................ 18
How to Use ImageBrowser’s Browser Window.................................................................... 19
Browser Window........................................................................................................................... 19
Display Modes................................................................................................................................ 20
Display Control Panel.................................................................................................................... 20
Browser Area Tasks........................................................................................................................ 21
File Information Window.............................................................................................................. 22
Viewer (View Image) Window...................................................................................................... 23
More Advanced Techniques............................................................................... 24
Editing Images......................................................................................................................... 24
Trimming – Cropping a Portion of an Image............................................................................... 24
Color/Brightness Adjustment........................................................................................................ 24
Red Eye Correction........................................................................................................................ 25
Inserting Text................................................................................................................................. 25
Correcting Levels............................................................................................................................ 26
Correcting Tone Curves................................................................................................................. 26
Adjusting Sharpness – Emphasizing Outlines.............................................................................. 27
Auto Adjustment........................................................................................................................... 27
Using Other Editing Software....................................................................................................... 28
Attaching Sounds........................................................................................................................... 29
Creating Panoramic Images – PhotoStitch ................................................................................. 30
Editing Movies............................................................................................................................... 31
Converting RAW Images – Digital Photo Professional................................................................ 32
4
Things to
Remember
Mastering
the Basics
More Advanced
Techniques
Appendices
Exporting................................................................................................................................. 34
Changing Image (Stills) Sizes and Types....................................................................................... 34
Exporting Shooting Information.................................................................................................. 34
Creating Computer Screen Saver Images..................................................................................... 35
Creating Computer Wallpaper Images......................................................................................... 35
Extracting Stills from Movies......................................................................................................... 36
Uploading Movies to YouTube............................................................................................... 37
Uploading to YouTube – Movie Uploader for YouTube.............................................................. 37
Email......................................................................................................................................... 38
Attaching Images to Email............................................................................................................ 38
Slide Shows.............................................................................................................................. 39
Viewing Images in Slide Shows..................................................................................................... 39
Image Management................................................................................................................ 40
Changing File Names in Batches .................................................................................................. 40
Sorting Images into Folders by Shooting Date............................................................................ 40
Sorting Images into Ratings Folders............................................................................................. 41
Y
P
O
C
Configuring Image Information Settings.............................................................................. 42
Setting Ratings............................................................................................................................... 42
Inserting Comments....................................................................................................................... 42
Assigning Keywords....................................................................................................................... 43
Searching, Filtering and Sorting Images................................................................................ 44
Searching Images........................................................................................................................... 44
Filtering Images............................................................................................................................. 45
Sorting Images............................................................................................................................... 45
Comparing Images.................................................................................................................. 46
Comparing Multiple Images.......................................................................................................... 46
My Camera Settings................................................................................................................ 47
Changing the Shutter Sound and Start-Up Image....................................................................... 47
Transferring Images................................................................................................................ 49
Transferring Images to a Camera.................................................................................................. 49
CANON iMAGE GATEWAY...................................................................................................... 50
About CANON iMAGE GATEWAY (for U.S.A. customers only).................................................... 50
Registering..................................................................................................................................... 50
Available Services........................................................................................................................... 51
Preference Settings................................................................................................................. 52
Customizing ImageBrowser.......................................................................................................... 52
Appendices.......................................................................................................... 53
List of Available Functions...................................................................................................... 53
Supported Image Types.......................................................................................................... 55
Uninstalling the Software...................................................................................................... 56
Memory Card Folder Structure............................................................................................... 57
Troubleshooting...................................................................................................................... 58
5
Things to
Remember
Mastering
the Basics
More Advanced
Techniques
Appendices
CameraWindow and ImageBrowser
CameraWindow and ImageBrowser
The following two windows are the main ones used for CameraWindow and
ImageBrowser procedures.
CameraWindow
This is software that communicates
with the camera.
You can use it to transfer images
to and from the camera, organize
images on the camera, and upload
movies on the camera to web
services.
The menu screen at the right
will appear when the camera is
connected to a computer.
Y
P
O
C
After the images are transferred from the camera,
the screen changes when CameraWindow is closed.
ImageBrowser
This is software that manages
images transferred to a computer.
You can use it to view, edit and
print images on a computer. If
you close CameraWindow after
transferring images, the window at
the right will appear.
You can also open the
window by clicking the
[ImageBrowser] icon in the
dock.
HINT
Use the Help Function
The
(Help) button or Help menu is available in most CameraWindow and ImageBrowser windows. It is
there for when you are unsure how to proceed.
Table of Contents
6
Things to
Remember
Mastering
the Basics
More Advanced
Techniques
Appendices
ImageBrowser’s Browser Window
How to Display Browser Window
ImageBrowser’s Browser Window will appear after the camera images are transferred
and CameraWindow closes. You can also display it by clicking the ImageBrowser icon
in the Dock (the bar at the bottom of the desktop).
•If the ImageBrowser icon is not displayed in the Dock, double-click
the [Applications] folder, followed by the [Canon Utilities] folder,
[ImageBrowser] folder and the [ImageBrowser] icon.
Names of the Browser Window Parts
Y
P
O
C
Display Modes
Menu Bar
Browser Area
Icons that indicate image properties
display around thumbnail images, as
shown on the bottom left.
Last Acquired Images
Displays the last images
transferred.
Folder Area
Selects a folder to display.
Control Panel
Display Control Panel
Properties Icon (Displays Image Properties)
: Image recorded using the camera’s Stitch Assist
: Movies recorded with Movie Digest mode
: Image with sound memo attached
: RAW image
: Protected image
: Movie
: Image recorded using the camera’s AEB function
: Rotated image (rotated in display only)
mode
: Super Slow Motion Movie
Table of Contents
7
Things to
Remember
Mastering
the Basics
More Advanced
Techniques
Appendices
How to Perform Tasks
Selecting and Using Functions
Many ImageBrowser functions can be accessed by selecting them from the Control
Panel and following the instructions in the guidance section of the new window. For
further details on the functions, refer to “List of Available Functions” in the appendix.
1
Select a function from the Control Panel or a menu.
Y
P
O
C
2
Follow the instructions
to perform the task.
Table of Contents
8
Things to
Remember
Mastering
the Basics
More Advanced
Techniques
Appendices
Transferring Images
Transferring Images by Connecting the Camera to a Computer
Transfer the camera images to the computer.
Y
P
O
C
IMPORTANT
•The instructions in this software manual assume that you have correctly installed
the software. See the Camera User Guide for software installation procedures.
•For details on how to connect the camera to a computer, refer to the Camera
User Guide. Please also refer to “Precautions for Connecting the Camera to the
Computer”.
•If CameraWindow fails to open when you connect the camera, click the
[CameraWindow] icon in the Dock (the bar at the bottom of the desktop).
1
Connect the camera to the computer with
the supplied interface cable.
2
Turn on the camera power, set it to
playback mode and prepare it to
communicate with the computer.
3
Click [Import Images from
Camera] and then click [Import
Untransferred Images].
Only images that have not yet been
transferred will start to transfer.
Table of Contents
CameraWindow (Menu Screen)
9
Things to
Remember
Mastering
the Basics
More Advanced
Techniques
Appendices
After you click [OK] in the dialog that indicates the transfer is complete and
close the CameraWindow screen, the transferred images will display in the
Browser Window.
You can select the newly transferred
images by their shooting dates or My
Category (select models only) classification.
: Folders containing
newly acquired images
Y
P
O
C
•Images from memory cards with large numbers of images (more than 1,000) may not transfer
correctly. If this happens, please use a memory card reader to transfer. For details on transferring
images from a memory card reader, refer to “Transferring Images Using a Memory Card Reader”.
•Movie files take time to transfer since the files are large.
HINT
Changing the Transfer Destination Folder
The default settings save transferred images into the
[Pictures] folder. To change the destination folder, click
the
button shown on the right in Step 3 as described
on the previous page, then click the [Import] button. In
[Folder Settings], click [Browse] to complete settings in the
screen currently displayed.
Changing the software that displays after images
have been transferred
You can choose the software that displays after images
have been transferred. Click
in the upper right corner
of CameraWindow, then click [Import] in the screen that
appears and choose the [After Import] tab. After making
your settings, press [OK] and close the [Preferences]
screen.
Table of Contents
10
Things to
Remember
Mastering
the Basics
More Advanced
Techniques
Appendices
HINT
Select Images to Import
To transfer only a selection of images from the
camera, click [Import Images from Camera] in
CameraWindow (menu screen), [Select Images
to Import], then select images in the image
transfer screen, and click the
(Import)
button. For details, refer to “Image Transfer
Screen”.
Import All Images
To transfer all images on the camera,
click [Import Images from Camera] in
CameraWindow (menu screen) then, [Import
All Images].
Y
P
O
C
Automatically Transferring Images on
CameraWindow Start-Up
To automatically transfer images when
CameraWindow starts up, click the button
shown on the right in CameraWindow (menu
screen), then click the [Import] button, and
the [Auto Import] tab. Add a checkmark to [Start importing images automatically when this software is
launched.].
Transferring Images Using a Memory Card Reader
ImageBrowser will start when you insert a memory card into the memory card reader, and display the
following window. Use this window to perform the transferring procedures.
Transfers all images.
Allows you to select and transfer images.
Prints images.
Configures the transfer folder and
other settings.
Table of Contents
11
Things to
Remember
Mastering
the Basics
More Advanced
Techniques
Appendices
Printing
Printing a Single Image on a Single Page
Prints one image per page.
Y
P
O
C
HINT
Printing Movies
Movies cannot be printed, but you can extract still images from movies, and print them after they have
been saved. For details on how to save still images from movies, refer to “Extracting Stills from Movies”.
1
Select images for printing.
2
Click [Print & Share], and
[Photo Print].
Table of Contents
12
Things to
Remember
3
Mastering
the Basics
More Advanced
Techniques
Appendices
Set the categories as desired.
Sets the printer, paper
size and borderless
printing settings.
Sets the shooting
date/time imprint
settings.
Y
P
O
C
Click here to
crop and print
a portion of an
image.
4
Click [Print].
Print window will display.
5
Click [Print].
Printing will start.
Click here to insert
text onto an image
and print.
HINT
Laying Out and Printing
You can also select multiple images, add captions and print freely composed layouts on a single page.
Click [Print & Share] in the Control Panel and select [Layout Print]. The shooting date will automatically
appear when you perform a layout print if you click the [ImageBrowser] menu, followed by [Preferences]
and [Layout Print], and place a check mark beside [Shooting Date].
Table of Contents
13
Things to
Remember
Mastering
the Basics
More Advanced
Techniques
Appendices
Index Print
Prints an index of the images.
Y
P
O
C
1
Select images for printing.
2
Click [Print & Share], and
[Index Print].
Table of Contents
14
Things to
Remember
3
Mastering
the Basics
Set the categories as desired.
More Advanced
Techniques
Appendices
Select an image to rotate or trim.
Sets the printer, paper
size and number of
print copies settings.
Sets the number of
rows or columns.
Y
P
O
C
Configures the printing of
the shooting information,
comments, headers,
footers or page numbers.
Rotates selected
images.
Click here to crop a portion of the
selected image and print it.
4
Click [Print].
Print window will display.
5
Click [Print].
Printing will start.
Table of Contents
15
Things to
Remember
Mastering
the Basics
More Advanced
Techniques
Appendices
How to Use CameraWindow
First Menu Screen to Open
This screen appears when the camera is connected to your computer.
Click each button to display the available options.
Displays in-camera
memory card
information.
Displays camera information.
Y
P
O
C
Starts operations for
transferring images from the
camera to your computer.
Starts operations for
protecting, rotating, and
deleting images on the
camera. Also transfers images
from your computer to the
camera.
Starts operations for
uploading movies on the
camera to web services.
Starts operations for setting
the camera start-up screen,
start-up sound, and various
camera sounds. For details,
refer to “My Camera
Settings” in “More Advanced
Techniques”. This menu may
not appear depending on your
camera model.
HINT
Customizing CameraWindow Functions
If you click the
button as shown in the upper right of the screen, you can customize various functions
to make CameraWindow easier to use. You can change the automatic transfer settings, the start-up
screen that appears when starting CameraWindow, and the transfer destination folder.
Table of Contents
16
Things to
Remember
Mastering
the Basics
More Advanced
Techniques
Appendices
Image Transfer Screen
This screen appears when you click [Import Images from Camera] on the Menu screen,
then click [Select Images to Import]. Select the image you want to transfer and click
the
button to transfer the image to your computer.
Viewer Window (Thumbnail Display)
Closes CameraWindow.
Returns to the Menu screen.
Turns the shooting date and folder name below the
thumbnails on and off (when in thumbnail display).
Changes thumbnail size
(when in thumbnail display).
Switches between window display
modes.
Y
P
O
C
Thumbnail display
Preview display
Full screen display
Double-clicking an image switches
to preview display when a single
image is selected.
This mark appears on images that
have not yet been transferred.
Images on the camera
that match the selected
filter display in the area
to the right.
Rotates chosen images
90° to the left or right.
Transfers the image chosen
in Viewer Window to your
computer.
Cancels image selection.
Selects all images.
The background of chosen images turns blue.
IMPORTANT
•The functions (buttons) that display will differ depending on the camera model.
Table of Contents
17
Things to
Remember
Mastering
the Basics
More Advanced
Techniques
Appendices
Organize Images Screen
This screen appears when you click [Organize Images on Camera] on the Menu screen,
then click [Organize Images]. Clicking a folder on the left will display all images within
the folder as thumbnails (small images) on the right of the screen.
Viewer Window (Thumbnail Display)
Closes CameraWindow.
Returns to the Menu screen.
Turns the shooting date and folder name below the
thumbnails on and off (when in thumbnail display).
Changes thumbnail size
(when in thumbnail display).
Switches between window display
modes.
Y
P
O
C
Thumbnail display
Preview display
Full screen display
Double-clicking an image switches
to preview display when a single
image is selected.
This mark appears on images that
have not yet been transferred.
Images on the camera
that match the selected
filter display in the area
to the right.
Rotates chosen images
90° to the left or right.
Deletes the image chosen
in Viewer Window.
Protects/cancels protection
for the image chosen in
Viewer Window.
Transfers images on your
computer to the camera.
The background of chosen images turns blue.
IMPORTANT
•The functions (buttons) that display will differ depending on the camera model.
•Clicking the
(Delete) button will delete the image from the camera. Exercise
adequate caution, as you cannot retrieve the deleted images.
Table of Contents
18
Things to
Remember
Mastering
the Basics
More Advanced
Techniques
Appendices
How to Use ImageBrowser’s Browser Window
Browser Window
This is the main window for performing tasks in ImageBrowser.
Last Acquired Images
You can check images by
shooting date or My Category.
Display Mode
Selects a display mode
for the Browser Area.
Image Information Panel
When in Preview Mode: Displays information about
the selected image.
When in List Mode: Displays image information if you
click the [File] menu and select [Get Info].
Y
P
O
C
Canon Camera
Displays CameraWindow.
View Image
Displays the selected image in the
Viewer Window.
Slide Show
Displays the selected images in
succession in the window.
Folder Area
Selects a folder to display.
• You can register folders you use often
as Favorite Folders (
). Register by
clicking [Add]. To delete a folder in the
Favorite Folders area, select a folder
and click the [Remove] button.
Table of Contents
Browser Area
• Displays the images
in the selected folder.
Display Control Panel
Configures the settings
for displaying images in
the Browser Area.
Send to Trash
Deletes selected images or folders.
• Deleted images are placed in the Trash.
• If you mistakenly send an image to the Trash,
click the [Trash] icon in the Dock and restore
the image to its original folder in the Finder.
Print & Share
Prints the selected image(s), creates an image
attachment for email, or uploads movies to
YouTube.
Rotate Image
• To rotate images, click the [Edit] menu and select [Rotate Image].
• To rotate the original image in the displayed direction, click the
[Edit] menu and select [Rotate According to Rotation Information].
19
Things to
Remember
Mastering
the Basics
More Advanced
Techniques
Appendices
Display Modes
Select a browser area display mode to fit your purposes.
Y
P
O
C
Preview Mode: allows the
image information to be read
while viewing the image.
List Mode: allows
thumbnails to be viewed at a
size suited for easy viewing.
Display Control Panel
This panel adjusts the display settings for the Browser Area.
Display Size
Changes the size of the thumbnail
in the Browser Area.
Filter Tool Menu
Displays only images that correspond
to specific conditions.
Table of Contents
Selection Menu
Click this to select/deselect all
images in the Browser Area.
Hide Buttons
Left: Hides the Folder Area and the Last
Acquired Images.
Middle:Hides the control panel.
Right: Hides the Show Shooting Information
panel in the [Preview] display mode.
20
Things to
Remember
Mastering
the Basics
More Advanced
Techniques
Appendices
Browser Area Tasks
Functions Used in the Browser Area
Create New Folder
To create a new folder in the Browser Area, click the
[File] menu and select [New Folder].
Select Images
Clicking an image in the Browser Area selects that
image. To select multiple images, hold down the
[shift] key or [ ] (Command) key while clicking
images, or hold down the [option] and [shift] key
together and click a starting and ending image to
select a range of adjacent images.
Display Images
Y
P
O
C
Double-clicking an image in the Browser Area (or
selecting the image and clicking
), displays it in
the Viewer Window.
Change the Display Size
You can change the size of
the thumbnails.
Show Window
You can switch between
showing/hiding the Folder
Area, Control Panel and
Information Panel.
HINT
Move, Copy Images
To move an image between folders, drag it over the
destination folder and release the mouse button.
To copy an image, hold the [option] key while
releasing the mouse button as above.
Right-Click Context Menus
Right-clicking (or [Control] key and clicking) over a window or image displays contextual menus. These
menus contain the functions available in the current context as well as other convenient functions. Use
the context menus to increase your efficiency. Table of Contents
21
Things to
Remember
Mastering
the Basics
More Advanced
Techniques
Appendices
File Information Window
The File Information Window displays when you select an image in the Browser Area,
select [List Mode], and then click the [File] menu and select [Get Info].
File Name
You can change file names.
Switches between showing and
hiding detailed information.
Switches between showing and hiding
detailed information for the category.
Rating / My Category
Sets the rating for an image.
An icon will display if a My
Category is set (certain models
only).
Y
P
O
C
Comment
You can type a
comment here.
Keyword
Sets the keywords used in
searches.
Brightness Histogram
A graph of the highlights and
shadows distribution in an
image.
Image Selector Buttons
When multiple images are selected, you can switch between
images that display information in the File Information Window.
Shooting Information
Displays detailed information,
such as the shutter speed
and exposure compensation
setting. The camera model will
determine what information is
displayed.
Lock
Prevents an image from
being overwritten or deleted.
Table of Contents
22
Things to
Remember
Mastering
the Basics
More Advanced
Techniques
Appendices
Viewer (View Image) Window
Double-clicking a thumbnail image in the Browser Window displays it in this window.
Shooting information
Change the display
magnification.
Zooming in displays
the Navigator window
to show the relative
position on the image.
Set the Rating.
Y
P
O
C
Save an image.
Edit an image.
Display multiple
images side by side.
Display the shooting information.
You can configure the information
display by clicking the [ImageBrowser]
menu and selecting [Preferences].
Display at full screen size.
•The following window will appear when a movie is displayed.
You can control
movie playback
and sound volume.
You can extract
stills from movies.
You can cut portions at
either end of a movie clip.
•A bar for changing the playback speed, and
(real-time playback) will appear when a Super Slow Motion
Movie is displayed. If you click
, the movie will play back at the actual speed it was shot at.
Table of Contents
23
Things to
Remember
Mastering
the Basics
More Advanced
Techniques
Appendices
Editing Images
IMPORTANT
•The original image will be overwritten after an image is edited unless the file
name is changed before saving it. To preserve the original image intact, change
the file name when saving the edited image.
•This section introduces the procedures for starting from the [Edit] button in the Viewer Window, but you
can also start the same process by clicking the [Edit] menu and selecting [Edit still image].
Trimming – Cropping a Portion of an Image
Use this to delete unnecessary portions of the image and leave only the necessary
portions.
Y
P
O
C
Procedures
1
2
Double-click an image.
[Edit] and [Trim].
•You can also input values or an aspect
ratio to specify the trim area.
•Movies and RAW images cannot be
edited.
Color/Brightness Adjustment
Adjusts the images’ RGB values (red, green, blue) and the saturation and brightness.
Procedures
Saturation,
Brightness
1
2
Double-click an image.
[Edit] and [Color/
Brightness
Adjustment].
•Movies and RAW images cannot be
edited.
RGB Adjustment
Table of Contents
24
Things to
Remember
Mastering
the Basics
More Advanced
Techniques
Appendices
Red Eye Correction
Restores eye appearance to the original color when light reflected from the flash
makes them appear red.
Procedures
1
2
•Click [Start] when Auto Mode is selected.
•Switch to Manual Mode if Auto Mode cannot correct the
image, and select the location of the eye to correct. Inserting Text
Double-click an image.
[Edit] and [Red Eye
Correction].
•Movies and RAW images cannot be
edited.
•If a message appears that recommends
installation of additional software when
using Mac OS X v10.6, follow the
message to install the software.
Y
P
O
C
Use this to insert text onto the image.
Procedures
You can freely adjust the font,
size, color and text attributes.
HELLO
Table of Contents
1
2
Double-click an image.
[Edit] and [Insert
Text].
•Placing a checkmark in the [Antialias] box
causes the text edges to blend in with
the underlying image.
•Movies and RAW images cannot be
edited.
25
Things to
Remember
Mastering
the Basics
More Advanced
Techniques
Appendices
Correcting Levels
You can adjust the highlights (brightest portions), shadows (darkest portions) and midtone levels of an image while viewing its histogram.
Procedures
Level Adjustment
1
2
Double-click an image.
[Edit] and [Level
Adjustment].
•Movies and RAW images cannot be
edited.
Y
P
O
C
Correcting Tone Curves
You can adjust the color balance and brightness of an image using its tone curve
(input/output conversion graph of image brightness).
Procedures
Tone Curve Adjustment
1
2
Double-click an image.
[Edit] and [Tone
Curve Adjustment].
•Movies and RAW images cannot be
edited.
Table of Contents
26
Things to
Remember
Mastering
the Basics
More Advanced
Techniques
Appendices
Adjusting Sharpness – Emphasizing Outlines
Makes images appear sharper by emphasizing the outlines of subjects, such as people
and objects.
Procedures
Sharpen
1
2
Double-click an image.
[Edit] and
[Sharpness].
•Movies and RAW images cannot be
edited.
Y
P
O
C
Auto Adjustment
Automatically adjusts the image color balance and brightness.
Procedures
1
2
Double-click an image.
[Edit] and [Auto
Adjustment].
•Movies and RAW images cannot be
edited.
Table of Contents
27
Things to
Remember
Mastering
the Basics
More Advanced
Techniques
Appendices
Using Other Editing Software
If you register another image editing program with ImageBrowser in advance, you can
use that software to edit an image selected in ImageBrowser.
Registering an Editing Program
Procedures
Register the program so
it can be started from
within ImageBrowser.
ImageBrowser
1
Other Image
Editing Program
2
[ImageBrowser] and
[Preferences].
[Register Application]
Y
P
O
C
Editing Images with a Registered Editing Program
Procedures
1
2
Double-click an image.
[Edit] and [Edit
with Registered
Application].
•The shooting information may be lost
from images recorded with the camera
and then processed and saved with
another image editing program. •Movies and RAW images cannot be
edited.
Table of Contents
28
Things to
Remember
Mastering
the Basics
More Advanced
Techniques
Appendices
Attaching Sounds
You can add sound to images and play back the sounds.
Adding Sound
Procedures
1
2
Select an image.
[File], [Sound] and [Record].
Symbol displayed on image
thumbnails to which sound
files have been added.
•ImageBrowser’s Sound Recorder uses
the Mac OS X recording function. If
required, prepare such equipment as a
microphone, and check that recording
is enabled in the [System Preferences],
[Sound] window.
•To delete a recorded sound, click the
[File] menu and select [Sound], followed
by [Send to Trash].
•To record a new sound for an image
that already has one associated with it,
click the [File] menu and select [Sound],
followed by [Record].
Y
P
O
C
IMPORTANT
•Sounds cannot be attached to movies.
Playing an Image Sound File
Procedures
1
2
Select an image.
[File], [Sound] and [Play].
•You can also play sounds in the Preview
Mode and the File Information Window.
Table of Contents
29
Things to
Remember
Mastering
the Basics
More Advanced
Techniques
Appendices
Creating Panoramic Images – PhotoStitch
You can create wide panoramic images by moving the camera slightly when recording
a series of images and merging them into one image.
Procedures
1
Select the images that you
want to stitch together.
2
[Edit] and [PhotoStitch].
•Movies and RAW images cannot be
edited.
Y
P
O
C
Use the PhotoStitch program
to create panoramic images.
HINT
Using the Stitch Assist Mode
If you use the camera’s Stitch Assist mode to record the images, PhotoStitch can automatically detect the
image order and merge direction, making it easier to merge the images. (Some camera models may not
feature the Stitch Assist mode.)
IMPORTANT
•If a message appears, notifying you that the computer has insufficient memory,
try one of the following methods to solve the problem.
•Close all other applications other than PhotoStitch.
•Reduce the size or number of images to combine.
•In the [Save] tab, select [Adjust image...], then in “Saved Image Size“ reduce
the size.
Table of Contents
30
Things to
Remember
Mastering
the Basics
More Advanced
Techniques
Appendices
Editing Movies
You can create original movies by linking movie clips and still images.
You can even add titles and other text, background music and various special effects
to the movie.
ABC
Procedures
1
Select an image (movie or
still image).
2
[Edit] and [Movie Edit].
•You can configure the default settings
for editing movies by clicking the
[MovieEdit Task] menu and selecting
[Preferences].
Y
P
O
C
HINT
Recordable Movie Length
• The length of movies you can save is shown at right. A
message will appear if you try to save a longer movie.
Reduce the length or size of the movie if this happens.
Changing the Playback Speed of a Super Slow Motion
Movie and Saving it as a New File
• Click [Slow] in step 1 to change the playback speed (only
with Super Slow Motion Movies).
Movie Size
1920x1080
1280x720
640x480
320x240
Max. Length
Under 10 minutes
Under 20 minutes
Under 30 minutes
Under 60 minutes
IMPORTANT
•Movies edited with this function cannot be transferred back to the camera.
•Saving movies takes time, especially MOV type movies selected with [Save
image type] takes a considerable amount of time.
•There is a file number limit when editing MOV type movies.
To edit and save an MOV movie with a size of 1920 x 1080 at the same size and
file type, set the number of files to 20 or less. Likewise, with 1280 x 720 MOV
movies, the number of files should be set to 40 or less, and with 640 x 480 MOV
movies, 80 or less.
Table of Contents
31
Things to
Remember
Mastering
the Basics
More Advanced
Techniques
Appendices
Converting RAW Images – Digital Photo Professional
You can convert RAW images to JPEG and TIFF images.
Digital Photo Professional’s Main Window
Procedures
1
2
Select a RAW image.
[File] and [Process RAW Images
by Digital Photo Professional].
3
Y
P
O
C
4
Selects folders containing images.
Click
(Edit image window).
Adjust the image brightness
and white balance in the
tool palette.
•The modified contents (the
information for image processing
requirements) are saved along
with the image as a “recipe”.
•With Digital Photo Professional,
you can adjust images to achieve
the best results for your desired
scene or subject by specifying a
picture style.
•The items available to be modified
differ depending on the camera
model.
Digital Photo Professional’s Tool Palette
You can adjust all three RGB channel
levels together or separately with the
Tone Curve.
Reduces noise that occurs when
shooting night time scenery, or
when shooting at a high ISO speed.
Adjusts the brightness, white
balance and picture style.
5
[File] and [Convert and
save].
•After setting the file type, size,
and destination folder, click [Save].
Adjusts attributes such as the
contrast, color tone and color
saturation.
Table of Contents
•Only RAW images compatible with Digital
Photo Professional can be processed.
•Ensure that you use the RAW image
conversion software included with your
camera.
32
Things to
Remember
Mastering
the Basics
More Advanced
Techniques
Appendices
To print, using Digital Photo Professional, select an image in the Main Window, then
click the [File] menu and select the print function. Digital Photo Professional offers the
following printing methods.
Printing Method
Description
Single Print
Automatically sets the layout for printing a single image on a single page.
Detailed Setting
Gives you the freedom to set the layout, add titles, or print with shooting information.
Contact Sheet
Prints a line-up of multiple images on one page (also allows you to select the number of
images, layout, and add titles).
IMPORTANT
• RAW images can only be captured on certain camera models that list “RAW” as one of
the data types included in the “Specifications” section of the Camera User Guide.
• Only RAW images compatible with Digital Photo Professional can be processed. Check
the “Data Type” item of the “Specifications” section of the Camera User Guide for
compatibility.
• For a more detailed explanation of operating procedures, download the Digital
Photo Professional manual (PDF format) from the Canon website.
Y
P
O
C
HINT
About RAW Images
RAW images contain the data captured by the camera’s image sensor without modification. Since
they contain raw data that differs from the usual JPEG images by not having any image adjustment or
compression processing performed in the camera, they can be converted on a computer with a lossless
process.
Processing in the Camera
Standard Image
Capture
Image sensor
data from
shutter release
Processing by Computer
Image Adjustment
Compression
JPEG Image
Image adjustment
& compression
automatically performed
RAW Image
Capture
• Can be used with general programs.
• Image is subject to degradation when
adjusted because it has been compressed.
Digital Photo Professional
RAW Image Processing
RAW Image
Image Adjustment
Compression
JPEG Image,
TIFF Image
• You can view the image while making
adjustments without worrying about quality
loss.
• Processing with Digital Photo Professional
is required to view the images with general
programs.
Table of Contents
33
Things to
Remember
Mastering
the Basics
More Advanced
Techniques
Appendices
Exporting
Changing Image (Stills) Sizes and Types
You can change an image’s size and format when exporting it so that it can be
published on the Internet or attached to an email message.
Procedures
1
2
.jpg
.tif
[File] and [Export Image].
[Edit and Save Image]
[Next >]
Y
P
O
C
3
4
.bmp
Select an image.
•You will lose the shooting information
if you save images as a type other than
JPEG.
Exporting Shooting Information
You can export the shooting information recorded with an image, such as the shutter
speed and exposure, as a text file. Procedures
1
2
3
4
Select an image.
[File] and [Export Image].
[Export Shooting Properties]
[Next >]
Ascertain the causes of
failed photos or compare the
settings for several images.
Table of Contents
34
Things to
Remember
Mastering
the Basics
More Advanced
Techniques
Appendices
Creating Computer Screen Saver Images
You can export images to serve as computer screen savers.
Procedures
1
2
3
4
Select an image.
[File] and [Export Image].
[Export as a Screensaver]
[Next >]
Y
P
O
C
Creating Computer Wallpaper Images
You can export images to serve as computer wallpaper images.
Procedures
1
2
3
4
Table of Contents
Select an image.
[File] and [Export Image].
[Export an Image as
Wallpaper]
[Next >]
35
Things to
Remember
Mastering
the Basics
More Advanced
Techniques
Appendices
Extracting Stills from Movies
You can extract and save stills from your favorite frames recorded in a movie.
Procedures
1
2
Select an image.
[Edit] and [Extract frames
from a movie].
Y
P
O
C
Extract your best
shots as stills
Table of Contents
36
Things to
Remember
Mastering
the Basics
More Advanced
Techniques
Appendices
Uploading Movies to YouTube
Uploading to YouTube – Movie Uploader for YouTube
You can upload movies you have shot to YouTube. You can upload movies saved on
the camera or a computer.
Procedures
1
Connect the camera
to a computer to start
CameraWindow.
•For details, refer to steps 1- 2 in
“Transferring Images”.
Y
P
O
C
2
3
4
5
6
7
HINT
[Upload Images from
Camera]
[Upload Movies to YouTube]
Select movies.
Click
(Next).
Input a title and description,
then click
(Upload).
Enter your YouTube
username and password,
and sign in.
Uploading Movies Saved on a Computer
Select a movie from the Browser Window, then click [Print & Share] in the Control Panel and select [Upload
movies to YouTube]. The selected movie will be added to the list that appears on the screen. Set a title and
explanation for the movie, then click the
(Upload) button.
IMPORTANT
•Depending on YouTube specifications, or future changes to specifications, this
function cannot be guaranteed.
•The maximum length for uploadable movies is less than 10 minutes, and the
maximum file size is less than 1 GB.
•Movies that have been edited on a computer cannot be uploaded.
•Internet access is required to upload movies (You must already have an account
with an Internet service provider (ISP), browser software installed and an
Internet connection).
•Any ISP account charges and access fees must be paid separately.
Table of Contents
37
Things to
Remember
Mastering
the Basics
More Advanced
Techniques
Appendices
Email
Attaching Images to Email
You can send images as email file attachments.
You can configure
the image size and
quality settings.
Procedures
1
2
Select images.
[Print & Share] and
[Create Image for
Email].
•You can configure how the email
program automatically starts up by
opening the [Applications] folder, and
double-clicking the [Mail] icon to start
the Mail program, and clicking the [Mail]
menu, followed by [Preferences] and the
[General] tab.
•Images in the [Email Images] folder can
be found by opening the [Users] folder
on the startup disk, followed by the [User
Login Name], [Library], [Preferences],
[ImageBrowserUserData] and [Mail]
folder.
Y
P
O
C
IMPORTANT
•If the e-mail software does not start automatically, start your e-mail software to
attach and send the images.
Table of Contents
38
Things to
Remember
Mastering
the Basics
More Advanced
Techniques
Appendices
Slide Shows
Viewing Images in Slide Shows
A multiple selection of images can be shown at full size on the screen in succession as
a slide show.
You can freely configure the
transition effects, information
displayed and display time settings.
Procedures
1
2
Select images.
[SlideShow]
Y
P
O
C
•You can configure the slide show display
method by clicking the [View] menu and
selecting [Slide Show Options].
HINT
Slide Show Button Functions
The following buttons appear at the bottom of the screen while a slide show is playing.
You can set the Rating
Rewind
for an image while it is
Go to first image
displayed.
After the slide show,
the images you
clicked during the
show remain selected.
Table of Contents
Pause
After the slide show,
the images you clicked
during the show appear
in a printing window.
Forward
Advance to last frame
Stops the slide show.
39
Things to
Remember
Mastering
the Basics
More Advanced
Techniques
Appendices
Image Management
Changing File Names in Batches
You can change the file names of multiple images in one procedure.
Procedures
1
2
Name + Number
[File], [Organize Image] and
[Rename].
Shooting Date + Number
Y
P
O
C
Name + Shooting Date + Number
Shooting Date + Name + Number
xxx_01
xxx_02
xxx_03
Select an image.
Change randomly
numbered images
and received images
into consecutively
numbered images.
xxx_04
•You can change individual file and
folder names by clicking on the file
name in Preview mode or with the File
Information Window.
•Changing the image name in
ImageBrowser also changes the actual
file name on the disk.
xxx_05
Sorting Images into Folders by Shooting Date
You can sort images into folders by their shooting dates.
Procedures
200x/05/15
1
2
200x/05/16
200x/05/17
Images predating your use
of ImageBrowser can also
be managed together.
Table of Contents
3
4
Select an image.
[File], [Organize Image] and
[Sort Images].
[The files will be separated
into folders for each
shooting date.]
[Next >]
40
Things to
Remember
Mastering
the Basics
More Advanced
Techniques
Appendices
Sorting Images into Ratings Folders
You can sort images according to their Ratings into separate folders.
Procedures
1
2
3
4
Select an image.
[File], [Organize Image] and
[Sort Images].
[The files will be organized
by rating.]
[Next >]
Y
P
O
C
Table of Contents
41
Things to
Remember
Mastering
the Basics
More Advanced
Techniques
Appendices
Configuring Image Information Settings
Setting Ratings
There are seven rating levels for images: ,
,
,
,
, Unrated and Reject.
By using ratings, you can group your images for viewing or searching.
Procedures
1
2
3
Select an image.
Switch to [Preview Mode].
Set [Rating].
Y
P
O
C
•Ratings can also be set with the
following:
- ImageBrowser’s [Edit] menu or File
Information Window, or the rating
setting function of the Viewer Window.
- The camera’s [Tag as Favorite] function
(excluding movies).
•If you overwrite your previous installation
when installing the software, existing
rating settings may change. Refer to the
Help function for details.
IMPORTANT
•The only cameras that can be used to rate images will list “Favorites” in the
“Playback Menu” table of the “Menus” section at the end of the Camera User Guide.
Inserting Comments
You can freely insert your choice of text as Comments.
Procedures
1
2
ite
Endless wh
hes
c
a
sandy be
Trip to t
he
blue sea
Table of Contents
Relaxing
afternoon
snooze
3
Select an image.
Switch to [Preview Mode].
Insert [Comment].
•Comments can also be managed in the
File Information Window.
42
Things to
Remember
Mastering
the Basics
More Advanced
Techniques
Appendices
Assigning Keywords
You can set Keywords for use in image searches. Procedures
Family,
1
2
s
Animals
Family, Trip
Select keywords
3
Friends, H
olidays
Select an image.
Switch to [Preview Mode].
Set [Keyword].
•Keywords can also be managed from the
[Edit] menu or File Information Window.
•To add keywords, click the [Edit] menu
and select [Manage] from the [Keyword]
submenu.
Y
P
O
C
HINT
About Image Information
This chart shows the information other than shooting information that can be added to images.
Information Type My Category
Categories
such as People,
Scenery, etc.
Content
Ratings
Comments
Keywords
Favorite images are rated by
adding stars ( ).
Text input
without
restriction
regarding
the shooting
circumstances
or associated
memories.
Selections are
made from a
list (editable)
of keywords,
such as the
photographic
subject, place or
action.
Camera
ImageBrowser, Digital Photo Professional,
Camera (Favorite)
Used in Searches
—
O
O
O
Used as Filter
Criteria
O
O
—
—
Display beneath
Thumbnail
O
O
O
—
Configuration
Method
ImageBrowser
Categories displayed beneath thumbnails can be selected from the [View] menu and [View Settings]
submenu.
Table of Contents
43
Things to
Remember
Mastering
the Basics
More Advanced
Techniques
Appendices
Searching, Filtering and Sorting Images
Searching Images
You can search images using parameters extracted from the information associated
with them. Procedures
1
[File] and [Search].
•After a search, the correlated images
display in the [Search Results] folder.
Favorite photo
Keyword
Y
P
O
C
Date
Comment
HINT
Tasks Related to Search Results
You can select images in the [Search Results] folder and perform operations on them, such as printing or
copying them to other folders.
IMPORTANT
•Please note that deleting an image from the [Search Results] folder deletes the
original image. Use caution in deleting items from this folder.
Table of Contents
44
Things to
Remember
Mastering
the Basics
More Advanced
Techniques
Appendices
Filtering Images
You can use filters to display only images meeting the selected parameters in the
Browser Area.
Procedures
1
[Filter Tool]
This section is used to specify the filter criteria.
Ratings
My Category
Sorting Images
Y
P
O
C
You can sort images in the Browser Area based on the specified parameters.
D
C
A
E
B
File Name
Shooting Date/Time
File Modification Date
File Size
A
B
Table of Contents
1
[View] and [Sort].
Type
Ascending/
Descending
Order
C
Procedures
D
E
45
Things to
Remember
Mastering
the Basics
More Advanced
Techniques
Appendices
Comparing Images
Comparing Multiple Images
When a good photo opportunity arises, you can shoot the same subject using different
shutter speeds and exposures. In ImageBrowser, it is easy to compare images so that
minute differences can be detected.
Procedures
1
2
Select several images to
compare.
[View Image]
Y
P
O
C
3
4
Select a view
method from
[Number of
Displays].
[Synchronize]
•Selecting [Synchronize] causes actions
such as increasing/reducing the
magnification level or scrolling around
the image to apply to all of the selected
images in lock step, making it easy to
check minute details of focus, coloring
and other image characteristics. Actions performed on an image, such as scrolling or changing the
magnification, are performed on the other image as well. Table of Contents
46
Things to
Remember
Mastering
the Basics
More Advanced
Techniques
Appendices
My Camera Settings
Changing the Shutter Sound and Start-Up Image
You can select from dedicated screens to register to the start-up screen that appears
when turning the camera on, and dedicated sounds to register to various camera
operation sounds (My Camera Settings).
My Camera Settings
• Start-up Image
• Start-up Sound
• Operation Sound
• Selftimer Sound
• Shutter Sound
Procedures
1
Connect the camera
to a computer to start
CameraWindow.
Y
P
O
C
•For details, refer to steps 1- 2 in
“Transferring Images”.
2
[Camera Settings]
Select the desired item from
the following and make
settings.
u [Set Start-up Image]
u [Set Sounds]
u [Set Theme]
IMPORTANT
•My Camera Settings are only available on certain models, when [Camera
Settings] displays in CameraWindow.
Table of Contents
47
Things to
Remember
Mastering
the Basics
More Advanced
Techniques
My Camera Settings
registered in the camera.
You can register the
start‑up image, start‑up
sound, shutter sound,
operation sound
and self‑timer sound
collectively if you select
[Theme].
Appendices
My Camera Settings
Y
P
O
C
Select a My Camera Settings file to replace in the right-hand list
and click this button to register it in the camera. If multiple My
Camera Settings files are displayed in the left-hand list, choose
the file you want to replace first, then register it in the camera.
HINT
Downloading My Camera Settings Files
You can also download various files to use in My Camera Settings from CANON iMAGE GATEWAY.
Table of Contents
48
Things to
Remember
Mastering
the Basics
More Advanced
Techniques
Appendices
Transferring Images
Transferring Images to a Camera
Images transferred once to a computer can be transferred back to the camera.
Procedures
1
Connect the camera
to a computer to start
CameraWindow.
•For details, refer to steps 1- 2 in
“Transferring Images”.
Y
P
O
C
2
Show favorite images
to friends or connect
a TV to show them
on a large screen.
3
4
5
[Organize Images on
Camera]
[Organize Images]
(Upload)
Select images.
•If ImageBrowser’s Browser Window is
open when the camera is connected
(directly after transferring for instance),
open the CameraWindow (menu screen)
by clicking the [CameraWindow] icon in
the Dock (the bar at the bottom of the
desktop).
IMPORTANT
•Cameras that use the “MOV” data type can play back movies transferred back to
the camera if movies were taken with that camera. Refer to the “Data Type” item
in “Specifications” near the end of the Camera User Guide to see if the camera
uses the “MOV” data type. You may not be able to play back movies taken with
another camera.
•Only still images compliant with Design rule for Camera File system standards
can be transferred to your camera’s memory card.
•You may not be able to transfer images back to the camera if they have been
edited on a computer, or if the image information has been modified.
Table of Contents
49
Things to
Remember
Mastering
the Basics
More Advanced
Techniques
Appendices
CANON iMAGE GATEWAY
About CANON iMAGE GATEWAY (for U.S.A. customers only)
CANON iMAGE GATEWAY is an online photo service for the purchasers of this product.
Registering online allows you to use the various services.
IMPORTANT
•Internet access is required to use CANON iMAGE GATEWAY (You must already
have an account with an Internet service provider (ISP), browser software
installed and an Internet connection).
•See the homepage for information regarding browser versions (Safari, etc.) and
settings to best connect to CANON iMAGE GATEWAY online photo services.
• Any ISP account charges and access fees must be paid separately.
Registering
Y
P
O
C
First, register as a CANON iMAGE GATEWAY member.
Register
Procedures
1
[CANON iMAGE
GATEWAY] and
[Register/Add
Product].
•You can register online using the
supplied CD-ROM. To do this, in the
installer panel, click [Register] underneath
CANON iMAGE GATEWAY.
Table of Contents
50
Things to
Remember
Mastering
the Basics
More Advanced
Techniques
Appendices
Available Services
CANON iMAGE GATEWAY offers a variety of convenient and useful services.
Procedures
Upload and
share images
Create your own photo album
on CANON iMAGE GATEWAY
E-mail notifications
of album uploads
Friends and family can
freely browse images
1
[CANON iMAGE
GATEWAY]
Select the desired item from
the following and make
settings.
u [Register/Add Product]
u [Top Page]
u [Upload Images]
u [View Online Photo
Album]
u [Download My Camera
Contents]
Y
P
O
C
Order prints
Access even from
mobile phones
My Camera Settings Files on
CANON iMAGE GATEWAY
Download files for My Camera
Settings (certain models only)
Table of Contents
Also, you get the
latest customer
support information,
just for registering
your product
51
Things to
Remember
Mastering
the Basics
More Advanced
Techniques
Appendices
Preference Settings
Customizing ImageBrowser
You can configure ImageBrowser and CameraWindow to your preferences.
• Overall coloring, such as
window appearances
• Processing methods for
images shot with the
camera on end
• Categories of shooting
information displayed
• Show/hide messages
• Print settings
• Registering applications
Procedures
ImageBrowser
1
[ImageBrowser] and
[Preferences].
Y
P
O
C
CameraWindow
1
Table of Contents
Click
(Preferences).
52
Things to
Remember
Mastering
the Basics
More Advanced
Techniques
Appendices
List of Available Functions
CameraWindow Functions
Function Names
Description of Function
Import Untransferred
Only transfers images from the camera that have not yet been transferred.
Images
Import Images
from Camera
Select Images to Import Only transfers chosen images from the camera.
Import All Images
Transfers all images from the camera.
Protect, rotate, and delete images on the camera. Also transfers images
Organize Images
Organize Images
on Camera
back to the camera from your computer.
Upload Movies to
Upload Images
Uploads movies on the camera to YouTube.
from Camera
YouTube
Sets the camera start-up screen.
Set Start-up Image
Sets camera sound effects (start-up sound, shutter sound, operation
Camera Settings Set Sounds
sounds, self-timer sound).
Set Theme
Sets the camera start-up screen and sound effects in My Camera Settings.
Sets the camera owner name, and start-up screen when CameraWindow
General (General/
Connected Camera)
starts.
Preferences
Import (Auto Import/
Folder Settings/After
Sets the automatic transfer settings and destination folder.
Import)
Y
P
O
C
ImageBrowser Functions
Control Panel Functions
Function Names
Canon Camera
When a Camera is
Connected
When a Memory Card
Reader is Connected
View Image
SlideShow
CANON iMAGE
GATEWAY
Register/Add Product
Top Page
Upload Images
View Online Photo
Album
Download My Camera
Contents
Table of Contents
Description of Function
Connects to the camera to open CameraWindow (menu screen), and use
CameraWindow functions.
Transfers images from a memory card. You can also select images on the
memory card and print them.
Displays the selected image or movie in the Viewer Window.
Starts a slide show of the selected images. Click the [View] menu and
select [Slide Show Options] to set the slide show settings.
Connects to CANON iMAGE GATEWAY and opens the registration page.
Connects to CANON iMAGE GATEWAY and goes to the top of the page.
Connects to CANON iMAGE GATEWAY and uploads images.
Connects to CANON iMAGE GATEWAY and displays albums created.
Connects to CANON iMAGE GATEWAY and downloads images and
sounds for use with My Camera Settings.
53
Things to
Remember
Mastering
the Basics
Function Names
Photo Print
Index Print
Layout Print
Print & Share
Create Image for Email
Upload movies to
YouTube
Send to Trash
More Advanced
Techniques
Appendices
Description of Function
Prints one image per page. You can print “photos” easily.
Lines up small versions of the images in rows and prints.
Allows you to freely arrange multiple images on a single page and print.
You can also insert captions and titles.
Converts the selected images to the appropriate size for transmission by
e-mail. You can also use it to automatically start an e-mail program after
conversion.
Uploads movies saved on the computer to YouTube.
Sends the selected images or folders to the Trash.
Functions Selected from Menus
Function Names
Menu
Search Images
[File] menu, [Search]
Description of Function
Searches for images based on such criteria as Ratings, dates, keywords or
comments.
Y
P
O
C
[File] menu, [Export
Image]
Export Images
Edit and Save Image
Export Shooting
Properties
Export as a
Screensaver
Export an Image as
Wallpaper
[File] menu, [Organize
Image], [Sort Images]
Organize Images
[File] menu, [Organize
Image], [Rename]
[File] menu, [Process
Convert RAW
RAW Images by Digital
Images
Photo Professional]
[File] menu, [Rewrite
Writing to
Image to Memory
Memory Card
Card]
Merge
[Edit] menu,
Panoramas
[PhotoStitch]
[Edit] menu, [Movie
Edit Movie
Edit]
Extract frames
[Edit] menu, [Extract
from a movie
frames from a movie]
[View] menu, [View
Display Settings
Settings]
Sort Images
[View] menu, [Sort]
Table of Contents
Allows you to change the file type or size and export the file.
Allows you to export the shooting properties as a text file.
Exports the image as a screen saver file.
Exports the image as a wallpaper file.
Sorts images according to criteria such as the shooting date or Rating and
saves them into a specified folder.
Changes the files names of multiple images in a single pass.
Converts RAW images into JPEG or TIFF images. You can adjust the image
brightness, contrast and color balance among other attributes during
conversion.
Transfers images from the computer to the memory card.
Merges multiple images and creates a single large panoramic image .
Edits movies or still images strung together. You can add text as titles, or
background music, and apply various effects.
Extracts still images from movies over a specified interval and saves them
as image files.
Hides or shows image information beneath the thumbnail, such as the file
name or the shooting date and time.
Arranges image order in the Browser Area according to criteria such as the
filename, file modification date, file size or shooting date.
54
Things to
Remember
Mastering
the Basics
More Advanced
Techniques
Appendices
Supported Image Types
The following is a list of image types supported by ImageBrowser.
JPEG
Most cameras use this image type. It compresses at very high ratios, taking advantage
of the characteristics of the human eye. However, because it is an irreversible
compression method (part of the data is lost during compression), if you process and
save an image repeatedly using this method, the image may become rougher.
Exif JPEG is an image type that adds information such as shooting data to a JPEG
image.
RAW
Y
P
O
C
This is a proprietary image type provided by Canon. It allows the output of the image
pixels from a digital camera without any deterioration in the quality of the image.
Some cameras might not support this image type.
PICT
This is the standard image type for Macintosh. This image type is supported by most
Macintosh software.
TIFF
This is a relatively popular image type. It is widely supported by non-Macintosh
programs (such as Windows).
BMP (Windows Bitmap)
This image type comes standard with Windows. Most Windows programs support it.
AVI (.AVI)
Standard Windows movie type. The movie icon appears in ImageBrowser’s Browser
Area.
MOV (.MOV)
Movie type. The movie icon appears in ImageBrowser’s Browser Area.
Table of Contents
55
Things to
Remember
Mastering
the Basics
More Advanced
Techniques
Appendices
Uninstalling the Software
The procedures for uninstalling the software are only required when you wish to
delete the programs from your computer or when reinstallation is required to fix
corrupted files.
IMPORTANT
•Computer administrator status is required to perform the following operation.
•Please be careful not to accidentally delete any folders with downloaded images
that may be contained within the application folder.
1
Move all of the application folders from the installation destination
folder to the trash.
2
Empty the trash.
Y
P
O
C
Table of Contents
56
Things to
Remember
Mastering
the Basics
More Advanced
Techniques
Appendices
Memory Card Folder Structure
Images on the memory card are in either the [DCIM] folder’s [xxx___mm] folder, or the
[xxx_mmdd] folder (xxx: numbers 100 to 999, mm: shooting month, dd: shooting day).
DCIM
xxx___mm
or
xxx_mmdd
IMG_xxxx.JPG (JPEG images)
_MG_xxxx.JPG (JPEG images recorded in the Adobe RGB color space)
IMG_xxxx.CR2 (RAW images)
_MG_xxxx.CR2 (RAW images recorded in the Adobe RGB color space)
STx_xxxx.JPG (Stitch Assist mode images)
MVI_xxxx.MOV*1 (Movies)
MVI_xxxx.AVI, MVI_xxxx.THM*2 (Movies)
MDG_xxxx.MOV (Movies recorded with Movie Digest mode)
Y
P
O
C
The folder that holds the settings files
for images in the DCIM folder.
CANONMSC
The folder created when DPOF settings are set.
It holds the DPOF settings files.
MISC
•*1 Some camera models create thumbnail image files for index display (MVI_xxxx.
THM). If you delete these files, you will be unable to transfer movies to the camera
from a computer.
*2 Thumbnail image files for index display.
•The “xxxx” in file names represent four-digit numbers.
•Each successive file shot in Stitch Assist mode is assigned a letter starting from “A,”
which is inserted as the third digit in the name. i.e. [STA_0001.JPG], [STB_0002.JPG],
[STC_0003.JPG]...
•All folders except the “xxx__mm” or “xxx_mmdd“ folders contain image settings
files. Do not open or delete them.
•Depending on the camera, some data types cannot be recorded.
Table of Contents
57
Things to
Remember
Mastering
the Basics
More Advanced
Techniques
Appendices
Troubleshooting
Please read this section if you encounter a problem using the software.
Start by Checking This
Investigate the following points first if you encounter a problem.
Does your computer satisfy the requirements listed in the System
Requirements section?
See “System Requirements” in the Camera User Guide.
Y
P
O
C
Is the camera correctly connected to the computer?
See the Camera User Guide for the correct connection procedures. Also check to
ensure that you are using the correct cable and that it is securely attached at both
ends.
Are the camera and computer in the correct modes to transfer data?
Some models require the camera to be set to the playback mode to transfer data. See
the Camera User Guide for details.
Is the battery sufficiently charged?
Check the battery charge if you are powering the camera with a battery. You are
recommended to use an AC adapter (sold separately) to power the camera when it is
connected to a computer.
Problems
You can’t find transferred images.
Refer to “Changing the Transfer Destination Folder” to confirm where the destination
folder is.
Table of Contents
58
Things to
Remember
Mastering
the Basics
More Advanced
Techniques
Appendices
Y
P
O
C
Software Guide
Macintosh
Disclaimer
•Reprinting, transmitting, or storing in a retrieval system any part of this guide without the
permission of Canon is prohibited.
•Canon reserves the right to change the contents of this guide at any time without prior
notice.
•Illustrations and screenshots in this guide may differ slightly from the actual products.
•The above items notwithstanding, Canon accepts no liability for damages due to mistaken
operation of the products.
CDP-E115-020
Table of Contents
© CANON INC. 2011
59