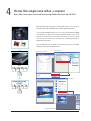
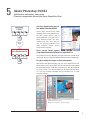
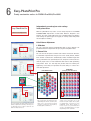
1
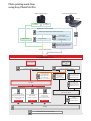
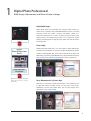
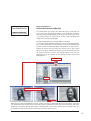
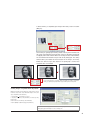
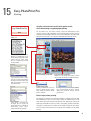
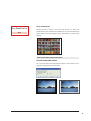
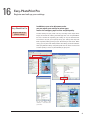
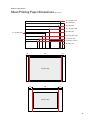
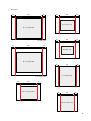
Easy-PhotoPrint Pro Version 1.0
Tutorial
Digital Photo Professional Ver.2.1
®
®
Adobe Photoshop CS/CS2
Easy-PhotoPrint Pro
Contents
Overview of the Easy-PhotoPrint Pro
1
Photo printing work-flow using Easy-PhotoPrint Pro
2
Install Easy-PhotoPrint Pro
3
Digital Photo Professional
4
RAW Image Adjustment and Picture Style settings
5
Print RAW images after transferring them directly to Easy-PhotoPrint Pro
®
®
Convert RAW images to TIFF or JPEG and save them to transfer directly to Adobe Photoshop CS/CS2
6
35 mm film single-lens reflex
+ scanner
Scan film, then open scanned data using Adobe Photoshop CS/CS2
7
Adobe Photoshop CS/CS2
Add further retouches, then print (Transfer image data directly to Easy-PhotoPrint Pro)
Easy-PhotoPrint Pro
Freely customize colors in PIXMA Pro9500/Pro9000
8
9–10
of "portrait" or "landscape" in the Picture Style
C o l o r m o d e E n a b l e I C C P r o f i l e Print faithfully to the characteristics
®
11–12
Accurately print Adobe RGB (1998) color space
L i n e a r
P h o t o
To n e
C o l o r
Create your favorite picture while adjusting the image for printing
13
Print images according to your preference for a photograph, based on memory colors.
14
Print color data in highly expressive black and white gradations without color shift
15–16
Monochrome mode Check "Grayscale Photo" Print data in your desired colors using Grayscale mode in the Picture Style (Toning effect(None)).
Print data using a filter effect in your desired colors,
using Grayscale mode in the Picture Style (Toning effect(None)).
Getting the right margin
for your photographs
Print with the Color Mode
17
18
19-22
Printing B/W photographs as beautiful artworks
Use Grayscale mode in the Picture Style to print image data using preferred tones,
such as with sepia, with the colors as they are (Toning effect(On)).
23
24-26
Printing
27
Register and call up your settings
28-29
Sheet Printing Paper Dimensions
Canon Inc.
2005
English Version 0.92
Overview
of the Easy-PhotoPrint Pro
Easy-PhotoPrint Pro is plug-in software for Professional Print.
This powerful software application will satisfy the needs of both professionals and
high-level amateurs by providing effective printing solutions.
PIXUS Pro9500 and Pro9000 professional photo printers support paper sizes larger than A3. These two printers, made
specifically to create photographic works of art, not only enable distinct expressiveness in the final printout, with long shelflife, but they also maximize that performance. This dedicated print software "Easy-PhotoPrint Pro" is bundled to make it easy
for anyone to use these products. That is the essence of the Easy-PhotoPrint Pro. Professionals and high-level amateurs,
including users of the EOS DIGITAL, alike will quickly recognize that the Easy-PhotoPrint Pro eliminates the troublesome and
complicated tasks associated with printing, and that they can easily print out photographs as beautiful as one can imagine.
Startup as plug-in software
Easy-PhotoPrint Pro starts up as a plug-in software program in a version later than Digital Photo Professional Ver.2.1 and in
®
®
Adobe Photoshop CS/CS2. It can directly hand-over image data. Then, after developing and retouching images, this
software application allows you to shift seamlessly and directly to the print work.
Solves problems associated with printing for users of Adobe Photoshop CS/CS2
Specifically, problems like "troublesome print size settings," "can't batch print multiple images," and "color management
settings are complex" are now in the past. Easy-PhotoPrint Pro solves these problems that users of the Adobe Photoshop
CS/CS2 often face when printing.
Faithfully reproduces the original colors found in EOS DIGITAL
Easy-PhotoPrint Pro correctly recognizes the color space information set by Digital Photo Professional or Adobe
Photoshop CS/CS2 and reflects that in the final print, to faithfully reproduce images captured by EOS DIGITAL on the PIXUS
Pro9500/Pro9000.
This not only faithfully reproduces the coloring of the picture style set by Digital Photo Professional, but it also prints with
®
the wide color space available in Adobe RGB(1998).
New features perfect for creating photographs
Easy-PhotoPrint Pro is provided a whole range of new features developed based on EOS DIGITAL and Adobe Photoshop
CS/CS2 user work-flows. Specifically, this software offers users print modes to satisfy any user need. Users will
immediately find use for features like the "Linear Tone" mode that linearly applies adjustments made to images, or the
"Grayscale Photo" mode that prints authentic looking B/W photographs. Other features include independently setting the
color balance, brightness and contrast of the printer, and registering and calling these settings up.
Easy-PhotoPrint Pro makes it fun and easy to produce beautiful, high-quality photographs.
Comfortable, and Easy Photograph Production using the Easy-PhotoPrint Pro
Shooting
Retouch Images
Set Printing Features
Can't Get Your Desired Results
Printer Settings are Troublesome
Image Adjustments
on the Easy-PhotoPrint Pro
If You Use the Easy-PhotoPrint Pro
Color Balance
Brightness
Contrast
Done
Paper Sizes and Layouts are
Easy to Set
Color Management Settings are Easy
Settings for Beautiful B/W Output
are Easy
Batch Printing of Multiple Images
Adobe, Adobe Photoshop and Adobe RGB (1998) are either registered trademarks or trademarks of Adobe Systems Incorporated in the United States and/or other countries.
1
Photo printing work-flow
using Easy-PhotoPrint Pro
Digital single-lens reflex
35 mm film single-lens reflex
Scanner
JPEG
photographs
RAW
photographs
Digital Photo Professional
1
RAW Image Adjustment / Picture Style settings
P4
3
2
Image transfer
Image transfer
P5
P6
5
P8
4
P7
Convert/Save
RAW images to TIFF or JPEG
Image transfer
Adobe Photoshop CS/CS2
Retouching/image transfer
Seamless linked printing
Plug-in
Easy-PhotoPrint Pro
Monochrome
data
Color data
6
P9
10
Customize printing colors:
color balance, brightness, contrast
14
P23
P15
Use Grayscale mode
in the Picture Style
to print image data
using preferred tones,
such as with sepia,
with the colors as they are.
10
P15
Customize printing colors:
color balance, brightness, contrast
Print color data
in highly expressive
black and white
gradations
without color shift
Print data
in your desired colors
11 using
Grayscale mode
P17
in the Picture Style.
Print data
Color Mode
a filter effect
12 in using
your desired colors,
P18
using Grayscale mode
in the Picture Style.
Color Management
7
8
9
P11
P13
P14
Print faithfully to the
characteristics of "portrait" or
"landscape" in the Picture Style
Accurately print Adobe® RGB
color space
Create your favorite picture
while adjusting
the image for printing
Print images according to
your preference
for a photograph,
based on memory colors.
Enable ICC Profile
Linear Tone
Photo Color
15
Monochrome Mode
13
P19
Printing
B/W photographs as
beautiful artworks
Printing
P24
16
P27
Registration and call up of settings
2
0
Install Easy-PhotoPrint Pro
With only four easy clicks, you can plug in to and install Digital Photo
Professional and Adobe Photoshop CS/CS2.
After installation, Easy-PhotoPrint Pro is started from the screen below of Digital Photo Professional Ver.2.1
or Adobe Photoshop CS/CS2.
Digital Photo Professional Ver.2.1
Adobe Photoshop CS/CS2
[Link printing with Canon printer]
[Print with Easy-PhotoPrint Pro].
[Automate]
[Easy-PhotoPrint Pro].
3
1
Digital Photo Professional
RAW Image Adjustment and Picture Style settings
Adjust RAW images
Digital Photo Professional (bundled with the EOS Digital cameras) is
software that is provided a high-speed RAW developing process, and image
adjusting function that realize a working environment suitable for a
professional work-flow. This includes an editing screen that allows highspeed previews and multiple image display, and a comparison function
RAW photographs
allowing the photographer to compare images before and after adjustments
have been made.
RAW
Picture Style
Digital
Photo Professional
Ver.2.1
Digital Photo Professional Ver.2.1 uses Picture Style to adjust RAW images.
This allows the photographer to reset Picture Styles for RAW images of EOS1D Mark II N/EOS 5D/EOS 30D, and to reflect preferred Picture Styles onto
RAW images captured by an EOS DIGITAL that is not provided with the Picture
Style function. This also allows making adjustments of hue, saturation etc.
Image adjustment
Picture Style
RAW
Digital Photo Professional adjusts RAW
images and saves them as recipes in
separate files.
Set to "Monochrome" in Picture Style
While this can set images to general monochrome, it also enables the user
to apply filter effects of yellow, orange, red and green to the images.
Additionally, using the toning effect allows you to change images into a
monotone in such as sepia and blue.
4
2
Digital Photo Professional
Print RAW images after transferring them directly to Easy-PhotoPrint Pro
Digital
Photo Professional
Ver.2.1
RAW
RAW image
transfer
Digital Photo Professional and Easy-PhotoPrint Pro,
Linking these enables printing of RAW images.
"To print data of images photographed in RAW format, I have to develop the
images, and then convert them to TIFF or JPEG. So, it takes a lot of effort, and is
quite a bother." Digital Photo Professional and Easy-PhotoPrint Pro will change
all that. By linking these two applications together, you can print RAW images
using PIXMA. This takes away the trouble of converting original data to TIFF or
JPEG images and saving them to print by another application. Furthermore,
RAW images can be transferred directly from Digital Photo Professional Ver.2.1
to Easy-PhotoPrint Pro with one click, without having to be saved.
Easy-PhotoPrint Pro
RAW
Digital Photo Professional Ver.2.1
RAW image transfer
Easy-PhotoPrint Pro
RAW image print
5
3
Digital Photo Professional
Convert RAW images to TIFF or JPEG and save them to
transfer directly to Adobe Photoshop CS/CS2
Digital
Photo Professional
Ver.2.1
RAW
Convert/Save
JPEG
Retouch using Adobe Photoshop CS/CS2,
then convert RAW images to TIFF or JPEG and save them.
Photographers that want to make further, more detailed retouches using
Adobe Photoshop CS/CS2, use Digital PhotoProfessional to adjust the RAW
images, then convert them to JPEG or 8/16 bit TIFF format for saving. Select
[Convert and save...] from the [File] to develop images one at a time, or select
[Batch process...] to develop a number of images all at once.
8/16bit
TIFF
Image data
transfer
Adobe Photoshop
CS/CS2
JPEG
8/16bit
TIFF
Transfer converted and saved RAW images to
Adobe Photoshop CS/CS2
Digital Photo Professional enables transferring files converted to JPEG or
8/16 bit TIFF format to Adobe Photoshop CS/CS2. Select the image, then
simply click [Transfer to Photoshop] in the [Tools] menu. This offers a simple
way to automatically transfer images.
Digital Photo Professional Ver.2.1
Adobe Photoshop CS2
6
4
35 mm film single-lens reflex + scanner
Scan film, then open scanned data using Adobe Photoshop CS/CS2
When printing images captured by a standard film camera, use a scanner to
load image data to Easy-PhotoPrint Pro via Adobe Photoshop CS/CS2.
If using CanoScan9950F, ScanGear CS starts up by selecting [CanoScan9950F]
from [Import] in the [File] menu of Adobe Photoshop CS/CS2. Select source
(negative or positive film), and click the preview button to check the image.
Film photographs
Then, click the scan button to scan the image. The scanned image will open in
Adobe Photoshop CS/CS2.
(See the following page for details on how to transfer images from Adobe
Photoshop CS/CS2 to Easy-PhotoPrint Pro.)
ScanGear CS
Adobe Photoshop CS2
Scan
JPEG
8/16bit
TIFF
EPS
PSD
Other
RGB
formats
ScanGear CS
Adobe Photoshop
CS/CS2
JPEG
8/16bit
TIFF
EPS
PSD
Other
RGB
formats
Adobe Photoshop CS2
7
5
Adobe Photoshop CS/CS2
Add further retouches, then print
(Transfer image data directly to Easy-PhotoPrint Pro)
Start Easy-PhotoPrint Pro plug-ins
from Adobe Photoshop CS/CS2
Photoshop®
CS/CS2
Transfer images retouched using Adobe
JPEG
8/16bit
TIFF
EPS
PSD
Photoshop CS/CS2 to Easy-PhotoPrint Pro.
This offers seamless transfers simply by
clicking [Automate] in the [File] menu in
Other
RGB
formats
Adobe Photoshop CS/CS2, then [EasyPhotoPrint Pro]. Then, shift to your print
Plug-in
startup
work. This easy-to-use application is like
Adobe
Photoshop
CS/CS2's
printing
function has been upgraded.
Easy-PhotoPrint Pro
JPEG
8/16bit
TIFF
EPS
Other
RGB
formats
PSD
Batch transfer images opened
using Adobe Photoshop CS/CS2 to Easy-PhotoPrint Pro
You can batch-transfer up to 400 images for display. Furthermore, it handles all file
formats (PSD, EPS etc.) supported by Adobe Photoshop CS/CS2 in the RGB format.
Easy print settings for simple, carefree printing work
When printing from Adobe Photoshop, there were many complicated tasks like
making complex settings for print layouts and color management. Another problem
was that multiple printings could not be performed at one time. Easy-PhotoPrint
Pro solves all those issues. All print-related tasks for Adobe Photoshop CS/CS2
users are now uniformly controllable with Easy-PhotoPrint Pro, a unified
management solution.
Images are displayed in the order in which the images were created
using Adobe Photoshop CS/CS2.
All images are set to print one-at-a-time in default.
8
6
Easy-PhotoPrint Pro
Freely customize colors in PIXMA Pro9500/Pro9000
Easy-PhotoPrint Pro
Color Balance Adjustment
Independently set and register color settings
in the printer driver
With Easy-PhotoPrint Pro, colors can be freely adjusted in the PIXMA
Pro9500/Pro9000. Adjustments include Color Balance, Brightness and
Contrast. This new system reflects the user's intended coloring, by allowing
color settings for specific types of art paper, or creating colors finely-tuned
for each object of shooting.
Color Balance Adjustment
1. Slide bars
For users who have specific target/intented colors in mind, slide bars are
provided to make fine adjustments to cyan, magenta and yellow values.
2. Pattern Print
For users that are not quite sure which color value to increase or decrease,
or would like to preview the changes first on the actual printout, "Pattern
Print" function is offered. This automatically creates simulated images with
varying color balance as specified by the user, and prints out the results on a
sheet of paper. Users can then determine color balance after previewing
that printout. Users can also keep the printed sheet for another print
opportunity, so that they can reproduce the same settings as a basis for a
new color adjustment.
Print All Directions
Single Hue
(Example: print in Direction R)
Input
The cyan, magenta and yellow parameter values are
printed out right below each image. That way, users
can simply type in those values to return the color
balance to their preferred one.
Prints samples where yellow, red, magenta,
blue, cyan and green are varied based on the
original image (shown in the red frame). This
allows users to select their most preferred
coloring by checking the actual printout,
including slight color differences.
Users that want to make even more detailed
changes to the color balance can use the
function that prints samples where yellow,
red, magenta, blue, cyan and green can be
individually varied. When wanting to
increase red, choose to print in Direction R
and up to 48 simulated images are output.
Original image is at the bottom left.
9
Brightness and Contrast Adjustments
Easy-PhotoPrint Pro
Brightness Adjustment
Contrast Adjustment
In the same way as the color balance, this application provides slide bars
and pattern print for brightness and contrast adjustment. On a pattern print ,
the brightness is varied in the vertical direction, and the contrast in the
horizontal direction, based on the original image (shown in the red frame).
Adjustments can be made by entering values below the image.
Bright
Contrast
Weak
Contrast
Strong
Settings can be registered.
User adjustments can be registered
for Color Balance, Brightness and
Contrast, so users can call them up
later. (For details, see the last page.)
Dark
10
7
Easy-PhotoPrint Pro
Print faithfully to the characteristics of "portrait" or "landscape"
in the Picture Style
Accurately print Adobe RGB (1998) color space
Color mode: Enable ICC Profile
Easy-PhotoPrint Pro
Color Management
Enable ICC Profile
The default setting of "Enable ICC Profile" is
the recommended mode when picture mode is set to
"portrait" or "landscape."
The Picture Style "portrait" is a specialized tuning mode to reproduce skin
colors, by adjusting the color hue from magenta to red and yellow to realize
a healthy look with little or no clouding. Another option, "landscape" is a
mode for refreshingly reproducing color phases from greens to bluer hues.
To reproduce images using both modes' characteristics, make sure that the
color mode on Easy-PhotoPrint Pro is set to "Enable ICC Profile." This makes
it easy to realize the results you wanted, reflecting the image you had in
mind when you took & developed your photos.
Digital Photo Professional Picture Style
"Portrait"
"Landscape"
Easy-PhotoPrint Pro Color Management screen
Color Management
default settings screen
Color Mode:
Enable ICC Profile
Printer Profile: Auto
Rendering Intent:
Relative Colorimetric
Faithfully reproduces the coloring of the Picture Style
11
Easy-PhotoPrint Pro
Color Management
Enable ICC Profile
Set to "Enable ICC Profile" when wanting to maintain
Adobe RGB (1998) color space for printing.
When using "Enable ICC Profile", Easy-PhotoPrint Pro automatically
recognizes the image data's color space information (Adobe RGB (1998)
/sRGB) and prints image data in colors that are faithful to the original.
How to check the color space of the image data
Adobe Photoshop CS2
Refer to the print preview document.
Digital Photo Professional
Refer to the Info: Color Space.
12
8
Easy-PhotoPrint Pro
Create your favorite picture while adjusting the image for printing
Color Mode: Linear Tone
Easy-PhotoPrint Pro
Color matching presuming image adjustment by the user.
Choose "Linear Tone" to finish each image exactly to your liking.
Color Management screen
Color Management
Linear Tone
Color Mode: Linear Tone
"Linear Tone" sets the color space
to sRGB. If the original image is in
®
Adobe
RGB, "Linear Tone"
converts it to sRGB.
Because "Linear Tone" in Easy-PhotoPrint Pro presumes that images will be
adjusted prior to printing, it maintains the original gradation balance of the
image data and subdues color saturation and contrast, allowing for the dark
area details to remain clear in the final print. When adjusting the image,
color designs that accurately reflect the adjustments are employed, so there
is no need to make test prints, or repeated adjustments, thereby enabling
users to speedily finish the final image.
Linear Tone
This mode accurately reflects image
adjustments where color saturation and
contrast are subdued and the gradation
balance is maintained in good order.
Photo Color
This mode enables blues and greens to be
reproduced more freshly than the "Linear Tone"
mode.
13
9
Easy-PhotoPrint Pro
Print images according to your preference for a photograph,
based on memory colors.
Color Mode: Photo Color
Easy-PhotoPrint Pro
Color Management
Photo Color
"Linear Tone" sets the color space
to sRGB. If the original image is in
®
Adobe
RGB, "Linear Tone"
converts it to sRGB.
"Photo Color" is the mode recommended
for printing beautiful images with ease,
without having to make any adjustments to
JPEG-captured images.
"Photo Color" represents "Canon Digital Photo Color". Select this mode to print
images by emphasizing "favorable colors" (colors that tend to be potentially
preferred), based on faithfully reproducing the coloring of the image data,
and without losing faithfulness to the original image. The blueness of the sky,
or the evening skyline...and the trees will all look more vivid and alive. The
skin tone will also be more vividly reproduced. Therefore, no high level
image adjustments are necessary. Anyone can easily attain beautifully
reproduced photographs.
Easy to photograph in JPEG
Easy-PhotoPrint Pro Color Management screen
Color Mode: Photo Color
Print with your preferred colors, based on memory colors.
14
10
Easy-PhotoPrint Pro
Print color data in highly expressive black and white gradations
without color shift
Monochrome Mode: Check "Grayscale Photo"
Easy-PhotoPrint Pro
Check "Grayscale Photo"
Set with one click.
You can print color data easily and beautifully in grayscale.
Apply a check mark to "Grayscale Photo" in Easy-PhotoPrint Pro.
Pro9500/Pro9000 will produce beautiful grayscale photos without color shift.
Realizes a stable gray balance because it uses black and gray inks, without
using any coloring, if possible. This allows for greater expression with the
shadows of light richer, and smoother.
Color data
Simply apply a check mark to "Grayscale Photo."
Black and white print
with highly expressive gradations,
and no color shift.
Black and white
In addition to the standard black and white, Warm Tone and
Cool Tone selections are also available.
With Easy-PhotoPrint Pro, you can adjust the grayscale tone to "Cool Tone"
or "Warm Tone."
Cool Tone
Warm Tone
15
Brightness and Contrast adjustments
Easy-PhotoPrint Pro
Brightness adjustment
Contrast adjustment
You can adjust Brightness and Contrast on the slide bars when "Black/White,"
"Cool Tone," or "Warm Tone" is selected. With a Pattern Print, in the same way
as with color, a sample is printed with the adjusted brightness and contrast,
based on the original (shown in the red frame). Adjustments can be made by
entering values below the image.
Bright
Contrast
Weak
Contrast
Strong
Dark
The color balance can also be adjusted by setting to "Custom."
Easy-PhotoPrint Pro
Color Balance
adjustment
You can adjust the cyan, magenta, and yellow values using the slide bars.
With a Pattern Print, in the same way as with color, you can print simulated
images that vary the color balance of the original image.
16
11
Easy-PhotoPrint Pro
Print data in your desired colors using Grayscale mode
in the Picture Style (Toning effect(None)).
Monochrome Mode: Check "Grayscale Photo"
Easy-PhotoPrint Pro
Check "Grayscale Photo"
Simply by applying a check mark to "Grayscale Photo,"
you can print with your desired colors.
Images turned to Monochrome in Picture Style in Digital Photo Professional
inherit the feel of silver halide monochrome film, without having to process
images by setting the color saturation to zero. To print this data faithfully,
apply a checkmark to "Grayscale Photo" in Easy-PhotoPrint Pro. Furthermore,
when selecting Cool Tone or Warm Tone, you can also adjust brightness,
contrast and color balance.
Digital Photo Professional Picture Style
"Monochrome"
Simply by applying a check mark to "Grayscale Photo,"
you can accurately reproduce monochrome images set in Picture Style.
When printing in grayscale, we recommend printing with the top and bottom
margins of the paper set to more than 45 mm/1.77 inches.
See page 19 "Printing B/W Photographs as Beautiful Artworks" for details on
creating margins.
17
12
Easy-PhotoPrint Pro
Print data using a filter effect in your desired colors,
using Grayscale mode in the Picture Style (Toning effect(None)).
Monochrome Mode: Check "Grayscale Photo"
Easy-PhotoPrint Pro
Check "Grayscale Photo"
Simply by applying a check mark to "Grayscale Photo,"
you can print with your desired colors.
When Selecting Monochrome in Digital Photo Professional Picture Style, you
can apply filter effects to images. There are four types of filters available.
They are yellow, orange, red and green. To accurately print data that uses
your desired filter effect, apply a checkmark to "Grayscale Photo" in EasyPhotoPrint Pro. Furthermore, when selecting Cool Tone or Warm Tone, you
can also adjust brightness, contrast and color balance.
Digital Photo Professional Picture Style
Original image
Filter Effect: Red
Filter Effect: None
Filter effect makes the selected color brighter,
while darkening its complementary color.
Below is a normal black and white image
without a filter effect. The red coloring is
darker, compared to the image on the left.
Simply by applying a check mark to "Grayscale Photo,"
you can accurately reproduce your selected filter effect on monochrome image.
18
13
Easy-PhotoPrint Pro
Printing B/W photographs as beautiful artworks
Getting the right margin for your photographs
The beauty of margins
Easy-PhotoPrint Pro
B/W Print with Margins
Most of the B/W photographs on display for viewing pleasure in art
museums and galleries have wide margins. Without question, presenting the
photograph itself is singularly the most important aspect of viewing B/W
photographs as pieces of artistic expression. It should be noted, however,
that at the same time, the use of the margins framing a photograph is also
immeasurably important and the delicate balance between a photograph
and its margins dramatically affects the impression and overall atmosphere
a piece can possess. Margins are essential in expertly depicting textures, if
using the special material quality of the paper itself, such as that found in
fine art paper. Other advantages of having margins around a photograph are
that they can be used to describe the name of the piece, and the date it was
captured, or they can be used for tacking up a photograph on a wall without
having to damage the image itself.
Provides a function for creating calculated margins
Example of Fine Art Paper Photo
Rag
Expanded top right providing a
margin expertly brings out the
paper texture
As anyone who has experienced photofinishing B/W film in a darkroom will
tell you, normally the size of the margin is adjusted on a photograph by
setting the developing paper at the desired size in the easel mask. EasyPhotoPrint Pro is provided a function for setting where to arrange your
image on the paper by allowing you the same kind of freedom in expressing
margins above, below and right and left of the final printout. There are three
methods for setting margins. This provides every level of user with expert
capabilities in photo reproduction, for every desired end result. (Note that
functions also output high quality color photographs.)
When printing in grayscale, we recommend printing with the top and bottom margins of the paper set to
more than 45 mm/1.77 inches. Depending on an image, without these margins, the printing troubles may
occur on the top and/or bottom edges of the paper such as uneven coloration or white streaks, and the
print quality may be degraded. A setting method for 45 mm/1.77 inches margins is outlined below.
Margin Setting Method 1
[Layout Selection Function]
This is the easiest method for setting [Bordered full [Margin 45]] using the
layout selection feature on Easy-PhotoPrint Pro. One, easy click automatically
reduces the image size so that the short edge margins are 45 mm/1.77 inch.
Click
45 mm
45 mm
19
Margin Setting Method 2
Easy-PhotoPrint Pro
B/W Print with Margins
Set Print Size function of [Print Size]
Margins can be set to any height and width of the photograph size to print. This
setting fixes the photograph's vertical and horizontal ratios. Apply this feature
when you want to maintain the original composition of your photograph.
[Example of application to A3 size paper (420 mm x 297 mm)
1. Use Layout to select [Bordered (full)], then click on the [Specify Print Size]
button to call up the setting screen.
Specify Print Size Button
Bordered (full)
2. To set the right and left margins on the short edges to 45
mm/1.77 inch, set the width to 330 mm (420 mm - 45 mm x
2). The photograph's vertical and horizontal ratios are
fixed, so the ratio to the height is automatically maintained
even when you only change the width direction. Note that
margins can also be larger than 45 mm. The Preview
screen allows you to check the final balance between the
margin and photograph. This further aids in the degree of
freedom and ease of use of this feature.
3. Click on [Center Image] to automatically move the image to the paper center. To
increase the amount of margin at the bottom of the photograph to include the
name of the photograph or the shooting information, simply reduce the [Top] value.
Layout when Center
Image is applied
Example of increasing the bottom margin to insert
shooting information
20
Margin Setting Method 3
Easy-PhotoPrint Pro
B/W Print with Margins
Set Print Size Function of [Margins]
This method allows you to adjust the amount of margin just like when you
use an easel mask. The original photograph's size and position are fixed to
allow you to trim the photograph by increasing the size of the margin. This is
a convenient feature for setting margin amounts while maintaining the
composition of the original photograph.
[Example of application to A3 size paper (420 mm x 297 mm)]
1. Use Layout to select [Bordered (full)], then click on the [Trimming] button.
First, set the composition using the trimming screen. Easy-PhotoPrint Pro
provides a trimming feature that applies the concept of the Rule of Thirds.
Imagine those times when you only had an instant to get a shot, or when
there was no time to compose the image for a professional-looking shot, or
the shot was preset for a margin. This method enables you to trim such
photographs to easily compose the final photograph with a professional
looking balance.
Trimming Button
Bordered (full)
Drag the intersecting point on the upper right to
a position near the subject's face.
Dotted lines that split the photograph into three sections vertically and horizontally appear on the trimming screen that
uses the Rule of Thirds concept. Drag an intersecting point to simultaneously shrink and move the trimming range of the
photograph. (See above.) The intersecting point at the top portion can move to a position near the subject's face. The
screen widens to allow for extra space in the direction which the subject is facing.
21
2. When trimming is completed, open the [Set Print Size] screen and select
[Margins].
Set the margins (photograph trimming) while checking the final balance of
the margin and photograph in the preview screen. For example, set the [Left]
and [Right] side values to 45 mm. Because the original values were 40 mm, 5
mm are trimmed from the left and right sides of the photograph. This setting
method allows you freedom of the final layout for the margins on the top,
bottom and left and right sides because the photograph's vertical and
horizontal ratios are not fixed.
If you set the margins for your final output photograph to be right for a particular
frame, your printed photograph will be ready to frame right out of the printer.
Creating margins using Adobe Photoshop CS/CS2
[Example of printing a horizontal image captured using a single
reflex lens (aspect ratio of 3:2) with 45 mm margins on the short
edges and printing to A3 size media]
1. Open the [File]
[Print Options] screens.
2. Set [Paper Size] to A3, and [Orientation] to Landscape using
[Page Setup].
3. Remove the check mark in [Scale to Fit Media].
4. Set the [Width] to 330 mm using [Scaled Print Size].
See the information on pages 28 and 29 "Sheet Printing Paper Dimensions" for details on
printing photographs with margins set for each image size.
22
14
Easy-PhotoPrint Pro
Use Grayscale mode in the Picture Style
to print image data using preferred tones, such as with sepia,
with the colors as they are (Toning effect(On)).
Color Mode: No check for "Grayscale Photo"
Easy-PhotoPrint Pro
Print with the Color Mode
If you changed the default grayscale tone,
select the "Color" mode to accurately
reflect your desired colors.
A "Toning effect" is provided when selecting "Monochrome" in Digital Photo
Professional Picture Style. This function adjusts the image colors to monotones
of sepia, blue, purple or green. When using this function, or setting to a
®
monotone color with Photoshop CS/CS2, print with the Color Mode, not with
"Grayscale Photo," to accurately reflect your intended color on the final print.
Digital Photo Professional Picture Style
Toning effect: None
Toning effect: Sepia
Toning effect: Blue
Toning effect: Green
Do not apply a check mark to
"Grayscale Photo."
A sepia image printed
in "Color Mode"
Printed with the intended toning
Toning effect: Purple
A sepia image printed
with a check mark applied to
"Grayscale Photo"
Printed in black and white
23
15
Easy-PhotoPrint Pro
Printing
Easy-PhotoPrint Pro
Print
Paper size
Includes a function that would satisfy professionals,
while maintaining easy photograph printing
For the novice uses, the various settings used to be performed on three
separate screens on Easy-PhotoPrint. In Easy-PhotoPrint Pro, all those settings
have been brought together into one screen in Easy-PhotoPrint Pro. Along with
the various new functions, this supports comfortable work of professionals.
Newly supports the 14" x 17" size.
Margins are automatically set to
35 mm when printing to Art Paper
(except Fine Art Paper Photo
Rag), so a dedicated size item
has been added.
One-click layout specification
If you specify Art Paper in Paper
Size, you can select genuine Fine
Art Paper, or Fine Art Paper from
other manufacturers, Canvas on
even Board Paper.
Easy print count specification
Allows users to specify the number of copies
they want by checking the thumbnailed images.
Setting of print quality
With Easy-PhotoPrint, there was
only the default quality setting.
Now, settings just like the printer
driver is enabled.
Amount of extension of borderless printing
Press the [Set] button to open a separate
dialog box, and make settings like the
printer driver.
Batch, large volume printing
If you specify a size other than
Art Paper, you can specify Art
Paper Photo Rag, in addition to
conventional paper types.
(Except in borderless printing)
For example, you want to print all images borderless on Photo Paper Pro. With
Easy-PhotoPrint Pro, you can make various settings for multiple images at one
time, without having to repeat the operation for each single image: settings for
media type and borderless layout, as well as print quality, amount of extension,
and paper size. And yet, you can freely set the number of copies for each image.
These translate into increased ease and speed when handling a large volume
printing.
24
Index Print
Easy-PhotoPrint Pro
You can arrange your desired number of images on one sheet of paper,
setting from a minimum of 1 image to a maximum of 80 images. You can
Print
choose to display small size images to confirm all uploaded images, or display
in enlarged size to check your adjusted images. This allows you to use the
data as you please. Filenames and page number can also be added below the
thumbnailed images, when printing. You can also freely add text as headers
and footers. This further enhances the ease of handling your image files.
1 to 10
1 to 8
Header
Filename
Footer
Page number
Print with shooting information
You can add shooting information for printing in the
"Bordered" or "Index" layout. This is particularly useful
when printing photos taken under special circumstances.
25
35-up contact print
Easy-PhotoPrint Pro
Print
Contact print means to print a list of the "main images" in a 35mm size,
without reducing the resolution. For example, you can check the expression
of the subject of the image, degree of focus, and whether it is under or over
exposed.
New function when printing with borders
Print the background in black
You can invert white margin background to black in the final print. This is
good for bringing more focus to the image.
Print the background in black
Normal bordered printing
26
16
Easy-PhotoPrint Pro
Register and call up your settings
Easy-PhotoPrint Pro
Register and call up
previous settings
In addition to your color adjustment results
you can register your settings for printer types,
media sizes and types, paper sources and print quality.
The best settings for your printer can vary according to the subject of the
image, the situation of shooting, the media type and so on. Easy-PhotoPrint
Pro has a function for registering your settings to any user defined name.
This makes it easy for you to quickly call up your settings after they have
been registered, making printing of your desired images even easier. When
saving, you can give a file number/name to the settings you found to be best
after trying different settings and printing them out. This means no more trial
and error printing is necessary the next time you go to print.
You can revise names, or add
comments, or even delete from
you favorites.
27
Reference Information
Sheet Printing Paper Dimensions (Units: mm)
14" x 17" (356 x 432)
A3+ (329 x 483)
A3 (297 x 420)
10" x 12" (254 x 305)
A4 (210 x 297)
8" x 10" (203 x 254)
6.5" x 8.5" (165 x 216)
5" x 7"(127 x 178)
4" x 6"(101.6 x 152.4)
A6 (105 x 148)
45
393
45
A3 (297 x 420)
A3+ (329 x 483)
45
330
45
A4 (210 x 297)
A3 (297 x 420)
28
(Units: mm)
45
330
45
45
207
45
5" x 7"(127 x 178)
10" x 12" (254 x 305)
A4 (210 x 297)
A3 (297 x 420)
45
342
45
207
45
45
A6 (105 x 148)
A4 (210 x 297)
10" x 12" (254 x 305)
45
215
8" x 10" (203 x 254)
14" x 17" (356 x 432)
45
207
45
45
10" x 12" (254 x 305)
6.5" x 8.5" (165 x 216)
45
164
45
A4 (210 x 297)
6.5" x 8.5" (165 x 216)
8" x 10" (203 x 254)
29
Camera Direct Tutorial
The "Manual Color Adjustment Functions" are provided in the Camera Direct
composed of the PIXMA Pro9500/Pro9000 and EOS DIGITAL. This makes it
possible for you to create pictures you'll be proud of by faithfully reproducing
the coloring of the Picture Style in the final printout, and by adjusting
contrasts and color balance.
Refer to the "Camera Direct Tutorial" for details.
The color tone may differ because of differences in coloration depending on the type of paper used to print.
The samples provided are simulations.
© CANON INC. 2006


![3 Sélectionnez [Réglages].](http://vs1.manualzilla.com/store/data/006502646_1-716314e518c265d6faa81347dd31fca9-150x150.png)