1
MultiPASS 1000
USER’S
MANUAL
Canon
Copyright
This manual is copyrighted by Canon U.S.A., Inc. with all rights
reserved. Under the copyright laws, this manual may not be
reproduced in any form, in whole or part, without the prior written
consent of Canon U.S.A.
© Canon U.S.A., Inc. 1995
Disclaimer
Canon U.S.A., Inc. has reviewed this manual thoroughly to ensure
that it will be an easy to use guide to your Canon MultiPASS 1000
Document Processing System. All statements, diagrams, technical
information, and recommendations in this manual and in any
guides or related documents are believed reliable, but the accuracy
and completeness thereof are not guaranteed or warranted, and
they are not intended to be, nor should they be understood to be,
representations or warranties concerning the products described.
Your MultiPASS 1000 and the software media included with your
unit have been sold to you subject to the limited warranties set
forth in the warranty card and license agreement enclosed with the
respective product. All software is licensed AS IS, as described in
the license agreement enclosed with the software diskette. Further,
Canon U.S.A. reserves the right to make changes in the
specifications of the products described in this manual at any time
without notice and without obligation to notify any person of such
changes.
If you have any questions regarding your MultiPASS 1000 or the
information in this manual, please call the Canon U.S.A. Consumer
Information Center at 1-800-828-4040.
ii
Contents
Trademarks
Canon is a registered trademark and MultiPASS is a trademark of
Canon Inc.
CompuServe is a registered trademark of CompuServe
Information Services, Inc.
Centronics is a registered trademark of Centronics Data Computer
Corporation.
Epson is a registered trademark of Seiko Epson Corporation.
Epson LQ is a trademark of Epson America, Inc.
IBM is a registered trademark and IBM Proprinter is a trademark
of International Business Machines Corporation.
IEEE is a trademark of Institute of Electrical and Electronic
Engineers, Inc.
Microsoft is a registered trademark and Windows is a trademark
of Microsoft Corporation.
All other trademarks identified herein are the property of their
respective owners.
As an Energy Star Partner, Canon has determined
that the MultiPASS 1000 meets the Energy Star
guidelines for energy efficiency.
Contents
iii
USERS IN U.S.A.
PRE-INSTALLATION REQUIREMENTS FOR CANON
FACSIMILE EQUIPMENT
A. Location
Supply a suitable table, cabinet, or desk. See Appendix A for the unit’s
dimensions and weight.
B.
Order Information
1. Only a single line, touch tone or rotary telephone set is to be used.
2.
Order an RJ11-C modular jack (USOC code), which should be
installed by the phone company. If the RJ11-C jack is not present,
installation cannot occur.
3.
Order a normal business line from your telephone company’s
business representative. The line should be a regular voice grade
line or equivalent. Use one line per unit.
DDD (DIRECT DISTANCE DIAL) LINE
or
IDDD (INTERNATIONAL DIRECT DISTANCE DIAL) LINE IF
YOU COMMUNICATE OVERSEAS
N
Canon recommends an individual line following industry standards
[e.g., the 2500 (touch tone) or 500 (rotary/pulse dial) telephones]. A
dedicated extension off a PBX unit without “Call Waiting” can be used
with your fax unit. Key telephone systems are not recommended because
they send non-standard signals to individual telephones for ringing and
special codes, which may cause a fax error.
C.
Power Requirements
This equipment should be connected to a standard 120 volt AC, threewire grounded outlet only. Do not connect this unit to an outlet or
power line shared with other appliances that cause “electrical noise.”
Air conditioners, electric typewriters, copiers, and machines of this
sort generate noise which often interferes with communications
equipment and the sending and receiving of documents.
CONNECTION OF THE EQUIPMENT
This equipment complies with Part 68 of the FCC rules. On the rear panel
of this equipment is a label that contains, among other information, the
FCC Registration Number and Ringer Equivalence Number (REN) for this
equipment. If requested, this information must be given to the telephone
company. This equipment may not be used on coin service provided by the
telephone company. Connection to party lines is subject to state tariffs.
IN CASE OF EQUIPMENT MALFUNCTION
Should any malfunction occur which cannot be corrected by the
procedures described in this User’s Guide, disconnect the equipment from
the telephone line or unplug the power cord. The telephone line should not
be reconnected or the power cord plugged in until the problem is
iv
Contents
completely resolved. Users should contact Canon Authorized Service
Facilities for servicing of equipment. Information regarding Authorized
Service Facility locations can be obtained by calling the Canon U.S.A.
Consumer Information Center.
CANON U.S.A. CONSUMER INFORMATION CENTER
1-800-828-4040
MONDAY THROUGH FRIDAY 9 A.M. TO 6 P.M. EST
EXCEPT HOLIDAYS.
RIGHTS OF THE TELEPHONE COMPANY
Should the equipment cause harm to the telephone network, the telephone
company may temporarily disconnect service. The telephone company
also retains the right to make changes in facilities and services which may
affect the operation of this equipment. When such changes are necessary,
the telephone company is required to give adequate prior notice to the
user.
WARNING
Do not make any changes or modifications to the equipment unless
otherwise specified in the manual. If such changes or modifications should
be made, you could be required to stop operation of the equipment.
Note: This equipment has been tested and found to comply with the limits
for a Class B digital device, pursuant to Part 15 of the FCC Rules. These
limits are designed to provide reasonable protection against harmful
interference in a residential installation. This equipment generates, uses
and can radiate radio frequency energy and, if not installed and used in
accordance with the instructions, may cause harmful interference to radio
communications.
However, there is no guarantee that interference will not occur in a
particular installation. If this equipment does cause harmful interference
to radio or television reception, which can be determined by turning the
equipment off and on, the user is encouraged to try to correct the
interference by one of the following measures:
❏
❏
❏
❏
Re-orient or relocate the receiving antenna.
Increase the separation between the equipment and receiver.
Connect the equipment into an outlet on a circuit different from that
to which the receiver is connected.
Consult the dealer or an experienced radio/TV technician for help.
The Telephone Consumer Protection Act of 1991 makes it unlawful for any
person to use a computer or other electronic device to send any message
via a telephone fax machine unless such message clearly contains in a
margin at the top or bottom of each transmitted page or on the first page
of the transmission, the date and time it is sent and an identification of the
business or other entity, or other individual sending the message and the
telephone number of the sending machine or such business, other entity,
or individual.
In order to program this information into your MultiPASS 1000, you
should complete registering your number and name. See Chapter 3,
Registering Information in the MultiPASS 1000, for details.
Contents
v
USERS IN CANADA
PRE-INSTALLATION REQUIREMENTS FOR CANON
FACSIMILE EQUIPMENT
A. Location
Supply a suitable table, cabinet, or desk. See Appendix A for
the unit’s dimensions and weight.
B. Order Information
1. Provide only a single-line to touch-tone or rotary
telephone set terminated with a standard 4-pin modular
phone plug. (Touch-tone is recommended if available in
your area.)
2.
Order an RJ11-C modular jack (USOC code), which should
be installed by the phone company. If the RJ11-C jack is
not present, installation cannot occur.
3.
Order a normal business line from your telephone
company’s business representative. The line should be a
regular voice grade line or equivalent. Use one line per unit.
DDD (DIRECT DISTANCE DIAL) LINE
or
IDDD (INTERNATIONAL DIRECT DISTANCE DIAL)
LINE IF YOU COMMUNICATE OVERSEAS
N
Canon recommends an individual line following industry
standards [e.g., the 2500 (touch tone) or 500 (rotary/pulse dial)
telephones]. A dedicated extension off a PBX unit without “Camp
On” signals is also permissible with a fax unit. Key telephone
systems are not recommended because they send non-standard
signals to individual telephones for ringing and special codes,
which may cause a fax error.
C. Power Requirements
The power outlet should be a three-prong grounded receptacle
(Single or Duplex). It should be independent from copiers,
heaters, air conditioners, or any electric equipment that is
thermostatically controlled. The rated value is 120 volts and
15 amperes. The RJ11-C modular jack should be relatively close
to the power outlet to facilitate installation.
NOTICE
The Canadian Department label identifies certified equipment.
This certification means that the equipment meets certain
telecommunications networks protective, operational and safety
requirements. The Department does not guarantee the equipment
will operate to the user’s satisfaction.
vi
Contents
Before installing this equipment, users should ensure that it is
permissible to be connected to the facilities of the local
telecommunications company. The equipment must also be
installed using an acceptable method of connection. In some cases,
the company’s inside wiring associated with a single line
individual service may be extended by means of a certified
connector assembly (telephone extension cord). The customer
should be aware that compliance with the above conditions may
not prevent degradation of service in some situations.
The Load Number (LN) assigned to each terminal device denotes
the percentage of the total load to be connected to a telephone loop
which is used by the device, to prevent overloading. The
termination on a loop may consist of any combination of devices
subject only to the requirements that the total of the Load Numbers
of all the devices does not exceed 100.
Repairs to certified equipment should be made by an authorized
Canadian maintenance facility designated by the supplier. Any
repairs or alterations made by the user to this equipment, or
equipment malfunctions, may give the telecommunications
company cause to request the user to disconnect the equipment.
Information regarding authorized service facility locations can be
obtained by calling the nearest Canon Service Center below.
Canon Canada Inc.
WESTERN CANADA
2828 16th Street, N.E., Calgary, Alberta T2E 7K7
Telephone: (403) 291-4350
ONTARIO
6390 Dixie Road, Mississauga, Ontario L5T 1P7
Telephone: (905) 795-2146
´ & MARITIME PROVINCES
QUEBEC
10652 Côte de Liesse, Montreal, Quebéc H8T 1A5
Telephone: (514) 631-8821
Users should ensure for their own protection that the electrical
ground connections power utility, telephone lines and internal
metallic water pipe system, if present, are connected together. This
precaution may be particularly important in rural areas.
CAUTION
Users should not attempt to make such connections themselves,
but should contact the appropriate electric inspection authority, or
electrician, as appropriate.
This digital apparatus does not exceed the Class B limits for radio
noise emissions from digital apparatus set out in the Radio
Interference Regulations of the Canadian Department of
Communications.
Contents
vii
viii
Contents
Contents
Chapter 1
Before You Begin ......................................................................................
Features and Benefits .................................................................................
Using Your Documentation ......................................................................
Customer Support ......................................................................................
Canon U.S.A. .......................................................................................
Canon Canada .....................................................................................
Important Safety Instructions ...................................................................
1-1
1-3
1-5
1-6
1-6
1-6
1-7
Chapter 2
Getting Started ..........................................................................................
Selecting a Location for Your MultiPASS 1000 ......................................
Unpacking the MultiPASS 1000 ...............................................................
Removing the Shipping Materials ....................................................
Learning the MultiPASS 1000 Controls and Connections ...................
From the Front .....................................................................................
From the Side .......................................................................................
Handset ................................................................................................
Operation Panel ..................................................................................
Numeric Keypad .................................................................................
Function Buttons and Lights .............................................................
One-touch Speed Dialing Keypad ....................................................
Fax/Telephone Operation Buttons ..................................................
Setting Up the MultiPASS 1000 ................................................................
Attaching the Handset .......................................................................
Installing the Paper Cassette .............................................................
Connecting the Telephone Line ........................................................
Attaching the Parallel Cable ..............................................................
Attaching the Power Cord .................................................................
Installing the Ink Cartridge ...............................................................
Attaching the Document Supports ...................................................
Attaching the One-touch Speed Dialing Faceplate ........................
Testing the MultiPASS 1000 .....................................................................
Printing the Help List .........................................................................
2-1
2-2
2-4
2-6
2-7
2-7
2-8
2-9
2-10
2-11
2-12
2-13
2-14
2-15
2-15
2-16
2-20
2-20
2-22
2-23
2-27
2-29
2-30
2-30
Chapter 3
Registering Information in the MultiPASS 1000 ................................
Guidelines for Registering Information ..................................................
Using the Menu System .....................................................................
Entering a Number .............................................................................
Entering a Name .................................................................................
Personalizing Your MultiPASS 1000 .......................................................
Identifying Your Documents ............................................................
Setting the Date and Time .................................................................
Registering Your Fax Number ..........................................................
Registering Your Name ......................................................................
Customizing the MultiPASS 1000 Operations .......................................
Customizing Your ID ..........................................................................
Customizing the LCD Display ..........................................................
Customizing MultiPASS 1000 Sounds .............................................
3-1
3-1
3-2
3-3
3-4
3-6
3-6
3-7
3-8
3-10
3-13
3-13
3-15
3-16
Contents
ix
Chapter 4
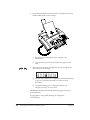
Preparing Documents and Making Copies ..........................................
Preparing Documents ................................................................................
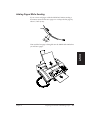
Feeding Documents ...................................................................................
Adding Pages While Sending ...........................................................
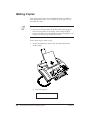
Making Copies ............................................................................................
Receiving a Fax While Making a Copy ............................................
Adjusting the Paper Cassette for Legal-size Paper ...............................
4-1
4-1
4-3
4-5
4-6
4-8
4-9
Chapter 5
Sending Fax Documents ..........................................................................
Sending a Document Using Regular Dialing .........................................
Sending a Document Directly ..................................................................
Sending a Document from Memory ........................................................
Sending Procedures ...................................................................................
Sending Large Documents ................................................................
Customizing the Transmission Mode ..............................................
Transmitting the Document ..............................................................
Selecting Document Settings ....................................................................
Type of Document ..............................................................................
Density Control ...................................................................................
Setting Up Special Transmission Procedures ........................................
ECM Sending .......................................................................................
Auto Redial ..........................................................................................
Customizing the Transmission Speed .....................................................
5-1
5-2
5-4
5-6
5-10
5-10
5-10
5-11
5-12
5-12
5-14
5-15
5-15
5-17
5-19
Chapter 6
Using Automatic Dialing .........................................................................
Using One-touch Speed Dialing ..............................................................
Registering Your Most Frequently Called Fax Numbers ..............
Sending a Document Using One-touch Speed Dialing .................
Registering Your Most Frequently Called Telephone
Numbers ...........................................................................................
Making a One-touch Speed Dialing Telephone Call .....................
Using Coded Speed Dialing Numbers ....................................................
Registering Coded Speed Dialing Numbers ...................................
Using Coded Speed Dialing for Fax Numbers ...............................
Using Coded Speed Dialing for Telephone Numbers ...................
Using Group Dialing .................................................................................
Registering Group Dialing Numbers ...............................................
Sending a Document Using Group Dialing ....................................
Changing a Group Dialing Number ................................................
Using Expanded Dialing ...........................................................................
Registering Expanded Dialing Numbers ........................................
Sending a Document Using Expanded Dialing ..............................
Using Directory Dialing ............................................................................
6-1
6-1
6-1
6-3
x
6-4
6-6
6-7
6-7
6-9
6-9
6-10
6-10
6-12
6-13
6-15
6-15
6-16
6-17
Contents
Chapter 7
Chapter 8
Contents
Receiving Fax Documents .......................................................................
Receiving Documents Over a Dedicated Fax Line ................................
Setting Up the MultiPASS 1000 for Dedicated Receiving .............
Receiving Documents Automatically Over a Dedicated
Fax Line ............................................................................................
Receiving Both Documents and Telephone Calls Over a Shared
Fax/Telephone Line (FAX/TEL SWITCH).............................................
Setting Up the MultiPASS 1000 for a Shared Line .........................
Receiving Both Documents and Telephone Calls Automatically
Receiving Documents in Memory ...........................................................
Receiving a PC Fax Document in Memory .....................................
Receiving Documents Manually ..............................................................
Setting the MultiPASS 1000 to Switch Automatically from .........
Manual to Automatic Receiving ...................................................
Receiving Documents Manually Using an Extension Telephone .......
Setting Up the MultiPASS 1000 to Receive a Document
Manually Using an Extension Telephone ...................................
Receiving a Document Manually Using the
Extension Telephone ......................................................................
Customized Receiving Operations ..........................................................
Receiving Oversized Documents ......................................................
Setting Up Special Receiving Features ............................................
Customizing the FAX/TEL SWITCH Feature ....................................
Restricting Incoming Documents .....................................................
Customizing the Receiving Speed ....................................................
Using the Telephone, an Answering Machine,
and a Modem .............................................................................................
Using the Telephone ..................................................................................
Making a Regular Dial Telephone Call ...........................................
Making a One-touch Speed Dial Telephone Call ...........................
Receiving Calls and Documents Automatically on a Shared
Fax/Telephone Line .......................................................................
Placing a Call on Hold .......................................................................
Using an Answering Machine Connected to the MultiPASS 1000 .....
Hints When Using the MultiPASS 1000 with an Answering
Machine ............................................................................................
Connecting the Answering Machine ...............................................
Turning on Automatic Receiving for Messages and
Documents .......................................................................................
Adjusting the MultiPASS 1000 for Different Types of
Answering Machines ......................................................................
Using an Extension Telephone Connected to the MultiPASS 1000 ....
Connecting the Extension Telephone ..............................................
Calling with the Extension Telephone .............................................
Receiving Calls and Documents Automatically with the
Extension Telephone ......................................................................
Using a Data Modem with the MultiPASS 1000 ...................................
Connecting the Data Modem ............................................................
Avoiding Conflict Between Fax and Data Communications .......
7-1
7-2
7-2
7-3
7-4
7-4
7-5
7-7
7-8
7-9
7-10
7-12
7-12
7-14
7-15
7-15
7-17
7-20
7-22
7-23
8-1
8-1
8-1
8-2
8-2
8-3
8-4
8-4
8-5
8-6
8-7
8-9
8-9
8-10
8-10
8-10
8-10
8-11
xi
Chapter 9
Chapter 10
Chapter 11
xii
Using Special Dialing ..............................................................................
Changing Dialing Systems .......................................................................
Switching to Pulse Dialing ................................................................
Switching to Tone Dialing Temporarily to Access
On-line Services ...............................................................................
Using the PAUSE Button ...........................................................................
Dialing or Registering Long Distance Numbers ............................
Connecting Through a Switchboard ................................................
Entering Pauses ...................................................................................
Changing the Length of the Pause Time .........................................
Using the MultiPASS 1000 with Distinctive Ringing Pattern
(DRP) Service ..........................................................................................
Setting the MultiPASS 1000 for DRP Use ........................................
Communicating Using the Distinctive Ringing Pattern
Detector (DRPD) Feature ................................................................
9-1
9-2
9-2
Special Sending Procedures ....................................................................
Sending to More than One Location (Broadcasting)..............................
Transmitting the Document ..............................................................
Sending Documents at a Preset Time ......................................................
Sending Other Documents While the MultiPASS 1000 Is Set
for Preset Sending ...........................................................................
Canceling Preset Sending ..................................................................
Sending Through a Relay Fax ..................................................................
Sending Documents to a Relay Fax ..................................................
Registering the Relay Procedure for One-touch or Coded
Speed Dialing ..................................................................................
Using One-touch or Coded Relay Sending .....................................
Sending a Confidential Document ..........................................................
Sending One-touch or Coded Speed Dialing
Confidential Documents ................................................................
Requesting Documents from Other Fax Machines (Polling) ...............
Registering Your Polling ID ..............................................................
Polling Other Fax Machines ..............................................................
Allowing Others to Poll Your MultiPASS 1000 ..............................
Polling at a Preset Time .....................................................................
Canceling Preset Polling ....................................................................
10-1
10-1
10-2
10-3
10-12
10-16
10-16
10-18
10-19
10-19
10-21
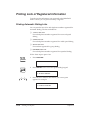
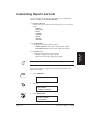
Printing Fax Reports .................................................................................
Printing a Fax Cover Sheet .......................................................................
Printing Activity Reports ..........................................................................
Printing a Single Transaction Activity Report ................................
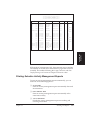
Printing an Activity Management Report .......................................
Printing Selective Activity Management Reports ..........................
Receiving a Relay Broadcast Report ................................................
Receiving a Memory Clear Report ...................................................
Printing Lists of Registered Information ................................................
Printing Automatic Dialing Lists ......................................................
Printing a User’s Data List .................................................................
Customizing Reports and Lists ................................................................
11-1
11-2
11-3
11-3
11-6
11-7
11-9
11-9
11-10
11-10
11-11
11-13
9-3
9-4
9-4
9-4
9-4
9-5
9-6
9-6
9-9
10-5
10-5
10-6
10-6
10-8
10-10
10-11
Contents
Chapter 12
Miscellaneous Printer Operations .........................................................
Changing Printer Settings .........................................................................
12-1
12-1
Chapter 13
Maintaining the MultiPASS 1000 ..........................................................
Cleaning the MultiPASS 1000 ...................................................................
Cleaning the Scanner Components ..................................................
Cleaning the Printer Area ..................................................................
Cleaning the Print Head ............................................................................
Starting Print Head Cleaning ............................................................
Ink Cartridge Guidelines ..........................................................................
Ink Cartridge Maintenance ................................................................
Replacing the Ink Cartridge .....................................................................
13-1
13-1
13-2
13-5
13-6
13-6
13-7
13-8
13-9
Chapter 14
Troubleshooting ........................................................................................ 14-1
Clearing Paper Jams .................................................................................. 14-2
Removing Jammed Paper from the Cassette Area ......................... 14-2
Removing Jammed Paper from the Printer Area ........................... 14-3
Removing Jammed Paper from the Bottom
of the MultiPASS 1000 .................................................................... 14-4
Problems and Solutions ............................................................................. 14-5
Sending Problems ............................................................................... 14-5
Receiving Problems ............................................................................ 14-6
Other Problems ................................................................................... 14-7
Display Messages and Actions ................................................................. 14-10
Appendix A Specifications .............................................................................................
Document Sizes ..........................................................................................
Interface Specifications ..............................................................................
A-1
A-3
A-4
Appendix B Menu System Summary ...........................................................................
B-1
Glossary ..............................................................................................................................
G-1
Index ....................................................................................................................................
I-1
Contents
xiii
xiv
Contents
Thank you for purchasing the new Canon MultiPASS™ 1000
Document Processing System. We are sure your MultiPASS 1000
will help you work more efficiently and expand your work
capacity.
The new MultiPASS 1000 is a complete 6-in-1 desktop system for
your home or small office. Your new system provides the following
functions:
❏
Printer
❏
Scanner
❏
Plain paper fax
❏
Copier
❏
PC fax
❏
Telephone
The MultiPASS 1000 is equipped with a standard bi-directional
parallel port, which enables it to transfer data to and from your
computer. You can send scanned documents and received faxes
from your MultiPASS 1000 to your computer, and you can send
data to be printed and/or faxed from your computer to the
MultiPASS 1000.
Chapter 1
Before You Begin
1-1
Before You Begin
Chapter 1
Before You Begin
Your MultiPASS 1000 includes the MultiPASS Desktop Manager
for Windows™ software. This exclusive Canon software package
manages the printing, scanning, faxing, and telephone activities of
the MultiPASS 1000 through your computer in a single
management application.
As a scanner, the MultiPASS 1000 supports the TWAIN Scanning
Standard, which allows you to scan images from any graphics or
OCR applications program that supports the TWAIN standard.
Be sure to read this MultiPASS 1000 User’s Guide and the
MultiPASS Desktop Manager for Windows User’s Guide to find out all
you need to know about your new document processing system.
Before you begin setting up your MultiPASS 1000:
❏
Read this chapter to learn about your MultiPASS 1000’s
features, Canon’s customer support procedures, and operating
your new equipment safely.
❏
If you used your Quick Start Guide to set up the MultiPASS
1000, be sure to look through Chapter 2 for the additional
information it provides. If you are new to fax machines and
computer products, carefully follow all the instructions in
Chapter 2 to set up your MultiPASS 1000 properly.
❏
Use the rest of this User’s Guide to learn more about the
features of your MultiPASS 1000, such as registering
information, making copies, sending and receiving faxes, and
using the telephone features of the system. You can also learn
about the special features of the MultiPASS 1000, such as
sending to more than one location, sending a confidential
document, and receiving documents in memory.
❏
If you need help, see Chapter 13, Maintaining the MultiPASS
1000, or Chapter 14, Troubleshooting. For technical
specifications, see Appendix A.
❏
Use your MultiPASS Desktop Manager for Windows User’s Guide
to find out how to use the MultiPASS 1000 with your Windows
and non-Windows applications.
1-2 Before You Begin
Chapter 1
The MultiPASS 1000 is a complete 6-in-1 document processing
system that incorporates many useful features to meet all your
communications requirements as well as your office printing and
scanning needs.
Excellent print quality
The high performance print head offers 360 x 360 dots per inch
(dpi) for high resolution text and graphics.
Automatic switching between fax and voice calls
Fax/tel switching allows you to receive both fax messages and
normal phone calls automatically on a single line.
Bubble Jet ink cartridge
The BX-2 ink cartridge produces excellent print quality for crisp,
clean looking documents.
Convenient paper handling
The paper cassette holds up to 200 sheets of plain paper and is
adjustable to letter or legal size paper, and the Automatic
Document Feeder (ADF) holds up to 30 pages.
MultiPASS Desktop Manager for Windows software
This exclusive Canon software package manages all your scanning
and PC faxing activities as well as your printing activities from
Windows.
Simple maintenance
The replaceable ink cartridge contains both the ink and the print
head; when it runs out of ink, you simply replace it.
Printer features
❏
Built-in Bubble Jet printer
❏ Two resident printer control modes—Canon BJ mode and
Epson® LQ™ mode
❏ When using the Canon BJ mode, you can select, among other
drivers, the:
• IBM® Proprinter™
•
IBM Proprinter X24E/XL24
•
IBM Proprinter X24/XL24E
Plain paper fax features
❏ Transmission speed of nine seconds per page is based on the
CCITT #1 Chart, Standard mode
Chapter 1
Before You Begin
1-3
Before You Begin
Features and Benefits
❏ Memory receiving—approximately 70 pages based on the
CCITT #1 Chart, Standard mode
❏ Memory transmission—approximately 50 pages based on the
CCITT #1 Chart, Standard mode
❏
Error Correction Mode (ECM) reduces communication errors
❏ Sophisticated networking features include broadcasting,
polling, confidential sending, restricted receiving, sending to a
Canon relay fax
❏ Automatic dialing methods include one-touch speed dialing,
coded speed dialing, group dialing, expanded dialing,
directory dialing
PC fax features
❏
Fax address book
❏
Fax viewer
❏
Fax distribution lists
❏
Custom cover sheets
❏
ECM
Scanner features
❏ TWAIN scanning standard
❏
High quality scanning (200 x 200 dpi)
Copier features
❏
Plain paper copier
❏
Up to 99 copies
Telephone features
❏ Automatic dialing methods include one-touch speed dialing,
coded speed dialing, expanded dialing, directory dialing
❏ Connection for an answering machine or extension telephone
❏
On-hook dialing
❏ Distinctive Ringing Pattern Detector capability
❏ Point and click telephone dialer
1-4 Before You Begin
Chapter 1
The following documentation is supplied with the MultiPASS 1000
to help you use your new document processing system more
efficiently. Please read and use the manuals according to your
requirements.
Quick Start Guide
This fold-out card summarizes the steps you follow to unpack and
set up your MultiPASS 1000. If you are an advanced user familiar
with computers, printers, and fax machines, you can follow the
steps illustrated on this card to start using your MultiPASS 1000 in
minutes.
User’s Guide
This manual offers detailed information on how to set up and
operate your MultiPASS 1000. It includes initial setup procedures,
how to register information, fax operations, daily maintenance,
troubleshooting, and specifications.
Read this manual to set up your MultiPASS 1000 and master the
basic operating procedures. Later you can refer to this manual
when you have a problem or need to know the specifications of the
MultiPASS 1000.
Software User’s Guide
Your MultiPASS Desktop Manager for Windows User’s Guide includes
all the information you need to use your new MultiPASS 1000 with
your Windows software applications. It describes how to use the
MultiPASS 1000 for printing, scanning, and faxing in the Windows
environment, as well as how to print from a non-Windows
application.
See the Software User’s Guide whenever you need information
about printing, scanning, or PC faxing.
Chapter 1
Before You Begin
1-5
Before You Begin
Using Your Documentation
Customer Support
Your Canon MultiPASS 1000 is designed with the latest technology
to provide trouble-free operation. The warranty information at the
back of this User’s Guide describes Canon’s limited warranty for its
products. Be sure to read this warranty information.
If you encounter a problem, try to solve it by referring to the
information in Chapter 14, Troubleshooting. If you cannot solve the
problem, contact Canon’s Consumer Information Center (see below).
If you think your Canon MultiPASS 1000 needs servicing, call the
Consumer Information Center to locate the Canon Authorized
Service Facility (ASF) nearest you. Only a Canon ASF will do
warranty service.
N
You must have your sales receipt for warranty service.
Canon U.S.A.
Canon provides customer support and service for all Canon
products. If you have any questions regarding your new
MultiPASS 1000, call:
Canon U.S.A. Consumer Information Center
1-800-828-4040
Consumer information is available Monday through Friday, from
9 A.M. to 6 P.M. Eastern Standard Time (EST), except holidays.
For CompuServe® users, Canon U.S.A. provides support via the
Canon Forum. Simply type GO CANON at any CompuServe
prompt.
Canon Canada
The following Canon Information and Service Centers are located
in Canada:
Western Canada
2828 16th Street, N.E.
Calgary, Alberta T2E 7K7
Telephone: 403-291-4350
Quebéc & Maritime Provinces
10652 Côte de Liesse
Montreal, Quebéc H8T 1A5
Telephone: 514-631-8821
Ontario
6390 Dixie Road
Mississauga, Ontario L5T 1P7
Telephone: 905-795-2146
1-6 Before You Begin
Chapter 1
Before You Begin
Important Safety Instructions
1.
Read these safety instructions and refer to them later if you
have any questions.
2.
Follow all warnings and instructions marked on the
MultiPASS 1000.
3.
Place the MultiPASS 1000 on a level surface. Do not place it on
an unstable cart, stand, or table. If the MultiPASS 1000 falls,
serious damage could occur.
4.
Do not use the MultiPASS 1000 near water.
5.
Slots and openings on the cabinet and on the back or bottom
are provided for ventilation. To ensure reliable operation of the
MultiPASS 1000 and to protect it from overheating, do not
block or cover these openings. Do not block the openings by
placing the unit on a bed, sofa, rug, or other similar surface, or
near a radiator or heat register. Do not place the MultiPASS
1000 in a closet or built-in installation unless proper ventilation
is provided.
6.
Operate the MultiPASS 1000 only from the type of power
source indicated on the unit’s label. If you are not sure of the
type of power available, consult your dealer or local power
company.
7.
The MultiPASS 1000 is equipped with a 3-prong, groundingtype plug; the plug has a third (grounding) pin. This plug will
only fit into a grounding-type outlet. This is a safety feature. If
you are unable to insert the plug into your outlet, contact an
electrician to replace your outlet (do not use a 3-to-2 adapter).
Do not defeat the safety purpose of the grounding-type plug.
8.
Do not allow anything to rest on the power cord, and do not
locate the MultiPASS 1000 where the cord will be walked on.
9.
If you use an extension cord with the MultiPASS 1000, make
sure that the total of the ampere ratings on the products
plugged into the extension cord does not exceed the extension
cord ampere rating. Also, make sure that the total of all
products plugged into the wall outlet does not exceed the
current amperage of the circuit breaker.
10. Do not push objects of any kind into the slots or openings on
the cabinet as they may touch dangerous voltage points or
short out parts, which could result in a risk of fire or electric
shock.
Chapter 1
Before You Begin
1-7
11. Do not spill liquid of any kind on the MultiPASS 1000. If you
spill liquid or if any substance falls into the unit, immediately
unplug the MultiPASS 1000. Call your Canon Authorized
Service Facility (ASF).
12. Unplug the MultiPASS 1000 from the wall outlet before
cleaning. See Chapter 13, Maintaining the MultiPASS 1000, for
details.
13. Except as explained elsewhere in this manual, do not attempt
to service the MultiPASS 1000 yourself. Opening and removing
interior covers may expose you to dangerous voltage points or
other risks. Refer all servicing to a Canon Authorized Service
Facility (ASF).
14. Unplug this product from the wall outlet and refer servicing to
qualified service personnel under the following conditions:
N
❏
When the power cord or plug is damaged or frayed.
❏
If liquid has been spilled into the unit.
❏
If the MultiPASS 1000 has been exposed to rain or water.
❏
If the MultiPASS 1000 does not operate normally when
you have followed the operating instructions. Adjust only
those controls that are covered by the operating
instructions in this manual. Improper adjustment of other
controls may result in damage and may require extensive
work by a qualified technician to restore the product to
normal operation.
❏
If the MultiPASS 1000 has been dropped or the cabinet has
been damaged.
❏
If the MultiPASS 1000 exhibits a distinct change in
performance, indicating a need for service.
You must register your fax number, your name or company name,
and the date and time in the MultiPASS 1000 before you use it.
This is required by the FCC rules governing the use of fax
equipment. See Chapter 3, Registering Information in the MultiPASS
1000, for details.
1-8 Before You Begin
Chapter 1
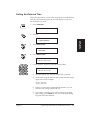
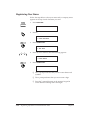
Chapter 2
Getting Started
❏
Selecting a location for your MultiPASS 1000
❏
Unpacking the MultiPASS 1000
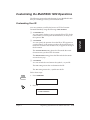
❏
Learning the MultiPASS 1000 controls and connections
❏
Setting up the MultiPASS 1000
•
•
•
•
•
•
•
•
❏
Getting Started
This chapter describes how to properly set up and start using your
MultiPASS 1000. It includes:
Attaching the handset
Installing the paper cassette
Connecting the telephone line
Attaching the parallel cable
Attaching the power cord
Installing the ink cartridge
Attaching the document supports
Attaching the one-touch speed dialing faceplate
Testing the MultiPASS 1000
•
Printing the help list
If you have already set up your MultiPASS 1000 using the Quick
Start Guide, you may want to look through this chapter to find any
additional information it supplies.
Chapter 2
Getting Started
2-1
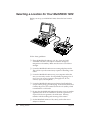
Selecting a Location for Your MultiPASS 1000
Before you set up your MultiPASS 1000, choose the best location
for it.
Follow these guidelines:
2-2 Getting Started
❏
Place the MultiPASS 1000 in a cool, dry, clean, and well
ventilated area that is not subject to extreme changes in
temperature or humidity. Make sure the unit is out of direct
sunlight.
❏
Locate the MultiPASS 1000 near an existing telephone outlet.
This will save you the unnecessary expense of installing a new
outlet.
❏
Locate the MultiPASS 1000 next to your computer and make
sure you can easily reach it. It will probably be getting a lot of
use as you can use it as a printer, plain paper fax, PC fax,
scanner, copier, and telephone.
❏
Locate the MultiPASS 1000 near an electrical wall outlet that
accepts a three-prong, grounded plug. In the United States and
Canada, the power source must be 120-volt AC (60 Hz), which
is standard for a wall outlet.
❏
Do not plug the MultiPASS 1000 into the same circuit as another
appliance, such as an air conditioner, electronic typewriter, or
copier. Such devices generate “electrical noise” that may
interfere with the sending and receiving of documents.
❏
Set the MultiPASS 1000 on a flat, sturdy surface that is not
subject to vibration.
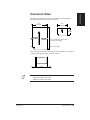
Chapter 2
Make sure there is enough room around the MultiPASS 1000 for
the paper to flow freely into and out of the unit. Also, make
sure there is adequate ventilation around the MultiPASS 1000. It
requires this much space:
Getting Started
❏
15.5”
7”
17.3”
15.5”
7”
13”
20”
Chapter 2
Getting Started
2-3
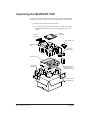
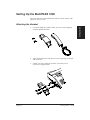
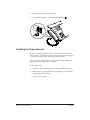
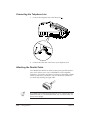
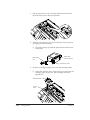
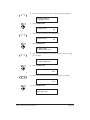
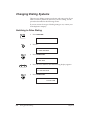
Unpacking the MultiPASS 1000
As you unpack the MultiPASS 1000, save the carton and packing
material in case you want to move or ship the unit in the future.
1.
Carefully remove all items from the box.
❏ It is best to have someone hold the box while you lift the
MultiPASS 1000 and its protective packaging out of the
carton.
POWER
CORD
PAPER
CASSETTE
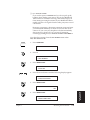
INK CARTRIDGE
TELEPHONE
LINE
HANDSET
AND CRADLE
MultiPASS 1000
DOCUMENT
SUPPORTS
MultiPASS DESKTOP
MANAGER FOR
WINDOWS PACKAGE
DOCUMENTATION
AND FACEPLATE
2-4 Getting Started
Chapter 2
Check to see that you have the following items:
❏
❏
Hardware:
MultiPASS 1000
PAPER CASSETTE
DOCUMENT SUPPORTS
HANDSET/CRADLE/
TWO SCREWS
INK CARTRIDGE
FACEPLATE
POWER CORD
TELEPHONE LINE
Getting Started
2.
Miscellaneous:
MultiPASS 1000 User’s Guide (this manual)
Quick Start Guide (fold-out card)
Registration card
MultiPASS Desktop Manager for Windows (package)
If any of these items are damaged or missing, notify your Canon
dealer immediately.
N
❏ In addition to the items shipped with your MultiPASS 1000,
you will need a Centronics®-compatible parallel interface
cable, which you can purchase from your dealer. (A cable less
than 6.6 feet is recommended.)
❏ Be sure to fill out your Registration card and send it to Canon
U.S.A. Also, save your sales receipt for proof of purchase.
Chapter 2
Getting Started
2-5
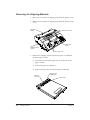
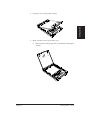
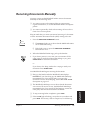
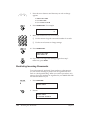
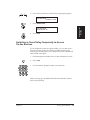
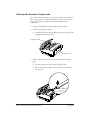
Removing the Shipping Materials
1.
Remove the two pieces of shipping tape from the printer cover.
2.
Remove the two pieces of shipping tape from the printer panel
cover.
PRINTER
COVER
REMOVE THIS TAPE
OPERATION
PANEL
PRINTER PANEL
COVER
REMOVE THIS TAPE
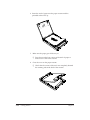
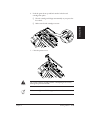
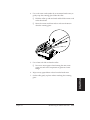
3.
Remove the shipping tape and protective piece of cardboard
from the paper cassette.
❏ Press down on the metal paper rest on the bottom of the
paper cassette.
❏ Pull out the piece of cardboard.
❏
Remove the tape that secures the piece of cardboard.
REMOVE
THIS TAPE
2-6 Getting Started
REMOVE THIS
CARDBOARD
PRESS HERE
Chapter 2
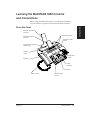
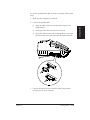
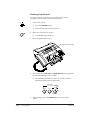
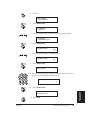
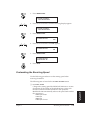
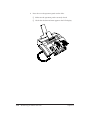
Learning the MultiPASS 1000 Controls
and Connections
Before using the MultiPASS 1000, it’s a good idea to familiarize
yourself with the components and understand their functions.
Getting Started
From the Front
RECEIVED DOCUMENT
SUPPORT
DOCUMENT GUIDES
SENDING DOCUMENT
SUPPORT
SPEAKER VOLUME
SWITCH
AUTOMATIC DOCUMENT
FEEDER (ADF)
PRINTER
COVER
OPERATION
PANEL
HANDSET
PAPER
CASSETTE
LCD DISPLAY
HANDSET CORD
Chapter 2
PRINTER PANEL
COVER
Getting Started
2-7
From the Side
BI-DIRECTIONAL
PARALLEL PORT
TELEPHONE
LINE JACK
HANDSET JACK
ANSWERING MACHINE/
EXTENSION TELEPHONE/
MODEM JACK
POWER CORD
CONNECTOR
2-8 Getting Started
Chapter 2
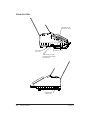
Handset
Getting Started
HOOK BUTTON
RINGER VOLUME
SWITCH
OFF
LOW
HIGH
Ringer volume switch
Use this switch to adjust the volume of the ringer. There are three
settings: high, low, and off.
N
Chapter 2
Use the tip of a pen to change the position of the ringer volume
switch.
Getting Started
2-9
Operation Panel
2 PRINT ERROR
LIGHT
LCD
DISPLAY
4
5 FUNCTION
BUTTONS
AND LIGHTS
SPEAKER VOLUME
SWITCH
6
PRINTER
LIGHTS
3
ALARM
LIGHT
7
1 PRINTER BUTTON
SHQ
ON LINE
HS
HQ
PRINT MODE
PRINT ERROR
TYPE OF
DOCUMENT
FUNCTION
PRINTER
ABC
1
GHI
PRS
ALARM
2
3
MEMOR Y
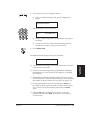
TRANSMISSION
MNO
5
6
TUV
7
01
CODED DIAL
/DIRECTORY
WXY
8
9
TONE
ON HOOK
STOP
START / COPY
SYMBOLS
0
DELA YED
TRANSMISSION
02
DELA YED
POLLING
03
POLLING
04
CONFID.
RELA Y
TRANSMISSION
BROADCAST
05
06
07
08
10
11
12
15
16
REPOR T
HELP
HOLD
FILE
PRINT
+
09
OPER
*
ANS HOOK UP
MANUAL
DEF
JKL
4
FINE
STANDARD
PAUSE
REDIAL
#
SP ACE
13
12 NUMERIC KEYPAD
11 FAX/TELEPHONE
OPERATION
BUTTONS
10 PRINTER
PANEL
COVER
9
PC INTERFACE
LIGHT
CLEAR
14
8 ONE-TOUCH
SPEED DIALING
KEYPAD
1
PRINTER button
Use this button when you need to perform print head cleaning
or you want to print from a non-Windows application. See
your Software User’s Guide for details on printing from a
non-Windows application.
2
PRINT ERROR light
Lights when a paper jam occurs if the MultiPASS 1000 is in
printer mode.
3
Printer lights
Indicate the status of the printer. See your Software User’s
Guide for details.
4
LCD display
Displays messages, print errors, and MultiPASS 1000 settings.
5
Function buttons and lights
Use these buttons for fax and telephone operations. The lights
indicate the status of the MultiPASS 1000.
6
Speaker volume switch
Use this switch to adjust the speaker’s volume; it works in
conjunction with the ON HOOK button.
2-10 Getting Started
Chapter 2
ALARM light
7
8
One-touch speed dialing keypad
Use these buttons for one-touch speed dialing and to perform
special operations.
9
PC interface light
Flashes when the computer is accessing the MultiPASS 1000
for scanning or PC faxing. See your Software User’s Guide for
details on using the MultiPASS 1000 with your software
applications.
10
Printer panel cover
Lift to access the printer panel, which you use to control
printer operations. See your Software User’s Guide for details
on using the MultiPASS 1000 as a printer.
11
Fax/telephone operation buttons
Use these buttons for fax and telephone operations.
12
Numeric keypad
Use these buttons to enter numbers and names when
registering information and to dial fax/telephone numbers
that are not registered for automatic dialing.
Numeric Keypad
Use these buttons to enter numbers and names when registering
information and to dial fax/telephone numbers that are not
registered for automatic dialing. You use these buttons like the
ones on your telephone dial.
Chapter 2
Getting Started
2-11
Getting Started
Flashes when an error occurs, when the MultiPASS 1000 is out
of paper or ink, or when received documents are stored in
memory.
Function Buttons and Lights
Use these buttons for fax and telephone operations. The lights
indicate the status of the MultiPASS 1000.
FUNCTION button
Use this button with the numeric keypad and the one-touch speed
dialing keypad when performing certain operations. You press this
button to start most procedures.
DOCUMENT (resolution) button
Use this button to select the resolution you want the MultiPASS
1000 to use for scanning, sending, or copying your document. The
lights above the button indicate the setting:
❏
TYPE OF DOCUMENT—Lights when you set the MultiPASS
1000 to send documents using special document settings that
you select in advance.
❏
FINE—Lights when you set the MultiPASS 1000 to increase the
clarity of the documents you send.
❏
STANDARD—Lights when you set the MultiPASS 1000 to send
normal, typewritten, or word processed documents.
ANS HOOK UP/MANUAL button
Use this button to set the MultiPASS 1000 to receive documents
automatically or manually. The lights above the button indicate the
setting:
❏
ANS HOOK UP—Lights when you set the MultiPASS 1000 to
perform answering machine operations.
❏
MANUAL—Lights when you set the MultiPASS 1000 to receive
documents manually.
❏
When the ANS HOOK UP and MANUAL lights are off, the
MultiPASS 1000 is set to receive documents automatically.
2-12 Getting Started
Chapter 2
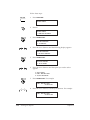
One-touch Speed Dialing Keypad
01
DELA YED
DELA YED
TRANSMISSION
02
CONFID.
POLLING
POLLING
03
04
RELA Y
TRANSMISSION
BROADCAST
05
06
07
REPOR T
08
HELP
10
11
12
15
16
FILE
+
09
PRINT
SP ACE
13
CLEAR
14
Use these buttons for one-touch speed dialing and to perform
special operations. The following buttons perform special
operations when used in conjunction with the FUNCTION button:
❏
MEMORY TRANSMISSION—Press to send documents from
memory.
❏
DELAYED TRANSMISSION—Press to send documents at a
preset time.
❏
DELAYED POLLING—Press to request other fax machines to
send documents at a preset time.
❏
POLLING—Press to request other fax machines to send
documents.
❏
CONFID. TRANSMISSION—Press to send confidential
documents to another Canon fax machine.
❏
RELAY BROADCAST—Press to send documents to more than
one location through a Canon relay fax machine.
❏
REPORT—Press to print reports.
❏
HELP—Press to print out an instruction sheet for basic fax
operations.
❏
+ —Press to insert the plus symbol (+) when registering
information.
❏
FILE PRINT—Press to print documents that are stored in
memory for uploading to your computer. (Once you print the
file, it is erased from memory and cannot be uploaded to your
computer.)
Chapter 2
❏
SPACE—Press to enter a space when registering information.
❏
CLEAR—Press to clear entries when registering information.
Getting Started
2-13
Getting Started
MEMOR Y
TRANSMISSION
Fax/Telephone Operation Buttons
CODED DIAL
/DIRECTORY
TONE
ON HOOK
<
>
STOP
START / COPY
PAUSE
HOLD
REDIAL
Use these buttons for fax and telephone operations:
CODED DIAL/ DIRECTORY—This button has two functions:
<
>
❏
Press this button once (followed by a two-digit code) to dial a
fax/telephone number registered for coded speed dialing.
❏
Press this button twice to search for fax/telephone numbers by
the name under which they are registered.
Arrow buttons—Use these buttons for the following operations:
❏
Press these buttons to search for items in menus and lists that
appear in the LCD display.
❏
Press these buttons to move the cursor when entering
information.
TONE—Press to temporarily set the MultiPASS 1000 to send tone
signals when using pulse dialing.
PAUSE—Press to enter a pause in a fax/telephone number when
registering or dialing.
ON HOOK—Press to engage or disengage the telephone line
(hands-free dial).
STOP—Press to stop an operation.
START/COPY—Press to start an operation or select a setting.
HOLD—Press to place a telephone call on hold.
REDIAL—Press to redial the last fax or telephone number you
dialed manually using the numeric keypad.
2-14 Getting Started
Chapter 2
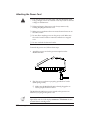
Setting Up the MultiPASS 1000
Place the main unit of the MultiPASS 1000 on a level surface with
plenty of room to work.
Chapter 2
1.
Locate the handset, handset cradle, and two screws shipped
with the MultiPASS 1000.
2.
Align the handset rest with the two screw openings on the left
side of the fax.
3.
Attach one screw and then the other. Twist the screws
clockwise to tighten them.
Getting Started
2-15
Getting Started
Attaching the Handset
4.
Set the handset in the handset cradle.
5.
Connect the handset to the handset jack marked
.
Installing the Paper Cassette
Before you install the paper cassette, you’ll want to load it with a
stack of paper. For the best quality printing, use white copier paper
or 20 lb cotton bond paper. (Do not use glossy paper.)
You can load up to 200 sheets of paper in the cassette. Make sure
the paper is not curled, torn, or wrinkled.
Follow these steps:
1.
Locate the paper cassette shipped with the MultiPASS 1000.
2.
Before removing the paper from its wrapping, check the label
for installation instructions.
3.
Fan the stack of paper.
2-16 Getting Started
Chapter 2
Open the cover on the paper cassette.
5.
Make sure the cover is open all the way.
Getting Started
4.
❏ This lowers the metal paper rest on the bottom of the paper
cassette.
Chapter 2
Getting Started
2-17
6. Insert the stack of paper into the paper cassette with the
printable surface face up.
7.
Make sure the paper goes all the way in.
❏ Press down on the four corners of the stack of paper to
make sure it is flat in the cassette.
8.
Close the cover on the paper cassette.
❏ Check that the corners of the stack are completely beneath
the retaining tabs at the back of the cassette.
2-18 Getting Started
Chapter 2
9.
Check the MultiPASS 1000 making sure the slot for the paper
cassette is clear.
❏
Make sure the area is free of any jammed paper.
10. Align the paper cassette with the slot on the bottom of the
MultiPASS 1000 and slowly press it all the way into the slot.
Getting Started
❏ Always grip the paper cassette by its handle.
❏ The paper cassette clicks into place.
❏ Make sure the paper cassette is securely in place.
❏
The top sheet feeds about 1/4 inch.
HANDLE
N
Chapter 2
To remove the paper cassette, grip the handle (in the center of the
cassette). Gently, but firmly, lift the cassette until it clicks, and then
slide it out.
Getting Started
2-19
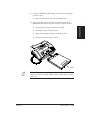
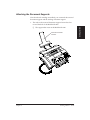
Connecting the Telephone Line
1.
Connect the telephone line to the line jack L .
L
2.
Connect the other end of the line to your telephone jack.
Attaching the Parallel Cable
Your MultiPASS 1000 has an 8-bit, bi-directional, parallel interface
port, which allows you to use it with IBM PCs and compatible
computers. You need to purchase a Centronics-compatible, parallel
interface cable from your dealer. Ask your dealer for assistance if
you need help selecting the right cable.
N
For reliable data communications between your computer and the
MultiPASS 1000, it is recommended that you use a short cable, 6.6
feet or less in length.
2-20 Getting Started
Chapter 2
1.
Make sure the computer is turned off.
2.
Connect the parallel cable.
❏ Align the cable connector with the interface port so the
shapes match.
❏ Gently press the cable connector into the port.
❏ Secure the cable connector by snapping the two wire clips
(located on the sides of the port) into the cable connector.
L
3.
Chapter 2
Connect the other end of the interface cable to the parallel
interface port on your computer.
Getting Started
2-21
Getting Started
To connect the MultiPASS 1000 to the host computer, follow these
steps:
Attaching the Power Cord
C
❏ Use only the power cord that came with the MultiPASS 1000.
Using a longer cord or an extension cord may result in reduced
voltage or malfunctions.
❏ When unplugging the power cord, always remove it by
holding the plug and not the cord.
❏ Make sure no appliances that can cause electrical noise are on
the same outlet.
❏ Do not allow anything to rest on the power cord. Make sure
the cord is located where it cannot be walked on or tripped
over.
❏ Do not overload the electrical outlet.
To attach the power cord, follow these steps:
1.
Attach the power cord to the power receptacle on the
MultiPASS 1000.
2.
Plug the power cord into a properly grounded AC outlet
(three-prong outlet).
❏ Make sure the MultiPASS 1000 is firmly plugged in to
assure proper electrical contact.
The MultiPASS 1000 has no power switch so the power is on
whenever you plug in the power cord.
N
Because you have not installed the ink cartridge yet, the ALARM
light blinks and the LCD displays REINSTALL CARTRIDGE. Be sure
to install the ink cartridge next.
2-22 Getting Started
Chapter 2
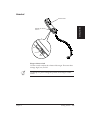
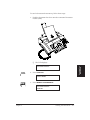
Installing the Ink Cartridge
The MultiPASS 1000 comes with one Canon BX-2 ink cartridge.
You can use the BX-2 ink cartridge or a Canon BC-02 ink cartridge
with your MultiPASS 1000.
1.
Make sure the MultiPASS 1000 is plugged in.
❏ The date and time appear in the LCD display. Don’t worry
if the date and time are not correct; you will set them later.
06/07/95
2.
12:50
Open the printer cover.
❏
Lift from both sides.
❏ The cartridge holder may move to the left side of the
MultiPASS 1000 or it may be there already. (Wait for it to
stop moving.)
Chapter 2
Getting Started
2-23
Getting Started
To install the ink cartridge, follow these steps:
3.
Pull the green lever on the cartridge holder forward towards
the front of the unit (to the open position).
4.
Take the ink cartridge out of its box and remove the protective
packaging from the cartridge.
❏ Lift off the orange cap from the print head and remove the
orange tape.
PRINT HEAD
CAP
PRINT HEAD
(DO NOT TOUCH)
PROTECTIVE TAPE
5.
Set the ink cartridge straight down onto the cartridge holder.
❏ Center the cartridge slot over the yellow post and place the
cartridge gently on the post. (The cartridge will not be
aligned yet.)
CARTRIDGE SLOT
YELLOW
POST
2-24 Getting Started
Chapter 2
6.
Push the green lever up and back until it locks the ink
cartridge into place.
❏ The ink cartridge will align automatically as you press the
lever back.
Getting Started
❏ Make sure the ink cartridge is secure.
7.
C
N
Chapter 2
Close the printer cover.
Do not move the ink cartridge holder. Attempting to do so may
damage the print mechanism.
If the ALARM light is still flashing, press the STOP button.
Getting Started
2-25
Cleaning the print head
You must clean the print head on a new BX-2 or BC-02 ink
cartridge to ensure the best possible print quality.
1.
ON LINE
2.
Turn on the printer.
❏
Press the PRINTER button.
❏
Make sure the printer light comes on.
Make sure the printer is on-line.
❏
3.
The ON LINE light will be on.
Open the printer panel cover.
PRINTER PANEL COVER
4.
Press and hold the ON LINE and PRINT MODE buttons (together)
until the ON LINE light starts to blink.
❏
The ON LINE light blinks for about 12 seconds while the
MultiPASS 1000 cleans the print head.
PRESS HERE
FOR CLEANING
SHQ
ON LINE
LF/FF
HS
HQ
PRINT MODE
5.
2-26 Getting Started
After cleaning, press the PRINTER button to turn off the
printer.
Chapter 2
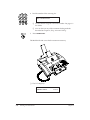
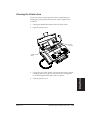
Attaching the Document Supports
Now that the ink cartridge is installed, you can attach the received
document support and the sending document support.
The tabs on the received document support fit into the slots
toward the back of the MultiPASS 1000.
❏
Getting Started
1.
The support then rests on the MultiPASS 1000.
RECEIVED DOCUMENT
SUPPORT
Chapter 2
Getting Started
2-27
2.
The tab on the sending document support fits into the slot
above the Automatic Document Feeder (ADF) on the
MultiPASS 1000.
❏
The support then rests on the MultiPASS 1000.
SENDING DOCUMENT
SUPPORT
2-28 Getting Started
Chapter 2
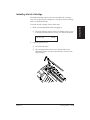
Attaching the One-touch Speed Dialing Faceplate
Attach the faceplate for the one-touch speed dialing keypad over
the dialing buttons.
Getting Started
❏ It fits only one way—the tabs on the faceplate fit into slots on
the MultiPASS 1000.
Be sure to put the faceplate for the one-touch speed dialing keypad
on the MultiPASS 1000; it identifies the buttons you use for various
operations as well as the numbers you assign for one-touch speed
dialing.
Chapter 2
Getting Started
2-29
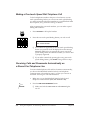
Testing the MultiPASS 1000
Now that the MultiPASS 1000 is set up, you’ll want to test it by
printing a help list.
Printing the Help List
The fastest way to test the MultiPASS 1000 is to print a help list
that is built into the system. The help list describes basic operating
instructions.
1.
Press the FUNCTION button. The LCD displays:
SELECT MENU
2.
Press HELP on the one-touch speed dialing keypad. The LCD
displays:
PRINTING
The MultiPASS 1000 prints out the help list.
If the help list does not print for any reason, see Chapter 14,
Troubleshooting.
2-30 Getting Started
Chapter 2
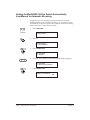
Chapter 3
Registering Information in
the MultiPASS 1000
❏
Registering guidelines
• Using the menu system
• Entering numbers
• Entering names during registration
❏
Personalizing your MultiPASS 1000
• Identifying your documents
• Setting the date and time
• Registering your fax number
• Registering your name
❏
Customizing the MultiPASS 1000
• Customizing your ID
• Customizing the LCD display
• Customizing MultiPASS 1000 sounds
Registering
Information
This chapter describes how to register information in your
MultiPASS 1000. It includes:
Guidelines for Registering Information
When you are registering information in your MultiPASS 1000,
follow these guidelines:
❏
If you pause and do not make an entry for more than 60
seconds, the MultiPASS 1000 returns to standby mode. You
must start the procedure over from the beginning.
❏
If you make a mistake while entering registration information,
you can press STOP and start the procedure over from the
beginning, or you can press CLEAR (on the one-touch speed
dialing keypad) and re-enter the current information.
❏
If the MultiPASS 1000 rings while you are entering registration
information, press STOP and lift the handset.
• If you hear nothing or a slow beep, someone is trying to
send a fax; press START/COPY.
•
If it is a phone call, you can converse normally.
After the call, start the registration procedure again from the
beginning.
Chapter 3
Registering Information in the MultiPASS 1000
3-1
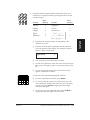
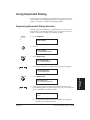
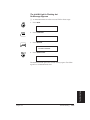
Using the Menu System
The MultiPASS 1000 includes a menu system that you use to
register information and select fax, telephone, and printer
operations. The main menu includes these items:
1.TEL REGISTRATION
2.USER SETTINGS
3.REPORT SETTINGS
4.TX SETTINGS
5.RX SETTINGS
6.PRINTER SETTINGS
7.BJ PRINT SETTINGS
8.SYSTEM SETTINGS
For a complete description of the menu structure, see Appendix B,
Menu System Summary.
In general, you follow these steps to access the menus and make
selections:
1.
Press FUNCTION. The LCD displays:
SELECT MENU
2.
Press the number of the menu you wish to access. The LCD
displays the menu title. For example:
SELECT MENU
2.USER SETTINGS
3.
Press START/COPY. The LCD displays the first selection for the
selected menu.
USER SETTINGS
1.SET TIME
4.
You can now make a selection in one of two ways:
❏
Press the arrow buttons to view the possible selections.
❏
Enter data using the numeric keypad.
5.
After selecting or entering a value, press START/COPY.
6.
Repeat steps 4 and 5 as needed.
3-2 Registering Information in the MultiPASS 1000
Chapter 3
7.
When the operation is complete, press STOP.
❏
Registration ends and the fax returns to standby mode.
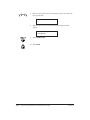
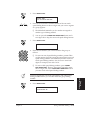
Entering a Number
Whenever you are prompted to enter a fax number or a telephone
number, follow these procedures.
Use the numeric keypad to enter the number.
❏
You can enter up to 20 digits for a fax number, 32 digits for a
speed dialing number, or 118 digits for an expanded dialing
number.
❏ Be sure to enter 1 and the area code, if necessary, to dial a
different area code.
MEMOR Y
TRANSMISSION
01
DELA YED
02
CONFID.
BROADCAST
05
06
REPOR T
07
HELP
08
PRINT
10
SP ACE
13
❏
To enter a space between numbers, press SPACE.
FILE
+
09
If you need to enter a pause for any reason, see Using the
PAUSE button in Chapter 9.
04
RELA Y
TRANSMISSION
❏
POLLING
POLLING
03
Do not enter dashes, slashes, commas, or other punctuations.
Use the one-touch speed dialing keypad as follows:
DELA YED
TRANSMISSION
❏
11
12
15
16
CLEAR
14
❏ If you make a mistake, press CLEAR and enter the number
again.
❏ To erase a previously registered number, press CLEAR. You
can also enter a new number over the old one.
Chapter 3
Registering Information in the MultiPASS 1000
3-3
Registering
Information
TEL=
Entering a Name
Whenever you register a fax number or a telephone number, you
can assign a name to that number. To enter a name from the
operation panel, you use the numeric keypad to create
alphanumeric characters.
When entering a name, you will normally see a prompt similar to
this:
USER NAME
:A
❏ The :A prompt indicates that you are to enter letters and
symbols.
❏ To enter a digit in the name, press the * (asterisk) button on the
numeric keypad. This brings up the :1 prompt:
USER NAME
:1
❏ The :1 prompt indicates that you are to enter a digit.
❏ Press * on the numeric keypad to switch between entering
letters and digits.
3-4 Registering Information in the MultiPASS 1000
Chapter 3
To enter the identifying name, you use the numeric keypad:
❏ Use the chart below to determine which number to press for
each character:
Press
this key
Press
this key
To enter
ABCabc
2
PQRSpqrs
7
DEFdef
3
TUVtuv
8
GHIghi
4
WXYZwxyz
9
JKLjkl
5
-.*#!”,;:^`
MNOmno
6
_=/|’?$@%
&+()[]{}<>
}
#
❏ First press the numeric button corresponding to the character
you want.
❏ Press the numeric button repeatedly until the character you
want appears in the display. For example, to enter a capital C,
press 2 three times:
USER NAME
C
❏
:A
You can enter up to 16 characters in a name.
❏ Use the arrow buttons to move the cursor. Press > to move the
cursor to the right, or press < to move the cursor to the left.
❏ To enter a digit in the name, press the * button. Press * again to
switch back to letters.
MEMOR Y
TRANSMISSION
01
DELA YED
DELA YED
TRANSMISSION
02
CONFID.
POLLING
POLLING
03
04
RELA Y
TRANSMISSION
BROADCAST
05
06
07
08
REPOR T
HELP
10
11
12
15
16
FILE
+
09
PRINT
SP ACE
13
While entering a name, you can use the one-touch speed dialing
keypad as follows:
CLEAR
14
❏
To enter a space between names, press SPACE.
❏ To correct a mistake, use the arrow buttons to move the cursor
under the mistake; then enter the correct character. You can
also press CLEAR to begin again; then simply enter the name
again.
❏ To erase a previously registered name, press CLEAR or simply
enter the new name over the old one.
Chapter 3
Registering Information in the MultiPASS 1000
3-5
Registering
Information
To enter
Personalizing Your MultiPASS 1000
Identifying Your Documents
When sending a document, you can have your fax number and
your name (known as your ID), and the current date and time
printed out by the receiving fax. This information is called your
TTI (Transmit Terminal Identification) and appears at the top of
the faxed document in small type.
N
In the United States, you are required to include this information
every time you send a fax. So be sure to enter your TTI information
in your MultiPASS 1000 now.
By identifying the documents you send, the receiving party will
recognize your fax messages at a glance. The illustration below
shows a sample document with the identifying information:
THE DATE AND TIME YOU
SENT THE DOCUMENT
06/10/95
18:00
321-456-7777
CANON U.S.A.
WESTERN REGION
001-/001
CANON U.S.A., INC.
ONE CANON PLAZA
LAKE SUCCESS, N.Y. 11042-1113
Telephone: (516) 488-6700
General Fax Telephone
YOUR FAX/TELEPHONE
NUMBER
(516) 328-5069
Spring 1995
YOUR NAME OR COMPANY
NAME
Dear Canon Customer:
THE NAME OF THE PARTY
WHO IS RECEIVING THE
DOCUMENT
THE PAGE NUMBER/
NUMBER OF PAGES SENT
Thank you for purchasing the new Canon MultiPASS 1000 Document Processing
System. We are sure your new system will help you work more efficiently and
expand your work capacity.
The new MultiPASS 1000 is a complete 6-in-1 desktop system for your home or
small office. Your new system provides the following functions:
❏
❏
❏
Plain paper fax
PC fax
Printer
❏
❏
❏
Scanner
Copier
Telephone
Your MultiPASS 1000 includes the MultiPASS Desktop Manager for Windows.
This exclusive Canon software package manages the printing, scanning, and
faxing activities of your MultiPASS 1000 on your computer in a single
management application.
As a scanner, the MultiPASS 1000 supports the Twain Scanning Standard, which
allows you to scan images from any graphics or OCR applications program that
supports the TWAIN standard.
Once again, we thank you and hope you enjoy your new MultiPASS 1000.
Sincerely,
Canon U.S.A.
The top line includes the name of the receiving party if you send
the document using one-touch speed dialing, coded speed dialing,
group dialing, or directory dialing and you registered the party’s
name. It also includes a page number if you send the document
from memory.
3-6 Registering Information in the MultiPASS 1000
Chapter 3
Setting the Date and Time
Follow the steps below to set the date and time for your MultiPASS
1000. The date and time appear in the LCD display as well as on
the documents you send.
1.
Press FUNCTION.
SELECT MENU
2.
Press 2.
3.
Registering
Information
SELECT MENU
2.USER SETTINGS
Press START/COPY.
USER SETTINGS
1.SET TIME
4.
Press START/COPY.
SET TIME
* 06/07/95 12:50
5.
Use the numeric keypad to enter the date and time.
SET TIME
* 06/06/95 15:30
❏
Enter the month, day, and year in mm/dd/yy format.
❏ Set the time using the 24-hour clock system. Precede single
digits with a zero. Example:
07:30 = 7:30 a.m.
17:05 = 5:05 p.m.
❏ If there is a previously registered date and time, you can
enter the new setting over the old one.
❏ If you make a mistake or you want to change an existing
date setting, press CLEAR (on the one-touch speed dialing
keypad). Then enter the date.
Chapter 3
Registering Information in the MultiPASS 1000
3-7
6.
Press START/COPY.
7.
Press STOP.
Registering Your Fax Number
Follow the steps below so that your fax number appears on the top
of each document you send.
1.
Press FUNCTION.
SELECT MENU
2.
Press 2.
SELECT MENU
2.USER SETTINGS
3.
Press START/COPY.
USER SETTINGS
1.SET TIME
<
>
4.
Press the arrow buttons until the following appears:
USER SETTINGS
2.ENTER YOUR TEL
5.
Press START/COPY.
ENTER YOUR TEL
TEL=
3-8 Registering Information in the MultiPASS 1000
Chapter 3
6.
Use the numeric keypad to enter your fax number.
ENTER YOUR TEL
TEL = 19876543211
❏
You can enter up to 20 digits.
❏ Do not enter dashes, slashes, commas, or other
punctuation.
01
DELA YED
02
CONFID.
Use the one-touch speed dialing keypad as follows:
DELA YED
TRANSMISSION
POLLING
POLLING
03
04
BROADCAST
05
06
REPOR T
07
HELP
08
PRINT
10
SP ACE
13
To enter a space between numbers, press SPACE.
FILE
+
09
❏
RELA Y
TRANSMISSION
11
12
15
16
❏ If you make a mistake, press CLEAR. Then enter the
number again.
CLEAR
14
❏ To erase a previously registered number, press CLEAR or
simply enter the new number over the old one.
❏ If you want a plus sign (+) to appear in the number when
using a country code, press + on the one-touch speed
dialing keypad when entering the fax number.
Chapter 3
7.
Press START/COPY.
8.
Press STOP.
Registering Information in the MultiPASS 1000
3-9
Registering
Information
MEMOR Y
TRANSMISSION
Registering Your Name
Follow the steps below so that your name and/or company name
appears on the top of each document you send.
1.
Press FUNCTION.
SELECT MENU
2.
Press 2.
SELECT MENU
2.USER SETTINGS
3.
Press START/COPY.
USER SETTINGS
1.SET TIME
<
>
4.
Press the arrow buttons until the following appears:
USER SETTINGS
3.USER NAME
5.
Press START/COPY.
USER NAME
_
:A
❏ The :A prompt indicates that you are to enter letters and
symbols.
❏ The :1 prompt indicates that you are to enter a digit.
❏ Press the * (asterisk) button on the numeric keypad to
switch between entering letters and digits.
3-10 Registering Information in the MultiPASS 1000
Chapter 3
Using the numeric keypad and the chart below, enter your
name and/or company name by pressing the buttons on the
numeric keypad.
To enter
Press
this key
Press
this key
ABCabc
2
PQRSpqrs
7
DEFdef
3
TUVtuv
8
GHIghi
4
WXYZwxyz
9
JKLjkl
5
-.*#!”,;:^`
MNOmno
6
_=/|’?$@%
To enter
&+()[]{}<>
}
#
❏ First press the numeric button corresponding to the
character you want.
❏ Press the numeric button repeatedly until the character
you want appears in the display. For example, to enter a
capital C, press 2 three times:
USER NAME
C
❏
:A
You can enter up to 16 characters in a name.
❏ Use the arrow buttons to move the cursor. Press > to move
the cursor to the right, or press < to move the cursor to the
left.
❏ To enter a digit in the name, press the * button. Press *
again to switch back to letters.
MEMOR Y
TRANSMISSION
01
DELA YED
02
CONFID.
Use the one-touch speed dialing keypad as follows:
DELA YED
TRANSMISSION
POLLING
POLLING
03
04
RELA Y
TRANSMISSION
BROADCAST
05
06
REPOR T
07
HELP
08
09
PRINT
10
SP ACE
13
❏
To enter a space between names, press SPACE.
FILE
+
11
12
15
16
CLEAR
14
❏ To correct a mistake, use the arrow buttons to move the
cursor under the mistake; then enter the correct character.
You can also press CLEAR to begin again; then simply
enter the name again.
❏ To erase a previously registered name, press CLEAR or
simply enter the new name over the old one.
Chapter 3
Registering Information in the MultiPASS 1000
3-11
Registering
Information
6.
<
>
7.
Press > to move the cursor to the right, or press < to move the
cursor to the left.
USER NAME
C_
8.
Repeat steps 6 and 7 until the entire name appears in the
display:
USER NAME
CANON USA
9.
:A
:A
Press START/COPY.
10. Press STOP.
3-12 Registering Information in the MultiPASS 1000
Chapter 3
Customizing the MultiPASS 1000 Operations
The following sections describe features of your MultiPASS 1000
that you can change to meet your individual needs.
Customizing Your ID
You can customize your ID (also known as TTI for Transmit
Terminal Identifier) using the following USER SETTINGS:
❏
TX TERMINAL ID
❏
TTI POSITION
You can specify the position where the ID (or TTI) appears on
your document. It can appear just above the document area or
inside the document area. In either case, it appears at the top of
the document.
The OUTSIDE IMAGE setting places the ID outside the actual
document area, just above the document.
The INSIDE IMAGE setting places the ID inside the document
area at the very top.
❏
TTI MARKER
You can include the word FAX or the symbol ( in your ID.
The FAX setting inserts the word FAX into the ID.
The TEL setting inserts the ( symbol into the ID.
Follow these steps:
1.
Press FUNCTION.
SELECT MENU
2.
Press 2.
SELECT MENU
2.USER SETTINGS
Chapter 3
Registering Information in the MultiPASS 1000
3-13
Registering
Information
You can specify whether or not to print the ID (or TTI). In the
United States, you must print this information, so always set
this option to ON.
3.
Press START/COPY.
USER SETTINGS
1.SET TIME
<
>
4.
Press the arrow buttons until the following appears:
USER SETTINGS
4.TTI OPTION SET
5.
Press START/COPY.
TTI OPTION SET
1.TX TERMINAL ID
<
>
6.
Press the arrow buttons to display the item you want to
change.
TX TERMINAL ID
TTI POSITION
TTI MARKER
7.
Press START/COPY. The LCD displays the setting for the
option you select. For example:
TX TERMINAL ID
ON
<
>
8.
Press the arrow buttons to display the selection you want to
make.
TX TERMINAL ID
– ON
– OFF
TTI POSITION
– OUTSIDE IMAGE
– INSIDE IMAGE
TTI MARKER
– FAX
– TEL
3-14 Registering Information in the MultiPASS 1000
Chapter 3
9.
Press START/COPY.
TX TERMINAL ID
DATA ENTRY OK
10. If you want to change other settings, start again from step 6.
Otherwise press STOP.
Customizing the LCD Display
❏
Format the date shown on the display
❏
Choose the language of the display and reports
❏
Set the display brightness
Registering
Information
Use the following procedure to:
The following items are found in the SYSTEM SETTINGS menu:
❏
DATE SETUP
Choose one of three formats: USA, European, Japanese
MM/DD/YY:
USA
DD/MM ‘YY:
European
‘YY MM/DD:
Japanese
❏
DISPLAY LANGUAGE
Choose one of three: ENGLISH, FRENCH, SPANISH
❏
LCD BRIGHTNESS
Changes the brightness of the display
STANDING UP: Set for viewing the display from a standing
position.
SITTING DOWN: Set for viewing the display from a sitting
position.
Follow these steps to change the LCD display:
1.
Press FUNCTION.
SELECT MENU
2.
Press 8.
SELECT MENU
8.SYSTEM SETTINGS
Chapter 3
Registering Information in the MultiPASS 1000
3-15
3.
Press START/COPY.
SYSTEM SETTINGS
1.RX RESTRICTION
<
>
4.
Press the arrow buttons to display the item you want to
change. For example:
SYSTEM SETTINGS
7.LCD BRIGHTNESS
5.
Press START/COPY.
LCD BRIGHTNESS
SITTING DOWN
<
>
6.
Press the arrow buttons to select a setting. For example:
LCD BRIGHTNESS
STANDING UP
7.
Press START/COPY.
LCD BRIGHTNESS
DATA ENTRY OK
8.
If you want to change other settings, start again from step 4.
Otherwise press STOP.
Customizing MultiPASS 1000 Sounds
You can vary the different sounds and sound levels used by the
MultiPASS 1000 by:
❏
Changing the volume of MultiPASS 1000 sounds
❏
Changing the tone of the ringer
❏
Turning the MultiPASS 1000 dialing sound on or off
❏
Turning the off hook alarm on and off (The off hook alarm
sounds when the handset is not properly placed in its cradle.)
❏
Turning the hold melody on and off
3-16 Registering Information in the MultiPASS 1000
Chapter 3
You’ll find the following items in the USER SETTINGS menu:
❏
OFF HOOK ALARM
Turns the off hook alarm on and off
OFF
ON
❏
HOLD MELODY
Turns the hold melody on and off
OFF
ON
❏
VOLUME CONTROL
Changes the volume of the MultiPASS 1000 ring (separate
from the volume of the handset), alarm sound, and keypad
touch sound
Registering
Information
CALLING VOLUME
ALARM VOLUME
KEYPAD VOLUME
You can set the volume as follows:
VOL MID: Medium volume
VOL MAX: Maximum volume
VOL MIN: Minimum volume
❏
RX CALL LEVEL
Changes the tone of the MultiPASS 1000 ring
LOW
HIGH
❏
DIALING TONE
Turns the sound the MultiPASS 1000 makes when dialing on
or off
OFF
ON
Follow these steps to change any of the sounds made by the
MultiPASS 1000:
1.
Press FUNCTION.
SELECT MENU
2.
Press 2.
SELECT MENU
2.USER SETTINGS
Chapter 3
Registering Information in the MultiPASS 1000
3-17
3.
Press START/COPY.
USER SETTINGS
1.SET TIME
<
>
4.
Press the arrow buttons to display the item you want to
change. For example:
USER SETTINGS
8.HOLD MELODY
5.
Press START/COPY. The LCD displays the setting for the
option you select; for example:
HOLD MELODY
OFF
<
>
6.
Press the arrow buttons to select a setting. For example:
HOLD MELODY
ON
7.
Press START/COPY.
HOLD MELODY
DATA ENTRY OK
<
>
8.
If you are changing one of the VOLUME CONTROL options,
press the arrow buttons until one of the following appears:
VOL MID: Medium volume
VOL MAX: Maximum volume
VOL MIN: Minimum volume
❏
9.
After making your selection, press START/COPY.
If you want to change other items, start again from step 4.
Otherwise press STOP.
3-18 Registering Information in the MultiPASS 1000
Chapter 3
Chapter 4
Preparing Documents and
Making Copies
This chapter explains how to prepare your documents and then
feed them into the MultiPASS 1000. It also describes how to make
copies.
It includes:
❏
Preparing documents
❏
Feeding documents
•
Making copies
•
❏
Receiving while making a copy
Adjusting the paper cassette for legal-size paper
Preparing
Documents
❏
Adding pages while sending
Preparing Documents
Follow these guidelines to prepare your documents:
Chapter 4
❏
Remove clips, staples, or other similar objects from documents
before feeding them into the MultiPASS 1000.
❏
Let ink, paste, or correction fluid on documents dry completely
before feeding the document into the MultiPASS 1000.
❏
Do not feed documents with pages that are of different sizes or
of different thicknesses.
Preparing Documents and Making Copies
4-1
❏
Do not attempt to feed the following types of documents into
the MultiPASS 1000:
Wrinkled or creased paper
Curled or rolled paper
Torn paper
Carbon paper or carbon-backed paper
Coated paper
Glossy pictures
Onion-skin or thin paper
Envelopes
These types of paper may cause jams.
You can automatically feed paper that is between 0.002 and 0.005
inches (0.06 and 0.13 mm) thick.
See Appendix A, Specifications, for the document sizes supported
by the MultiPASS 1000.
N
Make a photocopy of any document that will not feed into the
MultiPASS 1000; you can then feed the copy.
4-2 Preparing Documents and Making Copies
Chapter 4
Feeding Documents
You can stack up to 30 sheets of paper in the Automatic Document
Feeder (ADF).
You can specify the resolution of the document you are sending
using the DOCUMENT (resolution) button, as follows:
❏
TYPE OF DOCUMENT
Use this setting for special documents, such as photographs or
blue prints. See Chapter 5, Sending Fax Documents, for details.
❏
FINE
Use this setting for documents that contain very small
characters or lines, such as maps or diagrams.
❏
STANDARD
Use this setting for normal typewritten, word-processed, or
printed documents.
1.
Press the DOCUMENT (resolution) button for the kind of
document you are sending. The lights show the setting.
❏ If you are sending a special document, such as
photographs or blueprints, see Chapter 5, Sending Fax
Documents, for details on how to select a special document
type.
2.
Chapter 4
Adjust the paper guides for the width of the document.
Preparing Documents and Making Copies
4-3
Preparing
Documents
Follow these steps to feed a document into the MultiPASS 1000:
3.
Insert the document face-down into the Automatic Document
Feeder (ADF) until you hear a beep.
❏ Insert the top of the page first (for example, your
letterhead).
❏ You can stack up to 30 sheets of letter-size paper at one
time.
<
>
4.
Press the arrow buttons to change the density setting for the
document you are sending.
❏ Choose from 1 (darkest) to 7 (lightest); the standard setting
of 4 is for a normal typewritten or word-processed
document.
❏ The default setting is 4; to change the default, see
Chapter 5, Sending Fax Documents.
The MultiPASS 1000 automatically feeds the pages one by one
from the bottom.
If a page jams or stops while feeding, see Chapter 14,
Troubleshooting.
4-4 Preparing Documents and Making Copies
Chapter 4
Adding Pages While Sending
If you want to add pages while the MultiPASS 1000 is sending a
document, insert the first new page so it overlaps the last page by
about 3/4 inch (2 cm).
Preparing
Documents
Wait until the last page is being fed into the MultiPASS 1000 before
you add new pages.
Chapter 4
Preparing Documents and Making Copies
4-5
Making Copies
One of the great features of your MultiPASS 1000 is its ability to
make high quality copies. You can make up to 99 copies of one
document at a time.
N
❏
You cannot copy if the handset is off the hook.
❏ Any dust or foreign matter on the document scanning glass
will lower the quality of the image. Always keep the glass
clean. For details on cleaning the document scanning glass, see
Chapter 13, Maintaining the MultiPASS 1000.
Follow these steps to make a copy:
1.
Set the document face-down in the Automatic Document
Feeder (ADF).
❏ The LCD displays:
DOCUMENT READY
4-6 Preparing Documents and Making Copies
Chapter 4
2.
Press START/COPY.
❏ When you press START/COPY without entering a phone
number, the LCD displays:
COPY
COPY PAGE
N
01
To make a single copy, press START/COPY once more.
3.
To make multiple copies, use the numeric keypad to enter the
number of copies.
❏ The MultiPASS 1000 can make up to 99 copies at one time.
If you make a mistake when entering the number, press
CLEAR on the one-touch speed dialing keypad; then enter
the number again.
4.
37
Press START/COPY.
❏ The LCD displays the number of the copy. It starts with the
total number of copies and decreases the number for each
copy.
COPY
COPY PAGE
37
P.037
If you want to stop copying, press STOP.
Chapter 4
Preparing Documents and Making Copies
4-7
Preparing
Documents
COPY
COPY PAGE
Receiving a Fax While Making a Copy
If someone tries to send you a document while the MultiPASS 1000
is copying, follow these steps to receive the document:
1.
Press STOP.
❏ Wait for the print head to stop moving (if necessary).
2.
Gently open the operation panel.
❏ Do not force it; it opens only slightly.
3.
Remove the document you were copying.
4.
Close the operation panel.
❏ Press gently until it clicks into place.
5.
Press the ANS HOOK UP/MANUAL button.
❏ The MANUAL light comes on to show you that the
MultiPASS 1000 is set for manual receiving.
6.
Now lift up the handset and press START/COPY to receive the
incoming document.
After receiving the fax, you can start the copying procedure over
again.
See Chapter 7, Receiving Fax Documents, for more details on
receiving documents manually.
4-8 Preparing Documents and Making Copies
Chapter 4
Adjusting the Paper Cassette
for Legal-size Paper
Chapter 4
1.
Remove the paper cassette from the MultiPASS 1000.
2.
Open the cover on the paper cassette and remove any paper
from the cassette.
3.
Loosen the two screws on the bottom of the paper cassette by
turning them counterclockwise. (The screws come all the way out.)
Preparing Documents and Making Copies
4-9
Preparing
Documents
The paper cassette that comes with the MultiPASS 1000 supports
both letter-size and legal-size paper. To load legal-size paper in the
paper cassette, follow these steps:
4.
Grip the handle on the front of the cassette and pull out the
cassette’s extension.
5.
Align the second set of holes on the cassette’s extension with the
holes in the bottom of the cassette and insert the two screws.
❏ Secure the screws by turning them clockwise.
4-10 Preparing Documents and Making Copies
Chapter 4
6.
Remove the cover from the paper cassette.
7.
Chapter 4
Preparing
Documents
❏ Grip the sides of the cover near the paper cassette and
gently press in on the plastic.
Lift the cover off the paper cassette.
Preparing Documents and Making Copies
4-11
8.
Align the tabs on the side of the cover with the slots on the side
of the paper cassette (closer to the front of the cassette).
❏ Again, press in slightly on the plastic to fit the tabs into the
slots on the paper cassette.
9.
Close the cover.
You can now use the paper cassette to load legal-size paper.
When you want to use letter-size paper, follow the same steps.
Return the extension to the letter-size position and replace the
cover in the back slots.
4-12 Preparing Documents and Making Copies
Chapter 4
Chapter 5
Sending Fax Documents
This chapter explains how to send fax documents with your
MultiPASS 1000. It includes:
❏
Sending a document using regular dialing
❏
Sending a document directly
❏
Sending a document from memory
❏
Sending procedures
❏
❏
Chapter 5
Sending large documents
•
Customizing the transmission mode
•
Transmitting the document
Selecting document settings
•
Type of document
•
Density control
Setting up special transmission procedures
•
ECM sending
•
Auto redial
Sending Fax
Documents
❏
•
Customizing the transmission speed
Sending Fax Documents
5-1
Sending a Document Using Regular Dialing
You can use regular dialing to enter a fax number that you have
not registered for one of the automatic dialing methods.
1.
Feed the document face-down into the Automatic Document
Feeder (ADF).
❏ The LCD displays the density control box for a few seconds:
5-2 Sending Fax Documents
Chapter 5
<
>
2.
Press the arrow keys to change the density.
❏ Press < to darken the image and press > to lighten
the image.
DOCUMENT READY
3.
Dial the number of the receiving fax.
TEL =
12345678999
❏ Use the numeric keypad to enter the number. See page 3-3
for details.
4.
Press START/COPY.
The MultiPASS 1000 begins sending the document.
TRANSMITTING OK
❏ If an error occurs during sending, the MultiPASS 1000 beeps
intermittently for a few seconds. If this happens, try sending
the fax again.
❏ The MultiPASS 1000 automatically redials if the receiving
fax machine does not answer or if the line is busy. (You can
specify the number of times it redials; see Auto Redial, on
page 5-17.)
❏
To stop sending before the fax is finished, press STOP. You
may need to lift the operation panel to remove the document.
If so, be sure to close the operation panel and press STOP
again.
❏ If the ALARM light is flashing for any reason, correct the
problem and then press STOP. If necessary, refer to Chapter 14,
Troubleshooting.
Chapter 5
Sending Fax Documents
5-3
Sending Fax
Documents
❏ The MultiPASS 1000 beeps once to indicate that the document
has been sent successfully.
Sending a Document Directly
To scan and transmit a document one page at a time without first
storing it in memory, follow the steps below. This procedure is
called “direct sending.”
1.
Feed the document face-down into the Automatic Document
Feeder (ADF).
❏ The LCD displays the density control box for a few
seconds:
5-4 Sending Fax Documents
Chapter 5
<
>
2.
Press the arrow keys to change the density.
❏ Press < to darken the image and press > to lighten the
image.
DOCUMENT READY
3.
Dial the number of the receiving fax.
TEL =
15164886700
❏ Use the numeric keypad to enter the number. See page 3-3
for details.
❏ You can also use any of the automatic dialing methods
described in Chapter 6, Using Automatic Dialing.
4.
Press START/COPY.
The MultiPASS 1000 begins sending the document.
❏ The MultiPASS 1000 beeps once to indicate that the document
has been sent successfully.
❏ If an error occurs during sending, the MultiPASS 1000 beeps
intermittently for a few seconds. If this happens, try sending
the fax again.
❏ The MultiPASS 1000 automatically redials if the receiving fax
machine does not answer or if the line is busy. (You can specify
the number of times it redials; see Auto Redial, on page 5-17.)
❏
To stop sending before the fax is finished, press STOP. You
may need to lift the operation panel to remove the document.
If so, be sure to close the operation panel and press STOP
again.
❏ If the ALARM light is flashing for any reason, correct the
problem and then press STOP. If necessary, see Chapter 14,
Troubleshooting.
Chapter 5
Sending Fax Documents
5-5
Sending Fax
Documents
TRANSMITTING OK
Sending a Document from Memory
You can use memory sending to send your document. With
memory sending, the MultiPASS 1000 quickly scans the document
into memory. Then, after it dials the receiving party, it sends the
document from memory. This means you do not have to wait for
the MultiPASS 1000 to finish sending before you can retrieve your
original document.
You can send up to 50 letter-size pages (based on CCITT #1 Chart)
at one time with memory sending.
❏ If memory becomes full while scanning your document and
you are sending to one location, the MultiPASS 1000 stops
scanning in the document. It sends the pages in memory and
then switches to direct sending to send the rest of the
document.
❏ If memory becomes full while scanning your document and
you are sending to multiple locations, the LCD displays
MEMORY FULL and the MultiPASS 1000 erases the document
from memory. If this happens, start the procedure from the
beginning.
N
The definition of a letter-size page for memory storage purposes is
based on CCITT #1 Chart.
Before using memory sending, it is a good idea to print out any
received documents stored in memory. If a received document is
stored in memory, the LCD displays:
06/31/95
11:17
RECEIVED IN MEMORY
See Receiving Documents in Memory on page 7-7 for details.
5-6 Sending Fax Documents
Chapter 5
To send a document from memory, follow these steps:
1.
Feed the document face-down into the Automatic Document
Feeder (ADF).
❏
The LCD displays:
2.
Sending Fax
Documents
DOCUMENT READY
Press FUNCTION.
SELECT MENU
3.
Press MEMORY TRANSMISSION.
DOCUMENT READY
MEMORY
Chapter 5
Sending Fax Documents
5-7
4.
Dial the number of the receiving fax.
TEL = 9876543333
❏ Use the numeric keypad to enter the number. See page 3-3
for details.
❏ You can also use any of the automatic dialing methods
described in Chapter 6, Using Automatic Dialing.
5.
Press START/COPY.
The MultiPASS 1000 scans the document into memory.
❏
The LCD displays:
TRANSMIT
MEMORY INPUT
5-8 Sending Fax Documents
XXXX
P.001
Chapter 5
After scanning the document into memory, the MultiPASS 1000
dials the fax number and sends the document.
TRANSMITTING OK
❏ The MultiPASS 1000 beeps once to indicate that the document
has been sent successfully.
❏
After the document is sent, it is erased from memory.
❏ If an error occurs during sending, the MultiPASS 1000 beeps
intermittently for a few seconds. If this happens, try sending
the fax again.
❏ The MultiPASS 1000 automatically redials if the receiving fax
does not answer or if the line is busy. (You can specify the
number of times it redials; see Auto Redial, on page 5-17.)
❏ To stop sending before the fax is finished, press STOP. Any
information stored in memory is erased.
❏ If memory becomes full while scanning your document, the
MultiPASS 1000 stops scanning in the document. It sends the
pages in memory and then switches to direct sending to send
the rest of the document.
Sending Fax
Documents
❏ If the ALARM light is flashing, make sure the error has been
corrected and then press STOP. If necessary, refer to Chapter
14, Troubleshooting.
Chapter 5
Sending Fax Documents
5-9
Sending Procedures
You can use the features described in this section with other
sending features.
Sending Large Documents
The MultiPASS 1000 scans up to 50 letter-size pages into its
memory (based on CCITT #1 Chart).
❏
If you have more than 50 pages to send, divide the document
and send each 50-page or less section separately.
❏
You can send up to 50 letter-size pages (based on CCITT #1
Chart) at one time with memory sending.
• If memory becomes full while scanning your document
and you are sending to one location, the MultiPASS 1000
stops scanning in the document. It sends the pages in
memory and then switches to direct sending to send the
rest of the document.
• If memory becomes full while scanning your document
and you are sending to multiple locations, the LCD
displays MEMORY FULL and the MultiPASS 1000 erases
the document from memory. If this happens, start the
procedure from the beginning.
❏
The Automatic Document Feeder (ADF) holds 30 sheets of
paper, but you can add pages to the stack as the MultiPASS
1000 feeds the paper. See page 4-5 for details.
Customizing the Transmission Mode
When you register a fax number for one-touch speed dialing or
coded speed dialing, you will see this LCD display after you enter
the fax number and name:
NEED TO SET TX MODE?
YES < > NO
This allows you to select the initial transmission speed, the long
distance setting, and whether you want to send the document
confidentially or to a Canon relay fax machine. Regular sending is
the default.
This starting speed is the speed at which the MultiPASS 1000 first
tries to send a document over the telephone line. There are two
starting speeds, 9600 bps and 4800 bps. The higher the speed, the
faster the documents are sent.
5-10 Sending Fax Documents
Chapter 5
Normally you do not need to select a starting speed. When you
send a document, the MultiPASS 1000 automatically tries to send
at the fastest speed possible (9600 bps). If there is a lot of noise on
the line, the MultiPASS 1000 automatically reduces the sending
speed for the best transmission.
If you know that the telephone line over which you will be sending
has a lot of noise that may interfere with transmission, you will
want to set the transmission speed. You can specify one of the
following speeds: 9600 bps or 4800 bps.
When you set the starting speed, the MultiPASS 1000 also allows
you to select a long distance setting. You can choose from four long
distance settings: 0, 1, 2, and 3.
Always try setting 1, LONG DISTANCE, first. If you have problems
transmitting your documents, you can try the other settings: LONG
DISTANCE 2 and LONG DISTANCE 3. Keep trying different settings
until you correct the problem.
Choosing 0, LONG DISTANCE 0, turns off the long distance feature.
For details on how to send a document, either confidentially or to a
Canon relay fax machine, see Chapter 10, Special Sending Procedures.
Transmitting the Document
When the MultiPASS 1000 begins sending the document, the LCD
displays:
❏
The MultiPASS 1000 beeps each time it successfully sends the
document to a destination.
❏
The MultiPASS 1000 automatically redials if a receiving fax
does not answer or if the line is busy. (You can specify the
number of times it redials; see Auto Redial on page 5-17.)
❏
The MultiPASS 1000 erases the document from memory after
sending it.
❏
If an error occurs during sending, the MultiPASS 1000 beeps
intermittently for a few seconds. If this occurs, try sending the
document again.
❏
To interrupt sending to all destinations you dialed, press
STOP. You may need to lift the operation panel to remove the
document. If so, be sure to close the operation panel and press
STOP again.
❏ If the ALARM light is flashing for any reason, correct the
problem and then press STOP. If necessary, refer to Chapter 14,
Troubleshooting.
Chapter 5
Sending Fax Documents
5-11
Sending Fax
Documents
TRANSMIT
Selecting Document Settings
You can use the MultiPASS 1000’s USER SETTINGS to register a
document type and to change the default density setting used by
the MultiPASS 1000.
Type of Document
Before using the TYPE OF DOCUMENT setting on the operation
panel, you must select a document type through the USER
SETTINGS. The MultiPASS 1000 allows you to choose from six
different document types:
❏
HALFTONE
For documents containing intermediate tones, such as a
photograph. Use this setting for black and white or color
photographs.
❏
AA (Auto Adjust)
For documents containing both photographs and text.
❏
BLUEPRINT
For blueprints or blue-colored line drawings. The quality of the
reproduction will depend on the contrast of the original.
Generally, the higher the contrast, the better the reproduction.
❏
TRACING PAPER
For slightly transparent documents, such as line drawings on
tracing paper or similar material.
❏
HIGHLIGHT MARKER
For typewritten documents that you have marked with a
colored felt-tip pen or a highlight marker. Highlights made
with blue or green markers may not reproduce clearly.
❏
IMAGE REVERSAL
For documents within which you want to reverse the tones; for
example, you can change white areas to black and vice versa.
If the document you are sending has a large white area,
remember that reversing an image may create an all black
background that requires a lot of ink.
After you register a setting, you can select it when sending a
document by pressing the DOCUMENT (resolution) button until the
TYPE OF DOCUMENT light comes on. The setting remains in effect
until you register a new one.
5-12 Sending Fax Documents
Chapter 5
Follow these steps:
1.
Press FUNCTION.
SELECT MENU
2.
Press 2.
SELECT MENU
2.USER SETTINGS
3.
Press START/COPY.
USER SETTINGS
1.SET TIME
<
>
4.
Press the arrow buttons until the following display appears:
USER SETTINGS
5.TYPE OF DOCUMENT
5.
Press START/COPY.
<
>
6.
Press the arrow buttons to select the type of document image
you want to register.
❏
Select one of the following:
HALFTONE
AA
BLUE PRINT
TRACING PAPER
HIGHLIGHT MARKER
IMAGE REVERSAL
7.
Press START/COPY.
TYPE OF DOCUMENT
DATA ENTRY OK
8.
Chapter 5
Press STOP.
Sending Fax Documents
5-13
Sending Fax
Documents
TYPE OF DOCUMENT
HALFTONE
Density Control
Each time you feed a document into the MultiPASS 1000, the
default density setting of 4 is displayed. You can change this
setting if you normally send documents that require a lighter
or darker setting. The new setting remains in effect until you
change it.
The density control box looks like this:
There are seven settings, from 1 to 7. The smaller the number, the
darker the image. The normal setting is 4; 1 is the darkest and 7 is
the lightest.
1.
Press FUNCTION.
SELECT MENU
2.
Press 2.
SELECT MENU
2.USER SETTINGS
3.
Press START/COPY.
USER SETTINGS
1.SET TIME
<
>
4.
Press the arrow buttons until the following display appears:
USER SETTINGS
6.DENSITY CONTROL
5-14 Sending Fax Documents
Chapter 5
<
>
5.
Press START/COPY.
6.
Press the arrow buttons to select the density you use most
often.
7.
Press START/COPY.
DENSITY CONTROL
DATA ENTRY OK
8.
Press STOP.
Setting Up Special Transmission Procedures
The TX SETTINGS menu of your MultiPASS 1000 includes options
for ECM sending and auto redial.
Your MultiPASS 1000 incorporates Error Correction Mode (ECM),
an automatic feature that greatly reduces system and line errors
when sending documents. To communicate with the ECM feature,
the receiving fax must also have ECM. If the receiving fax has
ECM, your MultiPASS 1000 automatically switches to ECM and
the LCD display shows:
ECM TX
If the receiving fax does not have ECM, you can communicate
normally using any procedures described in this manual.
Chapter 5
Sending Fax Documents
5-15
Sending Fax
Documents
ECM Sending
Keep in mind that even with ECM operating, line errors may
occasionally occur. If you communicate over a telephone line
affected by line noise, transmitting time may be slightly slower
with the ECM feature on. In this case, you can decrease the
transmitting time by turning off the ECM feature.
Changing the ECM sending option
1.
Press FUNCTION.
SELECT MENU
2.
Press 4.
SELECT MENU
4.TX SETTINGS
3.
Press START/COPY.
TX SETTINGS
1.ECM TX
<
>
4.
Press the arrow buttons until the following display appears.
TX SETTINGS
1.ECM TX
5.
Press START/COPY.
ECM TX
OFF
<
>
6.
Press the arrow buttons to set the ECM TX feature to ON or OFF.
ECM TX
ON
7.
Press START/COPY.
ECM TX
DATA ENTRY OK
8.
Press STOP.
5-16 Sending Fax Documents
Chapter 5
Auto Redial
You can turn the auto redial feature on or off. Auto redial is the
ability of your MultiPASS 1000 to redial a number if the line is
busy or there is no answer.
If you want auto redial on, you can set the amount of time the
MultiPASS 1000 waits before redialing and the number of times
the MultiPASS 1000 redials.
Changing the AUTO REDIAL feature
1.
Press FUNCTION.
SELECT MENU
2.
Press 4.
SELECT MENU
4.TX SETTINGS
3.
Press START/COPY.
TX SETTINGS
1.ECM TX
>
4.
Press the arrow buttons until the following display appears.
Sending Fax
Documents
<
TX SETTINGS
3.AUTO REDIAL
5.
Press START/COPY.
AUTO REDIAL
OFF
<
>
6.
Press the arrow buttons to set the AUTO REDIAL feature
to ON or OFF.
AUTO REDIAL
ON
Chapter 5
Sending Fax Documents
5-17
7.
Press START/COPY.
REDIAL TIMES
2
8.
If you turned on the AUTO REDIAL feature, continue with the
following steps. Otherwise, go to step 13.
9. Use the numeric keypad to enter the number of times (between
1 and 10) you want the MultiPASS 1000 to redial.
REDIAL TIMES
4
10. Press START/COPY.
REDIAL INTERVAL
2
11. Use the numeric keypad to enter the time in minutes (between
2 and 99) between redials.
REDIAL INTERVAL
10
12. Press START/COPY.
REDIAL INTERVAL
DATA ENTRY OK
13. Press STOP.
5-18 Sending Fax Documents
Chapter 5
Customizing the Transmission Speed
Use the following procedure to set the starting speed when
sending documents.
The following item is found in the SYSTEM SETTINGS menu:
❏
TX START SPEED
Changes the initial sending speed the MultiPASS 1000 uses to
send documents. (If the quality of the telephone line is poor
such that the connection cannot be made at a fast speed, the
MultiPASS 1000 automatically reduces the speed until it makes
the connection.)
9600 bps: fastest
7200 bps
4800 bps
2400 bps: slowest
Follow these steps to change the transmission speed:
1.
Press FUNCTION.
SELECT MENU
2.
Press 8.
3.
Sending Fax
Documents
SELECT MENU
8.SYSTEM SETTINGS
Press START/COPY.
SYSTEM SETTINGS
1.RX RESTRICTION
<
>
4.
Press the arrow buttons to display the item you want to
change. For example:
SYSTEM SETTINGS
5.TX START SPEED
5.
Press START/COPY.
TX START SPEED
9600 bps
Chapter 5
Sending Fax Documents
5-19
<
>
6.
Press the arrow buttons to select a setting. For example:
TX START SPEED
4800 bps
7.
Press START/COPY.
TX START SPEED
DATA ENTRY OK
8.
If you want to change other settings, start again from step 4.
Otherwise press STOP.
5-20 Sending Fax Documents
Chapter 5
Chapter 6
Using Automatic Dialing
The MultiPASS 1000 gives you several time-saving features that
allow you to send documents and make calls with the touch of one
or three buttons. This chapter describes how to make fax and
telephone calls using these automatic dialing methods:
❏
One-touch speed dialing
❏
Coded speed dialing
❏
Group dialing
❏
Expanded dialing
❏
Directory dialing
Using One-touch Speed Dialing
The quickest way to dial a fax number or a telephone number is to
use one-touch speed dialing. This allows you to dial a number by
pressing a single button.
Before you can use one-touch speed dialing, you must register the
receiving numbers with your MultiPASS 1000.
Registering Your Most Frequently Called Fax Numbers
1.
Using Automatic
Dialing
Each of the 16 one-touch speed dialing buttons, located on the
right of the operation panel, can contain both a fax number and
a telephone number, and each can contain up to 32 digits. To
register your most frequently called fax numbers in memory,
follow these steps:
Press FUNCTION.
SELECT MENU
2.
Press 1.
SELECT MENU
1.TEL REGISTRATION
Chapter 6
Using Automatic Dialing
6-1
3.
Press START/COPY.
TEL REGISTRATION
1.1-TOUCH SPD FAX
4.
To register a fax number, press START/COPY again.
1-TOUCH SPD FAX
F01=
<
>
5.
Press the arrow buttons until you see the one-touch speed
dialing number for which you want to register a fax number
(F01, F02, etc.).
1-TOUCH SPD FAX
F07=
❏ If a number is already registered for this one-touch speed
dialing button, the LCD displays the number.
6.
Use the numeric keypad to enter the fax number.
1-TOUCH SPD FAX
F07=
19876543210
❏
7.
See page 3-3 for details.
Press START/COPY.
1-TOUCH SPD NAME
F07=_
8.
:A
Use the numeric keypad to enter the name you want to use to
identify the current fax number.
❏
See page 3-4 for details.
❏
You can enter up to 16 characters.
6-2 Using Automatic Dialing
Chapter 6
9.
Press START/COPY.
NEED TO SET TX MODE?
YES < > NO
<
10. Press the arrow buttons to choose whether or not to set the
sending speed, long distance setting, and/or select to send the
fax confidentially or to a Canon relay fax machine.
>
❏ For now, press > for regular sending.
❏ If you want to set the sending speed and long distance
setting, see Chapter 5, Sending Fax Documents.
❏ To send the document confidentially or to a Canon relay
fax machine, see Chapter 10, Special Sending Procedures.
11. If you want to enter additional one-touch speed dialing fax
numbers, start again with step 5. Otherwise press STOP.
Sending a Document Using One-touch Speed Dialing
After registering the one-touch numbers, you can send documents
using one-touch speed dialing as follows:
1.
Feed your document face-down into the Automatic Document
Feeder (ADF).
DOCUMENT READY
01
DELA YED
02
CONFID.
2.
DELA YED
TRANSMISSION
POLLING
POLLING
03
04
RELA Y
TRANSMISSION
BROADCAST
05
06
07
08
REPOR T
HELP
10
11
12
15
16
FILE
+
09
PRINT
SP ACE
13
Press the one-touch speed dialing button for the number to
which you wish to fax.
CLEAR
14
TEL = 12345678999
F01 = CANON USA
❏ If no number is registered for the one-touch speed dialing
button you pressed, the LCD display shows the NO TEL #
message. Make sure you pressed the correct one-touch
speed dialing button and that the number you want to dial
is registered correctly.
Chapter 6
Using Automatic Dialing
6-3
Using Automatic
Dialing
MEMOR Y
TRANSMISSION
❏ If you make a mistake by pressing the wrong one-touch
speed dialing button, press STOP twice. Then press the
correct one-touch speed dialing button.
❏ If the ALARM light is flashing for any reason, correct the
error and press STOP. If necessary, refer to Chapter 14,
Troubleshooting.
Registering Your Most Frequently Called
Telephone Numbers
To register your most frequently called telephone numbers in
memory, follow these steps:
1.
Press FUNCTION.
SELECT MENU
2.
Press 1.
SELECT MENU
1.TEL REGISTRATION
3.
Press START/COPY.
TEL REGISTRATION
1.1-TOUCH SPD FAX
<
>
4.
Press the arrow buttons until the following display appears:
TEL REGISTRATION
2.1-TOUCH SPD TEL
5.
Press START/COPY.
1-TOUCH SPD TEL
T01=
6-4 Using Automatic Dialing
Chapter 6
<
>
6.
Press the arrow buttons until you see the one-touch speed
dialing number for which you want to register a telephone
number (T01, T02, etc.).
1-TOUCH SPD TEL
T01=
❏ If a number is already registered for this one-touch speed
dialing button, the LCD displays the number.
7.
Use the numeric keypad to enter the telephone number.
1-TOUCH SPD TEL
T01=
12345678900
❏
8.
See page 3-3 for details.
Press START/COPY.
1-TOUCH SPD NAME
T01= _
9.
:A
Use the numeric keypad to enter a name.
❏ See page 3-4 for details.
❏ You can enter up to 16 characters.
10. Press START/COPY.
:A
Using Automatic
Dialing
1-TOUCH SPD NAME
DATA ENTRY OK
11. If you want to enter additional one-touch speed dialing
telephone numbers, start again from step 6. Otherwise,
press STOP.
Chapter 6
Using Automatic Dialing
6-5
Making a One-touch Speed Dialing Telephone Call
To dial a telephone number at the press of one button, use onetouch speed dialing.
After registering the one-touch numbers, you can speed dial as
follows:
MEMOR Y
TRANSMISSION
01
DELA YED
DELA YED
TRANSMISSION
02
CONFID.
Press the one-touch speed dialing button you wish to call.
RELA Y
BROADCAST
05
06
07
08
REPOR T
HELP
10
11
12
15
16
TEL=
12345678900
T01 CANON PHONE
FILE
+
PRINT
SP ACE
13
2.
04
TRANSMISSION
09
Press ON HOOK or lift up the handset.
POLLING
POLLING
03
1.
CLEAR
14
❏ If no number is registered for the one-touch speed dialing
button you pushed, the LCD display shows the NO TEL #
message. Make sure you pressed the correct one-touch
speed dialing button and that the number you want to dial
is properly registered.
❏ If you make a mistake by pressing the wrong one-touch
speed dialing button, press STOP. Then go back to step 1.
6-6 Using Automatic Dialing
Chapter 6
Using Coded Speed Dialing Numbers
To dial a telephone number at the press of three buttons, use coded
speed dialing. Each two-digit coded speed dialing number can
contain either a fax number or a telephone number.
Registering Coded Speed Dialing Numbers
You can register up to 80 locations with each number containing
up to 32 digits.
1.
Press FUNCTION.
SELECT MENU
2.
Press 1.
SELECT MENU
1.TEL REGISTRATION
3.
Press START/COPY.
TEL REGISTRATION
1.1-TOUCH SPD FAX
<
>
4.
Press the arrow buttons until the following display appears.
TEL REGISTRATION
3.CODED DIAL
Press START/COPY.
CODED DIAL
*00=
<
>
6.
Press the arrow buttons until the display shows the two-digit
code under which you want to register the fax or telephone
number.
❏ If a two-digit code already has a number assigned to it,
that number will appear on the display.
Chapter 6
Using Automatic Dialing
6-7
Using Automatic
Dialing
5.
7.
Use the numeric keypad to enter the fax or telephone number.
CODED DIAL
*10=
12223334000
❏ See page 3-3 for details.
8.
Press START/COPY.
CODED DIAL NAME
*10=_
9.
:A
Use the numeric keypad to enter a name that corresponds to
the fax or telephone number you entered.
❏ See page 3-4 for details.
❏ You can enter up to 16 characters.
10. Press START/COPY.
NEED TO SET TX MODE?
YES < > NO
<
>
11. Press the arrow buttons to choose whether or not to set the
sending speed, and the long distance setting, and/or select to
send the fax confidentially or to a Canon relay fax machine.
❏ For now, press > to select NO for regular sending.
❏ If you want to set the sending speed and the long distance
setting, see Chapter 5, Sending Fax Documents.
❏ To send the document confidentially or to a Canon relay
fax machine, see Chapter 10, Special Sending Procedures.
12. To register additional numbers for coded one-touch speed
dialing, start this procedure again from step 6. Otherwise press
STOP.
6-8 Using Automatic Dialing
Chapter 6
Using Coded Speed Dialing for Fax Numbers
1.
Place the document face down in the Automatic Document
Feeder (ADF).
DOCUMENT READY
2.
Press the CODED DIAL / DIRECTORY button in the middle of the
operation panel.
*
3.
Use the numeric keypad to enter the appropriate two-digit
coded speed dialing code.
TEL=
*01
1234567
❏ If no number is registered for the code you entered, the
LCD display shows the NO TEL # message. Make sure you
pressed the correct buttons and that the number you want
to dial is registered correctly.
❏ If you make a mistake by pressing the wrong code digits,
press STOP. Then go back to step 1.
1.
Press the ON HOOK button or lift the handset.
2.
Press the CODED DIAL / DIRECTORY button in the middle of the
operation panel.
3.
Use the numeric keypad to enter the appropriate two-digit
coded speed dialing code.
❏ If no number is registered for the code you entered, the
LCD display shows the NO TEL # message. Make sure you
pressed the correct buttons and that the number you want
to dial is registered correctly.
❏ If you make a mistake by pressing the wrong coded speed
dialing digits, press STOP. Then go back to step 1.
Chapter 6
Using Automatic Dialing
6-9
Using Automatic
Dialing
Using Coded Speed Dialing for Telephone Numbers
Using Group Dialing
To dial a group of registered one-touch or coded speed dialing fax
numbers, use group dialing. By registering each group under a
one-touch speed dialing button or coded speed dialing code, you
press only one or three buttons to send a document to many
different locations.
You can use group dialing to
❏
Send to more than one destination
❏
Send to multiple destinations through Canon relay fax
machines
❏
Send confidential documents
Registering Group Dialing Numbers
N
You must register the one-touch speed dialing and coded speed
dialing numbers before you can enter them in a group dialing
number.
1.
Press FUNCTION.
SELECT MENU
2.
Press 1.
SELECT MENU
1.TEL REGISTRATION
3.
Press START/COPY.
TEL REGISTRATION
1.1-TOUCH SPD FAX
<
>
4.
Press the arrow buttons until the following display appears.
TEL REGISTRATION
4.GROUP DIAL
6-10 Using Automatic Dialing
Chapter 6
5.
Press START/COPY.
GROUP DIAL
F01=1-TOUCH SPD DIAL
<
>
6.
Press the arrow buttons until the number of the one-touch
speed dialing button or the two-digit code you want to register
as a group appears.
❏ The MultiPASS 1000 tells you if a number is assigned to
another type of dialing method.
❏ You can press the CODED DIAL/DIRECTORY button and a
two-digit code to skip the one-touch speed dialing buttons.
7.
Press START/COPY.
TEL=
8.
Enter the fax numbers you want included in the group as
follows:
❏ To enter one-touch speed dialing numbers, press #. Then
use the numeric keypad to enter the appropriate one-touch
speed dialing numbers. Press # before you enter each onetouch speed dialing number. Also, be sure to enter both
digits; for example, zero and 1 for 01.
N
You must register the one-touch speed dialing and coded speed
dialing numbers before you can enter them in a group dialing
number.
9.
Press START/COPY.
TEL=
DATA ENTRY OK
Chapter 6
5556666
Using Automatic Dialing
6-11
Using Automatic
Dialing
❏ To enter coded speed dialing numbers, press CODED
DIAL/DIRECTORY. Then use the numeric keypad to enter
the two-digit code. Press CODED DIAL/DIRECTORY before
you enter each coded speed dialing number.
10. Use the numeric keypad to enter the group name.
❏
See page 3-4 for details.
❏ You can enter up to 16 characters.
11. Press START/COPY.
GROUP DIAL NAME
DATA ENTRY OK
:A
12. To register additional fax numbers for group dialing, start this
procedure again with step 6. Otherwise press STOP.
Sending a Document Using Group Dialing
1.
Place the document face down in the Automatic Document
Feeder (ADF).
DOCUMENT READY
2.
Enter the group number you wish to dial:
❏ Press the one-touch speed dialing button under which you
registered the group.
or
❏ Press the CODED DIAL/DIRECTORY button followed by the
two-digit code under which you registered the group.
TEL=GROUP DIAL
F08 CANON GROUP
The MultiPASS 1000 automatically scans the document into
memory.
TRANSMIT
MEMORY INPUT
6-12 Using Automatic Dialing
0001
P.OO1
Chapter 6
After scanning the document into memory, the MultiPASS 1000
automatically dials each number in the group. It dials the numbers
in the order that you registered them.
❏
If there is no group registered under the one-touch speed
dialing button or two-digit code, the LCD displays the NO TEL #
message. Make sure you entered the correct number and that
the group whose numbers you want to dial has been registered
correctly for group dialing.
❏
If you make a mistake when dialing, press STOP. Then try
again.
Changing a Group Dialing Number
Use these steps when you need to make group dialing changes to:
❏
Add or delete numbers in a group
❏
Change the name of the group
❏
Cancel group dialing for a specific one-touch button or coded
dial code
1.
Follow the same steps that you would use to register the group
dialing numbers and names.
❏
<
>
2.
See steps 1-5 starting on page 6-10.
Press the arrow buttons to display the one-touch or coded
speed dialing number that contains the group you want to
change.
GROUP DIAL
F08=GROUP DIAL
Press START/COPY.
Using Automatic
Dialing
3.
TEL=
2226663000
F16 JONES & ASSOC.
❏ The MultiPASS 1000 displays the first speed dialing
number in the group.
4.
If you want to add one-touch or coded speed dialing numbers
to the group, enter them now.
❏
Chapter 6
Follow the instructions starting with step 8 on page 6-11.
Using Automatic Dialing
6-13
<
>
5.
If you want to erase one-touch or coded speed dialing numbers
from the group, first press the arrow buttons to locate the
number you want to erase.
TEL=
2228052000
*03 SMITH GRAPHICS
❏
Then press CLEAR.
ERASING END
*03 SMITH GRAPHICS
6.
Press START/COPY.
❏ If you want to change the name of the group, enter the new
name now; see page 3-4 for details.
7.
Press START/COPY.
GROUP DIAL
F09=
8.
If you want to change more group dialing numbers, start this
procedure again. Otherwise, press STOP.
6-14 Using Automatic Dialing
Chapter 6
Using Expanded Dialing
To dial a long fax number (up to 118 digits) at the touch of one to
three buttons, use expanded dialing. You can register each entry
under a one-touch or coded speed dialing number.
Registering Expanded Dialing Numbers
To dial a long fax number (up to 118 digits) at the touch of one to
three buttons, use expanded dialing. You can register each entry
under a one-touch or coded speed dialing number.
1.
Press FUNCTION.
SELECT MENU
2.
Press 1.
SELECT MENU
1.TEL REGISTRATION
3.
Press START/COPY.
TEL REGISTRATION
1.1-TOUCH SPD FAX
<
>
4.
Press the arrow buttons until the following display appears.
TEL REGISTRATION
5.EXPANDED DIAL
Press START/COPY.
EXPANDED DIAL
F01=1-TOUCH SPD DIAL
<
>
6.
Press the arrow buttons until the number of the one-touch
speed dialing button or the two-digit code you want to register
as an expanded dial number appears.
EXPANDED DIAL
F09=
❏ The MultiPASS 1000 tells you if a number is assigned to
another type of dialing method.
Chapter 6
Using Automatic Dialing
6-15
Using Automatic
Dialing
5.
7.
Press START/COPY.
EXPANDED DIAL
F09=
8.
Use the numeric keypad to enter the fax number.
❏
9.
See page 3-3 for details.
Press START/COPY.
EXPANDED DIAL NAME:A
F09=_
10. Use the numeric keypad to enter the name.
❏
See page 3-4 for details.
❏
You can enter up to 16 characters.
11. Press START/COPY.
EXPANDED DIAL NAME:A
DATA ENTRY OK
12. Press STOP.
Sending a Document Using Expanded Dialing
1.
Place the document in the Automatic Document Feeder (ADF).
2.
Press the one-touch speed dial button or press the CODED
DIAL/DIRECTORY button followed by the two-digit code
assigned to the expanded dialing number you want to dial.
6-16 Using Automatic Dialing
Chapter 6
Using Directory Dialing
To dial any fax or telephone number that is registered for onetouch or coded speed dialing, you can use directory dialing.
Directory dialing is similar to using a telephone book because it
allows you to look up a number by the name under which it is
registered.
You must make entries for directory dialing within 60 seconds
after starting or the MultiPASS 1000 returns to standby mode.
1.
When you reach a step asking you to dial, press the CODED
DIAL/DIRECTORY button in the middle of the operation panel
two times.
SEARCH TEL DIRECTORY
❏ Be sure to press the CODED DIAL/DIRECTORY button twice.
2.
Press the numeric button with the letter corresponding to the
first letter of the name you want to recall. The display shows
the first name in the fax or telephone name list that begins with
that letter.
❏ If the name begins with a number or symbol, first press
the # button to view the names.
❏ If no names are listed under the letter you choose, the
display shows a message similar to this:
[TUV]
NOT FOUND!
>
3.
4.
Chapter 6
Press the arrow buttons until the name whose number you
want to dial appears on the display.
❏
To search the list in alphabetical order, press <.
❏
To search the list in reverse alphabetical order, press >.
When the name you want to send to or call appears, press
START/COPY.
Using Automatic Dialing
6-17
Using Automatic
Dialing
<
6-18 Using Automatic Dialing
Chapter 6
Chapter 7
Receiving Fax Documents
This chapter explains how to receive fax documents with your
MultiPASS 1000. It includes:
❏
Receiving documents over a dedicated fax line
❏
Receiving both documents and telephone calls over a shared
fax/telephone line (FAX/TEL SWITCH)
❏
Receiving documents in memory
❏
Receiving documents manually
❏
Receiving documents using an extension telephone
❏
Customizing the receiving operations
•
Receiving oversized documents
•
Setting up special receiving features
•
Customizing the FAX/TEL SWITCH feature
•
Restricted receiving
•
Customizing the receiving speed
C
Chapter 7
❏
If you have one phone line in your office, you probably intend
to use the MultiPASS 1000 for both fax and telephone
communication.
❏
If you have two phone lines in your office, you probably plan
to use one line for the MultiPASS 1000 and the other line for
your telephone.
Do not pull received documents or printouts from your MultiPASS
1000. Always wait until the unit ejects a page completely and beeps
before you remove a page. If you pull a document out before it is
ejected, the message DARK PAPER USED may appear in the LCD
display. If you see this message, refer to Chapter 14, Troubleshooting.
Receiving Fax Documents
7-1
Receiving Fax
Documents
The procedures for receiving depend on whether you use the
MultiPASS 1000 for both fax and telephone communication or just
for fax communication.
Receiving Documents Over a Dedicated
Fax Line
The MultiPASS 1000 is set up at the factory for both fax
transmission and telephone calls. If you have a dedicated fax line,
you need to set the MultiPASS 1000 for dedicated receiving.
Setting Up the MultiPASS 1000 for Dedicated Receiving
When you set the MultiPASS 1000 for dedicated receiving, the unit
picks up each call after two rings and automatically treats the call
as a fax transmission.
If you have a separate phone line for your MultiPASS 1000
machine, follow these steps:
1.
Press FUNCTION.
SELECT MENU
2.
Press 5.
SELECT MENU
5.RX SETTINGS
3.
Press START/COPY.
RX SETTINGS
1.ECM RX
<
>
4.
Press the arrow buttons until the following display appears.
RX SETTINGS
2.FAX/TEL SWITCH
5.
Press START/COPY.
FAX/TEL SWITCH
ON
7-2 Receiving Fax Documents
Chapter 7
<
>
6.
Press the arrow buttons to change the setting to OFF.
FAX/TEL SWITCH
OFF
7.
Press START/COPY.
FAX/TEL SWITCH
DATA ENTRY OK
8.
Press STOP.
Receiving Documents Automatically Over
a Dedicated Fax Line
When the MultiPASS 1000 is set up for a dedicated line, it
automatically receives documents whenever a call comes over the
fax line.
N
ANS HOOK UP
The MultiPASS 1000 cannot receive automatically if you are
making copies, printing reports, or registering information.
1.
Make sure the MultiPASS 1000 is set to receive over a
dedicated fax line.
2.
Press the ANS HOOK UP/MANUAL button.
MANUAL
❏ Make sure both the ANS HOOK UP and MANUAL lights are
off.
The MultiPASS 1000 assumes all incoming calls are from another
fax machine sending a document. It receives the documents
automatically.
❏ The MultiPASS 1000 receives documents in memory if the
paper runs out or if the ink cartridge runs out of ink. (See
Receiving Documents in Memory on page 7-7.)
Receiving Fax
Documents
❏ To stop receiving before the document is complete, press
STOP.
❏ If the ALARM light is flashing for any reason, correct the
problem and then press STOP. If necessary, see Chapter 14,
Troubleshooting.
Chapter 7
Receiving Fax Documents
7-3
Receiving Both Documents and Telephone
Calls Over a Shared Fax/Telephone Line
(FAX/TEL SWITCH)
If you have only one phone line in your office, you can set up the
MultiPASS 1000 to receive both documents and telephone calls.
Setting Up the MultiPASS 1000 for a Shared Line
N
The MultiPASS 1000 is automatically set up (at the factory) for a
shared line. You only need to follow this procedure if you have
changed the factory settings.
1.
Press FUNCTION.
SELECT MENU
2.
Press 5.
SELECT MENU
5.RX SETTINGS
3.
Press START/COPY.
RX SETTINGS
1.ECM RX
<
>
4.
Press the arrow buttons until the following display appears.
RX SETTINGS
2.FAX/TEL SWITCH
7-4 Receiving Fax Documents
Chapter 7
5.
Press START/COPY.
FAX/TEL SWITCH
OFF
<
>
6.
Press the arrow buttons to change the setting to ON.
FAX/TEL SWITCH
ON
7.
Press START/COPY.
FAX/TEL SWITCH
DATA ENTRY OK
8.
Press STOP.
Receiving Both Documents and Telephone Calls
Automatically
You can set the MultiPASS 1000 to monitor all incoming calls over
the fax/telephone line. When the MultiPASS 1000 receives an
incoming call, it checks to see if the call is from another fax
machine trying to send a document or from someone wanting to
talk to you.
N
ANS HOOK UP
The MultiPASS 1000 cannot receive automatically if you are
making copies, printing reports, or registering information.
1.
Make sure you have set the MultiPASS 1000 for both fax and
telephone communication (FAX/TEL SWITCH is ON). See page 7-4.
2.
Press the ANS HOOK UP/MANUAL button.
MANUAL
When the MultiPASS 1000 receives a call, it checks to see whether
the call is from another fax machine or from a telephone.
06/01/95
Chapter 7
17:00
Receiving Fax Documents
7-5
Receiving Fax
Documents
❏ Make sure both the ANS HOOK UP and MANUAL lights are
off.
❏
If the INCOMING RING function is set to OFF, the MultiPASS 1000
does not ring when it receives a call from another fax machine
that is trying to send a document. This is so that you are not
disturbed when your MultiPASS 1000 is communicating with
another fax machine. The MultiPASS 1000 automatically receives
the document. (See page 7-17 for details.)
❏
If the call is from a person, the MultiPASS 1000 rings to alert
you to pick up the phone.
TALK
❏
If you do not pick up the handset within 22 seconds, the
MultiPASS 1000 stops ringing. It checks again to make sure the
call is not from a fax machine and then hangs up.
❏
If the paper runs out or if the ink cartridge runs out of ink, the
MultiPASS 1000 receives the rest of the document in memory.
(See page 7-7 for details.)
❏
To stop receiving before the document is complete, press
STOP.
❏
If the ALARM light is flashing for any reason, make sure the
error is corrected and press STOP. If necessary, see Chapter 14,
Troubleshooting.
7-6 Receiving Fax Documents
Chapter 7
Receiving Documents in Memory
When the MultiPASS 1000 is set for automatic receiving and the
paper or ink runs out, the unit stores incoming documents in
memory. The MultiPASS 1000 can store up to 70 letter-size pages
(based on CCITT #1 Chart).
When the MultiPASS 1000 receives documents in memory, you see
one of the following messages and you must perform one of the
following actions:
LCD display
06/09/95 20:17
SUPPLY REC. PAPER
06/09/95 20:17
CHANGE CARTRIDGE
Action
Load paper into the paper
cassette.
Install a new ink cartridge.
Press STOP.
06/09/95 20:17
DARK PAPER USED
Load clean, white paper into
the paper cassette. Press
STOP.
06/09/95 20:17
REC. PAPER JAM
STOP.
Clear the paper jam. Press
See Chapter 14, Troubleshooting, for details on these messages.
To print the received documents stored in memory, follow these
steps:
1.
Press START/COPY.
MEMORY COPY
The MultiPASS 1000 begins printing the received pages stored in
memory.
❏ If there is a power failure or you unplug the MultiPASS 1000
while documents are stored in memory, the documents are
erased.
Chapter 7
Receiving Fax Documents
7-7
Receiving Fax
Documents
❏ After printing the pages, the MultiPASS 1000 erases the
documents in memory. The ALARM light will stop blinking.
Receiving a PC Fax Document in Memory
You can use your MultiPASS 1000 as a PC fax through the
MultiPASS Desktop Manager for Windows. See your Software
User’s Guide for details.
Through the desktop manager, you can set up the MultiPASS 1000
to upload received documents to your computer. When you select
this option, the MultiPASS 1000 does not print out the received
document.
If your computer is turned off or otherwise cannot upload a
document, the received document remains in the memory of the
MultiPASS 1000. In this case, you must not unplug the MultiPASS
1000. If the MultiPASS 1000 loses power, the document will be
erased from memory.
When received documents are in memory, you see this message.
06/26/95
RECEIVED IN FILE
21:50
To upload the document, simply turn on your computer. The
document will be uploaded automatically to your computer.
If you want to print the document on the MultiPASS 1000, follow
these steps:
1.
Press FUNCTION.
SELECT MENU
2.
Press FILE PRINT.
FILE
PRINT
12
MEMORY COPY
The MultiPASS 1000 begins printing the document.
N
If you print the document, it will be erased from memory and you
will not be able to upload it to the computer.
7-8 Receiving Fax Documents
Chapter 7
Receiving Documents Manually
You may want to set the MultiPASS 1000 to receive documents
manually in the following cases:
❏
You want to receive a document while you print reports,
register information, or use the MultiPASS 1000 as a computer
printer.
❏
You want to personally check each incoming call to see if it is
from a fax or from a person.
Keep in mind that you cannot use manual receiving if a document
is in the Automatic Document Feeder (ADF) waiting to be sent.
ANS HOOK UP
1.
Press the ANS HOOK UP/MANUAL button.
MANUAL
❏
The MANUAL light is on to show that the MultiPASS 1000 is
set for manual receiving.
❏
If the light is not on, press the ANS HOOK UP/MANUAL
button to turn it on.
2.
When the MultiPASS 1000 rings, pick up the handset.
3.
If you hear a person’s voice, start your conversation. If the
caller wants to send a document after talking to you, press
START/COPY to receive the document.
or
If you hear a slow beep, another fax is trying to send you a
document. Press START/COPY.
Your MultiPASS 1000 begins receiving the document.
❏
Hang up the handset after the MultiPASS 1000 displays
RECEIVING. If you don’t hang up, the MultiPASS 1000 beeps
Chapter 7
❏
The MultiPASS 1000 beeps once to show that the document
was received. If an error occurs, the MultiPASS 1000 beeps
intermittently for a few seconds. If this happens, contact the
other party and have them resend the document.
❏
To stop receiving before completion, press STOP.
❏
If the ALARM light is flashing, correct the error condition and
press STOP. If necessary, refer to Chapter 14, Troubleshooting.
Receiving Fax Documents
7-9
Receiving Fax
Documents
intermittently for a few seconds after you receive the
document. To turn off the beeping, see the OFF HOOK ALARM
description on page 3-17.
Setting the MultiPASS 1000 to Switch Automatically
from Manual to Automatic Receiving
To prevent you from missing incoming documents when the
MultiPASS 1000 is set to manual receiving, you can set the unit to
automatically answer the phone and switch to automatic receiving
after it rings for a certain amount of time.
1.
Press FUNCTION.
SELECT MENU
2.
Press 5.
SELECT MENU
5.RX SETTINGS
3.
Press START/COPY.
RX SETTINGS
1.ECM RX
<
>
4.
Press the arrow buttons until the following display appears.
RX SETTINGS
5.MAN/AUTO SWITCH
5.
Press START/COPY.
MAN/AUTO SWITCH
OFF
7-10 Receiving Fax Documents
Chapter 7
<
>
6.
Press the arrow buttons until ON appears.
❏
7.
If you want to turn this feature off, press the arrow buttons
until OFF appears. Then go to step 9.
Press START/COPY.
RING TIME
1
8.
Use the numeric keypad to enter how many seconds (from 1 to
99) you want the MultiPASS 1000 to ring before switching to
automatic receiving and answering the telephone.
RING TIME
10
9.
Press START/COPY.
RING TIME
DATA ENTRY OK
Receiving Fax
Documents
10. Press STOP.
Chapter 7
Receiving Fax Documents
7-11
Receiving Documents Manually Using
an Extension Telephone
If your extension telephone is connected to the MultiPASS 1000 but
is not located near the unit, you can activate reception of a
document manually by answering the extension telephone without
physically touching the MultiPASS 1000.
For this feature, you must be using a touch-tone extension
telephone, and it must be plugged into the telephone jack of the
MultiPASS 1000. See Chapter 8 for details on Using an Extension
Telephone Connected to the MultiPASS 1000.
Setting Up the MultiPASS 1000 to Receive a Document
Manually Using an Extension Telephone
First set up the MultiPASS 1000 to receive a fax manually using a
remote receiving ID.
1.
Press FUNCTION.
SELECT MENU
2.
Press 5.
SELECT MENU
5.RX SETTINGS
3.
Press START/COPY.
RX SETTINGS
1.ECM RX
<
>
4.
Press the arrow buttons unti the following display appears.
RX SETTINGS
6.REMOTE RX
7-12 Receiving Fax Documents
Chapter 7
5.
Press START/COPY.
REMOTE RX
OFF
<
>
6.
Press the arrow buttons until ON appears.
REMOTE RX
ON
7.
Press START/COPY.
REMOTE RX ID
[2] [5]
8. Use the numeric keypad to enter the remote receiving (RX) ID
number.
REMOTE RX ID
[5] [8]
9.
❏
The remote receiving ID is the number you enter from the
extension telephone to start the remote receiving
operation.
❏
You can choose any two-digit number between 00 and 99.
You can also use * and #.
❏
Make sure the ID you choose is not used by your
telephone system for any other function. For example, in
large offices, certain numbers may access an outside line,
the company operator, or remote features on a Telephone
Answering Device (TAD).
Press START/COPY.
REMOTE RX ID
DATA ENTRY OK
Receiving Fax
Documents
10. Press STOP.
Chapter 7
Receiving Fax Documents
7-13
Receiving a Document Manually Using
the Extension Telephone
You can activate reception of a fax manually by using the remote
receiving ID on your extension telephone.
N
The extension telephone must be connected to the MultiPASS 1000
and must be a touch-tone phone.
1.
Make sure that you have connected the extension telephone to
the MultiPASS 1000.
❏
See Chapter 8, Using the Telephone, an Answering Machine,
and a Modem.
2.
Set the MultiPASS 1000 to receive a fax manually using a
remote receiving ID. See page 7-12.
3.
When the telephone rings, lift the handset of the extension
telephone.
❏
If you hear a voice, it is a telephone call, and you may
converse with the person on the other end.
❏
If you hear either a slow, high-pitched beep or silence on
the phone, a fax machine is trying to send you a document.
Continue with the following steps.
4.
Use the numeric keypad on the extension telephone to enter
the remote receiving ID.
5.
Wait for a high-pitch tone and then hang up the extension
telephone.
The MultiPASS 1000 begins receiving the document.
❏
The MultiPASS 1000 beeps once when the document has been
received.
❏
If an error occurs, the MultiPASS 1000 beeps intermittently for
a few seconds. In this case, contact the other party and ask
them to resend the document.
❏
If the ALARM light is flashing, correct the error condition and
press STOP. If necessary, refer to Chapter 14, Troubleshooting.
7-14 Receiving Fax Documents
Chapter 7
Customized Receiving Operations
The following sections describe various receiving operations you
can customize using the MultiPASS 1000 menu system.
Receiving Oversized Documents
To receive a document longer than the paper installed in your
paper cassette, you can set the MultiPASS 1000 to reduce the
received document and select how the document is reduced
(vertically or proportionally). The MultiPASS 1000 is preset to
reduce oversized documents proportionally by 10%. Use this
procedure to change the setting or turn off this feature.
The PRINTER SETTINGS menu contains these options:
❏
SELECT REDUCE %
Sets the reduction for oversized images as a percent of the
original size of the received document. When you set this
option to ON, you can specify the desired reduction percentage:
75%, 85%, 90%, or 95%.
❏
SELECT REDUCE DIR
Sets the MultiPASS 1000 to reduce the image. When you set
this option to ON, you can specify the type of reduction:
vertical only or horizontal and vertical. The MultiPASS 1000
reduces the image by the amount specified above.
N
When you turn on RX REDUCTION, the MultiPASS 1000 reduces all
incoming documents.
1.
Press FUNCTION.
SELECT MENU
2.
Press 6.
SELECT MENU
6.PRINTER SETTINGS
Press START/COPY.
Receiving Fax
Documents
3.
PRINTER SETTINGS
1.SELECT PAPER SIZE
Chapter 7
Receiving Fax Documents
7-15
<
>
4.
Press the arrow buttons unti the following display appears.
PRINTER SETTINGS
2.RX REDUCTION
5.
Press START/COPY.
RX REDUCTION
OFF
<
>
6.
Press the arrow buttons until ON appears.
RX REDUCTION
ON
7.
Press START/COPY.
RX REDUCTION
1.SELECT REDUCE %
<
>
8.
Press the arrow buttons to select the item you want to change.
For example:
RX REDUCTION
1.SELECT REDUCE %
9.
Press START/COPY.
SELECT REDUCE %
90%
<
>
10. Press the arrow buttons to select the setting. For example:
SELECT REDUCE %
95%
11. Press START/COPY.
SELECT REDUCE %
DATA ENTRY OK
7-16 Receiving Fax Documents
Chapter 7
12. To set the other reduction feature, begin again from step 8.
Otherwise, press STOP.
N
If you set RX REDUCTION to OFF and the sending party sends only
one page, the MultiPASS 1000 may print an extra blank page after
receiving the document.
Setting Up Special Receiving Features
Using the RX SETTINGS menu on the MultiPASS 1000, you can
turn the following features on or off to suit your particular needs,
including:
❏
ECM RX
Error Correction Mode (ECM)—Greatly reduces system and
line errors
❏
INCOMING RING
Controls the ringing of the handset and optional extension
telephone (described in the next section)
❏
MEMORY RX
Determines whether or not documents are received in memory
❏
MEMORY RX ALARM
Allows you to set continuous beeps (alarm) as a reminder that
a document has been stored in memory
❏
RX PAGE FOOTER
Turns on or off the receiving time, date, and transaction
number as a page footer
You select these options from the RX SETTINGS menu. Follow these
steps:
1.
Press FUNCTION.
SELECT MENU
Press 5.
Receiving Fax
Documents
2.
SELECT MENU
5.RX SETTINGS
Chapter 7
Receiving Fax Documents
7-17
3.
Press START/COPY.
RX SETTINGS
1.ECM RX
<
>
4.
Press the arrow buttons until the item you wish to change
appears.
1.ECM RX
3.INCOMING RING
7.MEMORY RX
8.MEMORY RX ALARM
9.RX PAGE FOOTER
5.
Press START/COPY. For example:
MEMORY RX
OFF
<
>
6.
Press the arrow buttons until ON or OFF appears. For example:
MEMORY RX
ON
7.
Press START/COPY.
MEMORY RX
DATA ENTRY OK
8.
If you want to change other receiving features, begin from
step 4. Otherwise, press STOP.
Incoming ring
This function controls the ringing of the handset and optional
extension telephone. When you turn this function on, you can also
set the number of times the MultiPASS 1000 rings.
1.
Press FUNCTION.
SELECT MENU
7-18 Receiving Fax Documents
Chapter 7
2.
Press 5.
SELECT MENU
5.RX SETTINGS
3.
Press START/COPY.
RX SETTINGS
1.ECM RX
<
>
4.
Press the arrow buttons until the following display appears.
RX SETTINGS
3.INCOMING RING
5.
Press START/COPY.
INCOMING RING
OFF
<
>
6.
Press the arrow buttons until ON appears.
INCOMING RING
ON
7.
Press START/COPY.
RING COUNT
2
8. Use the numeric keypad to enter the number of times (from 1 to
99) you want the MultiPASS 1000 to ring.
RING COUNT
8
9.
Press START/COPY.
Receiving Fax
Documents
RING COUNT
DATA ENTRY OK
10. Press STOP.
Chapter 7
Receiving Fax Documents
7-19
The following table shows how this function works with the
FAX/TEL SWITCH setting:
Settings
Rings
FAX/TEL SWITCH = OFF
INCOMING RING = OFF
The MultiPASS 1000 never rings.
FAX/TEL SWITCH = ON
INCOMING RING = OFF
The MultiPASS 1000 does not ring
when it receives a fax, but does
ring when it receives a telephone
call.
FAX/TEL SWITCH = OFF
INCOMING RING = ON
The MultiPASS 1000 rings to
alert you that a telephone call
is coming in.
or
FAX/TEL SWITCH = ON
INCOMING RING = ON
Customizing the FAX / TEL SWITCH Feature
When you plan to use the MultiPASS 1000 for both fax
communications and telephone calls, you set the FAX/TEL SWITCH
to ON. The FAX/TEL SWITCH function also allows you to:
❏
Change the amount of time the MultiPASS 1000 uses to check
incoming calls
❏
Change the number of times the MultiPASS 1000 rings when it
receives a call
❏
Set the MultiPASS 1000 to attempt to receive a fax or to
immediately disconnect after receiving a call
When you set the FAX/TEL SWITCH to ON, you can also set these
options.
❏
RING START TIME
When a call comes in, the MultiPASS 1000 checks to see if it is a
person wanting to talk to you or a fax machine trying to send a
document. If your MultiPASS 1000 does not have enough time
to detect the fax tone, it assumes the call is from a telephone.
Use the RING START TIME option to increase the time the
MultiPASS 1000 takes to check whether a call is from a fax
machine or a telephone. You can select a ring start time from 0
to 30 seconds; the default is 8 seconds.
❏
F/T RING TIME
When your MultiPASS 1000 is set to receive both fax and
telephone calls automatically, it rings to alert you to pick up
the handset if the call is from a person. If you do not pick up
the handset within a certain amount of time, the MultiPASS
1000 stops ringing. Use this option to change the number of
times the MultiPASS 1000 rings, from 15 to 300 seconds. The
default is 22.
7-20 Receiving Fax Documents
Chapter 7
❏
F/T SWITCH ACTION
If you set this option to RECEIVE and you do not pick up the
handset when another party tries to call you, the MultiPASS
1000 switches to automatic receiving. This feature keeps you
from missing incoming documents if your MultiPASS 1000 is
unable to detect a fax signal when the other party tries to send
a document.
Because it is expecting a document, automatic receiving keeps
your MultiPASS 1000 busy for about 35 seconds after a call
comes in. If you want your telephone to be free immediately
after receiving a phone call, you can turn off automatic
switching by setting the F/T SWITCH ACTION to DISCONNECT.
You select these options from the RX SETTINGS menu when
FAX/TEL SWITCH is ON.
1.
Press FUNCTION.
SELECT MENU
2.
Press 5.
SELECT MENU
5.RX SETTINGS
3.
Press START/COPY.
RX SETTINGS
1. ECM RX
<
>
4.
Press the arrow buttons until the following display appears.
RX SETTINGS
2.FAX/TEL SWITCH
5.
Press START/COPY.
FAX/TEL SWITCH
ON
Press START/COPY.
Receiving Fax
Documents
6.
FAX/TEL SWITCH
1.RING START TIME
Chapter 7
Receiving Fax Documents
7-21
<
>
7.
Press the arrow buttons until the item you wish to change
appears.
1.RING START TIME
2.F/T RING TIME
3.F/T SWITCH ACTION
8.
Press START/COPY. For example:
RING START TIME
8
9.
Make your selection in one of two ways:
❏
Use the numeric keypad to enter the number of seconds.
❏
Use the arrow buttons to change settings.
10. Press START/COPY.
RING START TIME
DATA ENTRY OK
11. If you want to change other settings, begin from step 7.
Otherwise, press STOP.
Restricting Incoming Documents
To avoid unwanted “junk mail” from vendors or other persons,
you can restrict receiving to parties who are registered for onetouch or coded speed dialing. When you use this procedure, only
persons whose fax numbers are registered in your MultiPASS 1000
can send documents to you.
1.
Press FUNCTION.
SELECT MENU
2.
Press 8.
SELECT MENU
8.SYSTEM SETTINGS
7-22 Receiving Fax Documents
Chapter 7
3.
Press START/COPY.
SYSTEM SETTINGS
1.RX RESTRICTION
<
>
4.
Press the arrow buttons until the following display appears.
SYSTEM SETTINGS
1.RX RESTRICTION
5.
Press START/COPY.
RX RESTRICTION
OFF
<
>
6.
Press the arrow buttons until ON appears.
RX RESTRICTION
ON
7.
Press START/COPY.
RX RESTRICTION
DATA ENTRY OK
8.
Press STOP.
Customizing the Receiving Speed
Use the following procedure to set the starting speed when
receiving documents.
The following item is found in the SYSTEM SETTINGS menu:
RX START SPEED
Changes the starting speed the MultiPASS 1000 uses to receive
documents. (If the quality of the telephone line is poor such
that the connection cannot be made at a fast speed, the
MultiPASS 1000 automatically reduces the speed until it makes
the connection.)
9600 bps: fastest
7200 bps
4800 bps
2400 bps: slowest
Chapter 7
Receiving Fax Documents
7-23
Receiving Fax
Documents
❏
Follow these steps to change the speed:
1.
Press FUNCTION.
SELECT MENU
2.
Press 8.
SELECT MENU
8.SYSTEM SETTINGS
3.
Press START/COPY.
SYSTEM SETTINGS
1.RX RESTRICTION
<
>
4.
Press the arrow buttons until the following display appears.
SYSTEM SETTINGS
6.RX START SPEED
5.
Press START/COPY.
RX START SPEED
9600 bps
<
>
6.
Press the arrow buttons to select a setting. For example:
RX START SPEED
4800 bps
7.
Press START/COPY.
RX START SPEED
DATA ENTRY OK
8.
Press STOP.
7-24 Receiving Fax Documents
Chapter 7
You can use the MultiPASS 1000 for telephone calls in one of three
ways: by itself with its built-in handset and keypad to make
telephone calls, with an answering machine connected to receive
phone messages, or with an extension telephone connected to make
calls or use for remote receiving. This chapter describes:
❏
Using the telephone
❏
Using an answering machine
❏
Using an extension telephone
❏
Using a data modem
Using the Telephone
The procedures in this chapter are based on using your MultiPASS
1000’s built-in telephone features on a shared fax/telephone line.
To make sure your MultiPASS 1000 is set up for a shared
fax/telephone line (FAX/TEL SWITCH must be ON), see page 7-4.
Making a Regular Dial Telephone Call
1.
Press ON HOOK.
TEL=
2.
Enter the telephone number you wish to call using the numeric
keypad.
TEL=
3.
12345678900
When the other party answers, lift up the handset.
❏ If you get a busy signal, press ON HOOK or STOP to
disconnect the line.
4.
Chapter 8
When you finish speaking, return the handset to the cradle to
disconnect the line.
Using the Telephone, an Answering Machine, and a Modem
8-1
Using the
Telephone
Chapter 8
Using the Telephone, an
Answering Machine, and a Modem
Making a One-touch Speed Dial Telephone Call
To dial a telephone number at the press of one button, use onetouch speed dialing. Before you can use one-touch speed dialing,
you must register the telephone numbers in your MultiPASS 1000.
See Chapter 6, Using Automatic Dialing, for details.
After registering the one-touch numbers, you can make a speed
dialing call as follows:
MEMOR Y
TRANSMISSION
01
DELA YED
DELA YED
TRANSMISSION
02
CONFID.
Press the one-touch speed dialing button you wish to call.
RELA Y
BROADCAST
05
06
07
REPOR T
08
HELP
10
11
12
15
16
TEL=
12345678900
T01 CANON PHONE
FILE
+
PRINT
SP ACE
13
2.
04
TRANSMISSION
09
Press ON HOOK or lift up the handset.
POLLING
POLLING
03
1.
CLEAR
14
❏ If no number is registered for the one-touch speed dialing
button you pressed, the LCD display shows the message
NO TEL #. Make sure you pressed the correct one-touch
speed dialing button and that the number you want to dial
is properly registered.
❏ If you make a mistake by pressing the wrong one-touch
speed dialing button, press STOP. Then go back to step 1.
Receiving Calls and Documents Automatically on
a Shared Fax/Telephone Line
To receive both telephone calls and fax documents automatically,
you first set the MultiPASS 1000 for both fax and telephone
communication as described on page 7-4. Then you can turn on
automatic receiving for calls and documents.
ANS HOOK UP
1.
Make sure you set the MultiPASS 1000 for both fax and
telephone communication (FAX/TEL SWITCH is ON).
2.
Press the ANS HOOK UP/MANUAL button.
MANUAL
❏ Make sure both the ANS HOOK UP and MANUAL lights
are off.
8-2 Using the Telephone, an Answering Machine, and a Modem
Chapter 8
❏ If the call is from a telephone, the machine rings to alert you
and the LCD displays:
TALK
❏ If you do not pick up the handset within 22 seconds, the
ringing stops. To change the ring time, see Customizing the
FAX/TEL SWITCH Feature on page 7-20.
❏ If the call is from a fax machine and the INCOMING RING
function is set to OFF, the MultiPASS 1000 does not ring. It
receives the document automatically.
❏ To set the MultiPASS 1000 to ring whenever it receives a call,
whether from a fax machine or telephone, you use the
INCOMING RING function; see page 7-18.
Placing a Call on Hold
1.
While talking on the telephone, press HOLD.
❏ The MultiPASS 1000 plays a melody over the line and the
ON HOOK light blinks.
2.
Return the handset to the cradle.
❏ If you do not resume the call within about 3 minutes, the
line disconnects.
3.
To take the call off hold and continue talking, simply lift the
handset or press HOLD again.
While a call is on hold, the MultiPASS 1000 plays a melody. The
person on the receiving end hears the tune. To turn off the hold
melody, see Customizing MultiPASS 1000 Sounds on page 3-16.
Chapter 8
Using the Telephone, an Answering Machine, and a Modem
8-3
Using the
Telephone
When a call comes in, the MultiPASS 1000 checks to see if the call is
from a telephone or fax machine.
Using an Answering Machine Connected
to the MultiPASS 1000
You can connect an answering machine to the MultiPASS 1000 to
enable you to receive telephone messages as well as documents
when you are away from your office. All incoming calls go first to
the answering machine. One of the following results can occur:
❏
If the call is a regular telephone call, the caller can leave a
message only.
❏
If the call is from a fax/telephone, the caller can leave a
message and send a document with just one call.
❏
If the call is from a fax machine, your MultiPASS 1000
automatically receives the document.
Hints When Using the MultiPASS 1000
with an Answering Machine
❏
Always turn off the answering machine when you do not need
it. Otherwise, the answering machine may interfere with your
normal fax and telephone use.
❏
Let callers know that they can leave a message on the
answering machine and send a fax with just one call. Callers
should manually start the sending operation from their fax
machines after they finish recording their message. To inform
callers of this feature, record an outgoing message similar to
the following:
“Hello. This is (your name or company name). Please leave a
message after the beep. If you would also like to send a fax
without hanging up, you may do so after you finish leaving
your message. Place your document in the sheet feeder and
press START after you leave a message. Thank you.”
❏
Set your answering machine to pick up all calls after one or
two rings only.
❏
Make sure the length of your outgoing message (OGM) is 15
seconds or less.
❏
When recording your outgoing message, do not speak for the
first four seconds; then record your message making it as short
as possible.
❏
If you experience problems with your answering machine
hanging up before the caller can send a fax, see Adjusting the
MultiPASS 1000 for Different Types of Answering Machines on
page 8-7.
8-4 Using the Telephone, an Answering Machine, and a Modem
Chapter 8
Connect the answering machine to the telephone jack marked
:
If you have already connected an extension telephone to the
MultiPASS 1000, you must unplug it to connect the answering
machine.
To connect both an answering machine and an extension telephone
to the MultiPASS 1000, you must connect the telephone to the
answering machine. (Follow the directions in your answering
machine’s manual to connect the extension telephone to the
answering machine.)
Chapter 8
Using the Telephone, an Answering Machine, and a Modem
8-5
Using the
Telephone
Connecting the Answering Machine
Turning on Automatic Receiving for Messages
and Documents
To set the MultiPASS 1000 to allow callers to leave a message and
send documents when you are away from your office, follow these
steps:
ANS HOOK UP
1.
Make sure the answering machine is properly connected to the
MultiPASS 1000 (see page 8-5).
2.
When you leave the office, press the ANS HOOK UP/MANUAL
button until the ANS HOOK UP light comes on.
MANUAL
❏ Now callers may leave messages and/or send documents.
❏ If your MultiPASS 1000 runs out of paper or ink, it receives
the document and stores it in memory. (To print out
documents in memory, see Receiving Documents in Memory
on page 7-7.)
ANS HOOK UP
MANUAL
3.
When you return, press the ANS HOOK UP/MANUAL button
until both lights are off. Also, turn off the answering machine.
❏ Alternatively, press the ANS HOOK UP/MANUAL button
until only the MANUAL light is on. In this case, the
MultiPASS 1000 will only receive documents manually.
(See Receiving Documents Manually on page 7-9.)
8-6 Using the Telephone, an Answering Machine, and a Modem
Chapter 8
When you use the MultiPASS 1000 with an answering machine, the
MultiPASS 1000 automatically switches to automatic receiving
after a caller leaves a message. This allows the caller to send a
document after leaving a message.
However, most answering machines hang up after a certain period
of silence. If the MultiPASS 1000 has not switched to automatic
receiving before your answering machine disconnects the call, the
caller must make another call to send a document.
If you experience this problem, follow these steps to make the
MultiPASS 1000 switch to automatic receiving more quickly.
1.
Press FUNCTION.
SELECT MENU
2.
Press 5.
SELECT MENU
5.RX SETTINGS
3.
Press START/COPY.
RX SETTINGS
1.ECM RX
<
>
4.
Press the arrow buttons until this display appears:
RX SETTINGS
4.ANS/FAX SWITCH
5.
Press START/COPY.
ANS/FAX SWITCH
OFF
<
>
6.
Press the arrow buttons to change the setting to ON.
ANS/FAX SWITCH
ON
Chapter 8
Using the Telephone, an Answering Machine, and a Modem
8-7
Using the
Telephone
Adjusting the MultiPASS 1000 for Different Types of
Answering Machines
7.
Press START/COPY.
ANS/FAX SWITCH TIME
4
8.
Press the numeric buttons to enter the number of seconds you
want the MultiPASS 1000 to wait before switching to automatic
receiving.
❏ You can choose from 1 to 99 seconds. The number of
seconds you choose must be less than the time it takes the
answering machine to hang up the phone after the caller
finishes leaving a message. (This will depend on the model
of the answering machine.)
❏ In this example, the MultiPASS 1000 will switch to fax
mode after four seconds of silence.
9.
Press START/COPY.
ANS/FAX SWITCH TIME
DATA ENTRY OK
10. Press STOP.
N
If your answering machine does not record at all or does not finish
recording the voice message, change the ANS/FAX SWITCH to OFF.
When the ANS/FAX SWITCH is set to OFF, the MultiPASS 1000
switches to automatic receiving only for fax machines that use
CNG (calling tone). Some fax machines (especially older models)
do not send a CNG tone. In this case, you need to set the ANS/FAX
SWITCH to ON.
8-8 Using the Telephone, an Answering Machine, and a Modem
Chapter 8
You can connect an extension phone to the MultiPASS 1000 and
use it to make and receive phone calls.
Connecting the Extension Telephone
If you have already connected an answering machine to the
telephone jack, you must unplug it to connect an extension
telephone to this jack.
To connect both an answering machine and an extension telephone
to the MultiPASS 1000, you must connect the telephone to the
answering machine. (Follow the directions in your answering
machine’s manual to connect the extension telephone to the
answering machine.)
Connect the extension phone to the telephone jack marked
:
L
Chapter 8
Using the Telephone, an Answering Machine, and a Modem
8-9
Using the
Telephone
Using an Extension Telephone Connected to
the MultiPASS 1000
Calling with the Extension Telephone
1.
Lift the handset.
2.
When you hear the dial tone, dial the number you wish to call.
Receiving Calls and Documents Automatically with
the Extension Telephone
You can receive phone calls and documents with the extension
telephone connected exactly as if you were using the handset of the
MultiPASS 1000. See Receiving Calls and Documents Automatically on a
Shared Fax/Telephone Line on page 8-2.
Using a Data Modem with the MultiPASS 1000
Connecting the Data Modem
Connect the line jack on your data modem to the extension phone
jack
on the MultiPASS 1000.
L
8-10 Using the Telephone, an Answering Machine, and a Modem
Chapter 8
When you are using your data modem for communications, the
MultiPASS 1000 recognizes that the line is busy and does not
attempt to use the line to start fax communication. However, when
the MultiPASS 1000 is in a fax communication, the data modem
cannot recognize that the line is being used by the MultiPASS 1000.
Before starting data communication with your modem, you must
check the LCD display on the MultiPASS 1000 to see if it is in the
standby mode. Only start data communications when the
MultiPASS 1000 is in standby mode.
N
Chapter 8
Only share the phone line attached to the MultiPASS 1000 with
your data modem if you will use the modem to initiate calls. If you
would like to have others access your computer by calling you, or
if you use your modem very frequently, you will need a dedicated
telephone line for your modem.
Using the Telephone, an Answering Machine, and a Modem
8-11
Using the
Telephone
Avoiding Conflict Between Fax and Data
Communications
8-12 Using the Telephone, an Answering Machine, and a Modem
Chapter 8
Chapter 9
Using Special Dialing
❏
Change dialing systems depending upon your access needs.
❏
Learn where and how to insert pauses when dialing telephone
and fax numbers or connecting through a switchboard.
❏
Use a distinctive ringing pattern (DRP) service.
This chapter includes:
❏
Changing dialing systems
•
Switching to pulse dialing
• Switching to tone dialing temporarily to access on-line
services
❏
❏
Chapter 9
Using the PAUSE button
•
Dialing or registering long distance numbers
•
Connecting through a switchboard
•
Entering pauses
•
Changing the length of the pause time
Using the MultiPASS 1000 with a distinctive ringing pattern
(DRP) service
•
Setting the MultiPASS 1000 for DRPD use
•
Communicating using a distinctive ringing pattern detector
Using Special Dialing
9-1
Using Special
Dialing
This chapter helps you:
Changing Dialing Systems
There are two dialing systems: touch-tone and rotary pulse. If you
need to switch to pulse from the factory-set tone setting, use the
procedure described in the following section.
If you are unsure what type of dialing setting to use, contact your
local telephone company.
Switching to Pulse Dialing
1.
Press FUNCTION.
SELECT MENU
2.
Press 2.
SELECT MENU
2.USER SETTINGS
3.
Press START/COPY.
USER SETTINGS
1.SET TIME
<
>
4.
Press the arrow buttons until the following display appears.
USER SETTINGS
12.TEL LINE TYPE
5.
Press START/COPY.
TEL LINE TYPE
TOUCH TONE
9-2 Using Special Dialing
Chapter 9
<
>
6.
Press the arrow buttons until the following display appears.
TEL LINE TYPE
ROTARY PULSE
7.
Press START/COPY.
8.
Using Special
Dialing
TEL LINE TYPE
DATA ENTRY OK
Press STOP.
Switching to Tone Dialing Temporarily to Access
On-line Services
If your telephone system uses pulse dialing, you can still use online services that require tone dialing to make selections. The
following procedure allows you to temporarily set the MultiPASS
1000 to send tone signals.
1.
Dial the telephone number of the on-line information service.
2.
Press TONE.
3.
Use the numeric keypad to make your selections.
When you hang up, the MultiPASS 1000 automatically switches
back to pulse dialing.
Chapter 9
Using Special Dialing
9-3
Using the PAUSE Button
In certain cases, to dial long distance numbers and to dial through
a switchboard, you must enter a pause using the PAUSE button.
Dialing or Registering Long Distance Numbers
When dialing or registering long distance fax/telephone numbers,
you sometimes need to insert a pause. The location of the pause
and the actual pause time differ depending on the telephone
number being dialed and the telephone network in which you are
communicating. See Entering Pauses below for examples of where
you may have to insert pauses. If you are unsure about where to
enter a pause in a number, contact your local telephone company.
Connecting Through a Switchboard
If your MultiPASS 1000 is connected to a switchboard (PBX
internal switching system), you may first have to dial an outside
line access number when dialing or registering fax/telephone
numbers. See Entering Pauses below for examples of where you
may have to insert pauses. If you are unsure about where to enter a
pause in a number, contact your local telephone company.
Entering Pauses
The following examples show where you may have to insert a
pause.
❏
A pause within a telephone number
9PAUSE13334445600
❏
A pause at the end of a telephone number
9884444PAUSE
❏
(2 seconds)
(10 seconds)
Continuous pauses
7PAUSE PAUSE14445556700
(2 second + 2 second =
4 seconds)
You can change the length of the pause time of pauses entered
within a telephone number. See the next section.
Pauses entered at the end of numbers are fixed at 10 seconds and
cannot be changed.
9-4 Using Special Dialing
Chapter 9
Changing the Length of the Pause Time
To change the length of the pauses that you enter within a telephone
number by pressing the PAUSE button, follow these steps.
1.
Press FUNCTION.
2.
Using Special
Dialing
SELECT MENU
Press 4.
SELECT MENU
4.TX SETTINGS
3.
Press START/COPY.
TX SETTINGS
1.ECM TX
<
>
4.
Press the arrow buttons until the following display appears.
TX SETTINGS
2.MID PAUSE SET
5.
Press START/COPY.
MID PAUSE SET
2
6.
Use the numeric keypad to enter the pause time in seconds
(between 1 and 15).
MID PAUSE SET
8
7.
Press START/COPY.
MID PAUSE SET
DATA ENTRY OK
8.
Chapter 9
Press STOP.
Using Special Dialing
9-5
Using the MultiPASS 1000 with Distinctive
Ringing Pattern (DRP) Service
Some phone companies offer a distinctive ringing pattern (DRP)
service whereby they assign two or more telephone numbers with
distinctive ringing patterns to an existing single telephone line. If
your phone company offers such a service, you can have both a fax
number(s) and a telephone number(s) for your MultiPASS 1000
using only one telephone line.
Your MultiPASS 1000 will automatically detect incoming calls.
Based on the distinctive ringing pattern, the MultiPASS 1000 will
know if the call is from a fax machine trying to send a document or
from a telephone trying to make a voice call.
Use the information in this section to set up the MultiPASS 1000 for
use with a DRP service.
N
This feature is called Distinctive Ringing Pattern Detector (DRPD).
For more details on a DRP service, contact your local telephone
company. (Your telephone company may have a different name for
this service. Also, this service may not be offered in all areas.)
Setting the MultiPASS 1000 for DRP Use
Your telephone company will assign a distinctive ringing pattern
to each number when you order the DRP service.
N
The setting you make with the following procedure must match
the setting assigned by the telephone company.
You can set the MultiPASS 1000 to ring in different ways:
❏
Normal ring:
Ring type of normal telephone line
❏
Double ring:
Two short rings at regular intervals
❏
Triple ring:
Short-short-long at regular intervals
❏
Triple ring:
Short-long-short at regular intervals
❏
Other ring type: Patterns other than those described above
9-6 Using Special Dialing
Chapter 9
To set the MultiPASS 1000 to ring in different ways with DRP
service, follow these steps:
1.
Press FUNCTION.
2.
Using Special
Dialing
SELECT MENU
Press 5.
SELECT MENU
5.RX SETTINGS
3.
Press START/COPY.
RX SETTINGS
1.ECM RX
<
>
4.
Press the arrow buttons until the following display appears.
RX SETTINGS
10. DRPD
5.
Press START/COPY.
DRPD
OFF
<
>
6.
Press the arrow buttons until the following display appears.
DRPD
ON
7.
Press START/COPY.
DRPD
1.NORMAL RING
Chapter 9
Using Special Dialing
9-7
<
>
8.
Press the arrow buttons until the type of ringing pattern you
want to set appears. Choose from:
1.NORMAL RING
2.DOUBLE RING
3.SHORT-SHORT-LONG
4.SHORT-LONG-SHORT
5.OTHER RING TYPE
9.
Press START/COPY.
DOUBLE RING
FAX
<
>
10. Press the arrow buttons until the communication type you
wish to assign to the ring pattern just selected appears. Choose
from:
TEL—Ringing pattern assigned to telephone number
FAX —Ringing pattern assigned to fax number
FAX/TEL SWITCH—Ringing pattern assigned to shared
fax/telephone number
11. Press START/COPY.
DOUBLE RING
DATA ENTRY OK
12. If you want to set the ringing pattern for other numbers, start
again with step 8. Otherwise, press STOP.
N
When DRPD is set to ON, the communication type for each ringing
pattern defaults to FAX. After you select the ringing pattern that
has been assigned for your fax communications, you must set the
other ringing patterns to TEL. Otherwise, the MultiPASS 1000 may
answer as a fax for each ringing pattern.
9-8 Using Special Dialing
Chapter 9
Communicating Using the Distinctive Ringing Pattern
Detector (DRPD) Feature
N
It’s a good idea to use DRP service with automatic receiving only.
MultiPASS 1000 set for automatic receiving
(ANS HOOK UP and MANUAL lights off)
❏
When someone calls using the number assigned for telephone
communication, the MultiPASS 1000 rings in the pattern you
registered in the above procedure. When you hear the
telephone call ring pattern, simply pick up the handset (or
extension phone) and talk. If you do not pick up the handset,
the MultiPASS 1000 continues to ring until the other party
hangs up.
❏
When someone sends a fax using the number assigned for fax
communication, the MultiPASS 1000 does not ring. It receives
the document automatically.
MultiPASS 1000 set for manual receiving
(MANUAL light on)
When you receive a call over any of the numbers in the DRP
system, the MultiPASS 1000 rings in the appropriate pattern you
registered earlier. Pick up the handset.
❏
If the call is from a person, talk normally.
❏
If you hear a slow beep, press START/COPY to receive a fax.
MultiPASS 1000 set for an answering machine
(ANS HOOK UP light on)
Chapter 9
❏
When someone calls using the number assigned for telephone
communication, the MultiPASS 1000 rings in the pattern you
registered earlier. While the MultiPASS 1000 rings, the
answering machine connects and then takes over the call.
❏
When someone sends a fax using the number assigned for fax
communication, the MultiPASS 1000 receives the document
automatically.
Using Special Dialing
9-9
Using Special
Dialing
Using the MultiPASS 1000 with a DRP service is almost the same
as using it with a normal telephone line. When you receive calls,
however, the MultiPASS 1000 responds somewhat differently, as
described below.
MultiPASS 1000 set for automatic switching
between fax and telephone calls
The MultiPASS 1000 monitors all incoming calls for all the
numbers with DRPD and rings in the patterns registered earlier. It
then answers the telephone for you and checks to see if the call is
from another fax machine or from a person wanting to talk to you.
If the call is from another fax, the MultiPASS 1000 automatically
receives the document. If the call is from a person, the MultiPASS
1000 rings again to alert you to pick up the phone.
N
No matter which number receives a call, if you hear a slow beep
signifying another fax trying to send you a document, press
START/COPY to receive the document.
9-10 Using Special Dialing
Chapter 9
Chapter 10
Special Sending Procedures
❏
Sending to more than one location.
❏
Sending documents at a preset time.
❏
Sending through a relay fax.
❏
Sending a confidential document.
❏
Requesting documents from other fax machines (polling).
Special Sending
Procedures
This chapter describes sending procedures you can use to save time
and money. It includes:
Sending to More than One Location
(Broadcasting)
You can feed a document once and automatically send it to up to 97
destinations when you use an automatic dialing method (other
than directory dialing). See Chapter 6, Using Automatic Dialing, for
details on using the automatic dialing methods.
If you often send to the same group of destinations, see Group
Dialing in Chapter 6 to register the fax numbers for the group.
You can send to a total of 97 destinations as follows:
One-touch speed dialing = 16 destinations
Coded speed dialing
= 80 destinations
Regular dialing
= 1 destination
or
Group dialing
= 95 destinations
You can enter the one-touch speed dialing and coded speed dialing
destinations in any order. You simply press the one-touch speed
dialing button, or press the CODED DIAL/DIRECTORY button
followed by the two-digit code (on the numeric keypad).
You can also include one destination using regular dialing.
Remember that when using regular dialing, you must press
START/COPY after entering the number.
N
Chapter 10
To send a document to more than one location, you must use
memory sending. You can send up to 50 letter-size pages (based on
the CCITT #1 Chart).
Special Sending Procedures
10-1
Transmitting the Document
To send your document to more than one location, follow these
steps:
1.
If necessary, press START/COPY to print any documents that
have been received in memory. (See Receiving Documents in
Memory on page 7-7 for details.)
❏ The LCD display alerts you if a received document is
stored in memory.
2.
Place your document face down in the Automatic Document
Feeder (ADF).
❏
3.
If the document has more than 30 pages, see Sending Large
Documents on page 5-10.
Press FUNCTION.
SELECT MENU
4.
Press MEMORY TRANSMISSION on the one-touch speed dialing
keypad.
DOCUMENT READY
MEMORY
5.
Enter the fax numbers.
TEL=
N
12345678999
❏
You can send to up to 97 destinations.
❏
Simply enter the numbers one after the other: press the
desired one-touch speed dialing button or press CODED
DIAL/DIRECTORY followed by the two-digit code (on the
numeric keypad).
You can enter only one number directly from the keypad using
regular dialing. Remember to press START/COPY after entering the
number.
You must press each button within five seconds of the preceding
one. The MultiPASS 1000 begins the operation approximately five
seconds after you press the last button.
10-2 Special Sending Procedures
Chapter 10
6.
N
Press START/COPY.
If the last number you enter is regular dialing, you must press
START/COPY twice.
Sending Documents at a Preset Time
You can use any dialing method to dial fax numbers to send a
document to up to 97 destinations at a preset time. See Sending to
More Than One Location on page 10-1 for details.
1.
If necessary, press START/COPY to print any documents that
have been received in memory. (See Receiving Documents in
Memory on page 7-7 for details.)
❏
2.
The LCD display alerts you if a received document is
stored in memory.
Place the document you want to send face down in the
Automatic Document Feeder (ADF).
❏ If the document has more than 30 pages, see Sending Large
Documents on page 5-10.
3.
Press FUNCTION.
SELECT MENU
4.
Press DELAYED TRANSMISSION on the one-touch speed dialing
keypad.
DELAYED TX
SET TIME
Chapter 10
14:15
Special Sending Procedures
10-3
Special Sending
Procedures
To take advantage of lower late-night, long-distance rates given by
some telephone companies, you can send a document at a preselected time.
5.
Use the numeric keypad to enter the time you want to send the
document.
❏
Set the time using the 24-hour system. If the hour or
minute is a single digit, precede it with a zero. For
example:
07:30 = 7:30 a.m.
17:05 = 5:05 p.m.
❏
6.
If you make an error entering the time, press CLEAR. Then
enter the correct time.
Press START/COPY.
TEL=
7.
Enter the fax number(s).
❏ You can use any dialing method: regular dialing,
one-touch speed dialing, or coded speed dialing.
❏
N
You can send to up to 97 destinations. See Sending to More
Than One Location on page 10-1 for details.
You can enter only one number directly from the keypad using
regular dialing. Remember to press START/COPY after entering the
number.
If the last number you enter is regular dialing, you must press
START/COPY twice.
8.
Press START/COPY.
❏
The MultiPASS 1000 scans the pages into memory. See
Sending Large Documents on page 5-10 for details.
The MultiPASS 1000 sends the document at the preset time. See
Transmitting the Document on page 5-11 for details.
To cancel the preset sending operation, see Canceling Preset Sending
on page 10-5. To change the settings for preset sending, first cancel
the preset sending operation; then repeat this procedure from the
beginning.
After the MultiPASS 1000 sends the document, the preset time
clears. The preset time also clears if you unplug the unit or if there
is a power failure.
10-4 Special Sending Procedures
Chapter 10
Sending Other Documents While the MultiPASS 1000 Is Set
for Preset Sending
You can send, receive, and copy other documents even when the
MultiPASS 1000 is set for sending at a preset time.
N
The MultiPASS 1000 can only register one preset sending operation
at a time.
Special Sending
Procedures
To send or copy other documents after setting the MultiPASS 1000
to send at a preset time, simply send or copy using any sending
procedure in this manual. Make sure there is enough room in
memory to store the additional documents.
Canceling Preset Sending
To cancel preset sending, follow these steps:
1.
Press FUNCTION.
SELECT MENU
2.
Press DELAYED TRANSMISSION.
DELAYED TX
SET TIME
3.
Press CLEAR.
DELAYED TX
SET TIME
4.
14:17
:
Press START/COPY.
ERASING END
Preset sending is canceled. To register a new time or fax number,
see Sending Documents at a Preset Time on page 10-3.
Chapter 10
Special Sending Procedures
10-5
Sending Through a Relay Fax
Using a Canon relay fax can save you time and money. For
example, if you want to send a document long distance to a group
of offices located in the same area, you can save on telephone
charges by sending through a Canon relay fax. First you send the
document to the relay fax. The relay fax receives the document as
one long distance telephone call. The relay fax then sends the
document to the other destinations as either local or short distance
toll calls.
You can send a document to up to 97 relay fax machines.
Sending Documents to a Relay Fax
If you often use the same relay fax, you can register the procedure
for one-touch or coded speed dialing; see page 10-8 for details.
1.
Make sure the party relaying your document has a Canon fax
with relay capability.
2.
Find out the group number (also called the “table number”)
from the relaying party.
❏
A group number is a two-digit number between 00 and 99
that contains the fax numbers of all the offices to receive
the document.
3.
Make sure your fax number is registered with the relay fax.
4.
Place the document face down in the Automatic Document
Feeder (ADF).
5.
Press FUNCTION.
SELECT MENU
6.
Press RELAY BROADCAST on the one-touch speed dialing
keypad.
RELAY BROADCAST
RELAY TX GROUP #
10-6 Special Sending Procedures
00
Chapter 10
7.
Use the numeric keypad to enter the group number.
❏
❏
If the group number is a single digit, precede it with 0.
If you make an error entering the group number, press
CLEAR and then enter the number correctly.
8.
Press START/COPY.
DOCUMENT READY
RELAY 08
To use memory sending or to send to more than one relay fax,
press FUNCTION. Otherwise, go to step 11.
Special Sending
Procedures
9.
SELECT MENU
N
If you are sending to more than one relay fax, you must use
memory sending.
10. Press MEMORY TRANSMISSION.
DOCUMENT READY
RELAY 08 MEMORY
11. Enter the fax number(s).
❏
If you are using direct sending, you can send to one relay
fax only.
❏
If you are using memory sending, you can send to up to 97
relay fax machines. See Sending to More Than One Location
on page 10-1 for details.
12. Press START/COPY.
❏
If you are using memory sending, the MultiPASS 1000
scans up to 50 letter-size pages (based on CCITT #1 Chart)
into memory. See Sending Large Documents on page 5-10 for
details.
The MultiPASS 1000 sends the document to the relay fax(es). See
Transmitting the Document on page 5-11 for details.
Chapter 10
Special Sending Procedures
10-7
Registering the Relay Procedure for One-touch or Coded
Speed Dialing
If you often send documents through the same relay fax machine,
you can register the entire relay sending procedure for one-touch
or coded speed dialing.
1.
Make sure the party relaying your document has a Canon fax
with relay capability.
2.
Find out the group number (also called the “table number”)
from the relaying party.
❏
3.
A group number is a two-digit number between 00 and 99
that contains the fax numbers of all of the destinations to
receive the document.
Press FUNCTION.
SELECT MENU
4.
Press 1.
SELECT MENU
1.TEL REGISTRATION
5.
6.
Register the relay fax number for either one-touch speed
dialing or coded speed dialing.
❏
To register the relay fax number for one-touch speed
dialing, see page 6-1 (steps 3 to 6).
❏
To register the relay fax number for coded speed dialing,
see page 6-7 (steps 3 to 7).
Press START/COPY.
❏
Enter the name you want associated with this relay fax
number; see page 3-4.
10-8 Special Sending Procedures
Chapter 10
7.
Press START/COPY.
NEED TO SET TX MODE?
YES < > NO
>
8.
You must set the transmission mode, so press < to choose YES.
❏
If you do not have any problems sending faxes to the relay
location, press START/COPY twice and go to the next step.
❏
If you have problems faxing to the relay location, see page
5-10 for details on Customizing the Transmission Mode before
you proceed.
CODED DIAL
*00=REGULAR TX
<
>
9.
MODE 3
Special Sending
Procedures
<
Press the arrow buttons to display ORIG RELAY TX.
CODED DIAL
MODE 3
*00=ORIG RELAY TX
10. Press START/COPY.
CODED DIAL
DATA ENTRY OK
MODE 3
11. Use the numeric keypad to enter the group number of the
relay fax.
CODED
*00=GROUP #
RELAY TX
00
12. Press START/COPY.
CODED
RELAY TX
DATA ENTRY OK
13. To register additional fax numbers for relay sending, begin
again from step 5. Otherwise, press STOP.
Chapter 10
Special Sending Procedures
10-9
Using One-touch or Coded Relay Sending
Before starting, confirm the following:
❏
Your fax number is registered with the relay fax.
❏
The fax numbers of the receiving fax machines (final
destinations) are registered with the relay fax.
❏
Your fax number is registered in your MultiPASS 1000.
❏
You have registered the relay procedure for one-touch or
coded speed dialing as described above.
Follow these steps:
1.
Place the document face down in the Automatic Document
Feeder (ADF).
2.
To use memory sending or to send to more than one relay fax,
press FUNCTION and then press MEMORY TRANSMISSION.
Otherwise, skip this step.
3.
Press the one-touch speed dialing button or press CODED
DIAL/DIRECTORY and the two-digit code (on the numeric
keypad) that you registered for relay sending.
❏
If you are using direct sending, you can send to only one
relay fax.
❏
If you are using memory sending, you can send to up to 97
relay fax machines. See Sending to More Than One Location
on page 10-1 for details.
• First make sure that each speed dialing number is
registered for relay sending.
• You can also use one-touch or coded speed dialing
buttons registered for group dialing as long as each
number in the group is registered for relay sending.
If you are using memory sending, the MultiPASS 1000 scans the
document into memory. See Sending Large Documents on page 5-10
for details.
The MultiPASS 1000 sends the document to the relay fax
machine(s). See Transmitting the Document on page 5-11 for details.
10-10 Special Sending Procedures
Chapter 10
Sending a Confidential Document
1.
Make sure you have the confidential mailbox number of the
receiving party.
2.
Place the document face down in the Automatic Document
Feeder (ADF).
3.
Press FUNCTION.
SELECT MENU
4.
Press CONFID. TRANSMISSION on the one-touch speed dialing
keypad.
CONFIDENTIAL TX
SET CONFID MBOX # 00
5.
Use the numeric keypad to enter the confidential mailbox
number of the receiving party.
CONFIDENTIAL TX
SET CONFID MBOX # 55
❏ Confidential mailbox numbers are two-digit numbers
between 00 and 99. If the mailbox number is a single digit,
precede it with a zero.
❏ If you make a mistake when entering the number, press
CLEAR and enter the number again.
6.
Press START/COPY.
DOCUMENT READY
CONF.55
Chapter 10
Special Sending Procedures
10-11
Special Sending
Procedures
You can send a confidential document to another Canon fax that
has the confidential mailbox capability. When the confidential
document is sent, it is stored in the confidential mailbox of the
receiving fax rather than being printed out. The user of the
receiving fax can print the document only after supplying the
correct password.
7.
Dial the number of the receiving fax.
TEL=
4445588
❏ You can use regular dialing, one-touch speed dialing, or
coded speed dialing. See Chapter 6, Using Automatic
Dialing, for details on speed dialing.
8.
Press START/COPY.
DIALING
4445588
The MultiPASS 1000 begins sending the document. See
Transmitting the Document on page 5-11 for details.
Sending One-touch or Coded Speed Dialing
Confidential Documents
If you often send confidential documents to the same party, you
can register the entire confidential sending procedure for onetouch or coded speed dialing. After you register the procedure, all
you have to do is feed your document into the MultiPASS 1000
and press the appropriate speed dialing button or the CODED
DIAL/DIRECTORY button and two-digit code (on the numeric
keypad).
Registering the confidential sending procedure for
one-touch or coded speed dialing
1.
Make sure the receiving party has a Canon fax with
confidential receiving capability.
2.
Find out the confidential mailbox number of the receiving
party.
3.
Press FUNCTION.
SELECT MENU
4.
Press 1.
SELECT MENU
1.TEL REGISTRATION
10-12 Special Sending Procedures
Chapter 10
6.
Register the fax number for either one-touch speed dialing or
coded speed dialing.
❏
To register the fax number for one-touch speed dialing, see
page 6-1 (steps 3 to 6).
❏
To register the fax number for coded speed dialing, see
page 6-7 (steps 3 to 7).
Press START/COPY.
❏
7.
Enter the name you want associated with this confidential
number, see page 3-4.
Press START/COPY.
NEED TO SET TX MODE?
YES < > NO
<
>
8.
You must set the transmission mode, so press < to choose YES.
❏
If you do not have any problems sending faxes to the
confidential location, press START/COPY twice and go to
the next step.
❏
If you have problems faxing to the confidential location,
see page 5-10 for details on Customizing the Transmission
Mode before you proceed.
1-TOUCH SPD
F04=REGULAR TX
<
>
9.
MODE 3
Press the arrow buttons to display CONFIDENTIAL TX.
1-TOUCH SPD
MODE 3
F04=CONFIDENTIAL TX
Chapter 10
Special Sending Procedures
10-13
Special Sending
Procedures
5.
10. Press START/COPY.
1-TOUCH SPD CONFID
F04=MAILBOX #
00
11. Use the numeric keypad to enter the confidential mailbox
number of the receiving party.
1-TOUCH SPD CONFID
F04=MAILBOX #
16
12. Press START/COPY.
1-TOUCH SPD CONFID
DATA ENTRY OK
13. To register additional fax numbers for confidential sending,
begin again from step 5. Otherwise, press STOP.
10-14 Special Sending Procedures
Chapter 10
Using one-touch or coded confidential sending
Make sure the receiving party has a Canon fax with
confidential receiving capability.
2.
Find out the confidential mailbox number of the receiving
party.
3.
Make sure the fax number is registered for confidential
sending.
4.
Place the document into the Automatic Document Feeder
(ADF).
5.
To use memory sending or to send to more than one
destination, press FUNCTION and then press MEMORY
TRANSMISSION. Otherwise, skip this step.
Special Sending
Procedures
1.
DOCUMENT READY
MEMORY
6.
Press the one-touch speed dialing button or press CODED
DIAL/DIRECTORY and the two-digit code that you registered
for confidential sending.
❏
If you are using direct sending, you can only send to one
location.
❏
If you are using memory sending, you can send to up to 97
locations. See page 10-1 for details.
• First make sure that each speed dialing number is
registered for confidential sending.
• You can also use one-touch or coded speed dialing
buttons registered for group dialing as long as each
number in the group is registered for confidential
sending.
If you are using memory sending, the MultiPASS 1000 scans the
document into memory. See page 5-6 for details.
The MultiPASS 1000 sends the document. See Transmitting the
Document on page 5-11 for details.
Chapter 10
Special Sending Procedures
10-15
Requesting Documents from Other
Fax Machines (Polling)
The polling feature allows you to request a document to be sent
from another fax machine. Whenever you are ready to receive the
document, you request it. The sending party simply leaves the
document in the Automatic Document Feeder (ADF) of their fax
machine.
This section shows you how to:
❏
Register your polling ID
❏
Poll other fax machines
❏
Allow other fax machines to poll you
❏
Poll at a preset time
❏
Cancel preset polling
Registering Your Polling ID
Polling IDs are eight-digit numbers consisting of only zeros and
ones. Keep in mind these special polling IDs:
N
11111111
Your MultiPASS 1000 sends documents when it
receives a polling request even if the other party’s
polling ID does not match or the other party does not
have a Canon fax.
00000000
This ID turns off the polling feature.
If you use a polling ID other than 11111111, the other party must
be a Canon fax and your IDs must match.
1.
Make sure the ID you register matches the other IDs in the
polling network.
2.
Press FUNCTION.
SELECT MENU
10-16 Special Sending Procedures
Chapter 10
3.
Press 8.
SELECT MENU
8.SYSTEM SETTINGS
4.
Press START/COPY.
SYSTEM SETTINGS
1.RX RESTRICTION
<
>
5.
Press the arrow buttons until the following display appears.
6.
Special Sending
Procedures
SYSTEM SETTINGS
2.PASSWORD
Press START/COPY.
PASSWORD
00000000
7.
8.
Use the numeric keypad to enter your 8-digit polling ID.
❏
Use 0s and 1s to enter the polling ID.
❏
If you make an error entering a number, press CLEAR.
Then enter the number again.
Press START/COPY.
PASSWORD
DATA ENTRY OK
9.
Chapter 10
Press STOP.
Special Sending Procedures
10-17
Polling Other Fax Machines
Use this procedure to request that another fax machine send a
document. The other fax must have polling capability and the
document must be placed in the document feeder or loaded in
memory to be polled.
1.
Make sure no documents are fed into your MultiPASS 1000.
2.
Press FUNCTION.
SELECT MENU
3.
Press POLLING on the one-touch speed dialing keypad.
06/06/95
POLLING
4.
Enter the fax number(s) you want to poll.
❏
You can poll up to 97 destinations. See page 10-1 for
details.
TEL=
5.
11:40
12345678999
Press START/COPY.
POLLING
Your MultiPASS 1000 receives the document.
❏
The MultiPASS 1000 beeps once when the document is
received without errors.
❏
The MultiPASS 1000 automatically redials if the other fax does
not answer or if the line is busy. (You can specify the number
of times it redials; see Auto Redial on page 5-17.)
❏
If an error occurs during reception, the MultiPASS 1000 beeps
intermittently for a few seconds. If this happens, try polling
again.
❏
To stop polling while receiving, press STOP.
❏
If the ALARM light is flashing, clear the error and press STOP. If
necessary, refer to Chapter 14, Troubleshooting.
10-18 Special Sending Procedures
Chapter 10
Allowing Others to Poll Your MultiPASS 1000
Use this procedure to allow others to call your MultiPASS 1000 to
receive a document. Your polling ID must be 11111111 or the other
fax must be a Canon fax and must have your polling ID registered.
ANS HOOK UP
1.
Press the ANS HOOK UP/MANUAL button.
MANUAL
❏
N
Make sure you make the appropriate settings for sending the
fax.
Remember the receiving fax has no control over the document
settings (such as density control, type of document).
3.
Place the document into the Automatic Document Feeder
(ADF).
Your MultiPASS 1000 sends the document when it receives a
polling request from the other fax.
To cancel polling before the MultiPASS 1000 sends the document,
remove the document from the feeder.
N
To turn off this feature, set your ID to 00000000.
Polling at a Preset Time
Use this procedure to request a document from another fax at a
preset time.
1.
Press FUNCTION.
SELECT MENU
2.
Press DELAYED POLLING on the one-touch speed dialing
keypad.
DELAYED POLLING
SET TIME
Chapter 10
15:24
Special Sending Procedures
10-19
Special Sending
Procedures
2.
Both the ANS HOOK UP and MANUAL lights should be off. If
they are not off, press the ANS HOOK UP/MANUAL button
again until both lights are off.
3.
Use the numeric keypad to enter the time that you want to poll
the other fax.
❏
Set the time using the 24-hour system. If the hour or
minute is a single digit, precede it with a zero. For
example:
07:30 = 7:30 a.m.
17:05 = 5:05 p.m.
❏
4.
If you make an error entering the time, press CLEAR. Then
enter the correct time.
Press START/COPY.
TEL=
5.
Dial the fax number(s) you want to poll.
❏
6.
You can poll up to 97 destinations. See page 10-1 for
details.
Press START/COPY.
POLLING
TX/RX NO.
XXXX
The LCD displays:
06/21/95
TIMER
17:10
Your MultiPASS 1000 begins receiving the document at the preset
time.
❏
The MultiPASS 1000 beeps once when the document is
received without errors.
❏
The MultiPASS 1000 automatically redials if the other fax does
not answer or if the line is busy. (You can specify the number
of times it redials; see Auto Redial on page 5-17.)
❏
If an error occurs during reception, the MultiPASS 1000 beeps
intermittently for a few seconds. If this happens, try polling
again.
❏
To stop polling while receiving, press STOP.
❏
If the ALARM light is flashing, clear the error and press STOP. If
necessary, refer to Chapter 14, Troubleshooting.
10-20 Special Sending Procedures
Chapter 10
Canceling Preset Polling
1.
Press FUNCTION.
SELECT MENU
Press DELAYED POLLING on the one-touch speed dialing
keypad.
DELAYED POLLING
SET TIME
3.
Press CLEAR on the one-touch speed dialing keypad.
DELAYED POLLING
SET TIME
4.
16:54
Special Sending
Procedures
2.
:
Press START/COPY.
ERASING END
Chapter 10
Special Sending Procedures
10-21
10-22 Special Sending Procedures
Chapter 10
Chapter 11
Printing Fax Reports
❏
Printing a fax cover sheet
❏
Printing activity reports
❏
❏
Chapter 11
•
Printing a single transaction activity report
•
Printing an activity management report
•
Printing a selective activity report
•
Receiving a relay broadcast report
•
Receiving a memory clear report
Printing Fax
Reports
This chapter describes how to use the MultiPASS 1000 for printing
different fax transaction and management reports, how to print a
generic fax cover page, and how to print lists of your registered
information. It includes:
Printing lists of registered information
•
Printing automatic dialing lists
•
Printing a user’s data list
Customizing reports and lists
Printing Fax Reports
11-1
Printing a Fax Cover Sheet
1.
Press FUNCTION.
SELECT MENU
2.
Press REPORT.
SELECT MENU
1.ACTIVITY REPORT
<
>
3.
Press the arrow buttons until the following appears.
SELECT MENU
7.PRT FAX COVER PG.
4.
Press START/COPY.
PRINTING
The MultiPASS 1000 prints a generic fax cover page you can use
when sending your fax information.
FACSIMILE MESSAGE
DATE: _____________________
TO:
____________________________________
FROM:
____________________________________
PHONE/FAX: ____________________________________
SUBJECT:
____________________________________
NUMBER OF PAGES INCLUDING COVER _______
11-2 Printing Fax Reports
Chapter 11
Printing Activity Reports
To help you monitor sending and receiving activities, the
MultiPASS 1000 can print many useful reports. These reports help
you confirm the date and time of a fax transaction, and whether or
not each transaction was successfully completed.
N
Before printing a report, confirm that the MultiPASS 1000 is
displaying the correct date and time so your reports will show the
correct information. See page 3-7 for details.
Printing a Single Transaction Activity Report
You can set the MultiPASS 1000 to print a single transaction
activity report every time you send or receive a document.
The REPORT SETTINGS menu contains selections for transmitting
(TX REPORT) and receiving (RX REPORT). For both of these
selections, you can specify the following:
❏
OUTPUT NO
❏
Printing Fax
Reports
Turns off the activity report features
OUTPUT YES
Prints an activity report after every sending/receiving
transaction
❏
PRINT ERROR ONLY
Prints an activity report only if an error occurs while sending
or receiving
If you chose OUTPUT YES or PRINT ERROR ONLY for the TX REPORT,
you can also select whether or not to automatically print the first
page of the document. This option is available if you are sending
from memory. You will see the TX CONFIRMATION REP option,
which includes these selections:
❏
OUTPUT YES
Prints a copy of the first page (it may not print the entire page)
❏
OUTPUT NO
Does not print a copy of the first page
Chapter 11
Printing Fax Reports
11-3
Follow these steps to change the transaction activity report
settings:
1.
Press FUNCTION.
SELECT MENU
2.
Press 3.
SELECT MENU
3.REPORT SETTINGS
3.
Press START/COPY.
REPORT SETTINGS
1.TX REPORT
<
>
4.
Press the arrow buttons until the type of report you wish to set
appears.
1.TX REPORT—for sending operations
2.RX REPORT—for receiving operations
5.
Press START/COPY.
TX REPORT
OUTPUT NO
<
>
6.
Press the arrow buttons to choose the setting you want. For
example:
TX REPORT
PRINT ERROR ONLY
7.
Press START/COPY.
TX REPORT
DATA ENTRY OK
<
>
8.
If you selected a TX REPORT in step 6, press the arrow buttons
to choose whether or not you want to automatically print the
first page of a document.
TX CONFIRMATION REP.
OUTPUT YES
11-4 Printing Fax Reports
Chapter 11
9.
Press START/COPY.
TX CONFIRMATION REP.
DATA ENTRY OK
10. To change settings for another report, repeat this procedure
from step 4. Otherwise, press STOP.
Each single transaction activity report shows:
❏
The transaction mode and number
❏
The telephone number and name of the party (if the name is
registered in your MultiPASS 1000 or the number identifies a
Canon fax)
❏
The start time (date and time) and usage time of a transaction
❏
The number of pages and the result of the transaction
06/10/95
18:00
333-444-5566
CANON U.S.A.
WESTERN REGION
001-/001
Printing Fax
Reports
***************************
***** ACTIVITY REPORT *****
***************************
TRANSMISSION OK
TX/RX NO.
CONNECTION TEL
CONNECTION ID
START TIME
USAGE TIME
PAGES
RESULT
0008
3460 8403
ZUD’S
01/13 11:29
00’53
1
OK
CANON U.S.A., INC.
ONE CANON PLAZA
LAKE SUCCESS, N.Y. 11042-1113
Telephone: (516) 488-6700
General Fax Telephone
(516) 328-5069
Spring 1995
Dear Canon Customer:
Thank you for purchasing the new Canon MultiPASS 1000 Document Processing
System. We are sure your new system will help you work more efficiently and
expand your work capacity.
The new MultiPASS 1000 is a complete 6-in-1 desktop system for your home or
small office. Your new system provides the following functions:
❏
❏
❏
Plain paper fax
PC fax
Printer
❏
❏
❏
Scanner
Copier
Telephone
Your MultiPASS 1000 includes the MultiPASS Desktop Manager for Windows.
This exclusive Canon software package manages the printing, scanning, and
faxing activities of your MultiPASS 1000 on your computer in a single
management application.
Chapter 11
Printing Fax Reports
11-5
N
To print this activity report, the bottom portion of your document
will not be printed.
If the result of a transmission is NG, the transaction is not
complete. The number under NG shows you the number of pages
that were sent normally; the number following the # sign is an
error code. See Display Messages and Actions in Chapter 14 for error
codes.
Printing an Activity Management Report
An activity management report provides information on the last 20
sending and receiving transactions performed.
Whenever you want to print an activity management report,
follow these steps:
1.
Press FUNCTION.
SELECT MENU
2.
Press REPORT on the one-touch speed dialing keypad.
SELECT MENU
1.ACTIVITY REPORT
3.
Press START/COPY.
The MultiPASS 1000 prints the activity management report. Each
report shows:
❏
The transaction mode
❏
The telephone number and names of the parties sending or
receiving (if the name is registered in your MultiPASS 1000 or
the number identifies a Canon fax)
❏
The start time (date and time) of the transactions
❏
The usage time, which is the amount of time it took to send or
receive the fax.
❏
The number of pages of the transaction
❏
The result, which indicates whether each transaction was
successfully completed
11-6 Printing Fax Reports
Chapter 11
***************************
***** ACTIVITY REPORT *****
***************************
MODE
CONNECTION TEL CONNECTION ID
START TIME
USAGE T
PAGES
RESULT
16667778888
12086662233
14192223344
15163334455
06/25
06/25
06/25
06/25
07’00
02’57
01’51
00’35
8
3
4
0
OK
OK
OK
NG
0 ##280
NG
0 ##280
OK
0 ##280
OK
OK
OK
NG
0 ##280
NG
0 ##280
NG
0 ##280
OK
OK
OK
OK
OK
OK
*TX
*TX
*TX
*TX
G3
G3
G3
G3
*TX
ECM 15163334455
JOHN DOE
LINDA SMITH
MARY JONES
CANON USA
09:08
09:22
09:51
10:30
CANON USA
06/25 10:32
00’34
0
*MEMORY RX ECM 15163336666
PRINT CORP.
06/25 10:32
00’34
0
*TX
*RX
*TX
*TX
ECM
ECM
ECM
ECM
15163334455
15163334455
15163334455
17147778988
CANON USA
CANON USA
CANON USA
GRAPHICS CORP.
06/25
06/25
06/25
06/25
10:34
10:42
11:38
11:59
02’07
07’48
18’41
00’21
3
15
30
0
*TX
G3
17147778999
GRAPHICS CORP.
06/25 12:04
00’22
0
*TX
G3
1208666777
BRAD THOMAS
06/25 12:07
00’00
0
*TX
*AUTO RX
*AUTO RX
*AUTO RX
*TX
*TX
ECM
ECM
ECM
ECM
G3
G3
15163334455
15163334499
15163336666
15165557777
17145557788
15163334455
CANON USA
CANON FAX - HQ
CANON USA FAX
CANON USA FAX
MICHELE JONES
CANON USA
06/25
06/25
06/25
06/25
06/25
06/25
07’00
03’37
03’03
00’57
02’57
01’51
18
9
7
2
5
4
Printing Fax
Reports
12:08
19:46
20:19
20:41
12:22
12:51
If the result of a transaction is NG, the transaction is not complete.
The number on the left shows the number of pages that were sent
normally. The number following the # sign is an error code. See
Display Messages and Actions in Chapter 14 for error codes.
Printing Selective Activity Management Reports
To print an activity management report automatically, you can
select one of the following options:
❏
AUTO PRINT
Prints an activity management report automatically after each
20 transactions
❏
DAILY REPORT TIME
Prints an activity management report automatically at the
same time each day
❏
TX/RX SEPARATE
Divides the activity management report into sending and
receiving transactions
Chapter 11
Printing Fax Reports
11-7
Follow these steps:
1.
Press FUNCTION.
SELECT MENU
2.
Press 3.
SELECT MENU
3.REPORT SETTINGS
3.
Press START/COPY.
REPORT SETTINGS
1.TX REPORT
<
>
4.
Press the arrow buttons until the following display appears.
REPORT SETTINGS
3.ACTIVITY REPORT
5.
Press START/COPY.
ACTIVITY REPORT
1.AUTO PRINT
<
>
6.
Press the arrow buttons until the option you wish to select
appears.
1.AUTO PRINT
2.DAILY REPORT TIME
3.TX/RX SEPARATE
7.
Press START/COPY. For example:
DAILY REPORT TIME
OUTPUT NO
<
>
8.
Press the arrow buttons to make your selection. For example:
DAILY REPORT TIME
OUTPUT YES
11-8 Printing Fax Reports
Chapter 11
9.
Press START/COPY.
DAILY REPORT TIME
DATA ENTRY OK
N
If you select DAILY REPORT TIME, you will be prompted to enter the
time. Enter the time and then press START/COPY.
10. Press STOP.
Receiving a Relay Broadcast Report
If you do not receive a report, it could be that the relay fax is not
set for sending relay broadcast reports. If in doubt about the
outcome of a relay transaction, contact the operator of the relay
fax machine.
Receiving a Memory Clear Report
If a power failure occurs while there is a document in memory
waiting to be sent, the MultiPASS 1000 automatically prints a
memory clear report. This report shows important information
about the document so that you can locate it and try to send it
again.
*******************************
***** MEMORY CLEAR REPORT *****
*******************************
TX/RX NO.
0001
0002
0003
Chapter 11
MODE
CONNECTION TEL
PAGES
MEMORY RX
MEMORY RX
MEMORY RX
3214569877
5678521
4758888
1
3
6
SET TIME
START TIME
06/13 10:32
06/13 10:45
06/13 10:49
Printing Fax Reports
11-9
Printing Fax
Reports
After sending a document through a relay fax, you may receive a
Relay Broadcast Report from the fax machine that relayed the
document. This shows whether or not the document was
successfully relayed to all the offices.
Printing Lists of Registered Information
To make sure the information you registered in the MultiPASS
1000 is current, you can print out lists by categories.
Printing Automatic Dialing Lists
You can print the lists of fax and telephone numbers registered for
automatic dialing. The lists available are:
❏
1-TOUCH SPD LIST
Fax and telephone numbers registered for one-touch speed
dialing
❏
CODED SPD LIST
Fax and telephone numbers registered for coded speed dialing
❏
GROUP DIAL LIST
Fax numbers registered for group dialing
❏
EXPANDED DIAL LIST
Fax and telephone numbers registered for expanded dialing
Follow these steps to print a list:
1.
Press FUNCTION.
SELECT MENU
2.
Press REPORT on the one-touch speed dialing keypad.
SELECT MENU
1.ACTIVITY REPORT
<
>
3.
Press the arrow buttons until the list you want to print
appears. For example:
SELECT MENU
2.1-TOUCH SPD LIST
11-10 Printing Fax Reports
Chapter 11
4.
Press START/COPY.
ACTIVITY REPORT
The following sample shows a one-touch speed dialing list:
****************************************
***** 1-TOUCH SPD DIALING FAX LIST *****
****************************************
SD #
CONNECTION TEL
CONNECTION ID
MODE
[F04]
[F05]
[F05]
[F09]
[F010]
[F011]
[F013]
15163334455
4993377
17144447777
12086667777
17147778888
17146662222
7772244
JOHN DOE
JUDY JOHNSON
MICHELE JONES CONFID.TX
BRAD THOMAS
GRAPHICS CORP. CONFID.TX
STOP THE PRESS
BOB BUTLER
ORIG.TX
TX SPEED
9600BPS
9600BPS
9600BPS
9600BPS
9600BPS
9600BPS
9600BPS
BOX
0
0
0
0
0
0
0
16
28
00
SD #
[T01]
[T02]
[T05]
[T09]
CONNECTION TEL
18008920020
43339977
17144447788
18006667777
Printing Fax
Reports
****************************************
***** 1-TOUCH SPD DIALING TEL LIST *****
****************************************
CONNECTION ID
CANON USA
JUDY JOHNSON
MICHELE JONES
GRAPHICS CORP.
Printing a User’s Data List
If you want to review all of the settings available and the selections
currently in place for your MultiPASS 1000, such as your company
name and telephone number, print a USER’S DATA LIST following
these steps:
1.
Press FUNCTION.
SELECT MENU
2.
Press REPORT.
SELECT MENU
1.ACTIVITY REPORT
Chapter 11
Printing Fax Reports
11-11
<
>
3.
Press the arrow buttons until the following display appears.
SELECT MENU
6.USER’S DATA LIST
4.
Press START/COPY.
ACTIVITY REPORT
The following sample shows the first page of a user’s data list.
****************************
***** USER’S DATA LIST *****
****************************
USER SETTINGS
USER’S TEL _____
USER’S ID _____
TTI OPTION SET
TX TERMINAL ID
TTI POSITION
TTI MARKER
TYPE OF DOCUMENT
DENSITY CONTROL
OFFHOOK ALARM
HOLD MELODY
VOLUME CONTROL
CALLING VOLUME
ALARM VOLUME
KEYPAD VOLUME
RX CALL LEVEL
DIALING TONE
TEL LINE TYPE
XXXXXXXXXXX
XXXXXXXXXXXXXXX
_____
_____
_____
_____
_____
_____
_____
ON
OUTSIDE IMAGE
FAX
HALFTONE
4
ON
OFF
_____
_____
_____
_____
_____
_____
VOL MIN
VOL MIN
VOL MIN
LOW
ON
TOUCH TONE
REPORT SETTINGS
TX REPORT _____
RX REPORT _____
ACTIVITY REPORT
AUTO PRINT
TX/RX SEPARATE
REPORT FONT SET
PRT DIRECTION
ECONOMY PRT
11-12 Printing Fax Reports
OUTPUT NO
OUTPUT NO
_____
_____
_____
_____
_____
OUTPUT NO
ON
ROMAN
BI-DIRECTION PRT
OFF
Chapter 11
Customizing Reports and Lists
You can change how reports and lists print on your MultiPASS
1000 by changing these REPORT SETTINGS:
❏
REPORT FONT SET
Changes the typeface (font) of the fax reports; you can choose
from:
ROMAN
SANS SERIF
DRAFT
COURIER
PRESTIGE
SCRIPT
ORATOR
ORATOR-S
❏
PRT DIRECTION
Changes the fax print speed for reports
BI-DIRECTION PRT: Faster print, normal print quality
ONE DIRECTION PRT: Slower print, high print quality
❏
ECONOMY PRT
N
Printing Fax
Reports
Changes the print quality for fax reports
ON: Ink-saving, normal print quality
OFF: Normal ink usage, high print quality
These options affect only how reports and lists print.
Follow these steps to change the print speed and quality or the
typeface of reports:
1.
Press FUNCTION.
SELECT MENU
2.
Press 3.
SELECT MENU
3.REPORT SETTINGS
3.
Press START/COPY.
REPORT SETTINGS
1.TX REPORT
Chapter 11
Printing Fax Reports
11-13
<
>
4.
Press the arrow buttons until the item you want to change
appears on the display. For example:
REPORT SETTINGS
5.PRT DIRECTION
5.
Press START/COPY.
PRT DIRECTION
BI-DIRECTION PRT
<
>
6.
Press the arrow buttons to select the setting. For example:
PRT DIRECTION
ONE DIRECTION PRT
7.
Press START/COPY.
PRT DIRECTION
DATA ENTRY OK
8.
If you want to change other items, start again from step 4.
Otherwise, press STOP.
11-14 Printing Fax Reports
Chapter 11
Chapter 12
Miscellaneous Printer Operations
This chapter describes miscellaneous printer operations you can
perform with your MultiPASS 1000. It includes:
❏
Changing printer settings
Changing Printer Settings
You can customize the built-in bubble jet printer settings by
changing the following selections in the PRINTER SETTINGS menu:
❏
SELECT PAPER SIZE
Changes the paper size that the MultiPASS 1000 uses: letter,
(8.5 x 11”) legal (8.5 x 14”) or A4 (8.25 x 11.7”).
LTR
A4
LEGAL
❏
RX REDUCTION
ON
OFF
❏
INK DETECTOR
Turns the ink detector on or off; the ink detector prints a small
square box on the bottom right of incoming documents to help
you estimate the amount of ink remaining. Turning this feature
on allows the MultiPASS 1000 to check automatically if there is
enough ink in the cartridge.
ON
OFF
N
Chapter 12
When set to OFF, the MultiPASS 1000 cannot detect when an ink
cartridge runs out of ink. Instead of displaying the CHANGE
CARTRIDGE message and storing the document in memory, the
MultiPASS 1000 continues to print (even blank pages).
Miscellaneous Printer Operations
12-1
Miscellaneous
Printer Operations
Selects a reduction mode for incoming documents. When
reduction mode is turned on, you can select a reduction size of
75%, 85%, 90%, or 95%. Also, you can specify whether the
reduction is to be vertical only or both vertical and horizontal.
When set to ON, all documents are reduced.
❏
PRINTING DENSITY
Changes the print density of documents from lighter to darker;
the light setting lightens documents you receive or copy (for
example, lines appear thinner).
STANDARD
LIGHT
❏
PRT DIRECTION
Changes the print speed of documents by selecting
bi-directional or unidirectional; bi-directional is faster
print speed, normal print quality; unidirectional is slower
print speed, high print quality. Setting this option to
unidirectional produces clearer print quality, but slower
print speed.
BI-DIRECTION PRT
ONE DIRECTION PRT
❏
ECONOMY PRT
Prints using less ink to extend cartridge life; print appears
lighter on page.
ON: Ink-saving, normal print quality
OFF: Normal ink usage, high print quality
12-2 Miscellaneous Printer Operations
Chapter 12
To change any of the printer settings, follow these steps:
1.
Press FUNCTION.
SELECT MENU
2.
Press 6.
SELECT MENU
6.PRINTER SETTINGS
3.
Press START/COPY.
PRINTER SETTINGS
1.SELECT PAPER SIZE
<
>
4.
Press the arrow buttons until the item you want to change
appears on the display. For example:
PRINTER SETTINGS
4.PRINTING DENSITY
5.
Press START/COPY.
<
>
6.
Miscellaneous
Printer Operations
PRINTING DENSITY
STANDARD
Press the arrow buttons to select the setting. For example:
PRINTING DENSITY
LIGHT
7.
Press START/COPY.
PRINTING DENSITY
DATA ENTRY OK
8.
Chapter 12
If you want to change other items, start again from step 4.
Otherwise, press STOP.
Miscellaneous Printer Operations
12-3
12-4 Miscellaneous Printer Operations
Chapter 12
Chapter 13
Maintaining the MultiPASS 1000
This chapter covers the care and maintenance required for your
Canon MultiPASS 1000. It includes:
❏
Cleaning the MultiPASS 1000
❏
Cleaning the print head unit
❏
Ink cartridge guidelines
❏
Replacing the ink cartridge
Cleaning the MultiPASS 1000
Your MultiPASS 1000 requires little routine maintenance. Perform
the following maintenance, as necessary, to keep your MultiPASS
1000 in good operating condition.
N
❏
Be very careful when cleaning the MultiPASS 1000.
❏
Do not use tissue paper when cleaning the unit; tissue paper
can stick to the components or generate a static charge.
❏ If necessary, press START/COPY to print out any documents in
memory. See Receiving Documents in Memory on page 7-7 for
details.
C
Chapter 13
1.
Unplug the MultiPASS 1000 from the electrical outlet.
2.
Lightly wipe the MultiPASS 1000 with a clean, soft cloth
moistened with water or a diluted dishwashing detergent
solution.
Do not use thinner, benzene, alcohol, or other inorganic solvents
on, inside, or near your MultiPASS 1000. These substances may
discolor the unit or cause an equipment malfunction.
Maintaining the MultiPASS 1000
13-1
Maintaining the
MultiPASS 1000
To clean the outer casing, follow these steps:
Cleaning the Scanner Components
If you notice that documents you copy have black vertical lines (or
if the receiving party complains that the documents you send are
dirty), follow this procedure to clean the MultiPASS 1000
components.
1.
Unplug the MultiPASS 1000 from the electrical outlet.
2.
Lift open the operation panel.
❏
Carefully reach into the document feeder area and pull the
operation panel toward you.
OPERATION PANEL
BACK OF UNIT
3.
Lift the white roller up as far as possible from the scanning
glass.
❏
Lift the roller on one side, either the right or left.
❏
The roller comes up about 1/2 inch; it does not come all
the way out.
13-2 Maintaining the MultiPASS 1000
Chapter 13
4.
5.
Use a soft cotton swab (either dry or moistened with water) to
gently wipe the scanning glass under the roller.
❏
Hold the roller up with one hand and hold the cotton swab
in the other hand.
❏
Move the cotton swab from side to side several times to
clean the scanning glass.
Use a clean soft cloth to clean the roller.
❏
Do not use tissue paper when cleaning the unit; tissue
paper can stick to the components or generate a static
charge.
Wipe out any paper debris or dust from the feeder area.
7.
Set the roller gently in place without touching the scanning
glass.
Maintaining the
MultiPASS 1000
6.
Chapter 13
Maintaining the MultiPASS 1000
13-3
8.
Press down on the operation panel until it clicks.
❏
Make sure the operation panel is securely closed.
❏
Check that the date and time appear in the LCD display.
13-4 Maintaining the MultiPASS 1000
Chapter 13
Cleaning the Printer Area
To prevent ink spots and paper dust from accumulating and
affecting the print quality of documents, clean the printer area
as follows:
1.
Unplug the MultiPASS 1000 from the electrical outlet.
2.
Open the printer cover.
BLACK
ROLLER
CLEAN THIS
AREA
Chapter 13
Using a dry, soft cloth, gently wipe out the area next to the ink
cartridge. Make sure you do not touch the ink cartridge and
avoid touching the black roller with your hands.
4.
Close the printer cover.
Maintaining the
MultiPASS 1000
3.
Maintaining the MultiPASS 1000
13-5
Cleaning the Print Head
The print head contains nozzles through which ink is propelled
onto the paper. The print head nozzles must be free from paper
particles and dust in order to maintain a high level of print quality.
The MultiPASS 1000 has an automatic cleaning function that clears
away paper particles and dust. The MultiPASS 1000 initiates this
automatic cleaning function each time you turn the printer on.
However, you can manually activate the print head cleaning
procedure whenever print quality is poor.
N
You must clean the print head when installing a new BX-2 or
BC-02 ink cartridge to ensure the best possible print quality.
Starting Print Head Cleaning
To start print head cleaning, follow these steps:
1.
ON LINE
2.
Turn on the printer.
❏
Press the PRINTER button.
❏
Make sure the printer light comes on.
Make sure the printer is on-line.
❏
The ON LINE light will be on.
3.
Open the printer panel cover.
4.
Press and hold the ON LINE and PRINT MODE buttons (together)
until the ON LINE light starts to blink.
❏
The ON LINE light blinks for about 12 seconds while the
MultiPASS 1000 cleans the print head.
PRESS HERE
FOR CLEANING
SHQ
ON LINE
LF/FF
HS
HQ
PRINT MODE
4.
After cleaning, press the PRINTER button to turn off the
printer.
13-6 Maintaining the MultiPASS 1000
Chapter 13
N
❏ Clean the print head only when you encounter a print quality
problem or when you have installed a new BX-2 or BC-02 ink
cartridge. Unnecessary and repetitious print head cleaning
wastes ink.
Ink Cartridge Guidelines
Use only the Canon BX-2 or BC-02 ink cartridge with the
MultiPASS 1000.
Each ink cartridge contains enough ink to print about 700 pages in
standard mode and 1400 pages in economy mode (based on CCITT
#1 Chart).
The actual amount of ink that you use will vary depending on the
print density of a page. If the majority of your printed output is
graphics, you may need to change the ink cartridge more often
than when you are receiving or printing text only.
N
Chapter 13
❏
Your printed output is not crisp and clear, and there are gaps
in the characters (missing dots) even after you have cleaned
the print head once or twice and you have removed and
reinstalled the ink cartridge a few times.
❏
You have been using the ink cartridge for over six months.
Canon makes numerous ink cartridges; the BX-2 and BC-02 ink
cartridge are designed to be used with the MultiPASS 1000 and are
the only ones you should use.
Maintaining the MultiPASS 1000
13-7
Maintaining the
MultiPASS 1000
You may need to replace the ink cartridge when either of the
following conditions exist:
Ink Cartridge Maintenance
One of the most important things you can do to extend the life of
your MultiPASS 1000 and to ensure optimum print quality is take
care of the ink cartridges.
To ensure excellent print quality, follow these guidelines for
maintaining the ink cartridges:
❏
Store ink cartridges at room temperature and protect them
from direct sunlight.
❏
Keep the ink cartridge in its sealed container until you are
ready to use it.
❏
Install the ink cartridge in the MultiPASS 1000 immediately
after opening the sealed container.
❏
Keep the ink cartridge in its home position (left side of the
printer) when you are not using the MultiPASS 1000. Leaving
it out of its home position will cause the print head to dry out.
(Make sure the printer light is off whenever you unplug the
MultiPASS 1000.)
❏
Perform the print head cleaning when your print quality is not
satisfactory. (See page 13-6 for instructions.)
❏
Replace the ink cartridge when the print quality does not
improve after one or two print head cleanings. (Also try
removing and reinstalling the ink cartridge a few times.)
❏
Do not touch the print head area on the ink cartridge. Ink may
leak out and cause stains.
❏
Do not vigorously shake the ink cartridge while handling it.
❏
Do not attempt to disassemble or refill an ink tank.
If spilled, the ink is very difficult to clean. Therefore, always follow
these precautions and carefully handle the ink cartridges.
13-8 Maintaining the MultiPASS 1000
Chapter 13
Replacing the Ink Cartridge
1.
Open the printer cover.
❏
Lift from both sides.
❏ The cartridge holder may move to the left side of the
MultiPASS 1000 or it may already be there.
Pull the green lever on the cartridge holder forward to the
open position.
Maintaining the
MultiPASS 1000
2.
Chapter 13
Maintaining the MultiPASS 1000
13-9
3.
Remove the used ink cartridge.
❏ Lift it straight up and off the yellow post of the cartridge
holder.
4.
Take the new ink cartridge out of its box and remove the
protective packaging from the cartridge.
❏ Lift off the orange cap from the print head and remove the
orange tape.
PRINT HEAD
(DO NOT TOUCH)
PRINT HEAD
CAP
PROTECTIVE TAPE
13-10 Maintaining the MultiPASS 1000
Chapter 13
5.
Set the ink cartridge straight down onto the cartridge holder.
❏ Center the cartridge slot over the yellow post and place the
cartridge gently on the post. (The cartridge will not be
aligned yet.)
CARTRIDGE SLOT
YELLOW POST
6.
Push the green lever up and back until it locks the ink
cartridge into place.
❏ The ink cartridge will align automatically as you press the
lever back.
Maintaining the
MultiPASS 1000
❏ Make sure the ink cartridge is securely in place.
Chapter 13
Maintaining the MultiPASS 1000
13-11
7.
C
Close the printer cover.
Do not try to move the ink cartridge holder manually. Attempting
to do so may damage the print mechanism.
8.
Press STOP on the operation panel.
9.
Clean the new print head.
❏
See page 13-6 for instructions.
If the LCD displays the CHANGE CARTRIDGE message, repeat these
steps until the date and time appear.
13-12 Maintaining the MultiPASS 1000
Chapter 13
Chapter 14
Troubleshooting
This chapter contains information to help you solve problems that
may occur while you are using your MultiPASS 1000. It includes:
❏
Clearing paper jams
❏
Problems and solutions
❏
Display messages and actions
A problem may have one or a combination of causes, including a
malfunction in your computer, the software, the parallel cable, or
the MultiPASS 1000 itself. The information presented in this
chapter will help you locate the problem.
This chapter also lists the messages that appear in the LCD display
of your control panel. Messages may provide the status of the
MultiPASS 1000 or may indicate a problem has occurred.
If your MultiPASS 1000 is not operating properly, try the
suggestions in this chapter. If you have a problem you cannot
resolve by referring to the information in this chapter, contact:
Canon U.S.A. Consumer Information Service
1-800-828-4040
The staff can provide you with the telephone number of your local
Canon Authorized Service Facility (ASF).
N
Attempting to repair the MultiPASS 1000 yourself may void the
warranty.
Chapter 14
❏
Product name
❏
Serial number
❏
Place of purchase
❏
Nature of problem
❏
Steps you have taken to solve the problem and the results
Troubleshooting
Troubleshooting
Before contacting Canon, make sure you have the following
information:
14-1
Clearing Paper Jams
N
Do not unplug the MultiPASS 1000. This will erase any data stored
in memory.
Removing Jammed Paper from the Cassette Area
1.
Remove the paper cassette.
2.
Gently pull the jammed paper out.
14-2 Troubleshooting
Chapter 14
3.
4.
Remove the paper from the cassette.
❏
Fan the paper and tap it on a flat surface to even out the
stack.
❏
Then reinsert the paper into the cassette making sure to
push it down under the tabs at the back of the cassette.
❏
Make sure the thickness of the stacked paper is less than
3/4 inch (20 mm). (Use plain white, 20 lb paper.)
Insert the paper cassette until it is securely in place.
❏
5.
Make sure the slot for the paper cassette is free of any
jammed paper.
Press STOP to clear the LCD display and turn off the ALARM
light.
If you cannot reach the jammed paper from the paper cassette slot,
lift the top cover and check for the paper. (See the next section.)
Removing Jammed Paper from the Printer Area
Open the printer cover.
❏
2.
Chapter 14
The cartridge moves to the left (it may already be in the left
position). Wait until the cartridge holder stops moving.
Gently pull the jammed paper out. (See the illustration on the
next page.)
❏
Make sure the printer light is off.
❏
If the cartridge is not all the way to the left and the paper is
jammed there, gently move the cartridge left and remove
the paper.
Troubleshooting
14-3
Troubleshooting
1.
3.
Close the printer cover.
4.
Press STOP.
Removing Jammed Paper from the Bottom of the
MultiPASS 1000
If you have looked in both the paper cassette area and the printer
area and have not been able to locate the jammed paper, follow
these steps:
1.
Remove the paper cassette and the document supports from
the MultiPASS 1000.
2.
Hold the front of the MultiPASS 1000 and carefully tilt it back.
3.
Notice the opening on the bottom of the unit.
❏
If the paper is jammed in this opening, remove it now.
4.
Carefully lower the MultiPASS 1000.
5.
Replace the paper cassette and the document supports.
6.
Press STOP.
14-4 Troubleshooting
Chapter 14
Problems and Solutions
This section lists common problems and their solutions.
Sending Problems
You cannot send documents
❏
Make sure you are feeding the document properly into the
Automatic Document Feeder (ADF). See Chapter 4, Preparing
Documents and Making Copies.
❏
Make sure the other party has installed recording paper in
their fax and that their fax is in the receive mode.
❏
Make sure there is a dial tone when you lift the handset.
❏
Make sure your dialing method, touch tone or pulse, is set
correctly. See Chapter 9, Using Special Dialing, for details.
❏
Print an activity report and check for an error code. See
Printing Activity Reports on page 11-3.
You cannot send documents through relay units
❏
Make sure the other unit is a Canon fax machine with relay
capability.
❏
Make sure you have registered your fax number in the
MultiPASS 1000. See Chapter 3, Registering Information in
the MultiPASS 1000.
❏
Make sure your fax number is registered with the relay fax
unit.
❏
Make sure that the fax numbers of the receiving “final
destinations” are registered with the relay fax.
Chapter 14
❏
Make sure the other unit is a Canon fax machine with
confidential receiving capability.
❏
Make sure the confidential mailbox number you entered
matches that of the other party.
❏
Make sure the other party has registered the mailbox to which
you are sending.
❏
See Chapter 10, Special Sending Procedures, for details on
sending a confidential document.
Troubleshooting
14-5
Troubleshooting
You cannot send confidential documents
The images you send are dirty or spotted
❏
Make sure the document scanning glass is clean.
❏
Clean the scanning glass. See Chapter 13, Maintaining the
MultiPASS 1000, for details.
Receiving Problems
You cannot receive documents automatically
❏
Make sure all the MultiPASS 1000 connections are secure.
❏
Make sure the MultiPASS 1000 is set to receive documents
automatically. See Chapter 7, Receiving Fax Documents.
❏
Make sure you have printed out any documents received in
memory. See Receiving Documents in Memory on page 7-7 for
details.
❏
Make sure paper is installed in the paper cassette.
❏
Check the LCD display for an error message. See page 14-10
for details.
❏
Print an activity report and check for an error code. See
Printing Activity Reports on page 11-3.
You cannot receive documents manually
❏
Make sure you have not fed a document into the
Automatic Document Feeder (ADF).
❏
Make sure you press START/COPY before hanging up the
receiver.
❏
Make sure you have printed out any documents received in
memory. See Receiving Documents in Memory on page 7-7 for
details.
❏
Check the LCD display for an error message. See page 14-10
for details.
The images you receive are dirty or spotted
❏
Make sure the other party’s fax machine is working properly.
❏
Print a report and then make a copy on the MultiPASS 1000.
If the image is OK, then the MultiPASS 1000 is operating
properly. Contact the other party and have them check their
machine.
14-6 Troubleshooting
Chapter 14
You cannot poll other units
❏
Make sure you have not fed a document into the Automatic
Document Feeder (ADF).
❏
Make sure your polling ID matches that of the other party.
❏
Make sure paper is loaded in the paper cassette.
❏
Make sure the other party has set their fax to receive
automatically.
❏
Make sure the other party has properly fed the document into
their fax.
❏
See Chapter 10, Special Sending Procedures, for details on
polling.
Nothing appears on the printed page
❏
Clean the print head several times.
❏
Make sure the ink cartridge is installed properly. See Replacing
the Ink Cartridge on page 13-9.
❏
Make sure the INK DETECTOR option is set to ON. See Changing
Printer Settings on page 12-1.
❏
Try another ink cartridge.
Other Problems
You cannot make copies
❏
Make sure the handset is on the hook.
❏
Make sure a document is set in the Automatic Document
Feeder (ADF).
❏
Print an activity report to ensure the MultiPASS 1000 is
working properly.
Chapter 14
❏
Make sure the ANS HOOK UP light is on.
❏
See Chapter 8, Using the Telephone, an Answering Machine, and a
Modem, for details.
Troubleshooting
14-7
Troubleshooting
You cannot use the answering machine
You cannot make a phone call using regular dialing
❏
Make sure you set the MultiPASS 1000 according to the kind of
telephone line you have.
❏
Check the cable connections.
❏
Make sure the power cord is plugged in.
You cannot make a phone call using the one-touch
speed dialing buttons
❏
Make sure there is not a document fed into the MultiPASS
1000.
❏
Print a one-touch speed dialing list and confirm that the
numbers are registered correctly. See Chapter 11, Printing Fax
Reports.
The MultiPASS 1000 does not switch from fax
communication to phone communication
❏
Make sure you set the MultiPASS 1000 for both fax and
telephone communications.
❏
Make sure the MultiPASS 1000 is set-up to receive both
documents and telephone calls automatically.
❏
See Chapter 7, Receiving Fax Documents, for details.
Nothing appears on the LCD display
❏
Make sure the power cord is firmly plugged in.
❏
Unplug the power cord and plug it back in.
You cannot do anything with the MultiPASS 1000
❏
The MultiPASS 1000 may have overheated and shut itself
down. Let it cool down, then try using it again.
❏
Unplug the MultiPASS 1000. Wait ten seconds and plug it in
again. Then try the procedure again.
❏
Sometimes the problem may be caused by the other party’s fax.
If you are sure your MultiPASS 1000 is working properly, have
the other party check their fax. Make sure the fax you are
trying to communicate with is a G3 (group 3) compatible fax
machine.
❏
If you still cannot solve the problem, contact your local Canon
authorized sales or service representatives. You can call the
Canon Consumer Information Service at 1-800-828-4040 for
this information.
14-8 Troubleshooting
Chapter 14
The ALARM Light is Flashing but
No Message Appears
❏
A communications error has occurred. Follow these steps:
1.
Press STOP.
06/25/95
2.
15:44
Press FUNCTION.
SELECT MENU
3.
Press REPORT.
SELECT MENU
1.ACTIVITY REPORT
4.
Press START/COPY.
ACTIVITY REPORT
Troubleshooting
The MultiPASS 1000 prints the current activity report. Check this
report for a communication error.
Chapter 14
Troubleshooting
14-9
Display Messages and Actions
This section describes the messages you see in the LCD display of
your MultiPASS 1000.
❏
Message
BUSY/NO SIGNAL
The Error Code appears on the activity report.
Error
code
# 005/ The telephone number
# 018 you dialed is busy.
14-10 Troubleshooting
Action
Try sending the document
at a later time.
The other party’s fax
is not working.
Contact the other party and
have them check their fax.
The other party is not
using a G3 machine.
Contact the other party and
have them send or receive the
document using a G3
machine.
The touch tone/rotary
pulse setting on your
MultiPASS 1000 is
incorrect.
Set your MultiPASS 1000 to
the setting that matches your
telephone line. See page 9-2.
The receiving fax did
not answer within 35
seconds.
Contact the other party and
have them check their fax.
You can try to send the
document manually. For an
overseas call, add pauses to
the registered number. See
page 9-4.
The ink in the ink
cartridge has run out.
Install a new ink cartridge. See
page 13-9.
The ink in the cartridge
is clogged.
Clean the print head. See
page 13-6.
# 001
Document is jammed.
Remove the document you are
trying to send or copy and
start again.
# 011
The MultiPASS 1000
tried to receive instead
of send because you
did not feed the
document properly.
Feed the document into the
MultiPASS 1000 and start
the operation again.
The MultiPASS 1000
tried to poll another
unit but the other
fax did not have a
document to send.
Contact the other party and
have them set the document
for polling.
CHANGE CARTRIDGE
CHECK DOCUMENT
Cause
Chapter 14
Error
code
Cause
Action
CHECK PAPER COVER
The printer cover is
open.
Close the cover.
CHECK PRINTER
An error occurred in
the printer.
Press STOP. Try your
operation again.
DARK PAPER USED
Colored or stained
paper is loaded in the
paper cassette.
Use clean, white paper, and
print out any documents
stored in memory. Press STOP
then START/COPY to print out
the documents stored in the
memory.
You may have pulled
the paper out before
the MultiPASS 1000
ejected it completely,
causing an error.
Press STOP. The document is
still stored in memory. Press
START/COPY to print the
received documents that
remain in the memory.
The received document
support is not properly
installed, causing the
MultiPASS 1000 to
operate incorrectly.
Press STOP, then install the
received document support
properly. See page 2-27.
There may be a lot of
print around the ink
detector mark, causing
the paper to bow or
fold. This will shift the
ink detector mark
slightly and cause the
ink detector to see black
instead of white.
Press STOP, then set PRINT
DENSITY to LIGHT or set
ECONOMY to ON. This will
It took more than
32 minutes to send or
copy a document.
Divide the document and
send or copy each part
separately.
It took more than
32 minutes to receive
a document.
Contact the other party. Have
them divide the document
and send each part separately.
HANG UP PHONE
The handset is off the
hook.
Hang up the handset.
INCORRECT CARTRIDGE
The wrong type of
cartridge is installed
in the MultiPASS 1000.
Install a Canon BX-2 or BC-02
ink cartridge. See page 13-9.
DOCUMENT TOO LONG # 003
Chapter 14
lighten the image so the paper
will not bow as much.
Troubleshooting
14-11
Troubleshooting
Message
Message
Error
code
MEMORY FULL
# 037
NO ORIGINAL
RELAY TX
14-12 Troubleshooting
Action
The memory of the
MultiPASS 1000 is full
because it has received
too many documents.
Print out any documents that
are stored in memory. Then
start the operation again. See
page 7-7 for details.
The memory is full
because you tried to
send too many
pages at once.
Divide the documents and
send each part separately.
See page 5-10 for details.
Your MultiPASS 1000
If you want the MultiPASS
is sending to more than 1000 to continue, do nothing.
one location.
If you want to stop sending,
press STOP.
MULTI TRANSACTION
ON
NO CONFID. TX
Cause
# 033
You cannot send a
confidential document
because the other
party’s fax does not
have confidential
receiving capability.
Have the other party use a
Canon fax that has the
confidential receiving
feature.
# 034
The confidential box
number you specified
does not exist in the
other party’s fax.
Contact the other party to
obtain the correct confidential
box number.
The memory of the
other fax is full.
Contact the other party and
have them print out the
documents already stored in
the memory of their fax so
you can send your document.
# 035
You cannot relay
Have the other party use a
documents because the Canon fax that has relay
other party’s fax does
capability.
not have relay capability.
# 036
The other party did not
set their fax to operate
as a relay fax.
Contact the other party and
have them make the
appropriate settings in
their fax.
You have specified
the wrong relay group
number.
Contact the other party to
obtain the correct relay group
number.
The memory of the
other fax is full.
Contact the other party and
have them print out the
documents already stored in
the memory of their fax so
you can send your document.
Chapter 14
Message
Error
code
NO RX PAPER
Cause
Action
# 012
The other party’s fax
is out of paper.
Contact the other party and
have them install paper in
their fax.
NO TEL #
# 022
The automatic onetouch speed dialing
button you pressed has
not been registered.
Register the telephone
information before using
the one-touch speed dialing
button. See page 6-1.
POLLING ID ERROR
# 008
Other units cannot poll
your MultiPASS 1000
because the polling IDs
do not match.
Register your polling ID so
that it matches that of the
other unit, or set your polling
ID to 11111111. See page
10-16.
# 021
You cannot poll the
other party’s fax
because the polling IDs
do not match.
Register your polling ID so
that it matches that of the
other fax unit, or have the
other party set their polling ID
to 11111111. See page 10-16.
RECEIVED IN FILE
The MultiPASS 1000 is
in memory receiving
mode set by the
MultiPASS Desktop
Manager for Windows.
However, it cannot
upload the received
documents.
Check the connections on each
end of the parallel interface
cable. Make sure your
computer is turned on.
See page 7-8.
RECEIVED IN MEMORY
The paper or ink ran
out, or a paper jam
occurred, so the
MultiPASS 1000
received the document
in the memory.
Add paper to the paper
cassette, change the ink
cartridge, or clear the
paper jam. To print out the
document from memory,
press STOP and then press
START/COPY. See page 7-7.
The paper has jammed.
Clear the paper jam. See page
14-2.
The paper cassette has
not been completely
inserted into the
MultiPASS 1000.
Insert the paper cassette all
the way into the MultiPASS
1000, and then press STOP.
# 009
Troubleshooting
REC. PAPER JAM
Chapter 14
Troubleshooting
14-13
Message
Error
code
Cause
Action
REDIALING
The MultiPASS 1000 is
waiting to redial the
other party’s number
because the line was
busy or the other party
did not answer when
you first tried to send
the document.
Wait for the MultiPASS
1000 to try redialing. If that
doesn’t work, wait until the
MultiPASS 1000 starts to dial
the number, then press STOP
to cancel redialing. Try to
send the document again at
a later time.
REINSTALL CARTRIDGE
The ink cartridge is
not installed correctly.
Remove and reinstall the
cartridge. See page 13-9.
Dirt has built up on
the contact.
Try removing and reinstalling
the ink cartridge a few times.
If this does not clear the
message, clean the contact
with a cotton swab dampened
with isopropyl alcohol. (The
contact is located on the inside
of the yellow post that holds
the ink cartridge.)
The paper cassette is
not installed correctly
or it is out of paper.
Check the paper cassette.
Make sure paper is loaded
and the cassette is installed
correctly.
SUPPLY REC. PAPER
If this message appears and
the paper cassette is loaded
with paper and seems to be
installed correctly, remove the
paper cassette. Try pressing
down on the stack of paper
toward the back of the
cassette. Press down firmly
several times; this may loosen
the springs that hold the
paper firmly in the cassette.
Make sure the thickness of the
stacked paper is less than 3/4
inch (20 mm).
14-14 Troubleshooting
Chapter 14
Scanning sheet size
Maximum width—8.5” (216 mm)
Minimum width—5.8” (148 mm)
Maximum length—39.4” (1 m)
Minimum length—4.2” (105 mm)
Maximum thickness—0.005” (0.13 mm)
Minimum thickness—0.002” (0.06 mm)
Effective image size
(when scanning)
Width (letter, legal)—8.4” (214 mm)
Printing paper size
Letter—8.5”x 11”
Legal—8.5” x 14”
Transmission time
(Letter-size, standard
document)
G3 ECM MMR approx. 9 seconds*
G3 MR Standard mode approx.
18 seconds
G3 MH Standard mode approx.
19 seconds*
Scanning line density
Horizontal—203 pels/inch
(8.00 pels/mm)
Vertical
Standard—98 lines/inch
(3.85 lines/mm)
Fine—196 lines/inch (7.70 lines/mm)
Scanning method
Solid state electronic scanning by
contact image sensor
Recording method
Bubble Jet printing
Paper cassette capacity
200 pages (letter/legal) of 20 lb
(75g/m2) paper weight
Paper type
Plain cut sheet paper
Paper weight—20 to 24 lb
(75 to 90 g/m2)
Paper thickness—0.003” to 0.004”
(00.1 to 0.12 mm)
*Based on CCITT # 1 Chart, Standard mode
Appendix A
Specifications
A-1
Specifications
Appendix A
Specifications
Applicable lines
Subscriber’s telephone circuit (PSTN)
Auto dial functions
One-touch speed dialing (registration
for 16 numbers)
Coded speed dialing (registration for 80
numbers)
Ink Cartridge
Type:
Ink color:
Print head:
Number of characters
printed:
Approx. 700 pages* per cartridge in
standard mode
Approx. 1400 pages* per cartridge in
economy mode
Ink amount:
Approx. 27 ml
Power source
120V/60Hz
Power consumption
Standby
Operation
N
Canon BX-2 or Canon BC-02 (single
cartridge ink supply)
Black
64 bubble jet nozzles
Approx. 7 W, maximum 7.8 W
68° F (20° C) room temp.
Approx. 27 W, maximum 40 W
(based on all black copy)
Operating environment
Temperature 50° to 90.5° F
(10° to 32.5° C)
Humidity 20 to 80% RH
Dimensions
17.3” (W) x 13” (D) x 7” (H)
440 mm (W) x 332 mm (D) x 179 mm (H)
Weight
Approx. 15.4 lbs. (7 kg) excluding paper
Specifications subject to change without notice.
*Based on CCITT # 1 Chart, Standard mode
A-2 Specifications
Appendix A
Specifications
Document Sizes
The following illustrations show the maximum and minimum
document sizes that can be fed into the fax.
8.5"
(216 mm)
5.8"
(148 mm)
4.2"
(105 mm)
Up to a maximum of 32 minutes
for sending each page
or
39.4" (1 m) in length
The receiving fax machine does not record information in 0.04 inch
of the left and right margins, as shown below:
Legal/Letter
0.04"
(1 mm)
N
Appendix A
8.42"
(214 mm)
0.04"
(1 mm)
Document thickness:
Maximum 0.005” (0.13 mm)
Minimum 0.002” (0.06 mm)
Specifications
A-3
Interface Specifications
The MultiPASS 1000 is equipped with a standard bi-directional
parallel port, which supports the IEEE™ 1284-B standard.
The port on the MultiPASS 1000 enables it to transmit data back
and forth to your computer. Therefore, you can send documents
from your computer to your MultiPASS 1000 to be printed and
faxed (transmitted). Also the MultiPASS 1000 can send scanned
documents and received faxes directly to your computer.
The standard bi-directional parallel port does not require a special
parallel port on your computer, nor do you need to purchase an
interface board. The bi-directional parallel port is compatible with
most standard Centronics-type parallel interface ports that come
with computers. The parallel interface connector on the MultiPASS
1000 is a standard 36-pin, Amphenol type with two metal-wire
retaining clips:
BI-DIRECTIONAL
PARALLEL PORT
You can also use this port as a normal Centronics-type unidirectional parallel port when you use the MultiPASS 1000 as a
normal printer.
The interface cable must be constructed of American Wire Gauge
(AWG) No. 28 or larger. The maximum length of the twisted-pair,
shielded cable must be approximately 6.6 feet (2.0 m).
A-4 Specifications
Interface type
IEEE 1284-B
Bi-directional parallel
Centronics parallel
Data transmission
Host to peripheral
8-bit parallel interface (compatible with
IBM and other personal computers)
Appendix A
Low: 0.0 V to +0.4 V
High: +2.4 V to +5.0 V
Interface cable
Twisted-pair, shielded cable
AWG28 or larger
Up to 6.6 feet (2.0 m)
Interface connectors
Amphenol 57-40360 (or equivalent) at
MultiPASS 1000
Amphenol 57-30360 (or equivalent) at
cable side
Specifications
Signal voltage levels
Input circuit
Output circuit
The names in parentheses show the
signals when you use the MultiPASS
1000 as a normal printer.
Appendix A
Specifications
A-5
Pin assignments
The following table lists the signals and input/output status of the
pin assignments used for parallel communication. (The names in
parentheses show the signals when you use the MultiPASS 1000 as
a normal printer.)
No. Signal
I/O
No. Signal
I/O
1
(STROBE)
HOSTCLK
IN
19
STROBE-RET1
2
(DATA 1)
IN/OUT
20
DATA 1-RET
3
(DATA 2)
IN/OUT
21
DATA 2-RET
4
(DATA 3)
IN/OUT
22
DATA 3-RET
5
(DATA 4)
IN/OUT
23
DATA 4-RET
6
(DATA 5)
IN/OUT
24
DATA 5-RET
7
(DATA 6)
IN/OUT
25
DATA 6-RET
8
(DATA 7)
IN/OUT
26
DATA 7-RET
9
(DATA 8)
IN/OUT
27
DATA 8-RET
10
(ACKNLG)
PTRCLK
OUT
28
ACKNLG-RET
11
(BUSY) PTRBUSY OUT
29
BUSY-RET
12
(P.E.)
ACK DATA REQ
OUT
30
PAPER END-RET
13
(SELECT) XFLAG OUT
31
(INIT)
IN
32
(ERROR)
OUT
14
(AUTO FEED
XT2)
HOST BUSY
DATA AVAIL
15
NO CONNECTION
33
GND
16
GND
34
NO CONNECTION
17
GND
35
+5.0V3
18
PERIPHERAL
LOGIC HIGH4
36
(SELECT IN2)
1284 ACTIVE
OUT
1 All RETs are connected to GND.
2 These signals are valid only in Epson LQ printer control mode.
3 The level is raised to +5.0V at 3.3k Ω register.
4 The level is raised to +5V at 390 Ω register.
A-6 Specifications
Appendix A
STROBE
When the MultiPASS 1000 receives the STROBE low pulse with a
width greater than 1 µs from the computer, it reads the data from
the interface and sets the BUSY line high.
DATA
These signals are the 8 bits of parallel data sent from the computer.
A high level indicates a logical 1; a low level indicates a logical 0.
The MultiPASS 1000 reads the DATA lines when it receives a
STROBE pulse.
ACKNLG
The ACKNLG pulse tells the computer that the MultiPASS 1000
has read the data from the previous STROBE pulse. An ACKNLG
pulse is also generated when the MultiPASS 1000 is powered on or
at the completion of the MultiPASS 1000 initialization by an INIT
signal requested from the computer.
BUSY
When the MultiPASS 1000 sets BUSY high it cannot receive data.
The BUSY line goes high in response to a STROBE pulse. This line
remains high until the data is read. BUSY is also high under the
following conditions:
❏
The receive buffer is full of data.
❏
The MultiPASS 1000 receives an INIT signal.
❏
You press the ON LINE button to set the MultiPASS 1000
printer off-line.
❏
An error condition, such as out-of-paper, occurs.
PAPER END
The MultiPASS 1000 sets PAPER END high when it is out of paper
or when a paper jam occurs. PAPER END remains high until you
load paper and press the ON LINE button.
SELECT
When the MultiPASS 1000 is ready, it sets the SELECT line high.
The SELECT line goes low when:
Appendix A
❏
You press the ON LINE button to set the MultiPASS 1000
printer off-line.
❏
An error condition, such as out-of-paper, occurs.
❏
The MultiPASS 1000 receives the Printer Deselect command. It
ignores all incoming data except DC1, which returns it to a
selected state.
Specifications
A-7
Specifications
When you use the MultiPASS 1000 as a normal printer, each signal
is defined as follows:
AUTO FEED XT
When this signal is low, the MultiPASS 1000 automatically feeds
the paper one line when it receives a carriage return (CR) control
code. This signal is valid only in Epson LQ mode.
INIT
INIT from the computer resets the MultiPASS 1000 to its initial
power-on state. The BUSY line goes high and any received data is
printed. When INIT goes low, the MultiPASS 1000 resets to the
power-on default state.
ERROR
The MultiPASS 1000 sets the ERROR line low if it detects an error,
such as an out-of-paper condition.
SELECT IN
When this signal is high, the DC1 and DC3 control codes are valid;
otherwise they are invalid. This signal is valid only in Epson LQ
mode.
Timing Chart
When you use the MultiPASS 1000 as a normal printer, the parallel
interface transfers data in one direction only—from the computer
to your MultiPASS 1000. The data path is 8 bits wide. The
MultiPASS 1000 and computer synchronize data transfer with the
interface signals STROBE, ACKNLG, and BUSY.
When the computer is ready to send a byte of data to the
MultiPASS 1000, it puts the byte of data on the data lines (DATA 1
through DATA 8). Then the computer sends a STROBE pulse to the
MultiPASS 1000, which responds with a BUSY signal.
When the MultiPASS 1000 receives the data, it pulses the ACKNLG
line. This signals the computer that the MultiPASS 1000 has read
the byte of data into memory. If the buffer is not full and it can
receive more data it removes the BUSY signal.
The timing charts below illustrate the data and handshake lines
during transfer of one data byte to the computer. DATA 1 through
DATA 8 and the STROBE line are driven by the computer; the
ACKNLG line is driven by the MultiPASS 1000.
N
A-8 Specifications
The use and time of the signals for IEEE 1284-B have not been
made public.
Appendix A
Specifications
Timing chart in BJ-10 mode
Timing chart in Epson LQ mode
Appendix A
Specifications
A-9
A-10 Specifications
Appendix A
Appendix B
Menu System Summary
❏
The page number refers to the page in this manual where the
description of the item starts.
❏
An asterisk (*) indicates the factory setting.
❏
To make selections using the menu system, use the following
buttons on the operation panel:
•
•
•
•
Press FUNCTION.
Press the arrow buttons.
Press START/COPY.
Press STOP to return to standby mode.
Menu item
Page
1.TEL REGISTRATION
Registration items related to one-touch and coded speed
dial functions.
6-1
1.1-TOUCH SPD FAX
Register one-touch speed dialing fax numbers
F01 = Enter fax number
F01 = Enter name
NEED TO SET TX MODE?
YES < > NO
If YES
MODE 1 (choose one)
9600
4800
MODE 2 (choose one)
0, 1, 2, or 3
MODE 3 (choose one)
REGULAR TX
ORIG RELAY TX
Group number =
00 to 99
CONFIDENTIAL TX
Mailbox number =
00 to 99
Appendix B
Menu System Summary
B-1
Menu System
Summary
This appendix lists each item in the menu system of the
MultiPASS 1000.
Menu item
Page
6-4
2.1-TOUCH SPD TEL
Register one-touch speed dialing telephone
numbers
T01 = Enter telephone number
T01 = Enter name
6-7
3.CODED DIAL
Register coded speed dialing fax or telephone
numbers
*00= Enter fax or telephone number
*00= Enter name
NEED TO SET TX MODE?
YES < > NO
If YES
MODE 1 (choose one)
9600
4800
MODE 2 (choose one)
0, 1, 2, or 3
MODE 3 (choose one)
REGULAR TX
ORIG RELAY TX
Group number =
00 to 99
CONFIDENTIAL TX
Mailbox number =
00 to 99
4.GROUP DIAL
6-10
Register group dialing numbers and names
5.EXPANDED DIAL
6-15
Register expanded dialing numbers
and names
2.USER SETTINGS
Registration items related to basic fax functions
1.SET TIME
3-7
Register date and time (In the United States, you
are required to enter the date and time.)
2.ENTER YOUR TEL
3-8
Register your fax number (In the United States,
you are required to enter your fax number.)
3.USER NAME
3-10
Register your name or your company name
(In the United States, you are required to enter
your name or company name.)
B-2 Menu System Summary
Appendix B
Menu item
Page
3-13
4.TTI OPTION SET
Print your ID (transmitting terminal ID) on each
page you transmit
Menu System
Summary
1.TX TERMINAL ID
ON* (In U.S., must be ON.)
OFF
2.TTI POSITION
OUTSIDE IMAGE*
INSIDE IMAGE
3.TTI MARKER
FAX*
TEL
5-12
5.TYPE OF DOCUMENT
Assign a document mode to the
TYPE OF DOCUMENT setting
HALFTONE*
AA
BLUEPRINT
TRACING PAPER
HIGHLIGHT MARKER
IMAGE REVERSAL
5-14
6.DENSITY CONTROL
Adjust the scanning density
From 1 (dark) to 7 (light); default is 4
3-16
7.OFF HOOK ALARM
Enable or disable the off hook alarm, which
alerts you if the handset is not set in the cradle
ON*
OFF
3-16
8.HOLD MELODY
Set the hold melody, which plays when you
press the HOLD button
ON*
OFF
3-16
9.VOLUME CONTROL
Adjust the volume of the MultiPASS 1000
1.CALLING VOLUME
VOL MIN
VOL MID*
VOL MAX
Appendix B
Menu System Summary
B-3
Menu item
Page
2.ALARM VOLUME
VOL MIN
VOL MID*
VOL MAX
3.KEYPAD VOLUME
VOL MIN
VOL MID*
VOL MAX
10.RX CALL LEVEL
3-16
Adjust the volume level of the received incoming
ring
LOW*
HIGH
11.DIALING TONE
3-16
Determine whether tones are heard during dialing
ON*
OFF
12.TEL LINE TYPE
9-2
Select telephone line type
TOUCH TONE*
ROTARY PULSE
3.REPORT SETTINGS
Registration items related to output of transmission
reports and registered lists
1.TX REPORT
11-3
Print transmission report
OUTPUT NO*
OUTPUT YES
TX CONFIRMATION REP.
OUTPUT NO*
OUTPUT YES
PRINT ERROR ONLY
TX CONFIRMATION REP.
OUTPUT NO*
OUTPUT YES
2. RX REPORT
11-3
Print reception result report
OUTPUT NO*
OUTPUT YES
PRINT ERROR ONLY
B-4 Menu System Summary
Appendix B
Menu item
Page
11-7
3.ACTIVITY REPORT
Print activity management report
1.AUTO PRINT
Print activity report after every 20 transactions
Menu System
Summary
OUTPUT YES*
OUTPUT NO
2.DAILY REPORT TIME
Print activity report at a preset time each day
OUTPUT NO*
OUTPUT YES
REPORT TIME XX:XX
3.TX/RX SEPARATE
Print activity report separating transmission
and reception activity
OFF*
ON
11-13
4.REPORT FONT SET
Select font in which reports are printed
ROMAN*
SANS SERIF
DRAFT
COURIER
PRESTIGE
SCRIPT
ORATOR
ORATOR-S
11-13
5.PRT DIRECTION
Select unidirectional or bi-directional (faster)
printing of reports
BI-DIRECTION PRT*
ONE DIRECTION PRT
11-13
6. ECONOMY PRT
Select economy printing mode to save ink, this
will reduce print quality
OFF*
ON
4.TX SETTINGS
Registration items related to fax transmission of
documents
5-15
1.ECM TX
Enable or disable the ECM transmission mode
ON*
OFF
Appendix B
Menu System Summary
B-5
Menu item
Page
2.MID PAUSE SET
9-5
Set length of pause when pressing PAUSE button
1 to 15 seconds; default is 2
3.AUTO REDIAL
5-17
Select whether to perform automatic redial when
other line is busy
OFF*
ON
REDIAL TIMES
From 1 to 10 times; default is 2
REDIAL INTERVAL
From 2 to 99 seconds; default is 2
5.RX SETTINGS
Registration items related to reception of fax documents
1.ECM RX
7-17
Enables or disables the ECM receiving mode.
ON*
OFF
2.FAX/TEL SWITCH
Select fax/telephone switching
7-2
7-4
OFF*
ON
1.RING TIME START
From 0 to 30 seconds; default is 8
2.F/T RING TIME
From 15 to 300 seconds; default is 22
3.F/T SWITCH ACTION
RECEIVE*
DISCONNECT
3.INCOMING RING
7-18
Select whether to sound incoming ring
OFF*
ON
RING COUNT
From 1 to 99 seconds; default is 2
4.ANS/FAX SWITCH
8-7
Select whether to go into reception when no sounds
occurs during ANS mode (ANS HOOK UP light is on)
OFF*
ON
ANS/FAX SWITCH TIME
From 1 to 99 seconds; default is 4
B-6 Menu System Summary
Appendix B
Menu item
Page
7-10
5.MAN/AUTO SWITCH
OFF*
ON
RING TIME
From 1 to 99 seconds; default is 10
7-12
6.REMOTE RX
Receive from a remote telephone when a pre-set
ID is used
OFF*
ON
REMOTE RX ID
Default is 25
From 0 to 99, *, #
7-17
7.MEMORY RX
Select whether to perform memory reception
ON*
OFF
7-17
8.MEMORY RX ALARM
Alert user when data is received in memory
OFF*
ON
7-17
9.RX PAGE FOOTER
Print footer on received images
ON*
OFF
9-6
10.DRPD
Select reception mode based on ringing pattern
of the telephone line using special telephone
company services
OFF*
ON
1.NORMAL RING
FAX*
TEL
FAX/TEL SWITCH
`
Appendix B
2.DOUBLE RING
FAX*
TEL
FAX/TEL SWITCH
Menu System Summary
B-7
Menu System
Summary
Select whether to go into automatic receiving while
in manual mode (MANUAL light is on)
Menu item
Page
3.SHORT-SHORT-LONG
FAX*
TEL
FAX/TEL SWITCH
4.SHORT-LONG-SHORT
FAX*
TEL
FAX/TEL SWITCH
5.OTHER RING TYPE
FAX*
TEL
FAX/TEL SWITCH
6.PRINTER SETTINGS
Registration items related to printing
1.SELECT PAPER SIZE
12-1
Select size of paper being used
LTR*
A4
LEGAL
2.RX REDUCTION
Receive images at a reduced size
7-15
12-1
OFF*
ON
1.SELECT REDUCT %
75%
85%
90%*
95%
2.SELECT REDUCE DIR
VERTICAL ONLY*
HORIZ & VERTICAL
3.INK DETECTOR
12-1
Print an ink detection mark on bottom right of
printed page
ON*
OFF
4.PRINTING DENSITY
12-2
Adjust the print density
STANDARD*
LIGHT
B-8 Menu System Summary
Appendix B
Menu item
Page
12-2
5.PRT DIRECTION
Select unidirectional or bi-directional (faster)
printing of received images and copies
12-2
6.ECONOMY PRT
Select economy printing mode to save ink when
printing received images and copies; this will
reduce print quality
OFF*
ON
7.BJ PRINT SETTINGS
Registration items related to printer emulation;
see the Software User’s Guide for details
BJ10
1.TEXT SCALE SET
2.PAGE LENGTH
3.CHARACTER SETTING
4.AUTO CR
5.AGM MODE SET
6.CODE PAGE SET
7.DOWNLOAD BUFFER
LQ
1.TEXT SCALE SET
2.PAGE LENGTH
3.CHARACTER SETTING
4.INT’L CHAR. SET
5.TYPEFACE SETTING
8.SYSTEM SETTINGS
Registration items related to customization
7-22
1.RX RESTRICTION
Select whether to prohibit reception of direct mail
OFF*
ON
10-16
2.PASSWORD
Set polling password; eight-digit binary codes
(zeros and ones)
00000000*
11111111
Appendix B
Menu System Summary
B-9
Menu System
Summary
BI-DIRECTION PRT*
ONE DIRECTION PRT
Menu item
3.DATE SETUP
Page
3-15
Select appearance of date in LCD display and
on reports
MM/DD/YY*
DD/MM ‘YY
‘YY MM/DD
4.DISPLAY LANGUAGE
3-15
Select language that appears in LCD display and
on reports
ENGLISH*
FRENCH
SPANISH
5.TX START SPEED
5-19
Select transmission speed
9600bps*
7200bps
4800bps
2400bps
6.RX START SPEED
7-23
Select reception speed
9600bps*
7200bps
4800bps
2400bps
7.LCD BRIGHTNESS
3-15
Adjust brightness of LCD display
STANDING UP*
SITTING DOWN
8.TEST PRINT
2-30
Print the help list
B-10 Menu System Summary
Appendix B
Glossary
A
AA
Automatic Adjust. The document setting you use for sending
documents such as text and photos.
AC
Alternating current. The type of electrical current available from a
wall outlet.
Activity report
Journal of transactions, both sent and received.
Glossary
ADF
Automatic Document Feeder. The document tray on the
MultiPASS 1000; it holds 30 sheets of paper.
Automatic dialing
Dialing fax or telephone numbers by pressing one or three buttons.
To use automatic dialing, you must register the numbers in the
MultiPASS 1000’s memory. See also One-touch speed dialing,
Coded speed dialing, and Group dialing.
ANS HOOK UP/MANUAL
The light and button that indicate and control how the MultiPASS
1000 detects whether a call is from a fax or a telephone. When you
use the MultiPASS 1000 with an answering machine, turn the ANS
HOOK UP light on so the answering machine will pick up the calls.
When the MANUAL light is on, the MultiPASS 1000 will work as a
phone until you manually engage it to receive a faxed document.
When both lights are off, the MultiPASS 1000 is in automatic mode
and will use the FAX/TEL switching capabilities.
Auto fax/tel switching
See FAX/TEL switching.
B
Baud rate
See Sending speed.
Bi-directional parallel interface port
An interface connection that is capable of both sending or
receiving. For example, when you print and when you send a fax
from your computer, data goes from your computer to the
MultiPASS 1000; when you scan and when you receive a fax into
your computer, data goes from the MultiPASS 1000 to your
computer.
Glossary
G-1
Bi-directional printing
The ability of the MultiPASS 1000 to print both left to right and
right to left. This printing method provides a fast speed. See also
Unidirectional printing.
bps
Bits per second. Refers to the speed with which a fax machine sends
and receives data.
Broadcasting
Transmitting documents to more than one location (through the
MultiPASS 1000’s memory).
Bubble Jet printing
An ink-jet type printing method that heats the ink to a boiling point
to form a bubble. When the bubble expands, there is no room left in
the nozzle for the ink and the ink is projected onto the paper.
C
CCITT #1 Chart
A test chart, defined by CCITT, used to check the transmission
speed as well as the transmitting and receiving memory capacity of
a fax machine.
CCITT/ITU-TS
Formally known as CCITT, Consultative Committee for
International Telegraph and Telephone. CCITT has been replaced
by the International Telecommunications Union –
Telecommunications Sector (ITU-TS), a committee created to set
international standards for telecommunications.
Centronics
An interface standard for parallel data transmission. The interface
on the MultiPASS 1000 is a Centronics-type parallel interface.
CNG
Calling Tone. This is a signal sent by fax machines to identify the
call as an incoming document. When the receiving fax detects this
signal, it automatically starts to receive the fax transmission. The
majority of fax machines in use today can send and detect CNG
signals.
Coded speed dialing
An automatic dialing method that allows you to dial a fax or
telephone number by pressing three buttons—the CODED
DIAL/DIRECTORY button and a two-digit code using the numeric
keypad. You can register up to 80 coded speed dialing numbers in
the MultiPASS 1000.
G-2
Glossary
Confidential mailbox number
Two-digit numbers between 00 and 99 used to arrange for
confidential sending of documents. See Confidential sending.
Confidential sending
The ability to send a document confidentially. The receiving fax
machine will keep the document in memory until the intended
recipient enters a two-digit code to print the document.
Cursor
The underline symbol you see on the LCD display when you
register numbers and names in the MultiPASS 1000. Press the
arrow buttons to move the cursor.
D
Glossary
Default
The preset value or factory setting used when you do not set a
different one. You can change default values by using the
FUNCTION button to access the menu system.
Delayed transmission
The ability to send a document at a preset time in the future. You
do not have to be in your office to use delayed sending to one or
more destinations. (You can set up only one delayed transmission
at a time on the MultiPASS 1000.)
Density control
A setting that darkens or lightens the scanning of documents.
Dialing methods
Ways of pressing one or more buttons to access a number to
connect to an outside party or fax machine. Dialing methods
include one-touch, coded speed dialing, group dialing, directory
dialing, and manual (regular).
Direct sending
Transmitting a fax document one page at a time without having
the document scanned into memory.
Directory dialing
A dialing method that allows you to dial any telephone or fax
number registered for one-touch or coded speed dialing. You recall
the number by the name you entered when registering the number.
Document
The sheet of paper containing the data that you send to or receive
from a fax.
dpi
Dots per inch. A unit of measurement for indicating a printer’s
resolution. Your MultiPASS 1000 prints at a resolution of 360 x 360
dpi and scans at a resolution of 200 x 200 dpi.
Glossary
G-3
DRPD
Distinctive Ringing Pattern Detector. Allows you to assign up to
five different ring patterns to distinguish voice and fax calls using
your telephone company’s special services.
E
ECM
Error Correction Mode. The ability of your MultiPASS 1000 to
reduce system and line errors when sending or receiving from
another fax with ECM capability. ECM is most effective in areas
where the telephone lines are in poor condition or there is frequent
interference on the line. Do not use ECM if you need to send a
document quickly and you are sure the other party can read your
transmission without it (turning off ECM also turns off MMR.).
Emulation
A technique where one device imitates (acts like) another device.
Expanded dialing
Ability to register and then dial a fax or telephone number up to
118-digits long by pressing just one or three buttons.
Extension
A telephone connected to the MultiPASS 1000 that is used in place
of the handset. You can use the extension telephone to activate
incoming reception of documents manually.
F
FAX/TEL switching
This option allows you to set the MultiPASS 1000 to automatically
detect whether a call is from a fax or a telephone. If the call is from
another fax, the transmission is automatically received. If the call is
from a telephone, the fax rings to let you know, so you can pick up
the handset. With this feature, one telephone line can be shared by
both the telephone and the fax.
FINE
The setting for documents with very small characters and lines.
G
G3, Group 3 fax machine
Defined by CCITT. Uses encoding schemes to transmit image data
while reducing the amount of data that needs to be transmitted,
thus reducing transmission time. G3 fax machines can transmit
one page in less than one minute. Encoding schemes for G3 fax
machines are Modified Huffman (MH), Modified Read (MR), and
Modified Modified Read (MMR)
G-4
Glossary
Group dialing
A dialing method that enables you to dial up to 95 registered onetouch speed dialing or coded speed dialing numbers together as a
group. This means that you can press just one or three buttons to
send the same document to many destinations.
Group number
A 2-digit number (between 00-99) associated with a relay fax
machine. The group number is registered on the fax machine with
relay capability. If you want to send a fax to another machine and
have it relayed, you must know the group number and enter it
when you register the one-touch or coded speed dialing number
for the relay fax machine. The group number of the relay fax
machine will contain a list of all faxes to receive the relayed
document.
Glossary
H
HALFTONE
The document setting you use for sending documents with
intermediate tones, such as photographs.
HOOK
The button that engages and disengages the telephone line.
I
Ink cartridge
The special type of ink cartridge used with Canon Bubble Jet
printers. The ink cartridge for the MultiPASS 1000 includes the
print head and ink. Use either the BX-2 or BC-02 ink cartridge only.
Ink detector
The printer setting that allows the MultiPASS 1000 to check if there
is enough ink in the ink cartridge. This option prints a small box in
the bottom right corner of incoming documents.
Interface
The connection between two devices that makes it possible for
them to communicate with each other. The MultiPASS 1000
features a parallel interface, which makes it compatible with IBM
and other similar personal computers.
Interface port
The MultiPASS 1000 comes with one Centronics, 8-bit,
bi-directional parallel interface port. You attach the cable to this
port that connects your computer to the MultiPASS 1000. See also
Bi-directional parallel interface port.
Glossary
G-5
J
Jacks
The telephone receptacles on your wall or in your MultiPASS 1000
used to connect the MultiPASS 1000 to the telephone line, handset,
answering machine, extension telephone, or data modem.
M
Manual dialing
Pressing the individual buttons on the numeric keypad to dial a fax
or telephone number. Also called regular dialing.
Manual receiving
A setting that allows you to answer all incoming telephone and fax
calls. If you hear a slow beep it indicates an incoming fax
transmission from another machine. Just push the START/COPY
button to receive the incoming fax.
Manual redialing
When you use regular dialing, you can redial a number manually
simply by pressing REDIAL on the operation panel. The last
number called is the number redialed.
Memory broadcast
The ability to scan documents into memory and send it to as many
as 97 locations using automatic or manual dialing. If you use this
feature regularly for the same locations, see Group dialing. The
MultiPASS 1000 can hold approximately 50 pages (based on CCITT
#1 Chart) in memory.
Memory sending
Scans a document into memory before the MultiPASS 1000 dials
the number and sends it. This method is faster than direct sending
and it allows you to retrieve your original document immediately
after scanning.
Modem
A device that converts (MOdulates) digital data from transmission
over telephone lines. At the receiving end, this device converts the
modulated data (DEModulates) to digital format that the computer
understands.
MultiPASS Desktop Manager for Windows software
Canon’s exclusive software package that allows you to use the
MultiPASS 1000 with your Windows software applications. You
must install the desktop manager to use your MultiPASS 1000 as a
printer, scanner, or PC fax.
G-6
Glossary
N
Noise
A term applied to a variety of problems that impair the operation
of telephone lines used for fax and modem communication.
Numeric keypad
The round numbered buttons on the operation panel marked the
same as a standard telephone keypad. Press them to perform
manual dialing. You also use the numeric buttons to enter numbers
and letters when you register numbers and names, and for
entering coded speed dialing or confidential sending codes with
two or more digits.
One-touch speed dialing keypad
The rectangular buttons numbered 01 to 16 on the operation panel,
each of which may be registered as a fax and/or telephone
number. Once a number is registered, you press one button to dial
the entire number.
P
Pause
A timing entry required for registering certain long distance
numbers and for dialing out through some telephone systems or
switchboards.
PBX
Private branch exchange. See Switchboard.
Polling
Requesting another fax machine to send a document to your
MultiPASS 1000. This feature is useful for obtaining a document
when the original document is waiting in the other fax and the fax
operator is not there. See Polling ID.
Polling ID
An eight-digit binary number (binary = 0 or 1) used to control your
ability to request another fax machine to send documents to your
MultiPASS 1000. The polling ID you register must match the ID
used in the polling network. See Polling.
Pulse
See Rotary pulse.
Glossary
G-7
Glossary
O
R
RAM
Random Access Memory. Memory that is used for temporary
storage of information such as your scanned or received
documents.
Redialing—automatic
When the fax you dial does not answer or a sending error occurs,
the MultiPASS 1000 waits for a specified interval and then redials
the same fax number. You can adjust the number of redials and the
length of time between redialing.
Redialing—manual
When you use the regular dialing method, you can quickly call the
last number dialed by pressing the REDIAL button.
Reduction mode
The MultiPASS 1000’s automatic feature that slightly reduces the
received image to allow room at the top of the page for the
sender’s ID information. You can also reduce the size of large
incoming documents using the RX REDUCTION option.
Registering
A process by which you place fax or telephone numbers and
names in the MultiPASS 1000’s memory for automatic dialing so
that you can save time dialing frequently called destinations.
Regular dialing
See Manual dialing.
Relay broadcast
See Relay sending.
Relay sending
Transmitting a document to more than one location through
another Canon relay fax. This is cost effective if you want to send a
document long distance to a group of offices located in the same
area. Sending the document directly to each office would require
one long distance call per document; sending the document
through a relay fax would require one long distance call and the
relay fax would make local or short toll calls to send to the nearby
destinations. Also called relay broadcast.
Remote receiving ID
The two-digit code that enables you to manually activate a
fax using an extension telephone that is connected to the
MultiPASS 1000.
Remote reception
Activating a fax by answering an extension telephone that is
connected to the MultiPASS 1000, but that is not located near the
MultiPASS 1000.
G-8
Glossary
Resolution
The density of dots for any given output device. Expressed in
terms of dots per inch (dpi). Low resolution causes font characters
and graphics to have a jagged appearance. Higher resolution
means smoother curves and angles as well as a better match to
traditional typeface designs. Resolution values are represented by
horizontal data and vertical data, for example, 360 x 360 dpi.
Rotary pulse
A telephone dialing system where a dial is rotated to send pulses
to the telephone switching system. When you pulse dial, you hear
clicks. When you touch-tone dial, the most common dialing
system, you hear tones. Rotary pulse dialing requires certain
setting adjustments.
S
Sender ID
The identifying information from the sender at the top of a
document including: date and time, the sender’s fax/telephone
number, sender’s name, receiver’s name or company name, and
page number. Also called TTI or Transmit Terminal ID.
Sending speed
The bits per second rate at which documents are sent. See also bps.
STANDARD
A document setting for sending normal typewritten or printed
documents containing only text and no drawings, photographs, or
illustrations.
Standby
The mode in which when the MultiPASS 1000 is on and ready to
use. All operations start from standby mode when the LCD
displays the date and time.
Switchboard
Also called a PBX (Private Branch Exchange) internal switching
system. A telephone system, usually for a large company office
with many extensions, whereby you must dial an outside line
number along with the regular telephone or fax number. Dialing
out through a switchboard sometimes requires use of the PAUSE
button.
Glossary
G-9
Glossary
Restricted reception
The ability of your MultiPASS 1000 to restrict incoming
documents. With this feature turned on, the MultiPASS 1000 will
receive documents only from speed dialing numbers registered in
the unit.
T
Timed sending
Setting the MultiPASS 1000 to transmit documents at a preset time
in the future. See also Delayed transmission.
Tone/pulse setting
The ability to set the MultiPASS 1000 to match the telephone
dialing system your telephone line uses: touch-tone or rotary
pulse.
TONE
A button that allows you to temporarily switch to touch-tone from
pulse dialing. In some countries, on-line data services may require
that you use tone dialing.
TTI
Transmit Terminal ID. See Sender ID.
TWAIN
Both a protocol and an application programmer’s interface (API)
that allows you to input image data directly from any source (for
example: desktop and handheld scanners, video capture boards,
digital cameras, and other imaging equipment) without requiring
users to switch out of the application. It provides compatibility
between image input devices and applications by acting as the
liaison between hardware devices and software applications.
Because your MultiPASS 1000 supports TWAIN, you can use the
scanning features of the MultiPASS 1000 with any Windows
application that also supports TWAIN. TWAIN, the industry
standard, was developed by the TWAIN working group which
consists of representatives from many leaders in the scanner
hardware and software industry.
U
Unidirectional printing
Printing in one direction only, left to right. This printing method
on the MultiPASS 1000 provides a higher image quality but slower
print speed. See also Bi-directional printing.
G-10
Glossary
Index
11-10–11
1-TOUCH SPD TEL option: 6-4–5
24-hour clock: 3-7
200x200 dpi: 1-4
360x360 dpi: 1-3
2400 bps: 5-19, 7-23
4800 bps: 5-10–11, 5-19, 7-23
7200 bps: 5-19, 7-23
9600 bps: 5-10–11, 5-19, 7-23
A
A4 setting: 12-1
AA (Auto Adjust) setting:
5-12–13
AC outlet: 2-22
Actions, display messages:
14-10–14
Activating reception, extension
telephone: 7-14
Activity report(s): 14-10
management report: 11-6–7
printing: 11-3–9
ACTIVITY REPORT option: 11-2,
11-7–8
Adding pages: 4-5, 5-10
Adjusting
answering machines: 8-7
paper cassette: 4-9–12
Alarm, memory: 7-17
ALARM light: 2-10–12, 2-22, 2-25,
5-11
flashing, no message: 14-9
ALARM VOLUME option: 3-17
Allowing others to poll: 10-19
ANS HOOK UP light: 2-12, 7-3,
7-5, 8-2, 8-6, 9-9, 10-19
ANS HOOK UP/MANUAL button:
2-12, 4-8, 7-3, 7-5, 7-9, 8-2,
8-6, 10-19
Index
ANS/FAX SWITCH option: 8-7
ANS/FAX SWITCH TIME option:
8-8
Answering machine
adjusting for: 8-7
cannot use: 14-7
connecting: 8-5
DRPD: 9-9
hints: 8-4
jack: 2-8
receiving documents: 8-7–8
using: 8-4–8
Applicable lines: A-1
Area code: 3-3
Arrow buttons: 2-14
Attaching
document supports: 2-27–28
handset: 2-15–16
one-touch speed dialing
faceplate: 2-29
parallel cable: 2-20–21
power cord: 2-22
Authorized Service Facility
(ASF): 1-6, 1-8, 14-1
Auto dial functions: A-2
AUTO PRINT option: 11-7–8
Auto redial: 5-17–18
AUTO REDIAL option: 5-17–18
Automatic dialing: 1-4
coded speed dialing: 2-14,
6-9, 10-1, 10-10, 10-12,
10-15, A-2
expanded dialing: 6-15–16
group dialing: 6-10–14, 10-1
one-touch speed dialing:
6-1–6, 10-1, A-2
printing lists: 11-10–12
using: 6-1–17
Automatic Document Feeder
(ADF): 1-3, 2-7, 4-3–4, 4-6,
5-2, 5-4, 5-7, 5-10, 6-16, 7-9,
10-19
Automatic receiving: 7-10–11,
7-21, 8-7
DRPD: 9-9
messages and documents:
8-6
switching: 8-8
I-1
Index
* button: 3-10
+ button: 2-13, 3-9
:1 prompt: 3-4, 3-10
:A prompt: 3-4, 3-10
< button: 2-14
> button: 2-14
1-TOUCH SPD FAX option: 6-1–2
1-TOUCH SPD LIST option:
Automatic switching
DRPD service: 9-10
fax/telephone: 1-3, 7-1–5,
7-20–21
See also Fax/tel switching
feature
Automatically, receiving
calls: 7-5
documents: 7-3, 7-5
Avoiding conflict, fax/data
communications: 8-11
B
BC-02 ink cartridge: 2-23,
13-6–7, A-2
See also Ink cartridge
BI-DIRECTION PRT setting: 11-13,
12-2
Bi-directional parallel port: 1-1,
2-5, 2-8, 2-20–21, A-4–9
BJ mode: 1-3
BJ PRINT SETTINGS: 3-2
Black vertical lines: 13-2
Blank pages: 7-17
Blue-colored line drawings:
5-12
BLUEPRINT setting: 5-12–13
Bottom of unit, jammed paper:
14-4
Brightness, display: 3-15
Broadcasting: 1-4, 5-10–11,
10-1–3
Bubble Jet printing: 1-3, A-1
BUSY/NO SIGNAL message:
14-10
BX-2 ink cartridge: 1-3, 2-23,
13-6–7, A-2
See also Ink cartridge
C
Cable
interface: A-5
length: 2-5, 2-20, A-4–5
Call(s)
and documents, receiving:
7-5–6
extension telephone: 8-10
fax vs. telephone: 7-20
on hold: 8-3
receiving: 8-2–3
ring pattern: 9-9
I-2
Calling tone (CNG): 8-8
CALLING VOLUME option: 3-17
Canada, Canon Information
and Service Centers: 1-6
Canceling
preset polling: 10-21
preset sending: 10-5
Cannot do anything: 14-8
Canon
Authorized Service Facility
(ASF): 1-6, 1-8, 14-1
BC-02 ink cartridge: 2-23,
13-6–7, A-2
BJ mode: 1-3
BX-2 ink cartridge: 1-3, 2-23,
13-6–7, A-2
Canada: 1-6
Consumer Information
Center: 1-6, 14-1
Forum: 1-6
Information and Service
Centers, Canada: 1-6
relay fax machine: 2-13,
5-10–11, 10-6, 10-8
U.S.A.: 1-6
Cardboard, paper cassette: 2-6
Cartridge
holder: 2-24–25, 13-11–12
life, extending: 12-2
slot: 2-24, 13-11
Cassette: See Paper cassette
Cassette area, jammed paper:
14-2–3
CCITT #1 Chart: 1-3–4, 5-6,
5-10, 7-7, 10-1, 10-7, 13-7,
A-1–2
Centronics
cable: 2-5, 2-20, A-4–5
interface: A-4
CHANGE CARTRIDGE message:
7-7, 12-1, 13-12, 14-10
Changing
dialing systems: 9-2–3
ECM option: 5-16
group dialing number:
6-13–14
pause time length: 9-5
printer settings: 12-1–3
volume: 3-16
CHECK DOCUMENT message:
14-10
CHECK PAPER COVER
message: 14-11
Index
CODED DIAL/DIRECTORY
button: 2-14, 6-11, 6-16–17
CODED SPD LIST option:
11-10–11
Coded speed dialing: 2-14, 10-1,
A-2
confidential documents:
10-12, 10-15
fax numbers: 6-9
relay sending: 10-10
telephone numbers: 6-9
Coded speed dialing numbers:
6-10–11
registering: 6-7–8
using: 6-7–9
Colored pens: 5-12
Communications: 7-1
errors: 1-4
type: 9-8
using DRPD: 9-9–10
CompuServe: 1-6
Computer: 2-2, 2-20
uploading documents: 2-13,
7-8
CONFID. TRANSMISSION
button: 2-13, 10-11
Confidential documents
cannot send: 14-5
one-touch or coded speed
dialing: 10-12–15
sending: 10-11–15
Confidential sending: 1-4,
10-11–15
mailbox capability: 10-11
registering procedure: 10-12
CONFIDENTIAL TX: 10-13
Conflict, between fax and data
communications: 8-11
Index
Connecting: 7-23
answering machine: 8-5
data modem: 8-10
extension telephone: 8-9
telephone line: 2-20
through a switchboard: 9-4
Connections
learning: 2-7–14
telephone line: 7-23
Connectors: 2-8
Consumer Information Center:
1-6, 14-1
Controlling, density: 5-2, 5-4,
5-14–15
Controls, learning: 2-7–14
Copier: 1-1, 1-4
paper: 2-16
Copies
making: 4-6–8
cannot make: 14-7
Copying
receiving a fax: 4-8
Cotton bond paper: 2-16
Cover sheet, fax, printing: 11-2
Current selections: 11-11
Cursor, moving: 2-14
Customer support: 1-6
Customizing
ID: 3-13–15
LCD display: 3-15–16
operations: 3-13–18
receiving operations: 7-15–24
receiving speed: 7-23–24
reports and lists: 11-13–14
sounds: 3-16–18
transmission mode: 5-10–11
transmission speed: 5-19–20
D
DAILY REPORT TIME option:
11-7–8
DARK PAPER USED message:
7-1, 7-7, 14-11
Data
modem, using: 8-10–11
transmission: A-4
Date and time, setting: 3-7–8
I-3
Index
CHECK PRINTER message: 14-11
Checking, incoming calls: 7-20
Cleaning: 1-8, 13-1–5
print head: 2-26, 13-6, 14-10
printer area: 13-5
scanner components: 13-2–4
CLEAR button: 2-13, 3-1, 3-3, 3-5
Clearing paper jams: 14-2–4
Clock, 24-hour: 3-7
CNG (calling tone): 8-8
CODED DIAL option: 6-7
Date format
European: 3-15
Japanese: 3-15
USA: 3-15
DATE SETUP option: 3-15
Dedicated
fax line: 7-2–3
receiving, setting up: 7-2–3
DELAYED POLLING button:
2-13, 10-19
DELAYED TRANSMISSION
button: 2-13, 10-3
Density control: 5-14–15
box: 5-2, 5-4, 5-14
setting: 4-4
DENSITY CONTROL option:
5-14–15
Desktop
manager: 1-2–3, 2-4–5, 7-8
system: 1-1
Destinations: 10-1
relay fax: 10-6
Detecting, incoming calls: 9-6
Dialing
automatic, using: 6-1–17
coded speed dialing: 6-7–9
lists, printing: 11-10–11
long distance numbers: 9-4
one-touch speed dialing:
6-1–6
regular: 5-2–3
sound: 3-16
systems, changing: 9-2–3
DIALING TONE option: 3-17
Dimensions: 2-3, A-2
Direct sending: 5-9
document: 5-4–5
Directory dialing: 2-14
using: 6-17
Dirty images: 14-6
Disconnecting, after receiving a
call: 7-20
Disengaging, telephone line:
2-14
Display brightness: 3-15
DISPLAY LANGUAGE option:
3-15
Display messages, actions:
14-10–14
Distinctive Ringing Pattern
(DRP) service: 9-6–10
I-4
Distinctive Ringing Pattern
Detector (DRPD): 9-6
Document
broadcasting: 10-2
confidential, sending:
10-11–15
direct sending: 5-4–5
expanded dialing: 6-16
feeder: 2-7
group dialing: 6-12–13
guides: 2-7
memory sending: 5-6–10
processing system: 1-1
sending: 6-12–13, 6-16
settings, selecting: 5-12–15
sizes, specifications: A-3
transmitting: 5-3, 5-5, 5-11,
10-2
types: 5-12
DOCUMENT (resolution) button:
2-12, 4-3, 5-12
Document supports: 2-4–5, 2-7
attaching: 2-27–28
DOCUMENT TOO LONG message:
14-11
Documentation: 2-4–5
using: 1-5
Documents
cannot receive: 14-6
cannot send: 14-5
feeding: 4-3–5
identifying: 3-6
incoming, restricting:
7-22–23
large, sending: 5-10
one-touch speed dialing:
6-3–4
oversized: 7-15–17
preparing: 4-1–2
printing: 7-7
requesting from other fax
machines: 10-16–21
sending: 5-1–20
special: 4-3
stored in memory: 2-13
Documents, receiving: 7-1–24,
8-2–3
extension telephone: 8-10
manually: 7-9–11
memory: 7-7–8
Index
E
ECM: 1-4
option, changing: 5-16
sending: 5-15–16
ECM RX option: 7-17–18
ECM TX option: 5-15–16
ECONOMY PRT option: 11-13,
12-2
Effective image size: A-1
Electrical
noise: 2-2, 2-22
outlet: 2-22
Engaging, telephone line: 2-14
ENGLISH setting: 3-15
ENTER YOUR TEL option: 3-8
Entering
name: 3-4–5
number: 3-3
pauses: 9-4
Epson LQ mode: 1-3
ERASING END message: 10-5,
10-21
Error(s)
codes: 14-10–14
reducing: 5-15–16
transmitting: 5-11
Error Correction Mode (ECM):
1-4, 5-15–16, 7-17
European, date format: 3-15
EXPANDED DIAL LIST option:
11-10–11
EXPANDED DIAL option: 6-15–16
Expanded dialing
registering numbers: 6-15–16
using: 6-15–16
Extension
cord: 1-7
phone jack: 8-10
Extension telephone
calling: 8-10
jack: 2-8, 8-9–10
receiving documents:
7-12–14
ringing: 7-14
using: 8-9–10
Index
F
F/T RING TIME option: 7-20,
7-22
F/T SWITCH ACTION option:
7-21–22
Faceplate, one-touch speed
dialing: 2-4–5, 2-29
Fax(es): 3-6
and data communications,
avoiding conflict: 8-11
and telephone calls,
automatic switching,
DRPD: 9-10
communication: 7-1
cover sheet, printing: 11-2
direct sending: 5-4–5
line: 7-2–3
memory sending: 5-6–10
polling: 10-18
receiving: 7-1–24
receiving manually: 7-9–11
regular dialing: 5-2–3
ringing: 7-18–22
sending: 5-1–20
signal: 7-21
to phone communication,
does not switch: 14-8
Fax number(s): 3-4, 9-6
coded speed dialing: 6-9
registering: 3-8–9
Fax reports
print quality: 11-13
print speed: 11-13
printing: 11-1–14
settings: 11-13
typeface: 11-13
FAX setting: 9-8
ID: 3-13
FAX/TEL SWITCH option: 7-1–5,
7-20–21, 8-1, 9-8
Fax/tel switching feature:
1-3, 7-1–5, 7-20–21, 8-1, 9-8
customizing: 7-20–24
Fax/telephone operation
buttons: 2-10–11, 2-14
FCC rules: 1-8
Features: 1-3–4
Feeder, document: 2-7
Feeding documents: 4-3–5
FILE PRINT button: 2-13, 7-8
FINE light: 2-12, 4-3
Fonts, fax reports: 11-13
I-5
Index
Does not switch from fax to
phone communication: 14-8
Double ring: 9-6
DOUBLE RING option: 9-8
DRP service: 9-6–10
DRPD option: 9-6–8
Format, date: 3-15
FRENCH setting: 3-15
FUNCTION button: 2-12–13, 3-2
Function buttons and lights:
2-10, 2-12
G
Getting started: 2-1–30
Green lever: 2-24–25, 13-9, 13-11
GROUP DIAL LIST option:
11-10–11
GROUP DIAL option: 6-10–11
Group dialing: 10-1
using: 6-10–14
Group dialing numbers
changing: 6-13–14
registering: 6-10–12
Group number, relay fax:
10-6–7
Guidelines
ink cartridge: 13-7–8
registering information: 3-1
Guides, document: 2-7
H
HALFTONE setting: 5-12–13
Hands-free dial: 2-14
Handset: 2-4–5, 2-7, 2-9, 3-16
attaching: 2-15–16
extension telephone: 7-14
ringing: 7-20
jack: 2-8, 2-16
HANG UP PHONE message:
14-11
Hanging up: 8-7
Hardware: 2-5
HELP button: 2-13, 2-30
Help list: 2-30
HIGHLIGHT MARKER setting:
5-12–13
Hold
call: 8-3
melody: 3-16, 8-3
HOLD button: 2-14, 8-3
HOLD MELODY option: 3-17
Hook button, handset: 2-9
Host computer: 2-21
Humidity: A-2
I-6
I
IBM PCs: 2-20
IBM Proprinter: 1-3
ID, user: 3-6, 3-13
customizing: 3-13–15
Identifying, documents: 3-6
IEEE 1284-B standard: A-4
IMAGE REVERSAL setting:
5-12–13
Images, dirty or spotted: 14-6–7
Important safety instructions:
1-7–8
Incoming calls: 7-3, 7-5
checking: 7-20
detecting: 9-6
ringing: 7-20
Incoming documents: 7-21–22
restricting: 7-22–23
INCOMING RING option: 7-6,
7-17–20
INCORRECT CARTRIDGE
message: 14-11
Information, registering: 3-1–18
Initial sending speed: 5-19
Initial transmission speed: 5-10
Ink
remaining: 12-1
saving: 12-2
Ink cartridge: 1-3, 2-4–5,
14-10–11, 14-14
alignment: 2-24–25
capacity: 13-7
guidelines: 13-7–8
installing: 2-23–26
maintenance: 13-8
protective packaging: 13-10
replacing: 13-9–12
specifications: A-2
unpacking: 2–24, 13-10
INK DETECTOR option: 12-1
Input circuit: A-5
Input/output status: A-6
Inserting, pauses: 9-4
INSIDE IMAGE setting: 3-13
Installing
ink cartridge: 2-23–26
paper cassette: 2-16–19
Index
J
Jacks: 2-8
handset: 2-16
telephone: 8-5
telephone line: 2-20
Jammed paper
bottom of unit: 14-4
cassette area: 2-19, 14-2–3
printer area: 14-3–4
Japanese, date format: 3-15
Junk mail, restricting: 7-22–23
K
Keypad
numeric: 3-3, 3-5
one-touch speed dialing: 3-3,
3-5
KEYPAD VOLUME option: 3-17
L
Language, display: 3-15
Large documents, sending: 5-10
LCD BRIGHTNESS option: 3-15
LCD display: 2-7, 2-10, 3-7
customizing: 3-15–16
messages: 14-10–14
nothing appears: 14-8
Learning
connections: 2-7–14
controls: 2-7–14
Leaving a message: 8-7
LEGAL setting: 12-1
Legal-size paper, paper
cassette: 4-9–12
LIGHT setting: 12-2
Line density, scanning: A-1
Index
Line
jack: 2-20
noise: 5-16
See also Telephone line
Line errors: 7-17
reducing: 5-15–16
Liquid, spilling: 1-8
Lists, printing
dialing: 11-10–11
registered information:
11-10–12
Location: 1-7, 2-1–2
LONG DISTANCE setting:
5-10–11
Long fax numbers: 6-15
LTR setting: 12-1
M
Mailbox, confidential: 10-11,
10-14
Main menu: 3-2
Maintaining: 13-1–12
ink cartridge: 13-8
Making
copies: 4-6–8
one-touch speed dial call: 8-2
regular dial call: 8-1
MAN/AUTO SWITCH option:
7-10
MANUAL light: 2-12, 4-8, 7-3, 7-5,
7-9, 8-2, 8-6, 9-9, 10-19
Manual receiving: 4-8, 7-9–11
DRPD: 9-9
Melody, hold: 8-3
Memory: 5-11
capacity: 5-6, 5-10
full: 5-9
printing documents: 7-7
storage: 5-6, 5-10, 7-7, 10-7,
10-10
Memory clear report, receiving:
11-9
MEMORY FULL message: 5-6,
5-10, 14-12
Memory receiving: 1-4, 7-17
documents: 7-7–8
PC fax document: 7-8
MEMORY RX ALARM option:
7-17–18
MEMORY RX option: 7-17–18
I-7
Index
Instructions, safety: 1-7–8
Interface
bi-directional: A-4
cable: A-5
connectors: A-5
parallel: 2-20, A-4
specifications: A-4–9
type: A-4
Intermediate tones: 5-12
Interrupting, sending: 5-11
Interval, redialing: 5-18
Memory sending: 1-4, 5-6–9,
10-1, 10-7, 10-10
capacity: 5-6, 5-10
MEMORY TRANSMISSION
button: 2-13, 5-7, 10-2, 10-7,
10-10, 10-15
Menu system
searching: 2-14
summary: B-1–9
using: 3-2–3
Messages, telephone: 8-4
MID PAUSE SET option: 9-5
Miscellaneous, printer
operations: 12-1–3
Modem jack: 2-8
Moving, cursor: 2-14
MULTI TRANSACTION ON
message: 14-12
MultiPASS Desktop Manager
for Windows: 1-2–3, 2-4–5,
7-8
User’s Guide: 1-2, 1-5,
2-10–11
Multiple copies: 4-7
N
Name
entering: 3-4–5
registering: 3-10–12
Networking: 1-4
NO CONFID. TX message: 14-12
NO ORIGINAL RELAY TX
message: 14-12
NO RX PAPER message: 14-13
NO TEL # message: 6-3, 6-6, 6-9,
6-13, 8-2, 14-13
Noise, on line: 5-11
Non-Windows applications:
2-10–11
Normal ring: 9-6
NORMAL RING option: 9-7–8
NOT FOUND! message: 6-17
Nothing on printed page: 14-7
Number(s)
directory dialing: 6-17
entering: 3-3
searching: 6-17
Numeric keypad: 2-10–11, 3-3,
3-5, 3-9, 3-11
I-8
O
OCR applications: 1-2
Off hook alarm: 3-16
OFF HOOK ALARM option: 3-17
ON HOOK button: 2-14, 8-1–2
ON HOOK light: 8-3
ON LINE button: 2-26, 13-6
ON LINE light: 2-26, 13-6
On-line services: 9-3
ONE DIRECTION PRT setting:
11-13, 12-2
One-touch speed dialing: 6-1–6,
10-1, A-2
call: 8-2
cannot make phone call: 14-8
confidential documents:
10-12, 10-15
keypad: 2-10–11, 2-13, 3-3,
3-5, 3-9, 3-11
faceplate: 2-4–5, 2-29
numbers: 6-10–11
relay sending: 10-10
sending: 6-3–4
Operating environment: A-2
Operation buttons, fax/
telephone : 2-10–11, 2-14
Operation panel: 2-6–7, 2-10–11,
13-2, 13-4
Operations, customizing:
3-13–18
Orange tape: 2-24, 13-10
ORIG RELAY TX: 10-9
Other problems: 14-7–8
Other ring type: 9-6
OTHER RING TYPE option: 9-8
Outgoing messages (OGM): 8-4
Output circuit: A-5
OUTPUT NO setting: 11-3–4
OUTPUT YES setting: 11-3–4
OUTSIDE IMAGE setting: 3-13
Outside line access: 9-4
Oversized documents,
receiving: 7-15–17
Index
Page footer, received
documents: 7-17
Paper
fanning: 2-16
guides: 4-3
handling: 1-3
jams, clearing: 14-2–4
legal-size: 4-9
size: 12-1, A-1
stack: 14-3
thickness: 4-2, 14-3
types: 4-2, 14-3, A-1
Paper cassette: 2-4–7, 14-3,
14-14
adjusting: 4-9–12
capacity: 2-16, A-1
installing: 2-16–19
legal-size paper: 4-9–12
thickness of stacked paper:
14-3, 14-14
Parallel
cable, attaching: 2-20–21
interface: 1-1, 2-5, 2-8, 2-20,
A-4–9
port: See Bi-directional
parallel port
Password: 10-11
PASSWORD option: 10-17
PAUSE button: 2-14
using: 9-4–5
Pause time, changing length:
9-5
Pauses
dialing: 2-14
entering: 9-4
PBX internal switching system:
9-4
PC fax: 1-1, 1-4
receiving in memory: 7-8
PC interface light: 2-10–11
Personalizing: 3-6–12
Phone call: 3-1
cannot make: 14-8
See also: Telephone
Phone jack: 8-10
Index
Photographs: 5-12
Picking up calls: 8-4
Pin assignments: A-6–8
Placing, call on hold: 8-3
Plain paper fax: 1-1, 1-3
Polling: 10-16–21
cannot poll other units: 14-7
other fax machines: 10-18
preset, canceling: 10-21
preset time: 10-19–20
POLLING button: 2-13, 10-18
Polling ID: 10-19
registering: 10-16–17
POLLING ID ERROR message:
14-13
Power
consumption: A-2
failure: 11-9
receptacle: 2-22
source: 1-7, 2-2, A-2
Power cord: 1-8, 2-4–5
attaching: 2-22
connector: 2-8
Preparing, documents: 4-1–2
Preset polling, canceling: 10-21
Preset sending: 10-3–5
canceling: 10-5
Preset time
polling: 10-19–20
sending documents: 10-3–5
Print
density: 12-2, 13-7
direction: 12-2
error light: 2-10
PRINT ERROR ONLY setting:
11-3–4
Print head: 2-24
cap: 13-10
nozzles: 13-6
Print head, cleaning: 2-26, 13-6
starting: 13-6
PRINT MODE button: 2-26, 13-6
Print quality: 1-3, 12-2
fax reports: 11-13
Print speed: 12-2
fax reports: 11-13
Printed page, nothing appears:
14-7
I-9
Index
P
Printer: 1-1
control modes: 1-3
cover: 2-6–7, 2-23, 2-25, 13-5,
13-9, 13-12
light(s): 2-10, 2-26, 13-6, 14-3
operations, miscellaneous:
12-1–3
panel cover: 2-7, 2-10–11,
2-26, 13-6
settings, changing: 12-1–3
Printer area
cleaning: 13-5
jammed paper: 14-3–4
PRINTER button: 2-10, 2-26, 13-6
PRINTER SETTINGS: 3-2, 7-15,
12-1, 12-3
Printing
activity management report:
11-6–7
activity reports: 11-3–9
automatic dialing lists:
11-10–11
documents in memory: 7-7
fax cover sheet: 11-2
fax reports: 11-1–14
help list: 2-30
ID, user: 3-13
lists, registered information:
11-10–12
paper size: A-1
reports: 2-13
selective activity
management reports:
11-7–9
single transaction activity
report: 11-3–6
user’s data list: 11-11–12
PRINTING DENSITY option: 12-2
Printouts: 7-1
Problems and solutions: 14-5–9
Procedures, sending: 5-10–11
PRT DIRECTION option:
11-13, 12-2
PRT FAX COVER PG. option:
11-2
PSTN: A-2
Pulse dialing: 2-14, 9-2–3
switching from touch-tone:
9-2
Q
Quick Start Guide: 1-2, 1-5
I-10
R
REC. PAPER JAM message: 7-7,
14-13
Receipt: 1-6
RECEIVE setting: 7-21
Received documents: 7-1, 7-8
in memory: 5-6, 7-17
Received document support:
2-7, 2-27
RECEIVED IN FILE message: 7-8,
14-13
RECEIVED IN MEMORY message:
5-6, 14-13
Receiving
activating, extension
telephone: 7-14
automatic, switching: 8-7–8
calls and documents: 7-5–6
dirty images: 14-6
documents: 7-14
fax documents: 7-1–24
fax vs. telephone: 7-21
features, setting up: 7-17–19
ID, user: 7-13–14
in memory: 1-4, 7-7–8
memory clear report: 11-9
operations, customized:
7-15–24
oversized documents:
7-15–17
PC fax document: 7-8
polling: 10-20
problems: 14-6–7
relay broadcast report: 11-9
speed, customizing: 7-23–24
transaction, report: 11-3
while making copies: 4-8
with answer machine: 8-7–8
Receiving calls
and documents, shared fax/
telephone line: 8-2–3
disconnecting: 7-20
extension telephone: 8-10
Receiving documents
automatically: 7-3, 7-10–11
dedicated fax line: 7-2–3
extension telephone: 7-12–14,
8-10
in memory: 7-7–8
manually: 7-9–14
receiving speed: 7-23–24
shared line: 7-4–6
Index
REINSTALL CARTRIDGE
message: 2-22, 14-14
RELAY BROADCAST button:
2-13, 10-6
RELAY BROADCAST message:
Relay broadcast report,
receiving: 11-9
Relay fax
group number: 10-6–7
location: 10-9
machine: 5-10–11
sending documents: 1-4,
10-6–7, 11-9
sending through: 10-6–10
table number: 10-6
Relay procedure
registering: 10-8–9
speed dialing: 10-8–9
Relay sending: 5-10–11
one-touch or coded speed
dialing: 10-10
RELAY TX GROUP #: 10-6
Remote receiving: 7-13–14
ID: 7-13–14
REMOTE RX ID: 7-13
REMOTE RX option: 7-12–13
Removing, shipping materials:
2-6
Replacing, ink cartridge:
13-9–12
REPORT button: 2-13, 11-2,
11-10
REPORT FONT SET option: 11-13
REPORT SETTINGS: 3-2, 11-3–4,
11-8, 11-13
Reports
activity: 11-3–9
and lists, customizing:
11-13–14
printing: 11-1–14
Requesting documents, from
other fax machines: 10-16–21
Requirements, space: 2-3
Resolution: 1-3, 2-12, 4-3, 5-12
See also DOCUMENT button
Restricting, incoming
documents: 1-4, 7-22–23
Reverse tones: 5-12
RING COUNT option: 7-19
RING START TIME option:
7-20–22
RING TIME option: 7-11
Ringer
tone: 3-16
volume switch: 2-9
10-6
Index
I-11
Index
RECEIVING message: 7-9
Recording method: A-1
REDIAL button: 2-14
REDIAL INTERVAL setting: 5-18
REDIAL TIMES setting: 5-18
Redialing: 5-11, 5-17–18
number: 2-14
REDIALING message: 14-14
Reducing
documents: 7-15
speed: 7-23
Reduction
horizontal: 7-15
mode: 12-1
size: 7-15
type: 7-15
vertical : 7-15
Registered information,
printing: 11-10–12
Registering
coded speed dialing
numbers: 6-7–8
confidential sending
procedure: 10-12
expanded dialing: 6-15–16
fax numbers: 3-8–9, 6-1–3
frequent numbers: 6-1–3,
6-4–5
group dialing numbers:
6-10–12
guidelines: 3-1
information: 3-1–18
long distance numbers: 9-4
name: 3-10–12
one-touch speed dialing
numbers: 6-1–3, 6-4–5
polling ID: 10-16–17
relay procedure: 10-8–9
telephone numbers: 6-4–5
Registration card: 2-5
Regular dialing: 10-1–3
cannot make phone call: 14-8
telephone call: 8-1
using: 5-2–3
Regular sending: 5-10, 6-3, 6-8
Ringing: 7-6, 8-3
incoming calls: 7-20
telephone: 7-17–20
Ringing patterns: 9-6–10
fax number: 9-8
shared fax/telephone
number: 9-8
telephone number: 9-8
Roller: 13-2
Rotary pulse dialing: 9-2–3
ROTARY PULSE setting: 9-3
Routine maintenance: 13-1
RX CALL LEVEL option: 3-17
RX PAGE FOOTER option:
7-17–18
RX REDUCTION option: 7-15–17,
12-1
RX REPORT option: 11-3–4
RX RESTRICTION option: 7-23
RX SETTINGS: 3-2, 7-2–4, 7-10,
7-12, 7-17–19, 7-21, 8-7, 9-7
RX START SPEED option:
7-23–24
S
Safety instructions: 1-7–8
Sales receipt: 1-6, 2-5
Scanner: 1-1–2, 1-4
components, cleaning: 13-2–4
Scanning
document: 5-6, 5-8–10
line density: A-1
method: A-1
sheet size: A-1
Scanning glass: 13-2
cleaning: 13-3
SEARCH TEL DIRECTORY
message: 6-17
Searching
directory dialing: 6-17
menu items: 2-14
number list: 6-17
SELECT REDUCE % option:
7-15–16
SELECT REDUCE DIR option:
7-15
SELECT PAPER SIZE option:
12-1
Selecting
a location: 2-1–2
document settings: 5-12–15
I-12
Selective activity management
reports, printing: 11-7–9
Sending
adding pages: 4-5
confidential: 5-10–11
confidential document:
10-11–15
dirty images: 14-6
document: 5-11
error: 5-11, 5-15–16
fax documents: 5-1–20
from memory: 1-4, 2-13,
5-6–9
interrupting: 5-11
large documents: 5-10
problems: 14-5–6
regular dialing: 5-2–3
speed: 5-11, 5-19, 6-3, 6-8
through relay fax: 10-6–10
to more than one location:
10-1–3
transaction report: 11-3
using one-touch speed
dialing: 6-3–4
Sending documents
directly: 5-4–5
errors: 5-11, 5-15–16
expanded dialing: 6-16
from memory: 2-13, 5-6–9
group dialing: 6-12–13
preset time: 2-13, 10-3–5
relay fax: 10-6–7, 11-9
speed: 5-19
Sending document support: 2-7,
2-28
Sending procedures: 5-10–11
special: 10-1–21
Servicing: 1-8
SET TIME option: 3-7
Setting, date and time: 3-7–9
Setting up: 2-15–29
dedicated receiving: 7-2–3
DRP use: 9-6–8
receiving with extension
telephone: 7-12–13
shared line: 7-4–5
special receiving features:
7-17–19
transmission: 5-15–18
Shared fax/telephone line: 7-1,
7-4–6, 8-1
receiving calls and
documents: 8-2–3
Index
Index
Standby mode: 6-17, 8-11
STANDING UP setting: 3-15
Start time, transaction: 11-5–6
START/COPY button: 2-14, 3-1–2
Starting
operation: 2-14
print head cleaning: 13-6
Starting speed: 7-23
transmission: 5-10–11
STOP button: 2-14, 3-1, 3-3
Stored, in memory, alarm: 7-17
Subscriber’s telephone circuit:
A-2
Summary, menu system: B-1–9
SUPPLY REC. PAPER message:
7-7, 14-14
Support, customer: 1-6
Supports, document: 1-7
Switchboard: 9-4
Switching to
automatic receiving: 7-10–11,
8-8
pulse dialing: 9-2
tone dialing: 9-3
System errors: 7-17
reducing: 5-15–16
SYSTEM SETTINGS: 3-2, 3-15–16,
5-19, 7-22–24
T
Table number, relay fax: 10-6
TALK message: 8-3
Tape: 2-6
TEL LINE TYPE option: 9-2–3
TEL REGISTRATION: 3-2, 6-1–2,
6-4, 6-7, 6-10, 6-15
TEL setting: 9-8
ID, user: 3-13
Telephone: 1-1
Answering Device (TAD):
7-13
book, directory dialing: 6-17
call, cannot make: 14-8
call, on hold: 2-14
circuit: A-2
communications: 7-1, 9-9
features: 1-4
messages: 8-4
ringing: 7-18–22
Telephone jack: 2-8, 2-20, 8-5,
8-9
I-13
Index
Shared line, setting up: 7-4–5
Shipping
box: 2-4
items: 2-5
materials, removing: 2-6
SHORT-LONG-SHORT option: 9-8
SHORT-SHORT-LONG option: 9-8
Signal voltage levels: A-5
Signals, interface: A-6–8
Single transaction activity
report: 11-3–6
SITTING DOWN setting: 3-15
Software User’s Guide: 1-2, 1-5,
2-10–11
Solutions, problems: 14-5–9
Sound(s)
customizing: 3-16–18
dialing: 3-17
SPACE button: 2-13, 3-3, 3-5
Space requirements: 2-3
SPANISH setting: 3-15
Speaker volume switch: 2-7,
2-10
Special
dialing: 9-1–10
documents: 4-3
operations: 2-13
receiving features, setting
up: 7-17–19
sending procedures: 10-1–21
Specifications: A-1–9
document sizes: A-3
ink cartridge: A-2
interface: A-4–9
Speed
ECM transmitting: 5-16
receiving: 7-23–24
reducing: 7-23
transmission: 1-3, 5-10–11,
5-19–20
Speed dialing
cannot make phone call: 14-8
coded: 6-7–9
group: 6-10–14
keypad: 3-3, 3-5
one-touch: 6-1–6
relay procedure: 10-8–9
Spotted images: 14-6
STANDARD light: 2-12, 4-3
STANDARD setting: 12-2
Telephone line: 2-4–5, 5-10–11,
9-6
connecting: 2-20
jack: 2-8, 2-20
Telephone numbers: 3-4, 9-6
coded speed dialing: 6-9
one-touch speed dialing:
6-4–6
pauses: 9-4–5
Temperature: A-2
TEST PRINT option: 2-30
Testing: 2-30
Thickness, paper: 4-2
Time, redialing: 5-18
Timing chart: A-8–9
Tissue paper: 13-1
Tone
ringer: 3-16–17
signals: 2-14, 9-3
TONE button: 2-14, 9-3
Tone dialing, switching from
pulse: 9-3
Touch tone dialing: 9-2–3
TOUCH TONE setting: 9-2
TRACING PAPER setting:
5-12–13
Transaction
activity reports: 11-3–6
mode: 11-5–6
number: 11-5
result: 11-5–6
Transmission
setting up: 5-15–18
time: A-1
Transmission mode: 6-3, 6-8,
10-9, 10-13
customizing: 5-10–11
Transmission speed: 1-3
customizing: 5-19–20
initial: 5-10
TRANSMIT message: 5-11
Transmit Terminal
Identification: 3-6, 3-13–15
Transmitting
broadcasting: 10-2
document: 5-3, 5-5, 5-11
error: 5-11
memory: 1-4, 5-6–9, 10-1,
10-7, 10-10
speed, ECM: 5-16
See also Sending
I-14
Transparent documents: 5-12
Triple ring: 9-6
Troubleshooting: 14-1–14
TTI: 3-6, 3-13–15
TTI MARKER option: 3-13–14
TTI OPTION SET option: 3-13
TTI POSITION option: 3-13–14
Tune, hold melody: 8-3
Turning on, automatic
receiving, messages and
documents: 8-6
TWAIN Scanning Standard:
1-2, 1-4
TX CONFIRMATION REP option:
11-3–4
TX MODE: 5-10–11
TX MODE option: 6-3, 6-8
TX REPORT option: 11-3–4, 11-8,
11-13
TX SETTINGS: 3-2, 5-15–17, 9-5
TX START SPEED option:
5-19–20
TX TERMINAL ID option: 3-13–14
TX/RX SEPARATE option:
11-7–8
Type
paper: 4-2
reduction: 7-15
TYPE OF DOCUMENT light: 2-12,
4-3, 5-12–13
Typefaces, fax reports: 11-13
U
Unidirectional printing: 12-2
Unpacking: 2-4–6
Upload document: 7-8
USA, date format: 3-15
Usage time, transaction: 11-5–6
USER NAME option: 3-4, 3-10
USER SETTINGS: 3-2, 3-13–14,
3-17, 5-12–14, 9-2
User’s data list, printing:
11-11–12
USER’S DATA LIST option:
11-11–12
Index
Index
V
Ventilation: 1-7, 2-2–3
Vertical lines, black: 13-2
VOL MAX setting: 3-17
VOL MID setting: 3-17
VOL MIN setting: 3-17
Voltage levels: A-5
Volume
changing: 3-16
ringer: 2-9
settings: 3-17–18
switch: 2-7
VOLUME CONTROL option: 3-17
W
Wall outlet: 1-7–8, 2-2, 2-22
Warranty: 14-1
service: 1-6
Weight: A-2
Windows: 1-2–3, 1-5, 2-10, 7-8
Y
Yellow post: 2-24, 13-11
Index
User’s Guide: 1-2, 1-5
Using
answering machine: 8-4–8
automatic dialing: 6-1–17
coded confidential sending:
10-15
coded speed dialing
numbers: 6-7–9
confidential sending: 10-15
data modem: 8-10–11
directory dialing: 6-17
Distinctive Ringing Pattern
Detector: 9-9–10
documentation: 1-5
expanded dialing: 6-15–16
extension telephone: 8-9–10
group dialing: 6-10–14
menu system: 3-2–3
one-touch confidential
sending: 10-15
one-touch speed dialing:
6-1–6
PAUSE button: 9-4–5
regular dialing: 5-2–3
special dialing: 9-1–10
telephone: 8-1–3
I-15
I-16
Index