1
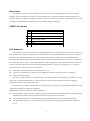
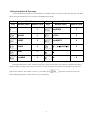
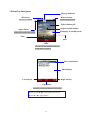
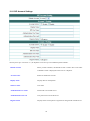
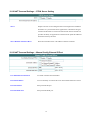
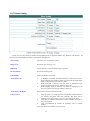
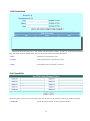
WLAN Phone User Manual Version V1.01 1 Table of Content INTRODUCTION .............................................................................................................................................................. 5 SAFETY DECLARATION ................................................................................................................................................ 5 FCC STATEMENT ............................................................................................................................................................ 5 1. GETTING STARTED .................................................................................................................................................... 6 1.1 PACKAGE CONTENTS ........................................................................................................................................... 6 1.2 PHONE SPECIFICATION ................................................................................................................................................ 7 1.3 HANDSET DESCRIPTION .............................................................................................................................................. 8 1.4 KEY PAD DEFINE & TEXT ENTRY ................................................................................................................................ 9 1.5 DESK TOP DESCRIPTION ........................................................................................................................................... 10 2. QUICK START OPERATION .................................................................................................................................... 11 PROCEDURE ................................................................................................................................................................... 11 STEP 1: FIT THE BATTERY ............................................................................................................................................... 12 STEP 2: CHARGE THE BATTERY ....................................................................................................................................... 12 STEP 3: POWER ON THE PHONE ....................................................................................................................................... 12 STEP 4: ENTER THE MAIN MENU ..................................................................................................................................... 12 STEP 5: ENTER THE WIRELESS SETTINGS........................................................................................................................ 12 STEP 6: SCAN APS .......................................................................................................................................................... 12 STEP 7: SETUP PREFERRED AP ....................................................................................................................................... 13 STEP 8: ENABLE DHCP FUNCTION ................................................................................................................................. 13 STEP 9: SIP ACCOUNT SETTING ...................................................................................................................................... 14 STEP 10: SIP SERVER SETTING ....................................................................................................................................... 14 STEP 11: OUTBOUND PROXY SETTING ............................................................................................................................ 14 STEP 12: PHONE PORT SETTING ...................................................................................................................................... 15 STEP 13: DIALING IP ADDRESS ....................................................................................................................................... 15 STEP 14: DIALLING SIP NUMBER ................................................................................................................................... 15 STEP 15: ANSWERING A PHONE CALL ............................................................................................................................. 15 3 MENU STRUCTURE ................................................................................................................................................... 16 4 SETTINGS ..................................................................................................................................................................... 17 4.1 NETWORK................................................................................................................................................................. 17 4.1.1 IP Setting ......................................................................................................................................................... 17 4.1.1.1 DHCP Setting ............................................................................................................................................................ 18 4.1.1.2 Static IP Setting ......................................................................................................................................................... 18 4.1.2 DNS Setting...................................................................................................................................................... 18 2 4.2 WIRELESS SETTINGS................................................................................................................................................. 19 4.2.1 Scan APs .......................................................................................................................................................... 19 4.2.2 Manual Input ................................................................................................................................................... 21 4.2.3 Preferred APs ................................................................................................................................................... 22 4.3 SIP SETTING ............................................................................................................................................................. 23 4.3.1 SIP Account ..................................................................................................................................................... 23 4.3.2 SIP Server ........................................................................................................................................................ 23 4.3.3 Outbound Proxy ............................................................................................................................................... 24 4.3.4 Phone Port ....................................................................................................................................................... 24 4.4 NAT ......................................................................................................................................................................... 24 4.4.1 STUN & UPnP ................................................................................................................................................. 25 4.4.2 STUN Server .................................................................................................................................................... 25 4.4.3 Manual Config ................................................................................................................................................. 26 4.4.4 NAT Keep Alive Time ....................................................................................................................................... 27 5. PHONE BOOK............................................................................................................................................................. 28 5.1 CREATE A NEW CONTACT ......................................................................................................................................... 28 5.2 BROWSE ................................................................................................................................................................... 28 6 MESSAGING ................................................................................................................................................................ 30 6.1 VOICE MAIL .............................................................................................................................................................. 30 6.2 SMS ......................................................................................................................................................................... 30 7 CALL LOG .................................................................................................................................................................... 33 8 APPLICATION ............................................................................................................................................................. 33 8.1 CALENDAR ............................................................................................................................................................... 33 8.2 CALCULATOR............................................................................................................................................................ 35 9 PHONE SETTING ........................................................................................................................................................ 36 9.1 TIME & DATE ........................................................................................................................................................... 36 9.2 LANGUAGE ............................................................................................................................................................... 37 9.3 BACKLIGHT LEVEL ................................................................................................................................................... 37 9.4 MELODY VOLUME .................................................................................................................................................... 37 9.5 ALERT TYPE ............................................................................................................................................................. 38 9.6 SCREEN SAVER ......................................................................................................................................................... 38 9.7 IMAGE MANAGEMENT .............................................................................................................................................. 38 9.8 MELODY MANAGEMENT .......................................................................................................................................... 39 9.9 CHANGE PASSWORD ................................................................................................................................................. 39 10 INFORMATION ......................................................................................................................................................... 39 3 11 CALL FUNCTION ........................................................................................................................................................ 40 11.1 CALL WAITING ....................................................................................................................................................... 40 11.2 CALL FORWARD ...................................................................................................................................................... 40 11.3 ANONYMOUS CALL................................................................................................................................................. 42 11.4 ANONYMOUS CALL REJECT .................................................................................................................................... 42 12 USING THE WEB CONFIGURATION ................................................................................................................... 43 12.1 ACCESSING CONFIGURATION MENU ....................................................................................................................... 43 12.2 WEB LOGIN SETTING .............................................................................................................................................. 43 12.3 MANAGEMENT SETTING – RESTORE FACTORY SETTING ......................................................................................... 45 12.4 MANAGEMENT SETTING – FIRMWARE UPDATE ....................................................................................................... 45 12.5 NETWORK SETTING – DHCP .................................................................................................................................. 46 12.6 NETWORK SETTING – STATIC IP ............................................................................................................................. 46 12.7 QOS SETTING ......................................................................................................................................................... 47 12.8 SIP SETTING – SIP PHONE SETTING, REGISTRAR AND OUTBOUND PROXY SERVER ................................................ 47 12.9 MESSAGE SERVER .................................................................................................................................................. 48 12.10 SIP SETTING – OTHERS ........................................................................................................................................ 49 12.11 SIP ACCOUNT SETTINGS ....................................................................................................................................... 50 12.12 NAT TRAVERSAL SETTINGS – STUN SERVER SETTING ........................................................................................ 51 12.13 NAT TRAVERSAL SETTINGS – MANUAL CONFIG EXTERNAL IP/PORT ................................................................... 51 12.14 NAT TRAVERSAL SETTINGS – UPNP SETTING ...................................................................................................... 52 12.15 NAT TRAVERSAL SETTINGS – NAT KEEP ALIVE TIME SETTINGS ......................................................................... 52 12.16 VOICE SETTING .................................................................................................................................................... 52 12.17 PHONE SETTING.................................................................................................................................................... 53 12.18 PHONE SETTING – TIMER ...................................................................................................................................... 54 12.19 CALL TRACING LOG ............................................................................................................................................. 54 12.20 PHONE BOOK ........................................................................................................................................................ 55 12.21 SPEED DIAL .......................................................................................................................................................... 55 12.22 RESTART SYSTEM ................................................................................................................................................. 56 13 TROUBLE SHOOTING ............................................................................................................................................. 56 4 Introduction Voice over IP (also known as Internet Phone) over wireless LAN is a technology that allows anyone to make a telephone call over the Internet in wireless LAN environment. This is a operation manual for the WLAN Phone. It is intended to help you configure the telephone and have it ready to run within a few minutes. Please follow the user guide carefully as troubleshooting the telephone can be very difficult and time consuming. SAFETY Declaration No. Safety Item 1 FCC Part 15 B / 15C 2 CE Class B 3 VCCI Class B, TELEC 4 SAR 5 EN60950 FCC Statement This product has been tested and complies with the specifications for a Class B digital device, pursuant to Part 15 of the FCC Rules. These limits are designed to provide reasonable protection against harmful interference in a residential installation. This equipment generates, uses, and can radiate radio frequency energy and, if not installed and used according to the instructions, may cause harmful interference to radio communications. However, there is no guarantee that interference will not occur in a particular installation. If this equipment does cause harmful interference to radio or television reception, which is found by turning the equipment off and on, the user is encouraged to try to correct the interference by one or more of the following measures: Increase the separation between the equipment and receiver. Connect the equipment into an outlet on a circuit different from that to which the receiver is connected. Consult the dealer for help. This device complies with Part 15 of the FCC Rules. Operation is subject to the following two conditions: (1) This device may not cause harmful interference, and (2) this device must accept any interference received, including interference that may cause undesired operation. FCC Caution: Any changes or modifications not expressly approved by the party responsible for compliance could void the user's authority to operate this equipment. IMPORTANT NOTE: FCC Radiation Exposure Statement This equipment complies with FCC radiation exposure limits set forth for an uncontrolled environment. End users must follow the specific operating instructions for satisfying RF exposure compliance. This transmitter must not be co-located or operating in conjunction with any other antenna or transmitter. This WiFi phone (FCC ID: xxxxxxx) is limited in CH1~CH11 for 2.4 GHz by specified firmware controlled in U.S.A. 5 1. GETTING STARTED 1.1 PACKAGE CONTENTS The following materials are included in the package. Please check the package to ensure that all the materials are listed below. Contact your supplier immediately if any item is missing. Quick Guide CD for User manual WLAN Phone 5V DC Power Adaptor Model: WLAN Phone x 1 Adapter x 1 Battery x 1 CD x 1 (This is a Manual file) Quick Guide x 1 Battery 1400mA Note: The radio frequency (RF) for this phone is configured for a specific regulatory domain. If you use this phone outside of its regulatory domain, the phone will not function properly and you might violate local regulations. 6 1.2 Phone Specification Dimension 105(L) x 45(W) x 19(H) mm Weight 100g Battery Rechargeable battery, 3.7V, 1400mAh Li-Polymer Adapter Input AC 110-220V / Output DC 5V 1A Standby Time 70 hours Talking Time 4 hours Protocol SIP LCD Color TFTLCD 1.8”, 176 * 220 Note: Standby time refers to the state in which the phone is on continuously without being used for calls, or moved to different service areas The standby time depends on the network conditions, phone usage and surrounding area. The phone consumes more battery power under the following conditions: 1. In areas with weak signals, with high or low temperatures, or when used outside the service coverage area. 2. When the phone frequently searches for network signal due to location changes 3. When you talk on the phone for long periods of time 4. The Alarm, Backlight or Vibration function is active 5. Ring or listening volume is set to maximum 7 1.3 Handset Description (10) (8) (1) (12) (2) (4) (9) (5) (3) (6) (7) (11) (1) Main display Middle soft key Enter the main menu / Activate the item in the label above the soft key Left soft key Activates the item in the label above the soft key (2) (3) (4) Right soft key Activate the item in the label above the soft key (5) Power/End (red) key Turn the phone on or off, or ends a connected call (6) Answer/Send (green) key Answer a call or dial a number (7) (8) | Number keys Use these to enter numbers and characters Side key Adjust receiver volume (9) Joystick Navigation key Move from one function to another. This guide uses these directional arrows ▲,▼,◄, ► & meddle key for “Menu” (10) Receiver Ear piece (11) (12) Microphone Ear set jack 8 1.4 Key Pad define & Text entry You use alphanumeric characters to enter details into the Phone Book, to create text and e-mail messages. The table below shows the characters that you can enter in the different text modes. Text Mode Key Normal (ABC) Text Mode Numeric (0-9) Key Normal (ABC) Numeric (0-9) 1 pqrsPQRS 7 abcABC 2 tuvTUV 8 defDEF 3 wxyzWXYZ 9 ghiGHI 4 @ . _-*#()%&+∕$, 0 jklJKL 5 * . mnoMNO 6 # # In Normal and Numeric modes, each time you press in quick succession the next character available on that key in displayed. When you did not press key for more then 1 sec the current character will be selected and cursor will move right for next selection. For example, to enter “c” you need to press enter the displayed character, release the key or press another key. 9 four times in quick succession. To 1.5 Desk Top Description Message Indicator SIP Status Battery Status SIP service available Indicate the battery level SSID of linking AP Registered SIP number Signal Status Wallpaper of standby mode Indicate the WLAN signal strength Time Date Menu Enter the main menu/Middle softkey or middle button of Joystick Title of Sub-menu Main Display Left Soft key Right Soft key Page Status Number of current page/Number of total pages Use joystick ▲/▼to scroll up/down each record Use ◄ or ►to page up/down 10 2. Quick Start Operation Procedure Step 1: Fit the battery Step 2: Charge the battery Step 3: Power on the phone Step 4: Enter the main menu Step 5: Enter the Wireless Settings Step 6: Scan APs Step 7: Setup Preferred AP Step 8: Enable DHCP function Step 9: SIP Account Setting Step 10: SIP Server Setting Step11: Outbound Proxy Setting Step 12: Phone Port Setting Step 13: Dialing IP Address Step 14: Dialling SIP Number Step 15: Answering a Phone Call 11 Step 1: Fit the battery Remove the battery cover and insert the battery then put cover back to the phone. Step 2: Charge the battery The battery must be fitted in the phone before you connect the adapter. Start to charge your phone at least 8 hours. Step 3: Power on the phone To turn the phone on, press and hold the “On hook” key for few seconds. Step 4: Enter the main menu Enter the main menu by pressing middle button of soft key or central of joystick, after you get in the default selection will be “Settings”, press the left soft key <Select>. Step 5: Enter the Wireless Settings Move the highlight bar to Wireless and press the left soft key <Select> to enter this Wireless Setting menu. This page provides 3 items there are Scan APs, Manual Input & Preferred APs. Step 6: Scan APs Move the highlight bar to Scan APs and press the left soft key <Select> to scan available APs. It will list all the SSID names of available APs or show “No AP found” message after scanning 12 Step 7: Setup Preferred AP Move the highlight bar to the AP you want to link and press the left soft key <Select>. It wills pop-up a small window that lists Information、Set as Preferred AP and Connect now items. Select “Set as preferred AP” then setup “SSID”, “Security” of this preferred AP. Please press the left soft key <Ok> to store the settings. Step 8: Enable DHCP function Move the highlight bar to Network and press the left soft key <Select> to enter this Network Setting menu. This page provides 2 items there are IP & DNS Setting. Move the highlight bar to IP and press the left soft key <Select> to enter this IP Setting menu. You can choose either DHCP or Static IP. The default network setting is DHCP enable. 13 Step 9: SIP Account Setting Move the highlight bar to SIP and press the left soft key <Select> to enter this SIP Setting menu. This page provides 4 items; there are SIP Account, SIP Server, and Outbound Proxy & Phone port. Move the highlight bar to SIP Account and press the left soft key <Select> to enter this SIP Account menu. Move cursor into the field of “Display name”, “User Name”, “Authentication ID” and “Authentication Pwd” for inputting data. Also you can input the alphabet by pressing middle soft key to switch. Please press the left soft key <Ok> to store the settings. Step 10: SIP Server Setting Move the highlight bar to SIP Server and press the left soft key <Select> to enter this SIP Server menu. Move cursor into the field of “Registrar Server”, “Registrar Port” and “Expire time”, for inputting data. Please press the left soft key <Ok> to store the settings. Step 11: Outbound Proxy Setting Move the highlight bar to Outbound Proxy and press the left soft key <Select> to enter this Outbound proxy menu. Move cursor into the field of “Registrar Server”, “Registrar Port” and “Expire time”, for inputting data. Please press the left soft key <Ok> to store the settings 14 Step 12: Phone Port Setting Move the highlight bar to Phone Port and press the left soft key <Select> to enter this Phone Port menu. Move cursor into the field of “Phone Port” for inputting data. Please press the left soft key <Ok> to store the settings. Step 13: Dialing IP Address Press Answer/Send (green) key or soft key <OK> Step 14: Dialling SIP Number Note: You have to register with SIP server to use SIP number. Dial SIP number. For example: dialing 1866 Press Answer/Send (green) key or soft key <OK> Step 15: Answering a Phone Call When phone rings, Press Answer/Send (green) The Power/End (red) key or soft key <Answer> to begin conversation. Note: key may be used to reject a call. 15 3 Menu Structure To enter the main menu, press middle button of soft key or middle button of joystick, after you get in the default selection will be “Settings” and each icon has several function to select, it show below. Phone Book Message Call Log Entertainment Setting 1. New 1. Voice Mail 1. Missed 1. 1. Network 2. Browse 2. SMS 2. Dialed 2. Wireless 3. Received 3. SIP 4. Delete All 4. NAT Java Download Application Phone Setting Information Call Function 1. Calendar 2. Calculator 1. Time & Date Showing IP, WLAN, SIP & 1. Call Waiting 2. Language MAC information 2. Call Forward 3. Back Light Level 3. Anonymous Call 4. Melody Volume 4. Anonymous Reject 5. Alert Type 6. Screen Saver 7. Image Management 8. Melody Management 9. Change Password 16 4 Settings To enter the “Setting” page, use joystick to locate “Settings” icon and press the left soft key <Select> to enter this sub-menu. This sub-menu provides 4 items, there are Network, Wireless, SIP, and NAT, and it shows below. 4.1 Network This WLAN phone supports DHCP that can assign IP address automatically and static IP that can assign IP address manually. Please ensure the network of this phone is set in order to use this phone properly. Move the highlight bar to Network and press the left soft key <Select> to enter this Network Setting menu. This page provides 2 items there are IP & DNS Setting. 4.1.1 IP Setting Move the highlight bar to IP and press the left soft key <Select> to enter this IP Setting menu. You can choose either DHCP or Static IP. The default network setting is DHCP. You can setup manually by using joystick keys to enter the column you want and then input the necessary data. 17 4.1.1.1 DHCP Setting Use joystick to select either “Enable” or “Disable”, if select “Enable” the IP will be obtained automatically, if not you should setup IP manually by choosing “Disable”. Press left soft key “Ok” to save your configuration. 4.1.1.2 Static IP Setting Get the information from your service provider before you enter data into the filed. You can use joystick to locate the column of filed which you going to input the data, also can use right soft key to <Clear> data. Press left soft key <Ok> to save your configuration. 4.1.2 DNS Setting Move the highlight bar to DNS Setting and press the left soft key <Select> to enter this IP Setting menu. There are 2 fields which are “Primary DNS” and “Secondary DNS” use joystick to locate the column of filed which you going to input the data, also can use right soft key to delete data. Press left soft key “Ok” to save your configuration. 18 4.2 Wireless Settings Before you use this WLAN phone, you need to setup the AP which will be associated. In the wireless setup you could input AP name and security method. Move the highlight bar to Wireless and press the left soft key <Select> to enter this Wireless Setting menu. This page provides 3 items there are Scan APs, Manual Input & Preferred APs. 4.2.1 Scan APs Move the highlight bar to Scan APs and press the left softkey <Select> to scan available APs. It will list all the names of available APs or show “No AP found” message after scanning. Move the highlight bar to the AP you want to link and press the left soft key <Select>. It will pop-up a small window that lists Information、Set as Preferred AP and Connect now items. 19 Information: List AP information of “SSID”, “Status” and “Signal”. Set as Preferred AP: Save the profile of this AP into Preferred APs, You may have several preferred APs. Please repeat the steps of Scan APs to add more preferred APs. Ones you select “Set as Preferred AP” that will show “AP Settings” menu, it contain two main items which are “ESSID” and “Security”. Enter SSID of the AP you want to link.( SSID: Shows the name of linking AP) and choose the security type as AP you associated. Security : There 4 type you can select which are “OFF”、”WEP” 、”WPA-PSK” and “PEAP”. 1. OFF: The AP you associated that does not set up security for any user. 2. WEP: Move the cursor to setup “WEP” length and type of authentication that AP you want to link.( WEP: Use navigation keys to turn on/off this function.) 20 3. WPA-PSK: Move the cursor to setup “WPA-PSK” length and type of authentication that AP you want to link. (WPA-PSK: Use navigation keys to select the function you need to set.) 4. PEAP: Move the cursor to setup “PEAP” length and type of authentication that AP you want to link. (PEAP: Use navigation keys to select the function you need to set.) 4.2.2 Manual Input Move the highlight bar to Manual Input and press the left soft key <Select> to setup APs manually. Enter SSID of the AP you want to link.( SSID: Shows the name of linking AP) Move the cursor to setup “Security” length and type of authentication that AP you want to link. (Use navigation keys to turn on/off or set up this function.) Please press the left soft key <Ok> to store the settings. This phone will automatically search for the available AP when it boots up at the first time. Note: This key supports Hexadecimal format and please use <0~9> and <A~F> for this. (64 bit: 10 digits; 128 bit: 26 digits) 21 4.2.3 Preferred APs Move the highlight bar to Preferred APs and press the left soft key <Select> to scan available APs. It will list all the names of available Preferred APs or show “No AP found” message after scanning. Move the highlight bar to the AP you prefer to link and press the left soft key <Select>. It will pop-up a small window that lists Setting, Delete and Connect now items. Move the highlight bar to Setting and press the left soft key <Select> to setup “SSID”, “Security” of this preferred AP. Please press the left soft key <Ok> to store the settings. Move the highlight bar to Delete and press the left soft key <Select> to delete this AP from Preferred APs list. The Connect now function is mean AP which be selected will start to be used for further access. This phone will automatically search for the available AP when it boots up at the first time. 22 4.3 SIP Setting Session Initiation Protocol (SIP) is the most popular Voice over IP standard. It enables two or more people to make phone calls, share multimedia and make multimedia conference over the internet. Please have an administrator setup these settings for you or obtain this information from your SIP service provider. SIP setting define the SIP registrar address, SIP account and related SIP parameter. The SIP account information is required before you setup. You could contact your service provider (eg carrier or ITSP) to get the information. Move the highlight bar to SIP and press the left soft key <Select> to enter this SIP Setting menu. This page provides 4 items; there are SIP Account, SIP Server, and Outbound Proxy & Phone port. 4.3.1 SIP Account Move the highlight bar to SIP Account and press the left soft key <Select> to enter this SIP Account menu. Move cursor into the field of “Display name”, “User Name”, “Authentication ID” and “Authentication Pwd” for inputting data. Also you can input the alphabet by pressing middle soft key to switch. Please press the left soft key <Ok> to store the settings. 4.3.2 SIP Server Move the highlight bar to SIP Server and press the left soft key <Select> to enter this SIP Server menu. Move cursor into the field of “Registrar Server”, “Registrar Port” and “Expire time”, for inputting data. Please press the left soft key <Ok> to store the settings 23 4.3.3 Outbound Proxy Move the highlight bar to Outbound Proxy and press the left soft key <Select> to enter this Outbound proxy menu. Move cursor into the field of “Registrar Server”, “Registrar Port” and “Expire time”, for inputting data. Please press the left soft key <Ok> to store the settings. 4.3.4 Phone Port Move the highlight bar to Phone Port and press the left soft key <Select> to enter this Phone Port menu. Move cursor into the field of “Phone Port” for inputting data. Please press the left soft key <Ok> to store the settings. 4.4 NAT Enable STUN or UPnP to activate the NAT traversal function if this device is behind NAT mechanism. Please ensure your NAT router can support UPnP as well. Please refer to the operation manual of your router for further information. 24 4.4.1 STUN & UPnP Move the highlight bar to NAT and press the left soft key <Select> to enter this NAT menu. This page provides 4 items; there are STUN & UPnP, STUN Server, Manual Config and NAT Keep Alive Time. Move the highlight bar to STUN & UPnP and press the left soft key <Select> to enter this STUN & UPnP Setting menu. Move cursor to enable or disable STUN or UPnP function. Please press the left soft key <Ok> to store the settings. 4.4.2 STUN Server Move the highlight bar to STUN Server and press the left soft key <Select> to enter this STUN Server menu. Move cursor into the field of “STUN Server” for entering STUN server IP address when enable STUN server. Please press the left soft key <Ok> to store the settings. 25 4.4.3 Manual Config Setup the external IP address manually. It has to be complied with the settings of virtual server of the NAT devices, if phone enables the configuration manually. Move the highlight bar to Manual Config and press the left soft key <Select> to enter this Manual Config menu. This page provides 3 items; there are User Define, External IP add, External Port. User Define Move the highlight bar to User Define and press the left soft key <Select> to enter this User Define menu. Move cursor to enable or disable User Define function. Please press the left soft key <Ok> to store the settings External IP add Move the highlight bar to External IP add and press the left soft key <Select> to enter this External IP menu. Please enter External IP. (1. Manual set. 2. Use Stun server to get external IP address. 3. Use UPnP to get external IP address). Move cursor to setup the field of “Manual Set” or “Use STUN” or “Use UPnP”. Please press the left soft key <Ok> to store the settings 26 External Port Move the highlight bar to External Port and press the left soft key <Select> to enter this External Port menu. Move cursor to setup the field of “SIP” and “Media”. Please press the left soft key <Ok> to store the settings 4.4.4 NAT Keep Alive Time Move the highlight bar to NAT KeepAlive Time and press the left soft key <Select> to enter this NAT KeepAlive Time menu. Move cursor to setup the field of “Always Send” and “KeepAlive Time”. Please press the left soft key <Ok> to store the settings. 27 5. Phone Book Use the Phone Book menu to store, browse, edit and delete a person’s name, Phone number and e-mail address. Enter the main menu and use joystick to locate Phone Book icon. Press the left soft key <Select> to enter this sub-menu. 5.1 Create a New Contact Move the highlight bar to New and press the left soft key <Select> to enter this Phone Book menu. Move cursor into the field of “Name”, “Phone Number”, and “E-mail” for inputting data. Also you can input the alphabet by pressing middle soft key to switch. Please press the left soft key <Ok> to store the settings. For each contact you can enter: Item Number of digits Name 31 Phone Number 63 Email 63 5.2 Browse Move the highlight bar to Browse and press the left soft key <Select> to enter this Browse menu. 28 The highlight bar will locate the record that you would like to find. Move the highlight bar to name and press the left soft key <Select> to view or delete this contact. You may save this new data after editing. You may delete this editing data, select <Delete> function to erase this contact. 29 6 Messaging From the Messaging menu you can view and retrieve the message and voice mail you have. Enter the main menu and use joystick to locate Messaging icon. Press the left soft key <Select> to enter this sub-menu. There are 2 items in this page, “Voice Mail” and “SMS”. 6.1 Voice mail Move the highlight bar to Voice Mail and press the left soft key <Select> to enter this menu. It will show the number of voice message you have. 6.2 SMS Move the highlight bar to SMS and press the left soft key <Select> to enter this menu. There are 4 items in this menu, “New”、”Inbox” 、”Archive” and “Delete”. 30 New: In order to create message, you can type letter in white field, it have 500 letters limitation, and the number indicator will decrease to count that how many letter remain. While you finished typing, you have two option, there are “Send” and “Save SMS” 1. If select “Send” function then you should input the phone number which you want to send and press “ok” to perform sending message. 2. If select “Save SMS” the message you typed that will save into “Archive” item. 31 Inbox: It will show the message list Archive: You have 3 function to use which are “Send”、”Update” and “Delete” while you press “Select” in archive list. Delete: Move highlight to “Delete” item that provide 3 functions which are “Delete All”、”Inbox” and “Archive”, you can select the item which going to delete. 32 7 Call Log From the Call Log menu you can view all the call history in this phone. It is grouped into “Missed” calls, “Dialed” calls, “Received” calls and “Delete All”. Enter the main menu and use joystick to locate Call Log icon. Press the left soft key <Select> to enter this sub-menu. 8 Application This WLAN phone supports the most continence tool, calendar and calculator. Use the calendar to view the date. Enter the main menu and use joystick to locate Application icon. Press the left soft key <Select> to enter this sub-menu. 8.1 Calendar Move the highlight bar to Calendar and press the left soft key <Select> to enter this menu. Click ◄ <Left>/ ►<Right> of Navigation Key to view pervious or the following month, also you can create a memo by select the date you had chose and into the memo item. 33 Memo: Move highlight to “Memo” and use left soft key to press “select” that will show 3 function which are “New”、”View” and ”Delete”. Select Date: The date you want to create memo. Use left soft key to press “select” into the “Select Date” menu to input. Delete All Memo: In order to delete any date of memo that you had created, move highlight to “Delete All Memo” item and use left soft key to press “select” to perform this function 34 8.2 Calculator Move the highlight bar to Calculator and press the left soft key <Select> to enter this menu. Please use the joystick as screen shows to calculate the number you want. Example: 1 + 2 = 3 35 9 Phone Setting Enter the main menu and use navigation keys to locate Phone Setting icon. Press the left soft key <Select> to enter this sub-menu. 9.1 Time & Date Move the highlight bar to Time & Date and press the left soft key <Select> to enter this menu. Please enter NTP server IP to have accurate time or enter the date and time manually. 36 Manual Input Move cursor into the field for inputting data. Please press the left soft key <Ok> to store the settings. 9.2 Language Move the highlight bar to Language and press the left soft key <Select> to enter this menu. Use joystick to select the language you wish to have and press <Ok> to save the setting. Currently it support “English” only. 9.3 Backlight Level Move the highlight bar to Backlight Level and press the left soft key <Select> to enter this menu. Use joystick ◄ <Left>/ ►<Right> to adjust the backlight level and press <OK> to save the setting. 9.4 Melody Volume Move the highlight bar to Melody Volume and press the left soft key <Select> to enter this menu. Use joystick ◄ <Left>/ ►<Right> to adjust the backlight level and press <OK> to save the setting. 37 9.5 Alert Type The WLAN phone could setup the incoming call indication type, you can set as vibration mode when you are in meeting. Move the highlight bar to Alert Type and press the left soft key <Select> to enter this menu. Move the highlight bar to the type you would like to setup and press the left soft key <Select> to select. 9.6 Screen Saver Screen save will show current time when you did not operate the WLAN phone for the dedicate period of time. Move the highlight bar to Screen Saver and press the left soft key <Select> to enter this menu. Select the screen server time setting or disable this function. 9.7 Image Management The WLAN phone support the selectable wall paper while in the standby mode, you can select prefer picture as wall paper and download photo from the network as well. Move the highlight bar to Image Management and press the left soft key <Select> to enter this menu. Select the image and press <Select> to set as wallpaper. 38 9.8 Melody Management The WLAN phone support the selectable polyphonic melody for the incoming ring tone, you could select prefer melody as ring tone and download it from network as well. Move the highlight bar to Melody Management and press the left soft key <Select> to enter this menu. Click ◄ <Left>/ ►<Right> of joystick to select the content provider or others and press <Select> to login. Select the melody and press <Select> then set as incoming ring tone. 9.9 Change Password Move the highlight bar to Change Password and press the left soft key <Select> to enter this menu. Enter the password to inform the new password. 10 Information List the main data of this phone. Enter the main menu and use the joystick to locate Information icon. The information shows IP status, WLAN status, SIP & MAC status. 39 11 Call Function Setups call function of this phone. This phone supports 4 items: Call Waiting, Call Forward, Anonymous Call and Anonymous Reject. Enter the main menu and use joystick to locate Call Function icon. Press the left soft key <Select> to enter this sub-menu. 11.1 Call Waiting Call waiting feature enable the WLAN phone play the remind tone when someone call you while you already on the phone call. Move the highlight bar to Call Waiting and press the left soft key <Select> to enter this menu. Use joystick to select enable or disable this function 11.2 Call Forward The call forward feature enable the WLAN phone forward the incoming call to the specified phone number to prevent missing call when you are not available to answer the call. Move the highlight bar to Call Forward and press the left soft key <Select> to enter this menu, this menu provide 3 items to setup, such as Unconditional, Busy and No Answer. 40 Unconditional Use joystick to enable or disable this function, if enable please enter the phone number or IP address. Please press the left soft key <Ok> to store the settings. Busy Use joystick to enable or disable this function, if enable please enter the phone number or IP address. Please press the left soft key <Ok> to store the settings. No Answer Use joystick to enable or disable this function, if enable please enter the phone number or IP address. Please press the left soft key <Ok> to store the settings. 41 11.3 Anonymous Call To make anonymous call means that you make the call without sending the caller information name or number. Move the highlight bar to Anonymous Call and press the left soft key <Select> to enter this menu, this function is to let you hide caller ID for making anonymous call, also you either enable to hide “Full URI” or “Display Name”. 11.4 Anonymous Call Reject When you don’t want to answer the call without the caller identification that you could enable the Anonymous Reject function. Move the highlight bar to Anonymous Reject and press the left soft key <Select> to enter this menu, this function is to let you reject the incoming call who hiding caller ID, you either enable or disable this function. 42 12 Using the web configuration The configuration web can be accessed using a web browser. 12.1 Accessing Configuration Menu 1. Open the web browser (ie. Internet Explorer, Netscape…) 2. Type in the IP Address of the phone followed by :9999 IP address is provided by your Internet Service Provider (ISP). If your ISP supports DHCP, you may obtain the IP address from you phone. Press MENU and scroll down to IP address. Enter User Name and Password (leave User Name and Password blank if you are installing the phone for the first time) Click OK 12.2 Web Login Setting 43 44 User Name Configuration menu login name. Password Configuration menu login password. NTP Server IP Network Time Protocol (NTP) is a protocol used to help match your system clock with an accurate time source (eg atomic clock, time server). It is good practice to have all your networked computers synchronized with one server. Time Zone Select your time zone. If there is daylight saving in your area, click the check box. TFTP Server Enable or Disable TFTP server to allow transfer of file from a computer to IP phone. FTP Client Enable or disable IP phone to download files from FTP server and update the firmware automatically Remote Config Password Remote password to access the configuration menu from VoIP software. 12.3 Management Setting – Restore Factory Setting Click on “Management”, Select “Restore Factory Setting” and the above screen will display on the screen. Restore Factory Setting Restores all the settings back to factory default settings. 12.4 Management Setting – Firmware update FTP server, login ID, login password and firmware filename are preset when you purchase the phone. These are required to download and update the firmware. FTP Server FTP Server address. Login ID Login ID provided by your supplier. Login Password Login password provided by you supplier. Firmware Filename Updated firmware filename. Do not change the file name unless specified by your supplier. 45 12.5 Network Setting – DHCP Select DHCP if you have cable internet. DHCP Server Dynamic Host Configuration Protocol (DHCP) Server address. This IP address information is obtained automatically from your ISP. DNS Server DNS address provided by your ISP. 12.6 Network Setting – Static IP Choose Static IP network setting if all Wide Area Network IP is provided to you by your ISP. IP Address IP address assigned to you by your ISP. Router IP Router IP address. Subnet Mask Subnet mask address. DNS Server DNS server address provided by your ISP. NOTE: RESTART the system for new settings to take effect after you modify the IP address. 46 12.7 QoS Setting Voice TOS Sets the type of service for this Internet datagram. SIP TOS Sets the SIP’s type of service for this Internet datagram VLAN Enable or disable virtual LAN. VLAN Priority Set the virtual LAN Priority. VLAN ID Virtual LAN ID. 12.8 SIP Setting – SIP Phone Setting, Registrar and Outbound Proxy Server Session Initiation Protocol (SIP) is the most popular Voice over IP standard. It enables two or more people to make phone calls, share multimedia and make multimedia conference over the internet. Please have an administrator setup these settings for you or obtain this information from your SIP service provider. 47 SIP Phone Port Number SIP phone port number. Registrar Server Domain Name/IP Address Registrar server domain name or IP address. Registrar Server Port Number Registrar server port number. Authentication Expire Time The time that the phone waits to connect to the SIP server after the user dialed a number. If still not connected, the phone will disconnect and redial. Outbound Proxy Domain Name/IP Address Outbound proxy domain name or IP address. Outbound Proxy Port Number Outbound proxy port number. 12.9 Message Server MWI Message Server Domain Name/IP Address Message server domain name or IP address. MWI Message Server Port Number Message server port number. MWI Message Subscribe Expire Time Expire time for message waiting indicator Voice Message Account Voice message account name 48 12.10 SIP Setting – Others This section is for network administrators. Session Timer The time interval in which the phone periodically refresh SIP sessions by sending repeated INVITE requests. These INVITE requests allow the user agent or proxies to determine the status of the SIP session. Media Port Real-time Transport Protocol port number. Provides end-to-end transfer of data with real-time audio. Prack Prack ensures that media information is exchanged and that network checks before connecting the call. Select Enable for a more reliable connection. Session Refresher Select None to disable SIP session timer support. Select UAC to initiate SIP request. Select UAS to receive SIP request and then return a response. Session Timer Method Select SIP request method. Default method is Invite. UDP/TCP Select SIP signal transmission method. Default method is UDP. Register with Proxy Register via proxy 49 12.11 SIP Account Settings You may have up to 4 accounts. i.e., the IP phone can receive up to four different phone numbers. Default Account When you dial a number, the default account is used to dial. User Name of default account is displayed on the receiver’s IP phone. Account Active Enable or disable this account. Display Name Display name on the IP phone. SIP User Name User name. Authentication User Name Name used to access SIP server. Authentication Password User password to access SIP server. Register Status Displays if the current phone is registered or unregistered with SIP server. 50 12.12 NAT Traversal Settings – STUN Server Setting STUN Simple Traversal of User Datagram Protocol through Network Address Translators is a protocol that allows applications to determine the types of NATs and firewalls are in between them and the internet. STUN also provides the ability for applications to determine the public IP addresses allocated to them by the NAT. STUN Domain Name/IP Address Enter STUN domain name or IP address if STUN is enabled. 12.13 NAT Traversal Settings – Manual Config External IP/Port User Defined External IP/Port To enable or disable external IP/Port External IP Address You can manually set external IP or use STUN/UPnP function to obtain External SIP Port Setup external SIP port External Media Port Setup external Media port 51 12.14 NAT Traversal Settings – UPnP Setting UPnP Enable or disable universal plug and play. Some NAT supports UPnP so STUN is not required and must be disabled. 12.15 NAT Traversal Settings – NAT Keep Alive Time Settings Always send keep alive packet Enable or disable to send period packet Keep Alive time To setup alive time 12.16 Voice Setting Codec Voice Compression Algorithm priority settings. Select from the most used codec to the least used codec. RTP Packet Length Real-Time Transfer Protocol (RTP) packet length. VAD VAD detects voice activity and adjusts the signal to a target power level. It ensures that background noise or echo does not get amplified to the target power level. DTMF Method Select the tone method for IP phone. 52 12.17 Phone Setting Recall you can only enable or disable call forwarding from the IP phone MENU key. With the web-browser, you can enter the forwarded phone numbers in the Phone Setting menu. Tone Setting Select the tone for particular country Ringer Type Select the type of ring (1 to 4). Hold Tone Select melody or tone when HOLD key is pressed. Do Not Disturb Reject all incoming calls. Call Waiting Enable or disable call waiting. Anonymous Call 1. 2. 3. If “Disable” is selected, full URI and name are sent to the receiver’s phone when the user makes a phone call. The URI and name of the caller are displayed on the receiver’s phone. When Full URI is selected, only user name is displayed on the receiver’s phone when the user makes a phone call. When Display Name is selected, only name is displayed on the receiver’s phone when the user makes a phone call. Anonymous Call Reject Select Enable to reject anonymous calls. Call Forward 1. Click No Answer to enable call forward to another number when no one answers the phone after 180s (default). The timer can be changed from 0-600s. Refer to section 7.14 to change the timer. 2. Click Busy to enable call forward to another number when user is busy on the phone. 3. Click Unconditional to transfer all incoming calls to another number. Enter the call forward number on the text box. 53 12.18 Phone Setting – Timer NTP Recycle NTP recycle time. Inter Digit The time interval that the IP phone waits to detect the end of DTMF digits. No more digits are accepted after this period and the phone begins to dial. Originating Not Accept The time interval that the caller’s phone waits to establish a call. If the receiver fails to answer the phone during this time interval, the caller’s phone will automatically disconnect. Incoming No Answer The time interval that the receiver’s phone will ring. If the receiver fails to answer the phone during this time interval, the phone will automatically disconnect. Hold Recall The time interval that the caller is put on hold before the phone automatically disconnect. Auto Speaker Off The time interval that the speaker phone is on before turning off automatically (due to inactivity). 12.19 Call Tracing Log Call Tracing Log keeps a record of all the phone activities. This log is used by our engineers to troubleshoot hardware problems. 54 12.20 Phone Book Phonebook menu allows the user to add, modify and delete phone numbers. To add, type in the name and number then click NEW to add. To modify/delete, select the name from the list and click modify/delete. Name Name that you would like to add. Number Phone number that corresponds to the name. Email Email address that corresponds to the name. 12.21 Speed Dial Speed dial numbers can be accessed from the phone. You can dial *00~*09 then press dial key to perform speed dail. Number 0x Speed dials phone number. 0x is the speed dial number. 55 12.22 Restart System Click Restart to update all the modifications and reboot the system. 13 Trouble Shooting QUESTION RECOMMENDED ACTION There are no signal Check if there is any available AP. Check if AP is set correctly. Check if AP settings (SSID, WEP and key) of WLAN phone are correct. Nothing is displayed on the LCD 1. Check if battery is run out of power. screen How to update Firmware? 1. WLAN Phone automatically updates firmware when it powers up (while connected to the internet) if auto-provisioning is available. Why can’t I dial my friend’s SIP number? 1. Check Registrar Server Domain Name/IP address and Outbound Proxy Domain Name/IP Address (under SIP Settings in Configuration Menu). Make sure you have the right Name or IP Address. 2. Check the LCD display on your phone to see if there is a name or number displayed on the screen. If the name or number is not displayed, use a web browser and access the configuration menu. Make sure that the Registrar Server Domain Name/IP Address is correct. 3. Check the register status under SIP Account Settings in the configuration menu (from web browser). If your status is unregistered, it means you do not have a SIP account. Contact your SIP service provider to get an account. Why isn’t my firmware updating? 1. Your WLAN phone automatically detects for new firmware when you turn on the power. If new version is available the phone will automatically update the firmware. 2. Check if auto-provisioning is available. 3. Check with your supplier if firmware filename is correct. Why do I get “Can’t Upgrade Make sure you exit setting mode (phonebook, menu…) before you click Now” screen when I click [Submit] in the configuration menu. [Submit] in the configuration menu? 56