1
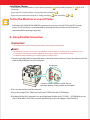
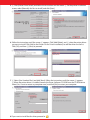
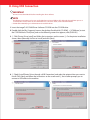
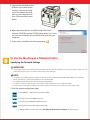
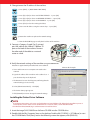
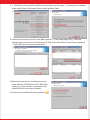
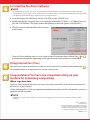
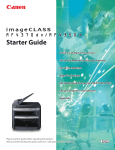
Set-Up Sheet
for Networking and Printing
READ the imageCLASS 2300 Set-Up Sheet for the Machine FIRST, then read this sheet for Networking and Printing set-up.
Thank you for purchasing the Canon imageCLASS 2300 Network Model.
To get your machine ready for network and printer functions, please follow the instructions in this sheet before referring to any other
documentation.
What is included in the 2 CD-ROMs
imageCLASS 2300 Driver Software CD-ROM
CONTENTS:
● CD-ROM Menu
This menu shows the available driver installations for your new machine.
●
Printer Driver
The printer driver enables you to use the machine as a printer. For details, see the PCL Driver Guide.
●
Fax Driver
The fax driver enables you to fax a document from your computer. For details, see the Fax Driver Guide with Cover Sheet
Editor.
●
Fonts
(Font Manager 2000 (including 96 screen fonts), Barcode Fonts (32 typefaces))
●
Documentation (PDF)
(PCL Printer Guide, PCL Driver Guide, Fax Driver Guide with Cover Sheet Editor, Adobe Acrobat Reader)
imageCLASS 2300 Network User Software CD-ROM
CONTENTS:
● Utility Software
NetSpot Device Installer (NSDI)
This program is for setting up the machine for network operations. For details, see the Readme file and Online Help for
this program.
NetSpot Console
This program is for setting network protocol settings and manage the devices connected to the network. For details,
see the NetSpot Console User’s Guide or online manual for this program.
LPR Port Utility
This program is for printing from Windows 95/98/Me in a TCP/IP network. For details, see the Network Guide.
NetBIOS/NetBEUI Port Monitor
This is for printing from Windows 95/98/Me in a NetBIOS/NetBEUI network. For details, see the Network Guide.
Device Status Extension
For monitoring shared printers and managing print jobs through a web browser. For more information, see the PCL
Driver Guide.
NDPS Gateway
For printing in a Novell NetWare (Novell Distributed Print Services) network. For details, see the Network Guide.
●
Documentation (PDF)
(Network Guide, Remote UI Guide, Adobe Acrobat Reader)
Installation Choices
•If you intend to use the machine as a local printer, proceed to
connection.
-A for parallel connection, or
•If you intend to use the machine as a network printer, proceed to
•If you want to install the fax driver for PC faxing, proceed to
-B for USB
.
after completing
or
.
To Use the Machine as a Local Printer
In Windows 95/98/Me/NT4.0/2000/XP environments, you can use both PCL5e and PCL6 printer
drivers. The PCL5e driver is recommended for printing text data, whereas the PCL6 driver is
recommended for printing image data.
A. Using Parallel Connection
IMPORTANT
●
Turn off both the computer and the machine before connecting the parallel cable.
NOTE
●
●
The following instructions and screens are for Windows 98 Second Edition (SE), although the installation process is
essentially the same for other versions of Windows OS as well. For details, see the PCL Driver Guide.
For Windows NT4.0/2000/XP, log in as Administrator to install the driver.
1 Connect a parallel cable to the parallel port on the back of the machine. Connect the other end of the
cable to the parallel port on your computer.
Parallel port
Connect a 36-pin Centronics cable. Secure
both ends properly to the machine and computer.
2 Turn on the machine and the computer.
3 Insert the imageCLASS 2300 Driver Software CD-ROM into the CD-ROM drive.
4 Double-click the [My Computer] icon on the desktop. Double-click [CD-ROM] ➝ [iC2300.exe] to start
the CD-ROM Menu. Click [Next], and on the following screen that appears, click [ENGLISH].
5 1 Click [Printer Driver Install] and follow the instructions on the screen. 2 On the printer installation
screen, select [Manually Set Port to Install] and click [Next].
1
2
6 Follow the instructions until the screen 1 appears. Click [Add/Delete], and 2 select the printer driver
you want to install. Click [Add to the Printer List for Driver Installation] to add the driver on the list.
Click [OK], and then 1 [Next] to proceed.
1
2
7 1 Select [Use Standard Port] and click [Next]. Follow the instructions until the screen 2 appears.
2 When the printer driver is installed, remove the Driver Software CD-ROM from the CD-ROM drive.
Select [Yes, I want to restart my computer now.] and click [Exit] to restart your computer.
1
2
8 If you want to install the fax driver, proceed to
.
B. Using USB Connection
IMPORTANT
●
Do not connect the USB cable before installing the driver software.
NOTE
●
●
The following instructions and screens are for Windows 98 Second Edition (SE), although the installation process is
essentially the same for other versions of Windows OS as well. For details, see the PCL Driver Guide.
For Windows 2000/XP, log in as Administrator to install the driver.
1 Insert the imageCLASS 2300 Driver Software CD-ROM into the CD-ROM drive.
2 Double-click the [My Computer] icon on the desktop. Double-click [CD-ROM] ➝ [iC2300.exe] to start
the CD-ROM Menu. Click [Next], and on the following screen that appears, click [ENGLISH].
3 1 Click [Printer Driver Install] and follow the instructions on the screen. 2 On the printer installation
screen, select [Manually Set Port to Install] and click [Next].
1
2
4 1 Check [Install Printer Driver through a USB Connection], and select the printer driver you want to
install. Click [Next] and follow the instructions on the screen until 2 the installer prompts you to
connect a USB cable to the machine.
1
2
5 Connect the USB cable to the
USB port on the back of the
machine. Connect the other
end of the cable to the USB
port on your computer, and
turn ON the machine’s main
power.
USB port
6 When the printer driver is installed, remove the Driver
Software CD-ROM from the CD-ROM drive. Select [Yes, I want
to restart my computer now.] and click [Exit] to restart your
computer.
7 If you want to install the fax driver, proceed to
.
To Use the Machine as a Network Printer
Specifying the Network Settings
IMPORTANT
●
The machine needs to be restarted for the specified settings to become effective. To restart the machine, simply turn the
power OFF, wait for at least 10 seconds, and turn the power ON again.
NOTE
●
●
●
●
For details on specifying network settings, see Chapter 2,“Using a TCP/IP Network (Windows/UNIX),” in the Network
Guide, and Chapter 2,“Setting the Network,” in the Sending Guide.
For additional network protocol settings, see the Network Guide.
For details on how to input characters, see Chapter 2,“Basic Operations,” in the Reference Guide.
For the values of the network settings, consult your network administrator or internet service provider (ISP).
1 Print the printer configuration page:
PRINT
a. Press [PRINT] ➝ [OK] to take the machine offline.
OK
F1
b. Press [F1] until <TEST MENU> appears.
F2
c. Press [F2] until <PRINT EN CONFIG> appears.
F4
d. Press [F4] to print out the configuration page.
e. If the IP address is correct, proceed to Installing the Printer Driver Software on the next page.
2 Change/correct the IP address of the machine:
a. Press [COPY] ➝ [ADDITIONAL FUNCTIONS].
COPY
Additional Functions
b. Press [F3] or [F4] to select <06 SYSTEM SETTINGS> ➝ press [OK].
F3
c. Press [F3] or [F4] to select <03 NETWORK SETTINGS> ➝ press [OK].
F4
OK
d. Press [F3] or [F4] to select <02 IP ADDRESS> ➝ press [OK].
e. Press [Clear] to clear the existing IP address.
Clear
C
@.
ABC
DEF
1
2
3
GHI
JKL
MNO
4
5
6
PRS
7
TUV
f. Enter a new IP address using the numeric keys ➝ press [OK].
WXY
8
9
OPER
SYMBOLS
0
OK
g. Restart the machine to update the network settings.
h. Print the EN CONFIG page to verify the IP address of the machine.
3 Connect a Category 5 rated (Cat 5) twistedpair LAN cable to the 10Base-T/100Base-TX
port on the back of the machine. Connect
the other end of the cable to a network
router or a hub.
10Base-T/100Base-TX port
4 Verify the network settings of the machine using the Remote UI:
*Machine is supplied with preinstalled web server software.
a. Start a web browser on a computer connected to the
network.
<Remote UI: Example>
b. Type the IP address of the machine on the address bar ➝
press the Enter key on the keyboard.
c. The Remote UI screen should appear, confirming that the
network settings are set correctly.
d. Select [Administrator Mode] ➝ click [OK].
e. The Device Status page appears.
f. Click [Network] to view or change the network settings.
Installing the Printer Driver Software
NOTE
●
●
The following instructions and screens are for Windows 98 Second Edition (SE), although the installation process is
essentially the same for other versions of Windows OS as well. For details, see the PCL Driver Guide.
For Windows NT4.0/2000/XP, log in as Administrator to install the driver.
1 Insert the imageCLASS 2300 Driver Software CD-ROM into the CD-ROM drive.
2 Double-click the [My Computer] icon on the desktop. Double-click [CD-ROM] ➝ [iC2300.exe] to start
the CD-ROM Menu. Click [Next], and on the following screen that appears, click [ENGLISH].
3 1 Click [Printer Driver Install] and follow the instructions on the screen. 2 On the printer installation
screen, select [Search for Network Port to Install] and click [Next].
1
2
4 Follow the instructions until the screen below appears. 1 Click [Add/Delete], and 2 select the
network printer you want to install the driver for. Click [Add to the Printer List for Driver Installation]
➝ [OK]. Follow the instructions on the screen.
1
2
5 When the printer driver is installed, remove the
Driver Software CD-ROM from the CD-ROM drive.
Select [Yes, I want to restart my computer now.]
and click [Exit] to restart your computer.
6 If you want to install the fax driver, proceed to
.
To Install the Fax Driver Software
NOTE
●
●
The following instructions and screens are for Windows 98 Second Edition (SE), although the installation process is
essentially the same for other versions of Windows OS as well. For details, see the Fax Driver Guide with Cover Sheet Editor.
For Windows NT4.0/2000/XP, log in as Administrator to install the driver.
1 Insert the imageCLASS 2300 Driver Software CD-ROM into the CD-ROM drive.
2 Double-click the [My Computer] icon on the desktop. Double-click [CD-ROM] ➝ [iC2300.exe] icons to
start the CD-ROM Menu. Click [Next], and on the following screen that appears, click [ENGLISH].
3 Click [Fax Driver Install] and follow the instructions
on the screen.
The rest of the installation process is very similar to that of the printer driver software. See
or
to complete the installation, depending on the type of interface your machine is connected to.
Using Internet Fax (I-Fax)
You must have a network connection in order to use the Internet Fax function of the machine (see
For complete details on using Internet Fax, see the Sending Guide.
).
Congratulations! You have now completed setting up your
machine for networking and printing.
Where to go from here...
Once you have completed the necessary steps in this sheet, see the Basic Guide for basic operations of
all functions of your machine.
If after reading the Basic Guide you require more detailed information, see the corresponding sections in
the other manuals provided.
NOTE
●
Remember to register your machine to ensure product support. The serial number is located on the back of the
machine.
Part no. FA7-4860-010
©2003 Canon Inc.
Canon and imageCLASS are trademarks of Canon Inc.
All other products and brand names are registered
trademarks or trademarks of their respective owners.
Specifications subject to change without notice.
PRINTED IN U.S.A.