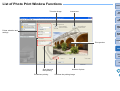
1
Introduction
Table of
Contents
Image Viewing, Organizing and Editing Software
1
2
3
4
Basic
Operation
ZoomBrowser EX
Advanced
Operation
Ver. 6.1
Instruction Manual
Y
P
O
C
High-Level
Functions
Preferences
O In this manual, ZB is used for ZoomBrowser EX.
Reference
O In this manual, the windows used in the examples are from Windows XP.
O Click on the icons below on the bottom right of the screen to switch
between pages.
: Go to next page
Contents
Lookup
: Go to previous page
Index
: Return to a page you had previously displayed
O Click on the chapter headings on the right side of the screen to switch to
the contents page of each chapter.
© CANON INC. 2008
CT1-7161ZBWE-000
READ CAREFULLY BEFORE USING!
CANON SOFTWARE LICENSE AGREEMENT
IMPORTANT - READ THIS AGREEMENT BEFORE USING THE SOFTWARE ON THE CD-ROM
IN THIS BOX. BY USING THE SOFTWARE, YOU AGREE TO BE BOUND BY THE TERMS OF
THIS AGREEMENT.
This is a license agreement (the [Agreement]) between you and Canon Inc. ([Canon]).
IF YOU DO NOT AGREE TO THE TERMS AND CONDITIONS OF THIS AGREEMENT, DO NOT
USE THE SOFTWARE PROGRAM ON THE CD-ROM AND THE USER MANUAL IN THIS BOX
(COLLECTIVELY, THE [SOFTWARE]) AND RETURN THE SOFTWARE WITHIN 30 DAYS FROM
THE DATE OF PURCHASE TO YOUR POINT OF PURCHASE FOR A REFUND.
In consideration of the right to use the SOFTWARE, you agree to abide by the terms and conditions
of this Agreement.
1. LICENSE: Canon grants you the non-exclusive right to use the SOFTWARE only on a single
computer. You may physically transfer the SOFTWARE from one computer to another provided
that the SOFTWARE is used on only one computer at a time. You shall not install or use the
SOFTWARE on a network, multiple CPU, multiple site arrangement, or any other hardware
configuration where the SOFTWARE is accessible to more than one CPU or to more than one
user.
NEITHER CANON NOR ANY OF CANON’S SUBSIDIARIES, DISTRIBUTORS OR DEALERS IS
LIABLE FOR ANY DAMAGES HOWSOEVER CAUSED, INCLUDING WITHOUT LIMITATION,
DIRECT, CONSEQUENTIAL OR INCIDENTAL LOSS OR DAMAGE INCLUDING LOSS OF
PROFITS, EXPENSE OR INCONVENIENCE HOWSOEVER CAUSED OR ARISING OUT OF THE
SOFTWARE OR THE USE THEREOF.
NEITHER CANON, NOR ANY OF CANON’S SUBSIDIARIES, DISTRIBUTORS OR DEALERS
SHALL HAVE ANY OBLIGATION TO INDEMNIFY YOU AGAINST ANY CLAIM OR SUIT
BROUGHT BY A THIRD PARTY ALLEGING THAT THE SOFTWARE OR THE USE THEREOF
INFRINGES ANY INTELLECTUAL PROPERTY OF SUCH THIRD PARTY.
5. TERM: This Agreement is effective upon your using the SOFTWARE and remains in effect until
expiration of all copyright interests in the SOFTWARE unless earlier terminated. You may
terminate this Agreement by destroying the SOFTWARE. This Agreement will also terminate
without notice to you if you fail to comply with any of the terms of this Agreement and you must
then promptly return the SOFTWARE. In addition, Canon may enforce its other legal rights.
6. U.S. GOVERNMENT RESTRICTED RIGHTS NOTICE: The SOFTWARE is provided with
restricted rights. Use, duplication or disclosure is subject to restrictions as set forth in either
subparagraph (c) (1) (ii) of the Rights in Technical Data and Computer software clause at
DFARs 252.227-7013 or subparagraph (c) (1) and (2) of the Commercial Computer Software
Restricted Rights Clause at FAR 52.227-19, as applicable.
Y
P
O
C
YOU SHALL NOT ASSIGN, SUBLICENSE, RENT, LEASE, LOAN, CONVEY OR OTHERWISE USE,
TRANSFER, COPY, TRANSLATE, CONVERT TO ANOTHER PROGRAMMING LANGUAGE,
ALTER, MODIFY, DECOMPILE OR DISASSEMBLE THE SOFTWARE, IN WHOLE OR IN PART,
EXCEPT AS EXPRESSLY PROVIDED IN THIS AGREEMENT.
2. BACK-UP COPY: You may make one copy of the SOFTWARE solely for back-up purposes, or
copy the SOFTWARE onto the permanent storage device (e.g. a hard disk) of your computer
and retain the original for back-up purposes. Any other copying of the SOFTWARE is a violation
of this Agreement. You must reproduce and include the copyright notice on the back-up copy.
3. SUPPORT AND UPDATES: Canon is not responsible for providing maintenance or support for
use of the SOFTWARE. No updates, fixes or support will be made available for the
SOFTWARE.
4. LIMITED WARRANTY AND LIMITATION OF LIABILITY: It is your responsibility to choose,
maintain and match the hardware and software components of your computer system. Thus
Canon does not guarantee uninterrupted service or correction of errors or that the functions or
performance of the SOFTWARE will meet your requirements. THE SOFTWARE IS LICENSED
ON AN [AS IS] BASIS AND WITHOUT WARRANTY OF ANY KIND. The CD-ROM storing the
SOFTWARE is warranted only against defective material under normal use for a period of ninety
(90) days after purchase from an authorized Canon dealer as evidenced by your sales receipt.
Your sole remedy for a defective CD-ROM shall be replacement of the same without charge
when returned by you at your expense to your point of purchase and proven to be defective
upon inspection. The replacement CD-ROM will be warranted for the remainder of the original
ninety (90) day warranty period of the defective CD-ROM. The limited warranty does not apply if
the failure of the CD-ROM resulted from accident, abuse or misapplication of the SOFTWARE
and shall not extend to anyone other than the original user of the SOFTWARE.
EXCEPT AS SPECIFICALLY SET FORTH IN THIS PARAGRAPH 4, CANON, CANON’S
SUBSIDIARIES, DISTRIBUTORS AND DEALERS DISCLAIM ALL WARRANTIES, EXPRESS OR
IMPLIED, INCLUDING ANY WARRANTY OF MERCHANTABILITY OR FITNESS FOR A
PARTICULAR PURPOSE, WITH RESPECT TO THE SOFTWARE.
7. SEVERABILITY: In the event that any provision of this Agreement is declared or found to be
illegal by any court or tribunal of competent jurisdiction, such provision shall be null and void
with respect to the jurisdiction of that court or tribunal and all the remaining provisions of this
Agreement shall remain in full force and effect.
8. CONTROLLING LAW: The terms of this Agreement as it relates to purchases of the Software in
the United States of America shall be governed and construed in all respects in accordance with
the laws and regulations of the State of New York, without reference to choice of law principles.
The terms of this Agreement as it relates to purchases of the Software in Canada shall be
governed by the laws of the province of Ontario.
9. OWNERSHIP: All rights, including but not limited to copyrights and trade secret rights, to the
SOFTWARE belong to Canon, its affiliated corporations and third party licensors. Your use of
the SOFTWARE is subject to the United States, Canada and other applicable copyright and
trademark laws and nothing in this Agreement constitutes a waiver of the rights of Canon, its
affiliated corporations and third party licensors under such laws.
Nothing contained in Paragraph 1 shall be construed to give Canon any ownership rights in any
images, graphics or textual material that you save in connection with the Software.
10.ACKNOWLEDGEMENT: BY USING THE SOFTWARE, YOU ACKNOWLEDGE THAT YOU
HAVE READ THIS AGREEMENT, UNDERSTOOD IT, AND AGREE TO BE BOUND BY ITS
TERMS AND CONDITIONS. YOU ALSO AGREE THAT THIS AGREEMENT IS THE
COMPLETE AND EXCLUSIVE STATEMENT OF AGREEMENT BETWEEN YOU AND CANON
CONCERNING THE SUBJECT MATTER HEREOF AND SUPERSEDES ALL PROPOSALS
OR PRIOR AGREEMENTS, VERBAL OR WRITTEN, AND ANY OTHER COMMUNICATIONS
BETWEEN THE PARTIES RELATING TO THE SUBJECT MATTER HEREOF. NO
AMENDMENT TO THIS AGREEMENT SHALL BE EFFECTIVE UNLESS SIGNED BY A DULY
AUTHORIZED OFFICER OF CANON.
Introduction
Table of
Contents
1
2
3
4
Basic
Operation
Advanced
Operation
High-Level
Functions
Preferences
Reference
Contents
Lookup
Index
1
Introduction
Introduction
Main Features of ZB
Makeup of Each Chapter
Download images to your computer
Check images
Print images
Organize images
Edit images
Chapter 1 Basic Operation
Starting up and exiting ZB
Downloading images to your computer
Checking images
Printing images
Basic
Operation
Chapter 2 Advanced Operation
Advanced
Operation
Efficient checking of images
Organizing images
Editing images
Utilizing images
Index printing
Adjust images
Trim images
Insert text
Correct red-eye
Utilize images
Attach an image to an e-mail
Create wallpaper or a screen saver
Convert images
Change image size and type
Symbols Used
Y
P
O
C
Chapter 3 High-Level Functions
Checking images with high-level functions
Organizing images with high-level functions
Advanced image editing
Editing RAW images
Printing with other software
Chapter 4 Preferences
X : Selection procedure for menus that appear on the computer
screen
[ ] : Names of items and menus, buttons, windows, etc. that appear on
the computer screen
< >: Camera switch name or icon, or a keyboard key name
p.** : Reference page (jump to page by clicking)
: Help
: Tip
: Important information
: Helpful information
Table of
Contents
1
2
3
4
High-Level
Functions
Preferences
Reference
Contents
Lookup
Settings for all functions
Reference
Index
Solving problems
Uninstalling ZB
System requirements
Supported images
Lists of primary window functions
2
Table of Contents
Introduction
Chapter 1 Basic Operation.................................. 6
Organizing Images ......................................................... 24
Starting up ZB ...................................................................7
Creating a Folder for Saving Images........................... 24
Moving Images ............................................................ 25
Moving Images in Folders ........................................ 25
Changing Image File Names or Folder Names ........... 26
Deleting Images........................................................... 26
Deleting Folders ....................................................... 27
Registering Frequently-Used Folders as Favorite
Folders......................................................................... 27
Deleting Favorite Folders ......................................... 28
Downloading an Image to Your Computer........................7
Downloading Images Using Your Card Reader.............9
Viewing an Image ...........................................................11
View Images as Thumbnails in the Main Window .......11
Enlarging a Selected Folder .....................................12
Changing the Display Magnification .........................13
Enlarging and Viewing Images One at a Time ............13
Displaying an Image Across the Whole Window
(Full View Display)....................................................14
Y
P
O
C
Editing an Image............................................................. 29
Chapter 2 Advanced Operation ........................ 19
Automatic Adjustment Using ZB.................................. 29
Adjusting Brightness, Color and Contrast.................... 31
Trimming an Image...................................................... 32
Inserting Text into Images ........................................... 33
Adjusting Sharpness.................................................... 34
Correcting Red-Eye Automatically............................... 35
Correcting Red-Eye Manually .................................. 35
Checking/Sorting Images................................................20
Utilizing Your Images...................................................... 36
Enlarging and Checking Images One at a Time ..........20
Enlarging a Specific Part of an Image ......................21
Sorting Images.............................................................21
Viewing Images as a Slide Show ................................ 36
Sending an Image by E-Mail ....................................... 37
Creating Wallpaper from an Image.............................. 38
Creating a Screen Saver from an Image ..................... 39
Printing an Image............................................................15
Printing One Image on One Sheet of Paper ................15
Printing an Image Using Easy-PhotoPrint EX..............16
Exiting ZB .......................................................................18
Arranging Images in the Main Window ...........................22
Extracting Images You Want to Display
(Filter Display) ..........................................................22
Efficiently Checking/Sorting Images ...............................23
Table of
Contents
1
2
3
4
Basic
Operation
Advanced
Operation
High-Level
Functions
Preferences
Reference
Contents
Lookup
Index
Writing Images to a CD .................................................. 41
Printing Multiple Images on One Sheet of Paper
(Index Printing) ............................................................... 42
3
Introduction
Chapter 3 High-Level Functions....................... 43
Adjusting RAW Images................................................... 59
Comparing Multiple Images ............................................44
Viewing Shooting Information for an Image ....................47
Applying Picture Style Files ......................................... 61
White Balance Files and Tone Curve Files ................. 62
Saving White Balance Files...................................... 62
Saving Tone Curve Files (Excludes the EOS-1Ds
Mark III and EOS-1D Mark III).................................. 63
Changing the Size and Type of an Image and Saving ...48
Adding Sound to Images/Playing Back .......................... 63
Exporting Shooting Information ......................................49
Adding Sound to Images ............................................. 63
Playing Back Sound .................................................... 63
Listing Images by Folder Level .......................................45
Changing the Levels of the Displayed Folders ............46
Organizing Images Using High-Level Functions.............50
Y
P
O
C
Setting Keywords in Images ........................................50
Entering Comments into Images .................................50
Saving Multiple Images with New File Names.............51
Classifying Images by Shot Date.................................52
Searching for Images......................................................53
Performing Advanced Editing .........................................54
Adjusting the Color of an Image in RGB .....................54
Adjusting the Brightness Level ...................................55
Adjusting the Tone Curve ............................................55
Unsharpening an Image ..............................................56
Transferring Images to Other Image Editing
Software.......................................................................57
Merging Images to Create Panorama Images.............57
Printing Using Other Printing Software ........................... 64
Chapter 4 Preferences....................................... 65
Preferences .................................................................... 66
General Settings.......................................................... 66
Selection Settings........................................................ 67
Rotation Settings ......................................................... 67
Printing Settings .......................................................... 68
Shooting Information Settings ..................................... 68
Themes Settings.......................................................... 69
Table of
Contents
1
2
3
4
Basic
Operation
Advanced
Operation
High-Level
Functions
Preferences
Reference
Contents
Lookup
Showing/Hiding Task Buttons......................................... 69
Index
4
Introduction
Reference ............................................................. 70
Troubleshooting ..............................................................71
Deleting the Software (Uninstalling) ...............................71
System Requirements ....................................................72
Supported Images ..........................................................72
List of Main Window Functions .......................................73
Zoom Mode..................................................................73
Scroll Mode..................................................................74
Preview Mode ..............................................................75
Y
P
O
C
List of Viewer Window Functions ....................................76
List of Photo Print Window Functions .............................77
List of Index Print Window Functions..............................78
List of RAW Image Task Main Window Functions ..........79
Contents Lookup.............................................................80
Table of
Contents
1
2
3
4
Basic
Operation
Advanced
Operation
High-Level
Functions
Preferences
Reference
Index ...............................................................................81
About This Instruction Manual ..................................83
Trademark Acknowledgments ..................................83
Contents
Lookup
Index
5
1
Basic Operation
Introduction
Starting up ZB............................................................ 7
Downloading an Image to Your Computer ................ 7
Downloading Images Using Your Card Reader............ 9
Viewing an Image .................................................... 11
View Images as Thumbnails in the Main Window ...... 11
Enlarging a Selected Folder ................................... 12
Changing the Display Magnification ....................... 13
Enlarging and Viewing Images One at a Time ........... 13
Displaying an Image Across the Whole Window (Full
View Display).......................................................... 14
Y
P
O
C
Printing an Image .................................................... 15
Printing One Image on One Sheet of Paper............... 15
Printing an Image Using Easy-PhotoPrint EX ............ 16
Exiting ZB ................................................................ 18
Table of
Contents
1
2
3
4
Basic
Operation
Advanced
Operation
High-Level
Functions
Preferences
Reference
Contents
Lookup
Index
6
Starting up ZB
Double-click the desktop icon.
Downloading an Image to Your Computer
Introduction
Connect the camera and computer with the cable provided and
download the images saved on the memory card inside the camera.
For downloading images, start up the camera software “EOS Utility”
from ZB and use.
Table of
Contents
1 Select the save destination for the images.
Basic
Operation
1
2
3
4
Advanced
Operation
Double-click
ZB starts up and the main window appears.
Main window
Y
P
O
C
Click to display the [All
Folders] tab sheet
Click
High-Level
Functions
Preferences
Reference
Contents
Lookup
When creating a folder, refer to p.24.
Index
The [CANON iMAGE GATEWAY] button may not be displayed
depending on the area you are in.
7
Introduction
2
Start up EOS Utility.
Click the buttons [Acquire & Camera Settings] X [Connect to
EOS Camera].
3
Connect your camera and computer and turn the
camera on.
Connect the camera and your computer with the interface cable
provided with the camera and turn the camera on.
For detailed instructions on connecting your camera and
computer, refer to the “EOS Utility Instruction Manual” (PDF
electronic manual).
Table of
Contents
1
2
3
4
Basic
Operation
Advanced
Operation
EOS Utility starts up.
EOS Utility
Y
P
O
C
When the dialog box below appears, select [Canon EOS Utility]
and then click the [OK] button.
High-Level
Functions
Preferences
Reference
Contents
Lookup
Index
8
Introduction
4
Download images.
Downloading Images Using Your Card Reader
You can also download images to the computer using a third-party card
reader.
Click
1 Select the save destination for the images
2 Load the memory card into the card reader.
Table of
Contents
(p.7).
1
2
3
4
Basic
Operation
Advanced
Operation
Y
P
O
C
Downloading of images begins.
The downloaded images are saved in the folder selected in step
1 and are displayed in the main window of ZB.
The downloaded images are sorted into folders by date and
saved.
Click the EOS Utility [Quit] button to exit EOS Utility and turn the
camera’s power switch to < OFF >.
When the dialog box below appears, select [using Canon
ZoomBrowser EX] and then click the [OK] button. ZB starts up.
High-Level
Functions
Preferences
Reference
Contents
Lookup
Index
Advantages of using EOS Utility to download images
Using EOS Utility to download images makes it easier to organize your
images as they are downloaded, sorted and saved into folders by date.
Proceed to step 4.
9
Introduction
3
Start up ZB.
Click the buttons [Acquire & Camera Settings] X [Acquire
Images from Memory Card].
4
Download images.
Download images window
Table of
Contents
Click
1
2
3
4
Basic
Operation
Advanced
Operation
Download images window appears.
Y
P
O
C
Downloading of images begins.
The downloaded images are saved in the folder selected in step
1 and are displayed in the main window of ZB.
The downloaded images are sorted into folders by date and
saved.
Click the [Exit] button to exit Download images window.
High-Level
Functions
Preferences
Reference
Contents
Lookup
Index
Advantages of using ZB to download images
Using ZB to download images makes it easier to organize your images
as they are downloaded, sorted and saved into folders by date.
10
Viewing an Image
Introduction
Images downloaded to your computer are displayed as a thumbnails list
in the main window. You can double-click an image to open the viewer
window and display the image at a larger size.
View Images as Thumbnails in the Main Window
Click to select the image
Main window
Simple Display Function
Move the cursor over the image with the
mouse and you can check images that
are displayed in the simple display
window (mouse over window).
To deactivate simple display, click on
[
] on the top of the window, select
[Show Mouse Over Windows] from the
menu and remove the check mark.
Simple display window
Table of
Contents
1
2
3
4
Basic
Operation
Advanced
Operation
Y
P
O
C
For a list of the main window functions, refer to p.73.
Display thumbnails of all the
images inside the folder selected
in the folder area on the left
High-Level
Functions
Preferences
Reference
Contents
Lookup
Index
To select multiple images, click on the images while holding
down the < Ctrl > key on the keyboard.
11
Introduction
Enlarging a Selected Folder
Images downloaded to your computer are displayed in folders in the
main window. Double-click on an empty part of the folder you want to
enlarge to zoom in and display the images inside that folder at a larger
size.
Table of
Contents
1
2
3
4
Basic
Operation
Enlarge folders.
Advanced
Operation
Y
P
O
C
High-Level
Functions
Doubleclick on an
empty part
of the folder
To revert to the folder size before enlarging, click [
of the window.
The folder you have double-clicked zooms in.
] on the top
Preferences
Reference
Contents
Lookup
Index
You can change the speed at which a folder zooms in (p.66).
12
Introduction
Changing the Display Magnification
Enlarging and Viewing Images One at a Time
If you have many images inside a folder and they are small and difficult
to see, you can change the display magnification and display the
images at a larger size.
1 Double-click an image to enlarge.
Double-click
Change the display magnification.
Table of
Contents
1
2
3
4
Basic
Operation
Drag to the right
Advanced
Operation
Y
P
O
C
You can also change the display magnification by clicking [
or [
].
The display magnification of the images changes.
]
The viewer window appears.
Navigator window
Enlargement
display position
Drag to move the
enlargement
display position
The [Navigator] window appears and you can check and move
the enlargement display position.
You can also move the enlargement display position by clicking
[
] on the top of the window and dragging over the window.
To return to full view, click [
] on the top of the window.
High-Level
Functions
Preferences
Reference
Contents
Lookup
Index
13
Introduction
2
Click [
] or [
display.
] to switch to the image you want to
Displaying an Image Across the Whole Window (Full View Display)
Double-click on the image you want to display
across the whole window.
Viewer window
Table of
Contents
1
2
3
4
Basic
Operation
Double-click
Advanced
Operation
Y
P
O
C
You can also display the image across the whole window by
clicking [
] on the top of the window.
The image is enlarged and displayed across the whole window.
The shooting information is displayed by clicking [
] on the
top of the window.
To exit the viewer window, click [
] on the top right of the
window.
High-Level
Functions
Preferences
Reference
Contents
Lookup
Index
When you display RAW images in the viewer window
The [Display Original Image] button appears at the bottom of the
window. Click this button to display the processed image.
For a list of viewer window functions, refer to p.76.
To return to the viewer window, click on the window or press the
< Esc > key on the keyboard.
14
Printing an Image
Introduction
This section explains how to print one image on one sheet of paper, and
how to print using Easy-PhotoPrint EX.
2
Display the print settings window.
Click the buttons [Print & Email] X [Photo Print].
Table of
Contents
Printing One Image on One Sheet of Paper
You can print one image on one sheet of paper.
1
1
2
3
4
Basic
Operation
Select the image to be printed.
Click
Advanced
Operation
Y
P
O
C
The [Photo Print] window appears.
the paper size and other settings, and then click
3 Set
the [Print] button.
Photo Print window
To select multiple images, click on the images while holding
down the < Ctrl > key on the keyboard.
You can select all the images inside a folder by clicking on an
empty part of the folder.
High-Level
Functions
Preferences
Reference
Contents
Lookup
Index
Printing begins.
For a list of photo print window functions, refer to p.77.
15
Introduction
Printing an Image Using Easy-PhotoPrint EX
If you have an inkjet printer that is compatible with the Easy-PhotoPrint
EX (hereinafter, “EPP EX”) software for Canon printers, you can start up
EPP EX from within ZB and easily perform high-quality photo printing.
To perform this printing, it is necessary to first install EPP EX version 1.0
or later on your computer.
Also, Easy-PhotoPrint users can select [Easy-PhotoPrint] in step 2 and
print following the same steps.
2
Start up EPP EX.
Click the buttons [Print & Email] X [Easy-PhotoPrint EX Photo
Print].
Table of
Contents
1
2
3
4
Basic
Operation
1 Select the image to be printed.
Advanced
Operation
Click
Y
P
O
C
EPP EX starts up.
the number of copies to be printed and then
3 Specify
click [Select Paper].
Easy-PhotoPrint EX
To select multiple images, click on the images while holding
down the < Ctrl > key on the keyboard.
You can select all the images inside a folder by clicking on an
empty part of the folder.
High-Level
Functions
Preferences
Reference
Contents
Lookup
Index
Click to increase the number of copies to be printed
16
Introduction
4
Specify the paper size and then click [Layout/Print].
5
Specify the layout and then click the [Print] button.
Table of
Contents
1
2
3
4
Basic
Operation
Advanced
Operation
Y
P
O
C
Printing begins.
High-Level
Functions
Preferences
Reference
Contents
Lookup
Index
You can also create an album with EPP EX by clicking the [Create
and Print Album] button in the menu in step 2.
17
Exiting ZB
Introduction
In the main window, select the [File] menu X [Exit].
Table of
Contents
1
2
3
4
Basic
Operation
Advanced
Operation
ZB exits.
Y
P
O
C
High-Level
Functions
Preferences
Reference
Contents
Lookup
Index
18
2
Advanced Operation
Introduction
Checking/Sorting Images ......................................... 20
Enlarging and Checking Images One at a Time ........ 20
Enlarging a Specific Part of an Image ................... 21
Sorting Images........................................................... 21
Arranging Images in the Main Window .................... 22
Extracting Images You Want to Display (Filter
Display) ............................................................... 22
Efficiently Checking/Sorting Images......................... 23
Organizing Images ................................................... 24
Creating a Folder for Saving Images ......................... 24
Moving Images .......................................................... 25
Moving Images in Folders...................................... 25
Changing Image File Names or Folder Names ........ 26
Deleting Images......................................................... 26
Deleting Folders..................................................... 27
Utilizing Your Images............................................... 36
Viewing Images as a Slide Show ............................... 36
Sending an Image by E-Mail ...................................... 37
Creating Wallpaper from an Image............................. 38
Creating a Screen Saver from an Image .................... 39
Writing Images to a CD ........................................... 41
Printing Multiple Images on One Sheet of Paper
(Index Printing) ...................................................... 42
Y
P
O
C
Registering Frequently-Used Folders as Favorite
Folders .................................................................... 27
Deleting Favorite Folders....................................... 28
Editing an Image ...................................................... 29
Automatic Adjustment Using ZB ................................ 29
Adjusting Brightness, Color and Contrast.................. 31
Trimming an Image.................................................... 32
Inserting Text into Images ......................................... 33
Adjusting Sharpness.................................................. 34
Correcting Red-Eye Automatically............................. 35
Correcting Red-Eye Manually................................ 35
Table of
Contents
1
2
3
4
Basic
Operation
Advanced
Operation
High-Level
Functions
Preferences
Reference
Contents
Lookup
Index
19
Checking/Sorting Images
Introduction
You can enlarge images one at a time from a list in the main window and
check what they look like in detail, and sort them into one of three
groups with [
] (ratings).
2
Click [
] or [
display.
] to switch to the image you want to
Viewer window
Table of
Contents
Enlarging and Checking Images One at a Time
1
1
2
3
4
Basic
Operation
Double-click on the image on the top left of the main
window.
Double-click
Advanced
Operation
The viewer window appears.
Y
P
O
C
The shooting information is displayed by clicking [
] on the
top of the window.
To exit the viewer window, click [
] on the top right of the
window.
High-Level
Functions
Preferences
Reference
Contents
Lookup
Index
To display only selected images in the viewer window
Select multiple images in the main window (p.11) and then click on
[
] on the top left of the main window (p.73) to display only
the selected images in the viewer window.
For a list of viewer window functions, refer to p.76.
20
Introduction
Enlarging a Specific Part of an Image
Sorting Images
1 Enlarge an image.
You can sort images into one of three groups by attaching [
according to photo subject or theme. Please note that [
automatically attached to images shot with your camera.
Increase or decrease a rating.
Drag to the right
You can also change the display magnification by clicking [
or [
].
The image enlarges and the [Navigator] window appears.
]
Y
P
O
C
Enlargement
display position
Drag to move the
enlargement
display position
Enlargement ratio
You can also move the enlargement display position by clicking
[
] on the top left of the window and dragging over the window.
To return to full view, click [
] on the top left of the window.
Table of
Contents
1
2
3
4
Basic
Operation
Advanced
Operation
2 Display the part of the image you want to check.
Drag the enlargement display position in the [Navigator] window
and display the part of the image you want to check.
Navigator window
] (ratings)
] is
Click to increase
Click to decrease
High-Level
Functions
Preferences
Reference
Contents
Lookup
Index
Enlarging RAW images
RAW images cannot be enlarged before they are processed. By clicking
the [Display Original Image] button on the bottom of the window, the
image is processed and it can be enlarged.
21
Arranging Images in the Main Window
You can arrange images in order of how many [
] you have attached
to it (ratings), or according to the image’s shooting date and time.
Select the [View] menu X [Sort by] X desired item.
Introduction
Extracting Images You Want to Display (Filter
Display)
You can extract images displayed in the main window by the number of
[
] you have attached to them (ratings).
Table of
Contents
1 Click the [
Basic
Operation
] button.
1
2
3
4
Advanced
Operation
Y
P
O
C
High-Level
Functions
The extract function appears.
the number of [
2 Checkmark
and display.
] you want to extract
Preferences
Reference
Contents
Lookup
The images are arranged in the order according to the selected
item.
Sort item
Star Rating
Name
Shooting Date
Modification Date
Type
Description
Images are arranged in the order of the least number of [
].
Image file names are arranged in the order of 0 – 9 J a – z.
Images are arranged in the order of most recently shot.
Images are arranged in the order of most recently updated.
Images are arranged in the order of BMP images J
RAW images J JPEG images J TIFF images.
Ascending Images are arranged from top to bottom in order of sorting criteria.
Descending Images are arranged from bottom to top in order of sorting criteria.
Only the images with the number of [
are displayed in the main window.
To exit the extract display, click the [
] you have checkmarked
Index
] button again.
22
Efficiently Checking/Sorting Images
With Preview Mode that displays images as thumbnails and as single
images in the same window, you can sort images by the number of
[
] while checking efficiently. You can also simultaneously check
shooting information for images.
Introduction
2
Click the [
] or the [
] button
to switch to the image you want to check, and then
sort with the number of [ ].
The selected image is enlarged in the center of the window
1 Enable Preview Mode.
Table of
Contents
Click to increase or decrease
1
2
3
4
Basic
Operation
Advanced
Operation
Click
The main window display switches to Preview Mode.
Y
P
O
C
High-Level
Functions
Preferences
Reference
Thumbnail image display area
Contents
Lookup
You can also click on the image in the thumbnail image display
area to display the image enlarged in the center of the window.
Index
When a folder icon appears in the thumbnail image display area
You can double-click the folder icon to display the images in the folder in
the thumbnail image display area.
For a list of Preview Mode functions, refer to p.75.
23
Organizing Images
This section explains functions that are useful for organizing images
such as creating new folders for saving sorted images, moving and
copying images and deleting unwanted images.
2
Select the [File] menu X [New Folder].
Introduction
Table of
Contents
Creating a Folder for Saving Images
1
2
3
4
Basic
Operation
You can create a folder to save sorted images.
the folder area, select the location where the new
1 Infolder
is to be created.
Advanced
Operation
Y
P
O
C
The [New Folder] dialog box appears.
3
Enter a folder name and click the [OK] button.
The new folder is created in the folder selected in step 1.
High-Level
Functions
Preferences
Reference
Contents
Lookup
Index
24
Introduction
Moving Images in Folders
Moving Images
You can move or copy images to separate folders and organize them
according to shot date or theme.
You can move or copy folders that contain images, and organize images
in folders.
Table of
Contents
Drag the folder to be moved or copied.
Drag the image to be moved or copied.
To move:Drag the image and release when the image is in the
destination folder.
To copy: Drag the image while holding down the < Ctrl > key and
release when the image is in the destination folder.
To move:Drag the folder and release when the folder is in the
destination folder.
To copy: Drag the folder while holding down the < Ctrl > key and
release when the folder is in the destination folder.
Advanced
Operation
Y
P
O
C
The image is moved or copied to the folder it was dragged to.
Moving images to a folder in the folder area
Drag an image in the main window to a folder in the folder area on the
bottom left of the window in the same way as described above to move
or copy the image.
1
2
3
4
Basic
Operation
The folder is moved or copied to the folder it was dragged to.
High-Level
Functions
Preferences
Reference
Contents
Lookup
Index
Moving folders in the folder area
Drag a folder in the main window to a folder in the folder area on the
bottom left of the window in the same way as described above to move
or copy a folder.
25
Introduction
Changing Image File Names or Folder Names
the image whose name you want to change in
1 Select
the main window, or select the folder whose name
you want to change in the folder area.
2 Select the [File] menu X [Rename].
Deleting Images
Please take care as deleted images cannot be recovered.
1 Select the unwanted image in the main window.
2 Click [Delete].
Table of
Contents
1
2
3
4
Basic
Operation
Advanced
Operation
Y
P
O
C
Click
The [Confirm File Delete] dialog box appears.
The [Rename Image] or [Rename Folder] dialog box appears.
the file name or folder name of the image and
3 Enter
then click the [OK] button.
The file name or folder name changes to the new name.
3 Click the [Yes] button.
The image is moved to the [Recycle Bin] and is deleted from ZB.
Right-click [Recycle Bin] on the desktop and select [Empty
Recycle Bin] from the menu that appears to delete the image
from your computer.
High-Level
Functions
Preferences
Reference
Contents
Lookup
Index
You can also change the file names in the [Properties] window
(p.47) or the image display area in Preview Mode (p.75).
You can also change the folder names in the [Properties] window
(p.47).
26
Introduction
Deleting Folders
Registering Frequently-Used Folders as Favorite Folders
Deleted folders cannot be recovered. Please take care as all images
inside folders are also deleted.
the folder area, select the folder you want to
1 Indelete.
2 Select the [File] menu X [Delete].
You can register shortcuts for frequently-used folders in the [Favorite
Folders] tab sheet in the folder area to make images easier to find.
Please note that because the [My Pictures] folder is registered as a
favorite folder by default, the folder icon appears as [
].
1
Select the folder you want to register.
Table of
Contents
1
2
3
4
Basic
Operation
Advanced
Operation
The [Confirm File Delete] window appears.
3
Click the [Yes] button.
Y
P
O
C
High-Level
Functions
Preferences
Reference
The folder is moved to the [Recycle Bin] and is deleted from ZB.
Right-click [Recycle Bin] on the desktop and select [Empty
Recycle Bin] from the menu that appears to delete the folder
from your computer.
Contents
Lookup
Index
2 Click the [Add to Favorites] button.
The folder icon changes to [
folder.
] and is registered as a favorite
27
Introduction
3
the registered folder to display the images
4 Select
inside the folder.
Select the [Favorite Folders] tab sheet.
Deleting Favorite Folders
If you no longer need a folder you have registered in the [Favorite
Folders] tab sheet, you can delete it from this tab sheet.
Please note that as registered folders are shortcuts, the original folder
will not be deleted when you delete the shortcut.
In the [Favorite Folders] tab sheet, select the folder
you want to delete and then click the [Remove]
button.
Table of
Contents
1
2
3
4
Basic
Operation
Advanced
Operation
Click
Y
P
O
C
Any changes done to images inside registered folders will be applied to
the original images. Therefore, please be aware that by editing or
deleting images inside registered folders, you are in fact editing or
deleting the original images.
Preferences
Reference
Contents
Lookup
Index
The images inside the folder appear.
If you have edited or deleted images in folders you have
registered as favorites
High-Level
Functions
The folder is deleted.
28
Editing an Image
If the brightness or color of images is different from what you visualized
when you shot the photo, you can adjust an image using the editing
functions to bring them closer to what you visualized.
This section explains about automatic adjustment of images, adjustment
of brightness, saturation and contrast, trimming images, inserting text
into images, adjustment of sharpness and red-eye correction.
JPEG images deteriorate slightly when edited and saved, and the image
before editing cannot be recovered. For this reason, an edited JPEG
image should be saved as a separate image from the original image.
Chapter 3 explains about high-level editing functions other than those
described above and adjustment of RAW images.
Automatic Adjustment Using ZB
3
Select the buttons [Auto Adjustment] X [Finish].
Edit Image window
Table of
Contents
1
2
3
4
Basic
Operation
Advanced
Operation
Y
P
O
C
The brightness and colors, etc. of the image are automatically adjusted.
1 Select the image you want to edit.
2 Click the buttons [Edit] X [Edit Image].
Introduction
The [Auto Adjustment] window appears.
High-Level
Functions
Preferences
Reference
Contents
Lookup
The [Edit Image] window appears.
Index
29
Introduction
4
Click the [Auto Adjust Image] button.
Window in enlarged display
Auto Adjustment window
Table of
Contents
1
2
3
4
Basic
Operation
Advanced
Operation
The image is adjusted.
5 Enlarge the window and check the adjustments.
Y
P
O
C
High-Level
Functions
Preferences
Enlargement display position
Drag to move the enlargement display position
To revert to full view, click [
] on the bottom left of the window.
the [Save As] button and save as a separate
6 Click
image.
Reference
Contents
Lookup
Index
Drag right to enlarge
Fits the image to the window size
Moves the enlargement display position
Zooms in/Zooms out
In enlarged view, the [Navigator] window appears and you can
check and move the enlargement display position.
The [Save As] window appears.
the save destination and then click the
7 Specify
[Save] button.
The edited image is saved as a separate image from the original
image.
30
Introduction
Adjusting Brightness, Color and Contrast
You can adjust the brightness, color (saturation) and contrast of images.
1
[Color/Brightness Adjustment] and then click
2 Select
the [Finish] button.
Select the image you want to edit and display the
[Edit Image] window (p.29).
4
the [Save As] button and save as a separate
5 Click
image
.
Enlarge the window and check the adjustments (p.30).
(p.30)
The [Color/Brightness Adjustment] window appears.
3 Adjust the image.
Table of
Contents
1
2
3
4
Basic
Operation
Advanced
Operation
Drag to the left or right to adjust
Color/Brightness Adjustment window
Y
P
O
C
High-Level
Functions
Preferences
Reference
Contents
Lookup
Index
Move the slider to the right to make the [Brightness] of an image
appear brighter, the [Saturation] to appear more vivid and the
[Contrast] stronger. Move the slider to the left to make the image
appear darker, and the saturation and the contrast weaker.
The image is adjusted.
31
Introduction
Trimming an Image
You can trim only the part of an image you need, or change the
composition of an image where an image shot horizontally becomes
vertical.
the image you want to edit and display the
1 Select
[Edit Image] window
.
2 Select [Trim] and then click the [Finish] button.
3 Drag the trimming range.
(p.29)
The [Trim Image] window appears.
4
Click the [Trim Image] button.
Table of
Contents
The image is trimmed.
5
Click the [Save As] button and save as a separate
image (p.30).
Y
P
O
C
Trim Image window
1
2
3
4
Basic
Operation
Advanced
Operation
High-Level
Functions
Preferences
Reference
Contents
Lookup
Index
Drag
The trimming range can be moved by dragging.
You can change the trimming range by dragging the four corners
and the four sides of the trimming range.
32
Introduction
Inserting Text into Images
You can insert the date and time you shot an image and text into an
image as text.
4
Using the keyboard, enter the text you want to insert.
Table of
Contents
the image you want to edit and display the
1 Select
[Edit Image] window
.
2 Select [Insert Text] and then click the [Finish] button.
3 Drag the range for inserting text.
1
2
3
4
Basic
Operation
(p.29)
The [Insert Text] window appears.
Advanced
Operation
Insert Text window
Y
P
O
C
The text you enter appears in the window.
the [Save As] button and save as a separate
5 Click
image
.
(p.30)
High-Level
Functions
Preferences
Reference
Contents
Lookup
Index
Drag
The text insertion range can be moved by dragging.
You can change the text insertion range by dragging the four
corners and the four sides of the text insertion range.
33
Introduction
4
the [Save As] button and save as a separate
5 Click
image
.
Enlarge the window and check the adjustments (p.30).
Adjusting Sharpness
You can make the overall atmosphere of an image harder or softer.
1
2 Select [Sharpness] and then click the [Finish] button.
3 Adjust the image.
Select the image you want to edit and display the
[Edit Image] window (p.29).
(p.30)
The [Sharpness] window appears.
Drag right to adjust
Sharpness window
Y
P
O
C
Table of
Contents
1
2
3
4
Basic
Operation
Advanced
Operation
High-Level
Functions
Preferences
Reference
Contents
Lookup
Index
Move the slider to the right to make an image harder and to the
left to make an image softer.
The image is adjusted.
34
Introduction
Correcting Red-Eye Manually
Correcting Red-Eye Automatically
You can automatically detect and correct red-eye that occurs when you
photograph people using a flash.
1
[Red Eye Correction] and then click the
2 Select
[Finish] button.
Select the image you want to edit and display the
[Edit Image] window (p.29).
The [Red Eye Correction] window appears.
3 Click the [Start] button.
Red Eye Correction window
You can manually correct red-eye that cannot be corrected automatically.
1 Display the. [Red Eye Correction] window
2 Enlarge the image .
3 Select [Manual Mode] and then click [ ].
4 Click on the places in the image you want to correct.
(Description
Table of
Contents
on the left)
(p.30)
When you move the mouse cursor on the places to be corrected,
[
] is displayed.
Y
P
O
C
1
2
3
4
Basic
Operation
Advanced
Operation
High-Level
Functions
Preferences
Reference
Contents
Lookup
Index
The image is corrected.
4
Click the [Save As] button and save as a separate
image (p.30).
Click
The image is corrected.
the [Save As] button and save as a separate
5 Click
image
.
(p.30)
35
Utilizing Your Images
Introduction
You can view your images as a slide show, send them in an e-mail or
use them as wallpaper or screen savers for your computer.
3
Set the slide show style and then click the [Finish]
button.
View as a Slide Show window
Viewing Images as a Slide Show
You can display selected images across the whole window and switch
between them as a slide show.
1 Select images.
2 Click [Slide Show].
The [View as a Slide Show] window appears.
Table of
Contents
1
2
3
4
Basic
Operation
Advanced
Operation
Y
P
O
C
High-Level
Functions
Preferences
Reference
The Slide Show window appears and the slide show begins.
Contents
Lookup
Index
36
Introduction
Slide Show window
Sending an Image by E-Mail
You can attach a selected image to an e-mail and send it.
The attached image to be sent is a copy of the original image and
therefore the original image remains unaffected on your computer.
Please note that the e-mail software for attaching and sending an image
selected in ZB is MAPI-compatible software. Please consult the
Instruction Manual for your e-mail software for settings related to MAPI.
1 Select an image.
2 Click the buttons [Print & Email] X [Email Images].
File name
Rating setting
Selects the image*1
Prints the image*2
Switches to the previous image
Pauses the slide show
Switches to the next image
Ends the slide show
Y
P
O
C
*1 The image is selected. When the slide show ends and returns to
the main window, the image is displayed as being selected.
*2 The image is selected for printing. When the slide show ends and
returns to the main window, the print dialog box is displayed.
The [Email Images] window appears.
Table of
Contents
1
2
3
4
Basic
Operation
Advanced
Operation
High-Level
Functions
Preferences
Reference
Contents
Lookup
Index
When all the images have been displayed, the Slide Show
window closes and returns to the main window.
To end the slide show half-way through, click [
].
37
Introduction
3
Select [Using the recommended settings.], and then
click the [Attach to Email] button.
Email Images window
Creating Wallpaper from an Image
You can make a selected image wallpaper for your computer.
The bitmap image for the wallpaper (extension “.BMP”) is created using
a copy of an image and therefore the original image remains unaffected.
1 Select an image.
2 Click the buttons [Export] X [Export as a Wallpaper].
Y
P
O
C
The [Export as a Wallpaper] window appears.
The e-mail software starts up and the image is attached to an email.
Enter the address and a message and send the e-mail.
Table of
Contents
1
2
3
4
Basic
Operation
Advanced
Operation
High-Level
Functions
Preferences
Reference
Contents
Lookup
Index
38
Introduction
3
Specify the layout and the save destination for the
wallpaper, and then click the [Finish] button.
Export as a Wallpaper window
Creating a Screen Saver from an Image
You can make a selected image a screen saver for your computer.
The data for the screen saver (extension “.SCR”) is created using a
copy of an image and therefore the original image remains unaffected.
1 Select an image.
the buttons [Export] X [Export as a Screen
2 Click
Saver].
Y
P
O
C
The [Export as a Screen Saver] window appears.
The image you selected for your wallpaper is applied as
wallpaper.
The image you selected for your wallpaper is saved in the
specified folder.
Table of
Contents
1
2
3
4
Basic
Operation
Advanced
Operation
High-Level
Functions
Preferences
Reference
Contents
Lookup
Index
To revert to the original wallpaper
1 On the desktop, right-click with the mouse and in the menu that
appears, select [Properties].
2 Select the [Desktop] tab sheet.
3 Select the file to become the wallpaper and then click the [OK] button.
39
Introduction
3
Checkmark [Include images in the screen saver] and
click the [Finish] button.
Export as a Screen Saver window
4
Specify the saved screen saver on your computer.
On the desktop, right-click with the mouse and in the menu that
appears, select [Properties]. Display the [Screen Saver] tab
sheet in the [Display Properties] dialog box.
Table of
Contents
1
2
3
4
Basic
Operation
Advanced
Operation
Y
P
O
C
High-Level
Functions
Preferences
Reference
The data for the screen saver is saved in the specified folder.
Contents
Lookup
Applies the selected screen saver data
Select the saved screen saver data
Index
About the [Include images in the screen saver] checkbox
When you checkmark [Include images in the screen saver] in step 3, the
original image is copied to create the data for the screen saver. This
means that even if the original image is deleted or the file name is
changed, it does not affect the screen saver. However, if you remove the
check mark, the data is created using the original image, and if the
original image is deleted or the file name is changed, the screen saver
will not work properly.
40
Writing Images to a CD
You can write selected images to a CD.
This function is only compatible with a computer that has Windows Vista
or Windows XP preinstalled and is equipped with a standard CD-R/RW
drive.
3
Click the buttons [Export] X [Backup to CD].
Introduction
Table of
Contents
1 Insert a CD-R/RW disk in the CD-R/RW drive.
When the dialog box below appears, select the [Cancel] to close
the dialog box.
1
2
3
4
Basic
Operation
Advanced
Operation
The [Backup to CD] window appears.
Y
P
O
C
4
Specify the settings for writing to the CD-R/RW disk
and then click the [Finish] button.
Backup to CD window
2 Select the images you want to write to the CD.
High-Level
Functions
Preferences
Reference
Contents
Lookup
Index
Writing to the CD-R/RW begins.
41
Printing Multiple Images on One Sheet of Paper (Index Printing)
You can arrange multiple images in index format and print them on one
sheet of paper.
1
2 Click the buttons [Print & Email] X [Index Print].
Select the images.
3
Introduction
Specify settings such as the paper type and the
number of prints, and then click the [Print] button.
Print preview
Index Print window
Table of
Contents
1
2
3
4
Basic
Operation
Advanced
Operation
The [Index Print] window appears.
Y
P
O
C
Printing begins.
High-Level
Functions
Preferences
Reference
Contents
Lookup
Index
For a list of index print window functions, refer to p.78.
42
3
High-Level Functions
Introduction
Listing Images by Folder Level ................................ 45
Changing the Levels of the Displayed Folders .......... 46
Adding Sound to Images/Playing Back .................. 63
Adding Sound to Images ............................................ 63
Playing Back Sound ................................................... 63
Viewing Shooting Information for an Image ............. 47
Printing Using Other Printing Software .................. 64
Comparing Multiple Images ..................................... 44
Changing the Size and Type of an Image and
Saving .............................................................. 48
Exporting Shooting Information............................. 49
Organizing Images Using High-Level Functions ... 50
Setting Keywords in Images ...................................... 50
Entering Comments into Images ............................... 50
Saving Multiple Images with New File Names........... 51
Classifying Images by Shot Date .................................. 52
Y
P
O
C
Searching for Images............................................ 53
Performing Advanced Editing................................ 54
Adjusting the Color of an Image in RGB.................... 54
Adjusting the Brightness Level .................................. 55
Adjusting the Tone Curve .......................................... 55
Unsharpening an Image ............................................ 56
Transferring Images to Other Image Editing Software... 57
Merging Images to Create Panorama Images........... 57
Table of
Contents
1
2
3
4
Basic
Operation
Advanced
Operation
High-Level
Functions
Preferences
Reference
Contents
Lookup
Index
Adjusting RAW Images ......................................... 59
Applying Picture Style Files ................................... 61
White Balance Files and Tone Curve Files................ 62
Saving White Balance Files ................................... 62
Saving Tone Curve Files (Excludes the EOS-1Ds
Mark III and EOS-1D Mark III) ............................... 63
43
Comparing Multiple Images
Introduction
To compare multiple images, you can split the viewer window into two,
three or four and display multiple images at the same time.
You can also align the display position of enlarged images and compare.
1
]
.
2 Click [
the number of images you want to display at
3 Select
the same time.
4
Click [Synchronize] and then enlarge the image.
Click
In the main window, select the images you want to
compare (p.11).
(p.73)
The viewer window appears.
] is clicked
1
2
3
4
Basic
Operation
Drag right to change the display magnification
Advanced
Operation
Y
P
O
C
The viewer window is split and the multiple images are displayed
at the same time.
Example of display when [
Table of
Contents
The synchronize display appears and all the images are
displayed at the same display magnification and in the same
position.
The [Navigator] window that displays the enlargement display
position appears and you can check and move the enlargement
display position (p.21).
Click [Synchronize] again to cancel the synchronize display. You
can now change the display magnification and move the
enlargement display position for each image.
To return to full view, click [
] on the top left of each window.
To cancel the split display, click [
] at the top of the window.
High-Level
Functions
Preferences
Reference
Contents
Lookup
Index
44
Listing Images by Folder Level
You can switch the main window display to Scroll Mode that displays in
folder levels and simultaneously view multiple folders and images inside
the folders.
Introduction
2
Check the images inside the folders.
Click
Number of images inside the folder
and number of folders
1 Click the [Scroll Mode] tab sheet.
Table of
Contents
1
2
3
4
Basic
Operation
Advanced
Operation
The display in the main window switches to Scroll Mode.
Y
P
O
C
High-Level
Functions
Preferences
The images inside the folder are displayed.
Reference
Contents
Lookup
Index
For a list of Scroll Mode window functions, refer to p.74.
45
Introduction
Changing the Levels of the Displayed Folders
You can set the level to which images and folders are displayed in the
window, which makes looking for the folders and images you want
easier.
3
Click the [OK] button.
The main window is displayed at the folder depth you set.
Example of display when you have set the folder level setting [3]
1 Select the [Tools] menu X [Preferences].
2 Change the depth of the folder level to be displayed.
Table of
Contents
1
2
3
4
Basic
Operation
The [Preferences] window appears.
Advanced
Operation
Y
P
O
C
Folders up to the third level and images inside the folders are
displayed in the window.
Folders at or higher than the fourth level are displayed as folder
icons. Double-click these folders to display images and folders
inside the folders.
High-Level
Functions
Preferences
Reference
Contents
Lookup
Index
46
Viewing Shooting Information for an Image
1 Enable Zoom Mode or Scroll Mode .
the image for which you want to view the
2 Select
information.
3 Click [Properties].
(p.73)
Introduction
Properties window
(p.74)
Table of
Contents
1
2
3
4
Basic
Operation
Advanced
Operation
Y
P
O
C
The [Properties] window (image information window) appears.
High-Level
Functions
Preferences
Reference
Contents
Lookup
Index
In Preview Mode, the same information as the [Properties] window
is displayed on the information display area (p.75).
47
Changing the Size and Type of an Image and Saving
You can change the size of an image or convert it to a TIFF image
(extension “.TIFF”) or a bitmap image (extension “.BMP”) and save it.
Because the image is saved as a separate image, the original image
remains unaffected.
3
Introduction
Specify the image size, type, file name and save
destination, and then click the [Finish] button.
Table of
Contents
1 Select an image.
2 Click the buttons [Export] X [Export Still Images].
1
2
3
4
Basic
Operation
Advanced
Operation
The [Export Still Images] window appears.
Y
P
O
C
The image is saved as an image separate from the original
image.
High-Level
Functions
Preferences
Reference
Contents
Lookup
Index
48
Exporting Shooting Information
You can export as a text file the shooting information recorded to the
image.
Introduction
3
Specify the export shooting information and save
destination, and then click the [Finish] button.
Table of
Contents
1
the buttons [Export] X [Export Shooting
2 Click
Properties].
Select an image.
1
2
3
4
Basic
Operation
Advanced
Operation
The [Export Shooting Properties] window appears.
Y
P
O
C
The shooting information is saved as a text file (extension
“.TXT”).
High-Level
Functions
Preferences
Reference
Contents
Lookup
Index
49
Organizing Images Using High-Level Functions
You can organize images using high-level functions such as setting
keywords and entering comments, renaming multiple files in a single
operation and classifying images by shot year/month/date, all of which
are useful when organizing your images.
Entering Comments into Images
You can enter information relating to images as comments. The entered
comments are also useful when searching for images (p.53).
1 Display the [Properties] window .
2 Click the [ ] button in [Comment].
text and then press the < Enter > key on the
3 Enter
keyboard.
Table of
Contents
(p.47)
Setting Keywords in Images
You can set keywords to identify images. The set keywords are also
useful when searching for images (p.53).
1
the [
] button in [Keywords] and then click
2 Click
the [View/Modify Keywords].
Display the [Properties] window (p.47).
The [View/Modify Keywords] dialog box appears.
Introduction
A field for entering comments is displayed.
Y
P
O
C
3 Select the keyword(s) and then click the [OK] button.
1
2
3
4
Basic
Operation
Advanced
Operation
High-Level
Functions
Preferences
Reference
Contents
Lookup
Index
The keyword is set in the image.
The entered text is saved in the image.
50
Introduction
Saving Multiple Images with New File Names
You can copy multiple images and save them with new file names in a
single operation.
3
Checkmark [Make copies of files], enter the file name
and then click the [Finish] button.
Table of
Contents
all the images you want to save with new file
1 Select
names
.
the buttons [View & Classify] X [Rename
2 Click
Multiple Files].
The [Rename Multiple Files] window appears.
1
2
3
4
Basic
Operation
(p.11)
Advanced
Operation
Y
P
O
C
Images separate from the original images are saved with the new
names.
High-Level
Functions
Preferences
Reference
Contents
Lookup
Index
In step 3, if you remove the check mark from [Make copies of files]
in the window, please be aware that the file name for all the selected
images including the original images changes.
51
Introduction
Classifying Images by Shot Date
Multiple images can be classified into different folders according to shot
date.
3
Specify the folder structure and save destination,
and then click the [Finish] button.
Table of
Contents
1 Select all the images to be classified .
the buttons [View & Classify] X [Classify into
2 Click
Folder].
(p.11)
1
2
3
4
Basic
Operation
Advanced
Operation
The [Classify into Folder] window appears.
Y
P
O
C
Images are classified by shot date.
Settings for Folder Structure
Setting Item
YearMonthDate
Description
Classifies images by creating a first-level folder
according to shot year/month/date.
Year\YearMonthDate Classifies images by creating a second-level folder
for the shot year, and the month and date.
Year\Month\
Classifies images by creating a third-level folder
YearMonthDate
for the shot year, the month, and the date.
High-Level
Functions
Preferences
Reference
Contents
Lookup
Index
52
Searching for Images
Introduction
3
You can search for images by ratings (p.21), shot date, update,
comments (p.50) and keywords (p.50).
1
Click the [Finish] button to close the search results
window.
The display returns to the main window.
Click the buttons [View & Classify] X [Search].
4 Check the searched images in the main window.
The searched images are displayed as [Search Results] in the
folder area in the main window. If you select this folder, the
searched images are displayed.
Table of
Contents
1
2
3
4
Basic
Operation
Advanced
Operation
The [Search] window appears.
Y
P
O
C
the search criteria and then click the [Next]
2 Specify
button.
The images inside the [Search Results] folder are stored until
you either perform another search or exit ZB.
Any work you do on images inside the [Search Results] folder will
be applied to all the original images. Therefore, please be aware
that if you edit or delete images inside the [Search Results]
folders, the original images will be edited or deleted also.
The search begins and the images that match the criteria are displayed.
You can click the [
the [Search] window.
High-Level
Functions
Preferences
Reference
Contents
Lookup
Index
] button in the main window and display
53
Performing Advanced Editing
Introduction
This section explains image editing using high-level functions based on
the assumption that you are familiar with handling standard image
editing software.
JPEG images deteriorate slightly when edited and saved, and the image
before editing cannot be recovered. For this reason, an edited JPEG
image should be saved as a separate image from the original image.
4
Adjust the image.
Drag to the left or right to adjust
Table of
Contents
1
2
3
4
Basic
Operation
Adjusting the Color of an Image in RGB
You can adjust the color of an image in RGB (red, green, blue).
Advanced
Operation
1 Select. an image and display the [Edit Image] window
[Color/Brightness Adjustment] and then click
2 Select
the [Finish] button.
(p.29)
The [Color/Brightness Adjustment] window appears.
3
From the list box, select [RGB Adjustment].
Y
P
O
C
High-Level
Functions
Preferences
Reference
The image is adjusted.
the [Save As] button and save as a separate
5 Click
image
.
(p.30)
The window switches to the [RGB Adjustment] window.
Contents
Lookup
Index
54
Introduction
Adjusting the Brightness Level
Adjusting the Tone Curve
You can adjust the level of brightness (balance).
You can adjust the brightness, contrast and color of a specific area by
changing the tone curve.
1 Select. an image and display the [Edit Image] window
[Color/Brightness Adjustment] and then click
2 Select
the [Finish] button.
(p.29)
The [Color/Brightness Adjustment] window appears.
3 From the list box
4 Adjust the image.
(p.54), select [Level Adjustment].
The window switches to the [Level Adjustment] window.
1 Select. an image and display the [Edit Image] window
[Color/Brightness Adjustment] and then click
2 Select
the [Finish] button.
(p.29)
The [Color/Brightness Adjustment] window appears.
the list box
3 From
Adjustment].
(p.54), select [Tone Curve
Y
P
O
C
The window switches to the [Tone Curve Adjustment] window.
Table of
Contents
1
2
3
4
Basic
Operation
Advanced
Operation
High-Level
Functions
Preferences
Reference
Contents
Lookup
Index
Drag to the left or right to adjust
The image is adjusted.
the [Save As] button and save as a separate
5 Click
image
.
(p.30)
55
Introduction
4
Adjust the image.
Unsharpening an Image
You can set amount, radius and threshold values and adjust sharpness.
1 Select. an image and display the [Edit Image] window
2 Select [Sharpness] and then click the [Finish] button.
3 Select the [Unsharp Mask] tab sheet and adjust.
(p.29)
The [Sharpness] window appears.
Y
P
O
C
Advanced
Operation
Preferences
Reference
The image is adjusted.
The horizontal axis shows the input level and the vertical axis
shows the output level.
The maximum number of [ ] is 10.
To delete a [ ], either press the < Del > key on the keyboard or
double-click on the [ ].
5
1
2
3
4
Basic
Operation
High-Level
Functions
Click to add a [ ] (point)
Adjust by dragging [ ]
Click the [Save As] button and save as a separate
image (p.30).
Table of
Contents
Contents
Lookup
Drag right to adjust
Index
The image is adjusted.
4 Enlarge the window and check the adjustments
the [Save As] button and save as a separate
5 Click
image
.
(p.30).
(p.30)
56
Introduction
Transferring Images to Other Image Editing Software
You can transfer images to image editing software other than ZB.
1 Select. an image and display the [Edit Image] window
2 Select [Edit with external image editor].
the [Manage List] button and then register the
3 Click
image editing software.
(p.29)
Merging Images to Create Panorama Images
You can merge up to four JPEG images to create panorama images.
For merging images, start up the image-merging software “PhotoStitch”
from ZB and use.
1 Select multiple images to merge .
2 Click the buttons [Edit] X [Stitch Photos].
(p.11)
Select the image editing software in the window that appears.
Y
P
O
C
[Edit with external image editor] list box, select
4 Inthetheregistered
image editing software.
5 Click the [Finish] button.
The software selected in step 4 starts up and the image selected
in step 1 is displayed.
PhotoStitch starts up and the main window appears.
Table of
Contents
1
2
3
4
Basic
Operation
Advanced
Operation
High-Level
Functions
Preferences
Reference
Contents
Lookup
Index
57
Introduction
3
Check the arrangement of the images to be merged
and click the [2. Merge] tab sheet.
4
Click [Start] to merge.
If the arrangement of the images to be merged is not correct,
drag the images to rearrange them.
Table of
Contents
1
2
3
4
Basic
Operation
Advanced
Operation
Y
P
O
C
The images are merged and displayed.
The window switches to the [2. Merge] tab sheet.
5 Click the [3. Save] tab sheet.
High-Level
Functions
Preferences
Reference
The display switches to the [3. Save] tab sheet.
Contents
Lookup
Index
58
Adjusting RAW Images
6
Check the save range and then click [Save].
You can make the same adjustments (reset processing conditions) to
RAW images as the functions that are available on the camera, such as
brightness and white balance adjustment. You can also convert edited
RAW images to JPEG or TIFF images and save them.
Because only the image processing conditions are changed when a
RAW image is adjusted, the original image data remains totally
unaffected. For this reason, image deterioration that usually
accompanies editing does not occur and you can readjust, redo or undo
changes knowing that you can always revert to the original shot
condition of the image.
1 Select a RAW image.
2 Click the buttons [Edit] X [Process RAW Images].
Y
P
O
C
Save range
Drag [ ] to change the range
The [Save As] dialog box appears.
the save destination and then click the
7 Specify
[Save] button.
The merged images are saved.
8 Select the [File] menu X [Exit].
PhotoStitch exits.
See also the Help that are displayed when you click [
] on the
right of the window for information on operating PhotoStitch and
PhotoStitch functions.
Introduction
Table of
Contents
1
2
3
4
Basic
Operation
Advanced
Operation
High-Level
Functions
Preferences
Reference
RAW Image Task starts up and the main window appears.
Contents
Lookup
Index
59
Introduction
3
5
Adjust the image.
RAW Image Task main window
Specify the type for the image to be saved and the
save destination, and then click the [Save] button.
Table of
Contents
1
2
3
4
Basic
Operation
Advanced
Operation
Y
P
O
C
The image is adjusted.
For the adjustment items in the RAW Image Task main window,
refer to p.79.
Adjustment items displayed in [Image Quality Adjustment] vary
depending on the camera model used for shooting the RAW
image.
4
Click the [Save] button.
The processing dialog box appears and the JPEG image or TIFF
image that has been converted from a RAW image is saved in
the specified place. The RAW image remains unaffected.
6 Select the [File] menu X [Exit] to exit.
RAW Image Task exits.
High-Level
Functions
Preferences
Reference
Contents
Lookup
Index
The [Save] dialog box appears.
See also [RAW Image Task Help] and the [Help] menu for
information on operating RAW Image Task and RAW Image Task
functions.
60
Introduction
Applying multiple adjustment settings to an image at one
time
1 Remove the check mark from [Preview].
2 Set multiple adjustment items.
3 Click the [Update] button.
All the adjustments are saved to the image and redisplayed in one
operation.
Applying adjustment settings to another image
Applying Picture Style Files
You can apply Picture Style files downloaded from Canon’s web site and
saved to your computer, as well as Picture Style files created with
Picture Style Editor and saved to your computer, to RAW images.
1 Display the main window of RAW Image Task
2 Click [ ].
(p.59).
You can apply the settings that have been adjusted in [Image Quality
Adjustment] to another image by selecting the [Edit] menu X
[Development Conditions] X [Copy] or [Paste] in the RAW Image Task
main window (p.79). You can also select [Save] or [Load] to save or
download the settings as a separate file from the image (extension
“.DVP”).
Y
P
O
C
It takes approximately 1 to 3 seconds until the adjusted image is
redisplayed (undergone development processing) (when using
the following: OS: Windows XP; CPU: 2.2 GHz Pentium 4; RAM:
512MB). However, the time it takes to redisplay an image varies
greatly depending on the camera model used to shoot the image,
computer type and the subject of the image.
A Picture Style file is an extended function of Picture Style. It is a
file that offers effective image characteristics for an image shot in
an extremely limited scene. For more details on Picture Style files,
refer to the Canon’s web site.
The [Open] window appears.
a Picture Style file, and then click the [Open]
3 Select
button.
Table of
Contents
1
2
3
4
Basic
Operation
Advanced
Operation
High-Level
Functions
Preferences
Reference
Contents
Lookup
Index
The Picture Style file is loaded and applied to the image.
61
Introduction
A Picture Style file is an extended function of Picture Style. For
more details on Picture Style files, refer to the Canon’s web site.
The Picture Style files that you can apply to the camera are files
with the “.PF2” extension only.
Only one Picture Style file can be loaded for one RAW image. To
apply another Picture Style file, repeat steps 2 to 3.
For details on using Picture Style Editor, refer to the “Picture Style
Editor Instruction Manual” (PDF electronic manual).
White Balance Files and Tone Curve Files
White balance (EOS-1D series cameras and EOS 40D) and tone curve
(EOS-1D series cameras excluding EOS-1Ds Mark III and EOS-1D
Mark III) adjustments made to RAW images can be saved as a file as
explained below and then registered to a camera and used.
For information on registering cameras, see the two related pages
below in “Chapter 2: Setting the Camera from Your Computer” in the
“EOS Utility Instruction Manual” (PDF electronic manual).
For details on white balance files, refer to “Registering Personal White
Balance in the Camera”.
For details on tone curve files, refer to “Setting Parameters and
Applying to the Camera”.
Y
P
O
C
Saving White Balance Files
1 Adjust white balance in [Image Quality Adjustment].
2 Click [ ] to save as a white balance file.
Click [
] to save the adjusted white balance results as a white
balance file (extension “.WBD”).
Table of
Contents
1
2
3
4
Basic
Operation
Advanced
Operation
High-Level
Functions
Preferences
Reference
EOS Utility to register the saved file to the
3 Use
camera.
Contents
Lookup
Index
62
Adding Sound to Images/Playing Back
Saving Tone Curve Files (Excludes the EOS1Ds Mark III and EOS-1D Mark III)
1
2 Click the [Save] button to save as a tone curve file.
Click [ ] in [Image Quality Adjustment] and adjust
the tone curve.
Click the [Save] button in the [Tone Curve] dialog box to save the
adjusted tone curve as a tone curve file (extension “.TCD”).
EOS Utility to register the saved file to the
3 Use
camera.
Introduction
You can add sound to images and play back sound which you have
added to images with a camera that has a sound record function.
Adding Sound to Images
You can add WAVE sound files to images (extension “.WAV”).
1
2 Select the [Edit] menu X [Add/Remove Sound].
Click the [Add] button and select the sound file to be
3 added
to the image.
Select an image to which you want to add sound.
The [Sound] dialog box appears.
Y
P
O
C
Select a WAVE sound file.
The display returns to the [Sound] dialog box.
4 Click the [OK] button to close the dialog box.
The [
] icon is displayed on images to which sound has been
added.
Table of
Contents
1
2
3
4
Basic
Operation
Advanced
Operation
High-Level
Functions
Preferences
Reference
Playing Back Sound
You can play back sound files that are attached to images.
1 Select an image to which a [ ] icon is attached.
2 Select the [Edit] menu X [Play Sound].
Contents
Lookup
Index
The sound is played back.
White balance files are not compatible with other camera models.
Tone curve files for the EOS-1Ds Mark II and the EOS-1D Mark II
are compatible and tone curve files for the EOS-1Ds and the
EOS-1D are compatible.
White balance files and tone curve files are compatible with
Windows and Macintosh computers.
63
Printing Using Other Printing Software
Introduction
You can start up printing software installed on your computer from within
ZB and print images.
Table of
Contents
1
Click the buttons [Print] X [Print Using Other
2 Software].
Select an image you want to print.
The [Print Using Other Software] window appears.
the printing software and then click the
3 Select
[Launch] button.
Advanced
Operation
The printing software starts up and the image you selected in
step 1 is displayed.
4
1
2
3
4
Basic
Operation
Y
P
O
C
Make the necessary settings in the printing software
and print.
High-Level
Functions
Preferences
Reference
Contents
Lookup
Index
Printing software does not appear
Printing software that is incompatible with ZB does not appear in the
[Print Using Other Software] window and can therefore not be used to
print.
64
4
Preferences
Introduction
Preferences ............................................................. 66
General Settings......................................................... 66
Selection Settings....................................................... 67
Rotation Settings ........................................................ 67
Printing Settings ......................................................... 68
Shooting Information Settings .................................... 68
Themes Settings......................................................... 69
Showing/Hiding Task Buttons.................................. 69
Y
P
O
C
Table of
Contents
1
2
3
4
Basic
Operation
Advanced
Operation
High-Level
Functions
Preferences
Reference
Contents
Lookup
Index
65
Preferences
Introduction
You can change any of the ZB functions in the preferences window.
Check the settings displayed for each window before making changes.
Select the [Tools] menu X [Preferences].
1
the tab sheet to be set, make changes to the
2 Select
settings and then click the [OK] button.
General Settings
You can make settings such as adjusting the minimum size of thumbnail
images that are displayed in the main window, the speed of Zoom Mode
(p.73), the levels of image and folder display in Scroll Mode (p.74) and
color management.
Table of
Contents
1
2
3
4
Basic
Operation
Advanced
Operation
Y
P
O
C
High-Level
Functions
Preferences
Reference
Contents
Lookup
Index
66
Introduction
Selection Settings
You can make settings related to image selection.
Rotation Settings
You can make settings related to image rotation.
Table of
Contents
1
2
3
4
Basic
Operation
Advanced
Operation
Y
P
O
C
High-Level
Functions
Preferences
Reference
Contents
Lookup
Index
67
Introduction
Printing Settings
Shooting Information Settings
If you are printing with the [Photo Print] window (p.15), you can set
whether to trim the image and print with no borders around the paper, or
to print as is without trimming.
You can set the information that is displayed when you click [
(shooting information display) in the viewer window (p.76).
]
Table of
Contents
1
2
3
4
Basic
Operation
Advanced
Operation
Y
P
O
C
High-Level
Functions
Preferences
Reference
Contents
Lookup
Index
68
Showing/Hiding Task Buttons
Themes Settings
You can set the background color for the main window.
You can show or hide task buttons displayed on the left of the main
window according to your requirements. Hiding buttons you do not use
makes operating ZB easier.
1 Select the [Tools] menu X [Customize].
the check mark from the buttons you want
2 Remove
to hide.
3 Click the [OK] button to apply your changes.
4 Restart ZB for the settings to be applied.
The [Customize] dialog box appears.
Y
P
O
C
Introduction
Table of
Contents
1
2
3
4
Basic
Operation
Advanced
Operation
High-Level
Functions
Preferences
Reference
Contents
Lookup
Index
69
Reference
Introduction
Troubleshooting....................................................... 71
Deleting the Software (Uninstalling) ........................ 71
System Requirements ............................................. 72
Supported Images ................................................... 72
List of Main Window Functions................................ 73
Zoom Mode ................................................................ 73
Scroll Mode................................................................. 74
Preview Mode............................................................. 75
Y
P
O
C
List of Viewer Window Functions............................. 76
List of Photo Print Window Functions .......................... 77
List of Index Print Window Functions ...................... 78
List of RAW Image Task Main Window Functions... 79
Contents Lookup ..................................................... 80
Index........................................................................ 81
About This Instruction Manual ................................ 83
Trademark Acknowledgments ................................ 83
Table of
Contents
1
2
3
4
Basic
Operation
Advanced
Operation
High-Level
Functions
Preferences
Reference
Contents
Lookup
Index
70
Troubleshooting
Deleting the Software (Uninstalling)
If ZB is not operating correctly, refer to the items below.
Also refer to the Help from the [Help] menu or click the [?] button at the
top of each window and refer to the Help displayed.
Installation could not be completed correctly
You cannot install the software if a user setting other than [Computer
administrator] privilege or [Administrator] privilege is selected. Select
the [Computer administrator] privilege user setting in Windows XP or
the [Administrator] privilege user setting in Windows 2000. For
detailed information on selecting the user setting, refer to your
computer User’s Manual.
ZB does not work
1
Select the [Start] button X [All Programs]
([Programs] in Windows 2000) X [Canon Utilities] X
[ZoomBrowser EX] X [ZoomBrowser EX Uninstall].
with the uninstallation as directed by the
2 Proceed
on-screen messages.
Y
P
O
C
ZB does not operate correctly on a computer if its system
requirements does not meet. Use ZB on a computer with compatible
system requirements (p.72).
Even if your computer has the RAM capacity (memory) described in
the system requirements (p.72), if other applications are running at
the same time as ZB, you may not have sufficient RAM (memory).
Exit any applications other than ZB.
Images do not display properly
Exit any applications before uninstalling the software.
Log in under the Computer administrator/Administrator privileges
when uninstalling the software.
To prevent computer malfunctions, always restart your computer after
you have uninstalled the software. Re-installing the software without
first restarting your computer is particularly likely to result in computer
malfunctions.
Images that are not supported by ZB (p.72) do not display. There are
various types of JPEG and TIFF images, so JPEG images other than
Exif 2.2 and 2.21 compatible images and TIFF images other than Exif
compatible images may not display properly.
With initial settings, the color of images that have been shot in Adobe
RGB appear weak. In this case, check the [General] tab sheet in
preferences and checkmark [Adjust color of images using monitor
profile] (p.66). Color management is performed and the color of the
image shot with an Adobe RGB setting and the image shot with an
sRGB setting are matched.
The software is uninstalled.
Introduction
Table of
Contents
1
2
3
4
Basic
Operation
Advanced
Operation
High-Level
Functions
Preferences
Reference
Contents
Lookup
Index
71
System Requirements
OS
Computer
CPU
RAM
Display
Supported Images
Windows Vista*1
Windows XP Professional/Home Edition*2
Windows 2000 Professional*3
PC with one of the above OS preinstalled (Upgraded
machines not supported)
* .NET Flamework 2.0 or later is required.*4
Windows Vista
1.3GHz Pentium or higher
Windows XP, 2000
500MHz Pentium or higher
Windows Vista
Minimum 512MB
Windows XP, 2000
Minimum 256MB
Screen resolution: 1024 × 768 pixels or more
Color quality: Medium (16 bit) or more
Image type/Camera used
Extension
JPEG images shot with a Canon digital
JPEG images camera (Exif 2.2 or 2.21-compatible
JPEG images)
.JPG, .JPEG
RAW images
EOS-1Ds Mark III EOS-1D Mark III
EOS-1D Mark II N EOS-1Ds Mark II
EOS-1D Mark II
EOS 5D
EOS 40D
EOS 30D
EOS 20D/20Da
EOS DIGITAL REBEL XSi/450D
EOS DIGITAL REBEL XTi/400D DIGITAL
EOS DIGITAL REBEL XT/350D DIGITAL
EOS 1000D
.CR2
EOS-1Ds
.TIF
Y
P
O
C
*1 Compatible with 32-bit/64-bit systems for all versions except Starter
Edition
*2 Compatible with Service Pack 2
*3 Compatible with Service Pack 4
*4 .NET Flamework is Microsoft software. It is installed together with ZB.
Introduction
EOS-1D
EOS 10D
EOS DIGITAL REBEL/300D DIGITAL
EOS D60
EOS D30
Table of
Contents
1
2
3
4
Basic
Operation
Advanced
Operation
.CRW
TIFF images
Exif-compatible TIFF images
.TIF, .TIFF
BMP images
Bitmap images
.BMP
PCD images
Photo CD images
.PCD
High-Level
Functions
Preferences
Reference
Contents
Lookup
Index
72
List of Main Window Functions
Zoom Mode
Introduction
Image search (p.53)
Slide show (p.36)
Properties window (p.47)
Viewer window (p.76)
Deletes images (p.26)
Rotates an image
Moves the enlargement display position (p.13)
Table of
Contents
Full view (p.13)
1
2
3
4
Basic
Operation
Folder path
Shows/hides
the task buttons
Display magnification (p.13)
Filter display (p.22)
Task buttons*1
Y
P
O
C
Folder area*2
Reduction display (p.13)
Enlargement display (p.13)
Cancels [
], [
] or [
]
Shows/hides the image or
folder information
Selects/deselects all the
images or folders
Displays the folder one level
above
Returns to the display of the
folder before [
] is clicked
Returns to the display of the
folder previously displayed
Image display area
Advanced
Operation
High-Level
Functions
Preferences
Reference
Contents
Lookup
Index
Shows/hides the task buttons and folder area
Protect icon
RAW image icon
Audio recording icon
Bracketing icon
Number of selected images
*1
2
The [CANON iMAGE GATEWAY] button may not be displayed depending on the area you are in.
* Images in folders and folders selected here are displayed on the image display area.
73
Introduction
Scroll Mode
Image search (p.53) Deletes images (p.26)
Slide show (p.36)
Rotates an image
Table of
Contents
Properties window (p.47)
Viewer window (p.76)
Display magnification (p.13)
Filter display (p.22)
1
Task buttons*
Folder area*2
1
2
3
4
Basic
Operation
Folder path
Shows/hides
the task buttons
Y
P
O
C
Shows/hides the image or
folder information
Selects/deselects all the
images or folders
Displays the folder one level
above
Returns to the display of the
folder before [
] is clicked
Advanced
Operation
High-Level
Functions
Preferences
Returns to the display of the
folder previously displayed
Reference
Image display area
Contents
Lookup
Index
Shows/hides the task buttons and folder area
Number of selected images
*1 The [CANON iMAGE GATEWAY] button may not be displayed depending on the area you are in.
*2 Images in folders and folders selected here are displayed on the image display area.
74
Introduction
Preview Mode
Image display area Image search (p.53)
Slide show (p.36)
Deletes images (p.26)
Viewer window (p.76)
Table of
Contents
Rotates an image
Folder path
Shows/hides
the task buttons
Filter display (p.22)
Shows/hides the image or
folder information
1
Task buttons*
Folder area*2
1
2
3
4
Basic
Operation
Y
P
O
C
Selects/deselects all the
images or folders
Displays the folder one level
above
Returns to the display of the
folder before [
] is clicked
Returns to the display of the
folder previously displayed
Advanced
Operation
High-Level
Functions
Preferences
Reference
Information display area
Shooting information (p.47)
Contents
Lookup
Thumbnail image display
area*3
Index
Switches between images
Shows/hides the task buttons and folder area
Number of selected images
Shows/hides the information display area
*1 The [CANON iMAGE GATEWAY] button may not be displayed depending on the area you are in.
*2 Images in folders and folders selected here are displayed on the thumbnail image display area.
*3 Images selected here are displayed on the image display area.
75
List of Viewer Window Functions
Photo print window (p.77)
Moves the enlargement display position (p.21)
Reduction display (p.21)
Enlargement display (p.21)
Introduction
Edits (p.29 to p.35, p.54 to p.57)
Shows/hides the AF point
Table of
Contents
Shows/hides the shooting information (p.14, p.20)
Split displays (p.44)
Switches between
images
Synchronize (p.44)
File name
Fit-to-window view
(p.21)
100% (actual pixel
size) view
Display magnification
(p.21)
Full view display (p.14)
Rating (p.21)
1
2
3
4
Basic
Operation
Folder path
Y
P
O
C
Advanced
Operation
High-Level
Functions
Preferences
Reference
Contents
Lookup
Index
76
List of Photo Print Window Functions
Trims the image
Introduction
Inserts text
Table of
Contents
1
2
3
4
Basic
Operation
Advanced
Operation
Printer selection and
settings
Y
P
O
C
High-Level
Functions
Print preview
Preferences
Reference
Contents
Lookup
Index
Shot date and
time printing
Borderless printing
Number of prints
Switches the printing image
77
List of Index Print Window Functions
Introduction
Printer selection and settings
Table of
Contents
1
2
3
4
Basic
Operation
Advanced
Operation
Paper orientation
Layout settings
Print information
settings
Y
P
O
C
High-Level
Functions
Print preview
Preferences
Reference
Contents
Lookup
Index
Switches the printing page
Number of prints
78
List of RAW Image Task Main Window Functions
Moves the enlargement display position
Saves the image
Transfers the image to image editing software
Rotates the image
Sets a check mark
Introduction
Zooms in
Zooms out
Cancels [
], [
] or [
]
100% (actual pixel size) view
Fit-to-window view
Table of
Contents
Enlargement/reduction
display
Switches between
displayed images
Image display area
Y
P
O
C
Thumbnail image
display area
Brightness adjustment
1
2
3
4
Basic
Operation
Advanced
Operation
Click white balance
High-Level
Functions
Saves the set white
balance as a white
balance file
Preferences
Loads a Picture Style file
and applies it to the image
Cancels all settings and
reverts to the status at the
time of shooting
Applies and redisplays
multiple adjustment
settings in a single
operation
Reference
Contents
Lookup
Index
Checkmark to redisplay
for each adjustment made
Cursor coordinates
position and RGB value
(8-bit conversion)
Shows/hides the shooting
Shows/hides the [Navigator]
information
Shows/hides the [Histogram]
Displays the image selected in
Shows/hides the [Image Quality Adjustment]
the thumbnail image display area
Shows/hides the thumbnail image display area
The settings at the time of shooting are displayed
in bold and italics in the list boxes.
79
Introduction
Contents Lookup
Downloading Images to Your Computer
Table of
Contents
Image Editing
Download images by connecting your camera
and computer
p.7
Download images using a card reader
p.9
Image Checking
Use automatic adjustment
p.29
Adjust brightness/darkness
p.31
Make colors more vivid
p.31
Raise the contrast
p.31
p.32
Look through
p.11
Trim parts of an image
Enlarge and view
p.13, p.20
Specify an aspect ratio that matches the size of
the paper on which an image is to be printed
p.32
Check efficiently
p.23
Make an image sharp
p.34
Compare multiple images
p.44
Insert text
p.33
Check the shooting information such as shot
date
p.47
Correct red-eye
p.35
Merge
p.57
Adjust RAW images
p.59
View as a slide show
p.36
Image Printing
Print one image on one page
p.15
Print using Easy-PhotoPrint EX
p.16
Arrange multiple images on one page and print
p.42
Y
P
O
C
1
2
3
4
Basic
Operation
Advanced
Operation
High-Level
Functions
Preferences
Reference
Utilizing Images
Attach an image to an e-mail
p.37
Make into computer wallpaper
p.38
Make into a computer screen saver
p.39
Contents
Lookup
Organizing Images
Converting Images
Index
Sort by rating
p.21
Move to a different location
p.25
Change the size
p.48
Move by entire folder to a different location
p.25
Convert to a different type
p.48
Change the file name
p.26
Convert a RAW image to a JPEG or TIFF image
p.59
Delete
p.26
Classify by shot date
p.52
Search
p.53
80
Index
Introduction
A
Adding Sound to Images..................................................................... 63
Adjust JPEG Images..................................................................... 29, 54
Adjust RAW Images............................................................................ 59
Adjusting (JPEG or TIFF Image)................................................... 29, 54
Adjusting in RGB .......................................................................... 54
Adjusting the Brightness............................................................... 31
Adjusting the Brightness Level ..................................................... 55
Adjusting the Contrast .................................................................. 31
Adjusting the Saturation ............................................................... 31
Adjusting the Sharpness .............................................................. 34
Adjusting the Tone Curve............................................................. 55
Automatic Adjustment .................................................................. 29
Correcting Red-eye ...................................................................... 35
Unsharpening Mask ..................................................................... 56
Adjusting (RAW image)....................................................................... 59
Adjusting Color Saturation............................................................ 79
Adjusting Color Tone.................................................................... 79
Adjusting the Contrast .................................................................. 79
Adjusting the Sharpness .............................................................. 79
Adjusting White Balance .............................................................. 79
Click White Balance ..................................................................... 79
Picture Style ................................................................................. 79
Picture Style File .......................................................................... 61
Adjusting Images in RGB.................................................................... 54
Adjusting the Brightness ..................................................................... 31
Adjusting the Brightness Level............................................................ 55
Adjusting the Contrast......................................................................... 31
Adjusting the Saturation...................................................................... 31
Adjusting the Sharpness ..................................................................... 34
Adjusting the Tone Curve ................................................................... 55
Attach an Image to an E-mail.............................................................. 37
Automatic Adjustment ......................................................................... 29
Change Folder Name .......................................................................... 26
Change the Display Magnification ....................................................... 13
Changing the Folder Level Settings .................................................... 46
Changing the Size and Type of an Image and Saving ........................ 48
Checking the Shooting Information ..................................................... 47
Classifying the Images by Shot Date................................................... 52
Click White Balance............................................................................. 79
Color Management .............................................................................. 66
Compare Multiple Images.................................................................... 44
Contrast ............................................................................................... 31
Correcting Red-eye ............................................................................. 35
Creating a Folder................................................................................. 24
Y
P
O
C
D
Delete
Delete Folders............................................................................... 27
Delete Images ............................................................................... 26
Delete the Software ...................................................................... 71
Delete Folders ..................................................................................... 27
Delete Images ..................................................................................... 26
Delete the Software (Uninstalling) ....................................................... 71
Deleting the ZB (Uninstalling).............................................................. 71
Displaying Images Shot with Adobe RGB ........................................... 71
Downloading an Image to Your Computer ............................................ 7
Downloading Images from a Camera ............................................. 7
Downloading Images from a Card Reader...................................... 9
Downloading Images ............................................................................. 7
Downloading Images from a Card Reader ............................................ 9
1
2
3
4
Basic
Operation
Advanced
Operation
High-Level
Functions
Preferences
Reference
Contents
Lookup
Index
E
Batch Change the File Name of Images ............................................. 51
Editing..................................................................................................
81
JAdjusting
Enlarge Folders ................................................................................... 12
Enlarge Images ............................................................................. 13, 21
Exiting ZB ............................................................................................ 18
Exporting Shooting Information ........................................................... 49
C
F
Change File Name .............................................................................. 26
Favorite Folders................................................................................... 27
B
Table of
Contents
81
Introduction
Full View Display................................................................................. 14
G
General Settings (Preferences) .......................................................... 66
I
Index Printing ......................................................................................
Insert Text ...........................................................................................
Inserting Comments............................................................................
Inserting Text into Images...................................................................
42
33
50
33
Printing
Index Printing ................................................................................ 42
Printing an Image Using Easy-PhotoPrint EX ............................... 16
Printing One Image on One Sheet of Paper ................................. 15
Printing with Printing Software other than EPP EX ....................... 64
Printing an Image Using Easy-PhotoPrint EX ..................................... 16
Printing One Image on One Sheet of Paper........................................ 15
Printing Settings (Preferences)............................................................ 68
R
Listing Images by Folder Level ........................................................... 45
Ratings ................................................................................................ 21
RAW Image Task .......................................................................... 60, 79
Rotate images ......................................................................... 73, 74, 75
Rotation Settings (Preferences) .......................................................... 67
M
S
K
Keywords Settings .............................................................................. 50
L
Y
P
O
C
Main Window .................................................................................. 7, 73
Main Window (RAW Image Task)................................................. 60, 79
Merging Panorama Images................................................................. 57
Move or Copy Folders......................................................................... 25
Move or Copy Images......................................................................... 25
N
Navigator window.......................................................................... 13, 21
O
Operating with EOS Utility .................................................................... 8
P
Picture Style File ................................................................................. 61
Playing Back Sound............................................................................ 63
Preferences......................................................................................... 66
General Settings........................................................................... 66
Printing Settings ........................................................................... 68
Rotation Settings .......................................................................... 67
Selection Settings......................................................................... 67
Shooting Information Settings ...................................................... 68
Themes Settings .......................................................................... 69
Preview Mode (Main Window) ...................................................... 23, 75
Save the White Balance File ............................................................... 62
Saving the Tone Curve File ................................................................. 63
Scroll Mode (Main Window)........................................................... 45, 74
Searching for Images .......................................................................... 53
Selection Settings (Preferences) ......................................................... 67
Setting a Screen Saver........................................................................ 39
Setting a Wallpaper ............................................................................. 38
Setting an Image as a Screen Saver................................................... 39
Setting an Image as Wallpaper ........................................................... 38
Shooting Information Settings (Preferences)....................................... 68
Simple Display..................................................................................... 11
Slide Show........................................................................................... 36
Starting up ZB........................................................................................ 7
Supported Images ............................................................................... 72
Synchronize Display ............................................................................ 44
System Requirements ......................................................................... 72
Table of
Contents
1
2
3
4
Basic
Operation
Advanced
Operation
High-Level
Functions
Preferences
Reference
Contents
Lookup
Index
T
Themes Settings (Preferences)........................................................... 69
Thumbnail Display (Main Window) ...................................................... 11
Transfer Images to other Image Editing Software ............................... 57
82
Introduction
Trimming ............................................................................................. 32
Trimming an Image ............................................................................. 32
U
Unsharpening Mask ............................................................................ 56
V
Viewer Window ....................................................................... 14, 20, 76
W
White Balance.....................................................................................
Click White Balance .....................................................................
Writing Images to a CD.......................................................................
Writing to a CD....................................................................................
Z
79
79
41
41
About This Instruction Manual
It is prohibited to reproduce, in whole or part, the contents of this
Instruction Manual without permission.
Canon may change without notice the software specifications and
contents of this Instruction Manual.
The software screens and displays printed in this Instruction Manual
may differ slightly from the actual software.
The content of this Instruction Manual has been reviewed thoroughly.
However, if you should notice any errors or omissions, please contact
a Canon Service Center.
Please note that irrespective of the above-mentioned, Canon does
not take responsibility for the outcome of the operation of the
software.
Y
P
O
C
Zoom Mode (Main Window).......................................................... 11, 73
Trademark Acknowledgments
Microsoft and Windows are registered trademarks or trademarks of
Microsoft Corporation in the United States and/or other countries.
Other names and products not mentioned above may be registered
trademarks or trademarks of their respective companies.
Table of
Contents
1
2
3
4
Basic
Operation
Advanced
Operation
High-Level
Functions
Preferences
Reference
Contents
Lookup
Index
83