1
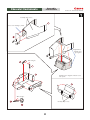
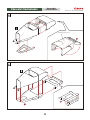
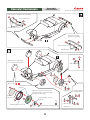
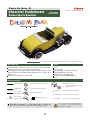
Classic Car Series : 01
Chevrolet Confederate
Deluxe Sports Roadster
View of completed model
© Canon Inc. © Toshimasa Mitsutake
Assembly
Instructions
* This model was designed for Papercraft and may differ from the original in some respects.
Assembly tip
Tools
Write the number of each part on the reverse side of the part in pencil upon
cutting it out, to be sure you can tell which part is which later.
Before gluing, crease the paper along mountain and valley fold lines. Trace
along the folds with a ruler and an exhausted ballpoint pen (out of ink) to get a
sharper fold.
Make sure rounded sections are nice and stiff.
Scissors
Ruler, set square
Glue (Wood glue or craft glue recommend)
Exhausted ballpoint pen (out of ink)
Toothpicks (for use in applying glue)
Tweezers (useful for handling small parts)
Pencil
Key to symbols
Dotted line
Dashed and
dotted line
Solid line
Scissors mark
Mountain fold
Fold so that the printed pattern faces outside.
Dots indicate parts to be glued;
dotted lines indicate approximate area for
application of glue.
Valley fold
Fold so that the printed pattern faces inside.
Cut a notch
along this line.
Cut along the center of the line.
Cut a notch
along the line.
Cut these areas out.
Assembly Instructions : Six A4 sheets (No. 1 to No. 6)
Build this model with careful reference to the Assembly Instructions.
Red dot
Glue parts with the same number together.
Green dot
Glue areas within the same part together.
Blue dot
Glue to the reverse side of the specified part.
Glue, scissors and other tools may be dangerous
to young children so be sure to keep them out of
the reach of young children.
Chevrolet Confederate
Assembly
Instructions
© Canon Inc. © Toshimasa Mitsutake
Carefully shape curves.
Press center and align | marks.
Align fold lines
and flaps and
glue together.
Affix with glue.
Shaded areas in diagrams indicate reverse
side of parts.
Affix with glue.
Carefully shape curves.
Chevrolet Confederate
Assembly
Instructions
© Canon Inc. © Toshimasa Mitsutake
Carefully shape curves.
Chevrolet Confederate
Assembly
Instructions
*Assemble right (R) and left (L) parts (diagram is R).
© Canon Inc. © Toshimasa Mitsutake
Glue this edge first.
Carefully shape curves.
Carefully shape curves.
*Assemble right (R)
and left (L) parts (diagram is L).
Carefully shape curves.
Glue this edge first.
Chevrolet Confederate
Assembly
Instructions
© Canon Inc. © Toshimasa Mitsutake
Affix with glue.
Wiper blade illustration
should face front.
Carefully shape curves.
Confirm top/bottom before gluing.
Confirm top/bottom before gluing.
Top
Top
Affix with glue.
Carefully shape curves.
Affix with glue.
Carefully shape curves.
*Confirm right/left
before gluing.
Chevrolet Confederate
Assembly
Instructions
© Canon Inc. © Toshimasa Mitsutake
Fold each in two and glue before assembling.
Arrow indicates 'up'.
Carefully shape curves.
Fold each in two and
glue before assembling.
Arrow indicates 'up'.
Carefully shape curves.
Affix all four tires, adjusting to
be sure they touch the ground.
Affix with glue.
Glue in order,
-
.
Joint should be positioned
at the top.
*diagram is L
Affix outer surface of tire like a bowl,
then wait until glue is dry before gently
pulling the tire into shape.
Arrow
indicates 'up'.
Pink flap indicates outer side.
Joint should be positioned
at the top.
Top
Affix with glue.
Confirm top/bottom before gluing.
*diagram is L
*Assemble right (R)
and left (L) parts