1
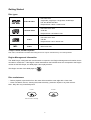
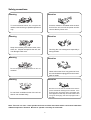
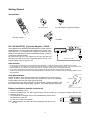
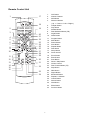
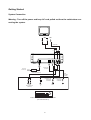
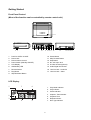
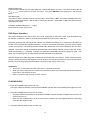
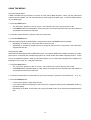
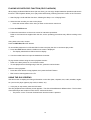
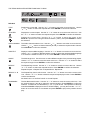
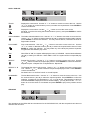
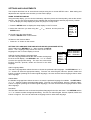
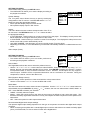
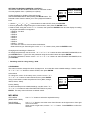
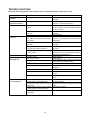
DVD / VIDEO CD / MP3 / CD - PLAYER
DVD105
OPERATION MANUAL
PLEASE READ THE INSTRUCTION CAREFULLY BEFORE OPERATING THIS UNIT.
WARNING
To prevent fire or shock hazard, do not expose this appliance to rain or moisture.
IMPORTANT
Since the CD circuitry may cause interference to other radio tuners nearby, switch this unit off when not in use
or move it away from the affected radio tuner.
This device complies with Part 15 of the FCC Rules, operation is subject to the following two conditions: (1) This
device may not cause harmful interference, and (2) this device must accept any interference received, including
interference that may cause undesirable operation.
NOTE : This equipment has been tested and found to comply within the limits for a Class B digital device,
pursuant to Part 15 of the FCC Rules. These limits are designed to provide reasonable protection against
harmful interference in a residential installation. This equipment generates, uses and can radiate radio frequency energy and, if not installed and used in accordance with the instruction, may cause harmful interference
to radio communications. However, there is no guarantee that interference will not occur in a particular installation. If this equipment does cause harmful interference to radio or television reception, which can be determined by turning the equipment off and on, the user is encouraged to try to correct the interference by one or
more of the following measures:
• Reorient or relocate the receiving antenna.
• Increase the separation between the equipment and receiver.
• Connect the equipment into an outlet on a circuit different from that to which the receiver is connected.
• Consult the dealer or an experienced radio / TV technician for help.
SAFETY CERTIFICATION
This Compact Disc Player is made and tested to meet safety standards of the FCC, requirements and compliance
with safety performance of the U.S. Department of Health and Human Services, and also with FDA Radiation
Performance Standards 21 CFR Subchapter J.
DANGER
LASER SAFETY
This unit employs an optical laser beam system in the CD mechanism, designed with
built -in safeguards. Do not attempt to disassemble, refer to qualified service personnel.
Exposure to this invisible laser light beam may be harmful to the human eye.
INVISIBLE LASER RADIATION WHEN OPEN
AND INTERLOCK FAILED
OR DEFEATED. AVOID
DIRECT EXPOSURE TO
LASER BEAM.
THIS IS A CLASS-1 LASER PRODUCT. USE OF CONTROLS, OR ADJUSTMENTS
OR PROCEDURES OTHER THAN THOSE SPECIFIED HEREIN, MAY RESULT IN
HAZARDOUS LASER LIGHT BEAM EXPOSURE.
SAFETY PRECAUTIONS
1. Do not open the cabinet. Refer servicing to qualified personnel only.
2. Do not expose to excessive heat, direct sunlight, dust, moisture, vibration or shock.
3. Use ONLY the AC adaptor required, others may damage your unit. Disconnect from the wall outlet when the
set is not to be used for an extended period of time.
4. Use a soft dry cloth when cleaning your unit. Do not use solvents or commercially available cleaners as they
may damage or discolor the finish.
5. Do not wear headphones while operating a motor vehicle, this could create a traffic hazard and is illegal in
many areas.
6. The headphones supplied with your unit provide super stereo listening while allowing you to hear outside
sounds when listening at normally low volume levels. Listening at extremely high volume levels minimizes
the intrusion of outside noise/sounds.
7. If you notice that the sound has become weak or distorted, this is an indication that your batteries are low.
Replace with new or recharged batteries. (see "BATTERY OPERATION")
2
Getting Started
Before attempting to connect, operate or adjust this product, please read these instruction
completely and keep this manual for future reference.
Dear customers :
May we take this opportunity to thank you for purchasing this DVD player.
We strongly recommend that you carefully study the operating instructions before operating the unit.
Main Features
•
•
•
•
•
•
•
Fully compatible with DVD, Video CD 1.0/1.1/2.0, CD and MP3
DTS - digital output.
Compatible with full DVD playback functions : multi-angle, multi-subtitle, parental control, etc.
Advanced 10-bit video D/A converter with over 500 lines of horizontal resolution.
Video output : Normal video output, S-Video output.
Audio output : 2ch mixed stereo output, Coaxial digital output, Linear PCM output.
NTSC/PAL discs compatibility.
Features of playback specifications
•
This product complies the MPEG II standard.
NTSC - 720 x 480
PAL
- 720 x 576
Features of audio specifications
–
DOLBY Digital AC-3 digital output
– DTS (Digital Theater System) digital output
– Linear PCM output
Playback features
•
•
•
•
•
•
•
Fast forwards and fast backwards
Multi-speed slow motion playback
Zooming playback
Repeat / Random playback
Programmable playback
Numeric selection
Time search
3
Getting Started
Disc types
MP3
Audio & Video
Disc size 12cm
single side, single layer / single side, double layer
PAL and NTSC DVD disc
Playback time 135min / 240min max.
Audio & Video
Disc size 12cm / 8cm
VCD disc
Playback time 74min/20min max.
Audio
Disc size 12cm / 8cm
CD disc
Playback time 74min / 20min max
Audio
MP3 format disc
* Player is CD-R, CD-RW compatible.
Note: CD-R, CD-RW Discs recorded with writing device can only be used when they are correctly treated.
Region Management Information
This DVD Player is disigned and manufactured to respond to the Region Management Information that is
recorded on a DVD disc. If the Region number described on the DVD disc does not correspond to the Region
number of this DVD Player, this DVD player cannot play that disc.
This Region number of this DVD player is
.
Disc manintenace
– Before playback, wipe the disc from the center hole toward the outer edge with a clean cloth.
– Never use bezine, thinner, cleaning fluid, static electricity prevention liquids or any other solvent.
Note : Dirty disc may cause bad picture.
Correct
Incorrect
From the center to the edge
4
Safety precautions
Warning
Attention
To avoid electrical shock, do not open the
cabinet, refer servicing to qualified personnel
only.
If smoke, malodor or unrelated noise are emitted from the unit, turn off the power and disconnect the AC power cord.
Warning
Attention
Keep the unit away from flower vases, tubs,
sinks, etc. If liquids are spilt into the unit, serious damage could occur.
Touching the unit is dangerous especially if
during thunder.
Warning
Attention
Do not expose this equipment to rain or
moisture.
When left unused for a long period of time,
the unit should be unplugged from the household AC outlet.
Warning
Attention
Be sure to turn the unit off and disconnect the AC
power cord before cleaning the unit surface. If the
surface is dirty, wipe clean with a cloth which has
been dipped in a weak soap and water solution and
wrung out thoroughly, and then wipe again with a
dry cloth.
Do not block ventilation holes of the unit so
that air can circulate freely,
Note: This unit is a class 1 laser product and uses a visible laser beam which could cause hazardous
radiation exposure if directed. Be sure to operate it correctly as instructed.
5
Getting Started
Accessories
AC Line Cord
DC Car Adaptor (Cigarette Adaptor)
Remote Control
AV Cable
DC CAR ADAPTOR (Cigarette Adaptor) / CORD
The supplied DC car adaptor/cord is designed for use with vehicles
equipped with a 12 volt negative ground electrical system only.
The equipment is compatible if the negative (-) terminal of the
battery is connected to the vehicle’s metal body/chassis. If unsure,
contact the vehicles’s dealer.
Plug the small end of the car adaptor into the DC 12V jack and
then plug the other end into the cigarette lighter socket. This
indicator lights when the power is on.
TO DC 12V JACK
PRECAUTIONS
• USE ONLY THE SUPPLIED DC CAR ADAPTOR/CORD PROVIDED. OTHER ADAPTORS COULD DAMAGE THE PLAYER.
• IF THE INSIDE OF THE VEHICLE’S CIGARETTE LIGHTER SOCKET IS DIRTY WITH ASHES OR DUST, THE PLUG SELECTION
MAY BECOME HOT AS A RESULT OF POOR ELECTRICAL CONTACT. BE SURE IT IS CLEAN BEFORE USE.
• AFTER USE, DISCONNECT THE CORD’S PLUGS FROM BOTH THE PLAYER AND THE CIGARETTE LIGHTER.
• SHOULD THIS PLAYER CAUSE RECEPTION INTERFERENCE TO NEARBY RADIO. INCREASE THE DISTANCE BETWEEN PLAYER
AND RECEVIER.
FUSE REPLACEMENT
Should the player fail to operate with the DC car adaptor/cord, check the fuse
(2.5A). If blown, check all connections and inspect the cord for any damage.
Always replace the fuse with same type and rating.
If the fuse blows again after replacement, this indicates a potential problem. DO
NOT replace fuse with a higher rating. Doing so, may cause damge to the player.
Indicator
Fuse
Battery installation (remote control unit)
1.
2.
3.
–
Remove the battery cover.
Insert two batteries (AA, R6, UM-3 types) making sure the polarity (+/-) matches the marks inside the unit.
Replace the cover.
Do not attempt to recharge, short-circuit, disabssemble, heat or throw
the batteries into the fire.
+
—
– Do not mix old and new batteries
Note : Weak batteries can leak and serveraly damage the remote control unit.
—
+
6
Remote Control Unit
1
1.
2.
3.
4.
17
18
2
5.
6.
7.
8.
9.
10.
11.
12.
13.
14.
15.
16.
17.
18.
19.
20.
21.
22.
23.
24.
25.
26.
27.
28.
29.
30.
31.
32.
33.
34.
19
3
4
5
6
7
8
9
10
11
20
21
22
23
24
25
26
27
28
29
12
30
13
14
15
16
31
32
33
34
7
GUI Button
Numeric Buttons
Shift Button
Direction Buttons
( Up / Down/ Left/ Right)
Chapter Button
Play Button
Subtitle Button
Fast Backward Button (FR)
Angle Button
Audio Button
Program Button
Mute Button
Return Button
Slow Button
Repeat Button
Fast Button
Setup Button
Power On/Off
Zoom Button
Enter Button
Root Button
Pause / Step Button
Volume Control
Fast Forward Button (FF)
Stop Button
PBC Button
Digest Button
Bookmark Button
Repeat A - B Button
Cancel Button
Search Button
Next Button
Effect Button
Previous Button
Getting Started
System Connection
Warning : Turn off the power and keep AC cord pulled out from the outlet when connecting the system.
R
AUDIO
OUT
VIDEO
OUT
L
VIDEO CORD
L
R
S-VIDEO
DC 12V
AUDIO
DIGITAL
OUT
AUDIO
R
L
VIDEO
LINE OUT
AC OUTLET
ON THE WALL
S-VIDEO CORD
(OPTIONAL)
ADAPTOR
AUDIO CORD (OPTIONAL)
COAXIAL
AUDIO CABLE
(OPTIONAL)
TO STEREO TV OR
OTHER AUDIO
EQUIPMENTS
TO AUDIO
INPUT CONNECTOR
(FRONT L/R)
VIDEO
IN
TO COAXIAL DIGITAL
AUDIO INPUT
CONNECTOR
S-VIDEO
AMPLIFIER WITH 5.1 CH INPUT CONNECTION
(SOLD SEPARATELY)
8
Getting Started
Front Panel Control
(Most of the function can be controlled by remote control unit.)
1
4
2 3
1.
2.
3.
4.
5.
6.
7.
8.
9.
5
6 7
8
Push for OPEN / CLOSE
Phone Jack
Phone Volume Control
Power Switch (Standby ON/OFF)
LCD Display
ON/Standby LED
Remote Sensor
Play Button
Skip Backward Button
9 10 11 12
13
14 15 16 17
10.
11.
12.
13.
14.
15.
16.
17.
Pause Button
Skip Forward Button
Stop Button
DC 12V Input Jack
S-Video Socket (optional)
Audio Digital Out Socket
Line Out Jack - Audio R/L
Line Out Jack - Video
1.
2.
3.
4.
5.
6.
7.
Play Mode Indicator
Play Indicator
Pause Indicator
Chapter / Track Number
Playback Time
Repeat Indicator
Disc Type Indicator
LCD Display
1
7
6
4
5
2
3
9
Function Button (Remote Control)
POWER Button ( ) [18]
The POWER button is used to toggle the DVD player standby mode and power on mode.
In standby mode, make sure red LED is on; press the POWER button and the player will turn on, and LED will
turn off, initialize, and begin to load the disc if there is a disc present.
BOOKMARK Button [28]
This button is used to store specific portions of the disc in memory and play them immediately whenever you
want without the need to search.
A-B REPEAT Button [29]
Pressing this button once marks A, pressing it twice marks B and causes the player to repeat from A to B.
SUBTITLE Button [7]
This button is used to select the subtitle language and enables or disables the display or subtitles form the DVD
Disc.
ANGLE Button [9]
This button is used to select the active angle, when angles are available (in DVD format only).
SETUP Button [17]
Pressing this button while the player is in Stop mode brings up the Setup Menu.
CHAPTER Button [5]
A DVD is divided into long sections of video and/or music, which are called Chapters. The CHAPTER button is
used to select the chapter using the chapter menu. This especially useful when you play a DVD that contains
serveral titles or chapters.
ROOT (MENU) Button [21]
Some DVDs include special menus called DVD menus. For example, DVDs with complex contents may contain
guide menus, and DVDs with multiple languages may contain audio and subtitle language menus. these
menus are called "DVD" menus. This button is used to select the language for the subtitles and the language
for the sound, etc. In addition, this button is used to toggle PBC control while playing the DVD.
CURSOR (DIRECTION) Button [4]
These buttons ""/ ""/ ""/ "" are used to select the items in a horizontal direction or vertical direction in
DVD menu mode. GUI display mode, or SETUP mode.
ENTER Button [20]
Pressing this button selects the button highlighted currently when the player is in DVD menu mode, GUI display
mode or SETUP mode.
GUI Button [1]
This button is used to display the information of the playing disc and the operating state of the player. GUI
stands for Graphic User Interrface.
RETURN [13]
When PBC is ON, this button is used to return to the previous menu screen. (For VCD only)
PROGRAM [11]
This button is used to store the track number of the Video CD or CD. Use this feature to play the tracks in a
desired order. Anywhere from two to 30 tracks can be set in a program
) [24]
FF Button (Fast Forward
This button is used to scan forward through the audio and video at 3-level speeds as X2, X4 and X8.
10
FR Button (Fast Reverse
) [8]
This button is used to scan backward through the audio and video at 3-level speeds as X2, X4 and X8.
PLAY Button [6]
This button is used to play the disc.
STOP Button ( ■ ) [25]
This button is used to stop the playing of the disc.
PREVIOUS Button [34]
Press this button to move back to beginning of the previous chapter or track.
NEXT Button [32]
Press this button to move ahead to the beginning of the next chapter or track.
AUDIO Button [10]
This button is used to set or reset the virtual surround sound.
PAUSE / STEP Button () [22]
This button is used to pause a playing disc temporarily, and you can see the pictures step by step, too.
SLOW Button [14]
This button is used to play a DVD disc slowly at 3-level speeds as 1/2, 1/4 and 1/8.
FAST Button [16]
This button is used to play a DVD disc quickly.
ZOOM Button [19]
This button is used to view a scene close-up during playback of the disc. (DVD, Video CD).
Use Numeric buttons (0 to 9) or cursor ""/ ""/ ""/ "" buttons to choose one zone to
view a scene close up.
1 2 3
4 5 6
7 8 9
NUMERIC 1-9, 0, and +10 Buttons [2]
These buttons are used to input numbers. Use the +10 button to input numbers of 10 or over.
To input 10 : +10 ➔ 0;
To input 25 : +10 ➔ +10 ➔ +5.
CANCEL Button [30]
This button is used to clear numbers that you have input.
EFFECT Button [33]
This button is used to set amount of TREBLE, BASS, 3D sound effect. (for VCD only)
MUTE Button [12]
Press this button to switch OFF the sound. Press once again to switch ON the sound.
SHIFT Button [3]
This button is used to switch TITLE MENU and current playing. (For some DVD discs only)
SEARCH Button [31]
Press this button TITLE, CHAPTER, TIME of DVD GUI will be display.
TITLE
Displays the current title. Use the ""/ "" button to move the cursor to the icon. Use the ""/
"" button to select the required title. Press ENTER to confirm the selection.
CHAPTER Displays the current chapter. Use the ""/ "" button to move the cursor to the icon. Use the
""/ "" button to select the required chapter. Press ENTER to confirm the selection.
TIME
Displays the current time. Use the " "/ " " button to move the cursor to the
00:00:00. Input the time using the Number buttons ( 0 to 9 ), and press ENTER to confirm the
selection.
11
DIGEST Button [27]
Press this button during VCD 2.0 higher playback, 9 frames will appear on screen, use numeric buttons (0 to 9)
or / //cursor buttons to choose one frame. Then press ENTER to start playing from the selected
frame.
PBC Button [26]
This button is used to set PBC function to ON and OFF. When PBC is "OFF", the system will display the menu
of VCD. Use Number Buttons ( 0 to 9, +10 ) to make your selection. When PBC is "ON" the system will be in
sequential play mode.
VOLUME UP/DOWN Buttons (/) [23]
These buttons control volume level.
DVD Player Operation
This chapter describe how to play a DVD, CD or VCD. Depending on the DVD or VCD, some operations may
be different or restricted. Refer to the instructions supplied with your DVD or VCD disc.
Each disc placed into the DVD Player has a built-in use interface that allows you to explore the information on
the disc, such as the title and chapter information. In order to access that information, you must use the remote
control or front panel. The following sections describe the relationship of the remote buttons to the disc menu
interface. There are a number of scenarios associated with remote button requests, some of which will, in fact,
result in a Not Valid ( ) response. Example; you press the CHAPTER button during playback mode. This
button has no meaning here and will result a Not Valid message being displayed.
The DVD Player has a wide range and complete set of functions that it can perform. Some of these functions
can be activated from front panel keypad, but most of them can only be accessed from the IR remote control,
therefore, the following instructions describe the functions of the remote control only.
Preparation
• Turn on the TV and select the video input source connected to the unit.
• When you want to enjoy the sound of disc from the audio system, turn on the audio system and select the
input source connected to the unit.
• Set the TV screen type correctly to match your TV.
PLAYING DISCS
1. Press the POWER button of the main unit
The player enters the standby mode and the STANDBY indicator above the POWER button lights up in red.
2. Press the POWER button on the remote control
• The player enters the operation mode and the STANDBY indicator above the POWER button will turn off
and LCD will turn on.
• Each time the POWER button on the remote control is pressed, the unit toggle between the operating
mode and the standby mode.
3. Press the OPEN/CLOSE to open the disc tray.
12
4. Press the PLAY button
• When playing a DVD, a DVD menu or title menu may appear on the TV.
• When playing a VCD/SVCD, a VCD/SVCD menu screen may appear, depending on the VCD/SVCD.
• When playing a MP3/CD, a MP3/CD menu screen will appear.
5. Use the cursor buttons to select the desired item
• For some discs there is a second menu screen. If so, press the ENTER button to display the next menu
screen.
• The cursor buttons do not work for VCDs. Use the number button to select the desired item.
6. Press the ENTER button
• The desired item is selected and playback starts.
• You can return to the menu screen by pressing the CHAPTER button and the ENTER button while the
DVD is playing, though this depends on the disc.
• If the Not Valid () symbol appears on the TV screen while buttons are being operated, that operation is
not possible on the player or with that disc.
• If you leave the player in pause or stop mode for 3 minutes, the screen saver image appears automatically .
STOPPING PLAYBACK
During playback, press the STOP button or OPEN/CLOSE.
Resume Function
This feature allows you to resume playback from the point where you stopped the disc.
The player automatically stores the point where the STOP button was pressed during play (RESUME function),
so you can resume playback from that point.
1. While playing a disc, press the STOP button to stop playback.
• The RESUME function works only with titles for which the elapsed playing time appears on the player’s
LCD during playback.
• When the door is opened or the STOP button is pressed again, the RESUME function will be cleared.
• This feature will not be cleared even if the player is set to standby mode
2. Press the PLAY button
• The player starts playback from the point where you stopped the disc in step 1.
• To play from the beginning of the disc, when the playing time appears on the player’s LCD before you
start playing, press the STOP button to reset the playing time, and then press the PLAY button.
• Resume Play may not be available depending on the DVD.
• Resume Play is not available in Program Play mode.
• Depending on where you stopped the disc, the player may resume playback from a slightly different
point.
• The point where you stopped playing is cleared when :
- You open or close the door.
- You disconnect the AC power cord.
- You turn off the power by pressing the POWER button on the player.
- You change the play mode.
- You start playback after selecting a title, chapter or track.
13
•
- You change the settings of TV TYPE in SCREEN SETUP in the setup display
- You change the settings of PARENTAL CONTROL in CUSTOME SETUP in the setup display.
If you do not want to continue playing the disc, to save electricity either, press the POWER button on the
player to turn the power off, or press the POWER button on the remote control unit to set the power to the
standby mode.
PLAYING AT VARIOUS SPEEDS / FRAME BY FRAME
Playing the Still Pictures
• During playback, press the PAUSE/STEP button.
• Press the PLAY button to resume normal playback.
Playing Frame by Frame (for DVD and VCD)
• During playback, press the PAUSE/STEP button.
• The picture moves forward one frame each time the button is pressed.
• Press the PLAY button to resume normal playback.
Forward / Reverse Searching
During playback, press one of the SEARCH (
•
•
FR
FF
,
) buttons :
: Reverse direction
: Forward direction
When pressed again, the search speed inscreases. Each time the SEARCH button is pressed, the speed
increase as follows : X2 ➔ X4 ➔ X8 ➔ X2
• Press the PLAY button to resume normal playback.
• In some cases the menu screen may reappear when one of SEARCH buttons is pressed during menu
playback on VCD/DVD/CD.
Skipping to the Beginning of Chapters or Tracks
During playback, press one of the SKIP buttons (PREVIOUS button and NEXT button)
• A number of chapters or tracks equal to the number of times the button is pressed is skipped.
• When the skip back button is pressed once, the pickup returns to the beginning of the currently playing
chapter or track.
• In some cases the menu screen may reappear when one of the SKIP buttons is pressed during menu
playback on VCD/DVD/CD.
Slow Playback (For DVD and VCD)
During playback, press the SLOW buttons. When pressed again, the slow play speed increases. Each time
the SLOW button is pressed, the speed increase as follows : 1/2 ➔ 1/4 ➔ 1/8 ➔ NORMAL ➔ 1/2
• Press the PLAY button to resume normal playback.
• Reverse slow play is not possible.
14
USING THE MENUS
Using the Chapter Menu
A DVD is divided into long sections of a picture of music piece called Chapters. When you play a DVD that
contains several chapters, you can select the title you want using the chapter menu. to use the chapter feature
on your DVD player.
1. Press the SHIFT button
• The “title menu” appears on the TV screen. The contents of the menu vary from disc to disc.
• If the SHIFT button is pressed again, the disc returns to the point at which the title menu was called out
and playback resumes from that point.
2. Press the number buttons to select the title you want to play.
3. Press the ENTER button
The Player starts playing the selected title. Playback also starts if the PLAY button is pressed.• Depending on the DVD, you may not be able to select the title.
• Depending on the DVD, a chapter menu may simply be called a menu or title menu in the instructions
supplied with the disc.
Using the DVD Menu
Some DVDs include special menus called DVD menus. for example, DVDs with complex contents may contain
guide menus, and DVDs with multiple languages may contain audio and subtitle, language menus. These
menus are called DVD menus. When you play these DVDs, you can select the language for the subtitles, the
language for the sound, etc., using the DVD menu.
1. Press the ROOT button
• The “root menu” appears on the TV screen. The contents of the menu vary from disc to disc.
• If the ROOT button is pressed again, the disc returns to the point at which the DVD menu was called out
and playback resumes from that point.
2. Press the number buttons to select the item you want to change, or press the cursor buttons (/ //).
3. Press the ENTER button
• If more menus appear, repeat steps 2 and 3.
•
•
If you want to select the language for the DVD menu, change the setting using LANGUAGE SETUP in
the setup display.
Depending on the DVD, a DVD menu may simply be called a menu in the instructions supplied with the
disc.
15
PLAYING VCD WITH PBC FUNCTION (PBC PLAYBACK)
When playing VCDs with PBC functions (Ver 2.0 discs), you can enjoy simple interactive operations with search
functions. PBC Playback allows you to play VCDs interactively, following the menu screen on the TV screen.
1. Start Playing a VCD with PBC functions, following the Step 1 to 4 in Playing Discs.
2. Select the item number you want on the player
• Press the number button of the item you want on the remote control unit.
3. Press the ENTER button
4. Follows the instructions on the menu screen for interactive operations.
Refer to the instructions supplied with the disc, as the operating procedures may differ according to the
VCD.
Going back to the menu screen:
Press the RETURN, FR or FF buttons.
To cancel PBC playback of a VCD with PBC functions and play the disc in continuous play mode:
1. Press the STOP button while the VCDs menu screen is displayed.
• The display switched from PBC to the time display.
2. Use the number buttons to input the desired track number.
To play the disc without using the menu playback function:
• Refer to the discs jacket, etc, for the track number
• To start playback from the beginning of the disc, press the number button.
Return to menu playback
• Press the STOP button to stop playback, then press the ROOT button.
• PBC menu screen appears on the TV.
USING THE GUI SCREENS
Use this function to display and change information on the disc (titles, chapters, time, audio, subtitles, angles,
etc.) and on the player (repeat, play mode, markers, etc).
1. In the play or stop mode, press the GUI button
The GUI (Graphical User Interface) screen appears. The GUI will be different for different discs. The functions
of the DVD Player are similar for DVD, SVCD, VCD and CD discs.
• The picture on the TV screen switches each time the button is pressed.
16
THE ITEMS DISPLAYED DIFFER FROM DISC TO DISC
--/--
--/--
DVD GUI
TITLE
Displays the current title. Use the ""/ "" button to move the cursor to the icon. Use the
""/ "" button to select the required title. Press ENTER to confirm the selection.
CHAPTER
Displays the current chapter. Use the ""/ "" button to move the cursor to the icon. Use
the ""/ "" button to select the required chapter. Press ENTER to confirm the selection.
TIME
Displays the current time. Use the " "/ " " button to move the cursor to the
00:00:00. Input the time using the Number buttons ( 0 to 9 ), and press ENTER to confirm
the selection.
AUDIO CHANNAL
The Audio Channel selection icon. Use the ""/ "" button to move the cursor to the icon.
Use the ""/ "" button or Number buttons ( 0 to 9 ) to select the required audio channel.
Press ENTER to confirm the selection.
SUBTITLE
Displays current subtitle language. Use the ""/ "" button to move the cursor to the icon.
Use the ""/ "" button or Number buttons ( 0 to 9 ) to select the required subtitle language
or to switch the subtitle function on or off. Press ENTER to confirm the selection.
ANGLE
The Multi-angle icon. Use this menu to select different angles of the pictures being played.
Use the ""/ "" button to move the cursor to the icon. Use the ""/ "" button to select
the required angle. Press ENTER to confirm the selection.
REPEAT
The Repeat Play function. Use the ""/ "" button to move the cursor to the icon. Use the
""/ "" button to select the required function. Press ENTER to confirm the selection.
Repeat Chapter ➔ Repeat Title ➔ Repeat Disk ➔ Repeat Off
REPEAT A - B
The Repeat Play from A to B function. Use the ""/ "" button to move the cursor to the
icon. Use the ""/ "" button to select the required repeat play function. Press ENTER to
confirm the selection.
Set Start Point A ➔ Set End Point B ➔ Cancel Repeat.
BOOKMARK
The Set Bookmark function. Use the ""/ "" button to move the cursor to the icon. Use
the number buttons ( 0 to 9 ) to select the required position. Press ENTER to confirm the
selection. At maximum, five bookmarks (1, 2, 3, 4, 5) can be set. This operation is valid only
when BOOKMARK is displyed on the On Screen Display. you may also use the ""/ ""
button to move the cursor to a bookmark and press ENTER to jump to the position set and
play.
17
SVCD / VCD GUI
TRACK
Displays the current track. Use the ""/ "" button to move the cursor to the icon. Use the
""/ "" button or number buttons ( 0 to 9 ) to select the required track. Press ENTER to
confirm the selection.
TIME
Displays the current time. Use the ""/ "" button to move the cursor to the
00:00:00. Input the time using the Number buttons ( 0 to 9 ), and press ENTER to confirm
the selection.
AUDIO CHANNAL
The Audio Channel selection icon. Use the ""/ "" button to move the cursor to the icon.
Use the ""/ "" button or Number buttons ( 0 to 9 ) to select the required audio channel.
Press ENTER to confirm the selection. You may choose Stereo, Left Audio Channel or
Right Audio Channel.
PLAY MODE
Play mode selection. Use the ""/ "" button to move the cursor to the icon. Use the
""/ "" button or Number buttons ( 0 to 9 ) to select the required audio channel. Press
ENTER to confirm the selection. You may select any of the three play modes: Squential,
Programmed and Random play mode.
PBC
When PBC is "ON", the system will display the menu of VCD/DVD. Use the Number Buttons
( 0 to 9 ) to make your selection. When PBC is "OFF" the system will be in sequential play
mode.
REPEAT
Repeat Play function. Use the ""/ "" button to move the cursor to the icon. Use the
""/ "" button to select the required play function. Press ENTER to confirm the selection.
Repeat Chapter ➔ Repeat Title ➔ Repeat Disk ➔ Repeat Off
REPEAT A - B
The Repeat Play from A to B function. Use the ""/ "" button to move the cursor to the
icon. Use the ""/ "" button to select the required repeat play function. Press ENTER to
confirm the selection.
Set Start Point A ➔ Set End Point B ➔ Cancel Repeat.
BOOKMARK
The Set Bookmark function. Use the ""/ "" button to move the cursor to the icon. Use
the number buttons ( 0 to 9 ) to select the required position. Press ENTER to confirm the
selection. At maximum, five bookmarks (1, 2, 3, 4, 5) can be set. This operation is valid only
when BOOKMARK is displyed on the On Screen Display. you may also use the ""/ ""
button to move the cursor to a bookmark and press ENTER to jump to the position set and
play.
CDDA GUI
The operations of the CDDA GUI are the same as for the VCD/SVCD GUI, with the exception that it does not
offer the PBC Function.
18
SETTINGS AND ADJUSTMENTS
This chapter describes how to set and how to adjust using the on-screen SETUP menu. Most setting and
adjustments are required to be set when you first use the player.
USING THE SETUP DISPLAY
Using the setup display, you can do the initial setup, adjust the picture and sound quality, and set the various
outputs. You can also set a language for the subtitles and the setup display and limit play back by children.
• You can display the setup display only when the player is in stop mode.
1. Press the SETUP button to display the setup display on the TV screen.
2. Select the main item you want using the " "/ " " buttons, and the press the
ENTER button.
To Cancel Using the Setup Display
• Press the SETUP button on the remote.
LANG
VIDEO
AUDIO
CHILD
OTHER
EXIT
To Return to the Previous Menu
• Press the "" button on the remote.
SETTING THE LANGUAGE FOR DISPLAY AND SOUND (LANGUAGE SETUP)
Select LANG using RETURN or "" after pressing the SETUP
button. The Language Setup allows the user to set various
languages for the on-screen display or sound.
LANG
VIDEO
OSD (On-Screen Display) Language Menu
AUDIO
The OSD Language Menu allows the user to select the language
CHILD
for the on-screen display. Use RETURN or the ""/ "" buttons
OTHER
to select the appropriate setting. The user can select either
EXIT
English, German, Spanish, Italian and French for the OSD
language.
O.S.D
AUDIO
SUBTITLE
DISC
ENGLISH
ENGLISH
ENGLISH
ENGLISH
Audio Language Menu
The Audio Language Menu allows the user to choose the preferred audio language. Use RETURN and ""/
"" buttons to select the appropriate setting. The user can select English, German, Spanish, Italian and
French or Original (meaning the movies original language). the user can also enter a language code to utilize
other language.
Subtitle Menu
the Subtitle Language Menu allows the user to choose the preferred language for subtitles. Use RETURN or
""/ "" buttons to select the appropriate setting. The user can select English, German, Spanish, Italian,
French or Original (meaning the movies original language). the user can also enter a language code to utilize
other language.
Disc Menu
The Disc Menu allows the user to choose the preferred language for the disc start menu. Use RETURN and the
""/ "" buttons to select the appropriate setting. The user can select English, German, Spanish, Italian and
French or Original. The user can also enter a language code to utilize other language.
19
SETTING FOR VIDEO
Select VIDEO after pressing the SETUP button.
• The VIDEO SETUP allows you to set the display according to
the playback conditions.
System Settings
The TV system menu allows the user to specify the display
configuration of the TV monitor. Use RETURN and the ""/ ""
buttons to select the appropriate settings.
• NTSC specifies display output in NTSC format.
• PAL specifies display output in PAL format
LANG
VIDEO
AUDIO
CHILD
OTHER
EXIT
SYSTEM NTSC
ASPECT 4 : 3 PS
OUTPUT S-VIDEO
Aspect
This menu allows the user to select the aspect ratio of the TV to
be connected. Use RETURN and the ""/ "" buttons to select
the appropriate settings.
• 4:3 LETTER BOX : Use this when you connect a normal TV to the player. This displays a wide picture with
bands displayed on the upper and lower portions of the screen.
• 4:3 PAN SCAN : Use this when you connect a normal TV to the player. This displays the wide picture on the
whole screen with a portion automatically cut off.
• 16:9 WIDE SCREEN : Use this when you connect a wide-screen TV to the player.
• Depending on the DVD, 4:3 LETTER BOX may be selected automatically instead of 4:3 PAN SCAN and vice
versa.
Video Output (Fixed)
SETTING FOR AUDIO
Select AUDIO after pressing the SETUP button.
• The AUDIO SETUP allows you to set audio preferences
according to the playback conditions.
LANG
VIDEO
AUDIO
CHILD
OTHER
EXIT
ANALOG
DIGITAL
D.R.C.
BASS
2 CH
DOLBY DTS
ON
OFF
Source Menu
The Digital Menu allows the user to select the preferred source.
• Use the ""/ ""/ ""/ "" cursor buttons to select DIGITAL, then press ENTER. By using ""/ ""
buttons, the user can select either DOLBY DTS or LPCM. Press ENTER to finalize your selection. LPCM is
uncompressed data, so none of stream information is lose. However, LPCM output can only support 2
channel ouput. DIGITAL DTS is compressed data which can be converted to 5.1 channels. During the
compression, however, some of the data is lost.
DRC (Dynamic Range Control)
Dynamic Range Control produces a clear sound with the volume turned down.
• Use the cursor buttons ""/ "" to turn the DRC ON or OFF.
BASS Menu
The Size menu allows the user to select the size of speakers. Use the ""/ ""/ ""/ "" cursor buttons to
select BASS, then press ENTER. By using ""/ "" buttons, the user can select either LARGE, SMALL or
OFF. Press ENTER to finalize your selection.
• LARGE : Normally select this option.
• SMALL : When the sound cracks or the effect of the surround is difficult to hear, select this option. This
activates the Dolby digital bass redirection circuitry and outputs the bass frequencies of the speaker from
subwoofers.
• OFF : Select this option for audio output without bass.
Recommended Digital Audio Output settings.
The optimum digital output setting depends on th the type of component connectd to the digital audio output
connector.
• When connecting an amplifier with a coaxial digital input connector which does not contain the Dolby digital
(AC-3) or DTS decoder, be sure to select "LPCM" at the Digital Menu.
20
SETTING FOR RATING (PARENTAL CONTROL)
This section of the SETUP Menu allows users to control the content
of movie playback from 1 (Children) to 8 (Adult).
Limiting Playback by Children (Parental Control)
Select CUSTOMER SETUP after pressing the SETUP button. The
Parental Control function allows you to set a playback limitation
level.
LANG
VIDEO
AUDIO
CHILD
OTHER
EXIT
RATING LEVEL 8
CHANGE PASSWORD
CANCEL PASSWORD
1. Use the ""/ ""/ ""/ "" cursor buttons to select CHILD, then press ENTER.
2. Enter a password in 4 digits using the number buttons, then press the ENTER button.
3. Select LEVEL using the cursor""/ "" buttons, then press the ENTER button and the display for setting
the playback limitation level appears.
• LEVEL 8 : for adult
• LEVEL 7
• LEVEL 6
• LEVEL 5
• LEVEL 4
• LEVEL 3
• LEVEL 2
• LEVEL 1 : for kids
• The lower the value is, the more strict the limitation.
• Select the level you want using the cursor ""/ "" buttons, then press the ENTER button.
Changing and Canceling the Password
To change the password, use the cursor ""/ ""/ ""/ "" buttons to select CHANGE PASSWORD, then
press ENTER button. Type in the new password using the number buttons and press ENTER.
To cancel the password, use the cursor ""/ ""/ ""/ "" buttons to select CANCEL PASSWORD, then
press ENTER.
* Resetting code for rating setting : 6688.
OTHER MENU
This menu is used to change the colour of setup menu, or to reset the menu to default settings. Use the cursor
""/ ""/ ""/ "" buttons to select OTHER, then press ENTER.
Colour Menu
To change the colour of the setup menu, use the cursor " "/
""/ ""/ "" buttons to select COLOUR, then press ENTER.
Using cursor buttons, select the preferred colour (Blue, Orange,
Yellow, Green, Violet).
Factory Setting
To return the setup menu to default settings, use the cursor ""/
""/ ""/ "" buttons to select FACTORY SETTING, then press
ENTER. The setup menu will return to default values.
LANG
VIDEO
AUDIO
CHILD
OTHER
EXIT
COLOUR
VERSION
FACTORY SETTING
MP3 MENU
LEFT MENU
(DIRECTORY TREE)
Use "/"" button to select the required directory.
RIGHT MENU
(SONG NUMBER)
Use ""/ "" button to move the cursor from left menu to the right menu or from right
menu to left menu.
When cursor in right menu, use the "”/ ”" button. Press ENTER to confirm the
selection.
21
SPECIFICATION
Power source (AC/DC Adaptor)
Power consumption
Laser
Signal System
Output
Digital audio output
Phone Jack
S-video
Video
Audio
Audio characteristics
Frequency
AC IN 120V 60Hz
DC Out 12V
< 35W, approx 12W (standby state)
Wave length : 655mm
Laser power : Class 1
PAL / NTSC
Coxial digital output: pin jack
ø3.5mm jack with level control
Y output level: 1Vp-p (75Ω);
C output level: 0.300Vp-p (75Ω) (PAL), 0.286Vp-p (75Ω) (NTSC);
connector: S-terminal
Ouput level: 1 Vp-p (75Ω);
Connector: pin jack (1 system)
10 Bit D/A converter
Output level: CD Disc - 1.3V ±0.3 / DVD Disc - 1V ±0.3 ; 1KHz, 0dB;
Connector: pin jack.
5.1ch mixed output: 1 system (2 channels)
96kHz, 24 Bit D/A converter
Total harmonic distortion
DVD (linear audio): 2Hz –22kHz (48kHz sampling);
2Hz~44kHz (96kHz sampling)
CD audio: 2Hz~20kHz (EIAJ)
CD audio: > 65dB
DVD (linear audio): > 95dB
CD audio: > 95dB
CD audio: 0.0025% (EIAJ)
Operating status
Accessories
Dimension
Weight
Horizontal / Vertical
Remote Control x 1, AC/DC Adaptor x 1, AV cable x 1, DC Car Adaptor x1
225 (W) x 190 (D) x 72 (H) mm
1.1 Kg. (without remote)
S/N ratio
Dynamic range
* Design and specification are subjuect to change without notice.
Manufactured under license from Dolby Laboratories. “Dolby”, “Pro Logic” and the double-D symbol are trademarks of Dolby Laboratories. Confidential unpublished works. ©1992-1997 Dolby
Laboratories, Inc. All rights reserved.
This product incorporates copyright protection technology that is protected by method claims of certain
U.S. patents and other intellectual property rights owned by Macrovision Corporation and other rights owners.
Use of this copyright protection technology must be authorized by Macrovision Corporation, and is intended
for home and other limited viewing uses only unless otherwise authorized by Macrovision Corporation. Reverse engineering or disassembly is prohibited.
22
TROUBLE SHOOTING
Check the following guide for the possible cause of a problem before contacting service.
Symptom
No Power
Correction
Cause
• The power cord is disconnected.
The power is on, but DVD • No disc is inserted.
player does not work
• The TV is not set to receive DVD signal
No Picture
output.
No Sound
• The video cable is not connected
securely.
• The connected TV power is turned off
• The equipment connected with the audio cable is not set to receive DVD signal output.
• The audio cables are not connected
securely.
• The power of the equipment connected
with the audio cable is turned off.
• The Digital Audio Output is set to the
wrong position.
The playback picture is poor • The disc is dirty.
The DVD player does not • No disc is inserted.
start playback
• An unplayable disc is inserted.
• The disc is placed upside down.
• The disc is not placed with the guide.
• The disc is dirty.
• A menu is on the TV screen.
• The Rating level is set.
The Remote Control does • The remote control is not pointed at the
not work properly
remote sensor of the DVD player.
• The remote control is too far from the
DVD player.
• There is an obstacle in the path of the
remote control and the DVD player.
• The batteries in the remote control are
exhausted.
23
• Plug the power cord into the wall outlet and unit
securely.
• Insert a disc. (Check that the DVD or audio CD
indicator in the DVD display is lit.)
• Select the appropriate video input mode on the
TV so the picture from the DVD player appears
on the TV screen.
• Connect the video cable into the jacks
securely.
• Turn on the TV.
• Select the correct input mode of the audio receiver so you can listen to the sound from the
DVD player.
• Connect the audio cable into the jacks
securely.
• Turn on the equipment connected with the audio cable.
• Set the Digital audio Output to the correct
position, then turn on the DVD player again by
pressing the POWER button.
• Clean the disc.
• Insert a disc
• Insert a playable disc. (Check the disc type,
color system and Regional code.)
• Place the disc with the playback side down.
• Place the disc on the disc tray correctly inside
the guide.
• Clean the disc.
• Press the SET UP button to turn off the menu
screen.
• Cancel the Rating function or change the rating
level.
• Point the remote control at the remote sensor
of the DVD player.
• Operate the remote control within about 23ft
(7m).
• Remove the obstacle.
• Replace the batteries with new ones.