1
PR600II H1-H4
EMBROIDERY MACHINE
PR-600
OPERATION MANUAL
English
884-T03
XD1133-0511
0512
Printed in Taiwan
Sapphire_brother.book Page i Thursday, November 17, 2005 2:44 PM
Important Safety Instructions
When using this machine, basic safety precautions should always be taken, including the following:
Read all instructions before using.
DANGER
- To reduce the risk of electric shock:
1. The machine should never be left unattended while plugged in. Always unplug the machine
from the electrical outlet immediately after using and before cleaning.
WARNING - To reduce the risk of burns, fire, electric shock, or injury to persons:
1. Do not allow this machine to be used as a toy. Close attention is necessary when the machine is
used by or near children.
2. Use this machine only for its intended use as described in this manual. Use only accessories
recommended by the manufacturer as contained in this manual.
3. Never operate this machine if it has a damaged cord or plug, if it is not working properly, if it has
been dropped or damaged, or dropped into water. Return the machine to the nearest authorized
retailer or service center for examination, repair, and electrical or mechanical adjustment.
4. Never operate the machine with any air openings blocked. Keep ventilation openings of the
machine free from the accumulation of lint, dust, and loose cloth.
5. Never drop or insert any object into any opening.
6. Do not use outdoors.
7. Do not operate where aerosol (spray) products are being used or where oxygen is being
administered.
8. To disconnect, set the main power switch to the “{” position, which represents off, and then
remove the plug from the outlet.
9. Do not unplug by pulling on the cord. To unplug, grasp the plug, not the cord.
10. Keep fingers away from all moving parts. Special care is required around the machine needle.
11. Always use the proper needle plate. The wrong plate can cause the needle to break.
12. Do not use bent needles.
13. Set the main power switch to the “{” position when making any adjustments in the needle area,
such as changing the needle.
14. Always unplug the machine from the electrical outlet when lubricating it or when making any
other user servicing adjustments mentioned in the manual.
15. This sewing machine is not intended for use by young children or infirm persons without
supervision.
16. Young children should be supervised to ensure that they do not play with this machine.
17. Keep fingers out of all sewing machine openings, such as near the carriage, otherwise injuries
may result.
18. If the LED light unit (light-emitting diode) is damaged, it must be replaced by authorized dealer.
SAVE THESE INSTRUCTIONS
This machine is intended for household use.
i
Sapphire_brother.book Page ii Thursday, November 17, 2005 2:44 PM
FOR USERS IN THE UK, EIRE, MALTA AND CYPRUS ONLY
If this machine is fitted with a three-pin non-rewireable BS plug, then please read the following.
IMPORTANT
If the available socket outlet is not suitable for the plug supplied with this equipment, it should be cut
off and an appropriate three-pin plug fitted. With alternative plugs, an approved fuse must be fitted in
the plug.
NOTE
The plug served from the main lead must be destroyed as a plug with bared flexible cords is
hazardous if engaged in a live socket outlet. In the event that the plug fuse must be replaced, use a
fuse approved by ASTA to BS 1362, i.e. carrying the
mark, rating as marked on plug.
Always replace the fuse cover, never use plugs with the fuse cover omitted.
WARNING
DO NOT CONNECT EITHER WIRE TO THE EARTH TERMINAL WHICH IS MARKED WITH THE
LETTER ‘E’, BY THE EARTH SYMBOL
OR COLOURED GREEN OR GREEN AND YELLOW.
The wires in this main lead are coloured in accordance with the following code:
Blue
Neutral
Brown
Live
As the colours of the wiring in the main lead of this appliance may not correspond with the coloured
markings identifying the terminals in your plug, proceed as follows.
The wire that is coloured blue must be connected to the terminal that is marked with the letter ‘N’ or
coloured black or blue.
The wire that is coloured brown must be connected to the terminal that is marked with the letter ‘L’
or coloured red or brown.
ii
Sapphire_brother.book Page iii Thursday, November 17, 2005 2:44 PM
Federal Communications Commission (FCC) Declaration of
Conformity (For USA Only)
Responsible Party: Brother International Corporation
100 Somerset Corporate Boulevard
Bridgewater, NJ 08807-0911 USA
TEL : (908) 704-1700
declares that the product
Product Name:
Brother Sewing Machine
Model Number:
PR-600II
complies with Part 15 of the FCC Rules. Operation is subject to the following two conditions: (1) this
device may not cause harmful interference, and (2) this device must accept any interference
received, including interference that may cause undesired operation.
This equipment has been tested and found to comply with the limits for a Class B digital device,
pursuant to Part 15 of the FCC Rules. These limits are designed to provide reasonable protection
against harmful interference in a residential installation. This equipment generates, uses, and can
radiate radio frequency energy and, if not installed and used in accordance with the instructions,
may cause harmful interference to radio communications. However, there is no guarantee that
interference will not occur in a particular installation. If this equipment does cause harmful
interference to radio or television reception, which can be determined by turning the equipment off
and on, the user is encouraged to try to correct the interference by one or more of the following
measures:
• Reorient or relocate the receiving antenna
• Increase the separation between the equipment and receiver.
• Connect the equipment into an outlet on a circuit different from that to which the receiver is
connected.
• Consult the retailer or an experienced radio/TV technician for help.
• The enclosed interface cable should be used in order to ensure compliance with the limits for a
Class B digital device.
• Changes or modifications not expressly approved by Brother Industries, Ltd. could void the user's
authority to operate the equipment.
iii
Sapphire_brother.book Page iv Thursday, November 17, 2005 2:44 PM
THANK YOU FOR CHOOSING OUR MACHINE
Your machine is one of the most advanced computerized household embroidery machines. To fully
enjoy all the features available, we suggest that you study the manual before using the machine.
PLEASE READ BEFORE USING THIS MACHINE
For safe operation
1. Be sure to keep your eye on the needle while sewing. Do not touch the handwheel, thread takeup lever, needle, or other moving parts.
2. Remember to turn off the power switch and unplug the cord when:
• Operation is completed
• Replacing or removing the needle or any other parts
• A power failure occurs during use
• Maintaining the machine
• Leaving the machine unattended
3. Plug the machine directly into the wall. Do not use extension cords.
For a longer service life
1. When storing this machine, avoid direct sunlight and high humidity locations. Do not use or
store the machine near a space heater, iron, halogen lamp, or other hot objects.
2. Use only neutral soaps or detergents to clean the machine. Benzene, thinner, and scouring
powders can damage the machine, and should never be used.
3. Do not drop or hit the machine.
4. Always consult the manual when replacing or installing any assemblies, needle, or other parts to
assure correct installation.
For repair or adjustment
In the event a malfunction occurs or adjustment is required, first follow the troubleshooting table at
the back of this Operation Manual to inspect and adjust the machine yourself. If the problem persists,
consult your local authorized Brother dealer.
For additional product information and updates, visit our web site at www.brother.com
iv
Sapphire_brother.book Page v Thursday, November 17, 2005 2:44 PM
License Agreement
The enclosed machine includes data, software and/or documentation (collectively “CONTENT”) that
are proprietary products of Brother Industries, Ltd. ("BROTHER"). BY USING THE CONTENT, THE
CUSTOMER ACCEPTS THE TERMS AND CONDITIONS OF THIS AGREEMENT. BROTHER retains
ownership of all rights to CONTENT and to the copies of the CONTENT included in this package.
The CONTENT are licensed (not sold) to you (“CUSTOMER”) under the terms and conditions of this
Agreement.
CUSTOMER is licensed to:
•
•
Use the CONTENT in combination with an embroidery machine to create embroidery.
Use the CONTENT in combination with an embroidery machine that CUSTOMER owns or uses,
provided that the CONTENT is not used on more than one embroidery machine at a time.
Except as otherwise provided herein, CUSTOMER may not:
•
•
•
•
•
•
Allow more than one copy of the CONTENT to be available for use at any one time.
Reproduce, modify, publish, distribute, sell, rent, sublicense or otherwise make available to
others CONTENT.
Distribute, rent, sublicense, lease, sell, transfer or assign the media card or CONTENT.
Decompile, disassemble or otherwise reverse engineer the CONTENT or assist others to do the
same.
Alter, translate, modify or adapt the CONTENT or any part thereof for business, commercial or
industrial purposes.
Sell or otherwise distribute the EMBROIDERY created by use of the CONTENT, WHICH
ORIGINALLY BEARS CERTAIN COPYRIGHT NOTICE UNDER THE NAME OF ANY THIRD
PARTIES OTHER THAN BROTHER (e.g. “©DISNEY”).
BROTHER retains all rights not expressly granted to CUSTOMER herein.
Nothing in this agreement constitutes a waiver of the rights of BROTHER under any law. This
agreement shall be governed by the laws of Japan.
Please direct all inquiries concerning this Agreement in writing by regular mail, to Brother Industries,
Ltd., 1-1-1 Kawagishi, Mizuho-ku, Nagoya 467-8562, Japan, Attention: P&H company Sales and
Marketing Dept.
v
Sapphire_brother.book Page vi Thursday, November 17, 2005 2:44 PM
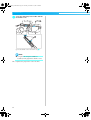
Warning Labels
The following warning labels are on the machine.
Be sure to observe the precautions described in the labels.
1
2
Label locations
Please put a drop of oil
onto the hook once a day
before use.
vi
Sapphire_brother.book Page vii Thursday, November 17, 2005 2:44 PM
Precautions
Concerning optional embroidery cards
•
•
•
•
•
•
•
•
•
•
•
Do not disassemble or alter the embroidery cards.
Do not forcefully bend, drop, scratch or place heavy objects on top of the embroidery cards.
Do not allow the embroidery cards to become wet, such as with water, solvents, drinks or any
other liquids.
Do not use or store the embroidery cards in a location exposed to strong static electricity or
electrical interference.
Do not use or store embroidery cards in locations exposed to vibrations or impacts, direct
sunlight, extreme dust (or lint), high temperatures, high humidity, severe temperature
fluctuations, or strong magnetic forces (such as from speakers).
While embroidery data is being recalled from the embroidery card, do not allow the machine to
be exposed to vibrations or impacts, and do not attempt to remove the embroidery card from the
machine.
Store embroidery cards in their protective cases.
If an embroidery card other than our original embroidery cards are used, the embroidery
machine may not operate correctly. Be sure to use only recommended embroidery cards.
Some licensed or copyright embroidery cards cannot be used with this embroidery machine.
Embroidery cards sold overseas cannot be used with this embroidery machine.
Only insert or remove embroidery cards while
appears in the display or while the
embroidery machine is turned off (see page 112).
Concerning USB media
•
•
•
•
•
•
•
•
Do not disassemble or alter the USB media.
Do not allow the USB media to become wet, such as with water, solvents, drinks or any other
liquids.
Do not use or store the USB media in a location exposed to strong static electricity or electrical
interference.
Do not use or store USB media in locations exposed to vibrations or impacts, direct sunlight,
extreme dust (or lint), high temperatures, high humidity, severe temperature fluctuations, or
strong magnetic forces (such as from speakers).
While embroidery data is being recalled from the USB media, do not allow the machine to be exposed
to vibrations or impacts, and do not attempt to remove the USB media from the machine.
Some USB media may not be usable with this machine. Please visit our web site for more details.
Only insert or remove USB media while
appears in the display, or when prompted to
change media by a message on the display (see page 137).
For additional information, refer to the instruction manual included with the USB media that you
have purchased.
vii
Sapphire_brother.book Page viii Thursday, November 17, 2005 2:44 PM
———————————————————————————————————————————————————————————————
Machine Structure and Features
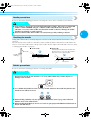
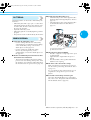
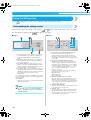
Six-needle machine
embroidering
Your machine has six needles, each threaded with a
different color of thread. It can sew embroidery
patterns that contain several colors by automatically
selecting the appropriate needle for each color.
The mechanism that moves the needles up and
down is called the needle bar, and the needle bars
are in the needle bar case. The needle bars are
named from right to left: needle bar 1, needle bar 2,
needle bar 3, needle bar 4 , needle bar 5, and needle
bar 6.
1 The threads threaded on the needle bars are
indicated as shown here.
The spool pins, thread tension knobs, thread take-up
levers and thread paths, mentioned when threading
the upper thread, are different according to their
corresponding needle bar number.
3
1
2
1 Needle bar 1
2 Needle 1
3 Needle bar case
The machine automatically assigns a thread color to
each needle. If a needle is already threaded by a
color that will be used on the next pattern the
machine will assign the color to that needle,
reducing the number of thread spool changes. This
also means that the machine does not always assign
colors according to the needle number, it assigns
colors based on the currently threaded colors.
Memo
● Sewing is not necessarily performed in the
order of the needle bar numbers.
viii
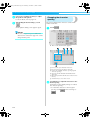
The thread colors assigned to the needle bars are
listed on the screen. Thread the needle bars as
indicated.
Sapphire_brother.book Page ix Thursday, November 17, 2005 2:44 PM
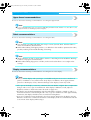
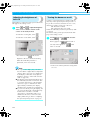
Not all six needles can be used to sew at the same
time. Only one needle is moved to the embroidering
position at a time. According to the sewing order, the
needle bar case is moved to the left and right so that
the needle bar and needle thread with the required
color can be moved to the embroidering position.
2
1
1 Needle at the embroidering position
The needle is positioned over the hole in the
needle plate 2.
When starting the machine, the presser foot is
automatically lowered, and the embroidery is sewn
while performing pulling thread from the materials at
the thread trimming and while changing thread
colors (moving the needle to be sewn within the
embroidering). When sewing is finished, the
machine stops. If the pattern uses seven or more
thread colors, the machine will stop when it is
necessary for the thread spools to be changed, and
the corresponding instructions appear on the LCD.
Differences with single-needle
machines
■ Can sew embroidery patterns using six or less
colors without the need to replace the thread
spools
With single-needle machines, the thread spool
must be changed and the machine must be
threaded each time a different thread color is
used. With this machine, it is not necessary to
change the thread spool or rethread the machine
with embroidery patterns containing six or less
colors. If total colors are less than 6 colors, and if
total color change is more than 7 times, machine
will come back to the needle that the machine is
already used and sew the same color again
automatically.
■ Automatic sewing reduces sewing time
Except to change the thread spools with patterns
containing seven or more colors, once the
machine is started, it continues to operate
automatically, from lowering the presser foot to
performing the specified operations at the starting
and end positions in addition to changing the
thread colors. Since the machine can change
threads and finish stitching, sewing time is
reduced.
■ Automatically pulls and holds the thread tails to
the under side of fabric at the beginning and end
of stitching
Since the machine automatically pulls the upper
thread under the fabric at the beginning of a
color, and pulls the upper thread from the fabric
at the time of thread trimming, you don’t need to
deal with the upper thread tail at all.
■ Automatically moves the embroidery frame to
the embroidering position
With single-needle machine, in most cases, the
embroidery pattern is centered in the frame and
the fabric must be correctly positioned within the
embroidery frame with the center of the desired
embroidering position aligned with the center of
the embroidery frame. However, with this
machine, the embroidery frame is moved to
determine the embroidering position, making it
easier to sew the pattern at any place in the frame.
In addition, the embroidering position can be
freely determined after the fabric is hooped and
the embroidery frame is attached to the machine,
regardless of how the fabric is positioned in the
embroidery frame.
Machine Structure and Features
ix
Sapphire_brother.book Page x Thursday, November 17, 2005 2:44 PM
———————————————————————————————————————————————————————————————
Other features
■ Easy-to-read and easy-to-use LCD
Equipped with a large color LCD, the colors of an
embroidery pattern can be previewed in a nearly
realistic image. In addition, since the LCD is a
touch panel, the keys that are displayed can be
touched to easily perform operations.
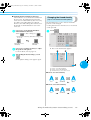
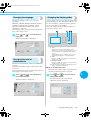
■ Safety mechanism
The machine is equipped with a locking
mechanism that helps prevent injuries from
accidental operation. The machine can only be
started after the machine is unlocked. The color of
the start/stop button changes to inform you of
whether or not the machine is locked.
Lit in red
Flashing in green
The machine is
locked.
The machine can be
started.
■ Wide selection of built-in thread color
information
The thread color information for manufacturers’
threads is available, making it easy to choose the
appropriate thread color.
x
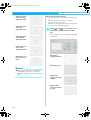
■ Expanded thread color display feature enables
colors to be displayed in almost the true color
The colors and thread color numbers are stored in
the machine’s memory. From this thread color
library, you can select colors to create your own
color thread table. If the pattern colors are
changed using this table, the pattern can be
displayed with only the thread colors that you
have. In addition, the embroidery pattern can be
displayed as it would appear after it is
embroidered.
■ Automatic needle-threading mechanism
Using the automatic needle-threading
mechanism, the needle can easily be threaded.
Sapphire_brother.book Page xi Thursday, November 17, 2005 2:44 PM
■ USB Type “B” (function) port connector
available as standard equipment
If a computer is connected to the machine
through the included USB cable, embroidery
patterns can be recalled from the computer.
Available features
Designs with a maximum size of 200 mm (H) ×
300 mm (W) (7-7/8 inches (H) × 11-3/4 inches (W))
can be embroidered. If the optional cap frame is
used, embroidery can be sewn on caps.
■ Various built-in patterns
In addition to the many lettering patterns,
embroidery patterns and frame patterns built into
the machine, if an optional embroidery card is
used, many more embroidery patterns are
available.
■ Embroidery pattern editing
Lettering and embroidery patterns can be
combined or a text arrangement can be specified
to arrange the patterns.
The machine can also be set to repeatedly sew the
same pattern.
Machine Structure and Features
xi
Sapphire_brother.book Page xii Thursday, November 17, 2005 2:44 PM
———————————————————————————————————————————————————————————————
Manual Structure
This manual is constructed as described below.
Read before use
Chapter 1: Getting Ready
The setup of the embroidery machine and the
various preparations required before starting to sew
are described in this chapter.
Chapter 2: Embroidering Tutorial
This chapter describes the basic embroidering
operations in order—from turning on the machine
and sewing a pattern to finishing sewing. Follow the
steps of the tutorial to embroider a pattern and
master the operation of this embroidery machine.
Chapter 3: Other Basic Procedures
This chapter provides explanations on operations
other than those described in chapter 2, such as
when sewing a pattern with seven or more colors,
and other necessary operations, for example, to
change the needle.
Read when additional
information is required
Chapter 4: Embroidering Settings
This chapter contains descriptions on the various
embroidering settings, which make editing patterns
simple.
Chapter 5: Selecting/Editing/Saving Patterns
This chapter provides details on selecting, editing
and saving embroidery patterns.
Chapter 6: Basic Settings and Help Feature
This chapter contains descriptions on the use of the
settings key, the machine operations key and the
help key. Details on changing the basic embroidery
machine settings and viewing operations on the LCD
will be provided.
Chapter 7: Appendix
This chapter provides descriptions of techniques for
various embroidering operations, pointers for
creating beautiful embroidery, and details on
maintenance procedures and corrective measures
that should be taken when a problem occurs.
xii
Searching for information
■ Searching the manual
By title
Check the descriptions at the left for the contents
of each chapter, and then check the table of
contents.
For basic operations, refer to the list of titles on
the first page of chapter 2. Find the appropriate
page by using the thumbtabs on the right edge of
the pages.
By keyword
Search the index at the end of this manual. Look
for the desired keyword, and then refer to the
page that is indicated.
By screen
Descriptions of the keys and other information
that appear in the main LCD screens are provided
in the tables on pages 49 to 57. For details, refer
to the page that is indicated.
By condition
Various possible conditions and the
corresponding operations are described on
page 58. For details, refer to the page that is
indicated.
■ Searching the machine
This machine is equipped with a help feature.
Learning how to perform an operation
Touch the machine operations guide key, and
then check for the desired information. For details
on using the machine operations guide key, refer
to page 151.
Learning how to use a screen feature
Touch the help key, and then check for the
desired information. For details on using the help
key, refer to page 153.
SapphireTOC.fm Page xiii Friday, November 18, 2005 1:47 PM
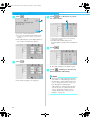
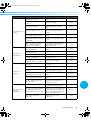
Contents
Important Safety Instructions ................................................................................................ i
License Agreement ............................................................................................................... v
Warning Labels.................................................................................................................... vi
Precautions......................................................................................................................... vii
Concerning optional embroidery cards ............................................................................................................ vii
Concerning USB media .................................................................................................................................... vii
Machine Structure and Features........................................................................................ viii
Six-needle machine embroidering ................................................................................................................... viii
Differences with single-needle machines .......................................................................................................... ix
Other features .................................................................................................................................................... x
Available features.............................................................................................................................................. xi
Manual Structure................................................................................................................ xii
Read before use ............................................................................................................................................... xii
Read when additional information is required.................................................................................................. xii
Searching for information................................................................................................................................. xii
Contents ............................................................................................................................ xiii
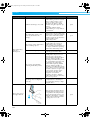
GETTING READY
1
Names of Machine Parts and Their Functions ...................................................................... 2
Front view .......................................................................................................................................................... 2
Right-side/rear view ........................................................................................................................................... 3
Operation panel ................................................................................................................................................. 3
Included Accessories ............................................................................................................ 4
Accessories ........................................................................................................................................................ 4
Optional Accessories............................................................................................................ 5
Setting Up the Machine........................................................................................................ 6
Setup and transporting precautions .................................................................................................................... 6
Setup location .................................................................................................................................................... 7
Setting up the machine....................................................................................................................................... 8
Adjusting the operation panel position ............................................................................................................... 9
Preparing the thread guide assembly ................................................................................................................ 10
Positioning the spool stand............................................................................................................................... 11
Attaching the embroidery frame holder ............................................................................................................ 11
EMBROIDERING TUTORIAL
13
Operating Precautions........................................................................................................14
Power supply precautions ................................................................................................................................ 14
Needle precautions .......................................................................................................................................... 15
Checking the needle ........................................................................................................................................ 15
Bobbin precautions .......................................................................................................................................... 15
Upper thread recommendations....................................................................................................................... 16
Fabric recommendations .................................................................................................................................. 16
Display recommendations................................................................................................................................ 16
Basic Procedures ................................................................................................................17
Installing the Bobbin .......................................................................................................... 18
Removing the bobbin case ............................................................................................................................... 18
Installing the bobbin ........................................................................................................................................ 19
Installing the bobbin case................................................................................................................................. 19
Turning ON the Machine ...................................................................................................20
Understanding the screens ............................................................................................................................... 21
Screen overview............................................................................................................................................... 22
Selecting an Embroidery Pattern ........................................................................................ 23
Selecting an embroidery pattern....................................................................................................................... 24
Editing the Embroidery Pattern...........................................................................................25
Continuing to the embroidering settings screen ................................................................................................ 25
Specifying Embroidering Setting ......................................................................................... 26
xiii
SapphireTOC.fm Page xiv Friday, November 18, 2005 1:47 PM
———————————————————————————————————————————————————————————————
Previewing the Image .........................................................................................................27
Checking a preview image ............................................................................................................................... 27
Hooping the Fabric in the Embroidery Frame..................................................................... 28
Hooping the fabric in the embroidery frame..................................................................................................... 28
Attaching the Embroidery Frame to the Machine ............................................................... 30
Attaching the embroidery frame ....................................................................................................................... 30
Checking the Embroidery Area...........................................................................................32
Continuing to the embroidering screen ............................................................................................................ 32
Upper Threading ................................................................................................................ 33
Checking the needle bars and thread colors ..................................................................................................... 33
Upper threading ............................................................................................................................................... 35
Threading the needle ....................................................................................................................................... 39
Sewing the Embroidery.......................................................................................................42
Starting embroidering ....................................................................................................................................... 42
Stopping embroidering..................................................................................................................................... 44
Checking the Thread Tension ............................................................................................. 45
Removing the Embroidery Frame and Fabric......................................................................46
Removing the embroidery frame ...................................................................................................................... 46
Removing the fabric ......................................................................................................................................... 46
Turning OFF the Machine...................................................................................................47
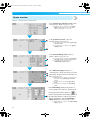
Screen Quick Reference Guide ..........................................................................................49
Key displays ..................................................................................................................................................... 49
Common screen controls ................................................................................................................................. 49
Understanding the pattern type selection screen .............................................................................................. 50
Understanding the pattern list screen ............................................................................................................... 51
Understanding the pattern editing screen ......................................................................................................... 52
Understanding the embroidering settings screen .............................................................................................. 54
Understanding the embroidering screen ........................................................................................................... 56
When You Have a Question, This May Help You ............................................................... 58
TECHNICAL TERMS: ........................................................................................................................................ 58
PATTERNS: ...................................................................................................................................................... 59
EMBROIDERING: ............................................................................................................................................ 59
OTHER BASIC PROCEDURES
61
Resume the Operation Being Performed Before the Machine Was Turned OFF................. 62
Changing the Needle .......................................................................................................... 63
Replacing the needle........................................................................................................................................ 63
Correctly Using the Embroidery Frames.............................................................................65
Embroidery frame types and applications ......................................................................................................... 65
Attaching Iron-On Stabilizer (Backing) to Fabric ............................................................... 66
Hooping the Fabric.............................................................................................................67
Hooping the fabric in the extra-large and large embroidery frames .................................................................. 67
Using the embroidery sheet.............................................................................................................................. 68
Large/small pieces of fabric .............................................................................................................................. 69
Embroidery Frame Position and Movement........................................................................70
Changing the Embroidering Position .................................................................................. 72
Adjusting the angle .......................................................................................................................................... 73
Embroidering a Pattern Containing Seven or More Colors ................................................. 75
Checking if thread spool changes are necessary ............................................................................................... 75
Changing the Thread Spools with Designs of Seven or More Colors ..................................77
Change thread spools message......................................................................................................................... 77
Easily changing the thread spools..................................................................................................................... 78
If the Thread Breaks or the Bobbin Thread Runs Out While Embroidering ........................ 79
If the upper thread breaks................................................................................................................................. 79
If the bobbin thread breaks or runs out ............................................................................................................. 80
Embroidering From the Beginning or Middle of the Pattern ...............................................81
Resume Embroidering After Turning OFF the Machine ...................................................... 83
Adjusting the Thread Tension ............................................................................................. 85
Adjusting the tension of the bobbin thread ....................................................................................................... 85
Adjusting the tension of the upper thread ......................................................................................................... 86
xiv
SapphireTOC.fm Page xv Friday, November 18, 2005 1:47 PM
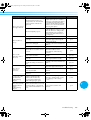
EMBROIDERING SETTINGS
87
Automatic Lock Stitch Setting ............................................................................................88
Starting/Ending Position Settings ........................................................................................ 89
Repeatedly sewing a pattern along a diagonal .................................................................................................. 90
Maximum Sewing Speed Setting......................................................................................... 91
Setting the Machine to Stop at Color Changes ................................................................... 92
Stopping the machine at the next color change ................................................................................................ 92
Specifying pause locations before embroidering............................................................................................... 92
Temporary Needle Bar Setting ...........................................................................................94
Reserved Needle Bar Settings ............................................................................................. 96
SELECTING/EDITING/SAVING PATTERNS
99
Embroidery Data Precautions........................................................................................... 100
Selecting an Embroidery Pattern ...................................................................................... 102
General pattern selection ............................................................................................................................... 102
Embroidery patterns ....................................................................................................................................... 104
Renaissance Alphabet Patterns ....................................................................................................................... 105
Floral alphabet patterns.................................................................................................................................. 106
Appliqué alphabet.......................................................................................................................................... 107
Frame patterns ............................................................................................................................................... 108
Alphabet patterns ........................................................................................................................................... 109
Embroidery patterns stored in the machine..................................................................................................... 111
Embroidery cards (optional) ........................................................................................................................... 112
Computer (USB) ............................................................................................................................................. 114
USB media (Commercially Available) ............................................................................................................ 117
Editing the Embroidery Pattern (Pattern Editing Screen) ..................................................119
Combining patterns........................................................................................................................................ 119
Selecting the pattern to be edited ................................................................................................................... 120
Moving a pattern............................................................................................................................................ 120
Flipping a pattern horizontally ....................................................................................................................... 121
Flipping a pattern vertically ............................................................................................................................ 121
Changing the size of a pattern ........................................................................................................................ 121
Rotating a pattern........................................................................................................................................... 122
Changing the text arrangement of a character ................................................................................................ 123
Changing the character spacing ..................................................................................................................... 124
Changing the thread density (only for some character and frame patterns) ..................................................... 125
Specifying multi-color text ............................................................................................................................. 126
Changing the colors of the pattern.................................................................................................................. 127
Deleting a pattern .......................................................................................................................................... 128
Editing the Embroidery Pattern (Embroidering Settings Screen) .......................................129
Rotating the entire pattern .............................................................................................................................. 129
Creating a repeating pattern ........................................................................................................................... 130
Changing the colors of the pattern.................................................................................................................. 131
Editing a Combined Pattern..............................................................................................132
Saving Embroidery Patterns..............................................................................................136
Machine’s Memory ........................................................................................................................................ 136
If the Embroidery Pattern Cannot Be Saved .................................................................................................... 136
USB Media (Commercially Available) ............................................................................................................ 137
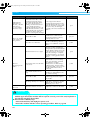
BASIC SETTINGS AND HELP FEATURE
139
Using the Settings Key ......................................................................................................140
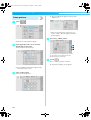
Understanding the settings screen .................................................................................................................. 140
Adjusting the brightness of the LCD ............................................................................................................... 142
Turning the buzzer on or off........................................................................................................................... 142
Changing the language................................................................................................................................... 143
Changing the units of measurements .............................................................................................................. 143
Changing the display guides........................................................................................................................... 143
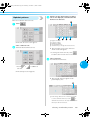
Changing the thread color information ........................................................................................................... 145
Display expanded thread color ...................................................................................................................... 146
Custom thread table settings........................................................................................................................... 147
xv
SapphireTOC.fm Page xvi Friday, November 18, 2005 1:47 PM
———————————————————————————————————————————————————————————————
Specifying jumpstitch trimming / “DST” jump codes for trimming .................................................................. 149
Deleting short stitches .................................................................................................................................... 150
Specifying the remaining length of thread ...................................................................................................... 150
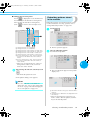
Using the Machine Operations Guide Key .......................................................................151
Using the Help Key...........................................................................................................153
APPENDIX
155
Appliqué Sewing............................................................................................................... 156
Sewing appliqué patterns ............................................................................................................................... 156
Using a frame pattern to create appliqués (1) ................................................................................................. 157
Using a frame pattern to create appliqués (2) ................................................................................................. 158
Helpful Tips for the Operation of PR-600II ......................................................................160
Checking the thread tension of built-in patterns ............................................................................................. 160
Sewing a pattern aligned with a mark on the fabric ........................................................................................ 161
Color thread table .......................................................................................................................................... 163
Colors of Tajima (.dst) embroidery data .......................................................................................................... 163
Creating Beautiful Embroidery .........................................................................................164
Threads .......................................................................................................................................................... 164
Stabilizers (Backing) ....................................................................................................................................... 165
Hooping Techniques...................................................................................................................................... 166
Fabric/stabilizer compatibility chart ............................................................................................................... 167
OPTIONAL ACCESSORIES
Attaching an optional embroidery frame for industrial embroidery machines .................168
Using the Optional Cap Frame .........................................................................................169
Cap frame and its accessories......................................................................................................................... 169
Types of caps ................................................................................................................................................. 170
Fabric precautions.......................................................................................................................................... 171
Preparing to use the cap frame ....................................................................................................................... 171
Attaching the standard cap frame to the mounting jig and putting a cap into the frame .................................. 176
Attaching the advanced cap frame to the mounting jig and putting a cap into the frame ................................ 180
Installing the embroidery frame holder ........................................................................................................... 185
Additional digitizing information.................................................................................................................... 186
Using the Optional Bobbin Winder ..................................................................................188
Precautions .................................................................................................................................................... 188
Optional bobbin winder and its accessories ................................................................................................... 188
Setting up the optional bobbin winder ........................................................................................................... 189
Connecting the AC adapter ............................................................................................................................ 189
Winding the bobbin ....................................................................................................................................... 190
Maintenance..................................................................................................................... 193
Cleaning the LCD........................................................................................................................................... 193
Cleaning the machine surface ........................................................................................................................ 193
Cleaning the hook.......................................................................................................................................... 193
Cleaning around the needle plate................................................................................................................... 194
Cleaning the bobbin case............................................................................................................................... 195
Oiling the machine ........................................................................................................................................ 196
Troubleshooting ............................................................................................................... 198
On-screen troubleshooting............................................................................................................................. 198
Troubleshooting ............................................................................................................................................. 199
Error messages ............................................................................................................................................... 207
If the LCD cannot be read .............................................................................................................................. 213
If the machine does not respond when a key is pressed.................................................................................. 213
Specifications ...................................................................................................................215
Embroidery machine specifications ................................................................................................................ 215
Index ................................................................................................................................216
xvi
Sapphire_brother.book Page 1 Thursday, November 17, 2005 2:44 PM
1
GETTING READY
After unpacking the PR-600II, first refer to “Included Accessories” on page 4, and
check that all listed accessories are included. After checking that all accessories are
included, the embroidery machine can be set up.
The setup of the PR-600II and the various preparations required before starting to sew
are described in this chapter.
Names of Machine Parts and Their Functions ...........................................................2
Front view / 2
Right-side/rear view / 3
Operation panel / 3
Included Accessories.................................................................................................4
Accessories / 4
Optional Accessories.................................................................................................5
Setting Up the Machine.............................................................................................6
Setup and transporting precautions / 6
Setup location / 7
Setting up the machine / 8
Adjusting the operation panel position / 9
Preparing the thread guide assembly / 10
Positioning the spool stand / 11
Attaching the embroidery frame holder / 11
Sapphire_brother.book Page 2 Thursday, November 17, 2005 2:44 PM
GETTING READY ————————————————————————————————————————————————————————
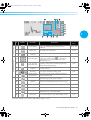
Names of Machine Parts and Their Functions
The names of the various parts of the sewing machine and their functions are described below. Before using the
sewing machine, carefully read these descriptions to learn the names of the machine parts.
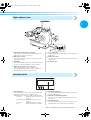
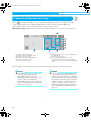
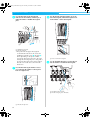
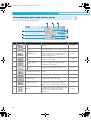
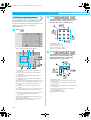
Front view
6
7
1
8
C
2
9
B
D
3
6 54321
A
4
5
0
1 Thread tension knobs
Adjusts the tension of the thread.
6 Thread guide
2 Needle bar case
The case moves to the left and right to move the needle
to the embroidering position.
8 Spool stand
Put 6 thread spools to embroider.
3 Carriage
Attach the embroidery frame to the carriage. When the
machine is turned on or when the machine does
embroidery, the carriage moves forward, backward, left
and right.
7 Thread guide assembly support
9 Operation panel
0 Feet
Use the feet to adjust the height of the legs.
A Sewing light
B Thread guide pins
4 Lower thread guide
C Upper thread guide
5 Hook cover/Hook
Open the hook cover, and then insert the bobbin case
into the hook.
D Middle thread guide
2
Sapphire_brother.book Page 3 Thursday, November 17, 2005 2:44 PM
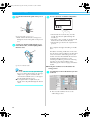
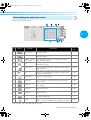
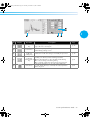
Right-side/rear view
1
Bottom
1 USB Type “A” (host) port connector
When using USB media, plug the USB media into the
USB Type “A” (host) port connector.
5 Power supply plug
Insert the plug on the power supply cord into the power
supply plug.
2 Embroidery card slot
Insert the embroidery cards (sold separately) into the
embroidery card slot.
6 Main power switch
Use the main power switch to turn the machine ON (I)
and OFF ({).
3 Handwheel
Rotate the handwheel to move the needle up and down.
Be sure to rotate the handwheel counterclockwise.
7 Ventilation slots
4 USB Type “B” (function) port connector
When sending patterns from a computer to the
machine, plug the USB cable from the computer into
the USB Type “B” (function) port connector.
Operation panel
1 2 3
1 Start/stop button
Press the start/stop button to start or stop machine. The
lighting status and color of the button changes
depending on the operation condition of the machine.
Lit in red
: When the machine cannot start
sewing
Flashing in green: When the machine can start
sewing
Lit in green
: While the machine is sewing
Off
: When the machine is turned off
4
2 Thread trimming button
Press the thread trimming button to trim both the upper
and the bobbin threads.
3 Automatic needle-threading button
Press the automatic needle threading button to thread
the needle.
4 LCD (touch panel)
Touch the keys that appear on the touch panel to select
and edit patterns and confirm various information.
Names of Machine Parts and Their Functions
3
Sapphire_brother.book Page 4 Thursday, November 17, 2005 2:44 PM
GETTING READY ————————————————————————————————————————————————————————
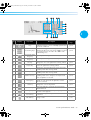
Included Accessories
After opening the box, check that the following accessories are included. If any item is missing or damaged,
contact your retailer.
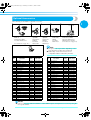
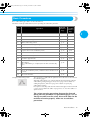
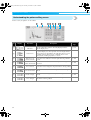
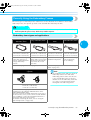
Accessories
The accessories listed below are included with this machine. Make sure to use the accessories supplied with this
machine.
1.
2.
3.
4.
5.
6.
7.
8.
9.
10.
11.
12.
13.
14.
15.
16.
17.
18.
No.
1
2
3
4
5
6
7
8
9
10
11
12
13
14
15
16
17
18
19
20
21
19.
20.
21.
22
22.
23.
24.
23
24
25.
26.
27.
25
26
28.
29.
30.
27
31.
4
32
28
Part Name
Model
Name
Parts Code
Accessory case
XC6482-051
Needle set (2 pcs.)
PRHA1BR11 XC6469-001
Prewound bobbin (6 pcs.)
XC6368-051
Spool net (6 pcs.)
S34455-000
Seam ripper
X54243-051
Scissors
XC1807-121
Tweezers
XC6542-051
Touch pen
XA9940-051
Needle changing tool (Threader)
XC4957-051
Needle plate spacer
XC6499-151
Phillips screwdriver
XC6543-051
Standard screwdriver
X55468-051
Allen screwdriver
XC5159-051
Offset screwdriver
XC6545-051
Disc-shaped screwdriver
XC1074-051
Wrench 13 x 10
XC6159-051
Oiler
XZ0206-051
Clean brush
X59476-051
Weight
XC5974-151
USB cable
XD1563-051
Embroidery frame (extra large)
200 mm (H) × 300 mm (W)
PRH300 XC6284-052
(7-7/8 inches (H) × 11-3/4 inches (W))
Embroidery frame (large)
130 mm (H) × 180 mm (W)
PRH180 XC6285-052
(5-1/8 inches (H) × 7-1/8 inches (W))
Embroidery frame (medium)
PRH100 XC6286-052
100 mm (H) × 100 mm (W)
(4 inches (H) × 4 inches (W))
Embroidery frame (small)
PRH60 XC6287-052
40 mm (H) × 60 mm (W)
(1-1/2 inches (H) × 2-3/8 inches (W))
Embroidery sheet (extra large)
200 mm (H) × 300 mm (W)
XC5704-051
(7-7/8 inches (H) × 11-3/4 inches (W))
Embroidery sheet (large)
130 mm (H) × 180 mm (W)
XC5721-051
(5-1/8 inches (H) × 7-1/8 inches (W))
Embroidery sheet (medium)
XC5759-051
100 mm (H) × 100 mm (W)
(4 inches (H) × 4 inches (W))
Embroidery sheet (small)
XC5761-051
40 mm (H) × 60 mm (W)
(1-1/2 inches (H) × 2-3/8 inches (W))
29
Operation manual
XD1133-051
30
Quick reference guide
XD0754-051
31
Spool mat (6pcs.)
XC7134-051
32
Spool cap (6pcs.)
130012-054
Sapphire_brother.book Page 5 Thursday, November 17, 2005 2:44 PM
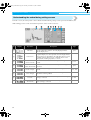
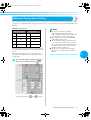
Optional Accessories
The following are available as optional accessories.
1
1.
2.
3.
4.
5.
1. Advanced cap
frame set
Model Name: PRCF2
Parts Code: XC7609-052
2. Standard
cap frame
Model Name:
PRCFH1
Parts Code:
XC6958-052
3. Advanced
cap frame
Model name:
PRCFH2
Parts Code:
XC7610-052
4. Hooping jig
Model name:
PRCFJ2
Parts Code:
XC7611-052
5. Bobbin winder set
Model Name: PRBW1
Parts Code: XC6290-052
XC6290-061(for Australia)
(See instructions on page 188.)
(See instructions on page 169.)
6. Embroidery card
Note
● The parts code may be differ depending on the
area where the machine was purchased.
● Embroidery cards sold overseas are not
compatible with this embroidery machine.
No.
1
2
10
11
12
13
14
16
19
20
25
27
28
29
30
31
32
33
35
36
37
38
39
40
41
42
43
44
Part Name
Alphabet
Flower
Monogram Emblem
Frame
Transportation
Sports Emblem
Large Floral
Dogs & Cats
Marine
Petite Designs
Horse
Birds
Christmas
Lace
Wildlife Animals
Large Flower II
Musical Instrument
Trees
Cats & Dogs II
Fruits & Vegetables
Appliqué Alphabet
Angel
Doll Face
Sports 3
Renaissance Alphabet
Farm
Victorian
Lace2
Model
Name
Parts Code
No.
Part Name
Model
Name
SA298
SA299
SA307
SA311
SA312
SA313
SA314
SA316
SA319
SA320
SA325
SA327
SA328
SA329
SA330
SA331
SA332
SA333
SA335
SA336
SA337
SA338
SA339
SA340
SA341
SA342
SA343
SA344
X58317-003
X58321-003
X59567-003
XA0257-001
XA0275-001
XA0517-003
XA1223-003
XA1406-003
XA2452-001
XA2869-003
XA3791-003
XA4289-003
XA4502-003
XA4664-003
XA4771-003
XA5037-003
XA5386-001
XA5567-003
XA5629-003
XA5659-003
XA5753-003
XA5781-001
XA5978-001
XA6111-001
XA6586-003
XA6733-003
XA6769-003
XA6849-003
45
47
49
50
51
52
53
54
55
56
57
58
60
61
62
63
64
65
66
67
68
69
70
71
72
73
74
75
Fancy Work
Butterfly
Folk Art
Fairy & Floral
Paper Dolls
Bear Collections
Scene
Tea Time
Gardening
Asian
Large Christmas
New Quilt Traditions
Summer Fun
Blouse Embellishment
Zodiac Signs
Bunny
Grand Mom
Red Work
Pop Mix
Home Dec
Cross Stitch Collection 1
Sport Shirt Motifs
Cross Stitch Collection 2
Heir loom
Cross Stitch Collection 3
Japanese Style
Scrapbooking
Lace Collection
SA345
SA347
SA349
SA350
SA351
SA352
SA353
SA354
SA355
SA356
SA357
SA358
SA360
SA361
SA362
SA363
SA364
SA365
SA366
SA367
SA368
SA369
SA370
SA371
SA372
SA373
SA374
SA375
*
*
*
*
*
*
*
Parts Code
XA7770-003
XA8206-003
XA8348-001
XA8414-003
XA8563-001
XA8511-003
XA8936-003
XA9129-001
XA9348-003
XC0025-003
XC0057-001
XC0861-003
XC1168-001
XC1304-003
XC1502-001
XC1646-001
XC2176-003
XC4220-003
XC4819-003
XC7048-003
XC7097-003
XC7274-003
XC7550-003
XC9094-003
XC9082-003
XC0130-003
XD1091-003
XD1193-003
* Discontinued
*
*
*
*
*
*
*
Memo
● Contact your nearest authorized dealer to order additional parts and optional accessories by using the
correct part number.
Optional Accessories
5
Sapphire_brother.book Page 6 Thursday, November 17, 2005 2:44 PM
GETTING READY ————————————————————————————————————————————————————————
Setting Up the Machine
The procedures for setting up the machine are described below. If the machine is not set up correctly, it may
shake or produce loud noises and the embroidery will not be sewn correctly. An optional sewing stand is also
available.
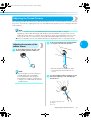
Setup and transporting precautions
CAUTION
● The temperature of the operating environment should be between 5 °C (40 °F) and 40 °C
●
●
●
●
●
(104 °F) . If the machine is operated in an environment that is either too cold or too hot, the
machine may malfunction.
Do not use the machine in a location where it will be exposed to direct sunlight, otherwise
the machine may malfunction.
Set up the machine with four feet completely in contact with the desk or table, so that the
machine is level.
Do not put anything under the embroidery machine that could block the ventilation slots at
the bottom toward the back and do not allow lint or dust to accumulate in the ventilation
slots, otherwise the machine’s motor may overheat, resulting in a fire or in damage to the
machine.
The machine weight is approximately 37 kg (81 Ibs.). The transporting or setting up of the
embroidery machine should be performed by two people.
When transporting the machine, be sure to lift it from the bottom at the indicated positions
by two people. Lifting the machine from any other area may damage the machine or result in
the machine falling, which could cause injuries.
● When lightning occurs, turn off the machine and unplug the power supply cord. Lightning
may cause the machine to malfunction.
● Do not plug in the power supply cord until setup of the machine is completed, otherwise
injuries may result if the start/stop button is accidentally pressed and the machine starts
sewing.
● When lubricating the machine, wear protective eyeglasses and gloves to prevent the oil or
grease from getting into your eyes or on your skin. Do not put the oil or grease into your
mouth. Keep the oil and grease out of the reach of children.
6
Sapphire_brother.book Page 7 Thursday, November 17, 2005 2:44 PM
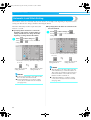
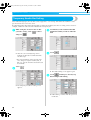
Setup location
Setup the machine in a location that meets the following requirements.
• Position machine more than 50 mm (2 inches) from the wall
• Allow sufficient space around the machine
• Place no objects within the moving range of the embroidery frame
• Set-up machine near an electrical outlet
• Use a level and stable surface, such as a desk
• Use a surface that can support the weight of the machine (about 37 kg (81 Ibs.))
• Allow open space around the ventilation slots at the bottom toward the back
1
More than
50 mm
(2 inches)
589 mm
(23-3/16 inches)
770 mm
(30-5/16 inches)
More than
350 mm
(13-3/4 inches)
More than
250 mm
(9-7/8 inches)
512 mm
(20-5/32 inches)
More than
250 mm
(9-7/8 inches)
CAUTION
● In order to prevent malfunctions or damage, do not set up the machine in a location exposed
to the following conditions.
Direct sunlight
Liquids, such as water
Extreme dust
Blocked ventilation
slots
Objects within the
moving range of the
embroidery frame
Connection to extension
cords or multiple
adapters
Insufficient space
An unstable surface
Extremely high or extremely low temperatures (The operating
environment should be between 5 °C (40 °F) and 40 °C (104°F)
Note
● For your safety: Since the machine weighs approximately 37 kg (81 lb.), do not set it up on an unstable
table or desk.
Setting Up the Machine
7
Sapphire_brother.book Page 8 Thursday, November 17, 2005 2:44 PM
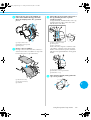
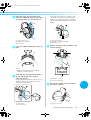
GETTING READY ————————————————————————————————————————————————————————
Use the included wrench to turn the
4 adjustable foot nut on the foot.
.
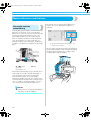
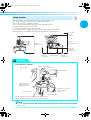
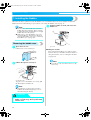
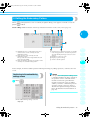
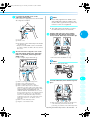
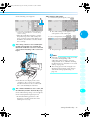
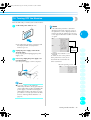
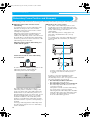
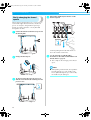
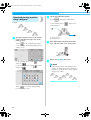
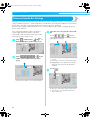
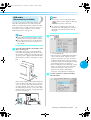
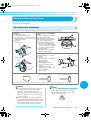
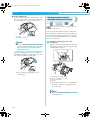
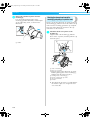
Setting up the machine
When setting up the machine, adjust the legs so that
the machine is steady.
Turning the nut in direction 1 lengthens the
leg; turning the nut in direction 2 shortens the
leg.
Make sure that all packing tape affixed to the
1 machine is peeled off and that all packing
material is removed.
2 there is sufficient space around it.
Set up the machine while making sure that
More than
50 mm
(2 inches)
589 mm
(23-3/16
inches)
More than
350 mm
(13-3/4 inches)
More than
250 mm
(9-7/8 inches)
512 mm
(20-5/32 inches)
1
2
1
1 Adjustable foot nut
• Adjust all four legs so that they securely
contact the desk or table.
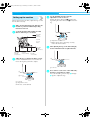
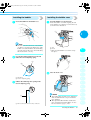
5 use the included wrench to tighten the nuts.
After adjusting the legs to the desired length,
More than
250 mm
(9-7/8 inches)
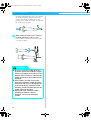
3 Use the included wrench to loosen the lock
Adjust the legs so that the machine is steady.
1
nut on the leg that you wish to adjust.
1 Lock nut
1
2
1 Lock nut
2 Adjustable foot nut
X The foot can be turned.
8
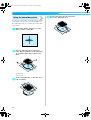
Press down on each corner of the embroidery
6 machine to check that it is stable.
If it is still unstable, perform steps 3 through
5 again to adjust the legs.
Sapphire_brother.book Page 9 Thursday, November 17, 2005 2:44 PM
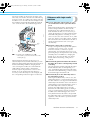
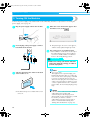
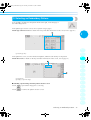
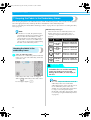
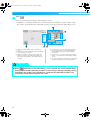
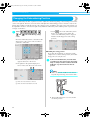
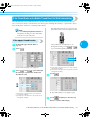
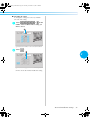
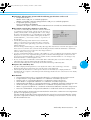
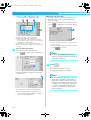
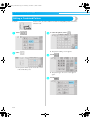
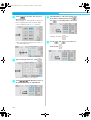
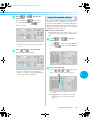
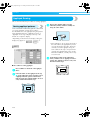
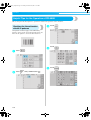
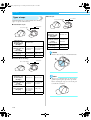
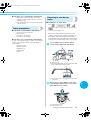
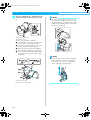
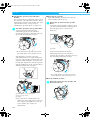
Adjust the orientation of the operation panel.
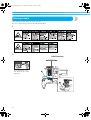
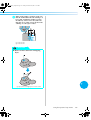
Adjusting the operation panel
position
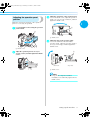
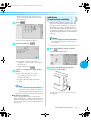
3 Loosen the thumb screw, adjust the operation
panel to an easy-to-view orientation, and then
tighten the thumb screw.
Adjust the orientation and angle of the operation
panel so it can easily be operated.
1
1 panel forward.
Loosen 2 thumb screws to bring the operation
1
1
1 Thumb screw
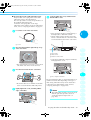
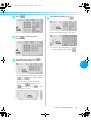
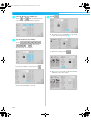
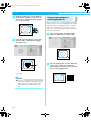
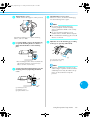
Adjust the angle of the operation panel.
4 Loosen the 2 thumb screws behind the
operation panel, adjust the operation panel to
an easy-to-view angle, and then tighten the
thumb screws.
1 Thumb screws
2 operate position, and then tighten the thumb
Adjust the operation panel to an easy-to-
1
screws.
1
(Side view)
(Top view)
1 Thumb screws
Note
● Using the disc-shaped screwdriver
included, loosen and firmly tighten the five
thumb screws.
Setting Up the Machine
9
Sapphire_brother.book Page 10 Thursday, November 17, 2005 2:44 PM
GETTING READY ————————————————————————————————————————————————————————
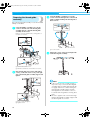
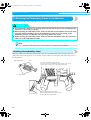
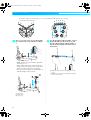
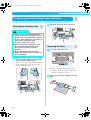
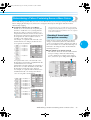
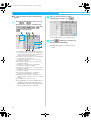
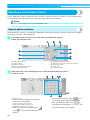
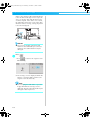
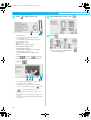
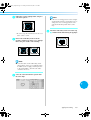
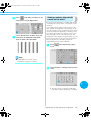
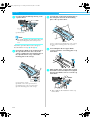
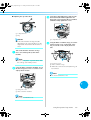
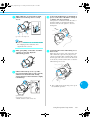
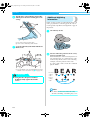
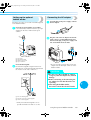
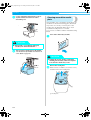
Using the Phillips screwdriver, loosen the
Preparing the thread guide
assembly
3 screws on the left and right sides of the thread
guide assembly and lift up the thread guide so
that it is level.
Raise the thread guide assembly. Locate the included
Phillips screwdriver.
1 screws on the left side of the thread guide
Using the Phillips screwdriver, loosen the
1
assembly support so that the thread guide
assembly can be raised.
Remove screw 1, and then turn screw 2 three or
four times to loosen it.
1 Loosen Screws
Tighten the screws on the left and right sides
4 of the thread guide assembly.
1 Remove the screw.
2 Turn the screw three or four times to loosen it.
Raise thread guide into position and tighten
2 screw2 on the left. Insert screw1 into right
side of the thread guide assembly support and
tighten.
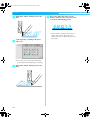
Note
● If the screws are not loosened enough, it
may not be easy to move the thread guide
assembly support and the thread guide. Do
not apply extreme force when moving the
thread guide assembly support and the
thread guide. Be sure that the screws are
loosened well enough before moving these
parts.
● Be sure to tighten each screw well enough
that the thread guide assembly support and
the thread guide are secured.
1 Insert screw and tighten.
2 Tighten screw.
10
Sapphire_brother.book Page 11 Thursday, November 17, 2005 2:44 PM
Positioning the spool stand
Secure the spool stand in the embroidering position.
Loosen the thumb screw, and then open up
1 the spool stand to the left and right.
1
Attaching the embroidery
frame holder
Attach the embroidery frame holder to the carriage.
Remove the two thumb screws of the
1 embroidery frame holder.
1 Thumb screws
Align the holes in the embroidery frame
2 holder with the pins on the frame-mounting
2
plate of the carriage.
1 Thumb screw
2 Spool stand
After the spool stand is fully opened up,
2 tighten the thumb screw.
X Secure the spool stand in the opened
position.
1 Pins on the frame-mounting plate
2 Holes in the embroidery frame holder
Setting Up the Machine
11
1
Sapphire_brother.book Page 12 Thursday, November 17, 2005 2:44 PM
GETTING READY ————————————————————————————————————————————————————————
Secure the embroidery frame holder with the
3 two thumb screws.
1 Use the thumb screws removed in step
1
.
Note
● Using the disc-shaped screwdriver
included, firmly tighten the thumb screws.
This completes the preparation of the machine.
12
Sapphire_brother.book Page 13 Thursday, November 17, 2005 2:48 PM
2
EMBROIDERING TUTORIAL
This chapter describes the basic embroidering operations in order—from turning on
the machine and sewing a pattern to finishing sewing. Follow the steps of the tutorial
to embroider a pattern and master the operation of this embroidery machine.
Operating Precautions ............................................................................................14
Basic Procedures .....................................................................................................17
Screen Quick Reference Guide ...............................................................................49
When You Have a Question, This May Help You ....................................................58
Installing the Bobbin
1
Turning ON the Machine
2
Selecting an Embroidery Pattern
3
Editing the Embroidery Pattern
4
Specifying Embroidering Setting
5
Previewing the Image
6
Hooping the Fabric in the Embroidery Frame
7
Attaching the Embroidery Frame to the Machine
8
Checking the Embroidery Area
9
Upper Threading
10
Sewing the Embroidery
11
Checking the Thread Tension
12
Removing the Embroidery Frame and Fabric
13
Turning OFF the Machine
14
Sapphire_brother.book Page 14 Thursday, November 17, 2005 2:48 PM
EMBROIDERING TUTORIAL ———————————————————————————————————————————————————
Operating Precautions
The necessary points to ensure the correct operation of this machine are described below.
Power supply precautions
Be sure to observe the following precautions concerning the power supply.
WARNING
● Use only regular household electricity for the power source. Using other power sources may
result in fire, electric shock, or damage to the machine.
● If any of the following occur, turn off the embroidery machine and unplug the power supply
cord, otherwise a fire, an electric shock or damage to the machine may result.
• When you are away from the machine.
• After using the machine.
• If a power outage occurs while the machine is being operated.
• If the machine is not operating properly, for example, when there is a loose or cut connection.
• During electrical storms.
CAUTION
● Do not plug this machine in with extension cords or multi-plug adapters with many other
appliances plugged into them, otherwise a fire or an electric shock may result.
● Do not plug in or unplug the power supply cord with wet hands, otherwise an electric shock
may result.
● When unplugging the power supply cord, be sure to first turn off the machine, and then grasp
the plug when unplugging the cord. Pulling on the cord may damage it or result in a fire or an
electric shock.
● Do not allow the power cord to be cut, damaged, modified, forcefully bent, pulled, twisted, or
bundled. In addition, do not place heavy objects on the cord or expose it to heat, otherwise
damage to the cord, fire or an electric shock may result. If the power supply cord or its plug is
damaged, stop using the machine, and then take the machine to your nearest authorized
retailer for repairs before continuing use.
● If the machine is not to be used for a long period of time, unplug the power supply cord,
otherwise a fire may result.
14
Sapphire_brother.book Page 15 Thursday, November 17, 2005 2:48 PM
Needle precautions
Be sure to observe the following precautions concerning the correct choice of needle for your machine.
CAUTION
● Your machine is designed to use household embroidery needles. The factory recommended
needle is “HAX 130 EBBR” (Organ). Schmetz needles 130/705 H-E may be used as a
substitute. Use of any other needles may break the needle or thread or damage the needlethreading mechanism or result in injuries.
● Never use bent needles. Bent needles can easily break, possibly resulting in injuries.
2
Checking the needle
Sewing with a bent needle is extremely dangerous since the needle may break while the machine is being
operated.
Place the flat side of the needle on a flat surface and check that the distance between the needle and the flat
surface is even. If the needle is bent or the tip of the needle is broken, replace the needle with a new one. (Refer
to “Changing the Needle” on page 63.)
■ Good needle
■ Bad needle
If the distance between the needle and
the flat surface is not even, the needle is
bent. Do not use a bent needle.
Flat side
Needle type
marking
Flat surface
Flat surface
Bobbin precautions
Be sure to observe the following precautions concerning the bobbin.
CAUTION
● Only use prewound bobbin (COATS “L” type/TRU-SEW POLYESTER “Filaments”) or bobbins
designed specifically for this machine. Use of any other bobbin may result in injuries or
damage to the machine.
COATS
L
Polyester
● Use a bobbin thread that has been correctly wound, otherwise the needle may break or the
thread tension will be incorrect.
● When winding a bobbin, only use optional bobbin winder (refer to page 188) and metal
bobbins (Parts Code: 100376-053).
● When winding the bobbin, be sure to use cotton or spun polyester bobbin thread (between 74
dtex/2 and 100 dtex/2).
Operating Precautions
15
Sapphire_brother.book Page 16 Thursday, November 17, 2005 2:48 PM
EMBROIDERING TUTORIAL ———————————————————————————————————————————————————
Upper thread recommendations
Be sure to observe the following recommendations concerning the upper thread.
Note
● It is recommended that rayon or polyester embroidery thread be used (120 den x 2 / 135 dtex x 2 / 40
weight (in Americas and Europe) / #50 (in Japan)).
Fabric recommendations
Be sure to observe the following recommendations concerning the fabric.
Note
● Your machine can embroider fabric that is up to 1 mm (3/8 inch) thick. If thicker fabric is
sewn, the needle may bend or break.
● When embroidering overlapping stitches, it is difficult for the needle to penetrate the fabric,
possibly resulting in the needle bending or breaking.
Note
● Attach stabilizers to thin or stretch fabrics. (Refer to “Attaching Iron-On Stabilizer (Backing)
to Fabric” on page 66 for information)
● When embroidering large pieces of fabric, make sure that the fabric is not caught in the
carriage.
Display recommendations
Be sure to observe the following recommendations concerning the use of the display.
Note
● Only touch the display with your finger or included touch pen. Do not use a mechanical
pencil, screwdriver or any other hard or sharp object. In addition, do not apply extreme
pressure to the display screen, otherwise damage to the display screen may result.
• All or part of the display screen may sometimes become darker or lighter due to temperature
changes. This is not a sign of a malfunction. If the display is difficult to read, adjust its
brightness. (Refer to “If the LCD cannot be read” on page 213.)
• The display may be dark immediately after the embroidery machine is turned on. This is a
normal characteristic of the backlight and is not a sign of a malfunction. After approximately
10 minutes, the display should reach its normal level of brightness.
• If you are not directly facing the display, the colors may be distorted or the display may be
difficult to read. This is a normal characteristic of the display and is not a malfunction. Be sure
to sit in front of the display while using it.
16
Sapphire_brother.book Page 17 Thursday, November 17, 2005 2:48 PM
Basic Procedures
Basic embroidering procedures are described below.
Check the overall procedure below, before operating the embroidery machine.
Operation
Procedure
Tutorial
Reference
Page
Operating
Procedure
Reference
Page
1
Install the bobbin.
p. 18
p.15
2
Turn on the machine.
p. 20
p.14, 16
3
Select an embroidery pattern.
p. 23
4
Edit the embroidery pattern.
p. 25
5
Specify the embroidering settings.
p. 26
6
Check the previewed image.
p. 27
7
Hoop the fabric in the embroidery frame.
p. 28
8
Attach the embroidery frame to the machine.
p. 30
9
Check the embroidery area.
p. 32
10
Thread the upper threads.
p. 33
11
Unlock the machine, then press the start/stop button to start
embroidering.
(Once embroidering is completed, the machine automatically
stops.)
p. 42
12
Check the thread tension.
p. 45
13
Remove the embroidery frame, and then remove the fabric from
the frame.
p. 46
14
Turn off the machine.
p. 47
(Example) Embroidery pattern
2
p. 16
p.16
The operations to embroider the pattern shown at the left are described on
the following pages.
Although embroidering can continue without the pattern being edited or
embroidering settings being specified, refer to page 119 for details on
editing the patterns, and refer to page 87 for details on specifying
embroidering settings.
Descriptions of the keys and other information that appear in the main LCD
screens are provided in the tables on pages 49 to 57. Use these tables for
quick reference.
The various operating precautions that must be observed
during the basic procedures are provided on pages 14 to 16.
These precautions must be strictly observed in order for the
machine to function properly. Make sure to read these
precautions.
Basic Procedures
17
Sapphire_brother.book Page 18 Thursday, November 17, 2005 2:48 PM
EMBROIDERING TUTORIAL ———————————————————————————————————————————————————
1. Installing the Bobbin
When the machine is purchased, only the bobbin case is installed in the hook. Insert a bobbin wound with
bobbin thread for embroidering. For precautions concerning the bobbin, refer to page 15.
Grab the bobbin case latch, and remove the
3 bobbin case.
Note
● The machine cannot indicate how much
bobbin thread is remaining. Before starting
to embroider make sure that there is enough
bobbin thread for the pattern.
● Make sure to clean the bobbin case every
time the bobbin is changed. For details on
cleaning the bobbin case, refer to “Cleaning
the bobbin case” on page 195.
1
Removing the bobbin case
Open the hook cover.
1 Pull the hook cover toward you.
1 Latch
■ Oiling the machine
After removing the bobbin case, apply oil to the
machine. The race should be oiled. For details on
oiling the machine, refer to “Oiling the machine”
on page 196.
Note
2
Pull the thread picker toward you.
1
1 Thread Picker
To gain access to the bobbin case easily, pull
the thread picker toward front.
Note
● Thread picker is a device that is used to
hold the thread when begining to sew or
when trimming the thread.
CAUTION
● The thread picker can only be moved
within a certain range. Do not pull it with
extreme force.
18
● Put a drop of oil onto the hook once a day
before use.
Sapphire_brother.book Page 19 Thursday, November 17, 2005 2:48 PM
Installing the bobbin
1
Installing the bobbin case
Insert the bobbin into the bobbin case.
1 Insert the bobbin case while aligning the tab
Insert the bobbin case into the hook.
on the bobbin case with the notch in the hook,
as shown in the illustration.
1
2
2
Note
● Check that the thread winds off the bobbin
clockwise as shown in the illustration. If the
bobbin is installed with the thread winding
off in the opposite direction, the embroidery
will not be sewn correctly.
1 Tab
2 Notch
1
• Fully insert the bobbin case until it snaps
into place.
2
Pass the thread through the thread slit and
2 under the tension-adjusting spring.
3
4
1
2
5
6
2
Close the hook cover.
7
1 Thread slit
2 Tension-adjusting spring
8
3 tension-adjusting spring.
9
Pull the thread through the opening in the
10
11
1
1 Pull out about 50 mm (2 inches) of thread.
12
Memo
● This embroidery machine is not equipped
with a bobbin-winder. Use pre-wound (L
type) bobbins.
● The optional bobbin winder (stand-alone
type) and optional metal bobbins can also
be used. (Refer to page 5, 188.)
Installing the Bobbin
19
13
14
Sapphire_brother.book Page 20 Thursday, November 17, 2005 2:48 PM
EMBROIDERING TUTORIAL ———————————————————————————————————————————————————
2. Turning ON the Machine
Connect the power supply cord, and then turn on the embroidery machine. For precautions concerning the
power supply, refer to page 14.
1
Plug the power supply cord into the machine.
Insert the plug of the power supply cord into a
2 household electrical outlet.
4
When the screen shown below appears after
the initial screen, touch
.
X The pattern type selection screen appears,
and the start/stop button lights up in red.
The carriage moves to its initial position.
5 • If the number 1 needle bar is not already at
the embroidering position, the needle bar
case moves and the number 1 needle bar
moves to the embroidering position.
CAUTION
● Make sure to keep your hands and other
items away from the carriage, in order to
prevent any injuries.
Note
Switch on the main power switch on the back
3 of the machine to “I”.
● (For U.S.A. only)
This appliance has a polarized plug (one
blade wider than the other). To reduce the
risk of electrical shock, this plug is intended
to fit into a polarized outlet in only one
direction. If the plug does not fit fully in the
outlet, reverse the plug. If it still does not fit,
contact a qualified electrician to install the
proper outlet. Do not modify the plug in any
way.
X The buzzer beeps once and the LCD screen
comes on.
● If the machine is turned off in the middle of
embroidering, the machine will
automatically save the design position
when turned on again. At that time, you will
be asked if you wish to continue
embroidering or begin a new operation.
(Refer to “Resume Embroidering After
Turning OFF the Machine” on page 83.)
20
Memo
Sapphire_brother.book Page 21 Thursday, November 17, 2005 2:48 PM
Understanding the screens
When the machine is turned on and
is touched, the pattern type selection screen appears. The
operations described below will be entered using the operation panel. For precautions concerning the use of the
touch panel, refer to page 16.
The screen that appears the next time that the embroidery machine is turned on differs depending on how the
machine was previously turned off. (Refer to page 62.)
2
1
2
No.
1
Display
Key Name
Settings key
Function
Touch this key to change the embroidery machine settings.
Reference
Page
3
p. 140
4
p.151
5
2
Machine
operations guide Touch this key to check a machine operation.
key
3
New embroidery Cancels all operations previously performed and returns to
key
the initial pattern group selection screen.
4
Help key
When a problem occurs, for example, there is an operating
procedure that you do not know, touch this key to view
solutions.
p. 153
Pattern display
area
This area displays the selected pattern. The line 6 shows the
embroidering area for the extra-large embroidery frame. The
embroidery frame indications, the grid lines and other
display settings can be specified from the machine settings
screen.
p. 143
5
6
7
8
*The keys in the table above appear and can be used in most of the screens described later in this manual. The
settings key cannot be used in the embroidering settings screen.
9
10
11
12
13
14
Turning ON the Machine 21
Sapphire_brother.book Page 22 Thursday, November 17, 2005 2:48 PM
EMBROIDERING TUTORIAL ———————————————————————————————————————————————————
Screen overview
The basic operation flow is shown below.
In the pattern type selection screen, select
a pattern type. (Refer to page 23, 50)
1 Touch this key to continue to the pattern
editing screen. This key is not available
unless a pattern type is selected.
In the pattern list screen, select the
pattern. (Refer to page 23, 51)
1 Touch this key to return to the pattern type
selection screen.
2 Touch this key to continue to the pattern
editing screen.
In the pattern editing screen, edit the
pattern. (Refer to page 25, 52)
1 Touch this key to return to the pattern type
selection screen and add another pattern.
2 Touch this key to continue to the
embroidering settings screen.
In the embroidering settings screen, if it is a
combined pattern , edit the entire pattern, specify the
embroidering settings and check the embroidery area.
(Refer to page 26, 54)
1 Touch this key to quit the current operation
and return to the pattern type selection
screen.
2 Touch this key to return to the pattern editing
screen.
3 Touch this key to continue to the embroidering
screen.
In the embroidering screen, check the thread
colors assigned to the needle bars, and then install
the upper threads.Touch the unlock key
so
that the start/stop button starts flashing in green and
the embroidery machine is ready to begin sewing.
After the embroidery is sewn, the embroidering
settings screen appears. (Refer to page 33, 56)
1 Touch this key to return to the embroidering
settings screen.
22
Sapphire_brother.book Page 23 Thursday, November 17, 2005 2:48 PM
3. Selecting an Embroidery Pattern
As an example, we will select the pattern shown at the right, on the last page of
the embroidery patterns.
In the pattern type selection screen, select a pattern category (type).
Pattern type selection screen (For details on the keys and other information on the screen, refer to page 50.)
2
1
2
1 Pattern type keys
In the pattern list screen, search for the desired pattern, and then touch the key for the pattern.
Pattern list screen (For details on the keys and other information on the screen, refer to page 51.)
3
4
5
6
7
8
1 Pattern keys
2 Displays a preview image.
9
■ Checking a preview image from the pattern selection screen
Touch
to preview the image prior to selecting.
Touch
to return to the pattern selection screen.
10
11
12
13
14
Selecting an Embroidery Pattern
23
Sapphire_brother.book Page 24 Thursday, November 17, 2005 2:48 PM
EMBROIDERING TUTORIAL ———————————————————————————————————————————————————
Selecting an embroidery pattern
3
Touch the desired pattern.
For this example, touch
.
We will select a floral on the second page.
1
Touch
to select the embroidery
patterns category.
X The selected pattern appears in the pattern
display area.
X The list of embroidery patterns appears.
2
Touch
and
until the desired
page is displayed.
• After a pattern is selected, the following
appear:
1 Vertical length of the pattern
2 Horizontal width of the pattern
3 Number of thread color changes
and the keys indicated by 4, which can be
used to change the pattern size or mirror
image the pattern. The functions that can be
used differ depending on the type of pattern
that is selected. (Refer to “Changing the size
of the pattern” on page 103.)
• If the wrong pattern was selected or you
wish to select a different pattern, touch the
desired pattern.
For this example, display the last page.
• To select a pattern group other than the
embroidery patterns, touch
1 Cancel key
The pattern type selection screen appears.
• When there is more than one page, the
following appear:
2 Current page number
3 Total number of pages
4 Next page key
Touch this key to display the next page. If
the next page key is touched while the last
page is displayed, the first page is displayed.
5 Previous page key
Touch this key to display the previous page.
If the previous page key is touched while the
first page is displayed, the last page is
displayed.
4
Touch
to display the selected design in
preview enlarged image.
5
Touch
to display the next screen.
This confirms the pattern selection.
X The pattern editing screen appears.
24
Sapphire_brother.book Page 25 Thursday, November 17, 2005 2:48 PM
4. Editing the Embroidery Pattern
When
in the pattern list screen is touched, the pattern editing screen appears. From this screen, the
pattern can be edited.
Pattern editing screen (For details on the keys and other information on the screen, refer to page 52.)
2
1
1 Highlights the sizes of embroidery frames that
can be used to sew the currently selected
embroidery pattern
2 Shows the size of the currently selected
embroidery pattern
The top value shows the height and the bottom
value shows the width.
3 Shows the number of thread color changes for the
currently selected embroidery pattern
4 Touch this key to delete the pattern, for example,
if the wrong pattern was selected. No pattern is
selected and the pattern type selection screen
appears.
5 Continues to the next screen
6 Displays a preview image
7 Touch to edit the pattern.
2
3
4
5
In this example, we will not edit the pattern. Without performing any editing operations, continue to the next
screen.
Continuing to the embroidering
settings screen
1
Press
.
Memo
● If an operation in the pattern editing screen
is interrupted and the machine is turned off,
the operation can be continued after the
machine is turned on again. When the
machine is turned on again, you will be
asked if you wish to continue the previous
operation or begin a new one. (Refer to
“Resume the Operation Being Performed
Before the Machine Was Turned OFF” on
page 62.)
6
7
8
9
10
11
12
13
X The embroidering settings screen is
displayed.
14
Editing the Embroidery Pattern
25
Sapphire_brother.book Page 26 Thursday, November 17, 2005 2:48 PM
EMBROIDERING TUTORIAL ———————————————————————————————————————————————————
5. Specifying Embroidering Setting
When
in the pattern editing screen is touched, the embroidering settings screen appears. From this
screen, the entire pattern can be edited and embroidering settings can be specified. In addition, the
embroidering position can be checked and a pattern can be saved for later use.
Embroidering settings screen (For details on the keys and other information on the screen, refer to page 54.)
1
2
3
4
5
6
Restarts from the beginning
Returns to the pattern editing screen
Displays a preview image
Touch to check the embroidering area.
Continues to the next screen
Touch to edit the pattern.
7 Touch these keys to specify how the pattern will
be embroidered.
8 Touch to store the pattern.
9 In the embroidering settings screen, the
embroidery frame guide in the pattern display
area indicates the size of the installed embroidery
frame.
In this example, we will not specify any of the embroidering settings. Continue with the next operation.
Memo
● If the embroidery frame is not positioned
correctly when continuing to the
embroidering settings screen, the
embroidery frame is moved to the correct
position at the same time that the
embroidering settings screen is displayed.
(Refer to “Embroidery Frame Position and
Movement” on page 70.)
26
Memo
● If an operation in the embroidering settings
screen is interrupted and the machine is
turned off, the operation can be continued
after the machine is turned on again. When
the machine is turned on again, you will be
asked if you wish to continue the previous
operation or begin a new one. (Refer to
“Resume the Operation Being Performed
Before the Machine Was Turned OFF” on
page 62.)
Sapphire_brother.book Page 27 Thursday, November 17, 2005 2:48 PM
6. Previewing the Image
You can view an image of the completed pattern within the embroidery frame.
Checking a preview image
Display the preview image to check that the
embroidery will be sewn as desired.
1
Touch
Memo
● The preview image can also be displayed
from the pattern editing screen.
2
.
1
X The preview image is displayed.
2
3
4
5
6
1 Touch these keys to display the pattern in the
various sizes of embroidery frames. The
embroidery frames that appear in white on gray
keys can be selected.
2 Touch this key to display an enlarged view of the
pattern.
2 screen.
Touch
7
8
to return to the previous
9
10
11
12
13
14
Previewing the Image
27
Sapphire_brother.book Page 28 Thursday, November 17, 2005 2:48 PM
EMBROIDERING TUTORIAL ———————————————————————————————————————————————————
7. Hooping the Fabric in the Embroidery Frame
After selecting the pattern to be embroidered, check which embroidery frames can be used to sew the pattern.
Select the appropriate frame, and hoop the fabric and stabilizer in the embroidery frame.
(Refer to “Attaching Iron-On Stabilizer (Backing) to Fabric” on page 66.) For precautions concerning the fabric,
refer to page 16.
Note
● If the fabric is not taut, the pattern may be
misaligned or the fabric may pucker. Follow
the procedure described below to firmly
stretch the fabric in the embroidery frame so
that the fabric is not loose. In addition, be
sure to work on a level surface when putting
the fabric in the embroidery frame.
Hooping the fabric in the
embroidery frame
Select an embroidery frame.
1 From the sizes of embroidery frames indicated
in the screen, select the embroidery frame that
you wish to use.
■ Embroidery frame types
There are four sizes of embroidery frames. For
details on the uses for each frame, refer to
“Correctly Using the Embroidery Frames” on
page 65.
Icon
Name
Embroidering area
Extra-large 200 mm (H) × 300 mm (W)
embroidery (7-7/8 inches (H) × 11-3/4 inches (W))
frame
Large
embroidery 130 mm (H) × 180 mm (W)
(5-1/8 inches ( H) × 7-1/8 inches (W))
frame
Medium
embroidery 100 mm (H) × 100 mm (W)
(4 inches (H) × 4 inches (W))
frame
Small
40 mm (H) × 60 mm (W)
embroidery (1-1/2 inches (H) × 2-3/8 inches (W))
frame
CAUTION
● If embroidery frames other than the four
included frames are used the embroidery
frame may hit the presser foot and
damage the machine, or cause injury to
the user.
Embroidery frames that can be used appear
darker (
) embroidery frames that cannot
be used appear lighter (
28
).
Note
● The embroidery frame indicators show all
embroidery frame sizes in which the
embroidery pattern can be sewn. Be sure to
use an embroidery frame of the most
suitable size. If the embroidery frame that is
too large is used, the pattern may be
misaligned or the fabric may pucker. (Refer
to “Correctly Using the Embroidery Frames”
on page 65.)
Sapphire_brother.book Page 29 Thursday, November 17, 2005 2:48 PM
■ Hooping fabric in the small embroidery frame
The procedure for hooping fabric in the small
embroidery frame is described below.
The same procedure is used to hoop the fabric in
the medium embroidery frame.
For details on hooping fabric in the large
embroidery frame and the extra-large embroidery
frame, refer to “Hooping the Fabric” on page 67.
2
Securely tighten the screw, and then check
6 that the fabric is taut.
Loosen the screw on the outer frame.
1
• After stretching the fabric, lightly tapping it
should produce a drum-like sound.
• Firmly clamp together the inner and outer
frames so that the bottom of the inner frame
is lower than the bottom of the outer frame.
2
1
1 Screw
2
Place the fabric with the right side up on top
3 of the outer frame.
3
1
1 Inner frame
2 Outer frame
3 Bottom of inner frame
2
• Using the included disc-shaped screwdriver,
firmly tighten the screw.
• The outer frame does not have a front or back
side. Either side can be used as the front.
4
3
4
5
Press the inner frame into the outer frame.
6
1
7
1 Disc-shaped screwdriver
• Be sure that there are no wrinkles in the fabric
after it is stretched in the embroidery frame.
5 edges of the fabric.
The amount that the fabric is stretched and the use of
stabilizer material differ depending on the type of
fabric being embroidered. Try various methods to
achieve the best embroidering results. (Refer to
“Hooping Techniques” on page 166.)
8
9
10
Lightly tighten the screw, and then pull the
11
Memo
● This embroidery machine can also be used
with the optional cap frames. (Refer to
“Using the Optional Cap Frame” on
page 169.)
12
13
14
Hooping the Fabric in the Embroidery Frame
29
Sapphire_brother.book Page 30 Thursday, November 17, 2005 2:48 PM
EMBROIDERING TUTORIAL ———————————————————————————————————————————————————
8. Attaching the Embroidery Frame to the Machine
After hooping the fabric in the embroidery frame, attach the frame to the embroidery machine.
CAUTION
● If the embroidery frame is not correctly attached it may hit the presser foot and damage the
machine, or cause injury to the user.
● When attaching the embroidery frame, make sure that the start/stop button is lit in red. If the
start/stop button is flashing in green, the embroidery machine may start sewing. If the
embroidery machine accidentally starts operating, injuries may result.
● When attaching the embroidery frame, make sure that the embroidery frame does not hit any
other part of the embroidery machine.
Note
● Before attaching the embroidery frame, check that there is enough thread in the bobbin.
Attaching the embroidery frame
Adjust the width of the embroidery frame holder to the size of the embroidery frame, and then attach the
embroidery frame to the machine. As an example, the procedure for attaching the small embroidery frame is
described below.
Embroidery frame
Holes
Left arm of embroidery frame holder
Move the arm of the embroidery frame holder to the left or
right to adjust it to the size of the embroidery frame.
Positioning slots
Positioning Pin
30
Clip on embroidery frame holder.
Insert the embroidery frame into the clips
on the embroidery frame holder.
Sapphire_brother.book Page 31 Thursday, November 17, 2005 2:48 PM
Loosen the two thumb screws on the
1 embroidery frame holder.
If the screw is too tight, please use the included
disc-shaped screwdriver.
2
Note
● Please firmly tighten the two thumb screws
with included disc-shaped screwdriver. The
machine will recognize the wrong frame size,
if the two screws are not tightened.
X The embroidery frame holder is ready for
the embroidery frame to be attached.
1
Hold the embroidery frame level, and then
3 simultaneously align both the left and right
mounts with the embroidery frame holder clips.
2
1 Left arm
2 Thumb screws
X The left arm of the embroidery frame holder
can be moved.
• Only loosen the thumb screws a maximum
of 2 turns counter clockwise. Do not remove
the screw.
Move the left arm to align the screw on the
2 right side with the mark for the embroidery
frame to be installed, and then tighten the
thumb screws.
For this example, align with mark 5.
1
2
3
• The inner frame should be on top.
Note
4
● Incorrect frame positioning.
54 3 2 1
5
6
6
7
8
1
2
3
4
Mark for extra-large embroidery frame
Mark for large embroidery frame
Mark for medium embroidery frame
Mark for embroidery frame for industrial
embroidery machines (When using embroidery
frames for industrial embroidery machines, THE
MACHINE DOES NOT RECOGNIZE THE
SEWING AREA OF THE FRAME. Be sure to use
the trial sewing function to check that the pattern
fits within the sewing area. If an embroidery
frame for an industrial embroidery machine is
installed, the right arm of the embroidery frame
holder must also move. For details, refer to
page 168.)
5 Mark for small embroidery frame
6 Align the screw with the mark.
4 place.
Insert the embroidery frame until it snaps into
9
10
1
11
12
13
1 Make sure that the pins on the left and right arms
of the embroidery frame holder fit into the
positioning slot and hole on the embroidery frame.
Attaching the Embroidery Frame to the Machine
31
14
Sapphire_brother.book Page 32 Thursday, November 17, 2005 2:48 PM
EMBROIDERING TUTORIAL ———————————————————————————————————————————————————
9. Checking the Embroidery Area
Check the embroidery area to make sure that the embroidery will be sewn in the desired location and will not
be misaligned and that the embroidery frame will not hit the presser foot.
If the embroidery frame is not correctly positioned, it moves to the correct position, and then the embroidering
position is indicated.
1
Touch
.
3
When the embroidery frame moves to the
desired position, touch
again.
X The embroidery frame stops moving, and
the next screen appears.
X The presser foot is lowered and the
embroidery frame moves to show the
embroidery area.
The corners of the octagon showing the
2 embroidery area for the pattern are indicated
by changing direction.
1 Touch to continue moving the frame.
2 Touch to stop checking the embroidering area.
4
To continue moving the embroidery frame,
touch
. To stop checking the
embroidering area, touch
.
Continuing to the embroidering
screen
Carefully watch the movement of the
embroidery frame and check that the
embroidery is sewn in the desired location and
that the embroidery frame does not hit the
presser foot.
After finishing the necessary operations in the
embroidering settings screen, continue to the
embroidering screen.
1
Touch
.
■ Stop checking the embroidery frame area.
The embroidery frame can be temporarily
stopped at a desired position or the checking of
the embroidering area can be stopped.
X The embroidering screen appears.
32
Sapphire_brother.book Page 33 Thursday, November 17, 2005 2:48 PM
10. Upper Threading
Check the embroidering screen for information on which needle bars should be threaded with which thread
colors, and then thread the upper threads.
Checking the needle bars and thread colors
In the embroidering settings screen, touch
to display the embroidering screen and the message
instructing that the needle bars be threaded (that the thread spools from the previous time be changed). Check
the thread colors in this screen.
Embroidering screen (For details on the keys and other information on the screen, refer to page 56.)
2
Thread Thread color Needle bar
name
number
color
or number
1
2
3
1
2
3
4
5
6
7
Thread information for the first needle bar
Thread information for the second needle bar
Thread information for the third needle bar
Thread information for the fourth needle bar
Thread information for the fifth needle bar
Thread information for the sixth needle bar
If no thread color name is displayed, that needle
bar has not been used.
If a thread color had been assigned to the needle
bar on a previously sewn design, the needle bar
will show the previously assigned color.
8 Change thread spools message (Refer to page 77.)
This message appears when it is necessary for the
thread spools to be changed. If
Thread with the color name that appears beside each
needle bar number is threaded on that needle bar.
For the screen shown
1: Lime green
2: Moss green
3: Orange
4: Red
5: Yellow
If there is no name beside the needle bar number,
that needle bar is not used. For this example, needle
bar 6 is not used.
4
5
6
7
8
9 is not
touched to close the message, embroidering
cannot continue.
9
10
11
12
13
14
Upper Threading 33
Sapphire_brother.book Page 34 Thursday, November 17, 2005 2:48 PM
EMBROIDERING TUTORIAL ———————————————————————————————————————————————————
1
Touch
.
X The screen indicating that the spools be changed is closed.
• In addition to checking the thread colors, information such as the number of stitches and the sewing
time can be checked and various embroidering settings can be specified in the embroidering screen.
1 Shows the embroidering order for the thread
colors.
2 Indicates the needle bar number where the thread
color at the left is assigned.
3 Shows the number of thread color changes, the
number of stitches, the embroidering time and
the length of time until the spools will need to be
changed.
4 Touch a key to move the selected needle bar to
the sewing position. Use when threading the
needle with the automatic needle-threading
mechanism.
5 Use these keys to specify various embroidering
settings or to return to the embroidering settings
screen.
6 To start the machine, touch this key to unlock the
machine, and then press the start/stop button.
CAUTION
● When
(unlock key) in the embroidering screen is touched, the start/stop button begins
flashing in green and the embroidery machine can start sewing. If the upper threading is being
performed or the needle is being threaded, be careful that the embroidery machine is not
accidentally started, otherwise injuries may result.
34
Sapphire_brother.book Page 35 Thursday, November 17, 2005 2:48 PM
Upper threading
Use embroidery thread to thread the needle bars in order, starting with needle bar 1.
Press
→
on the LCD (see page 151).
→
→
→
(To page 3)
in order to view a video of the operation
CAUTION
● When threading the upper thread, carefully follow the instructions. If the upper threading is
not performing correctly, the thread may break or become tangled, causing the needle to
bend or break.
Note
● It is recommended that rayon or polyester
embroidery thread be used (120 den/2, 135
dtex/2, 40 weight (in Americas and Europe),
#50 (in Japan)).
2
Memo
● The path that the embroidery machine
should be threaded is indicated by a line on
the machine. Be sure to thread the machine
as indicated.
1
2
3
4
5
6
7
8
9
10
11
12
13
14
Upper Threading 35
Sapphire_brother.book Page 36 Thursday, November 17, 2005 2:48 PM
EMBROIDERING TUTORIAL ———————————————————————————————————————————————————
The numbers indicate the thread path for each of the numbered needle bars. Be very careful to
correctly thread the needle bars.
6
6 5 4 3 2 1
1
5
2
4
3
6 5
2 1
6
1
5
1
6
2
5
2
4
3
Place on spool pin 1 the spool of thread with
1 the color (lime green) specified for needle bar
1.
4
Pass the thread through the number 1 hole in
2 the thread guide just above the spool, and
then pass the thread through the number 1
hole in the thread guide toward the front of
the machine.
2
• Make sure that the spool stand is opened in
the shape of a V.
• When using small spools of thread, be sure
to place the enclosed spool mat on the spool
pin before placing the spool on the pin.
• Use spool cap on all spools of thread shorter
than the height of the spool pin.
1 Spool mat
2 Small spool
3 Spool cap
36
3
1
1 Number 1 hole in the thread guide above the
spool
2 Number 1 hole in the thread guide toward the
front of the machine
Sapphire_brother.book Page 37 Thursday, November 17, 2005 2:48 PM
6 5 4 3 2 1
1
6
2
5
4
3
2
6 5 4 3 2 1
6 5 4 3 2 1
Pass the thread through the hole in the
3 number 1 upper thread guide.
Wind the thread clockwise once around the
5 number 1 thread tension disc.
Pass the thread toward you from the inside of
the thread guide.
1
1
2
3
4
5
6
1 Hole in upper thread guide
4 thread guide.
Pass the thread through the number 1 upper
Hold the thread with both hands, and then
pass it under the guide from the right.
1 Thread tension disc
• Make sure that the thread is securely caught
in the thread tension disc and passed correct
thread guide pins. (See left illustration at top
of page.)
7
8
9
Note
● All thread tension disks are threaded in
clockwise direction.
10
11
1
12
13
Pass around here.
14
1 Upper thread guide
Upper Threading 37
Sapphire_brother.book Page 38 Thursday, November 17, 2005 2:48 PM
EMBROIDERING TUTORIAL ———————————————————————————————————————————————————
Pass the thread along the thread path
6 indicated on the machine, and then pass it
under the number 1 middle thread guide
plate.
Pass the thread down through the slot to the
8 lower thread guide, and then through the hole
in the number 1 lower thread guide.
2
1
1 Middle thread guide
2 Thread guide pin
• The path from the upper thread guide
around the thread tension disc and to the
middle thread guide (steps 5 through 6)
differ depending on the spool number.
Passing the thread from the left to the right
through the thread guide pins is designed to
prevent the thread from becoming tangled.
Thread each needle bar as shown in the
illustration.
1
1 Hole in lower thread guide
Use the included threader to pass the thread
9 into the number 1 needle bar thread guide.
7 pass it through the number 1 take-up lever
Pass the thread along the number 1 slot to
hole from right to left.
1
1 Needle bar thread guide
2 Needle changing tool (Threader)
1 Thread take-up lever
38
Sapphire_brother.book Page 39 Thursday, November 17, 2005 2:48 PM
Threading the needle
Note
Use the automatic needle-threading mechanism to
thread the needle.
Press
→
(to page 2) →
→
→
in order to view a video
of the operation on the LCD (see page 151).
1
Press the automatic needle-threading button.
● To avoid damage, the automatic needlethreading mechanism may return to the
back position when you turn the
handwheel.
● The automatic needle-threading mechanism
can thread one needle at the sewing
position. When this mechanism is used, be
sure that the needle bar that you want to
thread is positioned as the sewing position,
otherwise the automatic needle-threading
mechanism cannot be used at the particular
needle. If the needle bar is not at the sewing
position, move it there. (Refer to page 40.)
2
2 Allow thread to relax and eliminate any stress
Pull out about 15 cm (6 inches) of thread.
X The hook on the automatic needlethreading mechanism passes through the
eye of the needle.
on the thread. Then, as shown in the
illustration, pass the thread under the fork of
the automatic needle-threading mechanism
from the right, and then catch the thread with
the hook that passes through the eye of the
needle.
2
CAUTION
2
3
4
● If the needle is not fully inserted, the
hook of the automatic needle-threading
mechanism will not pass through the eye
of the needle during automatic needle
threading, and the hook may bend or the
needle cannot be threaded.
● If the hook of the automatic needlethreading mechanism is bent or
damaged, contact your authorized
retailer.
● While the hook of the automatic needlethreading mechanism is passed through
the eye of the needle, do not rotate the
handwheel, otherwise the automatic
needle-threading mechanism may be
damaged.
1
5
1
6
1 Hook
2 Fork
7
Note
● When catching the thread with the hook, be
careful that the thread does not become
loose.
8
9
10
11
12
13
14
Upper Threading 39
Sapphire_brother.book Page 40 Thursday, November 17, 2005 2:48 PM
EMBROIDERING TUTORIAL ———————————————————————————————————————————————————
Pass the thread under the guide on the presser
3 foot.
5
Press the automatic needle-threading button.
1
2
1 Guide on presser foot
2 Notch in guide on presser foot
• Make sure that the thread securely passes
through the notch in the guide on the presser
foot.
4 in the thread cutter, and then lightly pull the
Securely pass the thread through the groove
thread to cut it.
1
1 Groove in thread cutter
• The threader moves back away from the
needle. The thread is pulled through the
needle eye.
• The wiper comes out and catches the thread
between the needle and the threader.
• The threader goes back to the original home
position.
This completes the upper threading for needle
bar 1.
Thread the remaining needle bars in the same
way. However, if the needle bar to be threaded
is not moved to the embroidery position, the
needle cannot be threaded with the automatic
needle-threading mechanism. For the
remaining needle bars, perform the following
operation to move the needle bar to the
embroidery position before trying to thread the
needle.
■ Moving the needle bar to be threaded to the
sewing position
Note
● If the thread is not correctly passed through
the groove in the thread cutter, the message
“Wiper error.” appears and the needle
cannot be threaded. Be sure to securely pass
the thread through the groove.
● If enough thread is not pulled out, the
thread cannot be pulled through the thread
cutter.
Touch the key for the needle bar that you wish
1 to thread.
X The selected needle bar moves to the
embroidery position.
40
Sapphire_brother.book Page 41 Thursday, November 17, 2005 2:48 PM
Note
● If the thread is not taut, it may come out of
the thread tension disc. After upper
threading is finished, check again to make
sure that the thread is correctly passed into
the thread tension disc. (Refer to step 5 on
page 37.)
2
Memo
● When changing one of the upper thread
colors, it is easy to re-thread by cutting the
thread currently being used between the
spool and the thread guide above the spool.
Place the new spool on the spool pin and
tie the end of the new thread to the end of
the previous thread. Then pull the thread
through to the needle. (Refer to page 78.)
1
■ Using the spool net
When using metallic thread or any other strong
thread, place the included spool net over the
spool before sewing.
If the spool net is too long, fold it once to match
the size of the spool before placing it over the
spool.
It may be necessary to adjust thread tension when
using the spool net.
2
3
4
5
1
6
7
2
8
9
1 Spool net
2 Thread
10
11
12
13
14
Upper Threading 41
Sapphire_brother.book Page 42 Thursday, November 17, 2005 2:48 PM
EMBROIDERING TUTORIAL ———————————————————————————————————————————————————
11. Sewing the Embroidery
Now, the embroidery machine is ready to begin sewing.
When the machine starts sewing, the presser foot is automatically lowered, the necessary thread trimming
operations at the end of stitching are performed, the threads are changed as necessary while the embroidery is
sewn, and the machine stops when the end of the stitching is reached.
CAUTION
● For safety reasons, the embroidery machine must not be left unattended while it is sewing.
● While the machine is in operation, pay special attention to the needle location. In addition,
keep your hands away from all moving parts such as the needle, needle bar case, thread takeup lever and carriage, otherwise injuries may result.
■ Locking mechanism
For safety reasons, this embroidery machine is equipped with a locking function.
Normally, the embroidery machine is locked (it cannot start sewing). Unless the machine is unlocked, it
cannot start sewing. If the embroidery machine is not started within 10 seconds after unlocking it, it
automatically returns to being locked.
The start/stop button shows whether or not the embroidery machine is locked. If the start/stop button lights up
in red, the machine is locked. If the start/stop button flashes in green, the machine is unlocked.
Press the start/stop button.
Starting embroidering
2 Press the start/stop button while it is flashing in
green. If the start/stop button returns to being lit
in red, perform this procedure again from step
1.
Note
● Make sure that there are no objects within
the moving area of the embroidery frame. If
the embroidery frame hits another object,
the pattern may become misaligned.
1
Touch
to unlock the embroidery
machine.
X The start/stop button lights up in green and
begins sewing the first color.
Note
X The start/stop button begins flashing in
green and the embroidery machine can be
started.
• If the start/stop button is not pressed within
10 seconds after unlocking the embroidery
machine, the machine becomes locked
again.
42
● The light goes off when sewing starts.
Sapphire_brother.book Page 43 Thursday, November 17, 2005 2:48 PM
X The following screen appears.
1 A red frame around the thread information box
indicates which needle bar is currently being
used for sewing.
• While the embroidery machine is sewing,
the point being sewn is indicated by the
green crosshairs in the pattern display area.
In addition, the number of stitches and the
time count up.
■ Continuing embroidering
To sew the same pattern again, touch
.
X The embroidering screen appears so the
2
same pattern can be sewn again.
To select a new pattern, touch
or
.
3 machine automatically stops and trims the
After sewing of the first color is finished, the
thread. The needle bar case moves to the 2nd
color position and sewing of the second color
begins.
X The pattern type selection screen appears.
1
2
Note
● Automatic Lock stitching can be set so that
it is sewn at the beginning of the
embroidery, when starting to sew after
change thread colors, and when trimming
the thread. (Refer to “Automatic Lock Stitch
Setting” on page 88.)
● The sewing speed can be changed, even
while the pattern is being sewn. (Refer to
“Maximum Sewing Speed Setting” on
page 91.)
3
4
5
6
7
8
X The thread color display in the screen
continues to the second color, and the
thread information for the second needle
bar is surrounded by the red frame.
9
10
This continues until the last color is sewn, and
4 the embroidery machine automatically stops.
11
X The embroidering settings screen reappears.
12
X The start/stop button lights up in red.
• No thread trimming operations at the
beginning of stitching and at the end of
stitching are necessary.
13
14
Sewing the Embroidery
43
Sapphire_brother.book Page 44 Thursday, November 17, 2005 2:48 PM
EMBROIDERING TUTORIAL ———————————————————————————————————————————————————
Stopping embroidering
2
Press the thread trimming button.
The machine can be stopped during sewing.
■ Temporarily pausing
1
Press the start/stop button.
X The bobbin and upper threads are trimmed.
• Before turning off the embroidery machine,
be sure to trim the threads.
3
Set the main power switch to “{”.
X The machine stops and the start/stop button
lights up in red.
• The thread is not trimmed.
• To continue sewing, after checking that the
upper thread is taut, touch the unlock key,
and then press the start/stop button.
Memo
● If the Reserve Stop key is touched while
embroidery is being sewn, the machine
stops before sewing for the next color
begins. (Refer to “Stopping the machine at
the next color change” on page 92.)
● Before starting to sew, the machine can be
set to stop at any thread color change.
(Refer to “Specifying pause locations before
embroidering” on page 92.)
X The embroidery machine is turned off and
the display and the start/stop button
indicator go off.
• Sewing can resume after the embroidery
machine is turned on again. Back up several
stitches to overlap the stitching. For details,
refer to “Resume Embroidering After Turning
OFF the Machine” on page 83.
Memo
■ Resume sewing after the machine was turned off
1
Press the start/stop button.
X The embroidery machine stops and the
start/stop button lights up in red.
• The thread is not trimmed.
44
● The machine can be stopped at any time,
even while it is embroidering; however, if
the machine is stopped when the thread
color is changed, it is not necessary to go
back through the stitching when
embroidering is continued. The machine
can be set to stop when the thread color is
changed. (For details, refer to “Specifying
pause locations before embroidering” on
page 92.)
■ If the thread breaks while sewing
If a problem occurs while sewing, such as if the
thread breaks, the machine stops automatically.
Re-thread the broken thread, back up several
stitches, and then continue sewing. For details,
refer to “If the Thread Breaks or the Bobbin
Thread Runs Out While Embroidering” on
page 79.
Sapphire_brother.book Page 45 Thursday, November 17, 2005 2:48 PM
12. Checking the Thread Tension
Check the embroidery to see if it was sewn with the correct thread tension. If the thread tension is not adjusted
correctly, the stitching may be uneven or there may be puckering in the fabric.
■ Correct thread tension
From the wrong side of the fabric, the bobbin
thread should be about one third of the stitch
width.
(Right side)
(Wrong side)
2
(Wrong side)
If the embroidery appears as shown below, the
thread tension is incorrect. Correct the thread
tension.
(Right side)
(Right side)
The tension of the upper thread is too loose,
resulting in a loose upper thread, loose thread
locks or loops appearing on the right side of the
fabric.
1
(Wrong side)
2
The tension of the upper thread is too tight,
resulting in the lower thread being visible from
the right side of the fabric.
Tighten the tension dial by turning the dial
clockwise.
3
For details on adjusting the thread tension, refer to
“Adjusting the Thread Tension” on page 85.
4
5
Note
Loosen the tension dial by turning the dial
counterclockwise.
● In this tutorial, the thread tension was
checked after embroidering was finished.
However, normally, embroidering should
be temporarily paused and the thread
tension should be checked after the first 100
stitches of each color sewn with each
needle bar.
● The resulting embroidery may not appear as
expected, due to the type or thickness of the
fabric being sewn or to the type of stabilizer
material used. Be sure to sew a trial
embroidery before sewing on your project.
6
7
8
9
10
11
Memo
● In the built-in embroidery patterns, one
pattern is used for checking the thread
tension. For details, refer to “Checking the
thread tension of built-in patterns” on
page 160.
Checking the Thread Tension
45
12
13
14
Sapphire_brother.book Page 46 Thursday, November 17, 2005 2:48 PM
EMBROIDERING TUTORIAL ———————————————————————————————————————————————————
13. Removing the Embroidery Frame and Fabric
After sewing is finished, remove the embroidery frame, and then remove the fabric from the frame.
Removing the embroidery frame
2
Pull off the embroidery frame toward you.
CAUTION
● When removing the embroidery frame,
make sure that the start/stop button is lit
in red. If the start/stop button is flashing
in green, the machine may start sewing. If
the machine accidentally starts
operating, injuries may result.
● When removing the embroidery frame,
be careful that the embroidery frame
does not hit any other part of the
machine.
● Do not lift up the embroidery frame
holder with extreme force, otherwise it
may be damaged.
Removing the fabric
1
Loosen the outer frame screw.
1 of the arms of the embroidery frame holder,
With both hands, grab the left and right sides
and then slightly lift up the frame.
The pins on the arms of the embroidery frame
holder should come out of the holes in the
sides of embroidery frame.
X If the screw was tightened using a discshaped screwdriver, use the included discshaped screwdriver to loosen it.
Remove the outer frame, and then remove the
2 fabric.
46
Sapphire_brother.book Page 47 Thursday, November 17, 2005 2:48 PM
14. Turning OFF the Machine
After all embroidery is finished, turn off the machine.
1
Set the main power switch to “{”.
Memo
● If the embroidery machine is turned off
while the pattern type selection screen or
the pattern list screen is displayed with no
pattern selected, the pattern type selection
screen appears when the machine is turned
on again.
X The embroidery machine is turned off and
the display and the start/stop button
indicator goes off.
Unplug the power supply cord from the
2 electrical outlet.
Grasp the plug when unplugging the power
supply cord.
If necessary, unplug the power supply cord
3 from the machine.
Store the power supply cord in a safe place.
2
Turned OFF
↓
Turned ON
If
is not touched to con-
1
2
firm the selection of the pattern
in the pattern list screen, the se-
3
lection will be erased if the machine is turned off.
After the opening screen
4
5
6
7
8
9
Note
● If a power outage occurs while the
embroidery machine is being operated, turn
off the embroidery machine and unplug the
power supply cord. When restarting the
embroidery machine, follow the necessary
procedure to correctly operate the machine.
(Refer to “Turning ON the Machine” on
page 20)
10
11
12
13
14
Turning OFF the Machine 47
Sapphire_brother.book Page 48 Thursday, November 17, 2005 2:48 PM
EMBROIDERING TUTORIAL ———————————————————————————————————————————————————
● If the embroidery machine is turned off
while the pattern editing screen is
displayed, the way that the pattern appears
before the machine was turned off is stored
in the machine's memory. When the
embroidery machine is turned on again, the
pattern editing screen as it appeared before
the machine was turned off can be
displayed again. (Refer to page 62.)
● If the machine is turned off while it is
sewing, embroidering can continue when
the machine is turned on again. (Refer to
“Resume Embroidering After Turning OFF
the Machine” on page 83.)
Turned off
while
embroidering
↓
Turned ON
Turned OFF
↓
Turned ON
After the opening screen
● If the embroidery machine is turned off
while the embroidery settings screen is
displayed, the embroidery settings screen
for the pattern before the machine was
turned off is stored in the machine's
memory. When the embroidery machine is
turned on again, the embroidery settings
screen as it appeared before the machine
was turned off can be displayed again.
(Refer to page 62.)
Turned off
either before
or after
embroidering
↓
Turned ON
After the opening screen
48
After the opening screen
Sapphire_brother.book Page 49 Thursday, November 17, 2005 2:48 PM
Screen Quick Reference Guide
Descriptions of the keys and other information that appear in the screens are provided in the tables below.
Key displays
The appearances of the keys have the following meanings.
(Normal color display)
: This key is not selected, but can be selected.
(Dark-colored display)
: This key is selected.
(Gray display)
: This key cannot be selected.
2
Common screen controls
The keys described below, except for the settings key, appear in all screens and can always be used. However,
the settings key cannot be used in the embroidering screen.
No.
1
Display
Key Name
Settings key
Reference
Page
Function
Touch this key to change the embroidery machine settings.
2
Machine
operations guide Touch this key to check a machine operation.
key
3
New embroidery Cancels all operations previously performed and returns to
key
the initial pattern group selection screen.
p. 140
p.151
4
Help key
When a problem occurs, for example, there is an operating
procedure that you do not know, touch this key to view
solutions.
p. 153
5
Pattern display
area
This area displays the selected pattern. The line 6 shows the
embroidering area for the extra-large embroidery frame. The
embroidery frame indications, the grid lines and other
display settings can be specified from the machine settings
screen.
p. 143
Screen Quick Reference Guide 49
Sapphire_brother.book Page 50 Thursday, November 17, 2005 2:48 PM
EMBROIDERING TUTORIAL ———————————————————————————————————————————————————
Understanding the pattern type selection screen
In this screen, select a pattern category (type).
No.
Display
Key Name
Description
Reference Page
Embroidery pattern
key
The embroidery pattern for a design can be
selected.
p. 104
2
Frame patterns
key
12 stitch types can be combined with 10
frame shapes, such as a circle and a square.
p. 108
Alphabet key
Uppercase letters, lowercase letters,
numbers, symbols and accented characters
from 13 fonts can be selected in small,
medium and large sizes.
p. 109
Renaissance alphabet Renaissance-style characters designed in a
key
50 mm x 50 mm square.
p. 105
3
4
Built-in patterns
1
5
Floral alphabet
key
Our original alphabet patterns designed with
flowers decorating large uppercase letters
(130 mm (H) x 80 mm (W)).
p. 106
6
Appliqué alphabet
key
Alphabet appliqué patterns, which are
available in small, medium and large sizes.
p. 107
7
Embroidery patterns
Recalls patterns stored in the machine’s
stored in the machine key memory.
p. 111
8
Embroidery cards key
Recalls patterns from embroidery cards.
p. 112
9
USB media key
Recalls patterns from USB media.
p. 117
0
Computer (USB) key
By using the included USB cable to connect
a computer to the embroidery machine,
patterns can be recalled from the computer.
p. 114
Edit key
This key is not available unless a pattern is
selected. Touch this key to quit trying to add
another pattern from the pattern type
selection screen. Return to the pattern
editing screen.
p. 119
A
50
Sapphire_brother.book Page 51 Thursday, November 17, 2005 2:48 PM
Understanding the pattern list screen
In this screen, select the pattern.
2
No.
Display
Key Name
Description
Reference
Page
1
Size (vertical)
Shows the vertical length of the currently selected
embroidery pattern.
2
Size (horizontal)
Shows the horizontal width of the currently selected
embroidery pattern.
3
Number of thread Shows the number of thread color changes for the currently
color changes
selected embroidery pattern.
4
Page
Shows the number of the currently displayed page and the
total number of pages.
5
Next page key
Touch this key to display the next page. If the next page key
is touched while the last page is displayed, the first page
will be displayed.
p. 102
6
Previous page
key
Touch this key to display the previous page. If the previous
page key is touched while the first page is displayed, the
last page will be displayed.
p. 102
7
Pattern keys
An image of the pattern appears on the key. Touch the
image to select the pattern.
p. 102
8
Cancel key
Touch to leave the currently selected pattern category and
choose a different category. Returns to the pattern type
selection screen.
p. 102
9
Size key
Allows the size of the currently selected embroidery pattern
to be changed.
p. 103
0
Horizontal mirror Allows the currently selected embroidery pattern to be
image key
flipped horizontally.
p. 103
A
Vertical mirror
image key
Allows the currently selected embroidery pattern to be
flipped vertically.
p. 103
B
Preview key
Displays an image of the pattern that is to be embroidered
so it can be previewed.
C
Set key
Touch after selecting the pattern. The selection of the
pattern is confirmed and the pattern editing screen appears.
p.27
p. 102
*Some patterns cannot be edited with 9, 0 or A.
Screen Quick Reference Guide 51
Sapphire_brother.book Page 52 Thursday, November 17, 2005 2:48 PM
EMBROIDERING TUTORIAL ———————————————————————————————————————————————————
Understanding the pattern editing screen
In this screen, the pattern can be edited.
No.
1
Display
Key Name
Description
Shows the sizes of embroidery frames that can be used to
Embroidery frame sew the embroidery pattern currently displayed in the
indicators
pattern display area.
Reference
Page
p. 28
2
Pattern size
Shows the size of the embroidery pattern currently displayed in
the pattern display area. The top value shows the height and the
bottom value shows the width. If the embroidery pattern consists
of multiple patterns that have been combined, the size of the
entire pattern, including all patterns, is shown.
3
Distance from
center (vertical)
Shows the vertical distance that the pattern being edited is
moved.
p.120
Distance from Shows the horizontal distance that the pattern being edited
center (horizontal) is moved.
p.120
4
5
6
7
8
52
Size (vertical)
Shows the vertical length of the pattern that is being edited.
Shows the horizontal width of the pattern that is being
Size (horizontal) edited.
Rotation angle
Shows the rotation angle that the pattern being edited is
rotated.
Number of thread Shows the total number of thread color changes for the
color changes pattern that is being edited.
p.122
Sapphire_brother.book Page 53 Thursday, November 17, 2005 2:48 PM
2
No.
Display
Key Name
Reference
Page
Description
1
Selects the pattern that is being edited when the
Pattern selection embroidery pattern consists of multiple patterns that
keys
have been combined.
p.120
2
Moves the sewing position of the pattern that is being
edited in the direction of the arrow (If
is touched,
the sewing position is moved to the center of the
embroidering area.)
p.120
3
Positioning keys
Horizontal mirror
Flips the pattern being edited horizontally.
image key
4
Vertical mirror
image key
5
Size key
6
Rotate key
7
Spacing key
8
Array key
9
Multi Color key
0
Density key
A
Change thread
color key
B
p.121
Flips the pattern being edited vertically.
p.121
Changes the size of the pattern that is being edited.
p.121
Rotates the pattern that is being edited.
p.122
Changes the spacing between the characters in the
alphabet pattern that is being edited.
p.124
Changes the orientation of the characters in the
alphabet pattern that is being edited.
p.123
Enables the thread color of each character in an
alphabet pattern to be changed; can only be used
when an alphabet is selected.
p.126
Changes the density of the pattern that is being
edited; can only be used if an alphabet or frame
pattern is selected.
p.125
Changes the color of the pattern.
p.127
Delete key
Deletes the pattern. If touched, the pattern being
edited is deleted.
p.128
C
Merge key
Adds a pattern. If touched, the pattern group
selection screen appears.
p.119
D
Preview key
Displays an image of the pattern so that it can be
previewed.
p.27
E
Edit End key
Finish editing and continues to the embroidering
settings screen.
p.25
Screen Quick Reference Guide 53
Sapphire_brother.book Page 54 Thursday, November 17, 2005 2:48 PM
EMBROIDERING TUTORIAL ———————————————————————————————————————————————————
Understanding the embroidering settings screen
From this screen, the entire pattern can be edited and embroidering settings can be specified. In addition, the
embroidering position can be checked and a pattern can be saved for later use.
No.
1
Display
Key Name
Description
Embroidery frame Shows the sizes of embroidery frames that can be used to
sew the embroidery pattern currently displayed in the
indicators
pattern display area.
Reference
Page
p.28
2
Pattern size
Shows the size of the embroidery pattern currently displayed in
the pattern display area. The top value shows the height and the
bottom value shows the width. If the embroidery pattern consists
of multiple patterns that have been combined, the size of the
entire pattern, including all patterns, is shown.
3
Distance from
center (vertical)
Shows the vertical distance that the pattern being edited is
moved.
p. 72
Distance from Shows the horizontal distance that the pattern being edited
center (horizontal) is moved.
p.72
4
5
6
Rotation angle
Shows the rotation angle that the pattern being edited is
rotated.
p.73, 129
Number of thread Shows the total number of thread color changes for the
color changes pattern that is being edited.
7
Repeat spacing
(vertical)
Shows the vertical distance between patterns when repeat
sewing is selected.
p.130
8
Repeat spacing
(horizontal)
Shows the horizontal distance between patterns when
repeat sewing is selected.
p. 130
54
Sapphire_brother.book Page 55 Thursday, November 17, 2005 2:48 PM
2
Embroidering settings
Editing functions
No.
Display
Key Name
1
Rotate All key
2
Repeat key
3
Change thread
color key
Description
Rotates the entire embroidery pattern when it
consists of multiple patterns that have been
combined.
Repeatedly sews the pattern.
Reference
Page
p. 73, 129
p.130
Changes the color of the pattern.
p.127, 131
4
Positioning keys
Moves the sewing position of the whole pattern in
the direction of the arrow (If
is touched, the
sewing position is moved to the center of the
embroidering area.)
5
Lock stitching
(beginning) key
Specifies that automatic lock stitch is sewn at the
beginning of the pattern and at the beginning of
sewing after thread trimming.
p.88
6
Lock stitching
(end) key
Specifies that automatic lock stitch is sewn when the
thread is trimmed.
p.88
7
Maximum sewing Specifies the maximum sewing speed.
speed key
p.72
p.91
8
Starting/ending
position key
Specifies the needle position at the beginning of
sewing and at the end.
p.89
9
Trial sewing key
Moves the embroidery frame so that the
embroidering position can be checked.
p.32
0
Quit key
Cancels all operations previously performed and
returns to the initial pattern type selection screen.
A
Edit key
Touch to return to the pattern editing screen.
B
Store key
Stores the pattern.
p.136
C
Preview key
Displays an image of the pattern that is to be
embroidered so it can be previewed.
p.27
D
Sewing key
Finish all operations in the embroidering settings
screen and continues to the embroidering screen.
p.32
* The functions and operations for the change thread color key 3 and the preview key C are the same in both
the pattern editing screen and the embroidering settings screen.
Screen Quick Reference Guide 55
Sapphire_brother.book Page 56 Thursday, November 17, 2005 2:48 PM
EMBROIDERING TUTORIAL ———————————————————————————————————————————————————
Understanding the embroidering screen
From this screen, the total number of thread colors and the sewing time can be checked, the needle bar settings
can be specified, and the stitching forward or backward can be done.
No.
Display
Key Name
Description
Reference
Page
the part of the pattern that will be sewn with the thread
Region display Shows
color shown first in the thread color sequence display.
1
Thread color Shows the order for the thread color changes. During
sequence
embroidering, this display scrolls so that the color of the
display
thread currently being sewn appears at the top.
2
Needle bar
number
3
Indicates the needle bar number where the thread color at
the left is assigned.
This indicator shows when the thread spools will need to be
Spool change changed. The thread spools will need to be changed at the
indicator
point between the two thread colors where the indicator is
displayed.
The bottom value shows the total number of thread color
Sewing order changes in the pattern and the top value shows the thread
color that is currently being sewn.
The bottom value shows the total number of stitches in the
Stitch count pattern and the top value shows how many stitches have
already been sewn.
The bottom value shows the total amount of time required to
Sewing time sew the pattern and the top value shows how much time has
already passed sewing.
Time until the If the pattern contains seven or more colors, the amount of
spools must time until the spools change is shown.
be replaced
4
5
6
7
8
p. 76
p. 75
Touch a key to move the needle bar position to the selected
needle bar number.
p. 34
Use when threading the needle with the automatic needlethreading mechanism.
the color and the thread color name (number) for the
Thread color Shows on
0
the needle bar indicated on the key. Thread the
p.33
set up display thread
machine as indicated here.
Maximum
A
sewing speed Specifies the maximum sewing speed.
p.91
key
*The functions and operations for the maximum sewing speed keys A are the same in both the pattern editing
screen and the embroidering settings screen.
Needle bar
key
9
Memo
● The thread color numbers in the thread color sequence display and the thread color set up display can
be changed, for example, to the color name or the thread color number for other brands. (Refer to
“Changing the thread color information” on page 145.)
56
Sapphire_brother.book Page 57 Thursday, November 17, 2005 2:48 PM
2
Key Name
Description
Reference
Page
B
Reserve Stop
key
While sewing embroidery, touch this key for the machine to
stop as the next color begins.
p. 92
C
Cancel key
Touch this key to quit sewing and return to the
embroidering settings screen.
D
Temporary
needle bar
settings key
Enables the needle bar settings to manually be specified
No.
E
F
Display
Moves the needle forward or backward through the
stitching. Use this key in the following situations:
Forward/
Backward stitch ● If the thread breaks or runs out while embroidering
key
● To restart sewing from the beginning
● To continue sewing after the machine was turned off
Unlocks the machine so it can start sewing within 10
Unlock key
seconds. When this key is touched, the start/stop button
flashes in green.
p. 94
p.79
p.42
Screen Quick Reference Guide 57
Sapphire_brother.book Page 58 Thursday, November 17, 2005 2:48 PM
EMBROIDERING TUTORIAL ———————————————————————————————————————————————————
When You Have a Question, This May Help You
TECHNICAL TERMS:
■ USB Type “A” (host) and USB Type “B”
(function)
This is one of the communication methods
between PC (Personal Computer) and peripherals.
You can connect USB media via USB Type “A”
(host) port connector and also you can connect
your machine to your PC via USB Type “B”
(function) port connector with included USB
cable. (Refer to page 114.)
■ Needle at the “embroidering position”
This is the needle that is placed above the needle
hole in the needle plate. The needle bar case is
moved to position that particular needle with the
next thread color to the “embroidery position”.
Also when using the needle threader, the needle
that is going to be threaded should be moved to
the “embroidery position”. (Refer to page 40.)
■ DST
This is the extension of Tajima data file (*.dst) that
is one of the data formats of embroidery patterns.
Tajima data doesn't have any color information,
so the machine assigns colors automatically when
you load it. (Refer to page 163.)
■ Needle number
The needles are numbered from right to left. The
far right needle is number 1 needle. (Refer to
page viii.)
1 Needle
2 Needle hole in the needle plate
■ Wiper
This is the mechanism for pulling the thread. The
wiper pulls the thread when the needle threader is
used.
The wiper also pulls the thread from the material
when the machine trims the thread. This makes
trimming threads after embroidering unnecessary. (Refer to page 40.)
58
Sapphire_brother.book Page 59 Thursday, November 17, 2005 2:48 PM
PATTERNS:
Following patterns can be used to embroider by the
machine.
- Embroidery data with *.pes, *.phc or *.dst format.
USB media transfer the data to the machine. Also
via USB cable, the data can be transferred from
the PC to the machine.
- Optional embroidery cards
- Embroidery patterns created by digitizing software
program
- The patterns saved on USB media by the machine
■ Getting false thread breakage error
- Check that the position of the upper thread is
under the upper thread guide plates. (Refer to
page 36.)
- Check that the position of the upper thread is
around the thread tension disk. (Refer to
page 37.)
2
EMBROIDERING:
■ Customize the embroidery colors
- Use the “Change thread color” function by
selecting the key on either the “pattern editing”
or the “embroidery setting” screen. More
details please see the page 127.
- Use the “Temporary needle bar setting”
function by selecting the key on the
“embroidering” screen. More details please see
the page 94.
■ Resume an unfinished pattern from the last time
the machine was switched off.
- The machine remembers the pattern and the
position even after turning off the power. And
the machine can resume the embroidery when
the machine turns on again. (Refer to page 62.)
1 Upper thread guide plates
2 Thread tension disk
■ Thread tension changed suddenly
- Thread is caught on a rough edge of the spool
of upper thread.
- Upper thread is caught under the spool of
thread.
- The thread dust or lint is gathered under the
bobbin's tension spring.
■ The frame came out from the carriage
Make sure that the positioning pins are placed
into the frame's positioning slot and hole. (Refer
to page 31.)
It is a good idea to turn off the machine once to
originate the carriage before you re-sew the
pattern.
■ Cancel the current design and start again
Select the “New Embroidery” key on the upper
left of the screen. The pattern and all information
will be deleted. (Refer to page 49.)
When You Have a Question, This May Help You 59
Sapphire_brother.book Page 60 Thursday, November 17, 2005 2:48 PM
EMBROIDERING TUTORIAL ———————————————————————————————————————————————————
60
Sapphire_brother.book Page 61 Thursday, November 17, 2005 2:48 PM
3
OTHER BASIC PROCEDURES
This chapter provides explanations on operations other than those described in
chapter 2, such as sewing a pattern with seven or more colors, changing the needles
and changing thread spools.
Resume the Operation Being Performed Before the Machine Was Turned OFF......62
Changing the Needle...............................................................................................63
Replacing the needle / 63
Correctly Using the Embroidery Frames..................................................................65
Embroidery frame types and applications / 65
Attaching Iron-On Stabilizer (Backing) to Fabric ....................................................66
Hooping the Fabric .................................................................................................67
Hooping the fabric in the extra-large and large embroidery frames / 67
Using the embroidery sheet / 68
Large/small pieces of fabric / 69
Embroidery Frame Position and Movement.............................................................70
Changing the Embroidering Position .......................................................................72
Adjusting the angle / 73
Embroidering a Pattern Containing Seven or More Colors ......................................75
Checking if thread spool changes are necessary / 75
Changing the Thread Spools with Designs of Seven or More Colors .......................77
Change thread spools message / 77
Easily changing the thread spools / 78
If the Thread Breaks or the Bobbin Thread Runs Out While Embroidering .............79
If the upper thread breaks / 79
If the bobbin thread breaks or runs out / 80
Embroidering From the Beginning or Middle of the Pattern ....................................81
Resume Embroidering After Turning OFF the Machine ...........................................83
Adjusting the Thread Tension..................................................................................85
Adjusting the tension of the bobbin thread / 85
Adjusting the tension of the upper thread / 86
Sapphire_brother.book Page 62 Thursday, November 17, 2005 2:48 PM
OTHER BASIC PROCEDURES
——————————————————————————————————————————————————
Resume the Operation Being Performed Before the Machine Was Turned OFF
The screen that appears after the machine is turned on and
is touched differs depending on how the
machine was previously turned off. If the machine was turned off while an operation was being performed, you
can choose to continue the operation being performed before the machine was turned off.
1
Turn on the embroidery machine.
■ To select a pattern and start a new operation
3
2
Touch
.
When the screen shown below appears after
the initial screen, touch
.
X The pattern type selection screen appears.
Memo
• If
X A message appears, asking if you wish to
continue the previous operation or begin a
new one.
• If the machine was turned off while an
operation was not being performed, the
pattern type selection screen appears.
■ To continue the operation being performed
before the machine was turned off
3
Touch
.
X Depending on the screen that was displayed
before the machine was turned off, the
pattern editing screen, the embroidering
settings screen or the embroidering screen
appears.
62
is not touched to confirm the
selection of the pattern in the pattern list
screen, the operation cannot be
continued.
• The screen that appears when an
operation is continued differs depending
on the screen that was displayed when
the machine was turned off.
If the operation in the pattern editing
screen is finished:
That pattern editing screen appears.
If the machine was turned off after a
pattern is selected and while the pattern
type selection screen or the pattern list
screen is displayed:
The pattern editing screen for the
selected pattern appears.
If the machine was turned off while the
embroidering settings screen is
displayed:
The embroidering settings screen for that
pattern appears.
If the machine was turned off while
embroidering:
The embroidering screen appears with
the needle positioned at the stitch being
sewn when the machine was turned off.
Sapphire_brother.book Page 63 Thursday, November 17, 2005 2:48 PM
Changing the Needle
If the needle is bent or the tip of the needle is broken, replace the needle with a new one. Use the included allen
screw driver to replace the needle with one that is designed specifically for this machine and that passes the test
described in “Checking the needle” (on page 15).
Replacing the needle
1
• Do not apply extreme force when loosening
or tightening the needle set screw, otherwise
the machine may be damaged.
Turn off the embroidery machine.
3
CAUTION
● Be sure to turn off the embroidery
machine before replacing the needle,
otherwise injuries may result if the
machine starts sewing.
Loosen the needle set screw and remove the
2 needle.
With the flat side of the needle toward the
3 back of the machine, insert the needle all the
way up until it touches the needle bar stopper.
Pass the needle through the hole in the presser
foot, and then use the needle changing tool to
lift up the needle.
Hold the needle with your left hand, and then
hold the allen screw driver in your right hand
and turn the needle set screw
counterclockwise.
1
2
4
3
1
2
3
4
Needle bar stopper
Needle
Flat side of needle
Needle changing tool
Note
● Be sure to use the included allen screw
driver to replace the needle, otherwise too
much force may be applied to the needle,
causing it to break.
Changing the Needle
63
Sapphire_brother.book Page 64 Thursday, November 17, 2005 2:48 PM
OTHER BASIC PROCEDURES
——————————————————————————————————————————————————
As shown in the illustration, press 1 to extend
the needle-mounting clamp 2. Attach the
clamp to the needle, and then release the
pressed area to clamp the needle. To unclamp
the needle, press 1 again.
While holding the needle in place with your
4 left hand, tighten the needle set screw.
Use the allen screw driver to turn the needle
set screw clockwise.
CAUTION
● Be sure to insert the needle all the way
up until it touches the needle bar stopper
and securely tighten the needle set screw
with the allen screw driver, otherwise the
needle may break or the machine may be
damaged.
● If the needle is not fully inserted, the
hook of the automatic needle-threading
mechanism will not pass through the eye
of the needle during automatic needle
threading, and the hook may bend or the
needle cannot be threaded.
● If the hook of the automatic needlethreading mechanism is bent or
damaged, contact your authorized
retailer.
64
Sapphire_brother.book Page 65 Thursday, November 17, 2005 2:48 PM
Correctly Using the Embroidery Frames
The various types of embroidery frames and their uses are described below. In addition to the included
embroidery frames, the optional cap frame can be used with this embroidery machine.
CAUTION
● Only use embroidery frames of the sizes indicated in the screen, otherwise the embroidery
frame may hit the presser foot, which may result in injuries.
Embroidery frame types and applications
Extra-large
embroidery frame
Large embroidery frame
Medium embroidery
frame
Small embroidery frame
3
Embroidering area:
200 mm (H) × 300 mm (W)
(7-7/8 inches (H) × 11-3/4 inches (W))
Embroidering area:
Embroidering area:
Embroidering area:
130 mm (H) × 180 mm (W) 100 mm (H) × 100 mm (W) 40 mm (H) × 60 mm (W)
(5-1/8 inches (H) × 7-1/8 inches (W)) (4 inches (H) × 4 inches (W)) (1-1/2 inches (H) × 2-3/8 inches (W))
Use when embroidering
connecting characters or
patterns, combined patterns
or large embroidery
patterns.
Use when embroidering
Use when embroidering Use when embroidering
patterns with a size less than standard-sized patterns. small-sized patterns,
130 mm (H) × 180 mm (W)
such as nametags.
(5-1/8 inches (H) × 7-1/8
inches (W))
(Refer to “Hooping the Fabric” on page 67.)
Cap frame
(optional)
<Standard type>
<Advanced type>
(Refer to “Hooping the Fabric in the Embroidery
Frame” on page 28.)
Note
● The embroidery frame indicators show all
embroidery frame sizes in which the
embroidery pattern can be sewn. Be sure
to use an embroidery frame of the most
suitable size. If the embroidery frame that
is too large is used, the pattern may be
misaligned or the fabric may pucker.
Embroidering area:
50 mm (H) × 130 mm (W)
(2 inches (H) × 5-1/8 inches (W))
Use when embroidering caps.
Baseball (golf) caps, tulip hats and bucket hats can be
embroidered with this frame.
This frame cannot be used with hats having a front area of
50 mm (2 inches) or less, such as sun visors and children’s
hats. In addition, it cannot be used with hats that have a
brim longer than 80 mm (3-1/8 inches).
(For details on attaching this frame, refer to “Using the
Optional Cap Frame” on page 169.)
Correctly Using the Embroidery Frames
65
Sapphire_brother.book Page 66 Thursday, November 17, 2005 2:48 PM
OTHER BASIC PROCEDURES
——————————————————————————————————————————————————
Attaching Iron-On Stabilizer (Backing) to Fabric
In order to prevent shrinkage of the stitching or misaligned patterns, we recommend that iron-on stabilizer
(backing) be used for embroidering.
CAUTION
● When embroidering on thin or stretch fabrics, fabrics with a coarse weave or fabrics that
easily allow the stitching to shrink, be sure to use iron-on stabilizer (backing) for
embroidering. If iron-on stabilizer (backing) is not used while embroidering, the needle may
bend or break or the pattern may become misaligned.
Using a steam iron, affix the iron-on stabilizer
1 (backing) to the back of the fabric.
Note
1
● Use a piece of iron-on stabilizer (backing)
that is larger than the embroidery frame.
When framing the fabric in the embroidery
frame, be sure that the stabilizer (backing) is
clamped on all edges in order to prevent
wrinkles in the fabric.
2
1 Adhesive side of iron-on stabilizer (backing)
2 Fabric (wrong side)
• When embroidering fabric that should not
be ironed or when embroidering an area that
is difficult to iron, hoop a layer of the iron-on
stabilizer (backing) under the fabric in the
embroidery frame without ironing it.
1
2
1 Area of embroidery frame
2 Iron-on stabilizer (backing)
Memo
● When embroidering thin fabrics, such as
organza or lawn, use a water-soluble
stabilizer (backing). Water-soluble
stabilizers dissolve when washed, allowing
you to create beautiful embroidery that is
not stiff.
● When embroidering fabric with a nap, such
as towels or corduroy, hoop a layer of ironon stabilizer (backing) under the fabric in
the embroidery frame without ironing it.
● For other uses of stabilizer (backing), refer to
“Stabilizers (Backing)” on page 165.
66
Sapphire_brother.book Page 67 Thursday, November 17, 2005 2:48 PM
Hooping the Fabric
Hooping the fabric in the extra-large
and large embroidery frames
1
Loosen the screw on the outer frame.
1
lightly pull the fabric in the direction indicated
by arrow D and insert corner D.
• Be sure that there are no wrinkles in the
fabric after it is stretched in the embroidery
frame.
4 securely tighten the screw so that the fabric is
While stretching the fabric even more,
taut.
3
1 Screw
Place the fabric with right side up on top of
2 the outer frame.
• After stretching the fabric, lightly tapping it
should produce a drum-like sound.
• Firmly clamp together the inner and outer
frames so that their tops are even.
4
2
3
1
• The outer frame does not have a front or
back side. Either side can be used as the
front.
Press the inner frame into the outer frame.
3 First insert the inner frame at the corner with
the screw A, next insert the nearby one corner
B, and then insert the opposite corner C.
Then insert the opposite corner of non screw
corner D.
1
2
3
4
Outer frame
Inner frame
Right side of fabric
Top of inner & outer frames are even
• Using the included disc-shaped screwdriver,
firmly tighten the screw.
1
1 Disc-shaped screwdriver
First, align the inner and outer frames at the
corner with the screw A. Then, while lightly
pulling the fabric in the direction indicated by
arrow B so that the fabric is taut, insert the
inner frame at corner B. In the same way,
lightly pull the fabric in the direction indicated
by arrow C and insert corner C, and then
Memo
● To correctly frame the fabric in the
embroidery frame, we recommend using a
flat surface.
Hooping the Fabric
67
Sapphire_brother.book Page 68 Thursday, November 17, 2005 2:48 PM
OTHER BASIC PROCEDURES
——————————————————————————————————————————————————
Press the inner frame into the outer frame.
Using the embroidery sheet
In order to hoop the fabric so that the pattern will be
sewn in the correct position, use the guidelines on
the embroidery sheet to accurately stretch the fabric
in the frame.
With a fabric marker, mark the area of the
1 fabric you want to embroider.
Place the embroidery sheet on the inner
2 frame. Align the guidelines on the embroidery
sheet with the marks that you drew on the
fabric.
1 Guidelines
2 Inner frame
Gently stretch the fabric, so that there are no
3 folds or wrinkles.
68
4 Remove the embroidery sheet.
Sapphire_brother.book Page 69 Thursday, November 17, 2005 2:48 PM
Large/small pieces of fabric
This section provides information on embroidering
fabric that is either much larger or much smaller than
the embroidery frame.
■ Embroidering large pieces of fabric or heavy
clothing
When embroidering large pieces of fabric or
heavy pieces of clothing, use a clothespin or
binder clip to fasten the excess fabric to the
embroidery frame so that it does not hang down
from the frame. Embroidering with excess fabric
hanging down from the embroidery frame may
prevent the frame from moving properly and may
result in a misaligned pattern.
■ Embroidering the corner of fabric
When embroidering the corner of a piece of
fabric, use spray fabric adhesive to attach the
corner of the fabric to stabilizer (backing), and
then hoop the stabilizer (backing) in the
embroidery frame. With fabrics where you do not
wish to use spray adhesive, baste the fabric to the
stabilizer (backing).
3
1
2
1 Fabric
2 Stabilizer (backing)
• Use a clothespin or binder clip to fasten the
excess fabric to the embroidery frame.
■ Embroidering small pieces of fabric
When embroidering pieces of fabric that are
smaller than the embroidery frame, use spray
fabric adhesive to attach the fabric to stabilizer
(backing) hooped in the embroidery frame. With
fabrics where you do not wish to use spray
adhesive, baste the fabric to the stabilizer
(backing).
■ Embroidering narrow pieces of fabric, such as
ribbon
When embroidering narrow pieces of fabric, use
spray fabric adhesive to attach the fabric to
stabilizer (backing), and then hoop the stabilizer
(backing) in the embroidery frame. With fabrics
where you do not wish to use spray adhesive,
clamp both ends of the fabric, together with the
stabilizer (backing), in the embroidery frame.
1
2
1 Ribbon
2 Stabilizer (backing)
1
2
1 Fabric
2 Stabilizer (backing)
Hooping the Fabric
69
Sapphire_brother.book Page 70 Thursday, November 17, 2005 2:48 PM
OTHER BASIC PROCEDURES
——————————————————————————————————————————————————
Embroidery Frame Position and Movement
The following provides information concerning the embroidery frame when operating the embroidery machine.
■ Embroidery frames that cannot be used for
embroidering
As explained on page 28, the embroidery frame
indicators at the top of the screen show the
embroidery frames that can be used to sew the
currently selected pattern.
Embroidery frames with an embroidering area
smaller than the pattern cannot be used. In
addition, the embroidery frame cannot be used if
the embroidery is smaller than the embroidering
area but is positioned so that it extends out of the
embroidering area of the frame.
■ Moving to the correct position
If the center of the embroidery frame is at the
needle drop point in the embroidering area, the
embroidery frame is correctly positioned, in other
words, at the starting position before
embroidering.
If the embroidery frame is changed, the next
frame that is installed will not be correctly
positioned.
For example, if the extra-large embroidery frame
is replaced with the small frame, the following
will occur.
Embroidery frames with an embroidering area
smaller than the pattern
Patterns that extend out of the embroidering
area of the frame
In either of these cases, a message appears on the
embroidery machine, warning that the
embroidery frame must be changed.
The embroidery machine detects which
embroidery frame is installed according to the
position of the left arm of the embroidery frame
holder. Therefore, the embroidery frame size is
determined by the position of the left arm, even if
the detected embroidery frame is not actually
installed. In addition, if the embroidery frame
holder is not installed, the embroidery machine
determines that the cap frame (sold separately) is
installed.
A message indicating that the embroidery frame
be replaced may appear even if no embroidery
frame is installed.
70
1
2
1 Center of embroidery frame at the correct position
2 Needle position when the embroidery frame is
replaced
In order to correct the misalignment of this
embroidery frame, the embroidery frame
automatically moves to the correct position when
any of the following are performed.
• The embroidery machine is turned on.
The embroidery frame will move.
• The embroidering settings screen is displayed.
The embroidery frame will not move if it is
correctly positioned.
If the pattern extends out of the embroidering
area for the frame, a message appears,
indicating that the embroidery frame should be
replaced. Either replace the embroidery frame
or return to the pattern editing screen and
move the embroidering position.
Sapphire_brother.book Page 71 Thursday, November 17, 2005 2:48 PM
• The embroidery frame is replaced while the
embroidering settings screen or embroidering
screen is displayed, and then the key for
checking the embroidering area, for moving
the embroidery frame, or for starting
embroidering is touched.
The embroidery frame will move.
Since the embroidery frame is moved to the
correct position and paused, touch the desired
key again.
If the pattern extends out of the embroidering
area for the frame after the frame is moved, a
message appears, indicating that the
embroidery frame should be replaced. Either
replace the embroidery frame or return to the
pattern editing screen and adjust the pattern
size or embroidering position.
3
Embroidery Frame Position and Movement
71
Sapphire_brother.book Page 72 Thursday, November 17, 2005 2:48 PM
OTHER BASIC PROCEDURES
——————————————————————————————————————————————————
Changing the Embroidering Position
When the embroidery machine is purchased, it was adjusted so that the beginning of the stitching was from the
center of the pattern. Therefore, move the frame and adjust the embroidering position so that the center of the
pattern aligns with the needle drop point at the sewing position. In addition, the angle of the entire pattern can
be adjusted if the fabric cannot be hooped evenly within the embroidery frame and the pattern is positioned at
an angle on the fabric.
1
Touch
and
,
,
,
,
,
,
in the embroidering settings
screen.
Move the embroidery frame so that the needle
drop point is at the center of the area where
you wish to embroider.
• Touch
to move the embroidery frame
back to its original position (where the
center of the embroidery frame is aligned
with the needle drop point at the sewing
position).
■ Finding the sewing position
By locking the needle bar (securing the needle
and presser foot in the down position), the needle
drop point can easily be seen.
X The embroidery frame moves in the
opposite direction of the arrow.
X The pattern in the pattern display area
moves in the same direction of the arrow.
As shown in the illustration, insert the allen
1 screwdriver into the square hole in the needle
clamp to slowly lower the needle bar down till
needle bar stops then clicks into the lock
position.
Note
● Make sure that the needle is not lowered
beyond the positioning click into the fabric.
1 Shows the vertical distance moved
2 Shows the horizontal distance moved
X The needle and presser foot are locked in
the down position.
72
Sapphire_brother.book Page 73 Thursday, November 17, 2005 2:48 PM
Touch the arrow keys in the embroidery
2 settings screen to move the embroidery frame
so that the needle drop point is at the center
of the area where you wish to embroider.
Adjusting the angle
Depending on the type of fabric being embroidered,
it may not be possible to stretch the fabric in the
embroidery frame at the desired angle. In this case,
adjust the angle of the pattern so that it is correctly
positioned on the fabric.
1
Touch
.
• When specifying the starting of stitching,
align the needle drop point with the point
specified as the starting of stitching. (For
details on specifying the starting/ending of
stitching, refer to page 89.)
3
■ Unlocking the needle bar
Display the embroidering screen, and then
1 touch the key for any needle bar other than
the one that is locked.
X The needle bar is unlocked.
The screen shown below appears.
Example: Original angle
1 Rotates 90 degrees to the left
2 Rotates 10 degrees to the left
3 Rotates 1 degree to the left
4 Rotates 90 degrees to the right
5 Rotates 10 degrees to the right
6 Rotates 1 degree to the right
7 Touch this key to return the pattern to its original
angle.
8 Moves the pattern in the direction of the arrow on
the key.
9 Enables the embroidering area to be
checked
0 Touch this key to close this screen.
Changing the Embroidering Position
73
Sapphire_brother.book Page 74 Thursday, November 17, 2005 2:48 PM
OTHER BASIC PROCEDURES
——————————————————————————————————————————————————
Touch the keys to adjust the pattern to the
2 desired angle.
Each touch of a key rotates the pattern.
Memo
● With this operation, fine adjustments can be
made to the angle; also, this operation is
particularly useful when embroidering
items, such as bags and tubular items, that
have limitations to being hooped in the
embroidery frame.
Example: When embroidering a pillowcase
Rotate the pattern 90 degrees to the left
before embroidering.
1 Shows the angle of the pattern after a key is
touched to change it
• To return the pattern to its original angle
(0 degrees), touch
to
so that it changes
.
If necessary, touch the arrow keys to adjust
3 the position of the pattern.
For more details, refer to page 72.
If necessary, touch
4 embroidering area.
to check the
For more details, refer to page 32.
5
After making the desired changes, touch
.
The embroidering settings screen appears again.
Memo
● If
is touched to return to the pattern
editing screen after the entire pattern is
rotated, the pattern appears as it did before
the rotation angle was specified, but the
setting is not cancelled. When the
embroidering settings screen is displayed
again, the pattern appears with the rotation
angle applied. However, if an error occurs,
for example, if the pattern is enlarged in the
pattern editing screen so that it extends out
of the embroidering area when it is rotated,
the following error message appears.
1 Touch
to return to the pattern editing
screen so that the pattern can be re-edited.
74
Example: When embroidering a T-shirt
Rotate the pattern 180 degrees. Pass the
machine bed through from the waist of the Tshirt, not from the neck, and attach the
embroidery frame to the machine. Prevent
the neck to be stretched when the
embroidery frame is moved.
Sapphire_brother.book Page 75 Thursday, November 17, 2005 2:48 PM
Embroidering a Pattern Containing Seven or More Colors
When embroidering a pattern that uses seven or more thread colors, it is necessary to change the thread spools.
When changing the thread spools, instruction to change the thread spools will appear with the machine
automatically stopping.
■ Assignment of thread colors to needle bars
Thread colors are automatically assigned by the
machine to needle bars 1 to 6, starting with the
thread colors that are sewn first. (However, if a
new pattern has thread colors that are the same as
the previously sewn pattern, the thread colors will
be assigned to the same needle bar as before,
regardless of the sewing order.)
For example, for a pattern with six thread colors
and ten thread color changes, the thread colors
are assigned as shown below.
1
2
3
4
5
1
2
6
5
6
→
→
→
→
→
Needle bar 1
Needle bar 2
Needle bar 3
Needle bar 4
Needle bar 5
Since the thread colors on needle bars 2 and 3 will be
used again after the thread spools are changed, they will
not be replaced. However, different colors are assigned
to the other needle bars.
Checking if thread spool
changes are necessary
When selecting a pattern, the number of thread
changes can be viewed, however, which thread
colors are used in the pattern cannot be checked on
this screen. Whether or not and when thread spools
will need to be changed can be checked with the
following indicators.
■ Time until the spools must be changed
This indicator shows the amount of time until the
next spool change. When the embroidering
screen is displayed, if a length of time appears
here, at least one spool change will be required.
→ Needle bar 6
For a pattern with seven or more thread colors,
the thread spool information is updated when the
seventh thread color is needed.
Afterward, the machine adjusts the assignment of
thread colors to reduce the number of times that
the thread spools will have to be changed.
For example, for a pattern with ten thread colors
and thirteen thread color changes, the thread
colors are assigned as shown below.
1 Time until the spools must be changed
1
2
3
4
5
6
5
7
3
8
9
10
2
→ Needle bar 1
→ Needle bar 2
→ Needle bar 3
→ Needle bar 4
→ Needle bar 5
→ Needle bar 6
Change thread spools here.
→ Needle bar 1
→ Needle bar 4
→ Needle bar 5
→ Needle bar 6
Embroidering a Pattern Containing Seven or More Colors
75
3
Sapphire_brother.book Page 76 Thursday, November 17, 2005 2:48 PM
OTHER BASIC PROCEDURES
■ Spool change indicator (
——————————————————————————————————————————————————
)
The spool change indicator in the stitch
navigating screen indicates the number of times
that the thread spools will need to be changed
and the amount of time between changes.
1
Touch
3
Check the position of
.
in the embroidering screen.
1
indicates when the thread spools will
need to be changed. The thread spools will need
to be changed the number of times that this
indicator is displayed and between the two
X The stitch navigating screen appears.
2
Touch
thread colors at the point where it is displayed.
.
2 Touch
to scroll up through thread color
sequence display. Each time this key is touched,
the previous color in the thread color sequence
display is selected. After reaching the first color in
the thread color sequence display, the scrolling
stops.
4
After checking the desired information, touch
or
X Each time this key is touched, the next color
in the thread color sequence display is
selected. After reaching the last color in the
thread color sequence display, the scrolling
stops.
And then touch
to return to the first color.
.
X The embroidering screen appears again.
76
Sapphire_brother.book Page 77 Thursday, November 17, 2005 2:48 PM
Changing the Thread Spools with Designs of Seven or More Colors
This section contains details on understanding the change thread spools message and on easily changing the
thread spools.
Change thread spools
message
When it is necessary to replace the thread spool
while embroidering a pattern that contains seven or
more colors, the machine automatically stops sewing
and the message shown below appears. This
message also appears when it is necessary to change
the thread spools before beginning to embroider a
new pattern. Change the thread spools according to
their new assignments.
Memo
● To use a different thread color than the one
that was specified, use temporary needle
bar setting key, and then change the thread
color setting. (For details, refer to
“Temporary Needle Bar Setting” on
page 94.)
● To minimize changing the thread spools,
frequently used thread colors can be
specifically assigned to certain needle bars.
(For details, refer to “Reserved Needle Bar
Settings” on page 96.)
1 The needle bars where the thread spools must be
changed appear in color.
2 The needle bars where it is not necessary to
change the thread spools appear in gray.
3 Touch this key to close the message indicating
that the thread spool be changed.
Note
● When the embroidering screen is displayed,
the current thread color assignment is
stored. If the same thread color is used the
next time that the thread spools must be
changed, the needle bar will be assigned
the same thread color as before.
Changing the Thread Spools with Designs of Seven or More Colors
77
3
Sapphire_brother.book Page 78 Thursday, November 17, 2005 2:48 PM
OTHER BASIC PROCEDURES
——————————————————————————————————————————————————
Pull out the old thread just after the needle
Easily changing the thread
spools
4 bar thread guide.
When replacing the thread spools, it is necessary to
re-thread the upper thread. However, the thread
spools can easily be changed when replacing a
thread spool whose thread is correctly threaded
through the machine.
1 the thread guide.
Cut the thread between the thread spool and
Continue pulling the thread until the knot is
above the needle. Cut the knot.
2
Change the thread spool.
5 mechanism to thread the needle with the new
Use the automatic needle-threading
thread. (Refer to page 39)
X This completes the changing of the thread
spool.
Note
● When pulling out the thread, do not pull the
knot through the eye of the needle. If the
knot is pulled through the eye of the needle,
the needle may be damaged.
Tie the end of the thread on the new spool
3 with the end of the thread remaining from the
previous color.
78
Sapphire_brother.book Page 79 Thursday, November 17, 2005 2:48 PM
If the Thread Breaks or the Bobbin Thread Runs Out While Embroidering
If the thread breaks or the bobbin thread runs out while embroidering, the machine will automatically stop.
Since some stitches may be sewn with only one thread, go back through the stitching to a point where stitches
have already been sewn before continuing embroidering.
The embroidery frame moves. Go back to the
point where stitches have already been sewn.
Note
● Be careful when going back or forward
through the stitching since the embroidery
frame moves at the same time.
If the upper thread breaks
Re-thread the upper thread. (Refer to
1 page 35.)
2
Touch
through the stitching, touch
.
Touch
or
to go forward through the stitching.
X The stitch navigating screen appears.
3
3
If the needle bar is moved back too far
and
1 Each touch of this key moves one stitch forward
through the stitching.
2 Each touch of this key moves ten stitches forward
through the stitching.
to go back through
the stitching to a point where stitches have
already been sewn.
1 Each touch of this key moves one stitch back
through the stitching.
2 Each touch of this key moves ten stitches back
through the stitching.
4
Touch
.
X The embroidering screen appears again.
5
Touch
, and then press the start/stop
button to continue embroidering.
If the Thread Breaks or the Bobbin Thread Runs Out While Embroidering
79
Sapphire_brother.book Page 80 Thursday, November 17, 2005 2:48 PM
OTHER BASIC PROCEDURES
——————————————————————————————————————————————————
If the bobbin thread breaks or
runs out
1
Touch
, and then press the thread
■ If the bobbin thread ran out, replace the bobbin
at this point in the procedure.
Replace the bobbin with a bobbin wound with
3 bobbin thread. (Refer to page 18.)
trimming button.
X The upper thread is trimmed.
• If the bobbin thread breaks or runs out, also
trim the upper thread.
Remove the stitches sewn only with the upper
2 thread.
Pull the trim end of the upper thread.
• If the hook cover can be opened, replace the
bobbin without removing the embroidery
frame from the machine.
• If the machine bed is hidden, for example,
with a bag-shaped piece of fabric, or if the
hook cover cannot be opened, temporarily
remove the embroidery frame. (Refer to
page 46.) After replacing the bobbin, reattach the embroidery frame. (Refer to
page 30.)
Note
• If the stitches cannot be cleanly removed,
trim the thread with scissors.
If the embroidery frame is removed before
embroidering of the pattern is finished, be
careful of the following, otherwise the pattern
may become misaligned.
● Do not apply extreme pressure to the
framed fabric and cause it to become loose.
● When removing and re-attaching the
embroidery frame, do not allow the frame to
hit the carriage or the presser foot.
If the carriage is hit and moves, turn the
machine off, then on again. The correct
frame position at the time that the machine
was stopped is stored in the machine’s
memory, and the embroidery frame is
returned to the correct position.
● When the embroidery frame is re-attached,
make sure that the pins on the left and right
arms of the embroidery frame holder
securely fit into the holes in the handles on
the embroidery frame.
Go back through the stitching in the same way
2 of “If the upper
thread breaks” on page 79, and then continue
embroidering.
4 as that described in step
80
Sapphire_brother.book Page 81 Thursday, November 17, 2005 2:48 PM
Embroidering From the Beginning or Middle of the Pattern
If you wish to restart embroidering from the beginning, for example, if trial embroidery was sewn and an
incorrect thread tension was used or if the wrong thread color was used, restart the embroidering using the
forward/backward stitch key. In addition, you can go forward or back through the stitching by thread color or by
stitch to start stitching at any position of the pattern.
■ To start sewing from the beginning
Note
● Be careful when going back or forward
through the stitching since the embroidery
frame moves at the same time.
3
Touch
.
Press the start/stop button to stop the
1 machine.
3
1 Touch this key to return to the beginning of the
first color.
X The embroidery frame moves to the starting
position.
• If necessary, change the fabric framed in the
embroidery frame or trim and remove the
sewn stitches.
2
Touch
.
X The stitch navigating screen appears.
Embroidering From the Beginning or Middle of the Pattern
81
Sapphire_brother.book Page 82 Thursday, November 17, 2005 2:48 PM
OTHER BASIC PROCEDURES
——————————————————————————————————————————————————
■ To select the stitch from where embroidering is
to begin
3
Touch
and
4
After selecting the stitch from where
embroidering is to begin, touch
.
to select a color in
the thread color sequence, and then touch
,
,
,
,
and
to select the stitch.
X The embroidering screen appears again.
5
Touch
, and then press the start/stop
button to begin embroidering.
X Embroidering begins from the specified
point.
1 Touch this key once to return to the beginning of
the stitching for the color being sewn. Afterward,
each touch of this key returns to the beginning of
sewing for the previous thread color.
2 Each touch of this key advances to the beginning
of sewing the next thread color.
3 Each touch of this key moves one stitch back
through the stitching.
4 Each touch of this key moves ten stitches back
through the stitching.
5 Each touch of this key moves one hundred
stitches back through the stitching.
6 Each touch of this key moves one stitch forward
through the stitching.
7 Each touch of this key moves ten stitches forward
through the stitching.
8 Each touch of this key moves one hundred
stitches forward through the stitching.
9 The thread color at the top of the thread color
sequence display is the color of the area currently
selected.
0 Touch this key to close this screen.
X The needle bar case moves and the current
needle bar moves to the sewing position,
and then the embroidery frame moves and
current needle position is indicated.
82
Sapphire_brother.book Page 83 Thursday, November 17, 2005 2:48 PM
Resume Embroidering After Turning OFF the Machine
In either of the following cases, the remaining stitches of the embroidery are stored in the machine’s memory.
• If the machine's power switch is pressed to turn off after stopping embroidering.
Cut the thread before the machine's main power switch is turned off, otherwise the thread may be pulled or
may catch when the carriage returns to its initial position after the machine is turned on again.
• If the machine was accidentally turned off, for example, due to a power outage, while it was embroidering.
The remainder of the embroidery can be sewn when the machine is turned on again; however, some of the
stitches that were already sewn may be sewn again.
1 the machine.
Set the main power switch to “I” to turn on
Note
● Be careful when going back or forward
through the stitching since the embroidery
frame moves at the same time.
3
2
When the screen shown below appears after
the initial screen, touch
.
X A message appears, asking if you wish to
continue embroidering or start a new
operation.
Resume Embroidering After Turning OFF the Machine
83
Sapphire_brother.book Page 84 Thursday, November 17, 2005 2:48 PM
OTHER BASIC PROCEDURES
3
Touch
——————————————————————————————————————————————————
.
5
1 Touch to continue embroidering.
2 Touch to cancel embroidering and display the
pattern type selection screen to select a new
pattern.
two or three stitches.
• Check that the needle drop point is
positioned where stitches have already been
sewn.
6
Touch
two or three times to go back
1 Each touch of this key moves one stitch back
through the stitching.
X The embroidering screen displayed before
the machine was turned off appears.
4
Touch
Touch
.
.
X The embroidering screen appears again.
7
Touch
, and then press the start/stop
button to continue embroidering.
Memo
X The stitch navigating screen appears.
84
● The machine can be stopped at any time,
even while it is embroidering; however, if
the machine is stopped when the thread
color is changed, it is not necessary to go
back through the stitching when
embroidering is continued. The machine
can also be set to stop when the thread
color is changed. (For details, refer to
“Setting the Machine to Stop at Color
Changes” on page 92.)
Sapphire_brother.book Page 85 Thursday, November 17, 2005 2:48 PM
Adjusting the Thread Tension
The following procedure describes how to adjust the thread tension if the correct thread tension as described on
page 45 was not used. After adjusting the tension of the bobbin thread, adjust the tension of the upper thread for
each needle bar.
Note
● Be sure to check the tension of the bobbin thread each time that the bobbin is changed.
Depending on the bobbin thread type and whether a prewound bobbin is used, the tension of the
bobbin thread may differ. For example, when replacing an empty prewound bobbin with one of the
same type, be sure to check the tension of the bobbin thread and adjust the tension if necessary.
● Be sure to adjust the tension of the bobbin thread before adjusting the tension of the upper thread.
As shown in the illustration, hold the bobbin
Adjusting the tension of the
bobbin thread
2 case against a smooth vertical surface.
Tie the included weight to the end of the
1 thread extending from the bobbin case.
Note
● Different weights are used to adjust prewound bobbins and metal bobbins.
Pre-wound bobbins: Only weight (L)
Metal bobbins: Weight (L) and weight (S)
* Weight (S) is included with the optional
bobbin winder.
• If the thread with the weight attached is
slowly pulled out, the thread tension is
correct.
Use the included standard screwdriver to turn
3 the tension-adjusting screw and adjust the
thread tension.
1
2
3
1 Tension-adjusting screw
2 Tighter
3 Looser
Adjusting the Thread Tension
85
3
Sapphire_brother.book Page 86 Thursday, November 17, 2005 2:48 PM
OTHER BASIC PROCEDURES
——————————————————————————————————————————————————
After making the adjustments, try
4 embroidering with all needle bars to check
the thread tension.
■ Upper thread is too tight
The tension of the upper thread is too tight,
resulting in the bobbin thread being visible from
the right side of the fabric.
(Right side)
Memo
(Wrong side)
● In the built-in embroidery patterns, one
pattern is used for checking the thread
tension. By sewing this pattern, the thread
tension can easily be checked. For details,
refer to page 160.
Turn the knob in the direction of the arrow to
decrease the tension of the upper thread.
Adjusting the tension of the
upper thread
1
1 If the red line is visible, the thread tension cannot
be decreased any further. Increase the tension of
the bobbin thread. For details, refer to page 85.
Turn the thread tension knobs.
3
1
2
4
1
2
3
4
Thread tension knobs
Tighter
Looser
Mark
Note
● If you decrease the thread tension further
than the red line, the tension knob may be
dis-assembled.
■ Upper thread is too loose
The tension of the upper thread is too loose,
resulting in a loose upper thread, loose thread
locks or loops appearing on the right side of the
fabric.
(Right side)
(Wrong side)
Turn the knob in the direction of the arrow to
increase the tension of the bobbin thread.
86
Sapphire_brother.book Page 87 Thursday, November 17, 2005 3:00 PM
4
EMBROIDERING SETTINGS
This chapter contains descriptions on the various embroidering settings, which make
operation easier.
Automatic Lock Stitch Setting .................................................................................88
Starting/Ending Position Settings .............................................................................89
Repeatedly sewing a pattern along a diagonal / 90
Maximum Sewing Speed Setting..............................................................................91
Setting the Machine to Stop at Color Changes ........................................................92
Stopping the machine at the next color change / 92
Specifying pause locations before embroidering / 92
Temporary Needle Bar Setting ................................................................................94
Reserved Needle Bar Settings..................................................................................96
Sapphire_brother.book Page 88 Thursday, November 17, 2005 3:00 PM
EMBROIDERING SETTINGS ———————————————————————————————————————————————————
Automatic Lock Stitch Setting
The machine can be set to automatically sew lock stitches, for example at the beginning of the pattern, before
sewing each thread color change, and before trimming the thread.
When the embroidery machine is purchased, this
function is set ON.
■ Specifying that lock stitches be sewn at the
beginning of the pattern, at the beginning of
sewing each thread color change and at the
beginning of sewing after the thread trim.
1
Touch
so that it changes to
Touch
(or
■ Specifying that lock stitches be sewn before the
thread is trimmed.
1
Touch
so that it changes to
Touch
(or
.
) to select the desired
setting.
.
) to select the desired
setting.
• Each touch of the key turns the setting either
on or off.
• Each touch of the key turns the setting either
on or off.
Automatic lock stitch
setting turned on
Automatic lock stitch
setting turned off
Memo
● If the first stitch length is less than 0.8 mm,
the lock stitch won't be inserted.
● If Thread Trimming is set OFF in setting
screen, the lock stitch won’t be inserted.
(See page 149.)
88
Automatic lock stitch
setting turned on
Automatic lock stitch
setting turned off
Memo
● The automatic lock stitch setting stays the
same until the key is touched to turn it off.
The setting specified before the machine is
turned off remains selected the next time
that the machine is turned on.
● If Thread Trimming is set OFF in setting
screen, the lock stitch won’t be inserted.
(See page 149.)
Sapphire_brother.book Page 89 Thursday, November 17, 2005 3:00 PM
Starting/Ending Position Settings
The machine can set the start point and the ending point separately from the 9 points of the pattern. Those are
upper-left corner, upper-center, upper-right corner, center-left, center-center, center-right, lower-left corner,
lower-center and lower-right corner.
These settings can be used to repeatedly sew a pattern along a diagonal.
The starting/ending position settings are specified
from the embroidering settings screen.
When the embroidery machine is purchased, both
the starting position and the ending positions are set
to the center of the pattern.
1
Touch
■ Specifying the starting position
2 setting.
Touch the key for the desired starting position
X When a starting position is selected, the
ending position is automatically set to the
same position.
.
X The embroidery frame moves to the starting
position.
■ Specifying the ending position
Touch the key for the desired ending position
3 setting.
4
X The starting/ending position settings screen
appears.
4
After selecting the desired settings, touch
.
X The embroidering settings screen appears
again.
1 Specifies the starting position
2 Specifies the ending position
Touch a key to select the setting.
The highlighted key shows the currently selected
setting.
Example
Memo
● The starting/ending position settings do not
change until the key for a new setting is
touched. The settings specified before the
machine is turned off remain selected the
next time that the machine is turned on.
This key is selected.
3 Touch this key to close this screen.
Starting/Ending Position Settings
89
Sapphire_brother.book Page 90 Thursday, November 17, 2005 3:00 PM
EMBROIDERING SETTINGS ———————————————————————————————————————————————————
Repeatedly sewing a pattern
along a diagonal
2
Sew the first embroidery pattern.
Touch
Example
to display the embroidering
screen, and then touch
and press the
start/stop button.
1 Starting position
2 Ending position
1 position and the lower-right corner as the
Specify the upper-left corner as the starting
ending position.
Touch
in the embroidering settings
3
After embroidering is finished, the machine
4
Repeat steps 2 and 3 three times.
stops at the lower-left corner of the pattern.
screen to display the starting/ending position
settings screen.
For the starting position, touch
changes to
.
For the ending position, touch
changes to
so that it
so that it
.
Touch
to close the starting/ending
position settings screen.
90
Memo
● If the starting position and ending position
settings are changed, instead of sewing the
patterns in a fixed direction, various pattern
designs are possible.
Sapphire_brother.book Page 91 Thursday, November 17, 2005 3:00 PM
Maximum Sewing Speed Setting
The maximum sewing speed can be set to one of five levels at every 100 rpm between 600 and 1000 rpm. If the
cap frame is used, the maximum sewing speed can be set to one of five levels at every 50 rpm between 400 and
600 rpm.
Maximum sewing speed
Embroidery frame
Memo
Cap frame
1
1000
1
600
2
900
2
550
3
800
3
500
4
700
4
450
5
600
5
400
The maximum sewing speed setting is specified from
the embroidering settings screen or the embroidering
screen.
When the embroidery machine is purchased, the
maximum sewing speed is set to 600 rpm (Cap frame
for 400 rpm).
1
To increase the sewing speed, touch
decrease the sewing speed, touch
X The value between
and
● Decrease the sewing speed when
embroidering on thin, thick or heavy
fabrics. In addition, the machine embroiders
more quietly at a slower sewing speed.
● The sewing speed can be changed while
embroidery is being sewn.
● The maximum sewing speed setting does
not change until a new setting is selected.
The setting specified before the machine is
turned off remains selected the next time
that the machine is turned on.
● Decrease the sewing speed to 600 rpm,
when using a weak thread like a metallic
thread.
4
. To
.
changes.
Maximum Sewing Speed Setting
91
Sapphire_brother.book Page 92 Thursday, November 17, 2005 3:00 PM
EMBROIDERING SETTINGS ———————————————————————————————————————————————————
Setting the Machine to Stop at Color Changes
The machine can be stopped at any time; however, if the machine is stopped while it is embroidering, it is better
to go back a few stitches before continuing sewing to overlap the stitching. If the machine stops at a color
change, it is not necessary to go back through the stitching before continuing embroidering.
Stopping the machine at the
next color change
The machine can be set to stop before sewing the
next color.
1
While sewing the color before the point
where you wish to stop the machine, touch
so that it changes to
Specifying pause locations
before embroidering
Pause locations can be specified in the change
thread color screen, displayed by touching
1
.
Touch
.
in the pattern editing screen or
the embroidering settings screen.
After finishing sewing the area for the current
2 color, the next needle bar moves into position
and the machine stops before sewing the next
color.
X
changes back to
.
• If the machine is temporarily turned off, you
will be asked if you wish to continue sewing
X The change thread color screen appears.
or select a new pattern when the machine is
turned on again.
Touch
to continue embroidering.
(Refer to “Resume Embroidering After
Turning OFF the Machine” on page 83.)
92
2
Touch
and
so that the color at
the top of the thread color sequence display is
the color where you wish to stop the machine
before sewing it.
Sapphire_brother.book Page 93 Thursday, November 17, 2005 3:00 PM
3
Touch
so that it changes to
.
• If the machine is temporarily turned off
when it is stopped at the specified location
after embroidering, you will be asked if you
wish to continue sewing or select a new
pattern when the machine is turned on
again.
Touch
to continue embroidering.
(Refer to “Resume Embroidering After
Turning OFF the Machine” on page 83.)
X The
mark appears to indicate where the
machine will stop.
Memo
● If the machine is temporarily turned off, the
settings to stop the machine at color
changes specified before the machine was
turned off are not cancelled. However, the
settings are cancelled if a new pattern is
selected.
● If a pattern with the settings to stop the
machine at color changes is saved, the
settings to stop the machine at color
changes are also saved.
4
1
mark
Repeat steps 2 and 3 for each pause that
4 you wish to specify.
• Any number of pauses can be specified.
5
After specifying the desired settings, touch
.
X The screen that was displayed before
was touched appears.
Setting the Machine to Stop at Color Changes
93
Sapphire_brother.book Page 94 Thursday, November 17, 2005 3:00 PM
EMBROIDERING SETTINGS ———————————————————————————————————————————————————
Temporary Needle Bar Setting
After embroidering begins, the machine can be stopped at a color change and a different needle bar can be
specified for the next color to be sewn.
By substituting upper thread already threaded on a different needle bar, the time for sewing can be saved. For
example, similar color thread can be substituted for temporary use.
1
While sewing the color before the one that
you wish to change, touch
changes to
so that it
Touch the key for the needle bar threaded
3 with the thread that you wish to embroider
with.
.
X After the color currently being sewn is
finished, the threads are trimmed and the
machine stops.
4
Touch
.
• The start/stop button can be pressed at the
color change to stop the machine, but, in
that case, stop the machine after the threads
are trimmed.
2
Touch
.
X The embroidering screen appears again.
5
Touch
, and then press the start/stop
button to begin embroidering.
X The temporary needle bar setting screen
appears.
X Embroidering continues with the specified
needle bar.
94
Sapphire_brother.book Page 95 Thursday, November 17, 2005 3:00 PM
Memo
● The thread color (needle bar) change
specified as described above only applies
until the next color change. If the pattern
contains another area with the same color
or when the same pattern is sewn the next
time, the area is sewn with the original
color.
● The thread color (needle bar) can be
changed with this procedure even when the
machine has been stopped with a specified
pause or at the time of spool change.
● If the start/stop button was pressed to stop
the machine while an area was being sewn,
a temporary needle bar setting cannot be
applied. The thread color (needle bar)
cannot be changed in the middle of an area
that is being sewn.
4
Temporary Needle Bar Setting
95
Sapphire_brother.book Page 96 Thursday, November 17, 2005 3:00 PM
EMBROIDERING SETTINGS ———————————————————————————————————————————————————
Reserved Needle Bar Settings
Normally, the machine automatically assigns thread colors to the needle bars; however, a specific thread color
can be manually assigned to a certain needle bar. If a needle bar is specified, that needle bar is removed from
the machine’s automatic assignments and the specified color remains assigned to it.
By specifically assigning often used thread colors to certain needle bars, the trouble of changing the thread
spools can be reduced.
Once a manual needle bar setting is specified, it
remains applied until the setting is cancelled.
The manual needle bar settings can be specified in
the third page of the settings screen.
1
Touch
2
Touch
, and then touch
and
Select the color to be assigned to the needle
3 bar.
Touch
,
,
and
until the
color that you wish to select from the thread
table appears enlarged.
to
display the third page of the settings screen.
,
,
,
,
or
for the
1 The color that appears enlarged is the color that is
selected.
2 Displays the color that is selected and its name
number of the needle bar that you wish to
specify.
X Highlighting a color square moves in the
direction of the arrow on the key that is
touched.
4
Touch
.
1 Indicates the number of the selected needle bar
X The color selected in step 3 is specified.
1 The selected color of thread and the anchor
appear on the spool.
96
Sapphire_brother.book Page 97 Thursday, November 17, 2005 3:00 PM
■ Cancelling the setting
To change the setting, first cancel it, and then
select the new setting.
1
Touch
,
,
,
,
or
for the
number of the needle bar whose setting you
wish to cancel.
1 Indicates the number of the selected needle bar
2
Touch
.
4
1 The anchor disappears from the thread spool.
X This cancels the manual needle bar setting.
Reserved Needle Bar Settings
97
Sapphire_brother.book Page 98 Thursday, November 17, 2005 3:00 PM
EMBROIDERING SETTINGS ———————————————————————————————————————————————————
98
Sapphire_brother.book Page 99 Thursday, November 17, 2005 3:00 PM
5
SELECTING/EDITING/SAVING PATTERNS
This chapter provides details on selecting, editing and saving embroidery patterns.
Embroidery Data Precautions................................................................................100
Selecting an Embroidery Pattern ...........................................................................102
General pattern selection / 102
Embroidery patterns / 104
Renaissance Alphabet Patterns / 105
Floral alphabet patterns / 106
Appliqué alphabet / 107
Frame patterns / 108
Alphabet patterns / 109
Embroidery patterns stored in the machine / 111
Embroidery cards (optional) / 112
Computer (USB) / 114
USB media (Commercially Available) / 117
Editing the Embroidery Pattern (Pattern Editing Screen) .......................................119
Combining patterns / 119
Selecting the pattern to be edited / 120
Moving a pattern / 120
Flipping a pattern horizontally / 121
Flipping a pattern vertically / 121
Changing the size of a pattern / 121
Rotating a pattern / 122
Changing the text arrangement of a character / 123
Changing the character spacing / 124
Changing the thread density (only for some character and frame patterns) / 125
Specifying multi-color text / 126
Changing the colors of the pattern / 127
Deleting a pattern / 128
Editing the Embroidery Pattern (Embroidering Settings Screen) ............................129
Rotating the entire pattern / 129
Creating a repeating pattern / 130
Changing the colors of the pattern / 131
Editing a Combined Pattern...................................................................................132
Saving Embroidery Patterns...................................................................................136
Machine’s Memory / 136
If the Embroidery Pattern Cannot Be Saved / 136
USB Media (Commercially Available) / 137
Sapphire_brother.book Page 100 Thursday, November 17, 2005 3:00 PM
SELECTING/EDITING/SAVING PATTERNS —————————————————————————————————————————————
Embroidery Data Precautions
Observe the following precautions when using embroidery data other than that created and saved in this
machine.
CAUTION
● While using embroidery data other than our original patterns, the thread or needle may break
when sewing with a stitch density that is too fine or when sewing three or more overlapping
stitches. In that case, use one of our original data design systems to edit the embroidery data.
■ Types of embroidery data that can be used
• Only .pes, .phc and .dst embroidery data files can be used with this machine. Using pattern data other than
those saved using our data design systems or sewing machines may cause the embroidery machine to
malfunction.
■ Types of USB Devices/Media that can be Used (through USB Type “A” (host) connector)
Stitch data can be saved to or recalled from USB media. Use media that meets the following
specifications.
• USB Floppy disk drive
• USB Flash drive (USB Flash memory).
• USB CD-ROM, CD-R, CD-RW drives (recalling only)
Memo
● Stitch/embroidery data cannot be saved using a USB CD-ROM, CD-R or CD-RW drive.
● USB devices/media can be used only through USB Type “A” (host) connector. USB Type “B“ (function)
connector is only for a computer connection.
You can also use the following types of media with the USB Memory Card Reader/Writer.
• Secure Digital (SD) Card
• CompactFlash
• Memory Stick
• Smart Media
• Multi Media Card (MMC)
• XD-Picture Card
Note
● Some USB media may not be usable with this machine. Please visit our website for more details.
● USB hubs cannot be used through USB Type “A” (host) connector. The machine will not recognize the
above USB devices or USB memory cards through a USB hub.
● The access lamp will begin blinking after inserting USB Devices/Media, and it will take about 5 to 6
seconds to recognize the Devices/Media. (Time will differ depending on the USB Device/Media).
● Only insert or remove USB media while
appears in the display, or when prompted to change
media by a message on the display (see page 117).
● For additional information, refer to the instruction manual included with the USB media that you have
purchased.
Memo
● When a file folder is necessary to create, use a computer.
● Letters and numerals can be used in the file names. In addition, if the file name contains no more than
eight characters, the entire file name will appear on the screen.
If the file name is more than eight characters long, only the first six characters followed by “~” and a
number appear as the file name.
100
Sapphire_brother.book Page 101 Thursday, November 17, 2005 3:00 PM
■ Computers and Operating Systems with the Following Specifications can be Used
• Compatible models:
IBM PC with a USB port as standard equipment
IBM PC-compatible computer equipped with a USB port as standard equipment
• Compatible operating systems:
Microsoft Windows Me/2000/XP
(Windows 98 requires a driver. Download the driver from our Web site (www.brother.com).)
■ Precautions on using the computer to create data
• If the name of embroidery data file/folder cannot be identified,
for example, because the name contains special characters or
symbols, the file/folder is not displayed. If this occurs, change
the name of the file/folder. It is recommended to use the upper
and lower case letters, the numbers 0 through 9, the dash “-”,
and the underline “_”. Do not use comma “,” or period “.” in
the file name.
• If embroidery data larger than 200 mm (H) × 300 mm (W)
(approx. 7-7/8 inches (H) × 11-3/4 inches (W)) is selected, a
message is shown at the right asking if you wish to rotate the
pattern 90 degrees.
Even after being rotated 90 degrees, embroidery data larger than 200 mm (H) × 300 mm (W) (approx. 7-7/8
inches (H) × 11-3/4 inches (W)) cannot be used. (All designs must be within the 200mm(H) × 300mm(W)
(approx. 7-7/8 inches (H) × 11-3/4 inches (W)) design field size.)
For more details, refer to page 113.
• .pes files saved with the number of stitches or the number of colors exceeding the specified limits cannot be
displayed. Use one of our original data design systems to edit the embroidery pattern so that it meets the
specifications (maximum number of stitches: 500,000 stitches; maximum number of color changes: 500;
maximum number of combined patterns: 100).
• Do not create folders in USB media or Removable disk. If embroidery data is stored in a folder, that
embroidery data cannot be displayed by the embroidery machine.
• Even if the embroidery unit is not attached, the machine will manage embroidery data.
■ Tajima (.dst) embroidery data
• .dst data is displayed in the pattern list screen by their file names. (The actual image cannot be
displayed.) Only the first eight characters of the file name can be displayed.
• Since Tajima (.dst) data does not contain specific thread color information, it is displayed with our
default thread color sequence. Check the preview and change the thread colors as desired. For more details,
refer to page 163.
■ Trademarks
• Secure Digital (SD) Card is a registered trademark or a trademark of SD Card Association.
• CompactFlash is a registered trademark or a trademark of Sandisk Corporation.
• Memory Stick is a registered trademark or a trademark of Sony Corporation.
• Smart Media is a registered trademark or a trademark of Toshiba Corporation.
• Multi Media Card (MMC) is a registered trademark or a trademark of Infineon Technologies AG.
• xD-Picture Card is a registered trademark or a trademark of Fuji Photo Film Co. Ltd.
• IBM is a registered trademark or a trademark of International Business Machines Corporation.
• Microsoft and Windows are registered trademarks or trademarks of Microsoft Corporation.
• Each company whose software title is mentioned in this manual has a Software License Agreement
specific to its proprietary programs.
All other brands and product names mentioned in this manual are registered trademarks of their
respective companies. However, the explanations for markings such as ® and ™ are not clearly
described within the text.
Embroidery Data Precautions
101
5
SELECTING/EDITING/SAVING PATTERNS ————————————————————————————————————————
Selecting an Embroidery Pattern
Various embroidery patterns are built into this machine. Other than the built-in patterns, various other patterns
can be selected from embroidery cards (sold separately) and from the computer.
Memo
● Please refer to page 5 for a list of compatible cards.
General pattern selection
The procedure for selecting a pattern differs depending on the type of pattern; however, the general procedure
for selecting a pattern is described below.
1
In the pattern type selection screen, touch the key for the desired category.
Pattern type selection screen
1
2
3
4
5
2
Embroidery patterns
Frame patterns
Alphabet patterns
Renaissance alphabet patterns
Floral alphabet patterns
Appliqué alphabet patterns
Embroidery patterns stored in the machine
Embroidery cards
USB media
Computer (USB)
In the pattern list screen, which appears next, touch the desired pattern to select it.
Pattern list screen
1 Pattern keys
• Touch a pattern to display the following
information of the pattern.
5Vertical length of the pattern
6Horizontal width of the pattern
7Number of thread color changes
• If there is more than one page, touch
2 and
displayed.
102
6
7
8
9
0
3 until the desired page is
4 to
• To change the category, touch
return to the pattern type selection screen.
• After selecting the pattern, touch
8.
The selection of the pattern is confirmed and
the pattern editing screen appears.
Sapphire_brother.book Page 103 Thursday, November 17, 2005 3:00 PM
When a pattern is selected, the following keys at the right side of the screen allow you to edit the
3 pattern.
1 Changing the size of the pattern
3 Flipping the pattern vertically
• Each touch of the key changes the setting as
shown below.
• Each touch of the key turns the setting either
on or off.
Large
Medium
Small
• If the key appears as
, the size of the
2 Flipping the pattern horizontally
• Each touch of the key turns the setting either
on or off.
• If the key appears as
Flipped vertically
• If the key appears as
, the pattern
cannot be flipped vertically.
pattern cannot be changed.
Horizontal flip
turned off
Vertical flip turned
off
4 Checking the preview image
• Touch this key to check that the embroidery
will be sewn as desired.
(For details, refer to page 27.)
Flipped horizontally
5
, the pattern
cannot be flipped horizontally.
Selecting an Embroidery Pattern
103
Sapphire_brother.book Page 104 Thursday, November 17, 2005 3:00 PM
SELECTING/EDITING/SAVING PATTERNS —————————————————————————————————————————————
Embroidery patterns
1
Touch
3
If necessary, edit the pattern.
.
1 The pattern can be flipped horizontally.
2 The pattern can be flipped vertically.
3 Checks the preview image.
X The list of embroidery patterns appears.
Select an embroidery pattern.
2 Touch the desired pattern.
4
Touch
.
This confirms the pattern selection.
X The pattern editing screen appears.
X The selected pattern appears in the pattern
display area.
• If the wrong pattern was selected or you
wish to select a different pattern, touch the
desired pattern.
104
Sapphire_brother.book Page 105 Thursday, November 17, 2005 3:00 PM
Renaissance Alphabet Patterns
1
Touch
3
If necessary, edit the pattern.
.
1
2
3
4
X The list of renaissance alphabet patterns
appears.
Select an embroidery pattern.
2 Touch the desired pattern.
4
Touch this key to change the size.
The pattern can be flipped horizontally.
The pattern can be flipped vertically.
Checks the preview image.
Touch
.
This confirms the pattern selection.
X The pattern editing screen appears.
X The selected pattern appears in the pattern
display area.
5
• If the wrong pattern was selected or you
wish to select a different pattern, touch the
desired pattern.
Selecting an Embroidery Pattern
105
Sapphire_brother.book Page 106 Thursday, November 17, 2005 3:00 PM
SELECTING/EDITING/SAVING PATTERNS —————————————————————————————————————————————
Floral alphabet patterns
1
Touch
3
If necessary, edit the pattern.
.
1 The pattern can be flipped horizontally.
2 The pattern can be flipped vertically.
3 Checks the preview image.
X The list of floral alphabet patterns appears.
2 Touch the desired pattern.
Select an embroidery pattern.
X The selected pattern appears in the pattern
display area.
• If the wrong pattern was selected or you
wish to select a different pattern, touch the
desired pattern.
106
4
Touch
.
This confirms the pattern selection.
X The pattern editing screen appears.
Sapphire_brother.book Page 107 Thursday, November 17, 2005 3:00 PM
X The selected pattern appears in the pattern
display area.
Appliqué alphabet
1
Touch
.
• If the wrong pattern was selected or you
wish to select a different pattern, touch the
desired pattern.
X The size selection screen appears.
4
If necessary, edit the pattern.
2 Touch the key for the desired text size.
Select the text size.
1 The pattern can be flipped horizontally.
2 The pattern can be flipped vertically.
3 Checks the preview image.
• The character will have the following
vertical length when the corresponding size
is selected.
1 Large:
122mm (4-13/16 inches)
2 Medium: 68mm (2-11/16 inches)
3 Small:
49mm (1-15/16 inches)
X The list of appliqué alphabet patterns
appears.
Select an embroidery pattern.
3 Touch the desired pattern.
5
Touch
.
5
This confirms the pattern selection.
X The pattern editing screen appears.
Memo
• For details on sewing appliqués, refer to
“Sewing appliqué patterns” on page 156.
1 Touch this button to change the character size.
Selecting an Embroidery Pattern
107
Sapphire_brother.book Page 108 Thursday, November 17, 2005 3:00 PM
SELECTING/EDITING/SAVING PATTERNS —————————————————————————————————————————————
X The selected pattern appears in the pattern
display area.
Frame patterns
1
Touch
.
• If the wrong pattern was selected or you
wish to select a different pattern, touch the
desired pattern.
4
If necessary, edit the pattern.
X The list of frame patterns appears.
2 desired shape for the frame.
In the upper half of the screen, select the
Touch the desired frame shape.
1 The pattern can be flipped horizonatally.
2 The pattern can be flipped vertically.
3 Checks the preview image.
5
Touch
.
This confirms the pattern selection.
X The pattern editing screen appears.
X The available frame patterns appear in the
lower half of the screen.
Select a frame pattern.
3 Touch the desired pattern.
108
Sapphire_brother.book Page 109 Thursday, November 17, 2005 3:00 PM
If the key for the character that you wish to
3 select is not displayed, touch the tab for the
Alphabet patterns
There are 13 built-in character fonts.
1
Touch
desired set of characters.
.
X The font selection screen appears.
Select a character font.
2 Touch the desired character font.
1
2
3
4
5
Uppercase letters
Lowercase letters
Numbers/symbols
Accented characters
Touch this key to change the character font.
X The text input screen for the characters
shown on the tab appears.
• To change the character font, touch
to return to the font selection screen.
Select a character.
4 Touch the desired character.
• Touch
or
5
for additional
selections.
X The text input screen appears.
X The selected character appears in the
pattern display area.
1 If the wrong character was selected or you wish
to select a different character, touch
to
delete the last character selected, and then touch
the key for the new character.
Selecting an Embroidery Pattern
109
Sapphire_chapt5.fm Page 110 Friday, November 18, 2005 2:12 PM
SELECTING/EDITING/SAVING PATTERNS —————————————————————————————————————————————
5 change the size of the character.
With one character entered, if necessary,
• If the text is small and difficult to read on the
1 Touch this key to change the size.
1 Touch this key to display the text preview screen.
screen, touch
to check the text.
■ Changing the size
After selecting the first character, touch
until the character is the desired size.
• The next characters that are selected will
have the new character size.
• The character size of all entered characters
cannot be changed after the characters are
combined. (The size of the entire pattern can
be changed from the pattern editing screen.)
After checking the text, touch
Note
● Size of the two small fonts
to return
to the text input screen.
and
7
cannot be changed.
If necessary, change the text arrangement.
To enter multiple characters, repeat steps 3
4 until all desired characters are
entered.
6 and
X The selected characters appear in the
pattern display area.
1 Touch this key to change the text arrangement.
1 If the wrong character was selected or you wish
to select a different character, touch
to
delete the last character selected, and then touch
the key for the desired character. Each touch of
deletes the last character of the text.
110
Sapphire_brother.book Page 111 Thursday, November 17, 2005 3:00 PM
■ Changing the text arrangement
Touch
to display the screen shown below.
Touch the key for the desired text arrangement.
After selecting the desired text arrangement,
touch
to return to the text input screen.
Embroidery patterns stored
in the machine
Embroidery patterns stored in the machine can be
recalled. For details on storing a pattern, refer to
“Saving Embroidery Patterns” on page 136.
1
1
2
3
4
5
6
7
Arranges the text on a straight line
Arranges the text on a slanted line
Arranges the text on the outside of a wide curve
Arranges the text on the outside of a sharp curve
Arranges the text on the inside of a wide curve
Arranges the text on the inside of a sharp curve
If text is arranged on a curve, each touch of this
key decreases the bend of the curve (makes it
flatter).
8 If text is arranged on a curve, each touch of this
key increases the bend of the curve (makes it
more curved).
Touch
.
X The list of patterns appears.
Select an embroidery pattern.
2 Touch the desired pattern.
• If the text is arranged using one of the text
arrangements on this screen, even more
characters can be entered.
8
After entering all of the text as desired, touch
.
5
X The selected pattern appears in the pattern
display area.
This confirms the pattern selection.
X The pattern editing screen appears.
Memo
● The color of the text is set to black. To
change the color, refer to “Specifying multicolor text” on page 126 and “Changing the
colors of the pattern” on page 127.
1 Shows the amount of free space in the machine’s
memory.
2 Touch this key to delete the selected pattern from
the memory.
• If the wrong pattern was selected or you
wish to select a different pattern, touch the
key for the desired pattern.
Selecting an Embroidery Pattern
111
Sapphire_brother.book Page 112 Thursday, November 17, 2005 3:00 PM
SELECTING/EDITING/SAVING PATTERNS —————————————————————————————————————————————
■ Deleting embroidery data
From this screen, the embroidery data stored in
the machine’s memory can be organized by
deleting unnecessary data.
After selecting the pattern that you wish to delete,
to display the screen shown below.
touch
Embroidery cards (optional)
1 embroidery card slot.
Insert the embroidery card into the machine’s
With the side of the embroidery card marked
with an arrow facing toward you, fully insert
the card into the embroidery card slot on the
right side of the operation panel.
1 Permanently deletes the data from the memory,
then returns to the data with no pattern selected.
2 Does not delete the data, then returns to the
screen before
3
Touch
was touched.
.
This confirms the pattern selection.
X The pattern editing screen appears.
Note
● Only insert or remove embroidery cards
while
appears in the display or
while the embroidery machine is turned off.
● Make sure that the embroidery card is
inserted with the side marked with the
arrow facing toward you, do not insert the
card with extreme force, and do not insert
any object other than embroidery cards into
the slot, otherwise the machine may be
damaged.
● If an embroidery card other than our
original embroidery cards are used, the
embroidery machine may not operate
correctly. Be sure to use only recommended
embroidery cards.
● Some licensed or copyright cards may not
be compatible with this embroidery
machine.
● Please refer to page 5 for a list of
compatible cards.
112
Sapphire_brother.book Page 113 Thursday, November 17, 2005 3:00 PM
2
Touch
.
Touch
to return to the pattern list screen.
Memo
● Perform the same operation when a pattern
larger than 200 mm(H) × 300 mm(W)
(7-7/8 inches (H) × 11-3/4 inches (W)) is
selected, whether from the computer or
USB media.
X The list of patterns on the embroidery card
appears.
3 111.
Select the pattern as described on page 104 to
■ With patterns larger than 200 mm(H) × 300 mm(W)
(7-7/8 inches (H) × 11-3/4 inches (W))
When a pattern larger than 200 mm(H) × 300 mm(W)
(7-7/8 inches (H) × 11-3/4 inches (W)) is selected, the
following message appears.
5
Touch
to rotate the pattern 90 degrees
before opening it.
If the data is larger than 200 mm(H) × 300 mm(W)
(7-7/8 inches (H) × 11-3/4 inches (W)) even after it is
rotated 90 degrees, the following message
appears.
Selecting an Embroidery Pattern
113
Sapphire_brother.book Page 114 Thursday, November 17, 2005 3:00 PM
SELECTING/EDITING/SAVING PATTERNS —————————————————————————————————————————————
Computer (USB)
Using the included USB cable, the embroidery
machine can be connected to your computer, and
the embroidery patterns saved on the computer can
be temporarily recalled and used from the machine.
Note
Check that the computer to be connected
meets the following operating conditions.
● Compatible models:
IBM-PC with a USB port as standard
equipment
IBM-PC-compatible computer
equipped with a USB port as
standard equipment
● Compatible operating systems:
Microsoft Windows Me/2000/XP
* Windows 98 SE requires a driver. Download
the driver from our Web site
(www.brother.com).
Note
● The connectors on the USB cable can only
be inserted into a connector in one
direction. If it is difficult to insert the
connector, do not insert it with force and
check the orientation of the connector.
● For details on the position of the USB port
on the computer (or USB hub), refer to the
instruction manual for the corresponding
equipment.
● Connection through a USB hub may not be
possible, depending on the operating
environment. If a connection is not
possible, connect the cable to the USB port
of the computer.
After the “Removable Disk” folder appears in
2 the “My Computer” folder on the computer,
the connection is completed.
■ Connecting
Plug the USB cable connector into the
1 corresponding connectors on the computer
and the USB Type “B” (function) port
connector on the embroidery machine.
■ Recalling
1 recall into the “Removable Disk” folder.
Move/copy the pattern data that you wish to
X Pattern data in the “Removable Disk” folder
is written to the machine.
1 USB Type “B” (function) connector
2 USB cable connector
• The USB cable can be plugged into the USB
connectors on the computer and embroidery
machine whether or not they are turned on.
114
Sapphire_brother.book Page 115 Thursday, November 17, 2005 3:00 PM
Memo
Note
● For details on large-size embroidery
patterns, refer to PE-DESIGN instruction
Manual.
● While data is being written, do not
disconnect the USB cable.
● Do not create folders within the
"Removable Disk" folder. Even if folders
have been created, they will not appear in
the machine's screen.
● While the machine is sewing, do not write
data to or delete data from “Removable
Disk”.
2
Touch
• To add a pattern from the computer, repeat
step 1.
X The following screen appears while data is
written to the embroidery machine, and the
key for that pattern appears when writing is
finished.
.
X The list of patterns is displayed.
3 Touch the desired pattern.
Select an embroidery pattern.
• If you decide not to recall the pattern, press
5
.
4
Touch
.
This confirms the pattern selection.
X The pattern editing screen appears.
Note
X The selected pattern appears in the pattern
display area.
● The pattern recalled from the computer is
only temporarily written to the machine. It
is erased from the machine when the
machine is turned off. If you wish to keep
the pattern, store it in the machine. (Refer to
“Machine’s Memory” on page 136.)
• If the wrong pattern was selected or you
wish to select a different pattern, touch the
desired pattern.
Selecting an Embroidery Pattern
115
Sapphire_brother.book Page 116 Thursday, November 17, 2005 3:00 PM
SELECTING/EDITING/SAVING PATTERNS —————————————————————————————————————————————
■ If the desired pattern cannot be recalled
When recalling pattern data from the computer,
the data is not taken directly from the computer.
Instead, the pattern data is temporarily written to
the machine, and that written pattern data is
recalled. The amount of data written to the
machine is limited, and pattern data cannot be
recalled if that data amount is exceeded.
■ Disconnecting the USB cable
Before disconnecting the USB cable, click the
“Unplug or Eject Hardware” icon in the taskbar of
Windows® Me/2000 or the “Safely Remove
Hardware” icon in the taskbar of Windows® XP.
Then, when the removable disk has been
removed safely, disconnect the USB cable from
the computer and the machine.
With Windows 98SE, check that the Access lamp
is not flashing before disconnecting the USB cable
from the computer and the machine.
Note
1 Shows the amount of available space in the USB
area of the machine. If pattern data with this size
is added, it can be recalled (temporarily written).
To recall a pattern larger than the amount of
space available, delete any currently written
patterns, and then place the pattern that you wish
to recall into the folder.
Remove all unnecessary patterns from the
1 “Removable Disk” folder on the computer.
Select the pattern data, and then move it to a
different folder, the Recycle Bin, or right-click
it and click “Delete”.
Place the pattern that you wish to recall into
2 the “Removable Disk” folder.
X After writing the data to the embroidery
machine, the key for that pattern appears in
the screen.
If the desired pattern can still not be written,
1 and 2 .
3 repeat steps
116
● Be sure to perform the operation described
above before disconnecting the USB cable
from the computer and embroidery
machine, otherwise the computer may
malfunction, the data may not be written
correctly, or the data or data writing area on
the embroidery machine may be damaged.
Sapphire_brother.book Page 117 Thursday, November 17, 2005 3:00 PM
USB media
(Commercially Available)
Note
● Only insert or remove USB media while
appears in the display or while the
You can recall a specific embroidery pattern from
either directly USB media or a folder in the USB
media. If the embroidery pattern is under the folder,
move down layers of folders following a path to it.
For details on storing a pattern, refer to “Saving
Embroidery Patterns” on page 136.
Note
● USB media and reader/writer units can be
purchased at electronic/computer retailers.
● Some USB media may not be usable with
this machine. Please visit our web site for
more details.
embroidery machine is turned off.
● Do not insert anything other than USB
media into the USB media port connector.
Otherwise, the USB media drive may be
damaged.
2
Touch
.
1 Type “A” (host) port.
Insert the USB media into the machine’s USB
Depending on the type of USB media being
used, either directly plug the USB device into
the machine’s USB port on the right side of the
operation panel or plug the USB Card Reader/
Writer into the machine’s USB Type “A” (host)
port.
X A list of patterns and folders at the topmost
level are displayed.
• The pattern list is usually displayed within a
few seconds; however, if there are many
patterns, it may take some time for them to
be displayed. While the patterns are being
read, do not remove the USB media. Instead,
wait until the patterns are displayed.
• After recalling data from USB media, if other
data is recalled from the same USB media
without removing the card, the list of
patterns in the folder containing the
previously selected pattern is displayed.
3 select the folder.
To select a pattern in a lower-level folder,
When connecting the USB Card Reader/Writer
to the machine’s USB Type “A” (host) port, be
sure to secure the cable with the three hooks
on the back panel. If the cable is not secured,
the embroidery frame may catch on the cable
while the frame is moving, causing the pattern
to become misaligned.
Selecting an Embroidery Pattern
117
5
Sapphire_brother.book Page 118 Thursday, November 17, 2005 3:00 PM
SELECTING/EDITING/SAVING PATTERNS —————————————————————————————————————————————
X The list of folders and patterns in the
selected folder are displayed in order.
■ Deleting embroidery data
From this screen, the embroidery data stored on
the USB media can be organized by deleting
unnecessary data.
After selecting the pattern that you wish to delete,
touch
1 Shows the name of the current folder
2 Shows the folder in the current folder
If the folder name is more than nine characters
long, the name changes to the first six characters
followed by "~" and a number.
3 Touch this key to move up one folder level.
4 Shows the amount of available space in the USB
media
to display the screen shown below.
1 Deletes the data, then returns to the data with no
pattern selected
2 Does not delete the data, then returns to the data
before
was touched
Select an embroidery pattern.
4 Touch the key for the desired pattern.
• Press
to return to the original screen.
Note
● To delete the USB media pattern data,
delete it from the PR-600II. This will delete
design data completely.
5
Touch
.
This confirms the pattern selection.
X The pattern editing screen appears.
X The selected pattern appears in the pattern
display area.
Note
1 Touch this key to delete the selected pattern.
X If the wrong pattern was selected or you
wish to select a different pattern, touch the
key for the desired pattern.
118
● Do not unplug the USB media or eject the
floppy disk or CD while a stitch pattern is
being read or deleted, otherwise the USB
media may be damaged or data may be lost.
In addition, do not unplug the USB media
or eject the floppy disk or CD while the
contents of the USB media, floppy disk or
CD are displayed.
Sapphire_brother.book Page 119 Thursday, November 17, 2005 3:00 PM
Editing the Embroidery Pattern (Pattern Editing Screen)
The patterns can be edited from the pattern editing screen and the embroidering settings screen. Individual
patterns can be edited with the pattern editing screen, and the entire pattern can be edited with the
embroidering settings screen. The results of editing the pattern can be seen in the pattern display area.
Select an embroidery pattern.
2 Select the pattern to be added as described on
Combining patterns
Various patterns, such as embroidery patterns, frame
patterns, built-in alphabet patterns and patterns on
embroidery cards, can easily be combined.
1
Touch
page 102 to 118.
.
• When another pattern is selected, it is
normally added at the center of the pattern
display area.
Repeat steps 1 and 2 until all patterns to be
X The pattern type selection screen appears
again.
3 combined are selected.
Note
● Up to 100 patterns can be combined. More
than 100 cannot be selected for combining.
In addition, combining cannot continue if
there is no more free space in the machine’s
memory or if the maximum number of
colors allowed (500 colors) is exceeded.
1 Touch this key to quit trying to combine patterns.
The pattern editing screen appears.
Memo
● The position of individual patterns and
other editing operations can be performed
from the pattern editing screen. The editing
operations can be performed in the same
way from the pattern editing screen whether
it is displayed as each pattern is selected or
after all patterns that you wish to combine
have been selected.
Editing the Embroidery Pattern (Pattern Editing Screen)
119
5
Sapphire_brother.book Page 120 Thursday, November 17, 2005 3:00 PM
SELECTING/EDITING/SAVING PATTERNS —————————————————————————————————————————————
Moving a pattern
Selecting the pattern to be
edited
If multiple patterns are selected, you can choose
which pattern will be edited.
1
Touch
or
Determine where in the embroidery frame the
pattern will be embroidered. If multiple patterns are
combined, move each pattern to lay out the design.
1 wish to move the pattern.
Touch the key for the direction where you
.
The pattern that will be edited is the pattern
enclosed by the red frame.
Continue touching
and
until
the red frame is around the pattern that you
wish to edit.
X The pattern moves in the direction of the
arrow on the key.
X The patterns are selected in the order or the
opposite order that they were added to the
pattern.
1 Shows the vertical distance moved
2 Shows the horizontal distance moved
• To return the pattern to its position before it
was moved (center of the embroidery frame),
touch
.
1 Red frame indicating the pattern to be edited
Memo
● If multiple patterns appear in the pattern
editing screen, the basic editing procedure
is to 1. select the pattern to be edited, and
then 2. edit that pattern.
Memo
● The pattern can also be moved by touching
the arrow keys in the screens that appear
when any of the other editing keys are
touched.
● The arrow keys in the embroidering settings
screen are used to move the frame to select
the embroidering position.
120
Sapphire_brother.book Page 121 Thursday, November 17, 2005 3:00 PM
Flipping a pattern horizontally
1
Touch
so that it changes to
Changing the size of a pattern
.
The size of the pattern can be increased or decreased
to between 90% and 120% of its original size.
1
Touch
.
X The pattern is flipped horizontally .
• Each touch of the key turns the setting either
on or off.
Horizontal flip turned off
X The screen shown below appears.
Flipped horizontally
Flipping a pattern vertically
1
Touch
so that it changes to
.
5
Example: Original size
1 Reduces without changing the
height-to-width proportion.
2 Reduces only in the vertical
direction.
X The pattern is flipped vertically.
3 Reduces only in the horizontal
direction.
• Each touch of the key turns the setting either
on or off.
4 Enlarges without changing the
height-to-width proportion.
5 Enlarges only in the vertical
direction.
Vertical flip turned off
Flipped vertically
6 Enlarges only in the horizontal
direction.
7 Touch this key to return the pattern to its original
size.
8 Moves the pattern in the direction of the arrow on
the key.
9 Touch this key to close this screen.
Editing the Embroidery Pattern (Pattern Editing Screen)
121
Sapphire_brother.book Page 122 Thursday, November 17, 2005 3:00 PM
SELECTING/EDITING/SAVING PATTERNS —————————————————————————————————————————————
Touch the keys to adjust the pattern to the
2 desired size.
Rotating a pattern
Each touch of a key slightly enlarges or reduces
the pattern.
The pattern can be rotated between 1 and 359
degrees either clockwise or counterclockwise.
1
Touch
.
The size of the pattern is displayed after a key
is touched to change it.
1 Vertical length
2 Horizontal width
• The size that the pattern can be enlarged
depending on the pattern or character.
• Depending on the pattern or character, if it is
rotated 90 degrees it may be enlarged even
more.
• If the pattern is rotated, the vertical and
horizontal directions may be reversed.
• To return the pattern to its original size,
touch
so that it changes to
X The screen shown below appears.
.
3 the position of the pattern.
If necessary, touch the arrow keys to adjust
For more details, refer to page 120.
4
After making the desired changes, touch
.
X The pattern editing screen appears again.
Example: Original angle
1 Rotates 90 degrees to the left
CAUTION
● After changing the size of the pattern,
check the icons for the embroidery
frames that can be used and use only the
indicated frames. If a frame other than
those indicated are used, the presser foot
may hit the embroidery frame and cause
injuries.
2 Rotates 10 degrees to the left
3 Rotates 1 degree to the left
4 Rotates 90 degrees to the right
5 Rotates 10 degrees to the right
6 Rotates 1 degree to the right
7 Touch this key to return the pattern to its original
angle.
8 Moves the pattern in the direction of the arrow on
the key.
9 Touch this key to close this screen.
122
Sapphire_brother.book Page 123 Thursday, November 17, 2005 3:00 PM
Touch the keys to adjust the pattern to the
2 desired angle.
Each touch of a key rotates the pattern.
Changing the text
arrangement of a character
Characters can be arranged on a horizontal line, on a
slant or on an arc.
1
Touch
.
1 Shows the angle of the pattern after a key is
touched to change it.
• To return the pattern to its original angle
(0 degrees), touch
to
so that it changes
.
3 the position of the pattern.
If necessary, touch the arrow keys to adjust
X The screen shown below appears.
For more details, refer to page 120.
4
After making the desired changes, touch
.
X The pattern editing screen appears again.
CAUTION
● After changing the angle of the pattern,
5
check the icons for the embroidery
frames that can be used and use only the
indicated frames. If a frame other than
those indicated are used, the presser foot
may hit the embroidery frame and cause
injuries.
1
2
3
4
5
6
7
Arranges the text on a straight line
Arranges the text on a slanted line
Arranges the text on the outside of a wide curve
Arranges the text on the outside of a sharp curve
Arranges the text on the inside of a wide curve
Arranges the text on the inside of a sharp curve
If touched after selecting a text arrangement on a
curve, each touch of this key decreases the bend
of the curve (makes it flatter).
8 If touched after selecting a text arrangement on a
curve, each touch of this key increases the bend
of the curve (makes it more curved).
9 Moves the pattern in the direction of the arrow on
the key
0 Touch this key to close this screen.
Memo
● If
in the embroidering settings
screen is used, the entire combined pattern
can be rotated. (For details, refer to
“Rotating the entire pattern” on page 129.)
● If the pattern is too large or the pattern is too
close to the edge of the embroidery field, all
of the rotating options may not apply.
2 arrangement.
Touch the key of the desired text
3
After selecting the desired text arrangement,
the bend of the curve can be adjusted. If
necessary, touch
and
to adjust
the bend of the curve.
Editing the Embroidery Pattern (Pattern Editing Screen)
123
Sapphire_brother.book Page 124 Thursday, November 17, 2005 3:00 PM
SELECTING/EDITING/SAVING PATTERNS —————————————————————————————————————————————
If necessary, touch the arrow keys to adjust
4 the position of the pattern.
For more details, refer to page 120.
5
After making the desired changes, touch
.
X The pattern editing screen appears again.
Changing the character
spacing
The spacing between the characters can be made
wider or narrower.
1
Touch
.
Memo
● The text arrangement specified when the
character was selected on page 123 can be
changed at this point.
X The screen shown below appears.
1 Increases the space between characters
2 Decreases the space between characters
3 Selects the standard character spacing (original
character spacing)
4 Specifies that the thread be trimmed between
characters
5 Moves the pattern in the direction of the arrow on
the key
6 Touch this key to close this screen.
Touch the keys to adjust the characters to the
2 desired spacing.
Each touch of a key slightly enlarges or reduces
the character spacing.
• To return the characters to their original
spacing, touch
.
124
so that it changes to
Sapphire_brother.book Page 125 Thursday, November 17, 2005 3:00 PM
■ Trimming the threads between characters
If the machine is set to trim the threads between
the characters, the jumpstitches between the
characters are reduced and any other necessary
procedures after embroidering are reduced.
However, the embroidering time will increase if
the threads are trimmed between each of the
characters.
If necessary, specify that the threads be
3 trimmed between characters.
Touch
so that it changes to
Changing the thread density
(only for some character and frame patterns)
The thread density for some character and frame
patterns can be changed.
A setting between 80% and 120% in 5% increments
can be specified.
1
Touch
.
.
• Each touch of the key turns the setting either
on or off.
Threads are not
trimmed.
Threads are
trimmed.
If necessary, touch the arrow keys to adjust
4 the position of the pattern.
X The screen shown below appears.
For more details, refer to page 120.
5
After making the desired changes, touch
.
X The pattern editing screen appears again.
5
1 Selects a less thread density
2 Selects a more thread density
3 Touch this key to close this screen.
■ Selects a less thread density
Less
Standard
More
■ Selects a more thread density
Less
Standard
More
Editing the Embroidery Pattern (Pattern Editing Screen)
125
Sapphire_brother.book Page 126 Thursday, November 17, 2005 3:00 PM
SELECTING/EDITING/SAVING PATTERNS —————————————————————————————————————————————
Touch the keys to select the desired thread
2 density.
Each touch of a key slightly increases or
decreases the thread density.
• To return to the original thread density
(standard), select “100%”.
3
After making the desired changes, touch
.
X The pattern editing screen appears again.
Specifying multi-color text
The alphabet pattern characters selected on
page 109 are set to black. The color of the characters
can be changed using the change thread color key;
however, to change the color of individual
characters, touch the Multi Color key to turn it on,
and then specify the color for each character.
1
Touch
so that it changes to
.
• Each touch of the key turns the setting either
on or off.
Multi-color text
Multi-color text
turned off
turned on
• For details on changing the thread color,
refer to “Changing the colors of the pattern”
on page 127.
126
Sapphire_brother.book Page 127 Thursday, November 17, 2005 3:00 PM
7 Color thread table
Select a color from this table.
8 Specifies pause locations (Refer to “Specifying
pause locations before embroidering” on
page 92.)
9 Touch this key to close this screen.
0 Name of the table
Changing the colors of the
pattern
The colors of the pattern can be changed and
previewed on the screen.
By changing the colors of the pattern, the same
pattern can be viewed in various ways.
If your thread colors are registered in a color thread
table and if you used the table for changing color,
the thread spools can be assigned with the thread
colors that you have. And the pattern displayed in
the screen will appear with colors that are almost the
same as the actual thread colors
With this operation, the colors of all patterns will be
changed, not just those of the pattern being edited.
1
Touch
2
Touch
and
until the color to be
changed appears at the top of the thread color
sequence display.
.
1 The thread color for the part of the pattern
displayed at the top will be changed.
3
Touch
,
,
and
to select the
new color from the color palette.
X The change thread color screen appears.
5
1 The color that appears enlarged is the color that is
selected.
2 Displays the name of the selected thread color
X In the pattern display area, the color of the
selected part of the pattern is changed.
1 The part of the pattern in the color at the top of
the thread color sequence display is the part
whose color is being changed.
2 Shows the number of thread color changes. The
top value shows the position in the sewing order
for the color at the top of the thread color
sequence display and the bottom value shows the
total number of thread color changes.
3 Selects the previous color in the thread color
sequence display
4 Selects the next color in the thread color
sequence display
5 Use these keys to select a color from the color
thread table.
6 Applies the color change
Editing the Embroidery Pattern (Pattern Editing Screen)
127
Sapphire_chapt5.fm Page 128 Friday, November 18, 2005 2:36 PM
SELECTING/EDITING/SAVING PATTERNS —————————————————————————————————————————————
4
Touch
.
Deleting a pattern
1
Touch
.
X The color change is confirmed.
• Make sure to touch
to specify the
X The screen shown below appears.
new color, otherwise the thread color is not
changed.
• If the wrong thread color is specified or if
2
Touch
.
you wish to change the thread color again,
select a different thread color, and then
touch
.
Repeat steps 2 through 4 until the colors of
5 all parts that you wish to change are changed.
6
After making the desired changes, touch
X The pattern is deleted.
.
X The pattern editing screen appears again.
Memo
● Touch
to specify pause locations.
For details, refer to “Specifying pause
locations before embroidering” on page 92.
● The color thread table can be changed to a
custom thread that you create to reflect the
thread colors that you have. (Refer to
“Custom thread table settings” on
page 147.)
128
• To quit deleting the pattern, touch
.
Sapphire_chapt5.fm Page 129 Saturday, November 26, 2005 3:46 PM
Editing the Embroidery Pattern (Embroidering Settings Screen)
In the embroidering settings screen, a single pattern can be edited if patterns were not combined or an entire
combined pattern can be edited as a single pattern.
In addition, the arrow keys can be used to move the pattern in the pattern editing screen or move the
embroidery frame in the embroidering settings screen. Touching these keys moves the embroidery frame.
3 the position of the embroidery frame.
If necessary, touch the arrow keys to adjust
Rotating the entire pattern
For more details, refer to page 72.
The entire pattern can be rotated.
1
Touch
If necessary, touch
4 embroidering area.
.
to check the
For more details, refer to page 32.
5
After making the desired changes, touch
.
X The embroidering settings screen appears
again.
Memo
X The screen shown below appears.
● If
is touched to return to the pattern
editing screen after the entire pattern is
rotated, the pattern appears as it did before
the rotation angle was specified, but the
setting is not cancelled. When the
embroidering settings screen is displayed
again, the pattern appears with the rotation
angle applied. However, if an error occurs,
for example, if the pattern is enlarged in the
pattern editing screen so that it extends out
of the embroidering area when it is rotated,
the following error message appears.
1
2
3
4
Enables the entire pattern to be rotated.
Enables the embroidery frame to be moved.
Enables the embroidering area to be checked.
Touch this key to close this screen.
Touch the keys to adjust the pattern to the
2 desired angle.
For more details, refer to page 122.
1Touch
to return to the pattern editing
screen so that the pattern can be re-edited.
Editing the Embroidery Pattern (Embroidering Settings Screen)
129
5
Sapphire_brother.book Page 130 Thursday, November 17, 2005 3:00 PM
SELECTING/EDITING/SAVING PATTERNS —————————————————————————————————————————————
Creating a repeating pattern
2
Touch
,
,
or
to
specify the number of times that the pattern is
copied. Each touch of a key increases or
decreases the rows or columns by one.
The entire pattern can be copied and repeated the
specified number of times. The pattern can be
repeated a maximum of 20 times in both the vertical
and the horizontal directions within the
embroidering area.
1
Touch
.
1
2
3
4
5
X The screen shown below appears.
3
Original pattern
Increases by one row
Decreases by one row
Increases by one column
Decreases by one column
Touch
,
,
or
to
specify the pattern spacing. Each touch of a
key increases or decreases the spacing
between patterns in the corresponding
direction by 5 mm (3/16 inches).
1 Each touch of this key reduces the number of
rows by one.
2 Each touch of this key increases the number of
rows by one.
3 Each touch of this key reduces the number of
columns by one.
4 Each touch of this key increases the number of
columns by one.
5 Decreases the spacing between patterns in a row.
6 Increases the spacing between patterns in a row.
7 Decreases the spacing between patterns in a
column.
8 Increases the spacing between patterns in a
column.
Each touch of these keys increases or decreases the
spacing between patterns by 5 mm (3/16 inches).
9 Resets the repeating settings. The pattern returns
to the arrangement before repeating was
specified.
0 Moves the embroidery frame in the direction of
the arrow on the key.
A Enables the embroidering area to be checked.
B Touch this key to close this screen.
130
1 Original pattern
2 Increases the spacing between rows by 5 mm
(3/16 inches)
3 Decreases the spacing between rows by 5 mm
(3/16 inches)
4 Increases the spacing between columns by 5 mm
(3/16 inches)
5 Decreases the spacing between columns by
5 mm (3/16 inches)
6 Spacing between rows
7 Spacing between columns
Sapphire_chapt5.fm Page 131 Friday, November 18, 2005 2:15 PM
The size of the pattern is displayed after a key
is touched to change it.
Changing the colors of the
pattern
The colors of the pattern can be changed and
previewed in the screen. The function and operation
for this key is the same as that for the change thread
color key in the pattern editing screen.
1
1 Repeat spacing (vertical)
2 Repeat spacing (horizontal)
Touch
.
• To quit repeating the pattern and return it to
its original arrangement, touch
that it changes to
so
.
If necessary, touch the arrow keys to adjust
4 the position of the embroidery frame.
For more details, refer to page 72.
If necessary, touch
5 embroidering area.
to check the
X The change thread color screen appears.
For more details, refer to page 32.
6
After specifying the desired repeat settings,
touch
.
X The embroidering settings screen appears
again.
Memo
● If
5
is touched to return to the pattern
editing screen after specifying repeat settings,
the pattern appears as it did before the repeat
settings were specified, but the settings are not
cancelled. When the embroidering settings
screen is displayed again, the pattern appears
with the repeat settings applied. However, if an
error occurs, for example, if the pattern is
enlarged in the pattern editing screen so that it
extends out of the embroidering area when it is
repeated, the following error message appears.
1Touch
For details on changing the colors, refer to
2 page 127.
Memo
● Even if
is touched to return to the
pattern editing screen after colors are
changed, the settings are not cancelled.
to return to the pattern editing
screen so that the pattern can be re-edited.
Editing the Embroidery Pattern (Embroidering Settings Screen)
131
Sapphire_brother.book Page 132 Thursday, November 17, 2005 3:00 PM
SELECTING/EDITING/SAVING PATTERNS —————————————————————————————————————————————
Editing a Combined Pattern
Example)
1
Touch
2
Select
In this section, we will combine text with floral alphabet pattern, which we
will then edit.
.
3
To select the pattern, touch
.
X The pattern editing screen appears.
.
4
Touch
.
X This pattern will be positioned at the center
of the embroidery area.
X The pattern type selection screen appears
again.
5
132
Touch
.
Sapphire_brother.book Page 133 Thursday, November 17, 2005 3:00 PM
6
Touch
.
Type “ood”.
7 Touch the tab for lowercase letters to display
the lowercase letters input screen, and then
touch “o”, “o”, then “d”.
X The selected letters appear at the center of
the embroidery area.
• To change the size of the pattern, select “o”,
and then touch
9
Touch
0
Touch
and adjust the position of the
letters.
.
X The pattern type selection screen appears
again.
a
As before, touch
.
to select the desired
size.
5
• To change the text arrangement, touch
, and then select the desired text
arrangement.
8
After selecting the characters, touch
.
X The pattern editing screen appears.
Editing a Combined Pattern
133
Sapphire_brother.book Page 134 Thursday, November 17, 2005 3:00 PM
SELECTING/EDITING/SAVING PATTERNS —————————————————————————————————————————————
b
Touch
e
to select the same font, and
then type “Luck”.
After touching “L”, touch the tab for lowercase
letters to display the lowercase letters input
screen, and then touch “u”, “c” , then “k”.
X The selected letters appear at the center of
the embroidery area.
Check the balance of the entire pattern, and,
if you wish to edit the pattern, touch
and
f
to select the pattern to be edited.
Example: To reduce
size.
Touch
to move the red
frame around
c
After selecting the characters, touch
.
X The pattern editing screen appears.
d
134
Touch
and adjust the position of
the letters so that they are well balanced.
and
.
Sapphire_brother.book Page 135 Thursday, November 17, 2005 3:00 PM
g
Touch
.
j
After finishing all editing, touch
.
X The embroidering settings screen appears.
h
Touch
to reduce the pattern
proportionately.
• To return to the pattern editing screen and
continue editing the pattern, touch
i return to the pattern editing screen.
After reducing the pattern, touch
.
to
5
• To adjust other parts of the pattern, touch
and
again, and then adjust
the pattern as desired.
• If it is difficult to view the text and the
pattern, touch
, and then touch
to preview it. Touch
to return
to the previous screen.
Editing a Combined Pattern
135
Sapphire_brother.book Page 136 Thursday, November 17, 2005 3:00 PM
SELECTING/EDITING/SAVING PATTERNS —————————————————————————————————————————————
Saving Embroidery Patterns
Machine’s Memory
If the Embroidery Pattern
Cannot Be Saved
You can save embroidery patterns that you have
customized and will use often, for example, your
name or other pattern combinations, patterns that
have been rotated or resized, or patterns that have
had their embroidering position changed.
If the following screen appears, the embroidery
pattern cannot be saved because either the machine's
memory is full or the pattern being saved is larger than
the amount of space available in the memory. To be
able to save the embroidery pattern in the machine's
memory, a previously saved pattern must be deleted.
Note
• Do not turn off the machine while the
“Saving” screen is displayed, otherwise
you may lose the pattern that you are
saving.
Memo
• It takes a few seconds to save a pattern in
the machine’s memory.
• See page 111 for information on
retrieving a saved pattern.
1
With the pattern that you want to save
2
Press
displayed in the sewing screen, press
• Press
.
■ Deleting saved data
1
Touch
.
X The list of patterns appears.
Select the pattern to be deleted.
2 Touch the pattern.
.
to return to the previous screen
without saving the pattern.
X The “Saving” screen appears. When the
pattern is saved, the previous screen
appears automatically.
136
.
• To quit saving, touch
X The selected pattern appears in the pattern
display area.
1 Touch this key to delete the selected pattern.
2 Shows the amount of free space in the machine's
memory.
Sapphire_brother.book Page 137 Thursday, November 17, 2005 3:00 PM
• If the wrong pattern was selected or you
wish to select a different pattern, touch the
desired pattern.
3
Touch
USB Media
(Commercially Available)
.
When sending embroidery patterns from the
machine to USB media, plug the USB media
into the machine’s USB Type “A” (host) port.
Depending on the type of USB media being
used, either directly plug the USB device into
the machine’s USB Type “A” (host) port or plug
the USB Card Reader/Writer into the machine’s
USB port.
Memo
● Some USB media may not be usable with
this machine. Please visit our web site for
more details.
X The screen shown below appears.
4
To delete the data, press
.
1
Press
when the pattern you want to
save is in the sewing screen.
X The pattern is deleted, and if there is
enough space, the previous screen appears
automatically.
• To quit deleting, press
.
5 pattern.
If there is not enough space, delete another
5
Insert the USB media into the USB port
2 connector on the machine.
X If the embroidery data was saved
successfully, the previous screen
automatically appears.
• Saving the data takes approximately 10
seconds.
a
Note
• Do not turn off the machine while the
"Saving" message is displayed, otherwise
the pattern data being saved may be lost.
b
1 USB Type “A” (host) port connector for media
2 USB media
■ Recalling stored patterns
Refer to the appropriate page of "Selecting an
Embroidery Pattern" according to the media being
used. (For patterns saved on the machine, refer to
page 111. For patterns saved on USB media, refer
to page 117.
Saving Embroidery Patterns
137
Sapphire_brother.book Page 138 Thursday, November 17, 2005 3:00 PM
SELECTING/EDITING/SAVING PATTERNS —————————————————————————————————————————————
When connecting the USB Card Reader/Writer
to the machine’s USB Type “A” (host) port, be
sure to secure the cable with the three hooks
on the back panel. If the cable is not secured,
the embroidery frame may catch on the cable
while the frame is moving, causing the pattern
to become misaligned.
Memo
● Do not insert anything other than USB
media into the USB media port connector.
Otherwise, the USB media drive may be
damaged.
3
Press
• Press
.
to return to the original screen
without saving.
X The “Saving” screen is displayed. When the
pattern is saved, the display returns to the
original screen automatically.
Note
● Do not unplug the USB media or eject the
floppy disk while the "Saving" screen is
displayed, otherwise the USB media may be
damaged or data may be lost.
138
Sapphire_chapt6.fm Page 139 Friday, November 18, 2005 11:51 AM
6
BASIC SETTINGS AND HELP FEATURE
This chapter contains descriptions on the use of the settings key, the machine
operations key and the help key, introduced on page 21. Details on changing the
basic embroidery machine settings and viewing operations on the LCD will be
provided.
Using the Settings Key...........................................................................................140
Understanding the settings screen / 140
Adjusting the brightness of the LCD / 142
Turning the buzzer on or off / 142
Changing the language / 143
Changing the units of measurements / 143
Changing the display guides / 143
Changing the thread color information / 145
Display expanded thread color / 146
Custom thread table settings / 147
Specifying jumpstitch trimming / “DST” jump codes for trimming / 149
Deleting short stitches / 150
Specifying the remaining length of thread / 150
Using the Machine Operations Guide Key ............................................................151
Using the Help Key ...............................................................................................153
Sapphire_chapt6.fm Page 140 Friday, November 18, 2005 11:51 AM
BASIC SETTINGS AND HELP FEATURE
——————————————————————————————————————————————
Using the Settings Key
Touch
(settings key) to change many of the basic embroidery machine settings.
Understanding the settings screen
There are five pages in the settings screen. Touch
the desired page is displayed. The
in the lower-right corner of the screen until
key appears on all pages.
■ Page 1
■ Page 2
1 Touch to quit specifying settings. The settings are
confirmed and the screen that was displayed
before the settings key was touched appears
again.
2 The guides (embroidery frame size, centerpoint
marker, grid and cursor) for the pattern display
area can be specified.
3 The TOTAL COUNT counter shows the total
number of stitches, and the TRIP COUNT counter
show the number of stitches that have been sewn
since the machine's last maintenance.
4 The TOTAL TIME counter shows the total amount
of time that the machine has been used, and the
TRIP TIME counter shows the amount of time that
the machine has been used since its last
maintenance.
Use counters 3 and 4 as a standard for performing
periodic maintenance and for receiving maintenance
for the machine.
5 VERSION
Shows the version of the software installed on this
embroidery machine
Note
● Check with your local authorized Brother
dealer or at www.brother.com for details on
available updates.
140
and
6 CHANGING THE THREAD COLOR DISPLAY
The color information in the thread color
sequence display and the needle bar thread
information can be switched to the color name,
the thread color number or the sewing time, refer
to page 145.
7 DISPLAY EXPANDED THREAD COLOR
The thread colors displayed in the thread color
sequence display and in the needle bar thread
information can be displayed as a color from the
machine's built-in color thread table, as a thread
color from another manufacturer, or as a color
that is created with PE-Design ver. 5.0 as an
original color chart.
If “ON” is selected, choose from the following
three threads, refer to page 146.
Original Thread
Custom Thread 1
Custom Thread 2
8 THREAD TRIMMING/“DST“ SETTING
Specifies whether or not jumpstitches are cut. In
addition, when using Tajima embroidery data
(.dst), you can specify whether or not the thread is
cut according to the specified number of jump
codes. (Refer to page 149.)
9 SHORT STITCH DELETE
Specifies the pitch length of short stitches that are
to be deleted, refer to page 150.
0 THREAD TAIL
Specifies the length of upper thread that remains
threaded through the needle after the thread is
trimmed (length of thread passed through the eye
of the needle), refer to page 150.
Sapphire_chapt6.fm Page 141 Friday, November 18, 2005 11:51 AM
■ Page 3
A RESERVED NEEDLE
A certain thread color can be set to a specific
needle bar. The specified color remains assigned
to the needle bar specified here until the setting is
cancelled. For details on specifying these settings,
refer to “Reserved Needle Bar Settings” on
page 96.
■ Page 4
■ Page 5
C BRIGHTNESS OF LCD
Enables the density or brightness of the screen to
be adjusted.
D BUZZER
Turns the buzzer on or off.
E UNIT
Enables the units of measurements that appear in
the screens to be changed.
F LANGUAGES
Enables the display language to be changed. The
keys and messages appear in the selected
language.
Details of each of the settings are described in the
following sections. After specifying the desired
settings, touch
to return to the screen that
was displayed before the settings screen was
B CUSTOM THREAD TABLE
Create a Custom Thread Table from this page. For
details on create a Custom thread table, refer to
“Custom thread table settings” on page 147.
displayed.
6
Using the Settings Key
141
Sapphire_chapt6.fm Page 142 Friday, November 18, 2005 11:51 AM
BASIC SETTINGS AND HELP FEATURE
——————————————————————————————————————————————
Turning the buzzer on or off
Adjusting the brightness of
the LCD
The brightness of the LCD can be specified from the
fifth page of the settings screen.
1
Touch
and
to adjust the brightness
of the screen so that the contents of the
screens can be clearly viewed.
To make the screen lighter, touch
.
To make the screen darker, touch
If “ON” is selected, the buzzer sounds to indicate
that a key in the operation panel was pressed or a
key on the screen was touched. If an error occurs,
the buzzer sounds to notify you of the error.
ON: The buzzer sounds.
OFF: The buzzer does not sound.
When the embroidery machine is purchased, “ON”
is selected.
The buzzer setting can be specified from the fifth
page of the settings screen.
1
Touch
(or
) and select the
The key appears as
when “ON” is
desired setting.
selected, and it appears as
when
“OFF” is selected.
• The number beside
indicates the
brightness. Move it to the desired setting.
When the embroidery machine is
purchased, “142” was selected.
Note
● All or part of the display may sometimes
become darker or lighter due to temperature
changes. This is not a sign of a malfunction.
If the display is difficult to read, adjust its
brightness. (Refer to “If the LCD cannot be
read” on page 213.)
● The display may be dark immediately after
the embroidery machine is turned on. This
is a normal characteristic of the backlight
and is not a sign of a malfunction. After
approximately 10 minutes, the display
should reach its normal level of brightness.
● If you are not directly facing the display, the
colors may be distorted or the display may
be difficult to read. This is a normal
characteristic of the display and is not a
malfunction. Be sure to sit in front of the
display while using it. (Refer to “Adjusting
the operation panel position” on page 9.)
142
• Each touch of the key turns the setting either
on or off.
Sapphire_chapt6.fm Page 143 Friday, November 18, 2005 11:51 AM
Changing the language
The display language can be set to any of the
following.
ENGLISH, GERMAN, FRENCH, ITALIAN, DUTCH,
SPANISH, PORTUGUESE, JAPANESE or THAI.
When the embroidery machine is purchased,
“ENGLISH” is selected.
The language setting can be specified from the fifth
page of the settings screen.
1
Touch
and
Changing the display guides
Various settings can be specified for the guides in the
pattern display area. The embroidery frame size can
be selected, and the centerpoint marker, grid and
cursor can be displayed or hidden.
The guide settings can be specified from the first
page of the settings screen.
to select the desired
language.
The desired language is displayed.
1 AREA
Specifies the size of the embroidery frame
displayed as a guide in the pattern type selection
screen, pattern list screen and pattern editing
screen.
The guide that appears indicates the size of the
embroidery frame that is actually installed.
2 GRID
Displays or hides the centerpoint marker of the
design (red) and the grid.
3 CENTER CURSOR
Displays or hides the needle cursor (green) and
specifies the type of cursor.
4 How the guides will appear with the specified
settings can be previewed here.
Changing the units of
measurements
The units of measurements can be set to millimeters
or inches.
When the embroidery machine is purchased, “mm”
is selected.
The measurement units setting can be specified from
the fifth page of the settings screen.
1
Touch
and
to select the desired
■ Size of the embroidery frame
When the embroidery machine is purchased, the
extra-large embroidery frame is selected.
1
Touch
and
6
to select the desired
measurement units.
embroidery frame size.
The desired units are displayed.
The embroidering area for the desired
embroidery frame is displayed.
Using the Settings Key
143
Sapphire_chapt6.fm Page 144 Friday, November 18, 2005 11:51 AM
BASIC SETTINGS AND HELP FEATURE
——————————————————————————————————————————————
Embroidering area
of the extra-large
embroidery frame
Embroidering area
of the large
embroidery frame
■ Centerpoint marker and grid
The centerpoint is indicated with a red plus sign
(+).
The spacing between the lines of the grid
represent 10 mm (3/8 inches).
When the embroidery machine is purchased, only
the centerpoint marker is displayed.
1
Touch
and
to select whether or not
to display the centerpoint marker and the
grid.
Embroidering area
of the medium
embroidery frame
The centerpoint marker and grid are displayed
as specified.
Embroidering area
of the small
embroidery frame
Embroidery area of
the optional cap
frame.
Only display
centerpoint marker
Only display grid
Memo
● If the optional cap frame is attached, the
embroidering area for the cap frame is
displayed, regardless of the setting selected
here.
Display both
centerpoint marker
and grid
Display neither
centerpoint marker
nor grid
144
Sapphire_chapt6.fm Page 145 Friday, November 18, 2005 11:51 AM
■ Center Cursor
The cursor indicates the current needle drop point
in the embroidering screen. The center cursor
appears in green.
When the embroidery machine is purchased,
“Display as plus sign (+)” is selected.
1
Touch
and
to select whether to
display the cursor as a plus sign (+) or as a
large crossbar and whether to display or hide
the cursor.
The center cursor is displayed as specified.
Changing the thread color
information
One of eight thread color information categories can
be selected for the thread colors information
category in the color information for the thread color
sequence display and the needle bar thread
information.
Thread color number (Embroidery)
Thread color number (Country)
Thread color number (Madeira Poly)
Thread color number (Madeira Rayon)
Thread color number (Sulky)
Thread color number (Robison-Anton)
Time
Thread color name (Name of Color)
When the embroidery machine is purchased, the
thread color name (Name of color) is selected.
The thread color display setting can be specified
from the second page of the settings screen.
1
Displayed as a plus
sign (+)
Touch
and
to select the desired
thread color display.
Displayed as a large
crossbar
The thread colors will be displayed as
specified.
Cursor hidden
6
■ Sample displays
Thread color name
(Name of Color)
Thread color
number
(Embroidery)
Thread color
number (Country)
Using the Settings Key
145
Sapphire_chapt6.fm Page 146 Friday, November 18, 2005 11:51 AM
BASIC SETTINGS AND HELP FEATURE
——————————————————————————————————————————————
Thread color
number
(Madeira Poly)
Thread color
number
(Madeira Rayon)
Thread color
number (Sulky)
Display expanded thread color
The thread colors displayed in the thread color
sequence display and in the needle bar thread
information can be displayed as original colors or
another manufacturer’s thread colors.
ON: If the pattern is created by the PE-Design’s
“User Thread Chart”, the machine will
display the color and number specified by
the “User Thread Chart”. Also, the machine’s
“Custom Thread Table” will be available.
(See below)
OFF:The thread colors are displayed by original
thread color.
If “OFF” is selected, the thread colors are displayed
as specified in the procedure described in “Changing
the thread color information” on page 145.
Thread color
number
(Robison-Anton)
Time
Memo
● The thread colors in the thread color
sequence display and in the patterns in the
pattern display area are displayed in the
original thread color (i.e. the thread colors
that have been built-in the machine). The
thread color numbers are displayed with the
number (or the nearest number) for the
brand specified here.
146
If “ON” is selected, one of the following three color
thread can be displayed in the change thread color
screen.
Original Thread
If the thread color has been specified by the
“User thread chart” in PE-Design, that color
will be displayed. If no thread color has been
specified, the machine’s built-in color is
displayed.
Custom Thread 1
Custom Thread 1, specified with this machine,
is displayed.
Custom Thread 2
Custom Thread 2, specified with this machine,
is displayed.
For details on the color thread and the color displays,
refer to page 163.
When the embroidery machine is purchased, “OFF”
is selected.
The thread color setting can be specified from the
second page of the settings screen.
Sapphire_chapt6.fm Page 147 Friday, November 18, 2005 11:51 AM
1
Touch
(or
) and select the
Custom thread table settings
desired setting.
The key appears as
when “ON” is
selected, and it appears as
when
“OFF” is selected.
The color thread table displayed, for example, when
changing the colors of a pattern, can be set to an
original color thread table, created by combining the
thread color numbers for the thread colors that you
like and for the brands that you have. Two CUSTOM
THREAD tables can be created.
■ Creating a custom thread
On the fourth page of the settings screen, colors
and numbers can be specified for each box in the
table.
1
Touch
(or
desired thread.
Touch
• Each touch of the key turns the setting either
on or off.
) to select the
to select CUSTOM THREAD 1
or touch
to select CUSTOM THREAD
2.
2
Touch
and
to select the thread.
The desired thread is displayed.
2
• If “ON” is selected, but a custom thread
table is not created, a color thread table with
no colors specified is displayed.
Select a box in the table.
Touch
,
,
and
until the box
that you wish to select appears enlarged.
6
1 The box that appears enlarged is the box that is
selected.
X Highlighting a color square moves in the
direction of the arrow on the key that is
touched.
Using the Settings Key
147
Sapphire_chapt6.fm Page 148 Friday, November 18, 2005 11:51 AM
BASIC SETTINGS AND HELP FEATURE
3
——————————————————————————————————————————————
Select the thread color number type.
Touch
and
until the desired thread
5
Touch
.
color number type (brand name) appears.
X The entered color and number are specified
for the box selected in step 2.
4
Type in the thread color number.
Touch
,
,
,
,
and
,
,
,
,
to type in the
desired thread color number.
To delete the setting, touch
If the wrong number is entered, touch
.
.
X That color is removed from the thread table
and the box becomes empty.
X The entered number is erased.
148
Sapphire_chapt6.fm Page 149 Friday, November 18, 2005 11:51 AM
Repeat steps 2 through 5 to specify colors
6 for the other boxes.
• To change the color specified in a box,
delete the previous color, and then specify a
new one.
■ Changing the color thread table
Set “DISPLAY EXPANDED THREAD COLOR” to
“ON”, and then select the color thread. Refer to
page 146.
Specifying jumpstitch trimming /
“DST” jump codes for trimming
You can specify whether or not jumpstitches are cut.
In addition, when using Tajima embroidery data
(.dst), you can specify whether or not the thread is
cut according to the specified number of jump
codes.
ON: The machine cuts the upper and bobbin thread
before the jumpstitch. When Tajima embroidery data
(.dst) is used, the machine converts the “jump” code
to a trim code, based on the number specified on the
next line.
OFF: The machine does not cut either a jumpstitch
or the “jump” code in Tajima embroidery data (.dst).
When the machine is purchased, “ON” is selected
and the number of jumps is set to “3”.
The “DST” thread trim settings can be specified from
the second page of the settings screen.
1
Touch
(or
) and select the
The key appears as
when “ON” is
desired setting.
selected, and it appears as
when
“OFF” is selected.
6
• Each touch of the key turns the setting either
on or off.
Note
● This setting is not applied to the trimming of
threads between characters in alphabet
patterns. (Refer to “Trimming the threads
between characters” on page 125.)
Memo
● The number of jump codes cannot be
specified for data other than Tajima
embroidery data (.dst).
Using the Settings Key
149
Sapphire_chapt6.fm Page 150 Friday, November 18, 2005 11:51 AM
BASIC SETTINGS AND HELP FEATURE
——————————————————————————————————————————————
■ When using Tajima embroidery data (.dst)
2
If “ON” is selected, touch
and
to
1
Touch
and
to select the pitch size.
The desired size is displayed.
select the number of feed codes.
The desired setting is displayed.
• A value between 1 and 8 can be specified.
For example, if 3 is specified, sequential 3
jump codes will be converted to the trim
code. But sequential 2 jump code will not be
converted to the trim code, it will be sewed
as the feed (jump) stitch.
Note
● You need to set the jump number same as
the number that was used when the
particular Tajima data was created.
If the jump number is not matched, either
unexpected trim or no trimming at trim
expected point will happen.
Deleting short stitches
• A value between 0 and 1 millimeters if the
units of measurements is set to “mm” (or a
value between 0 and 0.04 inch if the units of
measurements is set to “inch”) can be
specified.
Specifying the remaining
length of thread
This setting specifies whether the length of upper
thread that remains threaded through the needle after
the thread is trimmed (length of thread passed
through the eye of the needle) has a standard tail or
long tail.
When the embroidery machine is purchased,
“standard tail” is selected.
The setting for the remaining length of thread can be
specified from the second page of the settings screen.
1
Touch
and
to select the setting.
The desired length is displayed.
If embroidery data other than our original patterns is
used, the pitch may be too small, which may result
in the thread or the needle breaking. In order to
prevent this, the machine can be set to delete stitches
with a fine pitch. Stitches with a pitch less than that
specified here can be deleted.
When the embroidery machine is purchased, “0”
was selected (delete stitches with a pitch of 0).
The setting to delete short stitches can be specified
from the second page of the settings screen.
• If the machine misses stitches with a
standard length of thread after it is trimmed,
select “Long tail”.
• When using metallic thread, select “Long
tail”.
150
Sapphire_chapt6.fm Page 151 Friday, November 18, 2005 11:51 AM
Using the Machine Operations Guide Key
This machine contains information based on the contents of the Operation Manual, such as basic machine
operations. Touch
(machine operations guide key), and then select from the four topics that appear to
display the available information.
■ Contents of Categories
Names of Machine Principal Parts and Their
Functions
Example: To learn how to thread the upper
thread
1
Touch
.
Operations
X The sewing machine help screen appears.
2
Touch
.
Troubleshooting
Maintenance
6
X The list of basic operations appears.
3
Touch
.
X The procedure for threading the upper
thread appears.
Using the Machine Operations Guide Key
151
Sapphire_chapt6.fm Page 152 Friday, November 18, 2005 11:51 AM
BASIC SETTINGS AND HELP FEATURE
4
Touch
——————————————————————————————————————————————
to display the next page.
1 Next page key
Touch this key to display the next page.
2 Previous page key
Touch this key to display the previous page.
3 Current page number
4 Total number of pages
5 Movie key
Appears only if the procedure for
• Threading the upper thread
• Threading the needle
• Replacing the embroidery frame holder
• Attaching the cap frame.
A movie showing the procedure can be
viewed.
When
changes to
, touch the
key. While a movie is being shown, the key
changes to
.
1 Touch this key to display the movie from the
beginning of the current page.
2 Touch this key to pause the movie. While the
movie is paused, the key changes to
. Touch
to continue showing the movie.
3 Touch this key to skip to the next page of the
movie.
4 Touch this key to skip to the previous page of the
movie.
5 Touch this key to stop the movie and return to the
illustration.
152
5
After checking the procedure, touch
6
Touch
.
X The screen that was displayed before
was touched appears.
.
Sapphire_chapt6.fm Page 153 Friday, November 18, 2005 11:51 AM
Using the Help Key
If help is needed, touch
(help key) to check an operation or to check the function of a key.
■ Example: Viewing help on the function keys in
the pattern type selection screen
Touch
1 screen.
Touch
After checking the desired key information,
touch
.
in the pattern type selection
X The help screen appears.
2
3
and
X The screen that was displayed before
was touched appears.
until the key whose
help information you wish to view appears.
6
1 Next page key
Touch this key to display the next page. If the
next page key is touched while the last page is
displayed, the first page is displayed.
2 Previous page key
Touch this key to display the previous page. If the
previous page key is touched while the first page
is displayed, the last page is displayed.
3 Current page number
4 Total number of pages
Using the Help Key
153
Sapphire_chapt6.fm Page 154 Friday, November 18, 2005 11:51 AM
BASIC SETTINGS AND HELP FEATURE
154
——————————————————————————————————————————————
Sapphire_chapt7.fm Page 155 Friday, November 18, 2005 12:10 PM
7
APPENDIX
This chapter provides descriptions of techniques for sewing applications, pointers for
creating beautiful embroidery, and details on maintenance procedures and corrective
measures that should be taken when a problem occurs.
Appliqué Sewing ...................................................................................................156
Sewing appliqué patterns / 156
Using a frame pattern to create appliqués (1) / 157
Using a frame pattern to create appliqués (2) / 158
Helpful Tips for the Operation of PR-600II ...........................................................160
Checking the thread tension of built-in patterns / 160
Sewing a pattern aligned with a mark on the fabric / 161
Color thread table / 163
Colors of Tajima (.dst) embroidery data / 163
Creating Beautiful Embroidery ..............................................................................164
Threads / 164
Stabilizers (Backing) / 165
Hooping Techniques / 166
Fabric/stabilizer compatibility chart / 167
OPTIONAL ACCESSORIES
Attaching an optional embroidery frame for industrial embroidery machines ......168
Using the Optional Cap Frame..............................................................................169
Cap frame and its accessories / 169
Types of caps / 170
Fabric precautions / 171
Preparing to use the cap frame / 171
Attaching the standard cap frame to the mounting jig and putting a cap into the frame / 176
Attaching the advanced cap frame to the mounting jig and putting a cap into the frame / 180
Installing the embroidery frame holder / 185
Additional digitizing information / 186
Using the Optional Bobbin Winder.......................................................................188
Precautions / 188
Optional bobbin winder and its accessories / 188
Setting up the optional bobbin winder / 189
Connecting the AC adapter / 189
Winding the bobbin / 190
Maintenance .........................................................................................................193
Cleaning the LCD / 193
Cleaning the machine surface / 193
Cleaning the hook / 193
Cleaning around the needle plate / 194
Cleaning the bobbin case / 195
Oiling the machine / 196
Troubleshooting ....................................................................................................198
On-screen troubleshooting / 198
Troubleshooting / 199
Error messages / 207
If the LCD cannot be read / 213
If the machine does not respond when a key is pressed / 213
Specifications ........................................................................................................215
Embroidery machine specifications / 215
Index .....................................................................................................................216
Sapphire_chapt7.fm Page 156 Friday, November 18, 2005 12:10 PM
APPENDIX
——————————————————————————————————————————————————————————
Appliqué Sewing
This section describes the procedure for sewing appliqués.
3 embroidery frame, and then carefully cut
Remove the appliqué fabric from the
Sewing appliqué patterns
Some of the built-in embroidery patterns can be used
for sewing appliqués. Follow the procedures
described below to sew appliqués using the patterns
with “Appliqué Material”, “Appliqué Position” or
“Appliqué” in the region display at the top of the
thread color sequence display.
*Depending on the thread color display setting, the
display may appear as
,
Appliqué
Material
along the sewn cutline.
or
Appliqué
Position
.
Appliqué
• If the appliqué is cut out along the inside of
the sewn cutline, the appliqué may not be
correctly attached to the fabric. Therefore,
carefully cut out the appliqué along the
sewn cutline. If this step is not performed
carefully, the appliqué will not be cleanly
finished. In addition, carefully remove any
excess threads.
Frame the base fabric in the embroidery
4 frame, and then sew an “Appliqué Position”
pattern. The appliqué position is sewn, and
then the machine stops.
■ Procedure for sewing appliqués
Place stabilizer on the back of the appliqué
1 fabric.
2
156
Frame the fabric for the appliqué (from step
1) in the embroidery frame, and then sew an
“Appliqué Material” pattern. The line that
indicates where the appliqué will be cut out is
sewn, and then the machine stops.
Sapphire_chapt7.fm Page 157 Friday, November 18, 2005 12:10 PM
Lightly apply fabric glue or spray adhesive to
5 the back of the appliqué piece that was cut
out, and then attach the appliqué piece to the
base fabric at the position sewn using the
“Appliqué Position” pattern in step 4.
• If an iron-on stabilizer is used to attach the
appliqué piece to the base fabric, iron the
pieces together without removing the base
fabric from the embroidery frame.
Appliqués can be created by sewing two frame
patterns of the same size and shape—one sewn with
straight stitches and the other sewn with satin
stitches.
After attaching the appliqué piece, sew an
1 stitches to embroider onto the fabric for the
• Depending on the pattern, an “Appliqué”
pattern may not be available. In this case,
sew the appliqué using thread in the color of
a part of the embroidery.
2 fabric.
6 “Appliqué” pattern. The appliqué is finished.
7
Using a frame pattern to
create appliqués (1)
Select a frame pattern sewn with straight
appliqué. Carefully cut outside of the
stitching.
Embroider the same pattern on the base
Finish sewing the embroidery.
7
Appliqué Sewing
157
Sapphire_chapt7.fm Page 158 Friday, November 18, 2005 12:10 PM
APPENDIX
——————————————————————————————————————————————————————————
Lightly apply fabric glue or spray adhesive to
3 the back of the appliqué piece that was cut
out in step 1, and then attach the appliqué
piece to the base fabric.
Using a frame pattern to
create appliqués (2)
There is another way of sewing appliqués. With this
method, there is no need to change the fabric in the
embroidery frame. The appliqué can be created by
sewing two frame patterns of the same size and
shape—one sewn with straight stitches and the other
sewn with satin stitches.
Select a frame pattern sewn with straight
1 stitches to embroider onto the base fabric.
Select the satin-stitched frame pattern with
4 the same shape to embroider the appliqué
attached in step 3.
1
1 Appliqué
Note
● If the size or sewing position of the straightstitched frame pattern is changed, be sure to
change the size or sewing position of the
satin-stitched frame pattern in the same
way.
158
2 sewn in step
Place the appliqué fabric over the embroidery
1. Make sure that the area
surrounded by the stitching is not larger than
the area of the appliqué fabric.
Sapphire_chapt7.fm Page 159 Friday, November 18, 2005 12:10 PM
Embroider over the appliqué fabric using the
3 same frame pattern.
Note
● If the size or sewing position of the straightstitched frame pattern is changed, be sure to
change the size or sewing position of the
satin-stitched frame pattern in the same
way.
6
Attach the embroidery frame removed in step
4 , and then finish embroidering the appliqué.
• Be sure to stop the machine before the cross
at the center is sewn.
Remove the embroidery frame from the
4 machine, and then cut off the excess appliqué
fabric along the outside of the stitching.
Note
● Leave the fabric in the embroidery frame
when cutting off the excess appliqué fabric.
In addition, do not apply extreme pressure
to the framed fabric, otherwise the fabric
could become loose.
Select the satin-stitched frame pattern with
5 the same shape.
7
Appliqué Sewing
159
Sapphire_chapt7.fm Page 160 Friday, November 18, 2005 12:10 PM
APPENDIX
——————————————————————————————————————————————————————————
Helpful Tips for the Operation of PR-600II
This section provides descriptions to operations useful in the operation of this machine.
Checking the thread tension
of built-in patterns
3
Touch
.
4
Touch
.
5
Touch
.
One pattern on the last page of the embroidery
patterns can be used to check the thread tension. We
will sew this pattern to check the thread tension.
1
2
160
Touch
Touch
.
1 times, and then touch
.
Sapphire_chapt7.fm Page 161 Friday, November 18, 2005 12:10 PM
6
Touch
(unlock key), and then press the
start/stop key to begin embroidering.
Correct thread tension. From the wrong side
7 of the fabric, the bobbin thread should be
about one third of the stitch width.
Sewing a pattern aligned with
a mark on the fabric
By specifying the beginning of stitching and the end
of stitching, the exact position of the pattern can be
checked.
For example, when sewing text along a line in the
fabric pattern, the beginning of the stitching can be
set in the lower-left corner so that the position can be
checked, and then the beginning of stitching can be
reset. Next, the beginning of stitching can be set in
the lower-right corner to check the position. The
straight line connecting the first point and the second
point is the baseline for the text. If the baseline that
the text follows leaves the fabric pattern, the
embroidering position can be adjusted.
1
Touch
in the embroidering settings
screen.
Note
● If adjustment is necessary, refer to
instructions on page 45 or 85/86.
Set the beginning of stitching in the lower-left
2 corner.
7
X The frame moves so that the needle drop
point aligns with the beginning of stitching.
Helpful Tips for the Operation of PR-600II
161
Sapphire_chapt7.fm Page 162 Friday, November 18, 2005 12:10 PM
APPENDIX
——————————————————————————————————————————————————————————
With a fabric marker, mark this point on the
3 fabric.
Remove the embroidery frame from the
6 machine, and then connect these two points
to check the embroidering position.
• If the baseline is misaligned or intersects
another line, reframe the fabric in the
embroidery frame or adjust the position of
the pattern.
4 right corner.
Set the beginning of stitching in the lower-
X The frame moves so that the needle drop
point aligns with the beginning of stitching.
With a fabric marker, mark this point on the
5 fabric.
162
Sapphire_chapt7.fm Page 163 Friday, November 18, 2005 12:10 PM
Color thread table
Additional explanations of the machine’s built-in
color thread table and the custom thread table are
provided below.
Normally, the thread colors in the thread color
sequence display and in the pattern display area are
displayed in the colors of the machine's built-in
color thread table. The thread color numbers with
these thread colors are displayed with the thread
color number (or the nearest number) for the brand
specified on the second page of the settings screen.
Therefore, the finished embroidery colors may have
a slightly different tinge.
However, since the custom thread table specified on
the fourth page of the settings screen are created by
specifying thread colors by the thread color numbers
and color names from individual brands in the
machine’s built-in color library, the thread table is
displayed with those original thread colors.
If “CUSTOM THREAD TABLE” is selected and
“DISPLAY EXPANDED THREAD COLOR” is set to
“ON”, pattern colors changed using Custom Thread
can be previewed with colors nearest to the actual
embroidered thread colors.
Create color thread tables from the colors of threads
that you have and use them to display the patterns in
your own thread colors.
Normal thread color display
Colors of Tajima (.dst)
embroidery data
Tajima data (.dst) does not contain pattern color
information. The data is created by combining only
shapes.
For example, the following embroidery data appears
as shown below in the Tajima format (.dst)
In order for the parts of the pattern to be
differentiated when Tajima data is used with this
machine, the pattern is displayed with colors
automatically applied in the default thread color
sequence. Since the thread colors are applied
according to the sewing order of the parts, regardless
of the design of the pattern, colors may be applied
that seem unusual for the design, for example, an
orange-colored fruit may be displayed in blue.
When using Tajima data, be sure to preview the
sewn image on the screen and change the colors
from the change thread color screen.
Thread color display using a custom thread
7
Helpful Tips for the Operation of PR-600II
163
Sapphire_chapt7.fm Page 164 Friday, November 18, 2005 12:10 PM
APPENDIX
——————————————————————————————————————————————————————————
Creating Beautiful Embroidery
The various precautions concerning the thread, embroidery frames and stabilizers (backings) that must be
observed in order to create beautiful embroidery are described below.
Threads
Embroidery thread can be costly, therefore caring for
it should be a priority. No matter how well a thread
is manufactured, it must be appropriately stored if it
is to sew properly. This is especially true when one
considers the time that lapses between delivery to
the thread user and the moment the thread is actually
used on the embroidery machine. It is important that
embroidery threads be stored in an environment that
is free of damaging agents such as excessive heat,
light or moisture.
Embroidery threads are best stored in an area that is
as clean and dust-free as possible. It is also important
that the storage area be free of smoke, fumes and
gases. Certain gases may cause the thread to yellow.
These fumes originate from such appliances as gas
heaters or from gas or diesel engines.
Direct sunlight is also extremely destructive for
embroidery threads. Boxes of thread should not be
left open and exposed to direct sunlight. If possible,
skylights and windows should be diffused. The best
type of lighting for embroidery thread is tungstenfilament or fluorescent tubes. It is important to
remember that prolonged exposure to these harmful
sources may also cause the colors of cardboard
boxes and other objects to fade.
164
Temperature and humidity also pose a threat to
embroidery threads. The ideal conditions are
between 59 °F and 77 °F (or 15 °C and 25 °C).
Humidity should be between 40% and 60%. These
conditions should be kept as constant as possible in
order to prevent mildew from forming. Excessive
temperatures can also cause lubrication problems
that ultimately result in thread breaks. Damp
conditions can affect paper bobbins as the cardboard
will swell and the thread can become oversized. It is
also important to realize that even if the overall
storage conditions are good, there may be “spot
problems” where a thread is exposed to a heat
source or bright lights. Ensuring that thread does not
become damaged requires that stock be frequently
rotated and that threads are not left in the same place
for an extremely long time.
Choice of thread is a major factor in improving
production time. The thread run ability, strength,
consistency and weight all affect output. These
qualities determine how well the machine will sew
and the number of thread breaks during sewing.
Thread breaks have an important influence on
production. Each thread break reduces output by at
least 0.07% a day (7.5 hours), assuming that it takes
20 seconds to rethread a needle. For every reduction
of 14 thread breaks per a day, output can be
improved by more than 1.0 %.
Sapphire_chapt7.fm Page 165 Friday, November 18, 2005 12:10 PM
Stabilizers (Backing)
Backing and topping serve to stabilize and support
the product being embroidered so the stitches can be
sewn with the least amount of interference or
instability. They serve as stabilizers for your
embroidery work. Without the proper type of
stabilizer, the fabric may move too much within the
embroidery frame causing poor alignment of the
embroidery. At times, topping will be required in
order to manage fabrics with a pile-like surface, such
as towels, corduroy and pique knit. There are many
types of backing and toppings with various weights
for the various fabrics that you may be sewing.
There are four types of stabilizers (backing) that can
be used in embroidery: cut-away, tear-away, water
soluble and self-adhesive. In these four types, various
weights, sizes and textures are available. When
selecting the stabilizer type for a particular fabric,
consider the design size in addition to the stitch
count and stitch type used in the design.
Finally, make sure that the stabilizer is not stretched.
Some backings may not stretch vertically or
horizontally but may stretch diagonally. DO NOT
USE THESE TYPES. This type of backing will stretch
during sewing and may cause the design to shift.
1. Polyester mesh cut-away stabilizer works
extremely well with light-colored fabrics since it
prevents a shadow from showing through on the
front after you have trimmed away the excess.
This type of backing is ideal whenever you need
stability with a light and soft touch in your
finished product, for example, with baby
garments.
2. Cut-away stabilizer is excellent for medium- to
heavyweight knits, however it can also be used
on woven material. It will hold a large number of
stitches and with two or three layers can hold a
tremendous amount of stitches. This type of
backing is also available in black for those who
want the inside of their garments to look as good
as the outside. Black stabilizer is very useful on
similarly colored garments of lightweight fabrics.
The black backing is less likely to show through
as compared to white backing.
3. Self-adhesive (peel-and-stick) backing is used on
those difficult-to-hoop fabrics. This backing is
applied (with sticky side up) to the underside of
the frame, enabling your fabric to “stick on” the
exposed surface in the sewing areas. When the
embroidery is finished, the fabric can be
removed, the excess backing can be disposed of
and the process repeated.
4. Tear-away stabilizer can be used on
mediumweight woven fabrics and sturdy fabrics
such as canvas, poplin and denim. This stabilizer
will hold many stitches especially when used in
two or more layers. This type of stabilizer is
made of a non-woven material that enables it to
easily be torn away from the edges of your
embroidery design when it is completed. This
stabilizer is also available in black.
5. Water-soluble stabilizer is useful when you need
to keep the nap or pile, for example, on towels,
from interfering with the placement of stitches.
Fabrics such as terry cloth, corduroy, velvet and
faux fur are examples of materials that have a
nap or pile that can actually penetrate
embroidery stitches as your machine sews. The
result is an unfinished and often sloppy
appearance when fibers of the fabric poke out
between the finished stitches of an embroidery
design. In these situations, water-soluble
stabilizer is used as a topping to hold the fibers of
the fabric flat so the stitches can be placed on top
neatly and accurately. Water-soluble stabilizer is
also used as a backing when stitching lace or
other motifs where the desired result is only the
stitching. This is accomplished with watersoluble stabilizer, which can easily be pulled off
of the fabric after embroidering is completed and
any remnants can be easily be dissolved with
water. Water-soluble stabilizer is also used as a
backing on towels, where you often need some
stabilization, but any remnants of a formal
backing must not be visible in the finished
product.
Creating Beautiful Embroidery
165
7
Sapphire_chapt7.fm Page 166 Friday, November 18, 2005 12:10 PM
APPENDIX
——————————————————————————————————————————————————————————
Hooping Techniques
“Use the right tool for the right job” is a statement
many of us have heard throughout the years. This
statement holds true even in the embroidery
industry. The wrong size or type of embroidery frame
may result in poor design alignment during sewing
or damage the product altogether. You can take a
perfectly created design and ruin the final results by
simply not using the correct frame size, type or
technique designed for its application.
■ Frame Basics
Tubular frames: This type of frame allows tubular
fabric or pre-assembled garments to be placed
around the hook assembly. It allows embroidering
of the front of a garment without stitching through
the back of it.
Cap frames: These are specialized embroidery
frames (hoops) designed to hold caps for
embroidering. They are available in a variety of
styles for various machines, with two basic styles:
one that allows sewing a flattened cap (for use on
a flat machine) or one that allows sewing the cap
in its natural curved shape (for use on a tubular
machine).
Hooping fabric: The framed fabric and backing
should be perfectly flat and free of wrinkles or
bubbles. If there are bubbles or wrinkles that must
be removed, be sure that you pull on the fabric
and backing together. Pull no more than is
necessary to make the fabric flat and smooth.
Overstretching the fabric during this process may
cause puckers around the finished design when
the frame is removed. Gaps may also be
generated between design parts.
Inner/outer frame positioning: There should be a
slight ridge (3 mm (1/8 inch)) of fabric and
backing below the outer frame on the back side.
Tighten the screw only if the inner frame feels
loose. Avoid overtightening the screw as this will
cause puckers in the fabric and may “strip” the
screw.
166
Sapphire_chapt7.fm Page 167 Friday, November 18, 2005 12:10 PM
Fabric/stabilizer compatibility chart
Fabric/
Garment
No. of Backing
Pieces
No. of Topping
Pieces
Comments
1 water-soluble
Increase density and/or satin stitch width.
Fine details and small lettering tend to get
caught in the terry loops.
Satin jacket
Heavy lining:
None
Light or no lining:
1 tear-away
None
If garment slips in frame, causing alignment
problems, wrap inner frame with masking
tape or fabric bias tape. This provides a rough
surface to grip garment and also helps
minimize frame burn.
Cotton sheeting
1 tear-away
None
High-density or highly detailed designs may
require more backing. If so, use two pieces of
lightweight backing instead of one piece of
heavy backing.
Denim
1 tear-away
None
Reduce speed if needle begins to heat up and
the thread breaks.
Terry cloth
1 tear-away
Headwear
Optional
Optional
Change needles more often than usual
because the buckram backing dulls needles
faster. A lightweight tear-away backing helps
reduce thread breaks and regulates thread
tension. Use a topping on corduroy or foam
cap fronts.
Dress shirt
(woven)
1 tear-away
None
High-density or highly detailed designs may
require more backing. If so, use two pieces of
lightweight backing instead of one piece of
heavy backing.
Golf shirt
1 cut-away
Optional
Use topping for designs containing small
lettering or a lot of detail, and also for pique
knits.
Canton fleece
1 tear-away
Optional
Use a topping if the garment has a textured
surface, such as a basketweave or
pronounced twill.
Canvas
1 tear-away
None
Frame tightly
Corduroy
1 tear-away
1 water-soluble
A higher stitch density or more understitches,
as well as a topping, may be necessary to
prevent stitches from sinking into the fabric.
Optional
Reduce sewing speed. The thread tension
should be low. Use topping for designs with
high detail or small lettering. For very fine
fabrics, use a thinner thread. Avoid extremely
narrow satin stitching on letters or details;
instead increase satin stitch width or use a
bean stitch. Gently remove (don’t pull)
backing and topping from garment.
Lingerie or silk
1 or 2 lightweight
tear-away
Sweater knit
1 cut-away or
adhesive tearaway
1 water-soluble
Use tightly woven organza or curtain fabric in
a matching color as a backing for bulky or
“holey” knits.
Sweatshirt
1 cut-away or
adhesive tearaway
Optional
Highly detailed designs may require two
layers of lightweight cut-away stabilizer. Use
a topping on extra-thick fabrics or with finedetail designs.
T-shirt
1 light-weight cutaway or adhesive
tear-away
Optional
Use a topping on designs with fine detail or
small lettering. Tensions should be light.
Avoid stitch-heavy designs.
Creating Beautiful Embroidery
167
7
Sapphire_chapt7.fm Page 168 Friday, November 18, 2005 12:10 PM
APPENDIX
——————————————————————————————————————————————————————————
OPTIONAL ACCESSORIES
Attaching an optional embroidery frame for industrial embroidery machines
Prepare the embroidery frame holder in order to attach the embroidery frame for industrial embroidery
machines.
When the embroidery frame for industrial embroidery machines is attached, both the left and right arms of the
embroidery frame holder moves.
1 page 46.)
Remove the embroidery frame. (Refer to
4 screws, and then remove them.
Using a Phillips screwdriver, loosen the two
2 embroidery frame holder.
Loosen the two thumb screws on the
2
1
Remove the right arm, align the pins on the
1 Left arm
2 Thumb screws
X The left arm of the embroidery frame holder
can be moved.
• Only loosen the thumb screws a maximum
of 2 turns counterclockwise. Do not remove
the screw.
5 embroidery frame holder with the holes in the
arm, as shown in the illustration, and then
insert the screws removed in step 4 and
tighten them.
Move the left arm to align the screw on the
3 right side with the mark for the embroidery
frame for industrial embroidery machines,
and then tighten the thumb screws.
X The embroidery frame holder is ready for
the embroidery frame to be attached.
Attach the embroidery frame for industrial
embroidery machines in the same way that
enclosed embroidery frames are attached.
(Refer to page 30.)
Note
1 Mark for embroidery frame for industrial
embroidery machines
2 Align the screw with the mark.
168
● When using embroidery frames for
industrial embroidery machines, THE
MACHINE DOES NOT RECOGNIZE THE
SEWING AREA OF THE FRAME. Be sure to
use the trial sewing function to check that
the pattern fits within the sewing area.
Sapphire_chapt7.fm Page 169 Friday, November 18, 2005 12:10 PM
Using the Optional Cap Frame
By using the optional cap frame, patterns can be embroidered onto caps and hats. The procedures for using the
cap frame are described below.
Cap frame and its accessories
The cap frame driver and the mounting jig are required in order to use the cap frame.
Cap frame
1 Embroidering area:
50 mm (H) × 130 mm (W)
(2 inches (H) × 5-1/8 inches (W))
2 The mark indicates the center of the
embroidering area.
3 Snap lock
<Standard type>
1
2
3
<Advanced type>
1
2
3
Pad
Cap frame driver and 4 thumb
screws
In order to attach the cap frame to
the carriage, remove the
embroidery frame holder, and
then attach this cap frame driver to
the carriage of the machine.
1 Insert the thumb screws into
these holes and tighten the
screws to secure the movable
section. Use these holes when
storing this cap frame driver.
2 Holding Spring
The cap frame is secured by
the two holding Spring.
Mounting jig
Use when framing a cap in the
cap frame.
1 Holders
The cap frame is secured by
the two holders.
2 Mounting bracket
Tighten thumb screw to
secure to mounting surface.
3 Screws
Adjust the size of the
mounting jig according to the
type of cap being
embroidered.
Allen screwdriver (large)
1
3
2
Allen screwdriver (medium)
* Use when adjusting the ring of the cap frame driver and the height of the L-shaped bracket. (Refer to page 173.)
7
Memo
● Before installing the cap frame, be sure to adjust the ring of
the cap frame driver and the height of the L-shaped
bracket. (If the same machine is being used, this
adjustment is only required the first time that it is used. In
addition, this adjustment is not necessary if the enclosed
cap frame is installed.)
● After the ring of the cap frame driver and the height of
the L-shaped bracket have been adjusted, they must be
adjusted again if a different machine is being used. The
height may differ depending on the machine that is
used. For details, contact your sales representative.
Note
● If the cap embroidery frame is attached, the
embroidery frame indicators, showing
which embroidery frames can be used,
appear as shown below.
Using the Optional Cap Frame
169
Sapphire_chapt7.fm Page 170 Friday, November 18, 2005 12:10 PM
APPENDIX
——————————————————————————————————————————————————————————
■ Golf Style
Types of caps
With PR-600II, we recommend that the following
types of caps be embroidered.
Face: Not divided
5 sections
■ Standard(Pro Style)
Face: Pro style
Otto International, Inc. cap
model number
(Example)
6 sections
OTTO27-007
Mesh backing on
the back of front
panels
(soft or hard)
Constructed
firm front
Unconstructed
soft crown
Ease of framing
(hooping)
Easy
(Recommended)
Fairly easy
1 to 2 ply
2 to 3 ply
Backing
Otto International, Inc. cap
model number
(Example)
OTTO23-225
Mesh backing on
the back of front
panels
(soft or hard)
Constructed
firm front
Ease of framing
(hooping)
Fairly easy
Backing
1 to 2 ply
Memo
● Check if this area 1 is covered with mesh.
■ Low Profile (Low fitting)
Face: Low fitting
6 sections
Otto International, Inc. cap
model number
(Example)
OTTO23-225
OTTO18-203
Mesh backing on
the back of front
panels
(soft or hard)
Constructed
firm front
Unconstructed
soft crown
Ease of framing
(hooping)
Very difficult
(because the
cap material
very hard.)
Fairly easy
1 to 2 ply
2 to 3 ply
Backing
170
Note
● There is no centerline that can be used as a
guide for placing the cap in the cap frame.
Before framing the cap, use a charcoal pen
to mark the centerline.
Sapphire_chapt7.fm Page 171 Friday, November 18, 2005 12:10 PM
■ Cap fabric not recommended for embroidering
• Caps with a front panel that is less than
50 mm (2 inches) high (such as a sun visor)
• Children’s caps
• Caps with a brim that is longer than 80 mm
(3-1/16 inches)
Fabric precautions
■ Cap fabric recommended for embroidering
• 35%Cotton / 65%Polyester
• 100%Cotton
• 80%Wool / 20%Nylon
• 15%Wool / 85%Acrylic
■ Cap fabric not recommended for embroidering
If caps of the following types of fabric are used, they
will be very difficult to frame, easily wrinkled, or
easily shrink.
• Polyester Foam
• Stretch material
• Melton Wool
• 100%Nylon
• Suede
Preparing to use the cap
frame
■ Installing the cap frame driver
Press
→
→
→
→
in order to view a video of the operation
on the LCD (see page 151).
Remove the embroidery frame holder from the
carriage on the machine, and then install the cap
frame driver. Before removing the embroidery
frame holder, remove the embroidery frame. (Refer
to “Removing the embroidery frame” on page 46.)
Loosen and then remove the two thumb
1 screws and the embroidery frame holder.
1
1 Thumb screws
• The removed thumb screws remain attached
to the embroidery frame holder.
1
1 Put the two thumb screws back in the embroidery
fram holder.
2 cap frame driver and set aside. Loosen the two
Remove the two upper thumb screws of the
lower thumb screws (4 turns).
1
2
1 Upper thumb screws
2 Lower thumb screws
Using the Optional Cap Frame
171
7
Sapphire_chapt7.fm Page 172 Friday, November 18, 2005 12:10 PM
APPENDIX
——————————————————————————————————————————————————————————
Pass the machine bed through the ring of the
3 cap frame driver.
Insert the pins on the frame-mounting plate of
5 the carriage into the holes in the mounting
plate of the cap frame driver.
1
1
1 Machine bed
Note
● Be careful that the cap frame driver does not
hit any nearby parts, such as the presser
foot.
Attach the cap frame driver to the carriage as
described below in steps 4 through 6.
2
1 Pins on the frame-mounting plate of the carriage
2 Holes in the mounting plate of the cap frame
driver
6 screws in outer holes of mounting plate of cap
Insert and tighten the two upper thumb
Insert the two thumb screws at the bottom of
4 the cap frame driver into the v-cuts in the
carriage, and then place the mounting plate of
the cap frame driver on top of the framemounting plate of the carriage.
frame driver.
3
4
7 the machine so that it is fully inserted, tighten
While pushing in the cap frame driver toward
the two lower thumb screws to secure the cap
frame driver.
2
1
2
3
4
1
Notch in the carriage
Thumb screw of the cap frame driver
Mounting plate of the cap frame driver
Frame-mounting plate of the carriage
X This completes the installation of the cap
frame driver.
172
Sapphire_chapt7.fm Page 173 Friday, November 18, 2005 12:10 PM
■ Adjusting the cap frame driver
Lower the L-shaped bracket to make it touch
3 the machine bed and then tighten the two
hexagonal screws using the Allen screwdriver
(medium). Firmly tighten the screws.
1 L-shaped bracket
2 Ring
Memo
● If the same machine is being used, the
adjustment to the cap frame driver is only
required the first time that the machine is
used.
1 L-shaped bracket
Using the Allen screwdriver (large), loosen the
4 four hexagonal screws on the inside of the
ring. Loosen the screws only by about one
turn.
Turn on the machine. After the carriage
1 moves to its initial position, turn off the
machine.
Note
● Be sure to adjust the cap frame driver with
the carriage at its initial position.
Using the Allen screwdriver (medium), loosen
2 the two hexagonal screws. Loosen the screws
1 Hexagonal screws
2 Allen screwdriver (large)
X When the screws are loosened, the ring can
be lowered.
only by about one turn.
Note
● Do not loosen them too far.
7
1 Hexagonal screws
2 Allen screwdriver (medium)
Note
● Do not loosen them too far.
Using the Optional Cap Frame
173
Sapphire_chapt7.fm Page 174 Friday, November 18, 2005 12:10 PM
APPENDIX
——————————————————————————————————————————————————————————
Insert the pad between the machine bed and
5 the ring of the cap frame driver.
■ Installing the needle plate spacer
Attach the needle plate spacer to the needle plate.
1
1 Needle plate spacer
1 Pad
2 Machine bed
3 Ring of the cap frame driver
■ Preparing the mounting jig
Lower the stopper, and then attach the mounting
jig to a stable surface, such as a desk.
1 screws, and then lower the stopper in the
Use a Phillips screwdriver to loosen the two
Lightly press down the ring, and then use the
6 Allen screwdriver (large) to tighten the four
hexagonal screws on the inside of the ring.
Firmly tighten the screws.
1 Ring
CAUTION
● Make sure that each hexagonal screw is
firmly tightened. If any screw remains
loosen, injuries may result.
7
174
Remove the pad inserted in step 5.
direction of the arrow.
1 Loosen the screw so that the stopper can be
hooked onto the screw and clamped with it.
2 Loosen until the stopper moves.
3 Stopper
Sapphire_chapt7.fm Page 175 Friday, November 18, 2005 12:10 PM
Tighten the two screws.
2 • Make sure that the stopper is firmly secured.
Check that there is no looseness.
5 If there is looseness, mount the mounting jig
onto the mounting surface again.
Note
Attach the mounting jig to a stable mounting
surface, such as a desk.
Loosen the thumb screw for the mounting jig
3 to open the mounting bracket so that it is
● Be sure that the mounting bracket is
securely clamped onto the mounting
surface and that the thumb screw is firmly
tightened.
● Do not attach the mounting jig to an
unstable surface (flexible, bent or warped).
● Be careful that the mounting jig does not fall
when it is removed.
Adjust the size of the mounting jig according
6 to the type of cap being embroidered.
wider than the thickness of the mounting
plate.
1
2
• The mounting bracket can be mounted onto
a plate with a thickness from 9 mm (3/8
inch) to 38 mm (1-1/2 inches).
Securely clamp the mounting bracket onto the
4 mounting surface by tightening the thumb
screw.
1
1 Low Profile (Low fitting)
2 Standard (Pro style)
Note
● Either the standard type cap frame or the
advanced type cap frame can be used in the
standard position. Only the advanced cap
frame can be used in the low profile
position.
2
7
3
1 Mounting bracket
2 Mounting surface
3 Tighten thumb screw
Using the Optional Cap Frame
175
Sapphire_chapt7.fm Page 176 Friday, November 18, 2005 12:10 PM
APPENDIX
——————————————————————————————————————————————————————————
■ For the standard type
Using a Phillips screwdriver, turn the four screws
(two on the left and two on the right) at the inside
of the mounting jig one turn to loosen them.
Attaching the standard cap frame to the
mounting jig and putting a cap into the frame
→
Press
→
→
→
in order to view a video of the operation on
2
1
1 Screws
2 Phillips screwdriver
the LCD (see page 151).
Put the cap into the standard cap frame attached to
the mounting jig, and then remove the standard cap
frame from the mounting jig with the cap clamped.
Next, attach the standard cap frame to the cap frame
driver on the machine.
1 mounting jig.
Attach the standard cap frame to the
Note
● Do not remove any of the four screws (two
on the left and two on the right); otherwise,
they may be lost. Only turn the screws to
slightly loosen them.
Align the notch in the standard cap frame with
the guiding plate on the mounting jig, and then
snap the frame into place.
1
2
Pull the mounting jig toward you, and then use
the Phillips screwdriver to tighten the four screws
(two on the left and two on the right).
3
X This completes the preparation of the
mounting jig.
4
1
2
3
4
Guiding Plate on mounting jig
Notch on standard cap frame
Sweat guard holder
Holder
X The standard cap frame is secured with the
two holders (clips) one on right side and
one on left side.
Note
● Make sure that the mounting jig is set to the
standard position.
176
Sapphire_chapt7.fm Page 177 Friday, November 18, 2005 12:10 PM
Release the snap lock on the standard cap
2 frame down and then disengage the latch.
Open the clamping frame. Also, open brim
presser.
3
Lift up (flip) the sweat guard on the inside of
4 the cap, and then place the cap in the
standard cap frame.
Using both hands, hold both sides of the cap,
and then align the edge of the lower frame
with the base of the brim.
2
1
1 Snap lock released
2 Clamping frame opened
3 Brim presser
Placing a sheet of stabilizer.
3 Placing a sheet of about 100 mm (4 inches) x
250 mm (10 inches) of stabilizer on top of the
lower frame, place a cap in the frame.
1 Edge of the lower frame
2 Sweat guard
3 Base of the brim
At the same time, align the centerline of the
cap with the centerline of the sweat guard
holder on the standard cap frame, and then
slide the sweat guard under the sweat guard
holder.
1 Sweat guard holder
2 Centerline of sweat guard holder
3 Centerline of cap
After arranging the brim, firmly push in the
5 cap as far as possible.
1 100 mm (4 inches)
2 250 mm (10 inches)
3 Stabilizer
7
Using the Optional Cap Frame
177
Sapphire_chapt7.fm Page 178 Friday, November 18, 2005 12:10 PM
APPENDIX
——————————————————————————————————————————————————————————
Close the clamping frame, and then hook the
6 catch of the snap lock to temporarily secure
Memo
● According to the shape of the cap, loosen
the screw 4 and adjust the position of the
clamping frame 3 so that the teeth on the
inside of the clamping frame 1 align with
the base of cap brim 2.
it.
1 Catch of the snap lock
2 Clamping frame
Check for the following conditions.
1 The centerline of the cap is parallel with
the short side of the clamping frame.
2 The line on the left side of the cap cannot
be seen within the clamping frame.
3 The teeth on the inside of the clamping
frame cleanly grab the base of the brim.
4 The centerline of the brim holder and the
center line of the cap must make a single
straight line.
Memo
● If the cap fabric is thick and the clamping
frame cannot be closed, or if the fabric is
thin and the cap is too loose within the
frame, adjust the clamping frame.
4
3
1
2
1 Teeth on the inside of the clamping frame
2 Centerline of brim holder
178
Sapphire_chapt7.fm Page 179 Friday, November 18, 2005 12:10 PM
While pulling the cap down with one hand,
7 pull the lever of the snap lock to securely
close it.
As shown in the illustration, use both hands to
0 press in on the sides of the brim to reshape it
so that the sides do not fold out.
If the pattern is embroidered with the sides of
the brim folded out, the brim will hit the
machine and cause the pattern to become
misaligned.
1
1 Lever of the snap lock
Note
● Make sure that there are no wrinkles within
the clamping frame. Otherwise miss
alignment will occurred.
While again pulling on the fabric around the
8 cap frame to stretch it, adjust the
embroidering position.
Stretch the fabric in the embroidering area so
a that it is taut.
While pressing in on the sides of the brim, the
fabric within the cap frame may be pressed,
causing slack in the fabric. Pull the fabric along
the left, right and center seams in the direction
of the arrows, and stretch the fabric so that the
embroidering area is taut.
Pull the brim holder up as far as possible.
9 Next, turn the brim holder over the cap brim,
and then lower the brim holder. Finally,
arrange the brim so that it maintains a slightly
rounded shape.
X This completes the positioning of the cap in
the standard cap frame.
1 Brim holder
2 Centerline of brim presser
• Make sure the notch comes out.
Using the Optional Cap Frame
179
7
Sapphire_chapt7.fm Page 180 Friday, November 18, 2005 12:10 PM
APPENDIX
——————————————————————————————————————————————————————————
Remove the standard cap frame from the
b mounting jig.
Press both right and left holders on the
mounting jig with both thumbs, and then pull
off the embroidery frame, as shown in the
illustration.
1
Attaching the advanced cap frame to the
mounting jig and putting a cap into the frame
Put the cap into the advanced cap frame attached to
the mounting jig, and then remove the advanced cap
frame from the mounting jig with the cap clamped.
Next, attach the advanced cap frame to the cap
frame driver on the machine.
1 mounting jig.
Attach the advanced cap frame to the
Align the side of the mounting jig with the
brace on the cap frame, and then push the cap
frame into place.
4
3
1 Holder
5
6
1
2
1 Side of mounting jig
2 Brace on cap frame
• Align the notch in the advanced cap frame
with the guiding plate on the mounting jig,
and then snap the frame into place.
3
4
5
6
Guiding Plate on mounting jig
Notch on advanced cap frame
Sweat guard holder
Holder
X The advanced cap frame is secured with the
two holders (clips) one on right side and
one on left side.
180
Sapphire_chapt7.fm Page 181 Friday, November 18, 2005 12:10 PM
Release the snap lock on the advanced cap
2 frame down and then disengage the latch. Open
the clamping frame. Also, open brim presser.
3
At the same time, align the centerline of the
cap with the centerline of the sweat guard
holder on the advanced cap frame, and then
slide the sweat guard under the sweat guard
holder.
2
1
1 Sweat guard holder
2 Centerline of sweat guard holder
3 Centerline of cap
1 Snap lock released
2 Clamping frame opened
3 Brim presser
Secure the stabilizer with the pins on the cap
3 frame.
Align the centerline of the cap with the notch
5 in the mounting jig.
1
1
1 Pins
• Make sure that the pins go through the
stabilizer to firmly secure it.
Lift up (flip) the sweat guard on the inside of
4 the cap, and then place the cap in the
advanced cap frame.
Using both hands, hold both sides of the cap,
and then align the edge of the lower frame
with the base of the brim.
1 Edge of the lower frame
2 Sweat guard
3 Base of the brim
2
1 Centerline of cap
2 Notch in mounting jig
Place the sweat guard of the cap inside the
6 notch in the cap frame.
1
1 Notch in cap frame
Using the Optional Cap Frame
181
7
Sapphire_chapt7.fm Page 182 Friday, November 18, 2005 12:10 PM
APPENDIX
——————————————————————————————————————————————————————————
Close the clamping frame so that the brim of
7 the cap passes between the inside clamping
Note
frame and the outside clamping frame.
1
3
● Loosen the two screws for the outside
clamping frame, and then adjust the
position of the outside clamping frame so
that it conforms to the shape of the cap and
so that the teeth of the clamping frame
perfectly align with the base of the brim.
2
1 Brim
2 Inside clamping frame
3 Outside clamping frame
Neatly align the teeth of the clamping frame
8 with the base of the brim.
1
2
1
2
3
4
Teeth of clamping frame
Base of brim
Outside clamping frame
Screws for the outside clamping frame
9
Adjust the other side in the same way.
0
Close the lever of the snap lock.
1 Teeth of clamping frame
2 Base of brim
1
1 Lever of the snap lock
182
Sapphire_chapt7.fm Page 183 Friday, November 18, 2005 12:10 PM
Pull the brim holder up as far as possible.
c Next, turn the brim holder over the cap brim,
Note
● If the cap fabric is thick and the clamping
frame cannot be closed, or if the fabric is
thin and the cap is too loose within the
frame, loosen the screw for the inside
clamping frame, and then adjust the inside
clamping frame.
and then lower the brim holder. Finally,
arrange the brim so that it maintains a slightly
rounded shape.
1 Brim holder
2 Centerline of brim presser
• Make sure the notch comes out.
Adjust the brim so that it maintains a rounded
d shape.
1 Inside clamping frame
2 Screw for the inside clamping frame
Pull the ends of the cap out from the center to
a remove any slack.
X This completes the positioning of the cap in
the advanced cap frame.
Remove the advanced cap frame from the
e mounting jig.
b
Use the clips to secure the cap.
1
Press both right and left holders on the
mounting jig with both thumbs, and then pull
off the embroidery frame, as shown in the
illustration.
7
1
1
1 Clips
• Repeat steps a and b on the other side to
remove any slack and secure the cap with
the clips.
1 Holder
Using the Optional Cap Frame
183
Sapphire_chapt7.fm Page 184 Friday, November 18, 2005 12:10 PM
APPENDIX
——————————————————————————————————————————————————————————
■ Attaching the cap frame to the embroidery
machine
The cap frame driver is required in order to attach
the cap frame to the embroidery machine. Before
attaching the cap frame to the machine, attach the
cap frame driver to the carriage. (Refer to
“Installing the cap frame driver” on page 171.)
1 As shown in the illustration, turn the
Attach the cap frame to the cap frame driver.
■ Removing the cap frame
After embroidering is finished, remove the cap
frame, and then remove the cap.
Remove the cap frame from the cap frame
1 driver.
Press both of the two holders at the base of the
cap frame with both thumbs, and then pull off
the embroidery frame, as shown in the
illustration.
embroidering position to the side when
inserting the cap frame so the brim of the cap
does not hit the embroidery machine.
1
1 Holder
• Be careful that the cap frame does not hit
any nearby parts, such as the presser foot.
After turning the cap frame so that the
embroidering surface faces upward, align the
ring of the cap frame driver with the ring of the
cap frame. While sliding the cap frame to the
left and right, align the notch in the cap frame
with the guiding plate on the cap frame driver,
and then snap the frame into place.
2
As shown in the illustration, turn the
embroidering position to the side when
removing the cap frame so the brim of the cap
does not hit the embroidery machine.
1
• Be careful that the cap frame does not hit
any nearby parts, such as the presser foot.
■ For the standard cap frame
Release the snap lock on the cap frame, and
2 then remove the cap.
3
1 Guiding Plate on cap frame driver
2 Notch on cap frame
3 Holder
X The cap frame is secured with the two
holders one on the right and one on the left.
This completes the installation of the cap
frame, and the cap is ready to be
embroidered.
184
2
1
Sapphire_chapt7.fm Page 185 Friday, November 18, 2005 12:10 PM
■ For the advanced cap frame
3
Remove the two upper thumb screws
1
After removing the brim holder, unlock the
2 snap lock of the cap frame, remove the clips,
and then remove the cap.
1
2
1 Thumb screws
3
1 Brim holder
2 Snap lock
3 Clips
4
Remove the cap frame driver.
Installing the embroidery
frame holder
After embroidering using the cap embroidery frame
is finished, remove the needle plate spacer and cap
frame driver, and then re-attach the embroidery
frame holder.
1
Remove the needle plate spacer.
Note
● Be careful that the cap frame driver does not
hit any nearby parts, such as the presser
foot.
With the hole on the sweat guard holder
5 aligned with the centerline of the guiding
plate, insert the two thumb screws removed in
step 3 into the holes at the top, and then
tighten the thumb screws.
1 Needle plate spacer
2
3
3
Loosen the two lower thumb screws.
7
1
2
1 Hole on the sweat guard holder
2 Centerline of guiding plate
3 Holes on the top
1 Thumb screws
• Insert the thumb screws into the holes where
the cap frame driver that was originally
installed (holes that the thumb screws were
removed from in step 2 on page 171).
X The movable section of the cap frame driver
is secured.
Using the Optional Cap Frame
185
Sapphire_chapt7.fm Page 186 Friday, November 18, 2005 12:10 PM
APPENDIX
——————————————————————————————————————————————————————————
Align the holes on the embroidery frame holder
6 with the pins in the frame-mounting plate of the
carriage.
Additional digitizing
information
When creating a pattern for embroidering with a cap
frame, pay attention to following points in order to
avoid registration problems (misalignment of gaps in
the pattern).
1
Sew underlay stitches.
1 Pins in the frame-mounting plate
2 Holes on the embroidery frame holder
Secure the embroidery frame holder with the two
7 thumb screws.
2 and sew toward the ends.
Start the embroidery pattern from the center,
With PR-600II, the order in which patterns are
selected when they are combined is the order
in which they will be sewn. For the following
example, select the patterns in the order
“E”→”A”→”B”→”R” to make the combined
pattern “BEAR”.
1 Use the thumb screws included with the machine
(thumb screws removed in step 1 on page 171).
CAUTION
● Using the disc-shaped screwdriver
included, firmly tighten the thumb
screws.
Incorrect
sewing
order
Correct
sewing
order
Note
● Do NOT sew from one end to the other,
otherwise wrinkling or shrinking may occur.
186
Sapphire_chapt7.fm Page 187 Friday, November 18, 2005 12:10 PM
When sewing outlines of patterns, make sure
3 that the stitch width of the satin stitching is at
least 2 mm, and that the stitching over-laps
the fabric by at least 1 mm. Also, make sure
that there are no jumps of long stitches in the
outlining on each region or letter.
1 At least 1 mm
2 At least 2 mm
CAUTION
● Don’t sew more than four overlapping
layers.
7
1 Specify that overlapping areas not be sewn.
Using the Optional Cap Frame
187
Sapphire_chapt7.fm Page 188 Friday, November 18, 2005 12:10 PM
APPENDIX
——————————————————————————————————————————————————————————
Using the Optional Bobbin Winder
When winding the bobbin thread onto a metal bobbin, use the optional bobbin winder. The procedures for
using the optional bobbin winder are described below.
Precautions
For precautions concerning the power supply, refer to page 14.
CAUTION
● Be sure to place the bobbin winder on a level, stable surface.
● Only use the bobbins supplied with this bobbin winder.
Optional bobbin winder and its accessories
Check that the following bobbin winder and accessories are enclosed.
1.
3
2.
2
3.
4.
4
5
5.
1
9.
1
2
3
4
5
No.
Main power switch
Bobbin winder shaft
Hole for thread guide
Hole for spool pin
DC input connector
Name
6.
7.
8.
10.
Parts Code
No.
Name
1
Bobbin winder
XC6598-051
6
Power supply cord
2
3
4
Spool pin
Spool cushion
Thread guide
7
8
9
Metal bobbins (5)
Spool cap
Weight (L)
5
AC adapter
XC5949-051
XA0679-050
XC6644-051
XC6643-051
XD0318-051(Europe)
10
Weight (S)
Parts Code
X59354-151(UK)
LN2284-001
(USA/CANADA)
XA0070-151(Europe)
XC9548-051
(Australia)
100376-053
130012-054
XC5974-151
XC6631-051
* The parts code of the bobbin winder set may differ depending on the area where the machine was purchased.
188
Sapphire_chapt7.fm Page 189 Friday, November 18, 2005 12:10 PM
Setting up the optional
bobbin winder
Attach the spool pin, spool cushion and thread guide
to the bobbin winder.
Connecting the AC adapter
1 the AC adapter.
Insert the plug of the power supply cord into
1 Lower the holder, and then insert the spool pin
Insert the spool pin and the spool cushion.
straight into the hole. And insert the spool
cushion.
4
2 input connector of the bobbin winder, and
Plug the cord on the AC adapter into the DC
then insert the plug of the power supply cord
into a household electrical outlet.
1
2
3
1
2
3
4
Spool pin
Spool pin holder
Hole for spool pin
Spool cushion
Insert the thread guide.
2 Insert the thread guide straight into the hole
with the pins on the thread guide aligned with
the notches on the sides of the hole.
• Be sure to firmly insert the plug on the AC
adapter into the DC input connector of the
bobbin winder.
CAUTION
● Be sure to use the included AC adapter.
1
2
Using any other AC adapter may result in
damage.
● Before connecting or disconnecting the
AC adapter, be sure that the unit is not
operating.
● After using the bobbin winder,
disconnect it from the electrical outlet.
3
1 Pins on thread guide
2 Notches on hole for thread guide
3 Hole for thread guide
• Firmly insert the thread guide as far as
possible and make sure that it is secure.
Using the Optional Bobbin Winder
189
7
Sapphire_chapt7.fm Page 190 Friday, November 18, 2005 12:10 PM
APPENDIX
——————————————————————————————————————————————————————————
Winding the bobbin
Note
Prepare the bobbin and the spool of bobbin thread.
Use cotton or spun polyester bobbin thread (from 74
dtex/2 to 100 dtex/2).
● When using a small spool, remove the
spool cushion and set the spool directly
onto the spool pin. Also use the included
spool cap to keep the small spool stable.
3 the thread guide toward the front of the
Pass the thread through the hole in the left of
winder.
1
Align the groove in the bobbin with the spring
1 on the bobbin winder shaft, and set the
bobbin on the shaft.
1 Hole in the thread guide
2
Pass the thread around the tension disk as
4 shown in the illustration. Make sure that the
1
thread is correctly fed into the tension disk.
1 Groove in the bobbin
2 Spring on the shaft
2
Set the thread spool on the spool pin.
1
1 Tension disk
2
1 Thread spool
2 Spool pin
190
Sapphire_chapt7.fm Page 191 Friday, November 18, 2005 12:10 PM
Pass the thread through the hole in the right of
5 the thread guide toward the back of the
machine.
1
Note
● Be sure to follow the procedure described.
If the bobbin is wound without the thread
being cut with the cutter, when the bobbin
thread runs low, the thread may become
tangled around the bobbin and cause the
needle to break.
Slide the bobbin holder, until it clicks into
8 place.
1
1 Hole in the thread guide
Wind the thread clockwise around the bobbin
6 4 or 5 times, as shown in the illustration.
1 Bobbin holder
Press the main power switch to start winding
9 the bobbin.
Pass the end of the thread through the guide
7 slit in the bobbin winder seat, and pull the
thread. The cutter will cut the thread.
2
1
7
X Start winding the bobbin.
1 Guide slit
2 Bobbin winder seat
Using the Optional Bobbin Winder
191
Sapphire_chapt7.fm Page 192 Friday, November 18, 2005 12:10 PM
APPENDIX
——————————————————————————————————————————————————————————
The bobbin will stop rotating automatically
0 when it is done winding, and the bobbin
holder will return to its original position.
CAUTION
● Check that the bobbin thread has been
wound correctly, otherwise the needle
may break or the thread tension will be
incorrect.
● Be sure to clean the bobbin case each
a
Remove the bobbin.
time that the bobbin is changed. Thread
wax and dust easily collect around the
hole in the tension-adjusting spring on
the bobbin case, resulting in an incorrect
thread tension. For details, refer to
“Cleaning the bobbin case” on page 195.
● Be sure to check the tension of the
bobbin thread each time that the bobbin
is changed.
● Depending on the bobbin thread type,
the tension of the bobbin thread may
differ. Be sure to check the tension of the
bobbin thread and adjust the tension if
necessary.
For a metal bobbin, use both weights,
large (L) and small (S).
For detailed instructions on how to adjust
the bobbin tension, refer to page 85.
Note
● When removing the bobbin, do not pull on
the bobbin winder seat. Doing so could
loosen or remove the bobbin winder seat,
resulting in damage to the bobbin winder.
Pull the thread through the guide slit in the
b bobbin winder seat to cut the thread with the
cutter.
1
2
1 Weight (L) (Parts Code: XC5974-151)
2 Weight (S) (Parts Code: XC6631-051)
■ If bobbin winding is stopped before it is finished:
The bobbin winder stops automatically if the
thread does not feed, for example, if it becomes
tangled on the spool pin. If this occurs, correctly
thread the bobbin winder, and then wind the
bobbin correctly.
192
Sapphire_chapt7.fm Page 193 Friday, November 18, 2005 12:10 PM
Maintenance
Simple embroidery machine maintenance operations are described below. Always keep the machine clean,
otherwise malfunctions may occur.
Cleaning the LCD
If the surface of the LCD is dirty, lightly wipe it with a
soft dry cloth. Do not use organic cleansers or
detergents.
Cleaning the machine surface
Cleaning the hook
Periodically remove lint and dust for better
performance from Hook race area.
Use the included cleaning brush.
1
Turn off the embroidery machine.
If the surface of the machine is slightly dirty, wipe it
with a soft dry cloth. If the machine is heavily dirty,
lightly soak a cloth in neutral detergent, squeeze it
out firmly, and then wipe the surface of the machine.
After cleaning it once with a wet cloth, wipe it again
with a dry cloth.
CAUTION
● Unplug the power supply cord before
cleaning the machine, otherwise injuries
or an electric shock may occur.
CAUTION
● Unplug the power supply cord before
Note
● Do not use chemical products, such as
benzene or thinner.
cleaning the machine, otherwise injuries
or an electric shock may occur.
Open the hook cover, and remove the bobbin
2 case. (Refer to page 18.)
7
Maintenance
193
Sapphire_chapt7.fm Page 194 Friday, November 18, 2005 12:10 PM
APPENDIX
——————————————————————————————————————————————————————————
Use the included cleaning brush to remove
3 any lint and dust from the hook and its
surrounding area.
Cleaning around the needle
plate
If lint and dust collect around the moving knife, the
fixed knife or the thread retaining plate, the thread
may not be cut correctly or various parts of the
machine may be damaged. Make sure to clean
around the needle plate once a month.
Use on offset screwdriver and the included cleaning
brush.
1
Turn off the embroidery machine.
CAUTION
● If the hook is scratched or damaged,
consult your authorized dealer.
After cleaning is finished, insert the bobbin
4 case into the hook, and then close the hook
cover. (Refer to page 19.)
CAUTION
● Unplug the power supply cord before
cleaning the machine, otherwise injuries
or an electric shock may occur.
2 With an offset screwdriver, loosen the screws,
Remove the needle plate.
and then remove the needle plate.
1
1 Needle plate
194
Sapphire_chapt7.fm Page 195 Friday, November 18, 2005 12:10 PM
Use the included cleaning brush to remove
3 any lint and dust from the moving knife, the
fixed knife, the thread retaining plate, and
their surrounding areas.
Cleaning the bobbin case
Thread wax and dust easily collect around the hole
in the tension-adjusting spring on the bobbin case,
resulting in an incorrect thread tension. Therefore, it
should be cleaned each time when the bobbin is
changed.
Use a piece of paper with the thickness of a business
card.
Open the hook cover, remove the bobbin
1 case, and then remove the bobbin. (Refer to
page 18.)
1
1 Remove all lint in this area
After cleaning is finished, attach the needle
4 plate in the opposite way that it was removed
in step 2.
Slide the paper under the tension-adjusting
2 spring to remove any dust.
Use a corner of the paper to remove any dust
from around the hole.
1
7
1 Needle plate
1 Tension-adjusting spring
2 Hole
3 Paper
Maintenance
195
Sapphire_chapt7.fm Page 196 Friday, November 18, 2005 12:10 PM
APPENDIX
——————————————————————————————————————————————————————————
Note
● Do not bend the tension-adjusting spring. In
addition, do not use anything other than
thick paper or paper of the specified
thickness to clean the bobbin case.
3 any lint and dust from inside the bobbin case.
Use the enclosed cleaning brush to remove
Oiling the machine
In order to extend the life of the embroidery
machine’s parts and keep the machine operating
correctly, be sure to oil the machine before the first
time that it is used.
Afterward, put a drop of oil onto the hook once a day
before use, and put a drop of oil to the lower needle
bar felt washer every 40 to 50 hours of machine use.
■ Oiling the race
1
Turn off the embroidery machine.
4 into the bobbin case and the bobbin case into
After cleaning is finished, insert the bobbin
the hook, and then close the hook cover.
(Refer to page 19.)
CAUTION
● Unplug the power supply cord before
cleaning the machine, otherwise injuries
or an electric shock may occur.
2 case. (Refer to page 19.)
Open the hook cover, and remove the bobbin
196
Sapphire_chapt7.fm Page 197 Friday, November 18, 2005 12:10 PM
Rotate the handwheel (about 50 degrees) to
3 move the race of the hook to a position where
it can easily be oiled.
1
■ Oiling the needle bars
From embroidering screen, select one needle bar
at a time. Pull down the selected needle bar and
lock into position (refer to page 72). Put one drop
of oil on the lower needle bar felt washer.
1 Handwheel
• Be sure to rotate the handwheel
counterclockwise.
4
Put a drop of oil onto the hook.
1
1
1 Apply oil here.
• Too much oil may drip onto sewing project.
Note
2
1 Punch a small hole in oil bottle.
2 Apply oil here.
• Use a pointed object to punch a small hole
in the tip of the enclosed oiler before using
it.
After oiling, insert the bobbin case into the
5 hook, and then close the hook cover. (Refer to
page 18.)
● Put a drop of oil onto the hook once a day
before use.
● Apply one drop of oil on the lower needle
bar felt washer every 40 – 50 hours of
sewing time.
● Apply only sewing machine oil. Use of any
other type of oil may result in damage to the
embroidery machine.
● Do not apply too much oil. Fabric or thread
may get contaminated. If too much oil is
applied, wipe off any excess with a rag.
● If the thread breaks while sewing or the
operating noise of the hook becomes loud,
apply oil onto the race hook.
Maintenance
197
7
Sapphire_chapt7.fm Page 198 Friday, November 18, 2005 12:10 PM
APPENDIX
——————————————————————————————————————————————————————————
Troubleshooting
On-screen troubleshooting
4
Check the items that are displayed.
5
After checking the desired information, touch
6
Touch
This embroidery machine is equipped with an easyto-use troubleshooting feature for problems during
sewing. Touch the key that shows the problem, and
then check for the causes that are displayed.
1
2
Touch
.
Touch
.
.
.
Touch the key that contains a description of
3 the problem.
X The screen that was displayed before
was touched appears.
198
Sapphire_chapt7.fm Page 199 Friday, November 18, 2005 12:10 PM
Troubleshooting
If the machine does not operate correctly, check for the following points/issues before requesting service.
If the suggested remedy does not correct the problem, contact your authorized dealer.
Symptom
The embroidery
machine does not
operate.
Probable Cause
Remedy
Reference Page
The machine is not turned ON.
Turn on the embroidery machine.
p.20
The machine has not been
unlocked.
Touch the unlock key.
p.42
The start/stop button was not
pressed.
With the machine unlocked,
press the start/stop button.
p.42
The needle is not installed
correctly.
Correctly install the needle.
p.63
The needle set screw is loose.
Use the Allen screw driver to
securely tighten the needle set
screw.
p.63
The needle is bent or blunt.
Replace the needle with a new
one.
p.15, 63
The area around the hole in the
needle plate is damaged.
1
Replace the needle plate.
Consult your nearest authorized
dealer.
The needle
breaks.
1 Scratches/Burrs
The needle hits/touchs the
needle plate.
1
2
Replace needle.
Consult your nearest authorized
dealer.
3
1 Needle
2 Hole in needle plate
3 Needle hits hole
The presser foot is set too high
and not correctly positioned.
The needle hits/touches the
presser foot.
7
Consult your nearest authorized
dealer.
Troubleshooting
199
Sapphire_chapt7.fm Page 200 Friday, November 18, 2005 12:10 PM
APPENDIX
——————————————————————————————————————————————————————————
Symptom
Probable Cause
Remedy
Reference Page
The area around the embroidery
foot hole is damaged.
1
Replace the presser foot.
Consult your nearest authorized
dealer.
1 Scratches or Burrs
Sliding surface on hook race is
not smooth. There are scratches
or burrs on it.
1
Consult your nearest authorized
dealer.
1 Hook race area
The needle
breaks.
200
The hook is not correctly
installed.
Consult your nearest authorized
dealer.
The hook stopper is not
correctly installed, the hook is
making a complete rotation.
Consult your nearest authorized
dealer.
The upper thread is not threaded
correctly.
The upper thread is catching
somewhere.
Pull the upper thread by hand
from below the presser foot, and
check that the thread moves
smoothly. If the thread does not
move, it is not threaded
correctly. Thread the upper
thread correctly. Make sure the
thread is caught by the needle
bar thread guide.
The upper thread tension is set
too high. It does not run.
Decrease the upper thread
tension and make sure tension
disc rotate when pulling on
thread.
p.86
A bobbin designed specifically
for this machine is not used.
Use the correct bobbin.
p.15
The needle and the hook are not
correctly passing each other.
Hook timing may be OFF.
Consult your nearest authorized
dealer.
There is backlash play (forward/
backward) in the needle bar
case.
Consult your nearest authorized
dealer.
The thread density of the
embroidery data is too fine.
Three or more overlapping
stitches are being sewn.
Using a data design system,
correct the thread density and
overstitching settings in the
embroidery data.
p.35-38
p.100
Sapphire_chapt7.fm Page 201 Friday, November 18, 2005 12:10 PM
Symptom
Probable Cause
Remedy
Reference Page
The needle is not correctly
installed .
Correctly install the needle.
p.63
The needle set screw is loose.
Use the Allen screw driver to
tighten the needle set screw.
p.63
The needle is bent or blunt.
Replace the needle with a new
one.
p.15, 63
The area around the hole in the
needle plate is damaged.
1
Replace the needle plate or
consult your nearest authorized
dealer.
1 Scratches/Burrs
The needle is touching the
needle plate.
1
2
The upper thread
breaks.
Consult your nearest authorized
dealer.
3
1 Needle
2 Needle plate hole
3 Needle touching hole
The presser foot is set too high
and not correctly positioned.
The needle hits/touches the
presser foot.
Consult your nearest authorized
dealer.
The area around the embroidery
foot hole is damaged.
1
Replace the presser foot.
Consult your nearest authorized
dealer.
7
1 Scratches/Burrs
Using a weak thread like a
metallic thread.
Slow down the machine sewing
speed.
p.91
Troubleshooting
201
Sapphire_chapt7.fm Page 202 Friday, November 18, 2005 12:10 PM
APPENDIX
——————————————————————————————————————————————————————————
Symptom
Probable Cause
Remedy
Reference Page
Sliding surface on hook is not
smooth. There are burns on it.
1
Consult your nearest authorized
dealer.
1 Hook race area
The thread is loose in the hook
area.
Remove the loose thread. If the
thread is tangled in the hook,
clean the hook.
The play between the hook and
the race is too much.
Consult your nearest authorized
dealer.
The hook does not rotate
smoothly.
Remove lint, and clean and
apply oil.
The space between the hook
stopper and the hook cannot be
adjusted.
Consult your nearest authorized
dealer.
p.193
p.193, 196
The upper thread is not threaded
correctly.
Pull the upper thread by hand
from below the presser foot, and
check that the thread moves
smoothly. If the thread does not
move smoothly, it is not
correctly threaded.
Un-thread the machine and
re-thread the machine.
Make sure the thread is correctly
positioned in the needle bar
thread guide.
p.35-38
Upper thread is not positioned
in upper or middle thread guide.
Make sure thread passes
completely under upper and
middle thread guide.
p.36-37
There are knots or tangles in the
thread.
Remove any knots or tangles.
The upper thread tension is too
high.
Decrease the upper thread
tension.
p.86
The lower thread tension is
incorrect.
The thread does not roll out of
the bobbin case smoothly.
Adjust the lower thread tension.
p.85
The bobbin case is damaged.
Replace the bobbin case with a
new one.
p.15
The bobbin thread is not wound
correctly.
Check that the bobbin is wound
so that it about 80% full and that
the thread is evenly wound. If
the bobbin is not correctly
wound, replace the bobbin with
one that is correctly wound or
rewind the bobbin.
p.15
A bobbin designed specifically
for this machine is not used.
Use the correct bobbin.
p.15
The upper thread
breaks.
202
Sapphire_chapt7.fm Page 203 Friday, November 18, 2005 12:10 PM
Symptom
The upper thread
breaks.
The bobbin
thread breaks.
Stitches are
skipped.
The embroidery
pattern is
misaligned.
Probable Cause
Remedy
Reference Page
The automatic needle-threading
mechanism is broken.
Consult your nearest authorized
dealer.
Adhesive is attached to the
needle.
Replace the needle.
The fabric is not taut.
Firmly set the fabric in the
embroidery frame so that it is
taut.
The thread quality is poor.
The thread quality is too weak
due to age of thread. Replace
thread.
The embroidery data contains
stitches with a pitch of zero.
Delete all stitches with a zero
pitch.
p.150
The embroidery data contains
many stitches with an extremely
small pitch.
Delete all stitches with a small
pitch.
p.150
The thread density of the
embroidery data is too fine.
Three or more overlapping
stitches are being sewn.
Using a data design system,
correct the thread density and
overstitching settings in the
embroidery data.
p.100
The bobbin thread is not
correctly threaded.
Correctly thread the bobbin
thread.
p.19
The bobbin is scratched or does
not rotate smoothly.
Replace the bobbin.
p.18
The bobbin case is damaged.
Replace the bobbin case.
p.18
The thread is tangled.
Remove the thread jammed and
clean the hook.
p.193
A bobbin designed specifically
for this machine is not used.
Use the correct bobbin.
p.15
The upper thread is not threaded
correctly.
Thread the upper thread
correctly.
p.35
The needle is bent or blunt.
Replace the needle with a new
one.
The needle is not installed
correctly.
Correctly install the needle.
Dust has accumulated under the
needle plate or in the hook.
Clean the hook and the needle
plate.
The needle and the hook are not
correctly passing each other.
Consult your nearest authorized
dealer.
The thread twist is either too
tight or too loose.
Improper twisting results in
irregular loop formation. Try
using a new spool.
The thread is tangled.
Use tweezers to remove any
tangled thread from the hook.
The fabric is not well framed in
the embroidery frame (for
example, the fabric is not taut).
If the fabric is not taut, the
pattern may become misaligned
or the stitching may shrink. Be
sure to correctly frame the fabric
in the embroidery frame.
The embroidery frame is too
large for the size of the
embroidery.
Use an embroidery frame that
matches the size of the
embroidery.
p.63
p.28, 67
p.15, 63
p.63
p.193, 194
7
p.28, 67
p.65
Troubleshooting
203
Sapphire_chapt7.fm Page 204 Friday, November 18, 2005 12:10 PM
APPENDIX
——————————————————————————————————————————————————————————
Symptom
The embroidery
pattern is
misaligned.
Probable Cause
Remedy
Reference Page
Stabilizer (backing) is not used.
Use stabilizer (backing) when
embroidering on thin or stretch
fabrics, fabrics with a coarse
weave or fabrics that easily
allow the stitching to shrink.
<When using the optional cap
frame>
Use hard stabilizer when
embroidering on a cap made of
soft material.
p.66
The embroidery frame is not
correctly attached to the
carriage.
Correctly attach the embroidery
frame to the carriage. Make sure
that the pins on the left and right
arms of the embroidery frame
holder securely fit into the holes
in the handles on the
embroidery frame.
p.30
The carriage or the embroidery
frame is hitting objects.
The pattern may become
misaligned if the carriage or
embroidery frame is hitting
objects. Make sure that there are
no objects within the operating
field of the embroidery frame.
The fabric is caught or pinched.
Stop the machine, and then
correctly position the fabric.
The carriage moved while
removing embroidery frame.
The pattern may become
misaligned if the presser foot
was hit or the carriage was
moved while replacing bobbin
thread, changing needle, or
working near embroidery frame.
Be careful when removing and
reattaching the embroidery
frame while replacing bobbin
thread, changing needle, or
working near embroidery frame.
If the carriage is moved, turn the
machine off, then on again. The
correct frame position at the
time that the machine was
stopped is stored in the
machine’s memory, and the
embroidery frame is returned to
the correct position.
The design was not digitized
correctly.
The design may need more pull
compensation or underlay to
accommodate stretchy or highnapped fabrics.
The upper thread tension is low.
There are loops in
the upper thread.
204
After passing the upper thread
through the hole in the presser
foot, pull the thread by hand to
check the thread tension. If it is
difficult to determine, compare
it with other needle bars where
looping does not occur.
p.86
Sapphire_chapt7.fm Page 205 Friday, November 18, 2005 12:10 PM
Symptom
Probable Cause
Remedy
Reference Page
The thread tension does not
correspond to the amount that
the thread tension knob was
tightened.
If the thread tension cannot be
adjusted, thread wax and dust
may have collected in the upper
or middle thread guide plates,
causing the thread tension guide
plates to rise. Clean the thread
tension guide plates.
The thread quality is poor.
Try sewing with different thread.
If the problem no longer occurs
after the thread is changed, the
thread quality is the problem.
Replace the thread with one of
good quality.
Lint may be wound in the hook.
Clean the hook.
p.193
The upper thread is not threaded
correctly.
Check the thread path, and then
thread the upper thread again.
p.35
The hook is damaged.
Replace the hook.
Consult your nearest authorized
dealer.
Not enough oil was applied.
Oil recommended parts.
p.196
The needle is not at the correct
position.
Touch the key to move the
desired needle bar to be
threaded into embroidering
position.
p.40
Recommended needles are not
used on this machine.
Replace and use recommended
needle.
p.15, 63
The needle is not installed
correctly.
Correctly install the needle.
p.15, 63
The hook on the automatic
needle-threading mechanism is
bent.
Consult your nearest authorized
dealer.
p.15, 63
The upper thread is not threaded
correctly.
Check the thread path, and then
thread the upper thread again.
p.35
The bobbin thread is not
correctly threaded.
Correctly thread the bobbin
thread.
p.19
The lower thread tension is
incorrect.
Adjust the tension of the bobbin
thread.
p.85
The upper thread
comes out of the
needle when
embroidering
begins.
If a short length of thread
remains after the thread is
trimmed, the needle may
become unthreaded when
embroidering begins again.
Set the remaining length of
thread to “LONG TAIL” on the
second page of the settings
screen.
p.150
The upper thread
does not reach the
bobbin thread
when
embroidering
begins.
There is no more thread in the
bobbin, the thread does not feed
from the bobbin, or the thread
that is fed from the bobbin is too
short.
Correctly thread the lower
thread.
p.19
There are loops in
the upper thread.
The machine is
noisy.
The needle
threader cannot
be used.
The thread
tension is
incorrect.
Troubleshooting
7
205
Sapphire_chapt7.fm Page 206 Friday, November 18, 2005 12:10 PM
APPENDIX
——————————————————————————————————————————————————————————
Symptom
Probable Cause
Remedy
Reference Page
Although the
thread is not
broken, a broken
thread error
occurs and the
machine stops.
If the thread breakage sensor in
the thread tension disc of the
thread tension knobs cannot
detect that the thread is being
fed, even if the machine is
running, a broken thread error
occurs and the machine is
stopped. If the thread came out
of the thread tension disc, even
though the thread is not broken,
the machine detects that the
thread is not being fed and stops.
Correctly pass the thread
through the thread tension disc.
If the broken thread error occurs
after the machine is rethreaded,
the sensor may be damaged.
Consult your nearest authorized
dealer.
p.37
The needle is dull.
Replace the needle. Dull
needles have a difficult time
passing through the garment,
causing fabrics to tear.
The fabric is too delicate.
The simple penetration of the
needle could damage delicate
fabrics. Use stabilizer on top of
fabric.
p.167
The thread tension is too tight.
Adjust the tension according to
the type of fabric and thread
being used. Polyester thread will
stretch during sewing especially
if the tensions are set too high.
After the stitching is complete,
the thread returns to its original
strength, causing puckers in the
fabric.
p.86
The framing tension of the fabric
is incorrect.
Tightly frame non-stretchable,
woven fabrics. Loose framing
will cause the fabric to bunch
up under the stitching.
Tautly frame soft knits using a
stable backing. Overstretching
the garment will cause it to look
puckered when the frame is
removed.
p.166
The column stitches are too
long.
Re-digitize the design with fill
stitching or with multiple rows
of column stitching.
The needle is dull.
Dull needles push fabric down
and damage material. Replace
the needle.
The design density is too heavy.
Too many stitches in an area
pull fabric, causing it to pucker.
Slightly decrease the design
density by 5% to 10%.
The LCD contrast is incorrect.
Adjust the contrast on the LCD.
There are needle
cuts or holes in
the garment.
There is
puckering in the
fabric.
The LCD cannot
be read.
p.15, 63
p.15, 63
p.142
CAUTION
● This machine is equipped with a thread detecting mechanism. If the machine is not threaded
with the upper thread, the machine will not operate correctly, even if the start/stop button is
pressed after unlocking the machine.
● If the machine suddenly stops:
- Turn off the machine, and unplug the power cord.
- Restart the machine with the correct operating procedure. Refer to page 20.
206
Sapphire_chapt7.fm Page 207 Friday, November 18, 2005 12:10 PM
Error messages
If the start/stop button is pressed while the machine is not correctly set up or if an incorrect operation is
performed, the machine stops and informs you of the error with a buzzer and an error message. If an error
message appears, correct the problem according to the instructions in the message.
To close the message, touch
or perform the correct operation, then touch
. If the message
appears again, consult your nearest authorized dealer.
The pattern extends out of the
200 mm (H) × 300 mm (W)
embroidering area.
Move the pattern into the
embroidering area.
The installed embroidery frame
is too small.
Check which embroidery
frames can be used, and then
install a larger embroidery
frame. (Refer to page 28.)
There are too many characters
to be arranged on the curve.
Reduce the number of characters.
The upper thread was cut or
the thread came out the thread
tension disc or a thread guide.
The machine is not threaded
correctly.
Check that the thread is under
the upper and middle thread
guides and correctly thread the
upper thread.
(Refer to page 35.)
The bobbin thread was broken
or ran out.
Check that there is thread on
the bobbin and that approximately 50 mm (2 inches) of
thread has been pulled out, and
then re-install the bobbin.
(Refer to page 19.)
The machine couldn't delete
the data.
The media may be damaged.
7
Patterns on the embroidery
card cannot be read.
The embroidery card may be
damaged.
Characters have been combined until they extend out of
the embroidery frame.
Decrease the number of characters so that they fit within the
embroidery frame.
Six manual needle bar settings
were being specified.
No more than five needle bars
can be specified.
Troubleshooting
207
Sapphire_chapt7.fm Page 208 Friday, November 18, 2005 12:10 PM
APPENDIX
——————————————————————————————————————————————————————————
Sewing cannot begin from the
specified starting position.
Change the starting position or
move the frame and change the
embroidering position. (Refer to
page 89.)
The needle has stopped at an
incorrect position.
Turn the handwheel so that the
mark on the handwheel is at the
top.
More than 101 patterns are
being combined.
Reduce the number of patterns
combined. Up to 101 patterns
can be combined.
The needle bar case cannot be
moved to its initial position.
Touch
to automatically
reset the needle bar case.
The needle bar case has
stopped at an incorrect position.
Touch
to automatically
reset the needle bar case.
The needle bar case motor is
locked.
Touch
to automatically
reset the needle bar case.
The automatic needle-threading mechanism did not operate
correctly.
The thread is entangled in the
automatic needle-threading
mechanism, remove the thread,
and then touch
.
Another operation was performed while the automatic
needle-threading mechanism
was threading the needle.
Press the automatic needle
threading button, and then perform the other operation after
the needle is threaded. (Refer to
page 39.)
The USB media's memory
capacity is exceeded to the
limit.
There are too many data either
in the machine or USB media.
The pattern is too large.
Patterns larger than 200 mm (H)
× 300 mm (W) (7-7/8 inches (H)
× 11-3/4 inches (W)) cannot be
used. Reduce the pattern to a
size smaller than that specified.
The memory capacity is
exceeded to the limit.
Delete another data and try
again.
The thread picker did not operate correctly.
The thread is entangled on the
thread picker, remove the
thread.
208
Sapphire_chapt7.fm Page 209 Friday, November 18, 2005 12:10 PM
Patterns stored in the
machine's memory cannot be
recalled.
The machine's memory may be
damaged. Consult your nearest
authorized dealer.
The machine couldn't save the
data.
Try to use a different media.
The machine was stopped
while the needle bar case was
moving.
Touch
to automatically
reset the needle bar case.
The pattern is larger than the
embroidering area of the
installed embroidery frame.
Use an embroidery frame with
an embroidering area that is
larger than the pattern.
Thread color that was specified
is incorrect.
The thread color number that
was entered is not in the custom
thread table setting. Check the
number, and then try entering
the number again.
The USB media is write-protected.
Cancel the write protection.
The USB media is write-protected.
Touch
, and cancel the
write protection.
The USB media was attempted
to change while it is being
read.
Please try again without disconnecting.
was touched while no
embroidery card is inserted.
Insert an embroidery card.
(Refer to page 112.)
7
A pattern on an embroidery
card not compatible with this
machine was being recalled.
Some embroidery cards with
copyrighted patterns cannot be
used.
Embroidery data with an
incompatible version is being
used.
Embroidery data that is not
complete or has an unknown
version cannot be used.
The pattern has too many
stitches and cannot be used.
Data with stitches that exceed
specifications (500,000 stitches)
cannot be displayed. Use data
design software to reduce the
number of stitches.
Troubleshooting
209
Sapphire_chapt7.fm Page 210 Friday, November 18, 2005 12:10 PM
APPENDIX
——————————————————————————————————————————————————————————
More than 501 thread color
changes are being specified in
the pattern.
Up to 501 thread color changes
can be specified in a pattern.
The embroidery data cannot be
detected.
The embroidery data may be
damaged.
USB media error
Touch
, and try again. Or
the USB media may be damaged.
USB media is not connected to
the machine.
Connect a USB media.
During data transfer, the USB
cable was disconnected.
Do not disconnect the USB
cable while data is being transferred. (Refer to page 114.)
A wiper error occurred.
The thread is entangled on the
wiper, remove the thread.
210
Sapphire_chapt7.fm Page 211 Friday, November 18, 2005 12:10 PM
If any of the following messages appear, consult your nearest authorized dealer.
7
Troubleshooting
211
Sapphire_chapt7.fm Page 212 Friday, November 18, 2005 12:10 PM
APPENDIX
212
——————————————————————————————————————————————————————————
Sapphire_chapt7.fm Page 213 Friday, November 18, 2005 12:10 PM
If the LCD cannot be read
If the LCD cannot be read after the machine is turned
on, adjust the LCD as described below.
While touching anywhere inside the touch
1 panel turn the machine off, then on again.
If the machine does not
respond when a key is pressed
If nothing happens when a key on the screen is
touched (no key can be selected or the keys are
misaligned), adjust the touch panel as described
below.
Touch anywhere inside the touch panel, and
1 turn the machine off, then on again.
• Continue touching the touch panel until the
screen shown below appears.
• The start/stop button does not light up.
2
of the screen so that the contents of the
• Continue touching the touch panel until the
screen shown below appears.
• The start/stop button does not light up.
screens can be clearly viewed.
X The screen shown below appears.
Touch
and
to adjust the brightness
3 the machine off, then on again.
After making the necessary adjustment, turn
2
Press the thread trimming button.
7
X The adjustments screen appears.
Troubleshooting
213
Sapphire_chapt7.fm Page 214 Friday, November 18, 2005 12:10 PM
APPENDIX
——————————————————————————————————————————————————————————
Use the included touch pen to touch the center
3 of the crosses on the screen, from 1 to 5.
CAUTION
● Be sure to use the included touch pen to
adjust the touch panel. Do not use a
mechanical pencil, screwdriver or any
other hard or sharp object. Do not apply
pressure to the LCD screen display,
otherwise damage to the display may
result.
Touch the center of the crosses in order from
4 1 to 5. After number 5 is touched, a buzzer
will sound once to indicate that the
adjustments were correctly made.
• If the buzzer sounds twice when cross
number 5 is touched, an error occurred
during setting. Touch the crosses again,
starting from 1 to 5.
After making the necessary touch panel
5 adjustment, turn the machine off, and on
again.
Note
● If the keys still do not respond, even after
the touch panel is adjusted, or if the touch
panel cannot be adjusted, contact your
nearest authorized dealer.
214
Sapphire_chapt7.fm Page 215 Friday, November 18, 2005 12:10 PM
Specifications
Embroidery machine specifications
Item
Specification
Weight
37 kg (81 Ibs.).
Machine size
512(W) x 589(D) x 586 (H) mm (20-5/32 (W) x 23-3/16 (D) x 23-1/16(H) inches)
Sewing speed
Maximum / Tubular: 1,000 spm, Cap: 600 spm
Speed range / Max.: 1,000 spm, Min.: 400 spm
Hook Type
Vertical rotary hook
Hook size
Normal size (Type L)
Needle
HA130EBBR / #11
Number of needle
6 needles
Thread tension
Manual
Cap sewing
(Option) 130 mm (W) x 50 mm(H) (2 inches (H) x 5-1/8 inches (W))
Tubular sewing
(4 frames available)
300 mm (W) x 200 mm(H) (7-7/8 inches (H) x 11-3/4 inches (W)),
180 mm (W) x 130 mm(H) (5-1/8 inches (H) x 7-1/8 inches (W)) ,
100 mm (W) x 100 mm(H) (4 inches (H) x 4 inches (W)),
60 mm (W) x 40 mm(H) (1-1/2 inches (H) x 2-3/8 inches (W))
Thread trimming
Upper and lower thread
Thread breakage
sensor
Yes / Upper thread an bobbin thread
Automatic needle
threader
Yes
Communication
with PC
USB port
Data storage
Original card and USB media
7
Specifications
215
SapphireIX.fm Page 216 Friday, November 18, 2005 1:20 PM
APPENDIX
——————————————————————————————————————————————————————————
Index
Symbols
“DST” TRIM SETTING .........................................140, 149
A
Accessories .....................................................................4
Adjusting
angle .......................................................................73
cap frame driver ....................................................173
edited patterns ......................................................120
legs ...........................................................................8
operation panel .........................................................9
screen brightness ..........................................142, 213
sewing speed .......................................................... 91
thread tension .........................................................85
touch panel ...........................................................213
Alphabet patterns ........................................................ 109
Appliqué alphabet .......................................................107
Appliqué sewing .........................................................156
Array key .......................................................53, 111, 123
Arrrow key ............................................................72, 120
Automatic lock stitch ..................................................... 88
Automatic needle-threading button ...........................3, 39
Automatic needle-threading mechanism .......................39
B
Backing .......................................................................165
Basic procedures ...........................................................17
Bobbin .............................................................. 15, 18, 19
Bobbin case .............................................. 18, 19, 85, 195
Bobbin winder ............................................................ 188
Brightness of LCD ................................................141, 142
Buzzer .................................................................141, 142
C
Cancel key ..............................................................51, 57
Canton fleece .............................................................. 167
Canvas ........................................................................ 167
Cap frame ...................................................................169
removing .............................................................. 184
Cap frame driver .........................................................171
adjusting ...............................................................173
Carriage .......................................................................... 2
Center cursor ...............................................................145
Centerpoint .................................................................144
Change thread color key ........................... 53, 55, 92, 127
Changing
character spacing ..................................................124
color thread table ..................................................149
colors of the pattern ......................................127, 131
display guides .......................................................143
embroidery position ................................................72
language ...............................................................143
size .......................................................103, 110, 121
text arrangement of a character .............................123
thread color display ..............................................145
thread density .......................................................125
thread spools .......................................................... 77
216
units of measurements .......................................... 143
Checking
needle bars and thread colors .................................33
preview image ........................................................27
thread spool changes .............................................. 75
thread tension ......................................................... 45
Cleaning
around the needle plate ........................................ 194
bobbin case ..........................................................195
hook ..................................................................... 193
LCD ......................................................................193
machine surface ....................................................193
Color information ........................................................145
Color thread table ....................................................... 163
Combining patterns ..................................................... 119
Common screen ............................................................49
Corduroy ..................................................................... 167
Cotton sheeting ........................................................... 167
Custom thread table ............................................141, 147
D
Delete file key ..................................................... 112, 118
Delete key ............................................................. 53, 110
Deleting
pattern ..................................................................128
previously saved pattern ...............................112, 118
short stitches ......................................................... 150
Denim .........................................................................167
Density key ........................................................... 53, 125
Display ....................................................................16, 49
Display expanded color ...................................... 140, 146
Display guides ............................................................. 143
Distance from center (horizontal) ............................ 52, 54
Distance from center (vertical) .................................52, 54
Dress shirt (woven) ......................................................167
E
Edit end key ..................................................................53
Edit key ...................................................................50, 55
Editing ...........................................................25, 119, 129
combined pattern ..................................................132
Embroidering
corner of fabric ....................................................... 69
repeating pattern ...................................................130
small fabric ............................................................. 69
tape or ribbon ......................................................... 69
Embroidering screen ................................................33, 56
Embroidering settings screen ...........................26, 54, 129
Embroidery
basic method ..........................................................42
repeatedly sewing ...................................................90
Embroidery card slot .......................................................3
Embroidery cards ........................................................112
Embroidery data ..........................................................100
Embroidery frame
attaching to the machine .........................................30
hooping ..................................................................28
removing ................................................................46
SapphireIX.fm Page 217 Friday, November 25, 2005 10:20 AM
types .......................................................................65
Embroidery frame holder
installing ...............................................................185
removing .............................................................. 171
Embroidery frame indicators ..............................28, 52, 54
Embroidery patterns ....................................................104
Embroidery position ......................................................72
Embroidery thread .........................................................35
Error messages .............................................................207
F
Fabric ......................................................................16, 69
removing ................................................................ 46
Fabric/stabilizer compatibility chart .............................167
Features ........................................................................ viii
Feet ................................................................................. 2
Floral alphabet patterns ............................................... 106
Forward/Backward stitch key ............................. 57, 79, 81
Frame patterns .............................................................108
Front view .......................................................................2
G
Golf shirt .....................................................................167
Golf Style .................................................................... 170
Grid ............................................................................144
H
Handwheel .............................................................3, 197
Headwear ...................................................................167
Help key ...............................................................49, 153
Hook ........................................................................... 193
Hook cover/Hook ............................................................ 2
Hooping .......................................................... 28, 67, 166
Horizontal mirror image key ................... 51, 53, 103, 121
I
Industrial embroidery frame ........................................168
Mounting jig ................................................................174
Moving
needle ..................................................................... 40
Multi color key ......................................................53, 126
N
Names of machine parts .................................................. 2
Needle ..........................................................................15
changing ................................................................. 63
Needle bar case ..............................................................2
Needle bar key ........................................................34, 56
Needle plate ................................................................194
New embroidery key .....................................................49
Next page key ............................................................... 51
Number of thread color changes .......................51, 52, 54
O
Oiling .......................................................................... 196
Operation panel ......................................................2, 3, 9
Optional accessories .......................................................5
P
Pattern display area ....................................................... 49
Pattern editing screen ......................................25, 52, 119
Pattern list screen ....................................................23, 51
Pattern selection key .............................................53, 120
Pattern size ..............................................................52, 54
Pattern type selection screen ...................................23, 50
Positioning key ..........................................53, 55, 72, 120
Power supply cord ..................................................20, 47
Power supply plug ........................................................... 3
Preview key ....................................................... 51, 53, 55
Previewing the Image ....................................................27
Previous page key ......................................................... 51
Principal parts ......................................................... 2, 151
Q
Quit key ........................................................................55
J
Jump code ...................................................................149
L
Language .............................................................141, 143
LCD ....................................................3, 16, 49, 142, 213
Lingerie .......................................................................167
Lock stitching key ....................................................55, 88
Locking mechanism ......................................................42
Locking the needle bar ..................................................72
Low Profile (Low fitting) ..............................................170
Lower thread guide .........................................................2
M
Machine operations guide key ...............................49, 151
Main power switch ..............................................3, 20, 47
Maintenance .......................................................151, 193
Manual needle bar settings ............................................96
Maximum sewing speed key ...................................55, 56
Merge key .....................................................................53
Middle thread guide ........................................................2
R
Region display ............................................................... 56
Remaining length ........................................................150
Renaissance Alphabet Patterns .................................... 105
Repeat key ............................................................55, 130
Repeat spacing (horizontal) ...................................54, 131
Repeat spacing (vertical) ........................................ 54, 131
Reserve stop key ................................................57, 92, 94
Reserved needle ....................................................96, 141
Retrieving
from Computer (USB) ............................................ 114
from Embroidery cards .......................................... 112
from memory ........................................................111
from USB media ...................................................117
Right-side/rear view ......................................................... 3
Rotate all key ..................................................55, 73, 129
Rotate key ............................................................. 53, 122
Rotation angle ......................................................... 52, 54
Index
217
7
SapphireIX.fm Page 218 Friday, November 18, 2005 1:20 PM
APPENDIX
——————————————————————————————————————————————————————————
S
Satin jacket .................................................................. 167
Screen .........................................................16, 21, 22, 49
Selecting
edited pattern ........................................................ 120
embroidery pattern .........................................23, 102
Set key .......................................................................... 51
Setting up ........................................................................ 6
Settings key ...........................................................49, 140
Sewing
appliqué ...............................................................156
pattern aligned with a mark on the fabric .............. 161
Sewing key .................................................................... 55
Sewing light .................................................................... 2
Sewing order .................................................................56
Sewing speed ................................................................ 91
Sewing the embroidery ..................................................42
Sewing time .................................................................. 56
Short stitch delete ................................................140, 150
Silk ..............................................................................167
Six-needle machine ...................................................... viii
Size (horizontal) ......................................................51, 52
Size (vertical) ...........................................................51, 52
Size key ...................................................51, 53, 103, 121
Spacing key ...........................................................53, 124
Specifications .............................................................. 215
Spool ............................................................................. 36
Spool change indicator ............................................56, 76
Spool stand ...............................................................2, 11
Stabilizer .......................................................66, 165, 167
Standard Tail .......................................................140, 150
Standard(Pro Style) ......................................................170
Start/stop button ........................................................ 3, 42
Starting/ending position key ..............................55, 89, 90
Stitch count ...................................................................56
Stopping embroidering ..................................................44
Store key .......................................................................55
Sweater knit ................................................................ 167
Sweatshirt .................................................................... 167
T
Tajima data .................................................101, 149, 163
Temporary needle bar setting key ............................57, 94
Tension dial ............................................................45, 86
Terry cloth ...................................................................167
Thread .......................................................15, 16, 35, 164
Thread color ................................................ 131, 146, 163
Thread color display ....................................................145
Thread color set up display ........................................... 56
Thread guide .............................................................2, 36
Thread guide assembly support ....................................... 2
Thread guide pins ............................................................ 2
Thread spools ................................................................ 77
Thread tension ......................................................85, 192
Thread tension disc .......................................................37
Thread tension knobs ................................................2, 86
Thread trimming button ............................................. 3, 44
Threading
needle .....................................................................39
upper thread .....................................................33, 35
Touch panel .................................................................... 3
Trial sewing key ......................................................32, 55
218
Troubleshooting ..................................................151, 198
T-shirt .......................................................................... 167
U
Units of measurements ........................................ 141, 143
Unlock key ..............................................................42, 57
Upper thread guide ......................................................... 2
Upper threading ............................................................33
USB host ......................................................................... 3
USB media ..........................................................117, 137
USB port connector ......................................................... 3
V
Ventilation slots ............................................................... 3
Version ........................................................................140
Vertical mirror image key ........................ 51, 53, 103, 121
SapphireIX.fm Page 219 Friday, November 18, 2005 1:20 PM
7
Index
219
PR600II H1-H4
EMBROIDERY MACHINE
PR-600
OPERATION MANUAL
English
884-T03
XD1133-0511
0512
Printed in Taiwan