1
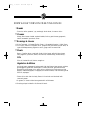
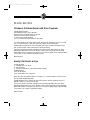
TR456_
1/28/03
4:02 PM
Page 1
THE PANINI MAKER
MODEL TR456
TR456_
1/28/03
4:02 PM
Page 2
TABLE OF CONTENTS
Important Safeguards
...................................................
Additional Important Safeguards
Polarized Plug
.....................................
2
...........................................................
3
Short Cord Instructions
Electric Power
1
................................................
3
...........................................................
3
Plasticizer Warning
The Panini Maker
.....................................................
3
......................................................
4
Before Using For The First Time
......................................
5
Panini Preparation . . . . . . . . . . . . . . . . . . . . . . . . . . . . . . . . . . . . . . . . . . . . . . . . . . . . . .
6-7
Hints for Best Results
..................................................
User Maintenance Instructions
.......................................
9
..................................................
9
....................................................
9
Cleaning Instructions
Storage Instructions
Dress Up Your Panini
..................................................
Some Variations On Creating Panini
Panini Recipes
8
10 - 11
................................
12
..........................................................
13 - 17
Guarantee/Warranty
. . . . . . . . . . . . . . . . . . . . . . . . . . . . . . . . . . . . . . .Inside
Back Cover
TR456_
1/28/03
4:02 PM
Page 3
IMPORTANT SAFEGUARDS
When using electrical appliances, basic safety precautions should always be followed,
including the following:
1. Read all instructions
2. Do not touch hot surfaces. Use handle. Use oven mitts or potholders.
3. To protect against electric shock do not immerse cord, plugs, or appliance in water
or other liquid.
4. Close supervision is necessary when any appliance is used by or near children.
5. Unplug from outlet when not in use and before cleaning. Allow to cool before
putting on or taking off parts, and before cleaning the appliance.
6. Do not operate any appliance with a damaged cord or plug or after the appliance
malfunctions, or has been damaged in any manner. Contact Consumer Service for
examination, repair or adjustment.
7. The use of accessory attachments not recommended by the appliance manufacturer
may cause injuries.
8. Do not use outdoors.
9. Do not let cord hang over edge of table or counter, or touch hot surfaces.
10. Do not place on or near a hot gas or electric burner, or in a heated oven.
11. Extreme caution must be used when moving an appliance containing hot oil or
other hot liquids.
12. To disconnect, remove plug from wall outlet.
13. Do not use appliance for other than intended use.
SAVE THESE INSTRUCTIONS
FOR HOUSEHOLD USE ONLY
1
TR456_
1/28/03
4:02 PM
Page 4
ADDITIONAL IMPORTANT SAFEGUARDS
CAUTION: HOT SURFACES. This appliance generates heat and escaping steam
during use. Proper precautions must be taken to prevent the risk of burns, fires or
other damage to persons or property.
CAUTION: This appliance is hot during operation and retains heat for some time after
turning OFF. Always use oven mitts when handling hot materials and allow metal
parts to cool before cleaning. Do not place anything on top of the appliance while it
is operating or while it is hot.
1. All users of this appliance must read and understand this Owner’s Manual before
operating or cleaning this appliance.
2. The cord to this appliance should be plugged into a 120V AC electrical outlet only.
3. If this appliance begins to malfunction during use, immediately unplug the cord. Do not
use or attempt to repair the malfunctioning appliance.
4. Do not leave this appliance unattended during use.
5. When using this appliance, provide adequate air space above and on all sides for air
circulation. Do not allow this appliance to touch curtains, wall coverings, clothing, dish
towels or other flammable materials during use.
6. This appliance generates steam — do not operate in open position.
7. Using a pot holder, hold the top cover (Lid) open while placing or removing food on
the cooking surface to prevent accidental closing and injury.
2
TR456_
1/28/03
4:02 PM
Page 5
POLARIZED PLUG
This appliance has a polarized plug (one blade is wider than the other). To
reduce the risk of electric shock, this plug is intended to fit into a polarized
outlet only one way. If the plug does not fit fully in the outlet, reverse the plug.
If it still does not fit, contact a qualified electrician. Do not attempt to modify
the plug in any way.
SHORT CORD INSTRUCTIONS
A short power-supply cord is provided to reduce the risk resulting from becoming
entangled in or tripping over a longer cord.
Longer detachable power-supply cords or extension cords are available and may be used
if care is exercised in their use.
If a longer detachable power-supply cord or extension cord is used, (1) the marked
electrical rating of the cord set or extension cord should be at least as great as the
electrical rating of the appliance, and (2) the longer cord should be arranged so that it
will not drape over the countertop or tabletop where it can be pulled on by children or
tripped over unintentionally.
ELECTRIC POWER
If the electrical circuit is overloaded with other appliances, your appliance may not
operate properly. It should be operated on a separate electrical circuit from other
appliances.
PLASTICIZER WARNING
CAUTION: To prevent Plasticizers from migrating from the finish of the counter top
or table top or other furniture, place NON-PLASTIC coasters or place mats
between the appliance and the finish of the counter top or table top.
Failure to do so may cause the finish to darken, permanent blemishes may occur or
stains can appear.
3
TR456_
1/28/03
4:02 PM
Page 6
THE PANINI MAKER
PRODUCT MAY VARY SLIGHTLY FROM ILLUSTRATIONS
8.
1.
7.
6.
2.
3.
4.
5.
(underneath)
10.
1. Metal Arm
2. Cool Touch Grip
3. Non-Stick Grilling Plates
4. Non-Skid Feet
5. Vertical Storage with Cord Wrap
6. Polarized Plug
7. Floating Hinge System
11.
8. Lid
9. Securing Latch
10. Green READY Light
9.
11. Red Power ON Indicator Light
LID / TOP VIEW
4
TR456_
1/28/03
4:02 PM
Page 7
BEFORE USING FOR THE FIRST TIME
Before using your Breadman® Panini Maker, clean and pre-heat the
non-stick Grilling Plates.
1. Carefully unpack Panini Maker.
2. Release the Securing Latch located on the side of the Metal Arm.
Wipe all surfaces with a cloth or sponge dampened with hot, soapy
water. NEVER IMMERSE THE PANINI MAKER IN WATER.
Rinse with a dampened cloth or sponge and wipe dry.
3. Set the appliance on a dry, clean and flat countertop surface where
it can be easily plugged into an electrical outlet. Plug the Panini
Maker into a 120V AC electrical outlet.
4. The red Power ON Indicator Light and the Green READY Light
will both illuminate.
CAUTION:
To avoid burns, care should be taken when handling the Panini
Maker. The sides of the Grilling Plates are exposed and may be hot.
Use oven mitts or potholders when handling hot surfaces.
5. You may notice a fine smoke haze and a slight odor while residues
burn off.
NOTE:
Some odor may still be detected during initial use; this is normal and
should disappear after one or two uses.
6. Allow the Panini Maker to pre-heat for approximately
4 - 5 minutes until the Green READY Indicator Light turns off.
7. While the Panini Maker is preheating, we suggest that you prepare
your panini and fillings.
5
TR456_
1/28/03
4:02 PM
Page 8
PANINI PREPARATION
Follow these simple steps to prepare the perfect panini for your friends or family. It is
customary to prepare panini from a hearty loaf of bread. However, panini made from
store-bought sliced breads or rolls can be delicious and simple to prepare.
Panini Bread
Technique
1. With a serrated knife, carefully trim off the top crust of the bread
to make a flat surface. Leave as much bread as possible.
Flip the loaf over and repeat.
STEP 1
2. Place your hand firmly on top of the loaf so you can feel the
position of the knife as it cuts evenly through the bread. Cut the
loaf horizontally into 2 (1/2” thick) slices.
STEP 2
6
TR456_
1/28/03
4:02 PM
Page 9
PANINI PREPARATION (Continued)
3. Assemble panini. Brush or spray both sides of the outside of the
sandwich with olive oil, butter or margarine. When the Green
READY Light goes out, your panini are ready to grill.
4. Using a pot holder or oven mitt, hold the top cover (Lid) open
when placing or removing food on the cooking surface to
prevent accidental closing and injury.
5. Using a pot holder or oven mitt, center one or two panini, oiled
side down, on the bottom Grilling Plate.
6. Grasp the Cool Touch Grip and pull down the Metal Arm to
gently lower the top Grilling Plate. The Floating Hinge system
will adjust to the thickness of your panini automatically. To
ensure a perfectly grilled sandwich, make sure that the top
Grilling Plate lies evenly on the top of the oiled panini.
7. During grilling, the Green READY Indicator Light will cycle on
and off during cooking. This indicates that the thermostat is
maintaining the proper cooking temperature to grill panini
to perfection.
NOTE:
Make sure that the cord is kept well away from the Grilling Plates
when in use.
8. Grill until the bread is toasted to your liking.
9. To remove your grilled panini, always use a plastic or wooden
spatula.
NOTE:
Never use a sharp or metal object as it may damage the non-stick
surface of the Grilling Plates.
10. Allow panini to cool to a safe handling temperature
before slicing.
11. Disconnect the plug from wall outlet when not in use.
7
TR456_
1/28/03
4:02 PM
Page 10
HINTS FOR BEST RESULTS
• Always preheat the Panini Maker before each use.
• Have all ingredients at hand before preparing panini.
• A wide variety of breads may be used, such as whole wheat, fruit breads, and
white bread.
• With the Panini Maker’s Non-Stick Grilling Plates, it is not necessary to
butter the outside of the bread. However, to encourage even browning of the
bread, spreading a small amount of butter or margarine is recommended.
NOTE: The Panini Maker is coated with a non-stick surface. Do not use nonstick sprays as they can cause build-up on the Cooking Plates. Use cooking
oil instead.
• When using soft or liquid fillings, use thicker-sliced breads. Bread can be
slightly toasted before filling is added.
• Most fresh fruits release juice when heated. It is preferable to used canned
fruit; drain and pat fruit dry with a clean paper towel.
• Avoid using processed cheeses, as they tend to “run” under high temperatures.
• A teaspoon of sugar sprinkled on the buttered side makes grilled panini
crispier and adds flavor when using sweet fillings. Prepare delicious panini
desserts with custard or cream.
• Remember that whole grain and sweet breads will grill quicker than
white breads.
• After you have removed finished panini, close the Lid to retain heat while
assembling more sandwiches.
• Wearing oven mitts, use a soft, absorbent paper towel to wipe the Grilling
Plates clean after each use to avoid food contamination.
8
TR456_
1/28/03
4:02 PM
Page 11
USER MAINTENANCE INSTRUCTIONS
This appliance requires little maintenance. It contains no user
serviceable parts. Do not try to repair it yourself. Any servicing
requiring disassembly other than cleaning must be performed by a
qualified appliance repair technician.
CAUTION:
Do not immerse Panini Maker, cord, or plug in water or any
other liquid.
Cleaning
Instructions
To keep your Panini Maker operating properly, clean regularly.
1. Unplug the Panini Maker and allow it to cool completely before
cleaning.
2. NEVER IMMERSE THE PANINI MAKER IN WATER OR ANY
OTHER LIQUID.
3. Wipe the exterior with a soft, damp cloth. Dry thoroughly.
4. To remove any remaining food on the Grilling Plates, wipe with a
soft, damp cloth or absorbent paper towel. If rubbing with a damp
cloth fails to remove burnt-on food, use a non-metallic scrubbing
pad to clean the Grilling Plates. Dry thoroughly.
5. Do not use steel wool, scouring pads, or abrasive cleaners or
utensils to clean either the inside or the outside of this Panini
Maker as they will damage the surfaces.
6. Make sure to hold the Lid by hand while cleaning to prevent
accidental closing and injury.
Storage
Instructions
Before storing your Panini Maker, unplug from the wall outlet and
allow the Panini Maker to cool completely.
1. Lock the Grilling Plates for storage, simply bring the Grilling
Plates together and press the Securing Latch on the side of the
Metal Arm.
2. Use the Cord Wrap on the bottom of the Panini Maker.
Never wrap cord tightly around the appliance. Do not put any
stress on cord where it enters unit, as this could cause cord to
fray and break.
3. Store the Panini Maker in closed position (handles pointed up) for
neat and compact storage or in its box or in a clean, dry place.
9
TR456_
1/28/03
4:02 PM
Page 12
DRESS UP YOUR PANINI
Adding fresh dressings to your panini keeps sandwiches moist and flavorful.
Use a food processor to prepare many of these creamy, herby spreads.
Olive Tapenade
2 cups pitted oil-cured black olives
3 tablespoons drained capers
3 tablespoons extra-virgin olive oil
2 tablespoons lemon juice
2 gloves garlic
2 teaspoons fresh thyme or 1 teaspoon dried
Pulse in food processor until mixture is coarse but uniform.
Roasted Garlic & Shallot Smear
10 shallots (roasted)
5 heads garlic (roasted)
2 ounces olive oil
2 ounces Balsamic vinegar
2 anchovy filets (optional)
1 tablespoon chopped fresh rosemary
4 ounces goat cheese
Salt and pepper to taste
Cut the tops off garlic heads. Drizzle 1 tablespoon olive oil over each garlic head.
Sprinkle salt on each. Wrap garlic heads in aluminum foil. Place in 425º - 450º oven
for 40 to 45 minutes until the garlic is soft and browned.
Trim shallots. Sprinkle with olive oil and add salt. Wrap in 2 packets of aluminum foil.
Place shallots into oven during the last 10 to 15 minutes of roasting the garlic. Roast
until golden brown, about 15 minutes, then cool to room temperature.
Place peeled garlic and shallots into a food processor, add remaining ingredients and
process until smooth. Refrigerate until needed.
10
TR456_
1/28/03
4:02 PM
Page 13
DRESS UP YOUR PANINI
(CONTINUED)
Vegetable Dressing
1 cup nonfat yogurt
3 tablespoons Dijon (or any spicy) mustard
freshly ground black pepper to taste
2 tablespoons nonfat cottage cheese
1/8 teaspoon Tabasco sauce
2 tablespoons shallots, minced
1 clove garlic
1 teaspoon lemon juice
Pulse in food processor until smooth.
Basil Pesto
2 cups packed fresh basil leaves
1/4 cup grated Parmesan cheese
3 tablespoons toasted pine nuts
1 teaspoon chopped garlic
1/2 teaspoon salt
1/3 cup extra virgin olive oil
Combine the basil, Parmesan cheese, pine nuts, garlic and salt in blender jar.
Purée on high speed. Slowly drizzle the oil through the feed tube and process
until a smooth paste forms. Store in the refrigerator until ready to use.
Cooking Tip: Freeze pesto in small quantities to use for any cooking occasion.
Chili Mayo
1/4 cup mayonnaise
2 tablespoons chili sauce
1/4 teaspoon chili powder
Mix by hand in a medium bowl. Store in the refrigerator until ready to use.
Salad Dressings & Sauces
Use your favorite bottled salad dressings and sauces. Substitute low-fat dressings
and sauces if you are watching fat or sugar intake. Try these favorites: red wine
vinaigrette, ranch, jalapeno lime grille sauce, teriyaki sauce, all types of barbeque
sauces, peppercorn ranch, ginger-carrot to name a few.
11
TR456_
1/28/03
4:02 PM
Page 14
SOME VARIATIONS ON CREATING PANINI
*Breads
*Focaccia, Italian, peasants’, rye, sourdough, whole wheat, cinnamon raisin...
**Cheeses
Asiago, blue cheese, cheddar, smoked cheddar, fontina, goat’s cheese, gorgonzola,
havarti, mozzarella, provolone, Swiss...
***Dressings & Sauces
***Olive Tapenade, ***Roasted Shallot Smear, ***Vegetable Dressing, ***Basil Pesto,
***Chili Mayo, red wine vinaigrette, ranch, jalapeno lime grille sauce, teriyaki sauce, all
types of barbeque sauces, peppercorn ranch, ginger-carrot to name a few.
**Meats
Bacon, Canadian bacon, roast beef, sliced chicken breast, grilled chicken breast,
ham, pepperoni, prosciutto, salami, canned tuna, roasted turkey, smoked turkey...
Oils
Olive oil, herbed olive oil, butter, margarine...
Vegetarian Additions
Artichoke hearts, asparagus, sliced avocado, fresh basil leaves, bean sprouts, coleslaw,
grilled eggplant, gardinaire, roasted garlic, sliced mushrooms, grilled mushrooms,
pitted olives, sliced sweet onion, green onions, grilled onions, fresh green and red
peppers, roasted red peppers, hot peppers, sun-dried tomatoes, fresh tomatoes, grilled
zucchini, asparagus...
*Some critics claim that the herby flavors in focaccia do not blend well with
some salty meats.
**In general, it is best to blend strong meats with mild cheeses.
***Dressing recipes included in this Owner’s Manual.
12
TR456_
1/28/03
4:02 PM
Page 15
PANINI RECIPES
Chicken & Artichoke Panini with Olive Tapenade
8 slices peasants’ bread
4-8 tablespoons fresh Olive Tapenade
4 pieces chicken breast butterfly cut, grilled
8 slices Provolone cheese (optional)
4 - 6 ounces sun-dried tomatoes
2 (6-oz.) jars drained and sliced artichoke hearts
To create a golden finish when grilled, brush each slice of bread with olive oil, one side
only. To build the panini, start with one slice of bread, olive oil side down.
Spread a generous portion of Olive Tapenade on the top, dry side of the bread. Layer
with chicken breast, cheese, tomatoes, and artichoke hearts.
Top with the remaining bread, making sure that the olive oil side is facing up. Place
assembled sandwiches on the Panini Maker. Lower top Grilling Plate onto the oiled
bread, making sure it lies evenly on the panini. Cook until golden brown, approximately
3-4 minutes, or until cheese is completely melted.
Makes 4 panini
Hearty Club Panini on Rye
4 slices rye bread
2 - 4 tablespoons Chili Mayo
4 - 6 slices turkey
4 - 6 slices cooked bacon (crisp, browned and drained)
shredded lettuce
4 thin slices tomato
4 thin slices sweet onion (optional)
Brush each slice of bread with butter, one side only. To build the panini, start with one
slice of bread, buttered side down.
Spread bread with Chili Mayo then layer turkey, bacon, lettuce, tomato and onion if
desired. Drizzle Chili Mayo over the top.
Top with the remaining bread, making sure that the buttered side is facing up. Place
assembled sandwiches on the Panini Maker. Lower top Grilling Plate onto the buttered
bread, making sure it lies evenly on the panini. Cook until golden brown, approximately
3-4 minutes, until cheese is completely melted.
Makes 2 panini
13
TR456_
1/28/03
4:02 PM
Page 16
PANINI RECIPES
(CONTINUED)
Tuna & Avocado Panini
8 (1/2-inch thick) slices peasants’ bread
2 - 4 tablespoons mayonnaise
2 - 4 tablespoons dijon mustard
4 - 8 cucumber slices, sliced lengthwise
4 - 8 slices red or sweet onion
1 (15-oz.) can white chunky tuna (drained and flaked)
2 large or 4 small avocados, sliced lengthwise
To create a golden finish when grilled, brush each slice of bread with olive oil, one side
only. To build the panini, start with one slice of bread, olive oil side down.
In a small bowl, mix the mayonnaise and mustard together. Spread the mayo/mustard
on the top, dry side of the bread. Layer with cucumber slices, tuna and avocado.
Top with the remaining bread, making sure that the olive oil side is facing up. Place
assembled sandwiches on the Panini Maker. Lower top Grilling Plate onto the oiled
bread, making sure it lies evenly on the panini. Cook until golden brown,
approximately 3-4 minutes.
Makes 4 panini
Variations:
For a lighter fare, prepare tuna salad using light mayonnaise, plain yogurt, or
light sour cream.
Spice up your tuna with 1/4 teaspoon cayenne pepper, 1/2 teaspoon ground cumin, or
crushed black pepper to taste.
Use rye bread, whole wheat or 4 soft panini (Italian) buns.
Add cheese to make a Tuna Panini Melt: use 1/2 cup shredded cheddar, Swiss,
colby or mozzarella.
Substitute salmon, chicken or ham salad.
14
TR456_
1/28/03
4:02 PM
Page 17
PANINI RECIPES
(CONTINUED)
Seared Sirloin Strip Panini with Roasted Shallot Smear
8 portabella mushrooms (Optional: Use marinated portabella mushroom recipe and
marinate as directed)
8 slices sourdough bread
8 tablespoons Roasted Garlic & Shallot Smear
4 sirloin strip steaks, 6 ounces each grilled
4 slices Asiago cheese, shaved thin
8 tablespoons olive oil
salt and pepper to taste
Prepare Portabella mushrooms by trimming the mushroom stems and then cutting in
1/4 inch slices. Brush both sides with oil. (Mushrooms may be marinated before
cooking.) Place slices of mushrooms in a preheated frying pan for about 3 - 6 minutes.
Do not overcook.
To create a golden finish when grilled, brush each slice of bread with olive oil, one side
only. To build the panini, start with one slice of bread, olive oil side down.
Spread bread with Roasted Shallot Smear, then stack steak, grilled portabella
mushrooms and cheese. Season with salt and pepper to taste. Top with the remaining
bread, making sure that the olive oil side is facing up. Place assembled sandwiches on
the Panini Maker. Lower top Grilling Plate onto the oiled bread, making sure it lies
evenly on the panini. Cook until golden brown, approximately 4-5 minutes.
Makes 4 panini
15
TR456_
1/28/03
4:02 PM
Page 18
PANINI RECIPES
(CONTINUED)
Herb Frittata, Arugula & Roasted Pepper Panini
4 large eggs
3 tablespoons Parmesan Reggiano, grated
1 tablespoon Italian parsley, chopped
1 tablespoon chives, minced
2 teaspoons butter
salt and pepper
2 soft rolls
2-3 ounces arugula
2 roasted red peppers
4-6 tablespoons extra virgin olive oil
Whisk eggs together with Parmesan cheese and herbs. Season with salt and pepper.
Heat an 8-inch non-stick skillet over high heat. Melt a teaspoon of butter in skillet and
when it stops foaming, add half the egg mixture. Stir and shake until the bottom is set
and lightly brown. Flip and cook the other side or place under the broiler until set.
Remove from the pan and repeat with the remaining egg mixture.
Slice the rolls in half, generously drizzle both sides of the roll with olive oil. Place
arugula on one side of the roll and top with roasted pepper. Cut frittata in half and place
both halves on top of roasted pepper, drizzle with balsamic vinegar and top with other
side of roll.
Repeat with remaining roll, then place both assembled panini on the Panini Maker.
Lower top Grilling Plate onto the oiled rolls, making sure it lies evenly on the rolls.
Cook until golden brown, approximately 3-4 minutes.
Makes 2 panini
16
TR456_
1/28/03
4:02 PM
Page 19
PANINI RECIPES
(CONTINUED)
Chocolate Panini
8 (1/2- inch) thick slices sourdough bread, buttered on 1 side
4 - 8 ounces semisweet or milk chocolate, chopped with a heavy knife
whipped butter
Lay slices of bread, butter side down, on the Panini Maker. Sprinkle the chopped
chocolate evenly onto the 4 slices of bread. Then cover each with a second slice of
bread, butter side up. Grill panini for 3-4 minutes or until bread is golden and
chocolate is melted. Using a spatula, carefully turn each panini over to bake for
another minute.
Let cool slightly before serving.
Makes 4 panini
Variations:
Cherry Chocolate Panini: Add 4 ounces dried cherries.
(Or any dried fruit of your choice.)
Chocolate Almond Panini: Add 4 ounces slivered almonds.
(Or any nut of your choice.)
Chocolate Java Panini: Add 4 teaspoons instant coffee.
(1 teaspoon per panini.)
Dad’s Favorite: Add 4 tablespoons peanut butter
Chocolate, Peanut Butter and layer with sliced bananas
& Banana Panini
17
TR456_
1/28/03
4:02 PM
Page 20
LIMITED ONE YEAR WARRANTY
Warranty: This Breadman® product is warranted by Salton, Inc. to be free from defects in materials or
workmanship for a period of (1) year from the original purchase date. This product warranty covers only the original
consumer purchaser of the product.
Warranty Coverage: This warranty is void if the product has been damaged by accident in shipment,
unreasonable use, misuse, neglect, improper service, commercial use, repairs by unauthorized personnel, normal
wear and tear, improper assembly, installation or maintenance abuse or other causes not arising out of defects in
materials or workmanship. This warranty is effective only if the product is purchased and operated in the USA, and
does not extend to any units which have been used in violation of written instructions furnished with the product or
to units which have been altered or modified or to damage to products or parts thereof which have had the serial
number removed, altered, defaced or rendered illegible.
Implied Warranties: ANY IMPLIED WARRANTIES WHICH THE PURCHASER MAY HAVE ARE LIMITED IN
DURATION TO ONE (1) YEAR FROM THE DATE OF PURCHASE. Some states do not allow limitations on how long an
implied warranty lasts, so the above limitation may not apply to you.
Warranty Performance: During the above one-year warranty period, a product with a defect will be either
repaired or replaced with a reconditioned comparable model (at our option) when the product is returned to the
Repair Center, or the purchase price refunded. The repaired or replacement product will be in warranty for the
balance of the one-year warranty period and an additional one-month period. No charge will be made for such
repair or replacement.
Service and Repair: Should the appliance malfunction, you should first call toll-free 1 (800) 233-9054 between the
hours of 9:00 am and 5:00 pm Central Standard Time and ask for CONSUMER SERVICE stating that you are a
consumer with a problem. Please refer to model number TR456 when you call.
In-Warranty Service (USA): For an appliance covered under the warranty period, no charge is made for service
or postage. Call for return authorization 1 (800) 233-9054.
Out-of Warranty Service: A flat rate charge by model is made for out-of-warranty service. Include $10.00 for
return shipping and handling. We will notify you by mail of the amount of the charge for service and require you to
pay in advance for the repair or replacement.
For Products Purchased in the USA, but Used in Canada: You may return the product insured, packaged
with sufficient protection, and postage and insurance prepaid to the USA address listed below. Please note that all
customs duty / brokerage fees, if any, must be paid by you and we will require you to pay the cost of customs duty /
brokerage fees to us in advance of our performing any service.
Risk During Shipment: We cannot assume responsibility for loss or damage during incoming shipment. For your
protection, carefully package the product for shipment and insure it with the carrier. Be sure to enclose the
following items with your appliance: any accessories related to your problem, your full return address and daytime
phone number, a note describing the problem you experienced, a copy of your sales receipt or other proof of
purchase to determine warranty status. C.O.D. shipments cannot be accepted.
To return the appliance, ship to:
To contact us, please write to, call, or email:
ATTN: Repair Center
Salton, Inc.
Salton, Inc.
P.O. Box 7366
708 South Missouri Street
Columbia, MO 65205-7366
Macon, MO 63552
1 (800) 233-9054
E-mail: [email protected]
Limitation of Remedies: No representative or person is authorized to assume for Salton, Inc. any other liability in
connection with the sale of our products. There shall be no claims for defects or failure of performance or product
failure under any theory of tort, contract or commercial law including, but not limited to negligence, gross
negligence, strict liability, breach of warranty and breach of contract. Repair, replacement or refund shall be the sole
remedy of the purchaser under this warranty, and in no event shall Salton be liable for any incidental or
consequential damages, losses or expenses. Some states do not allow the exclusion or limitation of
incidental or consequential damages, so the above limitation or exclusion may not apply to you.
Legal Rights: This warranty gives you specific legal rights, and you may also have other rights which vary from
state to state.
For more information on Salton products: visit our website: www.eSalton.com
©2003 Salton, Inc. All rights reserved.
Printed in China
P/N 61177
1/03