1
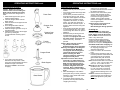
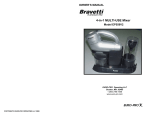
OWNER’S MANUAL
Model FP200
120V~, 60Hz., 350 Watts
DO IT ALL 3
STICK BLENDER/CHOPPER
EURO-PRO Operating LLC
Boston, MA, 02465
1 (800) 798-7398
www.euro-pro.com
COPYRIGHT© EURO-PRO OPERATING LLC 2008
GETTING TO KNOW YOUR DO IT ALL 3
STICK BLENDER/CHOPPER
IMPORTANT SAFETY INSTRUCTIONS
When using your Bravetti Platinum Pro DO IT ALL 3 STICK BLENDER
/CHOPPER, basic safety precautions should always be observed, including the
following:
1.
Read all instructions before using the
appliance.
2. To protect against risk of electrical shock, do
not immerse cord, plug or unit (body of
mixer) in water or other liquid.
3. Do not allow use by children. Care should
be taken when appliance is used near
children.
4. Unplug appliance from outlet when not in
use, before putting on or taking off
accessories, and before cleaning.
5. Avoid contact with moving parts at all times.
Keep hands, hair, clothing, as well as
spatulas and other utensils away from
blender during operation to prevent risk of
personal injury and/or damage to the
appliance.
6. Do not operate any appliance with a
damaged cord or plug or after the appliance
malfunctions, or is dropped or damaged in
any manner. Return appliance to EUROPRO Operating LLC. for examination, repair
or electric or mechanical adjustment.
7. The use of attachments not recommended
or sold by EURO-PRO Operating LLC may
cause fire, electrical shock or risk of
personal injury.
8. Do not use outdoors. This unit is for
household use ONLY.
9. Do not let cord hang over edge of table or
counter or touch hot surfaces, including
the stove.
10. To avoid injury by accidentally switching on
the appliance when changing the
chopper, or hand blender attachment,
always unplug the appliance before
assembling or disassembling. Remove hand
blender and chopper attachments from
motor power pack before cleaning.
11. DO NOT USE THIS APPLIANCE ON A
STOVE. If you wish to use it in a saucepan
while cooking, you must first remove the
saucepan from the stove.
12. Do not use appliance for other than intended
use.
13. Exercise extreme caution when blending hot
liquids. Use a tall open container to allow
steam to escape and avoid spillage or make
small quantities at a time to reduce spillage.
14. To avoid burns, place the Stick Blender
attachment first in the food to be beaten or
chopped, then press the start button. Always
release button before removing Stick
Blender from the food.
15. Keep hands and utensils out of the
container while blending to prevent the
possibility of severe personal injury or
damage to the unit. A spatula may be used
but must be used only when the unit is not
running.
16. CAUTION! Blades are sharp, handle
carefully. When handling the chopper blade,
always hold it by the plastic hub.
17. Make sure that the chopper cover is secured
in place before operating appliance.
18. Do not place the beaker in a microwave
oven.
19. Do not leave appliance unattended when
plugged in.
20. Do not use appliance if any blades are
damaged.
21. Immediately switch appliance OFF in the
event that the appliance malfunctions during
use.
1.
2.
3.
4.
5.
6.
7.
8.
350 Watt Power Pack
Chopper Gear Box
Frothier
Chopper Blade
Blade Support
Glass Beaker
Chopper Gear Box Adapter
Glass Beaker Cover
9.
10.
11.
12.
13.
14.
15.
16.
SAVE THESE INSTRUCTIONS
For Household Use Only
Technical Specifications
WARNING: To reduce the risk of electric shock, this appliance has a polarized plug
(one blade is wider than the other). This plug will fit in a polarized outlet only one way.
If the plug does not fit fully in the outlet, reverse the plug. If it still does not fit, contact a
qualified electrician to install the proper outlet. Do not modify the plug in any way.
1
Rev. 05/02B
Voltage:
Power:
120V~ 60Hz.
350 Watts
2
Metal Stick Blender
Wall Bracket
Mixer Gear Box
Dough Hooks (2)
Wire Beaters (2)
Wire Whisk
On/Off Switch
Variable Speed Control
OPERATING INSTRUCTIONS
The Bravetti Platinum Pro DO IT ALL 3 STICK BLENDER/CHOPPER is an
indispensable kitchen tool for blending, chopping, mixing or pureeing when preparing
your favorite recipes. The interchangeable accessories and attachments that come with
your unit are powered by a high efficiency 350 watt power pack. For best results, be
sure to carefully read all the instructions contained in this book before using this
appliance.
350 Watt Power Pack
Food Chopper Attachment
The 350 Watt Power Pack operates on
120V~, 60Hz. electrical power. Never
allow the power pack to become wet
when plugged into an electrical outlet.
Caution - Blades are sharp. Use
extreme caution when handling the
blade, always hold it by the plastic
hub. Do not immerse the cover and gear
box in water.
To store the unit, do not wrap cord
around the power pack. Coil cord loosely
and use a twist tie to secure it in large
loops.
To clean the power pack, processor
cover/gear box, wipe off with a clean,
damp kitchen cloth. Towel dry.
Warning: The power pack should
never be immersed in water.
Caution: Make sure that the power
pack is unplugged from power source
before attaching or removing any
accessory.
To use the power pack with any of the
Bravetti Platinum Pro Do It All Stick
Blender/Chopper accessories, place it
on the attachment shaft aligning the
arrows on the power pack and
accessories to be used and turn it
counterclockwise 90º until the arrow on
the power pack aligns with the square.
To remove the power pack, turn it
clockwise.
To operate the Power Pack, press on the
switch button located on the top of the
unit. The Power Pack will stop operating
when you remove your finger from the
switch button.
Wall Bracket
A wall bracket is provided with your
Bravetti Platinum Pro Do It All 3 Stick
Blender/ Chopper. Install the wall
bracket in any convenient location using
the wall anchors and screws (included).
The Power Pack with or without the Stick
Blender attachment may then be
conveniently stored out of the way. (See
illustration below.)
Important: Install wall mount bracket
high enough above countertop to
allow for clearance of power pack with
stick blender attached.
Variable Speed Control
OPERATING INSTRUCTIONS cont.
Your Bravetti Platinum Pro Do It All 3 Stick
Blender/ Chopper has been designed with a
variable speed control to provide more
versatility in preparing delicate sauces or for
chopping ice. To adjust speed, turn knob on
top of Power Pack clockwise from low setting to
increase speed and counterclockwise from
high setting to decrease speed.
Assembling the Stick Blender:
Make sure that the unit is unplugged from
power source before attaching or removing
any of the Stick Blender attachments.
1. Line up arrow of Stick Blender attachment
with arrow on power pack. Once fully
inserted, rotate stick blender attachment
clockwise 90º until arrow on power pack
aligns with square on Stick Blender.
Warning: This appliance is designed for
intermittent use. Maximum running time
with the Stick Blender is 1 minute. After
this time, allow the unit to cool.
Using the Stick Blender
Pureeing soups, sauces, fruits and
vegetables:
* Fruits and vegetables should be peeled,
cored and seeded.
* Meats, poultry, and fish should have skin
and bones removed.
* Food should be cut up into pieces no larger
than 3/4-inch.
* Cook the food in liquid until very soft and
tender.
* Puree cooked food ONLY after allowing to
cool down.
* Food can also be pureed directly in the
pot after being allowed to cool.
* Place the Stick Blender in the center of
the food in an upright position with the
processor end resting directly on the bottom
of the bowl or pot.
* The processor end must always be
immersed in the food. DO NOT lift up and
out of food while operating since the hot
food will splatter and could cause burns.
* While holding the power pack and the
Stick Blender in your hand, press and hold
down on the switch with your index finger.
* Release once the food has reached the
desired consistency.
* Do not operate continuously for more than
1 minute.
* If pieces of unprocessed food remain, or if
there are any lumps, continue pureeing the
food, however, mash the food pieces or
lumps by slightly raising and then lowering
the Stick Blender over those pieces.
2. Plug the cord into an electrical outlet.
Caution: To avoid splattering, place the
Stick Blender first in the food to be
beaten or chopped, then press the
button. Always release the button before
removing the Stick Blender from the
food, especially when using the Stick
Blender in hot liquids. Always hold the
Stick Blender with your hand while
processing. Never leave unit
unattended.
Caution: Do not use the Stick Blender on
the stove. If you want to use it in a
saucepan while cooking, you must first
remove saucepan from the stove.
3.
There is a variable speed control located
at the top of the power pack. To vary the
speed of your Do It All Stick
Blender/Chopper rotate the round knob
at the top of the power pack. From the
low setting turn the variable speed
control clockwise to increase speed and
counterclockwise to reduce speed.
4. Place the metal stick blender first into the
food to be chopped or pureed before
pressing the On/Off Switch to avoid
spattering.
5. Use the variable speed control knob to
select the desired speed.
6. Always release the On/Off switch before
removing the stick blender from the food
especially when using the stick blender in
hot liquids. Always hold the unit with your
hand while processing. Never leave the
unit unattended or hook it on the wall
bracket when it is plugged in.
7. To remove the stick blender attachment
from the power pack, first unplug the unit
from the power source and turn only the
stick blender attachment 90°
counterclockwise and pull it off.
Variable Speed Control:
Use the glass beaker with the Stick Blender
or you can use another container. The
glass beaker is intended only for
processing small quantities of food with the
Stick Blender.
Stick Blender Attachment
Caution - Blade is sharp. Detach Stick
Blender from power pack and wash with
warm soapy water. Do not use any sharp
pointed objects to clean residues from
under the blade.
Care and Cleanup
Always disconnect unit from power
source before cleaning or changing
accessories.
Caution: Never immerse the power
pack, cord, or plug in water.
3
4
OPERATING INSTRUCTIONS cont.
OPERATING INSTRUCTIONS cont.
Food Chopper Assembly
Using the Food Chopper
Caution - Blades are sharp. Use
extreme caution when handling the
blade, always hold it by the plastic
hub. Do not immerse the gear box in
water.
1. Place blade support in the groove
inside the glass beaker.
2. Insert the chopper blade onto the
blade support.
3. Place the food to be chopped into the
glass beaker.
4. Cover the glass beaker with the
chopper gear box adapter.
5. Place the chopper gear box on top of
the glass beaker.
6. Attach the power pack to the chopper
gear box by rotating 90°
counterclockwise and lining up the
arrows.
*
Power Pack
Chopper Gear
Box
Chopper Gear
Box Adapter
Frothier
(not for chopping)
Chopper Blade
7. If you wish to use the Frothier
attachment to whip cream or milk,
insert onto chopper blade as shown in
illustration at right. The frothier
attachment is NOT to be used for
chopping.
Blade Support
Glass Beaker
5
Press on the switch for 2 to 3 seconds
and then let go. Repeat this
procedure until the food has reached
the desired consistency.
3. Disconnect the unit from the power
source. After the blade has fully
stopped, remove the chopper gear
box and the chopper gear box
adapter. Using a rubber spatula,
remove the chopped or minced food
from the glass beaker.
Caution: Never put your fingers or
any utensils in the Stick
Blender/Chopper during operation.
Only process very soft, tender pieces
of food.
* Food pieces should not be larger than
¾-inch cubes.
* Do not fill the processor bowls more
than half way with very soft, tender
foods like cooked apples or tomatoes.
When pureeing foods like cooked
vegetables, soft cheese, or cooked
poultry, only add a few pieces at a
time so that the unit does not jam. It
is best to batch feed when using this
appliance.
* Avoid pureeing foods like citrus fruits
or other foods that have a lot of fiber
or hard, tough skin which can jam the
appliance.
* Should the unit jam during use and
the blade stops turning, cease
operation and unplug the unit from
the power source. Disassemble the
unit to remove any food that is
jammed.
Caution: Never put your fingers or
any utensils in the Stick
Blender/Chopper during operation.
Warning: This appliance is designed
for intermittent use. Maximum
running time with the Chopper is
15 seconds. Allow unit to cool
before resuming use. Best
chopping results are achieved by
using 2-3 second pulses.
Important: To mince meat, cut the
meat into 1/2” cubes and do not
mince more than 6 oz. at one time.
Make sure that the meat, fish or
poultry is fully defrosted and that
all bones and gristle have been
removed. Allow cooked food to
cool before placing in the chopping
bowl.
1. After assembling the unit, hold the
power pack with your hand, press and
hold down on the On/Off switch with
your index finger.
2. To avoid the food from being over
processed, use the pulse method of
chopping and mincing.
Crushing Ice
Caution - Blades are sharp. Use
extreme caution when handling the
blade, always hold it by the plastic
hub. Do NOT immerse Power Pack in
water or any other liquid.
Ensure that the chopper gear box,
chopper gear box adapter and blade
assembly is well seated before turning
the unit on to chop ice. Hold appliance
with BOTH hands when chopping ice.
1. Assemble the chopper as you would
for chopping (see page 5 for
assembly instructions).
2. Place ice cubes to be crushed into
bowl.
3. Hold the power pack firmly with one
hand and pulse the On/Off switch with
your index finger as you hold the
glass beaker firmly with the other
when you are crushing ice cubes.
Note: Recommended size of ice cubes is
1 1/4” x 1” x 3/4”. Do not crush more
than 6 oz. of ice cubes at a time.
Warning:This appliance is intended for
intermittent use. When crushing
ice, use only bursts of 4 seconds
each. Run time not to exceed 15
seconds before allowing unit to cool
down.
Caution: Hold both the bowl/gear box
and power pack when chopping ice.
Don’t hold appliance by the power
pack only.
6
OPERATING INSTRUCTIONS cont.
OPERATING INSTRUCTIONS cont.
Multi-Mixer Assembly
Care & Maintenance
Storing Your Unit
Caution: Ensure that the appliance is
unplugged from the electrical
power source before changing
attachments. Do not immerse the
mixer gear box in water.
Caution: Ensure that the appliance is
unplugged from the electrical
power source before changing or
cleaning attachments. Do not
immerse the mixer gear box in water.
1. To attach the mixer gear box to the
Power Pack, line up arrow on the
Power Pack and Mixer Gear Box.
2. Push Power Pack onto Mixer Gear
Box until seated.
3. While grasping Mixer Gear Box rotate
it 90º clockwise until the arrow on
the Power Pack aligns with the
“Square” on the Mixer Gear Box.
4. To disassemble Mixer Gear Box and
Power Pack rotate Mixer Gear Box
90º counterclockwise.
1. The unit and the various attachments
should be cleaned after each use.
2. All accessories and glass beaker can
be cleaned with warm soapy water.
3. Use a damp cloth or sponge to clean
the housing of the power pack. Do NOT
immerse in water or any other liquid.
You may store your unit in the wall
bracket provided. Do NOT wrap power
cord around unit. Coil the cord in
loose loops and tie with a tye wrap or
twist tie.
It is recommended that the chopping
blade be stored inside the glass
beaker as blade is very sharp.
Caution: Use extreme caution when
cleaning the chopper blade or
metal stick blender because blades
are SHARP.
Attaching the Attachments to the
Mixer Gear Box
C) Wire Whisk
This attachment is used for beating
air into mixtures such as egg whites,
yolks or creams..
• To install, place stem of Wire Whisk
into either of the openings in the
Mixer Gear Box.
• Rotate Wire Whisk while pushing
gently until Wire Whisk “Clicks” into
place.
• Ensure that Wire Whisk is well
seated in Mixer Gear Box.
Caution: Ensure that the appliance is
unplugged from the electrical
power source before changing
attachments. Do not immerse the
mixer gear box in water.
Select the desired attachment, either the
Dough Hooks, Wire Beaters or Whisk
and assemble to Mixer Gear Box as
noted below:
A) Dough Hooks (2)
For use with light dough ONLY.
• Insert stem end of dough hooks
(one at a time) into opening in base
of Mixer Gear Box.
• Rotate slightly while pressing gently
until dough hook “Clicks” into place.
• Repeat for second dough hook.
• Ensure that dough hooks are well
seated in Mixer Gear Box.
B) Wire Beaters (2)
Follow same installation procedure as
above.
1. After attaching the desired accessory
into the mixer gear box, plug the
mixer into power source.
2. Hold the power pack with one hand
and press and hold the On/Off switch
with your index finger.
3. Ensure that there are no obstructions
and that the accessories are moving
freely in the mixing container.
4. When finished using the unit, unplug
the unit before removing the
accessories.
7
8
Model FP200
O N E (1) Y E AR L IM IT E D W AR R AN T Y
E U R O -P R O O perating LLC warrants this product to be free from defects in m aterial and
w orkm anship for a period of one (1) year from the date of purchase w hen utilized for norm al
household use.
If your appliance fails to operate properly w hile in use under norm al household conditions
w ithin the w arranty period, return the com plete appliance and accessories, freight prepaid.
F or C ustom er S ervice support, call 1 (800) 798-7398 or visit our w ebsite w ww .euro-pro.com .
If the appliance is found by E U R O -P R O O perating LLC to be defective in m aterial or
w orkm anship, E U R O -P R O O perating LLC w ill repair or replace it free of charge. P roof of
purchase date and $9.95 to cover the cost of return shipping and handling m ust be included.*
T he liability of E U R O -P R O O perating LLC is lim ited solely to the cost of the repair or
replacem ent of the unit at our option. T his w arranty does not cover norm al w ear of parts and
does not apply to any unit that has been tam pered w ith or used for com m ercial purposes.
T his lim ited warranty does not cover dam age caused by m isuse, abuse, negligent handling
or dam age due to faulty packaging or m ishandling in transit.
T his w arranty is extended to the original purchaser of the unit and excludes
and/or conventional w arranties. T he responsibility of E U R O -P R O O perating
lim ited to the specific obligations expressly assum ed by it under the term s
w arranty. In n o even t is E U R O -P R O O perating LLC liable for incidental or
dam ages of any nature whatsoever. S om e states do not perm it the exclusion
incidental or consequential dam ages, so the above m ay not apply to you.
all other legal
LLC if any, is
of the lim ited
consequential
or lim itation of
T his w arranty gives you specific legal rights, and you m ay also have other rights w hich vary
from state to state.
*Im p o rtan t: C arefu lly p ack item to avo id d am ag e in sh ip p in g . B e su re to in clu d e p ro o f
o f p u rch ase d ate an d to attach tag to item b efo re p ackin g w ith yo u r n am e, co m p lete
ad d ress an d p h o n e n u m b er w ith a n o te g ivin g p u rch ase in fo rm atio n , m o d el n u m b er
an d w h at yo u b elieve is th e p ro b lem w ith item . W e reco m m en d yo u in su re th e p ackag e
(as d am ag e in sh ip p in g is n o t co vered b y yo u r w arran ty). M ark th e o u tsid e o f yo u r
p ackag e “ATTE N TIO N C U S TO M E R S E R V IC E ”.
-----------------------------------------------------------------------------------------------------------------
O W N E R S H IP R E G IS T R AT IO N C AR D
F O R C AN AD IAN C O N S U M E R S O N L Y
P lease fill out and m ail the product registration card w ithin ten (10) days of purchase. T he
registration w ill enable us to contact you in the unlikely event of a product safety notification.
B y returning this card you acknow ledge to have read and understood the instructions for use,
and w arnings set forth in the accom panying instructions.
R E TU R N T O E U R O -P R O O perating L L C , 4400 B o is F ran c, S t-L au ren t, Q C , H 4S 1A 7
_Model
_ __ _ __FP200
_ _ __ _ _ __ _ _ __ _ _ __ _ _ __ _ _ __ _ _ __ _ __ _ _ __ _ _ __ _ _ __ _ _ __ _ _ __ _ _ __ _ _
Ap p lian ce m o d el
_ _ __ _ __ _ _ __ _ _ __ _ _ __ _ _ __ _ _ __ _ _ __ _ _ __ _ __ _ _ __ _ _ __ _ _ __ _ _ __ _ _ __ _ _ __ _ _
D ate p u rch ased
N am e o f sto re
_ _ __ _ __ _ _ __ _ _ __ _ _ __ _ _ __ _ _ __ _ _ __ _ _ __ _ __ _ _ __ _ _ __ _ _ __ _ _ __ _ _ __ _ _ __ _ _
O w n er’s n am e
_ _ __ _ __ _ _ __ _ _ __ _ _ __ _ _ __ _ _ __ _ _ __ _ _ __ _ __ _ _ __ _ _ __ _ _ __ _ _ __ _ _ __ _ _ __ _ _
Ad d ress
Printed in China
C ity
P ro v
P o stal C o d e