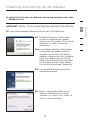
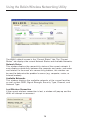
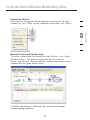
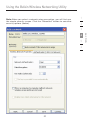
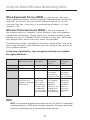
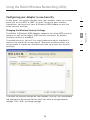
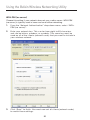
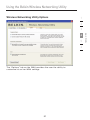
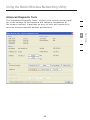
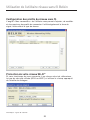
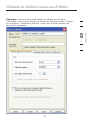
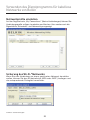
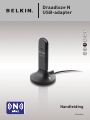
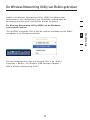
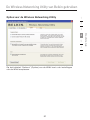
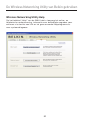
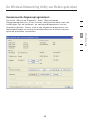
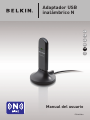
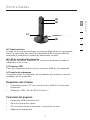
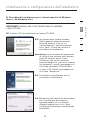
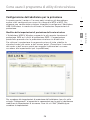
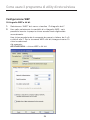
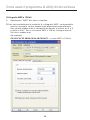
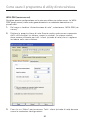
1
N Wireless
USB Adapter
EN
FR
DE
NL
ES
IT
User Manual
F5D8053ea
Table of Contents
1 Introduction. . . . . . . . . . . . . . . . . . . . . . . . . . . . . . . . . . . . . . . . . . . . . . . . . . . . . . 1
Benefits of a Home Network . . . . . . . . . . . . . . . . . . . . . . . . . . . . . . . . . . . . . . 1
Advantages of a Wireless Network . . . . . . . . . . . . . . . . . . . . . . . . . . . . . . . . . 1
Placement of your Wireless Networking Hardware
for Optimal Performance . . . . . . . . . . . . . . . . . . . . . . . . . . . . . . . . . . . . . . . . . 2
2 Overview . . . . . . . . . . . . . . . . . . . . . . . . . . . . . . . . . . . . . . . . . . . . . . . . . . . . . . . . 5
Product Features . . . . . . . . . . . . . . . . . . . . . . . . . . . . . . . . . . . . . . . . . . . . . . . 5
Applications and Advantages . . . . . . . . . . . . . . . . . . . . . . . . . . . . . . . . . . . . . 6
Product Specifications. . . . . . . . . . . . . . . . . . . . . . . . . . . . . . . . . . . . . . . . . . . 6
System Requirements . . . . . . . . . . . . . . . . . . . . . . . . . . . . . . . . . . . . . . . . . . 7
Package Contents . . . . . . . . . . . . . . . . . . . . . . . . . . . . . . . . . . . . . . . . . . . . . 7
3 Installing and Setting up the Adapter . . . . . . . . . . . . . . . . . . . . . . . . . . . . . . . . 8
A — Installation Process for Windows Vista . . . . . . . . . . . . . . . . . . . . . . . . . 8
B — Installation Process for Windows Operating Systems other than
Windows Vista . . . . . . . . . . . . . . . . . . . . . . . . . . . . . . . . . . . . . . . . . . . . 13
C — Configuration . . . . . . . . . . . . . . . . . . . . . . . . . . . . . . . . . . . . . . . . . . . . . 16
4 Using the Belkin Wireless Networking Utility . . . . . . . . . . . . . . . . . . . . . . . . 17
Accessing the Belkin Wireless Networking Utility from the
Windows System Tray. . . . . . . . . . . . . . . . . . . . . . . . . . . . . . . . . . . . . . . . . . 17
Network Status . . . . . . . . . . . . . . . . . . . . . . . . . . . . . . . . . . . . . . . . . . . . . . . 18
Available Networks . . . . . . . . . . . . . . . . . . . . . . . . . . . . . . . . . . . . . . . . . . . . 18
Network Status and Solution Tips . . . . . . . . . . . . . . . . . . . . . . . . . . . . . . . . 19
Setting Wireless Network Profiles . . . . . . . . . . . . . . . . . . . . . . . . . . . . . . . . 20
Securing your Wi-Fi Network . . . . . . . . . . . . . . . . . . . . . . . . . . . . . . . . . . . . 20
Configuring your Adapter to use Security . . . . . . . . . . . . . . . . . . . . . . . . . 25
5 Troubleshooting . . . . . . . . . . . . . . . . . . . . . . . . . . . . . . . . . . . . . . . . . . . . . . . . . 34
6 Information . . . . . . . . . . . . . . . . . . . . . . . . . . . . . . . . . . . . . . . . . . . . . . . . . . . . . 42
Introduction
1
2
3
4
Benefits of a Home Network
Your Belkin Home Network will allow you to:
• Share one high-speed Internet connection with all the computers in
your home
• Share resources, such as files, and hard drives among all the
connected computers in your home
• Share a single printer with the entire family
• Share documents, music, video, and digital pictures
• Store, retrieve, and copy files from one computer to another
• Simultaneously play games online, check Internet email, and chat
Advantages of a Wireless Network
Here are some of the advantages of setting up a Belkin wireless network:
• Mobility – you’ll no longer need a dedicated “computer room”—now you
can work on a networked laptop or desktop computer anywhere within your
wireless range
• Easy installation – Belkin Easy Installation Wizards make setup simple
• Flexibility – set up and access printers, computers, and other networking
devices from anywhere in your home
• Easy expansion – the wide range of Belkin networking products let you
expand your network to include devices such as printers and gaming
consoles
• No cabling required – you can spare the expense and hassle of retrofitting
Ethernet cabling throughout the home or office
• Widespread industry acceptance – choose from a wide range of
interoperable networking products
1
5
6
section
Thank you for purchasing the Belkin N Wireless USB Adapter. Now you
can take advantage of this great new technology and gain the freedom
to network your home and office computers wirelessly. This Adapter
allows you to connect a notebook computer to your network. Please
be sure to read through this User Manual completely, and pay special
attention to the section entitled “Placement of your Wireless Networking
Hardware for Optimal Performance”.
Introduction
Placement of your Wireless Networking Hardware for
Optimal Performance
Your wireless connection will be stronger the closer your computer
is to your wireless router (or access point). Typical indoor operating
range for your wireless devices is between 100 and 200 feet. In the
same way, your wireless connection and performance will degrade
somewhat as the distance between your wireless router (or access
point) and connected devices increases. This may or may not be
noticeable to you. As you move farther from your wireless router (or
access point), connection speed may decrease. Factors that can
weaken signals simply by getting in the way of your network’s radio
waves are metal appliances or obstructions, and walls.
If you have concerns about your network’s performance that might be
related to range or obstruction factors, try moving the computer to a
position between five and 10 feet from the wireless router (or access
point) in order to see if distance is the problem. If difficulties persist
even at close range, please contact Belkin Technical Support.
Note: While some of the items listed below can affect network
performance, they will not prohibit your wireless network from
functioning; if you are concerned that your network is not operating at
its maximum effectiveness, this checklist may help.
1.
Placement of your Wireless Router (or Access Point)
Place your wireless router (or access point), the central connection
point of your network, as close as possible to the center of your
wireless network devices.
To achieve the best wireless network coverage for your “wireless
clients,” (i.e., computers enabled by Belkin Adapters or Cards):
•
Ensure that your wireless router’s (or access point’s)
antennas are parallel to each other, and are positioned
vertically (toward the ceiling). If your wireless router (or
access point) itself is positioned vertically, point the
antennas as much as possible in an upward direction.
•
In multistory homes, place the wireless router (or access point)
on a floor that is as close to the center of the home as possible.
This may mean placing the wireless router (or access point) on
an upper floor.
•
Try not to place the wireless router (or access point) near a
cordless 2.4GHz phone.
2
Introduction
1
Avoid Obstacles and Interference
Avoid placing your wireless router (or access point) near devices that
may emit radio “noise”, such as microwave ovens. Other objects that
can inhibit wireless communication can include:
•
Refrigerators
•
Washers and/or dryers
•
Metal cabinets
•
Large aquariums
•
Metallic-based, UV-tinted windows
3
4
If your wireless signal seems weak in some spots, make sure that
objects such as these are not blocking the signal’s path between your
computers and wireless router (or access point).
3.
2
Cordless Phone Placement
If the performance of your wireless network is impaired after attending
to the above issues, and you have a cordless phone:
•
Try moving cordless phones away from the wireless router
(or access point) and your wireless-enabled computers.
•
Unplug and remove the battery from any cordless phone
that operates on the 2.4GHz band (check manufacturer’s
information). If this fixes the problem, your phone may be
interfering.
•
If your phone supports channel selection, change the
channel on the phone to the farthest channel from your
wireless network as possible. For example, change the
phone to channel 1 and move your wireless router (or access
point) to channel 11. (Your channel selection will vary
depending on your region.) See your phone’s user manual
for detailed instructions.
•
If necessary, consider switching to a 900MHz or 5GHz
cordless phone.
3
5
6
section
2.
Introduction
4. Choose the “Quietest” Channel for your Wireless Network
In locations where homes or offices are close together, such as
apartment buildings or office complexes, there may be wireless
networks nearby that can conflict with yours. Use the Site Survey
capabilities of your Belkin Wireless Networking Utility to locate any
other wireless networks, and move your wireless router (or access
point) and computers to a channel as far away from other networks as
possible.
Experiment with more than one of the available channels in order to
find the clearest connection and avoid interference from neighboring
cordless phones or other wireless devices.
For more Belkin wireless networking products, use the detailed
Site Survey and wireless channel information included in your User
Manual.
5.
Secure Connections, VPNs, and AOL
Secure connections typically require a user name and password, and
are used where security is important. Secure connections include:
•
Virtual Private Network (VPN) connections, often used to
connect remotely to an office network
•
The “Bring Your Own Access” program from America Online
(AOL), which lets you use AOL through broadband provided
by another cable or DSL service
•
Most online banking websites
•
Many commercial websites that require a user name and
password to access your account
Secure connections can be interrupted by a computer’s power
management setting, which causes it to “go to sleep.” The simplest
solution to avoid this is to simply reconnect by re-running the VPN or
AOL software, or by re-logging into the secure website.
A second alternative is to change your computer’s power management
settings so it does not go to sleep; however, this may not be appropriate
for portable computers. To change your power management setting in
Windows, see the “Power Options” item in the Control Panel.
If you continue to have difficulty with Secure Connections, VPNs, and
AOL, please review steps 1–4 in the previous pages to be sure you
have addressed these issues.
These guidelines should allow you to cover the maximum possible area
with your wireless router. Should you need to cover an even wider area,
we suggest the Belkin Wireless Range Extender/Access Point.
For more information regarding our networking products, visit our
website at www.belkin.com/networking or call Belkin Technical
Support.
4
Overview
Product Features
•
2.4GHz ISM (Industrial, Science, and Medical) band operation
•
Integrated easy-to-use Belkin Wireless Networking Utility
•
USB 2.0 interface, for operation in virtually any computer with a
USB 2.0 bus-power port
•
WPA, WPA2, 64-bit WEP (Wired Equivalent Privacy), or 128-bit
encryption
•
Wireless access to networked resources
•
Data rate of up to 300Mbps* (draft 802.11n), 54Mbps (802.11g),
or 11Mbps (802.11b)
•
Easy installation and use
•
LED power and network link/activity indicator
5
1
2
3
4
5
6
section
The Adapter complies with the IEEE draft-802.11n specification to
communicate with other draft-802.11n-compliant wireless devices at up
to 300Mbps*. The Adapter is also compatible with 802.11g devices at
54Mbps as well as 802.11b products at 11Mbps. The Adapter operates
on the same 2.4GHz frequency band as 802.11b/g Wi-Fi ® products.
Overview
Applications and Advantages
•
•
Wireless roaming with a laptop around the home or office
Offers the freedom of networking without cables
Connection rates of up to 300Mbps*
Provides immediate high-speed wireless connectivity at home, work,
and hotspot locations without compromising the use of existing
802.11b/g products
•
Compatibility with 802.11b/g products
The Adapter is backward-compatible with existing Wi-Fi (IEEE
802.11b/g) products
•
Difficult-to-wire environments
Enables networking in buildings with solid or finished walls, or open
areas where wiring is difficult to install
•
Frequently changing environments
Adapts easily in offices or environments that frequently rearrange or
change locations
•
SOHO (Small Office/Home Office) networking needs
Provides the easy and quick, small network installation SOHO users need
Product Specifications
Host Interface:
USB 2.0
Operating Temperature: 32—140 degrees F (0—60 degrees C)
Storage Temperature:
-4—176 degrees F (-20—80 degrees C)
Humidity:
Max. 90% (non-condensing)
Typical Operating Range: Up to 365 Mtr.**
* NOTE:
The standard transmission rate—300Mbps—is the physical data rate. Actual data
throughput will be lower.
** Wireless
performance may vary depending on the networking environment.
6
Overview
1
2
3
(c)
(d)
4
5
6
(a) Protective Cap
The cap is provided to protect the USB connector during transportation.
Remove the cap before inserting the Adapter to your computer’s USB
port or through the provided Desktop Stand.
(b) Power/Activity LED
Lights when the Adapter is powered on and flashes when it is active.
(c) USB Connector
Part of the Adapter that fits into your computer’s USB port.
(d) Desktop Stand
Lets you move the Adapter away from interfering objects around your
computer.
System Requirements
•
PC-compatible laptop with one available USB 2.0 bus-power port
•
Windows ® 2000, XP with SP2, or Vista TM***
Package Contents
•
N Wireless USB Adapter
•
Quick Installation Guide
•
CD with Installation Software and User Manual
•
Desktop Stand
7
section
(a)
(b)
Installing and Setting up the Adapter
A. Installation Process for Windows Vista
***NOTE: At the time of initial release of this product, Windows Vista
drivers were not available for release and might not be included on
the CD shipped with your product. For information on updated drivers for
Windows Vista (if any), please visit the Belkin website at
www.belkin.com/support/vista.
IMPORTANT: INSTALL THE SOFTWARE BEFORE INSERTING
THE ADAPTER.
A.1 Insert the Installation Software CD into your CD-ROM drive.
A.2 Click “Next” to begin the installation process.
Note: If the Belkin Wireless Card Installer screen does not appear within
20 seconds, access your CD-ROM by double-clicking on the “My
Computer” icon; then double-click on the CD-ROM drive into which the
installation CD has been placed. If the Installer does not start
automatically, double-click on the icon named “Setup.exe”.
8
Installing and Setting up the Adapter
1
2
installation process.
3
4
5
6
A.4 Select a destination folder for the
software installation by clicking
“Browse”; or, simply click “Next” to
select a default location.
A.5 A Setup Status screen will let you
know where you are in the setup
process.
A.6 A window may appear a second time
showing the message, “Windows
can’t verify the publisher of this driver
software”. This DOES NOT indicate a
problem. Our software has been fully
tested and is compatible with this
operating system.
9
section
A.3 The InstallShield Wizard starts the
Installing and Setting up the Adapter
A.7 When prompted, turn off your
computer and plug in your Adapter.
Your installation is now complete.
A.8 When the installation completes,
click on “Finish”.
A.9 The Found New Hardware Wizard
might appear within 3–15 seconds.
If it does, continue to follow the
prompts. Select “Locate and install
the driver software” to continue.
A.10 You might see a screen similar to
the one pictured below. This DOES
NOT mean there is a problem. Our
software has been fully tested and
is compatible with this operating
system. Select “Install this driver
software anyway” and follow the
on-screen instructions.
Next, a screen appears indicating
that hardware installation is taking
place; then, another indicates that
the process is complete.
10
Installing and Setting up the Adapter
A.11 To connect to the Internet, open the
Network and Sharing Center by first
opening the Control Panel from the
“Start” menu.
1
2
4
A.12 In the Control Panel, click on “View
network status and tasks”.
5
6
A.13 In the Network and Sharing Center,
click on “Connect to a network”.
A.14 In the next screen, select an
available wireless network and click
“Connect”.
11
section
3
Installing and Setting up the Adapter
A.15 Your Adapter will attempt to
connect to the selected network.
A.16 Depending on the security settings
of your wireless network, you may
be prompted to enter a network
security key or a passphrase. Click
“Connect” after you have done so.
A.17 After connecting to the network,
you can choose to save this
network and connect automatically
when your Adapter is in range.
A.18 The Network and Sharing Center
now indicates the network
connection that you have just
made. The links on the left of the
window allow you to configure your
network connections.
12
Installing and Setting up the Adapter
B. Installation Process for Windows Operating Systems other than
Windows Vista
B.1 Insert the Installation Software CD into your CD-ROM drive.
B.2 The Belkin Wireless Card Installer
screen will automatically appear
within up to 20 seconds. Click “Install
Software” or “Next” to start the
installation.
Note: If the Belkin Wireless Card Installer
screen does not appear within 20
seconds, access your CD-ROM by
double-clicking on the “My Computer”
icon; then double-click on the CDROM drive into which the installation
CD has been placed. Then, doubleclick on the icon named “Setup.exe”.
B.3 The InstallShield Wizard starts the
installation process.
B.4 Select a destination folder for the
software installation by clicking
“Browse”; or, simply click “Next” to
select a default location.
13
2
3
4
5
6
section
IMPORTANT: INSTALL THE SOFTWARE BEFORE INSERTING THE ADAPTER.
1
Installing and Setting up the Adapter
B.5 A Setup Status screen lets you know
where you are in the setup process.
B.6 After the software installation is
finished, the message “Please plug
in your USB Adapter now” will
appear. Connect the Adapter to your
computer.
B.7 The Found New Hardware Wizard
might appear in 3–15 seconds. If
it does, select “Install the software
automatically” and click “Next” to
install the hardware.
B.8 If the Found New Hardware Wizard
does not appear, click “Finish”.
B.9 You might see a screen similar to
this one. This DOES NOT mean
there is a problem. Our software has
been fully tested and is compatible
with this operating system. Select
“Continue Anyway” and follow the
on-screen instructions.
14
Installing and Setting up the Adapter
B.10 The Wizard will now install your
software.
1
2
4
B.11 The installation is now complete.
Click “Finish” to close the “Found
New Hardware Wizard”.
B.12 Click “Finish” again to exit the
InstallShield Wizard.
B.13 Depending on which operating
system you are using, you might be
required to reboot your computer
for the changes to take effect.
Save your data and close all other
applications. Then, reboot.
15
5
6
section
3
Installing and Setting up the Adapter
C. Configuration
Using the Belkin Wireless Networking Utility
C.1 After restarting your computer,
double-click the Belkin Wireless
Networking Utility icon on the
desktop screen.
Note: The Belkin Wireless Networking
Utility icon can also be found on
the system tray.
C.2 The Belkin Wireless Networking
Utility screen will appear.
C.3 Select a network to which to connect
from the “Available Networks” list
and click “Connect”.
Note: In order to see your available
networks, you must be near a
working wireless router or access
point.
Installation is now complete.
16
Using the Belkin Wireless Networking Utility
After successfully installing the Belkin Wireless Networking Utility
(WNU), configurations for wireless connection and security are just a
few easy clicks away.
Accessing the Belkin Wireless Networking Utility from the
Windows System Tray
2
3
4
5
6
If the icon is not present, click on “Start > Programs > Belkin
> N1 Wireless USB Network Adapter > Belkin Wireless
Networking Utility”.
17
section
To access the WNU, simply place your mouse pointer and right-click
over the WNU icon on the Windows task tray.
1
Using the Belkin Wireless Networking Utility
The WNU’s default screen is the “Current Status” tab. The “Current
Status” tab displays the current Network Status and Available Networks.
Network Status
This window displays the connectivity status of the current network. It
even displays connectivity between the computer and router, and router
and Internet. In the event of a connectivity problem, this window can
be used to determine the problem’s source (e.g. computer, router, or
Internet/modem).
Available Networks
This window displays the available networks at the current location
as well as their SSID, Signal Strength, Security Type, Channel, and
Network Type.
Lost Wireless Connection
If the current wireless connection is lost, a window will pop up and the
WNU will attempt to reconnect.
18
Using the Belkin Wireless Networking Utility
1
Connection Failure
Other options will appear during attempts to reconnect. To stop
connecting, click “Stop” and to reattempt connection, click “Retry”.
2
3
5
6
Network Status and Solution Tips
To further understand the current Network Status, click “Open
Wireless Utility”. The default screen will be the “Current
Status” tab and the “Network Status” section determines which
connections are good and/or faulty.
The WNU also features a “Solution Tips” section that provides
troubleshooting guidelines.
19
section
4
Using the Belkin Wireless Networking Utility
Setting Wireless Network Profiles
The “My Connections” tab on the WNU allows you to add, edit, and delete
connection profiles. It also displays signal strength, security, and network type.
Securing your Wi-Fi® Network
If you choose to connect to a secure network, determine the type of
security (WPA or WEP*) and use the appropriate field in the dialog box.
*Note: Types of security
20
Using the Belkin Wireless Networking Utility
Note: When you select a network using encryption, you will first see
the simple security screen. Click the “Advanced” button to see other
security options (below).
1
2
3
5
6
21
section
4
Using the Belkin Wireless Networking Utility
Wired Equivalent Privacy (WEP) is a less secure, but more
widely adopted wireless security protocol. Depending on the security
level (64- or 128-bit), the user will be asked to input a 10- or 26character hex key. A hex key is a combination of letters, a–f, and
numbers, 0–9.
Wireless Protected Access (WPA) is the new standard in
the wireless security. However, not all wireless cards and adapters
support this technology. Please check your wireless adapter’s user
manual to check if it supports WPA. Instead of a hex key, WPA uses
only passphrases, which are much easier to remember.
The following section, intended for the home, home-office, and smalloffice user, presents a few different ways to maximize the security of
your wireless network.
At the time of publication, four encryption methods are available:
Encryption Methods:
Name
64-bit Wired
128-bit
Equivalent Privacy Encryption
Wi-Fi
Protected
Access
Wi-Fi
Protected
Access
Acronym
64-bit WEP
128-bit WEP
WPA-TKIP
WPA-AES
Security
Good
Better
Best
Best
Features
Static keys
Static keys
Dynamic key
encryption
and mutual
authentication
Dynamic key
encryption
and mutual
authentication
Encryption keys
based on RC4
algorithm (typically
40-bit keys)
Added security
over 64-bit
WEP using a
key length of
104 bits, plus
24 additional
bits of systemgenerated data
TKIP (temporal
key integrity
protocol)
added so
that keys are
rotated and
encryption is
strengthened
AES
(Advanced
Encryption
Standard)
does not
cause any
throughput
loss
WEP
WEP is a common protocol that adds security to all Wi-Fi-compliant
wireless products. WEP gives wireless networks the equivalent level
of privacy protection as a comparable wired network.
22
Using the Belkin Wireless Networking Utility
64-Bit WEP
64-bit WEP was first introduced with 64-bit encryption, which includes
a key length of 40 bits plus 24 additional bits of system-generated data
(64 bits total). Some hardware manufacturers refer to 64-bit as 40-bit
encryption. Shortly after the technology was introduced, researchers
found that 64-bit encryption was too easy to decode.
2
3
As a result of 64-bit WEP’s potential security weaknesses, a
more secure method of 128-bit encryption was developed. 128bit encryption includes a key length of 104 bits plus 24 additional
bits of system-generated data (128 bits total). Some hardware
manufacturers refer to 128-bit as 104-bit encryption.
4
Most of the new wireless equipment in the market today supports
both 64-bit WEP and 128-bit WEP encryption, but you might
have older equipment that only supports 64-bit WEP. All Belkin
wireless products will support both 64-bit WEP and 128-bit
encryption.
6
Encryption Keys
After selecting either the 64-bit WEP or 128-bit encryption mode, it is
critical that you generate an encryption key. If the encryption key is
not consistent throughout the entire wireless network, your wireless
networking devices will be unable to communicate with one another.
You can enter your key by typing in the hex key. A hex (hexadecimal)
key is a combination of numbers and letters from A–F and 0–9. For
64-bit WEP, you must enter 10 hex keys. For 128-bit WEP, you must
enter 26 hex keys.
For instance:
AF 0F 4B C3 D4 = 64-bit WEP key
C3 03 0F AF 0F 4B B2 C3 D4 4B C3 D4 E7 = 128-bit WEP key
Write down the hex WEP key from your wireless router (or access
point) and enter it manually into the hex WEP key table in your
Adapter’s configuration screen.
23
5
section
128-Bit Encryption
1
Using the Belkin Wireless Networking Utility
WPA
WPA is a new Wi-Fi standard that improves upon the security features
of WEP. To use WPA security, the drivers and software of your wireless
equipment must be upgraded to support it. These updates will be found
on your wireless vendor’s website. There are three types of WPA security:
WPA-PSK (no server),WPA (with radius server), and WPA2.
WPA-PSK (no server) uses what is known as a pre-shared key as the
network key. A network key is a password that is between eight and
63 characters long. It can be a combination of letters, numbers, or
characters. Each client uses the same network key to access the network.
Typically, this is the mode that will be used in a home environment.
WPA (with radius server) works best in a business environment,
in which a radius server automatically distributes the network
key to clients.
WPA2 requires Advanced Encryption Standard (AES) for
encryption of data, which offers much greater security than WPA.
WPA uses both Temporal Key Integrity Protocol (TKIP) and AES
for encryption.
Setting up your Belkin Wireless Router (or Access Point)
to use Security
To start using security, you must first enable WEP or WPA for your
wireless router (or access point). For Belkin Wireless Routers (or
Access Points), these security features can be configured through the
web-based interface. See your wireless router’s (or access point’s)
manual for directions on how to access the management interface.
IMPORTANT: You must now set all wireless network cards/adapters
to match these settings.
24
Using the Belkin Wireless Networking Utility
Configuring your Adapter to use Security
At this point, you should already have your wireless router (or access
point) set to use WPA or WEP. In order for you to gain wireless
connection, you must set your N Wireless USB Adapter to use the
same security settings.
1
2
3
The Belkin N Wireless USB Adapter supports the latest WPA security
feature as well as the legacy WEP security standard. By default,
wireless security is disabled.
4
To enable security, you will first must determine which standard is
used by the router (or access point). (See your wireless router’s or
access point’s manual for directions on how to access the security
settings.)
To access the security settings on your Adapter, click the “My Connections”
tab and point to the connection for which you want to change security
settings. Click “Edit” to change settings.
25
5
6
section
Changing the Wireless Security Settings
Using the Belkin Wireless Networking Utility
WEP Setup
64-Bit WEP Encryption
1.
Select “WEP” from the “Data Encryption” drop-down menu.
2.
After selecting your WEP encryption mode, you can enter your key
by typing in the hex key manually.
A hex (hexadecimal) key is a combination of numbers and letters from
A–F and 0–9. For 64-bit WEP, you must enter 10 hex keys.
For instance:
AF 0F 4B C3 D4 = 64-bit WEP key
26
Using the Belkin Wireless Networking Utility
3.
Click “Save” to finish. Encryption in the wireless router (or access
point) is now set. Each of your computers on your wireless
network will now must be configured with the same security
settings.
2
3
4
5
6
27
section
WARNING: If you are using a wireless client to turn on the security
settings in your wireless router (or access point), you will temporarily
lose your wireless connection until you activate security on your
wireless client. Please record the key prior to applying changes in the
wireless router (or access point). If you don’t remember the hex key,
your client will be locked out of the wireless router (or access point).
1
Using the Belkin Wireless Networking Utility
128-Bit WEP Encryption
1.
Select “WEP” from the drop-down menu.
2.
After selecting your WEP encryption mode, you can enter your
key by typing in the hex key manually. A hex (hexadecimal) key is
a combination of numbers and letters from A–F and 0–9. For 128bit WEP, you must enter 26 hex keys.
For instance:
C3 03 0F AF 0F 4B B2 C3 D4 4B C3 D4 E7 = 128-bit WEP key
28
Using the Belkin Wireless Networking Utility
3.
Click “Save” to finish. Encryption in the wireless router (or access
point) is now set. You must now configure each of the computers
on your wireless network with the same security settings.
2
3
4
5
6
29
section
WARNING: If you are using a wireless client to turn on the security
settings in your wireless router (or access point), you will temporarily
lose your wireless connection until you activate security on your
wireless client. Please record the key prior to applying changes in the
wireless router (or access point). If you don’t remember the hex key,
your client will be locked out of the wireless router (or access point).
1
Using the Belkin Wireless Networking Utility
WPA-PSK (no server)
Choose this setting if your network does not use a radius server. WPA-PSK
(no server) is typically used in home and small office networking.
1.
From the “Network Authentication” drop-down menu, select “WPAPSK (no server)”.
2.
Enter your network key. This can be from eight to 63 characters
and can be letters, numbers, or symbols. This same key must be
used on all of the clients (network cards) that you want to include in
your wireless network.
3.
Click “Save” to finish. You must now set all clients (network cards)
to match these settings.
30
Using the Belkin Wireless Networking Utility
Wireless Networking Utility Options
1
2
3
5
6
The “Options” tab on the WNU provides the user the ability to
customize his or her WNU settings.
31
section
4
Using the Belkin Wireless Networking Utility
Wireless Networking Utility Help
The WNU “Help” tab provides users with access to online and
telephone support, one-click check for upgrades to updated versions
of software, and advanced diagnostic tools.
32
Using the Belkin Wireless Networking Utility
Advanced Diagnostic Tools
1
The “Advanced Diagnostic Tools” section is the central control panel
for all the settings of the hardware and software components of
the wireless network. It provides an array of tests and connectivity
services to ensure optimal network performance.
2
3
5
6
33
section
4
Troubleshooting
I can’t connect to the Internet wirelessly.
If you are unable to connect to the Internet from a wireless computer,
please check the following items:
1. Look at the lights on your wireless router. If you’re using a Belkin
Wireless Router, the lights should be as follows:
• The “Power” light should be on.
• The “Connected” light should be on, and not blinking.
• The “WAN” light should be either on or blinking.
If your Belkin Wireless Router’s lights have the above characteristics, go
to number 2 below.
If this is NOT the case, make sure:
• The router’s power cord is plugged in.
• All cables are connected between the router and the modem.
• All the modem’s LEDs are functioning correctly. If not, see your
modem’s user manual.
• Reboot the router.
• Reboot the modem.
If you continue to have issues, please contact Belkin Technical Support.
If you are not using a Belkin Wireless Router, consult that router
manufacturer’s user guide.
2. Open your wireless utility software by clicking on the icon in the
system tray at the bottom right-hand corner of the screen. The
tray icon should look like this (the icon may be red or green):
3. The window that opens should have a list of “Available Networks”.
Available networks are wireless networks to which you can connect.
If you are using a Belkin 802.11g (G Plus) Router, or Belkin 802.11g
(54g) Router, “Belkin54g” is the default name.
If you are using a Belkin 802.11b Router, the default name should
be “WLAN”.
If you are NOT using a Belkin Router, please consult your router
manufacturer’s user manual for the default name.
34
Troubleshooting
The name of your wireless network appears in
“Available Networks”.
1
If the correct network name is listed in the “Available Networks”
list, please follow the steps below to connect wirelessly:
2
1. Click on the correct network name in the “Available Networks” list.
2. If the network has security (encryption) enabled, you must
3
If you are still unable to access the Internet after connecting to
the wireless network, please contact Belkin Technical Support.
The name of your wireless network DOES NOT appear in the list
of “Available Networks”.
If the correct network name is not listed, check the SSID settings
to see if they match. The SSID is case-sensitive and the spelling
on each computer must be exactly the same in order for the
Adapter to connect to the wireless router (or access point).
Note: To check the SSID settings or look for an available network,
double-click the Signal Indicator icon to bring up the “Wireless
Networks” screen. Click “Add” if you do not see the network
you are trying to connect to and type in the SSID. For more
information about setting up an SSID, please reference your
router manufacturer’s user manual.
If issues persist even at close range, please contact Belkin
Technical Support.
35
4
5
6
section
enter the network key. Click “Connect”. For more information
regarding security, see the page entitled: “Securing your Wi-Fi
Network” on page 20 of this User Manual.
3. Within a few seconds, the tray icon in the lower right-hand
corner of your screen should turn green,indicating a successful
connection to the network.
Troubleshooting
Installation CD-ROM does not start Belkin
Wireless Networking Utility.
If the CD-ROM does not start the Belkin Wireless Networking
Utility automatically, it could be that the computer is running other
applications that are interfering with the CD drive. If the Belkin
Wireless Networking Utility screen does not appear within 15-20
seconds, open up your CD-ROM drive by double-clicking on the
“My Computer” icon. Next, double-click on the CD-ROM drive in
which the Installation CD has been placed to start the installation.
If the installation does not start automatically, right-click to select
“Explore”, then double-click on the icon named “setup.exe”.
Power LED does not come ON; Adapter is not working.
If the LED indicators are not ON, the problem may be that the
Adapter is not connected or installed properly. Verify that the
Adapter is plugged firmly into the USB port of your computer.
Check to see that the drivers for the Adapter have been installed.
Right-click on the “My Computer” icon on your desktop. Choose
“Properties” and navigate to the “Device Manager” and see if
your USB Network Adapter is listed without any errors. If an error
is indicated, contact Belkin Technical Support.
Link LED is blinking slowly; I cannot connect to a
wireless network or the Internet.
If your Adapter appears to be functioning properly, but you
cannot connect to a network or you have a red wireless icon
at the bottom of your screen, the problem may be that there is
a mismatch between the network name (SSID) settings in your
wireless network properties.
Check the SSID settings to see if they match. The SSID is casesensitive and the spelling on each computer must be exactly the
same in order for the Adapter to connect to the wireless router
(or access point).
Note: To check the SSID settings or look for an available
network, double-click the Signal Indicator icon to bring up the
“Wireless Networks” screen. Click “Add” if you do not see the
network you are trying to connect to and type in the SSID.
For more information about setting up an SSID, please reference
your router manufacturer’s user manual. If issues persist even at
close range, please contact Belkin Technical Support.
36
Troubleshooting
Link LED is solid but I cannot connect to the Internet.
If you have a signal but can’t get online or obtain an IP address,
the problem may be that there is a mismatch between the
encryption key settings in your computer and wireless router (or
access point). Check the WEP, WPA, or WPA2 key settings to see
if they match. The key is case-sensitive and the spelling on each
computer and wireless router (or access point) must be exactly
the same in order for the Adapter to connect to the router. For
more information about encryption, please see “Securing your
Wi-Fi Network” on page 20 of this User Manual.
Data transfer is sometimes slow.
Wireless technology is radio-based, which means connectivity
and the throughput performance between devices decreases
when the distance between devices increases. Other factors that
will cause signal degradation (metal is generally the worst culprit)
are obstructions such as walls and metal appliances. As a result,
the typical indoor range of your wireless devices will be between
100 to 200 feet. Note also that connection speed may decrease
as you move farther from the wireless router (or access point).
In order to determine if wireless issues are related to range, we
suggest temporarily moving the computer, if possible, to five to
10 feet away from the wireless router (or access point). Please
see the section titled “Placement of your Wireless Networking
Hardware for Optimal Performance” on page 2 of this User
Manual. If issues persist even at close range, please contact
Belkin Technical Support.
Signal strength is poor.
Wireless technology is radio-based, which means connectivity
and the throughput performance between devices decreases
when the distance between devices increases. Other factors that
will cause signal degradation (metal is generally the worst culprit)
are obstructions such as walls and metal appliances. As a result,
the typical indoor range of your wireless devices will be between
100 to 200 feet. Note also that connection speed may decrease
as you move farther from the wireless router (or access point).
In order to determine if wireless issues are related to range, we
suggest temporarily moving the computer, if possible, to five to
10 feet away from wireless router (or access point).
37
2
3
4
5
6
section
If issues persist even at close range, please contact Belkin
Technical Support.
1
Troubleshooting
Changing the wireless channel – Depending on local wireless
traffic and interference, switching the wireless channel of your
network can improve performance and reliability. The default
channel the router is shipped with is channel 6. You may choose
from several other channels depending on your region; see your
router’s (or access point’s) user manual for instructions on how to
choose other channels.
Limiting the wireless transmit rate – Limiting the wireless
transmit rate can help improve the maximum wireless range, and
connection stability. Most wireless cards have the ability to limit
the transmission rate. To change this property, go to the Windows
Control Panel, open “Network Connections” and double-click on
your Adapter’s connection. In the “Properties” dialog, select the
“Configure” button on the “General” tab (Windows 98 users will
have to select the USB Network Adapter in the list box and then
click “Properties”), then choose the “Advanced” tab and select the
rate property. Wireless client cards are usually set to automatically
adjust the wireless transmit rate for you, but doing so can cause
periodic disconnects when the wireless signal is too weak; as a
rule, slower transmission rates are more stable. Experiment with
different connection rates until you find the best one for your
environment; note that all available transmission rates should be
acceptable for browsing the Internet. For more assistance, see
your wireless card’s literature. If issues persist even at close range,
please contact Belkin Technical Support.
Why are there two wireless utilities in my system tray?
Which one do I use?
There are several features and advantages from using the Belkin
Wireless Networking Utility over the Windows XP Wireless
Zero Configuration utility. We offer a site survey, detailed link
information, and adapter diagnosis, to name a few.
It’s essential to know which utility is managing your Adapter. We
recommend using the Belkin Wireless Networking Utility. To use the
Belkin Wireless Networking Utility, follow the steps below:
Step 1 Right-click on the network status icon in the system tray and
select the “Status” tab.
Step 2 From the “Status” tab, uncheck the “Use Windows to
configure my wireless network settings” box. Once the box is
unchecked, click the “Close” button to close the window.
You are now using the Belkin Wireless Networking Utility to
configure the Adapter.
38
Troubleshooting
The Adapter does not perform or connection is unstable
when computer has a second built-in wireless network
card (such as a mini PCI or Intel® Centrino™).
This condition occurs if your computer has a built-in wireless
card while your Belkin N Wireless USB Adapter is also active.
This happens because Windows must now handle two active
wireless connections.
The Adapter does not perform or connection is slow
when computer has a built-in wired Ethernet card.
This condition occurs if your computer has an active Ethernet
card while your Adapter is also active. This happens because
Windows must now handle two active network connections.
You must disable the Ethernet card from your computer under
“Network Adapters” in the Device Manager.
What’s the difference between 802.11g and
draft 802.11n?
Currently there are three commonly used wireless networking
standards, which transmit data at very different maximum
speeds. Each is based on the designation for certifying network
standards. The most common wireless networking standard,
802.11g, can transmit information up to 54Mbps; 802.11a also
supports up to 54Mbps, but in the 5GHz frequency; and 802.11n
draft specification can connect at up to 300Mbps. See the chart
on the next page for more detailed information.
39
2
3
4
5
6
section
You must disable the built-in wireless card from your computer
under “Network Adapters” in the Device Manager.
1
Troubleshooting
Up to 300Mbps*
Frequency
N1 MIMO
(draft 802.11n
with MIMO)
N MIMO
(draft 802.11n
with MIMO)
Up to 300Mbps*
Common household
devices such as cordless
phones and microwave
ovens may interfere with
the unlicensed band
2.4GHz
Common household
devices such as cordless
phones and microwave
ovens may interfere with
the unlicensed band
2.4GHz
Common household
devices such as cordless
phones and microwave
ovens may interfere with
the unlicensed band
2.4GHz
Common household
devices such as cordless
phones and microwave
ovens may interfere with
the unlicensed band
2.4GHz
Compatibility
G Plus MIMO
(802.11g with
MIMO MRC)
Up to 54Mbps*
Compatible with
802.11b/g
Compatible with
802.11b/g
Compatible with draft
802.11n** and 802.11b/g
Compatible with draft
802.11n** and 802.11b/g
Coverage*
G
(802.11g)
Up to 54Mbps*
Up to 400 ft.*
Up to 1,000 ft.*
Up to 1,200 ft.*
Up to 1,400 ft.*
Advantage
Speed/Data
Rate*
Wireless
Technology
Belkin Wireless Comparison Chart
Common—widespread
use for Internet sharing
Better coverage and
consistent speed and
range
Enhanced speed and
coverage
Leading edge— best
coverage and throughput
*Distance and connection speeds will vary depending on your networking environment.
**This Adapter is compatible with products based on the same version of the draft 802.11n
specifications and may require a software upgrade for best results.
40
Troubleshooting
Free Tech Support*
*National call rates may apply
www.belkin.com
You can find additional support information on our website www.belkin.
com through the tech-support area. If you want to contact technical support
by phone, please call the number you need from the list below*.
NUMBER
INTERNET ADRESS
AUSTRIA
0820 200766
www.belkin.com/uk/networking/
BELGIUM
07 07 00 073
www.belkin.com/nl/networking/
CZECH REPUBLIC
239 000 406
www.belkin.com/uk/networking/
DENMARK
701 22 403
www.belkin.com/uk/networking/
FINL AND
097 25 19 123
www.belkin.com/uk/networking/
FR ANCE
08 - 25 54 00 26
www.belkin.com/fr/networking/
GERMANY
0180 - 500 57 09
www.belkin.com/de/networking/
GREECE
00800 - 44 14 23 90
www.belkin.com/uk/networking/
HUNG ARY
06 - 17 77 49 06
www.belkin.com/uk/networking/
ICEL AND
800 8534
www.belkin.com/uk/networking/
IREL AND
0818 55 50 06
www.belkin.com/uk/networking/
ITALY
02 - 69 43 02 51
www.belkin.com/it/support/tech/issues_more.asp
LUXEMBOURG
34 20 80 85 60
www.belkin.com/uk/networking/
NETHERL ANDS
0900 - 040 07 90 €0.10 per minute www.belkin.com/nl/networking/
NORWAY
81 50 0287
www.belkin.com/uk/networking/
POL AND
00800 - 441 17 37
www.belkin.com/uk/networking/
PORTUG AL
707 200 676
www.belkin.com/uk/networking/
RUSSIA
495 580 9541
www.belkin.com/networking/
SOUTH AFRICA
0800 - 99 15 21
www.belkin.com/uk/networking/
SPAIN
902 - 02 43 66
www.belkin.com/es/support/tech/networkingsupport. asp
SWEDEN
07 - 71 40 04 53
www.belkin.com/se/support/tech/networkingsupport.asp
SWITZERL AND
08 - 48 00 02 19
www.belkin.com/uk/networking/
UNITED KINGDOM
0845 - 607 77 87
www.belkin.com/uk/networking/
OTHER COUNTRIES
+44 - 1933 35 20 00
41
2
3
4
5
6
section
COUNTRY
1
Information
FCC Statement
DECLARATION OF CONFORMITY WITH FCC RULES FOR
ELECTROMAGNETIC COMPATIBILITY
We, Belkin International, Inc., of 501 West Walnut Street,
Compton, CA 90220, declare under our sole responsibility
that the product,
F5D8053
to which this declaration relates, complies with Part 15
of the FCC Rules. Operation is subject to the following
two conditions: (1) this device may not cause harmful
interference, and (2) this device must accept any
interference received, including interference that may
cause undesired operation.
Caution: Exposure to Radio Frequency Radiation.
The radiated output power of this device is far below the FCC radio frequency
exposure limits. Nevertheless, the device shall be used in such a manner that
the potential for human contact during normal operation is minimized.
When connecting an external antenna to the device, the antenna shall be
placed in such a manner to minimize the potential for human contact during
normal operation. In order to avoid the possibility of exceeding the FCC radio
frequency exposure limits, human proximity to the antenna shall not be less
than 20cm (8 inches) during normal operation.
Federal Communications Commission Notice
This equipment has been tested and found to comply with the limits for a
Class B digital device, pursuant to Part 15 of the FCC Rules. These limits are
designed to provide reasonable protection against harmful interference in a
residential installation.
This equipment generates, uses, and can radiate radio frequency energy.
If this equipment does cause harmful interference to radio or television
reception, which can be determined by turning the equipment off and on, the
user is encouraged to try and correct the interference by one or more of the
following measures:
• Reorient or relocate the receiving antenna.
• Increase the distance between the equipment and the receiver.
• Connect the equipment to an outlet on a circuit different from that to
which the receiver is connected.
• Consult the dealer or an experienced radio/TV technician for help.
42
Information
Modifications
The FCC requires the user to be notified that any changes or modifications to
this device that are not expressly approved by Belkin International, Inc., may
void the user’s authority to operate the equipment.
Belkin International, Inc., Limited Lifetime Product Warranty
What this warranty covers.
Belkin International, Inc. (“Belkin”) warrants to the original purchaser of this
Belkin product that the product shall be free of defects in design, assembly,
material, or workmanship.
What will we do to correct problems?
Product Warranty.
Belkin will repair or replace, at its option, any defective product free of charge
(except for shipping charges for the product).
What is not covered by this warranty?
All above warranties are null and void if the Belkin product is not provided
to Belkin for inspection upon Belkin’s request at the sole expense of
the purchaser, or if Belkin determines that the Belkin product has been
improperly installed, altered in any way, or tampered with. The Belkin Product
Warranty does not protect against acts of God such as flood, earthquake,
lightning, war, vandalism, theft, normal-use wear and tear, erosion,
depletion, obsolescence, abuse, damage due to low voltage disturbances
(i.e. brownouts or sags), non-authorized program, or system equipment
modification or alteration.
How to get service.
To get service for your Belkin product you must take the following steps:
1. Contact Belkin International, Inc., at 501 W. Walnut St., Compton CA
90220, Attn: Customer Service, or call (800)-223-5546, within 15 days of
the Occurrence. Be prepared to provide the following information:
a. The part number of the Belkin product.
b. Where you purchased the product.
c. When you purchased the product.
d. Copy of original receipt.
2. Your Belkin Customer Service Representative will then instruct you on
how to forward your receipt and Belkin product and how to proceed
with your claim.
43
2
3
4
5
6
section
What the period of coverage is.
Belkin warrants the Belkin product for the lifetime of the product.
1
Information
Belkin International, Inc., reserves the right to review the damaged Belkin
product. All costs of shipping the Belkin product to Belkin International, Inc.,
for inspection shall be borne solely by the purchaser. If Belkin determines,
in its sole discretion, that it is impractical to ship the damaged equipment
to Belkin International, Inc., Belkin may designate, in its sole discretion, an
equipment repair facility to inspect and estimate the cost to repair such
equipment. The cost, if any, of shipping the equipment to and from such
repair facility and of such estimate shall be borne solely by the purchaser.
Damaged equipment must remain available for inspection until the claim is
finalized. Whenever claims are settled, Belkin International, Inc., reserves the
right to be subrogated under any existing insurance policies the purchaser
may have.
How state law relates to the warranty.
THIS WARRANTY CONTAINS THE SOLE WARRANTY OF BELKIN. THERE
ARE NO OTHER WARRANTIES, EXPRESSED OR, EXCEPT AS REQUIRED
BY LAW, IMPLIED, INCLUDING THE IMPLIED WARRANTY OR CONDITION
OF QUALITY, MERCHANTABILITY OR FITNESS FOR A PARTICULAR
PURPOSE, AND SUCH IMPLIED WARRANTIES, IF ANY, ARE LIMITED IN
DURATION TO THE TERM OF THIS WARRANTY.
Some states do not allow limitations on how long an implied warranty lasts,
so the above limitations may not apply to you.
IN NO EVENT SHALL BELKIN BE LIABLE FOR INCIDENTAL, SPECIAL,
DIRECT, INDIRECT, CONSEQUENTIAL OR MULTIPLE DAMAGES SUCH AS,
BUT NOT LIMITED TO, LOST BUSINESS OR PROFITS ARISING OUT OF
THE SALE OR USE OF ANY BELKIN PRODUCT, EVEN IF ADVISED OF THE
POSSIBILITY OF SUCH DAMAGES.
This warranty gives you specific legal rights, and you may also have other
rights, which may vary from state to state. Some states do not allow the
exclusion or limitation of incidental, consequential, or other damages, so the
above limitations may not apply to you.
FOR USE IN
AT
BE CY
EE
FI
HU IE
For information on product disposal please refer to
http://environmental.belkin.com
44
CZ DK
FR DE GR
LV
LT
LU MT NL PL
IT
PT
SK
SI
IS
LI NO CH BG
ES
SE GB
RO TR
OPERATES ON
CHANNELS 1-13
Information
EC Declaration of Conformity
to R&TTE Directive 1999/5/EC
CE
Manufacturer
:
BELKIN LTD,
EXPRESS BUSINESS PARK,
SHIPTON WAY
,RUSHDEN
NN10 6GL ENGLAND
2
3
4
5
:
Product / Apparatus
:
N WIRELESS USB ADAPTER
Type Number
:
F5D8053
Variants include
:
All Country variants
Belkin Ltd
Declaration
I declare that above product conforms to all the applicable requirements of
EU Directive1999/5/EC and is CE-marked accordingly:
Article 3.1a:
(Standard(s)) used to show compliance with LVD, 73/23/EEC
EN60950-1:2001
Article 3.1b:
(Standard(s)) used to show compliance with EMC Directive, 89/336/EEC:
EN301 489-1 V1.5.1 (2004-11), EN301 489-17 V1.2.1 (2002-08)
Article 3.2:
Standard(s) used to show compliance:
EN300-328 V1.6.1 (2004-11)
Signature
:
Name
:
K Simpson
Title
:
European Regulatory Compliance Manager
Date
:
_10 JULY 2007______________________
45
6
section
Representative
(residing in the EC
holding the TCF)
1
N Wireless
USB Adapter
Belkin Tech Support
UK: 0845 607 77 87
Europe: www.belkin.com/support
Belkin Ltd.
Express Business Park
Shipton Way, Rushden
NN10 6GL, United Kingdom
+44 (0) 1933 35 2000
+44 (0) 1933 31 2000 fax
Belkin SAS
130 rue de Silly
92100 Boulogne-Billancourt,
France
+33 (0) 1 41 03 14 40
+33 (0) 1 41 31 01 72 fax
Belkin GmbH
Hanebergstrasse 2
80637 Munich
Germany
+49 (0) 89 143405 0
+49 (0) 89 143405 100 fax
Belkin Iberia
C/ Anabel Segura, 10 planta baja, Of. 2
28108, Alcobendas, Madrid
Spain
+34 91 791 23 00
+34 91 490 23 35 fax
Belkin Italy & Greece
Via Carducci, 7
Milano 20123
Italy
+39 02 862 719
+39 02 862 719 fax
Belkin B.V.
Boeing Avenue 333
1119 PH Schiphol-Rijk,
Netherlands
+31 (0) 20 654 7300
+31 (0) 20 654 7349 fax
© 2007 Belkin International, Inc. All rights reserved. All trade names are registered trademarks of
respective manufacturers listed. Windows and Windows Vista are either registered trademarks or
trademarks of Microsoft Corporation in the United States and/or other countries.
P75451ea
Adaptateur
USB Sans Fil N
EN
FR
DE
NL
ES
IT
Manuel de l’utilisateur
F5D8053ea
Table des matières
1 Introduction ................................................................................................. 1
Avantages d’un réseau domestique ............................................................... 1
Avantages d’un réseau sans fil ....................................................................... 1
Choix de l’emplacement de votre dispositif réseau sans fil
pour une performance maximale .................................................................... 2
2 Présentation ................................................................................................ 5
Caractéristiques du produit ............................................................................. 5
Applications et avantages ............................................................................... 6
Caractéristiques techniques du produit .......................................................... 6
Configuration requise ..................................................................................... 7
Contenu de l’emballage ................................................................................. 7
3 Installation et configuration de l’adaptateur ............................................... 8
A — Installation sous Windows Vista ............................................................. 8
B — Procédure d’installation pour les systèmes d’exploitation Windows
autres que Windows Vista .................................................................... 13
C — Configuration ......................................................................................... 16
4 Utilisation de l’utilitaire réseau sans fil Belkin ..........................................17
Accès à l’utilitaire de surveillance réseau sans fil à partir de la barre des
tâches Windows ............................................................................................ 17
État du réseau ................................................................................................ 18
Réseaux disponibles...................................................................................... 18
État du réseau et astuces.............................................................................. 19
Création de Profils réseau sans fil ............................................................... 20
Protection de votre réseau Wi-Fi ................................................................. 20
Configuration des paramètres de sécurité de votre adaptateur .............. 25
5 Dépannage ..................................................................................................34
6 Information .................................................................................................42
Introduction
Les avantages d’un réseau domestique
Votre réseau domestique Belkin vous permettra de :
• Partager une connexion Internet à haut débit avec tous les ordinateurs
de votre domicile
• Partager des ressources, telles que des fichiers et des disques durs,
avec tous les ordinateurs de votre domicile
• Partager une imprimante avec toute la famille
• Partager des documents, des fichiers de musique et vidéo, ainsi que
des photos numériques
• Stocker, récupérer et copier des fichiers d’un ordinateur à un autre
• Simultanément jouer à des jeux en ligne, consulter une messagerie
électronique et discuter
Avantages d’un réseau sans fil
Voici quelques-uns des avantages que vous tirerez d’un réseau sans fil Belkin :
•
La Mobilité – nul besoin de confiner votre ordinateur à une seule pièce. Vous
pourrez maintenant travailler sur un ordinateur de bureau ou portable, partout
dans la zone couverte par votre réseau sans fil
•
Installation simple – l’Assistant Installation Facile de Belkin vous facilite la
vie
•
Polyvalence– accédez à des imprimantes, des ordinateurs ou d’autres
périphériques réseau où que vous soyez dans votre domicile.
•
Possibilité d’expansion – l’étendue de la gamme de produits de mise en
réseau offerte par Belkin vous permet d’étendre votre réseau afin d’y inclure
des périphériques tels que des imprimantes ou des consoles de jeu
•
Aucun câblage nécessaire – plus besoin de perdre du temps et de l’argent
à réinstaller le câblage Ethernet chez vous ou au bureau.
•
Reconnaissance de l’industrie– choisissez parmi une vaste gamme de
produits réseau captables de communiquer entre eux.
1
1
2
3
4
5
6
section
Merci d’avoir choisi la l’Adaptateur USB Sans Fil N de Belkin. Vous
pouvez désormais profiter de cette nouvelle technologie en permettant à
vos ordinateurs domestiques ou d’entreprise de se connecter en réseau
sans fil. Cet adaptateur vous permet de connecter un ordinateur portable
à votre réseau. Lisez attentivement l’ensemble de ce manuel, en insistant
sur la section intitulée « Choix de l’emplacement de votre dispositif réseau
sans fil pour une performance maximale ».
Introduction
Choix de l’emplacement de votre dispositif réseau sans fil pour des
performances maximales
Plus votre ordinateur se rapproche de votre sans fil (ou votre point
d’accès), plus votre connexion sans fil gagne en force. De façon générale,
la portée de votre réseau sans fil à l’intérieur s’étend de 30 à 60 mètres.
À l’opposé, plus vos périphériques sans fil reliés à votre routeur ou votre
point d’accès sont éloignés de ceux-ci, moins grande est la performance
de votre connexion sans fil. Il se peut que vous vous en rendiez compte ou
pas. Si vous éloignez encore plus votre routeur (ou votre point d’accès),
il est possible que la vitesse de votre connexion diminue. Les appareils
électroménagers, les obstacles et les murs peuvent bloquer les signaux
radio de votre réseau sans fil et en diminuer la force.
Dans le but de vérifier si la performance de votre réseau est liée à la portée
ou à la présence d’obstacles, déplacez votre ordinateur afin qu’il soit dans
un rayon de 2 à 5 mètres du routeur (ou du point d’accès). Si les problèmes
persistent même dans une zone de couverture restreinte, veuillez contacter
l’assistance technique de Belkin.
Remarque :Alors que certains des objets énumérés ci-dessous peuvent
affecter les performances de votre réseau, ils n’empêcheront pas son
fonctionnement. Si vous croyez que votre réseau sans fil ne fonctionne pas
à pleine capacité, ces solutions peuvent vous aider.
1.
Choix de l’emplacement de votre routeur sans fil ou de votre point
d’accès
Placez votre routeur réseau sans fil (ou point d’accès), le centre nerveux
de votre réseau sans fil, aussi près que possible du centre de la zone de
couverture désirée.
Afin d’assurer une zone de couverture optimale pour vos « clients réseau »
(soit les ordinateurs dotés d’une carte ou d’un adaptateur réseau Belkin) :
•
Assurez-vous que les antennes de votre routeur ou de votre point
d’accès sont parallèles et disposées à la verticale (en pointant vers
le plafond). Si votre routeur (ou votre point d’accès) est posé à la
verticale, essayez autant que possible de disposer les antennes de
façon à ce qu’elles pointent vers le haut.
•
Dans des habitations à plusieurs étages, placez le routeur (ou le point
d’accès) à l’étage le plus central de votre domicile. Ceci peut signifier
que devrez placer le routeur sans fil (ou le point d’accès) à un étage
supérieur.
•
Évitez de placer le routeur (ou le point d’accès) près d’un
téléphone sans fil 2.4 GHz.
2
Introduction
Éviter les obstacles et les interférences
Évitez de placer le routeur ou le point d’accès près d’un appareil
émettant du « bruit » radio, comme un four à micro-ondes. Exemples
d’objets risquant d’empêcher la communication sans fil :
•
Réfrigérateurs
•
Lave-linge et/ou sèche-linge
•
Étagère en métal
•
Grands aquariums
•
Fenêtre avec teinture anti-UV métallique
2
3
4
Si le signal de votre réseau semble faible à certains endroits, assurezvous qu’aucun de ces objets ne peut lui faire obstruction (entre les
ordinateurs et le routeur ou le point d’accès).
3.
1
Téléphones sans fil
Si les performances de votre réseau sans fil sont toujours affectées
malgré les solutions mentionnées ci-dessus et si vous possédez un
téléphone sans fil :
•
Éloignez votre téléphone de votre routeur ou votre point
d’accès sans fil ainsi que de vos ordinateurs sans fil.
•
Débranchez et retirez la batterie de tout téléphone sans
fil fonctionnant sur la bande de 2.4 GHz. (Consultez la
documentation accompagnant votre téléphone à cet effet.)
Si ces gestes semblent résoudre le problème, c’est que
votre téléphone interfère avec les signaux du réseau sans fil.
•
Si votre téléphone prend en charge le choix du canal,
modifiez le canal de votre téléphone en choisissant le canal
le plus éloigné possible de celui de votre réseau sans fil.
Par exemple, choisissez le canal 1 pour votre téléphone
et modifiez le canal de votre routeur sans fil (ou de votre
point d’accès) en choisissant le canal 11 (le choix du canal
dépend de votre région). Reportez-vous au mode d’emploi
de votre téléphone pour obtenir les instructions détaillées.
•
Si le besoin se fait sentir, vous pouvez aussi changer votre
téléphone sans fil en choisissant un téléphone à 900 MHz ou
à 5 GHz.
3
5
6
section
2.
Introduction
4.
Choisissez le canal le plus « paisible » pour votre réseau sans fil
Dans des environnements domiciliaires ou d’entreprise rapprochés, tels
que les appartements et les immeubles à bureaux, il se peut qu’un autre
réseau sans fil interfère et entre en conflit avec votre réseau. Grâce à
la fonction d’analyse du site de l’Utilitaire réseau sans fil Belkin, vous
pourrez localiser d’autres réseaux sans fil et faire passer votre routeur
sans fil (ou point d’accès) et vos ordinateurs à un canal aussi loin que
possible du canal utilisé par ces réseaux.
Essayer plusieurs canaux parmi ceux disponibles afin de déterminer la
connexion la plus claire et éviter les interférences des téléphones sans fil
ou autres dispositifs sans fil se trouvant dans votre voisinage.
Pour les dispositifs de réseau sans fil d’une marque différente, utilisez
la fonction d’analyse de site détaillée et consultez les informations
concernant les canaux qui se trouvent dans ce manuel.
5.
Connexions sécurisées, VPN et AOL
Une connexion sécurisée est une connexion qui requiert un nom
d’utilisateur et un mot de passe et qui est utilisée là où la sécurité revêt
une grande importance. Parmi les connexions sécurisées :
•
Les connexions de type Virtual Private Network (VPN - réseau
privé virtuel), souvent utilisées pour accéder à distance à un
réseau d’entreprise
•
Le programme Bring your own access d’America Online (AOL)
qui vous permet d’utiliser AOL via une connexion à large bande
(DSL ou câble) offerte par un autre fournisseur d’accès à Internet
(États-Unis seulement).
• La plupart des banques en ligne
•
Plusieurs sites commerciaux qui requièrent un nom d’utilisateur
et un mot de passe afin d’accéder à un compte
Les connexions sécurisées peuvent être interrompues par les paramètres
de gestion de l’énergie de votre ordinateur (lorsqu’il est en état de veille).
La solution la plus simple pour éviter cette situation est simplement de
vous reconnecter en lançant le logiciel de VPN ou d’AOL, ou en vous
reconnectant au site web sécurisé.
Une solution alternative consiste à changer les paramètres de gestion de
l’énergie afin qu’il ne soit plus mis en état de veille. Toutefois, cette solution
peut ne pas être appropriée pour les ordinateurs portables. Pour modifier les
paramètres de gestion de l’énergie de Windows, reportez-vous aux « Options
d’alimentation » du Panneau de configuration.
Si les difficultés liées aux connexions sécurisées, au VPN et à AOL
persistent, veuillez reprendre les étapes 1 à 4 ci-dessus afin de vous
assurer d’avoir essayé les solutions proposées.
Ces solutions devraient vous permettre d’obtenir une zone de couverture
4
Présentation
Caractéristiques du produit
L’adaptateur est conforme aux spécifications du projet IEEE 802.11n,
pour communiquer avec d’autres dispositifs compatibles avec le projet
802.11n à un débit pouvant atteindre 300 Mbps*. L’adaptateur est
compatible avec tous les dispositifs 802.11g à 54 Mbps, ainsi qu’avec
les dispositifs 802.11b à 11 Mbps. L’adaptateur fonctionne sur la même
bande de fréquence de 2,4 GHz que les produits Wi-Fi ® 802.11b/g.
•
Fonctionnement sur la bande ISM (industriel, scientifique,
médical) 2,4 GHz
•
Utilitaire réseau sans fil Belkin intégré et convivial
•
Interface USB 2.0, fonctionne avec pratiquement tout
ordinateur doté d’un port USB 2.0 alimenté
•
Chiffrement WPA, WPA2, WEP (Wired Equivalent Privacy) sur
64 et 128 bits
•
Accès sans fil aux ressources du réseau
•
Débit de données jusqu’à 300 Mbps* (projet 802.11n), 54 Mbps
(802.11g) ou 11 Mbps (802.11b)
•
Facile à installer et à utiliser
•
Voyants lumineux d’alimentation et de liaison réseau
5
1
2
3
4
5
6
section
maximale avec votre routeur sans fil. Si vous devez étendre votre
zone de couverture, nous vous suggérons le Point d’accès/Module
d’extension de Belkin.
Pour de plus amples informations à propos des produits de
mise en réseau de Belkin, visitez notre site Internet au www.
belkin.com/networking ou appelez l’Assistance Technique Belkin.
Présentation
Applications et avantages
•
•
Connexion sans fil chez soi ou au bureau
Permet une liberté de mise en réseau sans la gêne liée aux câbles.
Débit de connexion jusqu’à 300 Mbps*
Connectivité instantanée à haut débit chez vous ou au bureau, sans
compromettre l’utilisation de produits 802.11b/g
•
Compatible avec les produits 802.11b/g
L’adaptateur est rétro-compatible avec les produits Wi-Fi (IEEE
802.11b/g).
•
Environnements impropres au câblage
Permet le partage d’imprimante dans des bâtiments comportant des
murs pleins ou dans des zones ouvertes où le câblage est difficile à
effectuer.
•
Environnements changeants
S’adapte facilement aux bureaux ou environnements souvent
réorganisés ou lorsque vous changez souvent de site.
•
Pour les besoins des particuliers ou des petites entreprises
(SOHO)
Fournit une installation facile et rapide d’un petit réseau.
Caractéristiques techniques du produit
Interface hôte :
USB 2.0
Température de fonctionnement :
0° – 60 °C
Température de stockage :
-20° à 80 °C
Humidité :
Maximum 90% (sans condensation)
Portée de fonctionnement moyenne : Jusqu’à 365 mètres**
* REMARQUE :
Le débit de transmission mentionné (300 Mbps) est le débit de données physique.
Le débit réel est inférieur.
** La
performance dépend de l’environnement du réseau.
6
Présentation
1
2
3
(c)
4
(d)
5
6
(a) Capuchon protecteur
Le capuchon sert à la protection du connecteur USB lors du transport.
Retirez le capuchon avant d’insérer l’adaptateur dans le port USB de votre
ordinateur ou le socle fourni.
(b) Témoin d’activité/alimentation
S’allume lorsque l’adaptateur est sous tension et clignote lorsque
l’adaptateur est actif.
(c) Connecteur USB
Partie de l’adaptateur qui s’insère dans le port USB de votre ordinateur
(d) Socle de bureau
Permet d’éloigner l’adaptateur d’objets qui interfèrent autour de votre
ordinateur.
Configuration requise
•
PC compatible avec un port USB 2.0 alimenté libre
•
Windows ® 2000, XP avec SP2 ou Vista TM***
Contenu de l’emballage
•
Adaptateur USB Sans Fil N
•
Guide d’installation rapide
•
CD avec logiciel d’installation et manuel de l’utilisateur
•
Socle
7
section
(a)
(b)
Installation et configuration de l’adaptateur
A. Installation sous Windows Vista
***REMARQUE : Au moment du lancement de ce produit, les pilotes
Windows Vista n’étaient pas disponibles et peuvent ne pas être
inclus sur le CD vendu avec votre produit. Pour plus d’informations sur
d’éventuels pilotes mis à jour pour Windows Vista, consultez le site Internet
de Belkin à l’adresse www.belkin.com/support/vista.
IMPORTANT : INSTALLEZ LE LOGICIEL AVANT D’INSTALLER
L’ADAPTATEUR.
A.1 Insérez le CD d’installation dans le lecteur de CD-ROM.
A.2 Cliquez sur « Next [Suivant] » pour commencer l’installation.
Remarque : Si l’écran de l’utilitaire d’installation n’apparaît pas dans les
20 secondes, accédez à votre CD-ROM en double-cliquant sur l’icône
« Poste de travail ». Ensuite, double-cliquez sur le lecteur de CD-ROM
contenant le CD d’installation. Si le programme d’installation n’est pas
lancé automatiquement, cliquez deux fois sur l’icône « Setup.exe ».
8
Installation et configuration de l’adaptateur
1
2
processus d’installation.
3
4
5
6
A.4 Sélectionnez un dossier de
destination pour l’installation
du logiciel en cliquant « Browse
[Parcourir] » ou cliquez simplement
« Next [Suivant] » pour sélectionner
l’emplacement par défaut.
A.5 Un écran vous indique l’état du
processus d’installation.
A.6 Une fenêtre peut apparaître pour
une seconde fois, avec le message
« Windows ne peut vérifier l’éditeur de
ce logiciel ». Ceci n’indique PAS qu’il
y a un problème. Notre logiciel a été
entièrement testé et est compatible
avec cette version de Windows.
9
section
A.3 L’assistant InstallShield commence le
Installation et configuration de l’adaptateur
A.7 Lorsque vous êtes invité à le
faire, éteignez votre ordinateur
et branchez votre adaptateur.
L’installation est terminée.
A.8 Lorsque le processus d’installation
est terminé, cliquez « Finish
[Terminer] ».
A.9 L’assistant d’ajout de nouveau
matériel apparaît dans les 15
secondes. Si c’est le cas, poursuivez
la procédure en suivant les
instructions. Sélectionnez « Locate
and install the driver software
[Localiser et installer le pilote] » pour
continuer.
A.10 Il se peut qu’un écran similaire à
celui-ci apparaisse. Cela ne signifie
PAS que Windows a rencontré
un problème. Notre logiciel a été
entièrement testé et est compatible
avec cette version de Windows.
Cliquez sur « Install this driver
software anyway [Poursuivre
l’installation du pilote] » et suivez
les instructions qui apparaissent à
l’écran.
Ensuite, un écran vous indique que
l’installation est en cours. Puis, un
autre vous indique que le processus
est terminé.
10
Installation et configuration de l’adaptateur
A.11 Pour vous connecter à l’Internet,
2
3
4
A.12 Dans le Panneau de configuration,
cliquez sur « Afficher l’état du
réseau et les tâches ».
A.13 Dans le Centre de réseau et de
partage, cliquez sur « Connexion à
un réseau ».
A.14 À l’écran suivant, sélectionnez un
réseau sans fil disponible et cliquez
sur « Se connecter ».
11
5
6
section
ouvrez le Centre de réseau et de
partage en allant dans le Panneau
de configuration, sous le menu
Démarrer.
1
Installation et configuration de l’adaptateur
A.15 Votre adaptateur tentera de se
connecter au réseau sélectionné.
A.16 En fonction des paramètres de
sécurité en vigueur sur votre réseau
sans fil, il se peut que vous deviez
saisir une clé de sécurité ou une
expression mot de passe. Cliquez
« Se connecter » après avoir saisi la
clé ou le mot de passe.
A.17 Après la connexion au réseau,
vous pouvez choisir d’enregistrer
ce réseau pour vous y connecter
automatiquement lorsque votre
adaptateur se trouve dans la zone
de couverture du réseau.
A.18 Le Centre réseau et de partage
indique la connexion réseau qui
vient d’être établie. Les liens
à la gauche de de la fenêtre
vous permet de configurer vos
connexions réseau.
12
Installation et configuration de l’adaptateur
B. Procédure d’installation pour les systèmes d’exploitation
Windows
autres que Windows Vista
B.1 Insérez le CD d’installation dans le lecteur de CD-ROM.
B.2 L’utilitaire d’installation de Belkin
apparaît dans les 20 secondes.
Cliquez sur « Install Software [Installer
le logiciel] » puis sur « Next [Suivant] »
pour commencer l’installation.
Remarque :Si l’écran de l’utilitaire
d’installation n’apparaît pas dans les
20 secondes, accédez à votre CDROM en double-cliquant sur l’icône
« Poste de travail ». Ensuite, doublecliquez sur le lecteur de CD-ROM
contenant le CD d’installation. Ensuite,
cliquez deux fois sur l’icône « Setup.
exe ».
B.3 L’assistant InstallShield commence le
processus d’installation.
B.4 Sélectionnez un dossier de destination
pour l’installation du logiciel en
cliquant « Browse [Parcourir] » ou
cliquez simplement « Next [Suivant] »
pour sélectionner l’emplacement par
défaut.
13
2
3
4
5
6
section
IMPORTANT : INSTALLEZ LE LOGICIEL AVANT D’INSTALLER L’ADAPTATEUR.
1
Installation et configuration de l’adaptateur
B.5 Un écran vous indique l’état du processus d’installation.
B.6 Une fois l’installation du logiciel
terminée, le message « Please
plug in your USB Adapter now
[Vous pouvez maintenant brancher
votre adaptateur USB] » apparaît.
Branchez l’adaptateur à l’ordinateur.
B.7 L’assistant d’ajout de nouveau
matériel apparaît dans les 15
secondes. Sélectionnez « Install
the software automatically [Installer
le logiciel automatiquement] » et
cliquez sur « Next [Suivant] » pour
poursuivre.
B.8 Si l’assistant d’ajout de nouveau
matériel n’apparaît pas, cliquez sur
« Finish [Terminer] ».
B.9 Il se peut qu’un écran similaire à
celui-ci apparaisse. Cela ne signifie
PAS que Windows a rencontré
un problème. Notre logiciel a
été entièrement testé et est
compatible avec cette version de
Windows. Cliquez sur « Continue
Anyway [Poursuivre] » et suivez
les instructions qui apparaissent à
l’écran.
14
Installation et configuration de l’adaptateur
B.10 L’assistant va maintenant installer
le logiciel..
1
2
4
B.11 L’installation du pilote est
maintenant terminée. Cliquez sur
« Terminer » pour quitter l’assistant
d’ajout de nouveau matériel.
B.12 Cliquez de nouveau sur « Finish
[Terminer] » pour quitter le
programme d’installation
InstallShield.
B.13 En fonction du système
d’exploitation de votre ordinateur,
il est probable que vous deviez
redémarrer votre ordinateur pour
que l’installation soit prise en
compte. Enregistrez vos données
et fermez toutes les applications.
Ensuite, redémarrez votre
ordinateur.
15
5
6
section
3
Installation et configuration de l’adaptateur
C. Configuration
Utilisation de l’utilitaire réseau sans fil Belkin
C.1 Après avoir redémarré votre
ordinateur, cliquez deux fois sur
l’icône de l’Utilitaire réseau sans fil
se trouvant sur votre bureau.
Remarque : L’icône de l’utilitaire sans fil
Belkin se trouve également
dans la barre de tâches.
C.2 L’écran de l’utilitaire sans fil Belkin
apparaît.
C.3 Sélectionnez un réseau dans la liste
des « Available Networks [Réseaux
disponibles] » et cliquez sur
« Connect [Connexion] ».
Remarque : Afin de voir les réseaux
disponibles, vous devez être
près d’un routeur ou d’un
point d’accès sans fil.
L’installation est terminée.
16
Utilisation de l’utilitaire réseau sans fil Belkin
Après avoir installé l’utilitaire réseau sans fil Belkin (URSF), la
configuration des connexions sans fil et la sécurité sera la prochaine
étape.
Accès à l’Utilitaire réseau sans fil à partir de la barre des tâches
Windows
2
3
4
5
6
Si l’icône est introuvable, cliquez sur « Démarrer > Programmes
> N Wireless USB Network Adapter > Belkin Wireless
Networking Utility ».
17
section
Pour accéder à l’utilitaire réseau sans fil, placez simplement le
pointeur de votre souris et cliquez avec le bouton droit sur l’icône de
l’utilitaire réseau sans fil de la barre de tâches de Windows.
1
Utilisation de l’utilitaire réseau sans fil Belkin
L’écran par défaut de l’utilitaire est l’onglet « Current Status [État actuel] » .
Il affiche l’état du réseau actuel ainsi que les réseaux disponibles.
État du réseau
Cette fenêtre montre l’état de la connexion du réseau actuel. Il affiche
de même l’état de la connexion entre le routeur et l’ordinateur, et entre
le routeur et l’Internet. En cas de problème, utilisez la fenêtre « État du
réseau » pour en déterminer la source (l’ordinateur, le routeur ou Internet/
modem, par exemple).
Réseaux disponibles
Cette fenêtre affiche les réseaux disponibles sur le site en cours ainsi que
leurs SSID, la force du signal, le type de sécurité, le canal et le type de
réseau.
Connexion sans fil perdue
Si la connexion sans fil en cours est perdue, une fenêtre apparaît et
l’utilitaire tente de se reconnecter.
18
Utilisation de l’utilitaire réseau sans fil Belkin
1
Échec de connexion
D’autres options apparaîtront pendant la nouvelle tentative de
connexion. Pour arrêter la connexion, cliquez sur « Arrêter » et pour
réessayer de vous connecter, cliquez sur « Réessayer ».
2
3
5
6
État du réseau et astuces
Pour mieux comprendre l’état du réseau en cours, cliquez sur
« Ouvrir l’utilitaire sans fil ». L’écran par défaut est l’onglet « Current
Status [État actuel] ». La section « État du réseau » détermine les
connexions qui sont bonnes et/ou mauvaises.
L’utilitaire contient également une section « Astuces » qui vous propose
des informations de dépannage.
19
section
4
Utilisation de l’utilitaire réseau sans fil Belkin
Configuration des profils du réseau sans fil
L’onglet « Mes connexions » de l’utilitaire vous permet d’ajouter, de modifier
et de supprimer des profils de connexion. Il affiche également la force du
signal, la sécurité et le type de réseau.
Protection de votre réseau Wi-Fi®
Si vous choisissez de vous connecter à un réseau sécurisé, déterminez
le type de sécurité utilisée (WPA ou WEP*) et utilisez le champ approprié
de la boîte de dialogue.
*Remarque : Types de sécurité
20
Utilisation de l’utilitaire réseau sans fil Belkin
Remarque : Lorsque vous sélectionnez un réseau qui utilise le
chiffrement, vous voyez d’abord la fenêtre de sécurité simple. Cliquez
sur le bouton « Advanced [Avancé] » pour voir d’autres options de
sécurité (ci-dessous).
1
2
3
5
6
21
section
4
Utilisation de l’utilitaire réseau sans fil Belkin
Wired Equivalent Privacy (WEP) est un protocole de sécurité moins
sûr, mais plus fréquemment employé. Selon le niveau de sécurité (64 ou 128 bits),
l’utilisateur devra entrer une clé hexadécimale à 10 ou 26 caractères. Une clé
hexadécimale est une association de lettres (de a à f) et de chiffres (de 0 à 9).
Le Wireless Protected Access (WPA) est la nouvelle norme de
sécurité sans fil. Cependant, toutes les cartes et adaptateurs sans fil ne prennent
pas en charge cette technologie. Veuillez consulter le manuel de l’utilisateur de
votre adaptateur sans fil pour savoir s’il prend en charge le WPA. Au lieu d’une clé
hexadécimale, le WPA utilise uniquement des expressions mot de passe dont il est
plus facile de se souvenir.
La section suivante, prévue pour les particuliers, les professionnels indépendants et
pour les petits bureaux, présente quelques nouvelles façons de maximiser la sécurité
de votre réseau sans fil.
Au moment de mettre sous presse, quatre méthodes de chiffrement étaient
disponibles :
Méthodes de chiffrement :
Nom
Wired Equivalent
Privacy 64 bits
Chiffrement sur
128 bits
Wi-Fi Protected
Access
Wi-Fi Protected
Access
Acronyme
WEP 64 bits
WEP 128 bits
WPA-TKIP
WPA-AES
Sécurité
Bon
Mieux
Meilleur
Excellent
Caractéristiques
Clés fixes
Clés fixes
Chiffrement
dynamique
de la clé et
authentification
mutuelle
Clés de
Sécurité
Le TKIP
chiffrement basées renforcée sur
(temporal
sur l’algorithme
WEP 64 bits
key integrity
RC4 (clés de
utilisant une
protocol)
40 bits)
clé de 104 bits, s’ajoute afin
plus 24 bits
d’assurer la
supplémentaires rotation des clés
pour des
et renforcer le
données
chiffrement
générées par le
système
Chiffrement
dynamique
de la clé et
authentification
mutuelle
L’AES
(Advanced
Encryption
Standard)
n’entraîne pas
de perte de
performances
WEP
Le WEP (Wired Equivalent Privacy) est un protocole courant qui renforce
la sécurité de tous les dispositifs sans fil Wi-Fi. Le WEP offre aux réseaux
sans fil un niveau de protection comparable à celui des réseaux câblés.
22
Utilisation de l’utilitaire réseau sans fil Belkin
WEP 64 bits
Chiffrement sur 128 bits
Pour contrer la faille de sécurité du WEP 64 bits, une méthode
de chiffrement plus sécurisée, le WEP 128 bits, a été créée.
Le WEP 128 bits comprend une clé de 104 bits plus 24 bits
supplémentaires composés de données générées par le système
(128 bits au total). Certains fabricants se réfèrent au chiffrement
sur 128 bits lorsqu’ils parlent du chiffrement sur 104 bits.
La plupart des dispositifs sans fil disponibles sur le marché
aujourd’hui prennent en charge le chiffrement WEP sur 64 et 128
bits, mais il se peut que vous possédiez un dispositif plus ancien
ne prenant en charge que le WEP sur 64 bits. Tous les produits
sans fil de Belkin prennent en charge le chiffrement WEP sur 64
et 128 bits.
Clés de chiffrement
Après avoir choisi le mode de chiffrement (64 ou 128 bits), il est
primordial de générer une clé de chiffrement. Si la clé de chiffrement
n’est pas la même dans tout le réseau sans fil, vos dispositifs sans fil
ne seront pas en mesure de communiquer entre eux.
Vous pouvez entrer votre clé en entrant la clé hexadécimale
manuellement. Une clé hexadécimale est une combinaison de
chiffres et de lettres, compris entre A et F et entre 0 et 9. Pour le
WEP 64 bits, vous devez entrer 10 clés hexadécimales. Pour le WEP
128 bits, vous devez entrer 26 clés hexadécimales.
Par exemple :
AF 0F 4B C3 D4 = clé WEP 64 bits
C3 03 0F AF 0F 4B B2 C3 D4 4B C3 D4 E7 = clé 128 bits
Prenez note de la clé hexadécimale WEP de votre routeur ou de votre
point d’accès sans fil et entrez-la manuellement dans la table de clés
hex WEP, à l’écran de configuration de votre adaptateur.
23
1
2
3
4
5
6
section
Le WEP 64 bits a été introduit la première fois avec un chiffrement
de 64 bits, ce qui comprend une clé de 40 bits plus 24 bits
supplémentaires composés de données générées par le système (64
bits au total). Certains fabricants se réfèrent au chiffrement sur 64 bits
lorsqu’ils parlent du chiffrement sur 40 bits. Peu après le lancement
de la technologie, les chercheurs ont découvert que le chiffrement sur
64 bits était trop simple à décoder.
Utilisation de l’utilitaire réseau sans fil Belkin
WPA
Le WPA (Wi-Fi Protected Access) est une nouvelle norme Wi-Fi, surpassant
les caractéristiques de sécurité du WEP. Pour utiliser la sécurité WPA, les
pilotes et le logiciel de vos dispositifs sans fil doivent être mis à niveau.
Ces mises à niveau sont disponibles sur les sites Web des fabricants de
vos dispositifs sans fil. Il existe trois types de sécurité par WPA : WPA-PSK
(sans serveur), WPA (avec serveur Radius) et WPA2.
Le WPA-PSK (sans serveur) utilise ce qu’on appelle une « clé prépartagée » comme clé de sécurité. Une clé réseau est en quelque sorte un
mot de passe qui contient entre 8 et 63 caractères. Il peut être composé
de lettres, de chiffres ou de symboles. Chaque client utilise la même clé
pour accéder au réseau. De façon générale, ce mode est utilisé pour les
réseaux domestiques.
WPA (avec serveur Radius), qui fonctionne mieux dans un
environnement professionnel, consiste en un système où le
serveur Radius qui distribue automatiquement les clés réseau aux
clients.
Le WPA2 utilise l’AES (Advanced Encryption Standard) pour le
chiffrement des données, ce qui apporte un niveau de sécurité
plus élevé que le WPA. Le WPA utilise à la fois le protocole
appelé Temporal Key Integrity Protocol (TKIP) et l’AES pour le
chiffrement.
Configuration de votre routeur sans fil ou de votre point d’accès
pour utilisation d’un mode de sécurité
Pour utiliser un mode sécurisé, vous devez d’abord activer le WEP
ou le WPA de votre routeur ou de votre point d’accès. Pour les
routeurs et les points d’accès de Belkin, cette fonction de sécurité
peut être configurée en utilisant l’interface basée sur navigateur Web.
Consultez le manuel d’instructions de votre routeur ou de votre point
d’accès pour des instructions sur l’accès à l’interface de gestion.
IMPORTANT : tous les cartes/adaptateurs réseau sans fil doivent
maintenant être configurés avec ces paramètres.
24
Utilisation de l’utilitaire réseau sans fil Belkin
Configuration des paramètres de sécurité de votre
adaptateur
1
Jusqu’à maintenant, vous avez configuré votre routeur ou point
d’accès sans fil afin qu’ils utilisent le WPA ou le WEP. Pour obtenir
une connexion sans fil, vous devrez configurer votre Adaptateur USB
Sans Fil N pour ordinateur de bureau afin qu’il utilise les mêmes
paramètres de sécurité.
2
Modification des paramètres de sécurité sans fil
4
L’Adaptateur USB Sans Fil N Belkin prend en charge les
fonctionnalités de sécurité WPA les plus récentes ainsi que la norme
de sécurité WEP plus ancienne. Par défaut, la sécurité sans fil est
désactivée.
5
Pour accéder aux paramètres de sécurité sur votre adaptateur, cliquez sur
l’onglet « Mes connexions » et sélectionnez la connexion dont vous voulez
modifier les paramètres de sécurité. Cliquez sur « Edit [Modifier] » pour
modifier les paramètres.
25
6
section
Pour activer la sécurité, vous devrez d’abord déterminer la norme
utilisée par le routeur ou le point d’accès. (Consultez le manuel de
votre routeur ou votre point d’accès sans fil pour savoir comment
accéder aux paramètres de sécurité.)
3
Utilisation de l’utilitaire réseau sans fil Belkin
Configuration du WEP
Chiffrement WEP 64 bits
1.
Sélectionnez « WEP » dans le menu déroulant « Chiffrement de
données ».
2.
Après avoir sélectionné votre mode de chiffrement WEP, entrez
votre clé hexadécimale manuellement.
Une clé hexadécimale est une combinaison de chiffres et de lettres,
compris entre A et F et entre 0 et 9. Pour le WEP 64 bits, vous devez
entrer 10 clés hexadécimales.
Par exemple :
AF 0F 4B C3 D4 = clé WEP 64 bits
26
Utilisation de l’utilitaire réseau sans fil Belkin
3.
Cliquez sur « Save [Enregistrer] » pour terminer. Le chiffrement de
votre routeur ou de votre point d’accès est maintenant configuré.
Chaque ordinateur de votre réseau sans fil devra maintenant être
configuré avec les mêmes paramètres de sécurité.
AVERTISSEMENT : Si vous utilisez un client sans fil pour activer les
27
2
3
4
5
6
section
paramètres de sécurité de votre routeur ou de votre point d’accès,
vous perdrez temporairement votre connexion sans fil jusqu’à ce que
vous ayez activé la sécurité de votre client sans fil. Veuillez noter la
clé avant d’apporter des modifications aux paramètres du routeur ou
du point d’accès sans fil. Si vous avez oublié votre clé hexadécimale,
votre client ne sera plus en mesure de se connecter au routeur ou au
point d’accès sans fil.
1
Utilisation de l’utilitaire réseau sans fil Belkin
Chiffrement WEP 128 bits
1.
Sélectionnez « WEP » dans le menu déroulant.
2.
Après avoir sélectionné votre mode de chiffrement WEP, entrez
votre clé hexadécimale manuellement. Une clé hexadécimale est
une combinaison de chiffres et de lettres, compris entre A et F
et entre 0 et 9. Pour le WEP 128 bits, vous devez entrer 26 clés
hexadécimales.
Par exemple :
C3 03 0F AF 0F 4B B2 C3 D4 4B C3 D4 E7 = clé 128 bits
28
Utilisation de l’utilitaire réseau sans fil Belkin
3.
Cliquez sur « Save [Enregistrer] » pour terminer. Le chiffrement de
votre routeur ou de votre point d’accès est maintenant configuré.
Chaque ordinateur de votre réseau sans fil devra maintenant être
configuré avec les mêmes paramètres de sécurité.
AVERTISSEMENT : Si vous utilisez un client sans fil pour activer les
29
2
3
4
5
6
section
paramètres de sécurité de votre routeur ou de votre point d’accès,
vous perdrez temporairement votre connexion sans fil jusqu’à ce que
vous ayez activé la sécurité de votre client sans fil. Veuillez noter la
clé avant d’apporter des modifications aux paramètres du routeur ou
du point d’accès sans fil. Si vous avez oublié votre clé hexadécimale,
votre client ne sera plus en mesure de se connecter au routeur ou au
point d’accès sans fil.
1
Utilisation de l’utilitaire réseau sans fil Belkin
WPA-PSK (sans serveur)
Choisissez cette option si votre réseau n’utilise pas de serveur radius. Le WPA-PSK
(sans serveur) se retrouve généralement dans des réseaux à domicile ou en entreprise.
1.
Dans le menu déroulant « Authentification du réseau », sélectionnez « WPAPSK (no server) ».
2.
Entrez votre clé réseau. Elle peut être composée de 8 à 63 caractères
(lettres, chiffres ou symboles). La même clé doit être utilisée sur chacun
des clients (cartes réseau) que vous désirez ajouter à votre réseau sans fil.
3.
Cliquez sur « Save [Enregistrer] » pour terminer. Tous les clients (cartes
réseau) doivent maintenant être configurés avec ces paramètres.
30
Utilisation de l’utilitaire réseau sans fil Belkin
Options de l’Utilitaire de surveillance réseau sans fil
1
2
3
5
6
L’onglet « Options » de l’Utilitaire permet à l’utilisateur de
personnaliser les paramètres de son utilitaire.
31
section
4
Utilisation de l’utilitaire réseau sans fil Belkin
Aide de l’Utilitaire réseau sans fil
L’onglet « Help [Aide] » de l’URSF permet l’accès à l’assistante en
ligne et téléphonique, la vérification express de mises à jour ou de
mises à niveau du logiciel et des outils diagnostiques avancés.
32
Utilisation de l’utilitaire réseau sans fil Belkin
1
Outils de diagnostics avancés
La section « Outils de diagnostics avancés » est le panneau de
configuration central de tous les paramètres des composants
matériels et logiciels du réseau sans fil. Il fournit un éventail de tests
et de services de connectivité pour garantir des performances réseau
optimales.
2
3
5
6
33
section
4
Dépannage
Je n’arrive pas à me connecter sans fil à Internet.
Si vous n’arrivez pas à vous connecter à l’Internet à partir d’un ordinateur sans
fil, veuillez vérifier les points suivants :
1. Observez les voyants de votre routeur sans fil. Si vous utilisez un routeur
sans fil Belkin, les voyants devraient être comme suit :
• Le voyant d’alimentation doit être allumé.
• Le voyant « Connected [Connecté] » doit être allumé et ne pas clignoter.
• Le voyant WAN doit être allumé ou clignoter.
Si les témoins de votre routeur sans fil de Belkin sont comme décrits ci-haut,
allez au point 2.
Si ce n’est pas le cas, assurez-vous que :
• Le cordon d’alimentation du routeur est bien branché.
• Tous les câbles entre le modem et le routeur sont bien branchés.
• Les voyants du modem fonctionnent correctement. Sinon, consultez le
manuel de l’utilisateur de votre modem.
• Redémarrez le routeur
• Redémarrez le Modem.
Si les problèmes persistent, veuillez contacter l’Assistance Technique Belkin.
Si nous n’utilisez pas un routeur sans fil Belkin, consultez son manuel
d’utilisation.
2. Lancez le logiciel de l’utilitaire sans fil en cliquant sur l’icône dans la barre
de tâches, à l’angle inférieur droit de l’écran. L’icône de la barre de tâches
devrait ressembler à celle-ci (elle peut être rouge ou verte) :
3. La fenêtre qui s’ouvre devrait montrer une liste de réseaux disponibles.
Les réseaux disponibles représentent les réseaux auxquels vous pouvez vous
connecter. Si vous utilisez un routeur 802.11g (G+) de Belkin ou 802.11g
(54g), le nom par défaut est « Belkin54g ».
Si vous utilisez un routeur 802.11b de Belkin, le nom par défaut est
« WLAN ».
Si vous utilisez un routeur d’un autre fabricant que Belkin, consultez son
manuel de l’utilisateur pour connaître le nom par défaut.
34
Dépannage
Le nom de votre réseau sans fil apparaît dans la liste des
réseaux disponibles.
1
Si le nom de réseau qui apparaît dans la liste des réseaux
disponibles est valide, procédez comme suit pour vous connecter
sans fil :
2
1. Cliquez sur le nom de réseau valide dans la liste des réseaux
Si vous ne pouvez toujours pas accéder à Internet après vous
être connecté au réseau sans fil, veuillez contacter l’assistance
technique de Belkin.
Le nom de votre réseau n’apparaît PAS dans la liste
des réseaux disponibles.
Si le nom de votre réseau n’apparaît pas dans la liste, vérifiez
le SSID et assurez-vous qu’il soit identique partout. Le SSID
est sensible à la casse et l’orthographie du nom sur chaque
ordinateur doit être identique afin que l’adaptateur puisse se
connecter au routeur sans fil ou au point d’accès.
Remarque : Pour vérifier le SSID ou pour voir les réseaux disponibles,
cliquez deux fois sur l’icône donnant l’état du signal afin de faire
apparaître l’écran « Réseaux sans fil ». Cliquez sur « Add [Ajouter] »
si vous ne voyez pas le nom du réseau auquel vous essayez de vous
connecter, puis tapez le SSID. Pour de plus amples informations sur la
configuration du SSID, reportez-vous à la documentation accompagnant
votre routeur sans fil.
Si le problème persiste même dans un rayon restreint, veuillez
communiquer avec l’assistance technique de Belkin.
35
3
4
5
6
section
disponibles.
2. Si le réseau est sécurisé (chiffrement), vous devrez entrer
la clé réseau. Cliquez « Connect [Connexion] ». Pour plus
d’informations sur la sécurité, rendez vous à la page intitulée
« Protection de votre réseau sans fil Wi-Fi » à la page 20 de ce
manuel.
3. Dans les secondes qui suivent, l’icône de la barre des tâches
dans l’angle inférieur droit de l’écran doit devenir verte, ce qui
indique que la connexion au réseau est réussie.
Dépannage
Le CD-ROM d’installation ne lance pas l’Utilitaire
réseau sans fil
Si le CD-ROM ne lance pas automatiquement l’utilitaire réseau sans fil, il
se peut qu’un autre programme utilisé par votre ordinateur interfère avec
le lecteur de CD-ROM. Si l’écran de l’Utilitaire n’apparaît pas dans les 15
à 20 secondes, ouvrez votre lecteur de CD-ROM en double-cliquant sur
l’icône « My Computer [Poste de travail] ». Ensuite, cliquez deux fois sur
le lecteur de CD-ROM dans lequel se trouve le CD d’installation afin de
démarrer l’installation. Si l’installation ne démarre pas automatiquement,
cliquez avec le bouton droit et sélectionnez « Explore [Explorer] », puis
cliquez deux fois sur l’icône « setup.exe ».
Le voyant d’alimentation ne s’allume pas. L’adaptateur ne
fonctionne pas.
Si le témoin d’alimentation demeure éteint, il se peut que l’adaptateur ne
soit pas connecté ou installé correctement. Vérifiez à ce que l’adaptateur
soit inséré fermement dans le port USB de votre ordinateur. Vérifiez que
les pilotes de l’adaptateur soient bien installés. Cliquez avec le bouton
droit sur l’icône « Poste de travail » du bureau. Choisissez «Propriétés»
et accédez au « Gestionnaire de périphériques ». Assurez-vous que votre
adaptateur y figure et qu’il ne présente aucune erreur. Si vous constatez
une erreur, contactez l’assistance technique de Belkin.
Le voyant de liaison clignote lentement. Impossible de se
connecter à un réseau sans fil ou à Internet.
Si votre adaptateur semble fonctionner correctement mais vous ne pouvez
pas vous connecter au réseau, ou si une icône rouge se trouve en bas de
l’écran, il est possible que l’origine du problème soit une disparité de nom
de réseau (SSID) dans les propriétés de votre réseau sans fil.
Vérifiez le SSID et assurez-vous qu’il est identique sur l’ensemble de
votre réseau. Le SSID est sensible à la casse et l’orthographie du nom
sur chaque ordinateur doit être identique afin que l’adaptateur puisse se
connecter au routeur sans fil ou au point d’accès.
Remarque :Pour vérifier le SSID ou pour voir les réseaux disponibles,
cliquez deux fois sur l’icône donnant l’état du signal afin de faire
apparaître l’écran « Réseaux sans fil ». Cliquez sur « Add [Ajouter] »
si vous ne voyez pas le nom du réseau auquel vous essayez de vous
connecter, puis tapez le SSID.
Pour de plus amples informations sur la configuration du SSID, reportezvous à la documentation accompagnant votre routeur sans fil. Si le
problème persiste même dans un rayon restreint, veuillez communiquer
avec l’assistance technique de Belkin.
36
Dépannage
Le voyant de liaison est allumé mais je n’arrive pas à me
connecter à Internet.
Si le problème persiste même dans un rayon restreint, veuillez
communiquer avec l’assistance technique de Belkin.
Le transfert de données est parfois très lent.
La technologie sans fil est basée sur des ondes radio. Ceci implique que
les performances et le débit de transfert entre les appareils diminuent
lorsque ceux-ci sont éloignés les uns des autres. D’autres facteurs peuvent
engendrer une dégradation du signal : le métal en est généralement
responsable. Des obstacles tels des murs et des appareils métalliques
peuvent aussi affecter la qualité du signal. Ainsi, à l’intérieur, la portée de
vos appareils sans fil va de 30 à 60 mètres. Notez également que la vitesse
de connexion diminue si vous vous éloignez du routeur sans fil ou du point
d’accès.
Afin de déterminer si vos problèmes de connexion sans fil sont dus à la
portée, déplacez temporairement votre ordinateur dans un rayon d’environ
3 mètres de votre routeur (ou de votre point d’accès). Reportez-vous à la
section « Choix de l’emplacement de votre dispositif de réseau sans fil pour
une performance maximale », à la page 2 de ce manuel de l’utilisateur. Si
le problème persiste même dans un rayon restreint, veuillez communiquer
avec l’assistance technique de Belkin.
La force du signal est faible.
La technologie sans fil est basée sur des ondes radio. Ceci implique que la
performance et le débit de transfert entre les appareils diminuent lorsque
ceux-ci sont éloignés les uns des autres. D’autres facteurs peuvent
engendrer une dégradation du signal : le métal en est généralement
responsable. Des obstacles tels des murs et des appareils métalliques
peuvent aussi affecter la qualité du signal. Ainsi, à l’intérieur, la portée de
vos appareils sans fil va de 30 à 60 mètres. Notez également que la vitesse
de connexion diminue si vous vous éloignez du routeur sans fil ou du point
d’accès. Afin de déterminer si vos problèmes de connexion sans fil sont
dus à la portée, déplacez temporairement votre ordinateur dans un rayon
d’environ 1,5 à 3 mètres de votre routeur (ou de votre point d’accès).
37
2
3
4
5
6
section
Si vous obtenez un signal mais ne pouvez vous connecter à l’Internet ou
obtenir une adresse IP, il se peut que le problème soit dû à une disparité
entre les clés de chiffrement de votre ordinateur et votre routeur ou
votre point d’accès. Vérifiez les paramètres de clé WEP, WPA et WPA2
et assurez-vous qu’il sont identiques sur l’ensemble de votre réseau.
La clé est sensible à la casse et l’orthographie sur chaque ordinateur
et le routeur sans fil (ou le point d’accès) doit être identique afin que
l’adaptateur puisse se connecter au routeur. Pour de plus amples
informations sur le chiffrement, veuillez consulter la section « Protection
de votre réseau sans fil Wi-Fi » à la page 20 de ce manuel.
1
Dépannage
Modification du canal sans fil – Selon le trafic de données et les
interférences au niveau local, passer à un autre canal peut améliorer la
performance de votre réseau. Le canal par défaut de votre routeur est 6.
Vous pouvez choisir à partir de plusieurs autres canaux, dépendamment
de votre région. Consultez le manuel de votre routeur ou de votre point
d’accès pour de plus amples informations concernant le choix du canal.
Limiter le débit de données sans fil – Limiter le débit de données
sans fil peut améliorer la portée sans fil maximale et la stabilité de la
connexion. La plupart des cartes sans fil sont en mesure de limiter le
débit de transmission. Pour modifier cette propriété, allez au « Panneau
de Configuration » de Windows, ouvrez les « Connexions Réseau » et
double-cliquez sur la connexion sans fil de votre adaptateur. Dans la boîte
de dialogue Propriétés, sélectionnez le bouton « Configure [Configurer] »
à partir de l’onglet « Général ». (Les utilisateurs de Windows 98SE devront
sélectionner l’adaptateur sans fil à partir de la liste, et cliquer ensuite
sur « Propriétés ».) Choisissez ensuite l’onglet « Advanced [Avancé] »
et sélectionnez la propriété « Rate [Débit] ». Les cartes clients sans fil
sont habituellement configurées de façon à ajuster automatiquement le
débit de transmission. Toutefois, ceci peut mener à des déconnexions
périodiques lorsque le signal sans fil est trop faible. De façon générale, les
débits de transmission plus lents sont plus stables. Faites des expériences
avec différents débits de transmission jusqu’à ce que vous trouviez celui
qui convient à votre environnement. Veuillez noter que chaque débit de
transmission est acceptable pour naviguer sur Internet. Pour de plus
amples informations, consultez le manuel de l’utilisateur de votre carte
sans fil. Si le problème persiste même dans un rayon restreint, veuillez
communiquer avec l’assistance technique de Belkin.
Pourquoi y a-t-il deux utilitaires sans fil dans ma barre des
tâches ? Lequel dois-je utiliser ?
Il y a plusieurs avantages à utiliser l’Utilitaire de surveillance réseau
sans fil Belkin par rapport à l’Utilitaire Wireless Zero Configuration de
(WZC) Windows XP. Nous offrons une fonction d’analyse du site, des
informations détaillées sur la liaison, et une aide diagnostique pour
l’adaptateur, entre autres.
Il est essentiel de déterminer quel utilitaire administre votre adaptateur.
Nous vous recommandons d’utiliser l’Utilitaire réseau sans fil Belkin.
Pour utiliser l’Utilitaire réseau sans fil de Belkin, procédez comme suit.
Étape 1 Cliquez avec le bouton droit de votre souris sur l’icône de l’état
du réseau dans la barre de tâches et choisissez « Status [État] ».
Étape 2 À l’onglet « Status [État] », désélectionnez la case « Utiliser
Windows pour configurer mon réseau sans fil ». Ensuite, cliquez sur le
38
Dépannage
bouton « Close [Fermer] » pour fermer la fenêtre.
Vous utilisez désormais l’utilitaire réseau sans fil pour configurer
l’adaptateur.
L’adaptateur fonctionne mal ou la connexion est instable
lorsque l’ordinateur possède une deuxième carte réseau
intégrée (telle que mini PCI ou Intel® Centrino™).
Vous devez désactiver la carte réseau sans fil intégrée de votre
ordinateur sous « Network Adapters [Adaptateurs Réseau] », dans
le « Device Manager [Gestionnaire de Périphérique] ».
L’adaptateur fonctionne mal ou la connexion est lente
lorsque l’ordinateur possède une carte réseau Ethernet
intégrée.
Ceci survient lorsque votre ordinateur possède une carte réseau
Ethernet intégrée en même temps que votre adaptateur sans fil
en fonction. Ceci se produit parce que Windows doit gérer deux
connexions réseau actives. Vous devez désactiver la carte réseau
Ethernet intégrée de votre ordinateur sous « Network Adapters
[Adaptateurs Réseau] », dans le « Device Manager [Gestionnaire
de Périphérique] ».
Quelle est la différence entre le 802.11g et le projet
802.11a ?
À l’heure actuelle, il existe trois normes de réseaux sans fil
les plus courants, qui transmettent des données à des débits
différents. Chaque norme est basée sur la désignation pour
certifier les normes réseau. La norme réseau sans fil la plus
courant, le 802.11b, transmet les données à un débit de
54 Mbps. Le 802.11a prend également en charge un débit à
54 Mbps, sur une fréquence de 5 GHz. De son côté, le projet
de norme 802.11n spécifie un débit de connexion à 300 Mbps.
Consultez le tableau ci-dessous pour de
plus amples informations.
39
2
3
4
5
6
section
Ceci survient lorsque votre ordinateur possède une carte réseau
sans fil intégrée en même temps qu’un adaptateur sans fil Belkin
en fonction. Ceci se produit parce que Windows doit gérer deux
connexions réseau sans fil actives.
1
Dépannage
N MIMO
(projet
802.11n avec
MIMO)
N1 MIMO
(projet
802.11n avec
MIMO)
Jusqu’à 300 Mbps*
Jusqu’à 300 Mbps*
Fréquence
Les appareils
domestiques courants
tels que téléphones sans
fil et fours à micro-ondes
peuvent interférer avec la
bande sans autorisation
2,4 GHz
Les appareils
domestiques courants
tels que téléphones sans
fil et fours à micro-ondes
peuvent interférer avec la
bande sans autorisation
2,4 GHz
Les appareils
domestiques courants
tels que téléphones sans
fil et fours à micro-ondes
peuvent interférer avec la
bande sans autorisation
2,4 GHz
Les appareils
domestiques courants
tels que téléphones sans
fil et fours à micro-ondes
peuvent interférer avec la
bande sans autorisation
2,4 GHz
Compatibilité
Compatible avec le
802.11b/g
Compatible avec le
802.11b/g
Compatible avec le projet
802.11n** et le 802.11b/g
Compatible avec le projet
802.11n** et le 802.11b/g
Couverture*
Jusqu’à 120 mètres*
Jusqu’à 305 mètres*
Jusqu’à 365 mètres*
Jusqu’à 425 mètres*
Populaire : grande
popularité pour le partage
d’une connexion Internet
Meilleure couverture avec
débit plus stable
Meilleure couverture et
débit plus rapide
Technologie de pointe :
le meilleur débit et la
meilleure couverture
Débit de
données*
G
(802.11g)
Jusqu’à 54 Mbps*
Technologie
sans fil
Jusqu’à 54 Mbps*
Avantage
G Plus MIMO
(802.11g avec
MIMO MRC)
Tableau comparatif des réseaux sans fil
*La portée et le débit de la connexion dépendent de l’environnement de votre réseau.
**Cet adaptateur est compatible avec les produits basés sur la même version des
spécifications du projet 802.11n. Une mise à jour logicielle peut être nécessaire pour de
meilleurs résultats.
40
Dépannage
Assistance technique gratuite*
1
*Hors coût de communication
www.belkin.com
nationale
Vous trouverez des informations techniques sur le site www.belkin.com dans la
zone d’assistance technique. Pour contacter le service d’assistance technique par
téléphone, veuillez composer le numéro correspondant dans la liste ci-dessous*.
NUMÉRO
ADRESSE INTERNET
AUTRICHE
0820 200766
www.belkin.com/uk/networking/
BELGIQUE
07 07 00 073
www.belkin.com/nl/networking/
RÉPUBLIQUE TCHÈQUE
239 000 406
www.belkin.com/uk/networking/
DANEMARK
701 22 403
www.belkin.com/uk/networking/
FINL ANDE
097 25 19 123
www.belkin.com/uk/networking/
FR ANCE
08 - 25 54 00 26
www.belkin.com/fr/networking/
ALLEMAGNE
0180 - 500 57 09
www.belkin.com/de/networking/
GRÈCE
00800 - 44 14 23 90
www.belkin.com/uk/networking/
HONGRIE
06 - 17 77 49 06
www.belkin.com/uk/networking/
ISL ANDE
800 8534
www.belkin.com/uk/networking/
IRL ANDE
0818 55 50 06
www.belkin.com/uk/networking/
ITALIE
02 - 69 43 02 51
www.belkin.com/it/support/tech/issues_more.asp
LUXEMBOURG
34 20 80 85 60
www.belkin.com/uk/networking/
PAYS-BAS
0900 - 040 07 90 0,10 € par minute www.belkin.com/nl/networking/
NORVÈGE
81 50 0287
www.belkin.com/uk/networking/
POLOGNE
00800 - 441 17 37
www.belkin.com/uk/networking/
PORTUG AL
707 200 676
www.belkin.com/uk/networking/
RUSSIE
495 580 9541
www.belkin.com/networking/
AFRIQUE DU SUD
0800 - 99 15 21
www.belkin.com/uk/networking/
ESPAGNE
902 - 02 43 66
www.belkin.com/es/support/tech/networkingsupport. asp
SUÈDE
07 - 71 40 04 53
www.belkin.com/se/support/tech/networkingsupport.asp
SUISSE
08 - 48 00 02 19
www.belkin.com/uk/networking/
ROYAUME-UNI
0845 - 607 77 87
www.belkin.com/uk/networking/
AUTRES PAYS
+44 - 1933 35 20 00
41
3
4
5
6
section
PAYS
2
Information
Déclaration FCC
DÉCLARATION DE CONFORMITÉ À LA
RÉGLEMENTATION FCC EN MATIÈRE DE COMPATIBILITÉ
ÉLECTROMAGNÉTIQUE
Nous, Belkin International, Inc., sis au 501 West Walnut
Street, Compton CA, 90220, États-Unis, déclarons sous notre
seule responsabilité que le produit
F5D8053
auquel se réfère la présente déclaration, est conforme
aux normes énoncées à l’alinéa 15 de la réglementation
de la FCC. Le fonctionnement est assujetti aux deux
conditions suivantes: (1) cet appareil ne peut pas provoquer
d’interférence nuisible et (2) cet appareil doit accepter toute
interférence reçue, y compris les interférences pouvant
entraîner un fonctionnement non désiré.
Attention : Exposition aux radiations dues aux fréquences radio.
La puissance d’émission en sortie de cet appareil reste largement en dessous des
limites d’exposition aux fréquences radios de la FCC. Toutefois, il est conseillé
d’utiliser l’appareil de manière à minimiser les risques d’exposition dans des
conditions de fonctionnement normales.
Lorsqu’une antenne extérieure est raccordée à l’appareil, la placer de manière
à minimiser les risques d’exposition dans des conditions de fonctionnement
normales. Pour éviter la possibilité d’excéder les limites d’exposition aux
fréquences radio de la FCC, il est conseillé d’éviter qu’une personne se trouve à
moins de 20 cm de l’antenne dans des conditions de fonctionnement normales.
Avertissement de la Commission Fédérale des Communications (FCC)
Cet appareil a été testé et satisfait aux limites établies pour les appareils
numériques de classe B, conformément à l’alinéa 15 de la réglementation FCC.
Ces limites ont été conçues de manière à assurer une protection raisonnable
contre les interférences nuisibles au sein d’une installation domestique.
L’appareil génère, utilise et peut irradier une énergie radiofréquence. Si cet
équipement cause des interférences nuisibles sur le plan de la réception radio ou
télévision, pouvant être déterminées en mettant l’appareil sous et hors tension,
l’utilisateur est invité à tester et à corriger l’interférence en prenant une des
mesures suivantes :
• Réorienter ou changer de place l’antenne de réception.
• Augmenter la distance entre l’appareil et le récepteur.
• Connecter l’appareil à une prise située sur un circuit différent de celui sur
lequel le récepteur est connecté.
• Consulter le revendeur ou un technicien en radio/TV pour obtenir de l’aide.
42
Information
43
1
2
3
4
5
6
section
Modifications
La réglementation de la FCC souligne la nécessité d’indiquer à l’utilisateur
que toute modification, de quelque nature que ce soit et non agréée par
Belkin Internationa, Inc., lui retire le droit d’utiliser l’appareil.
Garantie à vie du produit limitée à vie de Belkin International, Inc.
Couverture offerte par la garantie
Belkin International, Inc. (« Belkin ») garantit à l’acheteur initial de ce produit
Belkin que le produit est exempt de défauts de conception, de montage, de
matériau et de fabrication.
Période de couverture
Belkin garantit le produit Belkin pour toute la durée de vie du produit.
Mesures correctives.
Garantie du produit.
Belkin s’engage à réparer ou à remplacer gratuitement, à sa convenance, tout
produit défectueux (à l’exception des frais d’expédition du produit).
Limites de la couverture offerte par la garantie
Toutes les garanties précitées sont nulles et non avenues si le produit
Belkin n’est pas retourné à Belkin, à la demande expresse de celui-ci,
l’acheteur étant responsable de l’acquittement des frais d’expédition, ou si
Belkin détermine que le produit Belkin a été installé de façon inappropriée
ou modifié d’une quelconque manière. La garantie du produit Belkin ne
protège pas contre des calamités naturelles (autre que la foudre) comme
les inondations, les tremblements de terre ou la guerre, le vandalisme, le
vol, l’usure normale, l’érosion, l’épuisement, l’obsolescence, l’abus, les
dommages provoqués par des perturbations de basse tension (baisses ou
affaissements de tension, par exemple), un programme non autorisé ou une
modification de l’équipement du système.
Pour une demande d’intervention
Vous devez prendre les mesures suivantes pour faire réparer ou entretenir
votre produit Belkin :
1. Contactez Belkin International, Inc. au 501 W. Walnut St., Compton
CA 90220, U.S.A. À l’attention de : Service Client, ou appelez au (800)223-5545 dans les 15 suivant l’événement. Préparez-vous à fournir les
informations suivantes :
a. Le numéro de référence du produit Belkin.
b. Le lieu de l’achat du produit.
c. La date de l’achat du produit.
d. Une copie du reçu original.
2. Le représentant du service client Belkin vous donnera alors toutes les
instructions sur la façon d’expédier votre facture et le produit Belkin et la
façon de présenter votre réclamation.
Information
Belkin International, Inc. se réserve le droit d’examiner le produit Belkin endommagé.
Tous les frais d’expédition du produit Belkin à l’adresse de Belkin International, Inc. en
vue de son inspection seront entièrement à la charge de l’acheteur. Si Belkin détermine,
à son entière discrétion, qu’il serait impossible d’expédier l’équipement endommagé à
Belkin International, Inc., Belkin peut désigner un atelier de réparation de son choix pour
l’inspection du produit et l’établissement d’un devis de réparation. Les coûts, s’il en
est, pour l’expédition de l’équipement jusqu’à l’atelier de réparation et le retour, et pour
l’estimation, seront entièrement assumés par l’acheteur. L’équipement endommagé doit
être disponible pour inspection jusqu’à ce que la demande de réclamation soit réglée.
Lors de tout règlement, Belkin International, Inc. se réserve le droit d’un recours en
subrogation sous toute autre police d’assurance détenue par l’acheteur.
Relation entre le Droit national et la garantie
BELKIN REJETTE PAR LE PRÉSENT DOCUMENT TOUTES LES AUTRES GARANTIES,
EXPLICITES OU IMPLICITES, SAUF EXCEPTIONS PRÉVUES PAR LA LOI, Y COMPRIS
MAIS SANS S’Y LIMITER, LES GARANTIES IMPLICITES AFFÉRENTES À LA QUALITÉ
LOYALE ET MARCHANDE ET À L’ADÉQUATION À UNE FINALITÉ DONNÉE. CES
GARANTIES IMPLICITES, LE CAS ÉCHÉANT, SONT D’UNE DURÉE LIMITÉE AUX
CONDITIONS DE LA PRÉSENTE GARANTIE.
Certains pays ne permettent pas d’imposer de limite à la durée de validité des garanties
implicites. Il se peut donc que les limites ci-dessus ne s’appliquent pas dans votre cas.
BELKIN NE PEUT EN AUCUN CAS ÊTRE TENU RESPONSABLE DE DOMMAGES
ACCESSOIRES, DIRECTS, INDIRECTS OU MULTIPLES, Y COMPRIS, MAIS SANS S’Y
LIMITER, LA PERTE DE REVENUS OU D’AFFAIRES DÉCOULANT DE LA VENTE OU DE
L’UTILISATION DE TOUT PRODUIT BELKIN, MÊME LORSQU’IL A ÉTÉ AVISÉ DE LA
PROBABILITÉ DES DITS DOMMAGES.
La garantie vous confère des droits légaux spécifiques. Vous
pouvez également bénéficier d’autres droits qui varient d’un pays
à l’autre. Certains pays ne permettent pas d’exclure ou de limiter
les dommages accidentels, consécutifs ou autres, de sorte que les
limitations d’exclusions précitées peuvent ne pas s’appliquer dans
votre cas.
POUR UTILISATION DANS LES
PAYS SUIVANTS
AT
BE CY
EE
FI
HU IE
CZ DK
FR DE GR
IT
LV
LT
LU MT NL PL
PT
SK
SI
ES
SE GB
IS
LI NO CH BG
RO TR
Pour en savoir plous sur la récupération du produit,
visitez
http://environmental.belkin.com
44
CANAUX DE
FONCTIONNEMENT
1-13
Information
1
EC Declaration of Conformity
to R&TTE Directive 1999/5/EC
CE
:
BELKIN LTD,
EXPRESS BUSINESS PARK,
SHIPTON WAY
,RUSHDEN
NN10 6GL ENGLAND
Representative
:
Belkin Ltd
Product / Apparatus
:
N WIRELESS USB ADAPTER
Type Number
:
F5D8053
Variants include
:
All Country variants
(residing in the EC
holding the TCF)
3
4
5
6
Declaration
I declare that above product conforms to all the applicable requirements of
EU Directive1999/5/EC and is CE-marked accordingly:
Article 3.1a:
(Standard(s)) used to show compliance with LVD, 73/23/EEC
EN60950-1:2001
Article 3.1b:
(Standard(s)) used to show compliance with EMC Directive, 89/336/EEC:
EN301 489-1 V1.5.1 (2004-11), EN301 489-17 V1.2.1 (2002-08)
Article 3.2:
Standard(s) used to show compliance:
EN300-328 V1.6.1 (2004-11)
Signature
:
Name
:
K Simpson
Title
:
European Regulatory Compliance Manager
Date
:
_10 JULY 2007______________________
45
section
Manufacturer
2
Adaptateur
USB Sans Fil N
Assistance Technique Belkin
Royaume-Uni : 0845 607 77 87
Europe : www.belkin.com/support
Belkin Ltd.
Express Business Park
Shipton Way, Rushden
NN10 6GL, Royaume-Uni
+44 (0) 1933 35 2000
+44 (0) 1933 31 2000 fax
Belkin SAS
130 rue de Silly
92100 Boulogne-Billancourt,
France
+33 (0) 1 41 03 14 40
+33 (0) 1 41 31 01 72 fax
Belkin GmbH
Hanebergstrasse 2
80637 Munich
Allemagne
+49 (0) 89 143405 0
+49 (0) 89 143405 100 fax
Belkin Iberia
C/ Anabel Segura, 10 planta baja, Of. 2
28108, Alcobendas, Madrid
Espagne
+34 91 791 23 00
+34 91 490 23 35 fax
Belkin Italie & Grèce
Via Carducci, 7
Milan 20123
Italie
+39 02 862 719
+39 02 862 719 fax
Belkin B.V.
Boeing Avenue 333
1119 PH Schiphol-Rijk,
Pays-Bas
+31 (0) 20 654 7300
+31 (0) 20 654 7349 fax
© 2007 Belkin International, Inc. Tous droits réservés. Toutes les raisons commerciales sont des marques
déposées de leurs fabricants respectifs. Windows et Windows Vista sont des marques déposées ou des
marques de commerce de Microsoft Corporation aux États-Unis et/ou dans d’autres pays.
P75451ea
Kabelloser N
USB-Adapter
EN
FR
DE
NL
ES
IT
Benutzerhandbuch
F5D8053ea
Inhaltsverzeichnis
1 Einleitung .................................................................................................... 1
Vorzüge eines Netzwerks zu Hause ................................................................. 1
Vorzüge eines kabellosen Netzwerks............................................................... 1
Aufstellung der Hardware für optimale Leistung des kabellosen Netzwerks . 2
2 Übersicht ..................................................................................................... 5
Produktmerkmale............................................................................................. 5
Anwendungsbereiche und Vorzüge ................................................................ 6
Technische Daten ............................................................................................ 6
Systemanforderungen .................................................................................... 7
Verpackungsinhalt .......................................................................................... 7
3 Installieren und Einrichten des Adapters .................................................... 8
A — Installationsvorgang unter Windows Vista.............................................. 8
B — Installationsvorgang für andere Betriebssysteme als
Windows Vista ....................................................................................... 13
C — Konfiguration ......................................................................................... 16
4 Verwenden des Dienstprogramms für kabellose Netzwerke von Belkin ...17
Zugriff auf das Dienstprogramm für kabellose Netzwerke von Belkin
über das Windows System-Tray ................................................................... 17
Netzwerkstatus .............................................................................................. 18
Verfügbare Netzwerke ................................................................................... 18
Netzwerkstatus und Lösungstipps................................................................ 19
Einstellen von Netzwerkprofilen ................................................................... 20
Sicherung des Wi-Fi Netzwerks ................................................................... 20
Einstellung der Sicherheitsfunktion des Adapters ..................................... 25
5 Fehlerbehebung..........................................................................................34
6 Informationen .............................................................................................42
Einleitung
2
3
4
Vorzüge eines Netzwerks zu Hause
Ein Heimnetzwerk von Belkin ermöglicht Ihnen Folgendes:
• Nutzung einer Hi-Speed Internetverbindung mit allen Computern bei
Ihnen zu Hause
• Nutzung von Ressourcen wie Dateien und Festplatten auf allen
angeschlossenen Computern bei Ihnen zu Hause
• Nutzung eines einzigen Druckers mit der ganzen Familie
• Gemeinsamer Zugriff auf Dokumente, Musik, Video und digitale Fotos
• Speichern von Dateien auf verschiedenen Computern; Aufrufen und
Kopieren dieser auf verschiedenen Computern
• Gleichzeitig Spielen von Spielen im Internet, Verschicken und
Empfangen von E-Mails und Chatten
Vorzüge eines kabellosen Netzwerks
Vorzüge der Einrichtung eines kabellosen Netzwerks von Belkin:
•
1
Mobilität – Sie brauchen kein spezielles „Computerzimmer” mehr - Sie
können jetzt überall in der Reichweite des kabellosen Netzwerks an einem
vernetzten Notebook oder Desktop-Computer arbeiten
•
Einfache Installation – Der Installationsassistent Belkin Easy Installation
Wizard vereinfacht die Konfiguration
•
Flexibilität – Sie können Drucker, Computer und andere Netzwerkgeräte
überall zu Hause aufstellen und benutzen
•
Einfache Erweiterung – die große Palette an Netzwerkprodukten von
Belkin ermöglicht die Erweiterung Ihres Netzwerks mit Geräten wie
Druckern und Spielkonsolen
•
Keine Verkabelung erforderlich – Sie können sich Kosten und Mühe für
die Aufrüstung der Ethernetverkabelung im ganzen Haus oder Büro sparen
•
Breite Akzeptanz auf dem Markt – wählen Sie aus einem großen
Angebot an Netzwerkprodukten aus, die vollständig kompatibel sind
1
5
6
Kapitel
Wir beglückwünschen Sie zum Kauf des Kabellosen N USB-Adapters
von Belkin. Jetzt können Sie diese großartige neue Technologie zum
Vernetzen Ihrer Computer zu Hause und im Büro nutzen - ohne Kabel.
Mit diesem Adapter können Sie Ihr Notebook in Ihr Netzwerk einbinden.
Bitte lesen Sie dieses Handbuch vollständig durch, und lesen Sie
besonders genau den Abschnitt „Aufstellung der Hardware für optimale
Leistung des kabellosen Netzwerks”.
Einleitung
Aufstellung der Hardware für optimale Leistung des kabellosen
Netzwerks
Je näher Ihr Computer an Ihrem kabellosen Router oder Access Point
steht, desto besser ist Ihre kabellose Verbindung. Die durchschnittliche
Reichweite für Ihre kabellosen Geräte liegt zwischen 30 und 60 Metern.
Entsprechend wird Ihre kabellose Verbindung und Leistung sich etwas
verschlechtern, wenn Sie den Abstand zwischen Ihrem kabellosen Router
(oder Access Point) und den angeschlossenen Geräten vergrößern. Das kann
Ihnen möglicherweise auffallen. Wenn Sie sich von Ihrem kabellosen Router
oder Access Point entfernen, kann sich die Verbindungsgeschwindigkeit
unter Umständen verringern. Geräte aus Metall oder Wände und andere
Hindernisse sind Faktoren, die die Signale möglicherweise abschwächen,
da Sie die Funkwellen Ihres Netzwerks durch Ihre bloße Anwesenheit stören
können.
Um zu überprüfen, ob die Leistung Ihres Netzwerks durch die Reichweite
oder Hindernisse negativ beeinflusst wird, versuchen Sie Ihren Computer in
einem Abstand von 1,5 bis 3 m vom kabellosen Router (oder Access Point)
aufzustellen. Dann werden Sie sehen, ob eventuelle Probleme aufgrund des
Abstands auftreten. Wenn Sie auch bei geringem Abstand noch Probleme
haben, nehmen Sie Kontakt mit dem technischen Support von Belkin auf.
Hinweis: Obwohl manche der folgenden Faktoren die Funktion Ihres
Netzwerks beeinträchtigen können, werden Sie Ihr kabelloses Netzwerk nicht
völlig funktionsunfähig machen. Wenn Sie vermuten, dass Ihr Netzwerk nicht
optimal funktioniert, kann Ihnen diese Kontrollliste helfen.
1.
Aufstellung Ihres kabellosen Routers (oder Access Points)
Stellen Sie Ihren kabellosen Router, den zentralen Verbindungspunkt
Ihres Netzwerks, soweit wie möglich in den Mittelpunkt Ihrer kabellosen
Netzwerkgeräte.
Um den besten Empfang für Ihre „kabellosen Clients” (d. h. Computer, die
mit Adaptern oder Karten von Belkin ausgestattet sind) zu bekommen:
•
Stellen Sie sicher, dass die Antennen des kabellosen Routers
(oder Access Points) parallel zueinander und vertikal aufgestellt
sind (mit Ausrichtung auf die Decke). Wenn Ihr kabelloser Router
(oder Access Point) vertikal aufgestellt ist, richten Sie die Antennen
soweit wie möglich nach oben aus.
•
Wenn sich Ihr Wohnraum über mehrere Etagen erstreckt, stellen Sie
den kabellosen Router (oder Access Point) in einem Stockwerk auf,
das im Gesamtwohnraum so zentral wie möglich gelegen ist. Dies kann
bedeuten, dass Sie den kabellosen Router (oder Access Point) in einem
der oberen Stockwerke aufstellen müssen.
2
Einleitung
Stellen Sie den kabellosen Router (oder Access Point) nicht in
der Nähe eines schnurlosen Telefons, das das 2,4-GHz-Band
nutzt, auf.
2.
Vermeiden Sie Hindernisse und Störungsquellen
Vermeiden Sie es, Ihren kabellosen Router (oder Access Point) in
der Nähe von Geräten, die elektromagnetische Strahlung abgeben
(z.B. Mikrowellenherde), aufzustellen Andere Objekte, die kabellose
Kommunikation behindern können sind z.B.:
•
Kühlschränke
•
Waschmaschinen und/oder Wäschetrockner
•
Aktenschränke aus Metall
•
Große Aquarien
•
UV-Beschichtung von Fenstern auf Metallbasis
2
3
4
5
6
Wenn das Funksignal Ihrer kabellosen Verbindung an manchen Stellen
schwach ist, sorgen Sie dafür, dass solche Objekte den Weg des
Funksignals zwischen Ihren Computern und dem kabellosen Router oder
Access Point nicht blockieren.
3.
1
Aufstellung schnurloser Telefone
Wenn die Leistung Ihres kabellosen Netzwerks noch beeinträchtigt
wird, nachdem Sie die oben genannten Hinweise beachtet und aber ein
schnurloses Telefon haben:
•
Versuchen Sie die schnurlosen Telefone aus der Nähe von
kabellosen Routern (oder Access Points) und Ihren Computern,
die für kabellose Vernetzung ausgerüstet sind, zu entfernen.
•
Entfernen Sie die Batterie jedes schnurlosen Telefons, das im
Frequenzband 2,4 GHz arbeitet, und ziehen Sie den Stecker
am Anschluss heraus (Sehen Sie sich hierzu die Informationen
des Herstellers an). Wenn das Problem dadurch behoben wird,
ist Ihr Telefon möglicherweise der Auslöser der Störung.
•
Wenn Sie Ihr Telefon über eine Kanalauswahl verfügt, wählen
Sie einen Kanal für Ihr Telefon aus, der soweit wie möglich
von dem Kanal Ihres kabellosen Netzwerks entfernt ist.
Stellen Sie z. B. den Kanal Ihres Telefons auf 1 ein und den
des kabellosen Routers oder Access Points auf 11. (Die
Kanalauswahl ist von Ihrer Umgebung abhängig.) Mehr
Informationen hierzu finden Sie im Benutzerhandbuch Ihres
Telefons.
•
Wenn es nötig ist, überlegen Sie sich, ein schnurloses Telefon
anzuschaffen, das mit 900 MHz oder 5 GHz funktioniert.
3
Kapitel
•
Einleitung
4. Wählen Sie den „ruhigsten” Kanal für Ihr kabelloses Netzwerk
An Orten, an denen es eine hohe Konzentration an Wohnräumen
und Büros gibt, wie z. B. in Wohnblocks oder Bürogebäuden, kann
Ihr kabelloses Netzwerk durch andere Netzwerke gestört werden.
Benutzen Sie die Funktion Standortübersicht (Site Survey) Ihres
Dienstprogramms für kabellose Netzwerke, um andere kabellose
Netzwerke ausfindig zu machen, und stellen Sie Ihren kabellosen
Router (oder Access Point) und Ihre Computer auf einen Kanal ein,
der soweit wie möglich von den anderen Netzwerken entfernt ist.
Probieren Sie mehr als einen der möglichen Kanäle aus, um
herauszufinden, welche Verbindung die beste ist, und um Störungen
durch schnurlose Telefone oder andere kabellose Geräte in der
Umgebung zu vermeiden.
Wenn Sie kabellose Netzwerkprodukte von Belkin benutzen,
verwenden Sie die detaillierte Standortübersicht (Site Survey)
und die Informationen über Kanäle für kabellose Geräte in Ihrem
Benutzerhandbuch.
5.
Sichere Verbindungen, VPNs und AOL
Sichere Verbindungen sind Verbindungen, für die normalerweise
ein Benutzername mit Kennwort erforderlich ist. Sie werden überall
benutzt, wo großer Wert auf Sicherheit gelegt wird. Zu sicheren
Verbindungen zählen folgende:
•
Virtual Private Network (VPN) Verbindungen, die oft benutzt
werden, um auf Entfernung eine Verbindung mit einem
Büronetzwerk herzustellen
•
Das „Bring Your Own Access”-Programm von America
Online (AOL), das Ihnen die Benutzung von AOL mit
Breitband durch Kabel oder DSL-Service ermöglicht
•
Die meisten Internetseiten für Bankangelegenheiten
•
Viele kommerzielle Internetseiten, für die ein Benutzername
und ein Kennwort erforderlich sind, um Ihnen Zugang zu
Ihrem Konto zu verschaffen
Sichere Verbindungen können durch die Einstellung der
Energieverwaltung (Power Management) eines Computers
unterbrochen werden, die den „Ruhezustand” aktiviert. Die einfachste
Möglichkeit, dies zu vermeiden, ist die Herstellung einer neuen
Verbindung, indem Sie die VPN- oder AOL-Software neu starten oder
sich wieder auf einer sicheren Website anmelden.
Eine zweite Möglichkeit ist die Änderung der Einstellungen der
Energieverwaltung, so dass der Ruhezustand deaktiviert ist; dies ist
allerdings bei tragbaren Computern weniger angebracht. Wenn Sie die
Einstellungen der Energieverwaltung unter Windows ändern wollen,
sehen Sie in der Systemsteuerung unter „Energieoptionen” nach.
4
Übersicht
Produktmerkmale
Der Adapter entspricht dem Entwurf des Standards IEEE 802.11n zur
Kommunikation mit anderen kabellosen Geräten, die dem Entwurf
des 802.11n-Standards entsprechen und Daten bei bis zu 300 Mbit/s
übertragen*. Der Adapter ist kompatibel zu allen Geräten des 802.11gStandards, die Übertragungsgeschwindigkeiten von 54 Mbit/s
erreichen, sowie Geräten des 802.11b-Standards, die Daten bei 11
Mbit/s übertragen. Der Adapter nutzt ebenso wie 802.11b/g Wi-Fi®
Geräte das 2,4 GHz Frequenzband.
•
Funkbetrieb im 2,4-GHz-ISM-Band (Industrie, Wissenschaft und
Medizin)
•
Benutzerfreundliches Dienstprogramm für kabellose Netzwerke
integriert
•
USB 2.0-Schnittstelle; geeignet für nahezu alle Computer mit
USB 2.0-Schnittstelle
•
WPA, WPA2, 64- oder 128-Bit WEP-Verschlüsselung (Wired
Equivalent Privacy)
•
Kabelloser Zugriff auf Netzwerkressourcen
•
Datenraten von bis zu 300 Mbit/s* (802.11n-Entwurf), 54 Mbit/s
(802.11g)
oder 11 Mbit/s (802.11b)
•
Einfache Installation und Bedienung
•
Betriebs- und Netzwerkverbindungs-/Aktivitätsanzeigen
5
1
2
3
4
5
6
Kapitel
Wenn Sie weiterhin Probleme mit sicheren Verbindungen, VPNs oder
AOL haben, beachten Sie bitte erneut die Schritte 1–4 der vorherigen
Seiten, um sicher zu stellen, dass Sie die angesprochenen Aspekte
berücksichtigt haben.
Diese Richtlinien sollten Ihnen helfen, den größtmöglichen Bereich
mit Ihrem kabellosen Router abzudecken. Wenn Sie einen größeren
Bereich abdecken müssen, empfehlen wir Ihnen den Kabellosen Range
Extender/Access Point von Belkin.
Weitere Informationen über unsere Netzwerkprodukte finden Sie auf
unserer Website www.belkin.com/networking oder wenden Sie sich
telefonisch an den technischen Support von Belkin
Übersicht
Anwendungsbereiche und Vorzüge
•
•
Bewegungsfreiheit mit dem Laptop zu Hause oder im Büro
Arbeiten mit dem Netzwerk - ohne die Einschränkungen von Kabeln
Verbindungsraten von bis zu 300 Mbit/s*
Für sofortige Hi-Speed-Verbindung zu Hause oder bei der Arbeit sowie
an Hotspots, ohne Beeinträchtigung vorhandener 802.11b/g-Produkte
•
Kompatibilität zu 802.11b/g-Produkten
Der Adapter ist abwärtskompatibel zu vorhandenen Wi-Fi (IEEE
802.11b/g)-Produkten
•
Schwer zu verkabelnde Umgebungen
Einrichtung von Netzwerken in Gebäuden mit Massiv- oder
Fertigwänden oder auf Freiflächen, in denen eine Verkabelung zu
aufwändig wäre
•
Häufig wechselnde Umgebungen
Geeignet für Büros oder Umgebungen, die häufiger verändert oder
verlagert werden.
•
SOHO-Netzwerkanforderungen (Kleine Büros/Privatanwender)
Bietet einfache, kleine und schnelle Netzwerkinstallationen, die SOHONutzer benötigen
Technische Daten
Host-Schnittstelle:
USB 2.0
Betriebstemperatur:
(0—60 Grad C)
Lagertemperatur:
-20—80 Grad C
Relative Luftfeuchtigkeit: Max. 90%, nicht kondensierend
ReichweiteBis zu 365 m**
* HINWEIS:
Die Standard-Übertragungsrate—300 Mbit/s—ist die physische Datenrate. Die
tatsächliche Durchsatzrate ist niedriger.
** *Die
Funkleistung ist von der Netzwerkumgebung abhängig.
6
Übersicht
(a)
(b)
1
3
(c)
(d)
4
5
(a) Schutzkappe
Die Schutzkappe schützt den USB-Stecker beim Transport. Nehmen Sie
die Schutzkappe ab, bevor Sie den Adapter am USB-Anschluss des
Computers oder am enthaltenen Desktop-Standfuß einstecken.
(b) Betriebs-/Aktivitätsanzeige
Leuchtet, wenn der Adapter eingeschaltet ist und blinkt, wenn er aktiv
ist.
(c) USB-Anschluss
Adapterteil, das sich am USB-Anschluss Ihres Computers einstecken
lässt.
(c) Desktop-Standfuß
Zur Aufstellung des Adapters ohne Behinderung durch Objekte, die
sich in der Computerumgebung befinden.
Systemanforderungen
•
PC-kompatibles Laptop mit freiem Bus-gespeistem USB 2.0Anschluss
•
Windows ® 2000, XP mit SP2 oder Vista TM***
Verpackungsinhalt
•
Kabelloser N USB-Adapter
•
Installationsanleitung
•
CD mit Installationssoftware und Benutzerhandbuch
•
Desktop-Standfuß
7
6
Kapitel
2
Installieren und Einrichten des Adapters
A. Installationsvorgang unter Windows Vista
***HINWEIS: Zum Zeitpunkt der ersten Freigabe dieses Produkts waren
Windows Vista-Treiber noch nicht verfügbar und befinden sich deshalb
möglicherweise nicht auf der enthaltenen CD. Informationen zu eventuellen
Treiber-Updates für Windows Vista finden Sie auf der Website von Belkin:
www.belkin.com/support/vista.
WICHTIGER HINWEIS: INSTALLIEREN SIE DIE SOFTWARE, BEVOR SIE
DEN ADAPTER ANSCHLIESSEN.
A.1 Legen Sie die Installations-CD in Ihr CD-ROM-Laufwerk ein.
A.2 Klicken Sie auf „Next” (Weiter), um die Installation zu starten.
Hinweis: Wenn das Programmfenster des Installationsprogramms nicht
innerhalb von 20 Sekunden erscheint, öffnen Sie Ihr CD-ROM-Laufwerk,
indem Sie doppelt auf das Symbol „Arbeitsplatz” klicken und dann doppelt
auf das CD-Rom-Laufwerk klicken, in welchem sich die CD befindet.
Doppelklicken Sie auf das Symbol mit der Bezeichnung „Setup.exe”, wenn
die Installation nicht automatisch gestartet wird.
8
Installieren und Einrichten des Adapters
1
2
den Installationsvorgang..
3
4
5
6
A.4 Wählen Sie einen Zielordner für die
Software-Installation aus, indem Sie
auf „Browse“ (Blättern) klicken, oder
klicken Sie auf „Next“ (Weiter), um
den Standardpfad zu wählen.
A.5 Fenster, die den jeweiligen Status
anzeigen, führen Sie durch den
Installationsvorgang.
A.6 Möglicherweise erscheint zweimal ein
Fenster, in welchem Ihnen mitgeteilt
wird, dass der Herausgeber der
Treiber-Software nicht überprüft
werden kann (Windows can’t verify
the publisher of this driver software).
Es liegt jedoch KEIN Fehler vor.
Unsere Software ist genau überprüft
worden und ist kompatibel zu diesem
Betriebssystem.
9
Kapitel
A.3 Der InstallShield-Assistent startet jetzt
Installieren und Einrichten des Adapters
A.7 Schalten Sie Ihren Computer aus und
stecken Sie den Adapter ein, wenn
Sie dazu aufgefordert werden. Die
Installation ist damit abgeschlossen.
A.8 Wenn die Installation abgeschlossen ist,
klicken Sie auf „Finish (Fertig stellen)”.
A.9 Der Hardware-Assistent erscheint
möglicherweise nach 3–15 Sekunden.
Ist dies der Fall, gehen Sie nach den
jeweiligen Anweisungen vor. Wählen
Sie „Locate and install the driver
software” (Treiber-Software suchen und
installieren), um fortzufahren.
A.10 Möglicherweise erscheint ein Fenster,
das der Abbildung unten entspricht.
Es liegt jedoch KEIN Fehler vor.
Unsere Software ist genau überprüft
worden und ist kompatibel zu diesem
Betriebssystem. Wählen Sie „Install this
driver software anyway” (Diese TreiberSoftware trotzdem installieren) und
folgen Sie den Anweisungen auf dem
Bildschirm.
Anschließend wird ihnen in einem
Dialogfenster mitgeteilt, dass die
Hardware-Installation ausgeführt wird;
danach wird der Abschluss dieses
Vorgangs angezeigt.
10
Installieren und Einrichten des Adapters
A.11 Um eine Verbindung zum Internet
2
3
4
A.12 Klicken Sie in der Systemsteuerung
auf „View network status and tasks”
(Netzwerkstatus und -Aufgaben
anzeigen).
A.13 Klicken Sie im Netzwerkcenter
auf „Connect to a network”
(Netzwerkverbindung herstellen).
A.14 Wählen Sie im nächsten Fenster ein
verfügbares kabelloses Netzwerk
und klicken Sie dann auf „Connect”
(Verbinden).
11
5
6
Kapitel
herzustellen, öffnen Sie das
„Network and Sharing Center”
(Netzwerkcenter) über die
Systemsteuerung im „Start”-Menü.
1
Installieren und Einrichten des Adapters
A.15 Ihr Adapter versucht nun, eine
Verbindung zum ausgewählten
Netzwerk herzustellen.
A.16 Je nachdem, welche
Sicherheitseinstellungen in
Ihrem Netzwerk eingestellt sind,
werden Sie aufgefordert einen
Netzwerksicherheitsschlüssel
oder eine Kennfolge (Passphrase)
einzugeben. Klicken Sie nach der
Eingabe auf „Connect” (Verbinden).
A.17 Wenn Sie eine Verbindung zum
Netzwerk hergestellt haben, können
Sie dieses Netzwerk speichern
und automatisch eine Verbindung
herstellen, wenn sich der Adapter in
dessen Reichweite befindet.
A.18 Das Netzwerkcenter zeigt jetzt
die aktuelle Netzwerkverbindung
an. Mit den Links auf der linken
Seite des Fensters können Sie
Ihre Netzwerkverbindungen
konfigurieren.
12
Installieren und Einrichten des Adapters
B. Installationsvorgang für andere Betriebssysteme als
Windows Vista
1
2
3
B.1 Legen Sie die Software-Installations-CD in Ihr CD-ROM-Laufwerk ein.
4
B.2 Das Fenster des
Installationsprogramms des
Kabellosen Adapters von Belkin
erscheint innerhalb von 20 Sekunden
automatisch. Klicken Sie auf „Install
Software” (Software installieren) oder
auf „Next” (Weiter), um die Installation
zu starten..
Hinweis:Wenn das Programmfenster
des Installationsprogramms nicht
innerhalb von 20 Sekunden erscheint,
öffnen Sie Ihr CD-ROM-Laufwerk,
indem Sie doppelt auf das Symbol
„Arbeitsplatz” klicken und dann
doppelt auf das CD-Rom-Laufwerk
klicken, in welchem sich die CD
befindet. Doppelklicken Sie dann auf
das Symbol „Setup.exe”.
B.3 Der InstallShield-Assistent startet jetzt
den Installationsvorgang..
B.4 Wählen Sie einen Zielordner für die
Software-Installation aus, indem Sie
auf „Browse“ (Blättern) klicken, oder
klicken Sie auf „Next“ (Weiter), um den
Standardpfad zu wählen.
13
5
6
Kapitel
WICHTIGER HINWEIS: INSTALLIEREN SIE DIE SOFTWARE, BEVOR SIE DEN
ADAPTER ANSCHLIESSEN.
Installieren und Einrichten des Adapters
B.5 Fenster, die den jeweiligen Status anzeigen, führen Sie durch den
Installationsvorgang.
B.6 Wenn die Software-Installation
abgeschlossen ist, erscheint die
Meldung „Please plug in your USB
Network Adapter now” (Schließen
Sie Ihren USB-Adapter bitte jetzt
an). Schließen Sie den Adapter an
den Computer an.
B.7 Der Hardware-Assistent
erscheint möglicherweise nach
3–15 Sekunden. Ist dies der
Fall, wählen Sie „Install the
software automatically” (Software
automatisch installieren) und klicken
Sie dann auf „Next” (Weiter), um die
Hardware zu installieren.
B.8 Wenn der Hardware-Assistent nicht
erscheint, klicken Sie auf „Finish”
(Fertig stellen).
B.9 Wenn der Hardware-Assistent
nicht erscheint, klicken Sie auf
„Finish” (Fertig stellen). Es liegt
jedoch KEIN Fehler vor. Unsere
Software ist genau überprüft
worden und ist kompatibel zu
diesem Betriebssystem. Wählen
Sie „Continue Anyway” (Trotzdem
Fortfahren) und folgen Sie den
Anweisungen auf dem Bildschirm.
14
Installieren und Einrichten des Adapters
B.10 Der Assistent installiert jetzt Ihre
Software..
1
2
4
B.11 Die Installation ist damit
abgeschlossen. Klicken Sie
auf „Finish” (Fertig stellen), um
den Installationsassistenten
abzuschließen.
B.12 Klicken Sie erneut auf „Finish”
(Fertig stellen), um den
InstallShield-Assistenten zu
beenden.
B.13 Je nachdem, welches
Betriebssystem Sie verwenden,
müssen Sie den Computer
gegebenenfalls neu starten,
damit die Änderungen in Kraft
treten. Speichern Sie Ihre Daten
und schließen Sie alle anderen
Anwendungen. Führen Sie dann
den Neustart durch.
15
5
6
Kapitel
3
Installieren und Einrichten des Adapters
C. Konfiguration
Verwenden des Dienstprogramms für kabellose
Netzwerke von Belkin
C.1 Doppelklicken Sie nach dem
Neustart Ihres Computers auf dem
Bildschirm auf das Symbol des
Dienstprogramms für kabellose
Netzwerke von Belkin.
Hinweis: Das Dienstprogramm für
kabellose Netzwerke von
Belkin finden Sie auch im
System-Tray.
C.2 Das Dienstprogramm für kabellose
Netzwerke von Belkin erscheint.
C.3 Wählen Sie das Netzwerk, zu
welchem Sie eine Verbindung
herstellen wollen, aus der Liste
„Available Networks” (Verfügbare
Netzwerke) aus und klicken Sie dann
auf „Connect” (Verbinden).
Hinweis: Um zu sehen, welche
Netzwerke Ihnen zur
Verfügung stehen, müssen
Sie sich in der Nähe eines
eingeschalteten kabellosen
Routers oder Access
Points befinden.
Die Installation ist damit abgeschlossen.
16
Verwenden des Dienstprogramms für kabellose
Netzwerke von Belkin
Nach der erfolgreichen Installation des Dienstprogramms für kabellose
Netzwerke von Belkin erfolgt die Konfiguration der kabellosen
Verbindung und der Sicherheitseinstellungen im Handumdrehen.
Zugriff auf das Dienstprogramm für kabellose Netzwerke von
Belkin über das Windows System-Tray
2
3
4
5
6
Wenn das Symbol nicht erscheint, klicken Sie auf „Start >
Programme > Belkin > Kabelloser N1 USB-Netzwerkadapter (N1
Wireless USB Network Adapter) > Belkin Dienstprogramm für
kabellose Netzwerke (Belkin Wireless Networking Utility)”.
17
Kapitel
Um das Dienstprogramm aufzurufen, richten Sie die Maus auf das
Symbol des Dienstprogramms im System-Tray unten rechts auf dem
Bildschirm und klicken es mit der rechten Maustaste an.
1
Verwenden des Dienstprogramms für kabellose
Netzwerke von Belkin
Das Standardprogrammfenster des Dienstprogramms ist die Registerkarte
„Current Status” (Aktueller Status). Dort werden der aktuelle Netzwerkstatus
und die verfügbaren Netzwerke angezeigt.
Netzwerkstatus (Network Status)
Dort werden der aktuelle Netzwerkstatus und das zur Zeit verwendete Netzwerk
angezeigt. Dieses Fenster zeigt auch den Verbindungsstatus des Netzwerks
an: zwischen Computer und Router und zwischen Router und Internet. Sollten
einmal Verbindungsprobleme auftreten, benutzen Sie dieses Fenster, um
herauszufinden, wo die Ursache des Problems liegt (z.B. Computer, Router oder
Internet/Modem).
Verfügbare Netzwerke (Available Networks)
In diesem Fenster werden alle verfügbaren Netzwerke am derzeitigen
Standort sowie deren SSID, Signalstärke, Sicherheitstyp, Kanal und
Netzwerktyp angezeigt.
Funkverbindung unterbrochen (Lost Wireless Connection)
Wenn die Funkverbindung unterbrochen wird, wird dies in einem PopupFenster angezeigt und das Dienstprogramm versucht, erneut eine Verbindung
herzustellen.
18
Verwenden des Dienstprogramms für kabellose
Netzwerke von Belkin
Verbindungsfehler (Connection Failure)
Andere Optionen werden während des Versuchs, eine Verbindung
herzustellen, angezeigt. Klicken Sie auf „Stop” (Stopp), um den
Verbindungsversuch abzubrechen und auf „Retry” (Erneut versuchen),
um einen erneuten Verbindungsversuch zu starten.
1
2
3
5
6
Netzwerkstatus und Lösungstipps
Genauere Informationen zum aktuellen Netzwerkstatus erhalten Sie,
wenn Sie auf „Open Wireless Utility” (Dienstprogramm starten) klicken.
Das Standardprogrammfenster ist die Registerkarte „Current Status”
(Aktueller Status). Unter „Network Status” (Netzwerkstatus) wird
angezeigt, welche Verbindungen einwandfrei und welche fehlerhaft sind.
Das Dienstprogramm verfügt auch über „Solution Tips” (Lösungstipps).
Dort finden Sie Anweisungen zur Fehlerbehebung.
19
Kapitel
4
Verwenden des Dienstprogramms für kabellose
Netzwerke von Belkin
Netzwerkprofile einstellen
Auf der Registerkarte „My Connections” (Meine Verbindungen) können Sie
Verbindungsprofile zufügen, bearbeiten und löschen. Hier werden auch die
Signalstärke, Sicherheits- und Netzwerktyp angezeigt.
Sicherung des Wi-Fi-®Netzwerks
Wenn Sie eine Verbindung zu einem gesicherten Netzwerk herstellen
wollen, können Sie den Sicherheitstyp (WPA oder WEP*) festlegen und
das entsprechende Dialogfeld verwenden.
*Hinweis: Sicherheitstypen
20
Verwenden des Dienstprogramms für kabellose
Netzwerke von Belkin
Hinweis: Wenn Sie ein Netzwerk auswählen, in dem eine
Verschlüsselung verwendet wird, wird erst ein Basisfenster für die
Sicherheitsoptionen (Security Screen) angezeigt. Wenn Sie auf
die Schaltfläche „Advanced” (Erweitert) klicken, werden andere
Sicherheitsoptionen angezeigt (s. unten).
1
2
3
5
6
21
Kapitel
4
Verwenden des Dienstprogramms für kabellose
Netzwerke von Belkin
Wired Equivalent Privacy (WEP) ist ein weniger sicheres aber weiter
verbreitetes Sicherheitsprotokoll für kabellose Netzwerke. Je nachdem, welches
Sicherheitsniveau verwendet wird (64 oder 128 Bit), muss ein Hexadezimalschlüssel
mit 10 bzw. 26 Zeichen eingegeben werden. Ein Hexadezimalschlüssel ist eine
Kombination aus Buchstaben, a–f, und Ziffern, 0–9.
Wireless Protected Access (WPA) ist der neue Sicherheitsstandard für
kabellose Netzwerke. Nicht alle kabellosen Karten oder Adapter unterstützen diese
Technologie. Überprüfen Sie im Benutzerhandbuch, ob Ihr kabelloser Adapter WPA
unterstützt. Bei WPA wird kein Hexadezimalschlüssel verwendet, sondern eine
Kennfolge (Passphrase), die man sich besser merken kann.
Der folgende Abschnitt richtet sich speziell an Benutzer, die Ihr Netzwerk privat oder
in einem kleinen Unternehmen nutzen. Sie finden darin Anweisungen, wie Sie die
Sicherheit Ihres kabellosen Netzwerks optimieren können.
Zum Zeitpunkt der Veröffentlichung gibt es vier Verschlüsselungsmethoden:
Verschlüsselungsmethoden:
Name
64-Bit WEP (Wired 128-BitEquivalent Privacy) Verschlüsselung
Wi-Fi Protected
Access
Wi-Fi Protected
Access
Akronym
64-Bit-WEP
128-Bit-WEP
WPA-TKIP
WPA-AES
Sicherheit
Gut
Besser
Ausgezeichnet
Ausgezeichnet
Merkmale
Statische
Schlüssel
Statische
Schlüssel
Dynamische
Verschlüsselung
und gegenseitige
Authentifizierung
Verschlüsselung
auf Basis von
RC4 Algorithmus
(normalerweise 40Bit-Schlüssel)
Zusätzliche
Sicherheit
über 64-Bit
WEP unter
Benutzung einer
Schlüssellänge
von 104 Bits,
ergänzt durch
weitere 24 Bits
Daten, die das
System erzeugt
Dynamische
Verschlüsselung
und
gegenseitige
Authentifizierung
Zugefügtes
TKIP (temporal
key integrity
protocol),
damit Schlüssel
rotieren und die
Verschlüsselung
verstärkt wird
AES (Advanced
Encryption
Standard)
verursacht keinen
Durchsatzverlust
WEP
WEP ist ein verbreitetes Protokoll, das allen Wi-Fi-kompatiblen Geräten
für kabellose Netzwerke Sicherheit verleiht. WEP verleiht kabellosen
Netzwerken Datenschutz, der mit dem von verkabelten Netzwerken
vergleichbar ist.
22
Verwenden des Dienstprogramms für kabellose
Netzwerke von Belkin
64-Bit-WEP-Verschlüsselung
128-Bit-WEP-Verschlüsselung
Aufgrund der möglichen Sicherheitsschwächen wurde mit 128Bit-Verschlüsselung eine sicherere Methode entwickelt. 128Bit-Verschlüsselung basiert auf einer Schlüssellänge von 104
Bits und 24 weiteren Bits, die durch das System erzeugt werden
(insgesamt 128 Bits). Manche Hardware-Hersteller bezeichnen
128-Bit als 104-Bit-Verschlüsselung.
Die meisten neueren Geräte für kabellose Netzwerke, die
heutzutage auf dem Markt sind, unterstützen sowohl 64-Bit- als
auch 128-Bit-WEP-Verschlüsselung. Vielleicht haben Sie aber
ältere Geräte, die nur 64-Bit-WEP unterstützen. Alle Belkin
Produkte für kabellose Netzwerke unterstützen sowohl 64-Bit- als
auch 128-Bit-WEP-Verschlüsselung.
Verschlüsselungsschlüssel
Nachdem Sie sich entweder für die 64-Bit- oder die 128-Bit WEPVerschlüsselungsmethode entschieden haben, müssen Sie einen
Schlüssel generieren. Wenn der Verschlüsselungsschlüssel nicht
überall im kabellosen Netzwerk einheitlich ist, können Ihre kabellosen
Netzwerkgeräte nicht miteinander kommunizieren.
Sie können Ihren Schlüssel eingeben, indem Sie den
Hexadezimalschlüssel manuell eintragen. Ein Hexadezimalschlüssel ist
eine Kombination aus Ziffern und Buchstaben von A-F und von 0–9.
Für 64-Bit-WEP müssen Sie 10 Hexadezimalzeichen eingeben. Für
128-Bit-WEP müssen Sie 26 Hexadezimalzeichen eingeben.
Beispiel:
AF 0F 4B C3 D4 = 64-Bit-WEP-Schlüssel
C3 03 0F AF 0F 4B B2 C3 D4 4B C3 D4 E7 = 128-Bit-WEP-Schlüssel
Notieren Sie den Hexadezimal-WEP-Schlüssel Ihres kabellosen
Routers oder Access Points und geben Sie ihn manuell in die HexWEP-Schlüssel Tabelle im Konfigurationsbildschirm des Adapters ein.
23
1
2
3
4
5
6
Kapitel
64-Bit-WEP wurde mit 64-Bit-Verschlüsselung eingeführt, die aus
einer Schlüssellänge von 40 Bits und 24 weiteren Bits an Daten, die
vom System erzeugt werden, besteht (insgesamt 64 Bits). Manche
Hardware-Hersteller bezeichnen 64-Bit als 40-Bit-Verschlüsselung.
Kurz nachdem die Technologie eingeführt worden war, haben
Fachleute festgestellt, dass die 64-Bit-Verschlüsselung zu einfach zu
entschlüsseln war.
Verwenden des Dienstprogramms für kabellose
Netzwerke von Belkin
WPA
WPA ist ein neuer Wi-Fi-Standard, der über die Sicherheitsstandards
von WEP hinausgeht. Wenn Sie WPA-Sicherheit nutzen wollen, müssen
die Treiber und die Software Ihrer Geräte für kabellose Netzwerke dafür
aufgerüstet sein. Die Updates für die Aufrüstung können Sie auf der
Internetseite Ihres Händlers finden. Es gibt drei Arten von WPA-Sicherheitse
instellungen: WPA-PSK (kein Server), WPA (mit Radiusserver) und WPA2.
WPA-PSK (kein Server) verwendet einen sogenannten „Pre-shared Key”
(PSK) als Netzwerkschlüssel. Ein Netzwerkschlüssel ist ein Kennwort,
das aus acht bis 63 Zeichen (Buchstaben, Ziffern oder Sonderzeichen)
besteht. Jeder Client verwendet denselben Netzwerkschlüssel, um auf
das Netzwerk zuzugreifen. Normalerweise ist dies der Modus, der in
einem Heimnetzwerk verwendet wird.
WPA (mit Radius-Server) funktioniert am besten in
Unternehmen, in denen der Netzwerkschlüssel von einem RadiusServer automatisch an die Clients verteilt wird.
WPA2 erfordert einen erweiterten Verschlüsselungsstandard
(Advanced Encryption Standard: AES) für die Verschlüsselung
von Daten mit noch mehr Sicherheit als WPA. WPA verwendet
sowohl TKIP (Temporal Key Integrity Protocol) als auch AES zur
Verschlüsselung.
Sicherheitseinstellung für Ihren kabellosen Router oder Access
Point von Belkin
Wenn Sie die Sicherheitsfunktion benutzen wollen, müssen
Sie erst WEP oder WPA für Ihren kabellosen Router oder
Access Point aktivieren. Für kabellose Router (oder Access
Points) von Belkin können diese Sicherheitsfunktionen über die
webbasierte Benutzeroberfläche konfiguriert werden. Sehen Sie im
Benutzerhandbuch für Ihren kabellosen Router (oder Access Point)
nach, wie Sie Zugang zur Verwaltungsoberfläche bekommen.
WICHTIG: Sie müssen nun alle kabellosen Karten/Adapter
entsprechend einstellen.
24
Verwenden des Dienstprogramms für kabellose
Netzwerke von Belkin
Einstellung der Sicherheitsfunktion des Adapters
An dieser Stelle sollten Sie Ihren kabellosen Router oder Access
Point bereits auf die Verwendung von WPA oder WEP eingestellt
haben. Zur Herstellung einer kabellosen Verbindung müssen Sie
Ihren Kabellosen N USB-Adapter so einstellen, dass er dieselben
Sicherheitseinstellungen verwendet.
Der Kabellose N USB-Adapter von Belkin unterstützt die neuesten
WPA-Sicherheitsfunktionen ebenso wie den älteren WEPSicherheitsstandard. Werkseitig ist die Sicherheitsfunktion deaktiviert.
Um sie zu aktivieren, müssen Sie festlegen, welchen Standard Sie
beim Router oder Access Point verwenden möchten. (Sehen Sie im
Benutzerhandbuch Ihres kabellosen Routers oder Access Points nach,
wie Sie Zugang zu den Sicherheitseinstellungen bekommen.)
Um die Sicherheitseinstellungen am Adapter einzustellen, klicken Sie auf
die Registerkarte „My Connections” (Verbindungen) und weisen Sie die
Verbindung an, für welche Sie die Sicherheitseinstellungen verändern
wollen. Klicken Sie auf „Edit” (Bearbeiten), um die Einstellungen zu ändern.
25
2
3
4
5
6
Kapitel
Änderungen der Sicherheitseinstellungen des Funknetzwerks
1
Verwenden des Dienstprogramms für kabellose
Netzwerke von Belkin
WEP-Einstellung
64-Bit-WEP-Verschlüsselung
1.
Wählen Sie im Dropdown-Menü „Data Encryption”
(Datenverschlüsselung) die Option „WEP”.
2.
Nachdem Sie den WEP-Verschlüsselungsmodus gewählt haben, können
Sie den Schlüssel eingeben, indem Sie den Hexadezimalschlüssel manuell
eintragen.
Ein Hexadezimalschlüssel ist eine Kombination aus Ziffern und Buchstaben
von A-F und von 0–9. Für 64-Bit-WEP müssen Sie 10 Hexadezimalzeichen
eingeben.
Beispiel:
AF 0F 4B C3 D4 = 64-Bit-WEP-Schlüssel
26
Verwenden des Dienstprogramms für kabellose
Netzwerke von Belkin
3.
Klicken Sie auf „Save” (Speichern), um den Vorgang
abzuschließen. Die Verschlüsselung für Ihren kabellosen
Router oder Access Point ist jetzt eingestellt. Jeder Computer
in Ihrem kabellosen Netzwerk muss jetzt mit denselben
Sicherheitseinstellungen konfiguriert werden.
Sicherheitseinstellungen an Ihrem kabellosen Router oder Access
Point einzuschalten, verlieren Sie vorübergehend Ihre kabellose
Netzwerkverbindung, bis Sie die Sicherheitsfunktion Ihres kabellosen
Clients aktivieren. Speichern Sie den Schlüssel, bevor Sie Änderungen
an Ihrem kabellosen Router oder Access Point vornehmen. Wenn Sie
den Hexadezimalschlüssel nicht mehr wissen, wird Ihrem Client der
Zugang zu Ihrem kabellosen Router oder Access Point verweigert.
27
2
3
4
5
6
Kapitel
ACHTUNG: Wenn Sie einen kabellosen Client benutzen, um die
1
Verwenden des Dienstprogramms für kabellose
Netzwerke von Belkin
128-Bit-WEP-Verschlüsselung
1.
Wählen Sie im Dropdown-Menü die Option „WEP”.
2.
Nachdem Sie den WEP-Verschlüsselungsmodus gewählt
haben, können Sie den Schlüssel eingeben, indem
Sie den Hexadezimalschlüssel manuell eintragen. Ein
Hexadezimalschlüssel ist eine Kombination aus Ziffern und
Buchstaben von A-F und von 0–9. Für 128-Bit-WEP müssen Sie
26 Hexadezimalzeichen eingeben.
Beispiel:
C3 03 0F AF 0F 4B B2 C3 D4 4B C3 D4 E7 = 128-Bit-WEP-Schlüssel
28
Verwenden des Dienstprogramms für kabellose
Netzwerke von Belkin
3.
Klicken Sie auf „Save” (Speichern), um den Vorgang abzuschließen.
Die Verschlüsselung für Ihren kabellosen Router oder Access Point
ist jetzt eingestellt. Jeder Computer in Ihrem kabellosen Netzwerk
muss jetzt mit denselben Sicherheitseinstellungen konfiguriert
werden.
Sicherheitseinstellungen an Ihrem kabellosen Router oder Access
Point einzuschalten, verlieren Sie vorübergehend Ihre kabellose
Netzwerkverbindung, bis Sie die Sicherheitsfunktion Ihres kabellosen
Clients aktivieren. Speichern Sie den Schlüssel, bevor Sie Änderungen
an Ihrem kabellosen Router oder Access Point vornehmen. Wenn Sie
den Hexadezimalschlüssel nicht mehr wissen, wird Ihrem Client der
Zugang zu Ihrem kabellosen Router oder Access Point verweigert.
29
2
3
4
5
6
Kapitel
ACHTUNG: Wenn Sie einen kabellosen Client benutzen, um die
1
Verwenden des Dienstprogramms für kabellose
Netzwerke von Belkin
WPA-PSK (kein Server)
Wählen Sie diese Einstellung, wenn in Ihrem Netzwerk kein Radiusserver benutzt
wird. WPA-PSK (kein Server) wird oft bei Netzwerken zu Hause oder in Kleinbüros
benutzt.
1.
Wählen Sie im Dropdown-Menü „Network Authentication” (NetzwerkAuthentifizierung) „WPA-PSK (no server)” (WPA-PSK [kein Server]) aus.
2.
Geben Sie Ihren Netzwerkschlüssel ein. Er kann aus acht bis 63 Zeichen
(Buchstaben, Ziffern, Sonderzeichen) bestehen. Sie müssen diesen
Schlüssel für alle Clients (Netzwerkkarten) verwenden, die Sie in Ihrem
kabellosen Netzwerk benutzen möchten.
3.
Klicken Sie auf „Save” (Speichern), um den Vorgang abzuschließen. Sie
müssen nun alle Clients (Netzwerkkarten) entsprechend einstellen.
30
Verwenden des Dienstprogramms für kabellose
Netzwerke von Belkin
Optionen des Dienstprogramms für kabellose Netzwerke
1
2
3
5
6
Die Registerkarte „Options” (Optionen) des Dienstprogramms bietet
die Möglichkeit, Einstellungen individuell anzupassen.
31
Kapitel
4
Verwenden des Dienstprogramms für kabellose
Netzwerke von Belkin
Dienstprogramm für kabellose Netzwerke: Hilfe
Die Registerkarte „Help” (Hilfe) des Dienstprogramms bietet Zugang
zu Online- und Telefon-Support und erweiterten Diagnosefunktionen
sowie die Möglichkeit, mit einfachem Klicken nach Upgrades zu
suchen, um auf aktuelle Software-Versionen zuzugreifen.
32
Verwenden des Dienstprogramms für kabellose
Netzwerke von Belkin
1
Erweiterte Diagnosefunktionen
„Advanced Diagnostic Tools” (Erweiterte Diagnosefunktionen) ist die
Zentralsteuerung für alle Einstellungen der Hardware- und SoftwareKomponenten des kabellosen Netzwerks. Sie bietet Ihnen eine Reihe
von Tests und Verbindungsdiensten, um eine optimale Leistung des
Netzwerks zu gewährleisten.
2
3
5
6
33
Kapitel
4
Fehlerbehebung
Ich kann keine Funkverbindung zum Internet herstellen.
Wenn Sie mit einem kabellosen Computer keine Internetverbindung aufbauen
können, prüfen Sie Folgendes:
1. Schauen Sie auf die Leuchten Ihres kabellosen Routers. Wenn Sie einen
kabellosen Router von Belkin benutzen, sehen diese wie folgt aus:
• Die Betriebsleuchte sollte leuchten.
• Die Anzeige „Connected” (Verbunden) sollte an sein aber nicht blinken.
• Die WAN-Anzeige sollte entweder an sein oder blinken.
Wenn die Leuchten Ihres kabellosen Routers von Belkin die obigen
Eigenschaften haben, gehen Sie zu Nummer 2 unten.
Wenn dies NICHT der Fall ist, überprüfen Sie Folgendes:
• Das Netzkabel des Routers ist angeschlossen.
• Alle Kabel vom Router zum Modem sind angeschlossen.
• Alle Leuchten des Modems funktionieren korrekt. Ist dies nicht der Fall,
sehen Sie im Benutzerhandbuch Ihres Modems nach.
• Fahren Sie den Router erneut hoch.
• Fahren Sie das Modem erneut hoch.
Wenn Sie trotzdem noch Probleme haben, wenden Sie sich an den technischen
Support von Belkin.
Wenn Sie keinen kabellosen Router von Belkin benutzen, beachten Sie bitte die
Gebrauchsanweisung des betreffenden Herstellers.
2. Klicken Sie in der rechten unteren Ecke des Bildschirms im System-Tray
auf das Symbol des WLAN-Programms, um es zu öffnen. Das Symbol sollte
dieser Abbildung gleichen und ist entweder rot oder grün:
3. Im geöffneten Fenster müsste eine Liste mit „Available Networks” (Verfügbare
Nertzwerke) aufgeführt sein.
Verfügbare Netzwerke sind Netzwerke, zu denen Sie eine Verbindung
herstellen können. Wenn Sie einen 802.11g (G+) Router oder 802.11g (54g)
Router von Belkin verwenden, ist „Belkin54g” die Standardbezeichnung.
Wenn Sie einen 802.11b Router von Belkin benutzen, ist die
Standardbezeichnung „WLAN”.
Wenn Sie KEINEN Router von Belkin benutzen, sehen Sie bitte im
Benutzerhandbuch Ihres Routers nach, wie die Vorgabe lautet.
34
Fehlerbehebung
Der Name Ihres kabellosen Netzwerks erscheint unter
„Available Networks” (Verfügbare Netzwerke).
1
Wenn der korrekte Netzwerkname auf der Liste für „Available
Networks” (Verfügbare Netzwerke) steht, folgen Sie bitte diesen
Schritten, um eine kabellose Verbindung herzustellen:
2
1. Klicken Sie auf der Liste „Verfügbare Netzwerke” auf den korrekten
Wenn es Ihnen nicht gelingt, Zugang zum Internet zu bekommen,
nachdem Sie eine kabellose Netzwerkverbindung hergestellt
haben, nehmen Sie Kontakt mit dem technischen Support von
Belkin auf.
Der Name Ihres kabellosen Netzwerks wird NICHT auf der Liste
„Available Networks” (Verfügbare Netzwerke) aufgeführt.
Wenn der korrekte Netzwerkname nicht auf der Liste steht,
überprüfen Sie die SSID-Einstellungen, um zu sehen, ob sie
übereinstimmen. Die SSID unterscheidet zwischen Klein- und
Großbuchstaben und die Schreibweise muss auf jedem Computer
genau gleich sein, damit der Adapter eine Verbindung mit dem
kabellosen Router oder Access Point herstellen kann.
Hinweis: Wenn Sie die SSID-Einstellungen überprüfen wollen oder ein
verfügbares Netzwerk suchen wollen, klicken Sie doppelt auf das SignalSymbol, um das Fenster „Kabellose Netzwerke” (Wireless Networks) zu
öffnen. Klicken Sie „Add” (Zufügen), wenn das Netzwerk, mit welchem
Sie eine Verbindung herstellen wollen, nicht angezeigt wird, und tragen
Sie die SSID ein. Weitere Informationen über die Einrichtung einer SSID
finden Sie im Handbuch Ihres Routers.
Wenn Sie auch bei geringem Abstand noch Probleme haben, nehmen
Sie bitte Kontakt mit dem technischen Support von Belkin auf.
35
3
4
5
6
Kapitel
Netzwerknamen.
2. Ist die Sicherheitsfunktion (Verschlüsselung) aktiviert,
müssen Sie den Netzwerkschlüssel eingeben. Klicken Sie auf
„Connect” (Verbinden). Weitere Informationen zur Sicherheit
finden Sie auf der Seite mit dem Titel: „Sicherung des Wi-Fi
Netzwerks” auf Seite 20 dieses Benutzerhandbuchs.
3. Nach wenigen Sekunden sollte das Symbol in der rechten
unteren Bildschirmecke grün werden - ein Zeichen dafür, dass
eine Verbindung zum Netzwerk aufgebaut wurde.
Fehlerbehebung
Die Installations-CD-ROM startet das Dienstprogramm
für kabellose Netzwerke von Belkin nicht.
Wenn die CD-ROM das Dienstprogramm von Belkin nicht automatisch startet,
führt der Computer möglicherweise andere Anwendungen aus, die das CDROM-Laufwerk beeinträchtigen. Wenn das Dienstprogramm von Belkin nicht
innerhalb von 15-20 Sekunden erscheint, öffnen Sie Ihr CD-ROM-Laufwerk,
indem Sie doppelt auf das Symbol „Arbeitsplatz” klicken. Klicken Sie dann
doppelt auf das CD-ROM-Laufwerk, in welchem sich die Installations-CD
befindet, um die Installation zu starten. Wenn die Installation nicht automatisch
gestartet wird, klicken Sie mit der rechten Maustaste auf „Explore” (Explorer) und
dann doppelt auf das Symbol „setup.exe”.
Die Betriebsanzeige leuchtet NICHT; Adapter funktioniert nicht
Wenn die LED-Anzeigen nicht leuchten, kann es sein, dass der Adapter nicht
richtig angeschlossen ist. Überprüfen Sie, ob der Adapter gut am USB-Anschluss
angeschlossen ist. Überprüfen Sie, ob die Adaptertreiber installiert worden sind.
Klicken Sie mit der rechten Maustaste auf das Symbol „Arbeitsplatz” auf Ihrem
Desktop. Wählen Sie „Eigenschaften” und gehen Sie zum „Gerätemanager”.
Sehen Sie nach, ob Ihr USB-Netzwerkadapter ohne Fehler aufgeführt wird. Wenn
ein Fehler gemeldet wird, nehmen Sie Kontakt mit dem technischen Support von
Belkin auf.
Die Verbindungs-LED blinkt langsam; ich kann keine
Verbindung zu einem kabellosen Netzwerk oder zum Internet
herstellen.
Wenn Ihr Adapter anscheinend richtig funktioniert, Sie aber keine
Netzwerkverbindung herstellen können oder das rote Netzwerk-Symbol unten
auf Ihrem Bildschirm angezeigt wird, kann das an fehlender Übereinstimmung
zwischen den Einstellungen für Netzwerknamen (SSID) in Ihren Eigenschaften für
kabellose Netzwerke liegen.
Überprüfen, ob die SSID-Einstellungen übereinstimmen. Die SSID unterscheidet
zwischen Klein- und Großbuchstaben und die Schreibweise muss auf jedem
Computer genau gleich sein, damit der Adapter eine Verbindung mit dem
kabellosen Router oder Access Point herstellen kann.
Hinweis:Wenn Sie die SSID-Einstellungen überprüfen wollen oder ein
verfügbares Netzwerk suchen wollen, klicken Sie doppelt auf das Signal-Symbol,
um das Fenster „Kabellose Netzwerke” (Wireless Networks) zu öffnen. Klicken
Sie „Add” (Zufügen), wenn das Netzwerk, mit welchem Sie eine Verbindung
herstellen wollen, nicht angezeigt wird, und tragen Sie die SSID ein.
Weitere Informationen über die Einrichtung einer SSID finden Sie im
Handbuch Ihres Routers. Wenn Sie auch bei geringem Abstand noch
Probleme haben, nehmen Sie bitte Kontakt mit dem technischen Support
von Belkin auf.
36
Fehlerbehebung
Trotz Daueranzeige der Verbindungs-LED, kann keine
Internetverbindung hergestellt werden.
Wenn Sie auch bei geringem Abstand noch Probleme haben, nehmen
Sie bitte Kontakt mit dem technischen Support von Belkin auf.
Die Datenübertragung ist manchmal langsam.
Funktechnologie basiert auf Radiotechnik. Das bedeutet, dass die
Verbindungsqualität und die Funktionalität zwischen den Geräten abnimmt,
wenn die Entfernung zwischen den Geräten zunimmt. Andere Faktoren,
die zur Verschlechterung des Signals führen können, sind Hindernisse wie
Wände und Metallvorrichtungen (gerade Metall ist ein großer Störfaktor).
Daraus ergibt sich in geschlossenen Räumen eine durchschnittliche
Reichweite für kabellose Netzwerkgeräte von 30 bis 60 Metern. Bitte
beachten Sie, dass die Verbindungsgeschwindigkeit abnehmen kann, wenn
Sie weiter vom Router oder Access Point entfernt sind.
Wenn Sie genau wissen wollen, ob Probleme mit dem kabellosen Netzwerk
mit der Reichweite zusammenhängen, stellen Sie den Computer nach
Möglichkeit vorübergehend in einem Abstand von 1,5 bis 3 m vom Router
(oder Access Point) auf. Schauen Sie sich den Abschnitt mit dem Titel
„Aufstellung der Hardware für optimale Leistung des kabellosen Netzwerks”
auf Seite 2 dieses Benutzerhandbuchs genau an. Wenn Sie auch bei
geringem Abstand noch Probleme haben, nehmen Sie bitte Kontakt mit dem
technischen Support von Belkin auf.
Die Signalstärke ist unzureichend.
Funktechnologie basiert auf Radiotechnik. Das bedeutet, dass die
Verbindungsqualität und die Durchsatzleistung zwischen den Geräten
abnimmt, wenn die Entfernung zwischen den Geräten vergrößert wird.
Andere Faktoren, die zur Verschlechterung des Signals führen können,
sind Hindernisse wie Wände und Metallvorrichtungen (gerade Metall
ist ein großer Störfaktor). Daraus ergibt sich in geschlossenen
37
2
3
4
5
6
Kapitel
Wenn Sie ein Signal bekommen, aber keine Internetverbindung
herstellen können oder keine IP-Adresse erhalten, kann das daran
liegen, dass es keine Übereinstimmung zwischen den Einstellungen
des Verschlüsselungsschlüssels auf Ihrem Computer und dem des
kabellosen Routers oder Access Points gibt. Überprüfen Sie, ob
die WEP-, WPA- oder WPA2-Einstellungen übereinstimmen. Der
Schlüssel unterscheidet zwischen Klein- und Großbuchstaben
und die Schreibweise auf jedem Computer und kabellosen Router
oder Access Point muss genau gleich sein, damit der Adapter eine
Verbindung zum Router herstellen kann. Weitere Informationen
über die Verschlüsselung, finden Sie unter „Sicherung des Wi-Fi
Netzwerks” auf Seite 20 dieses Benutzerhandbuchs.
1
Fehlerbehebung
Räumen eine durchschnittliche Reichweite für kabellose Netzwerkgeräte
von 30 bis 60 Metern. Bitte beachten Sie, dass die Verbindungsgesch
windigkeit abnehmen kann, wenn Sie weiter vom Router oder Access
Point entfernt sind. Wenn Sie genau wissen wollen, ob Probleme mit dem
kabellosen Netzwerk mit der Reichweite zusammenhängen, stellen Sie den
Computer nach Möglichkeit vorübergehend in einem Abstand von 1,5 bis 3
m vom Router (oder Access Point) auf.
Wechseln des Funkkanals – Wenn Störungen auftreten, z.B. durch
andere kabellose Netzwerke in der Umgebung, können Sie die Leistung
und Verlässlichkeit Ihres Netzwerks verbessern, indem Sie den Kanal Ihres
kabellosen Netzwerks wechseln. Im Lieferzustand ist der Standardkanal des
Routers Kanal 6. Je nach Umgebung haben Sie eine Auswahl an verschiedenen
anderen Kanälen. Im Benutzerhandbuch Ihres Routers oder Access Points
finden Sie mehr Informationen über die Einstellung anderer Kanäle.
Verringerung der Übertragungsrate des kabellosen Netzwerks—
Verringerung der Übertragungsrate des kabellosen Netzwerks kann
die maximale Reichweite des kabellosen Netzwerks und die Stabilität der
Verbindung verbessern. Bei vielen kabellosen Netzwerkkarten kann die
Übertragungsrate verringert werden. Gehen Sie hierfür zur Systemsteuerung
von Windows, öffnen Sie die Netzwerkverbindungen und klicken Sie doppelt
auf die Verbindung Ihres Adapters. Wählen Sie im Dialogfeld „Eigenschaften”
auf der Registerkarte „Allgemein” den Konfigurationsschalter aus (Anwender
von Windows 98 müssen den kabellosen Adapter im Listenfeld auswählen und
dann auf „Eigenschaften” klicken), wählen Sie den Schalter „Erweitert” und
anschließend die entsprechende Übertragungsrate. Kabellose Client-Karten
sind normalerweise so eingestellt, dass sie die Übertragungsrate automatisch
anpassen; dies kann allerdings zu periodischen Unterbrechungen führen, wenn
das Funksignal zu schwach ist; langsamere Übertragungsraten sind in der
Regel stabiler. Probieren Sie verschiedene Übertragungsraten aus, bis Sie die
passende für Ihre Umgebung gefunden haben; bitte beachten Sie, dass die
Übertragungsraten für den Internetgebrauch anwendbar sein müssen. Weitere
Informationen finden Sie in der Dokumentation zur kabellosen Karte. Wenn Sie
auch bei geringem Abstand noch Probleme haben, nehmen Sie bitte Kontakt
mit dem technischen Support von Belkin auf.
Warum gibt es zwei WLAN-Programme in meinem System-Tray?
Welches soll benutzt werden?
Das WLAN-Programm von Belkin bietet Ihnen einige Funktionen und
Vorzüge, über die das Wireless Zero Configuration Programm von Windows
XP nicht verfügt. Wir bieten Ihnen z. B. eine Standortübersicht (Site
Survey), detaillierte Verbindungsinformationen und Adapterdiagnose.
Es ist wichtig zu wissen, welches Überwachungsprogramm Ihren Adapter
verwaltet. Wir empfehlen Ihnen, das Dienstprogramm für kabellose
Netzwerke von Belkin zu benutzen. Wenn Sie das Dienstprogramm für
38
Fehlerbehebung
kabellose Netzwerke von Belkin benutzen wollen, folgen Sie diesen
Schritten:
1
Schritt 1 Klicken Sie mit der rechten Maustaste auf das
Netzwerkstatus-Symbol im System-Tray und wählen Sie die
Registerkarte „Status”.
2
Sie benutzen jetzt das Dienstprogramm für kabellose Netzwerke von
Belkin, um den kabellosen Adapter zu konfigurieren.
Der Adapter funktioniert nicht oder die Verbindung ist nicht
stabil, wenn der Computer über eine zweite eingebaute
kabellose Netzwerkkarte verfügt (z. B. mini PCI oder Intel®
Centrino™).
Dieses Problem tritt auf, wenn eine integrierte kabellose
Netzwerkkarte und der kabellose N USB-Adapter von Belkin
gleichzeitig aktiviert sind, weil Windows jetzt zwei aktive kabellose
Verbindungen verwalten muss.
Sie müssen die integrierte kabellose Karte Ihres Computers unter
„Netzwerkadapter” im Geräte-Manager deaktivieren.
Der Adapter funktioniert nicht oder die Verbindung ist
langsam, wenn der Computer über eine eingebaute
Ethernetkarte verfügt.
Dieses Problem tritt auf, wenn die Ethernetkarte und der Adapter
gleichzeitig aktiviert sind, weil Windows jetzt zwei aktive
Netzwerkverbindungen verwalten muss. Sie müssen die Ethernetkarte
Ihres Computers unter „Netzwerkadapter” im Geräte-Manager
deaktivieren.
Was ist der Unterschied zwischen 802.11g und
dem Entwurf für 802.11n?
Es gibt heutzutage drei gängige Netzwerkstandards, die Daten
bei sehr unterschiedlichen Höchstgeschwindigkeiten übertragen.
Jede basiert auf der jeweiligen Zuweisung für zertifizierte
Netzwerkstandards. Der gängigste Standard 802.11g überträgt Daten
mit 54 Mbit/s; 802.11a arbeitet auch mit 54 Mbit/s; jedoch auf der
5-GHz-Frequenz; der Entwurf des Standards 802.11n kann eine
Übertragungsrate von bis 300 Mbit/s erreichen. Auf der Tabelle auf
der nächsten Seite finden Sie weitere Informationen hierzu.
39
3
4
5
6
Kapitel
Schritt 2 Entfernen Sie auf der Registerkarte „Status” die Markierung
beim Kontrollkästchen „Use Windows to Configure my Wireless
Network” (Windows zum Konfigurieren der Einstellungen des
kabellosen Netzwerks verwenden). Wenn das Kontrollkästchen
deaktiviert ist, klicken Sie auf „OK”, um das Fenster zu schließen.
Fehlerbehebung
Bis zu 300 Mbit/s*
Frequenz
N1 MIMO
(Entwurf 802.11n
mit MIMO)
Bis zu 300 Mbit/s*
Normale Geräte im
Haushalt, wie schnurlose
Telefone und Mikrowellen,
können im lizenzfreien
2,4-GHz-Frequenzband
Störungen verursachen
Normale Geräte im
Haushalt, wie schnurlose
Telefone und Mikrowellen,
können im lizenzfreien
2,4-GHz-Frequenzband
Störungen verursachen
Normale Geräte im
Haushalt, wie schnurlose
Telefone und Mikrowellen,
können im lizenzfreien
2,4-GHz-Frequenzband
Störungen verursachen
Normale Geräte im
Haushalt, wie schnurlose
Telefone und Mikrowellen,
können im lizenzfreien
2,4-GHz-Frequenzband
Störungen verursachen
Kompatibilität
N MIMO
(Entwurf 802.11n
mit MIMO)
G+ MIMO
(802.11g mit MIMO
MRC)
Bis zu 54 Mbit/s*
Kompatibel mit 802.11b/g
Kompatibel mit 802.11b/g
Kompatibel mit dem
Entwurf des Standards
802.11n** und 802.11b/g
Kompatibel mit dem
Entwurf des Standards
802.11n** und 802.11b/g
Reichweite*
G
(802.11g)
Bis zu 54 Mbit/s*
Bis zu 120 m*
Bis zu 305 m*
Bis zu 365 m*
Bis zu 425 m*
Vorzug
Geschwindigkeit/ Funktechnologie
Datenrate*
Vergleich zwischen verschiedenen WLAN-Standards
Bekannt—verbreitet
bei der gemeinsamen
Internetnutzung
Bessere Funkabdeckung
und gleichmäßige Übertra
gungsgeschwindigkeit
Höhere Geschwindigkeit
und bessere
Funkabdeckung
Brandneu—beste
Funkabdeckung und
Durchsatzleistung
*Reichweite und Verbindungsgeschwindigkeit sind abhängig von Ihrer Netzwerkumgebung.
**Dieser Adapter ist kompatibel mit Produkten derselben Version des Entwurfs des 802.11nStandards; ein Software-Upgrade kann für die beste Leistung erforderlich sein.
40
Fehlerbehebung
Kostenloser technischer Support*
1
*Zum normalen
www.belkin.com
Telefontarif
Technische Informationen und Unterstützung erhalten Sie auf unserer
Website www.belkin.com im Bereich technischer Support. Wenn Sie
den technischen Support telefonisch erreichen wollen, wählen Sie die
entsprechende Nummer auf der unten aufgeführten Liste *.
NUMMER
INTERNET-ADRESSE
ÖSTERREICH
0820 200766
www.belkin.com/uk/networking/
BELGIEN
07 07 00 073
www.belkin.com/nl/networking/
TSCHECHISCHE
239 000 406
www.belkin.com/uk/networking/
DÄNEMARK
701 22 403
www.belkin.com/uk/networking/
FINNL AND
097 25 19 123
www.belkin.com/uk/networking/
FR ANKREICH
08 - 25 54 00 26
www.belkin.com/fr/networking/
DEUTSCHL AND
0180 - 500 57 09
www.belkin.com/de/networking/
GRIECHENL AND
00800 - 44 14 23 90
www.belkin.com/uk/networking/
UNG ARN
06 - 17 77 49 06
www.belkin.com/uk/networking/
ISL AND
800 8534
www.belkin.com/uk/networking/
IRL AND
0818 55 50 06
www.belkin.com/uk/networking/
ITALIEN
02 - 69 43 02 51
www.belkin.com/it/support/tech/issues_more.asp
LUXEMBURG
34 20 80 85 60
www.belkin.com/uk/networking/
NIEDERL ANDE
0900 - 040 07 90 0,10 € pro
www.belkin.com/nl/networking/
NORWEGEN
81 50 0287
www.belkin.com/uk/networking/
POLEN
00800 - 441 17 37
www.belkin.com/uk/networking/
PORTUG AL
707 200 676
www.belkin.com/uk/networking/
RUSSL AND
495 580 9541
www.belkin.com/networking/
SÜDAFRIK A
0800 - 99 15 21
www.belkin.com/uk/networking/
SPANIEN
902 - 02 43 66
www.belkin.com/es/support/tech/networkingsupport. asp
SCHWEDEN
07 - 71 40 04 53
www.belkin.com/se/support/tech/networkingsupport.asp
SCHWEIZ
08 - 48 00 02 19
www.belkin.com/uk/networking/
GROSSBRITANNIEN
0845 - 607 77 87
www.belkin.com/uk/networking/
SONSTIGE L ÄNDER
+44 - 1933 35 20 00
41
3
4
5
6
Kapitel
L AND
2
Informationen
FCC-Erklärung
KONFORMITÄTSERKLÄRUNG ZUR EINHALTUNG DER
FCC-BESTIMMUNGEN ÜBER ELEKTROMAGNETISCHE
KOMPATIBILITÄT
Wir, Belkin International, Inc., 501 West Walnut Street,
Compton, CA 90220, USA, erklären hiermit alleinverantwortlich,
dass der Artikel,
F5D8053
auf den sich diese Erklärung bezieht, Abschnitt 15 der FCCBestimmungen entspricht. Der Betrieb unterliegt den beiden
folgenden Bedingungen: (1) Dieses Gerät darf schädigende
Störungen nicht verursachen, und (2) dieses Gerät muss
jedwede Störung annehmen, einschließlich der Störungen, die
einen unerwünschten Betrieb verursachen könnten.
Achtung: Hochfrequente Strahlungen
Die Strahlungsleistung dieses Geräts liegt deutlich unter den FCC-Grenzwerten für
hochfrequente Strahlungen. Dennoch ist bei der Gerätenutzung darauf zu achten,
dass im Normalbetrieb Menschen möglichst wenig schädlichen Strahlungen
ausgesetzt werden.
Beim Anschluss einer externen Antenne an das Gerät muss die Antenne so
aufgestellt werden, dass im Normalbetrieb Menschen möglichst wenig mit
schädlichen Strahlungen in Berührung kommen. Um sicherzustellen, dass die FCCGrenzwerte für Belastungen durch hochfrequente Strahlungen nicht überschritten
werden, ist im Normalbetrieb stets ein Abstand von mindestens 20 cm zur Antenne
einzuhalten.
FCC-Hinweis
Dieses Gerät entspricht nachweislich den Grenzwerten für digitale Geräte der
Klasse B gemäß Teil 15 der FCC-Bestimmungen. Diese Grenzwerte dienen dem
angemessenen Schutz vor schädlichen Strahlungen beim Betrieb von Geräten im
Wohnbereich.
Das Gerät erzeugt und verwendet hochfrequente Strahlungen und kann sie
ausstrahlen. Verursacht dieses Gerät Störungen des Radio- oder Fernsehempfangs
(was sich durch Ein- und Ausschalten des Gerätes feststellen lässt), so können Sie
versuchen, die Störung auf folgende Weise zu beseitigen:
• Andere Ausrichtung oder Standortänderung der Empfangsantenne
• Vergrößern des Abstands zwischen Gerät und Empfänger
• Anschluss des Geräts an eine Steckdose in einem anderen Stromkreis als dem
des Empfängers
• Den Händler oder einen erfahrenen Rundfunk- und Fernsehtechniker
hinzuziehen.
42
Informationen
Anpassungen
Nach den Vorschriften der FCC muss dem Benutzer mitgeteilt werden, dass
Änderungen oder Modifikationen an diesem Gerät, die nicht ausdrücklich von
Belkin International, Inc. genehmigt wurden, dazu führen können, dass die
Berechtigung des Benutzers zum Betrieb des Geräts erlischt.
Eingeschränkte lebenslange Produktgarantie von Belkin International, Inc.
Garantieleistung.
Belkin International, Inc. („Belkin”) garantiert dem ursprünglichen Käufer dieses
Belkin-Produkts, dass dieses Produkt frei von Material-, Verarbeitungs-, und
Konstruktionsfehlern ist.
Garantiedauer.
Problembehebung.
Herstellergarantie.
Belkin wird das Produkt nach eigenem Ermessen entweder kostenlos (abgesehen
von den Versandkosten) reparieren oder austauschen.
Garantieausschluss.
Alle oben genannten Garantien verlieren ihre Gültigkeit, wenn das BelkinProdukt Belkin auf Anfrage nicht auf Kosten des Käufers zur Überprüfung zur
Verfügung gestellt wird oder wenn Belkin feststellt, dass das Belkin-Produkt
nicht ordnungsgemäß installiert worden ist, und dass unerlaubte Änderungen
daran vorgenommen worden sind. Die Herstellergarantie von Belkin gilt nicht
für (Natur)gewalten wie Überschwemmungen, Erdbeben und Bitzschlag sowie
Krieg, Vandalismus, Diebstahl, normalen Verschleiß, Erosion, Wertminderung,
Veralterung, schlechte Behandlung, Beschädigung durch Störungen aufgrund
von Unterspannung (z. B. Spannungsabfall oder -Senkung) oder nicht erlaubte
Programm- oder Systemänderungen.
Service.
Um Unterstützung von Belkin zu bekommen, gehen Sie nach folgenden Schritten vor:
1. Schreiben Sie an Belkin International, Inc., 501 W. Walnut St., Compton CA
90220, Attn: Customer Service oder wenden Sie sich innerhalb von 15 Tagen
nach dem Vorfall telefonisch unter (800)-223-5546 an Belkin. Halten Sie folgende
Informationen bereit:
a. Die Artikelnummer des Belkin-Produkts.
b. Wo Sie das Produkt erworben haben.
c. Das Kaufdatum.
d. Kopie der Originalquittung.
2. Die entsprechenden Mitarbeiter/innen informieren Sie darüber, wie Sie Ihre
Rechnung und das Belkin-Produkt versenden müssen und wie Sie fortfahren
müssen, um Ihre Ansprüche geltend zu machen.
43
2
3
4
5
6
Kapitel
Belkin gewährt für dieses Belkin-Produkt eine lebenslange Garantie.
1
Informationen
Belkin International, Inc., Belkin International, Inc. behält sich vor, das beschädigte
Belkin-Produkt zu überprüfen. Alle Kosten, die beim Versand des Belkin-Produkts
an Belkin International, Inc. zum Zweck der Überprüfung entstehen, sind vollständig
durch den Käufer zu tragen. Wenn Belkin nach eigenem Ermessen entscheidet, dass
es unpraktisch ist, das beschädigte Gerät an Belkin International, Inc., zu schicken,
kann Belkin nach eigenem Ermessen eine Reparaturstelle damit beauftragen, das
Gerät zu überprüfen und einen Kostenvoranschlag für die Reparaturkosten des
Gerätes zu machen. Die Kosten für den Versand zu einer solchen Reparaturstelle und
die eventuellen Kosten für einen Kostenvoranschlag gehen vollständig zu Lasten des
Käufers. Beschädigte Geräte müssen zur Überprüfung zur Verfügung stehen, bis das
Reklamationsverfahren abgeschlossen ist. Wenn Ansprüche beglichen werden, behält
sich Belkin International, Inc. das Recht vor, Ersatzansprüche an eine bestehende
Versicherung des Käufers zu übertragen.
Garantiegesetze.
DIESE GARANTIE BILDET DIE ALLEINIGE GARANTIE VON BELKIN. ES GIBT KEINE
ANDERE GARANTIE, EXPLIZIT ERWÄHNT ODER IMPLIZIT, AUSSER WENN DIES VOM
GESETZ VORGESCHRIEBEN IST, EINSCHLIESSLICH DER IMPLIZITEN GARANTIE
ODER DES QUALITÄTSZUSTANDS, DER ALLGEMEINEN GEBRAUCHSTAUGLICHKEIT
ODER EIGNUNG FÜR EINEN BESTIMMTEN ZWECK, UND SOLCHE IMPLIZITEN
GARANTIEN, WENN ES SOLCHE GIBT, BEZIEHEN SICH AUSSCHLIESSLICH AUF DIE
DAUER, DIE IN DIESER GARANTIE ZUGRUNDE GELEGT WIRD.
In manchen Ländern sind Einschränkungen bezüglich der Dauer der Garantie
nicht zulässig. Die oben erwähnten Einschränkungen treffen für Sie dementsprechend
nicht zu.
UNTER KEINEN UMSTÄNDEN HAFTET BELKIN FÜR ZUFÄLLIGEN, BESONDEREN,
DIREKTEN, INDIREKTEN, MEHRFACHEN SCHADEN ODER FOLGESCHÄDEN WIE,
ABER NICHT AUSSCHLIESSLICH, ENTGANGENES GESCHÄFT ODER PROFITE, DIE
IHNEN DURCH DEN VERKAUF ODER DIE BENUTZUNG VON EINEM BELKIN-PRODUKT
ENTGANGEN SIND, AUCH WENN SIE AUF DIE MÖGLICHKEIT SOLCHER SCHÄDEN
AUFMERKSAM GEMACHT WORDEN SIND.
Diese Garantie räumt Ihnen spezifische Rechte ein, die von
Land zu Land unterschiedlich ausgestaltet sein können. Da in
manchen Ländern der Ausschluss oder die Beschränkung der
Haftung für durch Zufall eingetretene oder Folgeschäden nicht
zulässig ist, haben die vorstehenden Beschränkungen und
Ausschlussregelungen für Sie möglicherweise keine Gültigkeit.
Informationen zur Entsorgung des Produkts finden Sie
unter http://environmental.belkin.com
44
ZUR VERWENDUNG IN
AT
BE CY
EE
FI
HU IE
CZ DK
FR DE GR
LV
LT
LU MT NL PL
IT
PT
SK
SI
IS
LI NO CH BG
ES
SE GB
RO TR
BETRIEB AUF DEN
KANÄLEN1-13
Informationen
1
Konformitätserklärung gemäß dem Gesetz über Funkanlagen und
Telekommunikationsendeinrichtungen (FTEG) und der Richtlinie 1999/5/EG (R&TTE)
Declaration of Conformity in accordance with the Radio and Telecommunications Terminal Equipment Act (FTEG)
and Directive 1999/5/EC (R&TTE Directive)
2
3
BELKIN LTD
…………………………………………………………………………………….
4
erklärt, dass das Produkt
5
Hersteller/Verantwortliche Person // The manufacturer / responsible person
declares that the product
6
Type (ggf. Anlagenkonfiguration mit Angabe der Module):
Type (if applicable, configuration including the modules)
N WIRELESS USB ADAPTER
��Telekommunikations(Tk-)endeinrichtung
x Funkanlage
……RLAN…………………………………………
…CLASS 2…………………….
Intended purpose
Equipment class
Telecommunications terminal equipment
Radio equipment
Verwendungszweck
Geräteklasse
bei bestimmungsgemäßer Verwendung den grundlegenden Anforderungen des § 3 und den übrigen
einschlägigen Bestimmungen des FTEG (Artikel 3 der R&TTE) entspricht.
complies with the essential requirements of §3 and the other relevant provisions of the FTEG (Article 3 of the R&TTE
Directive), when used for its intended purpose.
Gesundheit und Sicherheit gemäß § 3 (1) 1. (Artikel 3 (1) a))
Health and safety requirements pursuant to § 3 (1) 1. (Article 3(1) a))
angewendete harmonisierte Normen …
Harmonised standards applied
Einhaltung der grundlegenden Anforderungen auf
andere Art und Weise (hierzu verwendete Standards/
Spezifikationen) …
Other means of proving conformity with the essential
requirements (standards/specifications used) …
Schutzanforderungen in Bezug auf die elektromagn. Verträglichkeit § 3 (1) 2, Artikel 3 (1) b))
Protection requirements concerning electromagnetic compatibility § 3(1)(2), (Article 3(1)(b))
angewendete harmonisierte Normen
Harmonised standards applied…
Einhaltung der grundlegenden Anforderungen auf
andere Art und Weise (hierzu verwendete Standards/
Spezifikationen) …
Other means of proving conformity with the essential
requirements (standards/specifications used)…
45
Kapitel
F5D8053
Informationen
Maßnahmen zur effizienten Nutzung des Funkfrequenzenspektrums
Measures for the efficient use of the radio frequency spectrum
��Luftschnittstelle bei Funkanlagen gemäß § 3(2) (Artikel 3(2))
Air interface of the radio systems pursuant to § 3(2) (Articel 3(2))
angewendete harmonisierte Normen
Harmonized standards applied
Einhaltung der grundlegenden Anforderungen auf
andere Art und Weise (hierzu verwendete Standards/
Schnittstellenbeschreibungen)…
Other means of proving conformity with the essential
requirements (standards/interface specifications used) …
EN / HN … EN60950-1:2001……..
ETS EN301 489-1V1.5.1 (2004-11), EN301 48917 V1.2.1 (2002- 08)
EN300-328 V1.6.1 (2004-11)
Reg TP………………………………………..
BAPT…………………………………………
Anschrift
Address
+ TK-Nr.
Phone, fax, e-mail
rt, Datum
BELKIN LTD
EXPRESS BUSINESS PARK
SHIPTON WAY
RUSHDEN
UK
NN10 6GL
Tel:- +44 (0) 1933 35 2000
Fax:- +44 (0) 1933 31 4967
www.Belkin.com
Name und Unterschrift
Place & date of issue
Name and signature
10 July 2007
Rushden
Mr K Simpson
46
Kabelloser N
USB-Adapter
Belkin Technischer Support
GB: 0845 607 77 87
Europa: www.belkin.com/support
Belkin Ltd.
Express Business Park
Shipton Way, Rushden
NN10 6GL, Großbritannien
+44 (0) 1933 35 2000
+44 (0) 1933 31 2000 Fax
Belkin SAS
130 rue de Silly
92100 Boulogne-Billancourt,
Frankreich
+33 (0) 1 41 03 14 40
+33 (0) 1 41 31 01 72 Fax
Belkin GmbH
Hanebergstraße 2
80637 München
Deutschland
+49 (0) 89 143405 0
+49 (0) 89 143405 100 Fax
Belkin Iberia
C/ Anabel Segura, 10 planta baja, Of. 2
28108, Alcobendas, Madrid
Spanien
+34 91 791 23 00
+34 91 490 23 35 Fax
Belkin Italy & Greece
Via Carducci, 7
Mailand 20123
Italien
+39 02 862 719
+39 02 862 719 Fax
Belkin B.V.
Boeing Avenue 333
1119 PH Schiphol-Rijk,
Niederlande
+31 (0) 20 654 7300
+31 (0) 20 654 7349 Fax
© 2007 Belkin International, Inc. Alle Rechte vorbehalten. Alle Produktnamen sind eingetragene Marken
der angegebenen Hersteller. Windows und Windows Vista sind in den Vereinigten Staaten und/oder in
anderen Ländern eingetragene Marken bzw. Marken der Microsoft Corporation.
P75451ea
Draadloze N
USB-adapter
EN
FR
DE
NL
ES
IT
Handleiding
F5D8053ea
Inhoud
1 Inleiding 1
Voordelen van een netwerk in uw woning ...................................................... 1
Voordelen van een draadloos netwerk ............................................................ 1
Plaatsing van de hardware voor optimale prestaties van uw
draadloze netwerk ........................................................................................... 2
2 Overzicht 5
Productkenmerken .......................................................................................... 5
Toepassingen en voordelen ............................................................................ 6
Technische gegevens ...................................................................................... 6
Systeemvereisten ............................................................................................ 7
Inhoud van de verpakking .............................................................................. 7
3 De adapter installeren en instellen ............................................................. 8
A — Installatieproces voor Windows Vista ..................................................... 8
B — Installatieproces voor Windows besturingssystemen m.u.v.
Windows Vista ....................................................................................... 13
C — Configuratie ........................................................................................... 16
4 De Wireless Networking Utility van Belkin gebruiken ................................17
De Wireless Networking Utility van Belkin vanaf de Windows systeembalk
openen ........................................................................................................... 17
Netwerkstatus ................................................................................................ 18
Beschikbare netwerken ................................................................................. 18
Netwerkstatus en oplossingen ...................................................................... 19
Profielen instellen voor uw draadloze netwerk ............................................ 20
Beveiliging van uw WiFi-netwerk ................................................................. 20
De adapter voor het gebruik van beveiliging configureren ....................... 25
5 Problemen oplossen ...................................................................................34
6 Informatie ...................................................................................................42
Inleiding
Voordelen van een netwerk in uw woning
Met een privénetwerk van Belkin kunt u:
• Uw hi-speed internetverbinding met alle computers in huis delen
• Bronnen als bestanden en harde schijven delen met alle aangesloten
computers in huis
• Eén printer met het hele gezin gebruiken
• Documenten, muziek, videomateriaal en digitale foto’s delen
• Bestanden opslaan, ophalen en naar een andere computer kopiëren
• Samen on-line games spelen, via het internet uw e-mail bekijken en
chatten
Voordelen van een draadloos netwerk
Het opzetten van een draadloos netwerk met netwerkproducten van Belkin
heeft veel voordelen:
•
Mobiliteit – een speciale computerruimte is voortaan overbodig; u
kunt nu overal binnen de draadloze reikwijdte op een notebook of
desktopcomputer binnen het netwerk werken
•
Eenvoudige installatie – eenvoudige setup met behulp van de Easy
Installation Wizard
•
Flexibiliteit – installatie van en toegang tot printers, computers en andere
netwerkapparatuur vanaf elke plek in uw woning
•
Eenvoudige uitbreiding – Belkin biedt u keus uit een complete reeks
netwerkproducten die het u mogelijk maken uw netwerk uit te breiden met
apparaten als printers en game-consoles
•
Bekabeling is niet nodig – u bespaart de kosten en de moeite die komen
kijken bij het aanleggen van Ethernet-bekabeling in uw woning of kantoor
•
Algemeen aanvaard – keuze uit een groot aanbod van onderling
samenwerkende (interoperabele) netwerkproducten
1
1
2
3
4
5
6
Hoofdstuk
Wij danken u hartelijk voor het kopen van de draadloze N USBadapter van Belkin. U kunt nu profiteren van deze fantastische nieuwe
technologie om zonder kabels in uw huis of kantoor een netwerk
op te zetten. Met deze adapter kunt u een notebook op uw netwerk
aansluiten. Wij raden u aan deze handleiding volledig door te lezen
en extra aandacht te besteden aan het hoofdstuk “Plaatsing van de
hardware voor optimale prestaties van uw draadloze netwerk”.
Inleiding
Plaatsing van de hardware voor optimale prestaties van draadloze
netwerken
Uw draadloze verbinding wordt sterker naarmate u dichter bij de
computer komt die is aangesloten op uw router (of accesspoint).
Het bereik van draadloze apparatuur ligt doorgaans tussen de 30 en
60 meter. De prestaties van uw draadloze verbinding zullen ook iets
achteruit gaan naarmate de afstand tussen uw draadloze router (of
accesspoint) groter wordt. U hoeft hiervan niet altijd iets te merken.
Als de afstand tussen uw router (of accesspoint) groter wordt, kan de
verbindingssnelheid afnemen. Objecten die signalen kunnen verzwakken
doordat ze de radiogolven van het netwerk blokkeren, zijn metalen
apparaten of obstakels en muren.
Door de computer naar een andere positie op een afstand van 1,5 tot
3 meter van de router te verplaatsen, kunt u nagaan of de mindere
prestaties te maken hebben met de afstand of een blokkade. Neem
contact op met de afdeling Technische Ondersteuning van Belkin als u
een probleem niet zelf kunt oplossen.
Let op: Hoewel de onderstaande factoren de prestaties van een netwerk
nadelig kunnen beïnvloeden, beletten zij niet dat het draadloze netwerk
functioneert. Als u denkt dat het netwerk niet optimaal presteert, kan
deze checklist uitkomst bieden.
1.
Plaatsing van de draadloze router (of het draadloze accesspoint)
Plaats uw draadloze router (of accesspoint), het centrale
verbindingspunt binnen uw netwerk, op een centrale plek tussen uw
draadloze netwerkapparatuur.
De beste netwerkdekking voor uw “draadloze cliënten” (d.w.z.
computers die zijn voorzien van draadloze notebook- en
desktopkaarten of USB-adapters van Belkin) bereikt u als volgt:
•
Zorg ervoor dat de antennes van de draadloze router (of het
draadloze accesspoint) parallel aan elkaar en in verticale stand
staan (naar het plafond wijzen). Als de draadloze router (of het
draadloze accesspoint) zelf al verticaal is gepositioneerd, laat
de antennes dan zo recht mogelijk naar het plafond wijzen.
•
In woningen met meer verdiepingen plaatst u de draadloze
router (of accesspoint) op de verdieping die zich het dichtst bij
het midden van de woning bevindt. Dit kan betekenen dat u de
draadloze router (of het draadloze accesspoint) op een hogere
verdieping moet plaatsen.
•
Plaats de draadloze router (of het draadloze accesspoint) niet
in de buurt van een draadloze 2,4GHz-telefoon.
2
Inleiding
1
Vermijd obstakels en interferentie
Plaats de draadloze router (of het draadloze accesspoint) liefst niet in
de buurt van apparaten die radiogolven uitzenden, zoals magnetrons.
Andere objecten die de draadloze communicatie kunnen hinderen zijn:
•
Koelkasten
•
Wasmachines en/of drogers
•
Metalen kasten
•
Grote aquaria
•
Gemetalliseerde UV-werende ruiten
3
4
Als het draadloze signaal op sommige plaatsen zwakker lijkt, zorg
er dan voor dat zulke objecten zich niet tussen de computers en de
draadloze router (of het draadloze accesspoint) bevinden.
3.
2
De plaats van uw draadloze telefoon
Ga als volgt te werk als de prestaties van het draadloze netwerk niet
beter worden nadat u de bovenstaande wenken hebt opgevolgd én u
een draadloze telefoon bezit:
•
Kijk wat er gebeurt als u de draadloze telefoon uit de buurt
houdt van de draadloze router (of het draadloze accesspoint)
en de computers die geschikt zijn voor draadloze
communicatie.
•
Verwijder de batterij uit alle draadloze telefoons die gebruik
maken van de 2,4GHz-band (zie informatie van de fabrikant).
Als het probleem hiermee is opgelost, is(/zijn) uw telefoon(s)
de storingsbron.
•
Als de telefoon ook een kanalenkiezer heeft, kies dan het
kanaal dat het verst verwijderd is van het kanaal dat het
draadloze netwerk gebruikt. Verander bijvoorbeeld het
kanaal van de telefoon in kanaal 1 en stel het kanaal van de
draadloze router (of het draadloze accesspoint) in op kanaal
11 (afhankelijk van de regio kunt u verschillende andere
kanalen kiezen). In de handleiding van de telefoon vindt u
hierover de nodige informatie.
•
Gebruik zo nodig voortaan een draadloze telefoon van 900
MHz of 5 GHz.
3
5
6
Hoofdstuk
2.
Inleiding
4. Kies het “stilste” kanaal voor het draadloze netwerk
Op plaatsen waar meerdere woningen of kantoren dicht bij elkaar liggen,
zoals appartementen- of kantoorgebouwen, kunnen draadloze netwerken
in de omgeving problemen veroorzaken voor uw netwerk. In het siteoverzicht van de Wireless Networking Utility van Belkin kunt u andere
draadloze netwerken opsporen. Verplaats de draadloze router (of het
draadloze accesspoint) en de computers naar een kanaal dat zo ver
mogelijk van andere netwerken vandaan is.
Experimenteer met meerdere kanalen om de beste verbinding te vinden
en storing door draadloze telefoons en andere draadloze apparatuur te
voorkomen.
Gebruik voor niet van Belkin afkomstige draadloze netwerkproducten het
gedetailleerde site-overzicht en de informatie over draadloze kanalen in de
handleiding.
5.
Veilige verbindingen, VPN’s en AOL
Veilige verbindingen zijn verbindingen waarvoor een gebruikersnaam
en een wachtwoord vereist zijn. Hiervan wordt gebruik gemaakt in
situaties waar beveiliging van belang is. Veilige verbindingen zijn o.a.:
•
Virtual Private Network (VPN)-verbindingen; deze worden
vaak gebruikt om van afstand verbinding te maken met een
kantoornetwerk
•
Het “Bring Your Own Access”-programma van America Online
(AOL) - dit programma laat u AOL gebruiken via breedband die
ter beschikking wordt gesteld door een andere kabel- of DSLservice.
•
De meeste websites voor internetbankieren
•
Veel commerciële websites waarbij toegang uitsluitend verleend
wordt nadat een gebruikersnaam en wachtwoord zijn ingevuld
Veilige verbindingen kunnen worden onderbroken als het energiebeheer
van de computer de computer naar de slaapstand overschakelt. Om dit
te voorkomen moet u opnieuw verbinding maken door de VPN- of AOLsoftware te draaien of door opnieuw op de beveiligde website in te loggen.
Een tweede alternatief is het veranderen van de energiebeheerinstellingen
van de computer, zodat deze niet overgaat op de slaapstand. Dit is
niet noodzakelijkerwijs van toepassing voor draagbare computers. Om
het energiebeheer in Windows te wijzigen gaat u naar “Power Options”
(Energiebeheer) in het “Control Panel” (Configuratiescherm).
Als u nog steeds problemen ondervindt bij beveiligde verbindingen, VPN’s
en AOL, neem dan de bovenstaande stappen 1 t/m 4 nog eens door om
na te gaan of u hiermee rekening hebt gehouden.
Deze richtlijnen helpen u bij het optimaliseren van het bereik van de
draadloze router. Als u een nog groter bereik nodig hebt, overweeg dan
4
Overzicht
1
Productkenmerken
3
De adapter voldoet aan de IEEE draft-802.11n specificatie voor
communicatie met andere draadloze apparaten die voldoen aan draft802.11n met snelheden tot 300 Mbps*. De adapter is compatibel met
alle 802.11g-apparaten die werken met snelheden van 54 Mbps en
met 802.11b-producten die werken met snelheden van 11 Mbps. De
adapter werkt op dezelfde 2,4GHz-frequentieband als 802.11b/g WiFi ®-producten.
•
Werkt op de 2,4GHz ISM-band (Industrial, Science and Medical
band)
•
Geïntegreerde, eenvoudig te gebruiken Wireless Networking
Utility
•
USB 2.0-interface ten behoeve van compatibiliteit met vrijwel
elke computer die is voorzien van een USB 2.0-poort met
busvoeding
•
WPA, WPA2, 64- of 128-bits WEP (Wired Equivalent Privacy)
encryptie
•
Draadloze toegang tot via een netwerk verbonden bronnen
•
Datasnelheden van tot 300 Mbps* (draft 802.11n) 54 Mbps
(802.11g), of 11 Mbps (802.11b)
•
Gemakkelijk te installeren en te gebruiken
•
LED-indicatielampje voor Voeding en Verbinding/Activiteit
5
2
4
5
6
Hoofdstuk
de aanschaf van een draadloze range extender/draadloos accesspoint
van Belkin.
Ga voor meer informatie over de netwerkproducten van Belkin naar
www.belkin.nl/networking, of neem contact op met de afdeling
Technische ondersteuning.
Overzicht
Toepassingen en voordelen
•
•
•
•
•
•
Draadloos roamen met een laptop in huis of kantoor.
Biedt u de vrijheid van netwerken zonder kabels.
Verbindingssnelheden tot 300 Mbps*
Zorgt direct voor hi-speed draadloze verbindingen in huis, op kantoor en
op hotspot-locaties zonder de aanwezige 802.11b/g-producten te storen.
Compatibiliteit met 802.11b/g-producten
De adapter is “backward-compatible” met bestaande Wi-Fi (IEEE 802.11b/
g)-producten
Ideaal voor moeilijk te bekabelen locaties
Maakt het opzetten van een netwerk mogelijk in gebouwen met massieve
muren of afgewerkte wanden en op open terreinen die moeilijk te
bekabelen zijn
Voortdurend wisselende werkomgeving
Gemakkelijk aan te passen in kantoren en situaties die vaak van indeling of
van plaats veranderen
Netwerken in kleinere kantoren of het kantoor-aan-huis
Biedt de gebruikers van kleinere kantoren en het kantoor-aan-huis de
mogelijkheid in een handomdraai een netwerk op te zetten
Technische gegevens
Host-interface:
USB 2.0
Bedrijfstemperatuur:0—60 graden C
Bewaartemperatuur:
-20—80 ºC
Luchtvochtigheid:
Max. 90% (niet-condenserend)
Bereik:
365 m**
* LET
OP: De vermelde overdrachtssnelheid – 300 Mbps – is de fysieke datasnelheid. De werkelijk
gerealiseerde doorvoersnelheid van gegevens ligt lager.
** Het
effectieve draadloze bereik is afhankelijk van de netwerkomgeving.
6
Overzicht
1
2
3
(c)
(d)
4
5
(a) Beschermkapje
Het meegeleverde beschermkapje kan bij het vervoeren van de adapter
ter bescherming over de USB-connector worden geplaatst. Verwijder het
beschermkapje voordat u de adapter op de USB-poort van uw computer of
via de desktopstandaard aansluit
(b) LED voor Voeding/activiteit
Gaat branden als de adapter gevoed wordt en knippert als de adapter
actief is.
(c) USB-connector
Kant van de adapter die op de USB-poort van uw computer aangesloten
kan worden
(d) Desktopstandaard
Stelt u in staat de adapter op veilige afstand van storende objecten rond
uw computer te gebruiken.
Systeemvereisten
•
PC-compatible laptop met een vrije USB 2.0-poort met busvoeding
•
Windows ® 2000, XP met SP2 of Vista TM***
Inhoud van de verpakking
•
Draadloze N USB-adapter
•
Beknopte installatiehandleiding
•
CD met installatiesoftware en handleiding
•
Desktopstandaard
7
6
Hoofdstuk
(a)
(b)
De adapter installeren en instellen
A Installatieproces voor Windows Vista
***LET OP: Bij verschijnen van dit product op de markt, waren
de Windows Vista stuurprogramma’s nog niet beschikbaar voor
uitgave, waar. Voor informatie over de beschikbaarheid van updates van
stuurprogramma’s voor Windows Vista verwijzen wij u naar onze website
www.belkin.com/support/vista.
BELANGRIJK: INSTALLEER EERST DE SOFTWARE VOORDAT U DE
ADAPTER AANSLUIT.
A.1 Plaats de installatie-cd in uw cd-romstation.
A.2 Klik op “Next” (Volgende) om het installatieproces te starten.
Let op: Als het scherm van Belkins installatieprogramma voor de kaart
niet binnen 20 seconden verschijnt, dubbelklik dan op het pictogram “My
Computer” (Deze Computer) om het cd-romstation te openen. Klik
vervolgens op het cd-romstation waarin de installatie-cd is geplaatst.
Indien de installatie niet automatisch wordt gestart, dubbelklikt u op het
pictogram met de naam “Setup.exe”.
8
De adapter installeren en instellen
1
2
installatieproces.
3
4
5
6
A.4 Selecteer een bestemmingsmap voor
de installatie van de software door
te klikken op “Browser” (Zoeken)
of klik eenvoudigweg op “Next”
(Volgende) om een standaard lokatie
te selecteren.
A.5 Via een Setup Status scherm wordt
u op de hoogte gebracht van de fase
waarin de installatie zich bevindt.
A.6 Er verschijnt mogelijk (eventueel twee
keer) een venster met “Windows
can’t verify the publisher of this
driver software” (Windows kan
niet achterhalen wie de uitgever
van deze stuurprogrammasoftware
is). Dit betekent NIET dat er een
probleem is. Onze software is
volledig getest en compatibel met dit
besturingssysteem.
9
Hoofdstuk
A.3 De InstallShield Wizard start het
De adapter installeren en instellen
A.7 Schakel de computer uit en sluit de
adapter aan zodra de computer dat
vraagt. De installatie is nu voltooid.
A.8 Zodra de installatie is voltooid, klikt u
op “Finish” (Beëindigen).
A.9 De Wizard Found New Hardware
(Nieuwe hardware gevonden)
verschijnt mogelijk in 3–15
seconden. Als dit het geval is, volg
dan de instructies die op het scherm
verschijnen op. Selecteer “Locate
and install the driver software”
(Lokaliseer en installeer de stuurprog
rammasoftware)
A.10 Er kan een scherm als hieronder
is afgebeeld verschijnen. Dit
betekent NIET dat er een probleem
is. Onze software is volledig
getest en compatibel met dit
besturingssysteem. Selecteer
“Install this driver software anyway”
(Ga toch door met de installatie
van deze stuurprogrammasoftware)
en volg de aanwijzingen op uw
beeldscherm.
Vervolgens verschijnt er een scherm
waarop wordt aangegeven dat
de hardware wordt geïnstalleerd;
vervolgens verschijnt een ander
scherm waarop wordt meegedeeld
dat de installatie klaar is.
10
De adapter installeren en instellen
A.11 Om met het Internet verbinding te
2
3
4
A.12 In het Control Panel
(Configuratiescherm), klikt u
op “View network status and
tasks” (Netwerkstatus en -taken
weergeven).
A.13 In het “Network and Sharing
Center” (Netwerkcentrum), klikt
u op “Connect to a network”
(Verbinding maken met een
netwerk).
A.14 In het volgende scherm selecteert u
een beschikbaar draadloos netwerk
en klikt u op “Connect” (Verbinding
maken).
11
5
6
Hoofdstuk
maken, opent u het “Network and
Sharing Center” (Netwerkcentrum)
via “Start > Control Panel”
(Configuratiescherm).
1
De adapter installeren en instellen
A.15 Uw adapter zal proberen verbinding
te maken met het geselecteerde
netwerk.
A.16 Afhankelijk van de
beveiligingsinstellingen van uw
draadloze netwerk, kan u verzocht
worden een netwerkbeveiligingss
leutel of passphrase (meervoudig
wachtwoord) in te voeren. Klik op
“Connect” (Verbinding maken) als u
dit gedaan hebt.
A.17 Nadat u verbinding hebt gemaakt
met het netwerk, kunt u ervoor
kiezen dit netwerk op te slaan en
voortaan als uw adapter binnen
bereik is, automatisch verbinding te
maken met dit netwerk.
A.18 Het “Network and Sharing Center”
(Netwerkcentrum) geeft nu de
netwerkverbinding weer die u
zojuist tot stand hebt gebracht. De
links links in het venster stellen u
in staat uw netwerkverbindingen te
configureren.
12
De adapter installeren en instellen
B. Installatieproces voor Windows besturingssystemen m.u.v.
Windows Vista
ADAPTER AANSLUIT.
2
3
B.1 Doe de installatiesoftware-cd in uw cd-romstation.
B.2 Het installatiescherm van het
installatieprogramma van Belkin zal
automatisch binnen 20 seconden
verschijnen. Klik op “Install Software”
(Software installeren) of “Next”
(Volgende) om de installatie te starten..
Let op:Als het scherm van Belkins
installatieprogramma voor de kaart
niet binnen 20 seconden verschijnt,
dubbelklik dan op het pictogram
“My Computer” (Deze Computer) om
het cd-romstation te openen. Klik
vervolgens op het cd-romstation
waarin de installatie-cd is geplaatst.
Dubbelklik vervolgens op het
pictogram met de naam “Setup.exe”.
B.3 De InstallShield Wizard zal het
installatieproces starten.
B.4 Selecteer een bestemmingsmap voor
de installatie van de software door
te klikken op “Browser” (Zoeken)
of klik eenvoudigweg op “Next”
(Volgende) om een standaard lokatie te
selecteren.
13
4
5
6
Hoofdstuk
BELANGRIJK: INSTALLEER EERST DE SOFTWARE VOORDAT U DE
1
De adapter installeren en instellen
B.5 Via een Setup Status scherm wordt u op de hoogte gebracht van de
fase waarin de installatie zich bevindt.
B.6 Nadat u de installatie van de
software hebt voltooid, verschijnt
het bericht “Please plug in your USB
Adapter now” (Sluit uw USB-adapter
nu aan). Sluit de adapter op uw
computer aan.
B.7 De Wizard Found New Hardware
(Nieuwe hardware gevonden)
verschijnt mogelijk in 3–15
seconden. Als dat het geval
is, selecteer dan “Install the
software automatically” (Software
automatisch installeren) en klik op
“Next” (Volgende) om de hardware
te installeren.
B.8 Indien de wizard “Found New
Hardware” (Nieuwe hardware
gevonden) niet verschijnt, klikt u op
“Finish” (Beëindigen).
B.9 Er kan een scherm als dit
verschijnen. Dit betekent NIET dat
er een probleem is. Onze software
is volledig getest en compatibel met
dit besturingssysteem. Selecteer
“Continue Anyway” (Toch doorgaan)
en volg de aanwijzingen op uw
beeldscherm.
14
De adapter installeren en instellen
B.10 De wizard installeert nu de software..
1
2
4
B.11 De installatie van het stuurprogramma
is nu voltooid. Klik op “Finish”
(Beëindigen) om de wizard “Found
New Hardware” te sluiten.
B.12 Klik opnieuw op “Finish” om de
InstallShield Wizard te sluiten.
B.13 Afhankelijk van het besturingssysteem
dat u gebruikt, moet u mogelijk uw
computer opnieuw opstarten om
de wijzigingen door te voeren. Sla
uw gegevens op en sluit alle andere
applicaties. Vervolgens herstart u uw
computer.
15
5
6
Hoofdstuk
3
De adapter installeren en instellen
C. Configuratie
De Wireless Networking Utility van Belkin
gebruiken
C.1 Nadat u uw computer opnieuw
hebt gestart, dubbelklikt u op
het Wireless Networking Utility
pictogram op uw bureaublad.
Let op: U vindt het pictogram van de
Wireless Networking Utility (het
hulpprogramma voor draadloze
netwerken) eveneens op de
systeembalk.
C.2 Het scherm van de Wireless
Networking Utility van Belkin zal
verschijnen.
C.3 Selecteer in het overzicht “Available
Networks” (Beschikbare netwerken)
het netwerk waarmee u verbinding
wilt maken en klik op “Connect”
(Verbinding maken).
Let op: Om de beschikbare netwerken te
kunnen zien, moet u in de buurt
van een werkende draadloze
router of accesspoint zijn.
De installatie is nu voltooid.
16
De Wireless Networking Utility van Belkin gebruiken
Nadat u de Wireless Networking Utility (WNU) van Belkin hebt
geïnstalleerd, zijn configuraties voor draadloze verbindingen en
beveiliging met een paar muisklikken binnen uw bereik.
De Wireless Networking Utility (WNU) via de Windowssysteembalk openen
2
3
4
5
6
Als het pictogram zich daar niet bevindt, klikt u op “Start >
Programs > Belkin > N1 Wireless USB Network Adapter >
Belkin Wireless Networking Utility”.
17
Hoofdstuk
Om de WNU te openen, klikt u met de rechter muisknop op het WNUpictogram in uw Windows-taakbalk.
1
De Wireless Networking Utility van Belkin gebruiken
Het standaardscherm van de WNU is het tabblad “Current Status”
(Huidige status). Het tabblad “Current Status” toont de huidige
netwerkstatus en de beschikbare netwerken.
Netwerkstatus
Dit venster toont de verbindingsstatus van het huidige netwerk. Het geeft
tevens de status van de verbinding tussen de computer en de router en
de router en het Internet weer. Als u een probleem met de verbinding
ondervindt, dan kunt u dit venster gebruiken om de oorzaak ervan vast
te stellen (bijvoorbeeld computer, router of internet/modem).
Beschikbare netwerken
Dit venster toont de netwerken die u nu binnen uw bereik zijn evenals
hun SSID, signaalsterkte, type beveiliging, kanaal en netwerktype.
Draadloze verbinding verbroken
Als uw draadloze verbinding verbroken wordt, verschijnt een venster op
de voorgrond van het computerscherm en probeert de WNU een nieuwe
verbinding tot stand te brengen.
18
De Wireless Networking Utility van Belkin gebruiken
1
Fout in verbinding
Tijdens de pogingen om een nieuwe verbinding te maken krijgt u andere
opties te zien. Klik op “Stop” om het maken van een verbinding te staken of
klik op “Retry” (Opnieuw proberen) om het opnieuw te proberen.
2
3
5
6
Netwerkstatus en oplossingen
Voor een beter inzicht in de huidige netwerkstatus klikt u op “Open
Wireless Utility” (Wireless Utility openen). Het standaardscherm is
nu het tabblad “Current Status” (Huidige status) en in het hoofdstuk
“Netwerkstatus” kunt u zien welke verbindingen goed zijn en/of welke fout.
De WNU bevat ook een onderdeel met de naam “Solution Tips”
(Oplossingen) dat u helpt bij het oplossen van problemen.
19
Hoofdstuk
4
De Wireless Networking Utility van Belkin gebruiken
Profielen voor draadloze netwerken instellen
Op het tabblad “My Connections” (Mijn verbindingen) van de WNU kunt u
verbindingsprofielen toevoegen, bewerken en wissen. Dit tabblad toont ook
de signaalsterkte, het type beveiliging en het netwerktype.
Beveiliging van uw Wi-Fi®-netwerk
Als u verbinding wilt maken met een beveiligd netwerk, bepaal dan
het type beveiliging (WPA of WEP*) en gebruik het juiste veld in het
dialoogvenster.
20
De Wireless Networking Utility van Belkin gebruiken
Opmerking: Als u een netwerk selecteert dat encryptie gebruikt,
krijgt u eerst het eenvoudige beveiligingsscherm te zien. Klik op de
knop “Advanced” (Geavanceerd) om de andere beveiligingsopties te
bekijken (hieronder).
1
2
3
5
6
21
Hoofdstuk
4
De Wireless Networking Utility van Belkin gebruiken
Wired Equivalent Privacy (WEP) is een minder veilig maar wel breder
aanvaard protocol voor de beveiliging van draadloze netwerken. Afhankelijk van het
beveiligingsniveau (64- of 128-bit) wordt de gebruiker gevraagd een hexadecimale
sleutel van 10 of 26 tekens in te voeren. Een hexadecimale sleutel bestaat uit een
combinatie van de letters A t/m F en de cijfers 0 t/m 9.
Wireless Protected Access (WPA)) is de nieuwe norm voor draadloze
beveiliging. Niet alle draadloze netwerkkaarten en adapters ondersteunen deze
technologie. Raadpleeg de handleiding van uw draadloze adapter en kijk of WPAbeveiliging ondersteund wordt. In plaats van een hexadecimale sleutel gebruikt WPA
uitsluitend samengestelde wachtwoorden die veel gemakkelijker te onthouden zijn.
Het volgende hoofdstuk, dat bedoeld is voor computergebruikers die een kantoor of
praktijk aan huis hebben of een klein kantoor elders, bevat een aantal manieren om
de beveiliging van een netwerk te optimaliseren.
Bij het verschijnen van deze handleiding waren vier encryptiemethodes
beschikbaar.
Encryptiemethodes:
Naam
64-bits Wired
Equivalent
Privacy
128-bits
encryptie
Wi-Fi Protected
Access
Wi-Fi Protected
Access
Acroniem
64-bit WEP
128-bit WEP
WPA-TKIP
WPA-AES
Beveiliging
Goed
Beter
Uitstekend
Uitstekend
Statische
sleutels
Dynamische
encryptiesleutels
en tweezijdige
authentificatie
Dynamische
encryptiesleutels
en tweezijdige
authentificatie
Extra
beveiliging via
64-bits WEPencryptie,
met een
sleutellengte
van 104 bits,
plus 24 extra
bits van door
het systeem
gegenereerde
data
TKIP (temporal
key integrity
protocol); ter
verbetering van
de veiligheid
wordt de WEPsleutel continu
gewijzigd
AES (Advanced
Encryption
Standard)
beveiligt zonder
snelheidsverlies
Productkenmerken Statische
sleutels
Encryptiesleutels
gebaseerd
op het RC4algoritme
(meestal 40-bits
sleutels)
WEP
WEP is een protocol dat beveiliging van draadloze producten die voldoen
aan de WiFi-standaard mogelijk maakt. WEP-beveiliging biedt draadloze
netwerken dezelfde privacybescherming als vergelijkbare kabelnetwerken.
22
De Wireless Networking Utility van Belkin gebruiken
64-bits WEP-encryptie
64-bits WEP werd als eerste geïntroduceerd met 64-bits encryptie,
bestaande uit een sleutel met een lengte van 40 bits plus 24 extra
bits van door het systeem gegenereerde data (totaal 64 bits). Er zijn
hardwarefabrikanten die 64-bits echter 40-bits encryptie noemen. Kort
na de introductie van deze technologie ontdekten onderzoekers dat
64-bits encryptie te gemakkelijk te decoderen is.
Omdat beveiliging met 64-bits WEP-encryptie soms niet
voldoet, werd een veiligere methode met 128-bits WEPencryptie ontwikkeld. De 128-bits encryptie is opgebouwd
uit een sleutellengte van 104 bits plus 24 extra bits van door
het systeem gegenereerde data (128 bits in totaal). Er zijn
hardwarefabrikanten die 128-bits echter 104-bits encryptie
noemen.
De meeste nieuwe draadloze apparatuur die momenteel op de
markt is, ondersteunt zowel 64-bits als 128-bits WEP-encryptie
wat niet uitsluit dat u oudere apparatuur bezit die alleen 64-bits
WEP-encryptie ondersteunt. All draadloze producten van Belkin
ondersteunen zowel 64-bits als 128-bits WEP-encryptie.
Encryptiesleutels
Nadat u de 64-bits of 128-bits WEP-encryptiemodus hebt gekozen,
moet u een encryptiesleutel aanmaken. Als u niet overal in uw
netwerk dezelfde encryptiesleutel instelt, kunnen de draadloze
netwerkapparaten niet met elkaar communiceren.
U kunt uw sleutel invoeren door de hex-sleutel in te typen. Een
hexadecimale sleutel is een combinatie van de letters A t/m F en de
cijfers 0 t/m 9. Voor 64-bits WEP-encryptie dient u 10 hexadecimale
sleutels in te voeren. Voor 128-bits WEP-encryptie dient u 26
hexadecimale sleutels in te voeren.
Bijvoorbeeld:
AF 0F 4B C3 D4 = 64-bits WEP-sleutel
C3 03 0F AF 0F 4B B2 C3 D4 4B C3 D4 E7 = 128-bit WEP-sleutel
Wij raden u aan de hexadecimale WEP-sleutel van uw draadloze
router (of accesspoint) op te schrijven en deze handmatig in de tabel
met hex WEP-sleutels in het configuratiescherm van uw adapter in te
voeren.
23
2
3
4
5
6
Hoofdstuk
128-bits WEP-encryptie
1
De Wireless Networking Utility van Belkin gebruiken
WPA
WPA (Wi-Fi Protected Access) is een nieuwe Wi-Fi-standaard die een
betere beveiliging biedt dan WEP-beveiliging. De stuurprogramma’s en
software van draadloze apparatuur ondersteunen WPA pas na een upgrade.
Deze updates zijn te vinden op de website van de leverancier van het
draadloze product. Er zijn drie soorten WPA-beveiliging: WPA-PSK (geen
server), WPA (met radiusserver) en WPA2.
WPA-PSK (zonder server) gebruikt een zogenaamde “pre-shared key”
als netwerksleutel. Een netwerksleutel is een wachtwoord dat van 8 tot 63
tekens lang kan zijn. Het bestaat uit een combinatie van letters, cijfers en
andere tekens. Elke cliënt gebruikt dezelfde sleutel om toegang te krijgen
tot het netwerk. Dit is de modus die meestal in huiselijke omgeving wordt
gebruikt.
WPA (met radiusserver) is vooral geschikt voor een zakelijke
omgeving waarin een radiusserver de netwerksleutel automatisch
aan de cliënten stuurt.
WPA2 vereist de Advanced Encryption Standard (AES) voor de
encryptie van data, een protocol dat een veel betere beveiliging
biedt dan WPA. WPA gebruikt zowel Temporal Key Integrity
Protocol (TKIP) als AES voor encryptie.
Beveiliging instellen voor uw draadloze router (of accesspoint)
van Belkin
Om gebruik te kunnen maken van beveiliging dient u eerst WEP
of WPA te activeren op uw router of accesspoint. Om beveiliging
mogelijk te maken kunnen uw draadloze routers of accesspoints
geconfigureerd worden via web-based interface. Raadpleeg de
handleiding van uw draadloze router (of accesspoint) voor meer
informatie over het gebruiken van deze interface.
LET OP: Zorg er nu voor dat alle kaarten/adapters voor draadloos
netwerkverkeer op deze manier zijn ingesteld.
24
De Wireless Networking Utility van Belkin gebruiken
De adapter voor het gebruik van beveiliging configureren
We nemen aan dat u de draadloze router (of het draadloze
accesspoint ) nu al zo hebt ingesteld dat deze WPA of WEP gebruikt.
Om hiermee een draadloze verbinding te maken, dient u de draadloze
N USB-adapter met dezelfde beveiligingsinstellingen te configureren.
Instellingen voor beveiliging van uw draadloze netwerk wijzigen
Om de beveiliging te kunnen activeren, dient u eerst vast te stellen
welke standaard de router of het accesspoint gebruikt. (Raadpleeg
de handleiding van uw draadloze router of accesspoint voor meer
informatie over de toegang tot de beveiligingsinstellingen.)
Om de beveiligingsinstellingen van uw adapter te openen klikt u op het
tabblad “My Connections” (Mijn verbindingen) en wijst u de verbinding aan
waarvan u de beveiligingsinstellingen wilt wijzigen. Klik op “Edit” (Wijzigen)
om de instellingen te wijzigen.
25
2
3
4
5
6
Hoofdstuk
De draadloze N USB-adapter van Belkin ondersteunt de
nieuwste beveiligingsfuncties van WPA evenals de oudere
beveiligingsstandaard WEP. De beveiliging van een draadloos netwerk
is standaard uitgeschakeld.
1
De Wireless Networking Utility van Belkin gebruiken
WEP-setup
64-bits WEP-encryptie
1.
Selecteer “WEP” in het “Data Encryption”-dropdown-menu.
2.
Nadat u de WEP-encryptiemodus hebt geselecteerd, kunt u uw sleutel
invoeren door de hexadecimale sleutel handmatig in te typen.
Een hexadecimale sleutel is een combinatie van de letters A t/m F en de
cijfers 0 t/m 9. Voor 64-bits WEP-encryptie dient u 10 hexadecimale sleutels
in te voeren.
Bijvoorbeeld:
AF 0F 4B C3 D4 = 64-bits WEP-sleutel
26
De Wireless Networking Utility van Belkin gebruiken
3.
Klik op “Save” (Opslaan) om af te sluiten. Encryptie is nu
ingesteld voor de draadloze router (of het draadloze accesspoint).
U dient nu elke computer in uw draadloze netwerk met dezelfde
beveiligingsinstellingen te configureren.
27
2
3
4
5
6
Hoofdstuk
WAARSCHUWING: Als u een draadloze cliënt gebruikt voor het
activeren van de beveiligingsinstellingen van de draadloze router
of het accesspoint hebt u tijdelijk geen draadloze verbinding, en
wel totdat u de beveiliging op de draadloze cliënt hebt geactiveerd.
Noteer de sleutel voordat u de instellingen van de draadloze router (of
het draadloze accesspoint) verandert. Als u de hexadecimale sleutel
kwijt bent, heeft de cliënt geen toegang meer tot de draadloze router
of het accesspoint.
1
De Wireless Networking Utility van Belkin gebruiken
128-bits WEP-encryptie
1.
Selecteer “WEP” in de dropdown-menu.
2.
Nadat u de WEP-encryptiemodus hebt geselecteerd, kunt u uw
sleutel invoeren door de hexadecimale sleutel handmatig in te
typen. Een hexadecimale sleutel is een combinatie van de letters
A t/m F en de cijfers 0 t/m 9. Voor 128-bits WEP-encryptie dient
u 26 hexadecimale sleutels in te voeren.
Bijvoorbeeld:
C3 03 0F AF 0F 4B B2 C3 D4 4B C3 D4 E7 = 128-bit WEP-sleutel
28
De Wireless Networking Utility van Belkin gebruiken
3.
Klik op “Save” (Opslaan) om af te sluiten. Encryptie is nu ingesteld
voor de draadloze router (of het draadloze accesspoint). U dient nu
elke computer binnen uw draadloze netwerk te configureren met de
zelfde beveiligingsinstellingen.
29
2
3
4
5
6
Hoofdstuk
WAARSCHUWING: Als u een draadloze cliënt gebruikt voor het
activeren van de beveiligingsinstellingen van de draadloze router
of het accesspoint hebt u tijdelijk geen draadloze verbinding, en
wel totdat u de beveiliging op de draadloze cliënt hebt geactiveerd.
Noteer de sleutel voordat u de instellingen van de draadloze router (of
het draadloze accesspoint) verandert. Als u de hexadecimale sleutel
kwijt bent, heeft de cliënt geen toegang meer tot de draadloze router
of het accesspoint.
1
De Wireless Networking Utility van Belkin gebruiken
WPA-PSK (zonder server)
Kies deze instelling als het netwerk geen radiusserver gebruikt. WPA-PSK
(zonder server) wordt doorgaans gebruikt voor netwerken in woningen en op
kleine kantoren.
1.
Selecteer “WPA-PSK (no server)” in het vervolgmenu “Network
Authentication” (Netwerkverificatie).
2.
Voer de netwerksleutel in. Deze sleutel bestaat uit 8 tot 63 tekens,
dit kunnen letters, cijfers of symbolen zijn. U dient bij al de cliënten
(netwerkkaarten) die u in uw draadloze netwerk wilt opnemen,
dezelfde sleutel te gebruiken.
3.
Klik op “Save” (Opslaan) om af te sluiten. Zorg er nu voor dat alle
cliënten (netwerkkaarten) op deze manier zijn ingesteld.
30
De Wireless Networking Utility van Belkin gebruiken
Opties voor de Wireless Networking Utility
1
2
3
5
6
Op het tabblad “Options” (Opties) van de WNU kunt u de instellingen
van de WNU aanpassen.
31
Hoofdstuk
4
De Wireless Networking Utility van Belkin gebruiken
Wireless Networking Utility Help
Op het tabblad “Help” van de WNU hebt u toegang tot online- en
telefonische ondersteuning, informatie over benodigde upgrades voor
software via slechts een klik en tot geavanceerde hulpprogramma’s
voor systeemdiagnose.
32
De Wireless Networking Utility van Belkin gebruiken
Geavanceerde diagnoseprogramma’s
De sectie “Advanced Diagnostic Tools” (Geavanceerde
diagnoseprogramma’s) is het centrale configuratiescherm voor alle
instellingen van de hardware- en softwarecomponenten van het
draadloze netwerk. Daarin vindt u een uitgebreid programma van
testmogelijkheden en connectiviteitsdiensten om met een netwerk
optimale prestaties te bereiken.
1
2
3
5
6
33
Hoofdstuk
4
Problemen oplossen
Ik kan geen draadloze verbinding met het internet tot stand
brengen.
Indien u met een draadloze computer geen verbinding met het Internet tot stand
kunt brengen, ga dan als volgt te werk:
1. Kijk naar de LED’s op de draadloze router. Als u een draadloze router van
Belkin gebruikt, moet het volgende te zien zijn:
• De LED voor de voeding moet nu oplichten.
• De LED voor “Connected” (Verbinding gemaakt) moet constant branden en
niet knipperen.
• De LED voor “WAN” moet constant branden of knipperen.
Als dit het geval is gaat u verder bij 2.
Als dit NIET het geval is, ga dan als volgt te werk:
• Controleer of de voedingskabel van de router op de juiste wijze is
aangesloten
• Controleer of alle kabels tussen de router en het modem goed zijn
aangesloten.
• Controleer of alle LED’s op het modem naar behoren functioneren. Als dit
niet het geval is, raadpleeg dan de handleiding van het modem.
• Reboot the router.
• Reboot het modem.
Neem contact op met de afdeling Technische Ondersteuning van Belkin als de
problemen zich voor blijven doen.
Als u geen draadloze router van Belkin gebruikt, zie dan de handleiding die bij
de router is geleverd.
2. Open de “wireless utility”-software door te klikken op het pictogram rechts
onderin het scherm. Het pictogram in de systeembalk zou er als volgt uit
moeten zien (het pictogram kan rood of groen zijn):
3. Het venster toont een overzicht van “Available Networks” (Beschikbare
netwerken).
Beschikbare netwerken zijn draadloze netwerken waarmee u een verbinding
tot stand kunt brengen. Als u gebruik maakt van een 802.11g (G+) router
of van een 802.11g (54g) router van Belkin, dan is de standaard naam
“Belkin54g”.
Als u gebruik maakt van een 802.11b-router van Belkin, dan is de standaard
naam “WLAN”.
Als u GEEN router van Belkin gebruikt, zie dan de bijbehorende handleiding
voor de standaardnaam.
34
Problemen oplossen
De naam van het draadloze netwerk verschijnt in
“Available Networks” (Beschikbare netwerken).
1
Als de juiste netwerknaam in de lijst van “Available Networks”
(Beschikbare netwerken) staat, kunt u als volgt een draadloze
verbinding tot stand brengen:
2
1. Klik op de juiste netwerknaam in het overzicht met beschikbare
Als u nadat u verbinding hebt gemaakt met het draadloze netwerk
nog steeds geen toegang tot het Internet kunt krijgen, neem dan
contact op met de afdeling Technische Ondersteuning van Belkin.
De naam van uw draadloze netwerk is NIET in het overzicht
met beschikbare netwerken opgenomen.
Controleer de SSID-instellingen als uw netwerknaam niet is
opgenomen in het overzicht. De SSID dient heel nauwkeurig te
worden ingesteld. De spelling dient op elke computer precies
hetzelfde te zijn anders zal de adapter geen verbinding tot
stand kunnen brengen met de draadloze router (of het draadloze
accesspoint).
Opmerking: Om de SSID-instellingen te controleren of een
beschikbaar netwerk te vinden, moet u dubbelklikken op het sig
naalindicatiepictogram om het scherm “Wireless Networks” op
te roepen. Klik op “Add” (Toevoegen) als u het netwerk waarmee
u verbinding wilt maken niet ziet en typ de SSID in. Voor meer
informatie over hoe u een SSID moet instellen, raden wij u aan de
handleiding van uw router te raadplegen.
Als u zelfs op korte afstand van de router problemen houdt, neem
dan contact op met de afdeling Technische Ondersteuning van
Belkin.
35
3
4
5
6
Hoofdstuk
netwerken.
2. Als voor het netwerk beveiligingsinstellingen (encryptie) zijn
geactiveerd, dient u de netwerksleutel in te voeren. Klik op
“Connect” (Verbinding maken). Meer informatie over beveiliging
vindt u in het hoofdstuk “Beveiliging van uw WiFi-netwerk” op
pagina 20 van deze handleiding.
3. Binnen enkele seconden wordt het pictogram in de taakbalk,
rechts onderin uw scherm groen, om aan te geven dat u
verbinding heeft met het netwerk.
Problemen oplossen
De installatie-cd start de Wireless Networking Utility
van Belkin niet.
Als het cd-romstation de Wireless Networking Utility niet automatisch start,
voert de computer wellicht andere applicaties uit die het cd-romstation storen.
Als het scherm van de Wireless Networking Utility niet binnen 15-20 seconden
verschijnt, dubbelklik dan op het pictogram “My Computer” (Deze computer)
om het cd-romstation te openen. Vervolgens dubbelklikt u op het cd-romstation
waarin u de installatie-cd hebt geplaatst om de installatie te starten. Indien de
installatie niet automatisch wordt gestart, gebruikt u uw rechter muisknop om
“Explore” (Verkennen) te selecteren. Vervolgens dubbelklikt u op het pictogram
genaamd “setup.exe”.
De LED voor de voeding licht NIET op; de adapter werkt niet
Indien de LED-indicatoren NIET BRANDEN, kan het zijn dat de adapter niet
op de juiste wijze is aangesloten of geïnstalleerd. Controleer of de adapter op
de juiste wijze is aangesloten op de USB-poort op uw computer. Controleer
of de stuurprogramma’s voor de adapter zijn geïnstalleerd. Klik met de
rechter muisknop op het pictogram “My Computer” (Deze Computer) op uw
beeldscherm. Kies “Properties” (Eigenschappen), navigeer naar de “Device
Manager” (Apparaatbeheer) en controleer of uw USB-adapter zonder fouten
vermeld staat. Als er een fout wordt aangegeven, neem dan contact op met de
afdeling Technische Ondersteuning van Belkin.
De LED voor de verbinding knippert langzaam. U krijgt geen
verbinding met een draadloos netwerk of het Internet.
Als de adapter goed lijkt te functioneren terwijl u toch geen verbinding krijgt
met een netwerk of als het draadloze-netwerkpictogram onderin het scherm
rood is, dan zit het probleem mogelijk in niet kloppende instellingen van de
netwerknaam (SSID) in de draadloze-netwerkeigenschappen.
Controleer of de SSID-instellingen overal kloppen. De SSID dient heel
nauwkeurig te worden ingesteld. De spelling dient op elke computer precies
hetzelfde te zijn anders zal de adapter geen verbinding tot stand kunnen
brengen met de draadloze router (of het draadloze accesspoint).
Let op: Om de SSID-instellingen te controleren of een beschikbaar netwerk te
vinden, moet u dubbelklikken op het signaalindicatiepictogram om het scherm
“Wireless Networks” op te roepen. Klik op “Add” (Toevoegen) als u het netwerk
waarmee u verbinding wilt maken niet ziet en typ de SSID in.
Voor meer informatie over hoe u een SSID moet opzetten, raden wij u aan de
handleiding van uw router te raadplegen. Als u zelfs op korte afstand van de
router problemen houdt, neem dan contact op met de afdeling Technische
Ondersteuning van Belkin.
36
Problemen oplossen
De LED voor de verbinding brandt continu maar toch krijg ik
geen verbinding met het Internet.
Neem contact op met de afdeling Technische Ondersteuning indien u zelfs
op korte afstand problemen blijft houden.
De gegevensoverdracht is soms traag.
Draadloze technologie is gebaseerd op radiogolven. Dit betekent dat
de connectiviteit en de doorvoersnelheid afnemen naarmate de afstand
tussen de apparaten groter is. Andere factoren die een vermindering van
de signaalkwaliteit veroorzaken (metaal is meestal de grootste boosdoener)
zijn muren en metalen apparaten. Hierdoor is het bereik van draadloze
apparatuur binnenshuis meestal zo’n 30 tot 60 meter. Houd er verder
rekening mee dat de snelheid van de verbinding afneemt naarmate de
afstand tot de draadloze router (of het accesspoint) groter is.
Om vast te stellen of de problemen met de draadloze gegevensoverdracht
met afstand te maken hebben, kunt u eventueel de computer tijdelijk op
zo’n 1,5 tot 3 meter afstand van de router of het accesspoint plaatsen. Zie
het hoofdstuk “Plaatsing van de hardware voor optimale prestaties van
uw draadloze netwerk” op bladzijde 2 van deze handleiding. Als u zelfs op
korte afstand van de router problemen houdt, neem dan contact op met de
afdeling Technische Ondersteuning van Belkin.
Het signaal is zwak.
Draadloze technologie is gebaseerd op radiogolven. Dit betekent dat
de connectiviteit en de doorvoersnelheid afnemen naarmate de afstand
tussen de apparaten groter is. Andere factoren die een vermindering van
de signaalkwaliteit veroorzaken (metaal is meestal de grootste boosdoener)
zijn muren en metalen apparaten. Hierdoor is het bereik van draadloze
apparatuur binnenshuis meestal zo’n 30 tot 60 meter. Houd er verder
rekening mee dat de snelheid van de verbinding afneemt naarmate de
afstand tot de draadloze router (of het accesspoint) groter is. Om
vast te stellen of problemen met draadloze gegevensoverdracht
te maken hebben met afstand, stellen we voor dat u tijdelijk uw
computer, indien mogelijk op een afstand van 1,5 tot 3 meter van de
router (of het accesspoint) plaatst.
37
2
3
4
5
6
Hoofdstuk
Als u wel een signaal ontvangt, maar niet online bent of geen IP-adres
verkrijgt, kan het zijn dat de encryptiesleutelinstellingen voor uw computer
niet overeenkomen met die van uw draadloze router of accesspoint.
Controleer de instellingen van de WEP-, WPA- of WPA2-sleutels om te zien
of ze overeenkomen. De SSID is hoofdlettergevoelig en de spelling moet op
elke computer en draadloze router (of accesspoint) precies dezelfde zijn, wil
de adapter met de draadloze router (of het accesspoint) verbinding kunnen
maken. Raadpleeg het hoofdstuk “Beveiliging van uw WiFi-netwerk” op
pagina 20 van deze handleiding voor meer informatie over beveiliging.
1
Problemen oplossen
Het draadloze kanaal wijzigen – Het wijzigen van het kanaal kan
een positief effect hebben op de prestaties en betrouwbaarheid van
uw draadloze netwerk indien ander draadloos verkeer in uw omgeving
en interferentie de prestaties van uw netwerk negatief beïnvloeden. Het
standaard ingestelde kanaal van de router is 6. Afhankelijk van uw regio
kunt u voor verschillende andere kanalen kiezen. Raadpleeg de handleiding
van uw router of accesspoint voor meer informatie over het kiezen van een
kanaal.
De overdrachtssnelheid verlagen - Het verlagen van de
overdrachtssnelheid kan het draadloze bereik en de stabiliteit van de
verbinding verhogen. Bij de meeste draadloze netwerkkaarten kan de
overdrachtssnelheid aangepast worden. Als u deze eigenschap wilt wijzigen,
gaat u naar het “Controle Panel” (Configuratiescherm) in Windows, opent
u de map “Network connections” (Netwerkverbindingen) en dubbelklikt
u op de verbinding van uw draadloze adapter. Onder “Properties”
(Eigenschappen) selecteert u de knop “Configure” (Configureren) op
het tabblad “General” (Algemeen). (Gebruikers van Windows 98 dienen
de USB-adapter te selecteren en op “Properties” (Eigenschappen) te
klikken.) Vervolgens selecteert u op het tabblad “Advanced” (Geavanceerd)
de overdrachtssnelheid. Draadloze cliëntkaarten regelen doorgaans
automatisch de draadloze overdrachtssnelheid voor u, maar dit kan
periodiek onderbreking van de verbinding veroorzaken als het draadloze
signaal te zwak is; in de regel zijn langzamere overdrachtssnelheden
betrouwbaarder. Experimenteer met verschillende verbindingssnelheden
totdat u de beste verbinding voor uw netwerkomgeving gevonden hebt; de
beschikbare overdrachtssnelheden zouden allemaal geschikt moeten zijn
voor internetgebruik. Raadpleeg voor meer informatie de handleiding bij uw
draadloze kaart. Als u zelfs op korte afstand van de router problemen houdt,
neem dan contact op met de afdeling Technische Ondersteuning van Belkin.
Waarom staan er twee “wireless utilities” in mijn systeembalk?
Welke dien ik te gebruiken?
Het gebruik van de Wireless Networking Utility van Belkin heeft een aantal
voordelen ten opzichte van de Windows XP Wireless Zero Configuration (WZC)
utility. Wij bieden ondermeer een site-overzicht, gedetailleerde informatie over
de verbinding en adapterdiagnose.
Het is wel belangrijk dat u weet welke utility wordt gebruikt voor het beheer
van de adapter. Wij adviseren het gebruik van de Wireless Networking
Utility van Belkin. Volg de volgende stappen als u gebruik wilt maken van de
Wireless Networking Utility:
Stap 1 Klik met uw rechter muisknop op het netwerkstatuspictogram in de
taakbalk en selecteer het tabblad “Status”.
38
Problemen oplossen
Stap 2 Verwijder op het tabblad “Status” het vinkje bij “Use Windows
to configure my wireless network” (Windows gebruiken om mijn
draadloze netwerk te configureren). Zodra u het vinkje verwijderd hebt,
klikt u op de knop “Close” (Sluiten) om het venster te sluiten.
Nu gebruikt u de Wireless Networking Utility van Belkin voor het
configureren van de adapter.
Deze situatie doet zich voor als uw computer is uitgerust met een
ingebouwde kaart voor draadloos verkeer, terwijl de draadloze N USBadapter van Belkin eveneens actief is. Dit komt doordat Windows nu
twee actieve draadloze verbindingen moet aansturen.
Die ingebouwde kaart voor draadloos netwerkverkeer dient
gedeactiveerd te worden. U kunt dit doen via het “Network Adapters”
(Netwerkadapters), te vinden onder “Device Manager” (Apparaatbeheer).
De adapter werkt niet naar behoren of de verbinding is
traag als uw computer is voorzien van een ingebouwde
Ethernet-kaart voor een bedraad netwerk.
Deze situatie doet zich voor als uw computer is uitgerust met een
geactiveerde Ethernet-kaart terwijl uw adapter eveneens actief is. Dit
komt doordat Windows nu twee actieve netwerkverbindingen moet
aansturen. De Ethernet-kaart dient gedeactiveerd te worden. U kunt
dit doen op uw computer via “Network Adapters” (Netwerkadapters),
te vinden onder “Device Manager” (Apparaatbeheer).
Wat is het verschil tussen 802.11g en 802.11a?
Momenteel bestaan er drie niveaus van draadloze
netwerkstandaarden waarbij gegevens met uiteenlopende
maximumsnelheden worden verzonden. Deze benamingen
zijn elk gebaseerd op de aanduiding voor de certificering van
netwerkstandaarden. De meest gebruikte standaard voor draadloos
netwerkverkeer, 802.11g, maakt een gegevensoverdracht van 54
Mbps mogelijk; 802.11a ondersteunt ook snelheden van 54 Mbps bij
gebruik van de 5GHz-frequentie; en 802.11n draft specificatie maakt
verbindingssnelheden mogelijk van 300 Mbps. Zie het overzicht op
de volgende pagina voor meer informatie.
39
2
3
4
5
6
Hoofdstuk
De adapter werkt niet naar behoren of de verbinding is
onstabiel als uw computer is uitgerust met een tweede
ingebouwde kaart voor draadloos netwerkverkeer (zoals
een mini-PCI of Intel® Centrino™).
1
Problemen oplossen
Tot 300 Mbps*
Frequentie
N1 MIMO
(draft 802.11n
met MIMO)
N MIMO
(draft 802.11n
met MIMO)
Tot 300 Mbps*
De vrije 2,4GHz-band is
gevoelig voor interferentie
door stoorsignalen van
huishoudelijke apparatuur
als draadloze telefoons en
magnetrons
De vrije 2,4 GHz-band is
gevoelig voor interferentie
door stoorsignalen van
huishoudelijke apparatuur
als draadloze telefoons en
magnetrons.
De vrije 2,4 GHz-band is
gevoelig voor interferentie
door stoorsignalen van
huishoudelijke apparatuur
als draadloze telefoons en
magnetrons.
De vrije 2,4 GHz-band is
gevoelig voor interferentie
door stoorsignalen van
huishoudelijke apparatuur
als draadloze telefoons en
magnetrons.
Compatibiliteit
G+ MIMO
(802.11g met
MIMO MRC)
Tot 54 Mbps*
Compatibel met
802.11b/g
Compatibel met
802.11b/g
Compatibel met draft
802.11n** en 802.11b/g
Compatibel met draft
802.11n** en 802.11b/g
Bereik*
G
(802.11g)
Tot 54 Mbps*
Tot 120 m*
Tot 300 m*
Tot 365 m*
Tot 420 m*
Voordeel
Draadloze
Snelheid/
gegevenssnelheid* technologie
Vergelijkend overzicht van draadloze technologieën
Veel gebruikt – vooral
voor het delen van
internetaansluitingen
Betere dekking en bereik
en constante snelheden
Groter bereik en hogere
snelheden
Geavanceerd – beste
reikwijdte en doorvoer
*Bereik en verbindingssnelheid afhankelijk van netwerkomgeving.
**Deze adapter is compatibel met producten die gebaseerd zijn op dezelfde 802.11nspecificaties en vereisen mogelijkerwijs een software-upgrade ten behoeve van optimale
resultaten.
40
Problemen oplossen
Gratis technische ondersteuning*
*tegen lokaal telefoontarief
www.belkin.com
Aanvullende informatie over technische ondersteuning is beschikbaar op onze
website www.belkin.com onder “Ondersteuning”. Als u telefonisch contact wilt
opnemen met onze afdeling voor technische ondersteuning, kunt u gebruik maken
van het voor u van toepassing zijnde telefoonnummer uit onderstaande lijst.
NUMMER
INTERNETADRES
OOSTENRIJK
0820 200766
www.belkin.com/uk/networking/
BELGIË
07 07 00 073
www.belkin.com/nl/networking/
TSJECHIË
239 000 406
www.belkin.com/uk/networking/
DENEMARKEN
701 22 403
www.belkin.com/uk/networking/
FINL AND
097 25 19 123
www.belkin.com/uk/networking/
FR ANKRIJK
08 - 25 54 00 26
www.belkin.com/fr/networking/
DUITSL AND
0180 - 500 57 09
www.belkin.com/de/networking/
GRIEKENL AND
00800 - 44 14 23 90
www.belkin.com/uk/networking/
HONG ARIJE
06 - 17 77 49 06
www.belkin.com/uk/networking/
IJSL AND
800 8534
www.belkin.com/uk/networking/
IERL AND
0818 55 50 06
www.belkin.com/uk/networking/
ITALIË
02 - 69 43 02 51
www.belkin.com/it/support/tech/issues_more.asp
LUXEMBURG
34 20 80 85 60
www.belkin.com/uk/networking/
NEDERL AND
0900 - 040 07 90 € 0,10 per minuut
www.belkin.com/nl/networking/
NOORWEGEN
81 50 0287
www.belkin.com/uk/networking/
POLEN
00800 - 441 17 37
www.belkin.com/uk/networking/
PORTUG AL
707 200 676
www.belkin.com/uk/networking/
RUSL AND
495 580 9541
www.belkin.com/networking/
ZUID-AFRIK A
0800 - 99 15 21
www.belkin.com/uk/networking/
SPANJE
902 - 02 43 66
www.belkin.com/es/support/tech/networkingsupport. asp
Z WEDEN
07 - 71 40 04 53
www.belkin.com/se/support/tech/networkingsupport.asp
Z WITSERL AND
08 - 48 00 02 19
www.belkin.com/uk/networking/
VERENIGD KONINKRIJK
0845 - 607 77 87
www.belkin.com/uk/networking/
OVERIGE L ANDEN
+44 - 1933 35 20 00
41
2
3
4
5
6
Hoofdstuk
L AND
1
Informatie
FCC-verklaring
VERKLARING VAN CONFORMITEIT MET DE FCCVOORSCHRIFTEN VOOR ELEKTROMAGNETISCHE
COMPATIBILITEIT
Wij, Belkin International, Inc., gevestigd 501 West Walnut
Street, Compton, CA 90220, Verenigde Staten van Amerika,
verklaren hierbij dat wij de volledige verantwoordelijkheid
aanvaarden dat het product met het artikelnummer
F5D8053
waarop deze verklaring betrekking heeft, voldoet aan Deel 15
van de FCC-Voorschriften. Het gebruik ervan is onderworpen
aan de beide volgende voorwaarden: (1) het apparaat mag
geen schadelijke storingen opwekken en (2) het apparaat
moet elke ontvangen interferentie accepteren, waaronder
storingen die een ongewenste werking kunnen veroorzaken.
Waarschuwing: Blootstelling aan radiofrequente straling.
Het door dit apparaat afgegeven uitgangsvermogen ligt ver beneden de hiervoor
in de FCC-voorschriften vastgelegde grenswaarden voor stralingsfrequenties.
Niettemin dient dit apparaat zodanig te worden gebruikt dat bij normaal gebruik de
mogelijkheid van persoonlijk contact tot een minimum beperkt blijft.
Ook bij het aansluiten van een externe antenne op dit apparaat moet de antenne
zodanig worden geplaatst dat bij normaal gebruik de kans op aanraking tot een
minimum beperkt blijft. Ter voorkoming van de mogelijkheid dat de in de FCCvoorschriften aangegeven grenswaarden voor de blootstelling aan radiofrequente
straling worden overschreden, mogen personen de werkende antenne niet dichter
naderen dan tot op een afstand van 20 centimeter.
Kennisgeving van de Federal Communications Commission (FCC)
Deze apparatuur is getest en voldoet aan de grenswaarden voor digitale
apparaten van Klasse B zoals vastgelegd in Deel 15 van de FCC-voorschriften.
Deze grenswaarden zijn vastgesteld als zinvolle bescherming tegen schadelijke
interferenties in de woonomgeving.
Deze apparatuur genereert en gebruikt radiofrequente energie en kan deze tevens
uitzenden. Als deze apparatuur de radio- of televisie-ontvangst stoort, wat u kunt
vaststellen door de apparatuur in- en uit te schakelen, kunt u proberen de storing
op te heffen met een of meer van de volgende maatregelen:
• Draai de ontvangstantenne in een andere richting of zet de antenne op een
andere plaats.
• Vergroot de afstand tussen de apparatuur en de ontvanger.
• Sluit de apparatuur aan op een stopcontact van een andere groep dan die
waarop de ontvanger is aangesloten.
• Neem voor advies contact op met de verkoper of een deskundig radio/
televisietechnicus.
42
Informatie
Veranderingen
De Federal Communications Commission eist dat de gebruiker ervoor wordt
gewaarschuwd dat elke verandering aan het apparaat die niet uitdrukkelijk door
Belkin International, Inc. is goedgekeurd de bevoegdheid van de gebruiker om
het apparaat te bedienen teniet kan doen.
Beperkte levenslange productgarantie van Belkin International, Inc.,
Deze garantie dekt het volgende:
Belkin International, Inc. (“Belkin”) garandeert de oorspronkelijke koper van dit
Belkin product dat het product vrij is van ontwerp-, assemblage-, materiaal- en
fabricagefouten.
De geldigheidsduur van de dekking.
Belkin garandeert het Belkin-product voor de levensduur van het product.
Wat valt buiten deze garantie?
Alle hierin versterkte garanties zijn niet van toepassing als het Belkin-product
op verzoek van Belkin International, Inc. niet op kosten van de koper voor
onderzoek aan Belkin International, Inc. ter beschikking is gesteld of als Belkin
International, Inc. constateert dat het Belkin-product verkeerd is geïnstalleerd,
op enige wijze is veranderd of vervalst. De productgarantie van Belkin biedt
geen bescherming tegen van buiten komend onheil (anders dan blikseminslag),
zoals overstromingen, aardbevingen en oorlogsmolest, vandalisme, diefstal,
normale slijtage, afslijting, depletie, veroudering, misbruik, beschadiging
door netspanningsdalingen (z.g. “brown-outs” en “sags”), ongeoorloofde
programmering en/of wijziging van de systeemapparatuur.
Hoe wordt service verleend?
Om voor serviceverlening door Belkin in aanmerking te komen, moet u het
volgende doen:
1. Neem binnen 15 dagen na het voorval schriftelijk contact op met de afdeling
Customer Service, Belkin International, Inc., 501 W. Walnut St., Compton
CA 90220, of bel (800)-223-5546. U moet de volgende gegevens kunnen
verstrekken:
a. Het artikelnummer van het Belkin-product.
b. Waar u het product hebt gekocht.
c. Wanneer u het product hebt gekocht.
d. De originele aankoopbon.
2. De medewerker/ster van de Belkin klantenservice zal u vervolgens instructies
geven hoe u het aankoopbewijs en het product moet verzenden en hoe u de
claim verder af moet wikkelen.
43
2
3
4
5
6
Hoofdstuk
Hoe worden problemen opgelost?
Productgarantie.
Belkin zal het product dat een defect vertoont naar eigen keus kosteloos (met
uitzondering van transportkosten) repareren of vervangen.
1
Informatie
Belkin International, Inc. behoudt zich het recht voor het defecte Belkin-product
te onderzoeken. De kosten voor verzending van het Belkin-product naar Belkin
International, Inc. komen volledig voor rekening van de koper. Als Belkin naar eigen
bevinding tot de conclusie komt dat het onpraktisch is de defecte apparatuur naar
Belkin International, Inc. te verzenden, kan Belkin naar eigen goeddunken een
deskundige reparatie-inrichting aanwijzen en deze opdragen de betreffende apparatuur
te inspecteren en de reparatiekosten ervan te begroten. De eventuele verzendkosten
van het product naar de reparatie-inrichting en van de terugzending naar de koper en
van de kostenbegroting komen geheel voor rekening van de koper. Het beschadigde
product moet voor onderzoek beschikbaar blijven totdat de claim is afgehandeld.
Belkin International, Inc. behoudt zich bij de vereffening van claims het recht voor tot
in-de-plaatstreding bij alle geldige verzekeringspolissen waarover de koper van het
product beschikt.
De garantie en de wet.
DEZE GARANTIE OMVAT DE ENIGE GARANTIE VAN BELKIN. ER ZIJN GEEN ANDERE
GARANTIES, NADRUKKELIJK OF TENZIJ WETTELIJK BEPAALD IMPLICIET, MET
INBEGRIP VAN IMPLICIETE GARANTIES OF VOORZIENINGEN VOOR KWALITEIT,
VERHANDELBAARHEID OF GESCHIKTHEID VOOR EEN BEPAALD DOEL, EN ZULKE
IMPLICIETE GARANTIES, MITS VAN TOEPASSING, ZIJN WAT HUN GELDIGHEID
BETREFT TOT DE DUUR VAN DEZE GARANTIE BEPERKT.
In sommige staten of landen is het niet toegestaan de duur van impliciete
garanties te beperken in welk geval de bovenstaande garantiebeperkingen wellicht niet
voor u gelden.
ONDER TOEPASSELIJK RECHT IS BELKIN INTERNATIONAL, INC. NIET
AANSPRAKELIJK VOOR INCIDENTELE, BIJZONDERE, DIRECTE, INDIRECTE,
BIJKOMENDE OF MEERVOUDIGE SCHADE ZOALS ONDERMEER SCHADE
TEN GEVOLGE VAN GEDERFDE WINST EN/OF GEMISTE OPBRENGSTEN
VOORTKOMEND UIT DE VERKOOP OF HET GEBRUIK VAN BELKIN PRODUCTEN,
ZELFS ALS DE BETROKKENE VAN DE MOGELIJKHEID VAN ZULKE SCHADE
TEVOREN OP DE HOOGTE WAS GESTELD.
Deze garantie verleent u specifieke wettelijke rechten en wellicht
hebt u andere rechten die van staat tot staat kunnen verschillen.
In sommige staten en landen is het niet toegestaan incidentele
schade, gevolgschade en andere schade uit te sluiten, daarom is
het mogelijk dat de bovenstaande garantiebeperkingen voor u niet
gelden.
Voor informatie over de verwijdering van afgedankte
apparatuur verwijzen wij u naar
http://environmental.belkin.com
44
VOOR GEBRUIK IN
AT
BE CY
EE
FI
HU IE
CZ DK
FR DE GR
LV
LT
LU MT NL PL
IT
PT
SK
SI
IS
LI NO CH BG
ES
SE GB
RO TR
WERKT OP DE KANALEN
1-13
Informatie
1
EC Declaration of Conformity
to R&TTE Directive 1999/5/EC
CE
Manufacturer
:
BELKIN LTD,
EXPRESS BUSINESS PARK,
SHIPTON WAY
,RUSHDEN
NN10 6GL ENGLAND
:
Product / Apparatus
:
N WIRELESS USB ADAPTER
Type Number
:
F5D8053
Variants include
:
All Country variants
(residing in the EC
holding the TCF)
Belkin Ltd
3
4
5
6
Declaration
I declare that above product conforms to all the applicable requirements of
EU Directive1999/5/EC and is CE-marked accordingly:
Article 3.1a:
(Standard(s)) used to show compliance with LVD, 73/23/EEC
EN60950-1:2001
Article 3.1b:
(Standard(s)) used to show compliance with EMC Directive, 89/336/EEC:
EN301 489-1 V1.5.1 (2004-11), EN301 489-17 V1.2.1 (2002-08)
Article 3.2:
Standard(s) used to show compliance:
EN300-328 V1.6.1 (2004-11)
Signature
:
Name
:
K Simpson
Title
:
European Regulatory Compliance Manager
Date
:
_10 JULY 2007______________________
45
Hoofdstuk
Representative
2
Draadloze N
USB-adapter
Technische ondersteuning
Verenigd Koninkrijk: 0845 607 77 87
Europa: www.belkin.com/support
Belkin Ltd.
Express Business Park
Shipton Way, Rushden
NN10 6GL, Verenigd Koninkrijk
+44 (0) 1933 35 2000
+44 (0) 1933 31 2000 fax
Belkin SAS
130 rue de Silly
92100 Boulogne-Billancourt,
Frankrijk
+33 (0) 1 41 03 14 40
+33 (0) 1 41 31 01 72 fax
Belkin GmbH
Hanebergstraße 2
80637 München
Duitsland
+49 (0) 89 143405 0
+49 (0) 89 143405 100 fax
Belkin Iberia
C/ Anabel Segura, 10 planta baja, Of. 2
28108, Alcobendas, Madrid
Spanje
+34 91 791 23 00
+34 91 490 23 35 fax
Belkin Italy & Greece
Via Carducci, 7
Milaan 20123
Italië
+39 02 862 719
+39 02 862 719 fax
Belkin B.V.
Boeing Avenue 333
1119 PH Schiphol-Rijk,
Nederland
+31 (0) 20 654 7300
+31 (0) 20,654 7349 fax
© 2007 Belkin International, Inc. Alle rechten voorbehouden. Alle handelsnamen zijn geregistreerde
handelsmerken van de betreffende rechthebbenden. Windows en Windows Vista zijn in de Verenigde
Staten en/of andere landen gedeponeerde handelsmerken of handelsmerken van Microsoft
Corporation.
P75451ea
Adaptador USB
inalámbrico N
EN
FR
DE
NL
ES
IT
Manual del usuario
F5D8053ea
Índice de contenidos
1 Introducción ................................................................................................. 1
Ventajas de una red doméstica
1
Ventajas de una red inalámbrica ...................................................................... 1
Colocación de su hardware de red inalámbricapara
un rendimiento óptimo .................................................................................... 2
2 Generalidades.............................................................................................. 5
Características del producto ........................................................................... 5
Aplicaciones y ventajas ................................................................................... 6
Especificaciones del producto ........................................................................ 6
Requisitos del sistema .................................................................................... 7
Contenido del paquete ................................................................................... 7
3 Instalación y configuración del adaptador ................................................... 8
A — Proceso de instalación para Windows Vista .......................................... 8
B — Proceso de instalación para los sistemas operativos Windows
que no sean Windows Vista...................................................................13
C — Configuración ........................................................................................ 16
4 Utilización de la utilidad de red inalámbrica de Belkin ..............................17
Acceso a la utilidad de red inalámbrica de Belkin desde la
bandeja del sistema de Windows ................................................................. 17
Estado de red................................................................................................. 18
Redes disponibles ......................................................................................... 18
Estado de la red y soluciones aconsejadas ................................................. 19
Cómo establecer los perfiles de red inalámbrica ........................................ 20
Cómo proteger su red Wi-Fi ........................................................................ 20
Configuración del adaptador para utilizar la seguridad ............................ 25
5 Resolución de problemas ...........................................................................34
6 Información ................................................................................................42
Introducción
1
2
3
4
Ventajas de una red en casa
Su red doméstica de Belkin le permitirá:
• Compartir una conexión de Internet de alta velocidad con todos los
ordenadores de su hogar
• Compartir recursos, como archivos y discos duros, entre todos los
ordenadores conectados en su hogar
• Compartir una única impresora con toda la familia
• Compartir documentos, música, vídeo e imágenes digitales
• Almacenar, recuperar y copiar archivos de un ordenador a otro
• Participar en juegos on-line, consultar su correo electrónico y chatear
de forma simultánea
Ventajas de una red inalámbrica
Estas son algunas de las ventajas de instalar una red inalámbrica de Belkin:
•
Movilidad: ya no necesitará una “sala de ordenadores” dedicada, ahora
podrá trabajar en cualquier parte dentro de su alcance inalámbrico con un
ordenador de sobremesa o portátil conectado en red
•
Instalación sencilla – el asistente de instalación sencilla de Belkin facilita
la instalación
•
Flexibilidad: instale y acceda a impresoras, ordenadores y otros
dispositivos de red desde cualquier punto de su hogar
•
Fácil ampliación: la extensa gama de productos de interconexión en red
de Belkin le permite ampliar su red para incluir dispositivos adicionales
como impresoras y consolas de juegos
•
Sin necesidad de cableado: podrá ahorrarse los gastos y las
complicaciones de colocar cableado Ethernet por todo su hogar u oficina
•
Aceptación general en el sector: - seleccione entre una amplia gama de
productos de red compatibles
1
5
6
sección
Gracias por haber adquirido el Adaptador USB inalámbrico N de Belkin.
Ahora puede sacar partido de esta nueva tecnología y conseguir la
libertad necesaria para conectarse en su oficina o en su hogar sin
utilizar cables. Este Adaptador le permite conectar un ordenador portátil
a su red. Le rogamos que lea este Manual del usuario en su totalidad,
prestando especial atención a la sección llamada “Colocación de su
hardware de red inalámbrica para un rendimiento óptimo”.
Introducción
Colocación de su hardware de red inalámbrica para un rendimiento
óptimo
Su conexión inalámbrica será más potente cuanto más cerca se encuentre el
ordenador de su router inalámbrico (o punto de acceso). El alcance habitual
de funcionamiento de sus dispositivos inalámbricos en interiores se sitúa
entre los 30 y los 60 metros. De la misma forma, su conexión inalámbrica y
su rendimiento se verán algo mermados a medida que aumente la distancia
entre los dispositivos conectados y su router inalámbrico (o punto de
acceso). Puede que usted lo aprecie, aunque no necesariamente. Si se
aleja aún más de su router inalámbrico (o punto de acceso), es posible que
descienda su velocidad de conexión. Los factores que pueden debilitar las
señales al interferir en el recorrido de las ondas de radio de su red, son los
obstáculos o aparatos de metal y las paredes.
Si le preocupa el rendimiento de su red con respecto a los factores de
obstrucción o alcance, trate de mover el ordenador a una posición entre 1,5 y
3 m del router inalámbrico (o punto de acceso) a fin de verificar si el problema
es la distancia. Si persisten las dificultades incluso a poca distancia, póngase
en contacto con el servicio de Asistencia técnica de Belkin.
Nota: Aunque algunos de los artículos enumerados a continuación pueden
afectar el rendimiento de la red, estos no impedirán que su red inalámbrica
funcione. Si le preocupa que su red no esté funcionando con la máxima
eficacia, esta lista de verificación puede ser útil.
1.
Colocación del router (o punto de acceso) inalámbrico
Coloque su router inalámbrico (o punto de acceso), el punto central de
conexión de su red, lo más cerca posible del centro de sus dispositivos de
interconexión en red inalámbricos.
Para lograr la mejor cobertura de red inalámbrica para sus “clientes
inalámbricos” (es decir, ordenadores equipados con Tarjetas o Adaptadores
de Belkin):
•
Asegúrese de que las antenas (o puntos de acceso) del router
inalámbrico están en paralelo y están colocadas en posición
vertical (hacia el techo). Si su router inalámbrico (o punto de
acceso) está colocado en posición vertical, oriente las antenas
hacia arriba en la máxima medida posible.
•
En las casas de varias plantas, coloque el router inalámbrico (o
punto de acceso) en el piso más cercano al centro de la casa. Esto
puede implicar la colocación de su router inalámbrico (o punto de
acceso) en una de las plantas superiores.
•
Intente no colocar el router inalámbrico (o punto de acceso) cerca
de un teléfono inalámbrico de 2,4 GHz.
2
Introducción
1
Evitar obstáculos e interferencias
Evite colocar su router inalámbrico (o punto de acceso) cerca de
dispositivos que puedan emitir “ruido” de radioemisión, como hornos
microondas. Otros objetos que pueden impedir la comunicación
inalámbrica incluyen:
•
Frigoríficos
•
Lavadoras y secadoras
•
Armarios de metal
•
Acuarios de gran tamaño
•
Ventanas con tinte de base metálica contra radiaciones
ultravioletas
3
4
Si su señal inalámbrica parece debilitarse en algunos puntos, asegúrese
de que este tipo de objetos no esté bloqueando la ruta de la señal entre
sus ordenadores y el router inalámbrico (o punto de acceso).
3.
2
Colocación del teléfono inalámbrico
Si el rendimiento de su red inalámbrica sigue afectado después de
tener en cuenta los aspectos mencionados anteriormente, y usted tiene
un teléfono inalámbrico:
•
Pruebe a alejar los teléfonos inalámbricos del router inalámbrico
(o punto de acceso) y de sus ordenadores con equipamiento
inalámbrico.
•
Desconecte y quite la batería de todos los teléfonos
inalámbricos que funcionen en la banda de 2,4 GHz (consulte la
información del fabricante). Si se solventa el problema de esta
forma, su teléfono probablemente esté causando interferencias.
•
Si su teléfono permite la selección de canales, modifique el
canal del teléfono para situarlo en el canal más alejado de su
red inalámbrica. Por ejemplo, cambie el teléfono al canal 1 y el
router inalámbrico (o punto de acceso) al canal 11. (La selección
del canal variará dependiendo de la región) Consulte el manual
de usuario de su teléfono para obtener instrucciones detalladas.
•
En caso necesario, considere la posibilidad de cambiar su
teléfono inalámbrico por uno de 900 MHz o 5 GHz.
3
5
6
sección
2.
Introducción
4. Seleccionar el canal “más tranquilo” para su red inalámbrica
En lugares en los que hay viviendas y oficinas cercanas, como por ejemplo,
edificios de apartamentos o complejos de oficinas, es posible que existan redes
inalámbricas en los alrededores que puedan entrar en conflicto con la suya.
Utilice la capacidad de inspección de la ubicación de su utilidad inalámbrica
para localizar otras redes inalámbricas y coloque su router inalámbrico (o punto
de acceso) y ordenadores en un canal que sea lo más alejado posible del resto
de redes.
Pruebe con más de uno de los canales disponibles a fin de descubrir cuál es
la conexión más nítida y de evitar las interferencias de teléfonos inalámbricos
cercanos o de otros dispositivos inalámbricos.
Para los productos de red inalámbrica de Belkin, utilice la información detallada
de inspección de la ubicación y de canales inalámbricos que se incluye en su
Manual del usuario.
5.
Conexiones seguras, VPN y AOL
Las conexiones seguras requieren normalmente un nombre de usuario y una
contraseña y se utilizan cuando la seguridad es importante. Las conexiones
seguras incluyen:
• Conexiones de red virtual privada (VPN), utilizadas con frecuencia para
conectar a distancia con una red de oficina
• El programa “Bring Your Own Access” (Trae tu propio acceso) de America
Online (AOL), que le permite emplear AOL a través de la banda ancha
proporcionada por otro servicio por cable o DSL
•
La mayoría de las páginas-web de servicios bancarios on-line
• Muchas páginas-web comerciales requieren un nombre de usuario y una
contraseña para acceder a su cuenta
Las conexiones seguras pueden verse interrumpidas por una configuración de
gestión de la alimentación del ordenador que le haga pasar al modo de ahorro
de energía. La solución más sencilla para evitarlo es simplemente conectarse de
nuevo ejecutando otra vez el software de VPN o AOL, o accediendo de nuevo a la
página web segura.
Una segunda alternativa consiste en modificar las configuraciones de gestión de la
alimentación de su ordenador, de forma que no pase al modo de suspensión; no
obstante, esto puede no ser apropiado para ordenadores portátiles. Para modificar
su configuración de gestión de la alimentación en Windows, consulte las opciones
de alimentación en el panel de control.
Si continúa teniendo dificultades con la Conexiones Seguras, VPN y AOL, revise
los anteriores pasos 1-4 para asegurarse de haber tratado estos temas.
Estas instrucciones deberán permitirle cubrir la zona más extensa posible con su
router inalámbrico. En caso de que necesite acceso en un área más amplia, le
recomendamos el Módulo de Extensión de Alcance Inalámbrico/Punto de Acceso
de Belkin.
Para más información acerca de nuestros productos de interconexión en red,
visite nuestro sitio web en www.belkin.com/networking o póngase en contacto con
el servicio de Asistencia Técnica de Belkin.
4
Generalidades
1
Características del producto
•
Funcionamiento en la banda de 2,4 GHz ISM (Industria, Ciencia
y Medicina)
•
Utilidad de red inalámbrica de Belkin integrada y fácil de usar
•
Interfaz USB 2.0, para funcionar prácticamente con cualquier
ordenador con un puerto bus USB 2.0
•
Encriptación WPA, WPA2, WEP (Wired Equivalent Privacy,
privacidad equivalente a la del cable) de 64 ó 128 bits.
•
Acceso inalámbrico a recursos en red
•
Velocidad de transmisión de hasta 300 Mbps* (borrador del
estándar 802.11n), 54 Mbps (802.11g), u 11 Mbps (802.11b)
•
Instalación y utilización sencillas
•
Indicador LED de vínculo/actividad de red
5
2
3
4
5
6
sección
El Adaptador cumple con especificaciones del borrador del
estándar 802.11n del IEEE, para comunicarse con otros dispositivos
inalámbricos compatibles con el borrador del estándar 802.11n a
velocidades de hasta 300 Mbps*. El Adaptador también es compatible
con los dispositivos 802.11g a 54 Mbps, así como con los productos
802.11b a 11 Mbps. El Adaptador funciona en la misma banda de
frecuencia de 2,4 GHz que los productos Wi-Fi ®.
Generalidades
Aplicaciones y ventajas
•
•
Desplazamiento con un ordenador portátil sin cables por toda la
casa o la oficina
Ofrece la libertad de la interconexión de red sin cables
Velocidades de conexión de hasta 300 Mbps*Proporciona una
conexión inalámbrica instantánea en casa, en el trabajo y en
ubicaciones “hotspot” (puntos de acceso públicos) sin comprometer la
utilización de los productos existentes 802.11g y 802.11b
•
Compatibilidad con productos 802.11b/gLa Tarjeta es compatible
con los productos anteriores Wi-Fi (IEEE 802.11b/g)
•
Entornos difíciles de conectar por cablePermite la interconexión
en red en edificios con paredes sólidas, así como en áreas
abiertas en las que el cableado es difícil de instalar
•
Entornos muy cambiantes
Se adapta de forma sencilla a oficinas y entornos cambiantes o que
cambian con frecuencia de disposición
•
Necesidades de la interconexión en red para SOHO (Oficina
pequeña / oficina en casa)
Permite la rápida y sencilla instalación de las redes pequeñas que
necesitan los usuarios de SOHO
Especificaciones del producto
Interfaz de host:
USB 2.0
Temperatura de funcionamiento:
0—60 grados ºC
Temperatura de almacenamiento:
-20—80°C
Humedad:
Máx. 90% (sin condensación)
Alcance de funcionamiento normal:
Hasta 365,8 m**
* ATENCIÓN:
La velocidad de transmisión mencionada, 300 Mbps, es la velocidad de datos físicos.
La tasa de transferencia de datos real será inferior.
** El
rendimiento inalámbrico puede variar dependiendo del entorno de la interconexión en red.
6
Generalidades
1
2
3
(c)
4
(d)
5
6
(a) Tapa protectora
La tapa se incluye para proteger el conector USB durante su transporte.
Retire la tapa antes de insertar el Adaptador USB al puerto USB del
ordenador o mediante el soporte de sobremesa incluido.
(b) LED de actividad/alimentación
Se ilumina cuando el Adaptador se conecta y parpadea cuando el
Adaptador está activo.
(c) Conector USB
Parte del Adaptador que encaja en el puerto USB de su ordenador.
(c) Soporte de sobremesa
Le permite alejar el Adaptador de los objetos que pudieran interferir
alrededor de su ordenador.
Requisitos del sistema
•
Ordenador portátil PC con un puerto bus USB 2.0 alimentado
disponible
•
Windows ® 2000, XP con SP2 ó Vista TM***
Contenido del paquete
•
Adaptador USB inalámbrico N
•
Guía de instalación rápida
•
CD con software de instalación y manual de usuario
•
Soporte de sobremesa
7
sección
(a)
(b)
Instalación y configuración del adaptador
A Proceso de instalación para Windows Vista
***NOTA: En el momento del lanzamiento inicial de este producto, los
drivers de Windows Vista no estaban disponibles y puede que no estén
incluidos en el CD de su producto. Para obtener información sobre drivers
actualizados para Windows Vista (si es que hay alguno), visite el website de
Belkin:
www.belkin.com/support/vista.
IMPORTANTE: INSTALE EL SOFTWARE ANTES DE INSERTAR
EL ADAPTADOR.
A.1 Inserte el CD de instalación del software en la unidad de CD-ROM.
A.2 Haga clic en “Next” (Siguiente) para comenzar el proceso de instalación.
Nota: Si la pantalla de la utilidad de la instalación de la tarjeta inalámbrica de
Belkin no aparece en 20 segundos, acceda a su CD-ROM haciendo doble clic
en el icono de “Mi PC”, a continuación, haga doble clic en la unidad de CDROM en la que ha colocado el CD de instalación. Si el instalador no se inicia
de forma automática, haga doble clic sobre el icono denominado “Setup.exe”.
8
Instalación y configuración del adaptador
1
2
el proceso de instalación.
3
4
A.4 Seleccione una carpeta de destino
para la instalación del software
pinchando en “Browse”(buscar) o
simplemente en “Next” (siguiente)
para seleccionar una ubicación
predeterminada.
A.5 La pantalla del estado de la
instalación le permitirá saber en qué
momento del proceso de instalación
se encuentra.
A.6 Puede aparecer una segunda ventana
mostrando el mensaje “Windows
can’t verify the publisher of this driver
software” (Windoes no puede verificar
el autor de este software) Esto NO
indica un problema. Nuestro software,
ha sido comprobado exhaustivamente
y es compatible con este sistema
operativo.
9
5
6
sección
A.3 El asistente InstallShield Wizard inicia
Instalación y configuración del adaptador
A.7 Cuando se le indique, apague el
ordenador y enchufe el Adaptador.
La instalación ha sido completada.
A.8 Cuando la instalación finalice, pinche
en “Finish”(finalizar).
A.9 El asistente para el nuevo hardware
aparecerá en 3-15 segundos.
Si aparece, continúe con las
instrucciones siguientes. Seleccione
“Locate and install the driver
software” (ubicar e instalar el
software del driver) para continuar.
A.10 Puede que vea una pantalla similar
a la que se muestra más abajo.
Esto NO significa que exista algún
problema. Nuestro software, ha
sido comprobado exhaustivamente
y es compatible con este sistema
operativo. Seleccione “Install this
driver software anyway” (instale el
software del driver de todos modos)
y siga las instrucciones en pantalla.
A continuación, aparecerá una
pantalla indicando que el hardware
se está instalando; en ese momento,
otra indicará que el proceso ha
finalizado.
10
Instalación y configuración del adaptador
A.11 Para conectarse a Internet, abra
el Centro de red y uso compartido
abriendo primero el panel de
control en el menú de inicio.
1
2
3
4
A.12 En el panel de control, pinche en
“View network status and tasks”
(ver el estado de la red y las
tareas).
A.13 en el Centro de red y uso
compartico, pinche en “Connect to
a network” (conexión a la red).
A.14 En la siguiente pantalla, seleccione
una red inalámbrica disponible y
pinche en “Connect”(conectar).
11
5
6
Instalación y configuración del adaptador
A.15 Su Adaptador intentará conectarse
a la red seleccionada.
A.16 Dependiendo de los ajustes de
seguridad de la red inalámbrica,
puede que se le solicite que
introduzca una clave o contraseña
de seguridad de red. Después
pinche en “Connect” (conexión).
A.17 Tras conectarse a la red, podrá
escoger guardar esta red y
conectarse automáticamente
cuando su Adaptador esté al
alcance.
A.18 En este momento el Centro de
red y uso compartido indicará
la conexión de red que acaba
de realizar. Los vínculos de la
izquierda le permitirán configurar
sus conexiones de red.
12
Instalación y configuración del adaptador
B. Proceso de instalación para los sistemas operativos Windows
que no sean Windows Vista
IMPORTANTE: INSTALE EL SOFTWARE ANTES DE INSERTAR EL
ADAPTADOR.
1
2
3
B.1 Inserte el CD de instalación del software en su unidad de CD-ROM.
B.2 La pantalla del instalador de la tarjeta
inalámbrica de Belkin aparecerá de
forma automática en 20 segundos
como máximo. Haga clic en “Install
Software” (Instalar software) o
“Next” (Siguiente) para comenzar la
instalación.
Nota:Si la pantalla de la utilidad de la
instalación de la tarjeta inalámbrica
de Belkin no aparece en 20 segundos,
acceda a su CD-ROM haciendo
doble clic en el icono de “Mi PC”,
a continuación, haga doble clic en
la unidad de CD-ROM en la que
ha colocado el CD de instalación.
Haga doble clic sobre el archivo
denominado “setup.exe”.
B.3 El asistente InstallShield Wizard inicia
el proceso de instalación.
B.4 Seleccione una carpeta de destino
para la instalación del software
pinchando en “Browse”(buscar) o
simplemente en “Next” (siguiente)
para seleccionar una ubicación
predeterminada.
13
4
5
6
Instalación y configuración del adaptador
B.5 La pantalla del estado de la instalación le permite saber en qué
momento del proceso de instalación se encuentra.
B.6 Una vez finalizada la instalación
del software, aparecerá el mensaje
“Please plug in your USB Adapter
now” (Por favor, ahora conecte
el Adaptador USB). Conecte el
Adaptador a su ordenador.
B.7 El asistente para el nuevo hardware
aparecerá en 3-15 segundos. Si
aparece, seleccione “Install the
software automatically” (Instalar el
software de forma automática) y
haga clic sobre “Next” (Siguiente)
para instalar el software.
B.8 Si el asistente para el nuevo
hardware no aparece, pinche en
“Finish” (finalizar).
B.9 Podría ver una pantalla parecida
a ésta. Esto NO significa que
exista algún problema. Nuestro
software, ha sido comprobado
exhaustivamente y es compatible
con este sistema operativo.
Seleccione “Continue Anyway”
(continuar de todas formas) y siga
las instrucciones que aparecen en
pantalla.
14
Instalación y configuración del adaptador
B.10 En ese momento el asistente
instalará el software.
1
2
3
4
B.11 La instalación ha sido completada.
Haga clic en “Finish” (finalizar)
para cerrar el asistente del nuevo
hardware.
B.12 Pinche en “Finish” (finalizar) de
nuevo para salir del asistente
InstallShield.
B.13 Dependiendo del sistema operativo
que esté utilizando, puede
necesitar reiniciar el ordenador
para que los cambios tengan
efecto. Guarde la información y
cierre el resto de las aplicaciones.
Después, reinícielo.
15
5
6
Instalación y configuración del adaptador
C. Configuración
Utilización de la utilidad de red inalámbrica de Belkin
C.1 Después de reiniciar el ordenador, haga
doble clic en el icono de la utilidad de red
inalámbrica de Belkin que se encuentra en
la pantalla del escritorio.
Nota: También puede encontrar el icono de la
utilidad de red inalámbrica de Belkin en
la bandeja del sistema.
C.2 Aparecerá la pantalla de la utilidad de red
inalámbrica de Belkin.
C.3 Seleccione una red a la que conectarse
en la lista “Available Networks” (redes
disponibles) y haga clic en “Connect”
(conectar).
Nota: Para ver sus redes disponibles, debe
estar cerca de un punto de acceso o de
un router inalámbrico activo.
La instalación ha finalizado.
16
Utilización de la utilidad de red inalámbrica de Belkin
Después de haber instalado la utilidad de red inalámbrica de Belkin
(WNU, Wireless Networking Utility), las configuraciones para la
seguridad y la conexión inalámbricas sólo están a unos pocos pasos
de distancia.
1
2
3
Para acceder a la WNU, simplemente coloque el puntero del ratón
sobre el icono que se encuentra en la bandeja del sistema y haga clic
con el botón derecho.
4
5
6
Si no aparece el icono, haga clic en “Inicio > Programas >
Belkin > N1 Wireless USB Network Adapter > Belkin Wireless
Networking Utility” (Utilidad inalámbrica de Belkin)”.
17
sección
Acceso a la utilidad de red inalámbrica de Belkin desde la
bandeja del sistema de Windows
Utilización de la utilidad de red inalámbrica de Belkin
La pantalla predeterminada WNU es la pestaña “Current Status” (Estado
actual). La pestaña “Current Status” muestra el estado actual de la red y las
redes disponibles.
Estado de la red
Esta ventana muestra el estado de conexión de la red actual. Incluso muestra
la conexión entre el ordenador y el router, y entre el router e Internet. En
caso de producirse un problema, utilice la ventana “Network Status” (Estado
de la red) para determinar la fuente del problema (p. ej. ordenador, router o
Internet/módem).
Redes disponibles
Esta ventana muestra las redes disponibles en la ubicación actual así
como su SSID, fuerza de la señal, tipo de seguridad, canal y tipo de red.
Pérdida de la conexión inalámbrica
Si no se encuentra la actual conexión inalámbrica, aparecerá una ventana y la
WNU intentará conectarse de nuevo.
18
Utilización de la utilidad de red inalámbrica de Belkin
1
Conexión fallida
Aparecerán otras opciones en los intentos de recuperación de la
conexión. Para detener la conexión, haga clic en Stop” y para intentar
reconectar de nuevo, haga clic en “Retry” (intentar de nuevo).
2
3
5
6
Estado de la red y soluciones aconsejadas
Para obtener más información sobre el estado de la red, haga
clic en “Open Wireless Utility” (Abrir utilidad inalámbrica). La
pantalla por defecto será la pestaña “Current Status” (estado
actual) y la sección “Network Status” (estado de la red)
determina qué conexiones son buenas y cuáles son defectuosas.
La WNU también incorpora la sección “Solution Tips” (Soluciones
aconsejadas) que ofrece consejos para la resolución de problemas.
19
sección
4
Utilización de la utilidad de red inalámbrica de Belkin
Cómo establecer los perfiles de la red inalámbrica
La pestaña “My Connections” (mis conexiones) de la WNU le permite
añadir, editar y borrar los perfiles de la conexión. También muestra la fuerza
de la señal, la seguridad y el tipo de red.
Cómo asegurar su red Wi-Fi®
Si elige conectarse a una red segura, determine el tipo de seguridad
(WPA o WEP*) y utilice el campo apropiado de la ventana de diálogo.
*Nota: Tipos de seguridad
20
Utilización de la utilidad de red inalámbrica de Belkin
Atención: Cuando seleccione una red mediante la encriptación, lo
primero que verá es la pantalla de seguridad. Haga clic en el botón
“Advanced” (Avanzado) para ver otras opciones de seguridad (a
continuación).
1
2
3
5
6
21
sección
4
Utilización de la utilidad de red inalámbrica de Belkin
El protocolo WEP (Wired Equivalent Privacy)es un protocolo
de seguridad inalámbrico menos seguro pero más ampliamente adoptado.
Dependiendo del nivel de seguridad (64 ó 128 bits), se pedirá al usuario que
introduzca una clave hexadecimal de 10 ó 26 caracteres. Una clave hexadecimal
es una combinación de letras (a-f) y de números (0-9).
El Wireless Protected Access (WPA) es el nuevo estándar en
seguridad inalámbrica. De todos modos, no todas las tarjetas y adaptadores
inalámbricos admiten esta tecnología. Consulte el manual del usuario de su
adaptador inalámbrico para comprobar si admite tecnología WPA. En lugar de una
clave hexadecimal, la tecnología WPA utiliza solo frases de paso, que son mucho
más fáciles de recordar.
La siguiente sección, pensada para el usuario en el hogar, de la oficina doméstica
y de la pequeña oficina, presenta distintas formas de optimizar la seguridad de su
red inalámbrica.
En el momento de la publicación, se encuentran disponibles cuatro
métodos de encriptación:
Métodos de encriptación:
Nombre
Privacidad
equivalente a la del
cable de 64 bits
Encriptación de
128 bits
Acceso Protegido
Wi-Fi
Acceso
Protegido Wi-Fi
Acrónimo
WEP de 64 bits
WEP de 128 bits
WPA-TKIP
WPA-AES
Seguridad
Buena
Mejor
La mejor
La mejor
Prestaciones
Claves estáticas
Claves estáticas
Encriptación de
clave dinámica
y autenticación
mutua
Claves de
encriptación
basadas en el
algoritmo RC4
(habitualmente
claves de 40 bits)
Seguridad
adicional WEP de
64 bits utilizando
una longitud de
clave de 104
bits, más 24 bits
adicionales de
datos generados
por el sistema
TKIP (Protocolo
de integridad de
clave temporal)
adicional que
permite la
rotación de las
claves y refuerza
la encriptación
Encriptación
de clave
dinámica y
autenticación
mutua
El AES
(Estándar de
encriptación
avanzada) no
causa ninguna
pérdida de
rendimiento
WEP
WEP (Privacidad equivalente a la del cable) es un protocolo común que
añade seguridad a todos los productos inalámbricos compatibles con
Wi-Fi. La WEP aporta a las redes inalámbricas un nivel de protección de
la privacidad equivalente al de una red por cable equiparable.
22
Utilización de la utilidad de red inalámbrica de Belkin
WEP de 64 bits
Encriptación de 128 bits
Como resultado de una debilidad potencial en la seguridad WEP
de 64 bits, se creó un método más seguro de encriptación de
128 bits. La encriptación de 128 bits incluye una longitud de
clave de 104 bits, más 24 bits adicionales de datos generados
por el sistema (128 bits en total). Algunos fabricantes de
hardware llaman encriptación de 104 bits a la encriptación de
128 bits.
La mayoría de los nuevos equipos inalámbricos actualmente en
el mercado ofrecen compatibilidad con la encriptación WEP tanto
de 64 bits como de 128 bits, pero es posible que usted tenga
equipos más antiguos que sólo son compatibles con WEP de 64
bits. Todos los productos inalámbricos de Belkin soportan WEP
de 64 bits y de 128 bits.
Claves de encriptación
Después de seleccionar ya sea el modo de encriptación WEP de 64
bits o de 128 bits, es esencial generar una clave de encriptación. Si
la clave de encriptación no es consistente para el conjunto de la red
inalámbrica, sus dispositivos de interconexión en red inalámbrica no
podrán comunicarse entre sí.
Puede introducir la clave introduciendo la clave hexadecimal. Una
clave hexadecimal es una mezcla de números y letras de la A a
la F y del 0 al 9. Para WEP de 64 bits deberá introducir 10 claves
hexadecimales. Para la WEP de 128 bits, deberá introducir 26 claves
hexadecimales.
Por ejemplo:
AF 0F 4B C3 D4 = clave WEP de 64 bits
C3 03 0F AF 0F 4B B2 C3 D4 4B C3 D4 E7 = clave WEP de 128 bits
Escriba la clave WEP hexadecimal del router inalámbrico (o punto
de acceso) e introdúzcala de modo manual en la tabla de clave WEP
hexadecimal en la pantalla de configuración del Adaptador.
23
1
2
3
4
5
6
sección
La WEP de 64 bits se introdujo en un principio con encriptación de
64 bits, que incluye una longitud de clave de 40 bits más 24 bits
adicionales de datos generados por el sistema (64 bits en total).
Algunos fabricantes de hardware llaman encriptación de 40 bits a la
encriptación de 64 bits. Poco después de que se introdujese esta
tecnología, los investigadores descubrieron que la encriptación de 64
bits era demasiado fácil de decodificar.
Utilización de la utilidad de red inalámbrica de Belkin
WPA
El WPA (Wi-Fi Protected Access, Acceso Wi-Fi protegido) es un nuevo
estándar Wi-Fi que mejora las propiedades de seguridad de la WEP. Para
utilizar la seguridad WPA, los controladores y el software de su equipo
inalámbrico deben actualizarse para que sean compatibles con WPA.
Estas actualizaciones estarán disponibles en el sitio web de su proveedor
inalámbrico. Existen dos tipos de seguridad WPA: WPA-PSK (sin servidor) y
WPA (con servidor Radius) y WPA2.
El WPA-PSK (sin servidor) emplea lo que se conoce como “clave
precompartida” como clave de red. Una clave de red es una frase de
acceso que contiene entre ocho y 63 caracteres de largo. Se compone
de una combinación de letras, números o caracteres. Todos los clientes
utilizan la misma clave de red para acceder a la red. Normalmente, este
es el modo que se utilizará en un entorno doméstico.
El WPA (con servidor Radius) funciona mejor en entornos
empresariales, donde un servidor Radius distribuye de forma
automática la clave de red a los clientes.
WPA2 requiere el Estándar de encriptación avanzado (AES) para
encriptar información, que ofrece mucha más seguridad que el
sistema WPA. El WPA utiliza tanto el Protocolo de integridad de
clave temporal (TKIP) como el estándar AES para encriptar.
Cómo configurar el router inalámbrico de Belkin (o punto de
acceso) para utilizar la seguridad
Para empezar a utilizar la seguridad, deberá en primer lugar activar
WEP o WPA para su router inalámbrico (o punto de acceso). Para
los routers inalámbricos de Belkin (o puntos de acceso), estas
características de seguridad pueden configurarse mediante la interfaz
basada en Internet. Consulte el manual de su router inalámbrico (o
punto de acceso) para obtener instrucciones acerca de cómo acceder
a la interfaz de gestión.
IMPORTANTE: Ahora deberá hacer que todas las tarjetas/
adaptadores de red inalámbrica coincidan con estos ajustes.
24
Utilización de la utilidad de red inalámbrica de Belkin
Configuración del Adaptador para utilizar la seguridad
En este momento, ya debe tener su router inalámbrico (o punto de
acceso) configurado para utilizar WPA o WEP. Con el fin de obtener una
conexión inalámbrica, deberá ajustar su Adaptador USB inalámbrico N
para emplear los mismos ajustes de seguridad.
Modificación de los ajustes de encriptación inalámbrica
Para activar la seguridad, primero necesitará determinar qué estándar
utiliza el router (o el punto de acceso). (Consulte el manual del router
inalámbrico o punto de acceso para obtener directrices sobre cómo
acceder a los ajustes de seguridad.)
Para acceder a los ajustes de seguridad del Adaptador, haga clic en la pestaña
“My Connections” (Mis conexiones) y seleccione la conexión para la que quiera
cambiar los ajustes de seguridad. Haga clic en “Edit” (Modificar) para cambiar
los ajustes.
25
2
3
4
5
6
sección
El Adaptador USB inalámbrico N de Belkin es compatible con la última
encriptación de seguridad WPA así como con el anterior estándar de
seguridad WEP. De forma predeterminada, la seguridad inalámbrica está
desactivada.
1
Utilización de la utilidad de red inalámbrica de Belkin
Configuración WEP
Encriptación WEP de 64 bits
1.
Seleccione “WEP” del menú desplegable “Data Encryption”
(Encriptación de datos).
2.
Después de seleccionar su modo de encriptación WEP, podrá
introducir su clave tecleando la clave hexadecimal manualmente.
Una clave hexadecimal es una mezcla de números y letras de la A
a la F y del 0 al 9. Para WEP de 64 bits deberá introducir 10 claves
hexadecimales.
Por ejemplo:
AF 0F 4B C3 D4 = clave WEP de 64 bits
26
Utilización de la utilidad de red inalámbrica de Belkin
3.
Haga clic en “Save” (Guardar) para finalizar. Ahora está
establecida la encriptación en el router inalámbrico (o punto de
acceso). Ahora cada ordenador de su red inalámbrica deberá
configurarse con los mismos ajustes de seguridad.
ADVERTENCIA: Si está utilizando un cliente inalámbrico para activar
2
3
4
5
6
27
sección
las configuraciones de seguridad en su router inalámbrico (o punto de
acceso), perderá temporalmente su conexión inalámbrica hasta que
active la seguridad en su cliente inalámbrico. Grabe la clave antes de
aplicar cualquier cambio en el router inalámbrico (o punto de acceso).
Si no recuerda la clave hexadecimal, se bloqueará el acceso de su
cliente al router inalámbrico (o punto de acceso).
1
Utilización de la utilidad de red inalámbrica de Belkin
Encriptación WEP de 128 bits
1.
Seleccione “WEP” del menú desplegable.
2.
Después de seleccionar su modo de encriptación WEP, podrá
introducir su clave tecleando la clave hexadecimal manualmente.
Una clave hexadecimal es una mezcla de números y letras de la
A a la F y del 0 al 9. Para WEP de 128 bits deberá introducir 26
claves hexadecimales.
Por ejemplo:
C3 03 0F AF 0F 4B B2 C3 D4 4B C3 D4 E7 = clave WEP de 128 bits
28
Utilización de la utilidad de red inalámbrica de Belkin
3. Haga clic en “Save” (Guardar) para finalizar. Ahora está
establecida la encriptación en el router inalámbrico (o punto
de acceso). Ahora deberá configurar cada ordenador de su red
inalámbrica con los mismos ajustes de seguridad.
ADVERTENCIA: Si está utilizando un cliente inalámbrico para activar
2
3
4
5
6
29
sección
las configuraciones de seguridad en su router inalámbrico (o punto de
acceso), perderá temporalmente su conexión inalámbrica hasta que
active la seguridad en su cliente inalámbrico. Grabe la clave antes de
aplicar cualquier cambio en el router inalámbrico (o punto de acceso).
Si no recuerda la clave hexadecimal, se bloqueará el acceso de su
cliente al router inalámbrico (o punto de acceso).
1
Utilización de la utilidad de red inalámbrica de Belkin
Configuración de WPA-PSK (sin servidor)
Elija este ajuste si su red no utiliza un servidor Radius. El WPA-PSK (sin servidor)
se utiliza normalmente en redes domésticas y para pequeñas oficinas.
1.
Desde el menú desplegable de autenticación de la red (“Network
Authentication”), seleccione “WPA-PSK (no server)” (WPA-PSK, sin
servidor).
2.
Introduzca su clave de red. Puede estar compuesta por entre ocho
y 63 caracteres entre letras, números y símbolos. Esta clave puede
utilizarse en todos los clientes (tarjetas de red) que quiera incluir en
su red inalámbrica.
3.
Haga clic en “Save” (Guardar) para finalizar. Ahora deberá hacer que
todos los clientes (tarjetas de red) coincidan con estos ajustes.
30
Utilización de la utilidad de red inalámbrica de Belkin
Opciones de la utilidad de la red inalámbrica
1
2
3
5
6
La pestaña “Options” de la WNU proporciona al usuario la capacidad
de personalizar los ajustes de su WNU.
31
sección
4
Utilización de la utilidad de red inalámbrica de Belkin
Utilidad de la red inalámbrica Ayuda
La pestaña “Help” (Ayuda) de la WNU proporciona al usuario acceso
a los servicios de asistencia on-line o telefónica, así como también a
herramientas avanzadas de diagnóstico..
32
Utilización de la utilidad de red inalámbrica de Belkin
Herramientas avanzadas de diagnóstico
La sección “Advanced Diagnostic Tools” (Herramientas avanzadas
de diagnóstico) es el panel de control central para todos los ajustes
del hardware y del software de la red inalámbrica. Proporciona un
conjunto de pruebas y de servicios de conectividad para asegurar un
rendimiento óptimo de la red.
1
2
3
5
6
33
sección
4
Resolución de problemas
No puedo conectar a Internet de forma inalámbrica.
Si no puede conectarse a Internet desde un ordenador inalámbrico,
compruebe lo siguiente:
1. Observe las luces de su router. Si está utilizando un router inalámbrico de
Belkin, las luces deberán aparecer como sigue:
• La luz de alimentación deberá estar encendida.
• La luz de conectado deberá estar encendida pero no intermitente.
• La luz “WAN” deberá estar encendida o intermitente.
Si las luces de su router inalámbrico de Belkin presentan las características
anteriores, diríjase al paso número 2.
Si NO es así, asegúrese de que:
• El cable de alimentación del router está conectado.
• Todos los cables están conectados entre el router y el módem.
• Todos los indicadores LED del módem están funcionando correctamente.
Si no es así, consulte el manual del usuario de su módem.
• Reiniciar el router.
• Reiniciar el módem.
Si persisten las dificultades, póngase en contacto con el servicio de asistencia
técnica de Belkin.
Si no está utilizando un router inalámbrico de Belkin, consulte la guía del
usuario del fabricante de dicho router.
2. Abra el software de su utilidad inalámbrica haciendo clic en el icono de la
bandeja del sistema en la esquina inferior derecha de la pantalla. El icono
de la bandeja tendrá el siguiente aspecto (el icono puede ser rojo o verde):
3. La ventana que se abre deberá presentar una lista de “Available Networks”
(redes disponibles).
Las redes disponibles son redes inalámbricas a las que puede conectarse.
Si está utilizando un router 802.11g (G+) de Belkin o un router 802.11g
(54g) de Belkin, “Belkin54g” es el nombre predeterminado.
Si está utilizando un router 802.11b de Belkin, “WLAN” será el nombre
predeterminado.
Si NO está utilizando un router de Belkin, consulte el manual del usuario
del fabricante de su router para conocer el nombre por defecto.
34
Resolución de problemas
El nombre de la red inalámbrica aparece en
“Available Networks” (redes disponibles)
1
Si el nombre correcto de la red está incluido en la lista de
“Available Networks” (redes disponibles), siga los siguientes
pasos para realizar la conexión inalámbrica:
2
1. Haga clic en el nombre correcto de la red en la lista de “Available
Si aún no puede acceder a Internet después de conectarse
a la red inalámbrica, póngase en contacto con el servicio de
Asistencia técnica de Belkin.
El nombre de su red inalámbrica NO aparece en la lista
de “Available Networks” (Redes disponibles).
Si el nombre correcto de la red no aparece en la lista, verifique
las configuraciones SSID para ver si coinciden. El SSID distingue
entre mayúsculas y minúsculas y el nombre en cada ordenador
debe ser exactamente el mismo para que el Adaptador se
conecte al router (o al punto de acceso) inalámbrico.
Nota: Para comprobar los ajustes del SSID o buscar una red
disponible, haga doble clic en el icono indicador de señal para
abrir la pantalla “Wireless Networks” (Redes inalámbricas).
Haga clic en “Add” (Añadir) si no ve la red a la que está tratando
de acceder e introduzca el SSID. Para obtener más información
acerca de la configuración de un SSID, consulte el manual del
usuario del fabricante de su router.
Si persisten las dificultades incluso a poca distancia, póngase en
contacto con el servicio de Asistencia técnica de Belkin.
35
3
4
5
6
sección
Networks” (Redes disponibles).
2. Si la red tiene activada la seguridad (encriptación), deberá
introducir la clave de red. Haga clic en “Connect” (Conectar).
Para más información acerca de la seguridad, consulte la
página titulada: “Securing your Wi-Fi Network” (asegurar su
red Wi-Fi) de la página 20 de este manual del usuario.
3. En pocos segundos, el icono de la bandeja del sistema, en la
esquina inferior derecha de su pantalla, deberá ponerse de
color verde indicando la correcta conexión con la red.
Resolución de problemas
El CD-ROM de instalación no activa la utilidad de red
inalámbrica de Belkin.
Si el CD-ROM no inicia la utilidad de red inalámbrica de forma automática,
puede ser que el ordenador esté ejecutando otras aplicaciones que estén
interfiriendo con la unidad de CD. Si la pantalla de la utilidad de la red
inalámbrica no aparece en un plazo de 15-20 segundos, haga doble clic
en el icono “Mi PC” para abrir su unidad de CD-ROM. A continuación,
haga doble clic en la unidad de CD-ROM en la que se haya introducido
el CD de instalación para iniciar la misma. Si la instalación no se inicia
automáticamente, haga clic con el botón derecho del ratón para seleccionar
“Explore” (Explorar), y a continuación haga doble clic en el icono
denominado “setup.exe”.
El LED de alimentación no se enciende; el Adaptador no
funciona.
Si los indicadores LED no están encendidos, es posible que el Adaptador
no esté correctamente conectado o instalado. Compruebe que el Adaptador
esté introducido correctamente en el puerto USB de su ordenador.
Compruebe que los controladores del Adaptador han sido instalados.
Haga clic con el botón derecho en el icono “Mi PC” de su escritorio.
Seleccione “Properties” (Propiedades), navegue hasta el “Device Manager”
(Administrador de dispositivos) y compruebe si su Adaptador se encuentra
en la lista sin ningún error. Si se indica un error, póngase en contacto con
el servicio técnico de Belkin.
El LED de vínculo parpadea lentamente, no puedo conectarme
a una red inalámbrica ni a Internet.
Si su adaptador parece estar funcionando correctamente, pero usted no
puede conectarse a una red, o aparece un icono inalámbrico rojo en la
parte inferior de su pantalla, es posible que exista una falta de coincidencia
entre los ajustes del nombre de red (SSID) en las propiedades de su red
inalámbrica.
Compruebe los ajustes SSID para ver si coinciden. El SSID distingue
entre mayúsculas y minúsculas y el nombre en cada ordenador debe ser
exactamente el mismo para que el Adaptador se conecte al router (o al
punto de acceso) inalámbrico.
Nota:Para comprobar los ajustes del SSID o buscar una red disponible,
haga doble clic en el icono indicador de señal para abrir la pantalla
“Wireless Networks” (Redes inalámbricas). Haga clic en “Add” (Añadir) si no
ve la red a la que está tratando de acceder e introduzca el SSID.
Para obtener más información acerca de la configuración de un SSID,
consulte el manual del usuario del fabricante de su router. Si persisten las
dificultades incluso a poca distancia, póngase en contacto con el servicio
de Asistencia técnica de Belkin.
36
Resolución de problemas
El LED de vínculo es permanente pero no se conecta a Internet.
Si persisten las dificultades incluso a poca distancia, póngase en contacto
con el servicio de Asistencia técnica de Belkin.
La transferencia de datos es lenta en ocasiones.
La tecnología inalámbrica está basada en la radioemisión, lo que significa
que la conectividad y el rendimiento entre dispositivos descenderán a
medida que aumente la distancia entre los mismos. Otros factores que
provocan un debilitamiento de la señal (el metal es habitualmente el
responsable) son obstáculos como paredes y aparatos metálicos. Como
resultado, el alcance habitual de sus dispositivos inalámbricos en interiores
se situará entre 30 y 60 m. Tenga en cuenta, además, que la velocidad de
conexión puede verse mermada cuanto más se aleje del router inalámbrico
(o punto de acceso).
Con el fin de determinar si los problemas de conexión inalámbrica están
relacionados con el alcance, le sugerimos desplazar temporalmente el
ordenador, de ser posible, a 1,5-3 m de distancia del router inalámbrico (o
punto de acceso). Consulte el capítulo titulado “Colocación de su hardware
de red inalámbrica para un óptimo rendimiento” en la página 2 de este
manual. Si persisten las dificultades incluso a poca distancia, póngase en
contacto con el servicio de Asistencia técnica de Belkin.
La potencia de la señal es débil.
La tecnología inalámbrica está basada en la radioemisión, lo que significa
que la conectividad y el rendimiento entre dispositivos descenderán a
medida que la distancia entre los mismos aumente. Otros factores que
provocan un debilitamiento de la señal (el metal es habitualmente el
responsable) son obstáculos como paredes y aparatos metálicos. Como
resultado, el alcance habitual de sus dispositivos inalámbricos en interiores
se situará entre 30 y 60 m. Tenga en cuenta, además, que la velocidad de
conexión puede verse mermada cuanto más se aleje del router inalámbrico
(o punto de acceso). Con el fin de determinar si los problemas de conexión
inalámbrica están relacionados con el alcance, le sugerimos desplazar
temporalmente el ordenador, de ser posible, a 1,5-3 m de distancia
del router inalámbrico (o punto de acceso).
37
1
2
3
4
5
6
sección
Si dispone de señal pero no puede acceder a Internet ni obtener
una dirección IP, es posible que el problema se deba a una falta de
coincidencia entre las configuraciones de la clave de encriptación en su
ordenador y el router inalámbrico (o punto de acceso). Compruebe las
configuraciones clave WEP, WPA o WPA2 para ver si coinciden. La clave
distingue entre minúsculas y mayúsculas, el nombre de cada ordenador y
del router inalámbrico (o punto de acceso) debe ser exactamente el mismo
para que el adaptador se conecte al router. Para más información sobre
la encriptación, consulte la sección “Cómo proteger su red Wi-Fi” en la
página 20 de este Manual del usuario.
Resolución de problemas
Modificación del canal inalámbrico: Según las interferencias y el
tráfico inalámbrico del área, cambiar el canal inalámbrico de la red
puede mejorar su rendimiento y fiabilidad. El canal 6 es el canal
predeterminado con el que se suministra el router; sin embargo,
puede elegir entre varios canales dependiendo de su región.
Consulte el manual del usuario de su router (o punto de acceso)
para obtener instrucciones de cómo elegir otros canales.
Limitación de la velocidad de transmisión inalámbrica: limitar
la velocidad de transmisión inalámbrica puede ayudar a mejorar
la estabilidad de la conexión y el alcance inalámbrico máximo. La
mayoría de las tarjetas inalámbricas tiene la capacidad de limitar
la velocidad de transmisión. Para cambiar esta propiedad, vaya al
panel de control de Windows, abra la ventana “Conexiones de red”
y haga doble clic sobre la conexión de su Adaptador. En el diálogo
de propiedades, seleccione el botón “Configure” (Configurar) en la
pestaña “General” (los usuarios de Windows 98 deberán seleccionar
el Adaptador USB inalámbrico del cuadro de lista, después
hacer clic en “Properties” (Propiedades), y luego elija la pestaña
“Advanced” (Opciones Avanzadas) y seleccione la propiedad
de velocidad. Por lo general, las tarjetas de cliente inalámbrico
se configuran de forma automática para ajustar la velocidad de
transmisión inalámbrica, pero esto puede causar interrupciones
periódicas en la conexión si la señal inalámbrica es demasiado
débil. Como regla general, las velocidades de transmisión más
lentas son más estables. Pruebe con diferentes velocidades de
conexión hasta que encuentre la mejor para su entorno; tenga en
cuenta que no todas las velocidades de transmisión disponibles
son aceptables para navegar por Internet. Para obtener más
información, consulte la documentación de la tarjeta inalámbrica. Si
persisten las dificultades incluso en un ámbito cercano, póngase en
contacto con el servicio de asistencia técnica de Belkin.
¿Por qué hay dos utilidades inalámbricas en mi bandeja
del sistema? ¿Cuál debo utilizar?
Emplear la utilidad de red inalámbrica de Belkin tiene varias
ventajas sobre la utilidad de la configuración cero inalámbrica
de Windows XP, Wireless Zero Configuration. Le ofrecemos una
inspección de la ubicación, información detallada sobre el vínculo y
un diagnóstico del adaptador, por citar algunas.
Es esencial conocer qué utilidad está gestionando su Adaptador.
Recomendamos emplear la utilidad de red inalámbrica de Belkin.
Para emplear la utilidad de red inalámbrica de Belkin siga los
siguientes pasos:
38
Resolución de problemas
Paso 1 Haga clic con el botón derecho del ratón en el icono del
estado de red situado en la bandeja del sistema y seleccione la
pestaña “Status” (Estado).
Paso 2 En la pestaña “Status” (estado), no marque el recuadro de
1
2
“Use Windows to Configure my Wireless Network” (Utilizar Windows
para configurar mi red inalámbrica). Una vez desactivada la casilla,
haga clic sobre “Close” (Cerrar) para cerrar la ventana.
3
Ahora está utilizando la utilidad de red inalámbrica de Belkin para
configurar el Adaptador.
4
Esta condición se da si su ordenador tiene una tarjeta inalámbrica
incorporada mientras su Adaptador USB inalámbrico N de Belkin
también está activo. Esto sucede porque ahora Windows debe
gestionar dos conexiones de red activas.
Tiene que desactivar la tarjeta inalámbrica incorporada en su
ordenador bajo “Network Adapters” (Adaptadores de red) en el
Administrador de dispositivos.
El Adaptador no funciona o la conexión es lenta cuando el
ordenador tiene incorporada una tarjeta Ethernet por cable.
Esta condición se da si su ordenador tiene una tarjeta Ethernet
activa mientras su Adaptador también está activo. Esto sucede
porque Windows debe gestionar ahora dos conexiones de red
activas. Tiene que desactivar la tarjeta Ethernet de su ordenador
bajo “Network Adapters” (Adaptadores de red) en el Administrador
de dispositivos.
¿Cuál es la diferencia entre 802.11g y 802.11n?
Actualmente existen tres estándares de interconexión en red
inalámbrica cuyas velocidades máximas de transmisión de datos
son muy diferentes. Todos se basan en la designación para certificar
los estándares de red. El estándar de red inalámbrica más común,
puede transmitir hasta 54Mbps de información; 802.11a también es
compatible con 54Mbps, pero en la frecuencia 5GHz; y el borrador
de las especificaciones de 802.11n puede conectarse hasta a
300Mbps. Consulte la siguiente tabla para obtener información más
detallada.
39
5
6
sección
El Adaptador no funciona o la conexión no es estable
cuando el ordenador tiene una segunda tarjeta de red
inalámbrica incorporada (tal como un PCI mini o Intel®
Centrino™).
Resolución de problemas
Hasta 300Mbps*
Frecuencia
N1 MIMO
(borrador
802.11n con
MIMO)
Hasta 300Mbps*
Los dispositivos
domésticos más comunes
como los teléfonos
inalámbricos y los hornos
microondas pueden
interferir con la banda 2,4
GHz sin licencia
Los dispositivos
domésticos más comunes
como los teléfonos
inalámbricos y los hornos
microondas pueden
interferir con la banda 2.4
GHz sin licencia
Los dispositivos
domésticos más comunes
como los teléfonos
inalámbricos y los hornos
microondas pueden
interferir con la banda 2.4
GHz sin licencia
Los dispositivos
domésticos más comunes
como los teléfonos
inalámbricos y los hornos
microondas pueden
interferir con la banda 2.4
GHz sin licencia
Compatibilidad
N MIMO
(borrador
802.11n con
MIMO)
G+ MIMO
(802.11g con
MIMO MRC)
Hasta 54Mbps*
Compatible con
802.11b/g
Compatible con
802.11b/g
Compatible con el
borrador del estándar
802.11n** y con
802.11b/g
Compatible con el
borrador del estándar
802.11n** y con
802.11b/g
Cobertura*
G
(802.11g)
Hasta 54Mbps*
Hasta 120 m*
Hasta 300 m*
Hasta 365,8 m*
Hasta 120 m*
Ventajas
Velocidad/
velocidad
datos*
Tecnología
inalámbrica
Tabla de comparación inalámbrica de Belkin
Gran aceptación para
el uso compartido de
Internet
Mejor cobertura y
velocidad y alcance
consistentes
Velocidad y cobertura
mejoradas
Tecnología punta: mejor
cobertura y transmisión
*La distancia y la velocidad de conexión variará según el entorno de red.
**Este Adaptador es compatible con productos que cumplen las especificaciones de la
misma versión del borrador para el estándar 802.11n y puede necesitar una actualización de
software para obtener los mejores resultados.
40
Resolución de problemas
Asistencia técnica gratuita*
*Pueden aplicarse tarifas de llamada
1
www.belkin.com
nacional
Podrá encontrar más información en nuestra página web www.belkin.
com a través del servicio de asistencia técnica. Si desea ponerse en
contacto con el servicio de asistencia técnica por teléfono, le rogamos
que llame al número correspondiente de la siguiente lista*.
NÚMERO
DIRECCIÓN DE INTERNET
AUSTRIA
0820 200766
www.belkin.com/uk/networking/
BÉLGICA
07 07 00 073
www.belkin.com/nl/networking/
REPÚBLICA CHECA
239 000 406
www.belkin.com/uk/networking/
DINAMARCA
701 22 403
www.belkin.com/uk/networking/
FINL ANDIA
097 25 19 123
www.belkin.com/uk/networking/
FR ANCIA
08 - 25 54 00 26
www.belkin.com/fr/networking/
ALEMANIA
0180 - 500 57 09
www.belkin.com/de/networking/
GRECIA
00800 - 44 14 23 90
www.belkin.com/uk/networking/
HUNGRÍA
06 - 17 77 49 06
www.belkin.com/uk/networking/
ISL ANDIA
800 8534
www.belkin.com/uk/networking/
IRL ANDA
0818 55 50 06
www.belkin.com/uk/networking/
ITALIA
02 - 69 43 02 51
www.belkin.com/it/support/tech/issues_more.asp
LUXEMBURGO
34 20 80 85 60
www.belkin.com/uk/networking/
PAÍSES BAJOS
0900 - 040 07 90 0,10 € por minuto www.belkin.com/nl/networking/
NORUEG A
81 50 0287
www.belkin.com/uk/networking/
POLONIA
00800 - 441 17 37
www.belkin.com/uk/networking/
PORTUG AL
707 200 676
www.belkin.com/uk/networking/
RUSIA
495 580 9541
www.belkin.com/networking/
SUDÁFRICA
0800 - 99 15 21
www.belkin.com/uk/networking/
ESPAÑA
902 - 02 43 66
www.belkin.com/es/support/tech/networkingsupport. asp
SUECIA
07 - 71 40 04 53
www.belkin.com/se/support/tech/networkingsupport.asp
SUIZ A
08 - 48 00 02 19
www.belkin.com/uk/networking/
REINO UNIDO
0845 - 607 77 87
www.belkin.com/uk/networking/
OTROS PAÍSES
+44 - 1933 35 20 00
41
3
4
5
6
sección
PAÍS
2
Información
Declaración de la FCC
DECLARACIÓN DE CONFORMIDAD CON LAS NORMATIVAS
DE LA FCC SOBRE COMPATIBILIDAD ELECTROMAGNÉTICA
Nosotros, Belkin International, Inc., con sede en 501 West Walnut
Street, Compton, CA 90220 (EE.UU.), declaramos bajo nuestra sola
responsabilidad que el producto:
F5D8053
al que hace referencia la presente declaración, cumple con la
sección 15 de las normativas de la FCC. Su utilización está sujeta
a las siguientes dos condiciones: (1) este dispositivo no debe
provocar interferencias nocivas y (2) este dispositivo debe aceptar
cualquier interferencia recibida, incluidas las interferencias que
puedan provocar un funcionamiento no deseado.
Precaución: Exposición a las radiaciones de radiofrecuencia.
La energía de salida emitida por este dispositivo se encuentra muy por debajo
de los límites de exposición a radiofrecuencias. No obstante, el dispositivo será
empleado de tal forma que se minimice la posibilidad de contacto humano
durante el funcionamiento normal.
Cuando se conecta una antena externa al dispositivo, dicha antena deberá ser
colocada de tal manera que se minimice la posibilidad de contacto humano
durante el funcionamiento normal. Con el fin de evitar la posibilidad de
superar los límites de exposición a radiofrecuencias establecidos por la FCC,
la proximidad del ser humano a la antena no deberá ser inferior a los 20 cm
durante el funcionamiento normal.
Declaración sobre interferencias de la Federal Communications
Commission (FCC, Comisión de comunicaciones de EEUU)
Las pruebas realizadas con este equipo dan como resultado el cumplimiento
con los límites establecidos para un dispositivo digital de la clase B, de acuerdo
a la sección 15 de las normativas de la FCC. Los límites se establecen con el fin
de proporcionar una protección razonable contra interferencias nocivas en zonas
residenciales.
Este equipo genera, emplea y puede irradiar energía de radiofrecuencia. Si este
equipo provoca interferencias nocivas en la recepción de radio y televisión,
las cuales se pueden determinar encendiendo y apagando seguidamente el
dispositivo, el mismo usuario puede intentar corregir dichas interferencias
tomando una o más de las siguientes medidas:
• Reorientar o colocar en otro lugar la antena de recepción.
• Aumentar la distancia entre el equipo y el receptor.
• Conectar el equipo a la toma de un circuito distinto de aquel al que está
conectado el receptor.
• Solicitar la ayuda del vendedor o de un técnico experto en radiotelevisión.
42
Información
Modificaciones
La FCC exige que el usuario sea notificado de que cualquier cambio o
modificación del presente dispositivo que no sea aprobado expresamente
por Belkin International, Inc. podría invalidar el derecho del usuario para
utilizar este equipo.
Belkin International, Inc., Garantía limitada de por vida del producto
La cobertura de la presente garantía.
Belkin International, Inc. (“Belkin”) otorga una garantía al comprador original
según la cual el producto Belkin no tendrá defectos en cuanto a diseño,
montaje, materiales o mano de obra.
El período de cobertura.
¿Qué haremos para resolver los problemas?
Garantía del producto.
Belkin reparará o sustituirá, según decida, cualquier producto defectuoso, sin
ningún tipo de cargo (excepto los gastos de envío del producto).
¿Qué excluye la presente garantía?
Todas las garantías mencionadas anteriormente resultarán nulas y sin valor
alguno si el producto Belkin no se le proporciona a Belkin para su inspección
bajo requerimiento de Belkin con cargo al comprador únicamente o si Belkin
determina que el producto Belkin se ha instalado de un modo inadecuado,
alterado de algún modo o forzado. La garantía del producto de Belkin no
lo protege de los desastres naturales tales como inundaciones, terremotos,
rayos, vandalismo, robos, mal uso, erosión, agotamiento, desuso o daño a
causa de interrupciones en la alimentación (p. ej. apagones) modificación o
alteración no autorizadas de programas o sistemas.
Cómo acceder a nuestros servicios.
Para obtener asistencia sobre algún producto de Belkin, debe seguir los
siguientes pasos:
1. Póngase en contacto con Belkin International, Inc en 501 W. Walnut St.,
Compton CA 90220, a la atención de: Servicio de atención al cliente,
o llame al teléfono (800)-223-5546, en un plazo de 15 días desde el
momento de la incidencia. Tenga preparada la siguiente información:
a. El número de artículo del producto Belkin.
b. El lugar de compra del producto.
c. Cuándo compró el producto.
d. Copia de la factura original.
2. El servicio de atención al cliente de Belkin le informará sobre cómo enviar
la factura y el producto Belkin y sobre cómo proceder con su reclamación.
43
2
3
4
5
6
sección
Belkin otorga una garantía a su producto durante toda su vida útil.
1
Información
Belkin International, Inc., se reserva el derecho a revisar el producto Belkin
dañado. Todos los gastos de envío del producto Belkin a Belkin International,
Inc para su inspección correrán a cargo del comprador exclusivamente. Si
Belkin determina, según su propio criterio, que resulta poco práctico el envío
de los equipos dañados a Belkin International, Inc, Belkin podrá designar,
según su propio criterio, una empresa de reparación de equipos para que
inspeccione y estime el coste de la reparación de dichos equipos. El coste, si
existe, del envío de los equipos hacia y desde dicha empresa de reparaciones,
y de la estimación correspondiente, correrá exclusivamente a cargo del
comprador. Los equipos dañados deberán permanecer disponibles para su
inspección hasta que haya finalizado la reclamación. Si se solucionan las
reclamaciones por negociación, Belkin International, Inc se reserva el derecho
a subrogar la garantía por cualquier póliza de seguros del comprador.
Relación de la garantía con la legislación estatal.
ESTA GARANTÍA CONTIENE LA GARANTÍA EXCLUSIVA DE BELKIN. NO
EXISTEN OTRAS GARANTÍAS EXPLÍCITAS O IMPLÍCITAS (EXCEPTO LAS
PROPORCIONADAS POR LA LEY). ESTO INCLUYE LAS GARANTÍAS
IMPLÍCITAS O LAS CONDICIONES DE CALIDAD, APTITUD PARA LA VENTA
O PARA CUALQUIER PROPÓSITO EN CONCRETO Y, TALES GARANTÍAS
IMPLÍCITAS, SI ES QUE EXISTE ALGUNA, ESTÁN LIMITADAS A LA
DURACIÓN DE ESTA GARANTÍA.
Algunas jurisdicciones no permiten la limitación de la duración de
las garantías implícitas, por lo que cabe la posibilidad de que las anteriores
limitaciones no le afecten.
EN NINGÚN CASO BELKIN SERÁ RESPONSABLE DE LOS DAÑOS
IMPREVISTOS, ESPECIALES, DIRECTOS, INDIRECTOS, CONSECUENTES
O MÚLTIPLES, INCLUYENDO ENTRE OTROS LA PÉRDIDA DE NEGOCIO
O BENEFICIOS QUE PUEDA SURGIR DE LA VENTA O EL EMPLEO
DE CUALQUIER PRODUCTO BELKIN, INCLUSO SI BELKIN HA SIDO
INFORMADA DE LA POSIBILIDAD DE DICHOS DAÑOS.
Esta garantía le proporciona derechos legales específicos y también
podría beneficiarse de otros derechos que pueden variar entre
las distintas jurisdicciones. Ciertas jurisdicciones no permiten la
exclusión o limitación de daños fortuitos, consiguientes o de otro
tipo, por lo que tal vez las limitaciones mencionadas no le afecten.
Para obtener información sobre el desecho del
producto remítase a
http://environmental.belkin.com
44
PARA USO EN
AT
BE CY
EE
FI
HU IE
CZ DK
FR DE GR
LV
LT
LU MT NL PL
IT
PT
SK
SI
IS
LI NO CH BG
ES
SE GB
RO TR
FUNCIONA EN
LOS CANALES 1-13
Información
1
EC Declaration of Conformity
to R&TTE Directive 1999/5/EC
CE
3
:
BELKIN LTD,
EXPRESS BUSINESS PARK,
SHIPTON WAY
,RUSHDEN
NN10 6GL ENGLAND
Representative
:
Belkin Ltd
Product / Apparatus
:
N WIRELESS USB ADAPTER
Type Number
:
F5D8053
Variants include
:
All Country variants
4
5
6
Declaration
I declare that above product conforms to all the applicable requirements of
EU Directive1999/5/EC and is CE-marked accordingly:
Article 3.1a:
(Standard(s)) used to show compliance with LVD, 73/23/EEC
EN60950-1:2001
Article 3.1b:
(Standard(s)) used to show compliance with EMC Directive, 89/336/EEC:
EN301 489-1 V1.5.1 (2004-11), EN301 489-17 V1.2.1 (2002-08)
Article 3.2:
Standard(s) used to show compliance:
EN300-328 V1.6.1 (2004-11)
Signature
:
Name
:
K Simpson
Title
:
European Regulatory Compliance Manager
Date
:
_10 JULY 2007______________________
45
sección
Manufacturer
(residing in the EC
holding the TCF)
2
Adaptador USB
inalámbrico N
Asistencia técnica de Belkin
R.U.: 0845 607 77 87
Europa: www.belkin.com/support
Belkin Ltd.
Express Business Park
Shipton Way, Rushden
NN10 6GL, Reino Unido
+44 (0) 1933 35 2000
+44 (0) 1933 31 2000 fax
Belkin SAS
130 rue de Silly
92100 Boulogne-Billancourt,
Francia
+33 (0) 1 41 03 14 40
+33 (0) 1 41 31 01 72 fax
Belkin GmbH
Hanebergstrasse 2
80637 Múnich
Alemania
+49 (0) 89 143405 0
+49 (0) 89 143405 100 fax
Belkin Iberia
C/ Anabel Segura, 10 planta baja, Of. 2
28108, Alcobendas, Madrid
España
+34 91 791 23 00
+34 91 490 23 35 fax
Belkin Italy & Greece
Via Carducci, 7
Milán 20123
Italia
+39 02 862 719
+39 02 862 719 fax
Belkin B.V.
Boeing Avenue 333
1119 PH Schiphol-Rijk,
Países Bajos
+31 (0) 20 654 7300
+31 (0) 20 654 7349 fax
© 2007 Belkin International, Inc. Todos los derechos reservados. Todos los nombres comerciales son
marcas registradas de los respectivos fabricantes mencionados. Windows y Windows Vista son marcas
registradas o marcas de Microsoft Corporation registradas en Estados Unidos u otros países.
P75451ea
Adattatore USB
wireless
N Wireless
EN
FR
DE
NL
ES
IT
Manuale d’uso
F5D8053ea
Indice
1 Introduzione................................................................................................. 1
I vantaggi di una rete domestica ..................................................................... 1
I vantaggi di una rete wireless ......................................................................... 1
Dove posizionare l’hardware di rete
wireless per ottenere prestazioni eccellenti .................................................... 2
2 Descrizione generale ................................................................................... 5
Caratteristiche del prodotto............................................................................. 5
Applicazioni e vantaggi .................................................................................... 6
Specifiche del prodotto ................................................................................... 6
Requisiti del sistema ....................................................................................... 7
Contenuto della confezione ............................................................................ 7
3 Installazione e configurazione dell’adattatore ............................................ 8
A — Installazione per Windows Vista ......................................................... 8
B — Procedura di installazione per i sistemi operativi di Windows
diversi da Windows Vista.................................................................... 13
C — Configurazione ................................................................................... 16
4 Come usare il programma di utilità di rete wireless ..................................17
Accesso alla utility di rete wireless di Belkin dalla barra di stato
di Windows..................................................................................................... 17
Stato della rete ............................................................................................... 18
Reti disponibili ................................................................................................ 18
Stato della rete e suggerimenti ..................................................................... 19
Impostazione dei profili di rete wireless ....................................................... 20
Protezione della rete Wi-Fi ........................................................................... 20
Configurazione dell’adattatore per la protezione ....................................... 25
5 Risoluzione delle anomalie.........................................................................34
6 Informazioni ...............................................................................................42
D
Introduzione
1
2
3
4
I vantaggi di una rete domestica
Con la vostra rete domestica Belkin potrete:
• Condividere la connessione ad alta velocità a Internet con tutti i
computer di casa
• Condividere risorse, quali file e dischi rigidi, tra tutti i computer
collegati alla rete domestica
• Condividere una sola stampante per tutta la famiglia
• Condividere documenti, musica, video e fotografie digitali
• Memorizzare, recuperare e copiare file da un computer all’altro
• Giocare online, controllare la posta elettronica e chattare da diversi
computer contemporaneamente
I vantaggi di una rete wireless
Ecco alcuni dei vantaggi di una rete wireless Belkin:
•
Mobilità – la “stanza per il computer” non è più necessaria: da oggi si
può lavorare da un computer da tavolo o portatile collegato in rete da un
qualsiasi punto all’interno della propria copertura wireless
•
Facilità di installazione: il programma di installazione guidata Belkin
semplifica la configurazione.
•
Flessibilità: – dopo la configurazione sarà possibile accedere a stampanti,
computer e altri dispositivi di rete dovunque vi troviate all’interno della
casa
•
Facilità di espansione – la vasta gamma di prodotti di rete Belkin
consente di espandere la rete aggiungendo altri dispositivi quali stampanti
e console per videogame
•
Niente cavi – da ora non è più necessario spendere soldi e perdere tempo
per cablare la casa o l’ufficio
•
Alta compatibilità con altri prodotti – è possibile – scegliere tra una
vasta gamma di prodotti di rete interoperabili.
1
5
6
sezione
Grazie per aver acquistato l’Adattatore USB N Wireless di Belkin. Ora
potrete usufruire di tutti i vantaggi di questa nuova grandiosa tecnologia
e contare sulla libertà di lavorare in rete dai computer di casa o
dell’ufficio senza dover ricorrere ad alcun tipo di cablaggio. Questo
adattatore vi consente di collegare un computer portatile alla vostra
rete. Leggere attentamente questo manuale, in particolare la sezione
“Dove posizionare l’hardware di rete wireless per ottenere prestazioni
ottimali”.
Introduzione
Dove posizionare l’hardware di rete wireless per
ottenere prestazioni eccellenti
Minore è la distanza tra il computer e il router (oppure l’access
point) wireless e maggiore è la potenza della connessione wireless.
La copertura tipica per i dispositivi wireless in un ambiente chiuso
è compresa tra i 30 e i 60 metri. Analogamente, la qualità della
connessione e delle prestazioni wireless diminuisce all’aumentare
della distanza tra il router (o l’access point) e i dispositivi wireless
collegati. Tuttavia, questa condizione potrebbe passare inosservata.
All’aumentare della distanza dal router (o dall’access point) wireless,
la velocità della connessione diminuisce. Apparecchiature in metallo,
ostacoli e muri sono alcuni dei fattori che indeboliscono i segnali,
invadendo il raggio d’azione delle onde radio della rete.
Per verificare se eventuali problemi di prestazione della rete siano
dovuti alla presenza di ostacoli nell’area di copertura, provare a
posizionare il computer a una distanza compresa tra 1,5 m e 3 m dal
router (o dall’access point) wireless. Se i problemi persistono anche
a una distanza minore, contattare il servizio di assistenza tecnica
Belkin.
Nota bene: sebbene alcuni dei fattori elencati di seguito possano
compromettere le prestazioni della rete, non ne impediscono il
funzionamento. Se ritenete che la rete non funzioni efficientemente, la
seguente lista di controllo potrebbe rivelarsi utile.
1.
Collocazione del router (o Access Point) wireless
Posizionare il router (o l’access point) wireless, che rappresenta il
punto di connessione centrale della rete, il più vicino possibile al
centro della raggio d’azione dei dispositivi wireless.
Per ottenere la migliore copertura di rete wireless per i “client
wireless” (per esempio, computer abilitati da adattatori o schede di
rete Belkin):
•
assicurarsi che le antenne del router (o dell’access point)
wireless siano parallele e verticali (rivolte verso il soffitto); se
il router (o l’access point) wireless è in posizione verticale,
puntare le antenne il più possibile verso l’alto;
•
negli edifici a più piani, posizionare il Router Wireless (o l’Access
Point) su un pavimento che sia il più vicino possibile al centro
dell’edificio; ad esempio sul pavimento di un piano superiore.
•
Non posizionare il router wireless (o l’access point) vicino a
telefoni senza filo da 2,4 GHz.
2
Introduzione
1
Evitare ostacoli e interferenze
Evitare di posizionare il router o (l’access point) vicino a dispositivi che
possono trasmettere “interferenze”, come i forni a microonde. Gli oggetti
spessi che possono impedire la comunicazione wireless includono:
•
Frigoriferi
•
Lavatrici e/o asciugabiancheria
•
Armadietti in metallo
•
Acquari grandi
•
Finestre verniciate con vernice a base metallica di protezione dai
raggi UV
3
4
Se il segnale wireless dovesse sembrare più debole in alcuni punti,
assicurarsi che oggetti di questo tipo non ostacolino il segnale tra i
computer e il router (o l’access point) wireless.
3.
2
Collocazione di telefoni cordless
Se le prestazioni della rete wireless dovessero continuare ad essere
inadeguate, dopo aver verificato i punti sopra riportati, e se si ha un
telefono cordless:
•
Allontanare il telefono cordless dal Router (o dall’Access Point)
Wireless e dai computer provvisti di tecnologia wireless.
•
Staccare la spina e rimuovere la batteria da eventuali telefoni
cordless che utilizzano la banda 2,4 GHz (consultare le
informazioni del produttore) Se il problema si risolve, questo era
probabilmente dovuto a un’interferenza del telefono
•
se il telefono supporta la selezione dei canali, passare al canale
del telefono più lontano possibile dalla propria rete wireless. Ad
esempio, passare al canale 1 del telefono e spostare il router
wireless (o access point) al canale 11. (La scelta del canale può
variare in base alla regione in cui ci si trova). Vedere il manuale
utente per maggiori informazioni.
•
Se necessario, passare ad un telefono cordless a 900 MHz o 5 GHz.
3
5
6
sezione
2.
Introduzione
4. Scegliere il canale “più tranquillo” della propria rete wireless
Negli edifici dove sono presenti sia abitazioni che uffici, una rete vicina
potrebbe entrare in conflitto con la vostra. Utilizzo della funzione Site
Survey del programma di utilità di rete wireless per localizzare eventuali reti
wireless e spostare il router (o Access Point) wireless e i computer su un
canale che sia il più lontano possibile da altre reti.
Provare con più canali, in modo da individuare la connessione più chiara
ed evitare in questo modo interferenze da altri telefoni cordless o da altri
dispositivi di rete wireless.
Per gli altri prodotti Belkin per reti senza fili, consultare l’opzione Site
Survey e le informazioni sui canali wireless riportate nel manuale d’uso.
5.
Connessioni protette, VPN e AOL
Le connessioni protette generalmente richiedono un nome utente e una
password e sono usate quando sono richieste condizioni di sicurezza. Le
connessioni protette comprendono:
•
Le connessioni Virtual Private Network (VPN), spesso usate per il
collegamento remoto ad una rete di un ufficio
•
Il programma di America Online (AOL) “Bring Your Own Access”,
che permette di usare AOL mediante la banda larga fornita da un
altro servizio via cavo o DSL
•
La maggior parte dei siti web di home banking
•
Molti siti commerciali che richiedono un nome utente e una
password per accedere all’account
Le connessioni protette si possono interrompere configurando la gestione
dell’alimentazione del computer, facendole “addormentare”. La soluzione
più semplice per evitare che questo accada è di ricollegarsi facendo
riavviare il software VPN o AOL oppure effettuando nuovamente il login nel
sito protetto.
Un’alternativa è cambiare le configurazioni della gestione dell’alimentazione
del computer, in modo da non farlo addormentare; tuttavia, ciò potrebbe non
essere raccomandabile per i portatili. Per modificare le configurazioni della
gestione dell’alimentazione in Windows, vedere in “Opzioni risparmio energia”
nel pannello di controllo.
Se le difficoltà con la connessione protetta VPN o AOL dovessero
persistere, rivedere i passaggi 1-4 nelle pagine precedenti per assicurarsi di
aver individuato il problema.
Queste indicazioni dovrebbero permettervi di coprire la maggior area
possibile con il router. Per coprire un’area più estesa, si consiglia di usare il
Range Extender/Access Point Wireless Belkin.
Per maggiori informazioni sulle soluzioni Belkin di networking, visitate il sito
www.belkin.com/networking o contattate il servizio di assistenza tecnica
Belkin.
4
Descrizione generale
1
Caratteristiche del prodotto
•
Funzionamento su banda da 2,4GHz ISM (industriale,
scientifica e medica)
•
Utilità di rete wireless integrata Belkin di facile utilizzo
•
Interfaccia USB 2.0, per l’uso con qualsiasi computer con porte
alimentate via USB 2.0
•
Crittografia WPA, WPA2 e WEP (Wired Equivalent Privacy) a 64
bit o 128 bit
•
Accesso wireless alle risorse in rete
•
Velocità di trasmissione dati fino a 300 Mbps* (bozza 802.11n),
54Mbps (802.11g), o 11Mbps (802.11b)
•
Facile da installare e da usare
•
Spia di accensione e indicatore di collegamento/attività
5
2
3
4
5
6
sezione
L’adattatore è conforme alle specifiche IEEE della bozza 802.11n ed
è in grado di comunicare con gli altri dispositivi wireless conformi alla
bozza 802.11n a una velocità massima di 300 Mbps*. L’adattatore è
compatibile con tutti i dispositivi 802.11g a 54 Mbps, così come con i
prodotti 802.11b a 11 Mbps. L’adattatore funziona con la stessa banda
di frequenza da 2,4GHz dei prodotti 802.11b/g Wi-Fi ®.
Descrizione generale
Applicazioni e vantaggi
•
•
Possibilità di roaming wireless con un computer desktop in casa o
in ufficio
Offre la libertà della rete, senza cavi
Velocità di connessione fino a 300 Mbps*
Offre una connessione immediata in casa, al lavoro e in altre sedi
importanti senza compromettere l’utilizzo di altri prodotti 802.11b/g
•
Compatibilià con i prodotti 802.11b/g
La scheda è compatibile con tutti i prodotti Wi-Fi (IEEE 802.11b/g)
preesistenti
•
Ambienti difficilmente cablabili
Con questo prodotto si possono creare reti anche negli edifici con
muri solidi o cementati, oppure negli spazi aperti dove è difficile
posare i cavi
•
Frequenti cambiamenti di ambiente
Adatto ad uffici ed ambienti che cambiano spesso sede.
•
Esigenze di applicazioni SOHO (Small office/Home office)
Offre una soluzione rapida e semplice per le piccole installazioni di rete
SOHO
Specifiche del prodotto
Interfaccia Host:
USB 2.0
Temperatura di funzionamento:
0 60 gradi C
Temperatura di immagazzinaggio:
-20—80 gradi C
Umidità:
Max 90% (non condensante)
Raggio di azione:
fino a 36,576.00 cm**
* NOTA
BENE: la velocità di trasferimento indicata - 300 Mbps - si riferisce alla velocità massima di
trasferimento dati che un segnale può raggiungere sul mezzo fisico. La velocità di trasferimento
effettiva risulterà inferiore.
** Le
prestazioni wireless potrebbero variare a seconda dell’ambiente di rete.
6
Descrizione generale
1
2
3
(c)
4
(d)
5
6
(a)Cappuccio di protezione,
serve per proteggere il connettore USB durante il trasporto. Rimuovere il
cappuccio prima di inserire l’adattatore nella porta USB del computer o
attraverso il supporto da tavolo fornito.
(b) Accensione/LED di attività
Si illumina quando l’adattatore è alimentato e lampeggia quando è attivo.
(c) Connettore USB
Parte dell’adattatore che deve essere inserita nella porta USB del
computer.
(c) Supporto da tavolo
Consente di allontanare l’adattatore da eventuali oggetti attorno al
computer che possono interferire con il funzionamento.
Requisiti del sistema
•
Laptop PC-compatibile con una porta alimentata via USB 2.0
•
Windows ® 2000, XP with SP2 o Vista TM***
Contenuto della confezione
•
Adattatore USB N Wireless
•
Guida di installazione rapida
•
CD con software di installazione e manuale d’uso
•
Supporto da tavolo
7
sezione
(a)
(b)
Installazione e configurazione dell’adattatore
A Installazione per Windows Vista
***NOTA: Al momento di produzione di questo prodotto, i driver di Windows
Vista non erano formalmente in circolazione e potrebbero non essere inclusi
nel CD fornito con il prodotto. Per informazioni su possibili driver aggiornati di
Windows Vista, fare riferimento al sito Web Belkin
www.belkin.com/support/vista.
IMPORTANTE: IINSTALLARE IL SOFTWARE PRIMA
DI INSERIRE L’ADATTATORE.
A0.1 Inserire il CD d’installazione del software nell’apposito drive.
A.2 Fare clic su Next (Avanti) per iniziare l’installazione.
Nota bene: se la schermata del programma di utilità di rete wireless non
compare entro 20 secondi, aprire l’unità Periferiche con archivi rimovibili
facendo doppio clic sull’icona “Risorse del computer”; quindi, fare doppio clic
sull’icona del lettore CD-ROM dove si trova il CD. Se l’installazione non si
dovesse avviare in automatico, fare doppio clic sull’icona “Setup.exe”
8
Installazione e configurazione dell’adattatore
1
2
processo di installazione.
3
4
5
6
A.4 Selezionare una cartella di
destinazione per l’installazione del
software, facendo doppio clic su
“Browse” (Sfoglia) oppure fare clic
su “Next” (Avanti) per selezionare la
destinazione predefinita.
A.5 A Lo stato dell’installazione sullo
schermo, segnala a che punto della
procedura ci si trova.
A.6 Potrebbe comparire per la seconda
volta una finestra mostrando il
messaggio “Windows can’t verificy
the publisher of this driver software”
(Windows non riesce a identificare il
produttore di questo driver). Questo
NON significa che ci sia un problema.
Il nostro software è stato testato ed
è compatibile con questo sistema
operativo.
9
sezione
A.3 L’assistente d’installazione avvia il
Installazione e configurazione dell’adattatore
A.7 Quando verrà segnalato, avviare il
computer e collegare l’adattatore.
L’installazione dell’hardware è
terminata.
A.8 Quando l’installazione è terminata,
fare clic su “Finish” (Fine).
A.9 Il sistema visualizzerà la schermata
di rilevamento del nuovo hardware
tra 3 o15 secondi. Se il programma
viene visualizzato, eseguire le
seguentioperazioni. Selezionare
“Locate and install the driver
software” (localizzare e installare il
driver del software) per continuare.
A.10 Potrebbe comparire una schermata
simile a quella illustrata di seguito.
Questo NON significa che ci sia un
problema. Il nostro software è stato
testato ed è compatibile con questo
sistema operativo. Selezionare
“Install this driver software anyway”
(Ignora e installa il software) per
seguire le istruzioni a video.
In seguito apparirà una schermata
indicante lo stato dell’installazione,
quindi una indicante la fine
dell’installazione.
10
Installazione e configurazione dell’adattatore
A.11 Per connettersi a Internet, fare
2
3
4
A.12 Nel pannello di controllo fare
clic su “View network status and
tasks” (visualizza stato di rete e
operazioni).
A.13 Nel centro di condivisione fare
clic su “Connect to a network”
(collegarsi a una rete).
A.14 Nella seconda schermata,
selezionare una rete disponibile e
fare clic su “Connetti”.
11
5
6
sezione
clic su Start e aprire il pannello di
controllo quindi selezionare la voce
“Network and Sharing Center” (rete
e centro di condivisione).
1
Installazione e configurazione dell’adattatore
A.15 L’adattatore tenterà di collegarsi
alla rete selezionata.
A.16 In base alle impostazioni di
sicurezza della propria rete wireless,
vi potrebbe essere richiesto di
inserire una chiave di sicurezza
di rete o una frase di accesso.
Fare clic su “Connetti”, dopo aver
inserito le informazioni richieste.
A.17 Dopo essersi collegati alla rete, è
possible salvare le impostazioni
di questa rete e connettersi
automaticamente se l’adattatore si
trova all’interno della zona.
A.18 La funzione “Network and
Sharing Center” (rete e centro
di condivisione) indica quale
connessione si è appena creata.
Il link presente a sinistra della
finestra consente di configurare le
connessioni di rete.
12
Installazione e configurazione dell’adattatore
B. Procedura di installazione per i sistemi operativi di Windows
diversi da Windows Vista
L’ADATTATORE.
2
3
B.1 Inserire il CD di installazione nel lettore CD-ROM.
B.2 Lo schermo della scheda wireless
Belkin apparirà automaticamente
entro 20 secondi. Fare clic su
“Install Software” (Installa software)
o su “Next” (Avanti) per iniziare la
procedura di installazione.
Nota bene:se la schermata del programma
di utilità di rete wireless non compare
entro 20 secondi, aprire l’unità
Periferiche con archivi rimovibili
facendo doppio clic sull’icona “Risorse
del computer”; quindi, fare doppio clic
sull’icona del lettore CD-ROM dove
si trova il CD. Quindi, fare doppio clic
sull’icona “Setup.exe”.
A.3 L’assistente d’installazione avvia il
processo di installazione.
A.4 Selezionare una cartella di destinazione
per l’installazione del software,
facendo doppio clic su “Browse”
(Sfoglia) oppure fare clic su “Next”
(Avanti) per selezionare la destinazione
predefinita.
13
4
5
6
sezione
IMPORTANTE: INSTALLARE IL SOFTWARE PRIMA DI INSERIRE
1
Installazione e configurazione dell’adattatore
A.5 A Lo stato dell’installazione sullo schermo, segnala a che punto della
procedura ci si trova.
B.6 Terminata l’installazione del
software, compare il messaggio
“You can plug in your WLAN adapter
now” (Ora è possibile collegare
l’adattatore di rete WLAN). Collegare
l’adattatore al PC.
A.7 Il sistema visualizzerà la schermata di
rilevamento del nuovo hardware tra
3 o15 secondi. Selezionare “Install
the software automatically” (Installa
automaticamente il software) e
fare clic su “Next” (“Avanti”) per
continuare.
B.8 Se la schermata di rilevamento del
nuovo hardware non compare, fare
click “Finish”(Fine).
B.9 Potrebbe comparire una schermata
simile a quella illustrata di seguito.
Questo NON significa che ci sia un
problema. Il nostro software è stato
testato ed è compatibile con questo
sistema operativo. Selezionare
“Continue Anyway” (Ignora) per
seguire le istruzioni a video.
14
Installazione e configurazione dell’adattatore
B.10 La configurazione guidata
provvederà all’installazione del
software..
1
2
4
5
B.11 L’installazione è completata. Fare
clic su “Finish” (Fine) per chiudere il
programma “Found New Hardware
Wizard” (programma di installazione
guidata nuovo hardware).
B.12 Fare nuovamente clic su “Finish”
(fine) per uscire dall’applicazione di
installazione guidata.
B.13 In base al sistema operativo in uso,
è possibile che venga richiesto
l’avvio del computer affinché le
modifiche vengano applicate.
Salvare i dati e chiudere tutte le
applicazioni. Quindi effettuare il
riavvio.
15
6
sezione
3
Installazione e configurazione dell’adattatore
C. Configurazione
Come usare il programma di utility di rete wireless
3.1 Dopo aver riavviato il computer, fare
doppio clic sull’icona del programma
di utilità di rete wireless sul desktop.
Nota: L’icona della utility di rete wireless
di Belkin si trova anche nella barra
di sistema.
C.2 Apparirà la schermata del
programma di utilità di rete wireless.
C..3 Selezionare una rete alla quale
collegarsi dall’elenco “Available
Networks” (Reti disponibili) e fare
clic su “Connect” (Collega).
Nota:per vedere la schermata delle reti
disponibili è necessario trovarsi
vicino ad un router o access point di
rete wireless funzionante.
L’installazione è completata.
16
+Come usare il programma di utility di rete wireless
Dopo aver installato correttamente il programma di utilità di rete
wireless (WNU), le configurazioni della connessione wireless e della
protezione richiedono soltanto pochi clic.
Accesso al programma di utilità di rete wireless dalla barra di
stato di Windows
2
3
4
5
6
Se l’icona non compare, fare clic su “Start > Programmi >
Belkin > N1 Wireless USB Network Adapter > Belkin Wireless
Networking Utility”.
17
sezione
Per accedere all’utilità di rete wireless (WNU), è sufficiente
posizionare il puntatore del mouse sull’icona WNU nel desktop di
Windows.
1
Come usare il programma di utility di rete wireless
La schermata predefinita della WNU è la scheda “Current Status” (Stato
corrente). La scheda “Current Status” (Stato corrente) mostra lo stato
attuale della rete e le reti disponibili.
Stato della rete
Questa finestra illustra lo stato di connessione della rete attuale, Illustra
anche la connessione tra il computer e il router, e tra il router e Internet.
In presenza di un problema di connessione, questa finestra può servire a
stabilirne l’origine (ad es., computer, router, oppure Internet/modem).
Reti disponibili
Questa finestra mostra le reti disponibili dalla posizione
attuale, e le rispettive condizioni SSID, Potenza del segnale,
tipo di protezione, canale e tipo di rete.
Connessione wireless assente
Se l’attuale connessione wireless fosse stata persa, verrà visualizzata
una finestra e la utility di rete wireless tenterà di ricollegarsi.
18
Come usare il programma di utility di rete wireless
1
Errore di connessione
Durante i tentativi di nuovo collegamento, appariranno altre opzioni.
Per terminare il collegamento, fare clic su “Stop” e ritentare facendo
clic su “Retry” (Riprova).
2
3
5
6
Stato della rete e suggerimenti
Per comprendere ulteriormente lo stato di rete attuale, fare clic
su “Open Wireless Utility” (Apri utility wireless). La schermata
predefinita sarà la scheda “Current Status” (Stato attuale) e
nella sezione “Network Status” (Stato rete) saranno indicate le
connessioni buone e/o difettose.
L’utilità di rete prevede anche una sezione “Solution Tips”
(Suggerimenti) che offre una serie di indicazioni per la risoluzione delle
anomalie.
19
sezione
4
Come usare il programma di utility di rete wireless
Impostazione dei profili di rete wireless
La scheda “My Connections” (Collegamenti personali) della WNU consente
di aggiungere, modificare e cancellare i profili di collegamento. Visualizza
anche la potenza del segnale e il tipo di sicurezza e rete.
Protezione della rete Wi-Fi® Network
Se si sceglie di collegarsi ad una rete protetta, stabilire il tipo di
protezione (WPA o WEP*) e utilizzare il campo adatto nella finestra di
dialogo.
*Nota bene: Tipi di protezione
20
Come usare il programma di utility di rete wireless
Nota: se si sceglie una rete che utilizza la crittografia, appare per
prima una semplice schermata di protezione. Fare clic sul pulsante
“Advanced” (Avanzate) per vedere altre opzioni di sicurezza (in
basso).
1
2
3
5
6
21
sezione
4
Come usare il programma di utility di rete wireless
Wired Equivalent Privacy (WEP) si tratta di un protocollo di
protezione wireless meno sicuro, ma maggiormente adottato. A seconda
del livello di sicurezza (a 64 o 128 bit), all’utente verrà chiesto di inserire
una chiave esadecimale da 10 o 26 caratteri. Una chiave esadecimale è
una combinazione di lettere, dalla a alla f e di numeri, da 0 a 9.
Wireless Protected Access (WPA) è il nuovo standard di protezione
wireless. Tuttavia, non tutte le schede e gli adattatori wireless supportano
questa tecnologia. Controllare nel manuale del proprio adattatore wireless
per verificare se supporta la funzione WPA. Al posto di una chiave
esadecimale, la protezione WPA utilizza soltanto frasi di accesso che sono
molto più facili da ricordare.
La seguente sezione, destinata all’uso in casa, negli uffici domestici o di
piccole dimensioni, presenta diversi modi per potenziare al massimo la
protezione della rete wireless.
Al momento della pubblicazione del presente manuale, sono previsti
quattro metodi di crittografia:
Metodi di crittografia:
Nome
64 bit Wired
Crittografia a
Equivalent Privacy 128 bit
Wi-Fi
Protected
Access
Wi-Fi
Protected
Access
Acronimo
WEP a 64 bit
WEP a 128 bit
WPA-TKIP
WPA-AES
Protezione
Buona
Migliore
Eccellente
Ottimo
Chiavi statiche
Crittografia
a chiavi
dinamiche e
autenticazione
reciproca
Protocollo
TKIP (temporal
key integrity
protocol)
aggiunto per
permettere
di cambiare
i codici e
rafforzare la
crittografia
Crittografia
a chiavi
dinamiche e
autenticazione
reciproca
La crittografia
AES
(Advanced
Encryption
Standard)
non provoca
alcuna
perdita di
trasferimento
dati
Caratteristiche Chiavi statiche
Chiavi di
crittografia basate
sull’algoritmo RC4
(generalmente
chiavi a 40 bit)
Protezione
supplementare
WEP a 64 bit
usando una
lunghezza di
chiave di 104
bit, più 24 bit
aggiuntivi dei
dati generati
dal sistema
WEP
Il protocollo WEP (Wired Equivalent Privacy) potenzia la protezione di
tutti i prodotti wireless conformi allo standard Wi-Fi. Questo protocollo
offre alle reti wireless un livello di protezione della privacy paragonabile
ad una rete cablata.
22
Come usare il programma di utility di rete wireless
WEP a 64 bit
Crittografia a 128 bit
Per riparare alle potenziali debolezze della crittografia WEP 64
bit, fu progettato un metodo più sicuro a 128 bit. La crittografia
a 128 bit comprende una chiave da 104 bit più 24 bit aggiuntivi
di dati generati dal sistema (128 bit in totale). Alcuni produttori di
hardware si riferiscono alla crittografia a 128 bit come crittografia
a 104 bit.
La maggior parte delle apparecchiature wireless attualmente in
commercio supporta entrambi i tipi di crittografia, a 64 e 128 bit,
tuttavia alcune apparecchiature più vecchie supportano solo la
WEP a 64 bit. Tutti i prodotti wireless Belkin supportano entrambi
i tipi di crittografia WEP a 64 e 128 bit.
Chiavi di crittografia
Dopo aver scelto tra la modalità WEP a 64 o 128 bit, è fondamentale
generare una chiave di crittografia. La chiave di crittografia deve
essere sempre la stessa per tutta la rete wireless, altrimenti i
dispositivi di rete wireless non saranno in grado di comunicare tra
loro.
La chiave di crittografia esadecimale può essere inserita
manualmente. Una chiave esadecimale è composta da numeri e
lettere, da 0 a 9 e dalla A alla F. Per la sicurezza WEP a 64 bit,
bisogna inserire 10 chiavi esadecimali. Per la sicurezza WEP a 128
bit, bisogna inserire 26 chiavi esadecimali.
Ad esempio:
AF 0F 4B C3 D4 = chiave WEP a 64 bit
C3 03 0F AF 0F 4B B2 C3 D4 4B C3 D4 E7 = chiave WEP a 128 bit
Annotare la chiave esadecimale WEP del router o dell’access point
wireless e inserirla manualmente nella tabella delle chiavi esadecimali
WEP nella schermata di configurazione dell’adattatore.
23
1
2
3
4
5
6
sezione
La protezione 64-bit WEP fu introdotta per la prima volta con la
crittografia da 64 bit, che prevedeva una lunghezza di chiave di 40 bit
più altri 24 bit supplementari di dati generati dal sistema (per un totale
di 64 bit). Alcuni produttori di hardware si riferiscono alla crittografia a
64 bit come crittografia a 40 bit. Poco tempo dopo l’introduzione della
tecnologia, i ricercatori scoprirono che la crittografia a 64 bit poteva
essere decodificata molto facilmente.
Come usare il programma di utility di rete wireless
WPA
WPA è un nuovo standard Wi-Fi che offre caratteristiche di protezione
migliori rispetto allo standard WEP. Per utilizzare la protezione WPA, i driver
ed il software dell’apparecchiatura wireless devono essere aggiornati. Gli
aggiornamenti sono disponibili nel sito web del rivenditore dei dispositivi
wireless. Esistono tre tipi di protezione WPA: WPA-PSK (senza server),
WPA (con radius server) e WPA2.
WPA-PSK (senza server)come chiave di rete utilizza una chiave
precondivisa. Una chiave di rete è una password la cui lunghezza varia
da 8 a 63 caratteri e risultante dalla combinazione di lettere, numeri
e altri caratteri. Ogni client usa la stessa chiave di accesso alla rete.
Generalmente, questa è la modalità utilizzata in un ambiente domestico.
WPA (con radius server) funziona meglio negli ambienti
lavorativi, nei quali un radius server distribuisce automaticamente
la
chiave di rete ai client.
WPA2 richiede lo standard di crittografia Advanced Encryption
Standard (AES) che offre una protezione molto maggiore dello
standard WPA. Lo standard WPA per la crittografia utilizza i
protocolli Temporal Key Integrity Protocol (TKIP) e (AES).
Configurazione del router (o dell’Access Point) wireless
Belkin per utilizzare la protezione
Per iniziare ad usare la protezione, sarà necessario abilitare prima
di tutto la protezione WEP o WPA del proprio router (o access point)
wireless. Per i router e access point wireless Belkin, le opzioni di
protezione possono essere configurate usando l’interfaccia web.
Consultare il manuale del router o dell’access point per maggiori
informazioni su come accedere all’interfaccia.
IMPORTANTE: schede/adattatori di rete wireless devono essere
configurati sulla base di queste impostazioni.
24
Come usare il programma di utility di rete wireless
Configurazione dell’adattatore per la protezione
A questo punto il router e l’access point wireless già dovrebbero
essere stati configurati per usare la crittografia WPA o WEP. Per
ottenere una connessione wireless, bisognerà configurare l’Adattatore
USB N Wireless in modo da utilizzare le medesime impostazioni di
protezione.
L’Adattatore USB N Wireless supporta la più recente funzione di
protezione WPA ed i diritti di protezione WEP. L’impostazione
predefinita prevede che la protezione wireless sia disattivata.
Per attivare la protezione è necessario prima di tutto stabilire lo
standard usato dal router o dall’access point. (Consultare il manuale
del router o dell’access point per maggiori informazioni su come
accedere alle impostazioni per la protezione).
Per accedere alle impostazioni di protezione dell’adattatore, fare clic sulla
scheda “Collegamenti” e impostare le connessioni per le quali si desiderano
modificare le impostazioni di sicurezza. Fare clic su “Edit” (Modifica) per
cambiare le impostazioni.
25
2
3
4
5
6
sezione
Modifica delle impostazioni di protezione della rete wireless
1
Come usare il programma di utility di rete wireless
Configurazione WEP
Crittografia WEP a 64 bit
1.
Selezionare “WEP” dal menu a tendina “Crittografia dati”.
2.
Una volta selezionata la modalità di crittografia WEP, sarà
possibile inserire la propria chiave esadecimale digitandola
manualmente.
Una chiave esadecimale è composta da numeri e lettere, da 0 a 9
e dalla A alla F. Per la sicurezza WEP a 64 bit, bisogna inserire 10
chiavi esadecimali.
Ad esempio:
AF 0F 4B C3 D4 = chiave WEP a 64 bit
26
Come usare il programma di utility di rete wireless
3.
Fare clic su “Salva” per terminare. La crittografia del router o
dell’access point wireless è stata impostata. Ogni computer
presente nella rete wireless deve essere configurato con le
medesime impostazioni di protezione.
AVVERTENZA: se si usa un client wireless per attivare le impostazioni
2
3
4
5
6
27
sezione
di protezione del router o dell’access point wireless, sarà necessario
interrompere temporaneamente la connessione wireless fino a quando
non si sarà attivata la protezione del client wireless. Prima di eseguire
le modifiche del router (o access point) wireless, annotare la chiave.
Se la chiave esadecimale venisse dimenticata, il client non potrà
accedere al router o all’access point wireless.
1
Come usare il programma di utility di rete wireless
Crittografia WEP a 128 bit
1.
Selezionare “WEP” dal menu a tendina.
2. Una volta selezionata la modalità di crittografia WEP, sarà possibile
inserire la propria chiave esadecimale digitandola manualmente.
Una chiave esadecimale è composta da numeri e lettere, da 0 a 9
e dalla A alla F. Per la sicurezza WEP a 128 bit, bisogna inserire
26 chiavi esadecimali.
Ad esempio:
C3 03 0F AF 0F 4B B2 C3 D4 4B C3 D4 E7 = chiave WEP a 128 bit
28
Come usare il programma di utility di rete wireless
3.
Fare clic su “Salva” per terminare. La crittografia del router o
dell’access point wireless è stata impostata. Ogni computer
presente nella rete wireless deve essere configurato con le
medesime impostazioni di protezione.
AVVERTENZA: se si usa un client wireless per attivare le impostazioni
2
3
4
5
6
29
sezione
di protezione del router o dell’access point wireless, sarà necessario
interrompere temporaneamente la connessione wireless fino a quando
non si sarà attivata la protezione del client wireless. Prima di eseguire
le modifiche del router (o access point) wireless, annotare la chiave.
Se la chiave esadecimale venisse dimenticata, il client non potrà
accedere al router o all’access point wireless.
1
Come usare il programma di utility di rete wireless
WPA-PSK (senza server)
Scegliere questa configurazione se la rete non utilizza un radius server. La WPAPSK (senza server) viene usata generalmente in un ambiente domestico o in
piccoli uffici.
1.
Dal menu a tendina “Autenticazione di rete”, selezionare “WPA-PSK (no
server)”.
2.
Digitare la propria chiave di rete Questo codice può essere composto
da 8 a 63 caratteri tra lettere, numeri o simboli. Lo stesso codice
deve essere utilizzato per tutti i client (schede di rete) che si vogliono
includere nella rete wireless.
3.
Fare clic su “Salva” per terminare. Tutti i client (schede di rete) devono
usare le medesime configurazioni.
30
Come usare il programma di utility di rete wireless
Opzioni della utility di rete wireless
1
2
3
5
6
La scheda “Opzioni” della WNU consente all’utente di personalizzare
le proprie impostazioni WNU.
31
sezione
4
Come usare il programma di utility di rete wireless
Guida alla utility di rete wireless
La scheda “Help” dell’utilità di rete consente agli utenti di accedere
all’assistenza online o telefonica, gli aggiornamenti o agli strumenti di
diagnostica avanzata.
32
Come usare il programma di utility di rete wireless
Strumenti di diagnostica avanzata
La sezione dedicata agli “Strumenti di diagnostica avanzata”
rappresenta il pannello di controllo centrale dei componenti hardware
e software della rete wireless. Mette a disposizione una vasta gamma
di servizi di verifica e connettività per garantire eccellenti prestazioni
di rete.
1
2
3
5
6
33
sezione
4
Risoluzione dei problemi
Non riesco a impostare un collegamento a Internet in
modalità wireless.
Se non si riesce a collegarsi a Internet da un computer wireless, si consiglia
di controllare quanto segue:
1. Controllare le spie luminose sul router. Se si sta usando un router wireless
Belkin, le spie devono essere:
• Spia di alimentazione (Power) accesa.
• Spia di collegamento (“Connected”) accesa e non lampeggiante.
• La spia “WAN” dovrebbe essere accesa o lampeggiante.
Se le luci del router wireless Belkin rispettano le caratteristiche sopra
menzionate, andare al punto numero 2 in basso.
In casoCONTRARIO accertarsi che:
• il cavo di alimentazione del router sia collegato;
• di aver collegato tutti cavi di rete dal Router al computer e al modem;
• tutti i LED del modem funzionino correttamente. Altrimenti, consultare il
manuale d’uso del modem;
• Riavviare il router
• Riavviare il modem
Contattare il servizio di assistenza tecnica Belkin nel caso in cui
continuassero a verificarsi problemi.
Se non si sta usando un router wireless Belkin, consultare il manuale d’uso
del router.
2.
Aprire il software della utility wireless facendo clic sull’icona nel desktop
di sistema nell’angolo in basso a destra dello schermo. L’
icona dovrebbe essere raffigurata in questo modo (l’icona dovrebbe
essere rossa o verde):
3. La finestra che si apre mostra un elenco di “Reti disponibili”
Per reti disponibili si intendono le reti wireless alle quali è possibile
collegarsi. Se si sta usando un router Belkin 802.11g (G Plus) oppure
802.11g (54g), il nome predefinito è “Belkin54g”.
Se si sta usando un router Belkin 802.11b, il nome predefinito
dovrebbe essere “WLAN”.
Se NON si sta usando un router Belkin, consultare il manuale d’uso del
router per identificarne il nome predefinito.
34
Risoluzione dei problemi
Il nome della rete wireless appare in
“Available Networks” (reti disponibili).
1
Se il nome corretto della rete appare nell’elenco “Available
Networks”, seguire le seguenti indicazioni per collegarsi in
modalità wireless:
2
1. Fare clic sul nome corretto della rete nell’elenco “Available
Se, dopo esservi collegati alla rete wireless, ancora non doveste
riuscire ad accedere ad Internet, si prega di contattare il servizio
di assistenza tecnica Belkin.
Il nome della rete wireless NON appare nella lista
“Available Networks” (Reti disponibili).
Se il nome corretto della rete non appare nell’elenco, verificare la
corrispondenza delle impostazioni SSID. Il nome SSID distingue
fra maiuscole e minuscole e lo spelling su ogni computer deve
essere esattamente lo stesso per collegare l’adattatore al router
o all’access point wireless.
Nota bene: per controllare le impostazioni SSID o per vedere
le reti disponibili, fare doppio clic sull’icona di indicazione del
segnale per far apparire la schermata “Wireless Networks” (Reti
wireless). Fare clic su “Add” (Aggiungi) se la rete alla quale ci si
vuole collegare non appare e digitare il nome SSID. Per maggiori
informazioni relative alla configurazione SSID, consultare il
manuale d’uso del produttore del router wireless.
Se i problemi dovessero persistere anche ad una distanza minore,
contattare il servizio di assistenza tecnica Belkin.
35
3
4
5
6
sezione
Networks” (Reti disponibili).
2. Se la protezione (crittografia) della rete è stata attivata,
bisognerà digitare la chiave di rete. Fare clic su “Connect”
(Connetti). Per ulteriori informazioni sulla protezione, vedere:
“Protezione della rete Wi-Fi” a pagina 20 di questo manuale.
3. In pochi secondi, l’icona nell’angolo in basso a destra del
desktop dovrebbe diventare verde, indicando la corretta
connessione alla rete.
Risoluzione dei problemi
Il CD ROM di installazione non avvia il programma di
utilità di rete wireless.
Se il CD-ROM non lancia automaticamente il programma di utilità di
rete wireless, il computer potrebbe avere altre applicazioni nell’unità
delle periferiche con dischi rimovibili. Se la schermata del programma
di utilità di rete wireless non compare entro 15-20 secondi, aprire l’unità
Periferiche con archivi rimovibili facendo doppio clic sull’icona “Risorse
del computer”. Quindi, fare doppio clic sull’icona del lettore CD-ROM
dove si trova il CD per iniziare l’ installazione. Se il programma di
installazione non viene avviato automaticamente, fare clic su “Esplora”,
quindi fare doppio clic sull’icona denominata “setup.exe”.
Il LED di alimentazione non si ACCENDE; l’adattatore non
funziona
Se gli indicatori LED non sono ACCESI, l’adattatore potrebbe non
essere collegato o installato correttamente. Assicurarsi che l’adattatore
sia collegato saldamente alla porta USB del computer. Accertarsi
che i driver dell’adattatore siano stati installati. Fare clic con il tasto
destro su “Risorse del computer” sul desktop. Scegliere “Proprietà”
e andare su “Gestione Periferiche” per vedere se l’adattatore di rete
USB è elencato correttamente. Se vengono riportati errori, contattare il
servizio di assistenza tecnica Belkin.
Il LED di collegamento lampeggia in modo lento, è
impossibile collegarsi a una rete wireless o a Internet.
Se l’adattatore sembra funzionare correttamente, ma non si è in grado di
collegarsi alla rete o se nello schermo in basso appare un’icona wireless
rossa, il problema potrebbe essere imputabile a una differenza nelle
impostazioni dei nomi della rete (SSID) nelle proprietà della rete wireless.
Controllare le impostazioni SSID per vedere se corrispondono. Il nome
SSID distingue fra maiuscole e minuscole e lo spelling su ogni computer
deve essere esattamente lo stesso per collegare l’adattatore al router o
all’access point wireless.
Nota bene:per controllare le impostazioni SSID o per vedere le reti
disponibili, fare doppio clic sull’icona di indicazione del segnale per far
apparire la schermata “Wireless Networks” (Reti wireless). Fare clic su
“Add” (Aggiungi) se la rete alla quale ci si vuole collegare non appare e
digitare il nome SSID.
Per maggiori informazioni relative alla configurazione SSID, consultare il
manuale d’uso del produttore del router wireless. Se i problemi dovessero
persistere anche ad una distanza minore, contattare il servizio di assistenza
tecnica Belkin.
36
Risoluzione dei problemi
Il LED di collegamento è acceso in modo permanente ma
non si riesce a collegarsi a Internet.
Il trasferimento dei dati a volte è lento.
La tecnologia wireless è basata sulla tecnologia radio. Ciò significa
che la connettività e le prestazioni di trasmissione tra i dispositivi
diminuiscono all’aumentare della distanza. Altri fattori che possono
causare un indebolimento del segnale (il metallo è generalmente
l’indiziato numero uno) sono gli ostacoli quali muri e apparecchiature in
metallo. Di conseguenza, la copertura tipica per i dispositivi wireless in
un ambiente chiuso è compresa tra i 30 e i 60 metri. Inoltre, aumentando
ulteriormente la distanza dal router o dall’access point wireless, la
velocità della connessione diminuisce.
Per stabilire se i problemi wireless siano dovuti a fattori di copertura,
provare a spostare provvisoriamente il computer a 3 metri di distanza
dal router o dall’access point wireless. Vedere il capitolo intitolato “Dove
posizionare l’hardware di rete wireless per ottenere prestazioni ottimali” a
pagina 2 di questo manuale. Se i problemi dovessero persistere anche ad
una distanza minore, contattare il servizio di assistenza tecnica Belkin.
Il segnale è debole.
La tecnologia wireless è basata sulla tecnologia radio. Ciò significa
che la connettività e le prestazioni di trasmissione tra i dispositivi
diminuiscono all’aumentare della distanza. Altri fattori che possono
causare un indebolimento del segnale (il metallo è generalmente
l’indiziato numero uno) sono gli ostacoli quali muri e apparecchiature
in metallo. Di conseguenza, la copertura tipica per i dispositivi
wireless in un ambiente chiuso è compresa tra i 30 e i 60 metri.
Inoltre, aumentando ulteriormente la distanza dal router o dall’access
point wireless, la velocità della connessione diminuisce. Per stabilire
se i problemi wireless siano dovuti a fattori di copertura, provare a
spostare provvisoriamente il computer a 3 metri di distanza dal router o
dall’access point wireless.
37
2
3
4
5
6
sezione
Se il segnale è presente ma il collegamento a Internet non avviene o non
si riesce ad ottenere un indirizzo IP, potrebbe esserci una discrepanza
tra le impostazioni della chiave di crittografia del computer e del router
o dell’access point wireless. Controllare le impostazioni WEP WPA o
WPA2 per vedere se corrispondono. La chiave distingue fra maiuscole
e minuscole e lo spelling per ogni computer e router o access point
wireless per collegare l’adattatore al router deve essere esattamente lo
stesso. Per maggiori informazioni sulla configurazione della crittografia,
consultare il capitolo intitolato “Protezione della rete Wi-Fi” a pagina 20
di questo manuale.
Se i problemi dovessero persistere anche a una distanza minore,
contattare il servizio di assistenza tecnica Belkin.
1
Risoluzione dei problemi
Cambiare il canale wireless – A seconda del traffico wireless locale e
delle interferenze, cambiare il canale wireless della rete può migliorarne
le prestazioni e l’affidabilità. Il canale predefinito è l’6, tuttavia si
possono scegliere altri canali, a seconda del paese nel quale ci si trova.
Consultare il manuale del router (o dell’access point) per le istruzioni su
come scegliere altri canali.
Limitazione della trasmissione dati wireless – Limitare la trasmissione
dati può aiutare a migliorare la copertura wireless e la stabilità della
connessione. La maggior parte delle schede di rete offre la possibilità
di limitare la trasmissione dati. Per cambiare questa proprietà, andare
sul pannello di controllo di Windows, aprire “Connessioni di rete” e
fare doppio clic sulla connessione della propria scheda. Nella finestra
di dialogo “Proprietà”, nella tabella “Generale” selezionare il pulsante
“Configura” (gli utenti Windows 98 dovranno selezionare l’adattatore di
rete USB nell’elenco e quindi fare clic su “Proprietà”, quindi fare clic
su la tabella “Avanzate” e selezionare le caratteristiche di trasmissione.
Le velocità di trasmissione delle schede di rete dei client wireless
sono generalmente preimpostate, tuttavia si possono verificare
periodiche disconnessioni quando il segnale wireless è troppo basso.
Generalmente, le velocità di trasmissione più lente sono le più stabili.
Provare varie velocità fino a trovare la migliore per la propria rete;
notare che tutte le trasmissioni di rete disponibili dovrebbero essere
accettabili per la navigazione in Internet. Per maggiore assistenza
consultare il manuale della scheda di rete wireless. Se i problemi
dovessero persistere anche ad una distanza minore, contattare il
servizio di assistenza tecnica Belkin.
Perché ci sono due utilità di rete wireless sulla barra delle
applicazioni? Quale devo usare?
Esistono diversi motivi e vantaggi legati all’utilizzo del programma di
utilità di rete wireless al posto della utility di Windows XP Wireless Zero
Configuration (WZC). Solo per menzionarne alcuni, Belkin comprende
l’opzione Site Survey, informazioni dettagliate sul collegamento e la
diagnosi dell’adattatore.
È fondamentale sapere quale utility gestisce il vostro adattatore. È
consigliabile usare il programma di utilità di rete wireless di Belkin. Per
usare questa utility, seguire le seguenti istruzioni:
Fase 1 Fare clic con il tasto destro sull’icona di stato della rete sul
desktop e selezionare la scheda “Status” (Stato).
Fase 2 Dalla scheda “Status”, togliere il segno di spunta dalla casella
che indica di utilizzare Windows per configurare la rete wireless “Use
Windows to Configure my Wireless Network.” Una volta disattivata la
38
Risoluzione dei problemi
casella, fare clic su “Close” (Chiudi) per chiudere la finestra.
Per configurare l’adattatore si sta ora utilizzando la utility di rete
wireless Belkin.
L’adattatore non funziona o la connessione è instabile
in presenza di una seconda scheda di rete wireless nel
computer (ad esempio mini PCI oppure Intel® Centrino™).
È necessario disattivare la scheda wireless integrata dal
computer in Gestione periferiche > Adattatori di rete.
L’adattatore non funziona o la connessione risulta lenta
quando nel computer è integrata una scheda di rete
Ethernet cablata.
Questa condizione si verifica quando entrambi, la scheda
Ethernet del computer e l’adattatore, sono attivi. Questo accade
perché Windows deve gestire due connessioni di rete attive.
È necessario disattivare la scheda Ethernet dal computer in
Gestione periferiche > Adattatori di rete.
Qual è la differenza tra 802.11b,
e la bozza 802.11n?
Attualmente vi sono tre tipi di livelli wireless, che trasferiscono
dati a velocità massime molto diverse tra loro. Ciascuna è
stabilita dalle assegnazioni di certificazione di rete standard.
Lo standard di rete wireless più comune, l’802.11b, trasferisce
dati fino a 54 Mbps, anche l’802.11a supporta fino a 54 Mbps;
ma solo in frequenza 5GHz e la bozza di standard 802.11n
può collegarsi fino a 300 Mbps. Vedere lo schema nella pagina
successiva per informazioni più dettagliate.
39
2
3
4
5
6
sezione
Questa condizione si verifica se nel computer è presente un
adattatore wireless integrato mentre è attivo anche l’adattatore
USB N wireless Belkin. Questo accade perché Windows ora deve
gestire due connessioni wireless attive.
1
Risoluzione dei problemi
Fino a 300 Mbps*
Frequenza
N1 MIMO
(bozza
802.11n con
MIMO)
Fino a 300 Mbps*
I comuni dispositivi
domestici, quali telefoni
cordless e forni a
microonde, potrebbero
interferire con la banda,
non provvista di licenza,
da 2,4 GHz
I comuni dispositivi
domestici, quali telefoni
cordless e forni a
microonde, potrebbero
interferire con la banda,
non provvista di licenza,
da 2,4 GHz
I comuni dispositivi
domestici, quali telefoni
cordless e forni a
microonde, potrebbero
interferire con la banda,
non provvista di licenza,
da 2,4 GHz
I comuni dispositivi
domestici, quali telefoni
cordless e forni a
microonde, potrebbero
interferire con la banda,
non provvista di licenza,
da 2,4 GHz
Compatibilità
N MIMO
(bozza
802.11n con
MIMO)
G+ MIMO
(802.11g con
MIMO MRC)
Fino a 54 Mbps*
Compatibile con
802.11b/g
Compatibile con
802.11b/g
Compatibile con la bozza
802.11n** e 802.11b/g
Compatibile con la bozza
802.11n** e 802.11b/g
Copertura*
G
(802.11g)
Fino a 54 Mbps*
Fino a 400 m *
Fino a 300 metri*
Fino a 365 metri*
Fino a 420 metri*
Vantaggi
Velocità/
Tecnologia
Trasferimento wireless
dati
Tabella di confronto wireless
Comune - ampio utilizzo
della condivisione Internet
Copertura maggiore e
velocità costante
Velocità e copertura
maggiori
Leader nel settore
- ottima copertura ed
efficienza
*La distanza e le velocità di connessione variano in funzione dell’ambiente di rete.
**Questa scheda è compatibile con i prodotti conformi alle specifiche della bozza 802.11n e
potrebbero richiedere un aggiornamento del software per ottenere risultati migliori.
40
Risoluzione dei problemi
Assistenza tecnica gratuita*
*Si applica solo la tariffa della chiamata
1
www.belkin.com
locale
Per maggiori informazioni sull’assistenza tecnica, visitare il nostro sito webwww.
belkin.com nell’area Assistenza tecnica. Per contattare telefonicamente
il servizio di assistenza tecnica, chiamare uno dei seguenti numeri*.
NUMERO
INDIRIZZO INTERNET
AUSTRIA
0820 200766
www.belkin.com/uk/networking/
BELGIO
07 07 00 073
www.belkin.com/nl/networking/
REPUBBLICA CECA
239 000 406
www.belkin.com/uk/networking/
DANIMARCA
701 22 403
www.belkin.com/uk/networking/
FINL ANDIA
097 25 19 123
www.belkin.com/uk/networking/
FR ANCIA
08 - 25 54 00 26
www.belkin.com/fr/networking/
GERMANIA
0180 - 500 57 09
www.belkin.com/de/networking/
GRECIA
00800 - 44 14 23 90
www.belkin.com/uk/networking/
UNGHERIA
06 - 17 77 49 06
www.belkin.com/uk/networking/
ISL ANDA
800 8534
www.belkin.com/uk/networking/
IRL ANDA
0818 55 50 06
www.belkin.com/uk/networking/
ITALIA
02 - 69 43 02 51
www.belkin.com/it/support/tech/issues_more.asp
LUSSEMBURGO
34 20 80 85 60
www.belkin.com/uk/networking/
PAESI BASSI
0900 - 040 07 90 € 0.10 alminuto
www.belkin.com/nl/networking/
NORVEGIA
81 50 0287
www.belkin.com/uk/networking/
POLONIA
00800 - 441 17 37
www.belkin.com/uk/networking/
PORTOG ALLO
707 200 676
www.belkin.com/uk/networking/
RUSSIA
495 580 9541
www.belkin.com/networking/
SUDAFRICA
0800 - 99 15 21
www.belkin.com/uk/networking/
SPAGNA
902 - 02 43 66
www.belkin.com/es/support/tech/networkingsupport. asp
SVEZIA
07 - 71 40 04 53
www.belkin.com/se/support/tech/networkingsupport.asp
SVIZZER A
08 - 48 00 02 19
www.belkin.com/uk/networking/
REGNO UNITO
0845 - 607 77 87
www.belkin.com/uk/networking/
ALTRI PAESI
+44 - 1933 35 20 00
41
3
4
5
6
sezione
NA ZIONE
2
Informazioni
Dichiarazione FCC
DICHIARAZIONE DI CONFORMITÀ ALLE NORMATIVE FCC
PER LA COMPATIBILITÀ’ ELETTROMAGNETICA
Noi sottoscritti, Belkin International, Inc., con sede al 501
West Walnut Street, Compton, CA 90220, dichiariamo sotto
la nostra piena responsabilità che il prodotto:
F5D8053
, cui questa dichiarazione fa riferimento, è conforme alla
sez. 15 delle norme FCC. Le due condizioni fondamentali
per il funzionamento sono le seguenti: (1) il dispositivo
non deve causare interferenze dannose e (2) il dispositivo
deve accettare qualsiasi interferenza ricevuta, comprese
eventuali interferenze che possano causare un funzionamento
anomalo.
Attenzione: esposizione alle radiazioni di radiofrequenza.
La potenza in uscita irradiata da questo dispositivo è molto inferiore ai limiti
di esposizione alla radiofrequenza FCC. Tuttavia, il dispositivo dovrà essere
utilizzato in modo da ridurre al minimo i potenziali rischi di contatto umano nel
corso del suo funzionamento.
Se il dispositivo venisse collegato con un’antenna esterna, l’antenna dovrà
essere posizionata in modo da ridurre al minimo il potenziale rischio di contatto
umano nel corso del suo funzionamento. Per evitare un eventuale superamento
dei limiti di esposizione alle radiofrequenze FCC, non è consentito avvicinarsi
all’antenna di oltre 20 cm nel corso del normale funzionamento.
Notifica della Commissione Federale per le Comunicazioni
Questa apparecchiatura è stata testata ed è risultata conforme ai limiti
per i dispositivi digitali di Classe B, ai sensi della Parte 15 delle normative
FCC. Questi limiti hanno lo scopo di offrire una protezione ragionevole dalle
interferenze dannose in un’installazione domestica.
Questo dispositivo genera, utilizza e può emettere energia in radiofrequenza.
Se questo dispositivo causasse interferenze dannose per la ricezione
delle trasmissioni radiotelevisive, determinabili spegnendo o riaccendendo
l’apparecchio stesso, si suggerisce all’utente di cercare di rimediare
all’interferenza ricorrendo ad uno o più dei seguenti provvedimenti:
• Modificare la direzione o la posizione dell’ antenna ricevente.
• Aumentare la distanza tra il dispositivo ed il ricevitore.
• Collegare il dispositivo ad una presa di un circuito diversa da quella cui
è collegato il ricevitore.
• Consultare il rivenditore o un tecnico radio/TV specializzato
42
Informazioni
Belkin International, Inc. si riserva il diritto di riesaminare il prodotto Belkin
danneggiato. Tutte le spese di spedizione per il prodotto Belkin restituito alla
Belkin International, Inc. sono a carico dell’acquirente. Qualora Belkin ritenga,
a sua discrezione, difficoltoso il rinvio dell’apparecchio danneggiato alla Belkin
43
1
2
3
4
5
6
sezione
Modifiche
Le indicazioni FCC prevedono che l’utente venga informato che eventuali
variazioni o modifiche apportate a questo dispositivo, non espressamente
approvate da Belkin, potrebbero annullare la facoltà dell’utente di utilizzare il
dispositivo.
Gara nzia a vita limitata sul prodotto Belkin International Inc.
Oggetto della garanzia.
Belkin International, Inc. (“Belkin”) garantisce all’acquirente di questo prodotto
Belkin che tale prodotto è esente da difetti di progettazione, montaggio,
materiale e lavorazione.
Periodo di copertura della garanzia.
Belkin International garantisce il prodotto Belkin per tutto il ciclo di vita di tale
prodotto.
Cosa facciamo per risolvere i problemi?
Garanzia sul prodotto.
Belkin provvederà a riparare o sostituire gratuitamente, a sua discrezione,
qualsiasi prodotto che dovesse risultare difettoso (escluse le spese di trasporto).
Condizioni non coperte dalla garanzia.
Tutte le garanzie di cui sopra saranno rese nulle qualora il prodotto Belkin non
fosse fornito alla Belkin per essere sottoposto alle necessarie verifiche dietro
espressa richiesta di Belkin e a spese del cliente, oppure nel caso in cui la Belkin
dovesse stabilire che il prodotto non è stato correttamente installato o che sia
stato in qualche modo alterato o manomesso. La Garanzia sul prodotto Belkin
non copre danni da imputarsi a calamità naturali, tra cui allagamenti o terremoti,
guerre, atti di vandalismo, furti, usura, erosione, assottigliamento, obsolescenza,
abusi, danni dovuti ad interferenze di bassa tensione (tra cui parziali oscuramenti
o abbassamenti di tensione), programmazione non autorizzata oppure modifiche
o alterazioni all’apparecchiatura dell’impianto.
Come usufruire del servizio di garanzia.
Per usufruire dell’assistenza per il proprio prodotto Belkin, è necessario:
1. Contattare la Belkin International, Inc. all’indirizzo 501 W. Walnut St., Compton
CA 90220, att.: Customer Service, oppure chiamare il numero (800)-223-5546,
entro 15 giorni dall’evento. Tenere a portata di mano le seguenti informazioni:
a. Il codice del prodotto Belkin.
b. Il luogo d’acquisto del prodotto.
c. La data di acquisto del prodotto
d. Una copia della ricevuta originale.
2. Il rappresentante del Servizio Clienti Belkin vi spiegherà come
inviare la ricevuta e il prodotto Belkin e come procedere con il reclamo.
Informazioni
International, Inc., quest’ultima potrebbe decidere, a sua discrezione, di farlo ispezionare
e determinare il costo della riparazione. In caso ci fossero delle spese di spedizione per
inviare e ricevere l’apparecchio dopo l’ispezione, queste saranno a carico dell’acquirente.
Eventuali apparecchi danneggiati dovranno essere mantenuti disponibili per eventuali
verifiche fino alla risoluzione della richiesta di indennizzo. Qualora si raggiunga un
accordo, Belkin International, Inc. si riserva il diritto di essere surrogata da eventuali
polizze assicurative dell’acquirente.
La garanzia e le leggi vigenti in materia.
LA PRESENTE GARANZIA COSTITUISCE L’UNICA GARANZIA DI BELKIN. LA PRESENTE
GARANZIA E L’UNICA GARANZIA, ESPLICITA O IMPLICITA, DELLA BELKIN. SI ESCLUDE
QUALSIASI GARANZIA IMPLICITA, DI COMMERCIABILITÀ E DI ATTITUDINE PER SCOPI
PARTICOLARI CHE VANNO OLTRE QUESTA GARANZIA ESPLICITA SCRITTA.
Alcune giurisdizioni non consentono l’esclusione o la limitazione delle garanzie implicite
o della responsabilità per i danni accidentali, pertanto i limiti di esclusione di cui sopra
potrebbero non fare al caso vostro.
IN NESSUN CASO BELKIN POTRÀ ESSERE CONSIDERATA RESPONSABILE
DI ALCUN DANNO DIRETTO, INDIRETTO, ACCIDENTALE, SPECIFICO O DANNI
MULTIPLI TRA I QUALI, MA NON SOLO, EVENTUALI DANNI DI MANCATI AFFARI O
MANCATO GUADAGNO DERIVATI DALLA VENDITA O UTILIZZO DELL’ADATTATORE DI
CORRENTE BELKIN, ANCHE NEL CASO IN CUI BELKIN FOSSE STATA INFORMATA DELLA
POSSIBILITÀ DI TALI DANNI.
Questa garanzia consente di godere di diritti legali specifici e di eventuali altri diritti che
possono variare di stato in stato. Alcune giurisdizioni non consentono l’esclusione o la
limitazione delle garanzie implicite o della responsabilità per i danni accidentali, pertanto i
limiti di esclusione di cui sopra potrebbero non fare al caso vostro.
L’apparecchiatura può essere liberamente utilizzata per uso personale o per attività
di propria pertinenza solo all’interno di edifici o di aree di esclusiva proprietà privata
(Decreto legislativo 259/03, art. 105). Se non si verificano queste condizioni, l’uso per
scopi privati è consentito solo previa autorizzazione, da chiedersi al Ministero delle
Comunicazioni – Ispettorato Territoriale competente per Regione (Decreto legislativo
259/03, art. 104).
L’apparecchiatura può essere utilizzata anche da Operatori pubblici di
PER L’USO IN
Telecomunicazione, per consentire l’accesso alle rispettive reti /
AT BE CY CZ
servizi (D.M. 28.5.03 e D.M. 4.10.05). In questo caso, l’installazione
EE FI FR DE
e l’esercizio dell’apparecchiatura è soggetto ad autorizzazione del
Ministero delle Comunicazioni, Direzione Generale – Roma.
HU IE IT LV
Nota: per ulteriori informazioni relative alle Autorizzazioni consultare
LU MT NL PL
l’indirizzo web http://www.urpcomunicazioni.it, alla voce “utilità per il
SK SI ES SE
cittadino”.
IS
Per informazioni sullo smaltimento del prodotto
consultare il sito: http://environmental.belkin.com
44
DK
GR
LT
PT
GB
LI NO CH BG
RO TR
FUNZIONA
SU CANALI 1-13
Informazioni
1
EC Declaration of Conformity
to R&TTE Directive 1999/5/EC
CE
:
BELKIN LTD,
EXPRESS BUSINESS PARK,
SHIPTON WAY
,RUSHDEN
NN10 6GL ENGLAND
Representative
:
Belkin Ltd
Product / Apparatus
:
N WIRELESS USB ADAPTER
Type Number
:
F5D8053
Variants include
:
All Country variants
(residing in the EC
holding the TCF)
3
4
5
6
Declaration
I declare that above product conforms to all the applicable requirements of
EU Directive1999/5/EC and is CE-marked accordingly:
Article 3.1a:
(Standard(s)) used to show compliance with LVD, 73/23/EEC
EN60950-1:2001
Article 3.1b:
(Standard(s)) used to show compliance with EMC Directive, 89/336/EEC:
EN301 489-1 V1.5.1 (2004-11), EN301 489-17 V1.2.1 (2002-08)
Article 3.2:
Standard(s) used to show compliance:
EN300-328 V1.6.1 (2004-11)
Signature
:
Name
:
K Simpson
Title
:
European Regulatory Compliance Manager
Date
:
_10 JULY 2007______________________
45
sezione
Manufacturer
2
Adattatore USB
wireless
N Wireless
Assistenza tecnica Belkin
REGNO UNITO: 0845 607 77 87
Europa: www.belkin.com/support
Belkin Ltd.
Express Business Park
Shipton Way, Rushden
NN10 6GL, Regno Unito
+44 (0) 1933 35 2000
+44 (0) 1933 31 2000 fax
Belkin SAS
130 rue de Silly
92100 Boulogne-Billancourt,
Francia
+33 (0) 1 41 03 14 40
+33 (0) 1 41 31 01 72 fax
Belkin GmbH
Hanebergstrasse 2
80637 Monaco di Baviera
Germania
+49 (0) 89 143405 0
+49 (0) 89 143405 100 fax
Belkin Iberia
C/ Anabel Segura, 10 planta baja, Of. 2
28108, Alcobendas, Madrid
Spagna
+34 91 791 23 00
+34 91 490 23 35 fax
Belkin Italy & Greece
Via Carducci, 7
20123 Milano
Italia
+39 02 862 719
+39 02 862 719 fax
Belkin B.V.
Boeing Avenue 333
1119 PH Schiphol-Rijk,
Paesi Bassi
+31 (0) 20 654 7300
+31 (0) 20,654 7349 fax
© 2007 Belkin International, Inc. Tutti i diritti riservati. Tutti i nomi commerciali sono marchi commerciali
registrati dei rispettivi produttori indicati. Windows e Windows Vista sono marchi commerciali o marchi
registrati della Microsoft Corporation negli Stati Uniti e/o in altri Paesi.
P75451ea