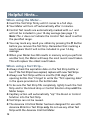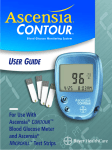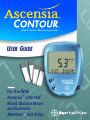
1
Blood Glucose Monitoring System
USER GUIDE
For Use With
Ascensia™ CONTOUR™
Blood Glucose Meter
and Ascensia™
MICROFILL™ Test Strips
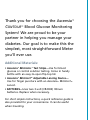
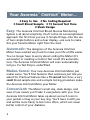
Thank you for choosing the Ascensia™
CONTOUR™ Blood Glucose Monitoring
System! We are proud to be your
partner in helping you manage your
diabetes. Our goal is to make this the
simplest, most straightforward Meter
you’ll ever use.
Additional Materials:
• Ascensia™ MICROFILL™ Test Strips—Use for blood
glucose or control solution testing. Come in handy
bottle with an easy-to-open flip-top lid.
• Ascensia™ MICROLET ® Adjustable Lancing Device—
Use for finger puncture with an Ascensia™ MICROLET ®
Lancet.
• BATTERIES—Uses two 3-volt (CR2032) lithium
batteries. Replace when necessary.
For short simple instructions, a quick reference guide is
also provided for your convenience. It can be useful
when traveling.
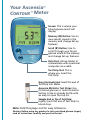
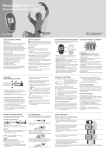
Your Ascensia™
CONTOUR ™ Meter
Screen: This is where your
blood glucose result will
display.
Memory (M) Button: Use to
view results stored in the
memory and change Set-up
features.
Scroll (▼) Button: Use to
scroll through your blood
glucose results in the memory
and change Set-up features.
Data Port: Allows Meter to
communicate with a personal
computer via a cable.
Test Strip Slot: This is
where you insert the
Test Strip.
Gray Electrode End: Insert this end of
Test Strip into Meter.
Ascensia MICROFILL Test Strips: Use
for blood glucose or control solution
testing. Come in a handy bottle with
an easy-to-open flip-top lid.
Sample End or Tip of Test Strip:
Lightly touch this end of Test Strip to
blood drop.
Note: Fold this page out for easy reference.
Caution: Before using any product to test your blood glucose (sugar),
read all instructions carefully and practice the test.
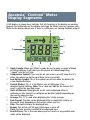
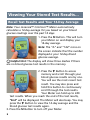
Ascensia™ CONTOUR™ Meter
Display Segments
A full display, as shown here, indicates that all characters in the display are working
properly. You will briefly see this display each time the Meter turns on. Compare your
Meter to the display shown here. If there is a difference, see Solving Problems, page 21.
B
A
D
F
C
}
}
{
{
H
E
G
{
{
K
{
I
J
A. Apply Sample: When your Meter is ready for you to apply a sample of blood
or control solution, it will show you this picture of a blood drop being
“sipped” into the Test Strip.
B. Temperature Symbol: If you see this on your screen, you will know that it is
either too cold or too hot for your Meter to test accurately.
C. Low Battery Symbol: This is the symbol you will see when the battery life
is low. Replace batteries.
D. Control Marker: This ✔ is the Meter’s way of telling you it has
detected Control Solution. Note: The ✔ does not indicate the Control Test
result is within the specified range.
E. Units-of-Measure: Blood glucose results can be displayed either in
millimole per liter (mmol/L) or milligram per deciliter (mg/dL) depending on
the country where you live.
F. Average: This “A” is used when displaying the 14-day average.
G. Date Format: The date can be displayed either as month/day (m/d) or as
day.month (d.m) depending on the country where you live.
H. Date: The month and day are displayed here.
I. Beeper: This picture will tell you if the beeper is on or off.
J. Time: The hour, minutes and AM/PM are displayed here.
K. Results/Errors: This is the area where your test results or any possible error
codes will be displayed.
Table of Contents…
Everyday Use
Testing Your Blood Glucose Level . . . . . . . . . . . . . . . . . . 4
Viewing Your Stored Test Results . . . . . . . . . . . . . . . . . . . 8
Performing a Control Test . . . . . . . . . . . . . . . . . . . . . . . . 10
Helpful Hints . . . . . . . . . . . . . . . . . . . . . . . . . . . . . . . . . . . 12
Beyond Everyday Use
Setting Time, Date and Other Features . . . . . . . . . . . . . . 13
Installing Batteries . . . . . . . . . . . . . . . . . . . . . . . . . . . . . . . 18
Meter and Test Strip Care . . . . . . . . . . . . . . . . . . . . . . . . . 19
Solving Problems . . . . . . . . . . . . . . . . . . . . . . . . . . . . . . . . 20
Specifications . . . . . . . . . . . . . . . . . . . . . . . . . . . . . . . . . . . 22
Performance Evaluations
Precision . . . . . . . . . . . . . . . . . . . . . . . . . . . . . . . . . . . . . . . 23
Accuracy . . . . . . . . . . . . . . . . . . . . . . . . . . . . . . . . . . . . . . . 24
Multiple Site Testing Evaluation . . . . . . . . . . . . . . . . . . . 34
Transfer Test Results to a Computer . . . . . . . . . . . . . . . . 36
Service . . . . . . . . . . . . . . . . . . . . . . . . . . . . . . . . . . . . . . . . 37
Supplies . . . . . . . . . . . . . . . . . . . . . . . . . . . . . . . . . . . . . . . 38
Warranty . . . . . . . . . . . . . . . . . . . . . . . . . . . . . . . . . . . . . . 39
The Ascensia™ CONTOUR ™ Blood Glucose Monitoring System (Meter,
Test Strips and Controls) is intended for self-testing by persons with
diabetes, and by healthcare professionals, to monitor the level of
glucose in whole blood. The Ascensia CONTOUR System is specific for
glucose and has been referenced to plasma/serum glucose values.
Your Ascensia™ CONTOUR™ Meter…
❖ Easy to Use ❖ No Coding Required
❖ Small Blood Sample ❖ 15 Second Test Time
❖ Sleek Design
Easy: The Ascensia CONTOUR Blood Glucose Monitoring
System is all about simplicity. You’ll notice its noncomplicated
approach the first time you see it. Simple things—like the use
of two simple buttons and a clear display—are sure to make
this your favorite Meter right from the start.
Automatic: The designers of the Ascensia CONTOUR
Meter have worked very hard to make your life a little easier.
You no longer have to worry about coding the Meter (it’s
automatic) or marking a Control Test result (it’s automatic,
too). The Ascensia CONTOUR Meter will even automatically
tell you if a Test Strip is underfilled.
Makes Sense: Your new Ascensia CONTOUR Meter just
makes sense. You’ll find features that customers just like you
asked for. Practical features like a 15 second test time, a very
small blood sample size and a simple testing procedure make
the Ascensia CONTOUR Meter your Meter.
Convenient: The Meter’s small size, sleek design, and
ease of use means you’ll take it everywhere with you. Your
Ascensia CONTOUR Meter takes up about as much room in
your pocket or bag as your key ring. You’ll have it with you
and will be more likely to test more often, which can mean
better control of your diabetes.
2
Everyday Use
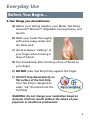
Before You Begin…
A few things you should know:
A) Gather your testing supplies: your Meter, Test Strips,
Ascensia™ MICROLET ® Adjustable Lancing Device, and
lancets.
B) Wash your hands thoroughly
with warm soapy water and
dry them well.
C) Avoid excessive “milking” of
your finger when forming a
drop of blood.
D) Test immediately after forming a drop of blood on
your finger.
E) DO NOT press Test Strip firmly against the finger.
F) DO NOT drop blood directly on
flat surface of the Test Strip.
Your Test Strip is designed to
easily “sip” the blood into the
Test Strip.
Sip-in Sampling
®
Automatic Sensor-filling Action
WARNING: Do not change your medication based on
Ascensia CONTOUR results without the advice of your
physician or healthcare professional.
3
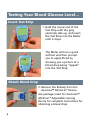
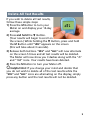
Testing Your Blood Glucose Level…
Insert Test Strip
1. Hold the round end of the
Test Strip with the gray
electrode side up, and insert
the Test Strip into the Meter
until it stops.
The Meter will run a quick
self-test and then prompt
you to apply blood by
showing you a picture of a
blood drop being “sipped”
into the Test Strip.
Obtain Blood Drop
2. Remove the Endcap from the
Ascensia™ MICROLET ® Device.
See package insert for Ascensia™
MICROLET ® Adjustable Lancing
Device for complete instructions for
obtaining a blood drop.
4
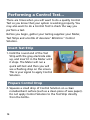
3. Insert lancet firmly until it comes
to a full stop. This will “cock”
the device.
4. Twist off lancet cap.
5. Replace the Endcap.
6. Press Ascensia™ MICROLET ® Device
firmly against puncture site and
press button to release. Form a
small drop of blood.
5
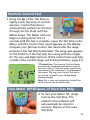
Test Blood Glucose
7. Bring tip of the Test Strip to
lightly touch the drop of
blood. Hold until the Meter
beeps. Blood is automatically
pulled into the Test Strip
through the tip. The Meter
will now begin counting
down the 15 seconds
until the test is
complete.
8. Leave the Test Strip in the Meter
until the test result appears on
the display.
Caution: If you see “HI” or “LO” displayed, your blood
glucose level may be above 33.3 mmol/L (600 mg/dL) or
below 0.6 mmol/L (10 mg/dL). Repeat test. If you receive the
same result, call your physician or health care professional
immediately.
Turn Meter Off/Dispose of Used Test Strip
9. To turn your Meter off, simply remove the used Test Strip.
Your test result will automatically be stored in memory.
6
Caution: Dispose of the used Test
Strip and lancet carefully to prevent
injury or contamination to others.
JHelpful Hint: You should always
turn your Meter off by removing the
Test Strip following a test. This will
conserve your battery power.
However, if you forget to turn the Meter off, the meter will
turn itself off after three minutes.
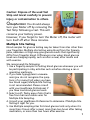
Multiple Site Testing
Blood samples for glucose testing may be taken from sites other than
your fingertips. Multiple site testing using blood from the forearm,
palm, abdomen or thigh may give glucose results that significantly
differ from fingertip blood. Differences occur when blood glucose
levels are changing rapidly, such as after a meal, after insulin and
with exercise.
We recommend the following:
1. Use a fingertip sample for testing blood glucose whenever you will
be participating in risky activities such as before driving a car or
operating machinery.
2. If you have hypoglycemic unawareness (you do not recognize the symptoms of or cannot tell when you have
low blood sugar) Multiple Site Testing
is not recommended. Please consult
with your Healthcare Professional if
you have low blood glucose levels.
3. Select a soft, fleshy area of skin that is
free from hair and visible veins for
Multiple Site Sampling.
4. Consult your Healthcare Professional to determine if Multiple Site
Testing is right for you.
5. Use Multiple sampling sites for blood glucose tests only when it is
more than 2 hours after a meal, more than two hours after taking
medication, or more than two hours after exercise.
7
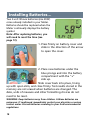
Viewing Your Stored Test Results…
Recall Test Results and Your 14-Day Average
Note: Your Ascensia™ CONTOUR ™ Meter automatically
calculates a 14-day average for you based on your blood
glucose readings over the past 14 days.
1. Press the M Button. This will turn
your Meter on and display your
14-day average.
Note: The “A” and “14d” icons on
the screen indicate that the number
displayed is your 14-day blood
glucose average.
J Helpful Hint: The display will show three dashes if there
are no blood glucose test results in the memory.
2. Press the ▼ Button to access
memory and scroll through your
blood glucose results one by one.
You will see the most recent test
result. You may also press and
hold this button to continuously
scroll through the test results.
Your Meter can hold up to 240
test results. When you reach the end of the test results,
“End” will be displayed. The Meter will also beep. You may
press the ▼ Button to view the 14-day average and the
blood glucose test results again.
3. Press the M Button to turn off your Meter.
8
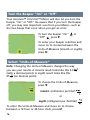
Delete All Test Results
If you wish to delete all test results,
follow these simple steps:
1) Press the M Button to turn your
Meter on and display your 14-day
average.
2) Press and hold the ▼ Button.
(Your results will begin to scroll on
the screen.) While holding the ▼ Button, press and hold
the M Button until “dEL” appears on the screen
(this will take about 3 seconds).
3) Release both buttons. “dEL” and “ALL” will now alternate
on the screen 5 times and all test results will be deleted.
The Meter will now show you 3 dashes along with the “A”
and “14d” icons. Your results have been deleted.
4) Press the M Button to turn your Meter off.
J Helpful Hint: If you change your mind and decide that
you do not wish to delete all of the test results while the
“dEL” and “ALL” icons are alternating on the display, simply
press any button and the test results will not be deleted.
9
Performing a Control Test…
There are times when you will want to do a quality Control
Test so you know that your system is working properly. You
may also want to do a Control Test to check the way you
perform a test.
Before you begin, gather your testing supplies: your Meter,
Test Strips and a bottle of Ascensia™ MICROFILL™ Control
Solution.
Insert Test Strip
1. Hold the round end of the Test
Strip with the gray electrode side
up, and insert it in the Meter until
it stops. The Meter will run a
quick self-test and then you will
see a flashing drop on the screen.
This is your signal to apply Control
Solution.
Prepare Control Drop
2. Squeeze a small drop of Control Solution on a clean
nonabsorbent surface (such as a clean piece of wax paper).
Do not apply Control Solution to the Test Strip directly
from the bottle.
10
Perform Control Test
3. Bring the tip of the Test Strip to
lightly touch the drop of Control
Solution. Control Solution is
automatically pulled into the strip
through the tip. Hold until the
Meter beeps. The Meter will now
begin counting down the 15
seconds until the test is complete. Leave the Test Strip in the
Meter until the Control Test result appears on the display.
Compare your Normal Control Test result with the range
printed on the Test Strip bottle label. This range also appears
on the bottom of the test strip box along with the ranges
for the Low and High Controls. (If the control test result falls
outside of the control range, see Solving Problems, page 21.)
J Helpful Hint: The Ascensia CONTOUR Meter
automatically recognizes and marks a Control
Test result for you. You will notice that this has
been done by the check mark (✔) displayed on
the screen. This way, your Control Test results
will not be included in your 14-day blood
glucose average.
Note: The ✔ does not indicate the Control Test
result is within the specified range.
Turn Meter Off/ Dispose of Used Test Strip
4. To turn your Meter off, simply
remove the Test Strip. The
marked Control Result will
automatically be stored in
memory. Dispose of the used
Test Strip.
11
Helpful Hints…
When using the Meter…
❖ Insert the Test Strip firmly until it comes to a full stop.
❖ Your Meter will turn off automatically after 3 minutes.
❖ Control Test results are automatically marked with a ✔ and
will not be included in your 14-day average (see page 11).
Note: The ✔ does not indicate the Control Test result is within
the specified range.
❖ You may mark any result you obtain by pressing the ▼ Button
before you remove the Test Strip. Remember that marking a
result means that it will not be included in your 14-day
average.
❖ When your Meter has 240 results in memory and you perform
another test, the Meter will keep the most recent result taken.
This will replace the oldest result taken.
When using a Test Strip…
❖ Always check the expiration date on the Test Strip bottle or
box. If the Test Strips have expired, replace with new Test Strips.
❖ Always use Test Strips within 6 months (180 days) after
opening bottle. Don’t forget to write the “first opening date”
in the space provided on the bottle label.
❖ To be sure the Test Strip fills completely, lightly touch the Test
Strip end to the blood drop or Control Solution drop until the
Meter beeps.
❖ Capillary action will automatically “sip” the blood or Control
Solution into the Test Strip.
❖ Test Strips can not be reused.
❖ The Ascensia CONTOUR Meter has been designed for use with
Ascensia MICROFILL Test Strips only. Do not use any other Test
Strips with the Ascensia CONTOUR Meter.
12
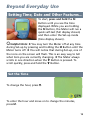
Beyond Everyday Use
Setting Time, Date and Other Features…
To start, press and hold the M
Button until you see the time
displayed. While you are holding
the M Button, the Meter will run a
quick self-test (full display shown)
and then enter the Set-up mode
(time display shown).
J Helpful Hints: ❖ You may turn the Meter off at any time
during Set-up by pressing and holding the M Button until the
Meter turns off. ❖ You will notice that during Set-up, one of
the icons on the screen will flash. This is an easy way to tell
what item you are currently changing. ❖ The Meter always
scrolls in one direction when the ▼ Button is pressed. To
scroll quickly, press and hold the ▼ Button.
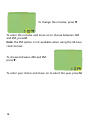
Set the Time
To change the hour, press ▼.
To enter the hour and move on to change the minutes,
press M.
13
To change the minutes, press ▼.
To enter the minutes and move on to choose between AM
and PM, press M.
Note: the PM option is not available when using the 24-hour
clock format.
To choose between AM and PM,
press ▼.
To enter your choice and move on to select the year, press M.
14
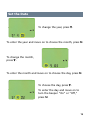
Set the Date
To change the year, press ▼.
To enter the year and move on to choose the month, press M.
To change the month,
press ▼.
To enter the month and move on to choose the day, press M.
To choose the day, press ▼.
To enter the day and move on to
turn the beeper “On” or “Off,”
press M.
15
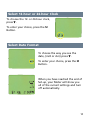
Turn the Beeper “On” or “Off”
Your Ascensia™ CONTOUR ™ Meter will also let you turn the
beeper “On” or “Off.” Be aware that if you turn the beeper
off, you may miss important cues from your Meter—such as
the two beeps that occur when you get an error.
To turn the beeper “On”
“Off”
, press ▼.
or
To enter your beeper selection and
move on to choose between the
Units-of-Measure (mmol/L or mg/dL),
press M.
Select “Units-of-Measure”
Note: Changing the Units-of-Measure changes the way
you see your results. A mmol/L result looks like this 5.3
(with a decimal point). A mg/dL result looks like this
95
(no decimal point).
To choose the Units-of-Measure,
press ▼.
mmol/L (millimoles per liter)
or
mg/dL (milligrams per deciliter)
To enter the Units-of-Measure and move on to choose
between a 12-hour or 24-hour clock, press M.
16
Select 12-hour or 24-hour Clock
To choose the 12- or 24-hour clock,
press ▼.
To enter your choice, press the M
Button.
Select Date Format
To choose the way you see the
date, (m/d or d.m) press ▼.
To enter your choice, press the M
Button.
When you have reached the end of
Set-up, your Meter will show you
all of the current settings and turn
off automatically.
17
Installing Batteries…
Two 3-volt lithium batteries (size 2032)
come already installed in your Meter.
Batteries should be replaced when the
Meter continually displays the battery
symbol.
Note: After replacing batteries, you
will need to reset the time (see
page 13).
1. Press firmly on battery cover and
slide in the direction of the arrow
to open the cover.
2. Place new batteries under the
blue prongs and into the battery
compartment with the “+”
side up.
Slide cover back into place, lining
up with open slots, and close firmly. Test results stored in the
memory are not erased when batteries are changed. The
date, units of measure and other formatting choices do not
need to be reset.
WARNING: Keep batteries away from children. Lithium batteries are
poisonous. If swallowed, immediately contact your physician or poison
control center. Discard batteries according to your local environmental
regulations.
18
Meter and Test Strip Care…
❖ Wash hands and dry thoroughly before handling to keep
the Meter and Test Strips free of oils and other
contaminants.
❖ Handle the Meter carefully to avoid damaging the
electronics or causing other malfunctions.
❖ Avoid exposing Meter and Test Strip to excessive humidity,
heat, cold, dust, or dirt.
❖ The exterior of the Meter can be cleaned using a moist
(not wet) lint-free tissue with a mild detergent or
disinfectant solution, such as 1 part bleach mixed with 9
parts water. Wipe dry with lint-free tissue after cleaning.
Caution: Do not allow solution to run down or in around the
buttons. Doing so may cause a malfunction.
❖ Store Meter in the carrying case provided or a replacement
case of your choice whenever possible.
Warning Potential Biohazard:
Health care professionals or persons using this system on multiple
patients should be aware of the following and should follow the
infection control procedure approved by their facility. All products or
objects which come in contact with human blood, even after cleaning,
should be handled as if capable of transmitting viral diseases. The user
should follow the recommendations for prevention of blood-borne
transmissible diseases in healthcare settings, as recommended for
potentially infectious human blood specimens in National Committee for
Clinical Laboratory Standards, Protection of Laboratory Workers from
Instrument Biohazards and Infectious Disease Transmitted by Blood,
Body Fluids and Tissues: Approved Guideline. NCCLS Document M29-A
[ISBN 1-56238-339-6] NCCLS, 940 West Valley Road, Suite 1400, Wayne,
Pennsylvania 19087-1898, USA, 1997. This document has complete
information on the topic of user protection and can be used as
background material for instruction.
19
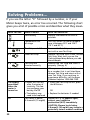
Solving Problems…
If you see the letter “E” followed by a number, or if your
Meter beeps twice, an error has occurred. The following chart
gives you a list of possible errors and describes what they mean.
What You See
What it Means
What You Should Do
Low battery
Replace the batteries as soon as
possible.
E1
Temperature out
of range
Test only when the Meter temperature is between 50°F and 104°F
(10°C and 40°C).
E2
Test Strip underfill
Remove the Test Strip and repeat the
test with a new Test Strip.
E3
Used Test Strip
Replace Test Strip with a new, unused
Test Strip. Wait until you see the
flashing blood drop before you add
blood sample.
E4
Test Strip not
inserted correctly
Remove the Test Strip and insert it
properly. (See pg. 4.)
E 5 and above
All other errors
When you see the letter E followed
by a number that is not listed here,
remove Test Strip and retest with a
new Test Strip. If you continue to
experience difficulty, call the Bayer
Diabetes Helpline 1-800-268-7200.
The display
goes blank
when the
meter is
turned on.
• Meter will turn off
after 3 minutes of
inactivity. This feature prolongs your
battery life OR
• The battery may
need to be replaced
• Insert new Test Strip to test, press
the M Button.
LO
Test result is below
0.6 mmol/L (10 mg/dL)
20
OR
• Replace the batteries if needed.
Repeat test. If LO appears again,
contact your healthcare
professional (HCP) immediately.
CAUTION: Glucose levels below
2.8 mmol/L (50 mg/dL) may indicate a
potentially serious medical condition.
What You See
What it Means
What You Should Do
HI
Test result is above
33.3 mmol/L
(600 mg/dL)
Wash your hands and test site. Repeat
the test. If the test result is still
“HI,” contact your physician or
healthcare professional (HCP)
immediately.
CAUTION: Glucose levels above
13.9 mmol/L (250 mg/dL) may
indicate a potentially serious medical
condition.
Control Test
result is out-ofrange (too high
or too low).
• Control Solution is
past expiration date
or is past the 3-month
open use date.
• Test Strip is past
expiration date or is
past the 6 month
open use date.
• Deteriorated Test
Strip due to heat,
cold or exposure to
moisture.
• Control Solution not
at room temperature.
Check all expiration dates. Do not
use expired testing materials. Run
another Control Test. If still out-ofrange, retest with a new Test Strip
and Control Solution. If still out of
range, call the Bayer Diabetes
Helpline 1-800-268-7200.
Some display
segments do
not appear
during self-test.
Possible meter electronics or battery failure. Compare display
with picture on inside
of Front Cover.
Replace batteries. If display is
still incorrect, call the Bayer
Diabetes Helpline 1-800-268-7200.
This may affect the way you
see your results.
21
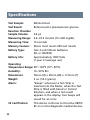
Specifications
Test Sample:
Test Result:
Reaction Chamber
Sample Volume:
Measuring Range:
Measuring Time:
Memory Feature:
Battery Type:
Battery Life:
Whole blood
Referenced to plasma/serum glucose
0.6 µL
0.6 –33.3 mmol/L (10 – 600 mg/dL)
15 seconds
Stores most recent 240 test results
Two 3-volt lithium batteries
(DL or CR2032)
Approximately 1000 Tests
(1 year of average use)
Operating
Temperature Range: 50º– 104ºF (10º– 40ºC)
Humidity:
10 – 93% RH
Dimensions:
74mm (H) x 53mm (W) x 17.3mm (T)
Weight:
2 oz. (52.3 grams)
Alarm:
“Beeps” whenever a Test Strip is
inserted into the Meter, when the Test
Strip is filled with blood or Control
Solution, and when a test result
appears in the display. Two beeps will
sound for an error.
CE Certification:
This device conforms to Directive 98/79/
EC on in vitro diagnostic medical devices.
22
Performance Evaluations
(for Healthcare Professionals)
Precision
1. Laboratory Precision: To assess the repeatability (withinrun precision) of the Ascensia™ CONTOUR ™ Blood Glucose
Monitoring System, 100 blood glucose readings (10
readings on each of 10 instruments) were obtained with
venous blood specimens at five glucose concentrations. The
following table summarizes the mean and pooled withinMeter %CV at each level.
Mean
%CV
2.6 mmol/L
2.4%
5.1 mmol/L
2.5%
8.0 mmol/L
2.8%
13.1 mmol/L
3.1%
20.9 mmol/L
2.4%
2. Control Testing Precision: Precision results were obtained
from duplicate assays of Control Solutions at two diabetes
clinics with the Ascensia CONTOUR System. Testing was
performed over 63 days. People with diabetes and
healthcare professionals (HCP) at each clinic evaluated two
reagent lots. One lot was evaluated at both clinics. The
tables below show the combined results for the lay users
and HCPs. The overall standard deviations (SD) and
coefficients of variation (CV) include the within run and
between run / day variations.
Low Control Solution
Reagent
Lot
22B
22C
23B
Operator
HCP
Lay User
HCP
Lay User
HCP
Lay User
(n = 1)
(n = 51)
(n = 4)
(n = 53)
(n = 5)
(n = 104)
Duplicate
Assays
(n = )
Mean
(mmol/L)
Overall
SD
(mmol/L)
Overall
CV
(%)
35
76
39
78
74
154
2.34
2.35
2.39
2.39
2.36
2.32
0.074
0.102
0.063
0.093
0.063
0.112
3.2
4.3
2.6
3.9
2.7
4.8
23
Normal Control Solution
Reagent
Lot
22B
22C
23B
Operator
HCP
Lay User
HCP
Lay User
HCP
Lay User
(n = 1)
(n = 51)
(n = 4)
(n = 53)
(n = 5)
(n = 104)
Duplicate
Assays
(n = )
Mean
(mmol/L)
Overall
SD
(mmol/L)
Overall
CV
(%)
35
76
39
78
74
154
6.64
6.69
6.77
6.79
6.71
6.67
0.254
0.216
0.179
0.271
0.169
0.204
3.8
3.2
2.6
4.0
2.5
3.1
Duplicate
Assays
(n = )
Mean
(mmol/L)
Overall
SD
(mmol/L)
Overall
CV
(%)
35
76
39
78
74
154
18.72
18.96
19.53
19.49
19.18
18.03
0.737
0.829
0.498
0.619
0.578
0.524
3.9
4.4
2.6
3.2
3.0
2.9
High Control Solution
Reagent
Lot
22B
22C
23B
Operator
HCP
Lay User
HCP
Lay User
HCP
Lay User
(n = 1)
(n = 51)
(n = 4)
(n = 53)
(n = 5)
(n = 104)
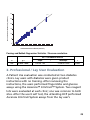
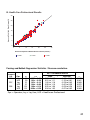
Accuracy
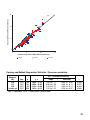
1. Bayer Accuracy Evaluation:
To assess the accuracy of the Ascensia™ CONTOUR ™ System,
60 fresh fingerstick specimens from people with diabetes
were tested with the Ascensia CONTOUR System (12 – 14
readings per fingerstick) and the YSI 2300 STAT Plus Glucose
Analyzer. The glucose concentration of the samples ranged
from 2.5 to 25.2 mmol/L with an average of 8.4 mmol/L. The
range of hematocrits was 32% to 49% with an average of
40%.
24
30
Ascensia CONTOUR Result (mmol/L)
y=x
25
20
15
10
5
0
0
5
10
15
20
25
30
YSI Plasma Glucose Result (mmol/L)
Passing and Bablok Regression Statistics / Pearson correlation
95% Confidence Interval
n
y=
Slope
746
1.01x – 0.49
1.00 to 1.03
/
Intercept
r
–0.58 to –0.39
0.992
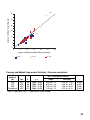
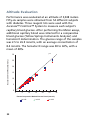
2. Professional / Lay User Evaluation
A Patient Use evaluation was conducted at two diabetes
clinics. Lay users with diabetes were given product
instructions with no training. After reviewing the
instructions, the users performed fingersticks and glucose
assays using the Ascensia™ CONTOUR ™ System. Two reagent
lots were evaluated at each clinic; one was common to both
sites. After the user’s self test, the attending HCP performed
Ascensia CONTOUR System assays from the lay user’s
25
fingerstick. Following the Ascensia™ CONTOUR ™ System
assays, a blood sample was collected for comparative
laboratory glucose and hematocrit determinations. The
glucose concentration of the samples from the two sites
ranged from 1.7 to 23.3 mmol/L with an average of 10.1
mmol/L. The range of hematocrits was 28 to 55% with an
average of 44%.
Ascensia CONTOUR Result (mmol/L)
A. Lay User Results
30
y=x
25
20
15
10
5
0
0
5
10
15
20
25
30
Plasma Comparative Method Glucose Result (mmol/L)
Lot 22B
26
Lot 22C
Lot 23B
B. Health Care Professional Results
Ascensia CONTOUR Result (mmol/L)
30
25
20
15
10
5
0
0
5
10
15
20
25
30
Plasma Comparative Method Glucose Result (mmol/L)
Lot 22B
Lot 22C
Lot 23B
Passing and Bablok Regression Statistics / Pearson correlation
Reagent
Lot
22B
22C
23B
95% Confidence Interval
Opr.
n
y=
Lay
HCP
Lay
HCP
Lay
HCP
50
50
51
51
101
101
1.03x – 0.00
1.01x – 0.28
1.07x – 0.14
1.04x – 0.08
1.00x + 0.14
0.98x + 0.20
Slope
0.93
0.91
1.00
0.99
0.95
0.94
to
to
to
to
to
to
1.15
1.11
1.16
1.10
1.04
1.05
/
Intercept
–1.17
–1.22
–0.79
–0.47
–0.23
–0.27
to
to
to
to
to
to
0.85
0.61
0.45
0.39
0.54
0.62
r
0.947
0.967
0.969
0.972
0.973
0.960
Opr. = Operator; Lay = Lay User; HCP = Healthcare Professional
27
Arterial Blood Evaluation (Effect of pO2:
Performance with Arterial Specimens)
An arterial specimen study was performed at a hospital site.
Ascensia™ CONTOUR ™ results from arterial samples were
compared to the site blood glucose method. The glucose
concentration of the samples ranged from 3.1 to 24.0
mmol/L, with an average of 8.5 mmol/L. The sample
hematocrit range was 22 to 58%, with an average of 39%.
The pO2 values ranged from 43 to 205 mm Hg, with an
average of 104 mm Hg. The reference range for arterial pO2
is 83 to 108 mm Hg (11.1 to 14.4 kPa)1. Mean biases were
–2.9% at pO2 concentrations <83 mm Hg (n = 33, Mean
pO2 = 71 mm Hg), –2.5% at pO2 concentrations between 83
to 108 mm Hg (n = 40, Mean pO2 = 94 mm Hg), and –0.8%
at pO2 concentrations >108 mm Hg (n = 38, Mean pO2 =
143 mm Hg). Two samples had glucose concentrations
<4.2 mmol/L and the bias was calculated as an absolute
difference rather than a percentage. These samples had
biases of –0.06 mmol/L and –0.44 mmol/L; pO2 values were
80 and 112 mm Hg, respectively.
1
Carl Burtis and Edward Ashwood (eds.): Tietz Textbook of Clinical Chemistry.
3rd Ed., W.B. Saunders Co. Philadelphia, PA. 1999, p. 1827.
28
y=x
Ascensia CONTOUR Result (mmol/L)
30
25
20
15
10
5
0
0
5
10
15
20
25
30
Plasma Comparative Method Result (mmol/L)
Lot 22B
Lot 22C
Lot 23B
Passing and Bablok Regression Statistics / Pearson correlation
95% Confidence Interval
Reagent
Lot
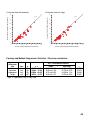
Opr.
n
22B
22C
23B
Combined
HCP
HCP
HCP
HCP
34
40
39
113
y=
1.00x
1.06x
1.12x
1.08x
–
–
–
–
Slope
0.01
0.62
1.22
0.70
0.84
0.92
1.00
1.00
to
to
to
to
1.15
1.19
1.24
1.15
/
Intercept
–1.08 to
–1.48 to
–1.96 to
–1.23 to
1.04
0.42
–0.31
–0.12
r
0.909
0.952
0.948
0.943
Opr. = Operator; HCP = Healthcare Professional
29
Neonatal Blood Evaluation (Performance with
Neonatal / Hospitalized Infant Samples)
Neonatal samples (n = 306) were collected from routine,
intermediate care, and intensive care nurseries at three sites.
The infants ranged in age from less than one day to 5
months (11 wks. premature birth). The median age was two
days. Nine venous, 176 capillary and 121 arterial samples
were evaluated with the Ascensia™ CONTOUR™ Blood
Glucose Monitoring System using three reagent lots. The lots
were rotated each day of sample collection over the duration
of the evaluation. Meter results were compared to laboratory
glucose assay methods used at each of the sites (Corning 860,
Beckman LX20, Hitachi 917 analyzers). Sample glucose
concentrations ranged from 0.8 to 11.5 mmol/L, with an
average of 4.6 mmol/L. The hematocrit range was 21 to 70%,
with an average of 48.3%. A pO2 was obtained with 116
samples. The range was 33 to 499 mm Hg, with an average of
126.9 mm Hg. A bilirubin assay was performed with 283
samples. The range was 3.4 to 319.8 µmol/L, with an average
of 95.8 µmol/L.
30
Ascensia CONTOUR Result (mmol/L)
15
y=x
10
5
0
0
5
10
15
Plasma Comparative Method Result (mmol/L)
Lot 22B
Lot 22C
Lot 23B
Passing and Bablok Regression Statistics / Pearson correlation
95% Confidence Interval
Reagent
Lot
Opr.
n
22B
22C
23B
Combined
HCP
HCP
HCP
HCP
106
101
99
306
y=
1.05x
1.03x
1.13x
1.07x
–
–
–
–
Slope
0.15
0.09
0.46
0.21
1.00
0.98
1.05
1.03
to
to
to
to
1.11
1.08
1.21
1.10
/
Intercept
–0.43
–0.33
–0.80
–0.36
to
to
to
to
–0.04
–0.11
–0.11
–0.07
r
0.958
0.975
0.964
0.966
Opr. = Operator; HCP = Healthcare Professional
31
Altitude Evaluation
Performance was evaluated at an altitude of 3,048 meters.
Fifty-six samples were obtained from 54 different subjects
with diabetes. Three reagent lots were used with the
Ascensia™ CONTOUR ™ System to measure each subject’s
capillary blood glucose. After performing the Meter assays,
additional capillary blood was collected for a comparative
blood glucose (Yellow Springs Instruments Analyzer) and
hematocrit determination. The glucose range of the samples
was 2.5 to 26.9 mmol/L, with an average concentration of
8.4 mmol/L. The hematocrit range was 38 to 60%, with a
mean of 48%.
y=x
Ascensia CONTOUR Result (mmol/L)
30
25
20
15
10
5
0
0
5
10
15
20
25
Plasma Comparative Method Glucose Result (mmol/L)
Lot 22B
32
Lot 22C
Lot 23B
30
Passing and Bablok Regression Statistics / Pearson correlation
95% Confidence Interval
Reagent
Lot
Opr.
n
y=
Slope
22B
22C
23B
HCP
HCP
HCP
56
56
56
0.90x + 0.15
0.90x + 0.13
0.89x + 0.21
0.85 to 0.97
0.86 to 0.96
0.85 to 0.94
/
Intercept
r
–0.25 to 0.33
–0.19 to 0.41
–0.09 to 0.48
0.984
0.988
0.983
Opr. = Operator; HCP = Healthcare Professional
33
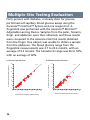
Multiple Site Testing Evaluation
Forty persons with diabetes, in steady state for glucose,
performed self-capillary blood glucose assays using the
Ascensia™ CONTOUR™ System and one reagent lot. A
fingerstick was performed with the Ascensia™ MICROLET ®
Adjustable Lancing Device. Samples from the palm, forearm,
thigh, and abdomen were then obtained, and those results
were compared to the Ascensia CONTOUR results obtained
from the finger. One subject was unable to obtain a sample
from the abdomen. The blood glucose range from the
fingerstick measurements was 2.7 to 22.6 mmol/L, with an
average of 9.2 mmol/L. The hematocrit range was 36 to 52%,
with an average of 42%.
A. Results from the Palm
B. Results from the Forearm
30
y=x
Ascensia CONTOUR Forearm Result (mmol/L)
Ascensia CONTOUR Palm Result (mmol/L)
30
25
20
15
10
5
0
20
15
10
5
0
0
5
10
15
20
25
Ascensia CONTOUR Fingerstick Result (mmol/L)
34
y=x
25
30
0
5
10
15
20
25
Ascensia CONTOUR Fingerstick Result (mmol/L)
30
C. Results from the Abdomen
D. Results from the Thigh
30
30
y=x
Ascensia CONTOUR Thigh Result (mmol/L)
Ascensia CONTOUR Abdomen Result (mmol/L)
y=x
25
20
15
10
5
25
20
15
10
5
0
0
0
5
10
15
20
25
0
30
5
10
15
20
25
30
Ascensia CONTOUR Fingerstick Result (mmol/L)
Ascensia CONTOUR Fingerstick Result (mmol/L)
Passing and Bablok Regression Statistics / Pearson correlation
95% Confidence Interval
Alternate
Site
Opr.
n
y=
Palm
Forearm
Abdomen
Thigh
Lay
Lay
Lay
Lay
40
40
39
40
1.00x – 0.06
0.96x – 0.04
0.85x + 0.63
0.97x – 0.23
Slope
0.95
0.89
0.76
0.88
to
to
to
to
1.07
1.04
0.95
1.07
/
Intercept
–0.63
–0.73
–0.09
–0.95
to
to
to
to
0.24
0.72
1.14
0.34
r
0.986
0.973
0.958
0.962
Opr. = Operator; Lay = Lay User
35
Transfer Test Results to a Computer
You can transfer test results from
the Ascensia™ CONTOUR ™ Meter
to a computer, where they can
be summarized in a report with
graphs and tables.
To make use of this feature, you
need Ascensia™ WinGlucofacts ®
(version 1.3 or higher) or Ascensia™ WinGlucofacts ®
Professional software (version 3.01 or higher), and an
Ascensia™ Data Cable.
Caution: The Ascensia™ CONTOUR ™ Meter cannot be used
with any other software except software supplied by
Bayer. Use of any other software package can result in
erroneous results.
For more information, contact the Bayer Diabetes Helpline:
1-800-268-7200 or visit our website at www.ascensia.ca.
36
Service
If attempts to correct a problem fail, please call our
Bayer Diabetes Helpline. We have friendly, knowledgeable
people who are there to help 12 hours a day, 7 days a
week (9 a.m.– 9 p.m. EST).
In Canada, call toll free: 1-800-268-7200
Important:
■ Speak to a Customer Service Representative before returning
your Meter for any reason. He/she will give you the
information needed to get your problem handled correctly
and efficiently.
■ Have your Ascensia CONTOUR Blood Glucose Meter and
Ascensia MICROFILL Test Strips available when you phone. It
would also be helpful to have a bottle of Ascensia MICROFILL
Normal Control Solution nearby.
■ Fill out the following check list before calling!
Check List
1. The Meter serial number (found on the back of
the meter) is: _________________________
2. The date and time the problem occurred was:______________
3. I have read the user guide and followed the testing
steps:__________________________________________
4. I am using Control Solution and Test Strips that have not
expired or passed their open use life dates:____________
5. I do not need to replace the batteries:______________
6. Please include the Lot number and expiration date of the
Test Strips and Controls being used. For the Test Strips, this
information is printed on the carton as well as on the back of
each bottle. For the Controls, this information is printed on
the bottle. __________________________________________
37
Supplies
When calling or writing for supplies be sure to include the
number with the name of the replacement part or accessory item.
REPLACEMENT PARTS
Part Number*
40030030
99971529
50184257
3479
3420C
Item
3-volt Lithium Battery (DL or CR2032) — 2
(Available at most camera stores)
Ascensia™ CONTOUR ™ User Guide
Ascensia™ CONTOUR ™ Quick Reference Guide
Ascensia Data Cable
Ascensia™ WinGlucofacts® Diabetes Management
Software**
**Part numbers are subject to change without notice
**Cable included
You can obtain these parts in Canada from:
Bayer Inc.
Diagnostics Division
77 Belfield Road
Toronto, Ontario M9W 1G6
Replacement Products
Number
7081
7091
7100
7101
6540B
6546A
6550A
Product Name
Ascensia™ MICROFILL™ Test Strips (box of 50)
Ascensia™ MICROFILL™ Test Strips (box of 100)
Ascensia™ MICROFILL™ Normal Control Solution
Ascensia™ MICROFILL™ Low and High
Control Solutions
Ascensia™ MICROLET ® Adjustable Lancing Device
Ascensia™ MICROLET ® Lancets (box of 100)
Ascensia™ MICROLET ® Lancets (box of 200)
Accessory items may be obtained from Diabetes Care Centers,
retail drug stores or other home healthcare distributors.
38
Warranty
Manufacturer’s Warranty: Bayer Inc. Diagnostics Division
(“Bayer”) warrants to the original purchaser that this
instrument will be free from defects in materials and
workmanship for 5 years from the date of original purchase
(except as noted below). During the stated 5-year period,
Bayer shall, at no charge, replace a unit found to be
defective with an equivalent or current version of the
owner’s model.
Limitations of Warranty: This warranty is subject to the
following exceptions and limitations:
1. A 90-day warranty only will be extended for consumable
parts and/or accessories.
2. This warranty is limited to replacement due to defects in
parts or workmanship. Bayer shall not be required to
replace any units which malfunction or are damaged due
to abuse, accidents, alteration, misuse, neglect,
maintenance by other than Bayer, or failure to operate
the instrument in accordance with instructions. Further,
Bayer assumes no liability for malfunction or damage to
Bayer instruments caused by the use of reagents other
than reagents (i.e., Ascensia™ MICROFILL™ Test Strips)
manufactured or recommended by Bayer.
3. Bayer reserves the right to make changes in design of this
instrument without obligation to incorporate such
changes into previously manufactured instruments.
39
4. Bayer has no knowledge of the performance of the
Ascensia™ CONTOUR ™ Blood Glucose Meter when used
with any Test Strips other than Ascensia™ MICROFILL™ Test
Strips, and therefore makes no warranty of the
performance of the Ascensia™ CONTOUR ™ Meter when
used with any Test Strips other than Ascensia™
MICROFILL™ Test Strips or when the Ascensia™ MICROFILL™
Test Strip is altered or modified in any manner.
BAYER MAKES NO OTHER EXPRESS WARRANTY FOR THIS
PRODUCT. THE OPTION OF REPLACEMENT, DESCRIBED
ABOVE, IS BAYER’S ONLY OBLIGATION UNDER THIS
WARRANTY.
Limitations of Capability:
IN NO EVENT SHALL BAYER BE LIABLE FOR INDIRECT, SPECIAL
OR CONSEQUENTIAL DAMAGES, EVEN IF BAYER HAS BEEN
ADVISED OF THE POSSIBILITY OF SUCH DAMAGES.
For warranty service: Purchaser must contact the Bayer
Diabetes Helpline of Bayer Inc., by calling toll free
1-800-268-7200, for assistance and/or instructions for
obtaining service of this instrument.
40
Manufactured for:
Bayer HealthCare LLC
Mishawaka, IN 46544 USA
Distributed by:
Bayer Inc.
Diagnostics Division
Toronto, Ontario M9W 1G6
Bayer and Bayer Cross are registered trademarks of Bayer AG, used under license.
®
/ ™ trademarks of Bayer HealthCare LLC, used under license.
99971529
© 2003 Bayer HealthCare LLC
Made and Printed in U.S.A.
Rev. 6/03