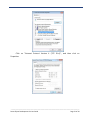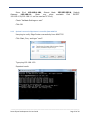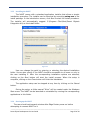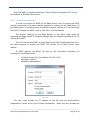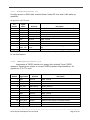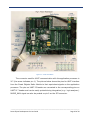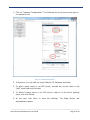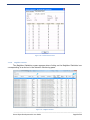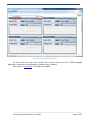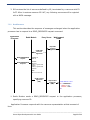
1
Smart Object Development Kit User Guide _____________________________________________________________________________________ Smart Object Development Kit User Guide Page 1 of 44 Table of Contents 1 2 Introduction .......................................................................................................................................... 5 1.1 Document Purpose ....................................................................................................................... 5 1.2 Audience ....................................................................................................................................... 5 1.3 Abbreviations and Acronyms ........................................................................................................ 5 Development Kit Overview ................................................................................................................... 6 2.1 About the Smart Object Development Kit .................................................................................... 6 2.2 Smart Object Platform Architecture ............................................................................................. 8 2.3 Summary of the Smart Object Development Kit Functional Features ....................................... 11 2.3.1 The Smart Object ................................................................................................................ 11 2.3.2 The Smart Object Endpoint ................................................................................................. 13 2.3.3 The Edge Router .................................................................................................................. 14 2.3.4 The Network and Application Monitoring Tool .................................................................. 15 2.4 3 Development Kit Contents .......................................................................................................... 15 Getting Started.................................................................................................................................... 16 3.1 Powering up the System Components ........................................................................................ 17 3.1.1 Powering up the Edge Router (refer to figure 3.3) ............................................................. 17 3.1.2 Powering up the Smart Objects (refer to figure 3.4) .......................................................... 18 3.1.3 Joining SO’s to the Edge Router .......................................................................................... 19 3.2 Accessing the NAMT ................................................................................................................... 19 3.2.1 Configuring the PC static IP address to be able to access the Edge Router ........................ 19 3.2.2 Optional: ensure the Edge Router is accessible from NAMT PC .......................................... 22 3.2.3 Installing the NAMT ............................................................................................................ 23 3.2.4 Starting up the NAMT ......................................................................................................... 23 3.2.4.1 4 Connecting to an Edge Router ........................................................................................ 24 Development Kit Components - Hardware ......................................................................................... 25 _____________________________________________________________________________________ Smart Object Development Kit User Guide Page 2 of 44 4.1.1 4.1.1.1 General product view...................................................................................................... 25 4.1.1.2 AC/DC Adapter ............................................................................................................... 27 4.1.1.3 Antenna ........................................................................................................................... 27 4.1.1.4 Mini-USB Power connection – J2 .................................................................................... 29 4.1.1.5 USB to UART programming connection – J5 ................................................................... 29 4.1.1.6 UART Application Connector – J17 ................................................................................. 29 4.1.1.7 SPI Application Connector – J13 ..................................................................................... 31 4.1.1.8 TWRPI Application Connector – J3, J6 ............................................................................ 31 4.1.1.9 Configuration Jumpers .................................................................................................... 32 4.1.1.10 JTAG Connector – J11.................................................................................................. 33 4.1.1.11 BDM Connector – J9.................................................................................................... 34 4.1.2 5 Smart Object Endpoint ........................................................................................................ 25 Edge Router Hardware Description .................................................................................... 34 4.1.2.1 General product view...................................................................................................... 34 4.1.2.2 Freescale TWR-P1025 Module ........................................................................................ 36 4.1.2.3 Freescale TWR-TWRPI-BD Carrier Module ..................................................................... 38 4.1.2.4 40-00055-01 TWRPI Adapter for SMO Radio .................................................................. 39 4.1.2.5 40-00043 SMO Radio Module ........................................................................................ 39 4.1.2.6 Antenna Specifications.................................................................................................... 41 4.1.2.7 Power Supply Specifications ........................................................................................... 42 Development Kit Components - Software .......................................................................................... 42 5.1.1 The Application Processor API ............................................................................................ 42 5.1.2 The Edge Router Software .................................................................................................. 44 5.1.2.1 COAP – HTTP Proxy & XML – EXI Translator ................................................................... 44 5.1.2.2 Web-based Administration /admin/ ............................................................................... 50 5.1.2.3 Ports & interfaces ........................................................................................................... 59 5.1.3 The NAMT ........................................................................................................................... 59 5.1.3.1 Connecting to an Edge Router ........................................................................................ 59 5.1.3.2 Creating a new connection ............................................................................................. 60 5.1.3.3 Connecting to the Edge Router ....................................................................................... 60 5.1.3.4 The main application window .......................................................................... 63 _____________________________________________________________________________________ Smart Object Development Kit User Guide Page 3 of 44 6 7 8 5.1.3.5 Settings............................................................................................................................ 63 5.1.3.6 The Network Monitoring module ................................................................................... 64 5.1.3.7 Device properties ............................................................................................................ 67 5.1.3.8 Neighbor Statistics .......................................................................................................... 68 5.1.3.9 Network settings ............................................................................................................. 69 5.1.3.10 Firmware Update ........................................................................................................ 70 5.1.3.11 The Development Kit module ..................................................................................... 71 Upgrading the Development Kit ......................................................................................................... 78 6.1 Upgrading the SO stack firmware using serial line ..................................................................... 78 6.2 Upgrading the SO stack firmware OTA using NAMT ................................................................... 81 6.3 Upgrading the Edge Router software ......................................................................................... 81 Use Cases ............................................................................................................................................ 81 7.1 Evaluating the on-board application COAP mapped parameters ............................................... 81 7.2 Application Processor Mapped COAP parameters ..................................................................... 83 7.2.1 Resource Discovery ............................................................................................................. 84 7.2.2 Read Resource..................................................................................................................... 85 Troubleshooting .................................................................................................................................. 86 Appendix A: List of Standards Supported in the Smart Object Platform .................................................... 88 Appendix B: FCC Related Statements ......................................................................................................... 89 Appendix C: Industry Canada Related Statements ..................................................................................... 90 Appendix D: European (ETSI) Related Statements..................................................................................... 91 _____________________________________________________________________________________ Smart Object Development Kit User Guide Page 4 of 44 1 Introduction 1.1 Document Purpose This user guide describes the content and use of the Smart Object development kit, including hardware and software installation, configuration and use of the Network and Application Monitoring Tool. 1.2 Audience This document is intended for the users of the Smart Object Integration Kit. 1.3 Abbreviations and Acronyms EDGE ROUTER The Edge Router of the Kit will be comprised of the Freescale designed and built P1025 Tower Board, the Tower Elevator boards, the “Tower TWRPI Carrier Module” w/ “Tower Plugin Module” w/ “Smart Object” attached. NETWORK AND APPLICATION MONITORING TOOL Windows based monitoring and management tool supplied by Nivis that will to allow the end user to evaluate the performance of the Smart Object network. P1025 TOWER BOARD Freescale designed and built Tower Board based on the P1025 processor. POWER PACK Nivis designed board that will supply either DC or battery power to the “Tower Plug-in Module” and the Nivis “Smart Object” radio module. SMART OBJECT Nivis built, manufactured, and sold Kinetis + Navajo Radio Module. SMART OBJECT API DOCUMENTATION Document supplied by Nivis that specifies the API through which an application processor can communicate with the Smart Object in order to send and receive application and network related status data. SMART OBJECT DEVELOPMENT KIT Consist of 1 “Edge Router” and 2 battery powered and 2 line powered“Smart Object End Node”. The “Network and Application Monitoring Tool” will be a Windows based application supplied on a USB stick. Also included in the Kit will be the “Quick Start Guide”, “User Guide”, “Smart Object API Documentation”, “Smart Object Datasheet” SMART OBJECT END NODE Combination of the “Smart Object” radio module, plus the “Tower Plug-in Module”, plus the “Power Pack”. The end node can either be line powered by DC input or battery powered by 2 AA batteries. TOWER ELEVATOR BOARD _____________________________________________________________________________________ Smart Object Development Kit User Guide Page 5 of 44 Standard TWR-ELEV Tower Board that uses a PCI hardware connector to form the buss between Tower Boards. TOWER PLUG-IN MODULE Nivis designed Carrier board for the Nivis “Smart Object” radio module with a TWRPI Connector on the bottom. TOWER TWRPI CARRIER MODULE Freescale designed and built Tower Board with 3 TWRPI connectors on it. This board will be used to attach the Tower Plug-in Module with attached Nivis Smart Object radio module to the Tower Board set that makes up the Edge Router of the Kit. 2 Development Kit Overview 2.1 About the Smart Object Development Kit The Smart Object Development Kit (SODK) is a user friendly and versatile development kit that serves two purposes: 1. The main purpose of the kit is to allow interested parties to swiftly integrate Nivis’ second generation wireless Smart Object technology into their products. The Smart Object platform is running on a Freescale based state-of-the-art subGigahertz hardware platform. The user can access the Smart Object stack over an UART or SPI serial communication port, allowing the user to connect an application processor to the stack modem. With minimal firmware development effort and following a simple API the user can swiftly build a wireless product that is an integral part of the Internet of Things. 2. The secondary purpose of the SODK is to allow users to evaluate the performance of: The Freescale based Smart Object hardware platform Nivis’ second generation wireless Smart Object wireless networking platform The Nivis Smart Object platform is a wireless communication platform based on IEEE and IETF standards for low power, short-range, resource constrained wireless devices. It enables building wireless Smart Objects through which the Internet is extended to small, embedded objects that monitor and control various parameters in our surroundings. _____________________________________________________________________________________ Smart Object Development Kit User Guide Page 6 of 44 The Nivis Smart Object platform was architected on a set of design goals. These design goals and their associated market benefits are captured in the table below. Design Goal High scalability Market Benefits Support for 500 smart objects per Edge Router minimizes cost of supporting infrastructure and allow for wide geographic coverage. Standards based platform An entirely standards based solution ensures cross-vendor interoperability and hence offers consumer advantages achieved by encouraging competition in the market. It also encourages the establishment of an ecosystem of interoperable Smart Object while ensuring the transparency of the solution. And last but not least, standards compliance facilitates regulatory compliance. Reliable delivery of data The Nivis Smart Object platform targets communications over shortrange wireless links in which reliable delivery of data is paramount. Data transmission reliability is ensured through various mechanisms such as: Path diversity (mesh) achieved through compliance to the IETF ROLL defined RPL routing protocol Time division multiplexed bandwidth allocation Frequency diversity (hopping) ARQ (automatic repeat request) Hop-to-hop acknowledged delivery End-to-end acknowledged delivery Smart Objects incorporate IP connectivity to the Smart Object ensures that he device is an integral 6loWPAN/IPv6 connectivity part of the Internet through IP addressability and connectivity. It also allows end users to leverage IPv6 network management and diagnostic tools. The 6loWPAN header compression scheme allows for transmission of shorter packets which in turn maximizes the wireless bandwidth _____________________________________________________________________________________ Smart Object Development Kit User Guide Page 7 of 44 available and increases the battery life of battery operated Smart Objects. Smart Objects incorporate Extending support for web services to the Smart Object allows the COAP/REST based web device to directly participate in the World Wide Web. services Application agnostic Offering an application agnostic communication platform ensures that the final solution is similar in charter to the Internet and the Internet of Thing. A common infrastructure supports a wide variety of applications since the communication platform is tunable to optimized application requirements. Class leading security Ensures authenticity, confidentiality and integrity of the data delivered through link-layer security mechanisms Power diverse solution Support for both line powered and battery operated devices. 2.2 Smart Object Platform Architecture The Nivis Smart Object platform is an application agnostic wireless monitoring and control platform. The entire communication stack construct is standards based. An entirely standards based solution ensures: Cross-Vendor Interoperability o Meets end-user requirements o Encourages competition in the market o Offers consumer cost advantages Establishes an ecosystem Ensures transparency of the solution Facilitates regulatory compliance The Standards Based SO platform, side-by-side with the OSI Reference Platform: _____________________________________________________________________________________ Smart Object Development Kit User Guide Page 8 of 44 Figure 2.1 Lists of the standards implemented into the Smart Object platform: Standardization Body IEEE Standard Designator P802.15.4g D7 Low-Rate Wireless Personal Area Networks (WPANs) Amendment 4: Physical Layer Specifications for Low Data Rate Wireless Smart Metering Utility Networks IEEE P802.15.4e D8 Wireless Medium Access Control (MAC) and Physical Layer (PHY) Specifications for Low-Rate Wireless Personal Area Networks (WPANs) IETF RFC 6282 Final Compression Format for IPv6 Datagrams over IEEE 802.15.4Based Networks IETF RFC 2460 Final Internet Protocol, Version 6 (IPv6) Specification IETF RFC4443 Final Internet Control Message Protocol for the IPv6 Specification IETF ID. draft-ietf-roll-rpl Rev 19 RPL: IPv6 Routing Protocol for Low power and Lossy Networks IETF RFC6202 IETF I.D. draft-ietf-roll-of0 IETF I.D. draft-ietf-roll-routingmetrics Revision Final Title The Trickle Algorithm Rev 19 RPL Objective Function 0 Rev 19 Routing Metrics used for Path Calculation in Low Power and Lossy Networks _____________________________________________________________________________________ Smart Object Development Kit User Guide Page 9 of 44 Standardization Body IETF Standard Designator IETF Revision Title Rev 2 Definition of Managed Objects for the IPv6 Routing Protocol for Low power and Lossy Networks RFC768 Final User Datagram Protocol (UDP) IETF ID.draft-ietf-core-coap Rev 8 Constrained (CoAP) IETF ID.draft-ietf-core-link-format09 Rev 9 CoRE Link Format Rev 3 Observing Resources in CoAP 1.0 Efficient XML Interchange (EXI) IETF W3C I.D. draft-sehgal-roll-rpl-mib ID.draft-ietf-core-observe-03 W3C Recommendation 10 March 2011 Application Protocol The platform topology is described in the image below: Figure 2.2 _____________________________________________________________________________________ Smart Object Development Kit User Guide Page 10 of 44 2.3 Summary of the Smart Object Development Kit Functional Features 2.3.1 The Smart Object The list below presents the main features and mechanisms present in the wireless Smart Object modem. Note: For a more detailed description of the Smart Object hardware platform please consult section 4 of this document. Note 2: For detailed hardware specifications and parameters please consult the VN400 – Smart Object datasheet provided with the kit. Layer Functional Feature Notes PHY Wireless communication is IEEE 802.15.4g compliant US and Canada: 902 – 928 MHz and utilizes the sub-Gigahertz frequency spectrum as Japan: 922.3 – 928.1 MHz mandated by the standard. It utilizes the MR-FSK Europe: 863 – 870 MHz physical layer. PHY Wireless communication is compliant to the header structures, timings and PIBs present in the IEEE 802.15.4g standard. The Smart Object supports both the Common Signaling Mode (CSM) and mandatory higher bitrates as defined in the IEEE 802.15.4g standard. It also supports dynamically switching between CSM and the higher bitrate. The Smart Object is compliant to applicable regulatory requirements in the United States, Canada, Europe and Japan. PHY PHY PHY MAC MAC MAC US and Canada: CSM and 200 kbps Japan: CSM and 100 kbps Europe: CSM and 100 kbps US: FCC (Title 47, part 15) Canada: IC RSS-210 Japan: ARIB T108 Europe: ERC 70-03/ETSI EN300220 Support payload as large as 2048 bytes. The MAC layer is IEEE 802.15.4e – TSCH compliant. It utilizes the MIBs, Information elements and headers structures present in the IEEE 802.15.4e amendment. The Smart Object support frequency diversity through US and Canada: 64 channels channel hopping in order to: Japan: 28 channels 1. Minimize susceptibility to interference from other Europe: 64 channels devices that operate in the same frequency spectrum 2. Maximize the number of coexisting Smart Object networks that operate in the same vicinity The Smart Object utilizes TDMA in order to most _____________________________________________________________________________________ Smart Object Development Kit User Guide Page 11 of 44 efficiently utilize the frequency spectrum and maximize the aggregate bandwidth of the WLAN composed of Smart Objects. NWK It utilizes IPv6 packets and addressability and the IETF defined 6loWPAN compression for constrained wireless Smart Objects. NWK Support IPv6 address auto-configuration. NWK Supports the widely used ping utility. NWK Support path diversity by implementing the RPL The WLAN formed of Smart protocol resulting in maximized reliability of data Objects is a multi-hop network transmissions. that can be as deep as 25 hops. NWK Inbound routing is based on RPL defined graphs (DODAG) that are formed utilizing ICMPv6 based discovery. Support ROLL defined Objective Function 0. Also supports concurrent operation in multiple DODAGs. NWK Outbound routing is based on both RPL defined storing (ensuring outbound path redundancy) mode as well as source routing. TL Communication at the transport layer utilizes widely utilized UDP datagrams. AL Supports COAP/HTTP based web services including the COAP defined observable mechanism that allows constrained wireless Smart Object to periodically publish parameters of interest without incurring the penalties associated with the HTTP based request/response data model. AL All application layer parameters are modeled as COAP web resources and are directly addressable from any browser. AL Communicates with an external application processor based on a simple API over UART or SPI. AL Allows and external application processor to map up to four parameters into COAP modeled web resources that can be monitored via the NAMT. AL Monitors and periodically publishes the following application layer COAP modeled resources: 1. Digital status of a button 2. Analog status of a potentiometer 3. Power status a. Line powered _____________________________________________________________________________________ Smart Object Development Kit User Guide Page 12 of 44 AL MGMT MGMT MGMT SEC b. Battery powered – battery level and critical alert Application layer payloads are encoded utilizing EXI which is a compressed form of XML. Management structures are modeled as COAP resources being accessible from any web browser. The Smart Object periodically published the following statistics (all modeled as COAP web resources): 1. Channel statistics – PER which is indicative of the quality of communication on each channel 2. Neighbor statistics – PER which is indicative of the quality of the communication link with individual neighbors The Smart Object communication stack is remotely upgradeable over-the-air. Utilizes link layer hop-by-hop IEEE 802.15.4 defined security, including authentication and AES-128 encryption. 2.3.2 The Smart Object Endpoint The Smart Object endpoint consists of the Smart Object modem that is hosted by a Power Pack board. The functional features of the Power Pack board are captured in the table below. Note: For a more detailed description of the Power Pack board hardware please consult section 4 of this document. Functional Feature Notes Can be line powered using a mini-USB power supply (provided with the kit) or battery powered. Battery operated Smart Object endpoints allow for increased mobility which is useful when evaluating the RF behavior of the Smart Object. Battery power is continuously monitored and reported. It can be visualized in the NAMT. Power status is signaled through an LED. On-board toggle switch allows user to select between UART or SPI based communication with an external application processor. On-board status button and LED indicates the network status of the Smart Object (in discovery, joined etc). On-board potentiometer allows user to showcase changes of an analog parameter. The Smart Object automatically dynamically detects at start-up the power mode. Also includes a battery low alert. _____________________________________________________________________________________ Smart Object Development Kit User Guide Page 13 of 44 Hosts a push-button that allows the end user to reset the Smart Object modem. On-board TWRPI expansion board allows connecting various TWRPI modules designed and marketed by Freescale. 2.3.3 The Edge Router The Edge Router is the network entity responsible for arbitrating and managing the WLAN formed of Smart Objects. It also acts as mitigates between the WLAN formed of Smart Objects and entities present on the backbone infrastructure (such as the NAMT). Note: For a more detailed description of the Edge Router hardware platform please consult section 4 of this document. Functional Feature Notes Supports connectivity between the Smart Object WLAN and entities A good example is the PC residing on the Internet. that hosts the Network and Application Monitoring Tool. Provides central arbitration for the WLAN formed of Smart Objects by This is accomplished through acting as a MAC WLAN coordinator. the distribution of a 802.15.4e compliant network maintenance slotframe. It collects network and communication diagnostics sent by the Smart Network and communication related statistics and Objects such as: parameters are displayed in the 1. Channel statistics NAMT. 2. Neighbor related statistics 3. Routing (RPL) related information such as the topology of the network It acts as the link layer security manager and the termination of hopto-hop security. Acts as an extraction point for application related as well as management parameters. Parameters are extracted utilizing HTTP requests and methods via a COAP/HTTP proxy. Hosts an EXI/XML translator, allowing external entities to extract XML encoded application and management payloads. _____________________________________________________________________________________ Smart Object Development Kit User Guide Page 14 of 44 2.3.4 The Network and Application Monitoring Tool The NAMT (Network and Application Monitoring Tool) is a stand-alone Windows based application that ship with each development kit. The NAMT is the configuration, visualization and diagnostic tool for the kit. Functional Feature Notes Visualization of the mechanisms associated with Time-synchronized Channel Hopping operation Time slotted (TDMA) communication schedule of the Smart Objects Channel quality map that shows packet success rates per channel Visualization of the remaining battery life of the Smart Objects Visualize the topology of the WLAN composed of Smart Objects (RPL tree structure) Visualize various management parameters of the Smart Objects IPv6 address, EUI-64 address, Join status Visualize various communication diagnostics of the Smart Objects Packet success rate per channel; Packet success rates associated with communication with particular neighbors Send on-demand data read commands 2.4 Development Kit Contents The Smart Object Development Kit includes the components and associated quantities listed below. Component Smart Objects Radio Module Edge Router Cables (USB) Power Adapter Quantity Picture (several pictures are included later in this document) (several pictures are included later in this document) Separate pictures are not needed. The connected cable is instead shown with the Freescale tower setup A separate picture is shown. Also, the power adapter is shown with the Freescale tower setup _____________________________________________________________________________________ Smart Object Development Kit User Guide Page 15 of 44 3 Getting Started The Edge router and the NAMT PC can connect either direct trough a cross-over cable (not recommended, will generate drawbacks: most notably slow boot up and incorrect data timestamp), or using an Ethernet switch (recommended). Recommended setup use a switch, which also connect the kit to the Internet: Figure 3.1 See the Quick Start Guide for the default Edge Router IPv4 and other network configurations necessary. Alternate setup does not need a switch. This setup is possible but not recommended, as in this setup the time cannot be synchronized with Internet time servers therefore the communication timestamps will be incorrect. Figure 3.2 Steps to a functional kit: _____________________________________________________________________________________ Smart Object Development Kit User Guide Page 16 of 44 - Connect the kit components Power up the kit components Configure the kit Install the NAMT Connect the NAMT with the Edge Router (default IP: 192.168.1.50) Step-by-step description of how to connect the components listed below. 3.1 Powering up the System Components 3.1.1 Powering up the Edge Router (refer to figure 3.3) Figure 3.3 _____________________________________________________________________________________ Smart Object Development Kit User Guide Page 17 of 44 - - - - 3.1.2 Care should be taken to ensure that communication with the Edge Router or NAMT does not attempt to use the wireless adaptor. Suggest disabling the wireless adaptor if present. Attach one end of an Ethernet Cable (10) to the Ethernet port located on the top. Insert the other end of an Ethernet cable to network equipment (Ethernet switch or hub). OPTIONAL: an external Ethernet router is not absolutely necessary; instead of hooking onto the external router, the Ethernet cable (cross-over) can be connected directly to the PC; the drawback is that the in this case the Edge Router and SO time will be incorrect; the COAP resources will time stamped incorrectly as well and the Edge Router boot time will increase. Attach the AC-DC Power Adapter (9) barrel to the power connector of the Edge Router. This is located on the left side. Connect the Power Adapter to the AC socket or cord and confirm that the LED on P1025 lights up. After few seconds, observe the LEDs installed on the Ethernet port. One LED will be in a solid ON state which indicates a “Link” to the Ethernet network. The second LED will blink indicating network “Activity”. Powering up the Smart Objects (refer to figure 3.4) Figure 3.4 - For all Battery Operated Smart Objects devices, insert the AA batteries into battery holder BH1 located on the bottom side of the Power Pack. Install batteries with respect to the polarity marked inside the holder. _____________________________________________________________________________________ Smart Object Development Kit User Guide Page 18 of 44 - - - - For all Line Powered Smart Objects devices, attach the AC/DC Power Supply’s mini-USB connector to the mating mini-USB socket located on the power pack (3). Connect the AC/DC Power Supply to the AC power line. NOTE – Do NOT install batteries on Line Powered Smart Objects. Install power-on jumper (14) (J18 installed, is ON). Observe the green-colored “JOIN STATUS LED” (6); it should start blinking. This LED will blink for approximately ten seconds then turn off to conserve power. In order to check the status, the operator needs to push the momentary STATUS button (5); the LED will light up to indicate the JOIN STATUS of the Smart Object. A blinking LED indicates a “Not Joined” status. Re-check the JOIN STATUS by pressing the STATUS button (5) and observing the LED behavior until the Green LED remains in a Solid “ON” state. This indicates a “Joined” status of the Smart Object. At this point the Smart Object is Joined and sensors can be exercised at will while observing the response of sensor actions in the NAMT (after connecting the NAMT to the Edge Router, see section “Accessing the NAMT”). 3.1.3 Joining SO’s to the Edge Router For SO’s to join an Edge Router the Vendor ID on the Edge Router must match the Net ID in the SO’s. By using the defaults, the SO’s and the Edge Router settings are matched. However, in case of two networks coexisting in the same area, the user must change both settings on at least one of the networks. To change the VendorID, login to the Edge Router and edit the file /jffs/nivis/far/activity_files/far_comm_profile.txt In section [Network] change the value of variable VendorNetworkID, save and power cycle the Edge Router. See SMO_Kit_Configuration.docx on instructions how to change the Net ID on the SO’s. 3.2 Accessing the NAMT 3.2.1 Configuring the PC static IP address to be able to access the Edge Router Step-by-step instructions for Windows 7: Open “Control Panel” -> “Network and Sharing Center“ _____________________________________________________________________________________ Smart Object Development Kit User Guide Page 19 of 44 Click on “Local Area Connection” Click on Properties _____________________________________________________________________________________ Smart Object Development Kit User Guide Page 20 of 44 Click on “Internet Protocol Version 4 (TCP IPv4)”, and then click on Properties _____________________________________________________________________________________ Smart Object Development Kit User Guide Page 21 of 44 Enter IPv4: 192.168.1.101, Subnet Mask: 255.255.255.0, Default Gateway 192.168.1.1. (Note: any other available IPv4 EXCEPT 192.168.1.50/192.168.1.1 can be used as PC IPv4). Check “Validate Settings on exit” Click OK. 3.2.2 Optional: ensure the Edge Router is accessible from NAMT PC Use ping to verify Edge Router connectivity from NAMT PC: Click Start, Run, and type “cmd”: Type ping 192.168.1.50 Expected result: _____________________________________________________________________________________ Smart Object Development Kit User Guide Page 22 of 44 3.2.3 Installing the NAMT The NAMT comes with a standard application installer that allows a simple installation procedure. The installer can be launched by executing setup.exe in the install package. In the introduction screen, click Next to start the install procedure. The installer will automatically suggest C:\Program Files\Nivis\Smart Objects Integration Kit\ as the install folder: Figure 3.5 User can change the path by entering or selecting the desired installation folder. He can also specify if the NAMT should be accessible to all users or only to the user installing it. After the corresponding installation options are selected, clicking on the Next button will start the install process. When the setup is complete, clicking on the Close button will finish the installation. The application setup can be stopped at any time by clicking on the Cancel button. During the setup, a folder named “Nivis” will be created under the Windows Start menu. The NAMT can be launched or uninstalled by running the corresponding applications in this folder. 3.2.4 Starting up the NAMT The user should wait several minutes after Edge Router power on before attempting to connect NAMT to it. _____________________________________________________________________________________ Smart Object Development Kit User Guide Page 23 of 44 Start the NAMT by double-clicking the “Smart Objects Integration Kit” icon on the desktop or Windows Start menu. 3.2.4.1 Connecting to an Edge Router In order to connect the NAMT to the Edge Router, the PC hosting the NAMT must be connected in the same network segment (or subnet) as the Edge Router. If the Edge Router is operating using the default network settings it is recommended that the PC hosting the NAMT use the 192.168.1.50 IPv4 address. See section “Setting Up the Edge Router” in the Quick start guide for matching the Edge Router IP network settings with the network settings of the PC hosting the NAMT. If the PC hosting the NAMT and the Edge Router has IP addressed that are in the same network or subnet, the NAMT will connect to the Edge Router when started. At NAMT startup, the NAMT will ask for the information necessary for connecting to the Edge Router: the Edge Router IPv4 (by default 192.168.1.50) username (admin) password (adminadmin) Figure 3.6 The user must provide the IP address of the ER and the authentication credentials or select from a list of saved connections. When the user presses the _____________________________________________________________________________________ Smart Object Development Kit User Guide Page 24 of 44 Ok button, the NAMT will attempt to connect to the target ER. If the connection succeeds, the Network Monitoring module of the application will be started. If the user presses the Cancel button, the connection window will be closed and the main NAMT window will be displayed. The user will be able to connect to an ER, to manage the application settings or to close the application. 4 Development Kit Components - Hardware 4.1.1 Smart Object Endpoint 4.1.1.1 General product view The Smart Objects Endpoint consists of a Power Pack unit (1) that has an SMO Radio module (2) installed. The Smart Objects Endpoint was designed to allow functionality as a Line Powered Endpoint or Battery Powered Endpoint. The Smart Objects Endpoint can be powered by attaching either 3 x AA batteries or a 5V DC mini-USB AC/DC adapter. Figure 4.1 The following elements are included on the Smart Object Endpoint: _____________________________________________________________________________________ Smart Object Development Kit User Guide Page 25 of 44 Nr. Designator Description 1 Power Pack Power Pack board including all other elements for a Smart Object Endpoint 2 SMO Module The SMO Radio Module used for connecting to a wireless network 3 J2 Mini-USB connector for power input when 5V DC is used 4 ANT Antenna and antenna cable that is attached to the SMO radio module 5 SW1 STATUS, Momentary push button for enabling the LED status display. The LED will display the unit registration status for only a limited period of time (~10 seconds) after the STATUS button is pressed. This is done to conserve power. 6 D3, D2 Two onboard LED’s used as: - Green LED, D3, display network registration STATUS of the unit Red LED, D2, used by the application 7 SW2 Slide switch used as a Digital Input sensor for demonstrations 8 R21 Potentiometer used as an Analog Input sensor for demonstrations 9 SW3 RESET Button, Momentary push button for hardware reset 10 SW4 Toggle switch selects between UART/SPI application interface used by API 11 J5 USB programming cable, header provides UART access to SMO Radio module 12 J17 UART Application connector, connects user application system via a serial port 13 J13 SPI Application connector, connects user application system via an SPI port 14 J18 Power jumper for SMO Radio module, used to access measurements on power consumption. Remove the jumper to conserve battery when system not used 15 J11 JTAG Connector used for K60 firmware updates 16 J9 BDM Connector used for MC13211 firmware updates 17 J3, J6 TWRPI connectors for attaching a Tower TWRPI Carrier Module 18 J8, J14, J15, J16, J17, J21 Configuration Jumpers allow connection/disconnection of various subsystems to the SMO Radio module pins. 19 J19, J20 LEDs connect/disconnect jumpers allow separation of LEDs from SMO Radio module pins _____________________________________________________________________________________ Smart Object Development Kit User Guide Page 26 of 44 20 BT1 Battery Holder installed on the bottom of the board (not shown in picture) For full electrical specifications please refer to Power Pack and SMO Radio Module datasheet. 4.1.1.2 AC/DC Adapter The Smart Object Endpoint can be powered by 5V DC via the mini-USB J2 connector (3). The connector provides power only and cannot act as a USB data connection. Alternately, the power can be provided by any computer or device that has a USB host port. The equipment used to power should be able to provide a minimum of 3 Watts. Manufacturer: Emerson Network Power Manufacturer P/N: DCH3-050US-0001 Description: PLUG WLMNT 5V 3W US 2 MINI USB Datasheet Link: https://www.powerconversion.com/assets/dch3_ds_us_1300949281.pdf 4.1.1.3 Antenna Antenna selected conforms to characteristics of SMO Radio module certifications and approvals. Smart Objects Endpoint uses a quarter wavelength antenna with +0 dBi gain. Full antenna characteristics are presented in the manufacturer’s datasheet. _____________________________________________________________________________________ Smart Object Development Kit User Guide Page 27 of 44 4.1.1.3.1 902 – 928 MHz Antenna Specifications Manufacturer: Antenna Factor (Linx Technologies) Manufacturer P/N: ANT-916-CW-RH-SMA Description: ANT 916 MHz, ¼ WAVE WHIP, RP-SMA (MALE) Datasheet Link: http://www.linxtechnologies.com/resources/data-guides/ant-916-cw-rh.pdf 4.1.1.3.2 863 - 870 MHz Antenna Specifications Manufacturer: Antenna Factor (Linx Technologies) Manufacturer P/N: ANT-868-CW-QW Description: ANT 868 MHz, ¼ WAVE WHIP, RP-SMA (MALE) Datasheet Link: https://www.linxtechnologies.com/resources/data-guides/ant-868-cw-qw.pdf _____________________________________________________________________________________ Smart Object Development Kit User Guide Page 28 of 44 4.1.1.4 Mini-USB Power connection – J2 The mini-USB provides input connections for 5V as per USB standard. USB Data connection is NOT available in this connector. Pin 1 is located on the left side of the connector. Pin Number 1 2 3 4 5 4.1.1.5 Signal Name 5V VCC NC NC NC GND Direction Power In Ground Description 5V, 500mA power input (AC/DC adapter or computer USB port) Not Used Not Used Not Used GND - Ground USB to UART programming connection – J5 The connection is intended for use with FTDI cable model TTL-232R-3V3; all signals are 3.3V TTL level. (http://www.ftdichip.com/Support/Documents/DataSheets/Cables/DS_TTL232R_CABLES.pdf) Pin Number Signal Name 1 GND 2 USB_CTS 3 USB-VCC USB_TXD_OU 4 T 5 USB_RXD_IN 6 USB_RTS 4.1.1.6 Direction Ground Output Power Input Description GND - Ground CTS Signal of FTDI USB-UART cable 5V provided by FTDI USB-UART cable (not used) Input Output Input TXD Signal of FTDI USB-UART cable RXD Signla of FTDI USB-UART cable RTS Signal of USB-UART cable UART Application Connector – J17 Provides access to the SMO radio module UART lines including flow control and LLWU wake-up capability. All signals are at a 3.3V TTL level. Pin Number Signal Name 1 K11_RXD_IN 2 3V3 K11_TXD_OU 3 T 4 3V3 Direction Input Power Output Description K11 UART, RX Data Line Low Current 3V3 Output (used for level shifters) Output Power Output K11 UART, TX Data Line Low Current 3V3 Output (used for level shifters, same _____________________________________________________________________________________ Smart Object Development Kit User Guide Page 29 of 44 5 nUART1_CTS Input 6 GND Ground 7 nUART1_RTS Output 8 GND Ground 9 LLWU_P13 Input 10 GND Ground NOTE: Select UART position for as pin 2) K11 UART, CTS Flow Control Line GND - Ground K11 UART, RTS Flow Control Line GND - Ground K11 LLWU_P13 Wake-up line (internal pull-up) GND - Ground SW4 in order to use this connection. _____________________________________________________________________________________ Smart Object Development Kit User Guide Page 30 of 44 4.1.1.7 SPI Application Connector – J13 Provides access to SMO radio module Master Mode SPI lines and LLWU wake-up capability. All signals are 3.3V TTL level. Pin Number 1 2 3 4 5 6 7 8 Signal Name SPI1_PCS0 3V3 SPI1_SIN 3V3 SPI1_SOUT GND SPI1_SCK GND Description Chip Select Line (Master Mode= Output) Low Current 3V3 Ouput (use for level shifters) MISO SPI Data Input Line (Master Mode) Low Current 3V3 Ouput (use for level shifters) MOSI SPI Data Output Line (Master Mode) GND - Ground SPI Clock Line Output (Master Mode) GND - Ground K11 LLWU_P13 Wake-up line (toggle to Low for wake9 LLWU_P13 Input up) 10 GND Ground GND - Ground NOTE: SPI Feature to be supported on future firmware, select SPI on SW4 in order to use this feature 4.1.1.8 Direction Output Power Output Input Power Output Output Ground Output Ground TWRPI Application Connector – J3, J6 Implements a TWRPI interface for usage with selected Tower TWRPI adapters. Signals are a subset of current TWRPI standard implementation. All signals are 3.3V TTL level. J3 Pin Number 1 2 3 4 5 6 7 8 9 10 11 12 Signal Name GND GND I2C_SCL I2C_SDA GND GND GND GND SPI1_SIN SPI1_SOUT SPI1_PCS0 SPI1_SCK Direction Ground Ground Output Bidirectional Ground Ground Ground Ground Input Output Output Output Description GND - Ground GND - Ground I2C Bus Clock Pin I2C Bus Data Pin GND - Ground GND - Ground GND - Ground GND - Ground MISO SPI Data Input Line (Master Mode) MOSI SPI Data Output Line (Master Mode) Chip Select Line (Master Mode= Output) SPI Clock Line Output (Master Mode) _____________________________________________________________________________________ Smart Object Development Kit User Guide Page 31 of 44 13 14 15 16 17 18 GND GND LLWU_P13 BOOT_SW UART1_TXD UART1_RXD nUART1_RT 19 S nUART1_CT 20 S J6 Pin Number 1 2 3 4 5 6 7 8 9 10 11 12 13 14 15 16 17 18 19 20 4.1.1.9 Ground Ground Input/Output Input/Output Output Input GND - Ground GND - Ground General Use as Digital I/O General Use as Digital I/O K11 UART1, TX Data Line K11 UART1, RX Data Line Output K11 UART1, RTS Flow Control Line Input K11 UART1, CTS Flow Control Line Signal Name Direction NC 3V3 GND NC GND GND GND ADC_SE12 SPI1_SIN SPI1_SOUT SPI1_PCS0 NC GND GND GND GND NC NC GND PTA5 Power Output Ground Ground Ground Ground Analog Input Input Output Output Ground Ground Ground Ground Ground Input/Output Description NOT USED Low Current 3V3 Output GND - Ground NOT USED GND - Ground GND - Ground GND - Ground Analog Input Single-Ended to K60 MISO SPI Data Input Line (Master Mode) MOSI SPI Data Output Line (Master Mode) Chip Select Line (Master Mode= Output) NOT USED GND - Ground GND - Ground GND - Ground GND - Ground NOT USED NOT USED GND - Ground General Use as Digital I/O Configuration Jumpers Configuration jumpers allow disconnection of various board subsystems from the SMO Radio Module pins. They are intended for separation for consumption measurement purposes or to allow alternate usage of the pins when TWRPI connection is used. Jumper Usage Description _____________________________________________________________________________________ Smart Object Development Kit User Guide Page 32 of 44 J14 J15 Analog Disconnect USB_CTS Disconnect J8 J16 J21 USB_TXD_OUT Disconnect USB_RTS Disconnect SW2 Disconnect J7 USB_RXD_IN Disconnect Battery Measurement Disconnect LED D2 Disconnect LED D3 Disconnect J10 J19 J20 Connects/Disconnects R21 analog voltage from the SMO Radio Connects/Disconnects USB_CTS signal from the SMO Radio Connects/Disconnects USB_TXD_OUT signal from the SMO Radio Connects/Disconnects USB_RTS signal from the SMO Radio Connects/Disconnects SW2 signal from the SMO Radio Connects/Disconnects USB_RXD_IN signal from the SMO Radio Connects/Disconnects battery measurement from SMO Radio Connects/Disconnects LED D2 (RED) from the SMO Radio Connects/Disconnects LED D3 (GREEN) from the SMO Radio 4.1.1.10 JTAG Connector – J11 Connector implements standard ARM JTAG 20 pin connection for K60 processor use. Pin Number 1 2 3 4 5 6 7 8 9 10 11 12 13 14 15 16 17 18 19 20 Signal Name 3V3 NC NC GND JTAG_TDI GND JTAG_TMS GND JTAG_TCLK GND NC GND JTAG_TDO GND nRESET_K11 GND NC GND NC GND Direction Power Output Ground Input Ground Input Ground Input Ground Ground Output Ground Input Ground Ground Ground Description Low Current 3V3 Output (for level shifters) NOT USED NOT USED GND - Ground JTAG Signal TDI Data Input GND - Ground JTAG Signal TMS Mode Select GND - Ground JTAG Signal TCLK Clock Input GND - Ground NOT USED GND - Ground JTAG Signal TDO Data Output GND - Ground JTAG Signal RESET processor reset GND - Ground NOT USED GND - Ground NOT USED GND - Ground _____________________________________________________________________________________ Smart Object Development Kit User Guide Page 33 of 44 4.1.1.11 BDM Connector – J9 Implements Freescale BDM connection for programming MC12311 Pin Number 1 2 3 4 5 6 4.1.2 4.1.2.1 Signal Name BKGD GND NC nRESET_MC NC 3V3 Direction Bidirectional Ground Input Power Output Description BDM Signal BKGD background mode GND - Ground NOT USED BDM Signal RESET processor reset NOT USED Low Current 3V3 Ouput (for level shifters) Edge Router Hardware Description General product view The Edge Router is a Freescale Tower System built around the TWR-P1025 module with the functionality of a network router. It requires only an Ethernet connection (10) and a 5V DC power (9) in order to run the hardware. The power is provided via an AC-DC adapter. The Smart Objects wireless connection is established via the antenna (8). _____________________________________________________________________________________ Smart Object Development Kit User Guide Page 34 of 44 Figure 4.2 _____________________________________________________________________________________ Smart Object Development Kit User Guide Page 35 of 44 11 10 12 Figure 4.3 The Edge Router is based on an e500v2 Power PC core processor running at 533MHz. The Edge Router accommodates the following connections: - Power connection (9) via a coaxial power connector (5V nominal voltage). - Ethernet Port connector (10), 10/100Base-T RJ45 connection to network, use top connection for current product. Ethernet accommodates two LEDs for LAN link and activity. - USB Device connection (12) used for serial console and alternate 5V powered from a USB host. 4.1.2.2 Freescale TWR-P1025 Module The TWR-P1025 is based on a dual-core e500v2 Power PC, running at 533MHz and accommodates all other onboard peripherals needed for a complete embedded system. _____________________________________________________________________________________ Smart Object Development Kit User Guide Page 36 of 44 Figure 4.4 The TWR-P1025 LED usage table is presented below: For complete details about the TWR-P1025 Module please refer to Freescale website documentation. User Manual of the TWR-P1025 module can be found at: http://cache.freescale.com/files/32bit/doc/user_guide/TWR-P1025HUG.pdf?fsrch=1&sr=1 _____________________________________________________________________________________ Smart Object Development Kit User Guide Page 37 of 44 4.1.2.3 Freescale TWR-TWRPI-BD Carrier Module The TWR-TWRPI-BD Tower Plug-in Carrier Module is designed to route signals from Elevators to up to three TWRPI Sockets. Current Edge Router uses a TWRPI-B socket in order to accommodate the SMO Radio Module via the adapter board. Figure 4.5 SMO Radio Module installs into the TWRPI-SKT-B Socket. Jumpers Configuration: - J1, UART0_TX – is installed - J3, UART0_RX – is installed - All other jumpers are NOT installed and should be removed from the board For complete details about the TWR-TWRPI-BD please refer to Freescale website documentation. User Manual of the TWR-TWRPI-BD module can be found at: http://cache.freescale.com/files/32bit/doc/user_guide/TWRTWRPIBDQSG.pdf?fpsp=1 _____________________________________________________________________________________ Smart Object Development Kit User Guide Page 38 of 44 4.1.2.4 40-00055-01 TWRPI Adapter for SMO Radio The 40-00055-01 TWRPI Adapter is a carrier and pass-through board that adapts the SMO radio connections to the TWRPI Socket standard in order to allow use of an SMO radio together with the TWR-TWRPI-BD carrier board. It also provides a method of detecting the presence of an SMO Radio module attached to the TWRPI socket using analog signals. For complete details about this board please refer to Freescale’s website documentation. 4.1.2.5 40-00043 SMO Radio Module The 40-00043 SMO Radio Module is the actual Sub-GHz wireless radio. The SMO radio module provides an MMCX antenna connection on the top side and a high-density 0.5mm pitch 30 pin connector on the bottom side. The SMO radio installed onto Edge Router acts as the network radio transceiver and communicates with the TWR-P1025 via the serial UART connection. 4.1.2.5.1 40-00043-01 SMO Radio Module – 902 - 928 MHz version 4.1.2.5.2 40-00043-02 SMO Radio Module – 863 - 870 MHz version _____________________________________________________________________________________ Smart Object Development Kit User Guide Page 39 of 44 Figure 4.6 For complete details about this board please refer to SMO Radio documentation. The mating connector for the SMO Radio Module is: Manufacturer: HIROSE Manufacturer P/N: DF12(5.0)-30DP-0.5V(86) Description: CONN HEADER 30POS 5MM SMD 0.5MM Datasheet Link: http://www.hirose.co.jp/cataloge_hp/e53700036.pdf _____________________________________________________________________________________ Smart Object Development Kit User Guide Page 40 of 44 4.1.2.6 Antenna Specifications The antenna used for the Edge Router is a quarter wavelength antenna with +0 dBi gain. This antenna uses the ground layer of the TWR-TWRPI-BD Module as a ground plane to improve its radiation pattern. Full antenna characteristics are presented in manufacturer datasheet. 4.1.2.6.1 902 – 928 MHz Antenna Specifications Manufacturer: Antenna Factor (Linx Technologies) Manufacturer P/N: ANT-916-CW-RH-SMA Description: ANT 916 MHz, ¼ WAVE WHIP, RP-SMA (MALE) Datasheet Link: http://www.linxtechnologies.com/resources/data-guides/ant-916-cw-rh.pdf 4.1.2.6.2 863 - 870 MHz Antenna Specifications Manufacturer: Antenna Factor (Linx Technologies) Manufacturer P/N: ANT-868-CW-QW Description: ANT 868 MHz, ¼ WAVE WHIP, RP-SMA (MALE) Datasheet Link: https://www.linxtechnologies.com/resources/data-guides/ant-868-cw-qw.pdf _____________________________________________________________________________________ Smart Object Development Kit User Guide Page 41 of 44 4.1.2.7 Power Supply Specifications The DC power supply used for the Edge Router is included with the TWRP1024 Freescale kit. Power supply will provide 25 Watts of power. Manufacturer: SCEPTRE Manufacturer P/N: PS2D-5050APL05 Description: ADAPTER WALLMOUNT 5V DC OUT, 2A (25 WATT) Datasheet Link: https://www1.elfa.se/data1/wwwroot/assets/datasheets/std-0505p21_eng_tds.pdf 5 Development Kit Components - Software 5.1.1 The Application Processor API The Power Pack board was designed to allow easy interfacing with the Nivis Smart Object radio module, offering integrators access to the main HW interfaces. Please refer to the picture below for the main components on the Power Pack board. _____________________________________________________________________________________ Smart Object Development Kit User Guide Page 42 of 44 Figure 5.1 – Power Pack Board The connector used for UART communication with the application processor is J17 (the arrow indicates pin 1). The picture below shows the pins for UART interface from the Smart Objects Radio Module to their equivalent signals on the application processor. The pins on UART-J5 header are connected to the corresponding pins on UART-J17 header and can be easily probed during integration (e.g.: logic analyzer). RADIO_WKU signal can also be probed on pin 9 on the SPI connector. _____________________________________________________________________________________ Smart Object Development Kit User Guide Page 43 of 44 RM_UART_RX 1 AP_UART_TX RM_UART_TX 3 AP_UART_RX RM_UART_CTS 5 AP_UART_RTS RM_UART_RTS 7 AP_UART_CTS External/ Application Processor Power Pack UART J17 connector RM_LL_WKU 9 RM_GND 10 RADIO_WKU AP_GND Fig 2 – UART Interface on Power Pack board Figure 5.2 –UART Interface on Power Pack Board For additional details on connecting the SO with an external application processor, please see the API document “ApiCommands_v1.0.docx”. The API allows an external application processor to get information on the HW platform, read the time, request network-related information (join status, link quality, RPL info), manage resources (list, read, write) and UDP-related commands (socket and datagram management). For detailed API messages list and description please see the API document “ApiCommands_v1.0.docx”. 5.1.2 5.1.2.1 The Edge Router Software COAP – HTTP Proxy & XML – EXI Translator The HTTP – COAP and XML-EXI is a translator from XML over HTTP to EXI over COAP, and a proxy for COAP resources. _____________________________________________________________________________________ Smart Object Development Kit User Guide Page 44 of 44 The client apps can query directly the COAP resources on the SO’s, using EXI on top of COAP; however this is not recommended as it may exceed with ease the bandwidth available. Recommended operation is: send the queries as XML on top of HTML; the Proxy on the Edge Router will serve the resource from cache or query the SO if necessary; in the same time it will translate from EXI/COAP to XML/HTTP. If configured, the Proxy will subscribe to observable resources on the SO’s, further reducing the bandwidth requirements. Advantages of using a XML/HTTP – EXI/COAP proxy against interrogating the SO’s directly: - Controllable bandwidth requirements - Reduced bandwidth requirements ensured trough use of caching on the proxy - Reduced bandwidth requirements ensured trough use of subscription to observable resources from the Proxy - Fast development by using XML/HTTP - Ability to see observables values directly in a browser, no need for a dedicated tool in order to evaluate the kit 5.1.2.1.1 COAP – HTTP Proxy Interface Description The Proxy interface allows a client application to list the observable resources, get the device list, topology, and observe resources (including the configuration of the resources to observe). 5.1.2.1.1.1 Resources HTTP query: http://resources HTTP response: IPv6_addr1 resources list for IPv6_addr1 IPv6_addr2 resources list for IPv6_addr2 IPv6_addr3 resources list for IPv6_addr3 _____________________________________________________________________________________ Smart Object Development Kit User Guide Page 45 of 44 … 5.1.2.1.1.2 Device List HTTP query: http://device-list(?search*) Where search can be: MAC=HHHHHHHHHHHH or IPv6Addr=HHHHHHHHHHHHHHHHHHHHHH HTTP response: <?xml version='1.0' encoding='ascii'?> <!DOCTYPE DeviceList [ <!ELEMENT DeviceList (Device)> <!ELEMENT Device (Value)> <!ELEMENT Value (#PCDATA)> <!ATTLIST Value Name CDATA #IMPLIED> <!ATTLIST Value Type CDATA #IMPLIED> ]> <DeviceList> <Device> <Value Name=’MAC’ Type=’BinHex’>…</Value> <Value Name=’IPv6Addr’ Type=’BinHex’>…</Value> <Value Name=’DeviceType’ Type=’Number’>…</Value> <Value Name=’Status’ Type=’Number’>…</Value> <Value Name=’LastComm’ Type=’Number’>…</Value> <Value Name=’LastRegistration’ Type=’Number’>…</Value> </Device> <Device> <Value Name=’MAC’ Type=’BinHex’>…</Value> <Value Name=’IPv6Addr’ Type=’BinHex’>…</Value> <Value Name=’DeviceType’ Type=’Number’>…</Value> <Value Name=’Status’ Type=’Number’>…</Value> <Value Name=’LastComm’ Type=’Number’>…</Value> <Value Name=’LastRegistration’ Type=’Number’>…</Value> </Device> </DeviceList> Notes: - LastComm – UTC time in seconds (since 1970) – time when last message (network or APP) was received from device LastRegistraton - UTC time in seconds (since 1970) – time when last DAO message was received from device DeviceType – please see NMS Network Manager Design Document for values. _____________________________________________________________________________________ Smart Object Development Kit User Guide Page 46 of 44 5.1.2.1.1.3 Topology HTTP query: http://topology HTTP response: <?xml version='1.0' encoding='ascii'?> <!DOCTYPE Topology [ <!ELEMENT Topology (Device)> <!ELEMENT Device (Value, Parents)> <!ELEMENT Parents (Parent)> <!ELEMENT Parent (Value)> <!ELEMENT Value (#PCDATA)> <!ATTLIST Value Name CDATA #IMPLIED> <!ATTLIST Value Type CDATA #IMPLIED> ]> <Topology> <Device> <Value Name=’MAC’ Type=’BinHex’>…</Value> <Value Name=’IPv6Addr’ Type=’BinHex’>…</Value> <Parents> <Parent> <Value Name=’MAC’ Type=’BinHex’>…</Value> <Value Name=’IPv6Addr’ Type=’BinHex’>…</Value> <Value Name=’ExpirationTime’ Type=’Number’>…</Value> <Value Name=’PathSequence’ Type=’BinHex’>…</Value> <Value Name=’PathControl’ Type=’BinHex’>…</Value> <Value Name=’Preferred’ Type=’Bool’>…</Value> </Parent> <Parent> <Value Name=’MAC’ Type=’BinHex’>…</Value> <Value Name=’IPv6Addr’ Type=’BinHex’>…</Value> <Value Name=’ExpirationTime’ Type=’Number’>…</Value> <Value Name=’PathSequence’ Type=’BinHex’>…</Value> <Value Name=’PathControl’ Type=’BinHex’>…</Value> <Value Name=’Preferred’ Type=’Bool’>…</Value> </Parent> </Parents> </Device> </Topology> 5.1.2.1.1.4 Observing Resources HttpCoapProxy Observation List - list of resources ([device ipv6 addr]/resource_path) which were processed by HttpCoapProxy for putting under observation; _____________________________________________________________________________________ Smart Object Development Kit User Guide Page 47 of 44 HttpCoapProxy Observation Cache - list of resources which are put under observation by HttpCoapProxy at current moment, with their corresponding responses; HTTP query: http://observe-resources-get(?search*) Where search can be: MAC=HHHHHHHHHHHH or IPv6Addr=HHHHHHHHHHHHHHHHHHHHHH HTTP response: List of resources which are are put under observation by HttpCoapProxy at that moment. This is actually the HttpCoapProxy Observation List in XML format. <ObservationList> <Resource> <Value Name=’DeviceMAC’ Type=’BinHex’>…</Value> <Value Name=’DeviceIPv6Addr’ Type=’BinHex’>…</Value> <Value Name=’UriPath’ Type=’String’>…</Value> <Value Name=’State’ Type=’String’>…</Value> </Resource> <Resource> <Value Name=’DeviceMAC’ Type=’BinHex’>…</Value> <Value Name=’DeviceIPv6Addr’ Type=’BinHex’>…</Value> <Value Name=’UriPath’ Type=’String’>…</Value> <Value Name=’State’ Type=’String’>…</Value> </Resource> </ObservationList> Notes: State field can take following values: - “Device not in Device List” “Waiting for response from device” “Device didn't respond during timeout” “Response from device is not Coap” “Resource doesn't exist” “Resource is not observable” “Subscribed” “Unsubscribed” HTTP query: http:// observe-resources-set?enable=1&device=device_ipv6_addr&path=resource_path HTTP response: _____________________________________________________________________________________ Smart Object Development Kit User Guide Page 48 of 44 - - If request is well formed, a 200 "OK" "Observing resources request processed - enabled" message will be retrieved to client. This is a sign that request was processed and HttpCoapProxy will subscribe for observing specified resource; If request is well formed, but was already in Observation List a 200 "OK" "Resource is already in observation list" message will be retrieved to client; If request is not well formed, 400 “Bad Request" response will be retrived. Every time a client makes a request for a resource http://[device ipv6 addr]/resource_path, HttpCoapProxy will look for it in its Observation Cache: - - If it is found, it will be retrived to the client, and it means that the resource is observable and that client or another client made an erlier request to put it under observation; If that resource doesn’t exist in HttpCoapProxy Observation Cache, normal flow will be followed: send Coap request, wait for Coap response, translate to Http, send back to Http client. HTTP query: http:// observe-resources-set?disable=1&device=device_ipv6_addr&path=resource_path HTTP response: - - - If request is well formed, and resource is found in Observation List a 200 "OK" "Observing resources request processed - disabled" message will be retrieved to client. This is a sign that request was processed and HttpCoapProxy will unsubscribe from observing specified resource; If request is well formed, but and resource is not found in Observation List a 200 "OK" "Resource is not in observation list" message will be retrieved to client; If request is not well formed , 400 "Bad Request" response will be retrieved. HTTP PUT query: http://observe-resources-set-xml Where query content is an XML file with following format: <ObservationListSet> <Resource> <Value Name=’DeviceIPv6Addr’ Type=’BinHex’>…</Value> <Value Name=’UriPath’ Type=’String’>…</Value> <Value Name=’Action’ Type=’String’>…</Value> </Resource> <Resource> <Value Name=’DeviceIPv6Addr’ Type=’BinHex’>…</Value> <Value Name=’UriPath’ Type=’String’>…</Value> <Value Name=’Action’ Type=’String’>…</Value> _____________________________________________________________________________________ Smart Object Development Kit User Guide Page 49 of 44 </Resource> </ObservationListSet> Notes: - Action – is a string which defines the type of action that HttpCoapProxy should take on the specified resource(Enable – set as observable, HttpCoapProxy will subscribe for that resource, Disable – unset, HttpCoapProxy will unsubscribe from observing that resource) HTTP response: - 5.1.2.2 If XML file is well formed then a 200 "OK" "XML observation list processed" will be sent back to client; If XML file is not well formed, 400 “Bad Request" response will be retrieved. Web-based Administration /admin/ The web-based administration is the preferred method to administer/configure the Edge Router. It requires a web browser and the IP of the Edge Router. The Edge Router must be connected to the local LAN then powered on, and the IP/mask or the router must be accessible from the PC where the browser is running. Note: Depending on the firmware running on the Edge Router, fewer or additional features respectively may be available. All the web administration tasks require login. The login step is presented here only once. It is understood that all the following steps will require it. 1. Open the following URL: http://<ER_IP>:8080/admin/ <ER_IP> with Edge Router IP. replacing Figure 5.3 – Admin interface login _____________________________________________________________________________________ Smart Object Development Kit User Guide Page 50 of 44 2. Type the following credentials in the input fields User: admin Password: adminadmin 3. Click “Login”. The following page appears, allowing access to various tasks: Figure 5.4 – Admin interface Note: Depending on the web browser you are using to login to the Edge Router Administration, the graphical representation of the page and some buttons related to the operations described in the following pages may differ slightly. For instance: the button Choose File in Google Chrome and Apple Safari is the same as the button Browse in Mozilla Firefox and Internet Explorer. 5.1.2.2.1 Upgrade Edge Router Firmware Use this function to upgrade the ER FW, when an update is provided by Nivis. _____________________________________________________________________________________ Smart Object Development Kit User Guide Page 51 of 44 1. Click “Upgrade Firmware”. The following screen shows the version currently installed. Figure 5.5 – TWR Firmware upgrade 2. Click Browse to locate and select a new firmware file, then click “Load” (the versions must be different than the previous one). 3. Wait until the firmware is activated. This process will take few minutes. Do not power cycle the board or interrupt in any other way the upgrade process. During the upgrade, the process log is displayed. When the operation is complete, the screen should look as shown in the screen capture below: _____________________________________________________________________________________ Smart Object Development Kit User Guide Page 52 of 44 Figure 5.6 – Firmware upgrade result Note: Contact Nivis support in case the operation does not succeed. Note: Power cycle all SO devices after performing an ER firmware upgrade. Then wait about 5 minutes before attempting to connect NAMT to the Edge Router. 5.1.2.2.2 Download Edge Router Logs The function provides the Edge Router logs, when a log snapshot is requested for troubleshooting purposes. _____________________________________________________________________________________ Smart Object Development Kit User Guide Page 53 of 44 1. Click “Download Logs”. A window opens prompting you to open or save the archive. 2. Click Save. The Save As dialog will open. 3. In this dialog, choose the location for the archive and click Save. 5.1.2.2.3 Edit Edge Router IP and other Network Settings This page allows you to view/set network-related address/mask/gateway, name servers used, time servers used. settings: IP This page is for advanced users only – do not use it unless you know precisely how to configure the network. Any invalid values may render the router dysfunctional, or may cause difficult to trace malfunctions. Note: Make sure you are not causing IP conflicts. Make sure the name servers used are functional and accessible from the Edge Router. Make sure the NTP servers are functional and accessible from the Edge Router. _____________________________________________________________________________________ Smart Object Development Kit User Guide Page 54 of 44 1. Click on “Network Configuration”. The following form will open to the right of the operation list: Figure 5.7 – Network Configuration 2. In the form, you can edit the input fields for IP, Gateway and Mask. 3. To add a name server or an NTP server, provide the correct value in the “Add” input field and click Add. 4. To delete a name server or an NTP server, select it in the list of existing items, and click Delete. 5. At the end, click Save to save the settings. The Edge Router will automatically restart. _____________________________________________________________________________________ Smart Object Development Kit User Guide Page 55 of 44 Pressing the Soft Restart button will restart all the application on the Edge Router. Pressing the Hard Restart button will reboot the Edge Router. 5.1.2.2.4 Edit Application Configuration Settings This page allows you to configure the VR to upload the logs on a FTP server, when long-term logs are needed and log snapshot does not provide enough information. This page is for advanced users only – do not use unless you have been instructed by a Nivis representative. Because of space restrictions, the logs on the Edge Router are frequently removed. In order to have logs over a longer period of time, a FTP server can be used. The Edge Router must be configured to move the logs on the FTP server instead of removing them. The FTP server must meet the following conditions: 1. Be in the same network with the Edge Router. It must be available in the network all the time otherwise the VR may not function correctly 2. Be UNIX compatible 3. Have a user and password created. Anonymous user should not be used Please be aware that the most recent logs will still be on the Edge Router (available through log snapshot: “Download Edge Router Logs” button) and not on the FTP server. _____________________________________________________________________________________ Smart Object Development Kit User Guide Page 56 of 44 Figure 5.8 – Configuring FTP logs upload 1. Edit Host input field with a valid FTP server IP address; 2. Edit the User and Pass input fields with a valid username and password for the FTP server. Do not use anonymous user; 3. Select the folder on the FTP server in which the logs to be saved; 4. Press Set. 5.1.2.2.5 Edit Edge Router General Configuration This page allows you to view/set less common configuration variables. This page is for advanced users only – do not use unless you have been instructed exactly by a Nivis representative on what values to change. Incorrect values may render the router dysfunctional, or may cause difficult to trace malfunctions. 1. Click on “Edit Configuration”. The following form will open to the right of the operation list: _____________________________________________________________________________________ Smart Object Development Kit User Guide Page 57 of 44 2. In the form, select a section in the drop down list. The Variable list will change accordingly. 3. Select a variable in the drop down list. 4. Set /edit the Value field, then click Set. Note: Do not change [GLOBAL].AN_ID under any circumstance. To add a new variable, select Sections/variables form will be empty: “Custom” under Variable type. The Type the desired information in the Section, Variable and Value fields and click Set. 5.1.2.2.6 Reset Profile The “Reset Profile” section is for troubleshooting purposes only. Do not use unless instructed specifically by a Nivis representative. _____________________________________________________________________________________ Smart Object Development Kit User Guide Page 58 of 44 5.1.2.3 Ports & interfaces The following interfaces are usable on the Edge Router: The serial port is used as kernel console and emergency backup. The Edge Router accepts ssh 22/TCP connections. The Edge Router has an http server listening on port 8080/TCP for Nivis-specific User Interface. The Edge Router has an http server listening on port 80/TCP for Freescale-specific website, not covered in this User Manual. The Edge Router has SNMP Agent listening on port 161/UDP. The HTTP – COAP proxy listen on port 9999/TCP for HTTP queries. The Edge Router utilizes the NTP protocol on port 123/USP to synchronize time with Internet time servers. In order to synchronize the time with Internet time servers, the port 123/UDP must be open in in both directions to allow time synchronization. Not all interfaces are guaranteed to be up in all cases. Some might be disabled for specific applications. 5.1.3 5.1.3.1 The NAMT Connecting to an Edge Router The application will display, at startup, a connection window that allows you to connect to an Edge Router by specifying the connection parameters or by selecting from a list of previously saved connections. _____________________________________________________________________________________ Smart Object Development Kit User Guide Page 59 of 44 Connections list Delete saved connection The IP address of the target router Username for conecting to the ER Password for conecting to the ER Checkbox for saving the current connection information Checkbox for setting the current connection as default Figure 5.9 – NAMT Connect 5.1.3.2 Creating a new connection By default, the connection window will display (read-only) the information of the connection which was saved with the Set as default flag set. If no such connection exists, the Connection drop-down list will be set on the first position, labeled “new”. If you need to create a new connection, make sure that “new” is selected in the connection list, then complete the required connection information (IP address of the ER, username and password), then press the Ok button to connect. Optionally, you can save the connection information by checking the Save connection information checkbox and specifying a name for the saved connection, or make the current connection the default application connection by checking the Set as default checkbox. A saved connection can be deleted by using the X button at the right of the connections list. 5.1.3.3 Connecting to the Edge Router In order to connect the NAMT to the Edge Router, the PC hosting the NAMT must be connected in the same network segment (or subnet) as the Edge Router. _____________________________________________________________________________________ Smart Object Development Kit User Guide Page 60 of 44 Please see Quick Start Guide for instructions on how to match the PC and Edge Router IPv4’s. Note: After powering on the Edge Router, please wait for 5 minutes before attempting to connect the NAMT to it. When connecting the NAMT with the TWR, the system behavior will be different depending on the PC and Edge Router time. Please ensure the NAMT PC time is correct and it does not suddenly change. Otherwise the system will behave inconsistently, leading to difficult to troubleshoot issues. The Edge Router time can be either: - Not set (no internet connectivity, or incorrectly configured internet connectivity) Properly set (by using Internet connectivity and automatically getting time from a time server, or previously set by a connecting NAMT) Set, but incorrect (usually, by a connecting NAMT running on a PC with incorrect time) If the TWR does not have the time set (no internet connectivity and no NAMT connected since last power on of the TWR), a message box is displayed asking the user permission to correct the time on TWR. Answering “Yes” is mandatory at this step; otherwise the system shall expose undefined behavior. Most notably, the SO’s will not join a system without proper time. After the user answer “Yes”, a message box will confirm the successful operation. The TWR is restarted automatically and the network will re-form. _____________________________________________________________________________________ Smart Object Development Kit User Guide Page 61 of 44 Please wait for about 5 minutes before re-connecting to the TWR after this operation. Note: If the TWR time was previously set correctly, the “TWR time incorrect” warning message box does not appear at all. If the time on Edge Router was set (either got from Internet, or set trough a previous NAMT connection) then PC time changed with more than one hour, the resulting system would have inconsistence between SO’s and the TWR, with undefined behavior. To prevent it, if NAMT detects the TWR has the time set yet TWR time is too different (more than one hour apart) from NAMT PC time, the NAMT will refuse to connect to the TWR and will recommend restarting TWR and SO’s. Such scenario can only occur if the user change the time on the PC hosting NAMT, or if several PC’s running NAMT are used to connect to the same TWR, one of the PC’s having incorrect time. If you see the message above, please reboot the Edge Router and all Smart Objects. _____________________________________________________________________________________ Smart Object Development Kit User Guide Page 62 of 44 5.1.3.4 The main application window After connecting or cancelling a connection to an Edge Router, the main application window is displayed. From here, you can connect/disconnect an Edge Router, manage the application settings, and select the application module to use or close the application by using the corresponding buttons in the toolbar: Connect to ER Disconnect Settings Select application module Exit Figure 5.10 – NAMT main toolbar 5.1.3.5 Settings Click on “Settings” button to bring up the settings dialog. Figure 5.11 – NAMT Settings The settings section allows: - Changing the http connection port (use the default 8080). Refresh interval for network tab Refresh interval for Development Kit tab Logging options, to be used for troubleshooting purposes only when instructed by a Nivis Representative. Recommend always using the default refresh interval. _____________________________________________________________________________________ Smart Object Development Kit User Guide Page 63 of 44 Note: Setting a refresh interval too small may affect the kit performance. Setting the refresh too high will result in slow data update in NAMT. 5.1.3.6 The Network Monitoring module The Network Monitoring module provides the following network level monitoring and management functionality: Manage network settings – security level, communication parameters (channels map and hopping sequence) View the list of joined devices, details on the joined devices, channel statistics and RPL Neighbor statistics for each device Update the firmware of the joined devices. _____________________________________________________________________________________ Smart Object Development Kit User Guide Page 64 of 44 Firmware update Device properties Search for device Change view (grid, map, logical) Network settings About Export Print Settings Figure 5.12 –Network Monitoring pane The user can see the list of joined devices in tabular form, search for a specific device, place the devices on a location map in map view or see the logical topology of the network. He can also print the current view or export the devices list to a file. _____________________________________________________________________________________ Smart Object Development Kit User Guide Page 65 of 44 Figure 5.13 – Map view Figure 5.14 – Logical view _____________________________________________________________________________________ Smart Object Development Kit User Guide Page 66 of 44 In the Network Monitoring module, the user can inspect the device properties by double-clicking on a device or by pressing the corresponding button in the module toolbar. 5.1.3.7 Device properties The Device Properties page when the user clicks a device in Network monitoring pane. The Device Properties window displays the details of the selected device: Figure 5.15 – Device Properties The device communications status is displayed as well, showing communication statistics and channels PSR. _____________________________________________________________________________________ Smart Object Development Kit User Guide Page 67 of 44 Figure 5.16 – Communication Status 5.1.3.8 Neighbor Statistics The Neighbor Statistics screen appears when clicking on the Neighbor Statistics icon corresponding to a device in the Network Monitoring pane. Figure 5.17 – Neighbor Statistics _____________________________________________________________________________________ Smart Object Development Kit User Guide Page 68 of 44 The screen display the neighbor MAC, the report time (UTC), state (REACHEABLE, STALE, PROBE, FAILED), LAST Rx time (UTC), last TX time (UTC), total number of transmissions, number of failed transmissions, packet success rate, RPL rank (increases in steps of 256: RPL default), whether the neighbor is parent or not, whether the neighbor is preferred parent or not. The meanings of the possible values of the “State” column are: REACHEABLE: There was at least one successful communication with this neighbor recently (last 5 minutes) STALE: There was no successful communication with this neighbor recently (last 5 minutes) PROBE: The neighbor is in a “probe” state in which messages get sent to it to verify connection. This is a transitory state; the state will change to either reachable / failed. FAILED: Communication with neighbor failed (current: at least 3 messages failed over an evaluation interval of at least one minute). 5.1.3.9 Network settings The Network settings windows allow the user to inspect the router information and manage the network security level and channel hopping sequence. Figure 5.18 – Communication Status _____________________________________________________________________________________ Smart Object Development Kit User Guide Page 69 of 44 In order to modify the network security level, press the On/Off button in the Security Settings group. The application will warn that this operation needs a network restart and will request your confirmation on continuing the operation. The hopping sequence used for network communication can be modified by using the up-down buttons at the hopping sequence edit box, then pressing the Apply button. The application will request confirmation for performing the change, as this requires a router restart. 5.1.3.10 Firmware Update The Firmware update function allows the OTA update of the device firmware for the joined devices. In order to start a firmware operation on one or more devices, select one or more devices in the grid view (the view allows multi-select, use Ctrl-click for multiple selection) then press the Firmware Update button in the toolbar. Figure 5.19 – FW Upgrade OTA In the Firmware Update window, select the firmware file to be used then click on the Start button. The status column will indicate the overall upgrade progress, and the final status of the OTA upgrade. _____________________________________________________________________________________ Smart Object Development Kit User Guide Page 70 of 44 Figure 5.20 – FW Upgrade OTA Progress 5.1.3.11 The Development Kit module The Development Kit module has two views: the Dashboard view and the Grid view. The Dashboard View monitor and display 3 fixed parameters of the SO. The Grid View shows all COAP-modeled resources of a SO, including user-defined ones, allowing subscription to observable resources, also showing the values reported by those resources (with history in case of subscribed COAP observables) The Development Kit module shows initially the Dashboard view. 5.1.3.11.1 The Dashboard View The SOEN monitors and periodically reports the parameters modeled as COAP resources listed in the table below. Parameter URI Power Pack Board Hardware Reference Range Reported Digital ON/OFF /app/sw SW2 ON - OFF Reported when status changes. Typical latency end-to-end (SOEN to NAMT display) is 3 seconds. _____________________________________________________________________________________ Smart Object Development Kit User Guide Page 71 of 44 Analog stat /app/ptm R21 Battery /app/batt NA 0 -100% Reported when pot value varies by > 5%. Typical latency end-to-end (SOEN to NAMT display) is 3 seconds. Line power or battery power left (%) Reported when battery value varies by > 5%. Typical latency end-toend (SOEN to NAMT display) is 3 seconds. Once the Smart Object network is up and running a first evaluation scenario consists of simply observing the change of the three pre-defined application resources. To enter the Development Kit screen of the NAMT, click on the top-right drop-down of the main application window, select Development Kit. Figure 5.21 – Development Kit: Dashboard Ensure in the NAMT that the SOEN is joined to the network (its MAC appears in the Development kit, status as Joined, yellow font). Example for device with MAC ending with “01:06:00:02” _____________________________________________________________________________________ Smart Object Development Kit User Guide Page 72 of 44 Figure 5.22 – Development Kit: Dashboard In this screen the user can monitor the current values for the 3 COAP-mapped application resources: potentiometer, status switch, battery. See section “Use Cases” for additional details. _____________________________________________________________________________________ Smart Object Development Kit User Guide Page 73 of 44 5.1.3.11.2 The Grid View In the “Development Kit” pane, the user can configure COAP observables for each device. Click on the “Grid View” icon in the top right of the window to switch to the Grid View: Figure 5.23 – Development Kit: Grid The Grid View show for each device: the total number of COAP resources and the number of currently observed COAP resources. It also shows a summary with total number of COAP resources exposed by all devices. Initially, all of the devices are shown collapsed. Click on expand (“+”) sign next to a device to expand the view of that device. _____________________________________________________________________________________ Smart Object Development Kit User Guide Page 74 of 44 Figure 5.24 – Development Kit: Grid View Detailed The following controls are available: - Display a summary of number of devices and resources, total per system Display the total number of resources and observed resources for each device Expand a device for additional controls: o Show all resources o Show last COAP communication time o Highlight last received value (if belongs to device currently expanded) o Access to values history o Show whether the resource is observable or not o For observable resource allow configuring it as observed/not observed If there is an Application Processor connected to the SO, and the Application Processor has defined User-defined COAP resources, they will show in NAMT, as any other COAP resource. See API Integration Manual for instructions on how to integrate userdefined COAP resources. _____________________________________________________________________________________ Smart Object Development Kit User Guide Page 75 of 44 Figure 5.25 – Development Kit: Grid View User-defined resources 5.1.3.11.3 Subscription to COAP observables To subscribe or unsubscribe to COAP observables resources, check/uncheck the checkbox on the right side of the resource then click on apply (“v”) sign or collapse (“-”) sign to apply the changes (status for several observable resources can be changed at one step). The application asks for confirmation: Figure 5.26 – Development Kit: Grid View Confirm COAP Observables subscription update After confirmation, the subscriptions/un-subscriptions to the COAP observable resources got submitted to the devices. _____________________________________________________________________________________ Smart Object Development Kit User Guide Page 76 of 44 Figure 5.27 – Development Kit: Grid View Updating resources subscription Note: It takes several seconds/tenths of seconds to apply the settings. Do not expand or collapse the devices while the subscription process is in progress. 5.1.3.11.4 The values history Clicking on the “History” icon brings up the values history for a COAP resource. If the resource is not observable or not observed, the history has a single reading. If the resource is (or was) observed, the history may show more than a single value, it more than one was reported by the SO. _____________________________________________________________________________________ Smart Object Development Kit User Guide Page 77 of 44 Figure 5.28 – Development Kit: Grid View Updating resources subscription The application allows user to copy (Ctrl-C) values in the history window, for further examination. Note: The values history gets built by NAMT and it’s not stored between successive NAMT sessions. 6 Upgrading the Development Kit There are two alternative ways to upgrade the SO stack firmware: over the serial line and over-the-air. 6.1 Upgrading the SO stack firmware using serial line Upload binary image with Firmware RS232 Uploader (Upload2Serial MFC.exe) Connection Parameters: Set the Serial Port Baudrate : 115200 Upload Parameters: Set: -Timeout in seconds: any value between 1 and 60; -Packet Data: select 512bytes -Send Termination: Enabled -Flash Destination: select Area1, Area2 or Area 3 _____________________________________________________________________________________ Smart Object Development Kit User Guide Page 78 of 44 Click and select the binary (file .afx.bin) Close the serial port if it is already in use; Click Reset device; ; _____________________________________________________________________________________ Smart Object Development Kit User Guide Page 79 of 44 After succefully loading and Firmware RS232 Uploader displayed status message Disconnected Open the serial port Wait about 10s and you can see the status messages from bootloader Wait another 5s to launch application Message error status: SPI_FLASH_ERR -> SPI Flash (external flash) is inaccessible or corrupted _____________________________________________________________________________________ Smart Object Development Kit User Guide Page 80 of 44 OR -> No image was loaded in external flash PFLASH_ERR ->Image cannot be erased or written to the CPU Flash BAD_IMG_PFLASH_ADD -> An image was compiled that didn't have the linker file set for the bootloader IMAG_CRC_BAD -> CRC image corrupted ERROR -> Any other problem 6.2 Upgrading the SO stack firmware OTA using NAMT See The NAMT section for upgrading the SO stack OTA. 6.3 Upgrading the Edge Router software Follow the steps at section “Upgrade Edge Router Firmware” 7 Use Cases 7.1 Evaluating the on-board application COAP mapped parameters Once the Smart Object network is up and running a first evaluation scenario consists of simply observing the change of the three pre-defined application resources. 1. Ensure in the NAMT that the SOEN is joined to the network (its MAC appears in the Development kit, status as Joined, yellow font). Example for device with MAC ending with “01:06:00:02” Figure 7.1 – SO joined _____________________________________________________________________________________ Smart Object Development Kit User Guide Page 81 of 44 2. Toggle the digital ON/OFF switch (SW2) present on the power pack board every 5 seconds. Observe the change in value in the NAMT Development Kit pane. Figure 7.2 – Digital state 3. Vary the potentiometer R21 present on the power pack board by turning it by more than 45 degrees. Observe the change in value in the NAMT Development Kit pane. Figure 7.3 – Analog State change 4. The line-powered or battery-operated status of the SO gets shown in the “Power supply” area. In case of battery operated SO’s, the battery level estimate is shown. Figure 7.4 – Line-powered SO’s _____________________________________________________________________________________ Smart Object Development Kit User Guide Page 82 of 44 Figure 7.5 – Battery Operated SO’s, battery at 25% (approximate) Figure 7.6 – Battery Operated SO’s, battery at 50% (approximate) Figure 7.7 – Battery Operated SO’s, battery at 75% (approximate) 7.2 Application Processor Mapped COAP parameters The Application Processor can map process variables as COAP resources for the external application to read or observe. The flow of packets trough the network in case of resource discovery and read resource is described below. _____________________________________________________________________________________ Smart Object Development Kit User Guide Page 83 of 44 7.2.1 Resource Discovery This section describes the sequence of messages exchanged between Radio Module and Application Processor from device start until it uploads the list of resources on the proxy server. Application Processor Proxy Server Radio Module GET_RESOURCES_LIST ACK RESOURCE_LIST_INDICATION ACK Content: Res ID=7; URI=”dev/info”; RT=”DevInfo”; If= “App1”; Sz = 100; Content Type = EXI NumberOfVariableDefinitions=2; VarId=1; Name=”Manuf”; Type = ShortOctetStream VarId=2; Name=”Model”; Type = ShortOctetStream Res ID=8; URI=”light/cntrl”; RT=”LightControl”; If= “App1”; Sz = 100; Content Type = EXI NumberOfVariableDefinitions=2; VarId=1; Name=”Status”; Type = Uint8 VarId=2; Name=”Dimmer”; Type = Uint8 HEX: 07:08:64:65:76:2F:69:6E:66:6F:07:44:65:76:49:6E:66:6F:04: 41:70:70:31:00:64:2F:02:01:05:4D:61:6E:75:66:08:02:05:4D :6F:64:65:6C:08:08:0B:6C:69:67:68:74:2F:63:6E:74:72:6C:0 C:4C:69:67:68:74:43:6F:6E:74:72:6F:6C:04:41:70:70:31:00: 64:2F:02:01:06:53:74:61:74:75:73:01:02:06:44:69:6D:6D:65: 72:01 RESOURCE_LIST_INDICATION ACK Content: Res ID=9; URI=”power”; RT=”Power”; If= “App1”; Sz = 100; Content Type = EXI NumberOfVariableDefinitions=2; VarId=1; Name=”InstantaneousPwr”; Type = Uint32 VarId=2; Name=”CumulativePwr”; Type = Uint32 Res ID=0xFF; HEX: 09:05:70:6F:77:65:72:05:50:6F:77:65:72:04:41:70:70:31:00: 64:2F:02:01:10:49:6E:73:74:61:6E:74:61:6E:65:6F:75:73:50 :77:72:03:02:0D:43:75:6D:75:6C:61:74:69:76:65:50:77:72:0 3:FF Send Resource List To Proxy Server 1. After power ON, Radio Module CPU sends a GET_RESOURCE_LIST command to the application processor. It will keep sending this command until it receives ACK/NACK from the AP. 2. After sending the response to the previous command (either in the form of an ACK or in the form of a NACK), AP starts sending RESOURCE_LIST_INDICATION commands to the Radio Module. Each of these commands will be acknowledged by RM. _____________________________________________________________________________________ Smart Object Development Kit User Guide Page 84 of 44 3. RM receives the list of resources defined by AP, terminated by a resource with ID 0xFF. After it receives resource ID 0xFF, any following resources will be rejected with a NACK message. 7.2.2 Read Resource This section describes the sequence of messages exchanged when the application processor has to respond to a READ_RESOURCE request command. Application Processor Radio Module Proxy Server COAP GET resource /light/cntrl READ_RESOURCE request Content: 08 Hex: 08 READ_RESOURCE response Content: Res ID=8; VarID=1; TypeID=Uint8; Value=1 VarID=2; TypeID=Uint8; Value=80 Web browser/ NAMT Http GET resource /light/cntrl HEX: 08:01:01:01:02:01:50: COAP content /light/cntrl (EXI) Http content /light/cntrl (XML) <?xml version="1.0"?> <e t="1350340915"> <Status v="1"/> <Dimmer v="80"/> </e> 1. Radio Modem sends a READ_RESOURCE request to the application processor, specifying resource ID. Application Processor responds with the resource representation at that moment of time. _____________________________________________________________________________________ Smart Object Development Kit User Guide Page 85 of 44 8 Troubleshooting The following table represents some typical problems that may be encountered while working with the Smart Object development kit, the cause of the problem and possible solutions. Problem No device joins the network (not even Transceiver) No SO device joins the network, but Transceiver does join the network Network slow to form, unstable after join With multiple coexisting networks, network slow to form, unstable after join Network unstable after connecting NAMT in Development Kit mode NAMT in Development kit mode slow to update after powering off a SO Explanation Transceiver module present on the P1025 Edge Router is not connected properly to the antenna or is not properly inserted in the TWRPI connector. Net ID on the SO’s does not match the Vendor ID on the TWR SO or TR on TWR with improperly connected antenna Overlapping networks with the same NetworkID/PanID Too aggressive interrogation rate Transceiver FW upgrade from NAMT fails at start, immediately after setting the time from NAMT There is no unjoin notification; NAMT keeps requesting COAP resources from devices powered off Did not wait few minutes after setting the time from NAMT before connecting to the kit again Inconsistent COAP resources shown after a TWR FW upgrade SO’s were not power cycled after TWR FW upgrade Solution Ensure that the transceiver is properly connected to the TWRPI connector and the antenna. Ensure consistency between SO Network ID and TWR Vendor ID (consistent with default settings) Make sure the antenna is properly connected The NetworkID/PanID depends on the last byte of Edge Router IPv6 Reduce the number of devices or increase the interrogation interval (Settings -> Development Kit Refresh interval) Restart the Edge Router to rebuild the resource list Do not start the TR FW upgrade immediately after the TR appears in the Network view; wait half a minute Restart all SO’s after TWR FW upgrade _____________________________________________________________________________________ Smart Object Development Kit User Guide Page 86 of 44 The NAMT refuse to connect to the TWR after setting the time on TWR The PC time changed significantly after setting the time on TWR, resulting in time differences between PC and TWR, which would lead to undefined network behavior Power cycle the whole system: TWR and SO’s _____________________________________________________________________________________ Smart Object Development Kit User Guide Page 87 of 44 Appendix A: List of Standards Supported in the Smart Object Platform Standardization Body Standard Designator Revision IEEE IEEE Std 802.15.4g - 2012 Final Title Low-Rate Wireless Personal Area Networks (WPANs) Amendment 4: Physical Layer Specifications for Low Data Rate Wireless Smart Metering Utility Networks IEEE IEEE Std 802.15.4e - 2012 Final Wireless Medium Access Control(MAC) and Physical Layer (PHY) Specifications for Low-Rate Wireless Personal Area Networks (WPANs) IETF RFC 6282 Final Compression Format for IPv6 Datagrams over IEEE 802.15.4-Based Networks IETF RFC 2460 Final Internet Protocol, Version 6 (IPv6) Specification IETF RFC4443 Final Internet Control Message Protocol for the IPv6 Specification IETF RFC6550 Final RPL: IPv6 Routing Protocol for Low power and Lossy Networks IETF RFC6202 Final The Trickle Algorithm IETF RFC6552 Final RPL Objective Function 0 Final Routing Metrics used for Path Calculation in Low Power and Lossy Networks Rev 2 Definition of Managed Objects for the IPv6 Routing Protocol for Low power and Lossy Networks IETF IETF RFC6551 I.D. draft-sehgal-roll-rpl-mib IETF RFC768 Final User Datagram Protocol (UDP) IETF ID.draft-ietf-core-coap Rev 8 Constrained Application Protocol (CoAP) IETF ID.draft-ietf-core-link-format09 Rev 9 CoRE Link Format IETF ID.draft-ietf-core-observe-03 Rev 3 Observing Resources in CoAP _____________________________________________________________________________________ Smart Object Development Kit User Guide Page 88 of 44 Appendix B: FCC Related Statements General Statements (For all devices): Warning: Changes or modifications to this device not expressly approved by Nivis, LLC could void the user’s authority to operate the equipment. FCC Specific Statements: For Class B Devices: “NOTE: This equipment has been tested and found to comply with the limits for a Class B digital device, pursuant to Part 15 of the FCC Rules. These limits are designed to provide reasonable protection against harmful interference in a residential installation. This equipment generates, uses, and can radiate radio frequency energy and, if not installed and used in accordance with the instructions, may cause harmful interference to radio communications. However, there is no guarantee that interference will not occur in a particular installation. If this equipment does cause harmful interference to radio or television reception, which can be determined by turning the equipment off and on, the user is encouraged to try to correct the interference by one or more of the following measures: • Reorient or relocate the receiving antenna. • Increase the separation between the equipment and receiver. • Connect the equipment into an outlet on a circuit different from that to which the receiver is connected. • Consult the dealer or an experienced radio/TV technician for help.” RF Exposure “This equipment complies with FCC radiation exposure limits set forth for an uncontrolled environment. This equipment should be installed and operated with minimum distance 20cm between the radiator and your body. This transmitter must not be co-located or operating in conjunction with any other antenna or transmitter.” _____________________________________________________________________________________ Smart Object Development Kit User Guide Page 89 of 44 Appendix C: Industry Canada Related Statements Industry Canada Specific Statements: Antenna (General): Under Industry Canada regulations, this radio transmitter may only operate using an antenna of a type and maximum (or lesser) gain approved for the transmitter by Industry Canada. To reduce potential radio interference to other users, the antenna type and its gain should be so chosen that the equivalent isotropically radiated power (e.i.r.p.)is not more than that necessary for successful communication. Conformément à la réglementation d'IndustrieCanada, le présent émetteur radio peut fonctionner avec une antenne d'un type et d'un gain maximal (ou inférieur) approuvé pour l'émetteur par Industrie Canada. Dans le but de réduire les risques de brouillage radioélectrique à l'intention des autres utilisateurs, il faut choisir le type d'antenne et son gain de sorte que la puissance isotrope rayonnée équivalente (p.i.r.e.) ne dépasse pas l'intensité nécessaire à l'établissement d'une communication satisfaisante. Detachable Antenna: This radio transmitter (identify the device by certification number, or model number if Category II) has been approved by Industry Canada to operate with the antenna types listed below with the maximum permissible gain and required antenna impedance for each antenna type indicated. Antenna types not included in this list, having a gain greater than the maximum gain indicated for that type, are strictly prohibited for use with this device. Le présent émetteur radio (identifier le dispositifpar son numéro de certification ou son numéro de modèle s'il fait partie du matériel de catégorieI) a été approuvé par Industrie Canada pour fonctionner avec les types d'antenne énumérés ci-dessous et ayant un gain admissible maximal et l'impédance requise pour chaque type d'antenne. Les types d'antenne non inclus dans cette liste, ou dont le gain est supérieur au gain maximal indiqué, sont strictement interdits pour l'exploitation de l'émetteur. Approved Antennas: Type ½ Wave Whip Gain 2 dBi Compliance: This device complies with Industry Canada licence-exempt RSS standard(s). Operation is subject to the following two conditions: (1) this device may not cause interference, and (2) this device must accept any interference, including interference that may cause undesired operation of the device. Le présent appareil est conforme aux CNR d'Industrie Canada applicables aux appareils radio exempts de licence. L'exploitation est autorisée aux deux conditions suivantes : (1) l'appareil ne doit pas produire de brouillage, et (2) l'utilisateur de l'appareil doit accepter tout brouillage radioélectrique subi, même si le brouillage est susceptible d'en compromettre le fonctionnement. _____________________________________________________________________________________ Smart Object Development Kit User Guide Page 90 of 44 Label Information Additional Requirements For Modular Approved Devices: When a modular device is used in an end product where the label of the module is not visible, the host device must have an exterior label to include the information shown below. If a label for the host device is not available, the manual must provide information to the integrator on labeling requirements. Contains FCC ID: SQB-NIVISVN400 Contains IC: 6546A-NIVISVN400 Appendix D: European (ETSI) Related Statements The Nivis, LLC model VersaNode 400, operates on a frequency of 863.00 to 870.00 MHz at 25 mW maximum output power, and is therefore classified as a short range device, of which the parameters to comply with are described in ERC/DEC 70-03. The relevant ETSI standards, applicable to this type of equipment, as indicated in Annex 1 of ERC/DEC 70-03, are: EN 300 220-1 V2.4.1 (2012-05): Electromagnetic compatibility and radio spectrum matters (ERM); Short range devices (SRD); Radio equipment to be used in the 25 MHz to 1000 MHz frequency range with power levels ranging up to 500 mW; Part 1: Technical characteristics and test methods And EN 300 220-2 V2.4.1 (2012-05): Electromagnetic compatibility and radio spectrum matters (ERM); Short range devices (SRD); Radio equipment to be used in the 25 MHz to 1000 MHz frequency range with power levels ranging up to 500 mW; Part 2: Harmonized EN covering essential requirements under article 3.2 of the R&TTE Directive. _____________________________________________________________________________________ Smart Object Development Kit User Guide Page 91 of 44 _____________________________________________________________________________________ Smart Object Development Kit User Guide Page 92 of 44