1
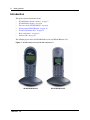
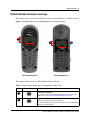
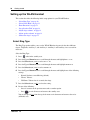
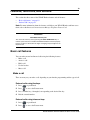
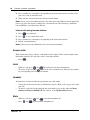
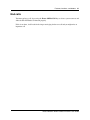
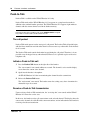
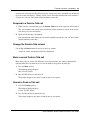
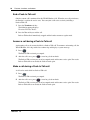
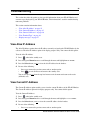
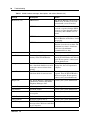
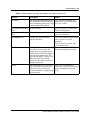
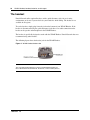
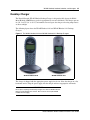
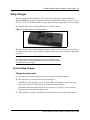
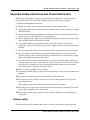
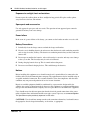
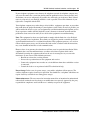
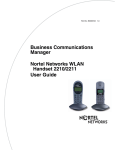
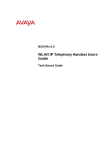
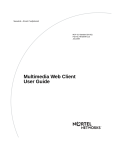
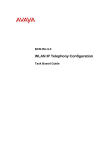
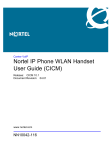
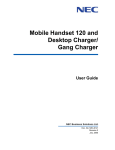
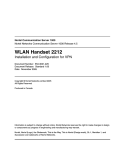
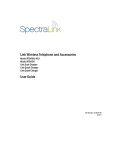
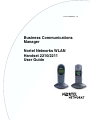
Part No. N0009103 2.0
Business Communications
Manager
Nortel Networks WLAN
Handset 2210/2211
User Guide
3
Getting started
The Nortel Networks WLAN Handset 2210 and the Nortel Networks WLAN Handset 2211 for
Business Communications Manager (BCM) are fully functional wireless handsets specifically
designed for the busy office environment.
In this User Guide, the WLAN Handset 2210 and WLAN Handset 2211 are referred to generically
as WLAN Handset.
IMPORTANT!
User MUST end every call
The user must end every call, by pressing the Power Off/End Call key, to
release system resources and allow the WLAN Handset to function properly.
If this is not done, it will result in the ringer not ringing and you might miss an
important call.
IMPORTANT!
The WLAN Handset must be fully charged before initial use. See “Battery
packs” on page 33.
WARNING
• Follow standard acceptance procedures before operating
the WLAN Handset near life-support systems.
• To minimize risk of interference, pacemaker users should
not carry the WLAN Handset next to the pacemaker.
• Avoid placing the WLAN Handset near small metallic
objects. The WLAN Handset earpiece attracts magnetic
objects.
• The WLAN Handset produces noise noticeable to hearing
aid users. Use a headset compatible with hearing aids.
• This device complies with part 15 of the FCC Rules.
Operation is subject to the following two conditions: (1)
This device may not cause harmful interference, and (2)
this device must accept any interference received,
including interference that may cause undesired
operation.
CAUTION
Loud noise environment: The WLAN Handset has been
designed to produce optimal voice quality. However, when
used in extremely loud noise environments (for example,
close to working heavy machinery), users may experience
degradation in call quality performance due to echo. Avoid
using the WLAN Handset when traversing these types of
environments.
Nortel Networks WLAN Handset 2210/2211 User Guide
4
Getting started
Introduction
This guide contains information about:
• “WLAN Handset buttons and keys” on page 5
• “WLAN Handset display” on page 6
• “The states of the WLAN Handset” on page 8
• “Setting up the WLAN Handset” on page 10
• “Feature and function keys” on page 15
• “Basic call features” on page 19
• “Push-to-Talk” on page 22
The following figure shows the WLAN Handset 2210 and WLAN Handset 2211.
Figure 1 WLAN Handset 2210 and WLAN Handset 2211
WLAN Handset 2210
N0009103 2.0
WLAN Handset 2211
Getting started
5
WLAN Handset buttons and keys
The following figure shows the WLAN Handset 2210 and WLAN Handset 2211 buttons and keys.
Figure 2 WLAN Handset 2210 and WLAN Handset 2211 buttons and keys
G
C
G
H
C
A
B
D
D
A
E
F
E
WLAN Handset 2210
B
F
WLAN Handset 2211
The following table describes the WLAN Handset buttons and keys.
Table 1 WLAN Handset buttons, keys, and descriptions (Sheet 1 of 2)
Button/key
A
Description
Power On/Start Call key
Turns on the handset. This key also affects some of the states of the
handset. See “The states of the WLAN Handset” on page 8.
B
Power Off/End Call key
Ends an active call and turns off the handset.
The user must end every call to release system resources and allow the
handset to function properly.
Nortel Networks WLAN Handset 2210/2211 User Guide
6
Getting started
Table 1 WLAN Handset buttons, keys, and descriptions (Sheet 2 of 2)
Button/key
C
Ftre
Description
Feature and Display soft keys
The first of the four soft keys is the Feature soft key, which starts or ends
a feature. The next three soft keys are Display keys, which show feature
options.
Menu key
D
Displays the full description of the Display soft keys abbreviations and
accesses the handset features.
Function key
E
Accesses handset functions when in active (idle) state.
The Function key also provides access to the User Option menu in the
standby state.
Line key
F
Accesses the Feature menu. For more information on Feature menu.
See “Feature menu – LINE key” on page 17.
Up, Down, and Select buttons
Enables you to navigate and activate the various menu options.
Adjusts the speaker and ringer volume.
G
Push-to-Talk button
Push-to-Talk is available on the WLAN Handset 2211 only.
Activates the Push-to-Talk feature on the WLAN Handset 2211. For
more information on the Push-to-Talk feature. See “Push-to-Talk” on
page 22.
H
WLAN Handset display
There are three areas to the WLAN Handset display:
• Status area
• Information area
• Feature options area
The following figure shows an example of the WLAN Handset display.
Figure 3 WLAN Handset display
Status area
Information area
Ftur
N0009103 2.0
Aaaa
Bbbb
Cccc
Feature options area
Getting started
7
Status area
The status area displays the handset status. It can include:
• status indicators (see the table below)
• left and right arrows
• a series of dots representing the line keys, which change to a number when active
The following table describes the status indicators on your WLAN Handset.
Table 2 Status indicators
No Service
You are outside the coverage area and cannot receive or place calls. An audible alarm
also sounds. Return to the coverage area to re-establish the connection.
Your battery pack charge is low. An audible beep also sounds. Replace your battery
pack within two minutes.
You have a new voicemail message.
Melody
A melody is played when the WLAN Handset is turned on for the first time following a
completed charge.
Note: The No Service status indicator displays in the information area of the handset display.
Information area
The Information area shows:
• the extension number of the handset
• a line for general information
• features and call information when the handset is in use
Feature options area
When a feature is activated, or when you are on an active call, the Feature options area shows you
the action you must take to proceed.
For example: Pswd. This means you must enter your mailbox password.
The Feature options area shows the label for the Ftre soft key and for the three display soft keys.
These button labels appear directly above the Feature and display soft keys, and to the right of the
Ftre label on the display. These button labels vary, depending on the feature in use.
Note: The WLAN Handset does not support scrolling. Therefore any features that require the
ability to scroll are not supported.
Nortel Networks WLAN Handset 2210/2211 User Guide
8
Getting started
The states of the WLAN Handset
The WLAN Handset can be in one of the states described in the following table.
IMPORTANT!
User MUST end every call
The user must end every call, by pressing the Power Off/End Call key, to
release system resources and allow the WLAN Handset to function properly.
If this is not done, it will result in the ringer not ringing and you might miss an
important call.
Table 3 States of the WLAN Handset (Sheet 1 of 2)
State
Description
Power off
The handset is turned off. It is not registered with the Call Server.
Normally the handset enters the power-off state when the user presses Power Off/End
Call for approximately two seconds when the set is in the standby state.
The batteries can be recharged in the power-off state.
Standby
This is the normal state when the handset is online but inactive. In the standby state, the
handset can receive calls and access the User Option menu.
To perform other operations, the handset must be active (off-hook).
The standby state uses less power than the active (idle) state. The batteries can be
recharged in the standby state.
When the handset is in the standby state, the programmed extension number is shown in
the display area.
Active
(off-hook)
This is equivalent to a regular telephone being off-hook.
The handset goes to the active (off-hook) state by pressing Power On/Start Call when
the handset is in the standby or active (idle) states.
Active (idle)
This is equivalent to a regular telephone being idle. The active (idle) state is reached in
three ways:
• The user presses MENU when the handset is in the standby state.
• An incoming call in the Standby state causes the handset to go to the active (idle)
state and begin ringing.
• The user presses FCN and 3 when the handset is in the active (off-hook) state to
access the function menu. In this state, the handset does not ring when a call comes
in.
In the active (idle) state, the handset and access point exchange a small packet
approximately once every 15 milliseconds. This increases the power consumption and
consumes bandwidth, particularly for the RF portion of the link. Therefore, the set is not
normally left in the active (idle) state except for special situations.
Error
The handset enters the error state when it loses the signal from the access point.
If the handset regains the signal within approximately 20 seconds, it returns to its state
when it lost the signal. If the handset is out of range for longer than 20 seconds, the set
restarts and returns to the standby state.
For more information on error messages, see “Display messages” on page 27.
N0009103 2.0
Getting started
9
Table 3 States of the WLAN Handset (Sheet 2 of 2)
State
Description
Active call
The handset enters the active call state when a user is in an active conversation. To enter
this state, the user either makes a call or answers an incoming call.
Push-to-Talk
The Push-to-Talk state begins with the first Push-to-Talk transmission and ends when
(WLAN Handset there has been no two-way radio traffic on the channel for 10 seconds.
2211 only)
While in the Push-to-Talk state, it is not possible to use the keypad for any other
functions. However, it is possible to place and receive telephone calls.
Nortel Networks WLAN Handset 2210/2211 User Guide
10
Getting started
Setting up the WLAN Handset
This section describes the following initial setup options for your WLAN Handset:
• “Select Ring Type” on page 10
• “Select Noise Mode” on page 11
• “Enter Extension” on page 11
• “Set up Push-to-Talk” on page 12
• “Adjust ringer volume” on page 12
• “Adjust speaker volume” on page 12
• “Silence the ringer” on page 13
Select Ring Type
The Ring Type option enables you to set the WLAN Handset ring tone for the three different
ringers: Telephone, Auxiliary 1, and Auxiliary 2. Auxiliary 1 and Auxiliary 2 are reserved for
future use.
Select the Ring Type:
1
Press
2
Press the Up and Down buttons to scroll through the menu and highlight Ring Type.
3
Press the Select button (or OK) to select Ring Type.
4
Press the Up and Down buttons to scroll through the menu and highlight Telephone.
5
Press the Select button (or OK) to select Telephone.
6
Press the Up and Down buttons to scroll through the menu and highlight one of the following
settings:
•
•
•
when in the standby state.
Normal: Produces an audible ring (default).
Vibrate: Vibrates.
Vib/Norm: Vibrates for six seconds, then rings.
7
Press the Select button (or OK) to select the setting.
8
Do one of the following:
•
•
Press UP to return to the previous menu and set another option.
Press
to exit all menus and return to the standby state.
You can also press Exit from the top-level menu to exit the menu and return to the active
(off-hook) state.
N0009103 2.0
Getting started
11
Select Noise Mode
The Noise Mode option enables you to adjust the WLAN Handset for different levels of noise
within the working environment.
Select the Noise Mode:
1
Press
2
Press the Up and Down buttons to scroll through the menu and highlight Noise Mode.
3
Press the Select button (or OK) to select Noise Mode.
4
Press the Up and Down buttons to scroll through the menu and highlight one of the following
settings:
•
•
•
when in the standby state.
Normal: For most office environments (default).
High: For moderate background noise.
Severe: For extremely noisy conditions.
5
Press the Select button (or OK) to select the setting.
6
Do one of the following:
•
•
Press UP to return to the previous menu and set another option.
Press
to exit all menus and return to the standby state.
You can also press Exit from the top-level menu to exit the menu and return to the active
(off-hook) state.
Enter Extension
The Extension option enables the user to enter the extension number for the WLAN Handset. This
number is used to identify the handset. It displays when the handset is in the standby state.
Note: Nortel Networks recommends you enter the Directory Number (DN) of the system or the
full number of your handset. When the WLAN Handset is in the active (idle) state, the DN of the
system displays.
Enter the Extension number:
1
Press
2
Press the Up and Down buttons to scroll through the menu and highlight Extension.
3
Press the Select button (or OK) to select Extension.
4
Enter the extension number using the handset keypad.
5
Press Save to save your extension number.
6
Do one of the following:
•
•
when in the standby state.
Press UP to return to the previous menu and set another option.
Press
to exit all menus and return to the standby state.
Nortel Networks WLAN Handset 2210/2211 User Guide
12
Getting started
You can also press Exit from the top-level menu to exit the menu and return to the active
(off-hook) state.
Set up Push-to-Talk
Push-to-Talk is available on the WLAN Handset 2211 only.
Push-to-Talk mode enables two-way radio communication with another WLAN Handset 2211
user. You can enable/disable Push-to-Talk mode and select a channel.
Set up Push-to-Talk for the handset:
1
Press
2
Press the Up and Down buttons to scroll through the menu and highlight Push-to-Talk.
3
Press the Select button (or OK) to select Push-to-Talk.
4
Press the Up and Down buttons to scroll through the menu and highlight one of the following
settings:
•
•
when in the standby state.
Enable: Enables Push-to-Talk mode.
Disable: Disables Push-to-Talk mode.
5
Press the Select button (or OK) to select the setting.
6
If enabled, select a channel (1 to 8).
7
Do one of the following:
•
•
Press UP to return to the previous menu and set another option.
Press
to exit all menus and return to the standby state.
You can also press Exit from the top-level menu to exit the menu and return to the active
(off-hook) state.
Adjust ringer volume
You can increase or decrease the ringer volume of the WLAN Handset 2211 only.
To adjust the ringer volume, press the Up or Down button while the handset is ringing.
Adjust speaker volume
You can increase or decrease the speaker volume of the WLAN Handset.
To adjust the speaker volume, press the Up or Down button while in a call.
N0009103 2.0
Getting started
13
Silence the ringer
You can silence (or mute) the WLAN Handset ringer.
To silence the ringer, press
while the handset is ringing.
Nortel Networks WLAN Handset 2210/2211 User Guide
14
Getting started
N0009103 2.0
15
Feature and function menus
You can view the features and functions programmed in your system using various menus, soft key
features, and the Line (DN) features. You can access some functions and features using one or
more or the methods described in this section.
This section describes the WLAN Handset feature and function menus:
• “Feature and function keys” on page 15
• “Soft Key Abbreviations menu – MENU key” on page 16
• “Function menu – FCN key” on page 16
• “Feature menu – LINE key” on page 17
Note: For more information about the features available to your WLAN Handset and how to use
them, refer to the Business Communications Manager Telephone Feature Card.
Feature and function keys
The following table lists the features and functions available on the WLAN Handset, along with
their key sequence.
Table 4 WLAN Handset feature and function keys
Key sequence
Feature/Function
+1
Mute
+2
+3
+4
+5
+6
+7
+8
Hold
+1
Intercom
+2
Intercom
+3
Page - General
+4
Last Number Redial
Goodbye
Directory
Inbox
Outbox
Quit
Copy
+5
Conference Call
+6
Call Forward
Nortel Networks WLAN Handset 2210/2211 User Guide
16
Feature and function menus
Soft Key Abbreviations menu – MENU key
Use the Soft Key Abbreviations menu to view the full description of the soft key abbreviations and
access the WLAN Handset features.
Activate a feature
1
Place the handset in the active (idle) or active (off-hook) state.
2
Press
3
Press the Up and Down buttons to scroll through the list of features. The full description is
highlighted in the display area.
4
Do one of the following:
•
•
to view the Soft Key Abbreviations menu.
Press the Select button (or OK) to activate the highlighted feature.
Press the appropriate number key. The feature does not have to be highlighted.
Function menu – FCN key
Use the Function menu to view and activate the WLAN Handset functions.
Activate a function
1
Place the handset in the active (idle) or active (off-hook) state.
2
Press
to display the first four functions in the display area. Press
functions.
3
Press the Up and Down buttons to scroll through the list of functions. The abbreviation is
highlighted in the display area.
4
Do one of the following:
•
•
again to view more
Press the Select button (or OK) to activate the highlighted feature.
Press the appropriate number key. The feature does not have to be highlighted.
N0009103 2.0
Feature and function menus
17
Feature menu – LINE key
Use the Feature menu to view and activate the WLAN Handset line features. These features are
programmed on each handset using the six line keys (number keys 1 through 6).
Note: A feature must be available on the system before it can be programmed on a handset.
Activate a feature
1
Place the handset in the active (idle) or active (off-hook) state.
2
Press
screen.
3
Press the Up and Down buttons to scroll through the list of features. The abbreviation is
highlighted in the display area.
4
Do one of the following:
•
•
to view the first screen of the Feature menu. Press
again to view the second
Press the Select button (or OK) to activate the highlighted feature.
Press the number key (1 through 6) corresponding to the desired feature. The feature does
not have to be highlighted.
Program Feature menu items
You must be in the active (off-hook) state to program a Feature menu item.
External autodial
1
Press Feature *1.
2
Press
3
Dial the external number, including routing codes.
4
Press OK to store the number.
and a number key (1 through 6) corresponding to an available key.
Internal autodial
1
Press Feature *2.
2
Press
3
Dial the extension number.
4
Press OK to store the number.
and a number key (1 through 6) corresponding to an available key.
Features
1
Press Feature *3.
2
Press
3
Press Feature and enter the feature code.
and a number key (1 through 6) corresponding to an available key.
Nortel Networks WLAN Handset 2210/2211 User Guide
18
Feature and function menus
4
Press OK to store the feature code.
Erase memory buttons
1
Press Feature *1.
2
Press
3
Press OK to erase the button.
N0009103 2.0
and a number key (1 through 6) corresponding to an available key.
19
Features, functions, and buttons
This section describes some of the WLAN Handset buttons and call features:
• “Basic call features” on page 19
• “Push-to-Talk” on page 22
Note: For more information about the features available to your WLAN Handset and how to use
them, refer to the Business Communications Manager Telephone Feature Card.
IMPORTANT!
User MUST end every call
The user must end every call, by pressing the Power Off/End Call key, to
release system resources and allow the WLAN Handset to function properly.
If this is not done, it will result in the ringer not ringing and you might miss an
important call.
Basic call features
You can make external and internal calls using the following features:
• Make a call
• Answer a call
• Hold a call
• Use the headset
• Mute a call
Make a call
There are many ways to make a call, depending on your handset programming and the type of call.
External calls using line keys
1
Press
2
Press
3
Press a number key (1 through 6) corresponding to the desired line key.
4
Dial the external number.
to go off-hook.
to access the Feature menu.
External calls using intercom keys
1
Press
2
Press
to go off-hook.
to access the Feature menu.
Nortel Networks WLAN Handset 2210/2211 User Guide
20
Features, functions, and buttons
3
Press a number key (1 through 6) corresponding to the desired intercom key and enter a line
pool access code or destination code.
4
When you hear an external dial tone, dial the external number.
Note: Contact your system administrator for a list of line pool codes. PRI lines do not support line
pool access codes; they must be configured as a destination code. When entering a destination
code on PRI lines, you will not hear dial tone.
Internal calls using intercom buttons
1
Press
2
Press
3
Press a number key (1 through 6) corresponding to the desired intercom key.
4
Dial the extension number.
to go off-hook.
to access the Feature menu.
Note: Contact your system administrator for a list of extension numbers.
Answer calls
When your handset rings or vibrates, a line number on the display flashes, and the display shows
information about the call, such as the caller’s name and extension:
• Press
.
Hold
•
•
While on a call, press
and
.The indicator for the line on hold flashes.
To retrieve a held call, press
, while in the active (off-hook) state. Then press the number
key corresponding to the flashing line number.
Headset
You must have a headset installed on your handset to use this feature.
• Connect the headset to the headset jack. Follow the steps in “Make a call” on page 25 to make
your call.
• To answer a call with a headset plugged into your handset, press any key other than Power
On/Start Call, Power Off/End Call, the soft keys, or the Up/Down/Select buttons.
Mute
•
•
While on a call, press
and
to turn the microphone off.
Press
and
again to turn the microphone on.
N0009103 2.0
Features, functions, and buttons
21
End calls
You must end every call, by pressing the Power Off/End Call key, to release system resources and
allow the WLAN Handset to function properly.
If this is not done, it will result in the ringer not ringing for the next call and you might miss an
important call.
Nortel Networks WLAN Handset 2210/2211 User Guide
22
Features, functions, and buttons
Push-to-Talk
Push-to-Talk is available on the WLAN Handset 2211 only.
Push-to-Talk mode enables WLAN Handsets 2211 to operate in a group broadcast mode in
addition to the standard handset operation. The WLAN Handset 2211 supports eight multicast
channels with the current channel saved in the handset memory.
IMPORTANT!
Pressing any other keys or buttons (such as the Up/Down/Select or keypad
keys) while in a Push-to-Talk call will terminate the call.
The call period
Push-to-Talk mode operates on the concept of a call period. The Push-to-Talk call period begins
with the first transmission and ends when there has been no two-way radio traffic on the channel
for 10 seconds.
The Push-to-Talk mode controls the handset keypad during the call period. Therefore, it is not
possible to use the keypad for any other functions. However, it is possible to place and receive
telephone calls.
Initiate a Push-to-Talk call
1
Press the Push-to-Talk button on the right side of the handset.
The “start transmit” tone sounds within two seconds. The channel is active and the display
screen shows the current active channel.
2
Speak into the handset’s microphone.
All WLAN Handsets 2211 that are monitoring that channel hear the transmission.
3
Release the Push-to-Talk button.
The “end transmit” tone sounds. The handset enters the waiting state, where it monitors the
channel for up to 10 seconds.
Receive a Push-to-Talk transmission
Upon receiving a Push-to-Talk transmission, the “receiving alert” tone sounds and the WLAN
Handset 2211 enters the receive state.
In this state, the handset receives all conversations on the selected channel. The display shows the
current active channel, the caller ID of the current transmitter, and an indication that the handset is
receiving a broadcast transmission.
N0009103 2.0
Features, functions, and buttons
23
At the end of a transmission, the handset enters the waiting state, where it monitors the channel for
up to 10 seconds and displays “Waiting” on the screen. If no other transmission occurs within 10
seconds, the “end call” tone sounds and the handset becomes idle.
Respond to a Push-to-Talk call
1
When you hear a transmission, press the Push-to-Talk button on the right side of the handset.
The “start transmit” tone sounds. Since all handsets on that channel are already in the receive
state, there is no two-second delay.
2
Speak into the handset’s microphone.
If no transmission occurs during the 10-second countdown period, the “end call” tone sounds
and the handset becomes idle.
Change the Push-to-Talk volume
Use the Up and Down buttons to increase or decrease volume.
A separate volume is maintained in Push-to-Talk mode.
Mute a current Push-to-Talk call
Mute affects only the current call. When the next call period starts, the audio is automatically
unmuted. Mute does not allow the user to use the handset’s keypad for anything else.
1
Press the Mute soft key.
The following prompt displays:
Mute Two-Way Radio?
2
Press the Yes soft key to mute the call.
The prompt disappears after three seconds if there is no response.
Unmute a Push-to-Talk call
1
Press the Unmute soft key.
The following prompt displays:
Unmute Two-Way Radio?
2
Press the Yes soft key to unmute the call.
The prompt disappears after three seconds if there is no response.
Nortel Networks WLAN Handset 2210/2211 User Guide
24
Features, functions, and buttons
End a Push-to-Talk call
Only the current call is terminated for this WLAN Handset 2211. When the next call period starts,
the handset is again in the receive state. You can rejoin a still-active session by initiating a
Push-to-Talk call.
1
Press the Terminate soft key.
The following prompt displays:
Terminate Two-Way Radio?
2
Press the Yes soft key to end the call.
Push-to-Talk audio is immediately stopped and the handset returns to regular mode.
Answer a call during a Push-to-Talk call
An incoming call can be answered while in a Push-to-Talk call. To announce an incoming call, the
WLAN Handset 2211 rings with a low-volume ring and displays a system message.
1
Press
.
The Push-to-Talk session is pre-empted.
2
After the call is over, press
as usual to go back on-hook.
The Push-to-Talk session goes out of pre-empted mode and becomes active again. If an active
Push-to-Talk call has not ended, the audio is heard again.
Make a call during a Push-to-Talk call
A call can be made while in a Push-to-Talk call.
1
Press
.
The Push-to-Talk session is pre-empted.
2
After the call is over, press
as usual to go back on-hook.
The Push-to-Talk session goes out of pre-empted mode and becomes active again. If an active
Push-to-Talk call has not ended, the audio is heard again.
N0009103 2.0
25
Troubleshooting
This section describes the options to view specific information about your WLAN Handset and
error messages displayed by your WLAN Handset. This information is useful in troubleshooting
numerous problems.
This section contains information about:
• “View Alias IP Address” on page 25
• “View Current IP Address” on page 25
• “View Current Call Server” on page 26
• “View Terminal Type” on page 26
• “Display messages” on page 27
View Alias IP Address
The Alias IP Address option shows the IP address currently assigned to the WLAN Handset by the
call server. The Alias IP Address option is for display purposes only. You cannot edit this option.
View the Alias IP Address:
1
Press
2
Press the Up and Down buttons to scroll through the menu and highlight Alias IP Addr.
3
Press the Select button (or OK) to view the alias IP address for the handset.
4
Do one of the following:
•
•
when in the standby state.
Press UP to return to the previous menu and set another option.
Press
to exit all menus and return to the standby state.
You can also press Exit from the top-level menu to exit the menu and return to the active
(off-hook) state.
View Current IP Address
The Current IP Address option enables you to view the current IP address of the WLAN Handset.
The Current IP Address option is for display purposes only. You cannot edit this option.
View the Current IP Address:
1
Press
2
Press the Up and Down buttons to scroll through the menu and highlight Current IP Addr.
3
Press the Select button (or OK) to view the current IP address for the handset.
4
Do one of the following:
•
when in the standby state.
Press UP to return to the previous menu and set another option.
Nortel Networks WLAN Handset 2210/2211 User Guide
26
Troubleshooting
•
Press
to exit all menus and return to the standby state.
You can also press Exit from the top-level menu to exit the menu and return to the active
(off-hook) state.
View Current Call Server
The Current Call Server option shows the Call Server IP address and port number. This option is
for display purposes. You cannot edit this option.
View the Current Call Server:
1
Press
2
Press the Up and Down buttons to scroll through the menu and highlight Current Call Svr.
3
Press the Select button (or OK) to view the current call server IP address and port number for
the handset.
4
Do one of the following:
•
•
when in the standby state.
Press UP to return to the previous menu and set another option.
Press
to exit all menus and return to the standby state.
You can also press Exit from the top-level menu to exit the menu and return to the active
(off-hook) state.
View Terminal Type
The Terminal Type option shows the handset type used by the system. The Terminal Type option is
for display purposes only. You cannot edit this option.
View the Terminal Type:
1
Press
2
Press the Up and Down buttons to scroll through the menu and highlight Terminal Type.
3
Press the Select button (or OK) to view the terminal type for the handset.
when in the standby state.
Note: The terminal type must be i2004. If it is not, please contact your system administrator.
4
Do one of the following:
•
•
Press UP to return to the previous menu and set another option.
Press
to exit all menus and return to the standby state.
You can also press Exit from the top-level menu to exit the menu and return to the active
(off-hook) state.
N0009103 2.0
Troubleshooting
27
Display messages
The following table lists the messages that can appear on your WLAN Handset. If a message
appears that cannot be resolved, contact your system administrator.
Table 5 WLAN Handset messages, descriptions, and actions (Sheet 1 of 3)
Message
Description
Action
3 chirps
WLAN Handset is not able to
communicate with the best access
point, probably because that access
point has no bandwidth available.
None. This is only a warning. The
call will handoff to the best access
point once it becomes available.
(battery icon), Low Battery Low battery
message, and beep
In call: the battery icon displays and
a soft beep is heard when the user is
on the WLAN Handset and the
battery charge is low. User has 15–30
minutes of battery life left.
Not in call: The battery icon displays
whenever the battery charge is low.
The message Low Battery and a
beep indicate a critically low battery
charge. The WLAN Handset will not
work until the battery pack is
charged.
Battery Failure
The battery pack is not functioning.
Replace the battery pack with a new
or confirmed Nortel Networks
battery pack. Any non-Nortel
Networks battery packs will not
work.
Charging …
The WLAN Handset is charging in
the Desktop Charger.
No action needed.
Charge Complete
The WLAN Handset is now fully
charged.
No action needed.
Checking Code
The WLAN Handset is checking for None. This message lasts for
a newer version of software that
approximately one second. If
should be downloaded.
message remains displayed, power
off the WLAN Handset and contact
your system administrator.
Nortel Networks WLAN Handset 2210/2211 User Guide
28
Troubleshooting
Table 5 WLAN Handset messages, descriptions, and actions (Sheet 2 of 3)
Message
Description
Action
DHCP Error (1-4)
DHCP Error 1
The WLAN Handset cannot locate a
DHCP server. It will try every four
seconds until a server is located.
DHCP Error 2
The WLAN Handset has not
received a response from the DHCP
server to a request for an IP address.
It will retry until a DHCP server is
found.
DHCP Error 3
The server refuses to lease the
WLAN Handset an IP address. It will
keep trying.
DHCP Error 4
The DHCP server offered the WLAN
Handset a lease that is too short. The
minimum lease time is 10 minutes.
One hour is the minimum
recommended lease time.
Can’t Renew DHCP
Contact your system administrator.
Erase Failed
Download process failed to erase the If error “int. error: 0F” is displayed,
memory in the WLAN Handset.
turn the WLAN Handset off, then on
again. If error persists, contact your
system administrator.
Erasing memory
The WLAN Handset has determined None. When the progress bar fills the
that a download should occur and is display line, the erase operation is
erasing the current software from
complete.
memory.
Internal Err. # #
The WLAN Handset has detected a
fault from which it cannot recover.
Multiple GW
The WLAN Handset is attempting to Contact your system administrator.
communicate with two WLAN IP
Telephony Managers 2245.
Network Busy
All access points are full or busy.
Try call again later.
No IP Address
Invalid IP address.
Contact your system administrator.
No Net Access
Cannot authenticate/associate with
access point
Contact your system administrator.
No Net Found
Can be caused by a variety of issues
Contact your system administrator.
No Reg Domain
Regulatory Domain not set
Contact your system administrator.
No PBX Response
The WLAN Handset tried to send a Contact your system administrator.
message to the Call Server and failed
to get a response.
N0009103 2.0
Record the error code so it can be
reported. Turn the WLAN Handset
off, then on again. If error persists,
contact your system administrator.
Troubleshooting
29
Table 5 WLAN Handset messages, descriptions, and actions (Sheet 3 of 3)
Message
Description
Action
Server Busy
The WLAN Handset is attempting to None. The WLAN Handset will
download from a TFTP Server that is automatically retry the download
busy downloading other devices and every few seconds.
refusing additional downloads.
System Locked (with Busy System is locked
Tone)
Try the call again, system has been
locked for maintenance.
System Busy (with Busy
Tone)
System is busy or out of resources
All call paths are in use, try the call
again in a few minutes.
TFTP ERROR(x):yy
A failure has occurred during a
software download.
Power off the WLAN Handset, then
turn it on again to retry the
download.
If the error persists, contact your
system administrator.
Updating Code
The WLAN Handset is downloading None. Do not turn the WLAN
new software into memory. The
Handset off during this operation.
number icons at the bottom of the
display indicate which file number is
currently being downloaded. This
message also displays a progress bar.
When the progress bar fills the
display line, the update operation is
complete on that file.
Waiting
The WLAN Handset has attempted
some operation several times and
failed, and is now waiting for a
period of time before attempting that
operation again.
None. The WLAN Handset is
waiting for a specified period of time
before attempting that operation
again.
Nortel Networks WLAN Handset 2210/2211 User Guide
30
Troubleshooting
N0009103 2.0
31
WLAN Handset, headset, batteries, and chargers
This section contains information about:
• “Cleaning your WLAN Handset” on page 31
• “The headset” on page 32
• “Battery packs” on page 33
• “Desktop Charger” on page 35
• “Gang Charger” on page 37
• “Clean the Desktop Charger” on page 38
• “Important Safety Instructions and Product Information” on page 39
Cleaning your WLAN Handset
The WLAN Handset occasionally must be cleaned to maintain appearance. In general, wiping the
handset surface with a clean water-dampened cloth or paper towel removes most films or residues.
If more rigorous cleaning is required, you can use:
• A mild detergent solution. Be sure to wipe away any detergent residue with a plain
water-dampened cloth.
• Any general-purpose household glass and surface cleaner. Do not spray the handset directly.
Spray the cleaner on a soft cloth or paper towel, then wipe the handset.
• Pre-treated cloths, like those used for eyeglasses or cameras.
• Pre-moistened towelettes. Avoid those containing lanolin or aloe, which leave a slippery
residue.
• Isopropyl alcohol, applied by a damp cloth or paper towel. When using alcohol, do not rub the
keypad characters vigorously, as this will significantly degrade legibility.
IMPORTANT!
•
•
•
•
Do not use furniture polishes, waxes, or plasticizer-based cleaner.
Do not use lanolin, aloe, glycerin, or other skin care products.
Do not apply any solvent such as acetone or mineral spirits.
Do not directly spray or immerse the handset.
If the headset connector becomes dirty, you may experience a scratchy or intermittent signal. To
clean the connector, dip the padded end of either a wooden- or paper-handled cotton swab in
isopropyl alcohol. Gently insert in the connector and twist, repeating several times. If available,
blow compressed air into the connector to clear debris.
Nortel Networks WLAN Handset 2210/2211 User Guide
32
WLAN Handset, headset, batteries, and chargers
The headset
Nortel Networks offers optional headsets, with a quick-disconnect jack, for use in noisy
environments or for use if you need to have your hands free while talking. The headset is not
available in all regions.
To use the headset, simply plug it into the jack on the bottom of your WLAN Handset. If the
headset is disconnected using the quick-disconnect jack, there is no audio connection on the
headset or the speaker and microphone in the WLAN Handset.
The headset is specifically designed to work with the WLAN Handset. Nortel Networks does not
recommend using other headsets.
The following figure shows the headset jack for the WLAN Handset.
Figure 4 WLAN Handset bottom view
IMPORTANT!
The only authorized headsets that can be used with WLAN Handset are
those obtained from Nortel Networks, Plantronics, or their reseller partners.
N0009103 2.0
WLAN Handset, headset, batteries, and chargers
33
Battery packs
The battery pack for the WLAN Handset must be recharged periodically. The Nickel Metal
Hydride (NiMH) rechargeable battery pack provides four hours of talk time or 70 hours of standby
time. Standby time is when the handset is turned on, but not in an active call.
The following figure shows the location of the battery pack.
Figure 5 WLAN Handset battery pack location
Low battery indicators
The WLAN Handset notifies you when the charge on the battery pack is low by displaying the
battery icon. If you are not in a call, you hear a loud beep. If you are in a call, you hear a soft beep
through the earpiece every six seconds. At this point, your handset has 15 to 30 minutes of battery
life left.
The Low Battery message in the display area and a loud beep indicate a critically low charge. The
handset will not work until the battery pack is charged.
Nortel Networks WLAN Handset 2210/2211 User Guide
34
WLAN Handset, headset, batteries, and chargers
Remove and insert the battery pack
Remove the battery pack
To release the battery pack, press both battery release buttons on the left and right sides of the
handset.
Insert the battery pack
Slide the battery pack straight into the handset cavity.
Do not force the battery pack into the handset.
Change the battery pack while in a call
1
Use Call Park to park the current call.
2
Quickly remove the discharged battery pack and replace it with a charged battery pack.
3
Press
4
Use Call Park to retrieve the parked call.
N0009103 2.0
to turn the handset back on.
WLAN Handset, headset, batteries, and chargers
35
Desktop Charger
The Nortel Networks WLAN Handset Desktop Charger is designed to fully charge the Nickel
Metal Hydride (NiMH) battery packs in approximately one and a half hours. The charger operates
in a 50° to 85° F (10° to 30° C) environment. Do not expose the charger to freezing temperatures
or direct sunlight.
The following figure shows the WLAN Handset 2210 and WLAN Handset 2211 Desktop
Chargers.
Figure 6 The WLAN Handset 2210 and WLAN Handset 2211 Desktop Chargers
WLAN Handset 2210
WLAN Handset 2211
The charger is shipped with the appropriate power supply for the site. Place the charger on a flat,
horizontal surface. Plug the power supply into the charger and into an appropriate wall outlet.
IMPORTANT!
Do not place anything in the Desktop Charger other than the WLAN Handset.
Doing so might damage the contacts. Bent contacts can keep the WLAN
Handset from charging.
Nortel Networks WLAN Handset 2210/2211 User Guide
36
WLAN Handset, headset, batteries, and chargers
Use the Desktop Charger
Charge the WLAN Handset
1
Press
2
Place the handset, face forward, into the Desktop Charger.
to terminate any calls. The handset can be off or in standby mode during charging.
The red indicator light turns on.
The indicator light does not come on when the charger slot is empty, when the handset is not
inserted properly, or when the charger has no power.
3
Charge the battery pack.
If the handset is in standby mode, it displays its extension number and Charging…. It is fully
operational and can receive calls. If the handset is off, only Charging… displays and the
handset cannot receive calls.
It is normal for the battery pack to become warm when charging.
4
When the handset is fully charged, Charge Complete displays. Remove the handset from the
charger.
The red indicator light remains on until the handset is removed from the charger.
N0009103 2.0
WLAN Handset, headset, batteries, and chargers
37
Gang Charger
The Nortel Networks WLAN Handset 2211 Gang Charger fully charges four Nickel Metal
Hydride (NiMH) battery packs in approximately one and a half hours. Chargers operate in a 50° to
85° F (10° to 30° C) environment. Do not expose them to freezing temperatures or direct sunlight.
The following figure shows the WLAN Handset 2211 Gang Charger.
Figure 7 WLAN Handset 2211 Gang Charger
The Gang Charger comes with the appropriate power supply for the site. Place the Gang Charger
on a flat, horizontal surface. Plug the power supply into the Gang Charger and into an appropriate
wall outlet.
IMPORTANT!
Do not place anything in the Gang Charger other than the WLAN Handset
2211 battery packs. You might damage the contacts. Bent contacts can keep
the battery packs from charging.
Use the Gang Charger
Charge the battery pack
1
Press both battery release buttons to remove the battery pack from the handset.
2
Insert the battery pack into one of the four charging bays.
The LED above the charging bay turns on. If the LED starts blinking as soon as the battery
pack is inserted, remove the battery pack and reinsert it into the charger.
If the LED continuously blinks during the charging process, the battery pack is unusable.
Properly dispose of the unusable battery pack.
3
When charging is complete, the LED turns off. Remove the battery pack from the charger.
Nortel Networks WLAN Handset 2210/2211 User Guide
38
WLAN Handset, headset, batteries, and chargers
Clean the Desktop Charger
Clean the Desktop Charger by wiping the surface with a clean, water-dampened cloth or paper
towel. A mild detergent solution can be used. Be sure to wipe away any detergent residue with a
plain water-dampened cloth.
CAUTION
Unplug the charger before attempting to clean it.
Do not immerse the charger in water or other liquid.
Do not pour liquids into the charger slot.
The battery pack contacts on the WLAN Handset can be cleaned with isopropyl (rubbing) alcohol
applied with a Q-tip, cloth, or paper towel. Do not push or pull the exposed battery pack contacts.
IMPORTANT!
•
•
•
•
•
Always use the Desktop Charger provided to charge the battery pack.
Other chargers can damage the battery pack.
Only use the original plug-in power adapter for the Desktop Charger.
Do not dip the battery pack in water or throw into the fire.
Do not dispose of the battery pack with your domestic waste. Take used
battery packs to an appropriate collection point for recycling or send them
back to your supplier or servicing agent.
Replacement battery packs are available from your supplier or servicing
agent.
N0009103 2.0
WLAN Handset, headset, batteries, and chargers
39
Important Safety Instructions and Product Information
Before using your telephone equipment, you should always follow basic safety instruction to
reduce the risk of fire, electrical shock and injury to persons, and damage to property.
1
Read and understand all instructions.
2
Follow all warnings and instructions including those marked on the product.
3
Unplug this product before cleaning. Do not use liquid cleaners or aerosol cleaners. Use damp
cloth for cleaning.
4
Do not install the telephone equipment in the bathroom or near a wash bowl, kitchen sink, or
laundry tub, in a wet basement, or near a swimming pool.
5
Slots or openings in the equipment are provided for ventilation to protect it from over-heating.
These openings must not be blocked or covered.
6
The product should be operated only from the type of power source indicated on the
instructions. If you are not sure of the type of power supply, consult your dealer or local power
company.
7
Do not overload wall outlets and extension cords as this can result in fire or electrical shock.
8
Never push objects of any kind into this product through cabinet slots as they may touch
dangerous voltage points or short out parts that could result in fire, electrical shock, or injury.
Never spill liquid of any kind into this product.
9
To reduce the risk of electrical shock or burns, do not disassemble this product. Opening or
removing covers may expose you to dangerous voltages, dangerous electrical current, or other
risks. Incorrect reassemble can cause electrical shock when the appliance is subsequently
used. If the product need repair, consult your dealer.
10 Refer servicing to qualified service personnel.
11 Avoid using telephone during an electrical storm. There may be a risk of electrical shock from
lightning.
12 Do not use the telephone to report a gas leak in the vicinity of the leak
13 Do not place the base or charger near microwave ovens, radio equipment, or non-ground
connected televisions.
These appliances may cause electrical interference to the base or handset
14 The charger must be placed on a hard, flat surface and connected to a functional 120 volt AC
power source depending on the country of use.
15 This telephone will not operate in the event of a blackout. Please keep a backup phone for
emergencies.
Intrinsic safety
Do not use the handset in conditions where there is a danger of electrically ignited explosions.
Nortel Networks WLAN Handset 2210/2211 User Guide
40
WLAN Handset, headset, batteries, and chargers
Exposure to sunlight, heat and moisture
Do not expose the cordless phone to direct sunlight for long periods. Keep the cordless phone
away from excessive heat and moisture.
Spare parts and accessories
Use only approved spare parts and accessories. The operation of non-approved parts cannot be
guaranteed and may even cause damage.
Power failure
In the event of a power failure or flat battery, you cannot use the handset to make or receive calls.
Battery Precautions
1
Periodically clean the charge contacts on both the charger and handset.
2
Exercise care in handling batteries in order not to short the batteries with conducting materials
such as rings, bracelets, and keys. The batteries or conducting material may overheat and cause
burns or fire
3
Do not open or mutilate the batteries, released electrolyte is corrosive and may cause damage
to the eyes or skin. The electrolyte may be toxic of swallowed.
4
During charging batteries heat up. This is normal and not dangerous.
5
Do not use non-Nortel charging devices. This could damage the batteries.
Notices
Before installing this equipment, users should ensure that it is permissible to be connected to the
facilities of the local telecommunications company. The equipment must also be installed using an
acceptable method of connection. The customer should be aware that compliance with the above
conditions may not prevent degradation of service in some situations.
Repairs to certified equipment should be coordinated by a representative designated by the
supplier. Any repairs or alterations made by the user to this equipment, or equipment malfunctions,
may give the telecommunications company cause to request the user to disconnect the equipment.
Users should ensure for their own protection that the electrical ground connections of the power
utility, telephone lines and internal metallic water pipe system, if present, are connected together.
This precaution may be particularly important in rural areas.
CAUTIONS: Users should not attempt to make such connections themselves, but should contact
the appropriate electric inspection authority, or electrician, as appropriate.
N0009103 2.0
WLAN Handset, headset, batteries, and chargers
41
If your telephone equipment causes harm to the telephone network, the telephone company may
ask you to disconnect the system from the line until the problem has been corrected or they may
discontinue your service temporarily. If possible, they will notify you in advance, But if advance
notice is not practical, you should be notified as soon as possible. You will be informed of your
right to file a complaint with the FCC.
Your telephone company may make changes in its facilities, equipment, operations, or procedures
that could affect the proper functioning of your telephone system, If they do and it is possible, you
will be notified in advance to give you an opportunity to maintain uninterrupted telephone service.
If you experience trouble with this telephone system, disconnect it from the network until the
problem has been corrected or until you are sure that the equipment is not malfunctioning.
Note: This equipment has been tested and found to comply with the limits for a class B digital
device, pursuant to local regulations. These limits are designed to provide reasonable protection
against harmful interference in a residential installation. This equipment generates, uses and can
radiate radio frequency energy and, if not installed and used in accordance with the instructions,
may cause harmful interference to radio communications.
However, there is no guarantee that interference will not occur in a particular installation. If this
equipment does cause harmful interference to radio or television reception, which can be
determined by turning the equipment off and on, the user is encouraged to try to correct the
interference by one or more of the following measures:
— Reorient or relocate the receiving antenna.
— Increase the separation between the equipment and receiver.
— Connect the equipment into an outlet on a circuit different from that to which the receiver
is connected.
— Consult the dealer or an experienced radio/TV technician for help.
Power Outage: In the event of a power outage, your cordless telephone will not operate. The
cordless telephone requires electricity for operation. You should have a telephone which does not
require electricity available for use during power outages.
Information to user: The users manual or instruction manual for an intentional or unintentional
radiator shall caution the user that changes or modifications not expressly approved by the party
responsible for compliance could void the user’s authority to operate the equipment.
Nortel Networks WLAN Handset 2210/2211 User Guide
42
WLAN Handset, headset, batteries, and chargers
N0009103 2.0