1
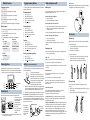
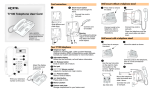
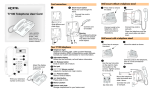
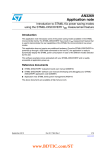
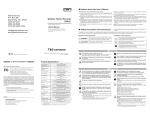
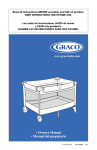
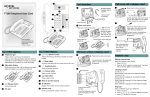
!NTENNA
#OLLARLIGHT
!
4ELEPHONESETUPCONTINUED
7!2.).'4HERECHARGEABLEBATTERYPACKMUSTBEFULLYCHARGED
BEFOREYOUUSEYOUR4HANDSETFORTHEFIRSTTIME
3ECURITYCODECONTINUED
4OCORRECTLYCHARGEANEWBATTERYPACKANDHANDSET
" $ISPLAY
4#ORDLESS4ELEPHONE
5SER#ARD
)NSTALLATION&IRSTTIMEBATTERYCHARGING
#HARGETHEBATTERYPACKINTHEBAT
TERYPORTATTHEBACKOFTHECHARGERFORA
MINIMUMOFMINUTES
# $ISPLAYBUTTONS
)NSTALLTHEBATTERYPACKONTOTHEBACK
OFTHEHANDSET
-EMORYAND
LINEBUTTONS $
' &EATURE
(ANDSET#ARD
& 2ELEASE
(OLD
0UTTHEHANDSETINTOTHEHANDSETPORT
ONTHECHARGER7HENTHECONTACTS
TOUCHCORRECTLYTHEHANDSETCHARGE
INDICATORLEFT,%$LIGHTSUPRED4HE
BATTERYPACKISFULLYCHARGEDWHENTHE
,%$TURNSGREENTHREEHOURS
%
(
.
(EADSETPORT
!"#
$%&
'()
*+,
-./
456
789:
#
0123
,ANYARD
ANCHOR
6OLUME
CONTROL
*
-ICROPHONE
)
$IALPAD
,
!
!NTENNACOLLARLIGHT
9OUR4CORDLESSTELEPHONE
&
$ISPLAY
3HOWSTHETIMEANDDATECALLINFORMATIONHANDSET
STATUSICONSANDGUIDESYOUTHROUGHFEATURESAND
OPTIONSMENUS
#
$
%NDSANACTIVECALL
'
j &EATUREBUTTON
3TARTSORCANCELSAFEATURE
k (OLDBUTTON
0LACESCALLSONHOLD
)
$IALPAD
*
-ICROPHONE
&EATUREMESSAGE
$ISPLAYBUTTONLABEL
$ISPLAYICONS
+
/PTIONSBUTTON-UTE
$ISPLAYBUTTON
,
$ISPLAYBUTTONS
-EMORYANDLINEBUTTONS
4HESEBUTTONSPROVIDEONETOUCHDIALINGFEATURE
OPERATIONSLINEACCESSORANSWERINGALINE
%
f 2ELEASEBUTTON
(
4HELABELSFORDISPLAYBUTTONSAPPEARONTHESECOND
LINEOFTHEDISPLAY$ISPLAYBUTTONFUNCTIONSCHANGE
WITHEACHFEATURE
(ANDSETCARD
/
"ATTERY
0ACK
&LASHESTOSIGNIFYANINCOMINGCALL
"
/PTIONS
BUTTON-UTE
+
Ú6.ORTEL.ETWORKS
04
0RINTEDIN4AIWAN
9OUR4CORDLESSTELEPHONE
0LACETHESPAREPACKINTOTHEBACK
BATTERYPORT4HEBATTERYPACKINDICATOR
LIGHTRIGHT,%$TURNSREDWHILEIT
CHARGES4HESPAREBATTERYPACKISFULLY
CHARGEDINAPPROXIMATELYHOURS
,%$TURNSGREEN
!NSWERSCALLSMUTESTHEMICROPHONEONANACTIVE
CALLANDACCESSESTHE/PTIONSLISTONTHEDISPLAY
-
.
6OLUMECONTROL
/
%ACHHANDSETMUSTBEREGISTEREDTOABASEBYSHARINGANIDENTI
CALSECURITYCODE!BASECANSUPPORTUPTOTHREEINDEPENDENT
HANDSETS%ACHHANDSETASSIGNEDTOABASESTATIONMUSTHAVEA
UNIQUE3ET)$OR
7HENVIEWINGTHEBACKOFTHEBASESTATIONTHE4#-2*JACKS
FROMLEFTTORIGHTCORRESPONDTOTHEHANDSET)$AND
(ANDSET)$
&OREACHNEWHANDSETYOUMUSTFIRSTCONFIGURETHEHANDSET)$
TOIDENTIFYTHEHANDSETTOTHEBASESTATION
0RESSTHE/PTIONSBUTTON
0RESS
0RESS
UNTILTHEDISPLAYSHOWS
0RESS
4HEDISPLAYSHOWSTHECURRENT(ANDSET)$
)FYOUWANTTOCHANGETHE)$NUMBERPRESS
4HEDISPLAYSHOWS
%NTERTHESIXDIGITPASSWORDDEFAULT
0RESS 4HEDISPLAYSHOWS
0RESSTHEAPPROPRIATEDIGITONTHEDIALPAD
0RESS TOACCEPTTHECONFIGURATION
2EFERTOTHE)NSTALLATIONMANUALFORINSTRUCTIONSABOUTHOWTO
CHANGETHEPASSWORD
3ECURITYCODE
!DJUSTSTHEHANDSETHEADSETANDRINGERVOLUME
)FYOURINSTALLERHASALREADYSETUPABASEOBTAINTHESECURITY
CODEANDFOLLOWSTEPSTOINCLUSIVE
,ANYARDANCHOR
)FYOUNEEDTOASSIGNASECURITYCODETOTHEBASEFOLLOWALLTHE
STEPSINTHISSECTION
&ORATTACHINGAWRISTSTRAP
4OASSIGNASECURITYCODETOAHANDSETFOLLOWSTEPSTO
(EADSETPORT
0RESSTHE/PTIONSBUTTON
0RESS
0RESS
UNTILTHEDISPLAYSHOWS
&ORCONNECTINGAHEADSET
7RITETHEBUTTONFUNCTIONONTHISCARD
4ELEPHONESETUP
"ATTERYPACK
#ONTINUED
0RESS
TOASSIGNASECURITYCODETOTHEHANDSET
4HEDISPLAYSHOWS
%NTERTHESIXDIGITPASSWORDDEFAULT
0RESS 4HEDISPLAYSHOWS
%NTERTHESIXDIGIT3ECURITYCODETHATWASASSIGNEDTOTHE
BASEYOUARECONNECTINGTO
0RESS TOACCEPTTHECODE
4HEDISPLAYSHOWS
)FYOUAREASSIGNINGAHANDSETTOANEXISTINGBASEYOUR
HANDSETISNOWCONNECTEDTOTHESYSTEM
)FYOUAREASSIGNINGTHEFIRSTHANDSETTOANEWBASESTATION
WHICHHASNOSECURITYCODECONTINUEWITHTHEFOLLOWING
STEPS
7HENTHEDISPLAYSSHOWS
PRESS
TOGETREADYTOSENDTHESECURITYCODETOTHEBASE
4HEDISPLAYSHOWS
5NPLUGTHE!#POWERADAPTERCONNECTEDTOTHEBASE
ANDPLUGITBACKINAGAIN
7ITHINSECONDSPRESSANDHOLDTHE FORFIVESEC
ONDSTOSENDTHESECURITYCODETOTHEBASE4HEDISPLAY
SHOWS
ANDYOUHEARABEEPWHENTHETRANSFER
ISSUCCESSFUL
.OTE)FTHE3ECURITY#ODETRANSFERFAILS
DIS
PLAYS4OCORRECTTHISREPEATSTEPSAND
0RESSTHE/PTIONSBUTTON4HEDATEANDTIMEDISPLAYS
(ANDSETOPTIONS
4OACCESSTHEFOLLOWINGHANDSETOPTIONS
0RESSTHE/PTIONSBUTTON
0RESS
4HEDISPLAYSHOWS
0RESS
UNTILTHEDISPLAYSHOWSYOUTHESELECTION
&OLLOWTHEDIRECTIONSINEACHSECTION
0RESS
TOEXITTHEMENU
2INGTYPE
4OSELECTARINGTYPEFORYOURHANDSET
PRESS
7HENTHEDISPLAYSHOWS
0RESS
TOLISTENTOTHEDIFFERENTTYPESOFRING
.OTE4HEREISALSOA2INGER/FFSETTING
0RESS TOACCEPTTHERINGTYPEOFYOURCHOICE
4HEDISPLAYSHOWSTHERINGTYPENUMBERYOUCHOSE
6OLUMELEVEL
4OSELECTTHERINGERVOLUMELEVELFORYOURHANDSET
0RESS
UNTILTHEDISPLAYSHOWS
0RESS
4HEDISPLAYSHOWS
0RESSTHEVOLUMEBARONTHELEFTSIDEOFTHEHANDSETTO
ADJUSTTHERINGERVOLUME
0RESS TOACCEPTTHERINGERVOLUME
4HEDISPLAYSHOWS
,OCK(ANDSET
4OLOCKTHEBUTTONSONTHEHANDSETTOPREVENTUNINTENTIONAL
BUTTONPRESSES
UNTILTHEDISPLAYSHOWS
0RESS
0RESS 4HEDISPLAYSHOWS
4ORELEASETHEHANDSETPRESSf THENPRESSd
Handset features
Language choices
≤•fi‚⁄
Selects the Primary Language for the display.
≤•fi‚¤
Selects the Alternate Language 2 for the display.
≤•fi‚‹
Selects the Alternate Language 3 for the display.
≤•fi‚›
Selects the second Alternate Language 4 for the display.
Program memory buttons
Make and answer calls
You can program a memory button with an internal or external
number or feature code.
Making calls
External autodial
There are many ways to make a call, depending on telephone
programming and the type of call.
1.
2.
3.
4.
5.
Press ≤•⁄.
Press a memory button.
Dial the external number.
Press OK to store the number.
Label the button.
Button Inquiry
Internal autodial
To check what is programmed on the handset memory buttons.
1.
2.
3.
4.
5.
1.
2.
3.
4.
Press ≤•‚.
Press the button(s) that you want to check.
Read the display.
The diagram below shows some sample displays:
Line
Intercom
XXX (LINENAME)
VIEW
XXXX (SETNAME)
VIEW
Internal autodial
External autodial
Autodial (XXXX)
(XXXXXXXXXX)
Feature
5.
External calls using intercom buttons
1. Press an intercom button and enter a line pool access code.
2. When you hear an external dial tone, dial the external
telephone number.
Press ≤•¤.
Press a memory button.
Dial the extension number.
Press OK to store the number.
Label the button.
Contact your System Administrator for the line pool code.
Internal calls using intercom buttons
1. Press an intercom button.
2. Dial the extension number.
Press ≤• ‹.
Press a memory button.
Press ≤and enter the feature code.
Press OK to store the feature code.
Label the button.
Contact your System Administrator for a list of extension
numbers.
Answering calls
When your telephone rings and the antenna collar light flashes:
How to erase memory buttons
(FEATURENAME)
1. Press ≤•⁄.
2. Press a memory button.
3. Press OK to erase the button.
Press ® to exit.
Memory buttons are assigned as line or intercom buttons.
Memory buttons can also store internal and external numbers
or features to give you one-touch dialing or feature activation.
The battery pack fits onto the back of the handset, as shown in
the following diagram.
Line 2
Voice Call
Call Fwd
Intercom
Button labels
Write the memory button contents on the handset card.
1. Remove the plastic
lens and handset card
from the handset.
2. Write the button
assignment beside
each button.
3. Insert the handset
card back on the
1
2
3
handset.
4. Insert the plastic lens, matching the tabs on the lens with
the notches on the handset.
ABC
DEF
To change the battery pack:
1. Press down on the button at the top of
the battery pack and lift it off the handset.
2. Place it in the battery port on the charger.
3. Put the bottom of the charged battery
pack into position on the handset.
4. Snap the battery pack into place.
5. Put the handset into the handset port on the charger. Make
sure the handset and charger contacts touch. The battery
packs are charged when the indicator lights are green.
6. Exchange the handset battery pack regularly (once a week).
Recycle Note: Nickel metal hydride batteries are recyclable.
Return your unwanted batteries to the nearest recycling center
for proper disposal. Do not dispose of the batteries in office or
household waste. Phone 1-800-8-BATTERY to locate a Battery
Recycling Center near you.
Handset charger
Note: Plug the
power adapter
into the charger
before plugging
it into the wall
socket.
Battery port
Handset
socket
Power adapter
The belt clip
Attach a belt clip to your set to provide hands-free portability.
To attach the belt clip:
1. Line up the side tabs of the belt clip with the notches on
the sides of the handset.
2. Snap the belt clip into place.
To remove the belt clip:
Hold calls
1. Use a small coin to release the side tabs of the belt clip
from the notches on each side of the handset.
2. Remove the belt clip by pulling it off the handset.
To retrieve a held call, press the lit red line button.
Battery (continued from third panel)
Last Number Redial
Accessories
1. Press the Options button.
While on a call, press ≥. The held line button lights red.
Memory buttons
Line 1
Handset functions and features are the same when a headset
is plugged into the headset port on the handset.
External calls using line buttons
1. Press a line button.
2. Dial the external telephone number.
Features
1.
2.
3.
4.
5.
Headset calls
Calls are put on hold automatically when you switch from one line
to another.
Mute microphone
To mute the microphone while you are on a call, press the
Options button.
To cancel mute, press the Options button again.
Note: If you want to mute a second call that comes into the
handset, you must press the Options button again when you
answer the call.
Handset Asleep mode
If your handset remains idle for more than 15 seconds, it
automatically reverts to Handset Asleep mode.
To wake up your handset, press any key.
Call indications: While your handset is asleep, the handset
displays no message waiting indicators or indications that the
ring-again feature is active.
Priority calls with DND active: When the handset is asleep and
a Priority call is made to the T7406, it appears to the caller that
the Priority Call was successfully connected, even though you
receive no indication on your T7406 handset. As soon as you
wake the handset (whenever you have DND set) you must
always press the line or intercom button and the ® button. This
ensures that your handset provides proper audible and visual
Ring Notification.
The wrist strap
The wrist strap can be attached to the handset for easy
carrying.
1. Put the loop of the wrist strap through the hook on the side
of the handset.
2. Put the other end of the wrist strap through the loop.