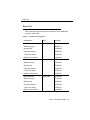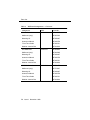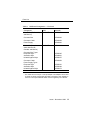
1
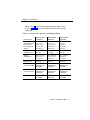
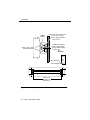
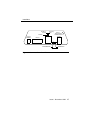
BCMS Vu Wallboard Models WB1, WB2, WB3, IW1, IW2, and IW3 Installation, Programming, and Troubleshooting 555-233-108 Comcode 108395153 Issue 1 November 1998 Copyright 1998, Lucent Technologies All Rights Reserved Printed in USA Notice Every effort was made to ensure that the information in this book was complete and accurate at the time of printing. However, information is subject to change. Your Responsibility for Your System’s Security Toll fraud is the unauthorized use of your telecommunications system by an unauthorized party, for example, persons other than your company’s employees, agents, subcontractors, or persons working on your company’s behalf. Note that there may be a risk of toll fraud associated with your telecommunications system and, if toll fraud occurs, it can result in substantial additional charges for your telecommunications services. You and your system manager are responsible for the security of your system, such as programming and configuring your equipment to prevent unauthorized use. The system manager is also responsible for reading all installation, instruction, and system administration documents provided with this product in order to fully understand the features that can introduce risk of toll fraud and the steps that can be taken to reduce that risk. Lucent Technologies does not warrant that this product is immune from or will prevent unauthorized use of common-carrier telecommunication services or facilities accessed through or connected to it. Lucent Technologies will not be responsible for any charges that result from such unauthorized use. Lucent Technologies Fraud Intervention If you suspect that you are being victimized by toll fraud and you need technical support or assistance, call Technical Service Center Toll Fraud Intervention Hotline at 1 800 643-2353. Federal Communication Commission (FCC) Statement This equipment has been tested and found to comply with the limits for a Class A digital device, pursuant to Part 15 of the FCC Rules. These limits are designed to provide reasonable protection against harmful interference when the equipment is operated in a commercial environment. This equipment generates, uses, and can radiate radio frequency energy and, if not installed and used in accordance with the instruction manual, may cause harmful interference to radio communications. However, there is no guarantee that interference will not occur in a particular installation. For further FCC information, see “Customer Support Information” below. Trademarks BCMS Vu is a trademark of Lucent Technologies. Ordering Information Call: Lucent Technologies Publications Center Voice 1 800 457-1235 International Voice 317 322-6416 Fax 1 800 457-1764 International Fax 317 322-6699 Write: Lucent Technologies Publications Center 2855 N. Franklin Road Indianapolis, IN 46219 Order: Document No. 555-233-108 Comcode 108395153 Issue 1, November 1998 Support Telephone Number In the continental US, Lucent Technologies provides a toll-free customer helpline 24 hours a day. Call the Lucent Technologies Helpline at 1 800 242-2121 or your Lucent Technologies authorized dealer if you need assistance when installing, programming, or using your system. Outside the continental US, contact your local Lucent Technologies representative. Warranty Lucent Technologies, Inc. warrants this equipment to be free of defects in materials and workmanship for a period of one year from date of shipment. All defects within this time will be repaired without charge upon return of the unit to the factory. This warranty is null and void if the manufacturer determines that any modifications have been made to the unit or the unit has been subjected to physical or electrical stress. This warranty covers parts and labor only and does not include shipping costs, travel expenses, or travel time. Installation of the equipment is the sole responsibility of the purchaser. The manufacturer, its agents, or its distributors accept no responsibility for malfunction or damage caused by improper treatment or connection of the unit. The manufacturer, its agents, or its distributors are not liable for any losses incurred through use or malfunction of the equipment or any losses or damages incurred by the use of the equipment in any means whatsoever. This warranty is limited to the repair of the equipment to its normal functioning capability. This warranty is complete as stated and all other warranties, expressed or implied, are invalid. The BCMS Vu Wallboard Models should be installed only by qualified personnel. No user-serviceable parts are contained within the units. Installation or programming should not begin prior to review of all sections of this manual. Contents ■ BCMS Vu™ Wallboard.................................................. 1 ■ Installation..................................................................... 5 Installing the Wallboard.......................................... 5 Considerations ....................................... 5 Wall-Mounted Installation ....................... 6 Counter-Mounted Installation ............... 10 Ceiling-Suspended Installation ............ 11 Installing the Converter Box .................................14 Required Parts ..................................... 15 Procedure ............................................ 16 The EOL Terminators ........................... 19 ■ Programming the Wallboard.......................................22 Running the Self-Test Program ............................ 22 Clearing the Memory............................................ 23 ■ EPROM Replacement................................................. 23 ■ Setting the Jumper ..................................................... 25 ■ Troubleshooting .......................................................... 26 First Start-Up ........................................................ 26 Trouble After Installation ...................................... 29 Wallboard Problems............................................. 31 Common Customer Questions ............................. 32 ■ Parts List ..................................................................... 33 Issue 1 November 1998 i Figures 1) 2) 3) 4) 5) 6) 7) 8) 9) 10) 11) Mounting on a Wall . . . . . . . . . . . . . . . . . . . . . . . . . . . . . . . . . 8 Mounting on a Counter . . . . . . . . . . . . . . . . . . . . . . . . . . . . . 11 Suspending from a Ceiling . . . . . . . . . . . . . . . . . . . . . . . . . . 13 Converter Box—Front View . . . . . . . . . . . . . . . . . . . . . . . . . 15 Converter Box—Rear View . . . . . . . . . . . . . . . . . . . . . . . . . . 17 RS-232 Pinouts . . . . . . . . . . . . . . . . . . . . . . . . . . . . . . . . . . . 18 RS-485 Network Connection Using Modular Jacks . . . . . . .19 Converter Box on One End of Transmission . . . . . . . . . . . . 20 Converter Box in Middle of Transmission . . . . . . . . . . . . . . . 21 Replacing the EPROM . . . . . . . . . . . . . . . . . . . . . . . . . . . . . 25 Setting the Jumper . . . . . . . . . . . . . . . . . . . . . . . . . . . . . . . . 26 Issue 1 November 1998 ii Tables 1) 2) 3) Characteristics Specific to a Wallboard Model . . . . . . . . . . .3 Common Characteristics of All Six Wallboard Models . . . . . . 4 Wallboard Components . . . . . . . . . . . . . . . . . . . . . . . . . . . . 33 Issue 1 November 1998 iii Important Safety Instructions When installing electrical equipment, always follow basic safety precautions to reduce the risk of fire, electrical shock, and injury to persons, including: ■ Read and understand all instructions. ■ Follow all warnings and instructions marked on or packed with the product. ■ Never install this unit during a lightning storm. ■ Use only Lucent Technologies-recommended/approved accessories. ■ Do not install this product near water, for example, in a wet basement location. ■ Do not overload wall outlets, as this can result in the risk of fire or electrical shock. ■ Do not attach the power supply cord to building surfaces. Do not allow anything to rest on the power cord. Do not locate this product where the cord will be abused by persons walking on it. ■ Unplug the product from the wall outlet before cleaning. Use a damp cloth for cleaning. Do not use cleaners or aerosol cleaners. ■ Do not operate the system if chemical gas leakage is suspected in the area. Use telephones located in some other safe area to report the trouble. SAVE THESE INSTRUCTIONS Issue 1 November 1998 v BCMS Vu™ Wallboard Models WB1, WB2, WB3, IW1, IW2, and IW3 Installation, Programming, and Troubleshooting Instructions BCMS Vu™ Wallboard The BCMS Vu Wallboards are indoor light-emitting diode (LED) message centers designed for use with the BCMS Vu software package. BCMS Vu is a PC software package that collects and stores Basic Call Call Management System (BCMS) data from a communications system. The wallboards can display two lines of 2.1-inch characters in any combination of red, green, and amber. NOTE: The wallboards can be used only with BCMS Vu software. See the documentation that came with the BCMS Vu software. The wallboards come in six models: ■ WB1 (PEC 5340-WB1) with a capacity of 40 typical characters in a two-line format ■ WB2 (PEC 5340-WB2) with a capacity of 52 typical characters in a two-line format Issue 1 November 1998 1 BCMS Vu™ Wallboard ■ WB3 (PEC 5340-WB3) with a capacity of 64 typical characters in a two-line format ■ IW1 (PEC 5340-IW1) with a capacity of 40 typical characters in a two-line format ■ IW2 (PEC 5340-IW2) with a capacity of 52 typical characters in a two-line format ■ IW3 (PEC 5340-IW3) with a capacity of 64 typical characters in a two-line format The WB models are for use in the US, Canada, and Mexico; IW models are for use in countries other than the US, Canada, and Mexico. NOTE: When the phrase “the wallboard” is used, it refers to all the WB and IW models listed above. When information is specific to one model of the wallboard, it is so indicated. Multiple wallboards can be networked together and connected to a personal computer to form a visual information system that can be updated automatically. These wallboards are used in customer service applications where the messages can include such information as the number of customers in queue, the number of available agents, and the average time for a call to be answered. 2 Issue 1 November 1998 BCMS Vu™ Wallboard Tables 1 and 2 show the characteristics specific (Table 1) and common (Table 2) to the WB1, WB2, WB3, IW1, IW2, and IW3 wallboards. Table 1. Characteristics Specific to a Wallboard Model Characteristic WB1 and IW1 Wallboard WB2 and IW2 Wallboard WB3 and IW3 Wallboard Case Dimensions (Depth dimension includes rearmounted power supply.) 40.2” L x 5.1” D x 7.7” H (102.1 cm L x 12.9 cm D x 19.6 cm H) 52.2” L x 5.1” D x 7.7” H (132.5 cm L x 12.9 cm D x 19.6 cm H) 64.2” L x 5.1” D x 7.7” H (163cm L x 12.9cm D x 19.6cm H Weight of Wallboard 18.5 lbs. (8.4 kg) 24.5 lbs. (11.2 kg) 31 lbs. (14 kg) Display Dimensions 36” L x 4.8” H (91.4 cm L x 12.2 cm H) 48” L x 4.8” H (121.9 cm L x 12.2 cm H) 60” L x 4.8” H (152cm L x 12.2cm H Display Array 120 x 16 160 x 16 200 x 16 Characters in Two-Line Format 40-60 maximum depending on characters 52-80 maximum depending on characters 66-100 maximum depending on characters Characters in One-Line Format 10-15 maximum depending on characters 14-20 maximum depending on characters 18-25 maximum depending on characters Display Memory 28,000 characters 27,500 characters 27,000 characters Issue 1 November 1998 3 BCMS Vu™ Wallboard Table 2. Common Characteristics of All Six Wallboard Models Characteristic Description Pixel Size (diameter) 0.2" (0.5 cm) Pixel (LED) Color Each dot can be red, green, or amber; three rainbow effects are also available. Center-to-Center Spacing (pitch) 0.3" (0.8 cm) Character Size Two-Line Format 2.1" (5.3 cm) Memory Retention Typically one month Real-Time Clock Day and time, 12- or 24-hour format; maintains accurate time without power for up to 30 days. Serial Computer Interface RS-232 (TTL) and RS-485 (multi-drop networking for up to 255 wallboards) Operating Mode Hold Power WB1, WB2, and WB3: 120 VAC ±10%; 100 watts IW1, IW2, and IW3: 220–240 VAC; 100–150 watts; 50–60 Hz; all ±10% Power Cord Length 10 feet (3 meters) Keyboard (ordered separately) Handheld, Eurostyle, infrared remote control Format EZ Key II™ Operating Temperature 32° to 120° F (0° to 49° C) (Continued on next page) 4 Issue 1 November 1998 Installation Table 2. Common Characteristics of All Six Wallboard Models — Characteristic Description Humidity Range 0% to 95% non-condensing Mounting Ceiling, wall, or counter Case Material Extruded aluminum Safety Meets ETL, UL, and CSA standards; international model meets CE standards Installation The complete installation of the wallboard involves installing the wallboard and the converter box that is part of the Master Kit. Installing the Wallboard The wallboard can be installed in any of the following ways: ■ Mounted on a wall ■ Mounted on a counter ■ Suspended from a ceiling Considerations Consider the following when installing the wallboard: ■ Do not use the wallboard outdoors. ■ Do not expose the wallboard to direct sunlight. Issue 1 November 1998 5 Installation ■ Select a mounting location that has adequate ventilation on all sides of the wallboard to avoid overheating. The maximum operating temperature is 120°F (49°C). ■ Make sure an electrical outlet is near the wallboard. ■ Any mounting hardware you supply (chains, wall anchors, “S” hooks, etc.) must be able to support at least four times the weight of the wallboard. ! CAUTION: Do not paint the wallboard to match your office decor. Painting the wallboard voids the warranty. ! SECURITY ALERT: If the wallboard is displaying sensitive BCMS data, be sure to locate it where only authorized personnel can see the information. Wall-Mounted Installation The list of parts needed and the steps for mounting the wallboard on a wall are explained below. Unless otherwise stated, the wallboard includes the parts mentioned. Required Parts ■ Wallboard ■ Four (4) pivot brackets ■ Eight (8) #8-32 X .375" screws ■ Eight (8) #8-32 lockwashers ■ Two (2) 5/16" 18 X .50" screws ■ Two (2) 5/16" 18 hex nuts 6 Issue 1 November 1998 Installation ■ Two (2) 5/16" split lockwashers ■ Two (2) cotter pins ■ Eight (8) rubber bumpers Procedure Follow these steps to mount a wallboard on a wall (see Figure 1): 1. As necessary, remove power from the wallboard. 2. Place two rubber bumpers on each pivot bracket. Issue 1 November 1998 7 Installation Rubber Bumper Install one each on each end: 5/16” x 0.50” screw 5/16” split lockwasher 5/16” hex nut To adjust the viewing angle, insert a cotter pin into different holes on each end #8-32 x .375” screws #8-32 lockwashers .187” diameter .280” diameter WB1/IW1 34” WB2/IW2 46” WB3/IW3 58” Figure 1. Mounting on a Wall 8 Issue 1 November 1998 Installation 3. Attach the large end of one pivot bracket to the desired mounting surface by using two #8 screws. ! CAUTION: Do not install the wallboard directly to drywall or plasterboard. Fasten it to wall studs or other structures that can support at least 250 pounds. 4. Attach the second pivot bracket to the mounting surface at the proper distance from the first bracket (varies depending on wallboard model) by using two #8 screws. NOTE: Use the type of screws and anchoring method appropriate for the mounting surface. For example, use wood screws if you are mounting to a wood surface (these screws are not supplied). 5. Mount two pivot brackets to the back of the wallboard with eight #8-32 X .375" screws and eight #8-32 lockwashers. Place the screws and lockwashers into the tapped holes on the back of the wallboard that line up with the pivot bracket. 6. Line up the brackets on the back of the wallboard with the pivot brackets you installed on the mounting surface. Insert a 5/16" X 0.50" screw through the larger holes of the lined-up brackets, and place a split lockwasher and a 5/16" hex nut on the end of the screw. Tighten until snug. 7. To adjust the viewing angle of the wallboard, insert a cotter pin into one of the holes on the pivot bracket. Do the same for the same-numbered hole on the other pivot bracket. Issue 1 November 1998 9 Installation Counter-Mounted Installation The list of parts needed and the steps for mounting the wallboard on a counter are explained below. Unless otherwise stated, the wallboard includes the parts mentioned. Required Parts ■ Wallboard ■ Four (4) pivot brackets ■ Eight (8) #8-32 X .375 screws ■ Eight (8) #8-32 lockwashers ■ Two (2) 5/16" 18 X .50 screws ■ Two (2) 5/16" 18 hex nuts ■ Two (2) 5/16" split lockwashers ■ Two (2) cotter pins ■ Eight (8) rubber bumpers Procedure Follow these steps to mount the wallboard on a counter (see Figure 2): 1. As necessary, remove power from the wallboard. 2. Place two rubber bumpers on each pivot bracket. 3. Mount two pivot brackets to the back of the wallboard’s aluminum extrusion by using four #8-32 X .375" screws and four #8-32 lockwashers. Place the screws with the lockwashers into the #8-32 tapped holes on the extrusion that line up with the holes in the pivot bracket. 4. Screw the other sides of the pivot brackets into the counter. 10 Issue 1 November 1998 Installation .187” diameter holes for counter mounting (2 places) (2) #8-32 x .375” screws (2) #8-32 x lockwashers Rubber Bumper Pivot Bracket Figure 2. Mounting on a Counter Ceiling-Suspended Installation The list of parts needed and the steps for suspending the wallboard from a ceiling are explained below. Unless otherwise stated, the wallboard includes the parts mentioned. Issue 1 November 1998 11 Installation Required Parts ■ Wallboard ■ Two (2) hanging brackets ■ Two (2) #6-32 X .50" panhead screws ■ Two (2) #6-32 lockwashers ■ Two (2) “S” hooks ■ Chain for suspending the wallboard (not supplied with the wallboard) Procedure Follow these steps to suspend a wallboard from the ceiling (see Figure 3): 1. As necessary, remove power from the wallboard. 2. Remove an end cap from the wallboard. 3. Slide the two hanging brackets into the channel on the top of the wallboard, and place the brackets at the appropriate location. 4. Thread the #6-32 X .50" panhead screw into the hanging bracket, and tighten until the screw engages the aluminum extrusion. 5. Insert the “S” hooks into the holes in the hanging brackets. To adjust the viewing angle, insert each “S” hook into another hole in the bracket. 12 Issue 1 November 1998 Installation Chain must support at least 250 pounds #6-32 x 50” screw #6-32 lockwasher “S” hook Hanging bracket Figure 3. Suspending from a Ceiling Issue 1 November 1998 13 Installation Installing the Converter Box The RS-232 to RS-485 converter box enables communication between the personal computer containing the BCMS Vu software and your wallboards. The converter box converts standard RS-232 signals from the PC’s serial port into RS-485 signals for use in the wallboard network. The converter kit comes in two versions: ■ Model for the US, Canada, and Mexico (PEC 5340-KIT) ■ Model for countries other than the US, Canada, and Mexico (PEC 5340-IKT) ■ The front of the converter box has three light-emitting diodes (LEDs) (see Figure 4): ■ Power indicator—When lit, this indicates that the converter box is receiving power. (The converter box comes with an AC adapter for connection to an electrical outlet.) ■ RS-232 RXD indicator—When lit, this indicates that the converter box is receiving data on the RS-232 port and transmitting data on the RS-485 port. ■ RS-232 TXD indicator—When lit, this indicates that the converter box is transmitting data on the RS-232 port and receiving data on the RS-485 port. 14 Issue 1 November 1998 Installation RS-232/RS-485 CONVERTER RS-232 RS-232 TXD RXD FOR INDOOR USE ONLY Figure 4. POWER Converter Box—Front View Two end-of-line (EOL) terminators come with the converter box. The EOL terminators are attached directly to the wallboards to help maintain stable communication across a network. See “The EOL Terminators” on page 19. Required Parts ■ DB9-to-DB9 RS-232 cable—This 9-pin connector connects the PC to the converter box. The converter box has a 9-pin female port. ■ RS-485 cable ■ As necessary, a DB25-to-DB9 adapter for the computer port. The required parts from the converter kit are: ■ Converter box ■ Converter cable assembly ■ Power supply Issue 1 November 1998 15 Installation You may need additional parts that are not included: ■ DB9-to-DB25 cable—This is a cable to connect the 9-pin RS-232 port on the converter box to a 25-pin serial port on the PC. ■ Gender changer—Occasionally the serial port on a device is the same as the port on the device to which it is connecting. In this case you need a connector that changes the gender of the connector to allow the cable to connect to the port on the device. NOTE: Some gender changers also rearrange the pins in the connector and therefore disrupt the communications to the device. Procedure Follow these steps to connect the converter box to the PC (see Figure 5): 1. Connect one end of the RS-232 cable to the serial port on the PC and the other end to the converter RS-232 port. On some PCs you may need to use a DB25-to-DB9 adapter for the serial port. Figure 6 shows the pinouts for the RS-232 cable. 2. Connect one end of the RS-485 cable to the RJ11 jack (the RS-485 port on the back of the converter box). Connect the other end of the RS-485 cable to a modular network adapter supplied with the wallboard in the following manner (see Figure 7): ■ RS-485 positive wire (sometimes black) to the black terminal ■ RS-485 negative wire (sometimes red) to the yellow terminal ■ Shield wire to the red terminal 16 Issue 1 November 1998 Installation RS-485 (+) BLACK SHIELD 9 VOLTSNOMINAL RS-485 (-) NOT A RED TELEPHONE CONNECTION RS-485 RS-232 UNTERMINATED Figure 5. TERMINATED Converter Box—Rear View Issue 1 November 1998 17 Installation Type A RS-232 Cable Pin Shield GND Pin Shield 3 TXD 3 2 RXD 2 7 RTS 7 8 CTS 8 6 DSR 6 1 DCD 1 4 DTR 4 5 Signal Ground 5 9 RJ 9 Female End Figure 6. RS-232 Pinouts 18 Issue 1 November 1998 Male End Installation To RS-485 out/ RS-485 in port on wallboard 4-wire, 8 ft. RS-485 cable 8 ft. max Plug into surface jack/junction box Connect positive 485 wire (sometimes black) to black Connect shield wire to red Figure 7. BL WH OR BR BK YL RD GN Surface jack/ junction box Connect negative 485 wire (sometimes red) to yellow RS-485 Network Connection Using Modular Jacks The EOL Terminators Plug EOL terminators into the wallboards that are on the ends of an RS-485 transmission line. Insert the EOL terminators into the RJ11 ports (labeled RS-232 IN or TTL) on the wallboards. The converter box has a termination switch with “Terminated” and “Unterminated” settings. If the converter box is on one end of an RS-485 transmission line, set the termination switch to “terminated” Issue 1 November 1998 19 Installation and plug one EOL terminator into the wallboard on the other end of the RS-485 transmission line (see Figure 8). An EOL Terminator is plugged into the last display on the network Wallboards Modular Network Adapters with 4-wire data cables Converter Box RS-485 Cable RS-232 Cable Serial port of device containing application software A DB25-to-DB9 Adapter may be required Set the terminal switch on the converter box to terminated. Attach on EOL terminator to the last wallboard on the network. Attach one RS-485 cable directly to the terminal block on the converter box. Figure 8. Converter Box on One End of Transmission If the converter box is not on one end of an RS-485 transmission line, set the termination switch to “unterminated” and place one EOL terminator into the wallboard at each end of the transmission line (see Figure 9). 20 Issue 1 November 1998 Installation Wallboards EOL Terminator Modular Network Adapters with 4-wire data cables RS-232 Cable Converter Box Serial port of device containing application software A DB25-to-DB9 Adapter may be required Wallboard EOL Terminator RS-485 Cable Modular Network Adapters with 4-wire data cables Set the terminal switch on the converter box to unterminated. Attach EOL terminators to the wallboards on each end of the RS-485 transmission line. Attach two RS-485 cables directly to the terminal block on the converter box. Figure 9. Converter Box in Middle of Transmission For the most stable transmission, use daisy-chain connections when you connect multiple wallboards to the converter box. Make sure each wallboard is connected to its own modular network adapter. NOTE: Do NOT use a star connection. In other words, do not connect more than two RS-485 cables directly to the terminal block or to a modular network adapter. Also note that you CANNOT use a home run connection. Issue 1 November 1998 21 Programming the Wallboard Programming the Wallboard You can program the following for the wallboard: ■ Running the Self-Test program ■ Clearing the memory Use the wireless keyboard to program the wallboard. NOTE: These are the ONLY functions you can perform with the wireless keyboard in a BCMS Vu environment. Disregard the other programming procedures described in the manual that is shipped with the wireless keyboard. Running the Self-Test Program You can run a self-test program via the wallboard. This program checks to see if all columns of LEDs are functioning properly. With the Self-Test program you also can easily clear the wallboard of all information stored in memory. Follow these steps to run the Self-Test program: 1. Press PROGRAM . PROG TEST FILE A appears on the display. 2. Press BACK appears. until SET TIME AND DAY or SET TIME 3. Press until the DAY and TIME appear. ADV 4. Using the keyboard, type “TEST.” Press “R” immediately after TEST if you want to save the memory. A number of diagnostic messages appear repeatedly until the test is discontinued. 22 Issue 1 November 1998 EPROM Replacement ! CAUTION: The wallboard’s memory is cleared of any previously stored messages when you run the Self-Test program. However, if you press R immediately after entering TEST, the memory is not cleared. 5. Press to cancel the test program. PROGRAM Clearing the Memory To clear the entire memory of the wallboard, follow these steps: 1. Press PROGRAM . PROG TEXT FILE A appears. 2. Press BACK 3. Press ADV until CLEAR MEMORY appears. . WARNING! appears momentarily; then CLEAR ALL? Y/N appears. 4. Press “Y” for YES if you want to clear everything in memory. Press “N” for NO. PROG TEXT FILE A reappears. EPROM Replacement To upgrade the wallboard, you must replace the EPROM in the wallboard. Follow these steps to replace the EPROM: 1. Unplug the wallboard from the wall outlet. 2. Remove the end cap located on the right side of the wallboard (as you face the wallboard). Issue 1 November 1998 23 EPROM Replacement 3. Touch a grounded surface to dissipate potentially damaging static electricity. 4. Remove the EPROM from its socket (see Figure 10). a. Find the EPROM located near the front of the exposed circuit board. b. Place your thumb under the EPROM’s top tab and your index finger under the EPROM’s bottom tab. c. Lift the EPROM out of the socket by pulling up with your thumb. 5. Install the new EPROM into the socket. a. Insert the EPROM so that the tabs on the EPROM are aligned with the notches in the socket. (The top edge of the socket has one notch, and the bottom edge has two notches. The top edge of the EPROM has one tab, and the bottom edge has two tabs.) b. Place your thumb on the EPROM, place your index finger on the back of the circuit board, and gently push down on the EPROM until it snaps into place. 6. Replace the end cap. 24 Issue 1 November 1998 Setting the Jumper 485 232 EPROM Carrier EPROM Snap-Off Cover Plate Figure 10. Replacing the EPROM Setting the Jumper The jumper that designates RS-232 or RS-485 operation is located inside the end cover of the wallboard. Set the jumper to “485.” Follow these steps to set the jumper (see Figure 11): 1. Turn the power off. 2. Remove the snap-off end cover. 3. Locate the RS-232/RS-485 jumper below the EPROM. 4. Place the jumper for the RS-485 setting by connecting the center pin and the pin on the right. Issue 1 November 1998 25 Troubleshooting 485 232 EPROM Carrier Jumper Set for RS-485 IR Receiver Snap-Off Cover Plate Figure 11. Setting the Jumper Troubleshooting The following are common troubleshooting problems and typical questions. In each case the problem or question is given in bold type, and the procedure or answer is given in plain type. First Start-Up The following problems may occur during the first start-up of the wallboard, before you have communicated with the wallboard. 26 Issue 1 November 1998 Troubleshooting The wallboard does not light up and does not make any power-up sound when plugged in. Follow these steps: 1. Check that you have one of the following wallboards: ■ WB1 (PEC 5340-WB1) ■ WB2 (PEC 5340-WB2) ■ WB3 (PEC 5340-WB3) ■ IW1 (PEC 5340-IW1) ■ IW2 (PEC 5340-IW2) ■ IW3 (PEC 5340-IW3) NOTE: The visual message signs 215C (PEC 5332-100) and 4120C (PEC 5332-150) do NOT work with the BCMS Vu software. 2. Check power at the outlet. For example, try plugging in another electrical device to see if it will work. If the outlet is good, return the wallboard for repair. The wallboard makes a power-up sound and shows the start-up message but does not update any information from the BCMS Vu PC. Follow these steps: 1. Check all cables and connections to ensure they are plugged in. 2. Consult the wiring diagram to ensure proper wiring. 3. Check if the wallboard was plugged in and cabled to the BCMS Vu PC when it was turned on. Issue 1 November 1998 27 Troubleshooting 4. Has a master kit been purchased? If so, the wallboard must be on an RS-485 network. See the wiring diagram in the master kit instructions. 5. Check the EPROM in the wallboard. The EPROM is located in the right endcap. Remove the right endcap and verify that the EPROM label part number is one of the following. If it is not, contact your Lucent Technologies representative or authorized dealer and request the correct EPROM: ■ WB1/IW1 wallboard—1018-4403 revision level J or later ■ WB2/IW2 wallboard—1018-5403 revision level J or later ■ WB3/IW3 wallboard—1018-6403 revision level J or later 6. Check the jumper underneath the EPROM. It must be set for RS-485 (see “Setting the Jumper” on page 25). 7. Check to see that the wallboard is connected to the correct COM port on the BCMS Vu PC. 8. Is the converter box plugged in and working? Check the power light on the box. 9. Is the BCMS Vu PC transmitting to the converter box and the box transmitting to the wallboard? Check the RXD and the TXD lights on the converter box. If they are flashing, there is communication with the wallboard. Check the output cable on the box and to the wallboard. 10. Is the cable plugged into the BCMS Vu PC and the converter box? If it is plugged in correctly and there still is no flashing light on the converter box, make sure you have the BCMS Vu software to drive the wallboard. 11. Check the cable on the back of the wallboard. Make sure it is plugged into the RS-485 connector. 12. Send the wallboard in for repair. 28 Issue 1 November 1998 Troubleshooting There is no light on the converter box. Follow these steps: 1. Check the outlet for power. 2. Return the converter box and the power supply for repair. Trouble After Installation Trouble sometimes occurs after communication has been established between the wallboard and the BCMS Vu PC. In other words, the wallboard has worked in the past and now has stopped working. The wallboard no longer lights up and does not make a power-up sound. Follow these steps: 1. Check the outlet for power. 2. Check the power cable to make sure it is plugged into the outlet. 3. Call for repair. The wallboard makes a power-up sound but does not light up or show any information from the BCMS Vu PC. Follow these steps: 1. Check all cables and connections from the BCMS Vu PC to the wallboard. 2. Check the BCMS Vu PC to make sure it is transmitting updates. Issue 1 November 1998 29 Troubleshooting 3. Is the converter box power light on? If not, check the power supply for the converter box. 4. Is the TXD or the RXD light on the converter box flashing? If not, check the cables and the connection from the BCMS Vu PC to the converter box. 5. Was the wallboard plugged in and operating before the BCMS Vu PC was turned on?. 6. Has the EPROM in the wallboard been changed? 7. Has the wallboard software on the BCMS Vu PC been removed? 8. Has the COM port on the BCMS Vu PC that is connected to the wallboard been changed? 9. Check with the BCMS Vu Helpline. 10. Call for repair. The wallboard displays nonsense or locks up. Follow these steps: 1. Unplug the wallboard and wait for one minute. Plug the wallboard back in, and check if it is functioning properly. 2. Check all cables and connections. 3. Check that the wiring is a daisy-chain configuration and not a star configuration. Check the wiring diagram for the wallboards. ! CAUTION: A star configuration is not supported and causes the wallboard to freeze. 30 Issue 1 November 1998 Troubleshooting 4. Replace any unapproved cables and connectors; they may be faulty. 5. Has the EPROM been changed? 6. Make sure the jumper underneath the EPROM is set at RS-485. If not, change the jumper to RS-485 (see “Setting the Jumper” on page 25). 7. Has the wallboard software on the BCMS Vu PC been changed or removed? 8. Are the other wallboards on the same network working? If so, check the connectors at the first wallboard. 9. Use the wireless keyboard to clear the wallboard’s memory (see instructions on page 26). Retransmit to the wallboard, and check if it is functioning properly. 10. Call for repair. Wallboard Problems Wallboard problems are physical defects in the wallboard; the network to the wallboard is functioning properly. Light-emitting diodes (LEDs) are out. This can be a single light, column, row, or any part of the wallboard. Call for repair. The plexiglass face is cracked. Call for repair. Issue 1 November 1998 31 Troubleshooting Common Customer Questions The following are questions commonly asked by wallboard customers. Can I hook up a slave unit directly to the DEFINITY G3V4 or DEFINITY ECS R5 (or later) communications system? No, the wallboard must be connected to a customer-supplied PC by using the Master Kit and the BCMS Vu software package. Do I have to have the wallboard driver software? Yes. The software sends out the information from the BCMS Vu PC in the proper format for the wallboard. To which COM port on the BCMS Vu PC do I connect? The BCMS Vu PC COM port chosen to connect the wallboard does not matter. Be sure to designate the COM port on which the wallboard is connected in the BCMS Vu configuration. Refer to the BCMS Vu documentation for details or consult your Lucent Technologies representative or authorized dealer. To which port on the wallboard do I connect? The top port, which is the RS-485 port. 32 Issue 1 November 1998 Parts List Parts List Table 3 lists the components and their numbers for the wallboards and the converter kits. Table 3. Wallboard Components Component PEC Comcode WB1 Wallboard 5340-WB1 407679158 Wallboard (only) 407643717 Mounting Kit 407643667 Instruction Manual 407643758 7-foot Telco Cable 407643741 Modular Junction Box 407643634 WB2 Wallboard 5340-WB2 407679166 Wallboard (only) 407643725 Mounting Kit 407643667 Instruction Manual 407643758 7-foot Telco Cable 407643741 Modular Junction Box 407643634 WB3 Wallboard 5340-WB3 407743483 Wallboard (only) 407743467 Mounting Kit 407643667 Instruction Manual 407643758 7-foot Telco Cable 407643741 Modular Junction Box 407643634 Issue 1 November 1998 33 Parts List Table 3. Wallboard Components —Continued Component PEC Comcode IW1 Wallboard 5340-IW1 407689827 Wallboard (only) 407650332 Mounting Kit 407643667 Instruction Manual 407643758 7-foot Telco Cable 407643741 Modular Junction Box 407643634 IW2 Wallboard 5340-IW2 407689835 Wallboard (only) 407689340 Mounting Kit 407643667 Instruction Manual 407643758 7-foot Telco Cable 407643741 Modular Junction Box 407643634 IWB3 Wallboard 5340-IW3 407743475 Wallboard (only) 407753227 Mounting Kit 407643667 Instruction Manual 407643758 7-foot Telco Cable 407643741 Modular Junction Box 407643634 34 Issue 1 November 1998 Parts List Table 3. Wallboard Components —Continued Component PEC Comcode Master Kit (US, Canada, and Mexico) 5340-KIT 407679174 Converter Box 407643642 Converter Cable* 407643659 Power Supply 407643626 Master Kit (Countries other than the US, Canada, and Mexico) 5340-IKT 407689892 Converter Box Types European Style Australian Style United Kingdom Style 407650365 407649961 407650357 Converter Cable* 407643659 Power Supply Types European Style Australian Style United Kingdom Style 407650381 407650399 407650373 * This cable can have a 9-pin or a 25-pin adapter. The adapters can be male or female on either end. Normally the cable is sent with a 9-pin adapter on each end. The required RS-485 cable must be supplied by the customer. Issue 1 November 1998 35