1
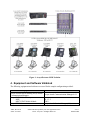
Avaya Solution & Interoperability Test Lab Application Notes for using Link Layer Discovery Protocol (LLDP) with Extreme Networks Black Diamond and Summit Series Switches and Avaya IP Telephones - Issue 1.0 Abstract These Application Notes describe the steps for configuring Extreme Networks Black Diamond and Summit Series switches to use the Network Policy Type Length Value (TLV) within the Link Layer Discovery Protocol Media Endpoint Discovery (LLDP-MED). The Extreme switches will be configured to assign VLAN, Quality of Service (QoS), Avaya Aura® Communication Manager and Avaya Aura® Session Manager information to Avaya 9600 and 1600 Series IP Telephones. Information in these Application Notes has been obtained through DevConnect compliance testing and additional technical discussions. Testing was conducted via the DevConnect Program at the Avaya Solution and Interoperability Test Lab. TMA; Reviewed: SPOC 4/12/2011 Solution & Interoperability Test Lab Application Notes ©2011 Avaya Inc. All Rights Reserved. 1 of 11 EXTR-LLDP 1. Introduction These Application Notes describe the steps for configuring Extreme Network Black Diamond and Summit switches to use the Network Policy Type Length Value (TLV) within the Link Layer Discovery Protocol Media Endpoint Devices (LLDP-MED). The Extreme switches will be configured to assign VLAN, Quality of Service (QoS), Avaya Aura® Communication Manager and Avaya Aura® Session Manager information to Avaya 9600 and 1600 Series IP Telephones. LLDP or 802.1AB is an IEEE standard designed for the discovery of directly attached adjacent network devices such as Ethernet switches, routers, and other LLDP capable devices such as the Avaya 9600 and 1600 Series IP Telephones. LLDP advertisements are encapsulated in LLDP Data Units (LLDPDU) in the format of Type Length Value or TLV for short. The IEEE 802.1AB specification defines different types of TLVs – Standard and Optional. LLDP capable devices must support the advertisement of Standard TLVs such as Chassis ID, Port ID, and Time to Live TLVs. The same LLDP capable device may also include Network Policy, IEEE 802.3 (MAC/PHY Configuration/Status) and other Vendor specific optional TLVs as part of its LLDP advertisement. The Avaya 9600 and 1600 Series IP Telephones supports the use of the Network Policy TLV as a means to accept VLAN, QoS, Avaya Aura® Communication Manager and Avaya Aura® Session Manager assignment in addition to using vendor specific TLVs. For supported IP Telephones & versions, refer to the table in Section 3. 2. General Test Approach and Test Results The general test approach was to verify that Avaya 9600 and 1600 Series IP Telephones were able to accept VLAN, QoS, Avaya Aura® Communication Manager and Avaya Aura® Session Manager LLDP-MED information from the Extreme Networks Black Diamond and Summit Series switches. 2.1. Interoperability Compliance Testing The sample network outlined in these Application Notes consists of an Extreme Networks Black Diamond 8810 switch, serving as the connection point for the Avaya IP Telephones to connect into the network. The Ethernet switch port is configured to support 2 VLANs, one for voice and one for data. The voice VLAN supports Avaya IP Telephone traffic and the data VLAN supports PC traffic. LLDP is enabled on these Ethernet ports and are configured to advertise the voice VLAN ID, QoS, Communication Manager and Session Manager, (depending on phone type, SIP or H.323) information using the Network Policy LLDP TLV. (*) Extreme Networks LLDP is the same across the switch line. Since the syntax for configuring LLDP for the Black Diamond and Summit Series Switches is the same, only the configuration for the Black Diamond 8810 switch is shown. The Summit 460 was tested to verify correct operation and configuration. TMA; Reviewed: SPOC 4/12/2011 Solution & Interoperability Test Lab Application Notes ©2011 Avaya Inc. All Rights Reserved. 2 of 11 EXTR-LLDP 2.2. Test Results The Extreme Networks Black Diamond switch, serving as the connection point for the Avaya IP Telephones, was able to configure the voice VLAN ID, QoS, Communication Manager and Session Manager information using the Network Policy LLDP TLV. 2.3. Support For technical support on Extreme Networks products, consult the support pages at http://www.extremenetworks.com or contact the Extreme Networks at: 800-998-2408. 3. Reference Configuration Figure 1 illustrates the configuration used in these Application Notes. The Avaya 16xx and 96xx series H.323 IP telephones are registered with Avaya Aura® Communication Manager and the 9600 series SIP IP telephones are registered with Avaya Aura® Session Manager. TMA; Reviewed: SPOC 4/12/2011 Solution & Interoperability Test Lab Application Notes ©2011 Avaya Inc. All Rights Reserved. 3 of 11 EXTR-LLDP Figure 1: Avaya/Extreme LLDP Solution 4. Equipment and Software Validated The following equipment and software were used for the sample configuration provided: Equipment Avaya S8300D Server running Avaya Aura® Communication Manager Avaya G450 Media Gateway MGP MM712 DCP Media Module Avaya S8800 Server TMA; Reviewed: SPOC 4/12/2011 Software/Firmware Avaya Aura® Communication Manager 6.0.1 30 .13 .2 HW9 Avaya Aura® Session Manager (6.1) Solution & Interoperability Test Lab Application Notes ©2011 Avaya Inc. All Rights Reserved. 4 of 11 EXTR-LLDP Equipment Avaya S8800 Server Avaya 1600 Series IP Telephone Avaya 96x1 Series IP Telephone Avaya 96x1 Series IP Telephone Avaya 9600 Series IP Telephone Avaya 9600 Series IP Telephone Extreme Networks BlackDiamond 8810 with 8500 G48T-e 48-port module. Extreme Networks Summit X460-48p Software/Firmware Avaya Aura® System Manager (6.1) Avaya one-X™ Deskphone Value Edition 1.3 (H.323) Avaya one-X® Deskphone SIP (6.1) Avaya one-X® Deskphone H.323 (6.0) Avaya one-X™ Deskphone Edition H.323 (3.1.1) Avaya one-X® Deskphone SIP (2.6) ExtremeXOS 12.1.5.6 ExtremeXOS 12.1.5.6 5. Configure Avaya Products There is no configuration requirement on Communication Manager, Session Manager or Avaya IP telephones to support the Extreme Networks LLDP solution. It is assumed that all Avaya products, appropriate licenses and authentication files have been configured already, e.g., trunks, dial plans, etc, and will not be covered in this document. For detailed information on the installation, maintenance, and configuration of Communication Manager and Session Manager, please reference Section 8. 6. Configure LLDP Protocol on the Extreme Networks BlackDiamond This section provides the LLDP configuration on the Extreme Networks BlackDiamond 8810. This section addresses how to configure the Extreme Networks BlackDiamond 8810 as shown in Figure 1 using the Command Line Interface (CLI). Basic router configuration is assumed, only information that pertains to the LLDP setup is covered in these Application Notes. For basic router setup information, refer to Section 8. *Note – The CLI to configure LLDP is identical on the Summit Series switches and will not be shown in this document. As shown in Figure 1, The PCs in the network are directly connected to the Avaya 9600 & 1600 Series IP Telephones. The Extreme 8810 interfaces that the Avaya IP telephones connect to are trunked, which allows both the data and voice VLANs to share the same interface. For this example, the DataVlan ID is 30 and the Voice ID is 33. To configure the Extreme Networks BlackDiamond 8810 switch, connect a PC or laptop to the serial port of the Extreme 8810 Switch. Run a terminal emulation program with the following configuration: Bits per second: 9600 Data bits: 8 Parity: None Stop bits: 1 Flow Control: None TMA; Reviewed: SPOC 4/12/2011 Solution & Interoperability Test Lab Application Notes ©2011 Avaya Inc. All Rights Reserved. 5 of 11 EXTR-LLDP 1. Log into the Extreme Networks BlackDiamond 8810 Switch using the appropriate Login ID and Password. Login: Password: BD-8810.1 # 2. Create and configure the telephony VLAN where all the Avaya telephony equipment will run. Create the telephony VLAN. Assign a VLAN ID for the telephony VLAN. Assign an IP address for the telephony VLAN. Assign ports to the telephony VLAN. Enable IP forwarding for the telephony VLAN. BD-8810.2 # create vlan vlan1100 BD-8810.3 # configure vlan vlan1100 tag 1100 BD-8810.4 # configure vlan vlan1100 ipaddress 10.32.100.254 255.255.255.0 BD-8810.5 # configure vlan vlan1100 add ports 7:10-12 untagged BD-8810.6 # enable ipforwarding vlan vlan1100 3. Create and configure the Voice VLAN. *Note: that the voice VLAN must be named to “voice” in order for the IP telephone to use the voice VLAN via LLDP. The VLAN name of “voice” is not case sensitive for the IP telephones and any combination of upper/lower case letters can be used (e.g. an upper case “V” is used in the VLAN name for these Application Notes as shown below). Create the voice VLAN. Assign a VLAN ID for the voice VLAN. Assign an IP address for the voice VLAN. Assign ports to the voice VLAN. Enable IP forwarding for the voice VLAN. BD-8810.7 # create vlan Voice BD-8810.8 # configure vlan Voice tag 33 TMA; Reviewed: SPOC 4/12/2011 Solution & Interoperability Test Lab Application Notes ©2011 Avaya Inc. All Rights Reserved. 6 of 11 EXTR-LLDP BD-8810.9 # configure vlan Voice ipaddress 10.32.75.254 255.255.255.0 BD-8810.10 # configure vlan Voice add ports 7:3-7 tagged BD-8810.11 # enable ipforwarding vlan Voice 4. Create and configure the Data VLAN. Create the data VLAN. Assign a VLAN ID for the data VLAN. Assign an IP address for the data VLAN. Assign ports to the data VLAN. Enable IP forwarding for the data VLAN. BD-8810.7 # create vlan DataVlan BD-8810.8 # configure vlan DataVlan tag 30 BD-8810.9 # configure vlan DataVlan ipaddress 10.32.85.254 255.255.255.0 BD-8810.10 # configure vlan DataVlan add ports 7:3-7 BD-8810.11 # enable ipforwarding vlan DataVlan TMA; Reviewed: SPOC 4/12/2011 Solution & Interoperability Test Lab Application Notes ©2011 Avaya Inc. All Rights Reserved. 7 of 11 EXTR-LLDP 5. Configure LLDP Parameters The following shows the LLDP configuration on the BlackDiamond 8810. BD-8810.12 # configure lldp port 7:3-7 advertise vendor-specific dot1 vlan-name BD-8810.13 # configure lldp port 7:3-5 advertise vendor-specific avaya-extreme callserver 10.32.100.1 (H.323 Phones registering to Communication Manager) BD-8810.14 # configure lldp port 7:6-7 advertise vendor-specific avaya-extreme callserver 10.32.100.100 (SIP Phones registering to Session Manager) BD-8810.15 # configure lldp port 7:3-7 advertise vendor-specific avaya-extreme file-server 10.32.100.250 BD-8810.16 # configure lldp port 7:3-7 advertise vendor-specific avaya-extreme dot1qframing tagged BD-8810.17 # configure lldp port 7:3-7 advertise vendor-specific med capabilities BD-8810.18 # configure lldp port 7:3-7 advertise vendor-specific med policy application voice vlan Voice dscp 46 BD-8810.19 # configure lldp port 7:3-7 advertise vendor-specific med policy application voice-signaling vlan Voice dscp 46 BD-8810.20 # enable lldp ports 7:3-7 6. Save the running configuration to the startup configuration. BD-8810.12 # save TMA; Reviewed: SPOC 4/12/2011 Solution & Interoperability Test Lab Application Notes ©2011 Avaya Inc. All Rights Reserved. 8 of 11 EXTR-LLDP 7. Verify LLDP On the Extreme Networks BlackDiamond 8810 1. Use the command show lldp detailed to display detailed LLDP configuration. The following screen shows that ports 7:3 and 7:4 are enabled with LLDP for Transmit (Tx) and Receive (Rx) modes. * BD-8810.14 # show lldp detailed LLDP transmit interval LLDP transmit hold multiplier LLDP transmit delay LLDP SNMP notification interval LLDP reinitialize delay LLDP-MED fast start repeat count : : : : : : 30 seconds 4 (used TTL = 120 seconds) 2 seconds 5 seconds 2 seconds 3 LLDP Port Configuration: Port Rx Tx SNMP Optional enabled transmit TLVs Mode Mode Notification LLDP 802.1 802.3 MED AvEx ============================================================================ 7:3 Enabled Enabled ---D-- --N ---C-P- -CFQ VLAN: vlan30 ----- --N ------- ---VLAN: vlan33 ----- --N ------- ---AvEx Call-Server: IP Address(es)=10.32.100.1 AvEx File-Server: IP Address(es)=10.32.100.250 AvEx 802.1Q Framing: Mode=tagged MED Policy: Application=voice VLAN=vlan33, DSCP=46 7:4 Enabled Enabled ---D-- --N ---C-P- -CFQ VLAN: vlan30 ----- --N ------- ---VLAN: vlan33 ----- --N ------- ---AvEx Call-Server: IP Address(es)=10.32.100.100 AvEx File-Server: IP Address(es)=10.32.100.250 AvEx 802.1Q Framing: Mode=tagged MED Policy: Application=voice VLAN=vlan33, DSCP=46 ============================================================================ Notification: (L) lldpRemTablesChange, (M) lldpXMedTopologyChangeDetected LLDP Flags : (P) Port Description, (N) System Name, (D) System Description (C) System Capabilities, (M) Mgmt Address 802.1 Flags : (P) Port VLAN ID, (p) Port & Protocol VLAN ID, (N) VLAN Name 802.3 Flags : (M) MAC/PHY Configuration/Status, (P) Power via MDI (+) Power via MDI with DLL Classification for PoE+, (L) Link Aggregation, (F) Frame Size MED Flags : (C) MED Capabilities, (P) Network Policy, (L) Location Identification, (p) Extended Power-via-MDI AvEx Flags : (P) PoE Conservation Request, (C) Call Server, (F) File Server (Q) 802.1Q Framing TMA; Reviewed: SPOC 4/12/2011 Solution & Interoperability Test Lab Application Notes ©2011 Avaya Inc. All Rights Reserved. 9 of 11 EXTR-LLDP 2. To verify that the IP telephone can transit from the untagged VLAN to the tagged voice VLAN via LLDP, reset the IP telephone to the factory default settings. Verify the IP telephone resets and uses the voice VLAN. Verify that the IP telephone can register to Communication Manager with the appropriate extension and password. Verify that calls can be made with acceptable voice quality. 3. Reset the IP telephone with the current configuration and verify that the telephone can register to Communication Manager or Session Manager with the appropriate QoS and VLAN information. 8. Conclusion These Application Notes have described the administration steps required to configure Extreme Networks Black Diamond and Summit Series switches to use LLDP-MED advertisement to assign VLAN, Quality of Service (QoS), Avaya Aura® Communication Manager and Avaya Aura® Session Manager information to Avaya 9600 and 1600 Series IP Telephones. All test cases were completed successfully. 9. Additional References Product documentation for Avaya products may be found at http://support.avaya.com [1] Administering Avaya Aura™ Communication Manager, Release 6.0, Doc ID 03-300509 June 2010 [2] Administering Avaya Aura® Session Manager, Doc ID 03-603324, Release 6.1 November 2010 [3] Administering Avaya Aura® System Manager, Release 6.1 November 2010 [4] Avaya one-X™ Deskphone SIP Administrator Guide, Release 6, Doc ID 16-603838 December 2010 [5] Avaya one-X™ Deskphone H.323 Administrator Guide Release, Doc ID 6.0 16-300698 August 2010 [6] Avaya one-X™ Deskphone Edition for 9600 Series IP Telephones Administrator Guide, Doc ID 16-300698 Issue 7 November 2009 [7] Avaya one-X™ Deskphone SIP for 9600 Series IP Telephones Administrator Guide, Release 2.6, Doc ID 16-601944 [8] Avaya 1600 Series IP Deskphones Administrator Guide, Release 1.3.x Product documentation for Extreme Networks products may be found at http://www.extremenetworks.com [9] BlackDiamond 8800 Series Switches Hardware Installation Guide, Part number:100284-00 [10] ExtremeXOS® Command Reference Guide, Part number: 100376-00 [11] Summit® Family Switches Hardware Installation Guide, Part Number: 100286-00 [12] ExtremeXOS® Command Reference Guide, Part number: 100376-00 TMA; Reviewed: SPOC 4/12/2011 Solution & Interoperability Test Lab Application Notes ©2011 Avaya Inc. All Rights Reserved. 10 of 11 EXTR-LLDP ©2011 Avaya Inc. All Rights Reserved. Avaya and the Avaya Logo are trademarks of Avaya Inc. All trademarks identified by ® and ™ are registered trademarks or trademarks, respectively, of Avaya Inc. All other trademarks are the property of their respective owners. The information provided in these Application Notes is subject to change without notice. The configurations, technical data, and recommendations provided in these Application Notes are believed to be accurate and dependable, but are presented without express or implied warranty. Users are responsible for their application of any products specified in these Application Notes. Please e-mail any questions or comments pertaining to these Application Notes along with the full title name and filename, located in the lower right corner, directly to the Avaya DevConnect Program at [email protected]. TMA; Reviewed: SPOC 4/12/2011 Solution & Interoperability Test Lab Application Notes ©2011 Avaya Inc. All Rights Reserved. 11 of 11 EXTR-LLDP