1
Avaya 1110 IP Deskphone User Guide
Avaya Business Communications Manager
Document Status: Standard
Document Number: NN40050-117
Document Version: 02.02
Date: May 2010
© 2010 Avaya Inc.
All Rights Reserved.
Notices
While reasonable efforts have been made to ensure that the information in this document is complete and accurate at the time of printing,
Avaya assumes no liability for any errors. Avaya reserves the right to make changes and corrections to the information in this document
without the obligation to notify any person or organization of such changes.
Documentation disclaimer
Avaya shall not be responsible for any modifications, additions, or deletions to the original published version of this documentation
unless such modifications, additions, or deletions were performed by Avaya. End User agree to indemnify and hold harmless Avaya,
Avaya’s agents, servants and employees against all claims, lawsuits, demands and judgments arising out of, or in connection with,
subsequent modifications, additions or deletions to this documentation, to the extent made by End User.
Link disclaimer
Avaya is not responsible for the contents or reliability of any linked Web sites referenced within this site or documentation(s) provided by
Avaya. Avaya is not responsible for the accuracy of any information, statement or content provided on these sites and does not
necessarily endorse the products, services, or information described or offered within them. Avaya does not guarantee that these links will
work all the time and has no control over the availability of the linked pages.
Warranty
Avaya provides a limited warranty on this product. Refer to your sales agreement to establish the terms of the limited warranty. In
addition, Avaya’s standard warranty language, as well as information regarding support for this product, while under warranty, is
available to Avaya customers and other parties through the Avaya Support Web site: http://www.avaya.com/support
Please note that if you acquired the product from an authorized reseller, the warranty is provided to you by said reseller and not by Avaya.
Licenses
THE SOFTWARE LICENSE TERMS AVAILABLE ON THE AVAYA WEBSITE, HTTP://SUPPORT.AVAYA.COM/LICENSEINFO/
ARE APPLICABLE TO ANYONE WHO DOWNLOADS, USES AND/OR INSTALLS AVAYA SOFTWARE, PURCHASED FROM
AVAYA INC., ANY AVAYA AFFILIATE, OR AN AUTHORIZED AVAYA RESELLER (AS APPLICABLE) UNDER A
COMMERCIAL AGREEMENT WITH AVAYA OR AN AUTHORIZED AVAYA RESELLER. UNLESS OTHERWISE AGREED TO
BY AVAYA IN WRITING, AVAYA DOES NOT EXTEND THIS LICENSE IF THE SOFTWARE WAS OBTAINED FROM ANYONE
OTHER THAN AVAYA, AN AVAYA AFFILIATE OR AN AVAYA AUTHORIZED RESELLER, AND AVAYA RESERVES THE
RIGHT TO TAKE LEGAL ACTION AGAINST YOU AND ANYONE ELSE USING OR SELLING THE SOFTWARE WITHOUT A
LICENSE. BY INSTALLING, DOWNLOADING OR USING THE SOFTWARE, OR AUTHORIZING OTHERS TO DO SO, YOU,
ON BEHALF OF YOURSELF AND THE ENTITY FOR WHOM YOU ARE INSTALLING, DOWNLOADING OR USING THE
SOFTWARE (HEREINAFTER REFERRED TO INTERCHANGEABLY AS "YOU" AND "END USER"), AGREE TO THESE
TERMS AND CONDITIONS AND CREATE A BINDING CONTRACT BETWEEN YOU AND AVAYA INC. OR THE
APPLICABLE AVAYA AFFILIATE ("AVAYA").
Copyright
Except where expressly stated otherwise, no use should be made of the Documentation(s) and Product(s) provided by Avaya. All content
in this documentation(s) and the product(s) provided by Avaya including the selection, arrangement and design of the content is owned
either by Avaya or its licensors and is protected by copyright and other intellectual property laws including the sui generis rights relating
to the protection of databases. You may not modify, copy, reproduce, republish, upload, post, transmit or distribute in any way any
content, in whole or in part, including any code and software. Unauthorized reproduction, transmission, dissemination, storage, and or
use without the express written consent of Avaya can be a criminal, as well as a civil offense under the applicable law.
Third Party Components
Certain software programs or portions thereof included in the Product may contain software distributed under third party agreements
("Third Party Components"), which may contain terms that expand or limit rights to use certain portions of the Product ("Third Party
Terms"). Information regarding distributed Linux OS source code (for those Products that have distributed the Linux OS source code),
and identifying the copyright holders of the Third Party Components and the Third Party Terms that apply to them is available on the
Avaya Support Web site: http://support.avaya.com/Copyright.
Trademarks
The trademarks, logos and service marks ("Marks") displayed in this site, the documentation(s) and product(s) provided by Avaya are the
registered or unregistered Marks of Avaya, its affiliates, or other third parties. Users are not permitted to use such Marks without prior
written consent from Avaya or such third party which may own the Mark. Nothing contained in this site, the documentation(s) and
product(s) should be construed as granting, by implication, estoppel, or otherwise, any license or right in and to the Marks without the
express written permission of Avaya or the applicable third party. Avaya is a registered trademark of Avaya Inc. All non-Avaya
trademarks are the property of their respective owners.
Downloading documents
For the most current versions of documentation, see the Avaya Support. Web site: http://www.avaya.com/support
Contact Avaya Support
Avaya provides a telephone number for you to use to report problems or to ask questions about your product. The support telephone
number is 1-800-242-2121 in the United States. For additional support telephone numbers, see the Avaya Web site: http://
www.avaya.com/support
Task List
3
Task List
Navigating the Local Tools menu ..................................................................................23
Setting the display contrast ...........................................................................................23
Selecting the handset language ....................................................................................23
Backlight Timer tool .......................................................................................................24
Making an external call using line keys .........................................................................27
Making a internal call using line keys ............................................................................27
Answering a call ............................................................................................................27
Answering a call while on an active call ........................................................................28
Placing a call on hold.....................................................................................................28
Accessing Voice Mail.....................................................................................................28
Programming a memory button for external autodial ....................................................28
Programming a memory button for internal autodial .....................................................29
Programming a memory button for a feature.................................................................29
Erasing a memory buttons.............................................................................................29
Avaya 1110 IP Deskphone User Guide
4
Task List
NN40050-117
Contents
5
Contents
Contents . . . . . . . . . . . . . . . . . . . . . . . . . . . . . . . . . . . . . . . . . . . . . . . . . . . . . . 5
Regulatory and safety information. . . . . . . . . . . . . . . . . . . . . . . . . . . . . . . . . 7
Other . . . . . . . . . . . . . . . . . . . . . . . . . . . . . . . . . . . . . . . . . . . . . . . . . . . . . . . . . . . . . . . 8
Other . . . . . . . . . . . . . . . . . . . . . . . . . . . . . . . . . . . . . . . . . . . . . . . . . . . . . . . . . . . . . . 10
DenAn regulatory notice for Japan . . . . . . . . . . . . . . . . . . . . . . . . . . . . . . . . . . . . . . . 11
Customer service . . . . . . . . . . . . . . . . . . . . . . . . . . . . . . . . . . . . . . . . . . . . . . 13
Navigation . . . . . . . . . . . . . . . . . . . . . . . . . . . . . . . . . . . . . . . . . . . . . . . . . . . . . . . 13
Getting technical documentation . . . . . . . . . . . . . . . . . . . . . . . . . . . . . . . . . . . . . . 13
Getting product training . . . . . . . . . . . . . . . . . . . . . . . . . . . . . . . . . . . . . . . . . . . . . 13
Getting help from a distributor or reseller . . . . . . . . . . . . . . . . . . . . . . . . . . . . . . . 13
Getting technical support from the Avaya Web site . . . . . . . . . . . . . . . . . . . . . . . 13
Getting started . . . . . . . . . . . . . . . . . . . . . . . . . . . . . . . . . . . . . . . . . . . . . . . . 15
About this guide . . . . . . . . . . . . . . . . . . . . . . . . . . . . . . . . . . . . . . . . . . . . . . . . . . . . . . 15
Audience . . . . . . . . . . . . . . . . . . . . . . . . . . . . . . . . . . . . . . . . . . . . . . . . . . . . . . . . . . . 15
Acronyms . . . . . . . . . . . . . . . . . . . . . . . . . . . . . . . . . . . . . . . . . . . . . . . . . . . . . . . . . . . 15
Symbols and conventions used in this guide . . . . . . . . . . . . . . . . . . . . . . . . . . . . . . . . 16
Related publications . . . . . . . . . . . . . . . . . . . . . . . . . . . . . . . . . . . . . . . . . . . . . . . . . . 16
Introduction . . . . . . . . . . . . . . . . . . . . . . . . . . . . . . . . . . . . . . . . . . . . . . . . . . 17
Basic features . . . . . . . . . . . . . . . . . . . . . . . . . . . . . . . . . . . . . . . . . . . . . . . . . . . . . . . 17
Telephone controls . . . . . . . . . . . . . . . . . . . . . . . . . . . . . . . . . . . . . . . . . . . . . . . . . . . 19
Telephone display . . . . . . . . . . . . . . . . . . . . . . . . . . . . . . . . . . . . . . . . . . . . . . . . . . . . 20
Local Tools . . . . . . . . . . . . . . . . . . . . . . . . . . . . . . . . . . . . . . . . . . . . . . . . . . . . . . . . . 20
Preferences menu . . . . . . . . . . . . . . . . . . . . . . . . . . . . . . . . . . . . . . . . . . . . . . . . . 21
Local Diagnostics menu . . . . . . . . . . . . . . . . . . . . . . . . . . . . . . . . . . . . . . . . . . . . 21
Network Configuration . . . . . . . . . . . . . . . . . . . . . . . . . . . . . . . . . . . . . . . . . . . . . . . . . 22
Lock menu . . . . . . . . . . . . . . . . . . . . . . . . . . . . . . . . . . . . . . . . . . . . . . . . . . . . . . . . . . 22
Configuring the telephone settings . . . . . . . . . . . . . . . . . . . . . . . . . . . . . . . 23
Server-based features . . . . . . . . . . . . . . . . . . . . . . . . . . . . . . . . . . . . . . . . . . . . . . . . . 24
Setting the language . . . . . . . . . . . . . . . . . . . . . . . . . . . . . . . . . . . . . . . . . . . . . . . 24
Setting the ring type . . . . . . . . . . . . . . . . . . . . . . . . . . . . . . . . . . . . . . . . . . . . . . . 25
Viewing and editing the call log . . . . . . . . . . . . . . . . . . . . . . . . . . . . . . . . . . . . . . . 25
Time offset . . . . . . . . . . . . . . . . . . . . . . . . . . . . . . . . . . . . . . . . . . . . . . . . . . . . . . 25
Using the handset . . . . . . . . . . . . . . . . . . . . . . . . . . . . . . . . . . . . . . . . . . . . . 27
Making a call . . . . . . . . . . . . . . . . . . . . . . . . . . . . . . . . . . . . . . . . . . . . . . . . . . . . . . . . 27
Programming buttons . . . . . . . . . . . . . . . . . . . . . . . . . . . . . . . . . . . . . . . . . . . . . . . . . 28
Avaya 1110 IP Deskphone User Guide
6
Contents
NN40050-117
7
Regulatory and safety information
This equipment has been tested and found to comply with the limits for a Class B digital device,
pursuant to part 15 of the FCC Rules. These limits are designed to provide reasonable protection
against harmful interference in a residential installation. This equipment generates, uses and can
radiate radio frequency energy and, if not installed and used in accordance with the instructions,
may cause harmful interference to radio communications. However, there is no guarantee that
interference will not occur in a particular installation. If this equipment does cause harmful
interference to radio or television reception, which can be determined by turning the equipment off
and on, the user is encouraged to try to correct the interference by one or more of the following
measures:
•
•
•
•
Reorient or relocate the receiving antenna.
Increase the separation between the equipment and receiver.
Connect the equipment into an outlet on a circuit different from that to which the receiver
is connected.
Consult the dealer or an experienced radio/ TV technician for help.
Note: Do not make changes or modifications that are not expressly approved by
Avaya. Any such changes can void your authority to operate the equipment.
This Class B digital apparatus complies with Canadian ICES-003. Cet appareil numérique de la
classe B est conforme à la norme NMB-003 du Canada.
Warnings:
•
•
•
This is a Class B product. In a domestic environment this product can cause radio
interference in which case the user must take adequate measures.
Operation is subject to the following two conditions: (1) this device may not cause
interference, and (2) this device must accept any interference, including interference that
may cause undesired operation of the device.
Privacy of communications may not be ensured when using this telephone.
To prevent radio interference to the licensed service, this device must be operated indoors only and should be kept away
from windows to provide maximum shielding.
Avaya 1110 IP Deskphone User Guide
8
Regulatory and safety information
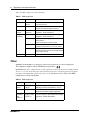
Table 1 lists EMC compliance for various jurisdictions.
Table 1 EMC compliance
Jurisdiction
Standard
Description
United States FCC CFR 47
Part 15
Class B Emissions: FCC Rules for Radio
Frequency Devices
Canada
Class B Emissions: Interference-Causing
Equipment Standard: Digital Apparatus
ICES-003
Australia/New AS/NZS 3548
Zealand
CISPR 22
Class B Emissions: Information technology
equipment - Radio disturbance
European
Community
EN 55022
Class B Emissions: Information technology
equipment - Radio disturbance
EN 55024
Information technology equipment - Immunity
characteristics
Limits and methods of measurement
EN 61000-3-2
Limits for harmonic current emissions
(equipment input current <= 16 A per phase)
EN 61000-3-3
Limitation of voltage fluctuations and flicker in
low-voltage supply systems for equipment with
rated current <= 16 A
VCCI
Regulations for voluntary control measures.
Japan
Other
Australia: AS/ACIF S004: Voice Frequency Performance Requirements for Customer Equipment
This equipment complies with the CE Marking requirements.
EU Countries: This device complies with the essential requirements and other relevant provisions of EMC and LVD
directives. A copy of the Declaration may be obtained from http://www.avaya.com/products/announcements/eumrdc/
index.html or Avaya GmbH address: Ingolstaedter Strasse 14-18, 80807 Munich Germany.Table 2 lists EMC
compliance for various jurisdictions
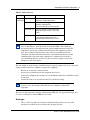
Table 2 EMC compliance
Jurisdiction
Standard
Description
United
States
FCC CFR 47
Part 15
Class A Emissions: FCC Rules for Radio
Frequency Devices (see Notes 1 and 2)
Canada
ICES-003
Class A Emissions: Interference-Causing
Equipment Standard: Digital Apparatus
Australia/
New
Zealand
AS/NZS 3548 Class A Emissions: Information technology
CISPR 22
equipment - Radio disturbance
NN40050-117
Regulatory and safety information
9
Table 2 EMC compliance
Jurisdiction
Standard
European EN 55022
Community
EN 55024
Description
Class A Emissions: Information technology
equipment - Radio disturbance
Information technology equipment Immunity characteristics
Limits and methods of measurement
EN 61000-3-2 Limits for harmonic current emissions
(equipment input current <= 16 A per
phase)
EN 61000-3-3 Limitation of voltage fluctuations and flicker
in low-voltage supply systems for
equipment with rated current <= 16 A
Note: This equipment has been tested and found to comply with the limits for a
Class A digital device, pursuant to Part 15 of the FCC Rules. These limits are
designed to provide reasonable protection against harmful interference when the
equipment is operated in a commercial environment. This equipment generates,
uses, and can radiate radio frequency energy and, if not installed and used in
accordance with the instruction manual, may cause harmful interference to radio
communications. Operation of this equipment in a residential area is likely to
cause harmful interference in which case the user will be required to correct the
interference at his own expense.
The user should not make changes or modifications not expressly approved by Avaya. Any such
changes could void the user’s authority to operate the equipment
•
•
•
•
Reorient or relocate the receiving antenna.
Increase the separation between the equipment and receiver.
Connect the equipment into an outlet on a circuit different from that to which the receiver
is connected.
Consult the dealer or an experienced radio/ TV technician for help.
Note: The user should not make changes or modifications not expressly approved
by Avaya. Any such changes could void the user’s authority to operate the
equipment.
This Class A digital apparatus complies with Canadian ICES-003. Cet appareil numérique de la
classe A est conforme à la norme NMB-003 du Canada
Warnings:
•
This is a Class A product. In a domestic environment this product can cause radio
interference in which case the user must take adequate measures.
Avaya 1110 IP Deskphone User Guide
10
Regulatory and safety information
•
•
•
Operation is subject to the following two conditions: (1) this device may not cause
interference, and (2) this device must accept any interference, including interference that
may cause undesired operation of the device."
Privacy of communications may not be ensured when using this telephone.
To prevent radio interference to the licensed service, this device must be operated indoors
only and should be kept away from windows to provide maximum shielding.
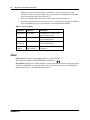
Table 3 Safety standards
Jurisdiction
Standard
Description
United States UL 60950-1
ITE equipment - Safety - Part 1:
General requirements
Canada
CSA 60950-1-03
ITE equipment - Safety - Part 1:
General requirements
European
Community
EN 60950-1 +A11 ITE equipment - Safety - Part 1:
General requirements
Australia/New AS/NZS
Zealand
60950.1:2003
Safety of Information Technology
Equipment
Other
US/Canada: Hearing Aid Compatibility (HAC) as per FCC Part 68
This equipment complies with the CE Marking requirements.
EU Countries: This device complies with the essential requirements and other relevant provisions
of Directive 1999/5/EC. A copy of the Declaration may be obtained from Avaya GmbH address:
Ingolstaedter Strasse 14-18, 80807 Munich Germany
NN40050-117
Regulatory and safety information
11
DenAn regulatory notice for Japan
Avaya 1110 IP Deskphone User Guide
12
Regulatory and safety information
NN40050-117
13
Customer service
Visit the Avaya Web site to access the complete range of services and support that Avaya provides.
Go to www.avaya.com or go to one of the pages listed in the following sections.
Navigation
• “Getting technical documentation” on page 13
• “Getting product training” on page 13
• “Getting help from a distributor or reseller” on page 13
• “Getting technical support from the Avaya Web site” on page 13
Getting technical documentation
To download and print selected technical publications and release notes directly from the Internet,
go to www.avaya.com/support.
Getting product training
Ongoing product training is available. For more information or to register, you can access the Web
site at www.avaya.com/support. From this Web site, you can locate the Training contacts link on
the left-hand navigation pane.
Getting help from a distributor or reseller
If you purchased a service contract for your Avaya product from a distributor or authorized
reseller, contact the technical support staff for that distributor or reseller for assistance.
Getting technical support from the Avaya Web site
The easiest and most effective way to get technical support for Avaya products is from the Avaya
Technical Support Web site at www.avaya.com/support.
Avaya 1110 IP Deskphone User Guide
14
Customer service
NN40050-117
15
Chapter 1
Getting started
This section contains information on the following topics:
•
•
•
•
•
“About this guide” on page 15
“Audience” on page 15
“Acronyms” on page 15
“Symbols and conventions used in this guide” on page 16
“Related publications” on page 16
About this guide
This guide tells a hardware installer or an Avaya 1110 IP Deskphone user how to configure and
use the Avaya 1110 IP Deskphone.
Audience
This guide is intended for people who install and use the Avaya 1110 IP Deskphone. This guide
assumes that you are familiar with using the compatible Avaya 1100 Series IP Deskphones. For
more information, refer to the Avaya 1120E IP Deskphone User Guide (NN40050-104) or Avaya
1140E IP Deskphone User Guide (NN40050-105).
Acronyms
The following is a list of acronyms used in this guide.
Table 1
Acronym
Description
AEM
Accessory expansion module
LCD
Liquid crystal display
PoE
Power over Ethernet
Avaya 1110 IP Deskphone User Guide
16
Chapter 1 Getting started
Symbols and conventions used in this guide
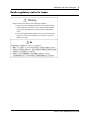
These symbols are used to highlight critical information:
Caution: Alerts you to conditions where you can damage the equipment.
Danger: Alerts you to conditions where you can get an electrical shock.
Warning: Alerts you to conditions where you can cause the system to fail or work
improperly.
Note: A Note alerts you to important information.
Tip: Alerts you to additional information that can help you perform a task.
!
Security note: Indicates a point of system security where a default should be changed,
or where the administrator needs to make a decision about the level of security required
for the system.
Related publications
Related publications are listed below. To locate specific information, you can refer to the master
index for the documentation suite for your system.
Avaya 1120E IP Deskphone User Guide (NN40050-104)
Avaya 1140E IP Deskphone User Guide (NN40050-105)
NN40050-117
17
Chapter 2
Introduction
The Avaya 1110 IP Deskphone brings voice and data to the desktop by connecting directly to a
local area network (LAN) connection.
The Avaya 1110 IP Deskphone does not support the Expansion Module for Avaya 1100 Series IP
Deskphones.
Some features described in this guide are not available on all telephones. Consult your system
administrator to verify which features are available for your use.
In this guide, soft key labels appear directly above the soft keys.
Basic features
Your Avaya 1110 IP Deskphone has the following features:
•
four soft keys
Note: Some Avaya 1110 IP Deskphone phones are not configured to support soft
key functionality. Consult your system administrator.
•
•
•
•
•
•
pixel-based LCD display, backlit, with adjustable contrast
speaker for on-hook dialing and listening
volume control keys for adjusting ringer, speaker, and handset volume
two call-processing, non-programmable keys:
— Hold
— Goodbye
four specialized feature keys:
— Services
— Message/Inbox
— Expand to PC
— Line
built-in 10/100 Ethernet switch for shared PC access
Avaya 1110 IP Deskphone User Guide
18
Chapter 2 Introduction
•
•
automatic network configuration
hearing aid compatibility
Caution: Risk of damage to equipment
Do not plug the Avaya 1110 IP Deskphone into a regular or ISDN telephone jack.
This can cause severe damage to the IP Phone. Consult your system administrator
to ensure that you plug your telephone into a 10/100BaseT Ethernet jack.
Caution: Risk of damage to equipment
Do not use your Avaya 1110 IP Deskphone outdoors. The Avaya 1110 IP
Deskphone is designed for use in an indoor environment only.
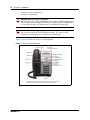
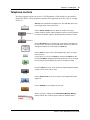
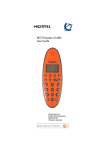
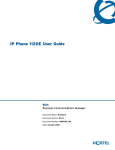
Figure 1 on page 18 shows the Avaya 1110 IP Deskphone.
Figure 1 Avaya 1110 IP Deskphone
NN40050-117
Chapter 2 Introduction
19
Telephone controls
In some geographic regions, the Avaya 1110 IP Deskphone is offered with key caps that have
English text labels. Text in parentheses indicates labels appearing on the key caps, for example,
(Services).
Soft keys are located below the display area. The LCD label above each
key changes based on the active feature.
ïï ï
(Volume +)
Use the Volume control buttons to adjust the volume of the ringer,
handset, headset, speaker, and the Handsfree feature. Press the top button
to increase the volume, and press the bottom button to decrease volume.
(Volume -)
Use the Navigation keys to scroll through menus and lists that appear on
the LCD screen. The outer part of this key cluster rocks for up, down, left,
and right movements.The center button is an Enter key.
Use the Enter key, at the center of the Navigation key cluster, to confirm
menu selections.
In most menus, you can use the Enter key instead of the Select soft key.
Use the Line (DN) key (programmable memory button) to access the single
line and activate on-hook dialing. No status icon or LED is provided.
(Line)
Press the Hold key to put an active call on hold. Tap the flashing line (DN)
soft key to return to the caller on hold.
(Hold)
Use the Expand to PC key to access external server applications where
supported.
(Expand to PC)
Use the Goodbye key to terminate an active call.
(Goodbye)
When a message is waiting, the red Visual Alerter/Message Waiting
indicator flashes. Also, when the ringer sounds, this indicator flashes.
Avaya 1110 IP Deskphone User Guide
20
Chapter 2 Introduction
When your Avaya 1110 IP Deskphone firmware is being updated, the blue
Feature Status Lamp indicator flashes.
To find out if additional features are supported on your phone, contact your
administrator.
Press the Services key (programmable memory button) to access the
scrollable Feature Display menu (FEATURE *900), including the hot
desking feature.
(Services)
(Services)
(Services)
Press the Services key twice to access the Local Tools menu, and use the
navigation keys to access the following items:
1. Preferences
2. Local Diagnostics
3. Network Configuration
4. Lock Menu
Your system administrator can establish a password for the Local Tools
menu. If you attempt to access the menu and a password prompt appears,
contact your system administrator.
Press the Message/Inbox key (programmable memory button) to open
your CallPilot mailbox. For more information about mailbox options, refer to
your Avaya CallPilot Quick Reference Card.
(Message/Inbox)
Telephone display
Your Avaya 1110 IP Deskphone LCD has two display areas:
•
•
The upper display area contains single-line information for items such as caller number,
caller name, feature prompt string, user-entered digits, date and time, and telephone
details.
The lower display area provides labels for the four soft keys.
Local Tools
Many of the options discussed in this section are for administrator use only. Do not make any
changes unless instructed to do so by an administrator.
Your Avaya 1110 IP Deskphone has both local tools and server-based features. Local tools are
accessed through the Local Tools menu.
Press the
key twice quickly in succession to open the Local Tools menu and access the
following menu items:
•
•
•
•
NN40050-117
1. Preferences
2. Local Diagnostics
3. Network Configuration
4. Lock Menu
Chapter 2 Introduction
21
Preferences menu
Use the Preferences menu to select local display preferences. The Preferences menu provides
access to the following local tools:
•
•
•
1. Contrast
2. Language
3. Backlight Timer
Backlight Timer tool
The Backlight Timer tool allows you to adjust how long the LCD display screen remains lit when
your phone is inactive.
Note: The backlight timer appears in the format xxx, where xxx is the time in
minutes or hours.
Language tool
Use the Language tool to select the language used in the Local tools menus on your phone.
The display language of server-based features is selected using the Language feature in the
Telephone features section.
Contrast tool
The Contrast tool allows you to adjust the LCD display screen contrast on your Avaya 1110 IP
Deskphone to be lighter or darker, making the screen text easier to read.
Local Diagnostics menu
Note: The Local Diagnostics tools are for system administrator use only.
The Local Diagnostics menu has the following menu items:
•
•
•
•
1. IP Set&DHCP Information
2. Network Diagnostics
3. Ethernet Statistics
4. IP Networks Statistics
Press the Return soft key to return to the Local Diagnostics submenu at any time while working
with tools in the Local Diagnostics submenu. Use the Return key to quickly gather information
and run tests without exiting and reentering the Local tools menu. For example, you can check the
Ethernet Statistics, then press Return and enter the Network Diagnostics Tools to ping an IP
address.
Avaya 1110 IP Deskphone User Guide
22
Chapter 2 Introduction
IP Set&DHCP Information
The system administrator uses the Network Configuration tool to view reports about IP set and
DHCP operation.
Network Diagnostic Tools
The system administrator uses the Network Diagnostic tools to diagnose network problems.
Ethernet statistics
The system administrator uses the Ethernet statistics tool to view reports about Ethernet operation.
IP networks statistics
The system administrator uses the IP Networks Statistics tool to view reports about network
operation.
Network Configuration
Note: The Network Configuration tool is for system administrator use only.
The Network Configuration tool displays information that in installer configured when the
telephone was installed.
Lock menu
Note: The Lock menu tool is for system administrator use only.
The system administrator uses the Lock menu prevent users from inadvertently changing the Local
tools menu items.
The Lock menu is not available on all systems. If the menu entry appears dimmed, it is not enabled
on your phone.
NN40050-117
23
Chapter 3
Configuring the telephone settings
This section describes how to set up a handset with your custom settings. Complete the procedures
in this chapter to:
•
•
•
•
•
navigate the Local Tools menu
set the backlight timer
set the handset language
set the display contrast
configure settings for server-based features
Navigating the Local Tools menu
You can navigate the Local tools menu in one of two ways:
•
•
Use the Up/Down navigation keys to scroll and highlight desired menu items and then
press Enter to select a menu item.
Where a menu item has a number in front of it, you can select that entry by pressing the
associated key on the dialpad. For example, when you are in the Local Tools menu, you
can access the Local Diagnostics menu by pressing 2 on the telephone dialpad.
Setting the display contrast
Use the Contrast tool to adjust the LCD screen contrast on your Avaya 1110 IP Deskphone.
1
To open the Local Tools menu, press
2
To open the Preferences menu, press 1 on the telephone dialpad.
3
To open the Contrast tool, press 1 on the telephone dialpad.
4
To increase or decrease the display screen contrast, press the Left/Right navigation keys.
5
Press
twice quickly in succession.
to save the selection or Cancel to leave the menu without saving the selection.
Changes are saved automatically.
Selecting the handset language
Use the Language tool to select the language used in the Local tools menus on your phone.
1
To open the Local Tools menu, press
2
To open the Preferences menu, press 1 on the telephone dialpad.
3
To open the Language tool, press 2 on the telephone dialpad.
4
To scroll to and highlight the desired language, press the Up/Down navigation keys.
twice quickly in succession.
Avaya 1110 IP Deskphone User Guide
24
Chapter 3 Configuring the telephone settings
5
Choose one of the following:
— To select the desired language and return to the Preferences menu, press
— To keep existing language and exit the Local Tools menu, press Cancel.
6
.
Press Exit.
Changes are saved automatically.
Backlight Timer tool
Use the Backlight Timer tool to adjust how long the LCD display screen remains lit when your
phone is inactive.
Note: The backlight timer appears in the format xxx, where xxx is the time in
minutes or hours.
1
To open the Local Tools menu, press
2
To open the Preferences menu, press 1 on the telephone dialpad.
3
To open the Backlight Timer tool, press 3 on the telephone dialpad.
4
To increase or decrease the backlight timer, press the Left/Right navigation keys.
5
Press
twice quickly in succession.
to save the selection or Cancel to leave the menu without saving the selection.
Changes are saved automatically.
Server-based features
For more information about the server-based features available on your telephone and how to use
them, refer to the telephone features guide for your system.
Setting the language
Select the language for the server-based features available on your phone. Choose one of the
following three options:
•
•
•
Press Feature *501. Select the Alternate Language for the telephone display.
Press Feature *502. Select the Alternate Language 2 for the telephone display.
Press Feature *503. Select the Alternate Language 3 for the telephone display.
The display language of the Local Tools menu is selected using the Language feature in the Local
tools section.
NN40050-117
Chapter 3 Configuring the telephone settings
25
Setting the ring type
1
Press Feature *6.
2
To hear the different ring types, press 1, 2, 3, 4, or Next.
3
To set the ring type, press OK.
Viewing and editing the call log
1
Press Feature 812.
2
To scroll through and edit the call log, use the navigation keys.
Note: Contact your system administrator to activate the call log feature.
Time offset
When your Avaya 1110 IP Deskphone is located in a different time zone than your system, the
display shows the system time instead of the local time. Use the Time Offset feature to adjust the
time that appears on the display. Before you begin, calculate the time difference, in hours, between
the server time and local time.
1
Press Feature *510.
2
Press Change.
3
To switch between adding or subtracting time, press *.
4
To enter the number of hours between local time and system time, use the dialpad.
5
To enter half-hour increments, press #.
6
Press OK.
It can take up to 1 minute for the change to appear on the display.
Avaya 1110 IP Deskphone User Guide
26
Chapter 3 Configuring the telephone settings
NN40050-117
27
Chapter 4
Using the handset
This section describes how to use the handset to
•
•
•
•
•
make calls
answer calls
put a call on hold
program memory buttons
access voice mail
Making a call
There are many ways to place a call depending on your telephone programming and the type of
call.
Making an external call using line keys
1
Lift the handset.
2
Press a line key, and enter a line pool access code.
3
When you hear an external dial tone, dial the external telephone number.
Note: Contact your system administrator for a list of line pool codes. When you enter a line
pool access code on a PRI or Voice over IP line, you do not hear a dial tone.
Making a internal call using line keys
1
Lift the handset.
2
Press a line key.
3
Dial the extension number.
Contact your system administrator for a list of extension numbers.
Answering a call
When your telephone rings and the light flashes, lift the handset.
Avaya 1110 IP Deskphone User Guide
28
Chapter 4 Using the handset
Answering a call while on an active call
1
To place the active call on hold press
2
Press the line button of the incoming call.
3
To terminate the call, press
4
To retrieve the held call, press
.
.
.
Placing a call on hold
1
While on a call, press
2
To retrieve a held call, press
.
.
Accessing Voice Mail
1
Lift the handset.
2
To access your voice mail, press
3
Log in with your voice mail password.
4
Press OK or RETRY.
.
Programming buttons
Your system administrator assigns the two programmable buttons as line, intercom, or memory
buttons. For more information, see your system administrator.
Memory buttons are not assigned as line buttons. Memory buttons store internal and external
phone numbers or features to give you one-touch dialing or feature activation.
You can program a memory button with a new phone number or feature.
Programming a memory button for external autodial
1
Press Feature *1.
2
Press an available memory button.
3
Dial the external phone number, including the prefix and area code, if applicable.
4
Press OK to store the phone number.
NN40050-117
Chapter 4 Using the handset
29
Programming a memory button for internal autodial
1
Press Feature *2.
2
Press a memory button.
3
Dial the extension number.
4
Press OK to store the extension number.
Programming a memory button for a feature
1
Press Feature *3.
2
Press a memory button.
3
Press Feature and enter the feature code.
4
Press OK to store the feature code.
Erasing a memory buttons
1
Press Feature *1.
2
Press a memory button.
3
Press OK to erase the phone number saved on the button.
Avaya 1110 IP Deskphone User Guide
30
Chapter 4 Using the handset
NN40050-117