1
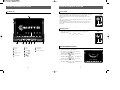
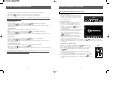
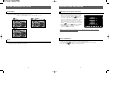
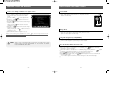
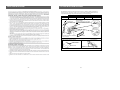
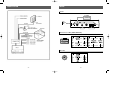
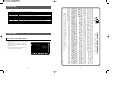
PAV-7
OWNER’S MANUAL
MENU
CONTROL
CONTROL
PWR
MODE
MENU
NAVI
CONTENTS
PRECAUTIONS IN HANDLING THE UNIT
2
BUTTON & OPERATION OF AV SYSTEM
4
ADDITIONAL DESCRIPTION & BUTTON
OPERATION OF AV SYSTEM
9
REMOTE CONTROL(PART NUMVER 136B2321)
11
INSTALLATION INSTRUCTIONS
12
TOLL-FREE INSTALLATION ASSISTANCE
13
WIRING DIAGRAM
14
WIRING
15
SPECIFICATIONS
16
IN PAL AREA
16
WARRANTY
17
-3-
AV Head Unit
Power On/Off
If the power button is pressed when ACC is on, the monitor will slide
out from the inside of the unit and stand-up vertically. After
displaying the logo for 4 sec, the monitor will display last mode in
memory.
If the power button is pressed again when power is on, the monitor
will slide into the unit.
When ignition key is removed while the unit is on, the unit will
remember the mode at that time, and recall it back when the ACC is
turned on.
15
POWER
MENU
PWR
MODE
CONTROL
BUTTON & OPERATION OF AV SYSTEM
CONTROL
BUTTON & OPERATION OF AV SYSTEM
MENU
NAVI
Changing Mode’s
11
12
13
When the mode button is pressed, the mode changes in the
following order.
AUX1
AUX2
AUX3
14
MODE
MENU
PWR
CONTROL
10
MODE
CONTROL
9
8
MENU
NAVI
1
2
3
4
5
6
7
BRIGHT/DIMMER/COLOR/TINT
1
Power
7
Reset
13
Menu display
2
VIDEO
8
Mode
14
Navigation
3
Close
9
MENU
15
7” TFT LCD display
4
Remote sensor
10
MENU
5
Open
11
6
Wide mode
12
CTRL
CTRL
-4-
When the VIDEO button is pressed, the unit
switches into video control mode.
To select the video mode to be adjusted,
press the Menu / button.
Pressing the Menu
button, switches the
video control mode as follows;
DIMMER
COLOR
TINT
BRIGHT
BRIGHT
Pressing the Menu
button, switches the
video control mode as follows;
BRIGHT
TINT
COLOR
DIMMER
BRIGHT
-5-
BUTTON & OPERATION OF AV SYSTEM
BUTTON & OPERATION OF AV SYSTEM
Closing the Monitor When the Power is On
Each mode's level adjustment is controlled by the CTRL up & down buttons.
Press the
CTRL button to decrease the level of the selected mode.
Press the CTRL
button to increase the level of the selected mode.
If there is no button press within 5 sec or the DISP button is pressed, mode switched
back to the previous mode.
1. Close the monitor
To close the monitor when the power is on,
press the Close button on the main unit or
press the power button and the screen will
retract into the unit.
2. Open the monitor
1. Adjust Brightness
Select Brightness mode by pressing the Menu / until "BRIGHT" is displayed.
Press the CTRL / button to adjust Brightness level.
Movement of the indicator level to the left will decrease the Brightness and to the right
will increase it.
2. Adjust Dimmer
Dimmer is to control the brightness of illumination in TFT LCD.
Select Dimmer mode by pressing the Menu / , until "DIMMER" is displayed.
Press the CTRL / button to adjust Dimmer level.
Movement of the indicator level to the left will decrease the Brightness of the LCD and to
the right will increase it.
3. Adjust Color
Select Color mode by pressing the menu / until "COLOR" is displayed.
Press the CTRL / button to adjust the Color level.
Movement of the indicator level to the left will decrease the intensity of the color and to
the right will increase it.
4. Adjust Tint (NTSC Only)
Press the Power button and the unit will turn
on and the screen will slide out and up.
To open the monitor from the main unit,
press the Open button or / button. The
monitor will slide out and open to the
memorized angle.
If monitor is physically prevented from sliding
out for longer than 2 sec, the monitor will
slide back in automatically. Remove the
obstacle and repress the Open button or the
/ button again.
If monitor is physically prevented from
opening for longer than 2 sec, the monitor
will stop opening and stay at that angle.
Remove the obstacle and press the Open button or the / buttons again to open the
monitor to the memorized angle. Or, press the Close button to close monitor and slide into
the main unit.
3. Memorizing the Monitor Angle
-6-
-7-
MODE
MENU
PWR
MODE
CONTROL
If no button is pressed within 5 seconds or the DISP button is pressed, the mode
will be switched back to the previous mode.
Press the Open button momentarily or the / button to adjust
the monitor backward one step as a time.
After adjusting monitor angle, press and hold the Open button or
the / button longer than 2 sec to memorized the current
monitor angle.
Once the monitor angle is memorized, the monitor will always
open to the memorized angle.
To clear the memorized angle; When the monitor is closed (Power
On condition), keep pressing the Open button or the / button
on Remote controller longer than 2 sec will extend the screen to 75
degrees.
CONTROL
Select Color mode by pressing the Menu / until "TINT" is displayed.
Press, the CTRL / button to adjust the Tint level.
Movement of the indicator level to the left will emphasize green color and to the right will
emphasize red color.
MENU
NAVI
BUTTON & OPERATION OF AV SYSTEM
ADDITIONAL FEATURE
Zoom In/Out
Removing AUX 2+3 inputs from menu
Press the “WIDE” button to adjust the picture size
4:3 (NORMAL)
ZOOM1
FULL
FULL
FULL
4 : 3 (NORMAL)
AND
OPERATION
When the mode button is pressed for longer
than 1sec the unit will display AUX1, AUX2,
and AUX3. Using the MENU
buttons
you may change AUX2 and/or AUX3 to blue
to remove it from the mode selection. To add
them back to the mode selection. hold the
mode button for longer then 1sec and use the
buttons to change them to green.
MENU
When PRESET DOWN( PRESET) or PRESET
UP(PRESET ) is pressed, the selected
mode's box color is changed.
ZOOM1
IF there is no button presed within 5 sec or DISP button is pressed, mode is
switched back to the previous mode.
Picture Adjustments
Reset
If the unit malfunctions or fails to respond press the RESET button(7) with a pen tip or
other thin object to initialize the system.
-8-
Press the video button to enter the picture adjustment menu.
Use the MENU
buttons to select from Bright/Dimmer/Color/Tint mode.
Use the CTRL
to adjust the selected function.
-9-
OPERATION
Used to store milage reminders for engine service
Press + hold the “DISP” button for more than
1second the display will switch into DIARY
mode.
Press the “MENU
” to select input mode.
Using the “CTRL
”, input the number on
the top right display.
Press the “ CTRL” button to decrease the input
number by 100.
(Keep pressing “ CTRL” button to decrease
rapidly by 1,000)
Press the “CTRL ” button to increase the input
number by 100.
(Keep pressing the “CTRL ” button to increase
rapidly by 1,000)
The maximum number of input is 999,999.
If there is no button pressed within 5 sec or the DISP button is pressed, the mode
will switch back to the previous mode.
REMOTE CONTROL PART NUMBER 136B2621
Power On/Off
Press “PWR” button to turn the unit On/Off (same as Power
button on main unit).
POWER
MENU
PWR
MODE
CONTROL
AND
CONTROL
ADDITIONAL FEATURE
MENU
NAVI
Change Mode
Press the mode button to switch from AUX1, AUX2, or AUX3
(Same as Mode button on main unit.)
Using with Navigation System ( OPTION)
OPTION)
Connect with Navigation system and press “Navi” button.
NOTE
“Diary” is the convenient feature so that user can make memo of the
milage required to change TRANSMISSION OIL, ENGINE OIL, BRAKE
PAD, ANTI-FREEZER, BELT, TIRE.
Close the Monitor When the Power is On
When the monitor is opened(Power On condition), press “ , ” button on Remote
Controller to close the monitor.
When the monitor is closed(Power On condition), keep pressing button or “ , ” button
on Remote Controller longer than 2 sec to bend backward about 75 .
Press “ , ” button to bend the monitor backward by one step.
After adjusting monitor angle, press “ , ” button longer than 2 sec to memorize the
current monitor angle.
Once monitor angle is memorized, monitor will open to the memorized angle.
-10-
-11-
INSTALLATION INSTRUCTIONS
TOLL-FREE INSTALLATION ASSISTANCE
The installation and wiring connections for this unit are so simple, we doubt you'll need our
help, but, if you do, we're here to help you. Just call our toll-free telephone assistance line at
1-800-645-4994 during the days and hours shown (U.S.A. and Canada only).
DAY
MON - FRI
SATURDAY
TIME ZONES
MOUNTAIN
CENTRAL
6:30AM - 5PM
7:30AM - 6PM
7AM - 3PM
8AM - 4PM
PACIFIC
5:30AM - 4PM
6AM - 2PM
NUT
EASTERN
8:30AM - 7PM
9AM - 5PM
UNIVERSAL INSTALLATION USING MOUNTING SLEEVE
PERFORATED STRAP
FASTEN THIS END TO SCREW
STUD ON REAR OF CHASSIS
EXISTING DASH OPENING
FILE EDGES TO FIT IF NECESSARY - DO NOT OVERFILE
NOTE: IF DASH IS SOLID, USE REAR SIDE (WITHOUT THE LIP) OF
MOUNTING SLEEVE AS A TEMPLATE & CUT OPENING
BEND TOP
TABS UPWARD
SCREW
BEND BOTTOM
TABS DOWNWARD
UNIT
SCREW STUD
NUT
MOUNTING SLEEVE
FRONT PANEL
FASTEN THIS END TO SECURE PART OF DASHBOARD.
DRILL HOLE IF NECESSARY.
ISO INSTALLATION
TYPICAL INSTALLATION
REMOVE THE PLASTIC FRAME FROM THE FRONT OF
THE CHASSIS BY CAREFULLY UN-SNAPPING IT.
UN-SNAP AT 2 PLACES
EACH ON TOP AND BOTTOM
PLASTIC FRAME
FACTORY MOUNTING
BRACKETS
-12-
-13-
WIRING DIAGRAM
WIRING
System
R.G.B INPUT
(ex : NAVIGATION)
PAV-7
MONITOR
ONLY
AUX-IN
14P Connector SPEC.(WIRE SIDE BASE)
7P Socket
-14-
-15-
14P Connector
SPECIFICATION
12 MONTH LIMITED WARRANTY
Applies to Audiovox Mobile Video Products
AUDIOVOX ELECTRONICS CORP. (the Company) warrants to the original retail purchaser of this product that should this product or any part
thereof, under normal use and conditions, be proven defective in material or workmanship within 12 months from the date of original purchase,
such defect(s) will be repaired or replaced with reconditioned product (at the Company’s option) without charge for parts and repair labor.
To obtain repair or replacement within the terms of this Warranty, the product is to be delivered with proof of warranty coverage (e.g. dated
bill of sale), specification of defect(s), transportation prepaid, to the Company at the address shown below.
This Warranty does not extend to the elimination of externally generated static or noise, to correction of antenna problems, to costs incurred
for installation, removal or reinstallation of the product, or to damage to tapes, discs, speakers, accessories, or vehicle electrical systems.
This Warranty does not apply to any product or part thereof which, in the opinion of the Company, has suffered or been damaged through
alteration, improper installation, mishandling, misuse, neglect, accident, or by removal or defacement of the factory serial number/bar code
label(s). THE EXTENT OF THE COMPANY’S LIABILITY UNDER THIS WARRANTY IS LIMITED TO THE REPAIR OR REPLACEMENT
PROVIDED ABOVE AND, IN NO EVENT, SHALL THE COMPANY’S LIABILITY EXCEED THE PURCHASE PRICE PAID BY PURCHASER
FOR THE PRODUCT.
This Warranty is in lieu of all other express warranties or liabilities. ANY IMPLIED WARRANTIES, INCLUDING ANY IMPLIED WARRANTY
OF MERCHANTABILITY, SHALL BE LIMITED TO THE DURATION OF THIS WRITTEN WARRANTY. ANY ACTION FOR BREACH OF ANY
WARRANTY HEREUNDER INCLUDING ANY IMPLIED WARRANTY OF MERCHANTABILITY MUST BE BROUGHT WITHIN A PERIOD
OF 24 MONTHS FROM DATE OF ORIGINAL PURCHASE. IN NO CASE SHALL THE COMPANY BE LIABLE FOR ANY CONSEQUENTIAL
OR INCIDENTAL DAMAGES FOR BREACH OF THIS OR ANY OTHER WARRANTY, EXPRESS OR IMPLIED, WHATSOEVER. No person
or representative is authorized to assume for the Company any liability other than expressed herein in connection with the sale of this product.
1-800-645-4994
128-5495C
Some states do not allow limitations on how long an implied warranty lasts or the exclusion or limitation of incidental or consequential damage
so the above limitations or exclusions may not apply to you. This Warranty gives you specific legal rights and you may also have other rights
which vary from state to state.
U.S.A. : AEC 150 MARCUS BLVD., HAUPPAUGE, NEW YORK 11788
F WARRANTY STATION SERVING YOUR AREA
IN PAL AREA
Intial Mode is Fixed With PAL D/K
When the NAVI Key is pressed for longer
than 2 sec.
Selected system is displayed in green.
Use the menu Up/Down to change from
NTSC to PAL.
Press the disp button to memorize the
desired system(NTSC/PAL).
-17-16-
CANADA : CALL 1-800-645-4994 FOR LOCATION
7 Wide (154mm
87mm)
112,320 pixels
TFT Active Matrix
Left/Right :63 , Top : 65 , Bottom : 40
C-Type, Cathode Fluorescent Lamp, Edge Lighting System
10
70
14
158
20
80
4
176
178mm(W) 180mm(H) 50mm(D), 7 (W) 7 (H) 2 (D)
3 Kg, 6.5lb
DISPLAY SIZE
PIXEL
SYSTEM
VIEW ANGLE
INTERNAL LIGHTING
OPERATION TEMP
DURABLE TEMP
SIZE
WEIGHT
2002Audiovox Electronics Corporation, Hauppauge, N.Y. 11788
-18-
Printed in Korea
1286548