1
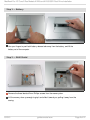
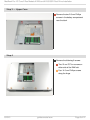
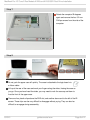
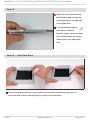
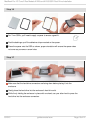
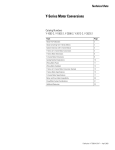
MacBook Pro 15" Core 2 Duo Models A1226 and A1260 SSD Dual Drive Installation
MacBook Pro 15" Core 2 Duo Models
A1226 and A1260 SSD Dual Drive
Installation
Written By: iRobot
INTRODUCTION
There are many benefits to adding a second hard drive to your laptop such as improved
speeds, greater storage space, and less heartache when installing new software. Use this
guide to install one using our optical bay hard drive enclosure.
Some drive bays have a height of 7 mm, while others have a height of 9.5 mm.
Depending on the size of your drive bay, you may need to use a spacer to make your
SSD fit properly.
TOOLS:
Phillips #00 Screwdriver (1)
Spudger (1)
T6 Torx Screwdriver (1)
© 2013
PARTS:
9.5 mm SATA Optical Bay SATA Hard
Drive Enclosure (1)
SSD Upgrade Kit (1)
guides.crucial.com
Page 1 of 12
MacBook Pro 15" Core 2 Duo Models A1226 and A1260 SSD Dual Drive Installation
Step 1 — Battery
Use your fingers to push both battery release tabs away from the battery, and lift the
battery out of the computer.
Step 2 — RAM Shield
Remove the three identical 2mm Phillips screws from the memory door.
Lift the memory door up enough to grip it and slide it toward you, pulling it away from the
casing.
© 2013
guides.crucial.com
Page 2 of 12
MacBook Pro 15" Core 2 Duo Models A1226 and A1260 SSD Dual Drive Installation
Step 3 — Upper Case
Remove the two 2.8 mm Phillips
screws in the battery compartment
near the latch.
Step 4
Remove the following 6 screws:
Two 10 mm T6 Torx screws on
either side of the RAM slot.
Four 14.5 mm Phillips screws
along the hinge.
© 2013
guides.crucial.com
Page 3 of 12
MacBook Pro 15" Core 2 Duo Models A1226 and A1260 SSD Dual Drive Installation
Step 5
Remove the four 3.2 mm Phillips
screws on the port side of the
computer.
Step 6
Rotate the computer 90 degrees
and remove the two 3.2 mm
Phillips screws from the rear of the
computer.
© 2013
guides.crucial.com
Page 4 of 12
MacBook Pro 15" Core 2 Duo Models A1226 and A1260 SSD Dual Drive Installation
Step 7
Rotate the computer 90 degrees
again and remove the four 3.2 mm
Phillips screws from the side of the
computer.
Step 8
Do not yank the upper case off quickly. The case is attached to the logic board via
a ribbon cable.
Lift up at the rear of the case and work your fingers along the sides, freeing the case as
you go. Once you have freed the sides, you may need to rock the case up and down to
free the front of the upper case.
There are four plastic clips above the DVD slot, and another above and to the left of the IR
sensor. These clips can be very difficult to disengage without prying. They can also be
difficult to re-engage during reassembly.
© 2013
guides.crucial.com
Page 5 of 12
MacBook Pro 15" Core 2 Duo Models A1226 and A1260 SSD Dual Drive Installation
Step 9
Disconnect the trackpad and keyboard ribbon cable from the logic board, removing tape as
necessary.
Note: It is possible to replace the hard drive without disconnecting the keyboard
from the chassis, but it will need to be held upright to keep it out of the way, while
still allowing you both hands to work on the drive removal. Be careful when removing the
keyboard-trackpad ribbon cable to ensure that the rear of the upper case is disengaged
from the area near the hinge. It is easy to accidentally bend the screw receivers on either
side of the keyboard.
Remove the upper case.
© 2013
guides.crucial.com
Page 6 of 12
MacBook Pro 15" Core 2 Duo Models A1226 and A1260 SSD Dual Drive Installation
Step 10 — Optical Drive
Use the flat end of a spudger to
disconnect the orange SuperDrive
ribbon cable from the logic board,
removing tape as necessary.
Step 11
Remove the following 4 screws:
Two 3.3 mm silver Phillips screws on either side of the SuperDrive.
One 4.7 mm silver T6 Torx screw from the top left corner of the drive.
One 6.2 mm black Phillips screw at the top right corner of the drive.
Lift the optical drive up and out of the computer.
© 2013
guides.crucial.com
Page 7 of 12
MacBook Pro 15" Core 2 Duo Models A1226 and A1260 SSD Dual Drive Installation
Step 12 — Optical Drive Replacement
If your new optical drive already has brackets on it, you'll only need to transfer the
data cable to your new drive.
Remove the two silver Phillips screws securing the mounting bracket to the left side of the
optical drive.
Rotate the drive and disconnect the orange ribbon cable from the optical drive.
Step 13
Remove the two Phillips screws
securing the mounting bracket to
the rear of the optical drive.
© 2013
guides.crucial.com
Page 8 of 12
MacBook Pro 15" Core 2 Duo Models A1226 and A1260 SSD Dual Drive Installation
Step 14
Rotate the drive and remove the
two Phillips screws securing the
mounting bracket to the right side
of the optical drive.
If you purchased an optical
drive without mounting
brackets, simply transfer the three
silver metal brackets and orange
ribbon cable to your new optical
drive.
Step 15 — Dual Hard Drive
Remove the plastic positioner from the optical bay hard drive enclosure by pressing in on
one of the clips on either side and lifting it up and out of the enclosure.
© 2013
guides.crucial.com
Page 9 of 12
MacBook Pro 15" Core 2 Duo Models A1226 and A1260 SSD Dual Drive Installation
Step 16
For 7 mm SSDs, you'll need to apply a spacer to ensure a good fit.
Peel the backings up off the adhesive strips mounted on the spacer.
Press the spacer onto the SSD as shown; proper orientation will ensure the spacer does
not cover any screws or screw holes.
Step 17
Make sure that the hard drive connectors are facing down before placing it into the
enclosure.
Gently place the hard drive into the enclosure's hard drive slot.
While firmly holding the enclosure in place with one hand, use your other hard to press the
hard drive into the enclosure connectors.
© 2013
guides.crucial.com
Page 10 of 12
MacBook Pro 15" Core 2 Duo Models A1226 and A1260 SSD Dual Drive Installation
Step 18
Once the hard drive is snug, reinsert the plastic positioner while holding the hard drive
against the bottom of the enclosure.
Reconnect any cables you have removed from the original optical drive onto the optical
bay enclosure.
Step 19
Use two Phillips #1 screws to secure the drive to its enclosure.
© 2013
guides.crucial.com
Page 11 of 12
MacBook Pro 15" Core 2 Duo Models A1226 and A1260 SSD Dual Drive Installation
Step 20
Attach the optical drive bracket to
the new enclosure with two Phillips
#0 screws.
Reconnect any cables you have
removed from the original optical
drive onto the optical bay
enclosure.
To reassemble your device, follow these instructions in reverse order.
This document was last generated on 2013-08-24 08:00:36 AM.
© 2013
guides.crucial.com
Page 12 of 12