1
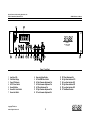
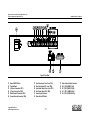
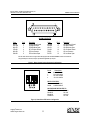
945 North Trimble Road
P.O. Box 1443
Mansfield, Ohio 44901
GEM 1/GEM 1E
Genius Environmental Monitor
Series 1
Reference Manual
Copyright©
Signals Power & Grounding Specialists, Inc., 1999
All Rights Reserved.
0199
Signals Power and Grounding Specialists, Inc.
945 North Trimble Road, Mansfield OH
GEMS1 Reference Manual
Table of Contents
1
INTRODUCTION.................................................................................................................................................................1
2
INSTALLATION .................................................................................................................................................................2
2.1 General Information ...................................................................................................................................................2
2.2 Electrical Requirement...............................................................................................................................................2
2.3 Tool Requirements ....................................................................................................................................................2
2.4 Material Requirements ..............................................................................................................................................2
2.5 Mounting....................................................................................................................................................................2
2.6 Power Connection .....................................................................................................................................................2
2.7 Ground Connections..................................................................................................................................................3
2.8 Fuse Alarm Connections...........................................................................................................................................3
2.9 GEMS1 Calibration....................................................................................................................................................3
2.10 Parameter Settings ....................................................................................................................................................3
2.11 Alarm Reporting.........................................................................................................................................................4
2.12 Alarm Latching Selection...........................................................................................................................................4
2.13 AC RMS/Peak Selection ..........................................................................................................................................4
2.14 Alarm Enabling & Disabling.......................................................................................................................................4
2.15 Sensor Installation......................................................................................................................................................5
2.16 GEM 1E Option.........................................................................................................................................................5
3
ADMINISTRATION ............................................................................................................................................................6
3.1 Alarm Parameter Adjustment....................................................................................................................................6
3.2 Extension Cable/Sensor Testing...............................................................................................................................6
4
SPECIFICATIONS .............................................................................................................................................................8
4.1 Physical Characteristics............................................................................................................................................8
4.2 Electrical Characteristics ...........................................................................................................................................8
INSTALLATION KIT ......................................................................................................................................................................12
INSTALLATION TOOLS...............................................................................................................................................................12
List of Illustrations
Figure 1, Front Panel............................................................................................................................................................................9
Figure 2, Rear Panel..........................................................................................................................................................................10
Figure 3, Alarm Contact Output Connector Configuration...................................................................................................................11
Figure 4, Alarm Select DIP Switch Configuration...............................................................................................................................11
Copyright© SPGS, Inc.
1999 All Rights Reserved.
i
Signals Power and Grounding Specialists, Inc.
945 North Trimble Road, Mansfield OH
1
1.1
GEMS1 Reference Manual
INTRODUCTION
1.3
The Genius Environment Monitor Series 1 is part of
the electrical environment monitoring family manufactured by Signals Power and Grounding Specialists, Inc. The GEMS1 units, which include the
GEM 1E, are capable of continuously monitoring
both AC and DC current on a single conductor.
The units may be ordered with a standard 20 Amp
configuration, or an optional 200 Amp configuration.
The GEMS1 units provide a real-time display of
current on the monitored conductor. The unit is capable of comparing current present with userselected threshold settings. Thresholds may be set
at both AC and DC, High and Low comparison
points. When the monitored current exceeds a
predetermined threshold point, the actual reading illuminates the LED, indicating an alarm condition.
Optional alarm cables will allow a customer's external alarm or data collection system to also indicate
the condition.
The GEMS1 standard mounting configuration accommodates 19" equipment frames. Extension
plates are available separately for 23" equipment
frame mounting.
1.2
Purpose of this manual is to provide beneficial information for:
•
Planning
•
Engineering
•
Installing GEMS1 units
•
Administration of GEMS1 units
Copyright© SPGS, Inc.
1999 All Rights Reserved.
1
1.4
Project Planning for GEMS1 equipment:
•
Project planning and coordination
•
Define site requirements
•
Select conductors to monitor
•
Install a GEMS1
•
Configure a GEMS1
•
Maintain a GEMS1
Intended Audience:
•
Project engineers
•
Equipment engineers
•
Land and Building engineers
•
Installers
•
Maintenance technicians
•
Administration personnel
•
Management
Signals Power and Grounding Specialists, Inc.
945 North Trimble Road, Mansfield OH
2
2.1
GEMS1 Reference Manual
INSTALLATION
2.4
General Information
Material Requirements
•
Unpacking
•
•
Handle parts with care.
Verify items below are included:
1 - GEMS1 Unit
1 - Current Sensor
1 - Extension Cable
4 - Screws, Philip (frame mounting)
1 - RJ45 Calibration Plug
2 - Frame Mount Brackets
4 - Screws, Flat (bracket mounting)
1 - Trimmer Adjustment Tool
1 - Operations Manual
1 - Spare 1/2 Amp GMT Fuse
Note:
2.5
2.3
Sensors available in 20 or 200
Amp
2.6
The unit requires a DC power source that will
provide voltage within a range of 20-70 volts.
Correct polarity must be observed. (The
GEMS1 units [front panel] are equipped with a
1/2 Amp fuse for internal circuit protection.)
Tool Requirements
•
•
•
Flat Blade Screwdriver
Phillips Blade Screwdriver
AC/DC Hand-held Amp Probe
Copyright© SPGS, Inc.
1999 All Rights Reserved.
Attach the two (2) Equipment Frame Mounting
Brackets (Fig. 1, Item 20), supplied with the
unit, to the GEMS1 unit using the four (4)
mounting screws provided.
Note:
Electrical Requirement
•
Mounting
•
Optional items:
1 - Alarm Cable (GEM 1)
1 - Set Extension Plates
(23"mount)
1 - Data Interface Cable (GEM 1E)
2.2
Insulated Copper Wire per customer
specifications for:
- Power (+) & (-)
- Shield Ground
- Chassis Ground
2
The unit depth is adjustable by
selecting desired depth and
mounting brackets at that depth.
•
Secure the GEMS1 in the selected equipment
frame with the four (4) mounting screws provided.
•
Optional 23" extension plate kits must be ordered separately.
Power Connection
•
•
Connect the (+) lead to terminal block TB-1
(Fig. 2, Item 23), located on the rear panel.
Connect the (-) lead to terminal block TB-2
(Fig. 2, Item 24), located on the rear panel.
Signals Power and Grounding Specialists, Inc.
945 North Trimble Road, Mansfield OH
2.7
Ground Connections
•
•
•
Insert the RJ45 calibration plug into the Sensor
Input Connector (Fig. 2, Item 31), located on
the rear panel.
Connect an insulated grounding conductor for
Chassis Ground to terminal block TB-4 (Fig.
2, Item 26), located on the rear panel.
•
Set the AC/DC Select Switch to AC (Fig. 1,
Item 4), located on the front panel.
•
While observing the Panel Meter Display (Fig.
1, Item 2), located on the front panel, calibrate
the AC Offset. Adjust the AC OFF adjustment
pot (Fig. 1, Item 12), located on the front panel,
until the Panel Display Meter reads 00.00
±.01.
•
Set the AC/DC Select Switch to DC (Fig. 1,
Item 4), located on the front panel.
•
While observing the Panel Meter Display (Fig.
1, Item 2), located on the front panel, calibrate
the DC Offset. Adjust the DC OFF adjustment
pot (Fig. 1, Item 15), located on the front panel,
until Panel M eter Display reads 00.00 ±.01.
•
Remove the RJ45 calibration plug.
•
Disregard any changes in the reading on the
Panel Meter Display at this time.
•
The GEMS1 unit is now calibrated.
Separate grounding conductors
MUST be used for Chassis Ground
and Shield Ground.
Fuse Alarm Connections
•
•
Connect the Fuse Alarm Input leads, Common (COM) and Normally Open (N/O) to TB5 and 6 (Fig. 2, Items 27 and 28), located on
the rear panel.
Connect the Fuse Alarm Output leads, Common (COM) and Normally Open (N/O) to TB7 and 8 (Fig. 2, Items 29 and 30), located on
the rear panel.
Note:
2.9
With the sensor removed from the GEMS1, calibration can be performed.
Connect an insulated grounding conductor for
Shield Ground to terminal block TB-3 (Fig. 2,
Item 25), located on the rear panel.
Note:
2.8
GEMS1 Reference Manual
The input and output fuse alarm
leads are internally connected for
chaining of the alarm leads.
GEMS1 Calibration
Unit must have power on prior to calibration.
2.10
•
Set the Power ON/OFF Switch to the ON position (Fig. 2, Item 21), located on the rear
panel.
•
The Power LED Indicator will illuminate (Fig.
1, Item 3), located on the front panel.
Copyright© SPGS, Inc.
1999 All Rights Reserved.
3
Parameter Settings
Each alarm parameter is adjustable, although
thresholds are preset for monitoring of safety conductors. They are shipped as follows:
Signals Power and Grounding Specialists, Inc.
945 North Trimble Road, Mansfield OH
GEMS1 Reference Manual
DC High -.25 amps
DC Low +.25 amps
AC High +.25 amps
AC Low DISABLED
Note:
2.11
See Section 3.1., Alarm Parameter Adjustment, for detailed information prior to
making adjustments.
•
•
An alarm condition will exist when the sensor's
current reading exceeds the high parameter
setting, or falls below the low parameter setting
on either the AC or DC current readings. This
condition must exist for more than 250ms.
•
When an alarm condition exists, it will be reported via its respective Alarm Indicator LED
(Fig. 1, Items 16-19), located on the front
panel, and the Alarm Contact Output Connector (Fig. 2, Item 33), located on the rear panel.
(For pin-out configuration see Fig. 3)
2.13
Alarm Latching Selection
•
2.14
When the Alarm Latch Switch (Fig. 1, Item 7),
located on front panel, is set to the OFF position, the following applies:
Copyright© SPGS, Inc.
1999 All Rights Reserved.
4
AC RMS/Peak Selection
Factory shipped with RMS selected
The Alarm Contact Output Connector (Fig. 2,
Item 33) provides the user with a closed or
open circuit (user selectable) for interfacing
with an alarm reporting device. The GEMS1
alarm outputs are designed to work with cross
platforms in mind (e.g., Ground and/or Battery
signals).
Factory shipped in the OFF position
When the Alarm Latch Switch (Fig. 1, Item 7),
located on front panel, is set to the ON position,
the following applies:
Once an alarm condition exists, the
GEMS1 will latch the alarm in the active
state. The alarm will remain active even
if the alarm condition is cleared. The respective alarm LED and contact output
will stay latched until both the alarm condition is cleared and the Alarm Latch Reset
Button (Fig. 1, Item 8), located on the
front panel, is depressed and released.
Alarm Reporting
•
2.12
Once an alarm condition exists, the respective LED, and contact output will
remain activated only for the duration of
the alarm condition.
•
When the AC RMS/Peak Select Switch (Fig.
1, Item 9), located on front panel, is set to the
RMS position, the AC component of the sensor input signal will be represented by its TrueRMS value.
•
When the AC RMS/Peak Select Switch (Fig.
1, Item 9), located on front panel, is set to the
Peak position, the AC component of the sensor input signal will be represented by its actual
peak value.
Alarm Enabling & Disabling
Factory shipped with the AC Low alarm disabled
and all other alarms enabled.
Signals Power and Grounding Specialists, Inc.
945 North Trimble Road, Mansfield OH
•
•
•
2.15
GEMS1 Reference Manual
The GEMS1 is equipped with an Alarm Select
Dip Switch (Fig. 2, Item 32), located on the
rear panel.
The Alarm Select Dip Switch consists of four
separate switches, each of which will enable/disable any of the four (4) alarm reporting
output types (DC H/L, AC H/L). (For switch
setting configuration see Fig. 4)
While an alarm output is disabled, its respective Alarm Indicator LED (Fig. 1, Items 1619), located on the front panel, and respective
Alarm Contact Output Connector contact set
(Fig. 2, Item 33), located on the rear panel, will
be deactivated.
Sensor Installation
•
GEM 1E Option
The GEM 1E provides an interface to simulate a 50
MV shunt output for an existing Data Collection device. All previous installation instructions also apply.
2.16.1
Interface to Existing Data Collection Unit
The supplied interface cables (2 twisted pair) are attached in the following manner:
•
Connect the DC+ lead to terminal block TB-9
(Fig.2, Item 34). located on the rear panel.
•
Connect the Common DC- lead to terminal
block TB-10 (Fig.2, Item 35) located on the
rear panel.
•
Connect the Common AC+ lead to terminal
block TB-12 (Fig.2, Item 37) located on the
rear panel.
•
Connect the AC- lead to terminal block TB-11
(Fig.2, Item 36) located on the rear panel.
Place the sensor assembly in the approximate
location of the conductor to be monitored.
Note:
Do not place a sensor around
the conductor at this time.
•
Allow approximately five (5) minutes for the
sensor to stabilize and adjust to room
temperature.
•
Route the extension cable from the GEMS1
unit and attach to the sensor.
•
Insert the extension cable into the Sensor Input
Connector (Fig. 2, Item 31), located on the
rear panel of the GEMS1 unit.
•
Carefully place the sensor around the conductor to be monitored. Make sure the stenciling
on the sensor is facing the ground bar, the
sensor is fastened securely, and the conductor is in the center of the sensor core.
The Panel Meter Display (Fig. 1, Item 2)
reading now indicates actual current flow, if
any, on the conductor monitored.
•
2.16
Copyright© SPGS, Inc.
1999 All Rights Reserved.
5
Signals Power and Grounding Specialists, Inc.
945 North Trimble Road, Mansfield OH
3
GEMS1 Reference Manual
ADMINISTRATION
settings.
3.1
Alarm Parameter Adjustment
Note:
3.1.1
Factory settings can be modified. Increasing parameter adjustments for safety conductors is not
recommended except for a temporary period of
time. For example, locating and correcting the
source of an alarm condition. To adjust, see 3.1.3
for details.
3.1.2
If the monitored conductor is NOT a safety conductor, adjustments should be made. See 3.1.3 for details.
3.1.3
If a different predetermined alarm parameter is desired, use a hand-held AC/DC Amp Probe to obtain
readings from the conductor to be monitored.
These readings will be necessary to establish the
parameter settings, which are adjusted as follows:
3.2
Extension Cable/Sensor Testing
It is recommended that all non-factory supplied extension cables and previously used cables or sensors be re-tested prior to installation. SPGS can
provide this service. If customer would like to test
these items, equipment required for testing includes:
•
•
•
•
•
•
•
•
Set the AC/DC Select Switch (Fig. 1, Item 4),
located on the front panel, to either AC or DC.
This is determined by the desired parameter
that will be adjusted.
3.2.1
Set the Alarm Hi/Lo Select Switch (Fig. 1,
Item 6), located on the front panel, to either
High or Low. This is determined by the desired parameter that will be adjusted.
Press and hold the Alarm Set Button (Fig. 1,
Item 5), located on the front panel, while observing the Panel Meter Display (Fig. 1, Item
2), located on the front panel. The display indicates the present alarm parameter setting.
To change the displayed parameter setting,
continue to hold the Alarm Set Button, and adjust the respective Parameter Adjustment Pot
(Fig. 1, Items 10, 11, 13, and 14), located on
the front panel, until the Panel Meter Display
shows the desired setting.
Follow the above steps for the AC and DC,
HIGH and LOW alarm parameter adjustment
Copyright© SPGS, Inc.
1999 All Rights Reserved.
6
On the DC reading of negative numbers, the more negative of the two
numbers is said to be lower. (i.e. 100.0 amps is lower than 50.0 amps.)
3.2.2
Remote Cable Tester capable of testing
open/short RJ-45 cable connectors
70 Ohm Cable Tester (manufactured by
SPGS)
Volt Ohm Meter
Extension Cable - Test #1
•
Insert one end of the extension cable into master's RJ-45 jack of the Remote Cable Tester.
•
Insert the other end of the extension cable into
remote RJ-45 jack of the Remote Cable
Tester.
•
Follow manufacturer's operation instructions
for the cable tester.
•
The extension cable must pass this test before
installation of the GEMS1 can
continue.
• If the extension cable does not pass the
test, change both module plugs and retest
or return to Signals Power and Grounding Specialists for repair.
Sensor Test
•
Set the volt ohm meter to measure ohms.
Signals Power and Grounding Specialists, Inc.
945 North Trimble Road, Mansfield OH
GEMS1 Reference Manual
•
Insert the 70 Ohm Cable Tester: red lead to
the VOLT OHM of the meter and black lead of
the tester to the COM of the meter.
•
Insert the sensor into the 70 ohm cable tester.
(The reading on the volt ohm meter should be
between 67 ohms and 73 ohms.)
•
The sensor must pass the above test before
continuing with installation of the GEMS1.
•
If the sensor does not pass the test, return the
sensor to Signals Power and Grounding Specialists for repair.
Copyright© SPGS, Inc.
1999 All Rights Reserved.
7
Signals Power and Grounding Specialists, Inc.
945 North Trimble Road, Mansfield OH
4
4.1
4.2
GEMS1 Reference Manual
SPECIFICATIONS
Accurate to within ±1%
Physical Characteristics
•
Unit Size (HxWxD)
Weight
•
Maximum conductor size
2" Diameter
•
Sensor size (HxWxD)
Weight
7" x 5" x 1"
0.9 lb.
•
Resolution:
20 amp 0.01
200 amp 0.10
•
Frequency range
AC: 5 Hz to 1 KHz
DC: 0 to 1 Hz
•
Minimum pulse detection
250 ms
•
GEM 1 output
L.E.D. Display
Dry contact source
Internal LCD meter
•
GEM 1E output
L.E.D. Display
Dry contact source
Internal LCD meter
AC 50 MV shunt
DC 50 MV shunt
3.5" x 9" x 17"
4.6 lbs.
Electrical Characteristics
•
Supply Voltage Requirement
DC: 20VDC to 70VDC
•
Supply Current Level
DC: 250 mA max.
•
Power Consumption
DC: 5 W max.
•
Input Fuse Alarm contact rating
1 Amps at 60V
•
Parameter Alarm contact rating
1 Amps at 60V
•
Monitoring range:
20 Amp Sensor
AC: 0.01 to 19.99 Amps
DC: -19.99 to 19.99 Amps
4.3
200 Amp Sensor
AC: 0.1 to 199.9 Amps
DC: -199.9 to 199.9 Amps
•
•
Alarm settings:
20 Amp Sensor
AC: 0 to 19.99 Amps
DC: -19.99 to 19.99 Amps
200 Amp Sensor
AC: 0 to 19.99 Amps
DC: -199.9 to 199.9 Amps
AC/DC readings:
Copyright© SPGS, Inc.
1999 All Rights Reserved.
8
Environmental Characteristics
•
Operating Temperature
Normal
59 F - 89 F (15 C - 30 C)
Maximum 32 F - 120 F (0 C - 40 C)
•
Relative Humidity
30-80% non-condensing
Signals Power and Grounding Specialists, Inc.
North Trimble Road, Mansfield OH
GEMS1 Reference Manual
GEMS 1
MONITORING
SYSTEM
Figure 1, Front Panel
1
2
3
4
5
6
7
Input Fuse 0.5A
Panel Meter Display
Power LED Indicator
AC/DC Select Switch
Alarm Set Button
Alarm Hi/Lo Select Switch
Alarm Latch Switch
8
9
10
11
12
13
14
Alarm Latch Reset Button
AC Peak/RMS Select Switch
AC High Parameter Adjustment Pot
AC Low Parameter Adjustment Pot
AC Offset Adjustment Pot
DC High Parameter Adjustment Pot
DC Low Parameter Adjustment Pot
Copyright© SPGS, Inc.
1998 All Rights Reserved.
9
15
16
17
18
19
20
DC Offset Adjustment Pot
AC High Alarm Indicator LED
AC Low Alarm Indicator LED
DC High Alarm Indicator LED
DC Low Alarm Indicator LED
19" Rack Mount Brackets
Signals Power and Grounding Specialists, Inc.
North Trimble Road, Mansfield OH
GEMS1 Reference Manual
Figure 2, Rear Panel
21
22
23
24
25
26
Power ON/OFF Switch
Terminal Block
(+) Return Connection (TB-1)
(-) Power Connection (TB-2)
Shield Ground Connection (TB-3)
Chassis Ground Connection (TB-4)
27
28
29
30
31
32
Fuse Alarm Input, Com. Conn (TB-5)
Fuse Alarm Input, N.O. Conn (TB-6)
Fuse Alarm Output, Com. Conn (TB-7)
Fuse Alarm Output, N.O. (TB-8)
Sensor Input Connector
Alarm Select DIP Switch
Copyright© SPGS, Inc.
1998 All Rights Reserved.
.
10
33
34
35
36
37
Alarm Contact Output Connector
DC + (TB-9) (GEM 1E Only)
DC - (TB-10) (GEM 1E Only)
AC - (TB-11) (GEM 1E Only)
AC + (TB-12) (GEM 1E Only)
Signals Power and Grounding Specialists, Inc.
168 Park Avenue East, Mansfield OH
GEMS1 Reference Manual
ALARM CONTACTS
Color
WH-BL
4BL-WH
WH-OR
OR-WH
WH-GN
GN-WH
Pin #
1
2
3
4
5
6
Description
DC High Norm Closed
DC High Common
DC High Norm Open
DC Low Norm Closed
DC Low Common
DC Low Norm Open
Color
WH-BN
BN-WH
WH-SL
SL-WH
RD-BL
BL-RD
Pin #
7
8
9
10
11
12
Description
AC High Norm Closed
AC High Common
AC High Norm Open
AC Low Norm Closed
AC Low Common
AC Low Norm Open
Note: The alarm interface cable is a single ended cable equipped with a standard DB-25 Male connector. This cable is normally provided by the customer, but may be purchased through SPGS upon request.
Figure 3, Alarm Contact Output Connector Configuration
Pos #
1
2
3
4
Description
DC HIGH ALARM
DC LOW ALARM
AC HIGH ALARM
AC LOW ALARM
SWITCH POSITION
UP
ALARM ENABLE
DOWN
ALARM DISABLE
SWITCHES ARE DEFAULTED TO:
ENABLED
DC HIGH
ENABLED
DC LOW
ENABLED
AC HIGH
DISABLED
AC LOW
Figure 4, Alarm Select DIP Switch Configuration
Copyright© SPGS, Inc.
1998 All Rights Reserved.
11
Signals Power and Grounding Specialists, Inc.
945 North Trimble Road, Mansfield OH
GEMS1 Reference Manual
INSTALLATION KIT
•
•
•
•
•
•
•
•
•
•
•
Cotton lacing cord
Ty-wrap with ID tag
GMT type fuses for DC powering at customer
fuse panel
Extra fuses for GEMS 1 DC fuse holders
Vinyl labels (alphanumeric)
DC power cable
Plastic screwdriver for adjusting sensor
offsets
Ground conductor
Ground conductor crimp terminal
(GEMS 1 end)
Ground conductor crimp terminal
(Types Spade and Fork) (grounded end)
RJ 45 calibration plug
1 Roll
20 Each
2 Each
2 Each
1 Sheet
15' Red and Black, 18 Gauge Solid
1 Each
40' Green, 18 Gauge, THHN stranded
2 Each
1 of Each Type
2 Each
INSTALLATION TOOLS
•
•
•
•
•
•
•
•
•
•
•
•
•
•
•
•
Scissors
Ty-rap with ID tag
Unwrap and wire wrap tools
Regular screwdriver
70 ohm cable tester
Continuity tester
Volt ohm meter (digital)
RJ 45 crimp tool
Crimp tool for ground terminals
Needle nose pliers
Black narrow point permanent magic marker
Jeweler type regular screwdriver for sensor offsets
Red pencil
Yellow highlighter
Spudger
Alarm simulation tester (SPGS developed) to validate wiring to MDF block
Copyright© SPGS, Inc.
1998 All Rights Reserved.
12
Signals Power and Grounding Specialists, Inc.
945 North Trimble Road, Mansfield OH
GEMS1 Reference Manual
GEMS1 SENSOR DATA FORM
Site:
Date:
GEMS1 Bay Location:
Employee:
Core
Size
DC
Description
High
Low
AC
Reading
High
Low
Reading
1
Site:
Date:
GEMS1 Bay Location:
Employee:
Core
Size
DC
Description
High
1
Copyright© SPGS, Inc.
1998 All Rights Reserved.
13
Low
AC
Reading
High
Low
Reading